
JavaScript (209)
Documents are often assembled from pieces: the cover, the body and the appendix arrive from different stages, and only before delivery does it turn out that the cover ended up after Chapter 2, or that a few pages need to change places. Only the page order has to change — not a word of the content — but without a PDF editor at hand the job stalls right there, and sending the file to a server means it leaves the user's device. This article shows how to rearrange PDF pages in a specified order in the browser with Spire.PDF for JavaScript. It loads, modifies and saves PDF documents based on WebAssembly, so the page order is rewritten entirely on the local machine, reading and writing files through a virtual file system (VFS), with no backend service required.
For installation and project configuration, refer to Integrating Spire.PDF for JavaScript in a React Project. The following examples assume Spire.PDF is installed and the WebAssembly module has been initialized.
Rearrange the Page Order
The page order is rewritten in a single call to PdfPageCollection.ReArrange(). The array of indices decides both where each page goes and how many pages the document has — as many indices as you pass, as many pages you get — so to keep every page, all indices from 0 to the page count minus one have to appear.
function App() {
  const rearrangePages = async () => {
    // Get the Spire.PDF WASM module
    const pdfModule = window.wasmModule?.spirepdf;

    // Check whether the module is ready
    if (!pdfModule) {
      alert('Spire.PDF is not ready yet');
      return;
    }

    // Load the PDF file to be processed into the VFS
    const inputFileName = 'Number.pdf';
    await window.spire.FetchFileToVFS(inputFileName, "", `${process.env.PUBLIC_URL}/data/`);

    // Create a PdfDocument object and load the PDF document
    let doc = new pdfModule.PdfDocument();
    doc.LoadFromFile(inputFileName);

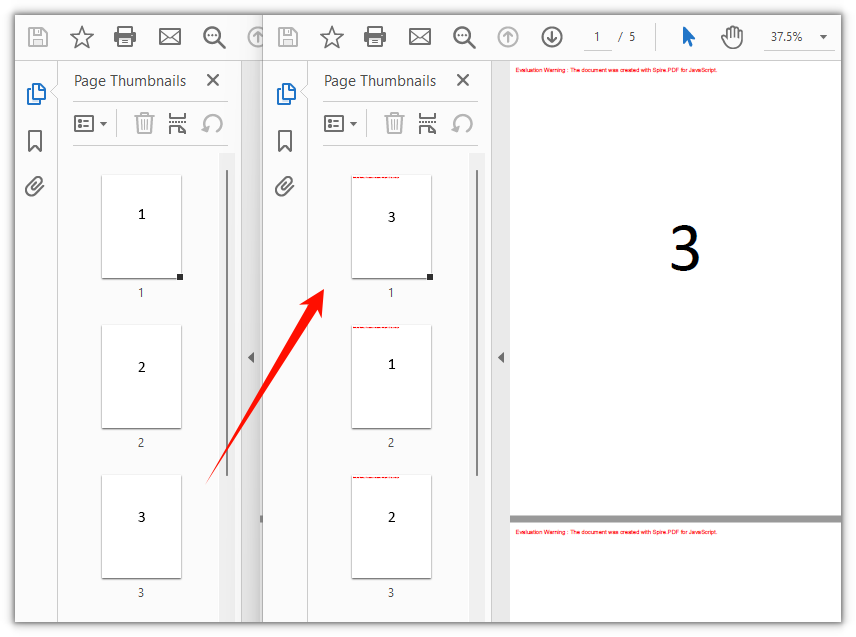
    // The new page order: move the third page to the front and shift the rest down; indices start at 0
    const newOrder = [2, 0, 1, 3, 4];
    doc.Pages.ReArrange(newOrder);

    const outputFileName = 'Rearranged_Pages.pdf';
    doc.SaveToFile(outputFileName);
    doc.Close();

    // Read the generated file from the VFS and trigger the download
    const fileArray = window.dotnetRuntime.Module.FS.readFile(outputFileName);
    const blob = new Blob([fileArray], { type: 'application/pdf' });
    const url = URL.createObjectURL(blob);
    const a = document.createElement('a');
    a.href = url;
    a.download = outputFileName;
    a.click();
    URL.revokeObjectURL(url);
  };

  return (
    <div style={{ textAlign: 'center', height: '300px' }}>
      <h1>Rearrange PDF Pages</h1>
      <button onClick={rearrangePages}>
        Start Rearranging
      </button>
    </div>
  );
}

export default App;
The document after the third page is moved to the front and the remaining pages shift down:
FAQ
The document has fewer pages after rearranging
Cause: ReArrange() rebuilds the page order from the array you pass, so a page whose index is missing from that array never makes it into the result document. Call ReArrange([1, 0]) on a five-page document and the output has two pages.
Solution: To keep the page count unchanged, the array length must equal doc.Pages.Count, with every index from 0 to doc.Pages.Count - 1 appearing exactly once:
// Indices start at 0: a five-page document uses 0, 1, 2, 3 and 4
const pageCount = doc.Pages.Count;
const fullOrder = Array.from({ length: pageCount }, (_, i) => i);
doc.Pages.ReArrange(fullOrder);
Calling ReArrange() reports "The page has existed."
Cause: The array contains a duplicate index, so the same original page is assigned to two positions. One page cannot occupy two positions at the same time, and Spire.PDF raises an error.
Solution: Make sure the array is a permutation of the original page indices — each index appears once and stays within range. For a five-page document the valid indices are 0 to 4.
How to swap only two pages
Cause: ReArrange() always works on the order of the whole document, and there is no shorter overload that swaps two pages on its own.
Solution: Still write the full order array, leaving the untouched positions at their original indices. The line below swaps the first and the second page:
// Swap the first two pages: 0 and 1 trade places, the rest stay put
const swappedOrder = [1, 0, 2, 3, 4];
doc.Pages.ReArrange(swappedOrder);
Get a Free License
If you wish to remove the evaluation message from the result document or remove feature limitations, please contact sales to obtain a temporary license valid for 30 days.
Set PDF Background Color or Background Image in React Using JavaScript
2026-09-18 06:08:07 Written by Nina TangWhen a batch of documents has to look like one set, the quickest way is to give every page the same brand tint or letterhead pattern. Doing that used to mean going back to the source files and reworking the layout one by one, or stacking an image on each page by hand — the first requires that you still have the editable originals, and the second easily ends up covering the body text.
Editing the PDF directly in the browser sidesteps both. Spire.PDF for JavaScript loads, modifies and saves PDF documents on WebAssembly; the tint and the background image are written into the BackgroundColor and BackgroundImage properties of pages that already exist, drawn below the body text; files are read and written through a virtual file system (VFS), with no backend involved.
This article covers two core features:
For installation and project configuration, refer to Integrating Spire.PDF for JavaScript in a React Project. The following examples assume Spire.PDF is installed and the WebAssembly module has been initialized.
Set a Background Color on All PDF Pages
When the whole document needs one tint, assigning a Color to BackgroundColor page by page is enough. The property blends at an opacity of 0.25 by default, so set BackgroudOpacity to 1 when you want the solid color.
function App() {
  const setBackgroundColor = async () => {
    // Get the Spire.PDF WASM module
    const pdfModule = window.wasmModule?.spirepdf;

    // Check whether the module is ready
    if (!pdfModule) {
      alert('Spire.PDF is not ready yet');
      return;
    }

    // Load the PDF file to be processed into the VFS
    const inputFileName = 'Lease_Agreement_EN.pdf';
    await window.spire.FetchFileToVFS(inputFileName, "", `${process.env.PUBLIC_URL}/data/`);

    // Create a PdfDocument object and load the PDF document
    let doc = new pdfModule.PdfDocument();
    doc.LoadFromFile(inputFileName);

    // Custom tint: four ARGB channels, light blue here
    const backgroundColor = pdfModule.Color.FromArgb(255, 226, 240, 253);

    // Set the background color page by page
    for (let i = 0; i < doc.Pages.Count; i++) {
      const page = doc.Pages.get_Item(i);
      page.BackgroundColor = backgroundColor;
      // The default blend opacity is 0.25; set it to 1 for the solid color
      page.BackgroudOpacity = 1;
    }

    const outputFileName = 'SetBackgroundColor.pdf';
    doc.SaveToFile(outputFileName);
    doc.Close();

    // Read the generated file back from the VFS to trigger the download
    const fileArray = window.dotnetRuntime.Module.FS.readFile(outputFileName);
    const blob = new Blob([fileArray], { type: 'application/pdf' });
    const url = URL.createObjectURL(blob);
    const a = document.createElement('a');
    a.href = url;
    a.download = outputFileName;
    a.click();
    URL.revokeObjectURL(url);
  };

  return (
    <div style={{ textAlign: 'center', height: '300px' }}>
      <h1>Set PDF Background Color</h1>
      <button onClick={setBackgroundColor}>
        Start Setting
      </button>
    </div>
  );
}

export default App;
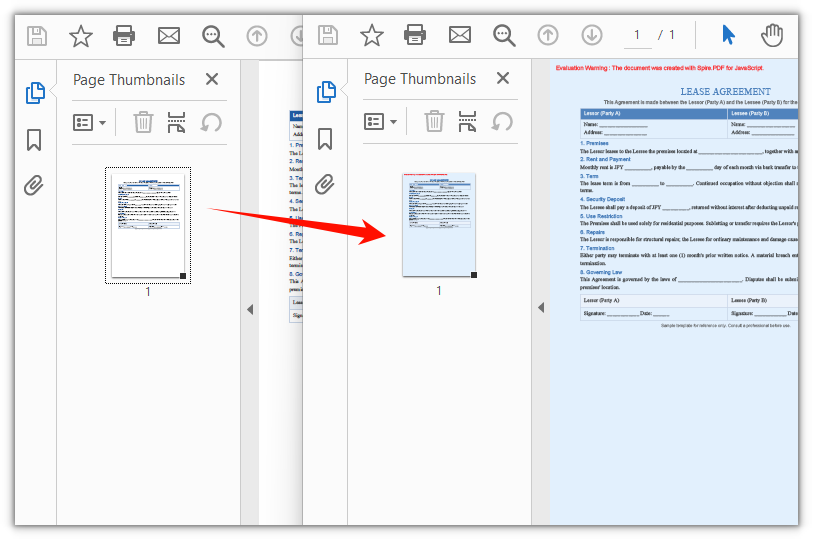
With the light blue background applied, the lease agreement takes on the same tint throughout:
Set a Background Image on All PDF Pages
To lay a full-page image underneath, hand it to BackgroundImage: it takes an image stream opened in the virtual file system and stretches it to fill the page content area, with BackgroudOpacity controlling how strongly it shows.
function App() {
  const setBackgroundImage = async () => {
    // Get the Spire.PDF WASM module
    const pdfModule = window.wasmModule?.spirepdf;

    // Check whether the module is ready
    if (!pdfModule) {
      alert('Spire.PDF is not ready yet');
      return;
    }

    // Load the PDF file to be processed and the background image into the VFS
    const inputFileName = 'Lease_Agreement_EN.pdf';
    const imageFileName = 'Background.png';
    await window.spire.FetchFileToVFS(inputFileName, "", `${process.env.PUBLIC_URL}/data/`);
    await window.spire.FetchFileToVFS(imageFileName, "", `${process.env.PUBLIC_URL}/data/`);

    // Create a PdfDocument object and load the PDF document
    let doc = new pdfModule.PdfDocument();
    doc.LoadFromFile(inputFileName);

    // Open the background image as a file stream in the VFS; every page shares one stream
    const imageStream = new window.spire.Stream(imageFileName);

    // Lay the image down page by page; it stretches to fill the page content area
    for (let i = 0; i < doc.Pages.Count; i++) {
      const page = doc.Pages.get_Item(i);
      page.BackgroundImage = imageStream;
      page.BackgroudOpacity = 1;
    }

    const outputFileName = 'SetBackgroundImage.pdf';
    doc.SaveToFile(outputFileName);
    doc.Close();

    // Read the generated file back from the VFS to trigger the download
    const fileArray = window.dotnetRuntime.Module.FS.readFile(outputFileName);
    const blob = new Blob([fileArray], { type: 'application/pdf' });
    const url = URL.createObjectURL(blob);
    const a = document.createElement('a');
    a.href = url;
    a.download = outputFileName;
    a.click();
    URL.revokeObjectURL(url);
  };

  return (
    <div style={{ textAlign: 'center', height: '300px' }}>
      <h1>Set PDF Background Image</h1>
      <button onClick={setBackgroundImage}>
        Start Setting
      </button>
    </div>
  );
}

export default App;
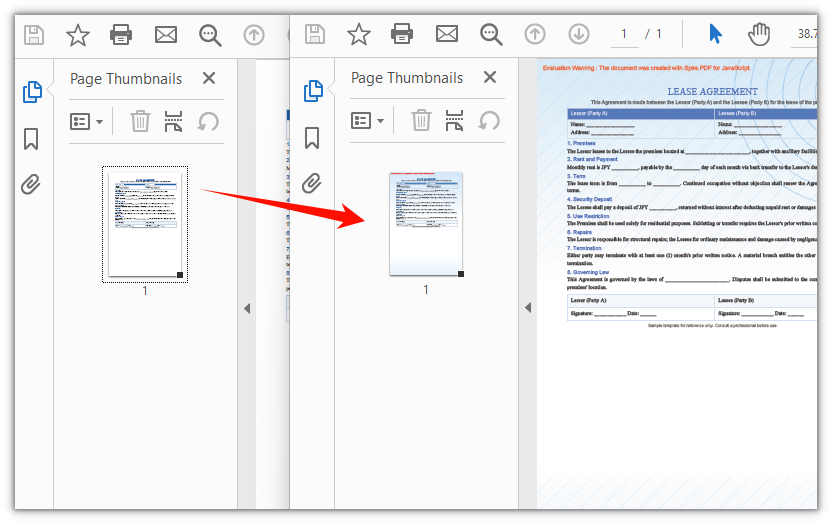
The same background image fills every page, and the body text stays legible:
FAQ
The background color comes out much paler than expected
Cause: BackgroudOpacity (note the missing "n" in the spelling) defaults to 0.25, so the background is blended onto the page at 25% opacity and even a dark color washes out.
Solution: Set BackgroudOpacity to 1 for the solid color; pick a value between 0.3 and 0.8 if you want it softened.
page.BackgroundColor = backgroundColor;
// 1 gives the solid color; a smaller value blends it in more faintly
page.BackgroudOpacity = 1;
The background does not reach the page edges
Cause: The background is only painted inside the page content area (ClientSize). A loaded PDF usually has no margins, so the background covers the whole page; a page created with Pages.Add() carries the default 40-point margins, and that band stays uncolored.
Solution: Create the page with zero margins, and the background covers the whole page:
// Pass a zero-margin object as the second argument; the content area then matches the page
const page = doc.Pages.Add(pdfModule.PdfPageSize.A4(), new pdfModule.PdfMargins());
I only want a background on one page
Cause: BackgroundColor and BackgroundImage are page-level properties: they apply only to the page you assign them on and are not carried over to the rest of the document.
Solution: Fetch the page by index and set it there; no loop needed:
// Handle only page 1 and leave the rest as they are
const page = doc.Pages.get_Item(0);
page.BackgroundColor = pdfModule.Color.FromArgb(255, 226, 240, 253);
page.BackgroudOpacity = 1;
Get a Free License
If you wish to remove the evaluation message from the result document or remove feature limitations, please contact sales to obtain a temporary license valid for 30 days.
Add a Table of Contents to a New Word Document with JavaScript in React
2026-09-18 06:01:11 Written by Amy ZhaoCreating a table of contents for a long document lets readers locate chapters quickly, and makes it easy to re-sync entries and page numbers after the document structure changes. Using a "Spire.Doc Developer Guide" as an example, this article shows how to build a Word document with multi-level headings from scratch and add a table of contents to it. Spire.Doc for JavaScript builds and edits Word documents directly in the browser via WebAssembly, managing font resources through a virtual file system (VFS) — no backend server required.
This article covers two core features:
For installation and project setup, refer to Integrating Spire.Doc for JavaScript in a React Project. The examples below assume Spire.Doc is installed and the WebAssembly module is initialized.
Add a Default Table of Contents
In Word, a table of contents is essentially a TOC field whose entries come from the paragraphs in the document that have a heading style applied. Creating a default table of contents has three phases: first, load the font file into the WASM virtual file system via FetchFileToVFS; then instantiate a Document and build the content with AddSection and AddParagraph, calling ApplyStyle on the paragraphs that should appear in the table of contents to apply heading styles, and inserting the TOC field at the beginning of the document with AppendTOC; finally, call UpdateTableOfContents to fill in the entries and page numbers, save the document, read the generated file from VFS, wrap it as a Blob, and trigger a browser download.
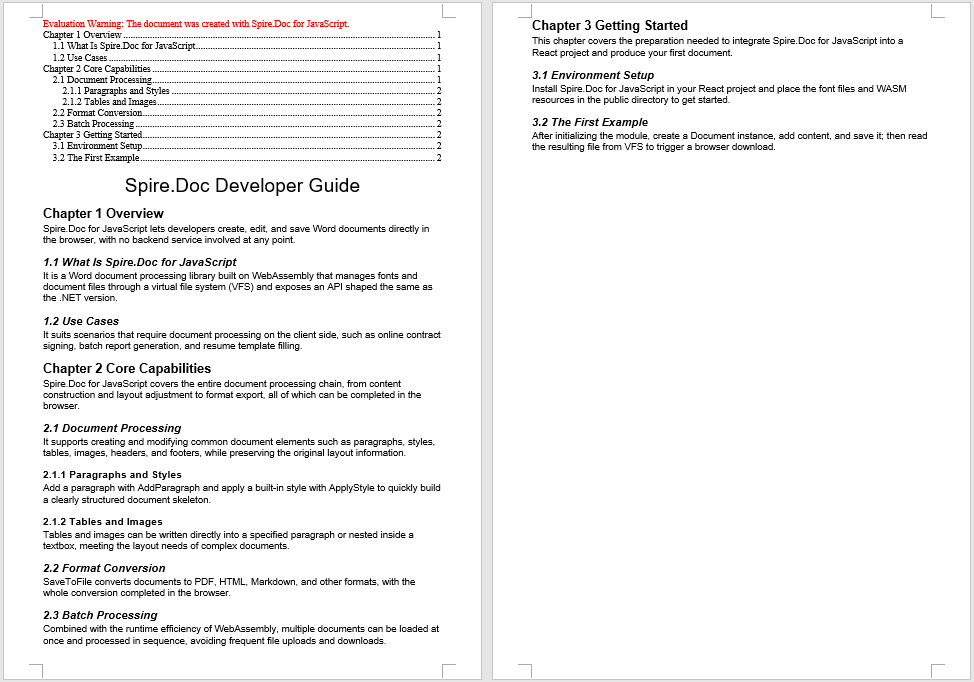
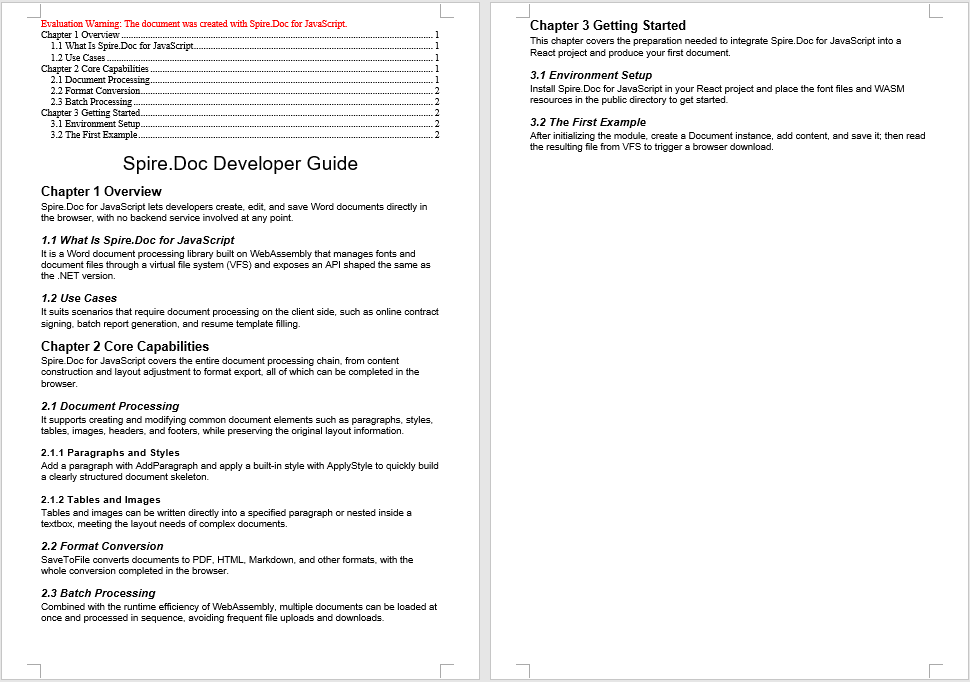
The sample document contains three chapters and twelve multi-level headings in total, spanning Heading 1 through Heading 3, which makes it easy to observe how the table of contents collects multi-level headings.
function App() {
  const AddTableOfContentsToNewDocument = async () => {
    // Get the Spire.Doc WASM module
    const docModule = window.wasmModule?.spiredoc;

    // Make sure the WASM module has fully loaded
    if (!docModule) {
      alert('Spire.Doc is not ready yet');
      return;
    }

    // Load the font into VFS
    await window.spire.FetchFileToVFS('ARIAL.TTF', '/Library/Fonts/', `${process.env.PUBLIC_URL}/font/`);

    // Create a document instance and add a section
    const doc = new docModule.Document();
    let section = doc.AddSection();

    // Insert a TOC field at the beginning of the document, collecting Heading 1 through Heading 3 entries
    let tocPara = section.AddParagraph();
    tocPara.AppendTOC(1, 3);

    // Add the document title
    let characterFormat = new docModule.CharacterFormat(doc);
    characterFormat.FontName ="Arial";
    let title = section.AddParagraph();
    let titleRun = title.AppendText("Spire.Doc Developer Guide");
    titleRun.ApplyCharacterFormat(characterFormat);
    titleRun.CharacterFormat.FontSize = 24;
    title.Format.HorizontalAlignment = docModule.HorizontalAlignment.Center;

    // Chapter 1 Overview (Heading 1)
    let p = section.AddParagraph();
    p.AppendText("Chapter 1 Overview").ApplyCharacterFormat(characterFormat);;
    p.ApplyStyle({ builtinStyle: docModule.BuiltinStyle.Heading1 });
    section.AddParagraph().AppendText("Spire.Doc for JavaScript lets developers create, edit, and save Word documents directly in the browser, with no backend service involved at any point.").ApplyCharacterFormat(characterFormat);;

    // 1.1 What Is Spire.Doc for JavaScript (Heading 2)
    p = section.AddParagraph();
    p.AppendText("1.1 What Is Spire.Doc for JavaScript").ApplyCharacterFormat(characterFormat);;
    p.ApplyStyle({ builtinStyle: docModule.BuiltinStyle.Heading2 });
    section.AddParagraph().AppendText("It is a Word document processing library built on WebAssembly that manages fonts and document files through a virtual file system (VFS) and exposes an API shaped the same as the .NET version.").ApplyCharacterFormat(characterFormat);;

    // 1.2 Use Cases (Heading 2)
    p = section.AddParagraph();
    p.AppendText("1.2 Use Cases").ApplyCharacterFormat(characterFormat);;
    p.ApplyStyle({ builtinStyle: docModule.BuiltinStyle.Heading2 });
    section.AddParagraph().AppendText("It suits scenarios that require document processing on the client side, such as online contract signing, batch report generation, and resume template filling.").ApplyCharacterFormat(characterFormat);;

    // Chapter 2 Core Capabilities (Heading 1)
    p = section.AddParagraph();
    p.AppendText("Chapter 2 Core Capabilities").ApplyCharacterFormat(characterFormat);;
    p.ApplyStyle({ builtinStyle: docModule.BuiltinStyle.Heading1 });
    section.AddParagraph().AppendText("Spire.Doc for JavaScript covers the entire document processing chain, from content construction and layout adjustment to format export, all of which can be completed in the browser.").ApplyCharacterFormat(characterFormat);;

    // 2.1 Document Processing (Heading 2)
    p = section.AddParagraph();
    p.AppendText("2.1 Document Processing").ApplyCharacterFormat(characterFormat);;
    p.ApplyStyle({ builtinStyle: docModule.BuiltinStyle.Heading2 });
    section.AddParagraph().AppendText("It supports creating and modifying common document elements such as paragraphs, styles, tables, images, headers, and footers, while preserving the original layout information.").ApplyCharacterFormat(characterFormat);;

    // 2.1.1 Paragraphs and Styles (Heading 3)
    p = section.AddParagraph();
    p.AppendText("2.1.1 Paragraphs and Styles").ApplyCharacterFormat(characterFormat);;
    p.ApplyStyle({ builtinStyle: docModule.BuiltinStyle.Heading3 });
    section.AddParagraph().AppendText("Add a paragraph with AddParagraph and apply a built-in style with ApplyStyle to quickly build a clearly structured document skeleton.").ApplyCharacterFormat(characterFormat);;

    // 2.1.2 Tables and Images (Heading 3)
    p = section.AddParagraph();
    p.AppendText("2.1.2 Tables and Images").ApplyCharacterFormat(characterFormat);;
    p.ApplyStyle({ builtinStyle: docModule.BuiltinStyle.Heading3 });
    section.AddParagraph().AppendText("Tables and images can be written directly into a specified paragraph or nested inside a textbox, meeting the layout needs of complex documents.").ApplyCharacterFormat(characterFormat);;

    // 2.2 Format Conversion (Heading 2)
    p = section.AddParagraph();
    p.AppendText("2.2 Format Conversion").ApplyCharacterFormat(characterFormat);;
    p.ApplyStyle({ builtinStyle: docModule.BuiltinStyle.Heading2 });
    section.AddParagraph().AppendText("SaveToFile converts documents to PDF, HTML, Markdown, and other formats, with the whole conversion completed in the browser.").ApplyCharacterFormat(characterFormat);;

    // 2.3 Batch Processing (Heading 2)
    p = section.AddParagraph();
    p.AppendText("2.3 Batch Processing").ApplyCharacterFormat(characterFormat);;
    p.ApplyStyle({ builtinStyle: docModule.BuiltinStyle.Heading2 });
    section.AddParagraph().AppendText("Combined with the runtime efficiency of WebAssembly, multiple documents can be loaded at once and processed in sequence, avoiding frequent file uploads and downloads.").ApplyCharacterFormat(characterFormat);;

    // Chapter 3 Getting Started (Heading 1)
    p = section.AddParagraph();
    p.AppendText("Chapter 3 Getting Started").ApplyCharacterFormat(characterFormat);;
    p.ApplyStyle({ builtinStyle: docModule.BuiltinStyle.Heading1 });
    section.AddParagraph().AppendText("This chapter covers the preparation needed to integrate Spire.Doc for JavaScript into a React project and produce your first document.").ApplyCharacterFormat(characterFormat);;

    // 3.1 Environment Setup (Heading 2)
    p = section.AddParagraph();
    p.AppendText("3.1 Environment Setup").ApplyCharacterFormat(characterFormat);;
    p.ApplyStyle({ builtinStyle: docModule.BuiltinStyle.Heading2 });
    section.AddParagraph().AppendText("Install Spire.Doc for JavaScript in your React project and place the font files and WASM resources in the public directory to get started.").ApplyCharacterFormat(characterFormat);;

    // 3.2 The First Example (Heading 2)
    p = section.AddParagraph();
    p.AppendText("3.2 The First Example").ApplyCharacterFormat(characterFormat);;
    p.ApplyStyle({ builtinStyle: docModule.BuiltinStyle.Heading2 });
    section.AddParagraph().AppendText("After initializing the module, create a Document instance, add content, and save it; then read the resulting file from VFS to trigger a browser download.").ApplyCharacterFormat(characterFormat);;

    // Update the table of contents to fill in entries and page numbers
    doc.UpdateTableOfContents();

    // Define the output file name and save
    const outputFileName = "Create a Default TOC in Word Document.docx";
    doc.SaveToFile({ fileName: outputFileName, fileFormat: docModule.FileFormat.Docx2013 });

    // Release resources
    doc.Dispose();

    // Read the generated file from VFS and trigger the download
    const modifiedFileArray = window.dotnetRuntime.Module.FS.readFile(outputFileName);
    const blob = new Blob([modifiedFileArray], { type: 'application/vnd.openxmlformats-officedocument.wordprocessingml.document' });
    const url = URL.createObjectURL(blob);
    const a = document.createElement('a');
    a.href = url;
    a.download = outputFileName;
    a.click();
    URL.revokeObjectURL(url);
  };

  return (
    <div style={{ textAlign: 'center', height: '300px' }}>
      <h1>Click the button below to create a default table of contents in a Word document</h1>
      <button onClick={AddTableOfContentsToNewDocument}>
        Generate
      </button>
    </div>
  );
}

export default App;
After a TOC field is inserted with AppendTOC and updated, the beginning of the document holds a default table of contents that collects three heading levels, complete with page numbers and hyperlinks.
Add a Custom Table of Contents
The table of contents generated by AppendTOC uses Word's default field switches. When you need to control its exact behavior, you can construct a TableOfContent object directly and specify the switch string instead. The difference from the previous feature lies in how it is inserted: you must manually add the table of contents object to a paragraph, supply the field separator and field end marks, and assign the object to document.TOC. The commonly used field switches and their meanings are as follows:
| Switch | Description |
|---|---|
\o "1-3" |
Collects entries by built-in heading styles; here it means including Heading 1 through Heading 3 |
\h |
Turns table of contents entries into hyperlinks that jump to the corresponding chapter when clicked |
\z |
Hides page numbers and tab leaders in Web Layout view |
\u |
Collects entries by the outline level of the paragraphs |
For example, changing the switch string to \o "1-2" means only Heading 1 and Heading 2 entries are collected, and Heading 3 no longer appears in the table of contents; removing \h means the entries no longer support jumping.
function App() {
  const CustomizeTableOfContent = async () => {
    // Get the Spire.Doc WASM module
    const docModule = window.wasmModule?.spiredoc;

    // Make sure the WASM module has fully loaded
    if (!docModule) {
      alert('Spire.Doc is not ready yet');
      return;
    }

    // Load the font into VFS
    await window.spire.FetchFileToVFS('ARIAL.TTF', '/Library/Fonts/', `${process.env.PUBLIC_URL}/font/`);

    // Create a document instance and add a section
    const doc = new docModule.Document();
    let section = doc.AddSection();

    // Construct a table of contents object with custom field switches
    let toc = new docModule.TableOfContent(doc, "{\\o \"1-2\" \\h \\z \\u}");

    // Add the table of contents object to a paragraph
    let tocPara = section.AddParagraph();
    tocPara.Items.Add(toc);

    // Supply the field separator and field end marks
    tocPara.AppendFieldMark(docModule.FieldMarkType.FieldSeparator);
    tocPara.AppendText("TOC");
    tocPara.AppendFieldMark(docModule.FieldMarkType.FieldEnd);

    // Bind this table of contents to the document
    doc.TOC = toc;

    // Add the document title
    let characterFormat = new docModule.CharacterFormat(doc);
    characterFormat.FontName ="Arial";
    let title = section.AddParagraph();
    let titleRun = title.AppendText("Spire.Doc Developer Guide");
    titleRun.ApplyCharacterFormat(characterFormat);
    titleRun.CharacterFormat.FontSize = 24;
    title.Format.HorizontalAlignment = docModule.HorizontalAlignment.Center;

    // Chapter 1 Overview (Heading 1)
    let p = section.AddParagraph();
    p.AppendText("Chapter 1 Overview").ApplyCharacterFormat(characterFormat);
    p.ApplyStyle({ builtinStyle: docModule.BuiltinStyle.Heading1 });
    section.AddParagraph().AppendText("Spire.Doc for JavaScript lets developers create, edit, and save Word documents directly in the browser, with no backend service involved at any point.").ApplyCharacterFormat(characterFormat);

    // 1.1 What Is Spire.Doc for JavaScript (Heading 2)
    p = section.AddParagraph();
    p.AppendText("1.1 What Is Spire.Doc for JavaScript").ApplyCharacterFormat(characterFormat);
    p.ApplyStyle({ builtinStyle: docModule.BuiltinStyle.Heading2 });
    section.AddParagraph().AppendText("It is a Word document processing library built on WebAssembly that manages fonts and document files through a virtual file system (VFS) and exposes an API shaped the same as the .NET version.").ApplyCharacterFormat(characterFormat);

    // 1.2 Use Cases (Heading 2)
    p = section.AddParagraph();
    p.AppendText("1.2 Use Cases").ApplyCharacterFormat(characterFormat);
    p.ApplyStyle({ builtinStyle: docModule.BuiltinStyle.Heading2 });
    section.AddParagraph().AppendText("It suits scenarios that require document processing on the client side, such as online contract signing, batch report generation, and resume template filling.").ApplyCharacterFormat(characterFormat);

    // Chapter 2 Core Capabilities (Heading 1)
    p = section.AddParagraph();
    p.AppendText("Chapter 2 Core Capabilities").ApplyCharacterFormat(characterFormat);
    p.ApplyStyle({ builtinStyle: docModule.BuiltinStyle.Heading1 });
    section.AddParagraph().AppendText("Spire.Doc for JavaScript covers the entire document processing chain, from content construction and layout adjustment to format export, all of which can be completed in the browser.").ApplyCharacterFormat(characterFormat);

    // 2.1 Document Processing (Heading 2)
    p = section.AddParagraph();
    p.AppendText("2.1 Document Processing").ApplyCharacterFormat(characterFormat);
    p.ApplyStyle({ builtinStyle: docModule.BuiltinStyle.Heading2 });
    section.AddParagraph().AppendText("It supports creating and modifying common document elements such as paragraphs, styles, tables, images, headers, and footers, while preserving the original layout information.").ApplyCharacterFormat(characterFormat);

    // 2.1.1 Paragraphs and Styles (Heading 3)
    p = section.AddParagraph();
    p.AppendText("2.1.1 Paragraphs and Styles").ApplyCharacterFormat(characterFormat);
    p.ApplyStyle({ builtinStyle: docModule.BuiltinStyle.Heading3 });
    section.AddParagraph().AppendText("Add a paragraph with AddParagraph and apply a built-in style with ApplyStyle to quickly build a clearly structured document skeleton.").ApplyCharacterFormat(characterFormat);

    // 2.1.2 Tables and Images (Heading 3)
    p = section.AddParagraph();
    p.AppendText("2.1.2 Tables and Images").ApplyCharacterFormat(characterFormat);
    p.ApplyStyle({ builtinStyle: docModule.BuiltinStyle.Heading3 });
    section.AddParagraph().AppendText("Tables and images can be written directly into a specified paragraph or nested inside a textbox, meeting the layout needs of complex documents.").ApplyCharacterFormat(characterFormat);

    // 2.2 Format Conversion (Heading 2)
    p = section.AddParagraph();
    p.AppendText("2.2 Format Conversion").ApplyCharacterFormat(characterFormat);
    p.ApplyStyle({ builtinStyle: docModule.BuiltinStyle.Heading2 });
    section.AddParagraph().AppendText("SaveToFile converts documents to PDF, HTML, Markdown, and other formats, with the whole conversion completed in the browser.").ApplyCharacterFormat(characterFormat);

    // 2.3 Batch Processing (Heading 2)
    p = section.AddParagraph();
    p.AppendText("2.3 Batch Processing").ApplyCharacterFormat(characterFormat);
    p.ApplyStyle({ builtinStyle: docModule.BuiltinStyle.Heading2 });
    section.AddParagraph().AppendText("Combined with the runtime efficiency of WebAssembly, multiple documents can be loaded at once and processed in sequence, avoiding frequent file uploads and downloads.").ApplyCharacterFormat(characterFormat);

    // Chapter 3 Getting Started (Heading 1)
    p = section.AddParagraph();
    p.AppendText("Chapter 3 Getting Started").ApplyCharacterFormat(characterFormat);
    p.ApplyStyle({ builtinStyle: docModule.BuiltinStyle.Heading1 });
    section.AddParagraph().AppendText("This chapter covers the preparation needed to integrate Spire.Doc for JavaScript into a React project and produce your first document.").ApplyCharacterFormat(characterFormat);

    // 3.1 Environment Setup (Heading 2)
    p = section.AddParagraph();
    p.AppendText("3.1 Environment Setup").ApplyCharacterFormat(characterFormat);
    p.ApplyStyle({ builtinStyle: docModule.BuiltinStyle.Heading2 });
    section.AddParagraph().AppendText("Install Spire.Doc for JavaScript in your React project and place the font files and WASM resources in the public directory to get started.").ApplyCharacterFormat(characterFormat);

    // 3.2 The First Example (Heading 2)
    p = section.AddParagraph();
    p.AppendText("3.2 The First Example").ApplyCharacterFormat(characterFormat);
    p.ApplyStyle({ builtinStyle: docModule.BuiltinStyle.Heading2 });
    section.AddParagraph().AppendText("After initializing the module, create a Document instance, add content, and save it; then read the resulting file from VFS to trigger a browser download.").ApplyCharacterFormat(characterFormat);

    // Update the table of contents to fill in entries and page numbers
    doc.UpdateTableOfContents();

    // Define the output file name and save
    const outputFileName = "Create a Custom TOC in Word Document.docx";
    doc.SaveToFile({ fileName: outputFileName, fileFormat: docModule.FileFormat.Docx2013 });

    // Release resources
    doc.Dispose();

    // Read the generated file from VFS and trigger the download
    const modifiedFileArray = window.dotnetRuntime.Module.FS.readFile(outputFileName);
    const blob = new Blob([modifiedFileArray], { type: 'application/vnd.openxmlformats-officedocument.wordprocessingml.document' });
    const url = URL.createObjectURL(blob);
    const a = document.createElement('a');
    a.href = url;
    a.download = outputFileName;
    a.click();
    URL.revokeObjectURL(url);
  };

  return (
    <div style={{ textAlign: 'center', height: '300px' }}>
      <h1>Click the button below to create a custom table of contents in a Word document</h1>
      <button onClick={CustomizeTableOfContent}>
        Generate
      </button>
    </div>
  );
}

export default App;
The table of contents generated with a TableOfContent object and custom field switches has its entry levels, hyperlinks, and page numbers all determined by the switch string.
FAQ
The generated table of contents is empty
Cause: A TOC field collects entries by heading style. If the paragraphs do not have built-in heading styles such as Heading1 to Heading3 applied, no entries will appear in the table of contents after updating, even if the TOC field was inserted successfully.
Solution: Call ApplyStyle on the paragraphs that should appear in the table of contents to apply a heading style:
p.AppendText("Chapter 1 Overview");
p.ApplyStyle({ builtinStyle: docModule.BuiltinStyle.Heading1 });
The table of contents contains fewer heading levels than expected
Cause: The two parameters of AppendTOC correspond to the starting and ending heading levels collected by the table of contents. If you pass AppendTOC(1, 2), Heading 3 will not appear in the table of contents. With custom switches, \o "1-2" produces the same result.
Solution: Adjust the parameter range to the levels you need to collect — for example, to include Heading 1 through Heading 3:
tocPara.AppendTOC(1, 3);
Page numbers in the table of contents are missing or incorrect
Cause: AppendTOC only inserts the TOC field itself; the field content must be updated explicitly. If UpdateTableOfContents is not called before saving, the generated table of contents contains only the field code, with no entries or page numbers.
Solution: Call the update method before SaveToFile:
doc.UpdateTableOfContents();
doc.SaveToFile({ fileName: outputFileName, fileFormat: docModule.FileFormat.Docx2013 });
Get a Free License
If you wish to remove the evaluation message from the resulting document, or to eliminate functional limitations, please contact our sales team to request a 30-day temporary license.
Besides holding cell data, an Excel workbook is often used as a container for files: a quotation carries a Word version of the contract terms, a product sheet carries a PDF datasheet, and double-clicking the object opens the source file directly. Files embedded into a worksheet like this are OLE objects (Object Linking and Embedding). Inserting one by hand takes two steps in the Excel UI—Insert → Object—but doing it from code in the browser needs a dedicated API.Spire.XLS for JavaScript performs this work directly in the browser through WebAssembly, managing input and output files with a virtual file system (VFS) and requiring no backend service.
This article covers two key features:
For installation and project setup, see Integrating Spire.XLS for JavaScript in a React Project. The examples below assume Spire.XLS is already installed and the WebAssembly module has been initialized.
Insert an OLE Object in Excel
OleObjects.Add inserts an external file into a worksheet. It takes three arguments: the file to embed, the icon the object shows on the sheet, and the link type—OleLinkType.Embed embeds the file into the workbook, OleLinkType.Link inserts it as a link. After the object is in place, Location decides which cell it is anchored to and ObjectType declares what was embedded, which is how Excel knows which program to use when the object is double-clicked. The steps are:
- Create a new workbook and write a caption into a cell.
- Open the workbook to be embedded and render its worksheet to an image, to use as the display icon.
- Embed that Excel file into the worksheet with
OleObjects.Add. - Set
LocationandObjectType. - Save the workbook.
Here is a complete code example that inserts an Excel file into a worksheet as an OLE object in React:
function App() {
  const insertOleObject = async () => {
    // Get the Spire.XLS WASM module
    const xlsModule = window.wasmModule?.spirexls;

    // Check if the module is ready
    if (!xlsModule) {
      alert('Spire.Xls is not ready yet');
      return;
    }

    // Load the font into VFS
    await window.spire.FetchFileToVFS('ARIAL.TTF', '/Library/Fonts/', `${process.env.PUBLIC_URL}/font/`);

    // Load the Excel file to be embedded into VFS
    const embeddedFileName = 'OLEObjects.xlsx';
    await window.spire.FetchFileToVFS(embeddedFileName, '', `${process.env.PUBLIC_URL}/static/data/`);

    // Create a new workbook and write the caption
    const workbook = new xlsModule.Workbook();
    const sheet = workbook.Worksheets.get(0);
    sheet.Range.get("A1").Text = "Here is an OLE object.";

    // Open the embedded workbook and render its worksheet to an image as the display icon
    const embeddedBook = new xlsModule.Workbook();
    embeddedBook.LoadFromFile(embeddedFileName);
    const embeddedSheet = embeddedBook.Worksheets.get(0);
    embeddedSheet.PageSetup.LeftMargin = 0;
    embeddedSheet.PageSetup.RightMargin = 0;
    embeddedSheet.PageSetup.TopMargin = 0;
    embeddedSheet.PageSetup.BottomMargin = 0;
    const image = embeddedSheet.ToImage(1, 1, 19, 5);
    embeddedBook.Dispose();

    // Embed the Excel file into the worksheet; the file data is stored with the workbook
    const oleObject = sheet.OleObjects.Add(
      embeddedFileName,
      image,
      xlsModule.OleLinkType.Embed
    );

    // Anchor the object at cell B4 and declare it as an Excel worksheet
    oleObject.Location = sheet.Range.get("B4");
    oleObject.ObjectType = xlsModule.OleObjectType.ExcelWorksheet;

    // Save the workbook
    const outputFileName = "InsertOLEObject.xlsx";
    workbook.SaveToFile({ fileName: outputFileName, version: xlsModule.ExcelVersion.Version2010 });

    // Release resources
    workbook.Dispose();

    // Read the result file from VFS and trigger the download
    const fileArray = window.dotnetRuntime.Module.FS.readFile(outputFileName);
    const blob = new Blob([fileArray], { type: 'application/vnd.openxmlformats-officedocument.spreadsheetml.sheet' });
    const url = URL.createObjectURL(blob);
    const a = document.createElement('a');
    a.href = url;
    a.download = outputFileName;
    a.click();
    URL.revokeObjectURL(url);
  };

  return (
    <div style={{ textAlign: 'center', height: '300px' }}>
      <h1>Insert an OLE Object</h1>
      <button onClick={insertOleObject}>Start</button>
    </div>
  );
}

export default App;
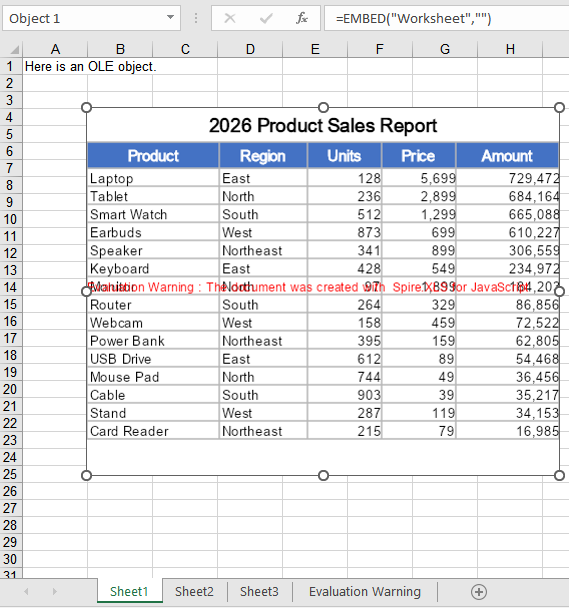
The icon here is taken directly from the rendered embedded worksheet, so the OLE object shows its own content on the sheet. Switching ObjectType to values such as OleObjectType.WordDocument or OleObjectType.AdobeAcrobatDocument declares other kinds of embedded files.
Running it, the effect of inserting a workbook as an OLE object:
Insert an OLE Object with a Custom Icon
ToImage has to open a workbook and render a row/column range every time, which suits cases where the object should present its own content; when a single icon should be applied to every attachment, reading a ready-made picture is simpler, and the same picture can be reused across attachments. The second argument of OleObjects.Add accepts both kinds of input. The steps are:
- Load the icon image and the attachment file into VFS.
- Create a new workbook and read the icon image into a stream with
new xlsModule.Stream. - Insert the attachment as an embedded object with
OleObjects.Add, passing the icon stream. - Set
LocationandObjectType. - Save the workbook.
Here is a complete code example that inserts a PDF attachment with a custom icon in React:
function App() {
  const insertOleObjectWithIcon = async () => {
    // Get the Spire.XLS WASM module
    const xlsModule = window.wasmModule?.spirexls;

    // Check if the module is ready
    if (!xlsModule) {
      alert('Spire.Xls is not ready yet');
      return;
    }

    // Load the font into VFS
    await window.spire.FetchFileToVFS('ARIAL.TTF', '/Library/Fonts/', `${process.env.PUBLIC_URL}/font/`);

    // Load the icon image and the attachment into VFS
    const iconFileName = 'OLEIcon.png';
    const attachmentFileName = 'Attachment.pdf';
    await window.spire.FetchFileToVFS(iconFileName, '', `${process.env.PUBLIC_URL}/static/data/`);
    await window.spire.FetchFileToVFS(attachmentFileName, '', `${process.env.PUBLIC_URL}/static/data/`);

    // Create a new workbook
    const workbook = new xlsModule.Workbook();
    const sheet = workbook.Worksheets.get(0);

    // Read the icon image as a stream to use as the display icon of the OLE object
    const iconStream = new xlsModule.Stream(iconFileName);

    // Embed the PDF attachment into the worksheet
    const oleObject = sheet.OleObjects.Add(
      attachmentFileName,
      iconStream,
      xlsModule.OleLinkType.Embed
    );

    // Anchor the object at cell B4 and declare it as a PDF document
    oleObject.Location = sheet.Range.get("B4");
    oleObject.ObjectType = xlsModule.OleObjectType.AdobeAcrobatDocument;

    // Save the workbook
    const outputFileName = "InsertOLEObjectWithIcon.xlsx";
    workbook.SaveToFile({ fileName: outputFileName, version: xlsModule.ExcelVersion.Version2010 });

    // Release resources
    workbook.Dispose();

    // Read the result file from VFS and trigger the download
    const fileArray = window.dotnetRuntime.Module.FS.readFile(outputFileName);
    const blob = new Blob([fileArray], { type: 'application/vnd.openxmlformats-officedocument.spreadsheetml.sheet' });
    const url = URL.createObjectURL(blob);
    const a = document.createElement('a');
    a.href = url;
    a.download = outputFileName;
    a.click();
    URL.revokeObjectURL(url);
  };

  return (
    <div style={{ textAlign: 'center', height: '300px' }}>
      <h1>Insert an OLE Object with a Custom Icon</h1>
      <button onClick={insertOleObjectWithIcon}>Start</button>
    </div>
  );
}

export default App;
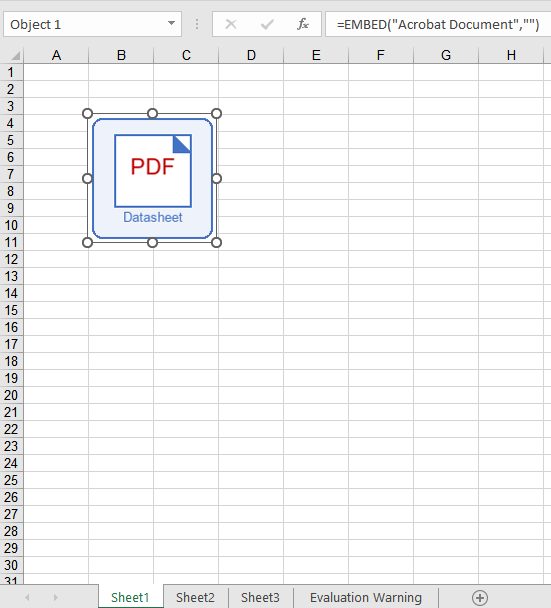
Running it, the effect of inserting a PDF attachment with a custom icon as an OLE object:
FAQ
Only a blank icon shows up on the sheet after inserting?
Cause: The second argument of OleObjects.Add decides the icon an OLE object shows on the sheet. When the image comes from ToImage, a region that falls outside the used range of the worksheet yields a blank picture, so the inserted object also shows only blank space.
Solution: Keep the region inside the part of the sheet that actually has content, or use a ready-made image file instead:
// Use a fixed picture as the icon, independent of the worksheet content
const iconStream = new xlsModule.Stream('OLEIcon.png');
const oleObject = sheet.OleObjects.Add('Attachment.pdf', iconStream, xlsModule.OleLinkType.Embed);
oleObject.Location = sheet.Range.get("B4");
oleObject.ObjectType = xlsModule.OleObjectType.AdobeAcrobatDocument;
What happens if ObjectType is set to something else?
Cause: ObjectType is not merely a comment—its value is written into the progId field of the workbook, and Excel uses that identifier to find the right program when the object is double-clicked. The same PDF attachment declares a progId of Acrobat Document under OleObjectType.AdobeAcrobatDocument; declare it as OleObjectType.ExcelWorksheet and the progId becomes Worksheet, so Excel attempts to open the PDF with Excel itself, and the object will not open.
Solution: Set ObjectType to the real type of the embedded file. The common values are:
| Embedded file | ObjectType |
|---|---|
| Excel workbook | OleObjectType.ExcelWorksheet |
| Word document | OleObjectType.WordDocument |
| PowerPoint presentation | OleObjectType.PowerPointSlide |
| PDF document | OleObjectType.AdobeAcrobatDocument |
// Declare the real file type so Excel opens it with the right program
oleObject.ObjectType = xlsModule.OleObjectType.AdobeAcrobatDocument;
Get a Free License
Spire.XLS for JavaScript offers a 30-day full-featured free trial license with no functional limitations. Apply here to evaluate before purchasing.
Compress, Resize or Move Excel Pictures in React with JavaScript
2026-09-18 01:57:13 Written by AdministratorOnce a report has accumulated a few pictures, the awkward part is rarely the text: a few hundred kilobytes of product photos pushed straight into a worksheet will swell the file until sending and archiving become painful, and pictures copied in from elsewhere rarely share one size—a large one covers an entire block of data while a small one sits unreadable in a corner. Fixing these by hand in Excel is bearable, but there is no entry point once the work has to be done in code.Spire.XLS for JavaScript performs this work directly in the browser through WebAssembly, managing input and output files with a virtual file system (VFS) and requiring no backend service.
This article covers three key features:
For installation and project setup, see Integrating Spire.XLS for JavaScript in a React Project. The examples below assume Spire.XLS is already installed and the WebAssembly module has been initialized.
Compress Pictures in Excel
Compress() re-encodes a picture at the quality ratio you pass in: a value of 50 brings the picture quality down to 50%. The lower the quality, the less data the picture takes up and the lighter the workbook becomes. Compression only touches the picture's own data—the picture keeps its position and its display size on the worksheet—so it is the right move when you want a smaller file without disturbing the layout. The steps are:
- Load the workbook.
- Walk every picture of every worksheet.
- Call
Compressto bring each picture down to 50% quality. - Save the workbook.
The following is a complete code example that compresses the pictures in an Excel file in React:
function App() {
  const compressPictures = async () => {
    // Get the Spire.XLS WASM module
    const xlsModule = window.wasmModule?.spirexls;

    // Check if the module is ready
    if (!xlsModule) {
      alert('Spire.Xls is not ready yet');
      return;
    }

    // Load the font into VFS
    await window.spire.FetchFileToVFS('ARIAL.TTF', '/Library/Fonts/', `${process.env.PUBLIC_URL}/font/`);

    // Load the Excel file into VFS
    const inputFileName = 'ResizeAndMovePictures.xlsx';
    await window.spire.FetchFileToVFS(inputFileName, '', `${process.env.PUBLIC_URL}/static/data/`);

    // Load the workbook
    const workbook = new xlsModule.Workbook();
    workbook.LoadFromFile(inputFileName);

    // Walk every picture of every worksheet
    for (const sheet of workbook.Worksheets) {
      for (const picture of sheet.Pictures) {
        // Compress the picture quality down to 50%
        picture.Compress(50);
      }
    }

    // Save the workbook
    const outputFileName = "CompressPictures.xlsx";
    workbook.SaveToFile(outputFileName);

    // Release resources
    workbook.Dispose();

    // Read the result file from VFS and trigger the download
    const fileArray = window.dotnetRuntime.Module.FS.readFile(outputFileName);
    const blob = new Blob([fileArray], { type: "application/vnd.openxmlformats-officedocument.spreadsheetml.sheet" });
    const url = URL.createObjectURL(blob);
    const a = document.createElement('a');
    a.href = url;
    a.download = outputFileName;
    a.click();
    URL.revokeObjectURL(url);
  };

  return (
    <div style={{ textAlign: 'center', height: '300px' }}>
      <h1>Compress, Resize or Move Pictures in Excel</h1>
      <button onClick={compressPictures}>Start</button>
    </div>
  );
}

export default App;
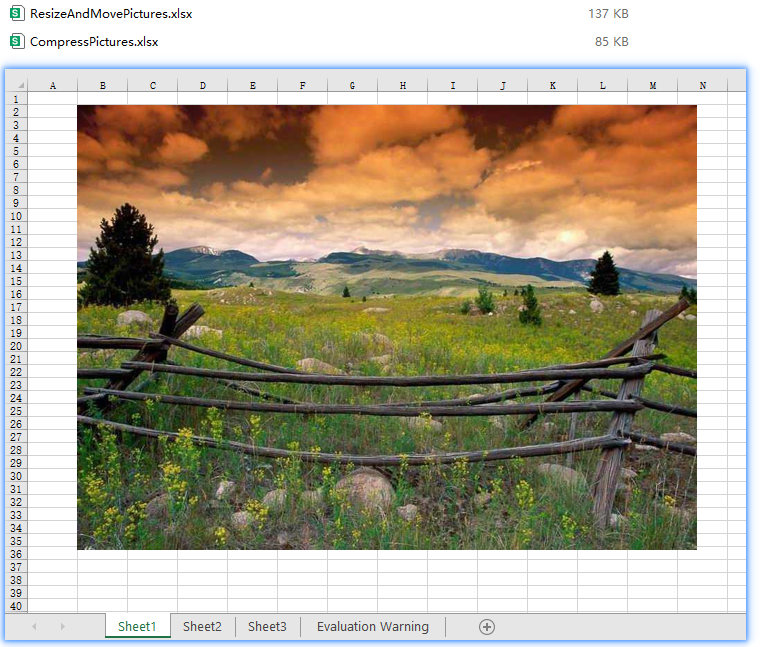
Compress handles every picture it reaches in one pass; the compressed pictures stay where they were and only lose some image quality.
After running, the effect of compressing pictures in Excel:
Resize a Picture in Excel
The size a picture is displayed at on a worksheet is controlled by two properties, Width and Height, measured in pixels. Assigning new values to them brings the picture to the size you want—a shrunken picture no longer covers the data next to it, and an enlarged one can fill a reserved picture slot. The steps are:
- Load the workbook and get the first worksheet.
- Get the first picture of the worksheet with
sheet.Pictures.get(0). - Set
WidthandHeightto resize the picture. - Save the workbook.
The following is a complete code example that resizes a picture in Excel in React:
function App() {
  const resizePicture = async () => {
    // Get the Spire.XLS WASM module
    const xlsModule = window.wasmModule?.spirexls;

    // Check if the module is ready
    if (!xlsModule) {
      alert('Spire.Xls is not ready yet');
      return;
    }

    // Load the font into VFS
    await window.spire.FetchFileToVFS('ARIAL.TTF', '/Library/Fonts/', `${process.env.PUBLIC_URL}/font/`);

    // Load the Excel file into VFS
    const inputFileName = 'ResizeAndMovePictures.xlsx';
    await window.spire.FetchFileToVFS(inputFileName, '', `${process.env.PUBLIC_URL}/static/data/`);

    // Load the workbook
    const workbook = new xlsModule.Workbook();
    workbook.LoadFromFile(inputFileName);

    // Get the first worksheet
    const sheet = workbook.Worksheets.get(0);

    // Get the first picture of the worksheet
    const picture = sheet.Pictures.get(0);

    // Resize the picture to 140 pixels wide and 140 pixels high
    picture.Width = 140;
    picture.Height = 140;

    // Save the workbook
    const outputFileName = "ResizePicture.xlsx";
    workbook.SaveToFile(outputFileName);

    // Release resources
    workbook.Dispose();

    // Read the result file from VFS and trigger the download
    const fileArray = window.dotnetRuntime.Module.FS.readFile(outputFileName);
    const blob = new Blob([fileArray], { type: "application/vnd.openxmlformats-officedocument.spreadsheetml.sheet" });
    const url = URL.createObjectURL(blob);
    const a = document.createElement('a');
    a.href = url;
    a.download = outputFileName;
    a.click();
    URL.revokeObjectURL(url);
  };

  return (
    <div style={{ textAlign: 'center', height: '300px' }}>
      <h1>Compress, Resize or Move Pictures in Excel</h1>
      <button onClick={resizePicture}>Start</button>
    </div>
  );
}

export default App;
Width and Height map to the picture's width and height and take effect independently, so the picture shows at its new size as soon as they are assigned. Note that this sets the size of the picture frame rather than scaling proportionally—when the new width and height do not match the original ratio, the picture is stretched. See the FAQ below for how to handle that.
After running, the effect of resizing a picture in Excel:
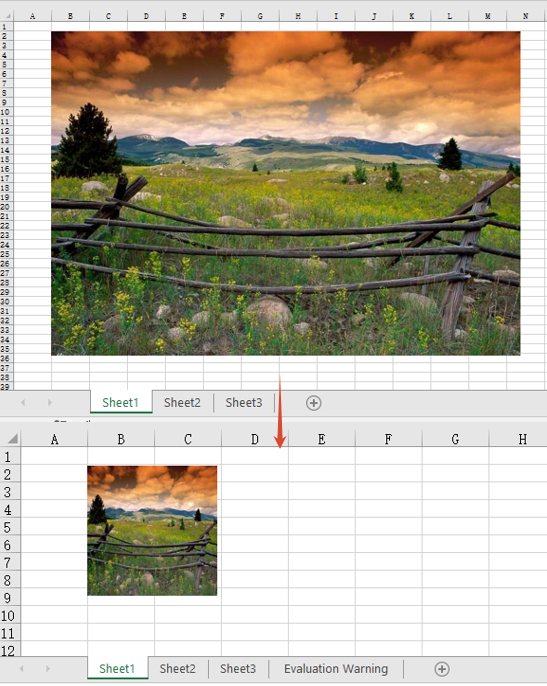
Move a Picture in Excel
A picture in Excel is a floating object anchored to a cell, so setting its size alone does not change where it shows up. The Left and Top properties are measured in pixels and give the distance from the top-left corner of the worksheet to the top-left corner of the picture; assigning them moves the picture to the new coordinates, which is how you push a picture out of a block of data or line several pictures up in the same column. The steps are:
- Load the workbook and get the first worksheet.
- Get the first picture of the worksheet with
sheet.Pictures.get(0). - Set
LeftandTopto move the picture. - Save the workbook.
The following is a complete code example that moves a picture in Excel in React:
function App() {
  const movePicture = async () => {
    // Get the Spire.XLS WASM module
    const xlsModule = window.wasmModule?.spirexls;

    // Check if the module is ready
    if (!xlsModule) {
      alert('Spire.Xls is not ready yet');
      return;
    }

    // Load the font into VFS
    await window.spire.FetchFileToVFS('ARIAL.TTF', '/Library/Fonts/', `${process.env.PUBLIC_URL}/font/`);

    // Load the Excel file into VFS
    const inputFileName = 'ResizeAndMovePictures.xlsx';
    await window.spire.FetchFileToVFS(inputFileName, '', `${process.env.PUBLIC_URL}/static/data/`);

    // Load the workbook
    const workbook = new xlsModule.Workbook();
    workbook.LoadFromFile(inputFileName);

    // Get the first worksheet
    const sheet = workbook.Worksheets.get(0);

    // Get the first picture of the worksheet
    const picture = sheet.Pictures.get(0);

    // Move the top-left corner of the picture 360 pixels from the left and 180 pixels from the top
    picture.Left = 360;
    picture.Top = 180;

    // Save the workbook
    const outputFileName = "MovePicture.xlsx";
    workbook.SaveToFile(outputFileName);

    // Release resources
    workbook.Dispose();

    // Read the result file from VFS and trigger the download
    const fileArray = window.dotnetRuntime.Module.FS.readFile(outputFileName);
    const blob = new Blob([fileArray], { type: "application/vnd.openxmlformats-officedocument.spreadsheetml.sheet" });
    const url = URL.createObjectURL(blob);
    const a = document.createElement('a');
    a.href = url;
    a.download = outputFileName;
    a.click();
    URL.revokeObjectURL(url);
  };

  return (
    <div style={{ textAlign: 'center', height: '300px' }}>
      <h1>Compress, Resize or Move Pictures in Excel</h1>
      <button onClick={movePicture}>Start</button>
    </div>
  );
}

export default App;
Left and Top describe the absolute coordinates of the picture's top-left corner on the worksheet, regardless of which row or column the picture was originally anchored to.
After running, the effect of moving a picture in Excel:
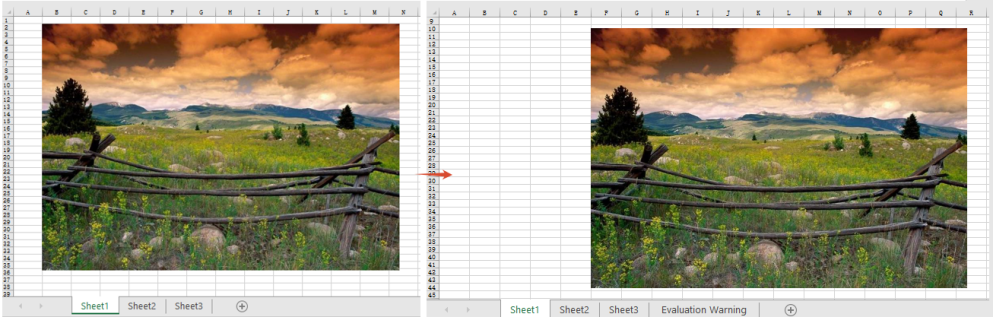
FAQ
Why does a picture look stretched after resizing?
Cause: Width and Height are two independent properties, and assigning them separately does not preserve the picture's original aspect ratio. Give a rectangular picture the same value for width and height and it is forced into a square.
Solution: read the picture's current width and height first, work out the ratio, and derive the other dimension from it. The size properties only accept integers, so round the result:
// Read the picture's current width and height to work out the ratio
const picture = sheet.Pictures.get(0);
const ratio = picture.Height / picture.Width;

// Fix the width and derive the height from the ratio so the picture is not distorted
picture.Width = 140;
picture.Height = Math.round(140 * ratio);
Does IsLockAspectRatio keep a picture from being distorted?
Cause: no. The property is true by default, and what it sets is the picture's lock flag, which constrains resizing by hand in Excel. It does not scale the other side for you when Width / Height are assigned from code—setting Width to 140 left Height at its original 300 whether IsLockAspectRatio was true or false.
Solution: proportional resizing still has to be computed by hand. The property reads and writes fine and survives a save, so set it when the file's lock state needs to match:
// The lock flag: true by default; setting it to false is written to the file and reads back as false
picture.IsLockAspectRatio = false;

// But it takes no part in the width / height conversion: change Width alone and Height stays put
picture.Width = 140;

// To scale proportionally, work out the ratio first
const ratio = picture.Height / picture.Width;
picture.Width = 140;
picture.Height = Math.round(140 * ratio);
Get a Free License
Spire.XLS for JavaScript offers a 30-day full-featured free trial license with no functional limitations. Apply here to evaluate before purchasing.
Autofit Row Heights and Column Widths in React with JavaScript
2026-09-18 01:55:27 Written by liu taliaOnce the data is in, a table usually needs one last pass before it is usable: a product name squeezed into a sliver of a column, a paragraph of remarks running along a single line until the next non-empty cell cuts it off. Dragging column borders and row dividers by hand is slow, and once there are enough columns it is easy to miss a few. Spire.XLS for JavaScript performs this work directly in the browser through WebAssembly, managing input and output files with a virtual file system (VFS) and requiring no backend service.
This article covers two key features:
- Autofit the Height of a Single Row and the Width of a Single Column
- Autofit the Heights of Multiple Rows and the Widths of Multiple Columns
For installation and project setup, see Integrating Spire.XLS for JavaScript in a React Project. The examples below assume Spire.XLS is already installed and the WebAssembly module has been initialized.
Autofit the Height of a Single Row and the Width of a Single Column
AutoFitRow works out the height of the given row from its content, and AutoFitColumn works out the width of the given column the same way. Each one affects only the row or the column it is pointed at and leaves the rest of the table untouched, which is what you want when a single overflow is the only thing in the way.
Note that row height autofit only means anything for content that needs to wrap: with wrapping turned off the text always sits on one line and the height simply follows the font size, so there is no taller value to calculate. The steps are:
- Load the workbook and get the first worksheet.
- Autofit the height of that row with
AutoFitRow. - Autofit the width of that column with
AutoFitColumn. - Save the workbook.
Here is a complete code example that autofits the height of a single row and the width of a single column in React:
function App() {
  const autoFitSingleRowColumn = async () => {
    // Get the Spire.XLS WASM module
    const xlsModule = window.wasmModule?.spirexls;

    // Check whether the module is ready
    if (!xlsModule) {
      alert('Spire.Xls is not ready yet');
      return;
    }

    // Load the font into the VFS
    await window.spire.FetchFileToVFS('ARIAL.TTF', '/Library/Fonts/', `${process.env.PUBLIC_URL}/font/`);

    // Load the Excel file into the VFS
    const inputFileName = 'AutoFitRowsAndColumns.xlsx';
    await window.spire.FetchFileToVFS(inputFileName, '', `${process.env.PUBLIC_URL}/static/data/`);

    // Load the workbook
    const workbook = new xlsModule.Workbook();
    workbook.LoadFromFile(inputFileName);

    // Get the first worksheet
    const sheet = workbook.Worksheets.get(0);

    // Autofit the height of row 2
    sheet.AutoFitRow(2);

    // Autofit the width of column 4
    sheet.AutoFitColumn(4);

    // Save the workbook
    const outputFileName = "AutoFitSingleRowColumn.xlsx";
    workbook.SaveToFile(outputFileName);

    // Dispose of the workbook object to free resources
    workbook.Dispose();

    // Read the result file from the VFS and trigger the download
    const fileArray = window.dotnetRuntime.Module.FS.readFile(outputFileName);
    const blob = new Blob([fileArray], { type: "application/vnd.openxmlformats-officedocument.spreadsheetml.sheet" });
    const url = URL.createObjectURL(blob);
    const a = document.createElement('a');
    a.href = url;
    a.download = outputFileName;
    a.click();
    URL.revokeObjectURL(url);
  };

  return (
    <div style={{ textAlign: 'center', height: '300px' }}>
      <h1>Autofit Row Height and Column Width</h1>
      <button onClick={autoFitSingleRowColumn}>Start</button>
    </div>
  );
}

export default App;
After running, the effect of autofitting a single row height and a single column width:
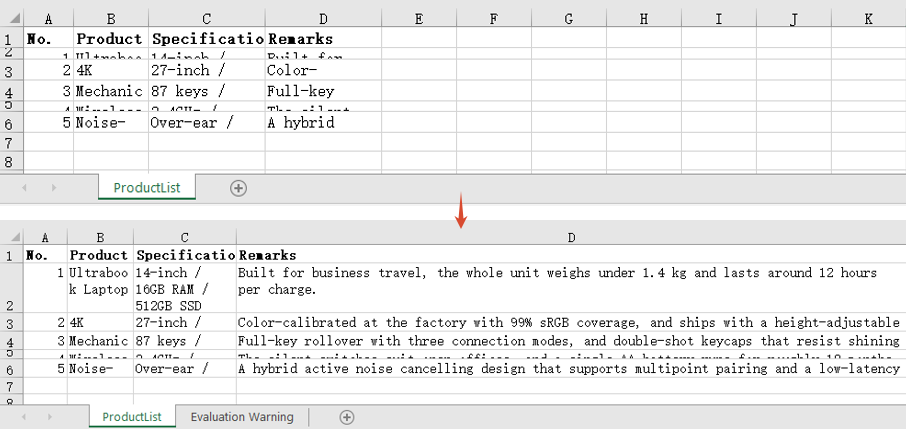
Autofit the Heights of Multiple Rows and the Widths of Multiple Columns
When the whole table needs tidying, calling the methods row by row is not realistic. Calling AutoFitRows or AutoFitColumns on a range recalculates every row and every column the range covers from its own content, so a single call lines up the whole block — the kind of pass you want before exporting a report. The steps are:
- Load the workbook and get the first worksheet.
- Autofit the heights of the rows with
AutoFitRows. - Autofit the widths of the columns with
AutoFitColumns. - Save the workbook.
Here is a complete code example that autofits the heights of multiple rows and the widths of multiple columns in React:
function App() {
  const autoFitMultipleRowsColumns = async () => {
    // Get the Spire.XLS WASM module
    const xlsModule = window.wasmModule?.spirexls;

    // Check whether the module is ready
    if (!xlsModule) {
      alert('Spire.Xls is not ready yet');
      return;
    }

    // Load the font into the VFS
    await window.spire.FetchFileToVFS('ARIAL.TTF', '/Library/Fonts/', `${process.env.PUBLIC_URL}/font/`);

    // Load the Excel file into the VFS
    const inputFileName = 'AutoFitRowsAndColumns.xlsx';
    await window.spire.FetchFileToVFS(inputFileName, '', `${process.env.PUBLIC_URL}/static/data/`);

    // Load the workbook
    const workbook = new xlsModule.Workbook();
    workbook.LoadFromFile(inputFileName);

    // Get the first worksheet
    const sheet = workbook.Worksheets.get(0);

    // Get the used range of the worksheet
    const range = sheet.AllocatedRange;

    // Autofit the height of every row in the range
    range.AutoFitRows();

    // Autofit the width of every column in the range
    range.AutoFitColumns();

    // Save the workbook
    const outputFileName = "AutoFitMultipleRowsColumns.xlsx";
    workbook.SaveToFile(outputFileName);

    // Dispose of the workbook object to free resources
    workbook.Dispose();

    // Read the result file from the VFS and trigger the download
    const fileArray = window.dotnetRuntime.Module.FS.readFile(outputFileName);
    const blob = new Blob([fileArray], { type: "application/vnd.openxmlformats-officedocument.spreadsheetml.sheet" });
    const url = URL.createObjectURL(blob);
    const a = document.createElement('a');
    a.href = url;
    a.download = outputFileName;
    a.click();
    URL.revokeObjectURL(url);
  };

  return (
    <div style={{ textAlign: 'center', height: '300px' }}>
      <h1>Autofit Row Height and Column Width</h1>
      <button onClick={autoFitMultipleRowsColumns}>Start</button>
    </div>
  );
}

export default App;
After running, the effect of autofitting multiple row heights and multiple column widths:
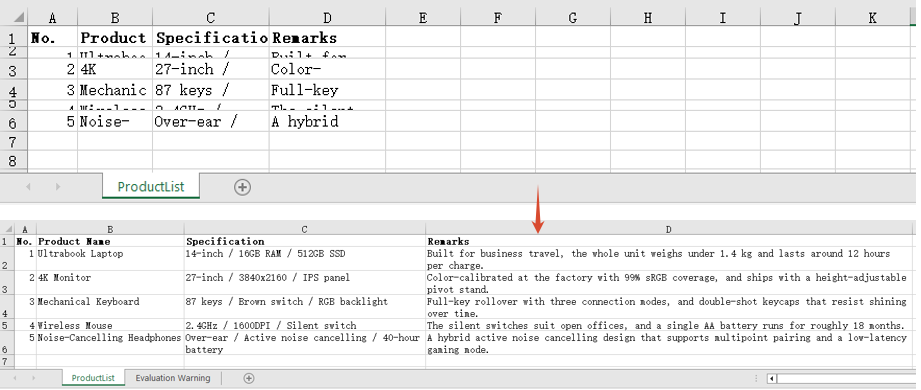
FAQ
I called AutoFitRow() and the row height did not change at all?
Cause: Row height autofit only applies to content that needs to wrap. With wrapping turned off the text stays on a single line and the height follows the font size, so autofit arrives at the same value as the existing height and appears to have done nothing.
Solution: Set WrapText to true first, then autofit the row height:
// With wrapping off, autofitting the row height changes nothing
sheet.Range.get("D2").Style.WrapText = false;
sheet.AutoFitRow(2);

// With wrapping on, the height is recalculated from the wrapped line count
sheet.Range.get("D2").Style.WrapText = true;
sheet.AutoFitRow(2);
AutoFitColumns() has no effect on merged cells?
Cause: Column width autofit measures the content of individual cells. In a merged range only the top-left cell actually holds text and every other position in the range is empty, so the width it works out is only enough for that top-left content.
Solution: Set the width of a merged range by hand with ColumnWidth:
// A7:D7 is a merged range, so autofit cannot work out its combined width
sheet.Range.get("A7:D7").Merge();
sheet.Range.get("A7:D7").AutoFitColumns();

// Set the column width by hand so the merged text fits
sheet.Range.get("A7").ColumnWidth = 40;
Get a Free License
Spire.XLS for JavaScript offers a 30-day full-featured free trial license with no functional limitations. Apply here to evaluate before purchasing.
A scanned page that landed sideways, a landscape table sandwiched between portrait pages, or a document you want turned as a whole before printing — none of these need to be re-laid out. The rotation angle is a property of the PDF page itself; changing it only affects how the page is displayed, and the content on the page stays as it is.
Spire.PDF for JavaScript loads, modifies and saves PDF documents directly in the browser based on WebAssembly, reading and writing files through a virtual file system (VFS), with no backend service required.
This article covers two core features:
For installation and project configuration, refer to Integrating Spire.PDF for JavaScript in a React Project. The following examples assume Spire.PDF is installed and the WebAssembly module has been initialized.
Rotate a New Page
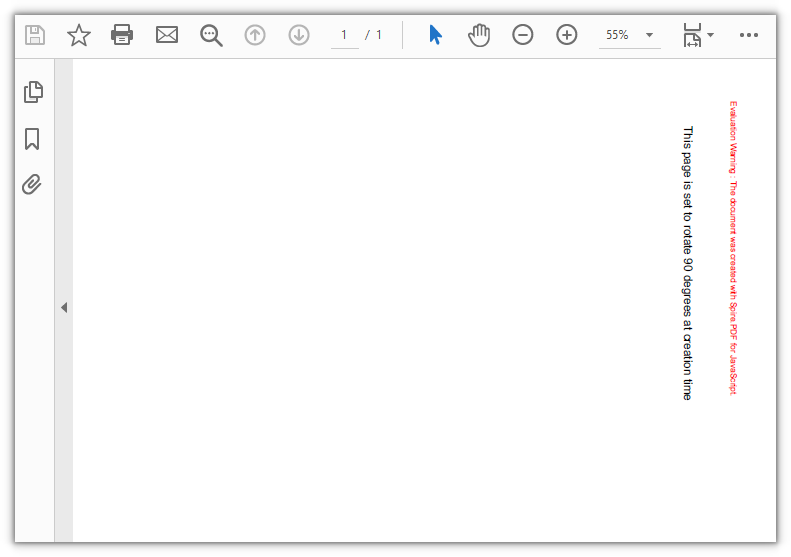
To give every page in a section the same orientation, one setting on the section is enough: section.PageSettings.Rotate takes PdfPageRotateAngle.RotateAngle90, and all pages in that section are rotated 90 degrees clockwise. RotateAngle180 and RotateAngle270 are also available, and leaving it unset means no rotation.
function App() {
  const createRotatedPdf = async () => {
    // Get the Spire.PDF WASM module
    const pdfModule = window.wasmModule?.spirepdf;

    // Check whether the module is ready
    if (!pdfModule) {
      alert('Spire.PDF is not ready yet');
      return;
    }

    // Load the font into the VFS for the page text
    await window.spire.FetchFileToVFS('ARIAL UNICODE MS.TTF', '/Library/Fonts/', `${process.env.PUBLIC_URL}/font/`);

    // Create a blank document
    const doc = new pdfModule.PdfDocument();

    // Add a section; every page in it shares a 90-degree clockwise rotation
    const section = doc.Sections.Add();
    section.PageSettings.Size = pdfModule.PdfPageSize.A4();
    section.PageSettings.Rotate = pdfModule.PdfPageRotateAngle.RotateAngle90;

    // Add a page to the section
    const page = section.Pages.Add();

    // Draw a line of text on the page
    const font = new pdfModule.PdfTrueTypeFont({ fontFile: '/Library/Fonts/ARIAL UNICODE MS.TTF', size: 14 });
    page.Canvas.DrawString({
      s: 'This page is set to rotate 90 degrees at creation time',
      font: font,
      brush: pdfModule.PdfBrushes.get_Black(),
      x: 40,
      y: 60,
      format: new pdfModule.PdfStringFormat({ alignment: pdfModule.PdfTextAlignment.Left })
    });

    // Save and read back from the VFS to trigger the download
    const outputFileName = 'RotatedDocument.pdf';
    doc.SaveToFile(outputFileName);
    doc.Close();

    const fileArray = window.dotnetRuntime.Module.FS.readFile(outputFileName);
    const blob = new Blob([fileArray], { type: 'application/pdf' });
    const url = URL.createObjectURL(blob);
    const a = document.createElement('a');
    a.href = url;
    a.download = outputFileName;
    a.click();
    URL.revokeObjectURL(url);
  };

  return (
    <div style={{ textAlign: 'center', height: '300px' }}>
      <h1>Create a Rotated PDF</h1>
      <button onClick={createRotatedPdf}>
        Start Creating
      </button>
    </div>
  );
}

export default App;
If you only want to pass the angle while creating a page, the overload
doc.Pages.Add(size, margins, rotation)works as well.
The A4 page is set to a 90-degree rotation at creation time:
Rotate an Existing Page
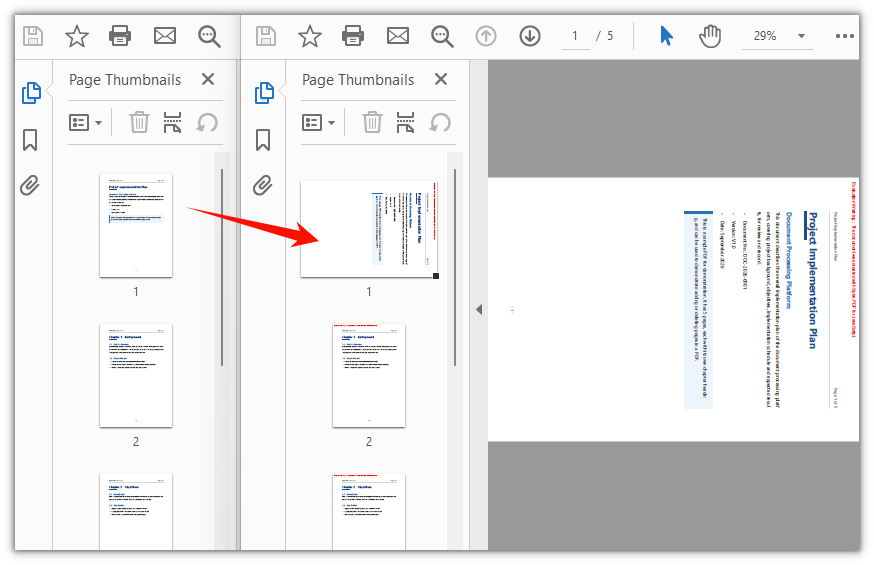
To change the orientation of an existing document, note that the angle lives in the page's own Rotation property: read the current value first, then add this call's rotation to it. What gets written back is the enum value of PdfPageRotateAngle (0 for no rotation, 1 for 90 degrees), not the angle itself.
function App() {
  const rotateExistingPage = async () => {
    // Get the Spire.PDF WASM module
    const pdfModule = window.wasmModule?.spirepdf;

    // Check whether the module is ready
    if (!pdfModule) {
      alert('Spire.PDF is not ready yet');
      return;
    }

    // Load the PDF file to be processed into the VFS
    const inputFileName = 'Multipage_Document.pdf';
    await window.spire.FetchFileToVFS(inputFileName, '', `${process.env.PUBLIC_URL}/data/`);

    // Create a PdfDocument object and load the PDF document
    const doc = new pdfModule.PdfDocument();
    doc.LoadFromFile(inputFileName);

    // Take the first page and add this call's rotation to its current angle
    const page = doc.Pages.get_Item(0);
    let rotation = page.Rotation.value + pdfModule.PdfPageRotateAngle.RotateAngle90.value;

    // The enum value only runs from 0 to 3; 4 means a full turn, back to no rotation
    if (rotation === 4) {
      rotation = 0;
    }
    page.Rotation = rotation;

    // Save and read back from the VFS to trigger the download
    const outputFileName = 'RotatedPage.pdf';
    doc.SaveToFile(outputFileName);
    doc.Close();

    const fileArray = window.dotnetRuntime.Module.FS.readFile(outputFileName);
    const blob = new Blob([fileArray], { type: 'application/pdf' });
    const url = URL.createObjectURL(blob);
    const a = document.createElement('a');
    a.href = url;
    a.download = outputFileName;
    a.click();
    URL.revokeObjectURL(url);
  };

  return (
    <div style={{ textAlign: 'center', height: '300px' }}>
      <h1>Rotate a Specific Page</h1>
      <button onClick={rotateExistingPage}>
        Start Rotating
      </button>
    </div>
  );
}

export default App;
Only the first page is rotated 90 degrees, the remaining pages keep their orientation:
FAQ
Why does assigning to Rotation report "Value is not an integer"
Cause: The write side of page.Rotation only accepts an integer. Passing a PdfPageRotateAngle enum object directly throws Assert failed: Value is not an integer: PdfPageRotateAngle.RotateAngle90 (object).
Solution: Take the enum's value and assign that:
page.Rotation = pdfModule.PdfPageRotateAngle.RotateAngle90.value;
Why does the page end up rotated 180 degrees after I pass 90
Cause: The enum values of PdfPageRotateAngle are 0, 1, 2 and 3, standing for 0, 90, 180 and 270 degrees. That value is what the write side expects, not the angle. Writing page.Rotation = 90 throws no error but does not give you 90 degrees, and looking the value up with PdfPageRotateAngle.fromValue(90) throws Invalid value for spirepdfPdfPageRotateAngle.
Solution: Convert to the enum value before writing:
// 90 degrees
page.Rotation = pdfModule.PdfPageRotateAngle.RotateAngle90.value;

// 180 degrees
page.Rotation = pdfModule.PdfPageRotateAngle.RotateAngle180.value;
Why does the rotation argument on section.Pages.Add(...) have no effect
Cause: The overload that takes a rotation argument, Add(size, margins, rotation), only works on doc.Pages. On section.Pages the argument is ignored, and the page orientation is decided by the PageSettings.Rotate of the section it belongs to. The /Rotate entry in the file stays 0, the page is not rotated, and no error is raised.
Solution: Pick one of the two forms below, and do not pass the argument to section.Pages:
// Form 1: set it on the section, applying to every page in that section
section.PageSettings.Rotate = pdfModule.PdfPageRotateAngle.RotateAngle90;
section.Pages.Add();

// Form 2: create the page on doc.Pages and pass the angle
const page = doc.Pages.Add(
  pdfModule.PdfPageSize.A4(),
  new pdfModule.PdfMargins(),
  pdfModule.PdfPageRotateAngle.RotateAngle90
);
A page can still be adjusted on its own after it has been created; page.Rotation overrides the section setting:
// Rotate only the second page to 180 degrees, leaving the rest untouched
doc.Pages.get_Item(1).Rotation = pdfModule.PdfPageRotateAngle.RotateAngle180.value;
Get a Free License
If you wish to remove the evaluation message from the result document or remove feature limitations, please contact sales to obtain a temporary license valid for 30 days.
Adding annotations to a PDF, pulling data out of a region, or drawing a border around an image all start with knowing where the target element sits on the page. A PDF has no ready-made coordinate table: text is a series of drawing instructions, images are objects in the page resources, and the position information is scattered across their own matrices and rectangles. In the past you either wrote your own parser to pull those numbers out, or sent the file back to a server to handle.
Spire.PDF for JavaScript loads and parses PDF documents in the browser with WebAssembly and reads and writes files through a virtual file system (VFS), with no backend involved.
This article covers two core features:
For installation and project setup, see How to Integrate Spire.PDF for JavaScript in a React Project. The examples below assume Spire.PDF is installed and the WebAssembly module is initialized.
Coordinate system
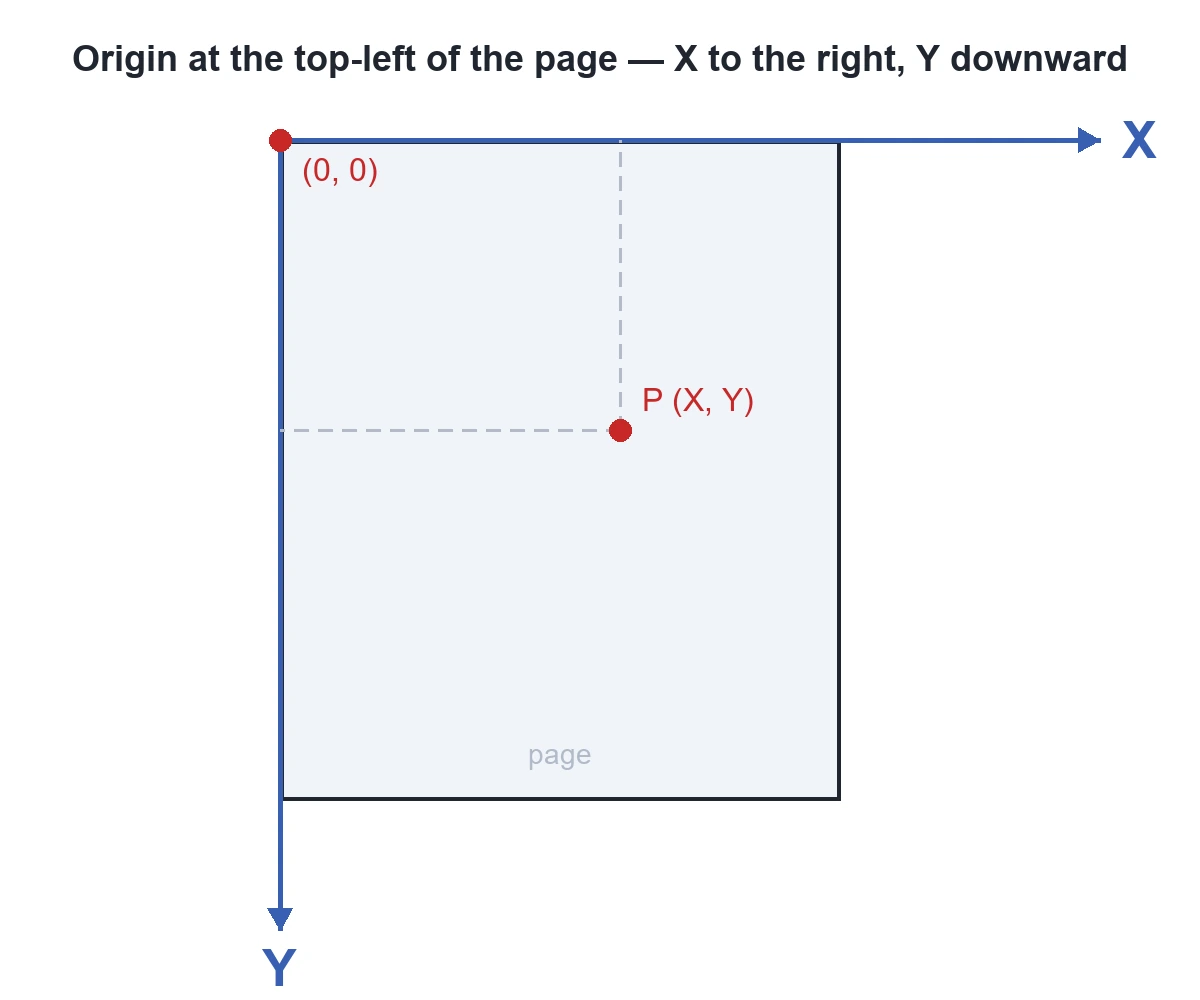
When Spire.PDF works with an existing PDF document, the origin of the coordinate system is at the top-left corner of the page. The X axis extends horizontally to the right from the origin, and the Y axis extends vertically downward from the origin (as shown below). Values are in points (1 point = 1/72 inch), and both Positions and Bounds in the two features below report coordinates in this system.
Get the coordinates of specified text
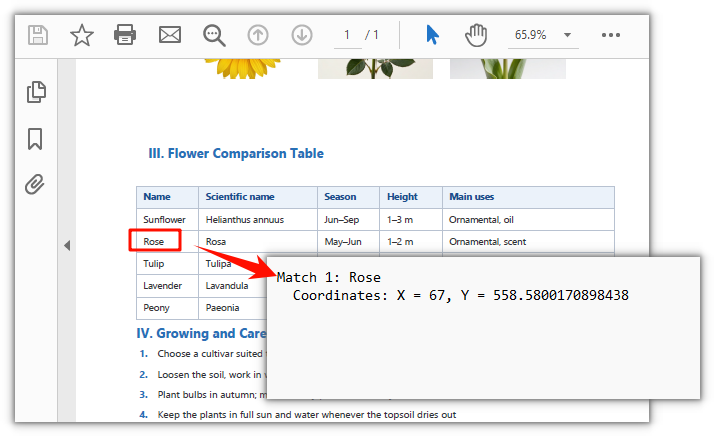
Spire.PDF for JavaScript provides PdfTextFinder to look up text on a page by content, and every match reports the coordinates of where it lands. The search works one page at a time, so a multi-page document has to be processed page by page.
function App() {
  const getTextCoordinates = async () => {
    // Get the Spire.PDF WASM module
    const pdfModule = window.wasmModule?.spirepdf;

    // Check whether the module is ready
    if (!pdfModule) {
      alert('Spire.PDF is not ready yet');
      return;
    }

    // Load the PDF file to process into the VFS
    const inputFileName = 'Flowers.pdf';
    await window.spire.FetchFileToVFS(inputFileName, "", `${process.env.PUBLIC_URL}/data/`);

    // Create a PdfDocument object and load the PDF document
    let doc = new pdfModule.PdfDocument();
    doc.LoadFromFile(inputFileName);

    // Get page 1
    let page = doc.Pages.get_Item(0);

    // Create a text finder and search for the given text, ignoring case
    let finder = new pdfModule.PdfTextFinder(page);
    finder.Options.Parameter = pdfModule.TextFindParameter.IgnoreCase;
    let results = finder.Find('Rose');

    // Collect the coordinates of each match
    let report = '';
    for (let i = 0; i < results.length; i++) {
      let find = results.get(i);
      let position = find.Positions[0];

      report += 'Match ' + (i + 1) + ': ' + find.Text + '\n';
      report += '  Coordinates: X = ' + position.X + ', Y = ' + position.Y + '\n';
    }

    // Write the report into the VFS
    const outputFileName = 'TextCoordinates.txt';
    window.dotnetRuntime.Module.FS.writeFile(outputFileName, new TextEncoder().encode(report));
    doc.Close();

    // Read the generated file back from the VFS and trigger a download
    const fileArray = window.dotnetRuntime.Module.FS.readFile(outputFileName);
    const blob = new Blob([fileArray], { type: 'text/plain' });
    const url = URL.createObjectURL(blob);
    const a = document.createElement('a');
    a.href = url;
    a.download = outputFileName;
    a.click();
    URL.revokeObjectURL(url);
  };

  return (
    <div style={{ textAlign: 'center', height: '300px' }}>
      <h1>Get Text Coordinates</h1>
      <button onClick={getTextCoordinates}>
        Get
      </button>
    </div>
  );
}

export default App;
Coordinates of the matched text
Get the coordinates of images on a page
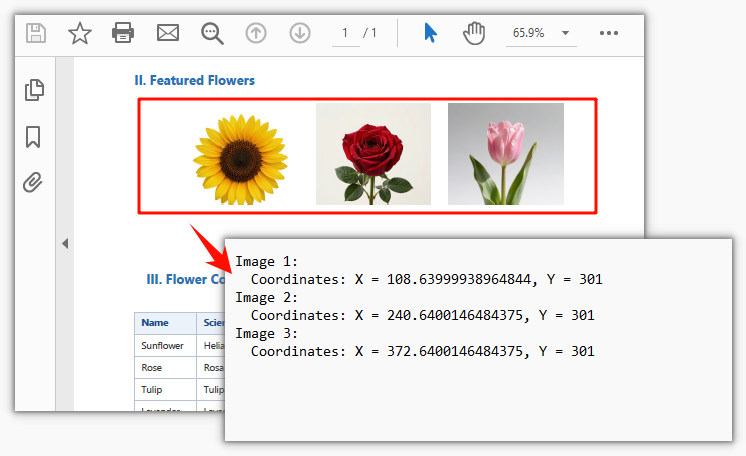
Spire.PDF for JavaScript also provides PdfImageHelper to read the position of every image on a page. Images are already registered in the page resources, so the Bounds you get back gives the top-left coordinates directly. This also works one page at a time.
function App() {
  const getImageCoordinates = async () => {
    // Get the Spire.PDF WASM module
    const pdfModule = window.wasmModule?.spirepdf;

    // Check whether the module is ready
    if (!pdfModule) {
      alert('Spire.PDF is not ready yet');
      return;
    }

    // Load the PDF file to process into the VFS
    const inputFileName = 'Flowers.pdf';
    await window.spire.FetchFileToVFS(inputFileName, "", `${process.env.PUBLIC_URL}/data/`);

    // Create a PdfDocument object and load the PDF document
    let doc = new pdfModule.PdfDocument();
    doc.LoadFromFile(inputFileName);

    // Get page 1
    let page = doc.Pages.get_Item(0);

    // Create an image helper and get the image info of this page
    let helper = new pdfModule.PdfImageHelper();
    let images = helper.GetImagesInfo(page);

    // Collect the coordinates of each image
    let report = '';
    for (let i = 0; i < images.length; i++) {
      let bounds = images[i].Bounds;

      report += 'Image ' + (i + 1) + ':' + '\n';
      report += '  Coordinates: X = ' + bounds.X + ', Y = ' + bounds.Y + '\n';
    }

    // Write the report into the VFS
    const outputFileName = 'ImageCoordinates.txt';
    window.dotnetRuntime.Module.FS.writeFile(outputFileName, new TextEncoder().encode(report));
    doc.Close();

    // Read the generated file back from the VFS and trigger a download
    const fileArray = window.dotnetRuntime.Module.FS.readFile(outputFileName);
    const blob = new Blob([fileArray], { type: 'text/plain' });
    const url = URL.createObjectURL(blob);
    const a = document.createElement('a');
    a.href = url;
    a.download = outputFileName;
    a.click();
    URL.revokeObjectURL(url);
  };

  return (
    <div style={{ textAlign: 'center', height: '300px' }}>
      <h1>Get Image Coordinates</h1>
      <button onClick={getImageCoordinates}>
        Get
      </button>
    </div>
  );
}

export default App;
Coordinates of the three flower images on the page
FAQ
A different letter case stops it from matching
Cause: The matching behavior of Find() is determined by Options.Parameter. The default value TextFindParameter.None searches by substring and is case-sensitive, so Rose and rose are treated as two different things.
Fix: Switch to the value you need. TextFindParameter is a flags enum, so values can be combined with bitwise OR:
// Ignore case
finder.Options.Parameter = pdfModule.TextFindParameter.IgnoreCase;

// Match whole words only, ignoring case
finder.Options.Parameter = pdfModule.TextFindParameter.WholeWord | pdfModule.TextFindParameter.IgnoreCase;

// Search with a regular expression: match Rosa or Tulipa in one pass
finder.Options.Parameter = pdfModule.TextFindParameter.Regex;
let results = finder.Find('Rosa|Tulipa');
The coordinates don't match what the PDF reader shows
Cause: Positions and Bounds use the page coordinate system described above; inside a PDF file (/MediaBox, content streams) the origin is at the bottom-left with Y increasing upward, so the two conventions differ by a full page height and a direct comparison will be off by the whole page.
Fix: Work with the top-left origin consistently. To convert to pixels, multiply by dpi / 72 — the factor is 1.333 at 96 dpi. The values you get are floating-point numbers, so round to two decimals before comparing if you need an exact match.
The image info doesn't include the shapes I can see on the page
Cause: GetImagesInfo returns the bitmap objects in the page resources. Lines, table borders, and color blocks drawn with vector instructions are not images; conversely, a full-page scan is a single image covering the page, and the text inside it cannot be searched.
Fix: Start by using the X and Y from Bounds to confirm where each image actually sits on the page. Lines and shapes drawn with vector instructions are not returned by GetImagesInfo, and text inside a scanned page cannot be found either — to locate those, use text extraction (PdfTextExtractor) or bring in OCR separately.
Get a Free License
If you want to remove the evaluation message from the result documents or get past the feature limits, contact sales for a 30-day temporary license.
Modify, Hide and Delete Named Ranges in React with JavaScript
2026-09-17 05:55:53 Written by liu taliaA named range is not something you set up once and forget. As the data table is restructured, the original name may no longer fit, and the referred range can go stale when rows are added or removed. Some named ranges exist only as an intermediate helper for a formula and have no business showing up in the Name Manager. And named ranges that are no longer used, if kept forever, turn the name list into something long and hard to search. Modifying, hiding and deleting are therefore just as much a part of working with named ranges as creating them. Spire.XLS for JavaScript provides a complete named range management API and can perform all of the above in the browser through WebAssembly, with no backend service required.
This article covers three key features:
For installation and project setup, see Integrating Spire.XLS for JavaScript in a React Project. The examples below assume Spire.XLS is already installed and the WebAssembly module has been initialized.
Modify a Named Range
Modifying covers two independent aspects: the name itself and the referred range. The name is reassigned through the Name property and the referred range through the RefersToRange property. The two can be changed separately, or together as in the example below. The steps are:
- Load the workbook and get the first worksheet.
- Take the named range to modify with
workbook.NameRanges.get(0). - Set
Nameto the new name. - Point
RefersToRangeat the new cell range. - Save the workbook.
The following is a complete code example that shows how to modify a named range in React:
function App() {
  const modifyNamedRange = async () => {
    // Get the Spire.XLS WASM module
    const xlsModule = window.wasmModule?.spirexls;

    // Check if the module is ready
    if (!xlsModule) {
      alert('Spire.Xls is not ready yet');
      return;
    }

    // Load the font into VFS
    await window.spire.FetchFileToVFS('ARIAL.TTF', '/Library/Fonts/', `${process.env.PUBLIC_URL}/font/`);

    // Load the Excel file into VFS
    const inputFileName = 'AllNamedRanges.xlsx';
    await window.spire.FetchFileToVFS(inputFileName, '', `${process.env.PUBLIC_URL}/static/data/`);

    // Load the workbook
    const workbook = new xlsModule.Workbook();
    workbook.LoadFromFile(inputFileName);

    // Get the first worksheet
    let sheet = workbook.Worksheets.get(0);

    // Change the name of the named range
    workbook.NameRanges.get(0).Name = "RegionData";

    // Change the cell range the named range refers to
    workbook.NameRanges.get(0).RefersToRange = sheet.Range.get("B2:C4");

    // Save the workbook
    const outputFileName = 'ModifyNamedRange.xlsx';
    workbook.SaveToFile(outputFileName);

    // Release resources
    workbook.Dispose();

    // Read the result file from VFS and trigger the download
    const fileArray = window.dotnetRuntime.Module.FS.readFile(outputFileName);
    const blob = new Blob([fileArray], { type: "application/vnd.openxmlformats-officedocument.spreadsheetml.sheet" });
    const url = URL.createObjectURL(blob);
    const a = document.createElement('a');
    a.href = url;
    a.download = outputFileName;
    a.click();
    URL.revokeObjectURL(url);
  };

  return (
    <div style={{ textAlign: 'center', height: '300px' }}>
      <h1>Modify Named Range</h1>
      <button onClick={modifyNamedRange}>Start</button>
    </div>
  );
}

export default App;
After running, the effect of modifying a named range:
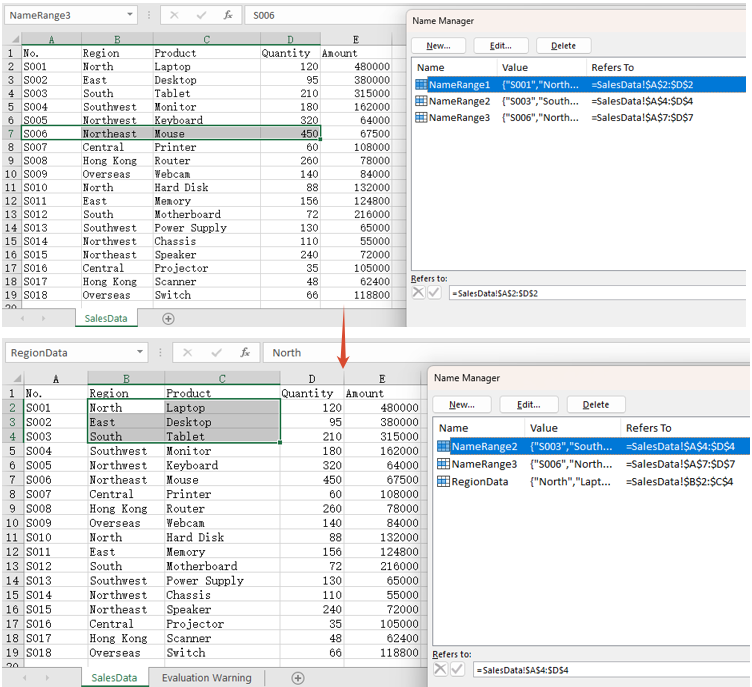
Hide a Named Range
Set the Visible property to false and the named range is hidden. A hidden named range is still stored in the workbook and formulas that refer to it are unaffected — it simply no longer appears in Excel's Name Manager and name box, which keeps the name list tidy. After hiding it, the example below also writes the formula =SUM(NameRange1) into cell F2: the formula still calculates normally, which is exactly what shows that the named range is only hidden, not deleted. The steps are:
- Load the workbook and get the first worksheet.
- Take the named range to hide.
- Set
Visibletofalse. - Write a formula that refers to the named range into a cell, to confirm it still works.
- Save the workbook.
The following is a complete code example that shows how to hide a named range in React:
function App() {
  const hideNamedRange = async () => {
    // Get the Spire.XLS WASM module
    const xlsModule = window.wasmModule?.spirexls;

    // Check if the module is ready
    if (!xlsModule) {
      alert('Spire.Xls is not ready yet');
      return;
    }

    // Load the font into VFS
    await window.spire.FetchFileToVFS('ARIAL.TTF', '/Library/Fonts/', `${process.env.PUBLIC_URL}/font/`);

    // Load the Excel file into VFS
    const inputFileName = 'AllNamedRanges.xlsx';
    await window.spire.FetchFileToVFS(inputFileName, '', `${process.env.PUBLIC_URL}/static/data/`);

    // Load the workbook
    const workbook = new xlsModule.Workbook();
    workbook.LoadFromFile(inputFileName);

    // Get the first worksheet
    let sheet = workbook.Worksheets.get(0);

    // Hide the first named range
    workbook.NameRanges.get(0).Visible = false;

    // Write a formula that refers to the hidden named range, proving it still exists and works
    sheet.Range.get("F1").Text = "Sum After Hiding";
    sheet.Range.get("F2").Formula = "=SUM(NameRange1)";

    // Calculate the formulas so the saved file shows the result as soon as it is opened
    workbook.CalculateAllValue();

    // Save the workbook
    const outputFileName = 'HideNamedRange.xlsx';
    workbook.SaveToFile(outputFileName);

    // Release resources
    workbook.Dispose();

    // Read the result file from VFS and trigger the download
    const fileArray = window.dotnetRuntime.Module.FS.readFile(outputFileName);
    const blob = new Blob([fileArray], { type: "application/vnd.openxmlformats-officedocument.spreadsheetml.sheet" });
    const url = URL.createObjectURL(blob);
    const a = document.createElement('a');
    a.href = url;
    a.download = outputFileName;
    a.click();
    URL.revokeObjectURL(url);
  };

  return (
    <div style={{ textAlign: 'center', height: '300px' }}>
      <h1>Hide Named Range</h1>
      <button onClick={hideNamedRange}>Start</button>
    </div>
  );
}

export default App;
After running, the effect of hiding a named range:
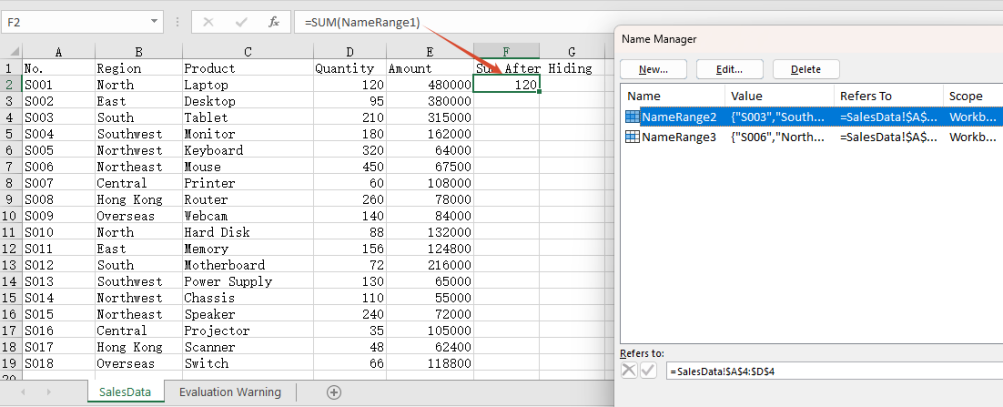
Note: The formula in cell F2 refers to the hidden NameRange1, and it still calculates 120. That shows the named range has only been hidden from view, not removed from the workbook.
Delete a Named Range
There are two ways to delete a named range: call Remove() when the name is known, or RemoveAt() when the position is known. Both remove the named range from the workbook entirely. The steps are:
- Load the workbook.
- Call
Remove()to delete a named range by name. - Call
RemoveAt()to delete a named range by index. - Save the workbook.
The following is a complete code example that shows how to delete a named range in React:
function App() {
  const deleteNamedRange = async () => {
    // Get the Spire.XLS WASM module
    const xlsModule = window.wasmModule?.spirexls;

    // Check if the module is ready
    if (!xlsModule) {
      alert('Spire.Xls is not ready yet');
      return;
    }

    // Load the font into VFS
    await window.spire.FetchFileToVFS('ARIAL.TTF', '/Library/Fonts/', `${process.env.PUBLIC_URL}/font/`);

    // Load the Excel file into VFS
    const inputFileName = 'AllNamedRanges.xlsx';
    await window.spire.FetchFileToVFS(inputFileName, '', `${process.env.PUBLIC_URL}/static/data/`);

    // Load the workbook
    const workbook = new xlsModule.Workbook();
    workbook.LoadFromFile(inputFileName);

    // Delete a named range by name
    workbook.NameRanges.Remove("NameRange2");

    // Delete a named range by index
    workbook.NameRanges.RemoveAt(0);

    // Save the workbook
    const outputFileName = 'DeleteNamedRange.xlsx';
    workbook.SaveToFile(outputFileName);

    // Release resources
    workbook.Dispose();

    // Read the result file from VFS and trigger the download
    const fileArray = window.dotnetRuntime.Module.FS.readFile(outputFileName);
    const blob = new Blob([fileArray], { type: "application/vnd.openxmlformats-officedocument.spreadsheetml.sheet" });
    const url = URL.createObjectURL(blob);
    const a = document.createElement('a');
    a.href = url;
    a.download = outputFileName;
    a.click();
    URL.revokeObjectURL(url);
  };

  return (
    <div style={{ textAlign: 'center', height: '300px' }}>
      <h1>Delete Named Range</h1>
      <button onClick={deleteNamedRange}>Start</button>
    </div>
  );
}

export default App;
After running, the effect of deleting a named range:
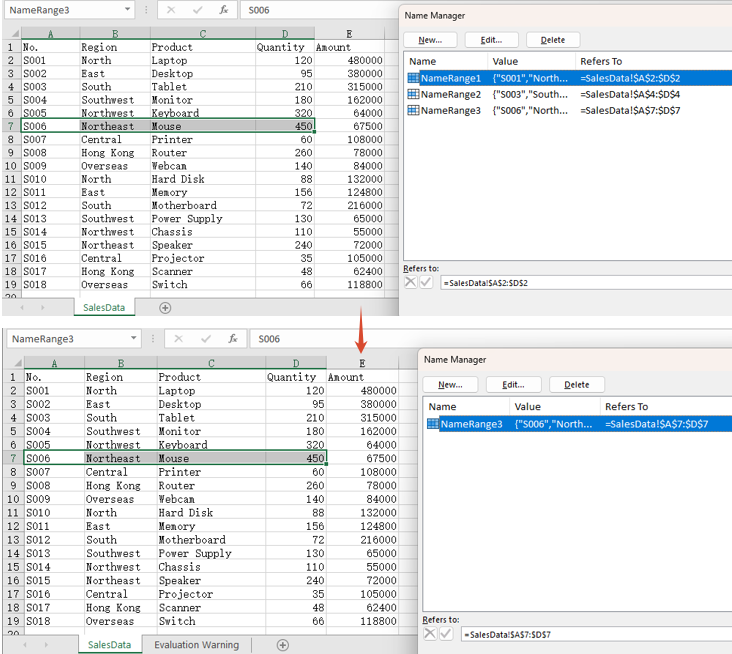
FAQ
Why is the result of a formula missing when the saved file is opened?
Cause: Setting only the Formula property of a cell does not make Spire calculate it. The saved file then contains the formula itself but no calculated result value, so the cell comes up blank when the file is opened.
Solution: Call workbook.CalculateAllValue() before saving, to evaluate the formulas first:
// Calculate all formulas so the result value is written into the saved file
workbook.CalculateAllValue();
Can I pass a named range object to the delete API?
Cause: Remove() takes a name string. Passing a NameRange object does not match the expected type and throws Assert failed: Value is not a String, and nothing is deleted.
Solution: Pass the name when it is known, or the index when the position is known:
// Delete by name
workbook.NameRanges.Remove("NameRange2");

// Delete by index
workbook.NameRanges.RemoveAt(0);
Get a Free License
Spire.XLS for JavaScript offers a 30-day full-featured free trial license with no functional limitations. Apply here to evaluate before purchasing.
Set the Alignment, Indent, Orientation and Wrapping of Excel Cell Text in React with JavaScript
2026-09-17 05:55:07 Written by liu taliaHow readable a table is often has nothing to do with the data itself and everything to do with how the text sits inside its cells. Titles need to be centred, amounts need to be pushed right, multi-line descriptions need to be indented, a long sentence in a narrow column needs to fold, and a header set at an angle fits more information into limited column width. All of these are cell text layout settings. Spire.XLS for JavaScript performs them directly in the browser through WebAssembly, managing input and output files with a virtual file system (VFS) and requiring no backend service.
This article covers four key features:
- Set the Alignment of Text
- Set the Indent of Text
- Set the Orientation of Text
- Set the Wrapping of Text
For installation and project setup, see Integrating Spire.XLS for JavaScript in a React Project. The examples below assume Spire.XLS is already installed and the WebAssembly module has been initialized.
Set the Alignment of Text
Alignment works along two axes. Vertical alignment decides where the text sits within the height of the cell and is set through the VerticalAlignment property, which accepts Top, Center, Bottom and others. Horizontal alignment decides where the text sits within the width of the cell and is set through the HorizontalAlignment property, which accepts General, Left, Center, Right and others. The two are independent and can be combined freely. The steps are as follows:
- Create a workbook and get the first worksheet.
- Write the sample text.
- Set the vertical alignment through
VerticalAlignment. - Set the horizontal alignment through
HorizontalAlignment. - Save the workbook.
Here is a complete code example that sets the alignment of cell text in React:
function App() {
  const setTextAlignment = async () => {
    // Get the Spire.XLS WASM module
    const xlsModule = window.wasmModule?.spirexls;

    // Check if the module is ready
    if (!xlsModule) {
      alert('Spire.Xls is not ready yet');
      return;
    }

    // Load the font into VFS
    await window.spire.FetchFileToVFS('ARIAL.TTF', '/Library/Fonts/', `${process.env.PUBLIC_URL}/font/`);

    // Create a new workbook
    const workbook = new xlsModule.Workbook();

    // Get the first worksheet
    const sheet = workbook.Worksheets.get(0);

    // Write the sample text for vertical alignment
    sheet.Range.get("A1").Text = "Alignment";
    sheet.Range.get("B1").Text = "Sample";
    sheet.Range.get("A2").Text = "Vertical Top";
    sheet.Range.get("B2").Text = "VerticalAlignType.Top";
    sheet.Range.get("A3").Text = "Vertical Center";
    sheet.Range.get("B3").Text = "VerticalAlignType.Center";
    sheet.Range.get("A4").Text = "Vertical Bottom";
    sheet.Range.get("B4").Text = "VerticalAlignType.Bottom";

    // Write the sample text for horizontal alignment
    sheet.Range.get("A6").Text = "Horizontal General";
    sheet.Range.get("B6").Text = "HorizontalAlignType.General";
    sheet.Range.get("A7").Text = "Horizontal Left";
    sheet.Range.get("B7").Text = "HorizontalAlignType.Left";
    sheet.Range.get("A8").Text = "Horizontal Center";
    sheet.Range.get("B8").Text = "HorizontalAlignType.Center";
    sheet.Range.get("A9").Text = "Horizontal Right";
    sheet.Range.get("B9").Text = "HorizontalAlignType.Right";

    // Set the vertical alignment
    sheet.Range.get("B2").Style.VerticalAlignment = xlsModule.VerticalAlignType.Top;
    sheet.Range.get("B3").Style.VerticalAlignment = xlsModule.VerticalAlignType.Center;
    sheet.Range.get("B4").Style.VerticalAlignment = xlsModule.VerticalAlignType.Bottom;

    // Set the horizontal alignment
    sheet.Range.get("B6").Style.HorizontalAlignment = xlsModule.HorizontalAlignType.General;
    sheet.Range.get("B7").Style.HorizontalAlignment = xlsModule.HorizontalAlignType.Left;
    sheet.Range.get("B8").Style.HorizontalAlignment = xlsModule.HorizontalAlignType.Center;
    sheet.Range.get("B9").Style.HorizontalAlignment = xlsModule.HorizontalAlignType.Right;

    // Widen column B and raise rows 2-4 so the alignment differences are visible
    sheet.Range.get("B1:B9").ColumnWidth = 32;
    sheet.Range.get("A2:B4").RowHeight = 40;

    // Save the workbook
    const outputFileName = "TextAlignment.xlsx";
    workbook.SaveToFile(outputFileName);

    // Release resources
    workbook.Dispose();

    // Read the result file from VFS and trigger the download
    const fileArray = window.dotnetRuntime.Module.FS.readFile(outputFileName);
    const blob = new Blob([fileArray], { type: "application/vnd.openxmlformats-officedocument.spreadsheetml.sheet" });
    const url = URL.createObjectURL(blob);
    const a = document.createElement('a');
    a.href = url;
    a.download = outputFileName;
    a.click();
    URL.revokeObjectURL(url);
  };

  return (
    <div style={{ textAlign: 'center', height: '300px' }}>
      <h1>Set Text Alignment</h1>
      <button onClick={setTextAlignment}>Start</button>
    </div>
  );
}

export default App;
Vertical alignment is only visible once the row is tall enough, which is why the example sets rows 2-4 to a height of 40; horizontal alignment is at its clearest once the column is wide enough.
After running, the effect of setting the alignment of text:
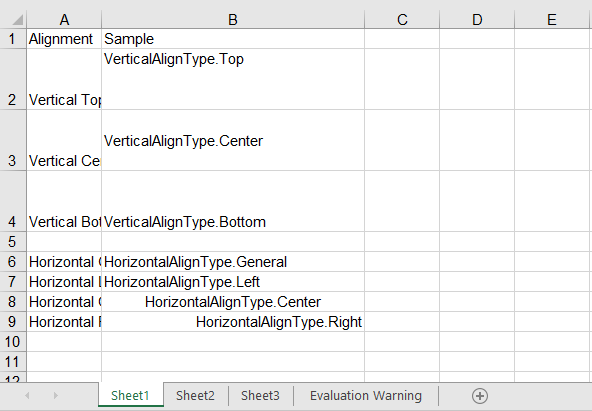
Set the Indent of Text
Indentation leaves blank space on the left (or right) inside a cell, which suits data that has a hierarchy, such as "region → city". The indent level is set through the IndentLevel property, where one level is roughly one character wide. The steps are as follows:
- Create a workbook and get the first worksheet.
- Write the sample text.
- Set the horizontal alignment to left so the indentation takes effect.
- Set an increasing indent level through
IndentLevel. - Save the workbook.
Here is a complete code example that sets the indent of cell text in React:
function App() {
  const setTextIndent = async () => {
    // Get the Spire.XLS WASM module
    const xlsModule = window.wasmModule?.spirexls;

    // Check if the module is ready
    if (!xlsModule) {
      alert('Spire.Xls is not ready yet');
      return;
    }

    // Load the font into VFS
    await window.spire.FetchFileToVFS('ARIAL.TTF', '/Library/Fonts/', `${process.env.PUBLIC_URL}/font/`);

    // Create a new workbook
    const workbook = new xlsModule.Workbook();

    // Get the first worksheet
    const sheet = workbook.Worksheets.get(0);

    // Write the sample text
    sheet.Range.get("A1").Text = "Indent Level";
    sheet.Range.get("B1").Text = "Sample";
    sheet.Range.get("A2").Text = "0";
    sheet.Range.get("B2").Text = "Worldwide";
    sheet.Range.get("A3").Text = "1";
    sheet.Range.get("B3").Text = "North Region";
    sheet.Range.get("A4").Text = "2";
    sheet.Range.get("B4").Text = "Beijing";
    sheet.Range.get("A5").Text = "3";
    sheet.Range.get("B5").Text = "Haidian District";

    // Indentation only takes effect together with left alignment
    sheet.Range.get("B2:B5").Style.HorizontalAlignment = xlsModule.HorizontalAlignType.Left;

    // Set the indentation level of the text
    sheet.Range.get("B2").Style.IndentLevel = 0;
    sheet.Range.get("B3").Style.IndentLevel = 1;
    sheet.Range.get("B4").Style.IndentLevel = 2;
    sheet.Range.get("B5").Style.IndentLevel = 3;

    // Widen column B so the indentation differences are visible
    sheet.Range.get("B1:B5").ColumnWidth = 32;

    // Save the workbook
    const outputFileName = "Indentation.xlsx";
    workbook.SaveToFile(outputFileName);

    // Release resources
    workbook.Dispose();

    // Read the result file from VFS and trigger the download
    const fileArray = window.dotnetRuntime.Module.FS.readFile(outputFileName);
    const blob = new Blob([fileArray], { type: "application/vnd.openxmlformats-officedocument.spreadsheetml.sheet" });
    const url = URL.createObjectURL(blob);
    const a = document.createElement('a');
    a.href = url;
    a.download = outputFileName;
    a.click();
    URL.revokeObjectURL(url);
  };

  return (
    <div style={{ textAlign: 'center', height: '300px' }}>
      <h1>Set Text Indent</h1>
      <button onClick={setTextIndent}>Start</button>
    </div>
  );
}

export default App;
The four rows step in one level at a time, forming exactly the hierarchy "Worldwide → North Region → Beijing → Haidian District". Cell B5 has an IndentLevel of 3, so its text starts about three characters in from the left edge.
After running, the effect of setting the indent of text:
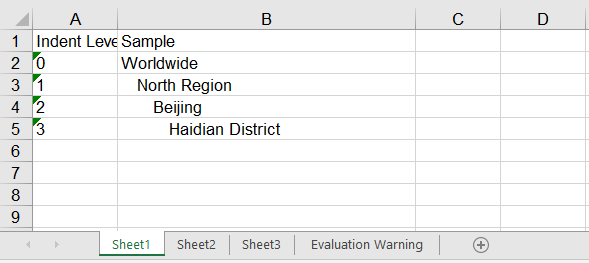
Set the Orientation of Text
Text orientation covers two independent settings. The first is the rotation angle, set through the Rotation property, where values 0 to 90 are degrees counterclockwise and -1 to -90 are degrees clockwise. There is also the special value 255, which stacks the text vertically one character per line; rotation is often used to fit a long header into a narrow column. The second is the reading order, set through the ReadingOrder property, which accepts LeftToRight, RightToLeft and Context. It decides which direction the mixed content in a cell is laid out from, and is used for languages written from right to left such as Arabic and Hebrew. Rotated or stacked text takes up far more height than usual, so the row height has to be raised at the same time to keep the text inside the cell. The steps are as follows:
- Create a workbook and get the first worksheet.
- Write the sample text.
- Set the rotation angle through
Rotation. - Set the reading order through
ReadingOrder. - Save the workbook.
Here is a complete code example that sets the orientation of cell text in React:
function App() {
  const setTextOrientation = async () => {
    // Get the Spire.XLS WASM module
    const xlsModule = window.wasmModule?.spirexls;

    // Check if the module is ready
    if (!xlsModule) {
      alert('Spire.Xls is not ready yet');
      return;
    }

    // Load the font into VFS
    await window.spire.FetchFileToVFS('ARIAL.TTF', '/Library/Fonts/', `${process.env.PUBLIC_URL}/font/`);

    // Create a new workbook
    const workbook = new xlsModule.Workbook();

    // Get the first worksheet
    const sheet = workbook.Worksheets.get(0);

    // Write the sample text for the rotation angle
    sheet.Range.get("A1").Text = "Text Orientation";
    sheet.Range.get("B1").Text = "Sample";
    sheet.Range.get("A2").Text = "Counterclockwise 45";
    sheet.Range.get("B2").Text = "Rotation = 45";
    sheet.Range.get("A3").Text = "Counterclockwise 90";
    sheet.Range.get("B3").Text = "Rotation = 90";
    sheet.Range.get("A4").Text = "Clockwise 45";
    sheet.Range.get("B4").Text = "Rotation = -45";
    sheet.Range.get("A5").Text = "Stacked";
    sheet.Range.get("B5").Text = "Spire";

    // Write the sample text for the reading order: Latin mixed with Hebrew, so the
    // difference between the two directions is actually visible
    sheet.Range.get("A7").Text = "Left to Right";
    sheet.Range.get("B7").Text = "Spire.XLS שלום";
    sheet.Range.get("A8").Text = "Right to Left";
    sheet.Range.get("B8").Text = "Spire.XLS שלום";

    // Set the rotation angle of the text; 255 stacks the text vertically
    sheet.Range.get("B2").Style.Rotation = 45;
    sheet.Range.get("B3").Style.Rotation = 90;
    sheet.Range.get("B4").Style.Rotation = -45;
    sheet.Range.get("B5").Style.Rotation = 255;

    // Set the reading order of the text
    sheet.Range.get("B7").Style.ReadingOrder = xlsModule.ReadingOrderType.LeftToRight;
    sheet.Range.get("B8").Style.ReadingOrder = xlsModule.ReadingOrderType.RightToLeft;

    // Widen column B and raise rows 2-5 so the rotated and stacked text fits
    sheet.Range.get("B1:B8").ColumnWidth = 20;
    sheet.Range.get("A2:B5").RowHeight = 60;

    // Save the workbook
    const outputFileName = "TextOrientation.xlsx";
    workbook.SaveToFile(outputFileName);

    // Release resources
    workbook.Dispose();

    // Read the result file from VFS and trigger the download
    const fileArray = window.dotnetRuntime.Module.FS.readFile(outputFileName);
    const blob = new Blob([fileArray], { type: "application/vnd.openxmlformats-officedocument.spreadsheetml.sheet" });
    const url = URL.createObjectURL(blob);
    const a = document.createElement('a');
    a.href = url;
    a.download = outputFileName;
    a.click();
    URL.revokeObjectURL(url);
  };

  return (
    <div style={{ textAlign: 'center', height: '300px' }}>
      <h1>Set Text Orientation</h1>
      <button onClick={setTextOrientation}>Start</button>
    </div>
  );
}

export default App;
In the example, B2, B3 and B4 are rotated 45 degrees, 90 degrees and -45 degrees respectively, and B5 uses a Rotation of 255, which stacks the text into a column running top to bottom; all five rows are given a height of 60. B7 and B8 hold the same mixed Latin and Hebrew string with opposite reading orders, and the Hebrew ends up on opposite sides in the two rows — which is exactly what reading order does to mixed content.
After running, the effect of setting the orientation of text:
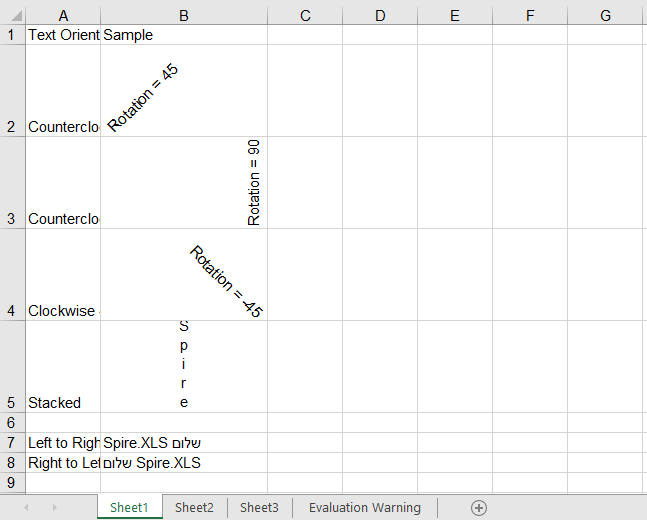
Set the Wrapping of Text
When a piece of text is longer than the column, it spills over onto the neighbouring empty cell by default, and is cut off as soon as that neighbour has content of its own. Setting the WrapText property to true folds the text inside the cell instead; setting it to false returns the text to a single line. As with rotation, wrapping only changes how the text is laid out and does not adjust the row height by itself, so the row height is usually raised as well to show every folded line in full. The steps are as follows:
- Create a workbook and get the first worksheet.
- Write a long piece of text.
- Turn wrapping on or off through
WrapText. - Adjust the column width and row height so the folding is fully visible.
- Save the workbook.
Here is a complete code example that sets the wrapping of cell text in React:
function App() {
  const setTextWrap = async () => {
    // Get the Spire.XLS WASM module
    const xlsModule = window.wasmModule?.spirexls;

    // Check if the module is ready
    if (!xlsModule) {
      alert('Spire.Xls is not ready yet');
      return;
    }

    // Load the font into VFS
    await window.spire.FetchFileToVFS('ARIAL.TTF', '/Library/Fonts/', `${process.env.PUBLIC_URL}/font/`);

    // Create a new workbook
    const workbook = new xlsModule.Workbook();

    // Get the first worksheet
    const sheet = workbook.Worksheets.get(0);

    // Write the sample text
    sheet.Range.get("A1").Text = "Wrap Text";
    sheet.Range.get("B1").Text = "Sample";
    sheet.Range.get("A2").Text = "On";
    sheet.Range.get("B2").Text = "Spire.XLS for JavaScript can wrap text inside a cell in the browser.";
    sheet.Range.get("A3").Text = "Off";
    sheet.Range.get("B3").Text = "Spire.XLS for JavaScript can wrap text inside a cell in the browser.";

    // Turn wrapping on so the text folds inside the cell when it is wider than the column
    sheet.Range.get("B2").Style.WrapText = true;

    // Turn wrapping off so the text stays on a single line
    sheet.Range.get("B3").Style.WrapText = false;

    // Narrow column B and raise rows 2-3 so the wrapping is visible
    sheet.Range.get("B1:B3").ColumnWidth = 24;
    sheet.Range.get("A2:B3").RowHeight = 60;

    // Save the workbook
    const outputFileName = "WrapText.xlsx";
    workbook.SaveToFile(outputFileName);

    // Release resources
    workbook.Dispose();

    // Read the result file from VFS and trigger the download
    const fileArray = window.dotnetRuntime.Module.FS.readFile(outputFileName);
    const blob = new Blob([fileArray], { type: "application/vnd.openxmlformats-officedocument.spreadsheetml.sheet" });
    const url = URL.createObjectURL(blob);
    const a = document.createElement('a');
    a.href = url;
    a.download = outputFileName;
    a.click();
    URL.revokeObjectURL(url);
  };

  return (
    <div style={{ textAlign: 'center', height: '300px' }}>
      <h1>Set Text Wrap</h1>
      <button onClick={setTextWrap}>Start</button>
    </div>
  );
}

export default App;
B2 and B3 hold the very same sentence; the only difference is the value of WrapText. B2 folds into several lines and shows in full, while B3 stays on one line. The cell to the right of B3 is empty, so the text spills into it; if there were content there, the overflow would simply be cut off.
After running, the effect of setting the wrapping of text:
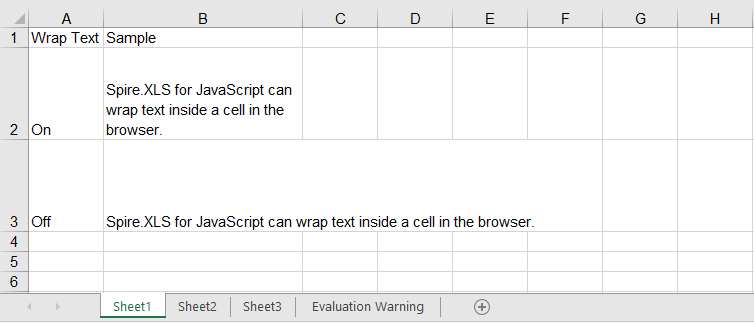
FAQ
I set IndentLevel and the text is not indented at all?
Cause: Indentation is only displayed when the horizontal alignment is a non-General value such as Left or Right. Cells default to General alignment, and IndentLevel is ignored outright in that case — so setting only the indent level shows no change.
Solution: Set HorizontalAlignment first, then IndentLevel:
// Indentation only takes effect together with left alignment
sheet.Range.get("B2").Style.HorizontalAlignment = xlsModule.HorizontalAlignType.Left;
sheet.Range.get("B3").Style.HorizontalAlignment = xlsModule.HorizontalAlignType.Left;

// Set the indent level of the text
sheet.Range.get("B2").Style.IndentLevel = 1;
sheet.Range.get("B3").Style.IndentLevel = 2;
I want the text stacked vertically, one character per line — why does Rotation = 90 not do it?
Cause: The 0 to 90 and -1 to -90 ranges of Rotation only deal with the rotation angle. 90 merely lays the text on its side; it never breaks it into a column of single characters.
Solution: Stacked text needs the special value 255:
// 90 degrees simply rotates the text
sheet.Range.get("B2").Style.Rotation = 90;

// 255 stacks the text vertically, one character per line
sheet.Range.get("B3").Style.Rotation = 255;
Get a Free License
Spire.XLS for JavaScript offers a 30-day full-featured free trial license with no functional limitations. Apply here to evaluate before purchasing.
