How to Add, Get and Delete Custom Document Properties with JavaScript in React
Besides the fixed fields such as title and author, a PDF's properties panel keeps a column for custom properties: both the property name and its value are named by you, and internal markers such as department, secrecy level, or source template live there. Contracts, tenders, and project documents often rely on it to carry this information, but a reader only lets you fill them in one by one by hand — adding markers to a batch of documents, or checking which markers a given file carries, is out of reach; and sending the files to a server for batch processing means the content leaves the user's device.
This article uses Spire.PDF for JavaScript to add, get, and delete a PDF's custom document properties. It runs on WebAssembly to load, modify, and save PDFs directly in the browser, working through a virtual file system (VFS) with no backend required.
This article covers three core features:
For installation and project configuration, refer to Integrating Spire.PDF for JavaScript in a React Project. The examples below assume Spire.PDF is installed and the WebAssembly module has been initialized. They take a PDF without custom properties as input, and the last two sections read the Custom-Properties-Added.pdf produced by the first section, so run the code in the first section before the others.
Add Custom Document Properties
Spire.PDF for JavaScript provides DocumentInformation.SetCustomProperty() for writing custom document properties: the property name is up to you, the value is stored as a string, and a repeated name overwrites the previous entry.
function App() {
  const addCustomProperties = async () => {
    // Get the Spire.PDF WASM module
    const pdfModule = window.wasmModule?.spirepdf;

    // Check that the module is ready
    if (!pdfModule) {
      alert('Spire.PDF is not ready yet');
      return;
    }

    // Load the PDF to be processed into the VFS
    const inputFileName = 'ProductOverview.pdf';
    await window.spire.FetchFileToVFS(inputFileName, '', `${process.env.PUBLIC_URL}/data/`);

    // Create a PdfDocument and load the PDF
    const doc = new pdfModule.PdfDocument();
    doc.LoadFromFile(inputFileName);

    // Write the custom document properties; the names are up to you
    doc.DocumentInformation.SetCustomProperty('Department', 'Research & Development');
    doc.DocumentInformation.SetCustomProperty('SecrecyLevel', 'Internal');
    doc.DocumentInformation.SetCustomProperty('Company', 'Ice Blue Technology');

    const outputFileName = 'Custom-Properties-Added.pdf';
    doc.SaveToFile(outputFileName);
    doc.Close();

    // Read the generated file from the VFS and trigger the download
    const fileArray = window.dotnetRuntime.Module.FS.readFile(outputFileName);
    const blob = new Blob([fileArray], { type: 'application/pdf' });
    const url = URL.createObjectURL(blob);
    const a = document.createElement('a');
    a.href = url;
    a.download = outputFileName;
    a.click();
    URL.revokeObjectURL(url);
  };

  return (
    <div style={{ textAlign: 'center', height: '300px' }}>
      <h1>Add Custom Document Properties</h1>
      <button onClick={addCustomProperties}>
        Add Properties
      </button>
    </div>
  );
}

export default App;
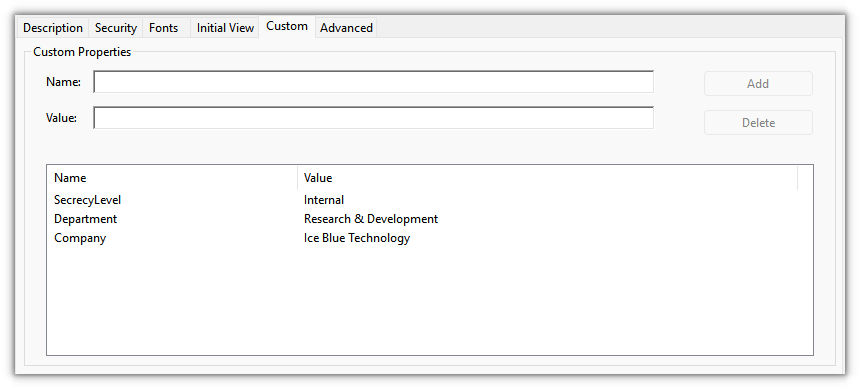
The result shows three more properties — Department, SecrecyLevel, and Company — in the custom column of the reader's properties panel
Get Custom Document Properties
Reading goes through the same DocumentInformation: GetCustomProperty() returns the value for a given property name, and returns null rather than throwing when the key does not exist.
function App() {
  const getCustomProperties = async () => {
    // Get the Spire.PDF WASM module
    const pdfModule = window.wasmModule?.spirepdf;

    // Check that the module is ready
    if (!pdfModule) {
      alert('Spire.PDF is not ready yet');
      return;
    }

    // Read the document produced by the previous section, already in the VFS
    const inputFileName = 'Custom-Properties-Added.pdf';

    // Create a PdfDocument and load the PDF
    const doc = new pdfModule.PdfDocument();
    doc.LoadFromFile(inputFileName);

    const info = doc.DocumentInformation;

    // Read each property by name; a missing key returns null
    const lines = [
      `Department: ${info.GetCustomProperty('Department')}`,
      `SecrecyLevel: ${info.GetCustomProperty('SecrecyLevel')}`,
      `Company: ${info.GetCustomProperty('Company')}`,
      `Owner: ${info.GetCustomProperty('Owner') ?? '(not set)'}`,
    ];

    // Write the result to a text file
    const outputFileName = 'Custom-Properties.txt';
    window.dotnetRuntime.Module.FS.writeFile(outputFileName, lines.join('\n'));
    doc.Close();

    // Read the generated file from the VFS and trigger the download
    const fileArray = window.dotnetRuntime.Module.FS.readFile(outputFileName);
    const blob = new Blob([fileArray], { type: 'text/plain' });
    const url = URL.createObjectURL(blob);
    const a = document.createElement('a');
    a.href = url;
    a.download = outputFileName;
    a.click();
    URL.revokeObjectURL(url);
  };

  return (
    <div style={{ textAlign: 'center', height: '300px' }}>
      <h1>Get Custom Document Properties</h1>
      <button onClick={getCustomProperties}>
        Get Properties
      </button>
    </div>
  );
}

export default App;
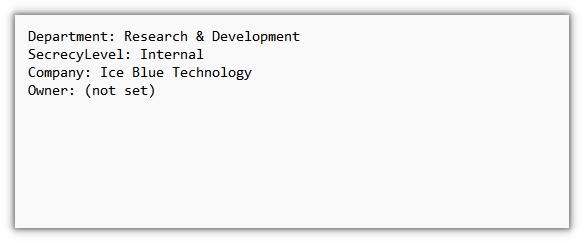
The exported text file lists the property values that were read, one per line:
Delete Custom Document Properties
Deleting uses RemoveCustomProperty(), which removes a single key by property name.
function App() {
  const removeCustomProperties = async () => {
    // Get the Spire.PDF WASM module
    const pdfModule = window.wasmModule?.spirepdf;

    // Check that the module is ready
    if (!pdfModule) {
      alert('Spire.PDF is not ready yet');
      return;
    }

    // Read the document produced by the previous section, already in the VFS
    const inputFileName = 'Custom-Properties-Added.pdf';

    // Create a PdfDocument and load the PDF
    const doc = new pdfModule.PdfDocument();
    doc.LoadFromFile(inputFileName);

    // Remove single custom properties by name; the rest are unaffected
    doc.DocumentInformation.RemoveCustomProperty('SecrecyLevel');
    doc.DocumentInformation.RemoveCustomProperty('Company');

    const outputFileName = 'Custom-Properties-Removed.pdf';
    doc.SaveToFile(outputFileName);
    doc.Close();

    // Read the generated file from the VFS and trigger the download
    const fileArray = window.dotnetRuntime.Module.FS.readFile(outputFileName);
    const blob = new Blob([fileArray], { type: 'application/pdf' });
    const url = URL.createObjectURL(blob);
    const a = document.createElement('a');
    a.href = url;
    a.download = outputFileName;
    a.click();
    URL.revokeObjectURL(url);
  };

  return (
    <div style={{ textAlign: 'center', height: '300px' }}>
      <h1>Delete Custom Document Properties</h1>
      <button onClick={removeCustomProperties}>
        Delete Properties
      </button>
    </div>
  );
}

export default App;
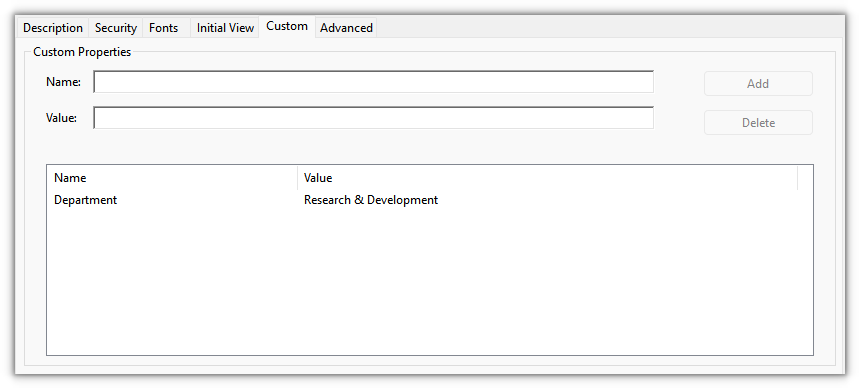
The result keeps only one custom property, Department; the two that were removed are gone from the panel:
FAQ
How are custom properties different from fields like title and author
Reason: the PDF spec fixes the standard fields Title, Author, Subject, Keywords, Creator, and Producer; any key-value pair outside the spec counts as a custom property. Readers show them in two columns: the standard fields in the upper part, and the custom properties in a column of their own.
Solution: the two kinds take two different styles. Assign standard fields such as title and author to the same-named property, and route business markers through custom properties:
// Standard fields
doc.DocumentInformation.Title = '2026 Product Overview';
doc.DocumentInformation.Author = 'Marketing Department';

// Custom properties
doc.DocumentInformation.SetCustomProperty('Department', 'Marketing Department');
Reading splits the same way: standard fields are read as properties such as info.Title, while custom properties can only be read with info.GetCustomProperty('Department').
After deleting, what comes back when I read it, and what if I get the key name wrong
Reason: GetCustomProperty() returns null for any key that does not exist, so a deleted entry and one that was never written look the same; passing a key that does not exist to RemoveCustomProperty() neither throws nor changes the document.
Solution: after deleting, reopen the result and check once — null means it is gone, and you can confirm the other properties still read back. A wrong key name has no side effects; just delete again with the correct name:
doc.DocumentInformation.RemoveCustomProperty('SecrecyLevel');
doc.SaveToFile(outputFileName);

// Reopen the result to check: null means it was removed
const check = new pdfModule.PdfDocument();
check.LoadFromFile(outputFileName);
console.log(check.DocumentInformation.GetCustomProperty('SecrecyLevel'));
Get a Free License
If you want to remove the evaluation message from the result documents or get rid of feature limitations, please contact sales to obtain a free 30-day temporary license.
How to Set or Get PDF Document Properties with JavaScript in React
A PDF's properties panel records the title, author, subject, and keywords, and knowledge bases, archival systems, and full-text search all use them as the basis for classification. The files you actually receive tend to be the opposite: the title still carries the name left over from a previous template, the author field is empty, and keywords are missing altogether. Filling them in means typing into each field by hand in a reader, and checking the author or subject of a batch of documents means opening the properties dialog one file at a time — desktop software cannot do it in bulk, and uploading the files to a server means the content leaves the user's device.
This article uses Spire.PDF for JavaScript to set and get PDF document properties. It runs on WebAssembly to load, modify, and save PDFs directly in the browser, working through a virtual file system (VFS) with no backend required.
This article covers two core features:
For installation and project configuration, refer to Integrating Spire.PDF for JavaScript in a React Project. The examples below assume Spire.PDF is installed and the WebAssembly module has been initialized.
Set PDF Document Properties
Spire.PDF for JavaScript provides doc.DocumentInformation for writing the standard document properties — title, author, subject, and keywords each take one field, while Creator and Producer record who generated the file, all of them plain strings.
function App() {
  const setPdfProperties = async () => {
    // Get the Spire.PDF WASM module
    const pdfModule = window.wasmModule?.spirepdf;

    // Check that the module is ready
    if (!pdfModule) {
      alert('Spire.PDF is not ready yet');
      return;
    }

    // Load the PDF to be processed into the VFS
    const inputFileName = 'ProductOverview.pdf';
    await window.spire.FetchFileToVFS(inputFileName, '', `${process.env.PUBLIC_URL}/data/`);

    // Create a PdfDocument and load the PDF
    const doc = new pdfModule.PdfDocument();
    doc.LoadFromFile(inputFileName);

    // Write the standard document properties
    doc.DocumentInformation.Title = '2026 Product Overview';
    doc.DocumentInformation.Author = 'Marketing Department';
    doc.DocumentInformation.Subject = 'Product Line and Pricing';
    doc.DocumentInformation.Keywords = 'product overview, pricing, 2026';
    doc.DocumentInformation.Creator = 'Content Center';
    doc.DocumentInformation.Producer = 'Spire.PDF for JavaScript';

    const outputFileName = 'Properties-Set.pdf';
    doc.SaveToFile(outputFileName);
    doc.Close();

    // Read the generated file from the VFS and trigger the download
    const fileArray = window.dotnetRuntime.Module.FS.readFile(outputFileName);
    const blob = new Blob([fileArray], { type: 'application/pdf' });
    const url = URL.createObjectURL(blob);
    const a = document.createElement('a');
    a.href = url;
    a.download = outputFileName;
    a.click();
    URL.revokeObjectURL(url);
  };

  return (
    <div style={{ textAlign: 'center', height: '300px' }}>
      <h1>Set PDF Document Properties</h1>
      <button onClick={setPdfProperties}>
        Set Properties
      </button>
    </div>
  );
}

export default App;
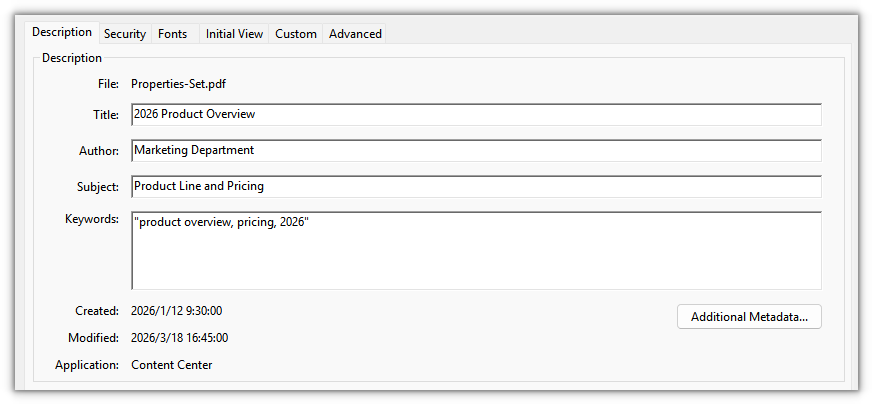
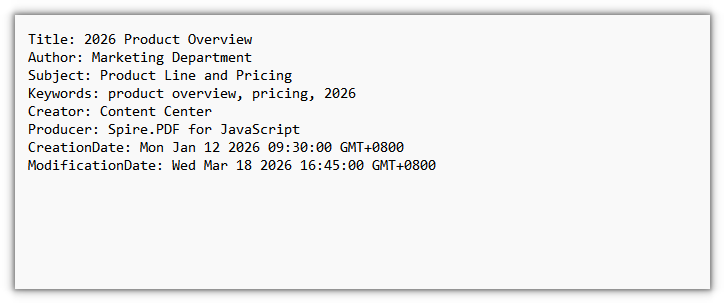
The standard fields shown in the reader's document properties panel after setting:
Get PDF Document Properties
Reading goes through the same DocumentInformation: the standard fields come back as strings. Joining the values you get into text and writing it out lets a batch pipeline compare or store them directly, without going through a reader's properties panel.
function App() {
  const getPdfProperties = async () => {
    // Get the Spire.PDF WASM module
    const pdfModule = window.wasmModule?.spirepdf;

    // Check that the module is ready
    if (!pdfModule) {
      alert('Spire.PDF is not ready yet');
      return;
    }

    // Load the PDF to be read into the VFS
    const inputFileName = 'Properties-Set.pdf';
    await window.spire.FetchFileToVFS(inputFileName, '', `${process.env.PUBLIC_URL}/data/`);

    // Create a PdfDocument and load the PDF
    const doc = new pdfModule.PdfDocument();
    doc.LoadFromFile(inputFileName);

    // Read the standard properties and the creation/modification dates one by one
    const info = doc.DocumentInformation;

    const lines = [
      `Title: ${info.Title}`,
      `Author: ${info.Author}`,
      `Subject: ${info.Subject}`,
      `Keywords: ${info.Keywords}`,
      `Creator: ${info.Creator}`,
      `Producer: ${info.Producer}`,
      `CreationDate: ${info.CreationDate.toString()}`,
      `ModificationDate: ${info.ModificationDate.toString()}`,
    ];

    // Write the result to a text file
    const outputFileName = 'Document-Properties.txt';
    window.dotnetRuntime.Module.FS.writeFile(outputFileName, lines.join('\n'));
    doc.Close();

    // Read the generated file from the VFS and trigger the download
    const fileArray = window.dotnetRuntime.Module.FS.readFile(outputFileName);
    const blob = new Blob([fileArray], { type: 'text/plain' });
    const url = URL.createObjectURL(blob);
    const a = document.createElement('a');
    a.href = url;
    a.download = outputFileName;
    a.click();
    URL.revokeObjectURL(url);
  };

  return (
    <div style={{ textAlign: 'center', height: '300px' }}>
      <h1>Get PDF Document Properties</h1>
      <button onClick={getPdfProperties}>
        Get Properties
      </button>
    </div>
  );
}

export default App;
The exported text file lists the standard properties that were read, one per line:
FAQ
Why do my property changes disappear after I reopen the file
Reason: the fields on DocumentInformation change the document object in memory, and only calling SaveToFile writes them into the file. Assign the values and close the document right away, or open the original input file again, and you will of course still see the old values.
Solution: after assigning the values, save the document to a new output file, then open that result to check it:
doc.DocumentInformation.Title = '2026 Product Overview';
doc.DocumentInformation.Author = 'Marketing Department';

// Only after saving do the properties land in the file
doc.SaveToFile('Properties-Set.pdf');
Get a Free License
If you want to remove the evaluation message from the result documents or get rid of feature limitations, please contact sales to obtain a free 30-day temporary license.
Create a Table of Contents in PDF Using JavaScript in React
Send out a manual or report of a few hundred pages and the complaint is rarely about the content — it's that readers can't find the chapter they want. They want a page-numbered list of chapters up front, and one click to jump there. Many PDFs are generated without one, so readers are left to the scrollbar or in-document search.
This article shows how to create a table of contents page and add navigation to its entries with Spire.PDF for JavaScript. It loads, edits and saves PDF documents directly in the browser through WebAssembly, reading and writing files through a virtual file system (VFS), so everything runs locally with no backend.
Two core features are covered:
For installation and project setup, see Integrate Spire.PDF for JavaScript in a React Project. The examples below assume Spire.PDF is installed and the WebAssembly module is initialized.
Create a Table of Contents Page
The contents page has to land at a specific position in the document. Pages.Insert({ index }) inserts a page and returns it, and the title, chapter entries, leader dots and page numbers are all drawn on that page with Canvas.DrawString. Each entry advances horizontally by its text width, and leader dots fill the gap from the end of the title to the start of the page number.
function App() {
  const createTocPage = async () => {
    // Get the Spire.PDF WASM module
    const pdfModule = window.wasmModule?.spirepdf;

    // Check whether the module is ready
    if (!pdfModule) {
      alert('Spire.PDF is not ready yet');
      return;
    }

    // Load the PDF to process into the VFS
    const inputFileName = 'Chapter_Document.pdf';
    await window.spire.FetchFileToVFS(inputFileName, '', `${process.env.PUBLIC_URL}/data/`);

    // Create a PdfDocument object and load the PDF
    let doc = new pdfModule.PdfDocument();
    doc.LoadFromFile(inputFileName);

    // Insert the contents page after the cover; the body pages shift down by one
    const tocPage = doc.Pages.Insert({ index: 1 });

    // Fonts for the title and the entries, using the built-in Helvetica (no font file to load)
    const titleFont = new pdfModule.PdfFont({ fontFamily: pdfModule.PdfFontFamily.Helvetica, size: 20, style: pdfModule.PdfFontStyle.Bold });
    const entryFont = new pdfModule.PdfFont({ fontFamily: pdfModule.PdfFontFamily.Helvetica, size: 14 });
    const centerFormat = new pdfModule.PdfStringFormat({ alignment: pdfModule.PdfTextAlignment.Center });

    // Draw the centered contents title
    const title = 'Contents';
    tocPage.Canvas.DrawString({
      s: title,
      font: titleFont,
      brush: pdfModule.PdfBrushes.get_Black(),
      point: new pdfModule.PointF(tocPage.Canvas.ClientSize.Width / 2, 50),
      format: centerFormat
    });

    // Chapter titles and their page numbers after the contents page is inserted
    const chapters = [
      { title: 'Chapter 1 Overview', page: 3 },
      { title: 'Chapter 2 Architecture', page: 4 },
      { title: 'Chapter 3 Deployment', page: 5 },
      { title: 'Chapter 4 Maintenance', page: 6 }
    ];

    const width = tocPage.Canvas.ClientSize.Width;
    let y = 110;
    for (const chapter of chapters) {
      // Entry text
      const titleSize = entryFont.MeasureString({ text: chapter.title });
      tocPage.Canvas.DrawString({ s: chapter.title, font: entryFont, brush: pdfModule.PdfBrushes.get_Black(), x: 40, y: y });

      // Right-aligned page number
      const pageText = chapter.page.toString();
      const pageSize = entryFont.MeasureString({ text: pageText });
      tocPage.Canvas.DrawString({ s: pageText, font: entryFont, brush: pdfModule.PdfBrushes.get_Black(), x: width - 40 - pageSize.Width, y: y });

      // Leader dots: fill from the end of the entry to the start of the page number
      const dotStart = 40 + titleSize.Width + 6;
      const dotEnd = width - 40 - pageSize.Width - 6;
      for (let x = dotStart; x < dotEnd; x += 6) {
        tocPage.Canvas.DrawString({ s: '.', font: entryFont, brush: pdfModule.PdfBrushes.get_Gray(), x: x, y: y });
      }

      y += 24;
    }

    // Define the output file name and save
    const outputFileName = 'Document-with-TOC.pdf';
    doc.SaveToFile(outputFileName);
    doc.Close();

    // Read the generated file from the VFS and trigger the download
    const fileArray = window.dotnetRuntime.Module.FS.readFile(outputFileName);
    const blob = new Blob([fileArray], { type: 'application/pdf' });
    const url = URL.createObjectURL(blob);
    const a = document.createElement('a');
    a.href = url;
    a.download = outputFileName;
    a.click();
    URL.revokeObjectURL(url);
  };

  return (
    <div style={{ textAlign: 'center', height: '300px' }}>
      <h1>Create a Table of Contents Page</h1>
      <button id="btn-1" onClick={createTocPage}>
        Create TOC
      </button>
    </div>
  );
}

export default App;
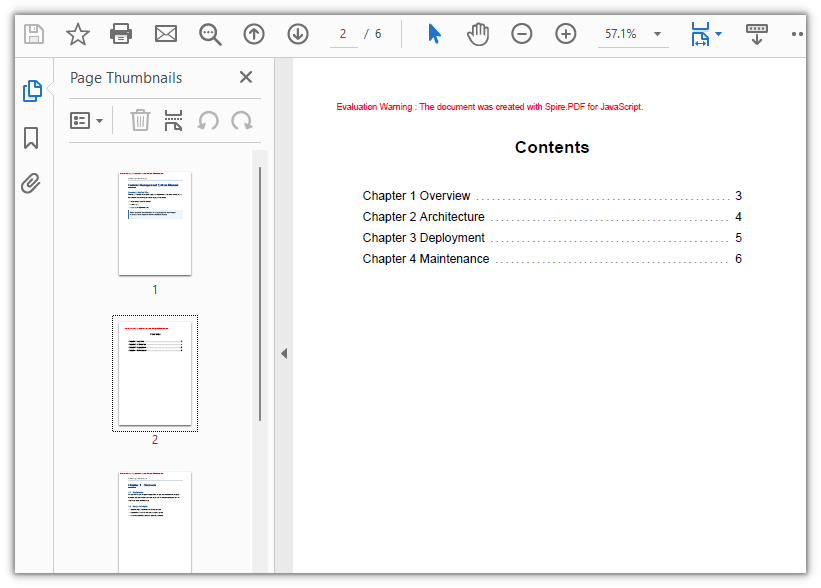
The document with a contents page: the page after the cover lists each chapter with its page number
Add Navigation to Table of Contents Entries
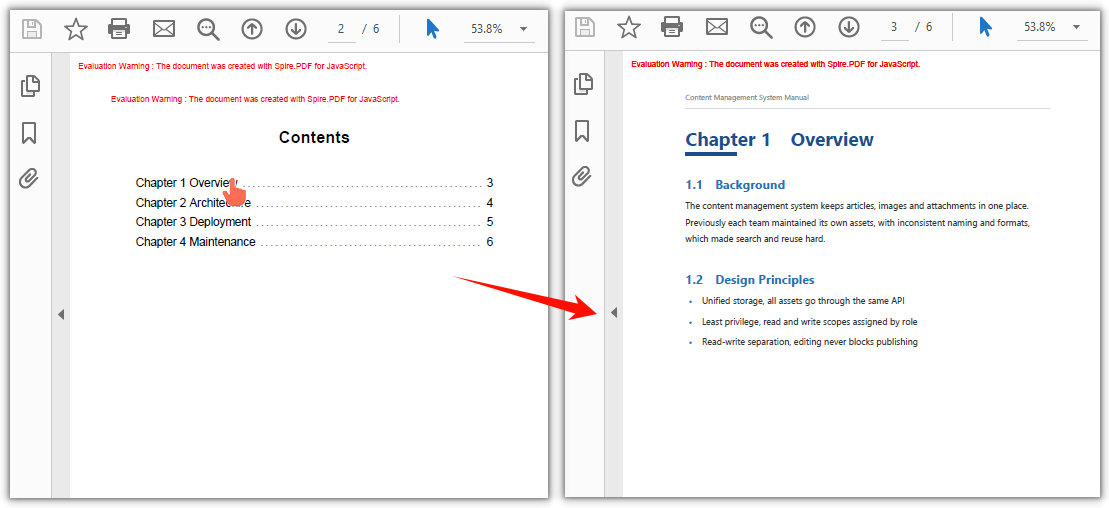
Once the contents page is drawn, each entry is still just a line of text. To make an entry clickable, cover it with a PdfActionAnnotation hit area and attach a PdfGoToAction carrying a PdfDestination that names the target page. There is no need to derive the hit area's position from line spacing — search the entry's text on the contents page with PdfTextFinder, and the rectangle it returns is where that line actually sits on the page, ready to use as the hit area.
function App() {
  const addTocNavigation = async () => {
    // Get the Spire.PDF WASM module
    const pdfModule = window.wasmModule?.spirepdf;

    // Check whether the module is ready
    if (!pdfModule) {
      alert('Spire.PDF is not ready yet');
      return;
    }

    // Load the document generated in the previous step
    const inputFileName = 'Document-with-TOC.pdf';
    await window.spire.FetchFileToVFS(inputFileName, '', `${process.env.PUBLIC_URL}/data/`);

    let doc = new pdfModule.PdfDocument();
    doc.LoadFromFile(inputFileName);

    // The contents page is page 2 of the document (index 1)
    const tocPage = doc.Pages.get_Item(1);

    // The entry text and the page each one should jump to
    const chapters = [
      { title: 'Chapter 1 Overview', page: 3 },
      { title: 'Chapter 2 Architecture', page: 4 },
      { title: 'Chapter 3 Deployment', page: 5 },
      { title: 'Chapter 4 Maintenance', page: 6 }
    ];

    // Search the contents page by keyword
    const finder = new pdfModule.PdfTextFinder(tocPage);

    for (const chapter of chapters) {
      const found = finder.Find(chapter.title);
      if (found.length === 0) {
        continue;
      }

      // Define the hit area based on the keyword position
      const lineBounds = found.get(0).Bounds[0];
      const bounds = new pdfModule.RectangleF({
        location: new pdfModule.PointF(0, lineBounds.Y),
        size: new pdfModule.SizeF({ width: tocPage.Canvas.ClientSize.Width, height: lineBounds.Height })
      });

      // The jump target is the chapter's page, aligned to the top-left corner of the body
      const targetPage = doc.Pages.get_Item(chapter.page - 1);
      const destination = new pdfModule.PdfDestination({
        page: targetPage,
        location: new pdfModule.PointF(0, 0)
      });

      // Attach the jump action and set the border width to 0
      const action = new pdfModule.PdfActionAnnotation(bounds, new pdfModule.PdfGoToAction({ destination }));
      action.Border = new pdfModule.PdfAnnotationBorder({ borderWidth: 0 });
      tocPage.Annotations.Add(action);
    }

    // Define the output file name and save
    const outputFileName = 'Clickable-TOC.pdf';
    doc.SaveToFile(outputFileName);
    doc.Close();

    // Read the generated file from the VFS and trigger the download
    const fileArray = window.dotnetRuntime.Module.FS.readFile(outputFileName);
    const blob = new Blob([fileArray], { type: 'application/pdf' });
    const url = URL.createObjectURL(blob);
    const a = document.createElement('a');
    a.href = url;
    a.download = outputFileName;
    a.click();
    URL.revokeObjectURL(url);
  };

  return (
    <div style={{ textAlign: 'center', height: '300px' }}>
      <h1>Add Navigation to Table of Contents Entries</h1>
      <button id="btn-2" onClick={addTocNavigation}>
        Add Navigation
      </button>
    </div>
  );
}

export default App;
Clicking a chapter title in the contents page jumps to that page
FAQ
Table of contents page numbers don't match the actual pages
Cause: the contents page is inserted into the original document, so every page after the insertion point shifts down by one. If the page numbers keep the order from before the insertion, they will be off by one across the board.
Solution: write the page numbers as they appear after the insertion. For example, if the cover was page 1 and chapter 1 was page 2, then after inserting the contents page after the cover, chapter 1 falls on page 3, and that is what the contents should list.
Clicking a table of contents entry jumps to the wrong chapter, or does nothing
Cause: the entry is drawn with Canvas.DrawString, but the hit area has to be given in page coordinates. Deriving it from the drawing y plus the line spacing means any mismatch in font metrics, line spacing or page margins accumulates row by row, so the click lands on a different entry — or on nothing at all.
Solution: don't derive it — search the contents page for the entry's text (the keyword) and use the rectangle that comes back. PdfTextFinder already returns page coordinates, so no top margin has to be added; get page with doc.Pages.get_Item(...) so it is a real page object:
const finder = new pdfModule.PdfTextFinder(tocPage);
const found = finder.Find(chapter.title);
const lineBounds = found.get(0).Bounds[0];
const bounds = new pdfModule.RectangleF({
  location: new pdfModule.PointF(0, lineBounds.Y),
  size: new pdfModule.SizeF({ width: tocPage.Canvas.ClientSize.Width, height: lineBounds.Height })
});
const targetPage = doc.Pages.get_Item(chapter.page - 1);
const action = new pdfModule.PdfActionAnnotation(bounds, new pdfModule.PdfGoToAction({ destination }));
Get a Free License
To remove the evaluation message from the generated documents, or to get rid of the function limitations, please contact sales for a temporary license valid for 30 days.
How to Change the PDF Version with JavaScript in React
A PDF's version number decides which features the document may use, and whether older readers, print systems, and archival platforms can open it at all. Documents collected from many sources come with mixed versions: some produced by new tools and declaring 1.7, others from systems that have not been updated in years and still sit at 1.4. To deliver a uniform format for a target environment, the version number has to be rewritten — and desktop software only lets you do that by hand, one file at a time.
This article uses Spire.PDF for JavaScript to change a PDF document's version number. It runs on WebAssembly to load, modify, and save PDFs directly in the browser, working through a virtual file system (VFS) with no backend required.
For installation and project configuration, refer to Integrating Spire.PDF for JavaScript in a React Project. The examples below assume Spire.PDF is installed and the WebAssembly module has been initialized.
Change the PDF Version
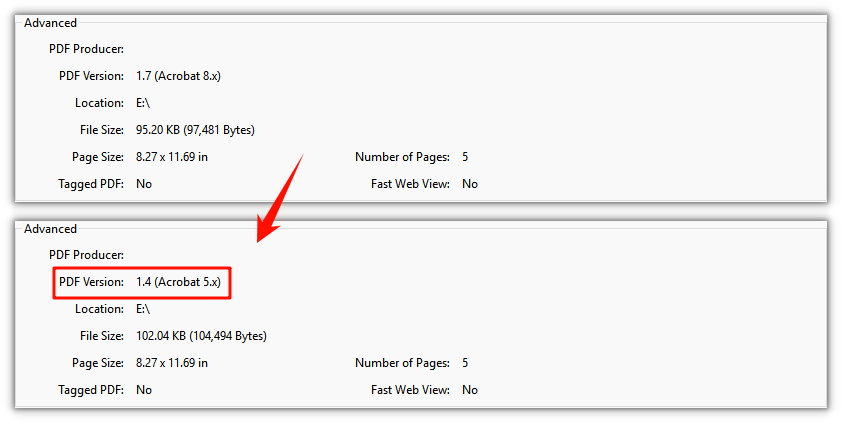
Assign a PdfVersion value to doc.FileInfo.Version to rewrite the version number; once saved, the file header is written as the matching %PDF-x.y. Set it to Version1_4 and a 1.7 document drops to 1.4, ready for readers or print systems that only accept the older specification.
function App() {
  const changePdfVersion = async () => {
    // Get the Spire.PDF WASM module
    const pdfModule = window.wasmModule?.spirepdf;

    // Check that the module is ready
    if (!pdfModule) {
      alert('Spire.PDF is not ready yet');
      return;
    }

    // Load the PDF to be processed into the VFS
    const inputFileName = 'Multipage_Document.pdf';
    await window.spire.FetchFileToVFS(inputFileName, '', `${process.env.PUBLIC_URL}/data/`);

    // Create a PdfDocument and load the PDF
    const doc = new pdfModule.PdfDocument();
    doc.LoadFromFile(inputFileName);

    // Set the version number to the target value, here downgrading to 1.4
    doc.FileInfo.Version = pdfModule.PdfVersion.Version1_4;

    const outputFileName = 'Version-1.4.pdf';
    doc.SaveToFile(outputFileName);
    doc.Close();

    // Read the generated file from the VFS and trigger the download
    const fileArray = window.dotnetRuntime.Module.FS.readFile(outputFileName);
    const blob = new Blob([fileArray], { type: 'application/pdf' });
    const url = URL.createObjectURL(blob);
    const a = document.createElement('a');
    a.href = url;
    a.download = outputFileName;
    a.click();
    URL.revokeObjectURL(url);
  };

  return (
    <div style={{ textAlign: 'center', height: '300px' }}>
      <h1>Change PDF Version</h1>
      <button onClick={changePdfVersion}>
        Change
      </button>
    </div>
  );
}

export default App;
A document saved with the version set to 1.4 — its file header now reads %PDF-1.4
FAQ
Why does the version stay the same after I set it and reopen the file
Reason: FileInfo.Version changes a property of the in-memory document object, and only saving writes it into the file. Close the document right after setting the version, or open the original input file again, and you will of course still see the old version number.
Solution: After assigning the value you must call SaveToFile to write a new output file, then open that result to check it:
// Set the version number first
doc.FileInfo.Version = pdfModule.PdfVersion.Version1_4;

// Then save — only now is the version number written to the file
doc.SaveToFile('Version-1.4.pdf');
Which version number should I set
Reason: It depends on what the recipient supports. Older print systems and archival platforms often require 1.4 or lower, while newer tools mostly handle 1.7. FileInfo.Version takes a PdfVersion enum, where Version1_0 through Version1_7 map to PDF 1.0 through PDF 1.7 in order.
Solution: Set the highest version the recipient accepts, assigning the enum directly:
// Deliver to readers or print systems that only accept the older specification
doc.FileInfo.Version = pdfModule.PdfVersion.Version1_4;

// The target environment is newer — keep or raise it to 1.7
doc.FileInfo.Version = pdfModule.PdfVersion.Version1_7;
Why does the document fail to open or render incorrectly after downgrading
Reason: FileInfo.Version only changes the declaration; it does not clean up objects in the document that go beyond that version's specification. If the source uses features introduced in a later version — such as cross-reference streams, object streams, or compressed transparency from PDF 1.5 onward — an older reader parsing it as a lower version will fail.
Solution: Before changing the declaration, confirm the source file does not rely on those features. If it is clean, changing the version number is enough; otherwise, use a source file that avoids the newer features, or first rebuild the document in a way that pushes its objects back to the older specification (re-export, or print to PDF) and then change the version number.
Get a Free License
If you want to remove the evaluation message from the result documents or get rid of feature limitations, please contact sales to obtain a free 30-day temporary license.
Add a Cross-Page Seal in React with JavaScript
Contracts, bids, and other multi-page documents get a cross-page seal before they go out, so that every page carries a fragment of the seal — if the other party swaps or reorders pages, the fragments no longer line up. With paper you stamp the whole stack at once; an electronic PDF has no equivalent gesture: paste the seal image on whole and every page shows a complete seal, which serves no cross-page purpose.
This article shows how to add a cross-page seal to a multi-page contract with Spire.PDF for JavaScript. Built on WebAssembly, it loads, modifies, and saves PDF documents directly in the browser, so the whole process stays local and files are read and written through a virtual file system (VFS) with no backend service required.
For installation and project configuration, refer to Integrating Spire.PDF for JavaScript in a React Project. The following example assumes Spire.PDF is installed and the WebAssembly module has been initialized.
Add a Cross-Page Seal
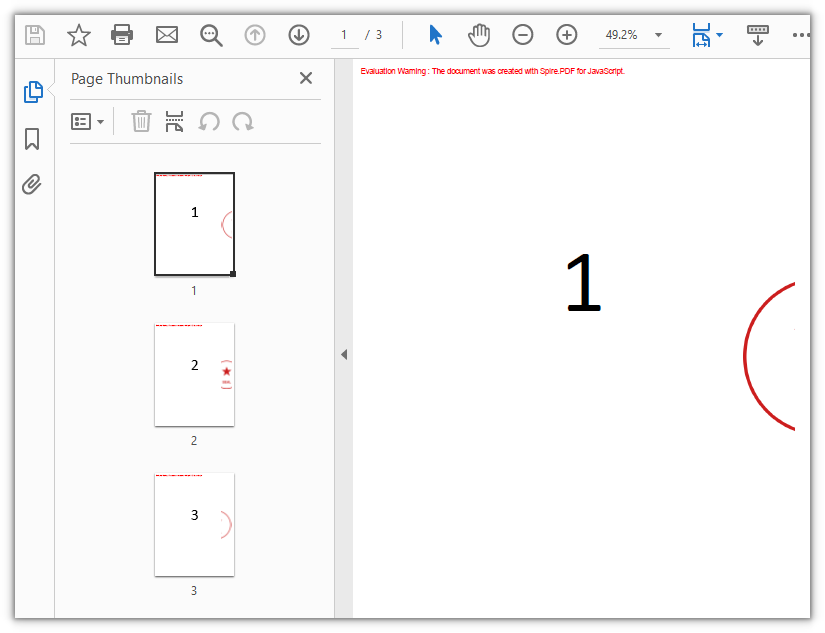
A cross-page seal cuts one seal into as many pieces as there are pages, leaving one piece on each page, so that flipping through the pages rebuilds the complete seal. The cutting is carried by a PdfTemplate: the template's bounds are the clipping area, so shifting the seal one strip width further left on each successive page makes exactly that page's strip show through, and Canvas.DrawTemplate drops it at the right edge of the page.
function App() {
  const addCrossPageSeal = async () => {
    // Get the Spire.PDF WASM module
    const pdfModule = window.wasmModule?.spirepdf;

    // Make sure the module is ready
    if (!pdfModule) {
      alert('Spire.PDF is not ready yet');
      return;
    }

    // Load the document to be sealed and the seal image into the VFS
    const inputFileName = 'Number.pdf';
    const sealFileName = 'Seal.png';
    await window.spire.FetchFileToVFS(inputFileName, '', `${process.env.PUBLIC_URL}/data/`);
    await window.spire.FetchFileToVFS(sealFileName, '', `${process.env.PUBLIC_URL}/data/`);

    // Create a PdfDocument object and load the document
    const doc = new pdfModule.PdfDocument();
    doc.LoadFromFile(inputFileName);

    // Load the seal image; its width and height are in pixels, treated as points (1 px = 1 pt) when laid out
    const seal = pdfModule.PdfImage.FromFile(sealFileName);

    // Overall scale of the seal, and the scaled seal width and height
    const scale = 0.55;
    const sealWidth = seal.Width * scale;
    const sealHeight = seal.Height * scale;

    // Split the seal evenly by page count, one strip per page
    const pageCount = doc.Pages.Count;
    const stripWidth = sealWidth / pageCount;

    // Draw the i-th strip of the seal at the right edge of each page
    for (let i = 0; i < pageCount; i++) {
      const page = doc.Pages.get_Item(i);

      // The template bounds are the clipping area: one strip wide and as tall as the seal
      const template = new pdfModule.PdfTemplate({ width: stripWidth, height: sealHeight });
      template.Graphics.ScaleTransform(scale, scale);

      // Shift the seal one more strip to the left on every page, so the next strip shows through
      template.Graphics.DrawImage({ image: seal, x: -(i * seal.Width) / pageCount, y: 0 });

      // Every page uses the same spot: 24 points in from the right edge, vertically centered
      const x = page.Canvas.ClientSize.Width - 24 - stripWidth;
      const y = (page.Canvas.ClientSize.Height - sealHeight) / 2;
      page.Canvas.DrawTemplate({ template: template, location: new pdfModule.PointF(x, y) });
    }

    // Save to the VFS
    const outputFileName = 'Cross-Page-Seal.pdf';
    doc.SaveToFile(outputFileName);
    doc.Close();

    // Read the generated file from the VFS and trigger a download
    const fileArray = window.dotnetRuntime.Module.FS.readFile(outputFileName);
    const blob = new Blob([fileArray], { type: 'application/pdf' });
    const url = URL.createObjectURL(blob);
    const a = document.createElement('a');
    a.href = url;
    a.download = outputFileName;
    a.click();
    URL.revokeObjectURL(url);
  };

  return (
    <div style={{ textAlign: 'center', height: '300px' }}>
      <h1>Add a Cross-Page Seal</h1>
      <button onClick={addCrossPageSeal}>
        Add Seal
      </button>
    </div>
  );
}

export default App;
The contract after the cross-page seal is applied: each page carries one fragment of the seal at its right edge, and turning to the last page shows the right half of the seal:
FAQ
Why does each page show only a narrow slice of the seal
Reason: A cross-page seal is by definition cut evenly across the pages, so each page carries only the strip seal width / page count. The more pages, the narrower the fragment on each page — that is by design: a narrow fragment at a fixed position is what makes a single swapped page impossible to line back up.
Solution: The page count is decided by the document, so to make the seal more prominent the only lever is to enlarge the whole seal, and the fragments grow with it:
// Raise 0.55, say to 0.8: the whole seal and every page's fragment grow together
const scale = 0.8;
const sealWidth = seal.Width * scale;
The seal is so large it covers the body text
Reason: PdfImage.Width and Height report pixel values, and without scaling they are laid out at 1 pixel = 1 point. A 400×400-pixel seal takes up 400 points of width, while an A4 page is only 595 points wide, so it will cover the body text.
Solution: Scale it down proportionally inside the template with ScaleTransform, and convert the seal width, seal height, and strip width by the same factor — all three must come from one source, or the strips will not line up with the placement:
const scale = 0.55;
const sealWidth = seal.Width * scale;
const sealHeight = seal.Height * scale;
const stripWidth = sealWidth / pageCount;
Get a Free License
If you wish to remove the evaluation message from the result document or remove feature limitations, please contact sales to obtain a temporary license valid for 30 days.
Replace Text in PDF Documents Using JavaScript in React
A product rename, a wording change, a company name typed wrong in a template — edits like these are awkward once they land in a PDF. When the source document is not at hand, the only options are to export the whole page as an image and lay text over it, or to delete the original text in a reader and type a replacement in by hand. Contracts and manuals make this worse: the same name can be scattered across body text, bullet lists and closing notes, and fixing each one by hand is slow and easy to miss.
Spire.PDF for JavaScript loads, edits and saves PDF documents in the browser on WebAssembly, so a rename is only a matter of locating the text and writing it back, with files read and written through a virtual file system (VFS) and no backend involved. The four sections below cover replacing the first match, replacing every match (together with three switches: recoloring, match mode and replacement area), covering the original word with a background color, and drawing a rectangle over the original before redrawing the new word. In the sample the old and new names are the same length, so the layout does not shift after replacement.
This article covers four core features:
- Replace the First Match
- Replace All Matches
- Replace by Covering
- Draw a Rectangle to Cover the Original and Redraw the Text
For installation and project configuration, see Integrate Spire.PDF for JavaScript into a React Project. The examples below assume Spire.PDF is installed and the WebAssembly module is initialized.
Replace the First Match
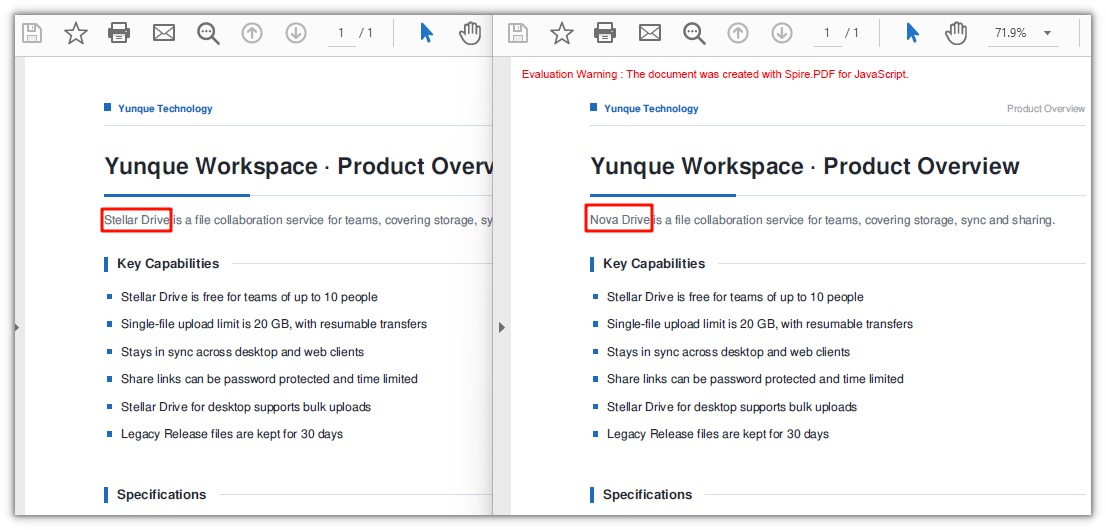
Spire.PDF for JavaScript provides the PdfTextReplacer class for turning text on a page into another piece of text. It is built per page, and ReplaceText replaces only the first match it finds, returning the number of replacements actually made (1 here); any remaining occurrences of the same name on the page are left as they are.
function App() {
  const replaceFirstMatch = async () => {
    // Get the Spire.PDF WASM module
    const pdfModule = window.wasmModule?.spirepdf;

    // Check whether the module is ready
    if (!pdfModule) {
      alert('Spire.PDF is not ready yet');
      return;
    }

    // Load the font into the VFS
    await window.spire.FetchFileToVFS('ARIAL.TTF', '/Library/Fonts/', `${process.env.PUBLIC_URL}/font/`);

    // Load the PDF file to be processed into the VFS
    const inputFileName = 'ProductOverview.pdf';
    await window.spire.FetchFileToVFS(inputFileName, "", `${process.env.PUBLIC_URL}/data/`);

    // Create a PdfDocument object and load the PDF document
    let doc = new pdfModule.PdfDocument();
    doc.LoadFromFile(inputFileName);

    // Take the first page; the replacement is limited to this page
    let page = doc.Pages.get_Item(0);

    // Create the text replacer and replace only the first match
    const replacer = new pdfModule.PdfTextReplacer(page);
    replacer.ReplaceText('Stellar Drive', 'Nova Drive');

    const outputFileName = 'ReplaceFirstMatch.pdf';
    doc.SaveToFile(outputFileName);
    doc.Close();

    // Read the generated file from the VFS and trigger the download
    const fileArray = window.dotnetRuntime.Module.FS.readFile(outputFileName);
    const blob = new Blob([fileArray], { type: 'application/pdf' });
    const url = URL.createObjectURL(blob);
    const a = document.createElement('a');
    a.href = url;
    a.download = outputFileName;
    a.click();
    URL.revokeObjectURL(url);
  };

  return (
    <div style={{ textAlign: 'center', height: '300px' }}>
      <h1>Replace the First Match</h1>
      <button onClick={replaceFirstMatch}>
        Replace
      </button>
    </div>
  );
}

export default App;
Only the first match is replaced:
Replace All Matches
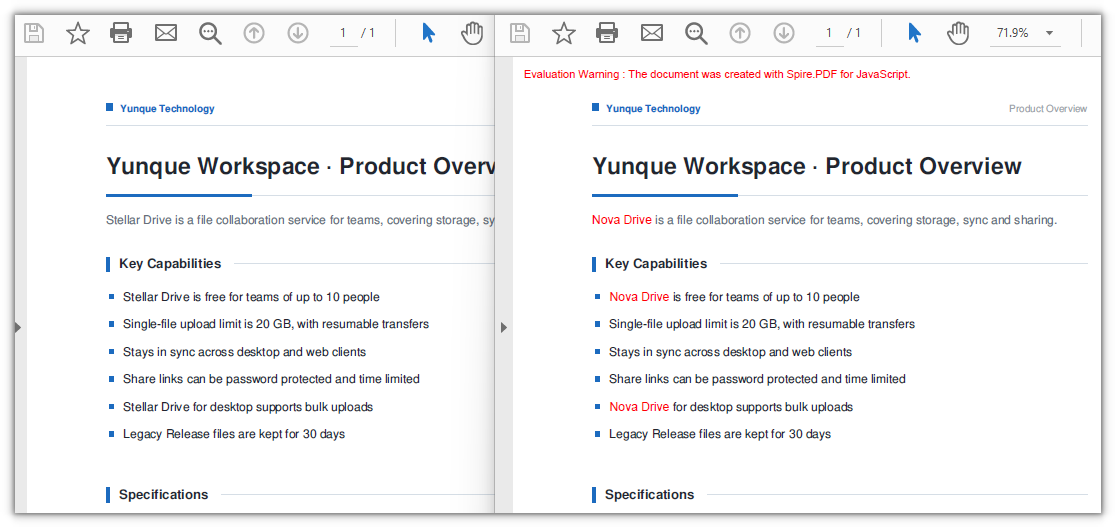
Spire.PDF for JavaScript also provides PdfTextReplacer.ReplaceAllText(), which swaps every matching piece of text on the page in one go. It takes the same arguments as ReplaceText and likewise returns the number of replacements. It also has a three-argument overload, ReplaceAllText(old, new, color), which recolors the text as it replaces it.
function App() {
  const replaceAllMatches = async () => {
    // Get the Spire.PDF WASM module
    const pdfModule = window.wasmModule?.spirepdf;

    // Check whether the module is ready
    if (!pdfModule) {
      alert('Spire.PDF is not ready yet');
      return;
    }

    // Load the font into the VFS
    await window.spire.FetchFileToVFS('ARIAL.TTF', '/Library/Fonts/', `${process.env.PUBLIC_URL}/font/`);

    // Load the PDF file to be processed into the VFS
    const inputFileName = 'ProductOverview.pdf';
    await window.spire.FetchFileToVFS(inputFileName, "", `${process.env.PUBLIC_URL}/data/`);

    // Create a PdfDocument object and load the PDF document
    let doc = new pdfModule.PdfDocument();
    doc.LoadFromFile(inputFileName);

    let page = doc.Pages.get_Item(0);

    // The third argument is a color, recoloring the new word as it is written
    const replacer = new pdfModule.PdfTextReplacer(page);
    replacer.ReplaceAllText('Stellar Drive', 'Nova Drive', pdfModule.Color.get_Red());

    const outputFileName = 'ReplaceAllMatches.pdf';
    doc.SaveToFile(outputFileName);
    doc.Close();

    // Read the generated file from the VFS and trigger the download
    const fileArray = window.dotnetRuntime.Module.FS.readFile(outputFileName);
    const blob = new Blob([fileArray], { type: 'application/pdf' });
    const url = URL.createObjectURL(blob);
    const a = document.createElement('a');
    a.href = url;
    a.download = outputFileName;
    a.click();
    URL.revokeObjectURL(url);
  };

  return (
    <div style={{ textAlign: 'center', height: '300px' }}>
      <h1>Replace All Matches</h1>
      <button onClick={replaceAllMatches}>
        Replace
      </button>
    </div>
  );
}

export default App;
All old name are replaced, and the new name is recolored red at the same time:
Beyond recoloring,
PdfTextReplacer.Optionshas two more switches.ReplaceTypedecides what counts as a match: by default only an identical string is accepted, and it can be switched toIgnoreCase,WholeWordorRegex.SetReplacementArealimits the replacement to a rectangle, whichPdfTextFindercan work out first:
const replacer = new pdfModule.PdfTextReplacer(page);
// Ignore case
replacer.Options.ReplaceType = pdfModule.ReplaceActionType.IgnoreCase;

// Limit the replacement to a rectangle
const finds = new pdfModule.PdfTextFinder(page).Find('Stellar Drive');
replacer.Options.SetReplacementArea(finds.get(0).Bounds[0]);

// Call it once the options are set
const count = replacer.ReplaceAllText('Stellar Drive', 'Nova Drive');
Replace by Covering
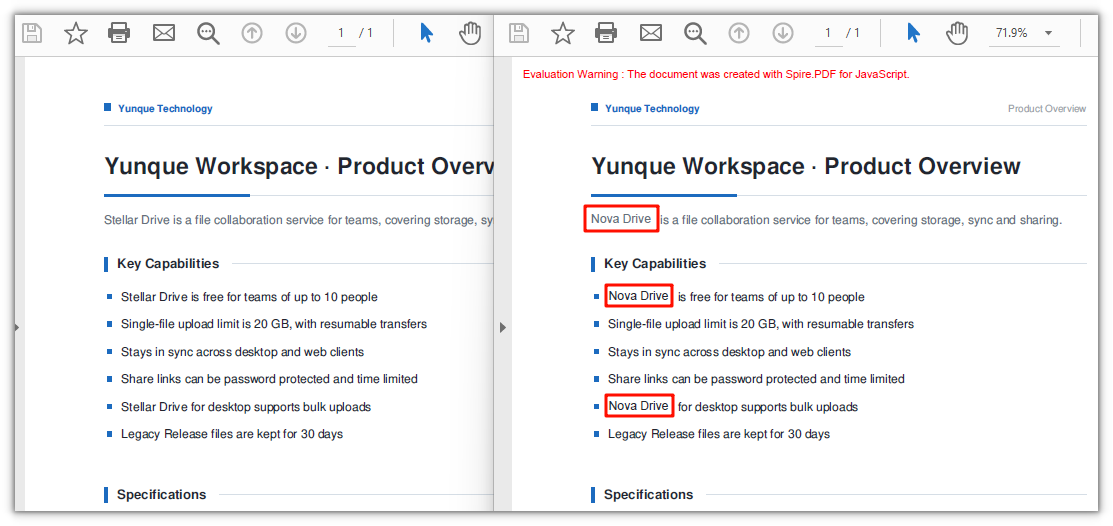
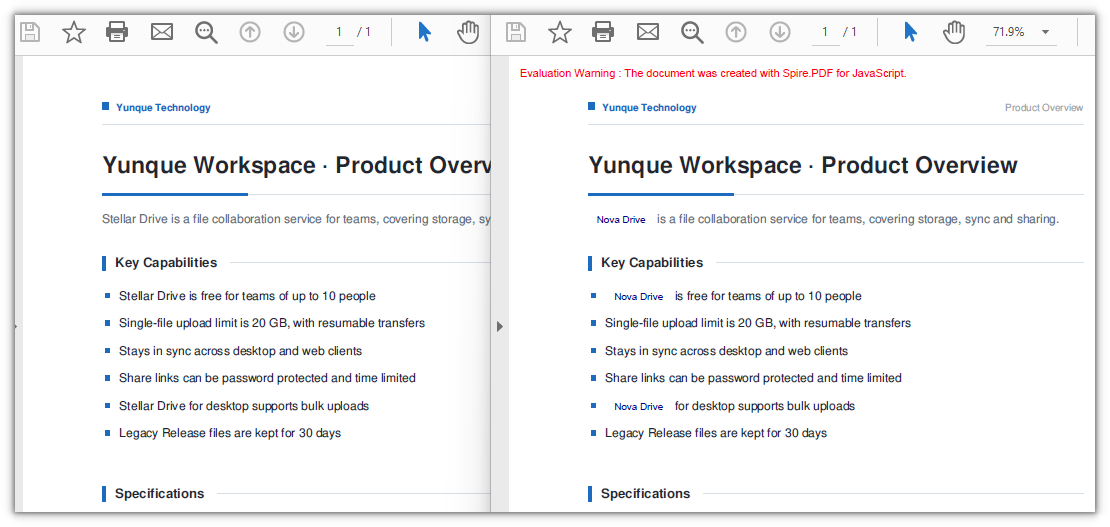
Spire.PDF for JavaScript also provides PdfTextFragment.ApplyRecoverString(), which covers a located piece of text in place: it lays a background color over the original and then writes the new text in the same position. It spares you from working out coordinates and redrawing by hand. The price is that only the background color can be chosen: the new text is drawn with the font resolved from the VFS and keeps the original foreground color, and with a white background the seam is invisible. When the font and the color need to change as well, see the redrawing approach in the next section.
function App() {
  const replaceByCovering = async () => {
    // Get the Spire.PDF WASM module
    const pdfModule = window.wasmModule?.spirepdf;

    // Check whether the module is ready
    if (!pdfModule) {
      alert('Spire.PDF is not ready yet');
      return;
    }

    // Load the fonts used by the document into the VFS
    await window.spire.FetchFileToVFS('ARIAL.TTF', '/Library/Fonts/', `${process.env.PUBLIC_URL}/font/`);

    // Load the PDF file to be processed into the VFS
    const inputFileName = 'ProductOverview.pdf';
    await window.spire.FetchFileToVFS(inputFileName, "", `${process.env.PUBLIC_URL}/data/`);

    // Create a PdfDocument object and load the PDF document
    let doc = new pdfModule.PdfDocument();
    doc.LoadFromFile(inputFileName);

    let page = doc.Pages.get_Item(0);

    // Locate the target text with a finder first
    const finder = new pdfModule.PdfTextFinder(page);
    const finds = finder.Find('Stellar Drive');

    // Cover each hit in turn: the second argument is the background color,
    // and the third one, true, writes the new text as Unicode
    for (let i = 0; i < finds.length; i++) {
      finds.get(i).ApplyRecoverString('Nova Drive', pdfModule.Color.get_White(), true);
    }

    const outputFileName = 'RecoverReplace.pdf';
    doc.SaveToFile(outputFileName);
    doc.Close();

    // Read the generated file from the VFS and trigger the download
    const fileArray = window.dotnetRuntime.Module.FS.readFile(outputFileName);
    const blob = new Blob([fileArray], { type: 'application/pdf' });
    const url = URL.createObjectURL(blob);
    const a = document.createElement('a');
    a.href = url;
    a.download = outputFileName;
    a.click();
    URL.revokeObjectURL(url);
  };

  return (
    <div style={{ textAlign: 'center', height: '300px' }}>
      <h1>Replace by Covering</h1>
      <button onClick={replaceByCovering}>
        Replace
      </button>
    </div>
  );
}

export default App;
A document where the original text is covered with a white background and the new word is written in its place:
Draw a Rectangle to Cover the Original and Redraw the Text
The first three sections all work on the text layer. This one takes a different tack: use PdfTextFinder to get the position of the keyword, draw a white rectangle to cover the original text, and then write the new text inside that rectangle. Compared with ApplyRecoverString, the extra freedom is that you choose the font, size and color yourself.
function App() {
  const replaceByDrawing = async () => {
    // Get the Spire.PDF WASM module
    const pdfModule = window.wasmModule?.spirepdf;

    // Check whether the module is ready
    if (!pdfModule) {
      alert('Spire.PDF is not ready yet');
      return;
    }

    // Load the font into the VFS
    await window.spire.FetchFileToVFS('ARIAL.TTF', '/Library/Fonts/', `${process.env.PUBLIC_URL}/font/`);

    // Load the PDF file to be processed into the VFS
    const inputFileName = 'ProductOverview.pdf';
    await window.spire.FetchFileToVFS(inputFileName, "", `${process.env.PUBLIC_URL}/data/`);

    // Create a PdfDocument object and load the PDF document
    let doc = new pdfModule.PdfDocument();
    doc.LoadFromFile(inputFileName);

    let page = doc.Pages.get_Item(0);

    // Locate the target text with a finder first
    const finder = new pdfModule.PdfTextFinder(page);
    const finds = finder.Find('Stellar Drive');

    // The white rectangle that covers the original, plus the new word's font and color
    const white = pdfModule.PdfBrushes.get_White();
    const FONT_SIZE = 9;
    const font = new pdfModule.PdfTrueTypeFont({ fontFile: '/Library/Fonts/ARIAL.TTF', size: FONT_SIZE });
    const brush = new pdfModule.PdfSolidBrush({ pdfRGBColor: new pdfModule.PdfRGBColor({ color: pdfModule.Color.get_DarkBlue() }) });

    // Turn LineLimit off so the text is not clipped to the box
    const format = new pdfModule.PdfStringFormat();
    format.LineLimit = false;
    // Set the alignment of the text
    format.Alignment = pdfModule.PdfTextAlignment.Center;
    format.LineAlignment = pdfModule.PdfVerticalAlignment.Middle;

    for (let i = 0; i < finds.length; i++) {
      const rec = finds.get(i).Bounds[0];

      // Cover the original text with a white rectangle first
      page.Canvas.DrawRectangle({ brush: white, rectangle: rec });

      // Write the new word straight into the hit box
      page.Canvas.DrawString({ s: 'Nova Drive', font: font, brush: brush, layoutRectangle: rec, format: format });
    }

    const outputFileName = 'DrawRectangleAndText.pdf';
    doc.SaveToFile(outputFileName);
    doc.Close();

    // Read the generated file from the VFS and trigger the download
    const fileArray = window.dotnetRuntime.Module.FS.readFile(outputFileName);
    const blob = new Blob([fileArray], { type: 'application/pdf' });
    const url = URL.createObjectURL(blob);
    const a = document.createElement('a');
    a.href = url;
    a.download = outputFileName;
    a.click();
    URL.revokeObjectURL(url);
  };

  return (
    <div style={{ textAlign: 'center', height: '300px' }}>
      <h1>Draw a Rectangle to Cover the Original and Redraw the Text</h1>
      <button onClick={replaceByDrawing}>
        Replace
      </button>
    </div>
  );
}

export default App;
A document where a white rectangle covers the original text and the new word is written directly inside the hit box:
FAQ
The old name can still be found and copied after replacement
Cause: ApplyRecoverString is a visual-layer operation — it lays a background color over the original text and draws the new word on top, while the original text object stays in the text layer, so searching or copying in a reader still returns the old name. Measured on the covering replacement, the occurrence count of the old word is unchanged while the new word gains four hits.
Fix: When a real replacement at the content level is needed, switch to PdfTextReplacer; in its output the old word disappears from the text layer and the new word enters it. Measured, the four occurrences of the old word drop to 0 and the new word rises from 1 to 5:
// Content-level replacement: the old text no longer remains
const replacer = new pdfModule.PdfTextReplacer(page);
replacer.ReplaceAllText('Stellar Drive', 'Nova Drive');
Following the official sample's white rectangle plus DrawString redraw, the white background appears but the new text does not
Cause: The official sample follows the same approach as the fourth section here — locate the position with PdfTextFinder, draw a white rectangle to cover the original text, then paint the new text with Canvas.DrawString. The white rectangle is fine, but the redraw step has a trap:
- The rectangle overload of
DrawStringis governed byPdfStringFormat.LineLimit, which defaults totrueand clips the text to the box; the hit box hugs the glyphs tightly, so if its height is 11 points (exactly the font size) it cannot hold a full line height, and the whole line is clipped away — the new text appears neither on the page nor in the text layer.
Fix: Pass a PdfStringFormat with LineLimit turned off and the hit box can be used as the layout box as it is (which is what the fourth section does).
const format = new pdfModule.PdfStringFormat();
format.LineLimit = false;

page.Canvas.DrawString({ s: 'Nova Drive', font: font, brush: brush, layoutRectangle: rec, format: format });
Get a Free License
If you want to remove the evaluation message from the result document, or get past the feature limits, contact sales for a 30-day temporary license.
Convert PDF to PCL in React with JavaScript
Many printers and print services only speak PCL (Printer Command Language). When the contract or manual at hand is a PDF, the old routes were to install a driver and save the file under a new format from desktop software, or to hand the file to a server that does the conversion — the first cannot be folded into a web workflow, and the second means the document leaves the user's device.
This article shows how to convert a PDF to PCL with Spire.PDF for JavaScript. Built on WebAssembly, it loads and saves PDF documents directly in the browser, so the whole conversion stays local and files are read and written through a virtual file system (VFS) with no backend service required.
For installation and project configuration, refer to Integrating Spire.PDF for JavaScript in a React Project. The following example assumes Spire.PDF is installed and the WebAssembly module has been initialized.
Convert PDF to PCL
To hand a document to a print pipeline that only accepts PCL, use PdfDocument.SaveToFile to write the whole document out as a PCL file — pass FileFormat.PCL as the second argument and the output is HP-PCL XL (PCL6).
function App() {
  const convertPdfToPcl = async () => {
    // Get the Spire.PDF WASM module
    const pdfModule = window.wasmModule?.spirepdf;

    // Check whether the module is ready
    if (!pdfModule) {
      alert('Spire.PDF is not ready yet');
      return;
    }

    // The conversion needs the Arial Unicode MS font, load it into the VFS first
    await window.spire.FetchFileToVFS('ARIAL UNICODE MS.TTF', '/Library/Fonts/', `${process.env.PUBLIC_URL}/font/`);

    // Load the PDF file to be converted into the VFS
    const inputFileName = 'Business_Data_Overview.pdf';
    await window.spire.FetchFileToVFS(inputFileName, "", `${process.env.PUBLIC_URL}/data/`);

    // Define the output file name
    const outputFileName = 'Business_Data_Overview.pcl';

    // Load the PDF document and pass FileFormat.PCL to write out a PCL file
    let doc = new pdfModule.PdfDocument();
    doc.LoadFromFile(inputFileName);
    doc.SaveToFile(outputFileName, pdfModule.FileFormat.PCL);
    doc.Close();

    // Read the generated file from the VFS and trigger the download
    const fileArray = window.dotnetRuntime.Module.FS.readFile(outputFileName);
    const blob = new Blob([fileArray], { type: 'application/octet-stream' });
    const url = URL.createObjectURL(blob);
    const a = document.createElement('a');
    a.href = url;
    a.download = outputFileName;
    a.click();
    URL.revokeObjectURL(url);
  };

  return (
    <div style={{ textAlign: 'center', height: '300px' }}>
      <h1>Convert PDF to PCL</h1>
      <button onClick={convertPdfToPcl}>
        Start Converting
      </button>
    </div>
  );
}

export default App;
The generated PCL file, whose header states the PCL-XL language:

FAQ
The output file name ends with .pcl, so why is the file still a PDF
Reason: The single-argument overload SaveToFile(fileName) always writes in PDF format — the extension takes no part in deciding the format, so a file whose name ends with .pcl still comes out as a document whose content is PDF.
Solution: Pass the output format explicitly as the second argument:
// Single argument: writes PDF
doc.SaveToFile(outputFileName);

// FileFormat.PCL: writes a real PCL file
doc.SaveToFile(outputFileName, pdfModule.FileFormat.PCL);
What to do about Cannot found font(Arial) installed on the system.
Reason: Converting to PCL means turning the text on the page into font subsetting instructions a printer can read, and the converter looks for fonts in /Library/Fonts/ in the virtual file system — an empty directory raises this error.
Solution: Send the font into the VFS before loading the PDF:
// Placed before LoadFromFile, the font is already in the VFS when the conversion runs
await window.spire.FetchFileToVFS('ARIAL UNICODE MS.TTF', '/Library/Fonts/', `${process.env.PUBLIC_URL}/font/`);
What format is the generated PCL file, and how do I open it
Reason: The output is PCL-XL (PCL6), and the file begins with ESC%-12345X@PJL ENTER LANGUAGE = PCLXL, followed by binary HP-PCL XL;2;0 data. It is not text, so opening it in an editor only shows garbage.
Solution: Hand it straight to a printer or print service that supports PCL; there is no need to open it by hand. To confirm the format is right, read the PJL declaration at the start of the file.
Get a Free License
If you wish to remove the evaluation message from the result document or remove feature limitations, please contact sales to obtain a temporary license valid for 30 days.
Convert PDF to Grayscale or Linearized PDF in React with JavaScript
Color documents burn ink when printed, and once filed away that color is of no use; a PDF also stores its objects in the order they were written, so a reader has to download the whole file before it can render the first page — open a manual that runs to tens of megabytes and you stare at a blank screen first. Both jobs used to need desktop software, one file at a time, with no way into a web workflow.
This article uses Spire.PDF for JavaScript to convert PDF documents into grayscale and into linearized PDF files. Grayscaling changes the colors on the page, while linearization only changes how the objects are arranged inside the file, so the two do not affect each other. The library is built on WebAssembly and loads, modifies and saves PDF documents directly in the browser, reading and writing files through a virtual file system (VFS) with no backend service required.
This article covers two core features:
For installation and project configuration, refer to Integrating Spire.PDF for JavaScript in a React Project. The following examples assume Spire.PDF is installed and the WebAssembly module has been initialized.
Convert PDF to Grayscale
Grayscaling a document before printing or archiving saves color ink. Pass the input file to the PdfGrayConverter constructor and call ToGrayPdf to write out the grayscale document — the color images on the page are re-encoded as grayscale, and the text stays searchable.
function App() {
  const convertToGrayscale = async () => {
    // Get the Spire.PDF WASM module
    const pdfModule = window.wasmModule?.spirepdf;

    // Check whether the module is ready
    if (!pdfModule) {
      alert('Spire.PDF is not ready yet');
      return;
    }

    // Load the PDF file to be converted into the VFS
    const inputFileName = 'Business_Data_Overview.pdf';
    await window.spire.FetchFileToVFS(inputFileName, "", `${process.env.PUBLIC_URL}/data/`);

    // Define the output file name
    const outputFileName = 'GrayscaleDocument.pdf';

    // Construct the grayscale converter from the input file and write out the grayscale document
    const converter = new pdfModule.PdfGrayConverter({ filePath: inputFileName });
    converter.ToGrayPdf({ filePath: outputFileName });
    converter.Dispose();

    // Read the generated file from the VFS and trigger the download
    const fileArray = window.dotnetRuntime.Module.FS.readFile(outputFileName);
    const blob = new Blob([fileArray], { type: 'application/pdf' });
    const url = URL.createObjectURL(blob);
    const a = document.createElement('a');
    a.href = url;
    a.download = outputFileName;
    a.click();
    URL.revokeObjectURL(url);
  };

  return (
    <div style={{ textAlign: 'center', height: '300px' }}>
      <h1>Convert PDF to Grayscale</h1>
      <button onClick={convertToGrayscale}>
        Start Converting
      </button>
    </div>
  );
}

export default App;
The sample document after grayscaling, with the color charts turned to grayscale

Linearize a PDF
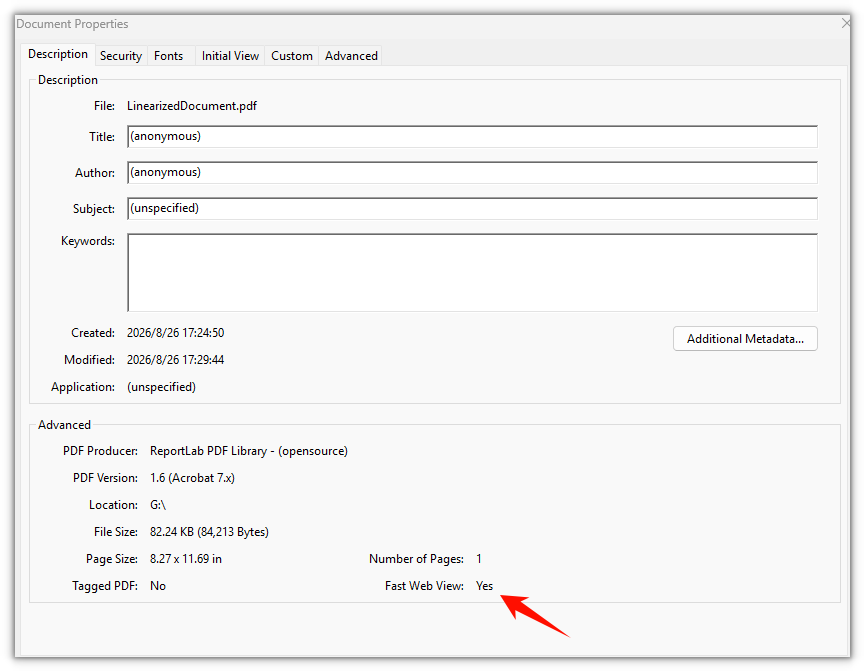
Linearization is what fast web view is built on: a reader does not have to wait for the whole file to arrive before it renders the first page. The usage is the same as in the first feature — pass the input file to the PdfToLinearizedPdfConverter constructor and call ToLinearizedPdf to write out the result, and the document keeps its appearance and content unchanged.
function App() {
  const convertToLinearized = async () => {
    // Get the Spire.PDF WASM module
    const pdfModule = window.wasmModule?.spirepdf;

    // Check whether the module is ready
    if (!pdfModule) {
      alert('Spire.PDF is not ready yet');
      return;
    }

    // Load the PDF file to be converted into the VFS
    const inputFileName = 'Business_Data_Overview.pdf';
    await window.spire.FetchFileToVFS(inputFileName, "", `${process.env.PUBLIC_URL}/data/`);

    // Define the output file name
    const outputFileName = 'LinearizedDocument.pdf';

    // Construct the linearization converter from the input file and write out the linearized document
    const converter = new pdfModule.PdfToLinearizedPdfConverter({ filePath: inputFileName });
    converter.ToLinearizedPdf({ filePath: outputFileName });
    converter.Dispose();

    // Read the generated file from the VFS and trigger the download
    const fileArray = window.dotnetRuntime.Module.FS.readFile(outputFileName);
    const blob = new Blob([fileArray], { type: 'application/pdf' });
    const url = URL.createObjectURL(blob);
    const a = document.createElement('a');
    a.href = url;
    a.download = outputFileName;
    a.click();
    URL.revokeObjectURL(url);
  };

  return (
    <div style={{ textAlign: 'center', height: '300px' }}>
      <h1>Linearize a PDF</h1>
      <button onClick={convertToLinearized}>
        Start Converting
      </button>
    </div>
  );
}

export default App;
The linearized document looks no different on the page, the change is inside the file structure
FAQ
Why does the converted document contain an extra Evaluation Warning line
Reason: An unlicensed Spire.PDF inserts a line Evaluation Warning : The document was created with Spire.PDF for JavaScript. into the output document. It is appended per call — convert the same file twice and the warning appears twice.
Solution: Request a temporary 30-day license and the output document no longer carries the warning. See "Get a Free License" at the end of this article.
Why is the grayscale file smaller
Reason: Grayscaling works by re-encoding color images as single-channel DeviceGray images, and the space they take drops along with the channel count. The color images in the sample document were 3-channel PNGs totaling about 66 KB, and come out at about 31 KB; the whole file went from 82 KB down to 44 KB.
Solution: This is the normal result of image re-encoding and needs no extra handling. The page count and the text content are unchanged, the text is still searchable and copyable, and only the colors are rewritten.
Get a Free License
If you wish to remove the evaluation message from the result document or remove feature limitations, please contact sales to obtain a temporary license valid for 30 days.
Import and Export PDF Form Data Using JavaScript in React
Once a table has been turned into a PDF, the data is sealed up together with the layout. Send the same document to ten people and what comes back is ten separately filled-in PDFs; to move the contents of one onto a different template, the only way is to copy it off the screen one field at a time. The form fields themselves do have names and the values do hang off those names, but as soon as you leave a reader, that structure can no longer be pulled back out.
This article uses Spire.PDF for JavaScript to export the values in a form's fields to a data file, then import that data file back into a blank form. ExportData and ImportData both support Xml, Fdf, and XFdf — the three are nothing more than a difference of DataFormat enum values, called in exactly the same way, differing only in the structure of the file written out. The code below runs the whole flow with XML, with the FDF and XFDF versions listed alongside in comments; uncomment to switch. Spire.PDF for JavaScript reads and writes documents in the browser on top of WebAssembly, so the whole process happens locally, going through a virtual file system (VFS) to read and write files, with no backend involved.
This article covers two core features:
For installation and project configuration, see Integrate Spire.PDF for JavaScript in a React Project. The examples below assume Spire.PDF is installed and the WebAssembly module is initialized.
Export PDF Form Data
PdfFormWidget.ExportData writes the values in a form's fields out to a single data file, with the format given by the second parameter, DataFormat. The three formats hold the same set of field values; they differ in file structure:
| Data format | File structure |
|---|---|
DataFormat.Xml |
Adobe form data XML — the field name is the element name, the value is the element content |
DataFormat.Fdf |
Forms Data Format (FDF) — a text structure starting with %FDF-, where /T holds the field name and /V the value |
DataFormat.XFdf |
XFDF, standard XML — one <field name="…"> per field, with the value inside <value> |
The third parameter is the form name; for an unnamed AcroForm, pass an empty string.
function App() {
  const exportFormData = async () => {
    // Get the Spire.PDF WASM module
    const pdfModule = window.wasmModule?.spirepdf;

    // Check that the module is ready
    if (!pdfModule) {
      alert('Spire.PDF is not ready yet');
      return;
    }

    // Load the PDF file to be exported into the VFS
    const inputFileName = 'CustomerInformationForm.pdf';
    await window.spire.FetchFileToVFS(inputFileName, "", `${process.env.PUBLIC_URL}/data/`);

    // Create a PdfDocument object and load the PDF document
    const doc = new pdfModule.PdfDocument();
    doc.LoadFromFile(inputFileName);

    // Build a PdfFormWidget from the document's form handle to reach the data export API
    const formWidget = new pdfModule.PdfFormWidget(doc.Form.H);

    // This demo exports XML
    const dataFiles = [
      { fileName: 'FormData.xml', format: pdfModule.DataFormat.Xml },
      // { fileName: 'FormData.fdf', format: pdfModule.DataFormat.Fdf },
      // { fileName: 'FormData.xfdf', format: pdfModule.DataFormat.XFdf },
    ];

    for (const item of dataFiles) {
      // The third parameter is the form name; pass an empty string for an unnamed form
      formWidget.ExportData(item.fileName, item.format, '');
    }
    doc.Close();

    // Read the generated file from the VFS and trigger the download
    for (const item of dataFiles) {
      const fileArray = window.dotnetRuntime.Module.FS.readFile(item.fileName);
      const blob = new Blob([fileArray], { type: 'application/octet-stream' });
      const url = URL.createObjectURL(blob);
      const a = document.createElement('a');
      a.href = url;
      a.download = item.fileName;
      a.click();
      URL.revokeObjectURL(url);
    }
  };

  return (
    <div style={{ textAlign: 'center', height: '300px' }}>
      <h1>Export Form Data</h1>
      <button onClick={exportFormData}>
        Export
      </button>
    </div>
  );
}

export default App;
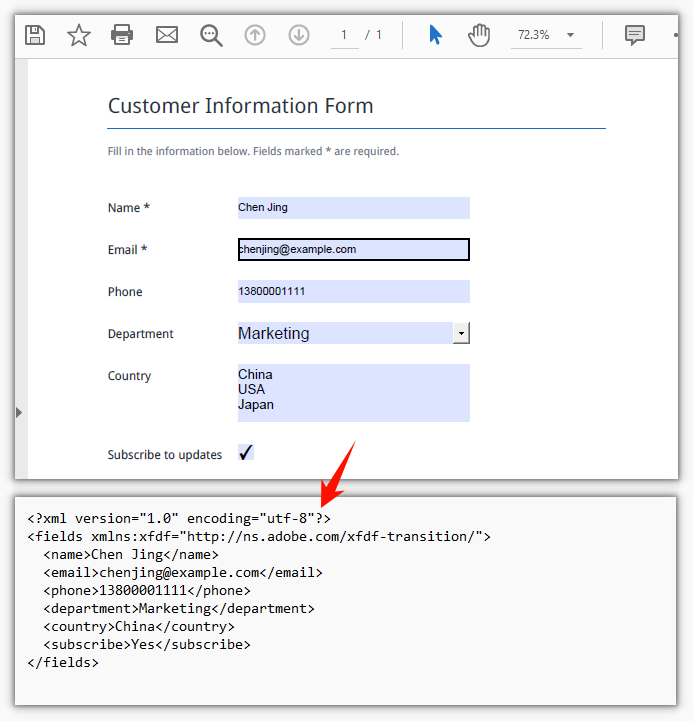
The exported XML form data file:
Import PDF Form Data
PdfFormWidget.ImportData reads a data file and writes the values back into the form fields by field name; the second parameter, DataFormat, only determines how the file is parsed and has nothing to do with the file extension — the same for all three formats.
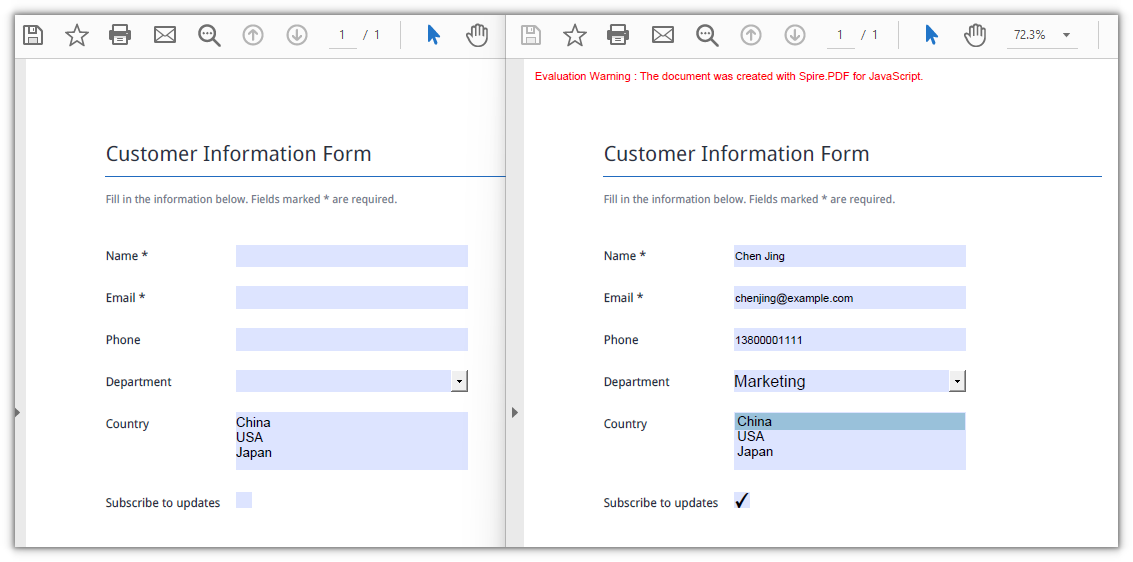
What gets imported is the blank form. The template goes out empty, and once the data files come back the values are filled in one by one — with a lot of fields there is no need to key everything in a second time.
function App() {
  const importFormData = async () => {
    // Get the Spire.PDF WASM module
    const pdfModule = window.wasmModule?.spirepdf;

    // Check that the module is ready
    if (!pdfModule) {
      alert('Spire.PDF is not ready yet');
      return;
    }

    // Load the blank form to be filled into the VFS
    const inputFileName = 'BlankCustomerInformationForm.pdf';
    await window.spire.FetchFileToVFS(inputFileName, "", `${process.env.PUBLIC_URL}/data/`);

    // This demo refills from the XML data file
    const dataFiles = [
      { fileName: 'FormData.xml', format: pdfModule.DataFormat.Xml, outputFileName: 'ImportedXMLData.pdf' },
      // { fileName: 'FormData.fdf', format: pdfModule.DataFormat.Fdf, outputFileName: 'ImportedFDFData.pdf' },
      // { fileName: 'FormData.xfdf', format: pdfModule.DataFormat.XFdf, outputFileName: 'ImportedXFDFData.pdf' },
    ];

    for (const item of dataFiles) {
      // The data file also has to be loaded into the VFS first
      await window.spire.FetchFileToVFS(item.fileName, "", `${process.env.PUBLIC_URL}/data/`);

      const doc = new pdfModule.PdfDocument();
      doc.LoadFromFile(inputFileName);

      // Read the data file and write the values back into the fields by name
      const formWidget = new pdfModule.PdfFormWidget(doc.Form.H);
      formWidget.ImportData(item.fileName, item.format);

      doc.SaveToFile(item.outputFileName);
      doc.Close();

      // Read the generated file from the VFS and trigger the download
      const fileArray = window.dotnetRuntime.Module.FS.readFile(item.outputFileName);
      const blob = new Blob([fileArray], { type: 'application/pdf' });
      const url = URL.createObjectURL(blob);
      const a = document.createElement('a');
      a.href = url;
      a.download = item.outputFileName;
      a.click();
      URL.revokeObjectURL(url);
    }
  };

  return (
    <div style={{ textAlign: 'center', height: '300px' }}>
      <h1>Import Form Data</h1>
      <button onClick={importFormData}>
        Import
      </button>
    </div>
  );
}

export default App;
The form after the XML data has been imported:
FAQ
Some fields are still empty after import
Cause: Import matches by field name, so the names in the data file have to be exactly the same as the field names in the form, case and spaces included. A field that doesn't match is skipped outright — no error and no return value saying so; only the fields that do match get a value.
Solution: Walk the field collection first and print out the real names, then check the data file against them:
const fields = formWidget.FieldsWidget;
for (let i = 0; i < fields.Count; i++) {
  console.log(fields.get_Item({ index: i }).Name);
}
Which of the three data formats should you choose
Cause: All three hold the same field values; the difference is structure and tool support. Fdf is the smallest, starts with %FDF-, and suits passing data between form programs only; XFdf and Xml are both XML, so they can be opened and read directly and diffed with text tools, which makes them safer for moving between tools; Xml puts the field name right in the element name, the most straightforward structure of the three.
Solution: Use Fdf for round trips inside a program; use XFdf when the file goes into version control, needs a human eye, or has to talk to another system; use Xml when all you need is a readable list of field names and values.
Import throws Xml_MessageWithErrorPosition or "not a valid FDF file"
Cause: ImportData parses the file as whatever format the second parameter names, and never looks at the extension. When the content doesn't match the format, it fails at the first step: XML reports Xml_MessageWithErrorPosition, Xml_InvalidRootData, and a non-FDF file reports The source is not a valid FDF file because it does not start with "%FDF-".
Solution: Pass the DataFormat that matches the file's real format, and use the original exported data file rather than another format after re-saving it.
Get a Free License
If you want to remove the evaluation message from the result document, or to get rid of the feature limitations, contact sales for a temporary license valid for 30 days.
Extract PDF Form Field Values Using JavaScript in React
A form-based PDF keeps its whole value in what was filled in, but once the file is filed away or handed over, that data is locked inside the layout. To find out what a field holds you have to open a reader and copy it out one by one; with a few dozen fields, transcribing by hand is slow and easy to get wrong. Before those values can be validated, imported into a database, or used to track an order, the program has to be able to read them out first.
This article shows how to extract form field values from an existing PDF with Spire.PDF for JavaScript: walk the field collection, determine each field's type, then read the current value of each text box, list box, combo box, radio button, and check box by type. Spire.PDF for JavaScript is built on WebAssembly and opens and parses documents in the browser, so the whole read happens locally. Files are read and written through a virtual file system (VFS), with no backend involved.
This article covers one core feature:
For installation and project configuration, see Integrate Spire.PDF for JavaScript in a React Project. The examples below assume Spire.PDF is installed and the WebAssembly module is initialized.
Extract All Form Field Values
Spire.PDF for JavaScript provides PdfFormWidget to take over the form fields already present in a document; FieldsWidget is its field collection, and fields can be pulled out one by one by index. The value properties are not uniform across field types: a text box keeps its value on Text, a check box is judged by Checked, list boxes and combo boxes split into an option collection and a selected value, and a radio button is read straight from Value. So once a field is in hand, dispatch on its type and then read the matching value, writing the type name into the result alongside it — you never need to know in advance which fields the document contains.
function App() {
  const getAllFieldValues = async () => {
    // Get the Spire.PDF WASM module
    const pdfModule = window.wasmModule?.spirepdf;

    // Check that the module is ready
    if (!pdfModule) {
      alert('Spire.PDF is not ready yet');
      return;
    }

    // Load the PDF file to be read into the VFS
    const inputFileName = 'ApplicationForm.pdf';
    await window.spire.FetchFileToVFS(inputFileName, "", `${process.env.PUBLIC_URL}/data/`);

    // Create a PdfDocument object and load the PDF document
    const doc = new pdfModule.PdfDocument();
    doc.LoadFromFile(inputFileName);

    // Build a PdfFormWidget from the document's form handle; FieldsWidget is its field collection
    const formWidget = new pdfModule.PdfFormWidget(doc.Form.H);
    const fields = formWidget.FieldsWidget;

    let report = '';

    // Walk the field collection, check each type, and read the matching value
    for (let i = 0; i < fields.Count; i++) {
      const field = fields.get_Item({ index: i });

      // Both the type name and the value are filled in by the type dispatch
      let type = 'Unknown';
      let value = '(Unrecognized field type)';

      if (field instanceof pdfModule.PdfTextBoxFieldWidget) {
        // Text box field: read Text directly
        type = 'TextBox';
        value = field.Text;
      } else if (field instanceof pdfModule.PdfListBoxWidgetFieldWidget) {
        // List box field: Values holds every option, SelectedValue is the current one
        const options = [];
        for (let j = 0; j < field.Values.Count; j++) {
          options.push(field.Values.get_Item(j).Value);
        }
        type = 'ListBox';
        value = `Selected ${field.SelectedValue}, options ${options.join(', ')}`;
      } else if (field instanceof pdfModule.PdfComboBoxWidgetFieldWidget) {
        // Combo box field: like a list box, it has an option collection and a selected value
        const options = [];
        for (let j = 0; j < field.Values.Count; j++) {
          options.push(field.Values.get_Item(j).Value);
        }
        type = 'ComboBox';
        value = `Selected ${field.SelectedValue}, options ${options.join(', ')}`;
      } else if (field instanceof pdfModule.PdfRadioButtonListFieldWidget) {
        // Radio button field: Value is the selected item
        type = 'RadioButton';
        value = `Selected ${field.Value}`;
      } else if (field instanceof pdfModule.PdfCheckBoxWidgetFieldWidget) {
        // Check box field: Checked gives the state, not Value
        type = 'CheckBox';
        value = field.Checked ? 'Checked' : 'Not checked';
      }

      report += `Field "${field.Name}" (${type}): ${value}\n`;
    }

    const outputFileName = 'AllFieldValues.txt';
    window.dotnetRuntime.Module.FS.writeFile(outputFileName, report);
    doc.Close();

    // Read the generated file from the VFS and trigger the download
    const fileArray = window.dotnetRuntime.Module.FS.readFile(outputFileName);
    const blob = new Blob([fileArray], { type: 'text/plain' });
    const url = URL.createObjectURL(blob);
    const a = document.createElement('a');
    a.href = url;
    a.download = outputFileName;
    a.click();
    URL.revokeObjectURL(url);
  };

  return (
    <div style={{ textAlign: 'center', height: '300px' }}>
      <h1>Extract Form Field Values</h1>
      <button onClick={getAllFieldValues}>
        Extract values
      </button>
    </div>
  );
}

export default App;
The values collected by walking every form field:

FAQ
A check box's Value doesn't give you its state
Cause: The check box widget (PdfCheckBoxWidgetFieldWidget) has no Value property — reading it gets you undefined. A check box tracks its state through export values: Off when it is not ticked, Yes or a custom export value when it is. A string value cannot tell you whether the box is checked.
Solution: Use Checked for the state:
// Check the state with Checked, not Value
const checked = field.Checked;
Should a list box or combo box be read with SelectedValue or Values
Cause: For these two fields Values is the full option set — walking it gives you every choice, and each entry is a PdfListWidgetItem whose .Value is the option text, so the item has to be unwrapped one more time; the item the user actually selected lives on SelectedValue. Treat Values as the value and what you get is not the filled-in result.
Solution: Read SelectedValue for the current value; walk Values only when you need to show the available range:
// The text of the currently selected item
const selected = field.SelectedValue;

// Every available option
const options = [];
for (let j = 0; j < field.Values.Count; j++) {
  options.push(field.Values.get_Item(j).Value);
}
Loading an encrypted PDF throws "Can not open an encrypted document. The password is invalid."
Cause: Reading a form means the document has to open first; when the document is password-protected, LoadFromFile without the password throws during loading, and no empty document comes back.
Solution: Pass the open password as the second argument to LoadFromFile:
doc.LoadFromFile(inputFileName, 'spire123');
Get a Free License
If you want to remove the evaluation message from the result document, or to get rid of the feature limitations, contact sales for a temporary license valid for 30 days.