
Watermark (3)
Contracts, bids, and other multi-page documents get a cross-page seal before they go out, so that every page carries a fragment of the seal — if the other party swaps or reorders pages, the fragments no longer line up. With paper you stamp the whole stack at once; an electronic PDF has no equivalent gesture: paste the seal image on whole and every page shows a complete seal, which serves no cross-page purpose.
This article shows how to add a cross-page seal to a multi-page contract with Spire.PDF for JavaScript. Built on WebAssembly, it loads, modifies, and saves PDF documents directly in the browser, so the whole process stays local and files are read and written through a virtual file system (VFS) with no backend service required.
For installation and project configuration, refer to Integrating Spire.PDF for JavaScript in a React Project. The following example assumes Spire.PDF is installed and the WebAssembly module has been initialized.
Add a Cross-Page Seal
A cross-page seal cuts one seal into as many pieces as there are pages, leaving one piece on each page, so that flipping through the pages rebuilds the complete seal. The cutting is carried by a PdfTemplate: the template's bounds are the clipping area, so shifting the seal one strip width further left on each successive page makes exactly that page's strip show through, and Canvas.DrawTemplate drops it at the right edge of the page.
function App() {
  const addCrossPageSeal = async () => {
    // Get the Spire.PDF WASM module
    const pdfModule = window.wasmModule?.spirepdf;

    // Make sure the module is ready
    if (!pdfModule) {
      alert('Spire.PDF is not ready yet');
      return;
    }

    // Load the document to be sealed and the seal image into the VFS
    const inputFileName = 'Number.pdf';
    const sealFileName = 'Seal.png';
    await window.spire.FetchFileToVFS(inputFileName, '', `${process.env.PUBLIC_URL}/data/`);
    await window.spire.FetchFileToVFS(sealFileName, '', `${process.env.PUBLIC_URL}/data/`);

    // Create a PdfDocument object and load the document
    const doc = new pdfModule.PdfDocument();
    doc.LoadFromFile(inputFileName);

    // Load the seal image; its width and height are in pixels, treated as points (1 px = 1 pt) when laid out
    const seal = pdfModule.PdfImage.FromFile(sealFileName);

    // Overall scale of the seal, and the scaled seal width and height
    const scale = 0.55;
    const sealWidth = seal.Width * scale;
    const sealHeight = seal.Height * scale;

    // Split the seal evenly by page count, one strip per page
    const pageCount = doc.Pages.Count;
    const stripWidth = sealWidth / pageCount;

    // Draw the i-th strip of the seal at the right edge of each page
    for (let i = 0; i < pageCount; i++) {
      const page = doc.Pages.get_Item(i);

      // The template bounds are the clipping area: one strip wide and as tall as the seal
      const template = new pdfModule.PdfTemplate({ width: stripWidth, height: sealHeight });
      template.Graphics.ScaleTransform(scale, scale);

      // Shift the seal one more strip to the left on every page, so the next strip shows through
      template.Graphics.DrawImage({ image: seal, x: -(i * seal.Width) / pageCount, y: 0 });

      // Every page uses the same spot: 24 points in from the right edge, vertically centered
      const x = page.Canvas.ClientSize.Width - 24 - stripWidth;
      const y = (page.Canvas.ClientSize.Height - sealHeight) / 2;
      page.Canvas.DrawTemplate({ template: template, location: new pdfModule.PointF(x, y) });
    }

    // Save to the VFS
    const outputFileName = 'Cross-Page-Seal.pdf';
    doc.SaveToFile(outputFileName);
    doc.Close();

    // Read the generated file from the VFS and trigger a download
    const fileArray = window.dotnetRuntime.Module.FS.readFile(outputFileName);
    const blob = new Blob([fileArray], { type: 'application/pdf' });
    const url = URL.createObjectURL(blob);
    const a = document.createElement('a');
    a.href = url;
    a.download = outputFileName;
    a.click();
    URL.revokeObjectURL(url);
  };

  return (
    <div style={{ textAlign: 'center', height: '300px' }}>
      <h1>Add a Cross-Page Seal</h1>
      <button onClick={addCrossPageSeal}>
        Add Seal
      </button>
    </div>
  );
}

export default App;
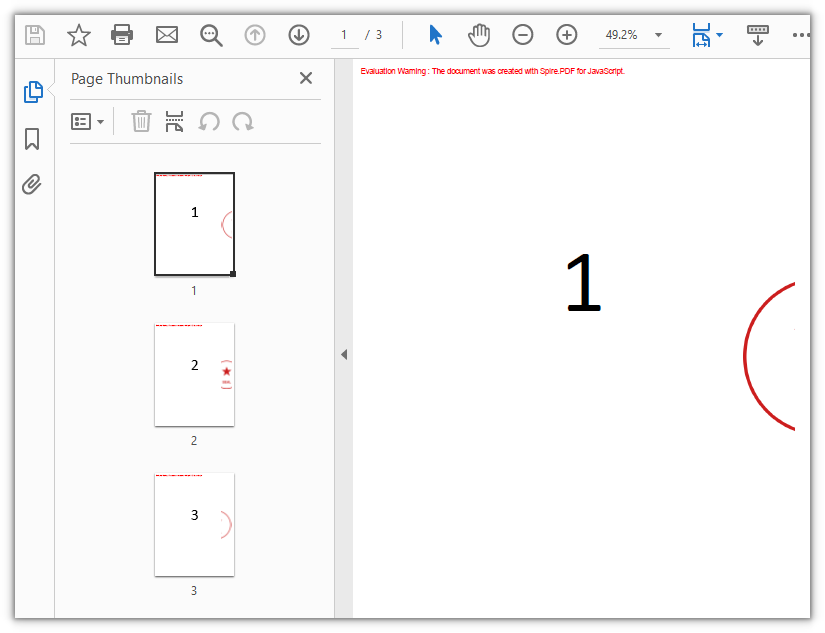
The contract after the cross-page seal is applied: each page carries one fragment of the seal at its right edge, and turning to the last page shows the right half of the seal:
FAQ
Why does each page show only a narrow slice of the seal
Reason: A cross-page seal is by definition cut evenly across the pages, so each page carries only the strip seal width / page count. The more pages, the narrower the fragment on each page — that is by design: a narrow fragment at a fixed position is what makes a single swapped page impossible to line back up.
Solution: The page count is decided by the document, so to make the seal more prominent the only lever is to enlarge the whole seal, and the fragments grow with it:
// Raise 0.55, say to 0.8: the whole seal and every page's fragment grow together
const scale = 0.8;
const sealWidth = seal.Width * scale;
The seal is so large it covers the body text
Reason: PdfImage.Width and Height report pixel values, and without scaling they are laid out at 1 pixel = 1 point. A 400×400-pixel seal takes up 400 points of width, while an A4 page is only 595 points wide, so it will cover the body text.
Solution: Scale it down proportionally inside the template with ScaleTransform, and convert the seal width, seal height, and strip width by the same factor — all three must come from one source, or the strips will not line up with the placement:
const scale = 0.55;
const sealWidth = seal.Width * scale;
const sealHeight = seal.Height * scale;
const stripWidth = sealWidth / pageCount;
Get a Free License
If you wish to remove the evaluation message from the result document or remove feature limitations, please contact sales to obtain a temporary license valid for 30 days.
PDF has a fixed layout and is easy to distribute, but once its content has been generated, it is difficult to modify within the body text. For documents such as contracts, reports, and notices, you often need to indicate the confidentiality level, copyright ownership, or usage states such as "Draft" and "Sample" without affecting the reading of the body content. Besides the text watermarks mentioned above, image watermarks made from a company logo, seal, or warning image are also quite common: they float over the content as semi-transparent images, conveying the brand and status information clearly without harming the readability of the original.
Spire.PDF for JavaScript loads, draws, and saves PDFs directly in the browser via WebAssembly, managing input and output files through a virtual file system (VFS) without requiring a backend server. Image watermarking usually takes two forms: one places a single image watermark at a specified position on the page (such as the center of the page), which can be achieved directly by loading the image with PdfImage.FromFile and combining the transparency settings of the page canvas with the DrawImage method; the other repeats the image across the whole page, which can be done with the PdfTilingBrush tiling brush.
This article covers two core features:
For installation and project setup, refer to Integrating Spire.PDF for JavaScript in a React Project. The examples below assume Spire.PDF is installed and the WebAssembly module is initialized.
Add a Single Image Watermark to PDF
A single image watermark places a semi-transparent image at a specified position on the page (in this example, the center of each page), suitable for placing a company logo or warning sign in a prominent position of the document. The approach is as follows: load the image from a file with PdfImage.FromFile; then, on the canvas of each page, save the state with Save, set the transparency and blend mode with SetTransparency, draw the image at the centered position with DrawImage, and finally restore the canvas state with Restore.
function App() {
  const addSingleImageWatermark = async () => {
    // Get the Spire.PDF WASM module
    const pdfModule = window.wasmModule?.spirepdf;

    // Check whether the WASM module is ready
    if (!pdfModule) {
      alert('Spire.PDF is not ready yet');
      return;
    }

    // Load the PDF file to be watermarked into VFS
    const inputFileName = 'Lease_Agreement_EN.pdf';
    await window.spire.FetchFileToVFS(inputFileName, "", `${process.env.PUBLIC_URL}/data/`);

    // Load the watermark image into VFS
    const inputImageName = 'logo.png';
    await window.spire.FetchFileToVFS(inputImageName, "", `${process.env.PUBLIC_URL}/data/`);

    // Create a PdfDocument object and load the PDF document
    let doc = new pdfModule.PdfDocument();
    doc.LoadFromFile(inputFileName);

    // Load the watermark image from a file
    let image = pdfModule.PdfImage.FromFile(inputImageName);

    // Loop through all the pages in the document
    for (let i = 0; i < doc.Pages.Count; i++) {
      // Get the specified page
      let page = doc.Pages.get_Item(i);

      // Save the canvas state, and set the semi-transparency (alpha 0.5) with the Multiply blend mode
      page.Canvas.Save();
      page.Canvas.SetTransparency({ alphaPen: 0.5, alphaBrush: 0.5, blendMode: pdfModule.PdfBlendMode.Multiply });

      // Compute the centered drawing position: subtract the image size from the page size and halve the result
      let position = new pdfModule.PointF(
        (page.Canvas.Size.Width - image.Width) / 2,
        (page.Canvas.Size.Height - image.Height) / 2
      );

      // Draw the watermark image at the center of the page
      page.Canvas.DrawImage({ image: image, point: position });

      // Restore the previous state of the canvas
      page.Canvas.Restore();
    }

    // Define the output file name and save the document
    const outputFileName = 'SingleImageWatermark.pdf';
    doc.SaveToFile(outputFileName);
    doc.Close();

    // Read the generated file from VFS and trigger the download
    const fileArray = window.dotnetRuntime.Module.FS.readFile(outputFileName);
    const blob = new Blob([fileArray], { type: 'application/pdf' });
    const url = URL.createObjectURL(blob);
    const a = document.createElement('a');
    a.href = url;
    a.download = outputFileName;
    a.click();
    URL.revokeObjectURL(url);
  };

  return (
    <div style={{ textAlign: 'center', height: '300px' }}>
      <h1>Add Single Image Watermark To PDF</h1>
      <button onClick={addSingleImageWatermark}>
        Generate
      </button>
    </div>
  );
}

export default App;
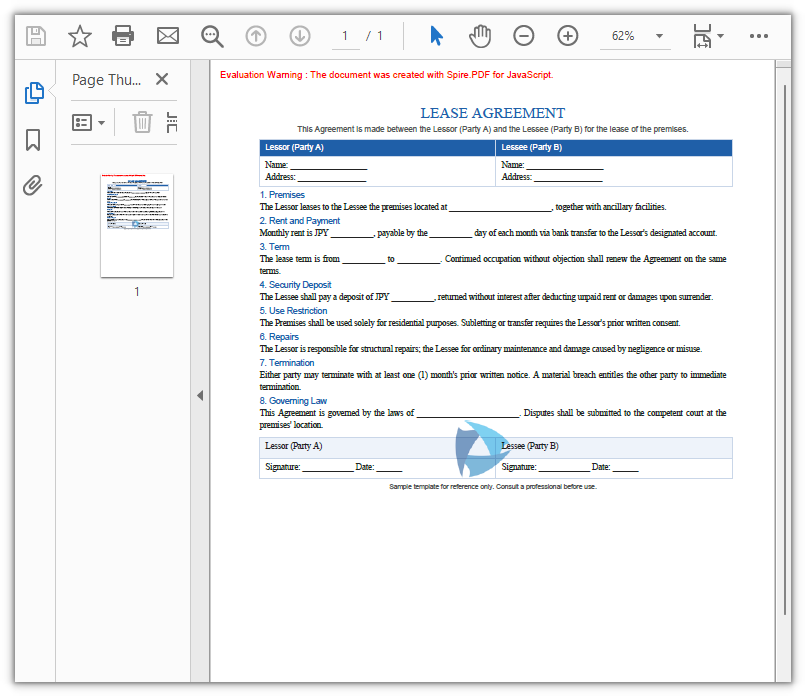
PDF document after adding the single image watermark
Add a Tiled Image Watermark to PDF
When you need the watermark to fill the whole page and form a faint background texture, use a tiled image watermark. The approach is as follows: load the image with PdfImage.FromFile; divide the page into tiling cells according to the page size with PdfTilingBrush; inside the graphics context of the brush, lower the transparency with SetTransparency and draw the image within the cell with DrawImage; finally fill the whole page with the brush using DrawRectangle so that the image repeats row by row and column by column, covering the entire page.
function App() {
  const addTiledImageWatermark = async () => {
    // Get the Spire.PDF WASM module
    const pdfModule = window.wasmModule?.spirepdf;

    // Check whether the WASM module is ready
    if (!pdfModule) {
      alert('Spire.PDF is not ready yet');
      return;
    }

    // Load the PDF file to be watermarked into VFS
    const inputFileName = 'Lease_Agreement_EN.pdf';
    await window.spire.FetchFileToVFS(inputFileName, "", `${process.env.PUBLIC_URL}/data/`);

    // Load the watermark image into VFS
    const inputImageName = 'logo.png';
    await window.spire.FetchFileToVFS(inputImageName, "", `${process.env.PUBLIC_URL}/data/`);

    // Create a PdfDocument object and load the PDF document
    let doc = new pdfModule.PdfDocument();
    doc.LoadFromFile(inputFileName);

    // Load the watermark image from a file
    let image = pdfModule.PdfImage.FromFile(inputImageName);

    // Loop through all the pages in the document
    for (let i = 0; i < doc.Pages.Count; i++) {
      // Get the specified page
      let page = doc.Pages.get_Item(i);

      // Create a tiling brush: use one third of the page width and one fifth of the page height as the tiling cell
      let size = new pdfModule.SizeF({
        width: page.Canvas.Size.Width / 3,
        height: page.Canvas.Size.Height / 5
      });
      let brush = new pdfModule.PdfTilingBrush({ size: size });

      // Set the watermark transparency to 30%
      brush.Graphics.SetTransparency({ alpha: 0.3 });

      // Draw the watermark image at the center of the tiling cell
      let point = new pdfModule.PointF(
        (brush.Size.Width - image.Width) / 2,
        (brush.Size.Height - image.Height) / 2
      );
      brush.Graphics.DrawImage({ image: image, point: point });

      // Fill a whole-page rectangle with the tiling brush so that the image watermark tiles across the entire page
      let rect = new pdfModule.RectangleF({
        location: new pdfModule.PointF(0, 0),
        size: page.Canvas.Size
      });
      page.Canvas.DrawRectangle({ brush: brush, rectangle: rect });
    }

    // Define the output file name and save the document
    const outputFileName = 'TiledImageWatermark.pdf';
    doc.SaveToFile(outputFileName);
    doc.Close();

    // Read the generated file from VFS and trigger the download
    const fileArray = window.dotnetRuntime.Module.FS.readFile(outputFileName);
    const blob = new Blob([fileArray], { type: 'application/pdf' });
    const url = URL.createObjectURL(blob);
    const a = document.createElement('a');
    a.href = url;
    a.download = outputFileName;
    a.click();
    URL.revokeObjectURL(url);
  };

  return (
    <div style={{ textAlign: 'center', height: '300px' }}>
      <h1>Add Tiled Image Watermark To PDF</h1>
      <button onClick={addTiledImageWatermark}>
        Generate
      </button>
    </div>
  );
}

export default App;
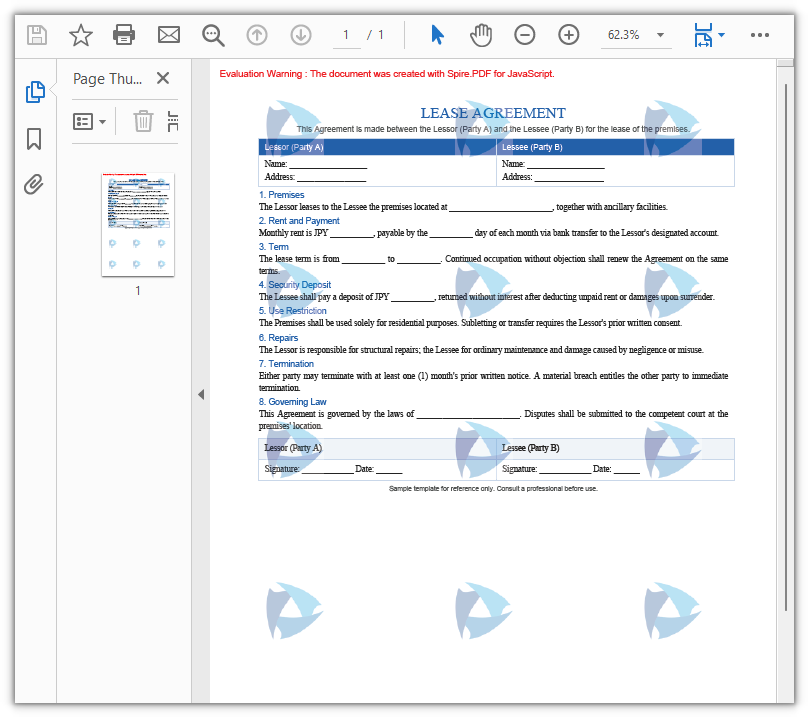
PDF document after adding the tiled image watermark
FAQ
How to control the transparency of an image watermark
Reason: An image watermark is layered over the body content as an image; if its transparency is not lowered, it will obscure the content underneath.
Solution: Before drawing, save the canvas state with Save, and then set the transparency with SetTransparency, whose value is specified by alphaPen and alphaBrush ranging from 0 (fully transparent) to 1 (opaque). To make the watermark blend naturally with the background, you can also specify a blend mode through blendMode, such as PdfBlendMode.Multiply. After drawing, restore the canvas state with Restore to avoid affecting subsequent drawing:
// Save the canvas state, set the semi-transparency and the Multiply blend mode, then draw the watermark image
page.Canvas.Save();
page.Canvas.SetTransparency({ alphaPen: 0.5, alphaBrush: 0.5, blendMode: pdfModule.PdfBlendMode.Multiply });
page.Canvas.DrawImage({ image: image, point: position });
page.Canvas.Restore();
How to specify the position of an image watermark
Reason: If no position is passed, DrawImage draws the image at the default coordinates, making it impossible to precisely control where the watermark lands.
Solution: DrawImage supports passing a PointF position or x, y coordinates. To center the image, subtract the image size from the page size and halve the result to get the centering coordinates:
// Compute the centered position: subtract the image size from the page size and halve the result
let point = new pdfModule.PointF(
  (page.Canvas.Size.Width - image.Width) / 2,
  (page.Canvas.Size.Height - image.Height) / 2
);

// Draw the watermark image at the specified position
page.Canvas.DrawImage({ image: image, point: point });
How to adjust the density of a tiled image watermark
Reason: The density of a tiled image watermark is determined by the size (tiling cell size) of the PdfTilingBrush tiling brush.
Solution: The smaller the tiling cell, the denser the repeated images; the larger the cell, the sparser they are. Set size to a certain ratio of the page width and height to tile the images row by row and column by column — for example, using one third of the page width and one fifth of the page height as one cell yields a moderately spaced watermark texture. To make it sparser, increase the divisor (such as Width / 4); to make it denser, decrease the divisor:
// Create a tiling brush: use one third of the page width and one fifth of the page height as the tiling cell
let size = new pdfModule.SizeF({
  width: page.Canvas.Size.Width / 3,
  height: page.Canvas.Size.Height / 5
});
let brush = new pdfModule.PdfTilingBrush({ size: size });
Get a Free License
If you want to remove the evaluation messages in the resulting documents or get rid of functional limitations, contact sales to obtain a 30-day temporary license.
PDF has a fixed layout and is easy to distribute, but once its content has been generated, it is difficult to modify within the body text. For documents such as contracts, reports, and notices, you often need to indicate the confidentiality level, copyright ownership, or usage states such as "Draft" and "Sample" without affecting the reading of the body content. A text watermark is a common solution to this problem: it floats over the content as semi-transparent text, conveying the information clearly without harming the readability of the original.
Spire.PDF for JavaScript loads, draws, and saves PDFs directly in the browser via WebAssembly, managing input and output files through a virtual file system (VFS) without requiring a backend server. Text watermarking usually takes two forms: one places a single line of watermark text diagonally across the center of each page, which can be achieved directly through the transparency settings and coordinate-system transformations of the page canvas; the other tiles text repeatedly across the whole page, which can be done with the PdfTilingBrush tiling brush.
This article covers two core features:
For installation and project setup, refer to Integrating Spire.PDF for JavaScript in a React Project. The examples below assume Spire.PDF is installed and the WebAssembly module is initialized.
Add a Single-Line Text Watermark to PDF
A single-line text watermark places a line of diagonal text at the center of each page, suitable for marking confidentiality levels or copyright ownership. The approach is as follows: use a PdfTrueTypeFont based on a font that supports the characters you need, together with MeasureString, to measure the text size and compute the centering offset; then, page by page, set the transparency and rotate the coordinate system through SetTransparency, TranslateTransform, and RotateTransform; and finally draw the watermark text with DrawString.
function App() {
  const addSingleLineTextWatermark = async () => {
    // Get the Spire.PDF WASM module
    const pdfModule = window.wasmModule?.spirepdf;

    // Check whether the WASM module is ready
    if (!pdfModule) {
      alert('Spire.PDF is not ready yet');
      return;
    }

    // Load a TrueType font into VFS
    await window.spire.FetchFileToVFS('ARIAL UNICODE MS.TTF', '/Library/Fonts/', `${process.env.PUBLIC_URL}/font/`);

    // Load the PDF file to be watermarked into VFS
    const inputFileName = 'Lease_Agreement_EN.pdf';
    await window.spire.FetchFileToVFS(inputFileName, "", `${process.env.PUBLIC_URL}/data/`);

    // Create a PdfDocument object and load the PDF document
    let doc = new pdfModule.PdfDocument();
    doc.LoadFromFile(inputFileName);

    // Create a TrueType font: bold, 30 point
    let trueTypeFont = new pdfModule.PdfTrueTypeFont({
      fontFamily: 'Arial Unicode MS',
      size: 30,
      style: pdfModule.PdfFontStyle.Bold,
      unicode: true
    });


    // Create the watermark brush and specify the watermark text
    let brush = pdfModule.PdfBrushes.get_DarkGray();
    const text = 'CONFIDENTIAL - DO NOT DISCLOSE';

    // Measure the size of the watermark text
    let textSize = trueTypeFont.MeasureString({ text: text });

    // Compute two offsets to determine the coordinate translation, so that the watermark is centered diagonally
    let offset1 = (textSize.Width * Math.sqrt(2)) / 4;
    let offset2 = (textSize.Height * Math.sqrt(2)) / 4;
    let format = new pdfModule.PdfStringFormat({ alignment: pdfModule.PdfTextAlignment.Left });

    // Loop through all the pages in the document
    for (let i = 0; i < doc.Pages.Count; i++) {
      // Get the specified page
      let page = doc.Pages.get_Item(i);

      // Set the page transparency
      page.Canvas.SetTransparency(0.8);

      // Translate the coordinate system to the center of the page and compensate for the offset caused by the text size
      page.Canvas.TranslateTransform(
        page.Canvas.ClientSize.Width / 2 - offset1 - offset2,
        page.Canvas.ClientSize.Height / 2 + offset1 - offset2
      );

      // Rotate the coordinate system counterclockwise by 45 degrees
      page.Canvas.RotateTransform({ angle: -45 });

      // Draw the watermark text on the page
      page.Canvas.DrawString({ s: text, font: trueTypeFont, brush: brush, x: 0, y: 0, format: format });
    }

    // Define the output file name and save the document
    const outputFileName = 'SingleLineTextWatermark.pdf';
    doc.SaveToFile(outputFileName);
    doc.Close();

    // Read the generated file from VFS and trigger the download
    const fileArray = window.dotnetRuntime.Module.FS.readFile(outputFileName);
    const blob = new Blob([fileArray], { type: 'application/pdf' });
    const url = URL.createObjectURL(blob);
    const a = document.createElement('a');
    a.href = url;
    a.download = outputFileName;
    a.click();
    URL.revokeObjectURL(url);
  };

  return (
    <div style={{ textAlign: 'center', height: '300px' }}>
      <h1>Add Single-line Text Watermark To PDF</h1>
      <button onClick={addSingleLineTextWatermark}>
        Generate
      </button>
    </div>
  );
}

export default App;
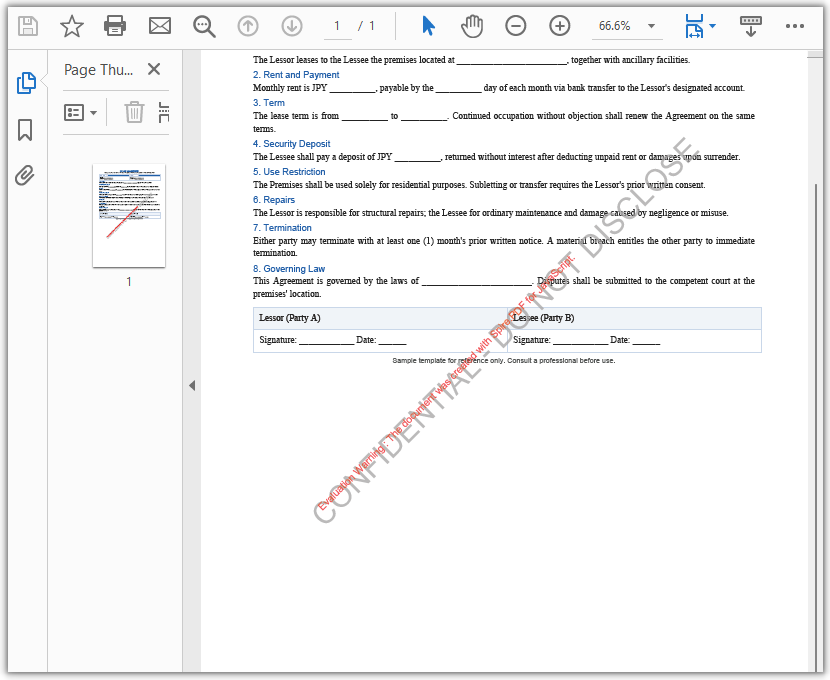
PDF document after adding the single-line text watermark
Add a Multiline Text Watermark to PDF
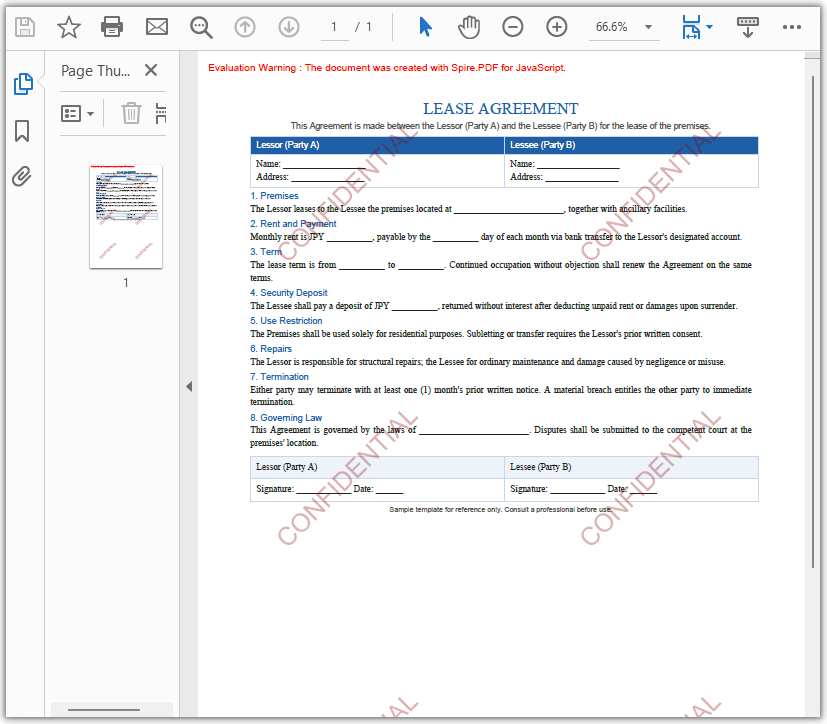
When you need the watermark to fill the entire page, use a multiline text watermark. The approach is as follows: use PdfTilingBrush to divide the page into tiling cells according to the page size; inside a cell, adjust the transparency and angle with SetTransparency and RotateTransform and draw the text with DrawString; finally fill the whole page with the brush using DrawRectangle.
function App() {
  const addMultilineTextWatermark = async () => {
    // Get the Spire.PDF WASM module
    const pdfModule = window.wasmModule?.spirepdf;

    // Check whether the WASM module is ready
    if (!pdfModule) {
      alert('Spire.PDF is not ready yet');
      return;
    }

    // Load the PDF file to be watermarked into VFS
    const inputFileName = 'Lease_Agreement_EN.pdf';
    await window.spire.FetchFileToVFS(inputFileName, "", `${process.env.PUBLIC_URL}/data/`);

    // Create a PdfDocument object and load the PDF document
    let doc = new pdfModule.PdfDocument();
    doc.LoadFromFile(inputFileName);

    // Get the first page of the document
    let page = doc.Pages.get_Item(0);

    // Create a tiling brush: use half the page width and one third of the page height as the tiling cell
    let size = new pdfModule.SizeF({
      width: page.Canvas.ClientSize.Width / 2,
      height: page.Canvas.ClientSize.Height / 3
    });
    let brush = new pdfModule.PdfTilingBrush({ size: size });

    // Set the watermark transparency to 30%
    brush.Graphics.SetTransparency(0.3);

    // Save the current state of the brush, then translate and rotate the coordinate system so that the watermark is arranged diagonally
    brush.Graphics.Save();
    brush.Graphics.TranslateTransform(brush.Size.Width / 2, brush.Size.Height / 2);
    brush.Graphics.RotateTransform({ angle: -45 });

    // Draw the tiled watermark
    let format = new pdfModule.PdfStringFormat({ alignment: pdfModule.PdfTextAlignment.Center });

    // Create font: bold, 25 point
    let font = new pdfModule.PdfFont({ fontFamily: pdfModule.PdfFontFamily.Helvetica, size: 25 });

    // Draw the watermark text
    brush.Graphics.DrawString({
      s: "CONFIDENTIAL",
      font: font,
      brush: pdfModule.PdfBrushes.get_DarkRed(),
      x: 0,
      y: -18,
      format: format
    });

    // Restore the previous state of the brush and set it back to opaque
    brush.Graphics.Restore();
    brush.Graphics.SetTransparency({ alpha: 1 });

    // Fill a whole-page rectangle with the tiling brush so that the watermark text tiles across the entire page
    let rect = new pdfModule.RectangleF({
      location: new pdfModule.PointF(0, 0),
      size: page.Canvas.ClientSize
    });
    page.Canvas.DrawRectangle({ brush: brush, rectangle: rect });

    // Define the output file name and save the document
    const outputFileName = 'MultilineTextWatermark.pdf';
    doc.SaveToFile(outputFileName);
    doc.Close();

    // Read the generated file from VFS and trigger the download
    const fileArray = window.dotnetRuntime.Module.FS.readFile(outputFileName);
    const blob = new Blob([fileArray], { type: 'application/pdf' });
    const url = URL.createObjectURL(blob);
    const a = document.createElement('a');
    a.href = url;
    a.download = outputFileName;
    a.click();
    URL.revokeObjectURL(url);
  };

  return (
    <div style={{ textAlign: 'center', height: '300px' }}>
      <h1>Add Multiline Text Watermark To PDF</h1>
      <button onClick={addMultilineTextWatermark}>
        Generate
      </button>
    </div>
  );
}

export default App;
PDF document after adding the multiline text watermark
FAQ
How to set the font, size, and color of the watermark text
Reason: DrawString requires you to explicitly specify the font and brush used to draw the text.
Solution: The font, size, and color of the watermark text are determined by the font and brush passed to DrawString. For Latin text, create a PdfFont based on a built-in PdfFontFamily such as Helvetica, and set the color through the brush:
// Create a built-in font: Helvetica, 24 point
let font = new pdfModule.PdfFont({
  fontFamily: pdfModule.PdfFontFamily.Helvetica,
  size: 24
});

// Set the watermark color through the brush
let brush = pdfModule.PdfBrushes.get_DarkRed();

// Draw the watermark text on the page canvas
page.Canvas.DrawString({ s: 'CONFIDENTIAL', font: font, brush: brush, x: 0, y: 0, format: format });
If you need a font that is not built in — for example, to display non-Latin scripts such as Chinese or Japanese, or to apply a specific typeface — load the corresponding TrueType font into VFS and use PdfTrueTypeFont instead, as shown in the single-line text watermark example.
How to add a watermark to every page of a PDF
Reason: In the single-line text watermark example, a page loop applies the watermark to every page, while the multiline text watermark example only targets the first page through doc.Pages.get_Item(0).
Solution: To make the multiline watermark cover the entire document as well, move the creation of the tiling brush and the page fill into the page loop:
for (let i = 0; i < doc.Pages.Count; i++) {
  let page = doc.Pages.get_Item(i);

  // Create a tiling brush and set the transparency, rotation, and text
  let size = new pdfModule.SizeF({
    width: page.Canvas.ClientSize.Width / 2,
    height: page.Canvas.ClientSize.Height / 3
  });
  let brush = new pdfModule.PdfTilingBrush({ size: size });
  // …… set transparency, rotate, and draw the watermark text ……

  // Fill the current page with the tiling brush
  page.Canvas.DrawRectangle({
    brush: brush,
    rectangle: new pdfModule.RectangleF({ location: new pdfModule.PointF(0, 0), size: page.Canvas.ClientSize })
  });
}
How to control the transparency and rotation angle of the watermark
Reason: Too high or too low transparency affects the appearance of the watermark, and the rotation angle determines the direction of the watermark text.
Solution: Use SetTransparency to set the transparency, whose value ranges from 0 (fully transparent) to 1 (opaque); use RotateTransform to control the coordinate-system rotation angle, where a negative value means counterclockwise rotation. The single-line example sets the transparency to 0.8 and rotates by -45 degrees, and the multiline tiling example makes the same settings within the graphics context of the tiling brush:
// Single-line watermark: set the page transparency and rotate the page canvas
page.Canvas.SetTransparency(0.8);
page.Canvas.RotateTransform({ angle: -45 });

// Multiline tiled watermark: set the transparency and rotation within the graphics context of the tiling brush
brush.Graphics.SetTransparency(0.3);
brush.Graphics.RotateTransform({ angle: -45 });
Get a Free License
If you want to remove the evaluation messages in the resulting documents or get rid of functional limitations, contact sales to obtain a 30-day temporary license.
