Create Lists in PDF Documents Using JavaScript in React
Product catalogs, checklists, step-by-step instructions, and clause summaries all read most clearly in a PDF when they are laid out as lists. Typing them out one by one in an editor is workable, but once the entries have to follow the data — exporting a category table or a to-do list to PDF, for example — manual layout stops keeping up: the number of entries, the numbering order, and the indentation levels all have to come from the data.
This article shows how to use Spire.PDF for JavaScript to create unordered lists, ordered lists, and multilevel lists, where unordered lists come in two forms: built-in markers and image markers. It runs on WebAssembly to create and save PDF documents directly in the browser, doing all the work locally and reading and writing files through a virtual file system (VFS) with no backend involved.
This article covers four core features:
- Create an Unordered List in a PDF Page
- Create an Unordered List with Images in a PDF Page
- Create an Ordered List in a PDF Page
- Create a Multilevel List in a PDF Page
Different list types use different classes and marker objects. Pick from the table below:
| List type | List class | Marker configuration | Common values |
|---|---|---|---|
| Unordered list (built-in markers) | PdfList |
PdfMarker + PdfUnorderedMarkerStyle |
Disk, Square, Circle, Asterisk |
| Unordered list (image markers) | PdfList |
the image parameter of PdfMarker (the style becomes CustomImage automatically) |
Any image, scaled to the text line height |
| Ordered list (numbers) | PdfSortedList |
PdfOrderedMarker + PdfNumberStyle (Suffix changes the number suffix, StartNumber changes the starting number) |
Numeric, LowerLatin, UpperLatin, LowerRoman, UpperRoman |
| Multilevel list (nested) | PdfList / PdfSortedList + the list item's SubList |
each level's own Marker and Indent |
the top level and the sublevel can each use a different marker or number style |
For installation and project configuration, see Integrate Spire.PDF for JavaScript into a React Project. The examples below assume Spire.PDF is installed and the WebAssembly module is initialized.
Create an Unordered List in a PDF Page
Spire.PDF for JavaScript provides PdfList to create lists, switching the marker shape through the PdfUnorderedMarkerStyle enumeration.
function App() {
  const createBulletLists = async () => {
    // Get the Spire.PDF WASM module
    const pdfModule = window.wasmModule?.spirepdf;

    // Check whether the module is ready
    if (!pdfModule) {
      alert('Spire.PDF is not ready yet');
      return;
    }

    // Load the font into the VFS for the list text
    await window.spire.FetchFileToVFS('ARIAL UNICODE MS.TTF', '/Library/Fonts/', `${process.env.PUBLIC_URL}/font/`);

    // Create a PDF document and add a blank page
    const doc = new pdfModule.PdfDocument();
    const page = doc.Pages.Add();

    // Font and item content for the list
    const font = new pdfModule.PdfTrueTypeFont({ fontFile: '/Library/Fonts/ARIAL UNICODE MS.TTF', size: 12 });
    const items = ['Fruit Juice', 'Condiments', 'Confectionery', 'Dairy Products', 'Grains & Cereals', 'Meat & Poultry', 'Fruits & Vegetables', 'Seafood'];

    // First list: add items one by one, with Square markers
    const list = new pdfModule.PdfList({ font: font });
    for (const item of items) {
      list.Items.Add(item);
    }
    list.Marker = new pdfModule.PdfMarker({ style: pdfModule.PdfUnorderedMarkerStyle.Square });
    // Brush affects both the marker and the list text
    list.Brush = new pdfModule.PdfSolidBrush({ pdfRGBColor: new pdfModule.PdfRGBColor({ color: pdfModule.Color.get_Navy() }) });
    list.Indent = 10;
    list.TextIndent = 6;
    const first = list.Draw({ page: page, x: 0, y: 40 });

    // Second list drawn below the first one, with Circle markers
    const list2 = new pdfModule.PdfList({ font: font });
    for (const item of items) {
      list2.Items.Add(item);
    }
    list2.Marker = new pdfModule.PdfMarker({ style: pdfModule.PdfUnorderedMarkerStyle.Circle });
    list2.Brush = pdfModule.PdfBrushes.get_Black();
    list2.Indent = 10;
    list2.TextIndent = 6;
    list2.Draw({ page: page, x: 0, y: first.Bounds.Bottom + 20 });

    // Save and read back from the VFS to trigger the download
    const outputFileName = 'BulletList.pdf';
    doc.SaveToFile(outputFileName);
    doc.Close();

    const fileArray = window.dotnetRuntime.Module.FS.readFile(outputFileName);
    const blob = new Blob([fileArray], { type: 'application/pdf' });
    const url = URL.createObjectURL(blob);
    const a = document.createElement('a');
    a.href = url;
    a.download = outputFileName;
    a.click();
    URL.revokeObjectURL(url);
  };

  return (
    <div style={{ textAlign: 'center', height: '300px' }}>
      <h1>Create an Unordered List</h1>
      <button onClick={createBulletLists}>
        Create
      </button>
    </div>
  );
}

export default App;
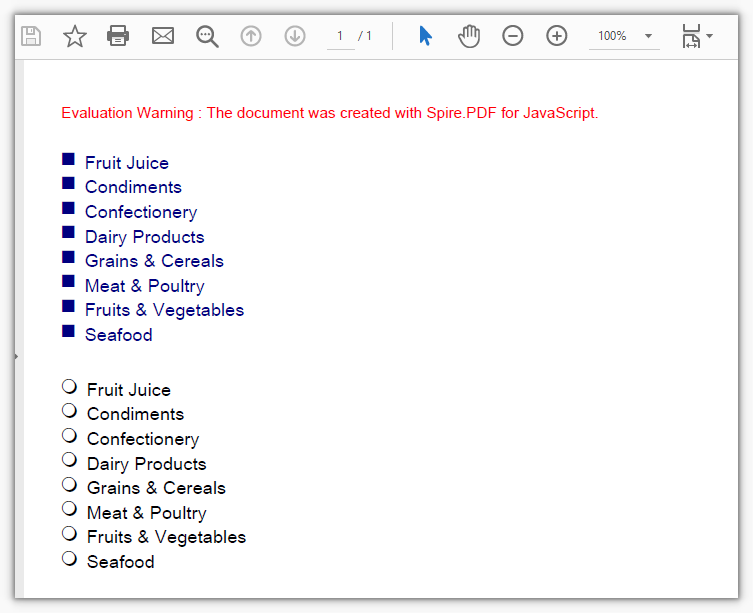
Two unordered lists of the same content, using Square and Circle markers
Create an Unordered List with Images in a PDF Page
Spire.PDF for JavaScript also provides PdfImage to read an image; hand it to PdfMarker and it becomes the bullet marker, with the style switching to CustomImage automatically.
function App() {
  const createImageBulletList = async () => {
    // Get the Spire.PDF WASM module
    const pdfModule = window.wasmModule?.spirepdf;

    // Check whether the module is ready
    if (!pdfModule) {
      alert('Spire.PDF is not ready yet');
      return;
    }

    // Load the font and the bullet image into the VFS
    await window.spire.FetchFileToVFS('ARIAL UNICODE MS.TTF', '/Library/Fonts/', `${process.env.PUBLIC_URL}/font/`);
    await window.spire.FetchFileToVFS('logo.png', '', `${process.env.PUBLIC_URL}/data/`);

    // Create a PDF document and add a blank page
    const doc = new pdfModule.PdfDocument();
    const page = doc.Pages.Add();

    // Font and item content for the list
    const font = new pdfModule.PdfTrueTypeFont({ fontFile: '/Library/Fonts/ARIAL UNICODE MS.TTF', size: 12 });
    const items = ['Fruit Juice', 'Condiments', 'Confectionery', 'Dairy Products', 'Grains & Cereals', 'Meat & Poultry', 'Fruits & Vegetables', 'Seafood'];

    // Read the image and hand it to PdfMarker as the marker; the style becomes CustomImage automatically
    const image = pdfModule.PdfImage.FromFile('logo.png');
    const marker = new pdfModule.PdfMarker({ image: image });

    // Add items one by one and apply the image marker
    const list = new pdfModule.PdfList({ font: font });
    for (const item of items) {
      list.Items.Add(item);
    }
    list.Marker = marker;
    list.Brush = pdfModule.PdfBrushes.get_Black();
    list.Indent = 10;
    list.TextIndent = 6;
    list.Draw({ page: page, x: 0, y: 40 });

    // Save and read back from the VFS to trigger the download
    const outputFileName = 'ImageBulletList.pdf';
    doc.SaveToFile(outputFileName);
    doc.Close();

    const fileArray = window.dotnetRuntime.Module.FS.readFile(outputFileName);
    const blob = new Blob([fileArray], { type: 'application/pdf' });
    const url = URL.createObjectURL(blob);
    const a = document.createElement('a');
    a.href = url;
    a.download = outputFileName;
    a.click();
    URL.revokeObjectURL(url);
  };

  return (
    <div style={{ textAlign: 'center', height: '300px' }}>
      <h1>Create an Unordered List with Images</h1>
      <button onClick={createImageBulletList}>
        Create
      </button>
    </div>
  );
}

export default App;
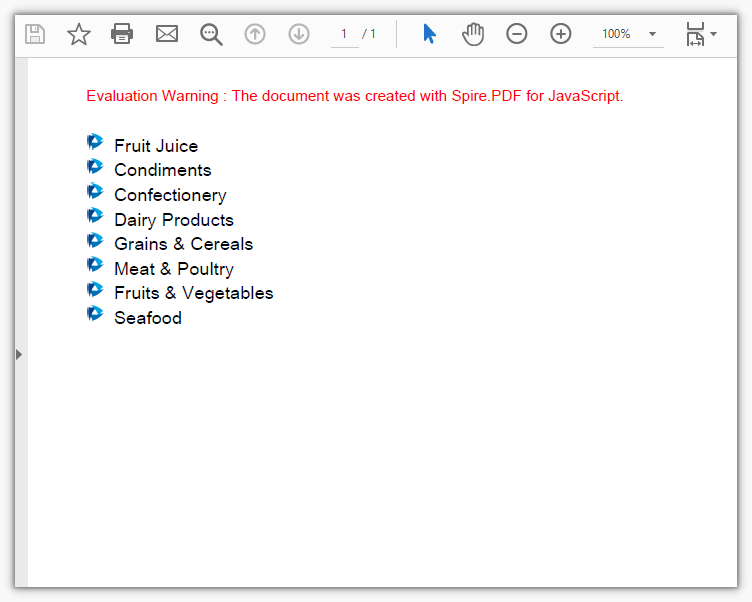
An unordered list using logo.png as the bullet marker
Create an Ordered List in a PDF Page
An ordered list is created by PdfSortedList, its numbers increment automatically with the items, and the number format is decided by the PdfNumberStyle enumeration on PdfOrderedMarker.
function App() {
  const createOrderedLists = async () => {
    // Get the Spire.PDF WASM module
    const pdfModule = window.wasmModule?.spirepdf;

    // Check whether the module is ready
    if (!pdfModule) {
      alert('Spire.PDF is not ready yet');
      return;
    }

    // Load the font into the VFS for the list text
    await window.spire.FetchFileToVFS('ARIAL UNICODE MS.TTF', '/Library/Fonts/', `${process.env.PUBLIC_URL}/font/`);

    // Create a PDF document and add a blank page
    const doc = new pdfModule.PdfDocument();
    const page = doc.Pages.Add();

    // Font and item content for the list
    const font = new pdfModule.PdfTrueTypeFont({ fontFile: '/Library/Fonts/ARIAL UNICODE MS.TTF', size: 12 });
    const items = ['Fruit Juice', 'Condiments', 'Confectionery', 'Dairy Products'];

    // First list: Arabic numerals, with "." as the default number suffix
    const list = new pdfModule.PdfSortedList({
      marker: new pdfModule.PdfOrderedMarker({ style: pdfModule.PdfNumberStyle.Numeric, font: font }),
    });
    list.Font = font;
    for (const item of items) {
      list.Items.Add(item);
    }
    list.Indent = 12;
    list.TextIndent = 6;
    list.Brush = pdfModule.PdfBrushes.get_Black();
    const first = list.Draw({ page: page, x: 0, y: 40 });

    // Second list: uppercase Roman numerals, with the suffix changed to ")"
    const marker = new pdfModule.PdfOrderedMarker({ style: pdfModule.PdfNumberStyle.UpperRoman, font: font });
    marker.Suffix = ')';
    const list2 = new pdfModule.PdfSortedList({ marker: marker });
    list2.Font = font;
    for (const item of items) {
      list2.Items.Add(item);
    }
    list2.Indent = 12;
    list2.TextIndent = 6;
    list2.Brush = pdfModule.PdfBrushes.get_Black();
    list2.Draw({ page: page, x: 0, y: first.Bounds.Bottom + 20 });

    // Save and read back from the VFS to trigger the download
    const outputFileName = 'NumberedList.pdf';
    doc.SaveToFile(outputFileName);
    doc.Close();

    const fileArray = window.dotnetRuntime.Module.FS.readFile(outputFileName);
    const blob = new Blob([fileArray], { type: 'application/pdf' });
    const url = URL.createObjectURL(blob);
    const a = document.createElement('a');
    a.href = url;
    a.download = outputFileName;
    a.click();
    URL.revokeObjectURL(url);
  };

  return (
    <div style={{ textAlign: 'center', height: '300px' }}>
      <h1>Create an Ordered List</h1>
      <button onClick={createOrderedLists}>
        Create
      </button>
    </div>
  );
}

export default App;
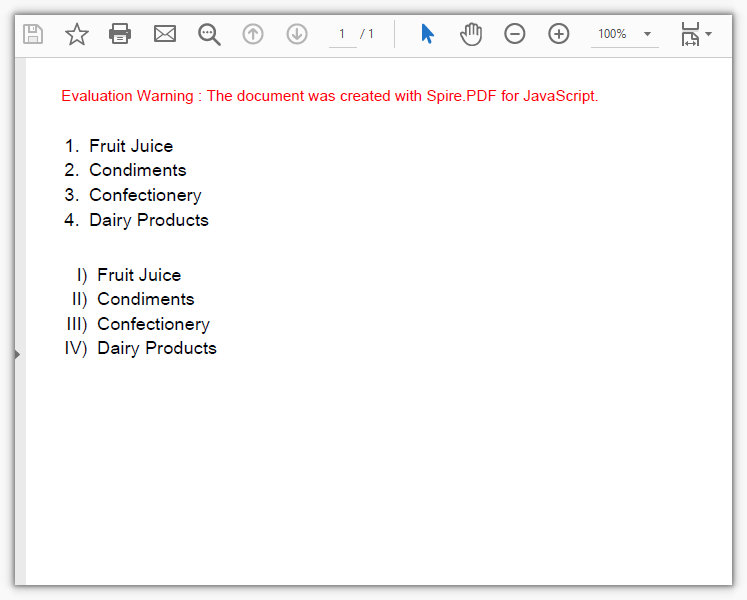
Ordered lists created with Arabic numerals and uppercase Roman numerals
Create a Multilevel List in a PDF Page
A multilevel list is built on the SubList property of an item: attach a sublist to an item and it gains one more level, with the indentation decided by the sublist's own Indent.
function App() {
  const createMultilevelList = async () => {
    // Get the Spire.PDF WASM module
    const pdfModule = window.wasmModule?.spirepdf;

    // Check whether the module is ready
    if (!pdfModule) {
      alert('Spire.PDF is not ready yet');
      return;
    }

    // Load the font into the VFS for the list text
    await window.spire.FetchFileToVFS('ARIAL UNICODE MS.TTF', '/Library/Fonts/', `${process.env.PUBLIC_URL}/font/`);

    // Create a PDF document and add a blank page
    const doc = new pdfModule.PdfDocument();
    const page = doc.Pages.Add();

    // Font and grouped data for the list
    const font = new pdfModule.PdfTrueTypeFont({ fontFile: '/Library/Fonts/ARIAL UNICODE MS.TTF', size: 12 });
    const groups = [
      { title: 'Beverages & Dairy', children: ['Fruit Juice', 'Dairy Products'] },
      { title: 'Fresh Produce & Grains', children: ['Grains & Cereals', 'Fruits & Vegetables'] },
      { title: 'Meat & Seafood', children: ['Meat & Poultry', 'Seafood'] },
    ];

    // Top-level list: Arabic numerals
    const root = new pdfModule.PdfSortedList({
      marker: new pdfModule.PdfOrderedMarker({ style: pdfModule.PdfNumberStyle.Numeric, font: font }),
    });
    root.Font = font;
    root.Indent = 10;
    root.TextIndent = 6;
    root.Brush = pdfModule.PdfBrushes.get_Black();

    // Attach a sublist to each top-level item, with Disk markers indented by 18 points
    for (const group of groups) {
      const item = root.Items.Add(group.title);
      const sub = new pdfModule.PdfList({ font: font });
      for (const child of group.children) {
        sub.Items.Add(child);
      }
      sub.Marker = new pdfModule.PdfMarker({ style: pdfModule.PdfUnorderedMarkerStyle.Disk });
      sub.Indent = 18;
      sub.TextIndent = 6;
      sub.Brush = pdfModule.PdfBrushes.get_Black();
      item.SubList = sub;
    }

    // Draw the whole multilevel list starting from the top of the page
    root.Draw({ page: page, x: 0, y: 40 });

    // Save and read back from the VFS to trigger the download
    const outputFileName = 'MultilevelList.pdf';
    doc.SaveToFile(outputFileName);
    doc.Close();

    const fileArray = window.dotnetRuntime.Module.FS.readFile(outputFileName);
    const blob = new Blob([fileArray], { type: 'application/pdf' });
    const url = URL.createObjectURL(blob);
    const a = document.createElement('a');
    a.href = url;
    a.download = outputFileName;
    a.click();
    URL.revokeObjectURL(url);
  };

  return (
    <div style={{ textAlign: 'center', height: '300px' }}>
      <h1>Create a Multilevel List</h1>
      <button onClick={createMultilevelList}>
        Create
      </button>
    </div>
  );
}

export default App;
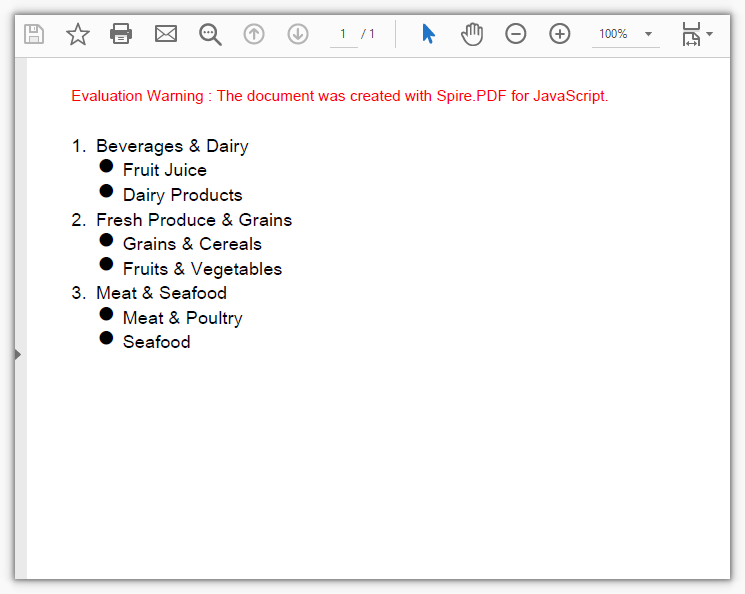
A two-level list made of numbered top-level items and bulleted sublists
FAQ
The list item text does not show up
Cause: List items use the font on the Font property. If it is not set, or the font file has not been loaded into the virtual file system yet, only the bullet markers are left on the page and the text never appears.
Solution: Load the font file into /Library/Fonts/ first, then hand the font object to the list's Font:
// Load the font file into the virtual file system
await window.spire.FetchFileToVFS('ARIAL UNICODE MS.TTF', '/Library/Fonts/', `${process.env.PUBLIC_URL}/font/`);

// Create the font from that file and pass it in when constructing the list (assigning it to list.Font afterwards works the same way)
const font = new pdfModule.PdfTrueTypeFont({ fontFile: '/Library/Fonts/ARIAL UNICODE MS.TTF', size: 12 });
const list = new pdfModule.PdfList({ font: font });
"Ambiguous call" is thrown when creating a list
Cause: PdfList, PdfSortedList, and PdfMarker all have multiple overloads, so positional arguments leave the runtime unable to tell which one to use; it throws Ambiguous call: arguments (object) match multiple overloads. and lists the available key names in the error. Positional arguments in list.Draw(page, x, y) are rejected the same way.
Solution: Switch to object notation and spell out the parameter names:
// This throws: new pdfModule.PdfList(font)
const list = new pdfModule.PdfList({ font: font });
const sortedList = new pdfModule.PdfSortedList({ marker: marker });
const marker2 = new pdfModule.PdfMarker({ style: pdfModule.PdfUnorderedMarkerStyle.Disk });

// Drawing works the same way: list.Draw(page, 0, 40) throws, so write
list.Draw({ page: page, x: 0, y: 40 });
"IO_FileNotFound_FileName" is thrown when using an image as the bullet marker
Cause: PdfImage.FromFile reads a path inside the virtual file system, so it throws IO_FileNotFound_FileName when the image has not been loaded with FetchFileToVFS first — having the image on disk does not count.
Solution: Load the image into the virtual file system first, then read it with the same file name:
// Load the image into the virtual file system
await window.spire.FetchFileToVFS('logo.png', '', `${process.env.PUBLIC_URL}/data/`);

// Read it with the same file name
const image = pdfModule.PdfImage.FromFile('logo.png');
const marker = new pdfModule.PdfMarker({ image: image });
Get a Free License
If you want to remove the evaluation message from the resulting documents, or to get rid of the feature limitations, contact sales for a temporary license valid for 30 days.
Technical Bid Response Generation with Spire.Agent.Office
In tendering, the technical bid response is a step every bid must go through, and one of the easiest to get wrong. A tender document runs to dozens or hundreds of pages, and its "Technical Requirements" chapter holds anywhere from dozens to hundreds of clauses. A bidder has to respond to each clause and state the deviation, and a single unanswered clause can invalidate the bid. The responses must also line up with the bidder's own product parameters, test reports and project references — content that is too generic is scored as non-responsive, while inventing parameters or references to pad out a "fully compliant" answer creates far worse contractual and compliance risk if the bid wins. Traditionally a bidding specialist reads clause by clause, looks up the materials and fills in the table row by row. That takes days per bid, and the depth and wording of the responses vary widely between projects and between people.
Compared with the Traditional SDK API
| Traditional Spire.Office for .NET API | Spire.Agent.Office | |
|---|---|---|
| Driving method | Code handles every clause: load the tender document → split clauses with regex → match enterprise materials by keyword → fill the response table row by row, each step controlled in code | Describe the response requirements in natural language; the AI splits the clauses and matches responses clause by clause |
| Code volume | Substantial code to maintain clause-splitting rules, material-matching logic and table filling | Configuration code plus one natural language instruction |
| Clause splitting | Relies on clause numbers and ★▲ symbols as regex anchors; cross-page tables and multi-level numbering are easily split wrongly or dropped | The AI reads semantics together with numbering, so hierarchy and page breaks lose no clauses |
| Material matching | Keyword hits only; two different wordings of the same capability never match | Semantic matching; a capability description in the product manual maps onto a specific clause |
| Deviation assessment | Assessment rules must be hard-coded; better-than / equal / missing is hard to formalize | Each clause is judged against the criteria given in the instruction, and the AI downgrades when evidence is thin |
| Maintainability | A change in tender format or assessment criteria means code changes and a new release | Assessment criteria and chapter structure are adjusted in natural language at any time |
This article shows how to use the Word AI capability of Spire.Agent.Office to hand the tender document and your enterprise technical materials to the AI together and generate, in one pass, a complete technical bid response document containing the technical response table and the technical proposal body. Both single-lot and multi-lot batch usage are covered.
- Single lot: one tender document, one complete technical bid
- Multiple lots: batch output from several tender documents, one consistent standard
For product installation and SpireToken configuration, see Integrating Spire.Agent.Office into a .NET project. The examples below assume Spire.Agent.Office is installed and SpireToken is configured.
Technical Bid Response Generation
Technical bid response generation is the process of extracting the technical requirement clauses from a tender document, writing a response for each clause against the bidder's own technical materials, assessing the deviation, and organizing the result into a submittable technical bid document. The core approach: pass the tender document and the enterprise technical materials to the AI as attachments, have the AI generate a "technical response table" clause by clause under the tender document's original numbering, then continue into the technical proposal body based on those responses — producing the complete technical bid response document in one pass.
This addresses three difficulties the traditional approach cannot get around:
- Semantic correspondence: the tender says "supports deployment in a domestic xinchuang environment" while the enterprise materials say "adaptation for Kylin and UOS completed" — different wording for the same thing, and only semantic understanding maps the two. Keyword matching cannot.
- No omissions: the number of response clauses matches the technical requirements in the tender document exactly, with no merging and nothing dropped, which removes the risk of an invalid bid at the source.
- No fabrication: any clause without support in the enterprise materials is assessed as "Partially Compliant" with the missing items noted, instead of writing extra content to reach "Fully Compliant".
Single lot: one tender document, one complete technical bid
using Spire.Agent.Office.AI;
using Spire.Agent.Office.Extensions;
using Spire.Doc;

// Tender document and enterprise technical materials (data source files)
string[] attachmentPaths = new string[] {
    @"E:\Input\XX-Project-Tender-Document.docx",
    @"E:\Input\Enterprise-Technical-Materials.docx"
};
// Save path
string savePath = @"E:\Output\XX-Project-Technical-Bid-Response.docx";
// SpireToken key
string key = "**************************";
// Natural language instruction
string instruction =
    "Based on the attached tender document and enterprise technical materials, write a technical bid response document: generate a Technical Response Table clause by clause under the tender document's original numbering (No. | Tender Requirement | Our Response | Deviation | Notes), one to one with the requirements and with none omitted; " +
    "deviation takes only Fully Compliant / Partially Compliant / Non-Compliant, and the response must cite the matching model, parameters or project reference from the materials, while any clause without support is assessed Partially Compliant with the missing items noted and nothing invented; " +
    "after the table, continue with a five-chapter technical proposal body: project understanding, technical solution, implementation plan, quality assurance and after-sales service.";

// Call the Word document processing function
AIResult result = ExecuteDemoWord(instruction, savePath, key, attachmentPaths);


// Run the Word document AI processing
static AIResult ExecuteDemoWord(string instruction, string savePath, string key, string[] attachmentPaths)
{
    // Create the AIOptions configuration object
    AIOptions options = new AIOptions();
    // Set the single-call timeout budget (ms)
    options.TimeoutMs = 3600000;
    // Set the SpireToken key
    options.SpireToken = key;

    // Process the Word document with a Document object
    using (Document doc = new Document())
    {
        // Create the AI document processor
        AIDocumentProcessor processor = doc.AI(options);

        // Execute the AI instruction
        return processor.ExecuteInstruction(doc, instruction, savePath, attachmentPaths);
    }
}
The technical bid response document generated by the AI (technical response table + technical proposal body):
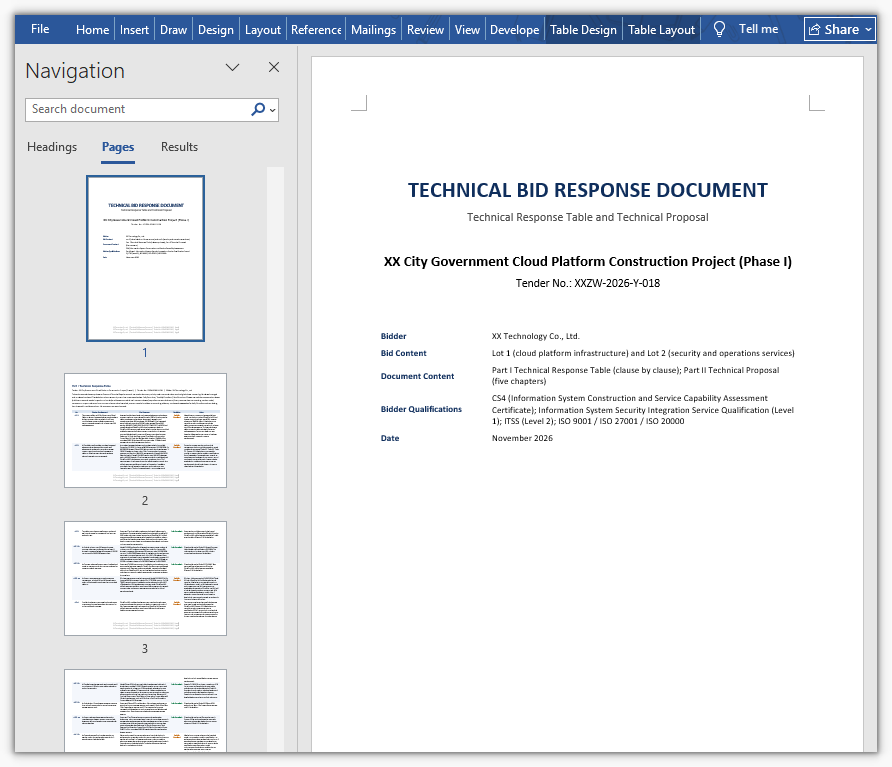
In the generated document the technical response table follows the tender document's original clause numbers one by one, and each row states the response and the deviation. Clauses with matching evidence cite specific product models and project references; the proposal body expands from the response table into the five chapters on project understanding, technical solution, implementation plan, quality assurance and after-sales service. The bidding specialist only has to check that the deviation assessments match reality and supply the materials that are missing, then move on to internal sign-off.
Multiple lots: batch output from several tender documents, one consistent standard
When a project is divided into several lots, each lot's tender document carries different technical requirements, but all lots use the same enterprise technical materials, which makes a single batch call a good fit. Set options.WorkDir to the output directory, pass null as savePath, and hand in every lot's tender document as an attachment — one call then produces several files, each named by the AI after its lot. Because all lots share the same materials and the same instruction, the assessment standard stays consistent by construction.
One caveat: a single call runs against a timeout budget (about 300 seconds by default), so a multi-lot batch should raise options.TimeoutMs; otherwise the call is cut off when the budget runs out.
using Spire.Agent.Office.AI;
using Spire.Agent.Office.Extensions;
using Spire.Doc;

// Tender documents for the lots (data source files)
string[] lotFiles = new string[] {
    @"E:\Input\Lot-1-Technical-Requirements.docx",  // Lot 1 tender document
    @"E:\Input\Lot-2-Technical-Requirements.docx"   // Lot 2 tender document
};
// All lots share the same enterprise technical materials
string materialPath = @"E:\Input\Enterprise-Technical-Materials.docx";
// Output directory
string OutDir = @"E:\Output";
// SpireToken key
string key = "**************************";
// Natural language instruction
string instruction =
    "Based on the attached tender documents and enterprise technical materials, generate a Technical Response Table clause by clause under that lot's original numbering (No. | Tender Requirement | Our Response | Deviation | Notes), one to one with that lot's requirements and with none omitted; " +
    "deviation takes only Fully Compliant / Partially Compliant / Non-Compliant, assessed as met or better → Fully Compliant, differences that do not affect use → Partially Compliant, cannot be met → Non-Compliant; " +
    "the response must cite the matching model, parameters or project reference from the materials, while any clause without support is assessed Partially Compliant with the missing items noted and nothing invented; " +
    "after the table, continue with a five-chapter technical proposal body: project understanding, technical solution, implementation plan, quality assurance and after-sales service; " +
    "the attachments hold two lots, so produce one document per lot, 2 files in total, each named with an 'output' prefix plus the lot and written directly into the working directory with no .csx script.";

// Attachments: two lot tender documents + the shared enterprise technical materials
string[] attachmentPaths = new string[] { lotFiles[0], lotFiles[1], materialPath };

// Call the Word document processing function
AIResult result = ExecuteDemoWordMultiLot(instruction, null, key, OutDir, attachmentPaths);


// Run the Word document AI processing
static AIResult ExecuteDemoWordMultiLot(string instruction, string? savePath, string key, string output, string[] attachmentPaths)
{
    // Create the AIOptions configuration object
    AIOptions options = new AIOptions();
    // Set the working directory to the output directory
    options.WorkDir = output;
    // Set the single-call timeout budget (ms)
    options.TimeoutMs = 3600000;
    // Set the SpireToken key
    options.SpireToken = key;

    // Process the Word document with a Document object
    using (Document doc = new Document())
    {
        // Create the AI document processor
        AIDocumentProcessor processor = doc.AI(options);

        // Execute the AI instruction
        return processor.ExecuteInstruction(doc, instruction, savePath, attachmentPaths);
    }
}
The technical bid response documents generated in batch by the AI (one per lot, named after the lot)
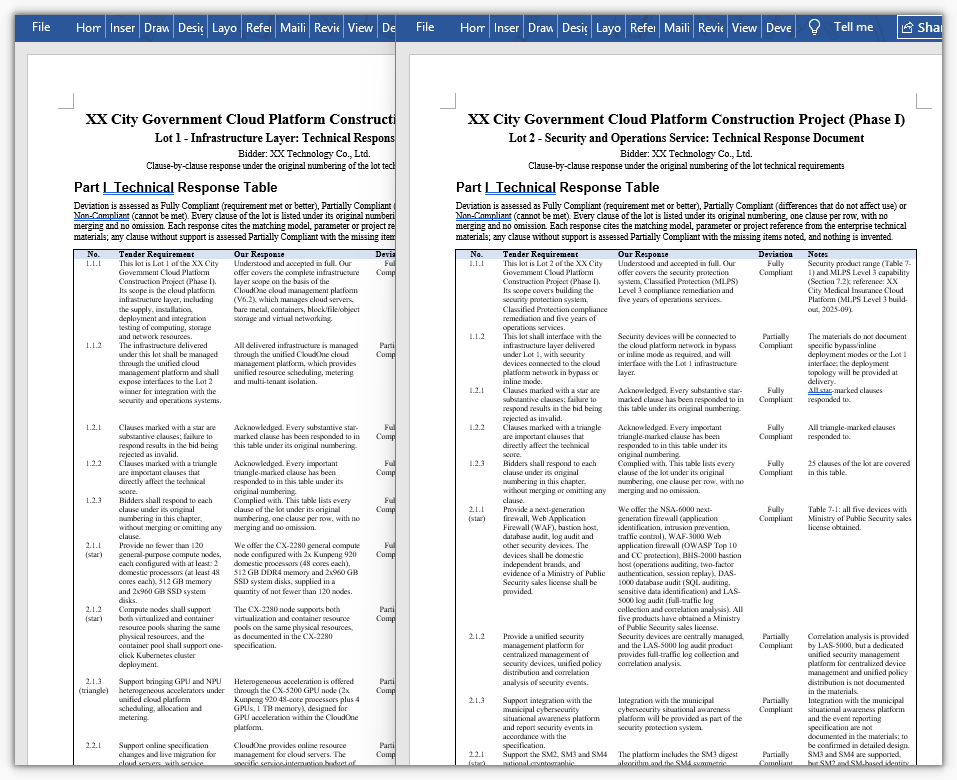
One call produces one independent response document per lot, named after the lot so that each can be submitted separately. Because all lots share the same deviation criteria and the same technical materials, the response standard stays consistent across lots — the same capability is not assessed "Fully Compliant" in one lot and "Partially Compliant" in another.
Common Questions
Response clauses are missing and the count does not match the tender document
Cause: the technical requirements in a tender document are often laid out as multi-level numbering, cross-page tables or even images, and the AI may merge adjacent clauses when splitting, or miss the entries that continue on the following page.
Solution: state in the instruction that each clause must be extracted individually and never merged or summarized, and require that the number of response clauses match the technical requirements in the tender document. For projects with many clauses, first have the AI output a clause list on its own (number + original text), check the count manually, and only then generate the responses — a two-step flow of "split first, respond second".
Responses are generic and do not reflect the company's actual capability
Cause: only the tender document was attached and no enterprise technical materials, so the AI can only write generic wording.
Solution: attach product manuals, test reports, qualification certificates and references for similar projects, and require in the instruction that "clauses with matching evidence must cite the specific product model, technical parameters or project reference".
Invented parameters, certificates or project references appear
Cause: when tender requirements and enterprise materials diverge, the AI tends to write extra content to fill the response table.
Solution: state in the instruction that "inventing parameters, certificates or project references to reach full compliance is forbidden; anything that cannot be confirmed is left blank and marked for manual confirmation", and write "any clause with no corresponding content in the materials is assessed as Partially Compliant" in as a hard rule.
Every deviation is assessed as "Fully Compliant"
Cause: no deviation criteria were given, so the AI sets its own standard, which usually leans lenient.
Solution: write the assessment standard into the instruction, for example "tender requirements fully met or better → Fully Compliant; differences that do not affect use → Partially Compliant; cannot be met → Non-Compliant". For stricter assessment, add "Fully Compliant may be assessed only when the enterprise materials provide explicit parameters or project references".
The response table layout breaks down and long clauses run together
Cause: a response table has many columns and long cell contents, so the AI may reorder columns or produce abnormal row heights when laying it out.
Solution: fix the column names and column order in the instruction (No. | Tender Requirement | Our Response | Deviation | Notes), and add layout requirements as needed (table centered, header row bold, body 12 pt, 1.5 line spacing); for very long clauses, require that "the Tender Requirement column keeps the original sentence, truncated at 80 characters with a trailing ellipsis".
Get the SpireToken Key
- Contact [email protected] or visit https://www.e-iceblue.com/TemLicense.html for a trial or commercial API key
Configure it in code:
AIOptions options = new AIOptions();
options.SpireToken = key;
Rearrange PDF Pages in React Using JavaScript
Documents are often assembled from pieces: the cover, the body and the appendix arrive from different stages, and only before delivery does it turn out that the cover ended up after Chapter 2, or that a few pages need to change places. Only the page order has to change — not a word of the content — but without a PDF editor at hand the job stalls right there, and sending the file to a server means it leaves the user's device. This article shows how to rearrange PDF pages in a specified order in the browser with Spire.PDF for JavaScript. It loads, modifies and saves PDF documents based on WebAssembly, so the page order is rewritten entirely on the local machine, reading and writing files through a virtual file system (VFS), with no backend service required.
For installation and project configuration, refer to Integrating Spire.PDF for JavaScript in a React Project. The following examples assume Spire.PDF is installed and the WebAssembly module has been initialized.
Rearrange the Page Order
The page order is rewritten in a single call to PdfPageCollection.ReArrange(). The array of indices decides both where each page goes and how many pages the document has — as many indices as you pass, as many pages you get — so to keep every page, all indices from 0 to the page count minus one have to appear.
function App() {
  const rearrangePages = async () => {
    // Get the Spire.PDF WASM module
    const pdfModule = window.wasmModule?.spirepdf;

    // Check whether the module is ready
    if (!pdfModule) {
      alert('Spire.PDF is not ready yet');
      return;
    }

    // Load the PDF file to be processed into the VFS
    const inputFileName = 'Number.pdf';
    await window.spire.FetchFileToVFS(inputFileName, "", `${process.env.PUBLIC_URL}/data/`);

    // Create a PdfDocument object and load the PDF document
    let doc = new pdfModule.PdfDocument();
    doc.LoadFromFile(inputFileName);

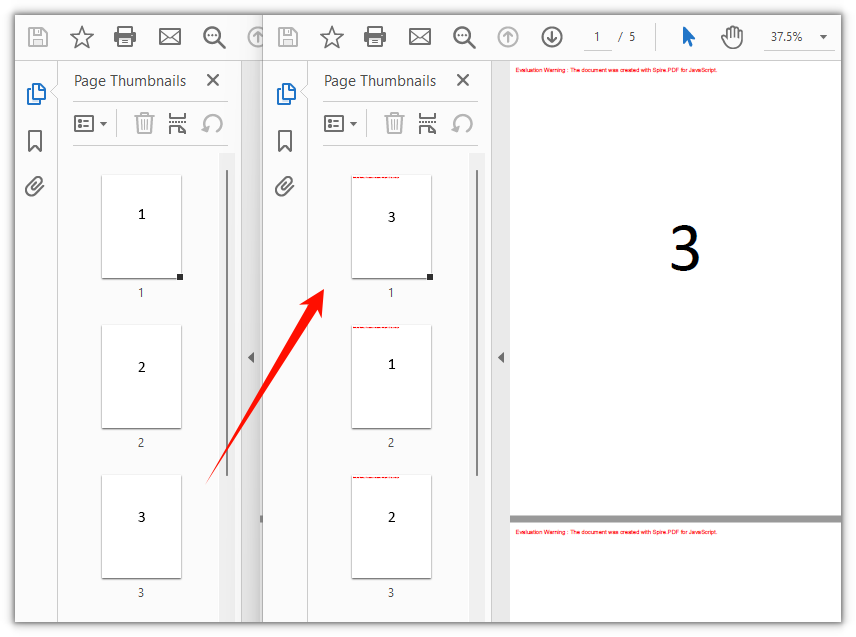
    // The new page order: move the third page to the front and shift the rest down; indices start at 0
    const newOrder = [2, 0, 1, 3, 4];
    doc.Pages.ReArrange(newOrder);

    const outputFileName = 'Rearranged_Pages.pdf';
    doc.SaveToFile(outputFileName);
    doc.Close();

    // Read the generated file from the VFS and trigger the download
    const fileArray = window.dotnetRuntime.Module.FS.readFile(outputFileName);
    const blob = new Blob([fileArray], { type: 'application/pdf' });
    const url = URL.createObjectURL(blob);
    const a = document.createElement('a');
    a.href = url;
    a.download = outputFileName;
    a.click();
    URL.revokeObjectURL(url);
  };

  return (
    <div style={{ textAlign: 'center', height: '300px' }}>
      <h1>Rearrange PDF Pages</h1>
      <button onClick={rearrangePages}>
        Start Rearranging
      </button>
    </div>
  );
}

export default App;
The document after the third page is moved to the front and the remaining pages shift down:
FAQ
The document has fewer pages after rearranging
Cause: ReArrange() rebuilds the page order from the array you pass, so a page whose index is missing from that array never makes it into the result document. Call ReArrange([1, 0]) on a five-page document and the output has two pages.
Solution: To keep the page count unchanged, the array length must equal doc.Pages.Count, with every index from 0 to doc.Pages.Count - 1 appearing exactly once:
// Indices start at 0: a five-page document uses 0, 1, 2, 3 and 4
const pageCount = doc.Pages.Count;
const fullOrder = Array.from({ length: pageCount }, (_, i) => i);
doc.Pages.ReArrange(fullOrder);
Calling ReArrange() reports "The page has existed."
Cause: The array contains a duplicate index, so the same original page is assigned to two positions. One page cannot occupy two positions at the same time, and Spire.PDF raises an error.
Solution: Make sure the array is a permutation of the original page indices — each index appears once and stays within range. For a five-page document the valid indices are 0 to 4.
How to swap only two pages
Cause: ReArrange() always works on the order of the whole document, and there is no shorter overload that swaps two pages on its own.
Solution: Still write the full order array, leaving the untouched positions at their original indices. The line below swaps the first and the second page:
// Swap the first two pages: 0 and 1 trade places, the rest stay put
const swappedOrder = [1, 0, 2, 3, 4];
doc.Pages.ReArrange(swappedOrder);
Get a Free License
If you wish to remove the evaluation message from the result document or remove feature limitations, please contact sales to obtain a temporary license valid for 30 days.
Set PDF Background Color or Background Image in React Using JavaScript
When a batch of documents has to look like one set, the quickest way is to give every page the same brand tint or letterhead pattern. Doing that used to mean going back to the source files and reworking the layout one by one, or stacking an image on each page by hand — the first requires that you still have the editable originals, and the second easily ends up covering the body text.
Editing the PDF directly in the browser sidesteps both. Spire.PDF for JavaScript loads, modifies and saves PDF documents on WebAssembly; the tint and the background image are written into the BackgroundColor and BackgroundImage properties of pages that already exist, drawn below the body text; files are read and written through a virtual file system (VFS), with no backend involved.
This article covers two core features:
For installation and project configuration, refer to Integrating Spire.PDF for JavaScript in a React Project. The following examples assume Spire.PDF is installed and the WebAssembly module has been initialized.
Set a Background Color on All PDF Pages
When the whole document needs one tint, assigning a Color to BackgroundColor page by page is enough. The property blends at an opacity of 0.25 by default, so set BackgroudOpacity to 1 when you want the solid color.
function App() {
  const setBackgroundColor = async () => {
    // Get the Spire.PDF WASM module
    const pdfModule = window.wasmModule?.spirepdf;

    // Check whether the module is ready
    if (!pdfModule) {
      alert('Spire.PDF is not ready yet');
      return;
    }

    // Load the PDF file to be processed into the VFS
    const inputFileName = 'Lease_Agreement_EN.pdf';
    await window.spire.FetchFileToVFS(inputFileName, "", `${process.env.PUBLIC_URL}/data/`);

    // Create a PdfDocument object and load the PDF document
    let doc = new pdfModule.PdfDocument();
    doc.LoadFromFile(inputFileName);

    // Custom tint: four ARGB channels, light blue here
    const backgroundColor = pdfModule.Color.FromArgb(255, 226, 240, 253);

    // Set the background color page by page
    for (let i = 0; i < doc.Pages.Count; i++) {
      const page = doc.Pages.get_Item(i);
      page.BackgroundColor = backgroundColor;
      // The default blend opacity is 0.25; set it to 1 for the solid color
      page.BackgroudOpacity = 1;
    }

    const outputFileName = 'SetBackgroundColor.pdf';
    doc.SaveToFile(outputFileName);
    doc.Close();

    // Read the generated file back from the VFS to trigger the download
    const fileArray = window.dotnetRuntime.Module.FS.readFile(outputFileName);
    const blob = new Blob([fileArray], { type: 'application/pdf' });
    const url = URL.createObjectURL(blob);
    const a = document.createElement('a');
    a.href = url;
    a.download = outputFileName;
    a.click();
    URL.revokeObjectURL(url);
  };

  return (
    <div style={{ textAlign: 'center', height: '300px' }}>
      <h1>Set PDF Background Color</h1>
      <button onClick={setBackgroundColor}>
        Start Setting
      </button>
    </div>
  );
}

export default App;
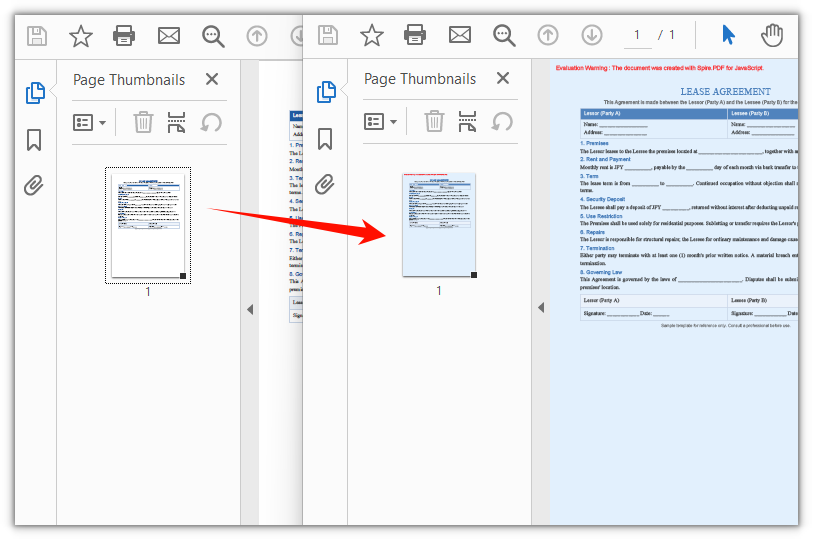
With the light blue background applied, the lease agreement takes on the same tint throughout:
Set a Background Image on All PDF Pages
To lay a full-page image underneath, hand it to BackgroundImage: it takes an image stream opened in the virtual file system and stretches it to fill the page content area, with BackgroudOpacity controlling how strongly it shows.
function App() {
  const setBackgroundImage = async () => {
    // Get the Spire.PDF WASM module
    const pdfModule = window.wasmModule?.spirepdf;

    // Check whether the module is ready
    if (!pdfModule) {
      alert('Spire.PDF is not ready yet');
      return;
    }

    // Load the PDF file to be processed and the background image into the VFS
    const inputFileName = 'Lease_Agreement_EN.pdf';
    const imageFileName = 'Background.png';
    await window.spire.FetchFileToVFS(inputFileName, "", `${process.env.PUBLIC_URL}/data/`);
    await window.spire.FetchFileToVFS(imageFileName, "", `${process.env.PUBLIC_URL}/data/`);

    // Create a PdfDocument object and load the PDF document
    let doc = new pdfModule.PdfDocument();
    doc.LoadFromFile(inputFileName);

    // Open the background image as a file stream in the VFS; every page shares one stream
    const imageStream = new window.spire.Stream(imageFileName);

    // Lay the image down page by page; it stretches to fill the page content area
    for (let i = 0; i < doc.Pages.Count; i++) {
      const page = doc.Pages.get_Item(i);
      page.BackgroundImage = imageStream;
      page.BackgroudOpacity = 1;
    }

    const outputFileName = 'SetBackgroundImage.pdf';
    doc.SaveToFile(outputFileName);
    doc.Close();

    // Read the generated file back from the VFS to trigger the download
    const fileArray = window.dotnetRuntime.Module.FS.readFile(outputFileName);
    const blob = new Blob([fileArray], { type: 'application/pdf' });
    const url = URL.createObjectURL(blob);
    const a = document.createElement('a');
    a.href = url;
    a.download = outputFileName;
    a.click();
    URL.revokeObjectURL(url);
  };

  return (
    <div style={{ textAlign: 'center', height: '300px' }}>
      <h1>Set PDF Background Image</h1>
      <button onClick={setBackgroundImage}>
        Start Setting
      </button>
    </div>
  );
}

export default App;
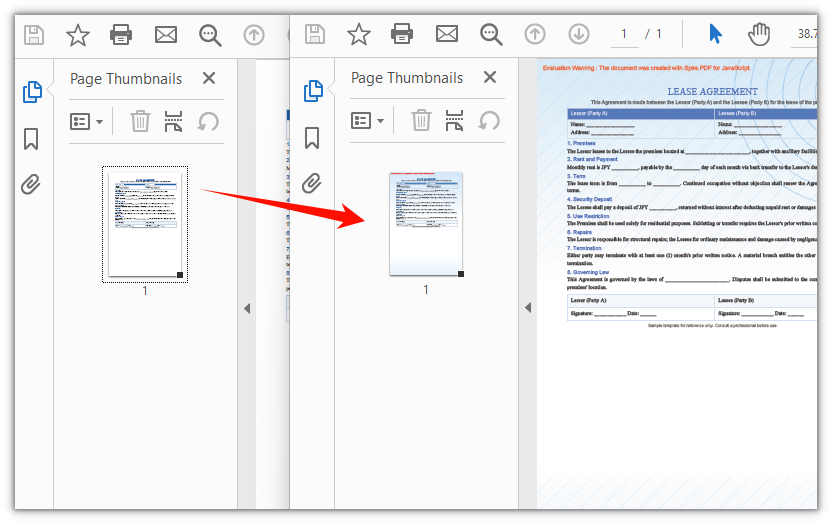
The same background image fills every page, and the body text stays legible:
FAQ
The background color comes out much paler than expected
Cause: BackgroudOpacity (note the missing "n" in the spelling) defaults to 0.25, so the background is blended onto the page at 25% opacity and even a dark color washes out.
Solution: Set BackgroudOpacity to 1 for the solid color; pick a value between 0.3 and 0.8 if you want it softened.
page.BackgroundColor = backgroundColor;
// 1 gives the solid color; a smaller value blends it in more faintly
page.BackgroudOpacity = 1;
The background does not reach the page edges
Cause: The background is only painted inside the page content area (ClientSize). A loaded PDF usually has no margins, so the background covers the whole page; a page created with Pages.Add() carries the default 40-point margins, and that band stays uncolored.
Solution: Create the page with zero margins, and the background covers the whole page:
// Pass a zero-margin object as the second argument; the content area then matches the page
const page = doc.Pages.Add(pdfModule.PdfPageSize.A4(), new pdfModule.PdfMargins());
I only want a background on one page
Cause: BackgroundColor and BackgroundImage are page-level properties: they apply only to the page you assign them on and are not carried over to the rest of the document.
Solution: Fetch the page by index and set it there; no loop needed:
// Handle only page 1 and leave the rest as they are
const page = doc.Pages.get_Item(0);
page.BackgroundColor = pdfModule.Color.FromArgb(255, 226, 240, 253);
page.BackgroudOpacity = 1;
Get a Free License
If you wish to remove the evaluation message from the result document or remove feature limitations, please contact sales to obtain a temporary license valid for 30 days.
Rotate PDF Pages in React Using JavaScript
A scanned page that landed sideways, a landscape table sandwiched between portrait pages, or a document you want turned as a whole before printing — none of these need to be re-laid out. The rotation angle is a property of the PDF page itself; changing it only affects how the page is displayed, and the content on the page stays as it is.
Spire.PDF for JavaScript loads, modifies and saves PDF documents directly in the browser based on WebAssembly, reading and writing files through a virtual file system (VFS), with no backend service required.
This article covers two core features:
For installation and project configuration, refer to Integrating Spire.PDF for JavaScript in a React Project. The following examples assume Spire.PDF is installed and the WebAssembly module has been initialized.
Rotate a New Page
To give every page in a section the same orientation, one setting on the section is enough: section.PageSettings.Rotate takes PdfPageRotateAngle.RotateAngle90, and all pages in that section are rotated 90 degrees clockwise. RotateAngle180 and RotateAngle270 are also available, and leaving it unset means no rotation.
function App() {
  const createRotatedPdf = async () => {
    // Get the Spire.PDF WASM module
    const pdfModule = window.wasmModule?.spirepdf;

    // Check whether the module is ready
    if (!pdfModule) {
      alert('Spire.PDF is not ready yet');
      return;
    }

    // Load the font into the VFS for the page text
    await window.spire.FetchFileToVFS('ARIAL UNICODE MS.TTF', '/Library/Fonts/', `${process.env.PUBLIC_URL}/font/`);

    // Create a blank document
    const doc = new pdfModule.PdfDocument();

    // Add a section; every page in it shares a 90-degree clockwise rotation
    const section = doc.Sections.Add();
    section.PageSettings.Size = pdfModule.PdfPageSize.A4();
    section.PageSettings.Rotate = pdfModule.PdfPageRotateAngle.RotateAngle90;

    // Add a page to the section
    const page = section.Pages.Add();

    // Draw a line of text on the page
    const font = new pdfModule.PdfTrueTypeFont({ fontFile: '/Library/Fonts/ARIAL UNICODE MS.TTF', size: 14 });
    page.Canvas.DrawString({
      s: 'This page is set to rotate 90 degrees at creation time',
      font: font,
      brush: pdfModule.PdfBrushes.get_Black(),
      x: 40,
      y: 60,
      format: new pdfModule.PdfStringFormat({ alignment: pdfModule.PdfTextAlignment.Left })
    });

    // Save and read back from the VFS to trigger the download
    const outputFileName = 'RotatedDocument.pdf';
    doc.SaveToFile(outputFileName);
    doc.Close();

    const fileArray = window.dotnetRuntime.Module.FS.readFile(outputFileName);
    const blob = new Blob([fileArray], { type: 'application/pdf' });
    const url = URL.createObjectURL(blob);
    const a = document.createElement('a');
    a.href = url;
    a.download = outputFileName;
    a.click();
    URL.revokeObjectURL(url);
  };

  return (
    <div style={{ textAlign: 'center', height: '300px' }}>
      <h1>Create a Rotated PDF</h1>
      <button onClick={createRotatedPdf}>
        Start Creating
      </button>
    </div>
  );
}

export default App;
If you only want to pass the angle while creating a page, the overload
doc.Pages.Add(size, margins, rotation)works as well.
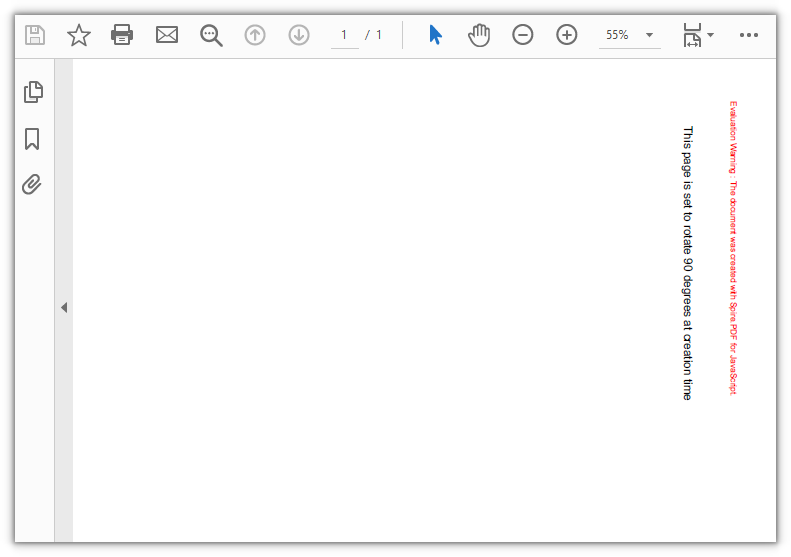
The A4 page is set to a 90-degree rotation at creation time:
Rotate an Existing Page
To change the orientation of an existing document, note that the angle lives in the page's own Rotation property: read the current value first, then add this call's rotation to it. What gets written back is the enum value of PdfPageRotateAngle (0 for no rotation, 1 for 90 degrees), not the angle itself.
function App() {
  const rotateExistingPage = async () => {
    // Get the Spire.PDF WASM module
    const pdfModule = window.wasmModule?.spirepdf;

    // Check whether the module is ready
    if (!pdfModule) {
      alert('Spire.PDF is not ready yet');
      return;
    }

    // Load the PDF file to be processed into the VFS
    const inputFileName = 'Multipage_Document.pdf';
    await window.spire.FetchFileToVFS(inputFileName, '', `${process.env.PUBLIC_URL}/data/`);

    // Create a PdfDocument object and load the PDF document
    const doc = new pdfModule.PdfDocument();
    doc.LoadFromFile(inputFileName);

    // Take the first page and add this call's rotation to its current angle
    const page = doc.Pages.get_Item(0);
    let rotation = page.Rotation.value + pdfModule.PdfPageRotateAngle.RotateAngle90.value;

    // The enum value only runs from 0 to 3; 4 means a full turn, back to no rotation
    if (rotation === 4) {
      rotation = 0;
    }
    page.Rotation = rotation;

    // Save and read back from the VFS to trigger the download
    const outputFileName = 'RotatedPage.pdf';
    doc.SaveToFile(outputFileName);
    doc.Close();

    const fileArray = window.dotnetRuntime.Module.FS.readFile(outputFileName);
    const blob = new Blob([fileArray], { type: 'application/pdf' });
    const url = URL.createObjectURL(blob);
    const a = document.createElement('a');
    a.href = url;
    a.download = outputFileName;
    a.click();
    URL.revokeObjectURL(url);
  };

  return (
    <div style={{ textAlign: 'center', height: '300px' }}>
      <h1>Rotate a Specific Page</h1>
      <button onClick={rotateExistingPage}>
        Start Rotating
      </button>
    </div>
  );
}

export default App;
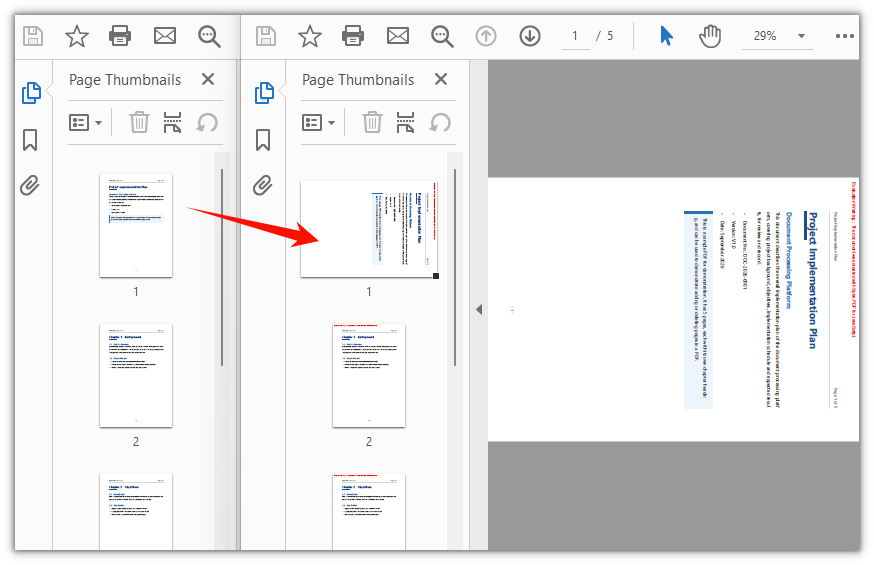
Only the first page is rotated 90 degrees, the remaining pages keep their orientation:
FAQ
Why does assigning to Rotation report "Value is not an integer"
Cause: The write side of page.Rotation only accepts an integer. Passing a PdfPageRotateAngle enum object directly throws Assert failed: Value is not an integer: PdfPageRotateAngle.RotateAngle90 (object).
Solution: Take the enum's value and assign that:
page.Rotation = pdfModule.PdfPageRotateAngle.RotateAngle90.value;
Why does the page end up rotated 180 degrees after I pass 90
Cause: The enum values of PdfPageRotateAngle are 0, 1, 2 and 3, standing for 0, 90, 180 and 270 degrees. That value is what the write side expects, not the angle. Writing page.Rotation = 90 throws no error but does not give you 90 degrees, and looking the value up with PdfPageRotateAngle.fromValue(90) throws Invalid value for spirepdfPdfPageRotateAngle.
Solution: Convert to the enum value before writing:
// 90 degrees
page.Rotation = pdfModule.PdfPageRotateAngle.RotateAngle90.value;

// 180 degrees
page.Rotation = pdfModule.PdfPageRotateAngle.RotateAngle180.value;
Why does the rotation argument on section.Pages.Add(...) have no effect
Cause: The overload that takes a rotation argument, Add(size, margins, rotation), only works on doc.Pages. On section.Pages the argument is ignored, and the page orientation is decided by the PageSettings.Rotate of the section it belongs to. The /Rotate entry in the file stays 0, the page is not rotated, and no error is raised.
Solution: Pick one of the two forms below, and do not pass the argument to section.Pages:
// Form 1: set it on the section, applying to every page in that section
section.PageSettings.Rotate = pdfModule.PdfPageRotateAngle.RotateAngle90;
section.Pages.Add();

// Form 2: create the page on doc.Pages and pass the angle
const page = doc.Pages.Add(
  pdfModule.PdfPageSize.A4(),
  new pdfModule.PdfMargins(),
  pdfModule.PdfPageRotateAngle.RotateAngle90
);
A page can still be adjusted on its own after it has been created; page.Rotation overrides the section setting:
// Rotate only the second page to 180 degrees, leaving the rest untouched
doc.Pages.get_Item(1).Rotation = pdfModule.PdfPageRotateAngle.RotateAngle180.value;
Get a Free License
If you wish to remove the evaluation message from the result document or remove feature limitations, please contact sales to obtain a temporary license valid for 30 days.
Get PDF Text or Image Coordinates with JavaScript in React
Adding annotations to a PDF, pulling data out of a region, or drawing a border around an image all start with knowing where the target element sits on the page. A PDF has no ready-made coordinate table: text is a series of drawing instructions, images are objects in the page resources, and the position information is scattered across their own matrices and rectangles. In the past you either wrote your own parser to pull those numbers out, or sent the file back to a server to handle.
Spire.PDF for JavaScript loads and parses PDF documents in the browser with WebAssembly and reads and writes files through a virtual file system (VFS), with no backend involved.
This article covers two core features:
For installation and project setup, see How to Integrate Spire.PDF for JavaScript in a React Project. The examples below assume Spire.PDF is installed and the WebAssembly module is initialized.
Coordinate system
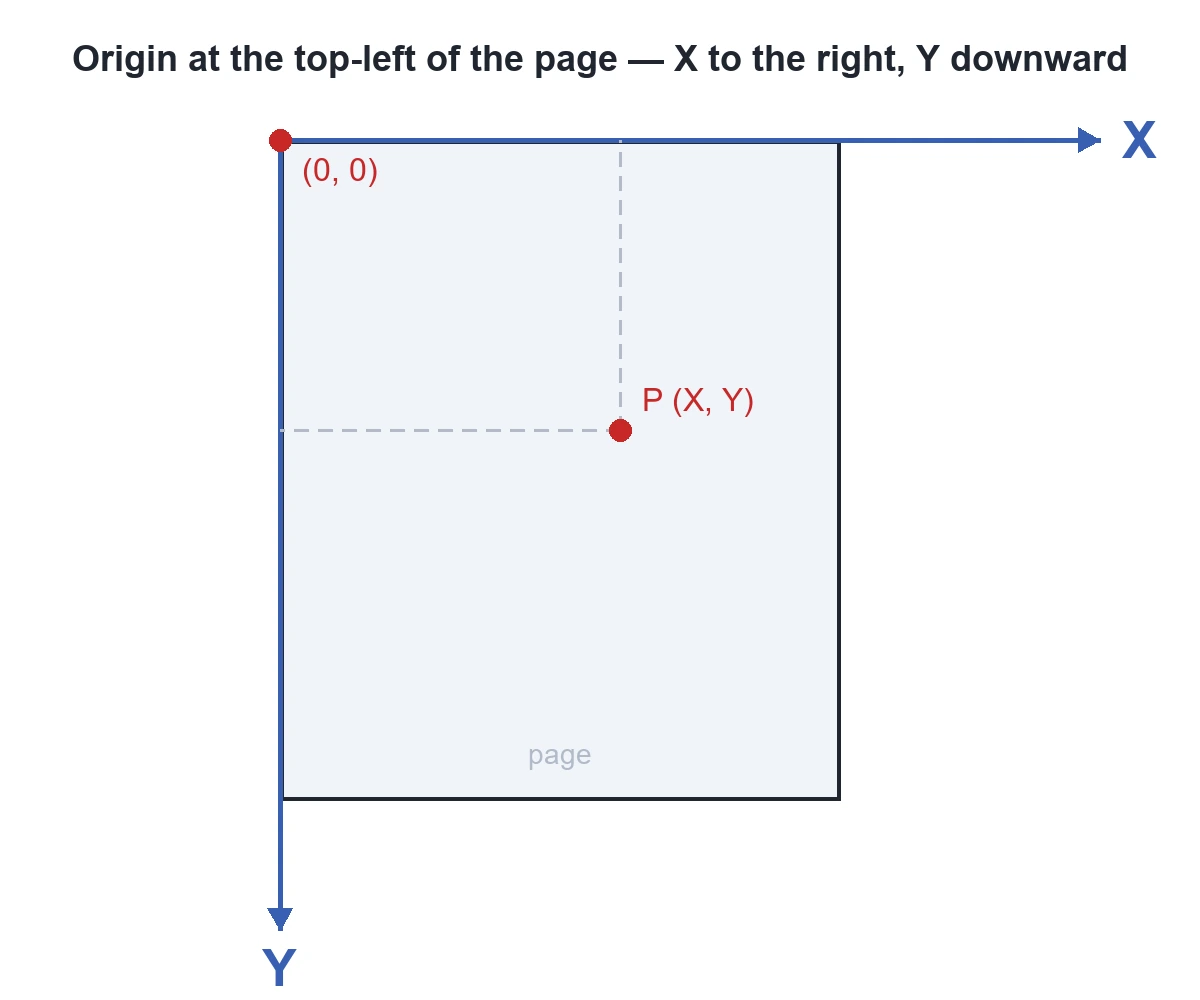
When Spire.PDF works with an existing PDF document, the origin of the coordinate system is at the top-left corner of the page. The X axis extends horizontally to the right from the origin, and the Y axis extends vertically downward from the origin (as shown below). Values are in points (1 point = 1/72 inch), and both Positions and Bounds in the two features below report coordinates in this system.
Get the coordinates of specified text
Spire.PDF for JavaScript provides PdfTextFinder to look up text on a page by content, and every match reports the coordinates of where it lands. The search works one page at a time, so a multi-page document has to be processed page by page.
function App() {
  const getTextCoordinates = async () => {
    // Get the Spire.PDF WASM module
    const pdfModule = window.wasmModule?.spirepdf;

    // Check whether the module is ready
    if (!pdfModule) {
      alert('Spire.PDF is not ready yet');
      return;
    }

    // Load the PDF file to process into the VFS
    const inputFileName = 'Flowers.pdf';
    await window.spire.FetchFileToVFS(inputFileName, "", `${process.env.PUBLIC_URL}/data/`);

    // Create a PdfDocument object and load the PDF document
    let doc = new pdfModule.PdfDocument();
    doc.LoadFromFile(inputFileName);

    // Get page 1
    let page = doc.Pages.get_Item(0);

    // Create a text finder and search for the given text, ignoring case
    let finder = new pdfModule.PdfTextFinder(page);
    finder.Options.Parameter = pdfModule.TextFindParameter.IgnoreCase;
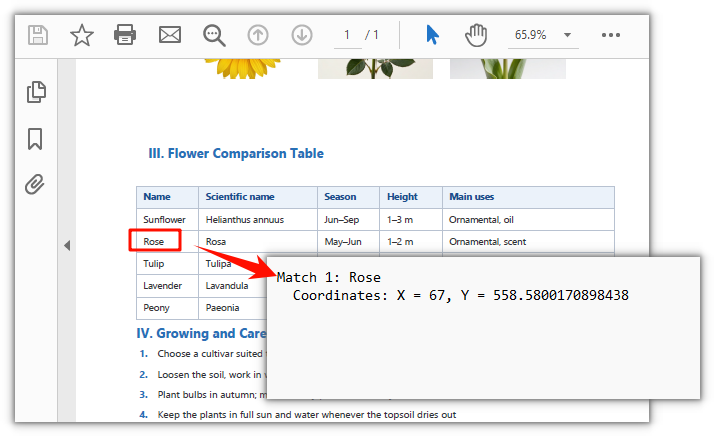
    let results = finder.Find('Rose');

    // Collect the coordinates of each match
    let report = '';
    for (let i = 0; i < results.length; i++) {
      let find = results.get(i);
      let position = find.Positions[0];

      report += 'Match ' + (i + 1) + ': ' + find.Text + '\n';
      report += '  Coordinates: X = ' + position.X + ', Y = ' + position.Y + '\n';
    }

    // Write the report into the VFS
    const outputFileName = 'TextCoordinates.txt';
    window.dotnetRuntime.Module.FS.writeFile(outputFileName, new TextEncoder().encode(report));
    doc.Close();

    // Read the generated file back from the VFS and trigger a download
    const fileArray = window.dotnetRuntime.Module.FS.readFile(outputFileName);
    const blob = new Blob([fileArray], { type: 'text/plain' });
    const url = URL.createObjectURL(blob);
    const a = document.createElement('a');
    a.href = url;
    a.download = outputFileName;
    a.click();
    URL.revokeObjectURL(url);
  };

  return (
    <div style={{ textAlign: 'center', height: '300px' }}>
      <h1>Get Text Coordinates</h1>
      <button onClick={getTextCoordinates}>
        Get
      </button>
    </div>
  );
}

export default App;
Coordinates of the matched text
Get the coordinates of images on a page
Spire.PDF for JavaScript also provides PdfImageHelper to read the position of every image on a page. Images are already registered in the page resources, so the Bounds you get back gives the top-left coordinates directly. This also works one page at a time.
function App() {
  const getImageCoordinates = async () => {
    // Get the Spire.PDF WASM module
    const pdfModule = window.wasmModule?.spirepdf;

    // Check whether the module is ready
    if (!pdfModule) {
      alert('Spire.PDF is not ready yet');
      return;
    }

    // Load the PDF file to process into the VFS
    const inputFileName = 'Flowers.pdf';
    await window.spire.FetchFileToVFS(inputFileName, "", `${process.env.PUBLIC_URL}/data/`);

    // Create a PdfDocument object and load the PDF document
    let doc = new pdfModule.PdfDocument();
    doc.LoadFromFile(inputFileName);

    // Get page 1
    let page = doc.Pages.get_Item(0);

    // Create an image helper and get the image info of this page
    let helper = new pdfModule.PdfImageHelper();
    let images = helper.GetImagesInfo(page);

    // Collect the coordinates of each image
    let report = '';
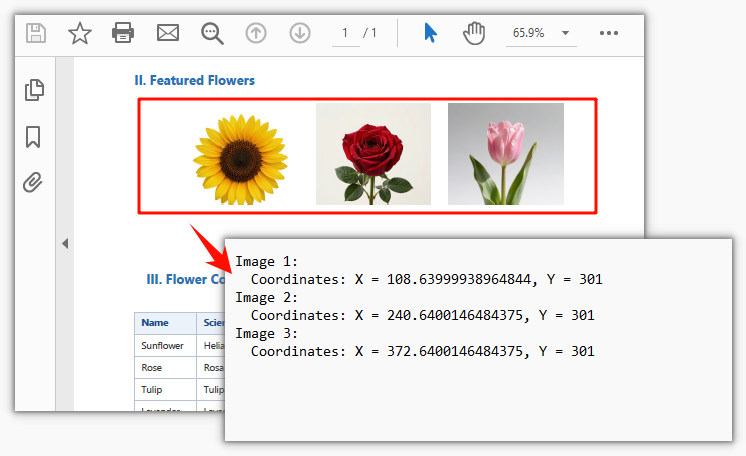
    for (let i = 0; i < images.length; i++) {
      let bounds = images[i].Bounds;

      report += 'Image ' + (i + 1) + ':' + '\n';
      report += '  Coordinates: X = ' + bounds.X + ', Y = ' + bounds.Y + '\n';
    }

    // Write the report into the VFS
    const outputFileName = 'ImageCoordinates.txt';
    window.dotnetRuntime.Module.FS.writeFile(outputFileName, new TextEncoder().encode(report));
    doc.Close();

    // Read the generated file back from the VFS and trigger a download
    const fileArray = window.dotnetRuntime.Module.FS.readFile(outputFileName);
    const blob = new Blob([fileArray], { type: 'text/plain' });
    const url = URL.createObjectURL(blob);
    const a = document.createElement('a');
    a.href = url;
    a.download = outputFileName;
    a.click();
    URL.revokeObjectURL(url);
  };

  return (
    <div style={{ textAlign: 'center', height: '300px' }}>
      <h1>Get Image Coordinates</h1>
      <button onClick={getImageCoordinates}>
        Get
      </button>
    </div>
  );
}

export default App;
Coordinates of the three flower images on the page
FAQ
A different letter case stops it from matching
Cause: The matching behavior of Find() is determined by Options.Parameter. The default value TextFindParameter.None searches by substring and is case-sensitive, so Rose and rose are treated as two different things.
Fix: Switch to the value you need. TextFindParameter is a flags enum, so values can be combined with bitwise OR:
// Ignore case
finder.Options.Parameter = pdfModule.TextFindParameter.IgnoreCase;

// Match whole words only, ignoring case
finder.Options.Parameter = pdfModule.TextFindParameter.WholeWord | pdfModule.TextFindParameter.IgnoreCase;

// Search with a regular expression: match Rosa or Tulipa in one pass
finder.Options.Parameter = pdfModule.TextFindParameter.Regex;
let results = finder.Find('Rosa|Tulipa');
The coordinates don't match what the PDF reader shows
Cause: Positions and Bounds use the page coordinate system described above; inside a PDF file (/MediaBox, content streams) the origin is at the bottom-left with Y increasing upward, so the two conventions differ by a full page height and a direct comparison will be off by the whole page.
Fix: Work with the top-left origin consistently. To convert to pixels, multiply by dpi / 72 — the factor is 1.333 at 96 dpi. The values you get are floating-point numbers, so round to two decimals before comparing if you need an exact match.
The image info doesn't include the shapes I can see on the page
Cause: GetImagesInfo returns the bitmap objects in the page resources. Lines, table borders, and color blocks drawn with vector instructions are not images; conversely, a full-page scan is a single image covering the page, and the text inside it cannot be searched.
Fix: Start by using the X and Y from Bounds to confirm where each image actually sits on the page. Lines and shapes drawn with vector instructions are not returned by GetImagesInfo, and text inside a scanned page cannot be found either — to locate those, use text extraction (PdfTextExtractor) or bring in OCR separately.
Get a Free License
If you want to remove the evaluation message from the result documents or get past the feature limits, contact sales for a 30-day temporary license.
Convert PDF to Markdown in React with JavaScript
PDF keeps its layout stable and is easy to distribute, but the cost is that the content is locked inside the page structure — changing a single word often means redoing the whole layout. Markdown takes a different path: plain text with a clear hierarchy that drops straight into Git repositories and knowledge bases, and is also easy to hand to a large language model for summarization or question answering. Converting a PDF to Markdown is essentially turning the content back into editable, structured text.
Spire.PDF for JavaScript is built on WebAssembly, so PDFs can be loaded, converted and saved entirely in the browser, with input and output managed through a virtual file system (VFS) and no backend service required. There are two entry points for conversion: set the output format of PdfDocument.SaveToFile to FileFormat.Markdown for a one-step result, or use PdfToMarkdownConverter, which exposes MarkdownOptions so you can fine-tune the details of the conversion.
This article covers two core features:
For installation and project configuration, refer to Integrate Spire.PDF for JavaScript in a React Project. The examples below assume Spire.PDF is already installed and the WebAssembly module is initialized.
Convert PDF to Markdown
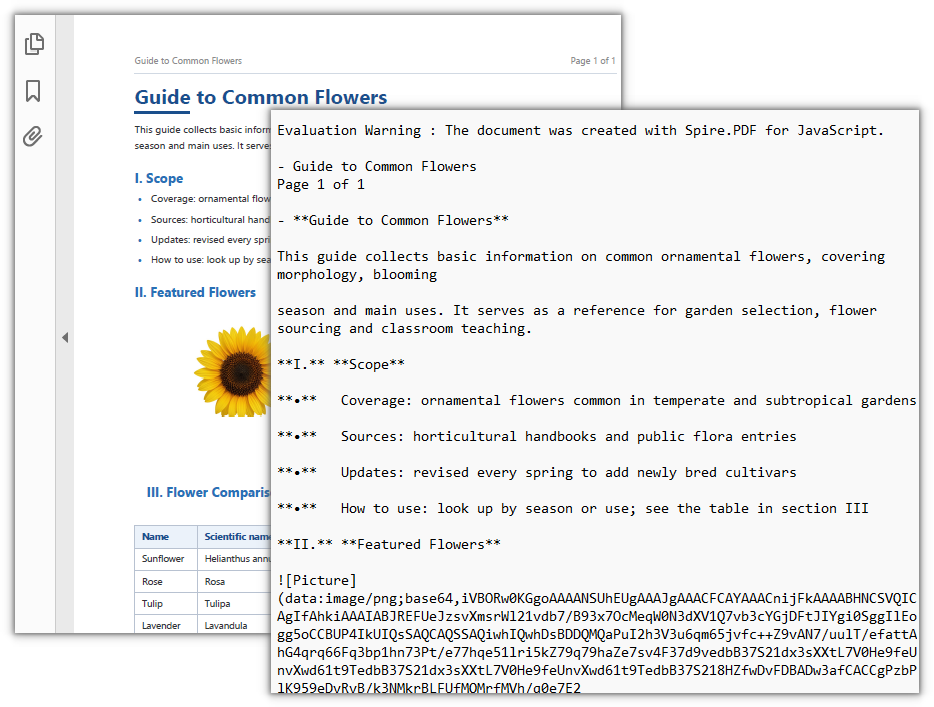
PdfDocument.SaveToFile can also output Markdown: set fileFormat to FileFormat.Markdown, and the headings, paragraphs and lists in the PDF are organized into Markdown text according to their original hierarchy. Images in the document are extracted as well by default.
function App() {
  const convertPdfToMarkdown = async () => {
    // Get the Spire.PDF WASM module
    const pdfModule = window.wasmModule?.spirepdf;

    // Check if the module is ready
    if (!pdfModule) {
      alert('Spire.PDF is not ready yet');
      return;
    }

    // Load the PDF file into the virtual file system
    const inputFileName = 'Flowers.pdf';
    await window.spire.FetchFileToVFS(inputFileName, "", `${process.env.PUBLIC_URL}/data/`);

    // Load the font into the virtual file system (the WebAssembly environment has no system fonts)
    await window.spire.FetchFileToVFS('ARIAL.TTF', '/Library/Fonts/', `${process.env.PUBLIC_URL}/font/`);

    // Create a PdfDocument object and load the PDF
    let doc = new pdfModule.PdfDocument();
    doc.LoadFromFile(inputFileName);

    // Define the output file name and convert to Markdown format
    const outputFileName = 'ConvertedResult.md';
    doc.SaveToFile({ fileName: outputFileName, fileFormat: pdfModule.FileFormat.Markdown });
    doc.Close();

    // Read the generated file from the VFS and trigger download
    const fileArray = window.dotnetRuntime.Module.FS.readFile(outputFileName);
    const blob = new Blob([fileArray], { type: 'text/markdown' });
    const url = URL.createObjectURL(blob);
    const a = document.createElement('a');
    a.href = url;
    a.download = outputFileName;
    a.click();
    URL.revokeObjectURL(url);
  };

  return (
    <div style={{ textAlign: 'center', height: '300px' }}>
      <h1>Convert PDF to Markdown</h1>
      <button onClick={convertPdfToMarkdown}>
        Convert
      </button>
    </div>
  );
}

export default App;
Markdown file after converting PDF to Markdown
Convert text only and skip images
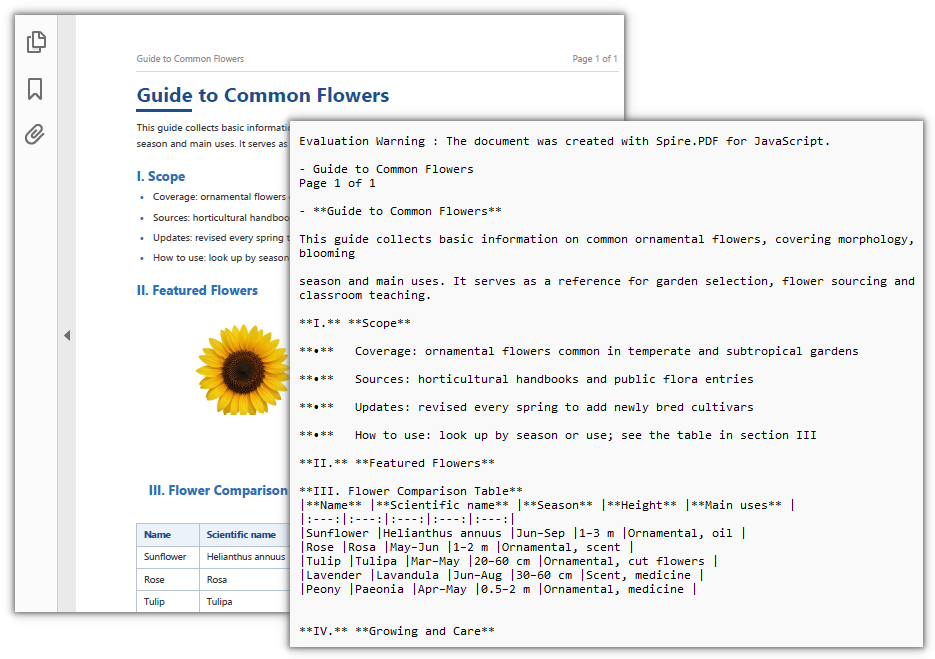
If you only want the text, PdfToMarkdownConverter is more direct. It extracts the images in the document by default; set MarkdownOptions.IgnoreImage to true and the output contains plain text only.
function App() {
  const convertPdfToTextOnlyMarkdown = async () => {
    // Get the Spire.PDF WASM module
    const pdfModule = window.wasmModule?.spirepdf;

    // Check if the module is ready
    if (!pdfModule) {
      alert('Spire.PDF is not ready yet');
      return;
    }

    // Load the PDF file into the virtual file system
    const inputFileName = 'Flowers.pdf';
    await window.spire.FetchFileToVFS(inputFileName, "", `${process.env.PUBLIC_URL}/data/`);

    // Load the font into the virtual file system (the WebAssembly environment has no system fonts)
    await window.spire.FetchFileToVFS('ARIAL.TTF', '/Library/Fonts/', `${process.env.PUBLIC_URL}/font/`);

    // Create the converter and set it to ignore images
    const converter = new pdfModule.PdfToMarkdownConverter(inputFileName);
    converter.MarkdownOptions.IgnoreImage = true;

    // Define the output file name and run the conversion
    const outputFileName = 'TextOnlyResult.md';
    converter.ConvertToMarkdown(outputFileName);
    converter.Dispose();

    // Read the generated file from the VFS and trigger download
    const fileArray = window.dotnetRuntime.Module.FS.readFile(outputFileName);
    const blob = new Blob([fileArray], { type: 'text/markdown' });
    const url = URL.createObjectURL(blob);
    const a = document.createElement('a');
    a.href = url;
    a.download = outputFileName;
    a.click();
    URL.revokeObjectURL(url);
  };

  return (
    <div style={{ textAlign: 'center', height: '300px' }}>
      <h1>Convert PDF to Text-only Markdown</h1>
      <button onClick={convertPdfToTextOnlyMarkdown}>
        Convert
      </button>
    </div>
  );
}

export default App;
Conversion result with text only and images skipped
Frequently Asked Questions
Where do the heading and list levels come from after conversion
Reason: A PDF has no semantic markers such as "heading" or "list" — only individual text fragments with coordinates. The converter has to infer the original structure from layout clues such as font size, font weight, indentation and line spacing.
Solution: Spire.PDF judges the levels from those clues and outputs the corresponding Markdown markers. If the source document has a loose layout (for example, distinguishing headings with spaces instead of actual font size differences), the inferred result may be poor. In that case, adjust the layout of the source PDF first, or proofread the converted output manually:
// Load the PDF and convert it to Markdown for inspection
let doc = new pdfModule.PdfDocument();
doc.LoadFromFile(inputFileName);
doc.SaveToFile({ fileName: outputFileName, fileFormat: pdfModule.FileFormat.Markdown });
doc.Close();
Why are the images gone after I set IgnoreImage
Reason: MarkdownOptions.IgnoreImage means exactly "skip images during conversion". Once it is set to true, images are neither extracted as separate files nor referenced in the Markdown output.
Solution: If you want both the text and the images, remove the property or set it to false, and the converter will handle images as usual:
// Keep images (default behavior)
const converter = new pdfModule.PdfToMarkdownConverter(inputFileName);
converter.MarkdownOptions.IgnoreImage = false;
converter.ConvertToMarkdown(outputFileName);
converter.Dispose();
The conversion of a scanned document comes out blank
Reason: A scanned document is a full-page image with no text layer, so the converter can extract no text from it and the output is nearly empty.
Solution: Such PDFs need OCR first to recognize the image into a text layer, and only then can Spire.PDF convert them. The check is simple: open the file in a reader and try to select the text. If nothing can be selected, it is a scanned document:
// Read the result back from the VFS to confirm whether text was actually produced
const fileArray = window.dotnetRuntime.Module.FS.readFile(outputFileName);
console.log('Output size:', fileArray.length, 'bytes');
Get a Free License
If you would like to remove the evaluation message from the result document or lift feature restrictions, please contact sales for a 30-day temporary license.
Set PDF Viewer Preferences with JavaScript in React
The same PDF can look different to everyone who opens it: one viewer starts centered, another pins the toolbar and menu bar to the top, one shows a single page at a time, another puts two pages side by side. When the document is a manual, a brochure, or a report meant for other people, the author usually wants control over those defaults — centered on open, minimal interface, straight into a two-column view. This behavior comes from the document's own viewer preferences, written into the PDF catalog and shipped with the file, so no viewer-side configuration is needed.
Spire.PDF for JavaScript loads, modifies, and saves PDF documents in the browser through WebAssembly. Viewer preferences are read and written through PdfDocument.ViewerPreferences, and files move in and out through a virtual file system (VFS), with no backend involved.
This article covers two features:
For installation and project setup, see Integrate Spire.PDF for JavaScript in a React project. The examples below assume Spire.PDF is installed and the WebAssembly module is initialized.
Set window and interface preferences
A few boolean switches on ViewerPreferences decide how the reader looks when it opens the document. All of them default to false, which leaves the reader's own interface untouched:
CenterWindowcenters the reader windowDisplayTitledecides whether the title bar uses the document title (with no title metadata in the document, the reader falls back to the file name)FitWindowdecides whether the window is scaled to fit the first pageHideMenubarhides the menu barHideToolbarhides the toolbarHideWindowUIhides interface elements such as scroll bars, leaving only the page content
function App() {
  const setWindowPreferences = async () => {
    // Get the Spire.PDF WASM module
    const pdfModule = window.wasmModule?.spirepdf;

    // Check that the module is ready
    if (!pdfModule) {
      alert('Spire.PDF is not ready yet');
      return;
    }

    // Load the PDF file to process into the VFS
    const inputFileName = 'FinancialStatement2025.pdf';
    await window.spire.FetchFileToVFS(inputFileName, "", `${process.env.PUBLIC_URL}/data/`);

    // Create a PdfDocument object and load the PDF document
    let doc = new pdfModule.PdfDocument();
    doc.LoadFromFile(inputFileName);

    // Center the reader window
    doc.ViewerPreferences.CenterWindow = true;
    // Do not use the document title in the title bar (keep showing the file name)
    doc.ViewerPreferences.DisplayTitle = false;
    // Do not scale the window to fit the first page
    doc.ViewerPreferences.FitWindow = false;
    // Hide the menu bar
    doc.ViewerPreferences.HideMenubar = true;
    // Hide the toolbar
    doc.ViewerPreferences.HideToolbar = true;
    // Hide interface elements such as scroll bars, leaving only the page content
    doc.ViewerPreferences.HideWindowUI = true;

    const outputFileName = 'WindowPreferences.pdf';
    doc.SaveToFile(outputFileName);
    doc.Close();

    // Read the generated file from the VFS and trigger the download
    const fileArray = window.dotnetRuntime.Module.FS.readFile(outputFileName);
    const blob = new Blob([fileArray], { type: 'application/pdf' });
    const url = URL.createObjectURL(blob);
    const a = document.createElement('a');
    a.href = url;
    a.download = outputFileName;
    a.click();
    URL.revokeObjectURL(url);
  };

  return (
    <div style={{ textAlign: 'center', height: '300px' }}>
      <h1>Window and Interface Preferences</h1>
      <button onClick={setWindowPreferences}>
        Apply
      </button>
    </div>
  );
}

export default App;
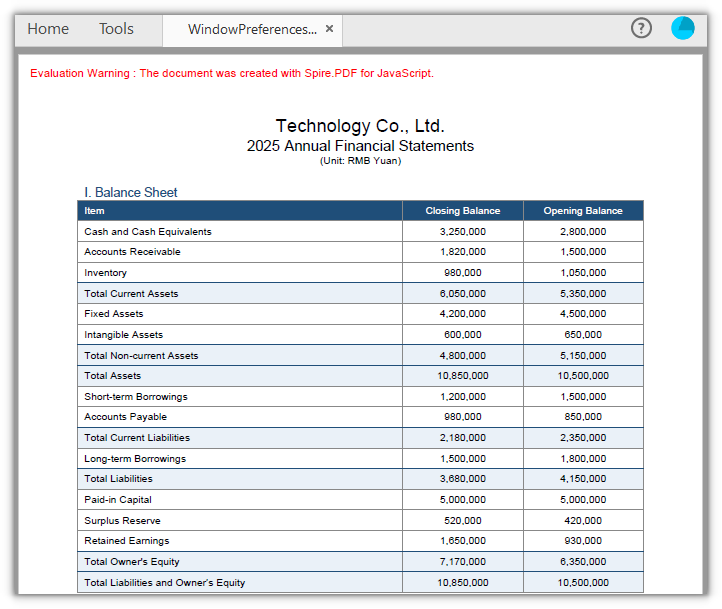
A PDF document with the window centered and the toolbar and menu bar hidden
Set page layout and opening display mode
How pages are arranged, and what appears first on open, are also decided by enum properties on ViewerPreferences. Their defaults are SinglePage and UseNone:
PageLayoutcontrols how pages are arranged:SinglePageshows one page at a time,TwoColumnLeftputs two pages side by side with odd-numbered pages on the leftPageModecontrols what the document shows first:UseNonegoes straight to the page content,UseThumbsexpands a thumbnail panel in the sidebar
function App() {
  const setPageLayout = async () => {
    // Get the Spire.PDF WASM module
    const pdfModule = window.wasmModule?.spirepdf;

    // Check that the module is ready
    if (!pdfModule) {
      alert('Spire.PDF is not ready yet');
      return;
    }

    // Load the PDF file to process into the VFS
    const inputFileName = 'FinancialStatement2025.pdf';
    await window.spire.FetchFileToVFS(inputFileName, "", `${process.env.PUBLIC_URL}/data/`);

    // Create a PdfDocument object and load the PDF document
    let doc = new pdfModule.PdfDocument();
    doc.LoadFromFile(inputFileName);

    // Show two pages side by side, with odd-numbered pages on the left
    doc.ViewerPreferences.PageLayout = pdfModule.PdfPageLayout.TwoColumnLeft;
    // Expand the thumbnail panel when the document opens
    doc.ViewerPreferences.PageMode = pdfModule.PdfPageMode.UseThumbs;

    const outputFileName = 'PageLayoutSettings.pdf';
    doc.SaveToFile(outputFileName);
    doc.Close();

    // Read the generated file from the VFS and trigger the download
    const fileArray = window.dotnetRuntime.Module.FS.readFile(outputFileName);
    const blob = new Blob([fileArray], { type: 'application/pdf' });
    const url = URL.createObjectURL(blob);
    const a = document.createElement('a');
    a.href = url;
    a.download = outputFileName;
    a.click();
    URL.revokeObjectURL(url);
  };

  return (
    <div style={{ textAlign: 'center', height: '300px' }}>
      <h1>Page Layout and Display Mode</h1>
      <button onClick={setPageLayout}>
        Apply
      </button>
    </div>
  );
}

export default App;
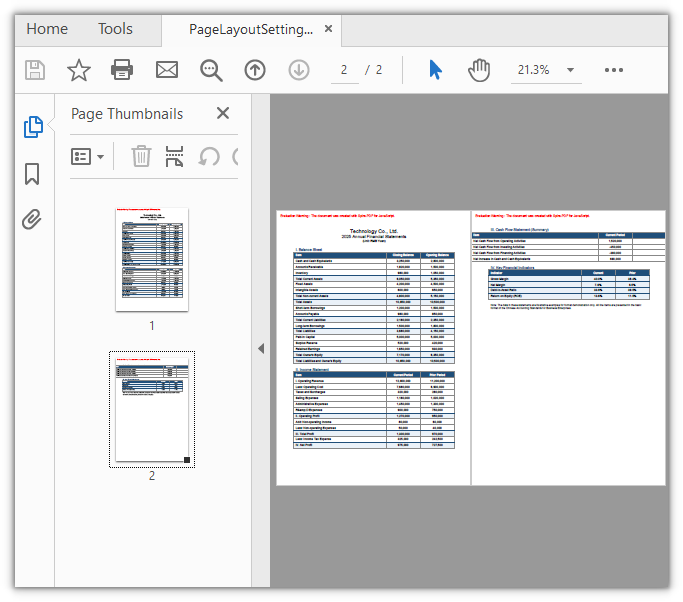
A PDF document that opens in two columns with the thumbnail panel expanded on the left
FAQ
I set the preferences but the document looks the same on open
Cause: Per the PDF specification, /ViewerPreferences is a hint to the reader, not a requirement. The built-in browser PDF viewers and many lightweight readers implement only a small part of it, and interface entries such as HideToolbar, HideMenubar, and PageLayout are often ignored outright. Adobe Acrobat also overrides the document values with the view state it remembers when "Restore last view settings" is turned on.
Solution: Open the file in Adobe Acrobat Reader to verify, and in Preferences → Documents make sure "Restore last view settings when reopening documents" is cleared. When troubleshooting, rule out the reader itself first, then check whether the settings made it into the file — the preferences only reach disk after SaveToFile, and calling Close() before saving discards the changes.
What is the difference between PageLayout and PageMode
Cause: The two property names are close and both affect how the document looks on open, so they are easy to mix up. They govern different things: PageLayout decides how pages are arranged, PageMode decides which panel shows first.
Solution: Pick one value for each as needed; the two do not affect each other:
// Page arrangement: single page, continuous single column, two columns, two pages
doc.ViewerPreferences.PageLayout = pdfModule.PdfPageLayout.TwoColumnLeft;

// Panel shown first on open: pages only, thumbnails, bookmark outlines
doc.ViewerPreferences.PageMode = pdfModule.PdfPageMode.UseThumbs;
PdfPageLayout accepts SinglePage, OneColumn, TwoColumnLeft, TwoColumnRight, TwoPageLeft, and TwoPageRight; PdfPageMode accepts UseNone, UseOutlines, UseThumbs, FullScreen, UseOC, and UseAttachments.
Can hiding the toolbar stop users from printing or saving a copy
Cause: No. HideToolbar, HideMenubar, and HideWindowUI only affect how the reader interface is displayed; they have nothing to do with the permissions for printing, copying, or saving a copy. Opening the file in a reader that ignores the setting, or using the menu directly, still allows both.
Solution: Restricting operations takes a permissions password — use PdfPasswordSecurityPolicy together with PdfDocumentPrivilege to turn off printing, copying, and the like. Those restrictions are enforced by the document's encryption dictionary, and readers honor them. Viewer preferences govern how it looks; permission settings govern what is allowed.
Get a Free License
If you want to remove the evaluation message from the result document or lift the feature limits, contact sales for a temporary 30-day license.
Adding Barcodes to a PDF in React with JavaScript
Order numbers, tracking numbers, and asset IDs are easy to mistype when someone enters them by hand. Printing them as barcodes on the document lets a scanner read them in one pass and brings the error rate down. Getting a barcode onto a PDF from a web app used to mean generating a barcode image on the server and compositing it back into the document, which sends the file on a round trip.
Spire.PDF for JavaScript creates, modifies, and saves PDF documents in the browser through WebAssembly. Barcodes are drawn straight onto the page by 1D barcode objects such as PdfCode128BBarcode and PdfCode39Barcode, and files are read and written through a virtual file system (VFS), so the document never has to be uploaded to a server.
This article covers two features:
For installation and project configuration, refer to Integrating Spire.PDF for JavaScript in a React Project. The following examples assume Spire.PDF is installed and the WebAssembly module has been initialized.
Supported barcode types
The ten 1D barcode classes all derive from PdfBarcode; they differ in the characters they accept and in how densely they encode, so use the table below to pick one:
| Class | Symbology | Characters supported |
|---|---|---|
PdfCodabarBarcode |
Codabar | Digits and - $ : / . + |
PdfCode11Barcode |
Code 11 | Digits and - |
PdfCode32Barcode |
Code 32 | Digits, common in pharmaceutical codes |
PdfCode39Barcode |
Code 39 | Digits, uppercase letters, space and - . $ / + % |
PdfCode39ExtendedBarcode |
Code 39 Extended | Full ASCII, represented by multi-character combinations |
PdfCode93Barcode |
Code 93 | Same character set as Code 39, higher density |
PdfCode93ExtendedBarcode |
Code 93 Extended | Full ASCII |
PdfCode128ABarcode |
Code 128A | Digits, uppercase letters, symbols and control characters |
PdfCode128BBarcode |
Code 128B | Digits, upper- and lowercase letters and symbols |
PdfCode128CBarcode |
Code 128C | Digits in pairs, the highest density |
function App() {
  const drawBarcodeTypes = async () => {
    // Get the Spire.PDF WASM module
    const pdfModule = window.wasmModule?.spirepdf;

    // Check that the module is ready
    if (!pdfModule) {
      alert('Spire.PDF is not ready yet');
      return;
    }

    // Load the font file into the VFS for the type name above each barcode
    await window.spire.FetchFileToVFS('ARIAL.TTF', '/Library/Fonts/', `${process.env.PUBLIC_URL}/font/`);

    // Create the PDF document and add a page
    const doc = new pdfModule.PdfDocument();
    const page = doc.Pages.Add();

    // Font, color, and alignment for the type names; green sets them apart from the black bars
    const labelFont = new pdfModule.PdfTrueTypeFont({ fontFile: '/Library/Fonts/ARIAL.TTF', size: 12 });
    const labelBrush = new pdfModule.PdfSolidBrush({ pdfRGBColor: new pdfModule.PdfRGBColor({ color: pdfModule.Color.get_Green() }) });
    const labelFormat = new pdfModule.PdfStringFormat({ alignment: pdfModule.PdfTextAlignment.Left });

    // The data to encode, the barcode class to use for each, and the type name shown above it
    const items = [
      { Barcode: pdfModule.PdfCodabarBarcode, label: 'Codabar', text: '00:12-3456/7890' },
      { Barcode: pdfModule.PdfCode11Barcode, label: 'Code 11', text: '123-4567890' },
      { Barcode: pdfModule.PdfCode32Barcode, label: 'Code 32', text: '16273849' },
      { Barcode: pdfModule.PdfCode39Barcode, label: 'Code 39', text: 'ORDER-2026-0007' },
      { Barcode: pdfModule.PdfCode39ExtendedBarcode, label: 'Code 39 Extended', text: 'Order 2026-0007' },
      { Barcode: pdfModule.PdfCode93Barcode, label: 'Code 93', text: 'ORDER-2026-0007' },
      { Barcode: pdfModule.PdfCode93ExtendedBarcode, label: 'Code 93 Extended', text: 'Order 2026-0007' },
      { Barcode: pdfModule.PdfCode128ABarcode, label: 'Code 128A', text: 'INVOICE 2026' },
      { Barcode: pdfModule.PdfCode128BBarcode, label: 'Code 128B', text: 'Order-2026-0001' },
      { Barcode: pdfModule.PdfCode128CBarcode, label: 'Code 128C', text: '20260001' },
    ];

    // Draw from the top of the page, one below the other
    let y = 20;
    for (const item of items) {
      // Label the barcode above it with the symbology it uses
      page.Canvas.DrawString({ s: `${item.label}:`, font: labelFont, brush: labelBrush, x: 20, y: y, format: labelFormat });

      // Create the barcode object from the text to encode
      const barcode = new item.Barcode({ text: item.text });

      // Show the readable text below the barcode
      barcode.TextDisplayLocation = pdfModule.TextLocation.Bottom;

      // Narrow the bars so all ten barcodes fit on one page
      barcode.BarHeight = 25;

      // Draw below the type name; this coordinate is the top-left corner of the barcode
      barcode.Draw({ page: page, location: new pdfModule.PointF(20, y + labelFont.Size + 4) });

      // Use the bottom edge of the area actually occupied to place the next one
      y = barcode.Bounds.Bottom + 10;
    }

    // Save the document
    const outputFileName = 'BarcodeTypes_result.pdf';
    doc.SaveToFile(outputFileName);
    doc.Close();

    // Read the generated file from the VFS and trigger the download
    const fileArray = window.dotnetRuntime.Module.FS.readFile(outputFileName);
    const blob = new Blob([fileArray], { type: 'application/pdf' });
    const url = URL.createObjectURL(blob);
    const a = document.createElement('a');
    a.href = url;
    a.download = outputFileName;
    a.click();
    URL.revokeObjectURL(url);
  };

  return (
    <div style={{ textAlign: 'center', height: '300px' }}>
      <h1>Drawing Multiple Barcode Types</h1>
      <button onClick={drawBarcodeTypes}>
        Draw Barcodes
      </button>
    </div>
  );
}

export default App;
Ten barcode types on one page, each labeled above with its symbology and below with the readable text
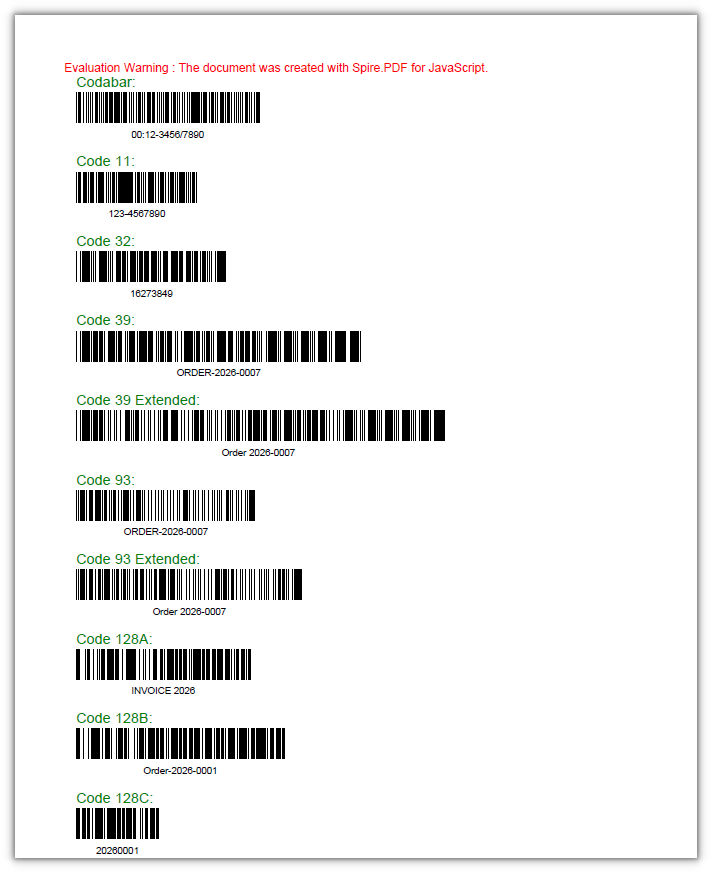
Customizing the barcode appearance
The default look is black bars on white with the text underneath, and each part of it can be overridden, from the colors and the bar height to the quiet zone and the label font. BarColor and TextColor color the bars and the text separately, BackColor fills the area behind the barcode, BarHeight, NarrowBarWidth, and BarcodeToTextGapHeight control the dimensions, and QuietZone is the blank space the barcode needs around it.
function App() {
  const customizeBarcode = async () => {
    // Get the Spire.PDF WASM module
    const pdfModule = window.wasmModule?.spirepdf;

    // Check that the module is ready
    if (!pdfModule) {
      alert('Spire.PDF is not ready yet');
      return;
    }

    // Load the font file into the VFS for the barcode label
    await window.spire.FetchFileToVFS('ARIAL.TTF', '/Library/Fonts/', `${process.env.PUBLIC_URL}/font/`);

    // Create the PDF document and add a page
    const doc = new pdfModule.PdfDocument();
    const page = doc.Pages.Add();

    // The first barcode keeps the default look, for comparison
    const plain = new pdfModule.PdfCode39Barcode({ text: 'ORDER-2026-0007' });
    plain.TextDisplayLocation = pdfModule.TextLocation.Bottom;
    plain.Draw({ page: page, location: new pdfModule.PointF(20, 20) });

    // The second one has each property set explicitly
    const barcode = new pdfModule.PdfCode39Barcode({ text: 'ORDER-2026-0007' });
    barcode.TextDisplayLocation = pdfModule.TextLocation.Bottom;

    // Set the bars, the text, and the background separately
    barcode.BarColor = new pdfModule.PdfRGBColor({ color: pdfModule.Color.FromArgb(0, 60, 160) });
    barcode.TextColor = new pdfModule.PdfRGBColor({ color: pdfModule.Color.FromArgb(200, 0, 0) });
    barcode.BackColor = new pdfModule.PdfRGBColor({ color: pdfModule.Color.FromArgb(255, 255, 0) });

    // Bar height, narrow bar width, and the gap between the bars and the text
    barcode.BarHeight = 45;
    barcode.NarrowBarWidth = 1.6;
    barcode.BarcodeToTextGapHeight = 4;

    // Center the text and leave 5 points of blank space on each side
    barcode.TextAlignment = pdfModule.PdfBarcodeTextAlignment.Center;
    barcode.QuietZone.Top = 5;
    barcode.QuietZone.Bottom = 5;
    barcode.QuietZone.Left = 5;
    barcode.QuietZone.Right = 5;

    // Switch the label to 12-point Arial
    barcode.Font = new pdfModule.PdfTrueTypeFont({ fontFile: '/Library/Fonts/ARIAL.TTF', size: 12 });

    // Place it below the first barcode
    barcode.Draw({ page: page, location: new pdfModule.PointF(20, plain.Bounds.Bottom + 30) });

    // Save the document
    const outputFileName = 'CustomBarcodeStyle_result.pdf';
    doc.SaveToFile(outputFileName);
    doc.Close();

    // Read the generated file from the VFS and trigger the download
    const fileArray = window.dotnetRuntime.Module.FS.readFile(outputFileName);
    const blob = new Blob([fileArray], { type: 'application/pdf' });
    const url = URL.createObjectURL(blob);
    const a = document.createElement('a');
    a.href = url;
    a.download = outputFileName;
    a.click();
    URL.revokeObjectURL(url);
  };

  return (
    <div style={{ textAlign: 'center', height: '300px' }}>
      <h1>Customizing the Barcode Style</h1>
      <button onClick={customizeBarcode}>
        Apply Styling
      </button>
    </div>
  );
}

export default App;
The lower barcode uses different bar colors, bar height, quiet zone, and label font
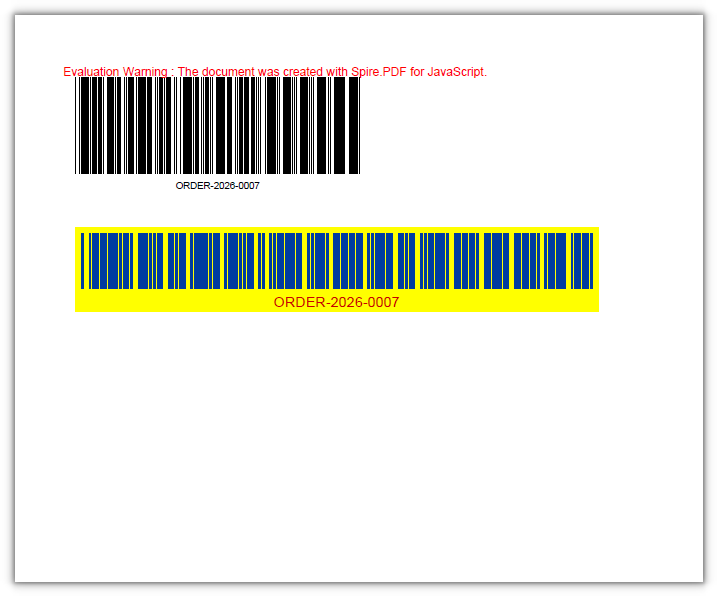
FAQ
PdfRGBColor reports "Ambiguous call" when it is constructed
Cause: the constructor of PdfRGBColor only accepts a Color object. Passing the three RGB components directly, as in new pdfModule.PdfRGBColor(0, 60, 160) or { r: 0, g: 60, b: 160 }, matches several overloads and throws Ambiguous call: arguments (object) match multiple overloads.
Solution: build a Color with Color.FromArgb first, then hand it to PdfRGBColor:
// Correct: produce a Color object first
barcode.BarColor = new pdfModule.PdfRGBColor({ color: pdfModule.Color.FromArgb(0, 60, 160) });

// A predefined color works too
barcode.TextColor = new pdfModule.PdfRGBColor({ color: pdfModule.Color.get_Blue() });
The same data produces barcodes of different lengths
Cause: symbologies encode at different densities, so the same text comes out shorter with Code128 than with Code39, and shorter still with Code128C. Raising NarrowBarWidth widens the whole barcode as well.
Solution: when the layout has to be fixed, use the Draw overload that takes a RectangleF to confine the barcode to an area, or adjust NarrowBarWidth across the board:
// However long the data is, the barcode stays inside the same rectangle
barcode.Draw({ page: page, rect: new pdfModule.RectangleF(20, 20, 250, 80) });
Can I add a QR code to a PDF
Cause: the 1D barcode classes Spire.PDF for JavaScript ships are PdfCodabarBarcode, PdfCode39Barcode, PdfCode128BBarcode, and the like. There is no QR code class, so a name such as PdfQRCodeBarcode evaluates to undefined.
Solution: generate the QR code as an image in the front end, then draw it into the page with PdfImage.FromStream and page.Canvas.DrawImage, leaving positioning and scaling to the canvas:
// qrBytes holds the PNG bytes of a QR code generated in the front end
const image = pdfModule.PdfImage.FromStream(new pdfModule.Stream(qrBytes));
page.Canvas.DrawImage({ image: image, x: 20, y: 20, width: 100, height: 100 });
Get a Free License
If you want to remove the evaluation message from the resulting documents, or to get rid of the feature limitations, please contact our sales team to obtain a temporary license valid for 30 days.
Detecting PDF Encryption and Verifying the Correct Password in React with JavaScript
Some of the PDFs users upload are password protected. If the code processes them without checking first, it either throws and stops, or writes out an incomplete result. Checking at the entry point is cheaper than debugging afterwards: is the document encrypted, which password does it need, and are the candidate passwords in hand correct?
Spire.PDF for JavaScript reads PDF documents in the browser through WebAssembly and manages input files in a virtual file system (VFS), so no backend is involved. PdfDocument.IsPasswordProtected() is a static method: it reads the file directly, without opening the document and without a password. Once a document is loaded, PdfDocument.Security records whether the password used this time is in UserPassword or OwnerPassword, which identifies the role of that password.
This article covers three features:
- Checking whether a PDF is password protected
- Checking whether a document requires an open password
- Verifying candidate passwords and confirming the password role
For installation and project configuration, refer to Integrating Spire.PDF for JavaScript in a React Project. The following examples assume Spire.PDF is installed and the WebAssembly module has been initialized.
Checking whether a PDF is password protected
PdfDocument.IsPasswordProtected() takes a file name in the virtual file system and returns a boolean. It checks whether the document carries an encryption dictionary, so it needs neither an opened document nor a password. It reads a path inside the virtual file system, so window.spire.FetchFileToVFS() must run first; otherwise it throws File doesn't exist.
function App() {
  const checkPasswordProtection = async () => {
    // Get the Spire.PDF WASM module
    const pdfModule = window.wasmModule?.spirepdf;

    // Check that the module is ready
    if (!pdfModule) {
      alert('Spire.PDF is not ready yet');
      return;
    }

    // File names to check
    const plainFileName = 'ContractTemplate.pdf';
    const lockedFileName = 'EncryptedContract.pdf';

    // The static method reads the virtual file system, so load the files first
    await window.spire.FetchFileToVFS(plainFileName, "", `${process.env.PUBLIC_URL}/data/`);
    await window.spire.FetchFileToVFS(lockedFileName, "", `${process.env.PUBLIC_URL}/data/`);

    // Check each file without opening the document or supplying a password
    const reportLines = [];
    for (const fileName of [plainFileName, lockedFileName]) {
      const isProtected = pdfModule.PdfDocument.IsPasswordProtected(fileName);
      reportLines.push(`${fileName}: ${isProtected ? 'password protected' : 'not encrypted'}`);
    }

    // Write the report into the virtual file system, then export it
    const outputFileName = 'EncryptionCheckResult.txt';
    const report = reportLines.join('\r\n');
    window.dotnetRuntime.Module.FS.writeFile(outputFileName, new TextEncoder().encode(report));

    // Read the generated file back from the VFS and trigger the download
    const fileArray = window.dotnetRuntime.Module.FS.readFile(outputFileName);
    const blob = new Blob([fileArray], { type: 'text/plain;charset=utf-8' });
    const url = URL.createObjectURL(blob);
    const a = document.createElement('a');
    a.href = url;
    a.download = outputFileName;
    a.click();
    URL.revokeObjectURL(url);
  };

  return (
    <div style={{ textAlign: 'center', height: '300px' }}>
      <h1>Checking Whether a PDF Is Password Protected</h1>
      <button onClick={checkPasswordProtection}>
        Run Check
      </button>
    </div>
  );
}

export default App;
Exported report: ContractTemplate.pdf is not encrypted, EncryptedContract.pdf is password protected
Checking whether a document requires an open password
IsPasswordProtected() returning true only means the document carries an encryption dictionary, not that a password is required to open it: a document with only a permission password still opens without one. To tell the two apart, call LoadFromFile() once without a password. A thrown exception means an open password is missing; a successful load means the document is merely restricted.
function App() {
  const checkOpenPassword = async () => {
    // Get the Spire.PDF WASM module
    const pdfModule = window.wasmModule?.spirepdf;

    // Check that the module is ready
    if (!pdfModule) {
      alert('Spire.PDF is not ready yet');
      return;
    }

    // File names to check
    const fileNames = ['ContractTemplate.pdf', 'EncryptedContract.pdf'];
    for (const fileName of fileNames) {
      await window.spire.FetchFileToVFS(fileName, "", `${process.env.PUBLIC_URL}/data/`);
    }

    // Load without a password: a thrown exception means an open password is required
    const reportLines = [];
    for (const fileName of fileNames) {
      try {
        const doc = new pdfModule.PdfDocument();
        doc.LoadFromFile(fileName);
        reportLines.push(`${fileName}: ${doc.IsEncrypted ? 'opens directly, but the document is still restricted by permissions' : 'not encrypted, opens directly'}`);
        doc.Close();
      } catch (error) {
        reportLines.push(`${fileName}: open password required`);
      }
    }

    // Write the report into the virtual file system, then export it
    const outputFileName = 'OpenPasswordCheck.txt';
    const report = reportLines.join('\r\n');
    window.dotnetRuntime.Module.FS.writeFile(outputFileName, new TextEncoder().encode(report));

    // Read the generated file back from the VFS and trigger the download
    const fileArray = window.dotnetRuntime.Module.FS.readFile(outputFileName);
    const blob = new Blob([fileArray], { type: 'text/plain;charset=utf-8' });
    const url = URL.createObjectURL(blob);
    const a = document.createElement('a');
    a.href = url;
    a.download = outputFileName;
    a.click();
    URL.revokeObjectURL(url);
  };

  return (
    <div style={{ textAlign: 'center', height: '300px' }}>
      <h1>Checking Whether a Document Requires an Open Password</h1>
      <button onClick={checkOpenPassword}>
        Run Check
      </button>
    </div>
  );
}

export default App;
Exported result: ContractTemplate.pdf opens directly, EncryptedContract.pdf requires an open password
Verifying candidate passwords and confirming the password role
Whether a password is correct is answered by whether LoadFromFile() loads successfully. On failure it always throws Can not open an encrypted document. The password is invalid., without distinguishing "no password supplied" from "wrong password". So check first whether the document is encrypted, skip the ones that are not, try passwords one by one on the encrypted ones, then read PdfDocument.Security to see whether the password used this time landed in UserPassword or OwnerPassword and confirm whether it is the open password or the permission password.
function App() {
  const verifyPassword = async () => {
    // Get the Spire.PDF WASM module
    const pdfModule = window.wasmModule?.spirepdf;

    // Check that the module is ready
    if (!pdfModule) {
      alert('Spire.PDF is not ready yet');
      return;
    }

    // Files to verify and candidate passwords
    const fileNames = ['ContractTemplate.pdf', 'EncryptedContract.pdf'];
    const candidates = ['wrong123', 'spire123', 'owner123'];

    // Both the static method and loading read the virtual file system, so load the files first
    for (const fileName of fileNames) {
      await window.spire.FetchFileToVFS(fileName, "", `${process.env.PUBLIC_URL}/data/`);
    }

    const reportLines = [];
    for (const fileName of fileNames) {
      // An unencrypted document needs no password verification
      if (!pdfModule.PdfDocument.IsPasswordProtected(fileName)) {
        reportLines.push(`${fileName}: this PDF document is not encrypted, no password verification needed`);
        continue;
      }

      // Encrypted: try each candidate; loading successfully means the password is correct
      for (const password of candidates) {
        try {
          const doc = new pdfModule.PdfDocument();
          doc.LoadFromFile(fileName, password);

          // Security records the password used this time, which gives its role
          const role = doc.Security.UserPassword ? 'open password' : 'permission password';
          reportLines.push(`${fileName}: password "${password}" is correct (${role})`);
          doc.Close();
        } catch (error) {
          reportLines.push(`${fileName}: password "${password}" is incorrect`);
        }
      }
    }

    // Write the report into the virtual file system, then export it
    const outputFileName = 'PasswordVerificationResult.txt';
    const report = reportLines.join('\r\n');
    window.dotnetRuntime.Module.FS.writeFile(outputFileName, new TextEncoder().encode(report));

    // Read the generated file back from the VFS and trigger the download
    const fileArray = window.dotnetRuntime.Module.FS.readFile(outputFileName);
    const blob = new Blob([fileArray], { type: 'text/plain;charset=utf-8' });
    const url = URL.createObjectURL(blob);
    const a = document.createElement('a');
    a.href = url;
    a.download = outputFileName;
    a.click();
    URL.revokeObjectURL(url);
  };

  return (
    <div style={{ textAlign: 'center', height: '300px' }}>
      <h1>Verifying Candidate Passwords and Confirming the Password Role</h1>
      <button onClick={verifyPassword}>
        Run Verification
      </button>
    </div>
  );
}

export default App;
Exported result: the incorrect password is rejected, spire123 is the open password, owner123 is the permission password
FAQ
IsPasswordProtected() throws File doesn't exist
Cause: the method reads a path inside the virtual file system, not an address the browser can fetch directly. When the file has not been loaded into the virtual file system, Spire.PDF cannot find the target and throws File doesn't exist Arg_ParamName_Name, fileName.
Solution: load the file into the virtual file system with FetchFileToVFS before calling the method, using the same name you pass afterwards:
// Load into the virtual file system first, then check
await window.spire.FetchFileToVFS('EncryptedContract.pdf', "", `${process.env.PUBLIC_URL}/data/`);
const isProtected = pdfModule.PdfDocument.IsPasswordProtected('EncryptedContract.pdf');
The document needs a password, but the error says the password is invalid
Cause: Spire.PDF returns the same message, Can not open an encrypted document. The password is invalid., for "no password supplied" and for "wrong password". The error text alone cannot tell them apart.
Solution: work in three steps. Use IsPasswordProtected() to check whether the document carries an encryption dictionary, load it without a password to separate "open password required" from "restricted by permissions only", and only then try candidate passwords, deciding correctness by whether an exception is thrown:
// Loading without a password fails → an open password is required; retry with a password → a throw means a miss
try {
  const doc = new pdfModule.PdfDocument();
  doc.LoadFromFile(fileName, password);
  // Loaded: read Security to confirm the role
} catch (error) {
  // Failed to load: this password does not work
}
Reading Security.Permissions after loading throws
Cause: the permission bits are a combination of several flags and do not necessarily match a member of the PdfPermissionsFlags enumeration, so reading them throws Invalid value for spirepdfPdfPermissionsFlags. In the same version, HasExtendedRight() throws ArgumentNullException as well.
Solution: use Security.UserPassword and Security.OwnerPassword instead to determine the role of the password used this time. A document loaded with the permission password carries all permissions, so Decrypt() can remove the protection directly; a document loaded with the open password needs the permission password supplied separately. To control permissions precisely, set them with PdfDocumentPrivilege while encrypting and keep a record yourself:
const role = doc.Security.UserPassword ? 'open password' : 'permission password';

// Loaded with the permission password: the protection can be removed directly
if (role === 'permission password') {
  doc.Decrypt();
}
Get a Free License
If you want to remove the evaluation message from the resulting documents, or to get rid of the feature limitations, please contact our sales team to obtain a temporary license valid for 30 days.