Convert PDF to Markdown in React with JavaScript
PDF keeps its layout stable and is easy to distribute, but the cost is that the content is locked inside the page structure — changing a single word often means redoing the whole layout. Markdown takes a different path: plain text with a clear hierarchy that drops straight into Git repositories and knowledge bases, and is also easy to hand to a large language model for summarization or question answering. Converting a PDF to Markdown is essentially turning the content back into editable, structured text.
Spire.PDF for JavaScript is built on WebAssembly, so PDFs can be loaded, converted and saved entirely in the browser, with input and output managed through a virtual file system (VFS) and no backend service required. There are two entry points for conversion: set the output format of PdfDocument.SaveToFile to FileFormat.Markdown for a one-step result, or use PdfToMarkdownConverter, which exposes MarkdownOptions so you can fine-tune the details of the conversion.
This article covers two core features:
For installation and project configuration, refer to Integrate Spire.PDF for JavaScript in a React Project. The examples below assume Spire.PDF is already installed and the WebAssembly module is initialized.
Convert PDF to Markdown
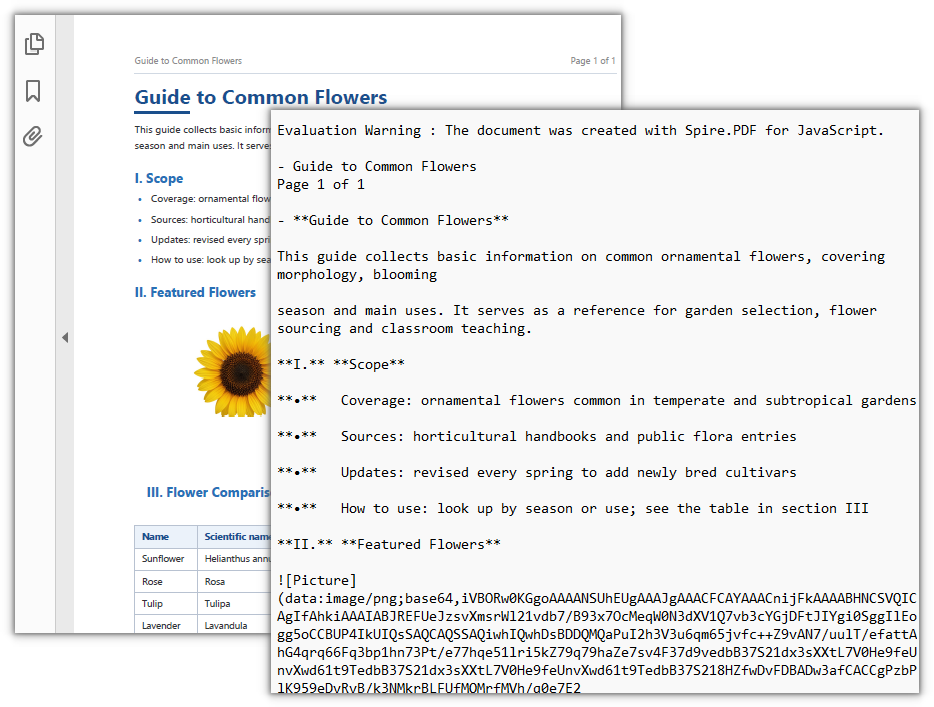
PdfDocument.SaveToFile can also output Markdown: set fileFormat to FileFormat.Markdown, and the headings, paragraphs and lists in the PDF are organized into Markdown text according to their original hierarchy. Images in the document are extracted as well by default.
function App() {
  const convertPdfToMarkdown = async () => {
    // Get the Spire.PDF WASM module
    const pdfModule = window.wasmModule?.spirepdf;

    // Check if the module is ready
    if (!pdfModule) {
      alert('Spire.PDF is not ready yet');
      return;
    }

    // Load the PDF file into the virtual file system
    const inputFileName = 'Flowers.pdf';
    await window.spire.FetchFileToVFS(inputFileName, "", `${process.env.PUBLIC_URL}/data/`);

    // Load the font into the virtual file system (the WebAssembly environment has no system fonts)
    await window.spire.FetchFileToVFS('ARIAL.TTF', '/Library/Fonts/', `${process.env.PUBLIC_URL}/font/`);

    // Create a PdfDocument object and load the PDF
    let doc = new pdfModule.PdfDocument();
    doc.LoadFromFile(inputFileName);

    // Define the output file name and convert to Markdown format
    const outputFileName = 'ConvertedResult.md';
    doc.SaveToFile({ fileName: outputFileName, fileFormat: pdfModule.FileFormat.Markdown });
    doc.Close();

    // Read the generated file from the VFS and trigger download
    const fileArray = window.dotnetRuntime.Module.FS.readFile(outputFileName);
    const blob = new Blob([fileArray], { type: 'text/markdown' });
    const url = URL.createObjectURL(blob);
    const a = document.createElement('a');
    a.href = url;
    a.download = outputFileName;
    a.click();
    URL.revokeObjectURL(url);
  };

  return (
    <div style={{ textAlign: 'center', height: '300px' }}>
      <h1>Convert PDF to Markdown</h1>
      <button onClick={convertPdfToMarkdown}>
        Convert
      </button>
    </div>
  );
}

export default App;
Markdown file after converting PDF to Markdown
Convert text only and skip images
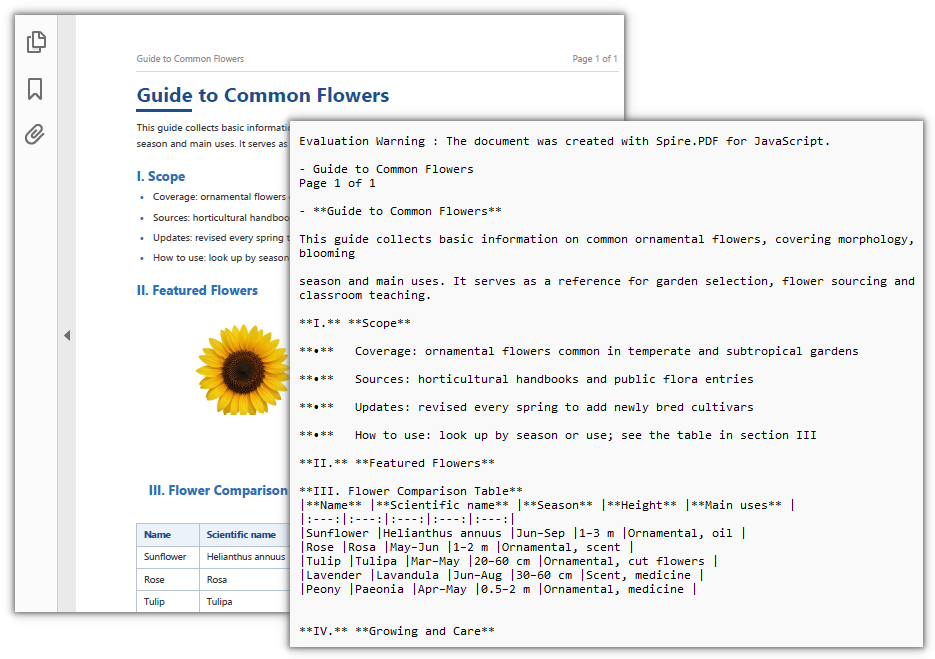
If you only want the text, PdfToMarkdownConverter is more direct. It extracts the images in the document by default; set MarkdownOptions.IgnoreImage to true and the output contains plain text only.
function App() {
  const convertPdfToTextOnlyMarkdown = async () => {
    // Get the Spire.PDF WASM module
    const pdfModule = window.wasmModule?.spirepdf;

    // Check if the module is ready
    if (!pdfModule) {
      alert('Spire.PDF is not ready yet');
      return;
    }

    // Load the PDF file into the virtual file system
    const inputFileName = 'Flowers.pdf';
    await window.spire.FetchFileToVFS(inputFileName, "", `${process.env.PUBLIC_URL}/data/`);

    // Load the font into the virtual file system (the WebAssembly environment has no system fonts)
    await window.spire.FetchFileToVFS('ARIAL.TTF', '/Library/Fonts/', `${process.env.PUBLIC_URL}/font/`);

    // Create the converter and set it to ignore images
    const converter = new pdfModule.PdfToMarkdownConverter(inputFileName);
    converter.MarkdownOptions.IgnoreImage = true;

    // Define the output file name and run the conversion
    const outputFileName = 'TextOnlyResult.md';
    converter.ConvertToMarkdown(outputFileName);
    converter.Dispose();

    // Read the generated file from the VFS and trigger download
    const fileArray = window.dotnetRuntime.Module.FS.readFile(outputFileName);
    const blob = new Blob([fileArray], { type: 'text/markdown' });
    const url = URL.createObjectURL(blob);
    const a = document.createElement('a');
    a.href = url;
    a.download = outputFileName;
    a.click();
    URL.revokeObjectURL(url);
  };

  return (
    <div style={{ textAlign: 'center', height: '300px' }}>
      <h1>Convert PDF to Text-only Markdown</h1>
      <button onClick={convertPdfToTextOnlyMarkdown}>
        Convert
      </button>
    </div>
  );
}

export default App;
Conversion result with text only and images skipped
Frequently Asked Questions
Where do the heading and list levels come from after conversion
Reason: A PDF has no semantic markers such as "heading" or "list" — only individual text fragments with coordinates. The converter has to infer the original structure from layout clues such as font size, font weight, indentation and line spacing.
Solution: Spire.PDF judges the levels from those clues and outputs the corresponding Markdown markers. If the source document has a loose layout (for example, distinguishing headings with spaces instead of actual font size differences), the inferred result may be poor. In that case, adjust the layout of the source PDF first, or proofread the converted output manually:
// Load the PDF and convert it to Markdown for inspection
let doc = new pdfModule.PdfDocument();
doc.LoadFromFile(inputFileName);
doc.SaveToFile({ fileName: outputFileName, fileFormat: pdfModule.FileFormat.Markdown });
doc.Close();
Why are the images gone after I set IgnoreImage
Reason: MarkdownOptions.IgnoreImage means exactly "skip images during conversion". Once it is set to true, images are neither extracted as separate files nor referenced in the Markdown output.
Solution: If you want both the text and the images, remove the property or set it to false, and the converter will handle images as usual:
// Keep images (default behavior)
const converter = new pdfModule.PdfToMarkdownConverter(inputFileName);
converter.MarkdownOptions.IgnoreImage = false;
converter.ConvertToMarkdown(outputFileName);
converter.Dispose();
The conversion of a scanned document comes out blank
Reason: A scanned document is a full-page image with no text layer, so the converter can extract no text from it and the output is nearly empty.
Solution: Such PDFs need OCR first to recognize the image into a text layer, and only then can Spire.PDF convert them. The check is simple: open the file in a reader and try to select the text. If nothing can be selected, it is a scanned document:
// Read the result back from the VFS to confirm whether text was actually produced
const fileArray = window.dotnetRuntime.Module.FS.readFile(outputFileName);
console.log('Output size:', fileArray.length, 'bytes');
Get a Free License
If you would like to remove the evaluation message from the result document or lift feature restrictions, please contact sales for a 30-day temporary license.
Convert Text to PDF with JavaScript: Customize Pages, Fonts & Layout
Converting plain text files to PDF is useful when you need to turn text-based content into a fixed-layout document that is easier to share, archive, print, or distribute. Compared with TXT files, PDF documents also provide more control over page size, margins, fonts, text alignment, and pagination.
In this article, we will demonstrate how to convert a TXT file to PDF with JavaScript in a React application using Spire.PDF for JavaScript. We will also explore several common formatting options, including setting the PDF page size and margins, using custom fonts, changing text alignment, and controlling where the text begins on the page.
On this page:
- Set Up Spire.PDF for JavaScript in React
- Convert Text to PDF with JavaScript
- Page and Text Configuration
- Conclusion
- FAQs
Set Up Spire.PDF for JavaScript in React
Before working with PDF files, make sure that Spire.PDF for JavaScript has been integrated into your React project and that its WebAssembly module can be loaded correctly.
If you haven't completed the setup yet, refer to the tutorial How to Integrate Spire.PDF for JavaScript in a React Project for detailed instructions.
The examples below assume that the required JavaScript, WebAssembly, and supporting files have already been added to the React project's public directory and that the Spire.PDF module can be accessed through:
window.wasmModule.spirepdf
The source TXT file used in this example should also be placed in a location accessible from the application's public directory.
Convert Text to PDF with JavaScript
The basic process of converting a TXT file to PDF involves several steps.
First, load the TXT file into the WebAssembly virtual file system (VFS). The file content can then be read as bytes and decoded into a JavaScript string.
Next, create a new PDF document and add a page. A PdfTextWidget can be used to draw the text onto the PDF page. By using PdfTextLayout with pagination enabled, long text can automatically flow across multiple PDF pages instead of being limited to the first page.
Finally, save the generated PDF to the virtual file system, read the resulting PDF data, and convert it into a Blob so that users can download the file directly from the browser.
The following example demonstrates the complete process:
import React, { useEffect, useState } from 'react';

function App() {
  const [ready, setReady] = useState(false);
  const [downloadUrl, setDownloadUrl] = useState(null);
  const [downloadName, setDownloadName] = useState('');

  useEffect(() => {
    (async () => {
      const publicUrl = process.env.PUBLIC_URL || '';
      await import(/* webpackIgnore: true */ `${publicUrl}/spire.common.js`);
      const spireModule = await import(/* webpackIgnore: true */ `${publicUrl}/spire.pdf.js`);
      const rawModule = spireModule.default || spireModule;

      window.wasmModule = typeof rawModule === 'function'
        ? await rawModule({ locateFile: p => p.endsWith('.wasm') ? `${publicUrl}/${p}` : p })
        : rawModule;

      setReady(true);
    })();
  }, []);

  const textToPdf = async () => {
    const wasmModule = window.wasmModule.spirepdf;
    if (!wasmModule) return;

    // 1. Load the text file into the virtual file system (VFS)
    const inputFileName = 'TextToPdf.txt';
    await window.spire.FetchFileToVFS(inputFileName, '', `${process.env.PUBLIC_URL || ''}/`);

    // 2. Read the text from the .txt file
    const textByte = window.dotnetRuntime.Module.FS.readFile(inputFileName);
    const text = new TextDecoder('utf-8').decode(textByte);

    // 3. Create a PDF document
    const doc = new wasmModule.PdfDocument();

    // 4. Add a section to the document
    const section = doc.Sections.Add();

    // 5. Add a page to the section
    const page = section.Pages.Add();

    // 6. Create a PdfFont using Microsoft YaHei at size 12
    await window.spire.FetchFileToVFS('msyh.ttc', '/Library/Fonts/', `${process.env.PUBLIC_URL}/fonts/`);
    let font = new wasmModule.PdfTrueTypeFont({
        fontFamily:'Microsoft YaHei',
        size: 12,
        style: wasmModule.PdfFontStyle.Regular,
        unicode:true
    });

    // 7. Create a PdfStringFormat for text formatting
    const format = new wasmModule.PdfStringFormat();
    format.Alignment = wasmModule.PdfTextAlignment.Left;
    format.LineSpacing = 20;

    // 8. Create a PdfBrush for text color
    const brush = wasmModule.PdfBrushes.get_Black();

    // 9. Create a PdfTextLayout for text layout options
    const textLayout = new wasmModule.PdfTextLayout();
    textLayout.Break = wasmModule.PdfLayoutBreakType.FitPage;
    textLayout.Layout = wasmModule.PdfLayoutType.Paginate;

    // 10. Define the bounds of the text widget on the page
    const bounds = new wasmModule.RectangleF({
      location: new wasmModule.PointF(0, 0),
      size: page.Canvas.ClientSize,
    });

    // 11. Create a PdfTextWidget with the given text, font, and brush
    const textWidget = new wasmModule.PdfTextWidget({ text, font, brush });
    textWidget.StringFormat = format;

    // 12. Draw the text widget on the page using the given bounds and layout options
    const layoutWidget = new wasmModule.PdfLayoutWidget(textWidget.H);
    layoutWidget.Draw({ page, layoutRectangle: bounds, format: textLayout });

    // 13. Define the output file name
    const outputFileName = 'TextToPdf_result.pdf';

    // 14. Save the document to the specified path
    doc.SaveToFile(outputFileName);
    doc.Close();

    // 15. Read the saved file and convert it to a Blob
    const bytes = window.dotnetRuntime.Module.FS.readFile(outputFileName);
    const blob = new Blob([bytes], { type: 'application/pdf' });

    // 16. Generate the download link
    setDownloadName(outputFileName);
    setDownloadUrl(URL.createObjectURL(blob));
  };

  return (
    <div style={{ textAlign: 'center', padding: 30 }}>
      <h1>Convert Text to PDF</h1>
      <span>Click the following button to convert text to PDF document.</span>
      <div style={{ marginTop: '20px' }}>
        <button onClick={textToPdf} disabled={!ready}>Convert to PDF</button>
        {downloadUrl && (
          <div style={{ marginTop: '10px' }}>
            <a href={downloadUrl} download={downloadName}>Click here to download the generated file</a>
          </div>
        )}
      </div>
    </div>
  );
}

export default App;
In this example, TextDecoder converts the UTF-8 byte data from the TXT file into a JavaScript string.
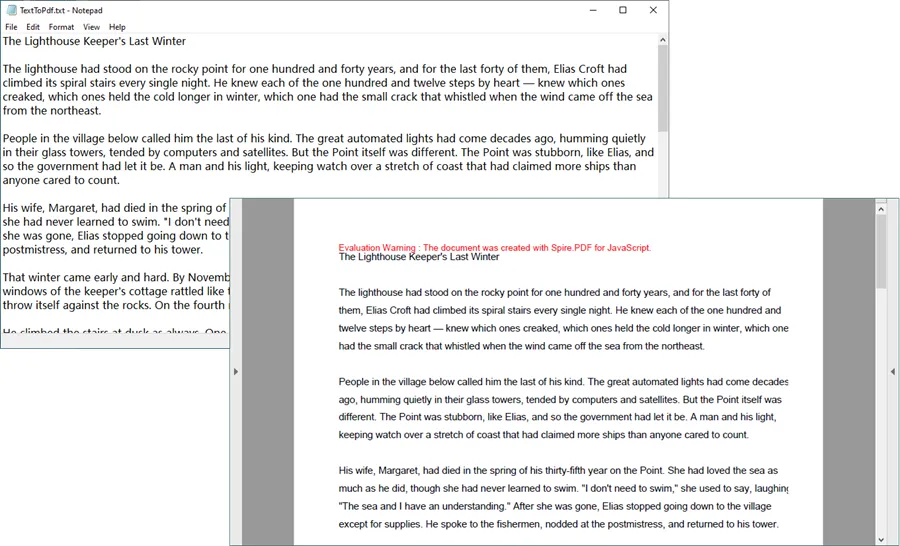
The text is then passed to PdfTextWidget, while PdfLayoutWidget.Draw() handles the actual layout process. Since PdfLayoutType.Paginate is used, text that exceeds the available space on the first page can continue onto additional pages automatically.
Output:
Page and Text Configuration
Set PDF Page Size and Margins
Page size and margins are important when converting long text documents because they determine how much content can fit on each page.
For example, you can set the page size to A4 and use 20-point margins on all four sides:
const page = section.Pages.Add();

page.PageSettings.Size = wasmModule.PdfPageSize.A4;

page.PageSettings.Margins = new wasmModule.PdfMargins({
  top: 20,
  bottom: 20,
  left: 20,
  right: 20
});
The page margins reduce the available drawing area for the text and prevent the content from being positioned too close to the edges of the PDF page.
You can adjust these values depending on the type of document being generated. Larger margins may be more appropriate for reports or printable documents, while smaller margins allow more text to fit on each page.
Use a Custom Font in the PDF
The built-in PDF fonts, such as Helvetica, are sufficient for many English documents. However, documents containing multilingual characters may require a Unicode-compatible TrueType font.
For example, you can load ARIALUNI.TTF into the virtual file system and use Arial Unicode MS when drawing text:
await window.spire.FetchFileToVFS(
  'ARIALUNI.TTF',
  '/Library/Fonts/',
  `${process.env.PUBLIC_URL}/static/font/`
);

let font = new wasmModule.PdfTrueTypeFont({
  fontFamily: 'Arial Unicode MS',
  size: 12,
  style: wasmModule.PdfFontStyle.Regular,
  unicode: true
});
In this case, the font file can be stored under:
public/static/font/
Using a Unicode-compatible font is particularly useful when the source text contains languages such as Chinese, Japanese, Korean, or other characters that are not fully covered by standard PDF fonts.
The unicode: true option enables Unicode text rendering when the TrueType font is used.
Change Text Alignment
Text alignment can be controlled through PdfStringFormat.
For example, the following code justifies the text so that it aligns with both sides of the available text area:
const format = new wasmModule.PdfStringFormat();

format.Alignment =
  wasmModule.PdfTextAlignment.Justify;
The alignment can be changed according to the layout requirements of the document.
For normal paragraphs, left alignment or justified alignment is generally the most practical choice. Other alignment options can be useful for titles, headings, or specially formatted text.
The same PdfStringFormat object can also be used to configure settings such as line spacing:
format.LineSpacing = 20;
Increasing the line spacing can improve readability, especially when converting large blocks of plain text into PDF.
Control the Starting Position of Text
When drawing text onto a PDF page, the RectangleF object determines the area in which the text is laid out.
The starting position is defined by the PointF object:
const bounds = new wasmModule.RectangleF({
  location: new wasmModule.PointF(0, y),
  size: page.Canvas.ClientSize,
});
Here, the y value determines how far the text starts from the top of the page.
For example:
location: new wasmModule.PointF(0, 30)
moves the beginning of the text downward by 30 points.
It is generally recommended to keep the x-coordinate at 0 when the drawing area uses page.Canvas.ClientSize.
Changing the x-coordinate without reducing the width of the drawing area accordingly can result in uneven left and right spacing. In some cases, text near the right edge may also extend beyond the available area and become clipped.
Therefore, when the goal is simply to create additional space above the first line of text, adjusting the y coordinate is usually the safer approach:
const bounds = new wasmModule.RectangleF({
  location: new wasmModule.PointF(0, 40),
  size: page.Canvas.ClientSize,
});
This starts the text 40 points below its default top position while preserving the full available page width.
Conclusion
Converting plain text to PDF in a React application involves more than simply changing the file extension. The text first needs to be read and decoded, after which it can be drawn onto PDF pages using appropriate fonts, formatting, and layout rules.
With Spire.PDF for JavaScript, you can create a PDF document from TXT content directly in a React application and configure important output properties such as page size, margins, fonts, text alignment, line spacing, starting position, and automatic pagination .
These options make it possible to turn basic plain-text content into a more structured and portable PDF document while keeping the entire processing workflow within the JavaScript application.
FAQs
Can JavaScript convert a TXT file to PDF in a React application?
Yes. A React application can read the contents of a TXT file and use a JavaScript PDF library such as Spire.PDF for JavaScript to create PDF pages and draw the text onto them.
How can I convert long text to multiple PDF pages?
Use PdfTextLayout together with PdfLayoutType.Paginate. This allows PdfTextWidget content to continue onto subsequent pages when the available space on the current page is exhausted.
const textLayout = new wasmModule.PdfTextLayout();

textLayout.Break =
  wasmModule.PdfLayoutBreakType.FitPage;

textLayout.Layout =
  wasmModule.PdfLayoutType.Paginate;
Can I specify the page size when converting text to PDF?
Yes. The page size can be configured through the page settings. For example, the following code creates an A4 page:
page.PageSettings.Size =
  wasmModule.PdfPageSize.A4;
You can also configure the top, bottom, left, and right margins to control the available text area.
How can I display Unicode characters in the generated PDF?
Use a Unicode-compatible TrueType font and create a PdfTrueTypeFont with Unicode support enabled:
let font = new wasmModule.PdfTrueTypeFont({
  fontFamily: 'Arial Unicode MS',
  size: 12,
  style: wasmModule.PdfFontStyle.Regular,
  unicode: true
});
The corresponding font file should also be made available to the WebAssembly virtual file system.
How can I move the text farther down from the top of the PDF page?
Change the y coordinate of the PointF used to define the text drawing area:
const bounds = new wasmModule.RectangleF({
  location: new wasmModule.PointF(0, 40),
  size: page.Canvas.ClientSize,
});
A larger y value moves the starting position of the text farther down the page.
Get a Free License
To fully experience the capabilities of Spire.PDF for JavaScript without any evaluation limitations, you can request a 30-day free trial license.
Convert PDF to Excel with JavaScript in React
PDF has a fixed layout and is easy to distribute, but the tabular data within it is hard to edit and analyze directly; Excel (XLSX) is the common format in the spreadsheet domain, supporting formulas, sorting, filtering, and further processing. Real-world business often requires converting reports, invoices, and data tables in PDF to Excel for continued editing, summarization, or entry into systems. Because the underlying models of PDF and Excel differ significantly, the layout strategy during conversion has a notable impact on result quality.
Spire.PDF for JavaScript completes PDF-to-Excel conversion entirely in the browser via WebAssembly, managing input and output files through a virtual file system (VFS) with no backend server required. In addition to simple regular conversion, it also provides two types of conversion options, XlsxLineLayoutOptions and XlsxTextLayoutOptions, to help you control the row layout and text layout of the converted result.
This article covers three core features:
- Convert PDF to Excel Using the Regular Method
- Convert PDF to Excel Using XlsxLineLayoutOptions
- Convert PDF to Excel Using XlsxTextLayoutOptions
For installation and project setup, refer to Integrating Spire.PDF for JavaScript in a React Project. The examples below assume Spire.PDF is installed and the WebAssembly module is initialized.
Convert PDF to Excel Using the Regular Method
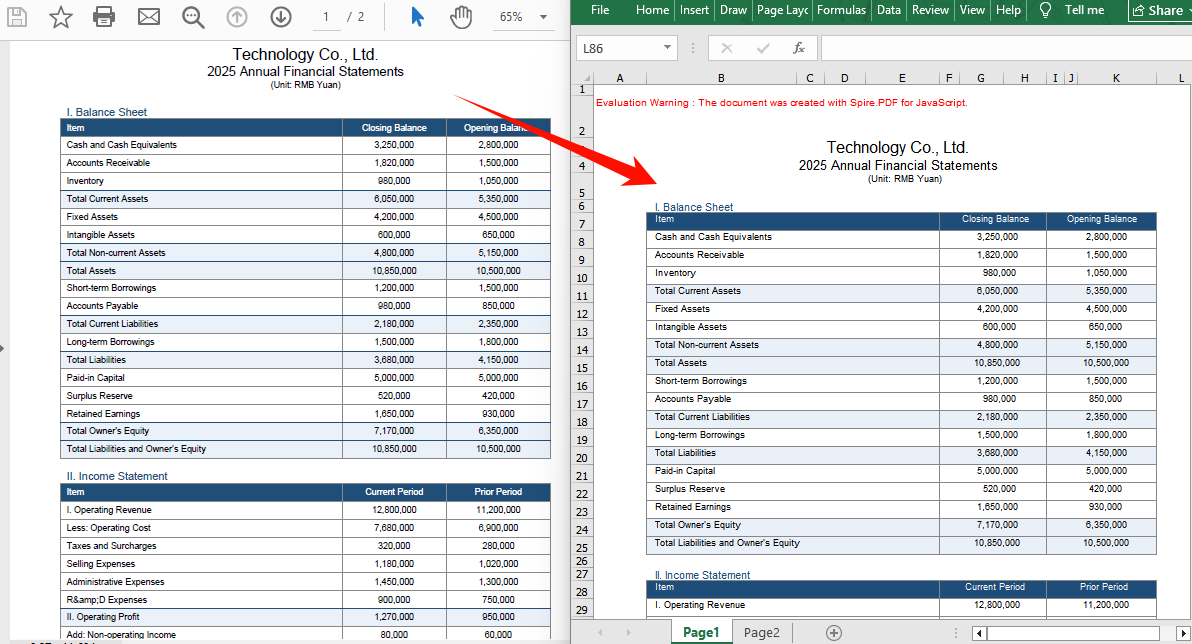
The regular conversion is the most direct way to convert PDF to Excel: after creating a PdfDocument object and loading the PDF, simply save it as an Excel document by specifying FileFormat.XLSX in the SaveToFile method, without setting any conversion options. Spire.PDF parses the text, table, and graphic content of the PDF using the default strategy, which suits most conversion needs for regular documents; when the default result cannot meet specific layout requirements, consider using XlsxLineLayoutOptions or XlsxTextLayoutOptions for fine-grained control.
function App() {
  const convertToExcel = async () => {
    // Get the Spire.PDF WASM module
    const pdfModule = window.wasmModule?.spirepdf;

    // Check if the WASM module is ready
    if (!pdfModule) {
      alert('Spire.PDF is not ready yet');
      return;
    }

    // Load the PDF file and fonts into VFS
    await window.spire.FetchFileToVFS('ARIAL.TTF', '/Library/Fonts/', `${process.env.PUBLIC_URL}/font/`);
    const inputFileName = 'FinancialStatement2025.pdf';
    await window.spire.FetchFileToVFS(inputFileName, "", `${process.env.PUBLIC_URL}/data/`);

    // Create PdfDocument object and load the PDF document
    let doc = new pdfModule.PdfDocument();
    doc.LoadFromFile(inputFileName);

    // Define the output file name in Excel format
    const outputFileName = 'OutputExcel.xlsx';

    // Save as Excel format
    doc.SaveToFile({ fileName: outputFileName, fileFormat: pdfModule.FileFormat.XLSX });
    doc.Close();

    // Read the converted file from VFS and trigger download
    const fileArray = window.dotnetRuntime.Module.FS.readFile(outputFileName);
    const blob = new Blob([fileArray], { type: 'application/vnd.openxmlformats-officedocument.spreadsheetml.sheet' });
    const url = URL.createObjectURL(blob);
    const a = document.createElement('a');
    a.href = url;
    a.download = outputFileName;
    a.click();
    URL.revokeObjectURL(url);
  };

  return (
    <div style={{ textAlign: 'center', height: '300px' }}>
      <h1>Convert PDF To Excel</h1>
      <button onClick={convertToExcel}>
        Generate
      </button>
    </div>
  );
}

export default App;
Excel document generated using the regular conversion method
Convert PDF to Excel Using XlsxLineLayoutOptions
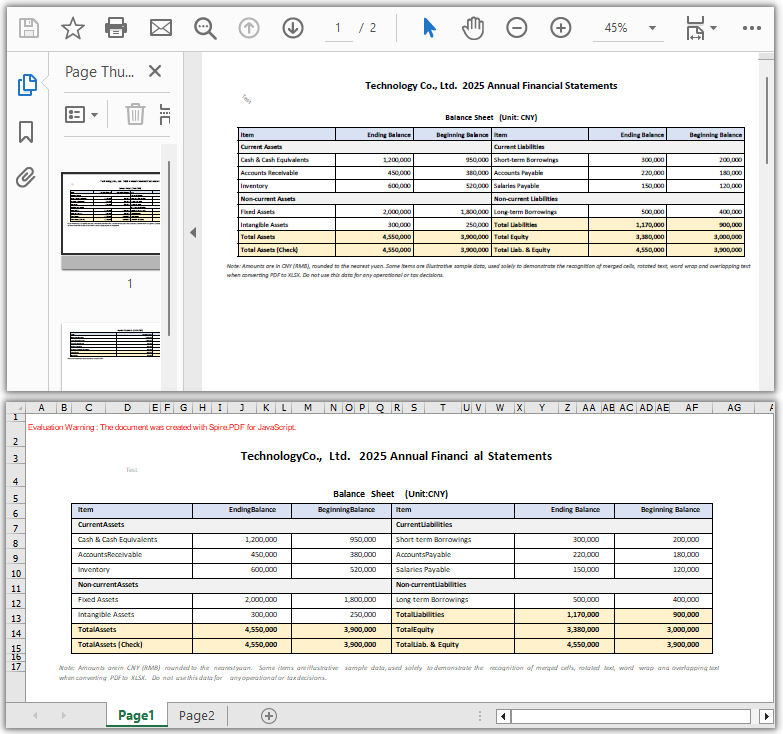
Line elements such as table borders, separator lines, and graphics need to be controlled through row layout options for their preservation during conversion to Excel. XlsxLineLayoutOptions provides several row layout parameters: whether to convert to multiple worksheets, whether to keep rotated text, whether to split cells containing multiple lines of text, whether to wrap text, and whether to keep overlapping text. Pass this option to the ConvertOptions SetPdfToXlsxOptions method, then save with SaveToFile specifying FileFormat.XLSX to complete the conversion.
function App() {
  const convertToExcel = async () => {
    // Get the Spire.PDF WASM module
    const pdfModule = window.wasmModule?.spirepdf;

    // Check if the WASM module is ready
    if (!pdfModule) {
      alert('Spire.PDF is not ready yet');
      return;
    }

    // Load the PDF file and fonts into VFS
    await window.spire.FetchFileToVFS('ARIAL.TTF', '/Library/Fonts/', `${process.env.PUBLIC_URL}/font/`);
    const inputFileName = 'FinancialStatement.pdf';
    await window.spire.FetchFileToVFS(inputFileName, "", `${process.env.PUBLIC_URL}/data/`);

    // Create PdfDocument object and load the PDF document
    let doc = new pdfModule.PdfDocument();
    doc.LoadFromFile(inputFileName);

    // Create row layout conversion options
    // Parameters: whether to convert to multiple worksheets, whether to keep rotated text, whether to split cells, whether to wrap text, whether to keep overlapping text
    let lineLayoutOptions = new pdfModule.XlsxLineLayoutOptions(true, true, false, true, true);
    doc.ConvertOptions.SetPdfToXlsxOptions(lineLayoutOptions);

    // Define the output file name in Excel format
    const outputFileName = 'LineLayoutOptions.xlsx';

    // Save as Excel format
    doc.SaveToFile({ fileName: outputFileName, fileFormat: pdfModule.FileFormat.XLSX });
    doc.Close();

    // Read the converted file from VFS and trigger download
    const fileArray = window.dotnetRuntime.Module.FS.readFile(outputFileName);
    const blob = new Blob([fileArray], { type: 'application/vnd.openxmlformats-officedocument.spreadsheetml.sheet' });
    const url = URL.createObjectURL(blob);
    const a = document.createElement('a');
    a.href = url;
    a.download = outputFileName;
    a.click();
    URL.revokeObjectURL(url);
  };

  return (
    <div style={{ textAlign: 'center', height: '300px' }}>
      <h1>Convert PDF To Excel using XlsxLineLayoutOptions</h1>
      <button onClick={convertToExcel}>
        Generate
      </button>
    </div>
  );
}

export default App;
Excel document generated using the XlsxLineLayoutOptions conversion option
Convert PDF to Excel Using XlsxTextLayoutOptions
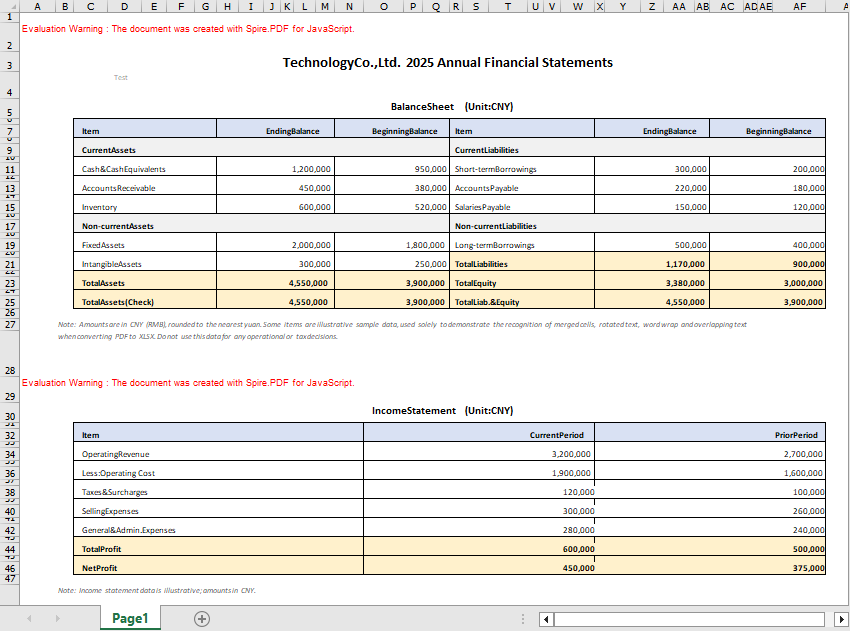
When the PDF content consists mainly of text and numeric values, you can switch to XlsxTextLayoutOptions to control text layout conversion parameters, such as whether to convert to multiple worksheets and whether to keep rotated text. Unlike the row layout option, this option focuses more on the arrangement of text content and is suitable for documents with few table lines and mainly text. The usage is the same: pass the option to the ConvertOptions SetPdfToXlsxOptions method, then save as XLSX.
function App() {
  const convertToExcel = async () => {
    // Get the Spire.PDF WASM module
    const pdfModule = window.wasmModule?.spirepdf;

    // Check if the WASM module is ready
    if (!pdfModule) {
      alert('Spire.PDF is not ready yet');
      return;
    }

    // Load the PDF file and fonts into VFS
    await window.spire.FetchFileToVFS('ARIAL.TTF', '/Library/Fonts/', `${process.env.PUBLIC_URL}/font/`);
    const inputFileName = 'Report.pdf';
    await window.spire.FetchFileToVFS(inputFileName, "", `${process.env.PUBLIC_URL}/data/`);

    // Create PdfDocument object and load the PDF document
    let doc = new pdfModule.PdfDocument();
    doc.LoadFromFile(inputFileName);

    // Create text layout conversion options
    // Parameters: whether to convert to multiple worksheets, whether to keep rotated text
    let textLayoutOptions = new pdfModule.XlsxTextLayoutOptions(false, true);
    doc.ConvertOptions.SetPdfToXlsxOptions(textLayoutOptions);

    // Define the output file name in Excel format
    const outputFileName = 'TextLayoutOptions.xlsx';

    // Save as Excel format
    doc.SaveToFile({ fileName: outputFileName, fileFormat: pdfModule.FileFormat.XLSX });
    doc.Close();

    // Read the converted file from VFS and trigger download
    const fileArray = window.dotnetRuntime.Module.FS.readFile(outputFileName);
    const blob = new Blob([fileArray], { type: 'application/vnd.openxmlformats-officedocument.spreadsheetml.sheet' });
    const url = URL.createObjectURL(blob);
    const a = document.createElement('a');
    a.href = url;
    a.download = outputFileName;
    a.click();
    URL.revokeObjectURL(url);
  };

  return (
    <div style={{ textAlign: 'center', height: '300px' }}>
      <h1>Convert PDF To Excel using XlsxTextLayoutOptions</h1>
      <button onClick={convertToExcel}>
        Generate
      </button>
    </div>
  );
}

export default App;
Excel document generated using the XlsxTextLayoutOptions conversion option
FAQ
What is the difference between regular conversion and conversion using the options?
Reason: When no conversion option is set, Spire.PDF converts the PDF content to Excel using the default layout strategy.
Solution: Regular conversion (without calling SetPdfToXlsxOptions) involves the fewest steps and suits documents with a simple content structure where the default layout is sufficient; when you need to control details such as multi-worksheet splitting, rotated text, cell splitting, and text wrapping, choose XlsxLineLayoutOptions (oriented toward graphics and lines) or XlsxTextLayoutOptions (oriented toward text) based on the document content.
What is the difference between XlsxLineLayoutOptions and XlsxTextLayoutOptions?
Reason: The two types of options control how different content is preserved during PDF-to-Excel conversion.
Solution: XlsxLineLayoutOptions targets graphic elements such as table borders and lines, controlling behaviors like multi-worksheet splitting, rotated text, cell splitting, text wrapping, and overlapping text; XlsxTextLayoutOptions targets text content, controlling whether to merge into a single worksheet and whether to keep rotated text. Choose the appropriate option based on whether the PDF content is graphics-oriented or text-oriented.
Can encrypted PDF files be converted to Excel?
Reason: Password-protected encrypted PDF files cannot be converted directly; the document needs to be decrypted first.
Solution: Pass the password as the second parameter of LoadFromFile when loading the PDF to decrypt it, then convert and save as Excel:
// Load the password-protected PDF document
let doc = new pdfModule.PdfDocument();
doc.LoadFromFile(inputFileName, "password");

// Save as Excel format
doc.SaveToFile({ fileName: outputFileName, fileFormat: pdfModule.FileFormat.XLSX });
doc.Close();
Get a Free License
If you want to remove the evaluation messages in the resulting documents or get rid of functional limitations, contact sales to obtain a 30-day temporary license.
Protect or Unprotect PowerPoint Presentations with JavaScript in React
PowerPoint presentations often contain sensitive or proprietary information, making it essential to secure them from unauthorized access or modifications. Whether you're sharing a presentation with colleagues, clients, or stakeholders, protecting your slides ensures that your content remains intact and confidential. On the other hand, there may be times when you need to unprotect a presentation to make edits or updates. In this guide, we'll explore how to protect and unprotect PowerPoint presentations programmatically in React using Spire.Presentation for JavaScript.
- Protect a PowerPoint Presentation with a Password
- Make a PowerPoint Presentation Read-Only
- Remove Password Protection from a PowerPoint Presentation
- Remove Read-Only Setting from a PowerPoint Presentation
Install Spire.Presentation for JavaScript
To get started with protecting and unprotecting PowerPoint presentations in a React application, you can either download Spire.Presentation for JavaScript from the official website or install it via npm with the following command:
npm i spire.office
The downloaded product package integrates Spire.Doc for JavaScript, Spire.XLS for JavaScript, Spire.PDF for JavaScript, and Spire.Presentation for JavaScript. To use Spire.Presentation for JavaScript functionality, you need to copy the corresponding files (spire.presentation.js, Spire.Presentation.Wasm.zip, spire.common.js, Spire.Common.Wasm.zip, and the _framework folder) to the public folder of your project. Additionally, to ensure proper text rendering, font files can be added to a custom path of your choice. In the following example, the font addition path is: public\static\font.
For more details, refer to the documentation: How to Integrate Spire.Presentation for JavaScript in a React Project.
Protect a PowerPoint Presentation with a Password
Setting a password on a PowerPoint presentation is an effective way to ensure that only authorized users can access its content. By using the Presentation.Encrypt() method of Spire.Presentation for JavaScript, developers can encrypt a PowerPoint presentation with ease. The key steps are as follows.
- Create an object of the Presentation class.
- Load a PowerPoint presentation using the Presentation.LoadFromFile() method.
- Encrypt the presentation with a password using the Presentation.Encrypt() method.
- Save the resulting presentation using the Presentation.SaveToFile() method.
- JavaScript
import React, { useState, useEffect } from 'react';

function App() {
   const [wasmModule, setWasmModule] = useState(null);
   useEffect(() => {
    (async () => {
      try {
        const publicUrl = process.env.PUBLIC_URL || '';
        const spireModule = await import(/* webpackIgnore: true */ `${publicUrl}/spire.presentation.js`);
        const rawModule = spireModule.default || spireModule;
        window.wasmModule = typeof rawModule === 'function'
          ? await rawModule({ locateFile: p => p.endsWith('.wasm') ? `${publicUrl}/${p}` : p })
          : rawModule;
        setWasmModule(window.wasmModule);
      } catch (error) {
        console.error('Failed to load spire.presentation.js:', error);
      }
    })();
  }, []);


  const ProtectPowerPointPresentation = async () => {
    const wasmModule = window.wasmModule.spirepresentation;

    if (wasmModule) {
      // Specify the input file paths
      let inputFileName  = "Sample.pptx";
      await window.spire.FetchFileToVFS(inputFileName , '',  `${process.env.PUBLIC_URL}static/data/`);
      await window.spire.FetchFileToVFS("arial.ttf","/Library/Fonts/",`${process.env.PUBLIC_URL}static/font/`);

      // Create a Presentation instance and load the PowerPoint file from the virtual file system
      const ppt =new wasmModule.Presentation();
      ppt.LoadFromFile(inputFileName);

      // Define the password
      let password = "e-iceblue";

      // Protect the PowerPoint file with the password
      ppt.Encrypt(password);

      // Define the output file name
      const outputFileName = "Encrypted.pptx";

      // Save the resulting PowerPoint file
      ppt.SaveToFile({ file: outputFileName, fileFormat: wasmModule.FileFormat.Pptx2013 });


      // Read the generated image file from VFS
      const imageFileArray = window.dotnetRuntime.Module.FS.readFile(outputFileName);

      // Create a Blog object from the image file
      const imageBlob = new Blob([imageFileArray], { type: "application/vnd.openxmlformats-officedocument.presentationml.presentation" });

      // Create a URL for the Blob
      const url = URL.createObjectURL(imageBlob);

      // Create an anchor element to trigger the download
      const a = document.createElement('a');
      a.href = url;
      a.download = outputFileName;
      document.body.appendChild(a);
      a.click();
      document.body.removeChild(a);
      URL.revokeObjectURL(url);

      // Clean up resources
      ppt.Dispose();
    }
  };

  return (
    <div style={{ textAlign: 'center', height: '300px' }}>
      <h1>Protect a PowerPoint Presentation with a Password</h1>
      <button onClick={ProtectPowerPointPresentation} disabled={!wasmModule}>
        Protect
      </button>
    </div>
  );
}


export default App;
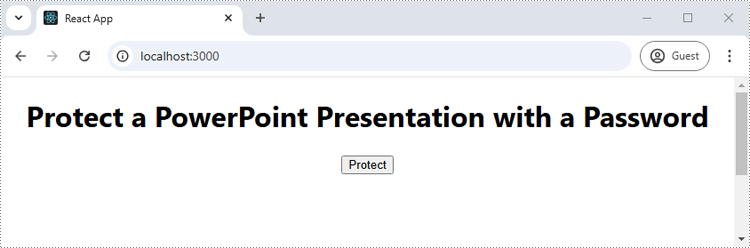
Run the code to launch the React app at localhost:3000. Once it's running, click on the "Protect" button to protect the PowerPoint presentation with a password:
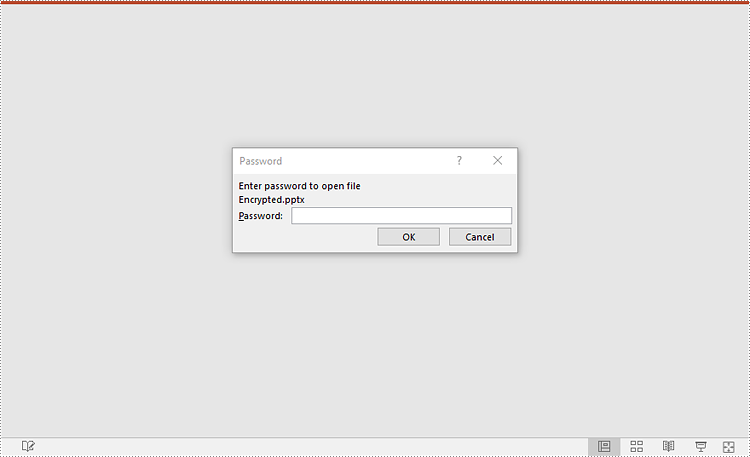
Upon opening the output presentation, a dialog box will appear, prompting you to enter a password to gain access to the file:
Make a PowerPoint Presentation Read-Only
Enabling the read-only setting prevents others from making changes to a PowerPoint presentation while still allowing them to view it. Spire.Presentation for JavaScript offers the Presentation.Protect() method to achieve this purpose. The key steps are as follows.
- Create an object of the Presentation class.
- Load a PowerPoint presentation using the Presentation.LoadFromFile() method.
- Make the presentation read-only using the Presentation.Protect() method.
- Save the resulting presentation using the Presentation.SaveToFile() method.
- JavaScript
import React, { useState, useEffect } from 'react';

function App() {
   const [wasmModule, setWasmModule] = useState(null);
   useEffect(() => {
    (async () => {
      try {
        const publicUrl = process.env.PUBLIC_URL || '';
        const spireModule = await import(/* webpackIgnore: true */ `${publicUrl}/spire.presentation.js`);
        const rawModule = spireModule.default || spireModule;
        window.wasmModule = typeof rawModule === 'function'
          ? await rawModule({ locateFile: p => p.endsWith('.wasm') ? `${publicUrl}/${p}` : p })
          : rawModule;
        setWasmModule(window.wasmModule);
      } catch (error) {
        console.error('Failed to load spire.presentation.js:', error);
      }
    })();
  }, []);


  const MakePresentationReadOnly = async () => {
    const wasmModule = window.wasmModule.spirepresentation;

    if (wasmModule) {
      // Specify the input file paths
      let inputFileName  = "Sample.pptx";
      await window.spire.FetchFileToVFS(inputFileName , '',  `${process.env.PUBLIC_URL}static/data/`);
      await window.spire.FetchFileToVFS("arial.ttf","/Library/Fonts/",`${process.env.PUBLIC_URL}static/font/`);

      // Create a Presentation instance and load the PowerPoint file from the virtual file system
      const ppt =new wasmModule.Presentation();
      ppt.LoadFromFile(inputFileName);

      // Define the password
      let password = "e-iceblue";

      // Protect the PowerPoint file with the password
      ppt.Protect(password);

      // Define the output file name
      const outputFileName = "ReadOnly.pptx";

      // Save the resulting PowerPoint file
      ppt.SaveToFile({ file: outputFileName, fileFormat: wasmModule.FileFormat.Pptx2013 });

      // Read the generated image file from VFS
      const imageFileArray = window.dotnetRuntime.Module.FS.readFile(outputFileName);

      // Create a Blog object from the image file
      const imageBlob = new Blob([imageFileArray], { type: "application/vnd.openxmlformats-officedocument.presentationml.presentation" });

      // Create a URL for the Blob
      const url = URL.createObjectURL(imageBlob);

      // Create an anchor element to trigger the download
      const a = document.createElement('a');
      a.href = url;
      a.download = outputFileName;
      document.body.appendChild(a);
      a.click();
      document.body.removeChild(a);
      URL.revokeObjectURL(url);

      // Clean up resources
      ppt.Dispose();
    }
  };

  return (
    <div style={{ textAlign: 'center', height: '300px' }}>
      <h1>Make a PowerPoint Presentation Read-Only</h1>
      <button onClick={MakePresentationReadOnly} disabled={!wasmModule}>
        Start
      </button>
    </div>
  );
}

export default App;

Remove Password Protection from a PowerPoint Presentation
If password protection is no longer needed, it can be easily removed to allow unrestricted access to the presentation using the Presentation.RemoveEncryption() method. The key steps are as follows.
- Create an object of the Presentation class.
- Load a password-protected PowerPoint presentation with its password using the Presentation.LoadFromFile() method.
- Remove password protection from the presentation using the Presentation.RemoveEncryption() method.
- Save the resulting presentation using the Presentation.SaveToFile() method.
- JavaScript
import React, { useState, useEffect } from 'react';

function App() {
   const [wasmModule, setWasmModule] = useState(null);
   useEffect(() => {
    (async () => {
      try {
        const publicUrl = process.env.PUBLIC_URL || '';
        const spireModule = await import(/* webpackIgnore: true */ `${publicUrl}/spire.presentation.js`);
        const rawModule = spireModule.default || spireModule;
        window.wasmModule = typeof rawModule === 'function'
          ? await rawModule({ locateFile: p => p.endsWith('.wasm') ? `${publicUrl}/${p}` : p })
          : rawModule;
        setWasmModule(window.wasmModule);
      } catch (error) {
        console.error('Failed to load spire.presentation.js:', error);
      }
    })();
  }, []);


  const RemoveEncryptionFromPresentation = async () => {
    const wasmModule = window.wasmModule.spirepresentation;

    if (wasmModule) {
      // Specify the input file paths
      let inputFileName  = "Encrypted.pptx";
      await window.spire.FetchFileToVFS(inputFileName , '',  `${process.env.PUBLIC_URL}static/data/`);
      await window.spire.FetchFileToVFS("arial.ttf","/Library/Fonts/",`${process.env.PUBLIC_URL}static/font/`);

      // Create a Presentation instance and load the PowerPoint file from the virtual file system
      const ppt =new wasmModule.Presentation();
      ppt.LoadFromFile({file: inputFileName, password: "e-iceblue"});

      //Remove the password encryption
      ppt.RemoveEncryption();

      // Define the output file name
      const outputFileName = "Decrypted.pptx";

      // Save the resulting PowerPoint file
      ppt.SaveToFile({ file: outputFileName, fileFormat: wasmModule.FileFormat.Pptx2013 });

      // Read the generated image file from VFS
      const imageFileArray = window.dotnetRuntime.Module.FS.readFile(outputFileName);

      // Create a Blog object from the image file
      const imageBlob = new Blob([imageFileArray], { type: "application/vnd.openxmlformats-officedocument.presentationml.presentation" });

      // Create a URL for the Blob
      const url = URL.createObjectURL(imageBlob);

      // Create an anchor element to trigger the download
      const a = document.createElement('a');
      a.href = url;
      a.download = outputFileName;
      document.body.appendChild(a);
      a.click();
      document.body.removeChild(a);
      URL.revokeObjectURL(url);

      // Clean up resources
      ppt.Dispose();
    }
  };

  return (
    <div style={{ textAlign: 'center', height: '300px' }}>
      <h1>Remove Password Protection from a PowerPoint Presentation</h1>
      <button onClick={RemoveEncryptionFromPresentation} disabled={!wasmModule}>
        Start
      </button>
    </div>
  );
}

export default App;

Remove Read-Only Setting from a PowerPoint Presentation
Disabling the read-only setting allows others to edit the presentation and make necessary changes. By using the Presentation.RemoveProtect() method, developers can remove the read-only setting from a PowerPoint presentation. The key steps are as follows.
- Create an object of the Presentation class.
- Load a PowerPoint presentation that has been made as read-only using the Presentation.LoadFromFile() method.
- Remove the read-only setting from the presentation using the Presentation.RemoveProtect() method.
- Save the resulting presentation using the Presentation.SaveToFile() method.
- JavaScript
import React, { useState, useEffect } from 'react';

function App() {
   const [wasmModule, setWasmModule] = useState(null);
   useEffect(() => {
    (async () => {
      try {
        const publicUrl = process.env.PUBLIC_URL || '';
        const spireModule = await import(/* webpackIgnore: true */ `${publicUrl}/spire.presentation.js`);
        const rawModule = spireModule.default || spireModule;
        window.wasmModule = typeof rawModule === 'function'
          ? await rawModule({ locateFile: p => p.endsWith('.wasm') ? `${publicUrl}/${p}` : p })
          : rawModule;
        setWasmModule(window.wasmModule);
      } catch (error) {
        console.error('Failed to load spire.presentation.js:', error);
      }
    })();
  }, []);


  const RemoveReadOnlyFromPresentation = async () => {
    const wasmModule = window.wasmModule.spirepresentation;

    if (wasmModule) {
      // Specify the input file paths
      let inputFileName  = "ReadOnly.pptx";
      await window.spire.FetchFileToVFS(inputFileName , '',  `${process.env.PUBLIC_URL}static/data/`);
      await window.spire.FetchFileToVFS("arial.ttf","/Library/Fonts/",`${process.env.PUBLIC_URL}static/font/`);

      // Create a Presentation instance and load the PowerPoint file from the virtual file system
      const ppt =new wasmModule.Presentation();
      ppt.LoadFromFile({file: inputFileName, password: "e-iceblue"});

      // Remove the read-only setting from the presentation
      ppt.RemoveProtect();

      // Define the output file name
      const outputFileName = "RemoveReadOnly.pptx";

      // Save the resulting PowerPoint file
      ppt.SaveToFile({ file: outputFileName, fileFormat: wasmModule.FileFormat.Pptx2013 });

      // Read the generated image file from VFS
      const imageFileArray = window.dotnetRuntime.Module.FS.readFile(outputFileName);

      // Create a Blog object from the image file
      const imageBlob = new Blob([imageFileArray], { type: "application/vnd.openxmlformats-officedocument.presentationml.presentation" });

      // Create a URL for the Blob
      const url = URL.createObjectURL(imageBlob);

      // Create an anchor element to trigger the download
      const a = document.createElement('a');
      a.href = url;
      a.download = outputFileName;
      document.body.appendChild(a);
      a.click();
      document.body.removeChild(a);
      URL.revokeObjectURL(url);

      // Clean up resources
      ppt.Dispose();
    }
  };

    return (
    <div style={{ textAlign: 'center', height: '300px' }}>
      <h1>Remove Read-Only Setting from a PowerPoint Presentation</h1>
      <button onClick={RemoveReadOnlyFromPresentation} disabled={!wasmModule}>
        Start
      </button>
    </div>
  );
}

export default App;

Get a Free License
To fully experience the capabilities of Spire.Presentation for JavaScript without any evaluation limitations, you can request a free 30-day trial license.
Convert PowerPoint to Images with JavaScript in React
Transforming PowerPoint presentations into image formats such as JPG or PNG is an effective method for enhancing the way you share visual content. By converting slides into images, you maintain the integrity of the design and layout, making it suitable for a wide range of uses, from online sharing to embedding in documents.
In this article, you will discover how to convert PowerPoint slides to images in React using Spire.Presentation for JavaScript. We will guide you through the process step-by-step, ensuring you can effortlessly create high-quality images from your presentations.
Install Spire.Presentation for JavaScript
To get started with converting PowerPoint to images in a React application, you can either download Spire.Presentation for JavaScript from the official website or install it via npm with the following command:
npm i spire.office
The downloaded product package integrates Spire.Doc for JavaScript, Spire.XLS for JavaScript, Spire.PDF for JavaScript, and Spire.Presentation for JavaScript. To use Spire.Presentation for JavaScript functionality, you need to copy the corresponding files (spire.presentation.js, Spire.Presentation.Wasm.zip, spire.common.js, Spire.Common.Wasm.zip, and the _framework folder) to the public folder of your project. Additionally, to ensure proper text rendering, font files can be added to a custom path of your choice. In the following example, the font addition path is: public\static\font.
For more details, refer to the documentation: How to Integrate Spire.Presentation for JavaScript in a React Project.
Convert PowerPoint to PNG or JPG with JavaScript
Using Spire.Presentation for JavaScript, you can access a specific slide with the Presentation.Slides.get_Item() method. Once you have the slide, convert it to image data using ISlide.SaveAsImage(). You can then save the image in PNG or JPG format. To convert each slide into a separate image file, simply iterate through the slides and perform the conversion for each one.
The steps to convert PowerPoint to PNG or JPG using JavaScript are as follows:
- Load required font files into the virtual file system (VFS).
- Instantiate a new document using the wasmModule.Presentation() method
- Load the PowerPoint document using the Presentation.LoadFromFile() method.
- Loop through the slides in the document:
- Get a specific slide using the Presentation.Slides.get_Item() method.
- Convert the slide into image data using the ISlide.SaveAsImage() method.
- Save the image data to a PNG or JPG file using the Save() method of the image data object.
- Create a Blob object from the generated image file.
- Trigger the download of the image file.
- JavaScript
import React, { useState, useEffect } from 'react';

function App() {
   const [wasmModule, setWasmModule] = useState(null);
   useEffect(() => {
    (async () => {
      try {
        const publicUrl = process.env.PUBLIC_URL || '';
        const spireModule = await import(/* webpackIgnore: true */ `${publicUrl}/spire.presentation.js`);
        const rawModule = spireModule.default || spireModule;
        window.wasmModule = typeof rawModule === 'function'
          ? await rawModule({ locateFile: p => p.endsWith('.wasm') ? `${publicUrl}/${p}` : p })
          : rawModule;
        setWasmModule(window.wasmModule);
      } catch (error) {
        console.error('Failed to load spire.presentation.js:', error);
      }
    })();
  }, []);

  const PowerPointToPNG = async () => {
    const wasmModule = window.wasmModule.spirepresentation;

    if (wasmModule) {
      // Specify the input file paths
      let inputFileName  = "Sample.pptx";
      await window.spire.FetchFileToVFS(inputFileName , '',  `${process.env.PUBLIC_URL}static/data/`);
      await window.spire.FetchFileToVFS("arial.ttf","/Library/Fonts/",`${process.env.PUBLIC_URL}static/font/`);

      // Create a Presentation instance and load the PowerPoint file from the virtual file system
      const presentation =new wasmModule.Presentation();
      presentation.LoadFromFile(inputFileName);

      // Iterate through the slides
      for (let i = 0; i < presentation.Slides.Count; i++) {

        // Convert a specific slide into image data
        let image = presentation.Slides.get_Item(i).SaveAsImage();

        // Specify the output file name
        let outputFileName = `ToImage_img_${i}.png`;

        // Save each image in virtual storage
        image.Save(outputFileName);

        // Read the generated image file from VFS
        const imageFileArray =  window.dotnetRuntime.Module.FS.readFile(outputFileName);

        // Create a Blog object from the image file
        const imageBlob = new Blob([imageFileArray], { type: "image/png" });

        // Create a URL for the Blob
        const url = URL.createObjectURL(imageBlob);

        // Create an anchor element to trigger the download
        const a = document.createElement('a');
        a.href = url;
        a.download = outputFileName;
        document.body.appendChild(a);
        a.click();
        document.body.removeChild(a);
        URL.revokeObjectURL(url);
      };

      // Clean up resources
      presentation.Dispose();
    }
  };

  return (
    <div style={{ textAlign: 'center', height: '300px' }}>
      <h1>Convert PowerPoint to PNG in React</h1>
      <button onClick={PowerPointToPNG} disabled={!wasmModule}>
        Generate
      </button>
    </div>
  );
}

export default App;
Run the code to launch the React app at localhost:3000. Click "Generate", and a "Save As" window will appear, prompting you to save the output file in your chosen folder.
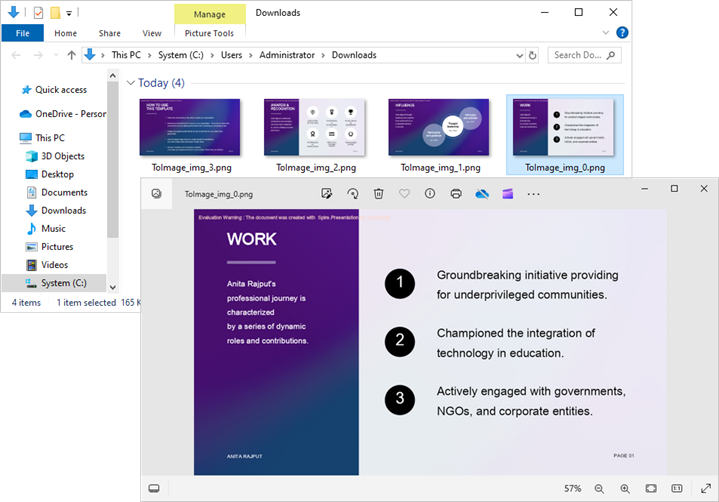
Below is a screenshot of the generated PNG image files:
Convert PowerPoint to SVG with JavaScript
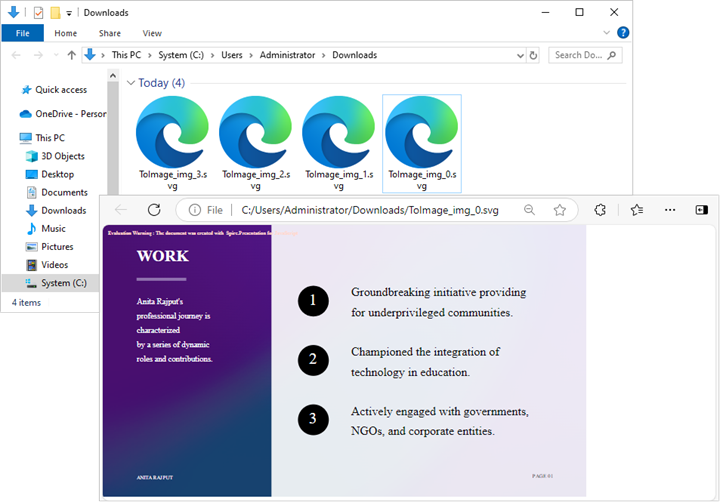
Spire.Presentation for JavaScript provides the ISlide.SaveToSVG() method, allowing you to convert a slide into SVG byte data. This byte data can then be saved as an SVG file using the Save() method.
The following are the steps to convert PowerPoint to SVG using JavaScript:
- Load required font files into the virtual file system (VFS).
- Instantiate a new document using the wasmModule.Presentation() method
- Load the PowerPoint document using the Presentation.LoadFromFile() method.
- Loop through the slides in the document:
- Get a specific slide using the Presentation.Slides.get_Item() method.
- Convert the slide into SVG byte data using the ISlide.SaveToSVG() method.
- Save the byte data to an SVG file using the Save() method.
- Create a Blob object from the generated image file.
- Trigger the download of the image file.
- JavaScript
import React, { useState, useEffect } from 'react';

function App() {
   const [wasmModule, setWasmModule] = useState(null);
   useEffect(() => {
    (async () => {
      try {
        const publicUrl = process.env.PUBLIC_URL || '';
        const spireModule = await import(/* webpackIgnore: true */ `${publicUrl}/spire.presentation.js`);
        const rawModule = spireModule.default || spireModule;
        window.wasmModule = typeof rawModule === 'function'
          ? await rawModule({ locateFile: p => p.endsWith('.wasm') ? `${publicUrl}/${p}` : p })
          : rawModule;
        setWasmModule(window.wasmModule);
      } catch (error) {
        console.error('Failed to load spire.presentation.js:', error);
      }
    })();
  }, []);


  const PowerPointToSVG = async () => {
    const wasmModule = window.wasmModule.spirepresentation;

    if (wasmModule) {
      // Specify the input file paths
      let inputFileName  = "Sample.pptx";
      await window.spire.FetchFileToVFS(inputFileName , '',  `${process.env.PUBLIC_URL}static/data/`);
      await window.spire.FetchFileToVFS("arial.ttf","/Library/Fonts/",`${process.env.PUBLIC_URL}static/font/`);

      // Create a Presentation instance and load the PowerPoint file from the virtual file system
      const presentation =new wasmModule.Presentation();
      presentation.LoadFromFile(inputFileName);

      // Iterate through the slides
      for (let i = 0; i < presentation.Slides.Count; i++) {
        let svgBytes = presentation.Slides.get_Item(i).SaveToSVG();
        let outputFileName = `ToSVG-${i}.svg`;

        // Save each image in virtual storage
        let stream = new wasmModule.Stream(svgBytes);
        stream.Save(outputFileName);
        const imageFileArray = window.dotnetRuntime.Module.FS.readFile(outputFileName);
        const imageBlob = new Blob([imageFileArray], { type: "image/svg" });

        // Create a URL for the Blob
        const url = URL.createObjectURL(imageBlob);

        // Create an anchor element to trigger the download
        const a = document.createElement('a');
        a.href = url;
        a.download = outputFileName;
        document.body.appendChild(a);
        a.click();
        document.body.removeChild(a);
        URL.revokeObjectURL(url);
          stream.Dispose();
        }
      // Clean up resources
      presentation.Dispose();
    }
  };

  return (
    <div style={{ textAlign: 'center', height: '300px' }}>
      <h1>Convert PowerPoint to SVG in React</h1>
      <button onClick={PowerPointToSVG} disabled={!wasmModule}>
        Generate
      </button>
    </div>
  );
}


export default App;
Convert PowerPoint to TIFF with JavaScript
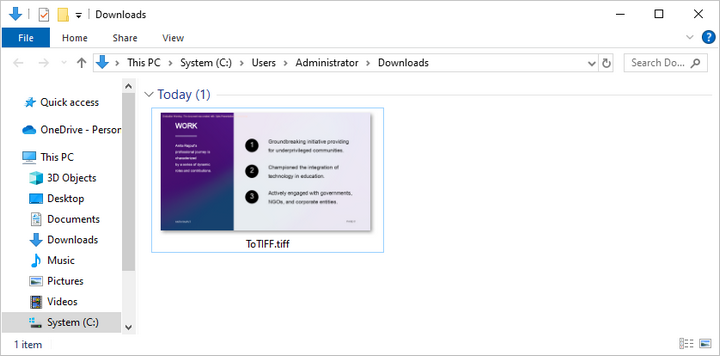
Spire.Presentation for JavaScript includes the Presentation.SaveToFile() method, which allows you to convert an entire PowerPoint document into a multi-frame TIFF image seamlessly.
The following are the steps to convert PowerPoint to TIFF using JavaScript:
- Load required font files into the virtual file system (VFS).
- Instantiate a new document using the wasmModule.Presentation() method
- Load the PowerPoint document using the Presentation.LoadFromFile() method.
- Convert the document to a TIFF image file using the Presenatation.SaveToFile() method.
- Create a Blob object from the generated image file.
- Trigger the download of the image file.
- JavaScript
import React, { useState, useEffect } from 'react';

function App() {
   const [wasmModule, setWasmModule] = useState(null);
   useEffect(() => {
    (async () => {
      try {
        const publicUrl = process.env.PUBLIC_URL || '';
        const spireModule = await import(/* webpackIgnore: true */ `${publicUrl}/spire.presentation.js`);
        const rawModule = spireModule.default || spireModule;
        window.wasmModule = typeof rawModule === 'function'
          ? await rawModule({ locateFile: p => p.endsWith('.wasm') ? `${publicUrl}/${p}` : p })
          : rawModule;
        setWasmModule(window.wasmModule);
      } catch (error) {
        console.error('Failed to load spire.presentation.js:', error);
      }
    })();
  }, []);


  const PowerPointToTIFF = async () => {
    const wasmModule = window.wasmModule.spirepresentation;

    if (wasmModule) {
      // Specify the input file paths
      let inputFileName  = "Sample.pptx";
      await window.spire.FetchFileToVFS(inputFileName , '',  `${process.env.PUBLIC_URL}static/data/`);
      await window.spire.FetchFileToVFS("arial.ttf","/Library/Fonts/",`${process.env.PUBLIC_URL}static/font/`);

      // Create a Presentation instance and load the PowerPoint file from the virtual file system
      const presentation =new wasmModule.Presentation();
      // Load the PowerPoint file
      presentation.LoadFromFile(inputFileName);

      // Specify the output file name
      const outputFileName = "ToTIFF.tiff"

      // Save the document to TIFF
      presentation.SaveToFile({ file: outputFileName, fileFormat: wasmModule.FileFormat.Tiff });

      // Read the generated image file from VFS
      const imageFileArray = window.dotnetRuntime.Module.FS.readFile(outputFileName);

      // Create a Blog object from the image file
      const imageBlob = new Blob([imageFileArray], { type: "image/tiff" });

      // Create a URL for the Blob
      const url = URL.createObjectURL(imageBlob);

      // Create an anchor element to trigger the download
      const a = document.createElement('a');
      a.href = url;
      a.download = outputFileName;
      document.body.appendChild(a);
      a.click();
      document.body.removeChild(a);
      URL.revokeObjectURL(url);

      // Clean up resources
      presentation.Dispose();
    }
  };

  return (
    <div style={{ textAlign: 'center', height: '300px' }}>
      <h1>Convert PowerPoint to TIFF in React</h1>
      <button onClick={PowerPointToTIFF} disabled={!wasmModule}>
        Generate
      </button>
    </div>
  );
}


export default App;
Get a Free License
To fully experience the capabilities of Spire.Presentation for JavaScript without any evaluation limitations, you can request a free 30-day trial license.
Convert PowerPoint to PDF with JavaScript in React
Converting PowerPoint presentations to PDF ensures that slide content remains intact while making the file easier to share and view across different devices. The PDF format preserves the original layout, text, and images, preventing unintended modifications and ensuring consistent formatting. This conversion is especially useful for professional and academic settings, where maintaining document integrity and accessibility is essential. Additionally, PDFs offer enhanced security features, such as restricted editing and password protection, making them a reliable choice for distributing important presentations. In this article, we will demonstrate how to convert PowerPoint presentations to PDF in React using Spire.Presentation for JavaScript.
- Convert a PowerPoint Presentation to PDF
- Convert a PowerPoint Presentation to PDF with a Custom Page Size
- Convert a PowerPoint Slide to PDF
Install Spire.Presentation for JavaScript
To get started with converting PowerPoint to PDF in a React application, you can either download Spire.Presentation for JavaScript from the official website or install it via npm with the following command:
npm i spire.office
The downloaded product package integrates Spire.Doc for JavaScript, Spire.XLS for JavaScript, Spire.PDF for JavaScript, and Spire.Presentation for JavaScript. To use Spire.Presentation for JavaScript functionality, you need to copy the corresponding files (spire.presentation.js, Spire.Presentation.Wasm.zip, spire.common.js, Spire.Common.Wasm.zip, and the _framework folder) to the public folder of your project. Additionally, to ensure proper text rendering, font files can be added to a custom path of your choice. In the following example, the font addition path is: public\static\font.
For more details, refer to the documentation: How to Integrate Spire.Presentation for JavaScript in a React Project.
Convert a PowerPoint Presentation to PDF
Converting a PowerPoint presentation to PDF allows you to share the entire document while preserving its original layout. Using the Presentation.SaveToFile() method, developers can export the full presentation to a PDF file. Below are the detailed steps to perform this operation.
- Create an object of Presentation class.
- Load a presentation file using Presentation.LoadFromFile() method.
- Save the presentation to a PDF document using Presentation.SaveToFile() method.
- JavaScript
import React, { useState, useEffect } from 'react';

function App() {
   const [wasmModule, setWasmModule] = useState(null);
   useEffect(() => {
    (async () => {
      try {
        const publicUrl = process.env.PUBLIC_URL || '';
        const spireModule = await import(/* webpackIgnore: true */ `${publicUrl}/spire.presentation.js`);
        const rawModule = spireModule.default || spireModule;
        window.wasmModule = typeof rawModule === 'function'
          ? await rawModule({ locateFile: p => p.endsWith('.wasm') ? `${publicUrl}/${p}` : p })
          : rawModule;
        setWasmModule(window.wasmModule);
      } catch (error) {
        console.error('Failed to load spire.presentation.js:', error);
      }
    })();
  }, []);

  const ConvertPowerPointToPDF = async () => {
    const wasmModule = window.wasmModule.spirepresentation;

    if (wasmModule) {
      // Specify the input file paths
      let inputFileName  = "Sample.pptx";
      await window.spire.FetchFileToVFS(inputFileName , '',  `${process.env.PUBLIC_URL}static/data/`);
      await window.spire.FetchFileToVFS("arial.ttf","/Library/Fonts/",`${process.env.PUBLIC_URL}static/font/`);

      // Create a Presentation instance and load the PowerPoint file from the virtual file system
      const ppt =new wasmModule.Presentation();
      ppt.LoadFromFile(inputFileName);

      // Define the output file name
      const outputFileName = "PowerPointToPDF.pdf";

      // Save the PowerPoint file to PDF format
      ppt.SaveToFile({ file: outputFileName, fileFormat: wasmModule.FileFormat.PDF });

      // Read the generated PDF file
      const modifiedFileArray = window.dotnetRuntime.Module.FS.readFile(outputFileName);

      // Create a Blob object from the PDF file
      const modifiedFile = new Blob([modifiedFileArray], { type: "application/pdf" });

      // Create a URL for the Blob
      const url = URL.createObjectURL(modifiedFile);

      // Create an anchor element to trigger the download
      const a = document.createElement('a');
      a.href = url;
      a.download = outputFileName;
      document.body.appendChild(a);
      a.click();
      document.body.removeChild(a);
      URL.revokeObjectURL(url);
    }
  };

  return (
    <div style={{ textAlign: 'center', height: '300px' }}>
      <h1>Convert a PowerPoint Presentation to PDF in React</h1>
      <button onClick={ConvertPowerPointToPDF} disabled={!wasmModule}>
        Convert
      </button>
    </div>
  );
}


export default App;
Run the code to launch the React app at localhost:3000. Once it's running, click on the "Convert" button to convert the PowerPoint presentation to PDF:
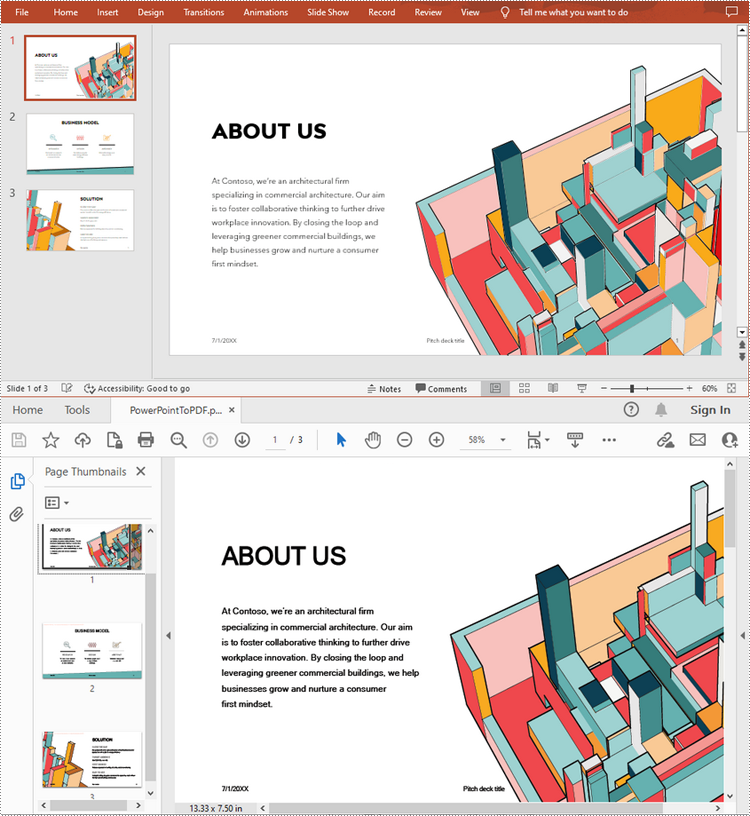
The below screenshot shows the input PowerPoint presentation and the converted PDF:
Convert a PowerPoint Presentation to PDF with a Custom Page Size
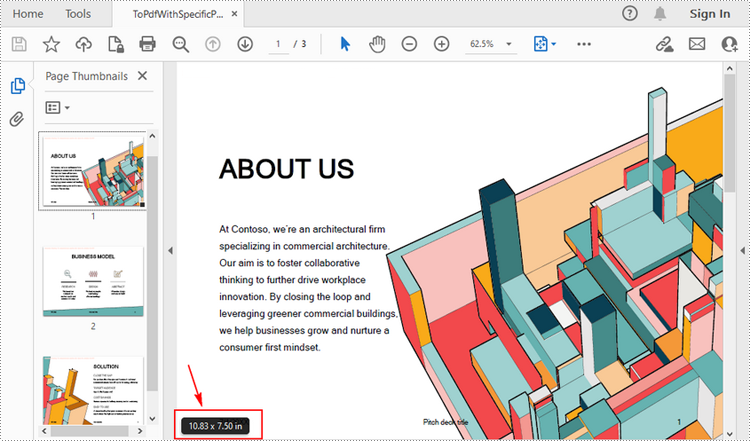
Developers can customize the page size of the resulting PDF by adjusting the slide size using the Presentation.SlideSize.Type property during conversion. This ensures that the converted PDF meets specific formatting or printing needs. Here are the detailed steps for this operation.
- Create an object of Presentation class.
- Load a presentation file using Presentation.LoadFromFile() method.
- Set the slide size to A4 using Presentation.SlideSize.Type property.
- Save the presentation to a PDF document using Presentation.SaveToFile() method.
- JavaScript
import React, { useState, useEffect } from 'react';

function App() {
   const [wasmModule, setWasmModule] = useState(null);
   useEffect(() => {
    (async () => {
      try {
        const publicUrl = process.env.PUBLIC_URL || '';
        const spireModule = await import(/* webpackIgnore: true */ `${publicUrl}/spire.presentation.js`);
        const rawModule = spireModule.default || spireModule;
        window.wasmModule = typeof rawModule === 'function'
          ? await rawModule({ locateFile: p => p.endsWith('.wasm') ? `${publicUrl}/${p}` : p })
          : rawModule;
        setWasmModule(window.wasmModule);
      } catch (error) {
        console.error('Failed to load spire.presentation.js:', error);
      }
    })();
  }, []);

  const ConvertPowerPointToPDF = async () => {
    const wasmModule = window.wasmModule.spirepresentation;

    if (wasmModule) {
      // Specify the input file paths
      let inputFileName  = "Sample.pptx";
      await window.spire.FetchFileToVFS(inputFileName , '',  `${process.env.PUBLIC_URL}static/data/`);
      await window.spire.FetchFileToVFS("arial.ttf","/Library/Fonts/",`${process.env.PUBLIC_URL}static/font/`);

      // Create a Presentation instance and load the PowerPoint file from the virtual file system
      const ppt =new wasmModule.Presentation();
      ppt.LoadFromFile(inputFileName);

      //Set A4 page size
      ppt.SlideSize.Type = wasmModule.SlideSizeType.A4;

      // Define the output file name
      const outputFileName = "ToPdfWithSpecificPageSize.pdf";

      // Save the PowerPoint file to PDF format
      ppt.SaveToFile({ file: outputFileName, fileFormat: wasmModule.FileFormat.PDF });

      // Read the generated PDF file
      const modifiedFileArray = window.dotnetRuntime.Module.FS.readFile(outputFileName);

      // Create a Blob object from the PDF file
      const modifiedFile = new Blob([modifiedFileArray], { type: "application/pdf" });

      // Create a URL for the Blob
      const url = URL.createObjectURL(modifiedFile);

      // Create an anchor element to trigger the download
      const a = document.createElement('a');
      a.href = url;
      a.download = outputFileName;
      document.body.appendChild(a);
      a.click();
      document.body.removeChild(a);
      URL.revokeObjectURL(url);
    }
  };

  return (
    <div style={{ textAlign: 'center', height: '300px' }}>
      <h1>Convert a PowerPoint Presentation to PDF with a Custom Page Size in React</h1>
      <button onClick={ConvertPowerPointToPDF} disabled={!wasmModule}>
        Convert
      </button>
    </div>
  );
}


export default App;
Convert a PowerPoint Slide to PDF
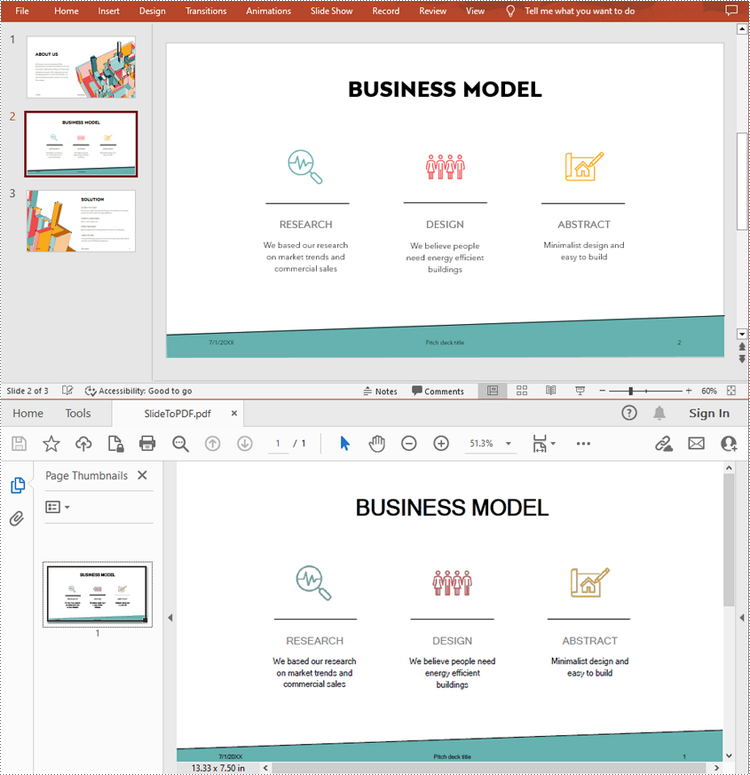
Converting a single PowerPoint slide to PDF allows for easy extraction and sharing of individual slides without exporting the entire presentation. Using the ISlide.SaveToFile() method, developers can convert individual slides to PDF with ease. The detailed steps for this operation are as follows.
- Create an object of the Presentation class.
- Load a presentation file using Presentation.LoadFromFile() method.
- Get a slide using Presentation.Slides.get_Item() method.
- Save the slide as a PDF document using ISlide.SaveToFile() method.
- JavaScript
import React, { useState, useEffect } from 'react';

function App() {
   const [wasmModule, setWasmModule] = useState(null);
   useEffect(() => {
    (async () => {
      try {
        const publicUrl = process.env.PUBLIC_URL || '';
        const spireModule = await import(/* webpackIgnore: true */ `${publicUrl}/spire.presentation.js`);
        const rawModule = spireModule.default || spireModule;
        window.wasmModule = typeof rawModule === 'function'
          ? await rawModule({ locateFile: p => p.endsWith('.wasm') ? `${publicUrl}/${p}` : p })
          : rawModule;
        setWasmModule(window.wasmModule);
      } catch (error) {
        console.error('Failed to load spire.presentation.js:', error);
      }
    })();
  }, []);

  const ConvertPowerPointSlideToPDF = async () => {
    const wasmModule = window.wasmModule.spirepresentation;

    if (wasmModule) {
      // Specify the input file paths
      let inputFileName  = "Sample.pptx";
      await window.spire.FetchFileToVFS(inputFileName , '',  `${process.env.PUBLIC_URL}static/data/`);
      await window.spire.FetchFileToVFS("arial.ttf","/Library/Fonts/",`${process.env.PUBLIC_URL}static/font/`);

      // Create a Presentation instance and load the PowerPoint file from the virtual file system
      const ppt =new wasmModule.Presentation();
      ppt.LoadFromFile(inputFileName);

      // Get the second slide
      let slide = ppt.Slides.get_Item(1);

      // Define the output file name
      const outputFileName = "SlideToPdf.pdf";

      // Save the slide to PDF format
      slide.SaveToFile( outputFileName, wasmModule.FileFormat.PDF);

      // Read the generated PDF file
      const modifiedFileArray = window.dotnetRuntime.Module.FS.readFile(outputFileName);

      // Create a Blob object from the PDF file
      const modifiedFile = new Blob([modifiedFileArray], { type: "application/pdf" });

      // Create a URL for the Blob
      const url = URL.createObjectURL(modifiedFile);

      // Create an anchor element to trigger the download
      const a = document.createElement('a');
      a.href = url;
      a.download = outputFileName;
      document.body.appendChild(a);
      a.click();
      document.body.removeChild(a);
      URL.revokeObjectURL(url);
    }
  };

  return (
    <div style={{ textAlign: 'center', height: '300px' }}>
      <h1>Convert a PowerPoint Slide to PDF in React</h1>
      <button onClick={ConvertPowerPointSlideToPDF} disabled={!wasmModule}>
        Convert
      </button>
    </div>
  );
}


export default App;
Get a Free License
To fully experience the capabilities of Spire.Presentation for JavaScript without any evaluation limitations, you can request a free 30-day trial license.