How to Add, Get and Delete Custom Document Properties with JavaScript in React
Besides the fixed fields such as title and author, a PDF's properties panel keeps a column for custom properties: both the property name and its value are named by you, and internal markers such as department, secrecy level, or source template live there. Contracts, tenders, and project documents often rely on it to carry this information, but a reader only lets you fill them in one by one by hand — adding markers to a batch of documents, or checking which markers a given file carries, is out of reach; and sending the files to a server for batch processing means the content leaves the user's device.
This article uses Spire.PDF for JavaScript to add, get, and delete a PDF's custom document properties. It runs on WebAssembly to load, modify, and save PDFs directly in the browser, working through a virtual file system (VFS) with no backend required.
This article covers three core features:
For installation and project configuration, refer to Integrating Spire.PDF for JavaScript in a React Project. The examples below assume Spire.PDF is installed and the WebAssembly module has been initialized. They take a PDF without custom properties as input, and the last two sections read the Custom-Properties-Added.pdf produced by the first section, so run the code in the first section before the others.
Add Custom Document Properties
Spire.PDF for JavaScript provides DocumentInformation.SetCustomProperty() for writing custom document properties: the property name is up to you, the value is stored as a string, and a repeated name overwrites the previous entry.
function App() {
  const addCustomProperties = async () => {
    // Get the Spire.PDF WASM module
    const pdfModule = window.wasmModule?.spirepdf;

    // Check that the module is ready
    if (!pdfModule) {
      alert('Spire.PDF is not ready yet');
      return;
    }

    // Load the PDF to be processed into the VFS
    const inputFileName = 'ProductOverview.pdf';
    await window.spire.FetchFileToVFS(inputFileName, '', `${process.env.PUBLIC_URL}/data/`);

    // Create a PdfDocument and load the PDF
    const doc = new pdfModule.PdfDocument();
    doc.LoadFromFile(inputFileName);

    // Write the custom document properties; the names are up to you
    doc.DocumentInformation.SetCustomProperty('Department', 'Research & Development');
    doc.DocumentInformation.SetCustomProperty('SecrecyLevel', 'Internal');
    doc.DocumentInformation.SetCustomProperty('Company', 'Ice Blue Technology');

    const outputFileName = 'Custom-Properties-Added.pdf';
    doc.SaveToFile(outputFileName);
    doc.Close();

    // Read the generated file from the VFS and trigger the download
    const fileArray = window.dotnetRuntime.Module.FS.readFile(outputFileName);
    const blob = new Blob([fileArray], { type: 'application/pdf' });
    const url = URL.createObjectURL(blob);
    const a = document.createElement('a');
    a.href = url;
    a.download = outputFileName;
    a.click();
    URL.revokeObjectURL(url);
  };

  return (
    <div style={{ textAlign: 'center', height: '300px' }}>
      <h1>Add Custom Document Properties</h1>
      <button onClick={addCustomProperties}>
        Add Properties
      </button>
    </div>
  );
}

export default App;
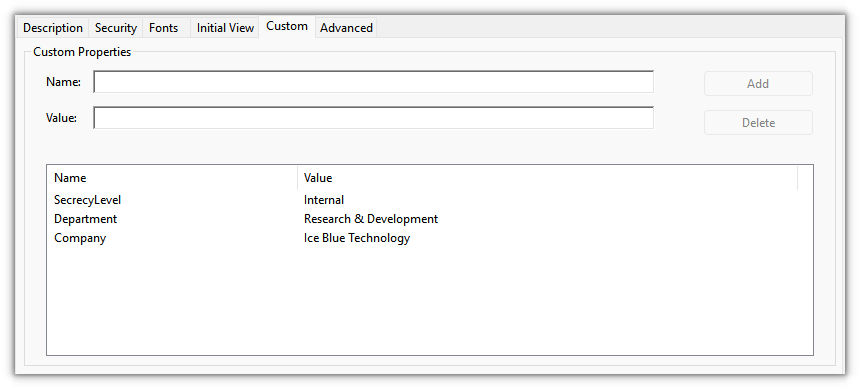
The result shows three more properties — Department, SecrecyLevel, and Company — in the custom column of the reader's properties panel
Get Custom Document Properties
Reading goes through the same DocumentInformation: GetCustomProperty() returns the value for a given property name, and returns null rather than throwing when the key does not exist.
function App() {
  const getCustomProperties = async () => {
    // Get the Spire.PDF WASM module
    const pdfModule = window.wasmModule?.spirepdf;

    // Check that the module is ready
    if (!pdfModule) {
      alert('Spire.PDF is not ready yet');
      return;
    }

    // Read the document produced by the previous section, already in the VFS
    const inputFileName = 'Custom-Properties-Added.pdf';

    // Create a PdfDocument and load the PDF
    const doc = new pdfModule.PdfDocument();
    doc.LoadFromFile(inputFileName);

    const info = doc.DocumentInformation;

    // Read each property by name; a missing key returns null
    const lines = [
      `Department: ${info.GetCustomProperty('Department')}`,
      `SecrecyLevel: ${info.GetCustomProperty('SecrecyLevel')}`,
      `Company: ${info.GetCustomProperty('Company')}`,
      `Owner: ${info.GetCustomProperty('Owner') ?? '(not set)'}`,
    ];

    // Write the result to a text file
    const outputFileName = 'Custom-Properties.txt';
    window.dotnetRuntime.Module.FS.writeFile(outputFileName, lines.join('\n'));
    doc.Close();

    // Read the generated file from the VFS and trigger the download
    const fileArray = window.dotnetRuntime.Module.FS.readFile(outputFileName);
    const blob = new Blob([fileArray], { type: 'text/plain' });
    const url = URL.createObjectURL(blob);
    const a = document.createElement('a');
    a.href = url;
    a.download = outputFileName;
    a.click();
    URL.revokeObjectURL(url);
  };

  return (
    <div style={{ textAlign: 'center', height: '300px' }}>
      <h1>Get Custom Document Properties</h1>
      <button onClick={getCustomProperties}>
        Get Properties
      </button>
    </div>
  );
}

export default App;
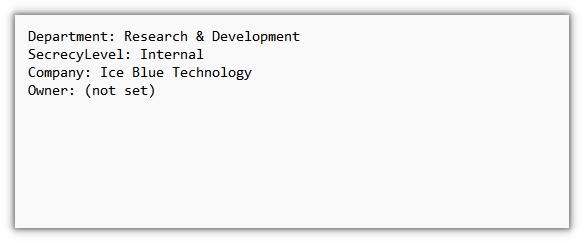
The exported text file lists the property values that were read, one per line:
Delete Custom Document Properties
Deleting uses RemoveCustomProperty(), which removes a single key by property name.
function App() {
  const removeCustomProperties = async () => {
    // Get the Spire.PDF WASM module
    const pdfModule = window.wasmModule?.spirepdf;

    // Check that the module is ready
    if (!pdfModule) {
      alert('Spire.PDF is not ready yet');
      return;
    }

    // Read the document produced by the previous section, already in the VFS
    const inputFileName = 'Custom-Properties-Added.pdf';

    // Create a PdfDocument and load the PDF
    const doc = new pdfModule.PdfDocument();
    doc.LoadFromFile(inputFileName);

    // Remove single custom properties by name; the rest are unaffected
    doc.DocumentInformation.RemoveCustomProperty('SecrecyLevel');
    doc.DocumentInformation.RemoveCustomProperty('Company');

    const outputFileName = 'Custom-Properties-Removed.pdf';
    doc.SaveToFile(outputFileName);
    doc.Close();

    // Read the generated file from the VFS and trigger the download
    const fileArray = window.dotnetRuntime.Module.FS.readFile(outputFileName);
    const blob = new Blob([fileArray], { type: 'application/pdf' });
    const url = URL.createObjectURL(blob);
    const a = document.createElement('a');
    a.href = url;
    a.download = outputFileName;
    a.click();
    URL.revokeObjectURL(url);
  };

  return (
    <div style={{ textAlign: 'center', height: '300px' }}>
      <h1>Delete Custom Document Properties</h1>
      <button onClick={removeCustomProperties}>
        Delete Properties
      </button>
    </div>
  );
}

export default App;
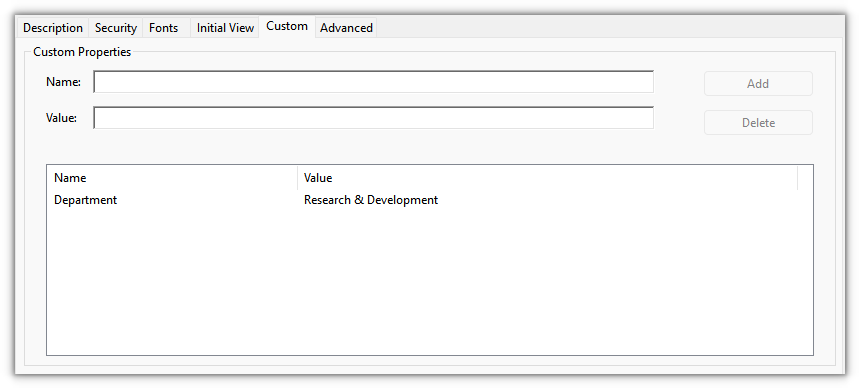
The result keeps only one custom property, Department; the two that were removed are gone from the panel:
FAQ
How are custom properties different from fields like title and author
Reason: the PDF spec fixes the standard fields Title, Author, Subject, Keywords, Creator, and Producer; any key-value pair outside the spec counts as a custom property. Readers show them in two columns: the standard fields in the upper part, and the custom properties in a column of their own.
Solution: the two kinds take two different styles. Assign standard fields such as title and author to the same-named property, and route business markers through custom properties:
// Standard fields
doc.DocumentInformation.Title = '2026 Product Overview';
doc.DocumentInformation.Author = 'Marketing Department';

// Custom properties
doc.DocumentInformation.SetCustomProperty('Department', 'Marketing Department');
Reading splits the same way: standard fields are read as properties such as info.Title, while custom properties can only be read with info.GetCustomProperty('Department').
After deleting, what comes back when I read it, and what if I get the key name wrong
Reason: GetCustomProperty() returns null for any key that does not exist, so a deleted entry and one that was never written look the same; passing a key that does not exist to RemoveCustomProperty() neither throws nor changes the document.
Solution: after deleting, reopen the result and check once — null means it is gone, and you can confirm the other properties still read back. A wrong key name has no side effects; just delete again with the correct name:
doc.DocumentInformation.RemoveCustomProperty('SecrecyLevel');
doc.SaveToFile(outputFileName);

// Reopen the result to check: null means it was removed
const check = new pdfModule.PdfDocument();
check.LoadFromFile(outputFileName);
console.log(check.DocumentInformation.GetCustomProperty('SecrecyLevel'));
Get a Free License
If you want to remove the evaluation message from the result documents or get rid of feature limitations, please contact sales to obtain a free 30-day temporary license.
How to Set or Get PDF Document Properties with JavaScript in React
A PDF's properties panel records the title, author, subject, and keywords, and knowledge bases, archival systems, and full-text search all use them as the basis for classification. The files you actually receive tend to be the opposite: the title still carries the name left over from a previous template, the author field is empty, and keywords are missing altogether. Filling them in means typing into each field by hand in a reader, and checking the author or subject of a batch of documents means opening the properties dialog one file at a time — desktop software cannot do it in bulk, and uploading the files to a server means the content leaves the user's device.
This article uses Spire.PDF for JavaScript to set and get PDF document properties. It runs on WebAssembly to load, modify, and save PDFs directly in the browser, working through a virtual file system (VFS) with no backend required.
This article covers two core features:
For installation and project configuration, refer to Integrating Spire.PDF for JavaScript in a React Project. The examples below assume Spire.PDF is installed and the WebAssembly module has been initialized.
Set PDF Document Properties
Spire.PDF for JavaScript provides doc.DocumentInformation for writing the standard document properties — title, author, subject, and keywords each take one field, while Creator and Producer record who generated the file, all of them plain strings.
function App() {
  const setPdfProperties = async () => {
    // Get the Spire.PDF WASM module
    const pdfModule = window.wasmModule?.spirepdf;

    // Check that the module is ready
    if (!pdfModule) {
      alert('Spire.PDF is not ready yet');
      return;
    }

    // Load the PDF to be processed into the VFS
    const inputFileName = 'ProductOverview.pdf';
    await window.spire.FetchFileToVFS(inputFileName, '', `${process.env.PUBLIC_URL}/data/`);

    // Create a PdfDocument and load the PDF
    const doc = new pdfModule.PdfDocument();
    doc.LoadFromFile(inputFileName);

    // Write the standard document properties
    doc.DocumentInformation.Title = '2026 Product Overview';
    doc.DocumentInformation.Author = 'Marketing Department';
    doc.DocumentInformation.Subject = 'Product Line and Pricing';
    doc.DocumentInformation.Keywords = 'product overview, pricing, 2026';
    doc.DocumentInformation.Creator = 'Content Center';
    doc.DocumentInformation.Producer = 'Spire.PDF for JavaScript';

    const outputFileName = 'Properties-Set.pdf';
    doc.SaveToFile(outputFileName);
    doc.Close();

    // Read the generated file from the VFS and trigger the download
    const fileArray = window.dotnetRuntime.Module.FS.readFile(outputFileName);
    const blob = new Blob([fileArray], { type: 'application/pdf' });
    const url = URL.createObjectURL(blob);
    const a = document.createElement('a');
    a.href = url;
    a.download = outputFileName;
    a.click();
    URL.revokeObjectURL(url);
  };

  return (
    <div style={{ textAlign: 'center', height: '300px' }}>
      <h1>Set PDF Document Properties</h1>
      <button onClick={setPdfProperties}>
        Set Properties
      </button>
    </div>
  );
}

export default App;
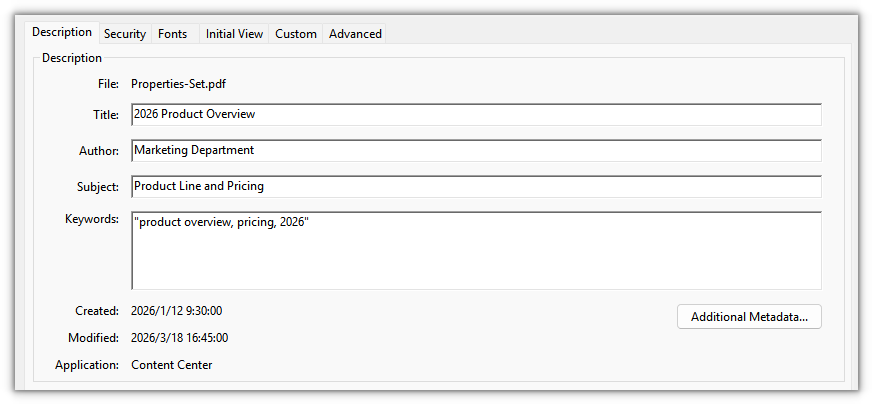
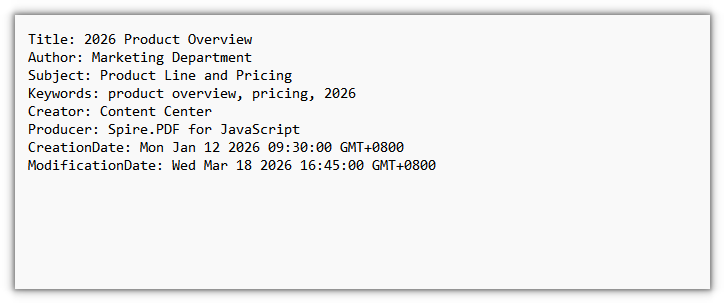
The standard fields shown in the reader's document properties panel after setting:
Get PDF Document Properties
Reading goes through the same DocumentInformation: the standard fields come back as strings. Joining the values you get into text and writing it out lets a batch pipeline compare or store them directly, without going through a reader's properties panel.
function App() {
  const getPdfProperties = async () => {
    // Get the Spire.PDF WASM module
    const pdfModule = window.wasmModule?.spirepdf;

    // Check that the module is ready
    if (!pdfModule) {
      alert('Spire.PDF is not ready yet');
      return;
    }

    // Load the PDF to be read into the VFS
    const inputFileName = 'Properties-Set.pdf';
    await window.spire.FetchFileToVFS(inputFileName, '', `${process.env.PUBLIC_URL}/data/`);

    // Create a PdfDocument and load the PDF
    const doc = new pdfModule.PdfDocument();
    doc.LoadFromFile(inputFileName);

    // Read the standard properties and the creation/modification dates one by one
    const info = doc.DocumentInformation;

    const lines = [
      `Title: ${info.Title}`,
      `Author: ${info.Author}`,
      `Subject: ${info.Subject}`,
      `Keywords: ${info.Keywords}`,
      `Creator: ${info.Creator}`,
      `Producer: ${info.Producer}`,
      `CreationDate: ${info.CreationDate.toString()}`,
      `ModificationDate: ${info.ModificationDate.toString()}`,
    ];

    // Write the result to a text file
    const outputFileName = 'Document-Properties.txt';
    window.dotnetRuntime.Module.FS.writeFile(outputFileName, lines.join('\n'));
    doc.Close();

    // Read the generated file from the VFS and trigger the download
    const fileArray = window.dotnetRuntime.Module.FS.readFile(outputFileName);
    const blob = new Blob([fileArray], { type: 'text/plain' });
    const url = URL.createObjectURL(blob);
    const a = document.createElement('a');
    a.href = url;
    a.download = outputFileName;
    a.click();
    URL.revokeObjectURL(url);
  };

  return (
    <div style={{ textAlign: 'center', height: '300px' }}>
      <h1>Get PDF Document Properties</h1>
      <button onClick={getPdfProperties}>
        Get Properties
      </button>
    </div>
  );
}

export default App;
The exported text file lists the standard properties that were read, one per line:
FAQ
Why do my property changes disappear after I reopen the file
Reason: the fields on DocumentInformation change the document object in memory, and only calling SaveToFile writes them into the file. Assign the values and close the document right away, or open the original input file again, and you will of course still see the old values.
Solution: after assigning the values, save the document to a new output file, then open that result to check it:
doc.DocumentInformation.Title = '2026 Product Overview';
doc.DocumentInformation.Author = 'Marketing Department';

// Only after saving do the properties land in the file
doc.SaveToFile('Properties-Set.pdf');
Get a Free License
If you want to remove the evaluation message from the result documents or get rid of feature limitations, please contact sales to obtain a free 30-day temporary license.
Create a Table of Contents in PDF Using JavaScript in React
Send out a manual or report of a few hundred pages and the complaint is rarely about the content — it's that readers can't find the chapter they want. They want a page-numbered list of chapters up front, and one click to jump there. Many PDFs are generated without one, so readers are left to the scrollbar or in-document search.
This article shows how to create a table of contents page and add navigation to its entries with Spire.PDF for JavaScript. It loads, edits and saves PDF documents directly in the browser through WebAssembly, reading and writing files through a virtual file system (VFS), so everything runs locally with no backend.
Two core features are covered:
For installation and project setup, see Integrate Spire.PDF for JavaScript in a React Project. The examples below assume Spire.PDF is installed and the WebAssembly module is initialized.
Create a Table of Contents Page
The contents page has to land at a specific position in the document. Pages.Insert({ index }) inserts a page and returns it, and the title, chapter entries, leader dots and page numbers are all drawn on that page with Canvas.DrawString. Each entry advances horizontally by its text width, and leader dots fill the gap from the end of the title to the start of the page number.
function App() {
  const createTocPage = async () => {
    // Get the Spire.PDF WASM module
    const pdfModule = window.wasmModule?.spirepdf;

    // Check whether the module is ready
    if (!pdfModule) {
      alert('Spire.PDF is not ready yet');
      return;
    }

    // Load the PDF to process into the VFS
    const inputFileName = 'Chapter_Document.pdf';
    await window.spire.FetchFileToVFS(inputFileName, '', `${process.env.PUBLIC_URL}/data/`);

    // Create a PdfDocument object and load the PDF
    let doc = new pdfModule.PdfDocument();
    doc.LoadFromFile(inputFileName);

    // Insert the contents page after the cover; the body pages shift down by one
    const tocPage = doc.Pages.Insert({ index: 1 });

    // Fonts for the title and the entries, using the built-in Helvetica (no font file to load)
    const titleFont = new pdfModule.PdfFont({ fontFamily: pdfModule.PdfFontFamily.Helvetica, size: 20, style: pdfModule.PdfFontStyle.Bold });
    const entryFont = new pdfModule.PdfFont({ fontFamily: pdfModule.PdfFontFamily.Helvetica, size: 14 });
    const centerFormat = new pdfModule.PdfStringFormat({ alignment: pdfModule.PdfTextAlignment.Center });

    // Draw the centered contents title
    const title = 'Contents';
    tocPage.Canvas.DrawString({
      s: title,
      font: titleFont,
      brush: pdfModule.PdfBrushes.get_Black(),
      point: new pdfModule.PointF(tocPage.Canvas.ClientSize.Width / 2, 50),
      format: centerFormat
    });

    // Chapter titles and their page numbers after the contents page is inserted
    const chapters = [
      { title: 'Chapter 1 Overview', page: 3 },
      { title: 'Chapter 2 Architecture', page: 4 },
      { title: 'Chapter 3 Deployment', page: 5 },
      { title: 'Chapter 4 Maintenance', page: 6 }
    ];

    const width = tocPage.Canvas.ClientSize.Width;
    let y = 110;
    for (const chapter of chapters) {
      // Entry text
      const titleSize = entryFont.MeasureString({ text: chapter.title });
      tocPage.Canvas.DrawString({ s: chapter.title, font: entryFont, brush: pdfModule.PdfBrushes.get_Black(), x: 40, y: y });

      // Right-aligned page number
      const pageText = chapter.page.toString();
      const pageSize = entryFont.MeasureString({ text: pageText });
      tocPage.Canvas.DrawString({ s: pageText, font: entryFont, brush: pdfModule.PdfBrushes.get_Black(), x: width - 40 - pageSize.Width, y: y });

      // Leader dots: fill from the end of the entry to the start of the page number
      const dotStart = 40 + titleSize.Width + 6;
      const dotEnd = width - 40 - pageSize.Width - 6;
      for (let x = dotStart; x < dotEnd; x += 6) {
        tocPage.Canvas.DrawString({ s: '.', font: entryFont, brush: pdfModule.PdfBrushes.get_Gray(), x: x, y: y });
      }

      y += 24;
    }

    // Define the output file name and save
    const outputFileName = 'Document-with-TOC.pdf';
    doc.SaveToFile(outputFileName);
    doc.Close();

    // Read the generated file from the VFS and trigger the download
    const fileArray = window.dotnetRuntime.Module.FS.readFile(outputFileName);
    const blob = new Blob([fileArray], { type: 'application/pdf' });
    const url = URL.createObjectURL(blob);
    const a = document.createElement('a');
    a.href = url;
    a.download = outputFileName;
    a.click();
    URL.revokeObjectURL(url);
  };

  return (
    <div style={{ textAlign: 'center', height: '300px' }}>
      <h1>Create a Table of Contents Page</h1>
      <button id="btn-1" onClick={createTocPage}>
        Create TOC
      </button>
    </div>
  );
}

export default App;
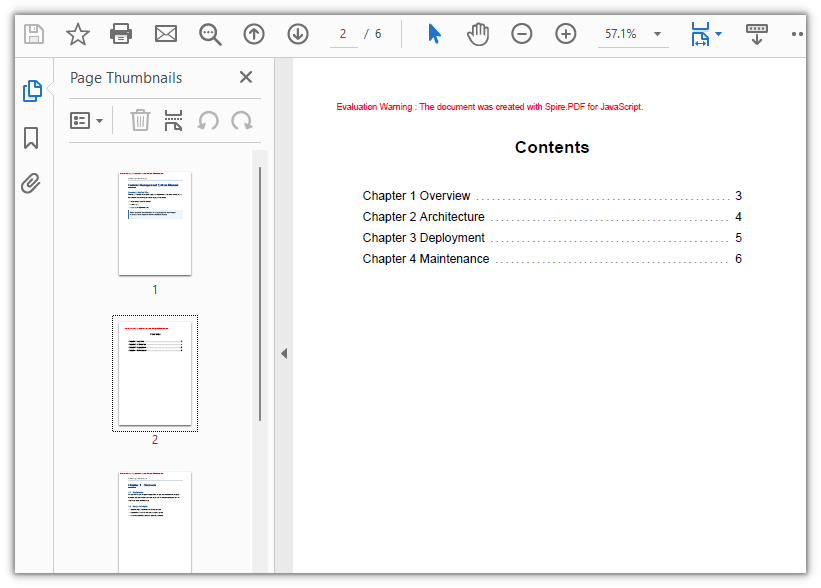
The document with a contents page: the page after the cover lists each chapter with its page number
Add Navigation to Table of Contents Entries
Once the contents page is drawn, each entry is still just a line of text. To make an entry clickable, cover it with a PdfActionAnnotation hit area and attach a PdfGoToAction carrying a PdfDestination that names the target page. There is no need to derive the hit area's position from line spacing — search the entry's text on the contents page with PdfTextFinder, and the rectangle it returns is where that line actually sits on the page, ready to use as the hit area.
function App() {
  const addTocNavigation = async () => {
    // Get the Spire.PDF WASM module
    const pdfModule = window.wasmModule?.spirepdf;

    // Check whether the module is ready
    if (!pdfModule) {
      alert('Spire.PDF is not ready yet');
      return;
    }

    // Load the document generated in the previous step
    const inputFileName = 'Document-with-TOC.pdf';
    await window.spire.FetchFileToVFS(inputFileName, '', `${process.env.PUBLIC_URL}/data/`);

    let doc = new pdfModule.PdfDocument();
    doc.LoadFromFile(inputFileName);

    // The contents page is page 2 of the document (index 1)
    const tocPage = doc.Pages.get_Item(1);

    // The entry text and the page each one should jump to
    const chapters = [
      { title: 'Chapter 1 Overview', page: 3 },
      { title: 'Chapter 2 Architecture', page: 4 },
      { title: 'Chapter 3 Deployment', page: 5 },
      { title: 'Chapter 4 Maintenance', page: 6 }
    ];

    // Search the contents page by keyword
    const finder = new pdfModule.PdfTextFinder(tocPage);

    for (const chapter of chapters) {
      const found = finder.Find(chapter.title);
      if (found.length === 0) {
        continue;
      }

      // Define the hit area based on the keyword position
      const lineBounds = found.get(0).Bounds[0];
      const bounds = new pdfModule.RectangleF({
        location: new pdfModule.PointF(0, lineBounds.Y),
        size: new pdfModule.SizeF({ width: tocPage.Canvas.ClientSize.Width, height: lineBounds.Height })
      });

      // The jump target is the chapter's page, aligned to the top-left corner of the body
      const targetPage = doc.Pages.get_Item(chapter.page - 1);
      const destination = new pdfModule.PdfDestination({
        page: targetPage,
        location: new pdfModule.PointF(0, 0)
      });

      // Attach the jump action and set the border width to 0
      const action = new pdfModule.PdfActionAnnotation(bounds, new pdfModule.PdfGoToAction({ destination }));
      action.Border = new pdfModule.PdfAnnotationBorder({ borderWidth: 0 });
      tocPage.Annotations.Add(action);
    }

    // Define the output file name and save
    const outputFileName = 'Clickable-TOC.pdf';
    doc.SaveToFile(outputFileName);
    doc.Close();

    // Read the generated file from the VFS and trigger the download
    const fileArray = window.dotnetRuntime.Module.FS.readFile(outputFileName);
    const blob = new Blob([fileArray], { type: 'application/pdf' });
    const url = URL.createObjectURL(blob);
    const a = document.createElement('a');
    a.href = url;
    a.download = outputFileName;
    a.click();
    URL.revokeObjectURL(url);
  };

  return (
    <div style={{ textAlign: 'center', height: '300px' }}>
      <h1>Add Navigation to Table of Contents Entries</h1>
      <button id="btn-2" onClick={addTocNavigation}>
        Add Navigation
      </button>
    </div>
  );
}

export default App;
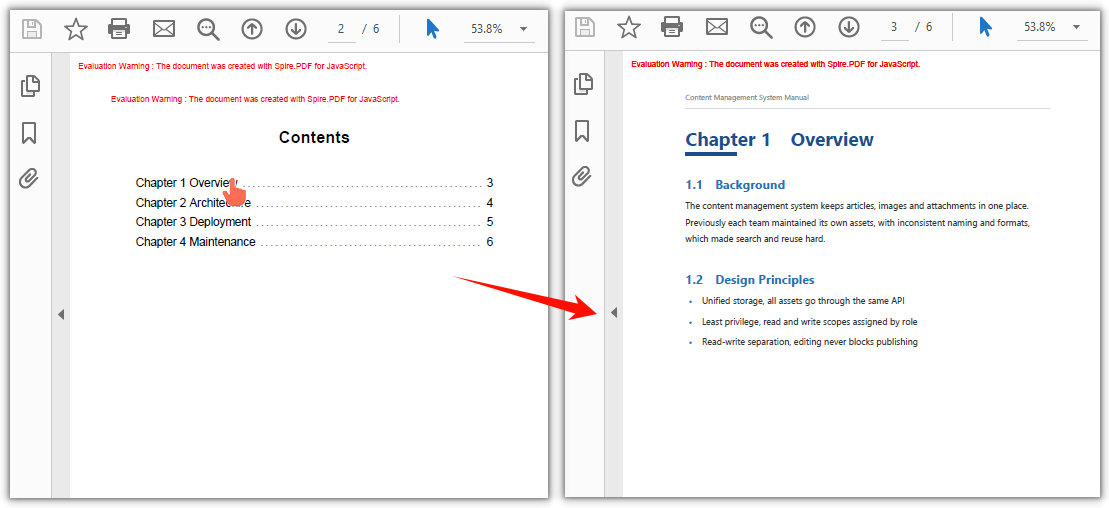
Clicking a chapter title in the contents page jumps to that page
FAQ
Table of contents page numbers don't match the actual pages
Cause: the contents page is inserted into the original document, so every page after the insertion point shifts down by one. If the page numbers keep the order from before the insertion, they will be off by one across the board.
Solution: write the page numbers as they appear after the insertion. For example, if the cover was page 1 and chapter 1 was page 2, then after inserting the contents page after the cover, chapter 1 falls on page 3, and that is what the contents should list.
Clicking a table of contents entry jumps to the wrong chapter, or does nothing
Cause: the entry is drawn with Canvas.DrawString, but the hit area has to be given in page coordinates. Deriving it from the drawing y plus the line spacing means any mismatch in font metrics, line spacing or page margins accumulates row by row, so the click lands on a different entry — or on nothing at all.
Solution: don't derive it — search the contents page for the entry's text (the keyword) and use the rectangle that comes back. PdfTextFinder already returns page coordinates, so no top margin has to be added; get page with doc.Pages.get_Item(...) so it is a real page object:
const finder = new pdfModule.PdfTextFinder(tocPage);
const found = finder.Find(chapter.title);
const lineBounds = found.get(0).Bounds[0];
const bounds = new pdfModule.RectangleF({
  location: new pdfModule.PointF(0, lineBounds.Y),
  size: new pdfModule.SizeF({ width: tocPage.Canvas.ClientSize.Width, height: lineBounds.Height })
});
const targetPage = doc.Pages.get_Item(chapter.page - 1);
const action = new pdfModule.PdfActionAnnotation(bounds, new pdfModule.PdfGoToAction({ destination }));
Get a Free License
To remove the evaluation message from the generated documents, or to get rid of the function limitations, please contact sales for a temporary license valid for 30 days.
How to Change the PDF Version with JavaScript in React
A PDF's version number decides which features the document may use, and whether older readers, print systems, and archival platforms can open it at all. Documents collected from many sources come with mixed versions: some produced by new tools and declaring 1.7, others from systems that have not been updated in years and still sit at 1.4. To deliver a uniform format for a target environment, the version number has to be rewritten — and desktop software only lets you do that by hand, one file at a time.
This article uses Spire.PDF for JavaScript to change a PDF document's version number. It runs on WebAssembly to load, modify, and save PDFs directly in the browser, working through a virtual file system (VFS) with no backend required.
For installation and project configuration, refer to Integrating Spire.PDF for JavaScript in a React Project. The examples below assume Spire.PDF is installed and the WebAssembly module has been initialized.
Change the PDF Version
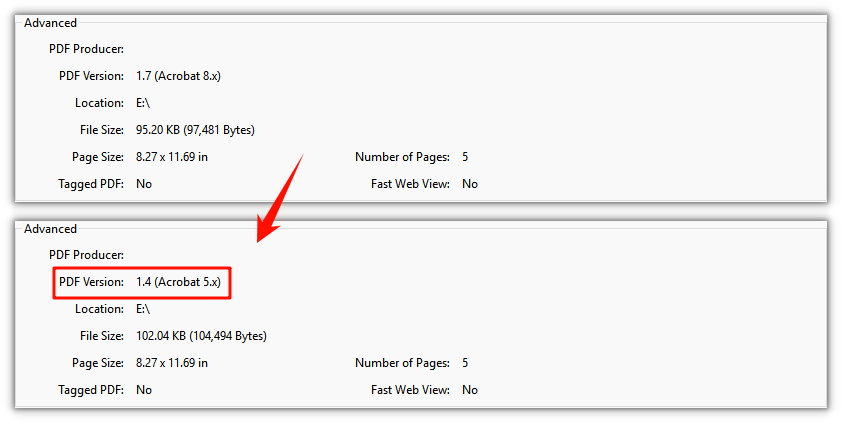
Assign a PdfVersion value to doc.FileInfo.Version to rewrite the version number; once saved, the file header is written as the matching %PDF-x.y. Set it to Version1_4 and a 1.7 document drops to 1.4, ready for readers or print systems that only accept the older specification.
function App() {
  const changePdfVersion = async () => {
    // Get the Spire.PDF WASM module
    const pdfModule = window.wasmModule?.spirepdf;

    // Check that the module is ready
    if (!pdfModule) {
      alert('Spire.PDF is not ready yet');
      return;
    }

    // Load the PDF to be processed into the VFS
    const inputFileName = 'Multipage_Document.pdf';
    await window.spire.FetchFileToVFS(inputFileName, '', `${process.env.PUBLIC_URL}/data/`);

    // Create a PdfDocument and load the PDF
    const doc = new pdfModule.PdfDocument();
    doc.LoadFromFile(inputFileName);

    // Set the version number to the target value, here downgrading to 1.4
    doc.FileInfo.Version = pdfModule.PdfVersion.Version1_4;

    const outputFileName = 'Version-1.4.pdf';
    doc.SaveToFile(outputFileName);
    doc.Close();

    // Read the generated file from the VFS and trigger the download
    const fileArray = window.dotnetRuntime.Module.FS.readFile(outputFileName);
    const blob = new Blob([fileArray], { type: 'application/pdf' });
    const url = URL.createObjectURL(blob);
    const a = document.createElement('a');
    a.href = url;
    a.download = outputFileName;
    a.click();
    URL.revokeObjectURL(url);
  };

  return (
    <div style={{ textAlign: 'center', height: '300px' }}>
      <h1>Change PDF Version</h1>
      <button onClick={changePdfVersion}>
        Change
      </button>
    </div>
  );
}

export default App;
A document saved with the version set to 1.4 — its file header now reads %PDF-1.4
FAQ
Why does the version stay the same after I set it and reopen the file
Reason: FileInfo.Version changes a property of the in-memory document object, and only saving writes it into the file. Close the document right after setting the version, or open the original input file again, and you will of course still see the old version number.
Solution: After assigning the value you must call SaveToFile to write a new output file, then open that result to check it:
// Set the version number first
doc.FileInfo.Version = pdfModule.PdfVersion.Version1_4;

// Then save — only now is the version number written to the file
doc.SaveToFile('Version-1.4.pdf');
Which version number should I set
Reason: It depends on what the recipient supports. Older print systems and archival platforms often require 1.4 or lower, while newer tools mostly handle 1.7. FileInfo.Version takes a PdfVersion enum, where Version1_0 through Version1_7 map to PDF 1.0 through PDF 1.7 in order.
Solution: Set the highest version the recipient accepts, assigning the enum directly:
// Deliver to readers or print systems that only accept the older specification
doc.FileInfo.Version = pdfModule.PdfVersion.Version1_4;

// The target environment is newer — keep or raise it to 1.7
doc.FileInfo.Version = pdfModule.PdfVersion.Version1_7;
Why does the document fail to open or render incorrectly after downgrading
Reason: FileInfo.Version only changes the declaration; it does not clean up objects in the document that go beyond that version's specification. If the source uses features introduced in a later version — such as cross-reference streams, object streams, or compressed transparency from PDF 1.5 onward — an older reader parsing it as a lower version will fail.
Solution: Before changing the declaration, confirm the source file does not rely on those features. If it is clean, changing the version number is enough; otherwise, use a source file that avoids the newer features, or first rebuild the document in a way that pushes its objects back to the older specification (re-export, or print to PDF) and then change the version number.
Get a Free License
If you want to remove the evaluation message from the result documents or get rid of feature limitations, please contact sales to obtain a free 30-day temporary license.
How to Generate a PDF in JavaScript (React)
JavaScript can generate PDF files programmatically by creating a document, adding pages, drawing text and other elements, and saving the document. In a React application, this workflow can run entirely in the browser with Spire.PDF for JavaScript and WebAssembly, without requiring a backend server.
At a high level, JavaScript PDF generation consists of five steps: create the document, add pages, add content, save the PDF, and download the generated file. This tutorial uses React as the example environment, but the PDF-generation workflow itself is JavaScript-based and applies to any frontend framework.
Here, “generating a PDF” means creating a PDF document programmatically from scratch, rather than printing an existing HTML page to PDF. JavaScript applications can generate PDFs through HTML-to-PDF conversion, canvas-based rendering, or programmatic PDF construction. This tutorial focuses on programmatic PDF generation with Spire.PDF for JavaScript.
What You Need
This tutorial assumes that Spire.PDF for JavaScript has already been installed and initialized in your React project. For setup details, see How to Integrate Spire.PDF for JavaScript in a React Project. You also need the WebAssembly resources configured so that the PDF module is available through window.spirepdf (Spire.Office for JavaScript 11.7.0 or later).
How to Generate a PDF in JavaScript
Create PdfDocument -> Add Page -> Draw Content -> Save -> Download
1. Create a PDF document
Start by creating a PdfDocument object. This is the in-memory representation of the PDF file you will build.
const pdf = window.spirepdf;
let doc = new pdf.PdfDocument();
2. Add a page
A PDF document needs at least one page. Call Pages.Add() to create a blank page with a default size.
let page = doc.Pages.Add();
3. Add text and other content
The page has a Canvas property that exposes drawing methods. Use DrawString to add text, DrawImage to add images, DrawLine to draw lines, and DrawRectangle to draw filled or outlined rectangles. Coordinates are measured in points (1 point = 1/72 inch) from the top-left corner.
let font = new pdf.PdfFont({ fontFamily: pdf.PdfFontFamily.Helvetica, size: 12 });
let brush = new pdf.PdfSolidBrush({ pdfRGBColor: new pdf.PdfRGBColor(0, 0, 0) });
page.Canvas.DrawString({ s: "Hello, World!", font: font, brush: brush, x: 50, y: 50 });
4. Save the generated PDF
Once all content is in place, call SaveToFile to write the PDF to the WebAssembly virtual file system (VFS). The VFS is an in-browser file system that Spire.PDF uses to manage input and output files without touching the real disk or a server.
doc.SaveToFile({ fileName: 'Output.pdf' });
doc.Close();
5. Download the PDF in the browser
After saving to the VFS, read the file back as a byte array, wrap it in a Blob, and trigger a download by creating a temporary anchor element. This pattern is used in every Spire.PDF for JavaScript example.
const fileArray = window.dotnetRuntime.Module.FS.readFile('Output.pdf');
const blob = new Blob([fileArray], { type: 'application/pdf' });
const url = URL.createObjectURL(blob);
const a = document.createElement('a');
a.href = url;
a.download = 'Output.pdf';
a.click();
URL.revokeObjectURL(url);
Programmatic PDF generation is useful when you need precise control over the document structure, page layout, text, graphics, or metadata. If you already have a web page or HTML template and simply need to convert that layout into a PDF, an JavaScript HTML-to-PDF workflow may be a better fit.
The next section puts these steps together in a complete example that generates a PDF from JavaScript data.
Generate an Invoice PDF from JavaScript Data
Real applications generate structured documents — invoices, reports, quotations — from application data, not hardcoded strings. In a React application, the invoice object could come from form input, component state, or an API response; the PDF generation code only needs the data needed for the document layout. This example defines an invoice as a JavaScript object and renders a print-ready PDF from it: a bleed header, a billed-to block, a line-item table, a totals cascade, and payment details. It combines DrawString, DrawRectangle, DrawLine, and PdfGrid into one complete runnable React component.
function App() {
  const generateInvoicePdf = async () => {
    // spire.office 11.7.0 hangs the engine off window.spirepdf.
    const pdf = window.spirepdf;
    if (!pdf) return alert('Spire.PDF is not ready yet');

    // ── The invoice, as data. Swap this object and the layout follows. ────
    const invoice = {
      number: 'INV-2026-0148', issued: '23 September 2026',
      due: '23 October 2026', po: 'PO-ACME-88231', terms: 'Net 30',
      seller: ['NIMBUS SOFTWARE LTD.', 'Cloud platforms for manufacturing teams',
        '12 Kingsway, London WC2B 6UN, United Kingdom'],
      buyer: ['Acme Manufacturing Co.', 'Attn: Sarah Chen, Procurement',
        '1400 Harbor Boulevard, Suite 320', 'Long Beach, CA 90802', 'United States'],
      // [description, quantity, unit price] — the amount is derived below
      items: [
        ['CloudDesk Pro — annual subscription (25 seats)', 25, 120],
        ['Implementation & onboarding (remote, 16 hours)', 16, 95],
        ['Priority support — Premium tier (12 months)', 1, 2400],
        ['Additional object storage (500 GB per year)', 1, 480],
      ],
      discountRate: 0.05, taxRate: 0.08,
      bank: ['Barclays Bank PLC · Sort code 20-00-00 · Account 5571 2043',
        'IBAN GB29 BARC 2000 0055 7120 43 · SWIFT BARCGB22'],
      remark: ['Quote the invoice number as the payment reference.',
        'Amounts unpaid after the due date accrue interest at 1.5% per month.'],
      legal:
        'Nimbus Software Ltd. · 12 Kingsway, London WC2B 6UN · VAT GB 412 8876 21 · Company No. 09882417',
      contact: '[email protected] · +44 20 7946 0812 · nimbussoftware.com',
    };

    const round = (n) => Math.round(n * 100) / 100;
    const subtotal = round(invoice.items.reduce((sum, [, qty, unit]) => sum + qty * unit, 0));
    const discount = -round(subtotal * invoice.discountRate);
    const tax = round((subtotal + discount) * invoice.taxRate);
    const total = round(subtotal + discount + tax);
    const money = (n) =>
      '$' + Math.abs(n).toLocaleString('en-US', { minimumFractionDigits: 2, maximumFractionDigits: 2 });
    const pct = (rate) => Math.round(rate * 100) + '%';

    // ── Document ──────────────────────────────────────────────────────────
    const doc = new pdf.PdfDocument();
    doc.PageSettings.Margins.All = 0; // before Pages.Add(), or the origin stays at the margin
    const page = doc.Pages.Add();

    // Text is dropped past the canvas client area, so lay out against it.
    const W = page.Canvas.ClientSize.Width;
    const H = page.Canvas.ClientSize.Height;
    const PAD = 28;
    const EDGE = W - PAD;

    // ── Drawing toolkit ───────────────────────────────────────────────────
    // Object notation selects the PdfFont / PdfSolidBrush / PdfPen overload —
    // the positional constructors all report "Ambiguous call" here.
    const rgb = (c) => new pdf.PdfRGBColor(c[0], c[1], c[2]);
    const paint = (c) => new pdf.PdfSolidBrush({ pdfRGBColor: rgb(c) });
    const font = (size, bold) =>
      new pdf.PdfFont({
        fontFamily: pdf.PdfFontFamily.Helvetica,
        size,
        ...(bold ? { style: pdf.PdfFontStyle.Bold } : {}),
      });
    // DrawString's first parameter is `s`, and it has no alignment option in
    // point mode — measure the string when it has to be right-aligned.
    const text = (s, f, colour, x, y, align) => {
      const dx = align === 'right' ? f.MeasureString({ text: s }).Width : 0;
      page.Canvas.DrawString({ s, font: f, brush: paint(colour), x: x - dx, y });
    };
    const box = (colour, x, y, w, h) =>
      page.Canvas.DrawRectangle({ brush: paint(colour), x, y, width: w, height: h });

    const INK = [26, 31, 43], NAVY = [23, 54, 93], ACCENT = [47, 111, 181];
    const MUTED = [107, 114, 128], RULE = [220, 225, 232], ZEBRA = [246, 248, 251];
    const SOFT = [238, 243, 249], WHITE = [255, 255, 255], ON_NAVY = [186, 200, 220];
    const fHero = font(26, true), fBrand = font(17, true), fTitle = font(11, true);
    const fBody = font(9.5), fBold = font(9.5, true), fSmall = font(8.5);
    const fLabel = font(7.5, true), fFoot = font(7.5), fCell = font(9), fHead = font(8, true);

    // ── Header band, bleeding to the sheet edges ──────────────────────────
    box(NAVY, 0, 0, W, 106);
    box(ACCENT, 0, 106, W, 3.5);
    text(invoice.seller[0], fBrand, WHITE, PAD, 30);
    text(invoice.seller[1], fSmall, ON_NAVY, PAD, 52);
    text(invoice.seller[2], fFoot, ON_NAVY, PAD, 68);
    text('INVOICE', fHero, WHITE, EDGE, 22, 'right');
    text(invoice.number, fBody, ON_NAVY, EDGE, 56, 'right');
    text(`Issued ${invoice.issued}`, fFoot, ON_NAVY, EDGE, 74, 'right');

    // ── Billed to / invoice details ───────────────────────────────────────
    const top = 158;
    text('BILL TO', fLabel, MUTED, PAD, top);
    text(invoice.buyer[0], fBold, INK, PAD, top + 17);
    invoice.buyer.slice(2).forEach((line, i) => text(line, fBody, MUTED, PAD, top + 35 + i * 14));
    text(invoice.buyer[1], fSmall, MUTED, PAD, top + 83);

    const details = [
      ['Invoice No.', invoice.number], ['Issue date', invoice.issued], ['Due date', invoice.due],
      ['PO number', invoice.po], ['Payment terms', invoice.terms],
    ];
    text('INVOICE DETAILS', fLabel, MUTED, EDGE, top, 'right');
    details.forEach(([key, value], i) => {
      text(key, fSmall, MUTED, EDGE - 128, top + 20 + i * 16);
      text(value, fBold, INK, EDGE, top + 20 + i * 16, 'right');
    });

    const tableY = top + 106;
    page.Canvas.DrawLine({
      pen: new pdf.PdfPen({ pdfRGBColor: rgb(RULE), width: 0.75 }),
      x1: PAD, y1: tableY, x2: EDGE, y2: tableY,
    });

    // ── Line items ────────────────────────────────────────────────────────
    const grid = new pdf.PdfGrid();
    grid.Columns.Add(4);
    [255, 44, 112, 128].forEach((w, i) => (grid.Columns.get_Item(i).Width = w));

    const alignRight = new pdf.PdfStringFormat({ alignment: pdf.PdfTextAlignment.Right });
    [1, 2, 3].forEach((i) => (grid.Columns.get_Item(i).Format = alignRight));

    // Cell padding is subtracted from row.Height — leave room for one line box
    // or every cell renders blank, with no error at all.
    const padding = new pdf.PdfPaddings();
    padding.Left = padding.Right = 8;
    padding.Top = padding.Bottom = 2;
    grid.Style.CellPadding = padding;
    grid.Style.Font = fCell;

    const hairline = new pdf.PdfBorders();
    hairline.All = new pdf.PdfPen({ pdfRGBColor: rgb(RULE), width: 0.5 });

    try { grid.Headers.Add(1); } catch {}
    const head = grid.Headers.get_Item(0);
    head.Height = 26;
    head.Style.BackgroundBrush = paint(NAVY);
    head.Style.TextBrush = paint(WHITE);
    head.Style.Font = fHead;
    ['DESCRIPTION', 'QTY', 'UNIT PRICE', 'AMOUNT'].forEach((label, i) => {
      const cell = head.Cells.get_Item(i);
      cell.Value = new pdf.String(label); // .Value is a .NET object — box the string
      if (i) cell.StringFormat = alignRight;
      cell.Style.Borders = hairline;
    });

    invoice.items.forEach(([description, qty, unit], r) => {
      const row = grid.Rows.Add();
      row.Height = 26;
      if (r % 2) row.Style.BackgroundBrush = paint(ZEBRA);
      [description, String(qty), money(unit), money(qty * unit)].forEach((value, i) => {
        const cell = row.Cells.get_Item(i);
        cell.Value = new pdf.String(value);
        cell.Style.Borders = hairline;
      });
    });

    const layout = new pdf.PdfGridLayoutFormat();
    layout.Layout = pdf.PdfLayoutType.Paginate;
    // The parameter is `format`, not `layout`.
    const tableBottom = grid.Draw({ page, x: PAD, y: tableY + 26, format: layout }).Bounds.Bottom;

    // ── Totals cascade ────────────────────────────────────────────────────
    let y = tableBottom + 22;
    const summary = [
      ['Subtotal', money(subtotal)],
      [`Discount · partner rate ${pct(invoice.discountRate)}`, '-' + money(discount)],
      [`Sales tax · ${pct(invoice.taxRate)}`, money(tax)],
    ];
    summary.forEach(([label, value], i) => {
      text(label, fBody, MUTED, EDGE - 220, y + i * 18);
      text(value, fBody, INK, EDGE, y + i * 18, 'right');
    });
    y += 58;

    box(NAVY, EDGE - 220, y, 220, 34);
    text('TOTAL DUE', fTitle, WHITE, EDGE - 204, y + 11);
    text(money(total), font(14, true), WHITE, EDGE - 14, y + 8, 'right');
    y += 34;

    // ── Payment details ───────────────────────────────────────────────────
    const cardTop = y + 34;
    box(SOFT, PAD, cardTop, W - 2 * PAD, 104);
    box(ACCENT, PAD, cardTop, 3, 104);
    text('PAYMENT DETAILS', fLabel, ACCENT, PAD + 18, cardTop + 16);
    text(invoice.bank[0], fBody, INK, PAD + 18, cardTop + 34);
    text(invoice.bank[1], fBody, INK, PAD + 18, cardTop + 50);
    invoice.remark.forEach((line, i) => text(line, fSmall, MUTED, PAD + 18, cardTop + 72 + i * 14));

    // ── Footer band, mirroring the header ─────────────────────────────────
    box(NAVY, 0, H - 58, W, 58);
    text(invoice.legal, fFoot, ON_NAVY, PAD, H - 41);
    text(invoice.contact, fFoot, ON_NAVY, PAD, H - 27);
    text('Page 1 of 1', fFoot, ON_NAVY, EDGE, H - 41, 'right');
    text(invoice.number, fFoot, ON_NAVY, EDGE, H - 27, 'right');

    // ── Save and download ─────────────────────────────────────────────────
    const fileName = 'Invoice.pdf';
    doc.SaveToFile({ fileName });
    doc.Close();

    const bytes = window.dotnetRuntime.Module.FS.readFile(fileName);
    const url = URL.createObjectURL(new Blob([bytes], { type: 'application/pdf' }));
    Object.assign(document.createElement('a'), { href: url, download: fileName }).click();
    URL.revokeObjectURL(url);
  };

  return (
    <div style={{ textAlign: 'center', height: '300px' }}>
      <h1>Generate Invoice PDF</h1>
      <button onClick={generateInvoicePdf}>Generate Invoice PDF</button>
    </div>
  );
}

export default App;
Invoice PDF generated from JavaScript data
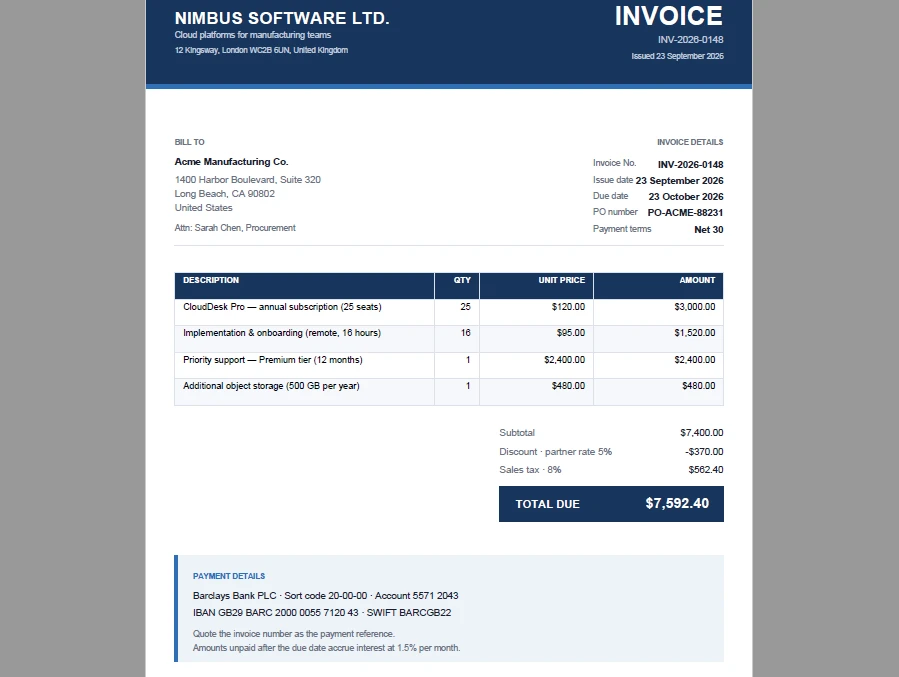
What the code does:
- Defines an
invoiceobject with the seller, the customer, the invoice metadata, and anitemsarray — the shape a React app would receive from a form, an API response, or component state. - Derives
subtotal,discount,tax, andtotalfrom that data withreduce, so the figures printed on the PDF always match the figures in the app. - Sets
Margins.Allto0before callingPages.Add(). The canvas origin sits at the page's margin origin, so this is what makes(0, 0)the top-left corner of the sheet and lets the header and footer bands bleed to the edges. - Lays the page out against
Canvas.ClientSizeinstead ofSize, because text drawn past the client area is dropped rather than clipped. - Draws the header band, the billed-to and invoice-details blocks, the totals cascade, and the payment box with
DrawRectangle,DrawLine, andDrawString. Right-aligned strings are measured withMeasureStringfirst, sinceDrawStringhas no alignment option when you draw at a point. - Builds the line-item table with
PdfGrid: fixed column widths, a styled header row, zebra-striped body rows, and right-aligned numeric columns driven by aPdfStringFormat. - Saves the document to the VFS and downloads it with the blob-and-anchor pattern from step 5.
The same pattern works for any structured document — replace the invoice object with report data, quotation data, or receipt data, and the five-step workflow stays the same.
Add More Content to the PDF
After creating the basic document, you can extend the same workflow with other PDF elements depending on the document you need to generate.
| Element | Typical use | Tutorial |
|---|---|---|
| Text | Titles, labels, paragraphs | Covered in this tutorial |
| Images | Logos, signatures, charts | Add Images to a PDF |
| Tables | Invoices, reports, statements | Document Operation guide |
| Shapes | Borders, separators, diagrams | Draw Shapes in PDF |
| Headers & Footers | Page numbers, repeating headers | Page Setting guide |
| Form fields | Interactive forms, editable documents | Form Field guide |
The five-step workflow does not change — only the content you draw in step 3 differs.
Generate PDFs in the Browser with WebAssembly
Spire.PDF for JavaScript runs its PDF processing engine through WebAssembly. Once the WASM module loads, your application can create, edit, and save PDFs on the client side. Files move through an in-browser Virtual File System (VFS):
JavaScript -> Spire.PDF WebAssembly -> VFS -> Blob -> Download
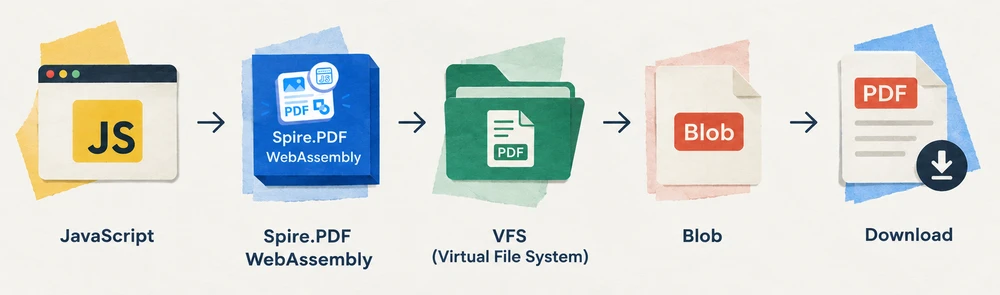
This means no PDF-generation backend is required. The browser handles document creation, rendering, and file output locally. The generated PDF is read from the VFS as a byte array and downloaded as a standard Blob.
The trade-off is the initial WASM download size, which is a one-time cost per session. For applications that generate documents frequently, subsequent generations are fast since the module is already loaded. For very large or complex PDFs, client-side performance depends on the user's device and available memory.
Common Use Cases
Common use cases include invoices, reports, quotations, certificates, receipts, and other structured business documents generated from application data. The specific layout changes, but the underlying workflow — create, add page, draw, save, download — remains the same.
Troubleshooting
WASM Module Not Initialized
If window.spirepdf is undefined, ensure the WebAssembly runtime is fully initialized before using the API:
const commonModule = await import('/node_modules/spire.office/spire.common.js');
await commonModule.initializeWasm();
await import('/node_modules/spire.office/spire.pdf.js');
Generated PDF Cannot Be Downloaded
If the download does not trigger or the file is empty, verify that SaveToFile was called before reading from the VFS. The file must exist in the VFS before FS.readFile can read it:
doc.SaveToFile({ fileName: 'Output.pdf' });
doc.Close();

// Only read after saving
const fileArray = window.dotnetRuntime.Module.FS.readFile('Output.pdf');
Conclusion
Spire.PDF for JavaScript provides a practical way to generate PDF files directly in the browser using JavaScript and WebAssembly. The five-step workflow — create, add page, draw, save, download — handles everything from simple text documents to structured invoices with tables and totals. You can apply for a 30-day free license to evaluate all features before purchasing.
Get PDF Text or Image Coordinates with JavaScript in React
Adding annotations to a PDF, pulling data out of a region, or drawing a border around an image all start with knowing where the target element sits on the page. A PDF has no ready-made coordinate table: text is a series of drawing instructions, images are objects in the page resources, and the position information is scattered across their own matrices and rectangles. In the past you either wrote your own parser to pull those numbers out, or sent the file back to a server to handle.
Spire.PDF for JavaScript loads and parses PDF documents in the browser with WebAssembly and reads and writes files through a virtual file system (VFS), with no backend involved.
This article covers two core features:
For installation and project setup, see How to Integrate Spire.PDF for JavaScript in a React Project. The examples below assume Spire.PDF is installed and the WebAssembly module is initialized.
Coordinate system
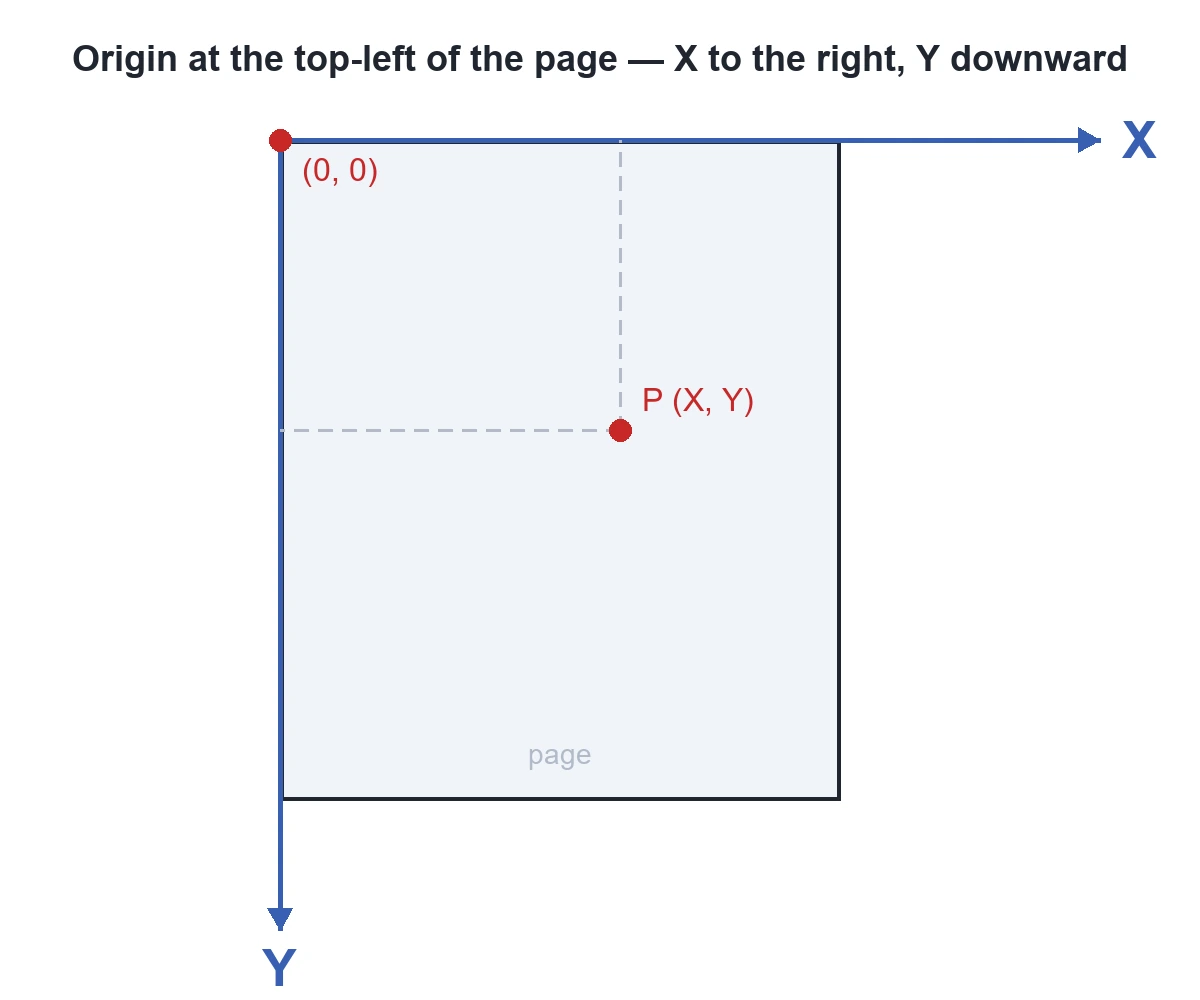
When Spire.PDF works with an existing PDF document, the origin of the coordinate system is at the top-left corner of the page. The X axis extends horizontally to the right from the origin, and the Y axis extends vertically downward from the origin (as shown below). Values are in points (1 point = 1/72 inch), and both Positions and Bounds in the two features below report coordinates in this system.
Get the coordinates of specified text
Spire.PDF for JavaScript provides PdfTextFinder to look up text on a page by content, and every match reports the coordinates of where it lands. The search works one page at a time, so a multi-page document has to be processed page by page.
function App() {
  const getTextCoordinates = async () => {
    // Get the Spire.PDF WASM module
    const pdfModule = window.wasmModule?.spirepdf;

    // Check whether the module is ready
    if (!pdfModule) {
      alert('Spire.PDF is not ready yet');
      return;
    }

    // Load the PDF file to process into the VFS
    const inputFileName = 'Flowers.pdf';
    await window.spire.FetchFileToVFS(inputFileName, "", `${process.env.PUBLIC_URL}/data/`);

    // Create a PdfDocument object and load the PDF document
    let doc = new pdfModule.PdfDocument();
    doc.LoadFromFile(inputFileName);

    // Get page 1
    let page = doc.Pages.get_Item(0);

    // Create a text finder and search for the given text, ignoring case
    let finder = new pdfModule.PdfTextFinder(page);
    finder.Options.Parameter = pdfModule.TextFindParameter.IgnoreCase;
    let results = finder.Find('Rose');

    // Collect the coordinates of each match
    let report = '';
    for (let i = 0; i < results.length; i++) {
      let find = results.get(i);
      let position = find.Positions[0];

      report += 'Match ' + (i + 1) + ': ' + find.Text + '\n';
      report += '  Coordinates: X = ' + position.X + ', Y = ' + position.Y + '\n';
    }

    // Write the report into the VFS
    const outputFileName = 'TextCoordinates.txt';
    window.dotnetRuntime.Module.FS.writeFile(outputFileName, new TextEncoder().encode(report));
    doc.Close();

    // Read the generated file back from the VFS and trigger a download
    const fileArray = window.dotnetRuntime.Module.FS.readFile(outputFileName);
    const blob = new Blob([fileArray], { type: 'text/plain' });
    const url = URL.createObjectURL(blob);
    const a = document.createElement('a');
    a.href = url;
    a.download = outputFileName;
    a.click();
    URL.revokeObjectURL(url);
  };

  return (
    <div style={{ textAlign: 'center', height: '300px' }}>
      <h1>Get Text Coordinates</h1>
      <button onClick={getTextCoordinates}>
        Get
      </button>
    </div>
  );
}

export default App;
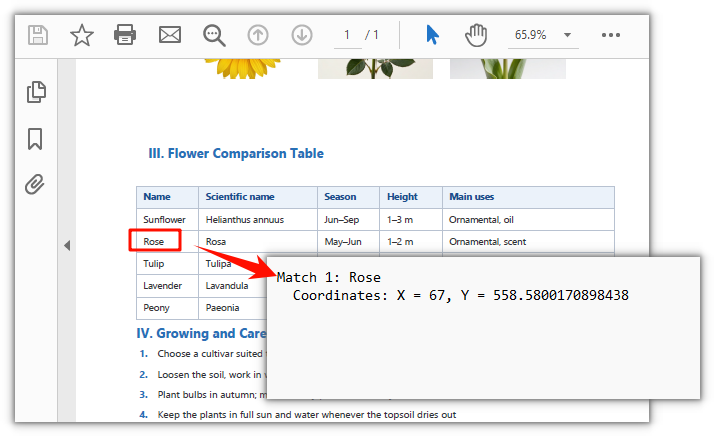
Coordinates of the matched text
Get the coordinates of images on a page
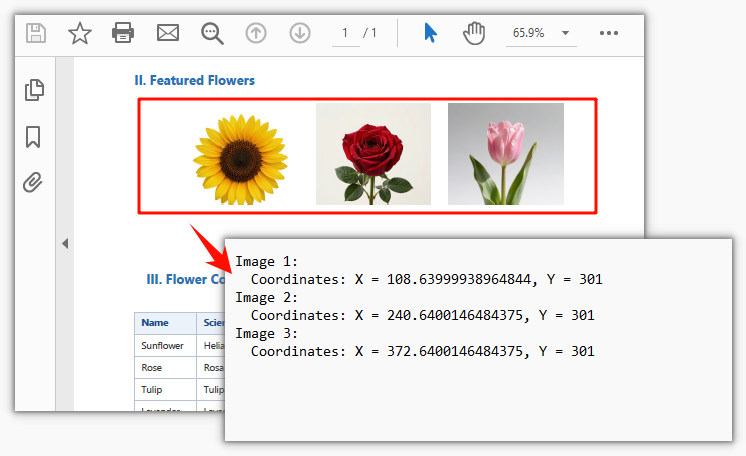
Spire.PDF for JavaScript also provides PdfImageHelper to read the position of every image on a page. Images are already registered in the page resources, so the Bounds you get back gives the top-left coordinates directly. This also works one page at a time.
function App() {
  const getImageCoordinates = async () => {
    // Get the Spire.PDF WASM module
    const pdfModule = window.wasmModule?.spirepdf;

    // Check whether the module is ready
    if (!pdfModule) {
      alert('Spire.PDF is not ready yet');
      return;
    }

    // Load the PDF file to process into the VFS
    const inputFileName = 'Flowers.pdf';
    await window.spire.FetchFileToVFS(inputFileName, "", `${process.env.PUBLIC_URL}/data/`);

    // Create a PdfDocument object and load the PDF document
    let doc = new pdfModule.PdfDocument();
    doc.LoadFromFile(inputFileName);

    // Get page 1
    let page = doc.Pages.get_Item(0);

    // Create an image helper and get the image info of this page
    let helper = new pdfModule.PdfImageHelper();
    let images = helper.GetImagesInfo(page);

    // Collect the coordinates of each image
    let report = '';
    for (let i = 0; i < images.length; i++) {
      let bounds = images[i].Bounds;

      report += 'Image ' + (i + 1) + ':' + '\n';
      report += '  Coordinates: X = ' + bounds.X + ', Y = ' + bounds.Y + '\n';
    }

    // Write the report into the VFS
    const outputFileName = 'ImageCoordinates.txt';
    window.dotnetRuntime.Module.FS.writeFile(outputFileName, new TextEncoder().encode(report));
    doc.Close();

    // Read the generated file back from the VFS and trigger a download
    const fileArray = window.dotnetRuntime.Module.FS.readFile(outputFileName);
    const blob = new Blob([fileArray], { type: 'text/plain' });
    const url = URL.createObjectURL(blob);
    const a = document.createElement('a');
    a.href = url;
    a.download = outputFileName;
    a.click();
    URL.revokeObjectURL(url);
  };

  return (
    <div style={{ textAlign: 'center', height: '300px' }}>
      <h1>Get Image Coordinates</h1>
      <button onClick={getImageCoordinates}>
        Get
      </button>
    </div>
  );
}

export default App;
Coordinates of the three flower images on the page
FAQ
A different letter case stops it from matching
Cause: The matching behavior of Find() is determined by Options.Parameter. The default value TextFindParameter.None searches by substring and is case-sensitive, so Rose and rose are treated as two different things.
Fix: Switch to the value you need. TextFindParameter is a flags enum, so values can be combined with bitwise OR:
// Ignore case
finder.Options.Parameter = pdfModule.TextFindParameter.IgnoreCase;

// Match whole words only, ignoring case
finder.Options.Parameter = pdfModule.TextFindParameter.WholeWord | pdfModule.TextFindParameter.IgnoreCase;

// Search with a regular expression: match Rosa or Tulipa in one pass
finder.Options.Parameter = pdfModule.TextFindParameter.Regex;
let results = finder.Find('Rosa|Tulipa');
The coordinates don't match what the PDF reader shows
Cause: Positions and Bounds use the page coordinate system described above; inside a PDF file (/MediaBox, content streams) the origin is at the bottom-left with Y increasing upward, so the two conventions differ by a full page height and a direct comparison will be off by the whole page.
Fix: Work with the top-left origin consistently. To convert to pixels, multiply by dpi / 72 — the factor is 1.333 at 96 dpi. The values you get are floating-point numbers, so round to two decimals before comparing if you need an exact match.
The image info doesn't include the shapes I can see on the page
Cause: GetImagesInfo returns the bitmap objects in the page resources. Lines, table borders, and color blocks drawn with vector instructions are not images; conversely, a full-page scan is a single image covering the page, and the text inside it cannot be searched.
Fix: Start by using the X and Y from Bounds to confirm where each image actually sits on the page. Lines and shapes drawn with vector instructions are not returned by GetImagesInfo, and text inside a scanned page cannot be found either — to locate those, use text extraction (PdfTextExtractor) or bring in OCR separately.
Get a Free License
If you want to remove the evaluation message from the result documents or get past the feature limits, contact sales for a 30-day temporary license.
Set PDF Viewer Preferences with JavaScript in React
The same PDF can look different to everyone who opens it: one viewer starts centered, another pins the toolbar and menu bar to the top, one shows a single page at a time, another puts two pages side by side. When the document is a manual, a brochure, or a report meant for other people, the author usually wants control over those defaults — centered on open, minimal interface, straight into a two-column view. This behavior comes from the document's own viewer preferences, written into the PDF catalog and shipped with the file, so no viewer-side configuration is needed.
Spire.PDF for JavaScript loads, modifies, and saves PDF documents in the browser through WebAssembly. Viewer preferences are read and written through PdfDocument.ViewerPreferences, and files move in and out through a virtual file system (VFS), with no backend involved.
This article covers two features:
For installation and project setup, see Integrate Spire.PDF for JavaScript in a React project. The examples below assume Spire.PDF is installed and the WebAssembly module is initialized.
Set window and interface preferences
A few boolean switches on ViewerPreferences decide how the reader looks when it opens the document. All of them default to false, which leaves the reader's own interface untouched:
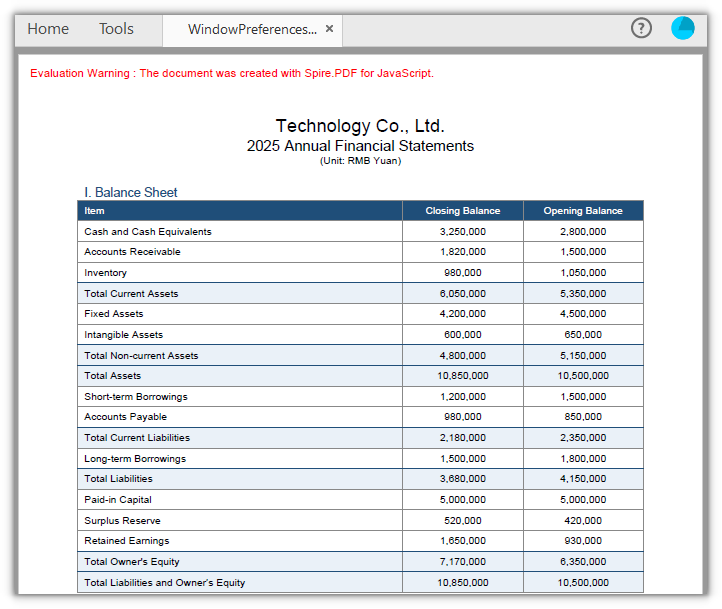
CenterWindowcenters the reader windowDisplayTitledecides whether the title bar uses the document title (with no title metadata in the document, the reader falls back to the file name)FitWindowdecides whether the window is scaled to fit the first pageHideMenubarhides the menu barHideToolbarhides the toolbarHideWindowUIhides interface elements such as scroll bars, leaving only the page content
function App() {
  const setWindowPreferences = async () => {
    // Get the Spire.PDF WASM module
    const pdfModule = window.wasmModule?.spirepdf;

    // Check that the module is ready
    if (!pdfModule) {
      alert('Spire.PDF is not ready yet');
      return;
    }

    // Load the PDF file to process into the VFS
    const inputFileName = 'FinancialStatement2025.pdf';
    await window.spire.FetchFileToVFS(inputFileName, "", `${process.env.PUBLIC_URL}/data/`);

    // Create a PdfDocument object and load the PDF document
    let doc = new pdfModule.PdfDocument();
    doc.LoadFromFile(inputFileName);

    // Center the reader window
    doc.ViewerPreferences.CenterWindow = true;
    // Do not use the document title in the title bar (keep showing the file name)
    doc.ViewerPreferences.DisplayTitle = false;
    // Do not scale the window to fit the first page
    doc.ViewerPreferences.FitWindow = false;
    // Hide the menu bar
    doc.ViewerPreferences.HideMenubar = true;
    // Hide the toolbar
    doc.ViewerPreferences.HideToolbar = true;
    // Hide interface elements such as scroll bars, leaving only the page content
    doc.ViewerPreferences.HideWindowUI = true;

    const outputFileName = 'WindowPreferences.pdf';
    doc.SaveToFile(outputFileName);
    doc.Close();

    // Read the generated file from the VFS and trigger the download
    const fileArray = window.dotnetRuntime.Module.FS.readFile(outputFileName);
    const blob = new Blob([fileArray], { type: 'application/pdf' });
    const url = URL.createObjectURL(blob);
    const a = document.createElement('a');
    a.href = url;
    a.download = outputFileName;
    a.click();
    URL.revokeObjectURL(url);
  };

  return (
    <div style={{ textAlign: 'center', height: '300px' }}>
      <h1>Window and Interface Preferences</h1>
      <button onClick={setWindowPreferences}>
        Apply
      </button>
    </div>
  );
}

export default App;
A PDF document with the window centered and the toolbar and menu bar hidden
Set page layout and opening display mode
How pages are arranged, and what appears first on open, are also decided by enum properties on ViewerPreferences. Their defaults are SinglePage and UseNone:
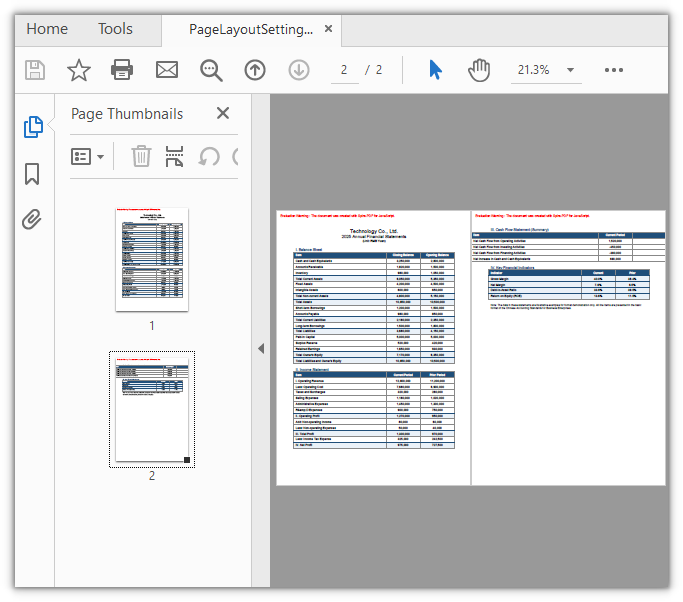
PageLayoutcontrols how pages are arranged:SinglePageshows one page at a time,TwoColumnLeftputs two pages side by side with odd-numbered pages on the leftPageModecontrols what the document shows first:UseNonegoes straight to the page content,UseThumbsexpands a thumbnail panel in the sidebar
function App() {
  const setPageLayout = async () => {
    // Get the Spire.PDF WASM module
    const pdfModule = window.wasmModule?.spirepdf;

    // Check that the module is ready
    if (!pdfModule) {
      alert('Spire.PDF is not ready yet');
      return;
    }

    // Load the PDF file to process into the VFS
    const inputFileName = 'FinancialStatement2025.pdf';
    await window.spire.FetchFileToVFS(inputFileName, "", `${process.env.PUBLIC_URL}/data/`);

    // Create a PdfDocument object and load the PDF document
    let doc = new pdfModule.PdfDocument();
    doc.LoadFromFile(inputFileName);

    // Show two pages side by side, with odd-numbered pages on the left
    doc.ViewerPreferences.PageLayout = pdfModule.PdfPageLayout.TwoColumnLeft;
    // Expand the thumbnail panel when the document opens
    doc.ViewerPreferences.PageMode = pdfModule.PdfPageMode.UseThumbs;

    const outputFileName = 'PageLayoutSettings.pdf';
    doc.SaveToFile(outputFileName);
    doc.Close();

    // Read the generated file from the VFS and trigger the download
    const fileArray = window.dotnetRuntime.Module.FS.readFile(outputFileName);
    const blob = new Blob([fileArray], { type: 'application/pdf' });
    const url = URL.createObjectURL(blob);
    const a = document.createElement('a');
    a.href = url;
    a.download = outputFileName;
    a.click();
    URL.revokeObjectURL(url);
  };

  return (
    <div style={{ textAlign: 'center', height: '300px' }}>
      <h1>Page Layout and Display Mode</h1>
      <button onClick={setPageLayout}>
        Apply
      </button>
    </div>
  );
}

export default App;
A PDF document that opens in two columns with the thumbnail panel expanded on the left
FAQ
I set the preferences but the document looks the same on open
Cause: Per the PDF specification, /ViewerPreferences is a hint to the reader, not a requirement. The built-in browser PDF viewers and many lightweight readers implement only a small part of it, and interface entries such as HideToolbar, HideMenubar, and PageLayout are often ignored outright. Adobe Acrobat also overrides the document values with the view state it remembers when "Restore last view settings" is turned on.
Solution: Open the file in Adobe Acrobat Reader to verify, and in Preferences → Documents make sure "Restore last view settings when reopening documents" is cleared. When troubleshooting, rule out the reader itself first, then check whether the settings made it into the file — the preferences only reach disk after SaveToFile, and calling Close() before saving discards the changes.
What is the difference between PageLayout and PageMode
Cause: The two property names are close and both affect how the document looks on open, so they are easy to mix up. They govern different things: PageLayout decides how pages are arranged, PageMode decides which panel shows first.
Solution: Pick one value for each as needed; the two do not affect each other:
// Page arrangement: single page, continuous single column, two columns, two pages
doc.ViewerPreferences.PageLayout = pdfModule.PdfPageLayout.TwoColumnLeft;

// Panel shown first on open: pages only, thumbnails, bookmark outlines
doc.ViewerPreferences.PageMode = pdfModule.PdfPageMode.UseThumbs;
PdfPageLayout accepts SinglePage, OneColumn, TwoColumnLeft, TwoColumnRight, TwoPageLeft, and TwoPageRight; PdfPageMode accepts UseNone, UseOutlines, UseThumbs, FullScreen, UseOC, and UseAttachments.
Can hiding the toolbar stop users from printing or saving a copy
Cause: No. HideToolbar, HideMenubar, and HideWindowUI only affect how the reader interface is displayed; they have nothing to do with the permissions for printing, copying, or saving a copy. Opening the file in a reader that ignores the setting, or using the menu directly, still allows both.
Solution: Restricting operations takes a permissions password — use PdfPasswordSecurityPolicy together with PdfDocumentPrivilege to turn off printing, copying, and the like. Those restrictions are enforced by the document's encryption dictionary, and readers honor them. Viewer preferences govern how it looks; permission settings govern what is allowed.
Get a Free License
If you want to remove the evaluation message from the result document or lift the feature limits, contact sales for a temporary 30-day license.
Adding Barcodes to a PDF in React with JavaScript
Order numbers, tracking numbers, and asset IDs are easy to mistype when someone enters them by hand. Printing them as barcodes on the document lets a scanner read them in one pass and brings the error rate down. Getting a barcode onto a PDF from a web app used to mean generating a barcode image on the server and compositing it back into the document, which sends the file on a round trip.
Spire.PDF for JavaScript creates, modifies, and saves PDF documents in the browser through WebAssembly. Barcodes are drawn straight onto the page by 1D barcode objects such as PdfCode128BBarcode and PdfCode39Barcode, and files are read and written through a virtual file system (VFS), so the document never has to be uploaded to a server.
This article covers two features:
For installation and project configuration, refer to Integrating Spire.PDF for JavaScript in a React Project. The following examples assume Spire.PDF is installed and the WebAssembly module has been initialized.
Supported barcode types
The ten 1D barcode classes all derive from PdfBarcode; they differ in the characters they accept and in how densely they encode, so use the table below to pick one:
| Class | Symbology | Characters supported |
|---|---|---|
PdfCodabarBarcode |
Codabar | Digits and - $ : / . + |
PdfCode11Barcode |
Code 11 | Digits and - |
PdfCode32Barcode |
Code 32 | Digits, common in pharmaceutical codes |
PdfCode39Barcode |
Code 39 | Digits, uppercase letters, space and - . $ / + % |
PdfCode39ExtendedBarcode |
Code 39 Extended | Full ASCII, represented by multi-character combinations |
PdfCode93Barcode |
Code 93 | Same character set as Code 39, higher density |
PdfCode93ExtendedBarcode |
Code 93 Extended | Full ASCII |
PdfCode128ABarcode |
Code 128A | Digits, uppercase letters, symbols and control characters |
PdfCode128BBarcode |
Code 128B | Digits, upper- and lowercase letters and symbols |
PdfCode128CBarcode |
Code 128C | Digits in pairs, the highest density |
function App() {
  const drawBarcodeTypes = async () => {
    // Get the Spire.PDF WASM module
    const pdfModule = window.wasmModule?.spirepdf;

    // Check that the module is ready
    if (!pdfModule) {
      alert('Spire.PDF is not ready yet');
      return;
    }

    // Load the font file into the VFS for the type name above each barcode
    await window.spire.FetchFileToVFS('ARIAL.TTF', '/Library/Fonts/', `${process.env.PUBLIC_URL}/font/`);

    // Create the PDF document and add a page
    const doc = new pdfModule.PdfDocument();
    const page = doc.Pages.Add();

    // Font, color, and alignment for the type names; green sets them apart from the black bars
    const labelFont = new pdfModule.PdfTrueTypeFont({ fontFile: '/Library/Fonts/ARIAL.TTF', size: 12 });
    const labelBrush = new pdfModule.PdfSolidBrush({ pdfRGBColor: new pdfModule.PdfRGBColor({ color: pdfModule.Color.get_Green() }) });
    const labelFormat = new pdfModule.PdfStringFormat({ alignment: pdfModule.PdfTextAlignment.Left });

    // The data to encode, the barcode class to use for each, and the type name shown above it
    const items = [
      { Barcode: pdfModule.PdfCodabarBarcode, label: 'Codabar', text: '00:12-3456/7890' },
      { Barcode: pdfModule.PdfCode11Barcode, label: 'Code 11', text: '123-4567890' },
      { Barcode: pdfModule.PdfCode32Barcode, label: 'Code 32', text: '16273849' },
      { Barcode: pdfModule.PdfCode39Barcode, label: 'Code 39', text: 'ORDER-2026-0007' },
      { Barcode: pdfModule.PdfCode39ExtendedBarcode, label: 'Code 39 Extended', text: 'Order 2026-0007' },
      { Barcode: pdfModule.PdfCode93Barcode, label: 'Code 93', text: 'ORDER-2026-0007' },
      { Barcode: pdfModule.PdfCode93ExtendedBarcode, label: 'Code 93 Extended', text: 'Order 2026-0007' },
      { Barcode: pdfModule.PdfCode128ABarcode, label: 'Code 128A', text: 'INVOICE 2026' },
      { Barcode: pdfModule.PdfCode128BBarcode, label: 'Code 128B', text: 'Order-2026-0001' },
      { Barcode: pdfModule.PdfCode128CBarcode, label: 'Code 128C', text: '20260001' },
    ];

    // Draw from the top of the page, one below the other
    let y = 20;
    for (const item of items) {
      // Label the barcode above it with the symbology it uses
      page.Canvas.DrawString({ s: `${item.label}:`, font: labelFont, brush: labelBrush, x: 20, y: y, format: labelFormat });

      // Create the barcode object from the text to encode
      const barcode = new item.Barcode({ text: item.text });

      // Show the readable text below the barcode
      barcode.TextDisplayLocation = pdfModule.TextLocation.Bottom;

      // Narrow the bars so all ten barcodes fit on one page
      barcode.BarHeight = 25;

      // Draw below the type name; this coordinate is the top-left corner of the barcode
      barcode.Draw({ page: page, location: new pdfModule.PointF(20, y + labelFont.Size + 4) });

      // Use the bottom edge of the area actually occupied to place the next one
      y = barcode.Bounds.Bottom + 10;
    }

    // Save the document
    const outputFileName = 'BarcodeTypes_result.pdf';
    doc.SaveToFile(outputFileName);
    doc.Close();

    // Read the generated file from the VFS and trigger the download
    const fileArray = window.dotnetRuntime.Module.FS.readFile(outputFileName);
    const blob = new Blob([fileArray], { type: 'application/pdf' });
    const url = URL.createObjectURL(blob);
    const a = document.createElement('a');
    a.href = url;
    a.download = outputFileName;
    a.click();
    URL.revokeObjectURL(url);
  };

  return (
    <div style={{ textAlign: 'center', height: '300px' }}>
      <h1>Drawing Multiple Barcode Types</h1>
      <button onClick={drawBarcodeTypes}>
        Draw Barcodes
      </button>
    </div>
  );
}

export default App;
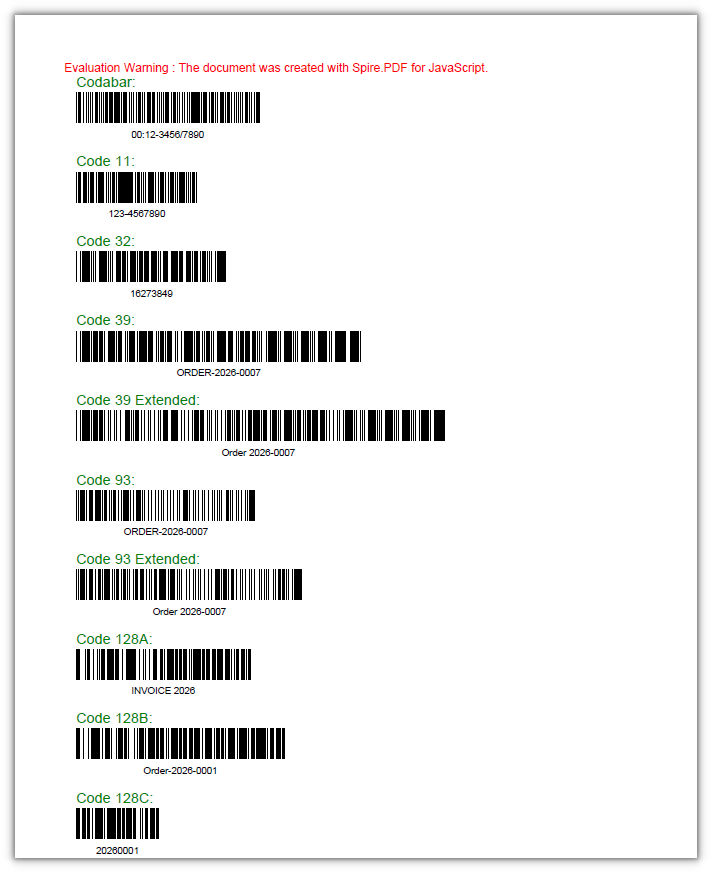
Ten barcode types on one page, each labeled above with its symbology and below with the readable text
Customizing the barcode appearance
The default look is black bars on white with the text underneath, and each part of it can be overridden, from the colors and the bar height to the quiet zone and the label font. BarColor and TextColor color the bars and the text separately, BackColor fills the area behind the barcode, BarHeight, NarrowBarWidth, and BarcodeToTextGapHeight control the dimensions, and QuietZone is the blank space the barcode needs around it.
function App() {
  const customizeBarcode = async () => {
    // Get the Spire.PDF WASM module
    const pdfModule = window.wasmModule?.spirepdf;

    // Check that the module is ready
    if (!pdfModule) {
      alert('Spire.PDF is not ready yet');
      return;
    }

    // Load the font file into the VFS for the barcode label
    await window.spire.FetchFileToVFS('ARIAL.TTF', '/Library/Fonts/', `${process.env.PUBLIC_URL}/font/`);

    // Create the PDF document and add a page
    const doc = new pdfModule.PdfDocument();
    const page = doc.Pages.Add();

    // The first barcode keeps the default look, for comparison
    const plain = new pdfModule.PdfCode39Barcode({ text: 'ORDER-2026-0007' });
    plain.TextDisplayLocation = pdfModule.TextLocation.Bottom;
    plain.Draw({ page: page, location: new pdfModule.PointF(20, 20) });

    // The second one has each property set explicitly
    const barcode = new pdfModule.PdfCode39Barcode({ text: 'ORDER-2026-0007' });
    barcode.TextDisplayLocation = pdfModule.TextLocation.Bottom;

    // Set the bars, the text, and the background separately
    barcode.BarColor = new pdfModule.PdfRGBColor({ color: pdfModule.Color.FromArgb(0, 60, 160) });
    barcode.TextColor = new pdfModule.PdfRGBColor({ color: pdfModule.Color.FromArgb(200, 0, 0) });
    barcode.BackColor = new pdfModule.PdfRGBColor({ color: pdfModule.Color.FromArgb(255, 255, 0) });

    // Bar height, narrow bar width, and the gap between the bars and the text
    barcode.BarHeight = 45;
    barcode.NarrowBarWidth = 1.6;
    barcode.BarcodeToTextGapHeight = 4;

    // Center the text and leave 5 points of blank space on each side
    barcode.TextAlignment = pdfModule.PdfBarcodeTextAlignment.Center;
    barcode.QuietZone.Top = 5;
    barcode.QuietZone.Bottom = 5;
    barcode.QuietZone.Left = 5;
    barcode.QuietZone.Right = 5;

    // Switch the label to 12-point Arial
    barcode.Font = new pdfModule.PdfTrueTypeFont({ fontFile: '/Library/Fonts/ARIAL.TTF', size: 12 });

    // Place it below the first barcode
    barcode.Draw({ page: page, location: new pdfModule.PointF(20, plain.Bounds.Bottom + 30) });

    // Save the document
    const outputFileName = 'CustomBarcodeStyle_result.pdf';
    doc.SaveToFile(outputFileName);
    doc.Close();

    // Read the generated file from the VFS and trigger the download
    const fileArray = window.dotnetRuntime.Module.FS.readFile(outputFileName);
    const blob = new Blob([fileArray], { type: 'application/pdf' });
    const url = URL.createObjectURL(blob);
    const a = document.createElement('a');
    a.href = url;
    a.download = outputFileName;
    a.click();
    URL.revokeObjectURL(url);
  };

  return (
    <div style={{ textAlign: 'center', height: '300px' }}>
      <h1>Customizing the Barcode Style</h1>
      <button onClick={customizeBarcode}>
        Apply Styling
      </button>
    </div>
  );
}

export default App;
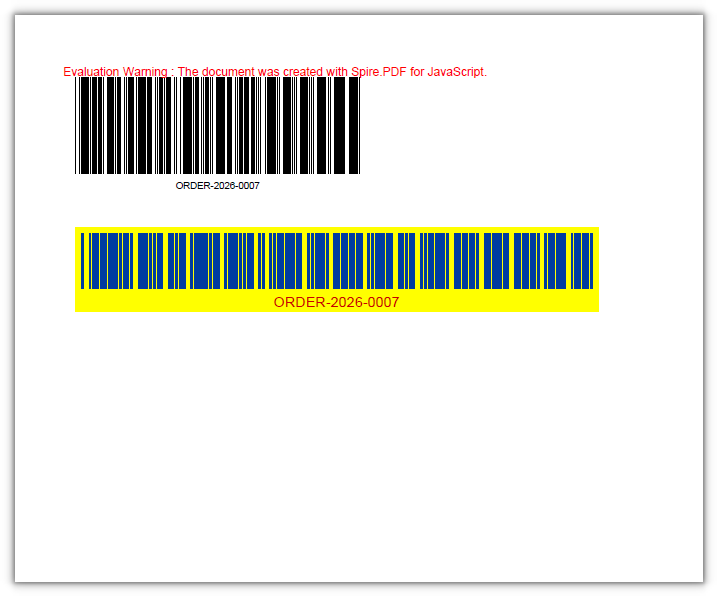
The lower barcode uses different bar colors, bar height, quiet zone, and label font
FAQ
PdfRGBColor reports "Ambiguous call" when it is constructed
Cause: the constructor of PdfRGBColor only accepts a Color object. Passing the three RGB components directly, as in new pdfModule.PdfRGBColor(0, 60, 160) or { r: 0, g: 60, b: 160 }, matches several overloads and throws Ambiguous call: arguments (object) match multiple overloads.
Solution: build a Color with Color.FromArgb first, then hand it to PdfRGBColor:
// Correct: produce a Color object first
barcode.BarColor = new pdfModule.PdfRGBColor({ color: pdfModule.Color.FromArgb(0, 60, 160) });

// A predefined color works too
barcode.TextColor = new pdfModule.PdfRGBColor({ color: pdfModule.Color.get_Blue() });
The same data produces barcodes of different lengths
Cause: symbologies encode at different densities, so the same text comes out shorter with Code128 than with Code39, and shorter still with Code128C. Raising NarrowBarWidth widens the whole barcode as well.
Solution: when the layout has to be fixed, use the Draw overload that takes a RectangleF to confine the barcode to an area, or adjust NarrowBarWidth across the board:
// However long the data is, the barcode stays inside the same rectangle
barcode.Draw({ page: page, rect: new pdfModule.RectangleF(20, 20, 250, 80) });
Can I add a QR code to a PDF
Cause: the 1D barcode classes Spire.PDF for JavaScript ships are PdfCodabarBarcode, PdfCode39Barcode, PdfCode128BBarcode, and the like. There is no QR code class, so a name such as PdfQRCodeBarcode evaluates to undefined.
Solution: generate the QR code as an image in the front end, then draw it into the page with PdfImage.FromStream and page.Canvas.DrawImage, leaving positioning and scaling to the canvas:
// qrBytes holds the PNG bytes of a QR code generated in the front end
const image = pdfModule.PdfImage.FromStream(new pdfModule.Stream(qrBytes));
page.Canvas.DrawImage({ image: image, x: 20, y: 20, width: 100, height: 100 });
Get a Free License
If you want to remove the evaluation message from the resulting documents, or to get rid of the feature limitations, please contact our sales team to obtain a temporary license valid for 30 days.
How to Add, Hide and Delete PDF Layers with JavaScript in React
PDF layers partition the content on a page into multiple "Optional Content Groups" (OCGs). This is most commonly seen in CAD drawings where walls, furniture, and electrical plans are separated onto layers, in maps where roads, water systems, and labels are separated, and in pages that need to switch between several plans or several languages on demand. Unlike erasing content, layers let you hide content and then bring it back at any time without destroying the document structure, which greatly increases the reuse value of the same PDF.
Spire.PDF for JavaScript runs on WebAssembly and completes the loading, drawing, and saving of PDFs entirely in the browser, managing input and output files through a virtual file system (VFS) with no backend required.
This article covers three core functions:
For installation and project configuration, refer to Integrating Spire.PDF for JavaScript in a React Project. The examples below assume Spire.PDF is installed and the WebAssembly module has been initialized.
Adding Layers to a PDF
To add a layer, first create a document and add a page, then create a named layer with doc.Layers.AddLayer({ name, state }) (the state argument lets you specify the initial visibility), and call the layer's layer.CreateGraphics(page.Canvas) to obtain a drawing context bound to the page canvas. From then on, methods such as DrawLine and DrawRectangle can draw lines, color blocks, and other content "into" that layer. The example below creates three layers named red line, blue line, and green line, draws one horizontal line and one small color block of the corresponding color into each layer, and staggers the three lines at different heights.
function App() {
  const addLayers = async () => {
    // Get the Spire.PDF WASM module
    const pdfModule = window.wasmModule?.spirepdf;

    // Check that the module is ready
    if (!pdfModule) {
      alert('Spire.PDF is not ready yet');
      return;
    }

    // Create a PdfDocument and add a page
    let doc = new pdfModule.PdfDocument();
    let page = doc.Pages.Add();

    // Get the page size for positioning content relative to the page
    const width = page.Canvas.Size.Width;
    const height = page.Canvas.Size.Height;

    // Define a local function that draws a horizontal line with a small
    // color block of the same color into the layer with the given name
    const drawRow = (layerName, centerY, brush) => {
      // Add a layer to the document and set its initial state to visible
      let layer = doc.Layers.AddLayer({ name: layerName, state: pdfModule.PdfVisibility.On });

      // Get the drawing context of the layer
      let g = layer.CreateGraphics(page.Canvas);

      // Draw a colored horizontal line that spans about 20% to 80% of the page width
      g.DrawLine({
        pen: new pdfModule.PdfPen({ brush: brush, width: 2 }),
        point1: new pdfModule.PointF(width * 0.2, centerY),
        point2: new pdfModule.PointF(width * 0.8, centerY)
      });

      // Draw a small color block at the left end of the line as an indicator of the layer color
      g.DrawRectangle({
        brush: brush,
        rectangle: new pdfModule.RectangleF({ x: width * 0.12, y: centerY - 6, width: 12, height: 12 })
      });
    };

    // Place the three lines from top to bottom at 25%, 50%, and 75% of the page height
    drawRow('red line', height * 0.25, pdfModule.PdfBrushes.get_Red());
    drawRow('blue line', height * 0.5, pdfModule.PdfBrushes.get_Blue());
    drawRow('green line', height * 0.75, pdfModule.PdfBrushes.get_Green());

    // Define the output file name and save the document
    const outputFileName = 'AddLayers.pdf';
    doc.SaveToFile(outputFileName);
    doc.Close();

    // Read the generated file from the VFS and trigger a download
    const fileArray = window.dotnetRuntime.Module.FS.readFile(outputFileName);
    const blob = new Blob([fileArray], { type: 'application/pdf' });
    const url = URL.createObjectURL(blob);
    const a = document.createElement('a');
    a.href = url;
    a.download = outputFileName;
    a.click();
    URL.revokeObjectURL(url);
  };

  return (
    <div style={{ textAlign: 'center', height: '300px' }}>
      <h1>Add Layers To PDF</h1>
      <button onClick={addLayers}>
        Generate
      </button>
    </div>
  );
}

export default App;
PDF page after adding the red line, blue line and green line layers
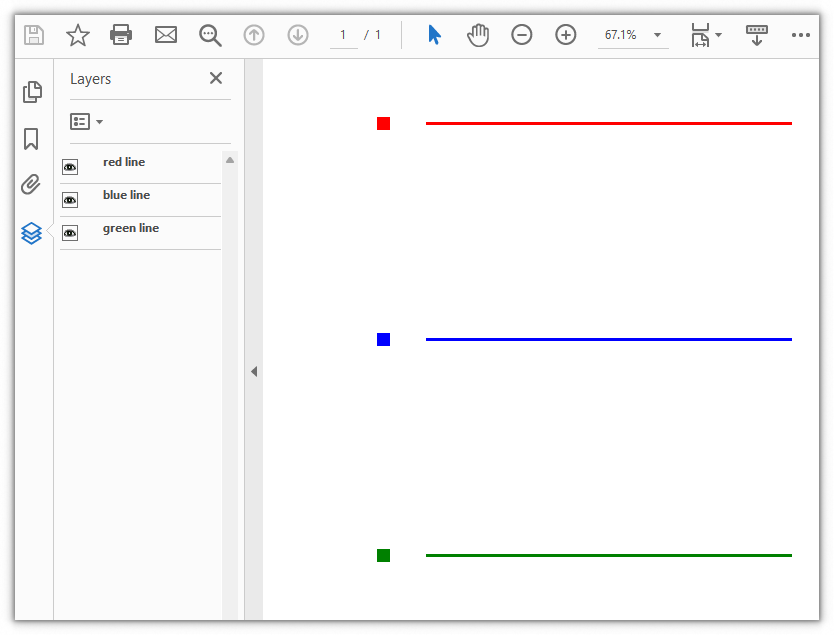
Hiding a Specified Layer
When the content of a layer should not be shown temporarily but may be needed again later, you do not have to delete it. Simply set the Visibility property of the layer to PdfVisibility.Off to "hide" it. The content then no longer displays, but the layer and the objects inside it are still kept in the PDF, and readers can turn them back on any time in the Layers panel of a PDF viewer. The example below takes the AddLayers.pdf produced in the previous section (it already contains the red line, blue line, and green line layers), fetches two of the layers by name with get_Item({ name }), and sets their Visibility to invisible, so only the green line layer remains on the page.
function App() {
  const hideLayers = async () => {
    // Get the Spire.PDF WASM module
    const pdfModule = window.wasmModule?.spirepdf;

    // Check that the module is ready
    if (!pdfModule) {
      alert('Spire.PDF is not ready yet');
      return;
    }

    // Load the PDF that contains the layers into the VFS
    const inputFileName = 'AddLayers.pdf';
    await window.spire.FetchFileToVFS(inputFileName, "", `${process.env.PUBLIC_URL}/data/`);

    // Create a PdfDocument object and load the PDF document
    let doc = new pdfModule.PdfDocument();
    doc.LoadFromFile(inputFileName);

    // Get the "red line" and "blue line" layers by name and set them to invisible,
    // so only "green line" remains on the page
    doc.Layers.get_Item({ name: 'red line' }).Visibility = pdfModule.PdfVisibility.Off;
    doc.Layers.get_Item({ name: 'blue line' }).Visibility = pdfModule.PdfVisibility.Off;

    // Define the output file name and save the document
    const outputFileName = 'HideLayers.pdf';
    doc.SaveToFile(outputFileName);
    doc.Close();

    // Read the generated file from the VFS and trigger a download
    const fileArray = window.dotnetRuntime.Module.FS.readFile(outputFileName);
    const blob = new Blob([fileArray], { type: 'application/pdf' });
    const url = URL.createObjectURL(blob);
    const a = document.createElement('a');
    a.href = url;
    a.download = outputFileName;
    a.click();
    URL.revokeObjectURL(url);
  };

  return (
    <div style={{ textAlign: 'center', height: '300px' }}>
      <h1>Hide Layers In PDF</h1>
      <button onClick={hideLayers}>
        Generate
      </button>
    </div>
  );
}

export default App;
After hiding the red line and blue line layers, only the green line layer remains on the page
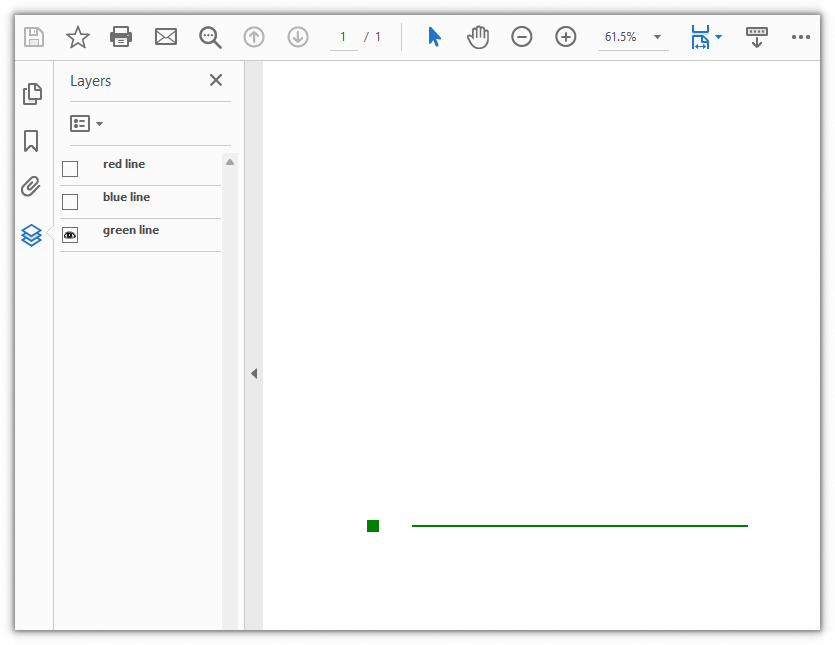
Deleting a Layer
When a layer and its content are no longer needed, you can remove it from the document's layer collection with doc.Layers.RemoveLayer: just pass the layer name, for example RemoveLayer({ name: 'red line' }) removes the entire layer named red line. The content of that layer no longer displays afterward and cannot be restored through the Layers panel either. The example below takes the AddLayers.pdf produced in the first section (it already contains the red line, blue line, and green line layers), and deletes the red line layer by name, so only the blue line and green line layers remain on the page.
function App() {
  const deleteLayer = async () => {
    // Get the Spire.PDF WASM module
    const pdfModule = window.wasmModule?.spirepdf;

    // Check that the module is ready
    if (!pdfModule) {
      alert('Spire.PDF is not ready yet');
      return;
    }

    // Load the PDF that contains the layers into the VFS
    const inputFileName = 'AddLayers.pdf';
    await window.spire.FetchFileToVFS(inputFileName, "", `${process.env.PUBLIC_URL}/data/`);

    // Create a PdfDocument object and load the PDF document
    let doc = new pdfModule.PdfDocument();
    doc.LoadFromFile(inputFileName);

    // Delete the "red line" layer by name; its content no longer shows on the page
    doc.Layers.RemoveLayer({ name: 'red line' });

    // Define the output file name and save the document
    const outputFileName = 'DeleteLayers.pdf';
    doc.SaveToFile(outputFileName);
    doc.Close();

    // Read the generated file from the VFS and trigger a download
    const fileArray = window.dotnetRuntime.Module.FS.readFile(outputFileName);
    const blob = new Blob([fileArray], { type: 'application/pdf' });
    const url = URL.createObjectURL(blob);
    const a = document.createElement('a');
    a.href = url;
    a.download = outputFileName;
    a.click();
    URL.revokeObjectURL(url);
  };

  return (
    <div style={{ textAlign: 'center', height: '300px' }}>
      <h1>Delete PDF Layer</h1>
      <button onClick={deleteLayer}>
        Generate
      </button>
    </div>
  );
}

export default App;
After deleting the red line layer, only the blue line and green line layers remain on the page
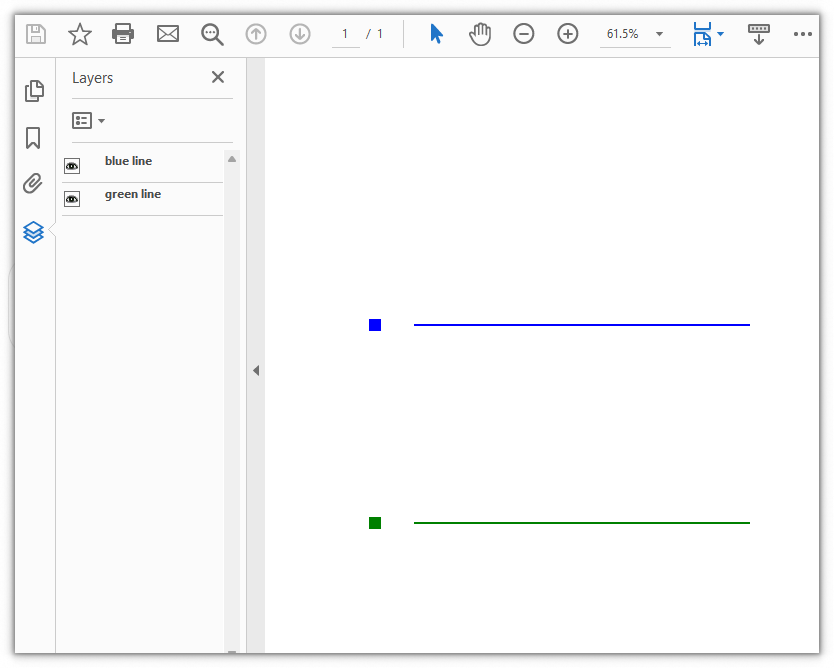
FAQ
What is the difference between hiding and deleting a layer
Reason: Both hiding and deleting make content "invisible" on the page, so it is easy to confuse the difference between the two in terms of the document structure.
Solution: Hiding sets the Visibility of a layer to Off; the layer and the objects inside it are still kept in the PDF, and you can turn them back on at any time in the Layers panel of the viewer. Deleting, on the other hand, removes the layer from doc.Layers entirely with RemoveLayer, and its content no longer displays and cannot be restored. In short: hide it when you do not need to see it for a while, delete it when you will never need it again:
// Hide: the content stays in the document and can be turned back on at any time
doc.Layers.get_Item({ name: 'red line' }).Visibility = pdfModule.PdfVisibility.Off;

// Delete: the layer is removed from the collection and cannot be turned back on
doc.Layers.RemoveLayer({ name: 'red line' });
How do I control whether a layer is visible when I add it
Reason: A layer created by AddLayer is visible by default, but sometimes you want a layer to start out hidden (for example, an alternative plan that is preset but not shown yet).
Solution: The state argument of AddLayer specifies the initial visibility of a layer. Passing PdfVisibility.Off creates it as invisible, while passing On (or omitting it) makes it visible immediately after creation. After creation you can switch it at any time with the Visibility property:
// Create a new layer that is invisible initially
doc.Layers.AddLayer({ name: 'Alternative Plan', state: pdfModule.PdfVisibility.Off });
How do I locate a layer by name or index
Reason: With a document that contains multiple layers, you often need to operate on one particular layer, and the Layers collection holds several elements, so you need an accurate way to locate it.
Solution: doc.Layers is the layer collection. Count gives the total number of layers, get_Item({ name }) retrieves a layer by its name, and get_Item(i) retrieves one by its index. To control layers in bulk, iterate through all of them, for example to set every layer invisible at once:
// Iterate through the layer collection and set all layers to invisible
for (let i = 0; i < doc.Layers.Count; i++) {
  doc.Layers.get_Item(i).Visibility = pdfModule.PdfVisibility.Off;
}
Get a Free Temporary License
If you want to remove the evaluation message from the result documents, or get rid of the function limitations, please contact our sales team to get a temporary license that is valid for 30 days.
How to Create and Identify PDF Portfolios with JavaScript in React
PDF keeps its layout fixed and renders consistently across devices, which makes it ideal for distributing contracts, manuals, and reports. In business, however, a set of materials often consists of multiple related PDFs: a product manual, for example, usually goes together with a quotation, a technical specification, and frequently asked questions. Sending each file separately is scattered and easy to miss. The PDF "portfolio" mechanism provides a standard way to solve this problem — it lets you package several documents into a single PDF. The recipient opens one file and can view, expand, and save each member file from the portfolio view of their PDF viewer, which makes unified delivery and archiving convenient.
Spire.PDF for JavaScript runs on WebAssembly and completes the loading, drawing, and saving of PDFs entirely in the browser, managing input and output files through a virtual file system (VFS) with no backend required. Two operations are commonly used around portfolios: creating one — load a main document with PdfDocument, then add each member file that has been loaded into the VFS one by one through the file collection's root folder doc.Collection.Folders and its AddFile method, using CreateSubfolder to build subfolders and group members when needed; and identifying one — read the doc.IsPortfolio property directly to tell whether a PDF is a portfolio.
This article covers two core functions:
For installation and project configuration, refer to Integrating Spire.PDF for JavaScript in a React Project. The examples below assume Spire.PDF is installed and the WebAssembly module has been initialized.
Creating a PDF Portfolio
Portfolio members are not limited to PDFs — Word, Excel, and image files can be added as well, and subfolders can be used to group them. The packaging logic is straightforward: first load a main document with PdfDocument to act as the carrier of the portfolio; load each member file to be packaged into the virtual file system with FetchFileToVFS; then iterate over the members and add each one to the file collection's root folder with doc.Collection.Folders.AddFile({ filePath }). If you want some files to live in a subfolder of their own, create the subfolder first with CreateSubfolder, then call AddFile on it to add the files. When every member has been added, save the document to obtain a PDF portfolio that packages the main document together with all of its member files.
function App() {
  const createPortfolio = async () => {
    // Get the Spire.PDF WASM module
    const pdfModule = window.wasmModule?.spirepdf;

    // Check whether the module is ready
    if (!pdfModule) {
      alert('Spire.PDF is not ready yet');
      return;
    }

    // Load the PDF used as the main document of the portfolio into the VFS
    const mainFileName = 'Product_Manual.pdf';
    await window.spire.FetchFileToVFS(mainFileName, "", `${process.env.PUBLIC_URL}/data/`);

    // Create a PdfDocument object and load the main document
    let doc = new pdfModule.PdfDocument();
    doc.LoadFromFile(mainFileName);

    // Load each member file placed under the root of the portfolio into the VFS and add it to the folder of the file collection
    const rootFiles = ['Quotation.pdf', 'Technical_Specification.pdf', 'logo.png', 'Financial_Statement.xlsx'];
    for (let i = 0; i < rootFiles.length; i++) {
      await window.spire.FetchFileToVFS(rootFiles[i], "", `${process.env.PUBLIC_URL}/data/`);
      doc.Collection.Folders.AddFile({ filePath: rootFiles[i] });
    }

    // Load the Word document to be placed in a subfolder into the VFS
    await window.spire.FetchFileToVFS('test.docx', "", `${process.env.PUBLIC_URL}/data/`);
    // Create a subfolder named "Documents" in the file collection and add the Word document to it
    const subFolder = doc.Collection.Folders.CreateSubfolder('Documents');
    subFolder.AddFile({ filePath: 'test.docx' });

    // Define the output file name and save the document
    const outputFileName = 'Product_Portfolio.pdf';
    doc.SaveToFile(outputFileName);
    doc.Close();

    // Read the generated file from the VFS and trigger a download
    const fileArray = window.dotnetRuntime.Module.FS.readFile(outputFileName);
    const blob = new Blob([fileArray], { type: 'application/pdf' });
    const url = URL.createObjectURL(blob);
    const a = document.createElement('a');
    a.href = url;
    a.download = outputFileName;
    a.click();
    URL.revokeObjectURL(url);
  };

  return (
    <div style={{ textAlign: 'center', height: '300px' }}>
      <h1>Create PDF Portfolio</h1>
      <button onClick={createPortfolio}>
        Generate
      </button>
    </div>
  );
}

export default App;
The resulting PDF portfolio after creation
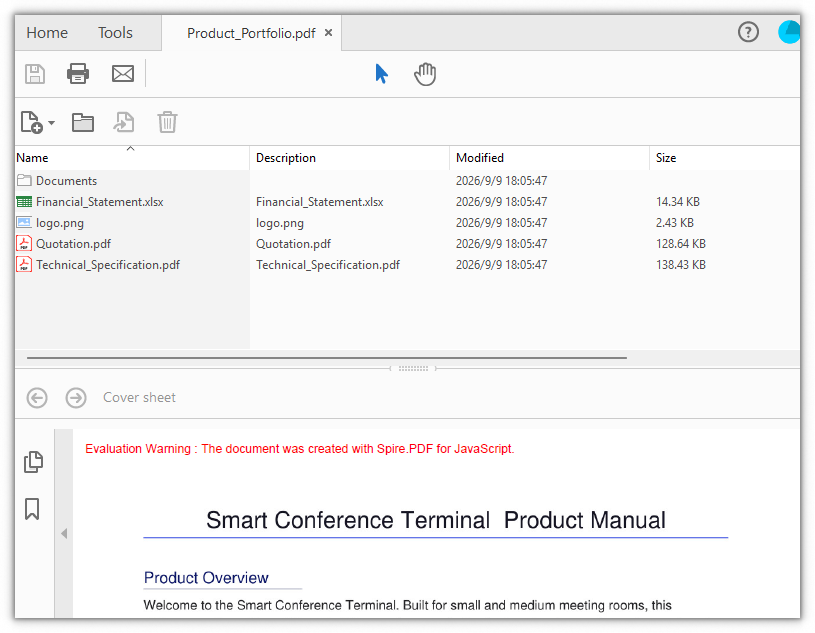
Identifying a PDF Portfolio
When you receive a PDF and need to tell whether it is a portfolio, use the PdfDocument.IsPortfolio property: load the document with LoadFromFile and read the Boolean property. A return value of true means the PDF is a portfolio, while false means it is a regular PDF document. This example loads a product portfolio sample to identify it, writes the "is a portfolio" result to a downloaded txt file, and also shows it below on the page so the conclusion can be seen at a glance.
function App() {
  const identifyPortfolio = async () => {
    // Get the Spire.PDF WASM module
    const pdfModule = window.wasmModule?.spirepdf;

    // Check whether the module is ready
    if (!pdfModule) {
      alert('Spire.PDF is not ready yet');
      return;
    }

    // Load the PDF to be identified into the VFS
    const inputFileName = 'Product_Portfolio.pdf';
    await window.spire.FetchFileToVFS(inputFileName, "", `${process.env.PUBLIC_URL}/data/`);

    // Create a PdfDocument object and load the PDF document
    let doc = new pdfModule.PdfDocument();
    doc.LoadFromFile(inputFileName);

    // Judge whether this PDF is a portfolio
    const isPortfolio = doc.IsPortfolio;
    const message = isPortfolio ? 'This PDF is a portfolio.' : 'This PDF is not a portfolio.';
    doc.Close();

    // Show the result below on the page
    const resultEl = document.getElementById('identify-result');
    if (resultEl) resultEl.innerText = message;

    // Write the result to a txt file and trigger a download
    const outputFileName = 'Identification_Result.txt';
    window.dotnetRuntime.Module.FS.writeFile(outputFileName, message);
    const fileArray = window.dotnetRuntime.Module.FS.readFile(outputFileName);
    const blob = new Blob([fileArray], { type: 'text/plain' });
    const url = URL.createObjectURL(blob);
    const a = document.createElement('a');
    a.href = url;
    a.download = outputFileName;
    a.click();
    URL.revokeObjectURL(url);
  };

  return (
    <div style={{ textAlign: 'center', height: '300px' }}>
      <h1>Identify PDF Portfolio</h1>
      <button onClick={identifyPortfolio}>
        Check
      </button>
      <p id="identify-result" style={{ marginTop: '20px', fontWeight: 'bold' }}></p>
    </div>
  );
}

export default App;
The identification result shows that the PDF is a portfolio
FAQ
How can I confirm that the file is really a portfolio after creating it
Reason: A portfolio only "packages" the member files into the same PDF, so it may not be obvious at a glance whether the saving succeeded.
Solution: Use doc.IsPortfolio for a second check on the saved result — reload the generated file and a return value of true means it is a portfolio:
// Reload the generated file and check whether it is a portfolio
let doc = new pdfModule.PdfDocument();
doc.LoadFromFile('Product_Portfolio.pdf');
const isPortfolio = doc.IsPortfolio;
What is the difference between a portfolio and ordinary PDF attachments
Reason: Both portfolios and attachments "stuff" files into a PDF, so it is easy to confuse their purposes and how to tell them apart.
Solution: A PDF attachment (Attachment) attaches a file as an embedded file that appears in the attachment panel of the document, while the body itself is usually an independent document. A portfolio, on the other hand, organizes member files around a file collection (Collection), and the members can be several documents that appear as separate files in the portfolio view and can be expanded and saved individually. To tell them apart, use doc.Attachments to inspect attachments and doc.IsPortfolio to check whether the document is a portfolio; the two do not substitute for each other.
Can only PDF files be added to a portfolio
Reason: The example presents the PDF members first, which makes it easy to assume a portfolio can only hold PDFs.
Solution: AddFile adds any file that exists in the virtual file system, not just PDFs. Load the target file into the VFS with FetchFileToVFS and add it with { filePath: fileName }; to group files into one place, create a subfolder with CreateSubfolder and add the files to it. Word, Excel, images, and other files can all be packaged into a portfolio as members:
// Load an Excel file and add it as a portfolio member
await window.spire.FetchFileToVFS('Financial_Statement.xlsx', "", `${process.env.PUBLIC_URL}/data/`);
doc.Collection.Folders.AddFile({ filePath: 'Financial_Statement.xlsx' });
Get a Free Temporary License
If you want to remove the evaluation message from the result documents, or get rid of the function limitations, please contact our sales team to get a temporary license that is valid for 30 days.