
Objects (4)
Contracts, quotations and slide decks are often embedded straight into an Excel workbook: what you see on the sheet is an icon or a thumbnail, while the real document data sits in the xl/embeddings part of the package. Pulling those attachments out for archiving one by one means opening each object and saving a copy by hand.Spire.XLS for JavaScript does the job in the browser through WebAssembly, using a virtual file system (VFS) for the input and the output, with no backend service involved.
This article covers two feature points:
For installation and project configuration, see Integrating Spire.XLS for JavaScript in a React Project. The examples below assume Spire.XLS is installed and the WebAssembly module has finished initializing.
Read the OLE object information of a worksheet
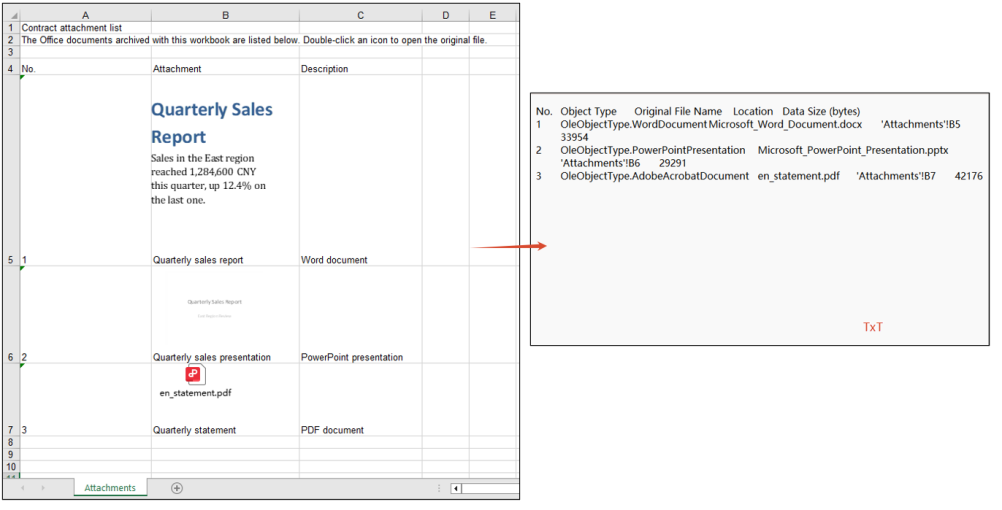
Before extracting anything it helps to know what a workbook actually carries. A listing sets out the kind, original name, cell and size of every embedded object in one place and serves as an attachment register, so archiving or handing the file over does not mean double-clicking each icon in turn.
The steps are:
- Use
HasOleObjectsto check whether the worksheet holds any embedded objects, and stop early if it does not - Walk every object of the worksheet through the
OleObjectscollection - Read four pieces of information off each object:
ObjectType: the kind of object, such asWordDocumentorPowerPointPresentationOleOriginName: the file name the object had before it was embeddedLocation: the cell the object sits on- the length of
OleData: the data size
- Join the four fields into one line per object and write the listing to
ListOleObjects.txt
The example below collects those fields into a plain text listing:
function App() {
  const listOleObjects = async () => {
    // Get the Spire.XLS WASM module
    const xlsModule = window.wasmModule?.spirexls;

    // Check if the module is ready
    if (!xlsModule) {
      alert('Spire.Xls is not ready yet');
      return;
    }

    // Load the font and the input file into VFS
    await window.spire.FetchFileToVFS('simsun.ttc', '/Library/Fonts/', `${process.env.PUBLIC_URL}/font/`);
    const inputFileName = 'OLEObjects.xlsx';
    await window.spire.FetchFileToVFS(inputFileName, '', `${process.env.PUBLIC_URL}data/`);

    // Load the workbook and take the first worksheet
    const workbook = new xlsModule.Workbook();
    workbook.LoadFromFile({ fileName: inputFileName });
    const sheet = workbook.Worksheets.get(0);

    // Check whether the worksheet contains OLE objects
    if (!sheet.HasOleObjects) {
      alert('The worksheet contains no OLE objects.');
      return;
    }

    // Collect the listing as text: a header line, then one tab-separated line per object
    const lines = [['No.', 'Object Type', 'Original File Name', 'Location', 'Data Size (bytes)'].join('\t')];

    // Walk the OLE objects of the worksheet, one line per object
    let index = 1;
    for (const oleObject of sheet.OleObjects) {
      lines.push([
        index,
        String(oleObject.ObjectType),
        String(oleObject.OleOriginName),
        String(oleObject.Location.RangeAddress),
        oleObject.OleData.length,
      ].join('\t'));
      index += 1;
    }

    // Release the workbook object
    workbook.Dispose();

    // Write the listing to a text file in the VFS
    const outputFileName = 'ListOleObjects.txt';
    window.dotnetRuntime.Module.FS.writeFile(outputFileName, lines.join('\n'));

    // Read the result file from VFS and trigger the download
    const fileArray = window.dotnetRuntime.Module.FS.readFile(outputFileName);
    const blob = new Blob([fileArray], { type: 'text/plain;charset=utf-8' });
    const url = URL.createObjectURL(blob);
    const a = document.createElement('a');
    a.href = url;
    a.download = outputFileName;
    a.click();
    URL.revokeObjectURL(url);
  };

  return (
    <div style={{ textAlign: 'center', height: '300px' }}>
      <h1>List OLE Objects</h1>
      <button onClick={listOleObjects}>List OLE objects</button>
    </div>
  );
}

export default App;
The effect of reading the OLE object information:
Extract OLE object payloads by type
A listing only says what is embedded; archiving the attachment itself means getting the document out. An OLE object carries its payload as a byte array, so writing those bytes out restores the document exactly as it was embedded, with no re-typesetting or format conversion.
The steps are:
- Use
HasOleObjectsto confirm the worksheet holds embedded objects - Walk every object in the
OleObjectscollection and decide the name and MIME type of the output file fromObjectType - Take the raw bytes of the object through
OleData, write them into the virtual file system, read them back and wrap them in a downloadable Blob - Dispose of the workbook once the walk is done, then trigger the downloads one by one
The example below walks every object of the worksheet and writes the Word, PowerPoint and PDF attachments out as .docx, .pptx and .pdf files, offering each one for download:
function App() {
  const extractOleObjects = async () => {
    // Get the Spire.XLS WASM module
    const xlsModule = window.wasmModule?.spirexls;

    // Check if the module is ready
    if (!xlsModule) {
      alert('Spire.Xls is not ready yet');
      return;
    }

    // Load the font and the input file into VFS
    await window.spire.FetchFileToVFS('simsun.ttc', '/Library/Fonts/', `${process.env.PUBLIC_URL}/font/`);
    const inputFileName = 'OLEObjects.xlsx';
    await window.spire.FetchFileToVFS(inputFileName, '', `${process.env.PUBLIC_URL}data/`);

    // Load the workbook and take the first worksheet
    const workbook = new xlsModule.Workbook();
    workbook.LoadFromFile({ fileName: inputFileName });
    const sheet = workbook.Worksheets.get(0);

    // Collect the extracted files so the page can offer them for download
    const results = [];

    // Walk the OLE objects of the worksheet and write each one out in its own format
    if (sheet.HasOleObjects) {
      for (const oleObject of sheet.OleObjects) {
        const type = oleObject.ObjectType;
        let outputFileName = '';
        let mimeType = '';

        // Word document
        if (type === xlsModule.OleObjectType.WordDocument) {
          outputFileName = 'ExtractWord.docx';
          mimeType = 'application/vnd.openxmlformats-officedocument.wordprocessingml.document';
        }
        // PowerPoint presentation: .pptx and .sldx fall under two different enum members
        else if (
          type === xlsModule.OleObjectType.PowerPointPresentation ||
          type === xlsModule.OleObjectType.PowerPointSlide
        ) {
          outputFileName = 'ExtractPowerPoint.pptx';
          mimeType = 'application/vnd.openxmlformats-officedocument.presentationml.presentation';
        }
        // PDF document
        else if (type === xlsModule.OleObjectType.AdobeAcrobatDocument) {
          outputFileName = 'ExtractPdf.pdf';
          mimeType = 'application/pdf';
        }

        // Any other type is left alone
        if (!outputFileName) continue;

        // Write the raw data of the object into the virtual file system
        window.dotnetRuntime.Module.FS.writeFile(outputFileName, oleObject.OleData);
        const fileArray = window.dotnetRuntime.Module.FS.readFile(outputFileName);
        results.push({
          name: outputFileName,
          url: URL.createObjectURL(new Blob([fileArray], { type: mimeType })),
        });
      }
    }

    // Release the workbook object
    workbook.Dispose();

    // Trigger the downloads one by one
    results.forEach(({ name, url }) => {
      const a = document.createElement('a');
      a.href = url;
      a.download = name;
      a.click();
      URL.revokeObjectURL(url);
    });
  };

  return (
    <div style={{ textAlign: 'center', height: '300px' }}>
      <h1>Extract OLE Objects</h1>
      <button onClick={extractOleObjects}>Extract OLE objects by type</button>
    </div>
  );
}

export default App;
The effect of extracting the attachment documents:

FAQ
OleObjectType.PowerPointSlide never matches a PowerPoint attachment
Cause: OleObjectType splits objects by the real format of the embedded file. A .pptx presentation reports PowerPointPresentation; only slideshow formats such as .sldx and .ppt land on PowerPointSlide, so testing for the latter alone misses the vast majority of PowerPoint attachments.
Solution: match both enum members in the branch, for example:
else if (
  type === xlsModule.OleObjectType.PowerPointPresentation ||
  type === xlsModule.OleObjectType.PowerPointSlide
) {
  outputFileName = 'ExtractPowerPoint.pptx';
}
Only the attachments of the first worksheet come out
Cause: OleObjects is a per-worksheet collection. The example takes the first sheet through Worksheets.get(0) and walks the OleObjects of that sheet alone, so objects embedded on any other worksheet are never visited. When the attachments are spread over several sheets, the extraction silently comes up short, with no error to show for it.
Solution: walk the worksheets instead, taking the OleObjects of each one in turn:
for (let i = 0; i < workbook.Worksheets.Count; i++) {
  const worksheet = workbook.Worksheets.get(i);
  for (const oleObject of worksheet.OleObjects) {
    // write the attachment out by type
  }
}
Get a Free License
Spire.XLS for JavaScript offers a 30-day full-featured free trial license with no functional limitations. Apply here to evaluate before purchasing.
Besides holding cell data, an Excel workbook is often used as a container for files: a quotation carries a Word version of the contract terms, a product sheet carries a PDF datasheet, and double-clicking the object opens the source file directly. Files embedded into a worksheet like this are OLE objects (Object Linking and Embedding). Inserting one by hand takes two steps in the Excel UI—Insert → Object—but doing it from code in the browser needs a dedicated API.Spire.XLS for JavaScript performs this work directly in the browser through WebAssembly, managing input and output files with a virtual file system (VFS) and requiring no backend service.
This article covers two key features:
For installation and project setup, see Integrating Spire.XLS for JavaScript in a React Project. The examples below assume Spire.XLS is already installed and the WebAssembly module has been initialized.
Insert an OLE Object in Excel
OleObjects.Add inserts an external file into a worksheet. It takes three arguments: the file to embed, the icon the object shows on the sheet, and the link type—OleLinkType.Embed embeds the file into the workbook, OleLinkType.Link inserts it as a link. After the object is in place, Location decides which cell it is anchored to and ObjectType declares what was embedded, which is how Excel knows which program to use when the object is double-clicked. The steps are:
- Create a new workbook and write a caption into a cell.
- Open the workbook to be embedded and render its worksheet to an image, to use as the display icon.
- Embed that Excel file into the worksheet with
OleObjects.Add. - Set
LocationandObjectType. - Save the workbook.
Here is a complete code example that inserts an Excel file into a worksheet as an OLE object in React:
function App() {
  const insertOleObject = async () => {
    // Get the Spire.XLS WASM module
    const xlsModule = window.wasmModule?.spirexls;

    // Check if the module is ready
    if (!xlsModule) {
      alert('Spire.Xls is not ready yet');
      return;
    }

    // Load the font into VFS
    await window.spire.FetchFileToVFS('ARIAL.TTF', '/Library/Fonts/', `${process.env.PUBLIC_URL}/font/`);

    // Load the Excel file to be embedded into VFS
    const embeddedFileName = 'OLEObjects.xlsx';
    await window.spire.FetchFileToVFS(embeddedFileName, '', `${process.env.PUBLIC_URL}/static/data/`);

    // Create a new workbook and write the caption
    const workbook = new xlsModule.Workbook();
    const sheet = workbook.Worksheets.get(0);
    sheet.Range.get("A1").Text = "Here is an OLE object.";

    // Open the embedded workbook and render its worksheet to an image as the display icon
    const embeddedBook = new xlsModule.Workbook();
    embeddedBook.LoadFromFile(embeddedFileName);
    const embeddedSheet = embeddedBook.Worksheets.get(0);
    embeddedSheet.PageSetup.LeftMargin = 0;
    embeddedSheet.PageSetup.RightMargin = 0;
    embeddedSheet.PageSetup.TopMargin = 0;
    embeddedSheet.PageSetup.BottomMargin = 0;
    const image = embeddedSheet.ToImage(1, 1, 19, 5);
    embeddedBook.Dispose();

    // Embed the Excel file into the worksheet; the file data is stored with the workbook
    const oleObject = sheet.OleObjects.Add(
      embeddedFileName,
      image,
      xlsModule.OleLinkType.Embed
    );

    // Anchor the object at cell B4 and declare it as an Excel worksheet
    oleObject.Location = sheet.Range.get("B4");
    oleObject.ObjectType = xlsModule.OleObjectType.ExcelWorksheet;

    // Save the workbook
    const outputFileName = "InsertOLEObject.xlsx";
    workbook.SaveToFile({ fileName: outputFileName, version: xlsModule.ExcelVersion.Version2010 });

    // Release resources
    workbook.Dispose();

    // Read the result file from VFS and trigger the download
    const fileArray = window.dotnetRuntime.Module.FS.readFile(outputFileName);
    const blob = new Blob([fileArray], { type: 'application/vnd.openxmlformats-officedocument.spreadsheetml.sheet' });
    const url = URL.createObjectURL(blob);
    const a = document.createElement('a');
    a.href = url;
    a.download = outputFileName;
    a.click();
    URL.revokeObjectURL(url);
  };

  return (
    <div style={{ textAlign: 'center', height: '300px' }}>
      <h1>Insert an OLE Object</h1>
      <button onClick={insertOleObject}>Start</button>
    </div>
  );
}

export default App;
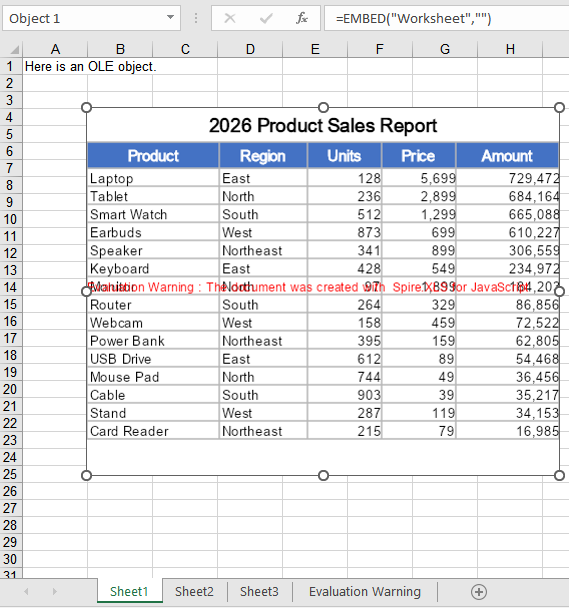
The icon here is taken directly from the rendered embedded worksheet, so the OLE object shows its own content on the sheet. Switching ObjectType to values such as OleObjectType.WordDocument or OleObjectType.AdobeAcrobatDocument declares other kinds of embedded files.
Running it, the effect of inserting a workbook as an OLE object:
Insert an OLE Object with a Custom Icon
ToImage has to open a workbook and render a row/column range every time, which suits cases where the object should present its own content; when a single icon should be applied to every attachment, reading a ready-made picture is simpler, and the same picture can be reused across attachments. The second argument of OleObjects.Add accepts both kinds of input. The steps are:
- Load the icon image and the attachment file into VFS.
- Create a new workbook and read the icon image into a stream with
new xlsModule.Stream. - Insert the attachment as an embedded object with
OleObjects.Add, passing the icon stream. - Set
LocationandObjectType. - Save the workbook.
Here is a complete code example that inserts a PDF attachment with a custom icon in React:
function App() {
  const insertOleObjectWithIcon = async () => {
    // Get the Spire.XLS WASM module
    const xlsModule = window.wasmModule?.spirexls;

    // Check if the module is ready
    if (!xlsModule) {
      alert('Spire.Xls is not ready yet');
      return;
    }

    // Load the font into VFS
    await window.spire.FetchFileToVFS('ARIAL.TTF', '/Library/Fonts/', `${process.env.PUBLIC_URL}/font/`);

    // Load the icon image and the attachment into VFS
    const iconFileName = 'OLEIcon.png';
    const attachmentFileName = 'Attachment.pdf';
    await window.spire.FetchFileToVFS(iconFileName, '', `${process.env.PUBLIC_URL}/static/data/`);
    await window.spire.FetchFileToVFS(attachmentFileName, '', `${process.env.PUBLIC_URL}/static/data/`);

    // Create a new workbook
    const workbook = new xlsModule.Workbook();
    const sheet = workbook.Worksheets.get(0);

    // Read the icon image as a stream to use as the display icon of the OLE object
    const iconStream = new xlsModule.Stream(iconFileName);

    // Embed the PDF attachment into the worksheet
    const oleObject = sheet.OleObjects.Add(
      attachmentFileName,
      iconStream,
      xlsModule.OleLinkType.Embed
    );

    // Anchor the object at cell B4 and declare it as a PDF document
    oleObject.Location = sheet.Range.get("B4");
    oleObject.ObjectType = xlsModule.OleObjectType.AdobeAcrobatDocument;

    // Save the workbook
    const outputFileName = "InsertOLEObjectWithIcon.xlsx";
    workbook.SaveToFile({ fileName: outputFileName, version: xlsModule.ExcelVersion.Version2010 });

    // Release resources
    workbook.Dispose();

    // Read the result file from VFS and trigger the download
    const fileArray = window.dotnetRuntime.Module.FS.readFile(outputFileName);
    const blob = new Blob([fileArray], { type: 'application/vnd.openxmlformats-officedocument.spreadsheetml.sheet' });
    const url = URL.createObjectURL(blob);
    const a = document.createElement('a');
    a.href = url;
    a.download = outputFileName;
    a.click();
    URL.revokeObjectURL(url);
  };

  return (
    <div style={{ textAlign: 'center', height: '300px' }}>
      <h1>Insert an OLE Object with a Custom Icon</h1>
      <button onClick={insertOleObjectWithIcon}>Start</button>
    </div>
  );
}

export default App;
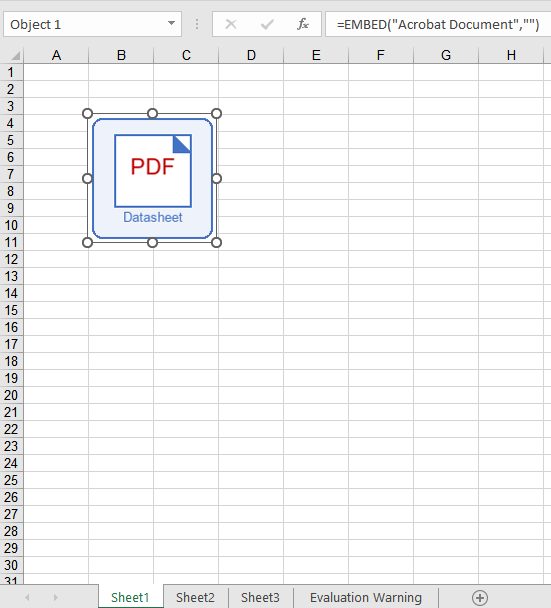
Running it, the effect of inserting a PDF attachment with a custom icon as an OLE object:
FAQ
Only a blank icon shows up on the sheet after inserting?
Cause: The second argument of OleObjects.Add decides the icon an OLE object shows on the sheet. When the image comes from ToImage, a region that falls outside the used range of the worksheet yields a blank picture, so the inserted object also shows only blank space.
Solution: Keep the region inside the part of the sheet that actually has content, or use a ready-made image file instead:
// Use a fixed picture as the icon, independent of the worksheet content
const iconStream = new xlsModule.Stream('OLEIcon.png');
const oleObject = sheet.OleObjects.Add('Attachment.pdf', iconStream, xlsModule.OleLinkType.Embed);
oleObject.Location = sheet.Range.get("B4");
oleObject.ObjectType = xlsModule.OleObjectType.AdobeAcrobatDocument;
What happens if ObjectType is set to something else?
Cause: ObjectType is not merely a comment—its value is written into the progId field of the workbook, and Excel uses that identifier to find the right program when the object is double-clicked. The same PDF attachment declares a progId of Acrobat Document under OleObjectType.AdobeAcrobatDocument; declare it as OleObjectType.ExcelWorksheet and the progId becomes Worksheet, so Excel attempts to open the PDF with Excel itself, and the object will not open.
Solution: Set ObjectType to the real type of the embedded file. The common values are:
| Embedded file | ObjectType |
|---|---|
| Excel workbook | OleObjectType.ExcelWorksheet |
| Word document | OleObjectType.WordDocument |
| PowerPoint presentation | OleObjectType.PowerPointSlide |
| PDF document | OleObjectType.AdobeAcrobatDocument |
// Declare the real file type so Excel opens it with the right program
oleObject.ObjectType = xlsModule.OleObjectType.AdobeAcrobatDocument;
Get a Free License
Spire.XLS for JavaScript offers a 30-day full-featured free trial license with no functional limitations. Apply here to evaluate before purchasing.
Add, Extract or Remove TextBoxes in Excel with JavaScript in React
2026-09-09 02:21:38 Written by jie zouIn daily Excel document processing, textboxes are often used to add explanatory text, annotations, or tips to data — whether adding comments to reports or extracting annotation content from existing documents, the add/remove/modify operations on textboxes are essential. Spire.XLS for JavaScript completes these operations directly in the browser based on WebAssembly, managing input and output files through a virtual file system (VFS), with no backend service required.
This article covers three core features:
For installation and project configuration, refer to Integrating Spire.XLS for JavaScript in a React Project. The examples below assume Spire.XLS is installed and the WebAssembly module is initialized.
Add TextBox
Adding textboxes to a worksheet provides supplementary explanations for data, such as operation guidance or notes. Spire.XLS for JavaScript inserts a textbox at a specified position with the Worksheet.TextBoxes.AddTextBox() method, after which you can set the text, alignment, font, and background color of the textbox, or fill it with a picture. The main steps are as follows:
- Create a
Workbookobject and use theLoadFromFile()method to load the Excel document. - Use the
Workbook.Worksheets.get()method to get a specific worksheet. - Use the
Worksheet.TextBoxes.AddTextBox()method to add the first textbox, and set its text, horizontal/vertical center alignment, font, and background color. - Use the
Worksheet.TextBoxes.AddTextBox()method to add a second textbox and fill it with a picture. - Use the
Workbook.SaveToFile()method to save the document to a specified path.
Here is a complete code example showing how to add two textboxes to a worksheet in React — one containing text and one filled with a picture:
function App() {
  const addTextBox = async () => {
    // Get the Spire.XLS WASM module
    const xlsModule = window.wasmModule?.spirexls;

    // Check whether the module is ready
    if (!xlsModule) {
      alert('Spire.Xls is not ready yet');
      return;
    }

    // Load the font, Excel file and picture into the VFS
    await window.spire.FetchFileToVFS('ARIAL.TTF', '/Library/Fonts/', `${process.env.PUBLIC_URL}/font/`);
    const inputFileName = 'TextBox.xlsx';
    await window.spire.FetchFileToVFS(inputFileName, '', `${process.env.PUBLIC_URL}data/`);
    await window.spire.FetchFileToVFS('logo.png', '', `${process.env.PUBLIC_URL}data/`);

    // Load the workbook
    const workbook = new xlsModule.Workbook();
    workbook.LoadFromFile({ fileName: inputFileName });

    // Get the first worksheet
    const sheet = workbook.Worksheets.get(0);

    // Add the first textbox and set its position and size
    const textBox = sheet.TextBoxes.AddTextBox(3, 2, 50, 196);

    // Set the text in the textbox
    textBox.Text = 'Insert Excel TextBox';

    // Set the text to be centered horizontally and vertically
    textBox.HAlignment = xlsModule.CommentHAlignType.Center;
    textBox.VAlignment = xlsModule.CommentVAlignType.Center;

    // Set the font of the textbox (bold, white, 12pt)
    const font = workbook.CreateFont();
    font.FontName = 'Arial';
    font.Size = 12;
    font.IsBold = true;
    font.Color = xlsModule.Color.get_White();
    const rt = xlsModule.RichTextShape.Convert(textBox.RichText);
    rt.SetFont(0, textBox.Text.length - 1, font);

    // Set the background color of the textbox to blue-gray
    textBox.Fill.FillType = xlsModule.ShapeFillType.SolidColor;
    textBox.Fill.ForeKnownColor = xlsModule.ExcelColors.BlueGray;

    // Add the second textbox and set its position and size
    const textBox2 = sheet.TextBoxes.AddTextBox(6, 5, 90, 90);

    // Load a picture and fill the textbox with it
    textBox2.Fill.CustomPicture('logo.png');
    textBox2.Fill.FillType = xlsModule.ShapeFillType.Picture;

    // Set the border of the second textbox to 0
    textBox2.Line.Weight = 0;

    // Save the document
    const outputFileName = 'AddTextBox_output.xlsx';
    workbook.SaveToFile({ fileName: outputFileName });

    // Release resources
    workbook.Dispose();

    // Read the converted file from the VFS and trigger the download
    const fileArray = window.dotnetRuntime.Module.FS.readFile(outputFileName);
    const blob = new Blob([fileArray], { type: 'application/vnd.openxmlformats-officedocument.spreadsheetml.sheet' });
    const url = URL.createObjectURL(blob);
    const a = document.createElement('a');
    a.href = url;
    a.download = outputFileName;
    a.click();
    URL.revokeObjectURL(url);
  };

  return (
    <div style={{ textAlign: 'center', height: '300px' }}>
      <h1>Add TextBox</h1>
      <button onClick={addTextBox}>
        Start
      </button>
    </div>
  );
}

export default App;
The result of adding the textboxes 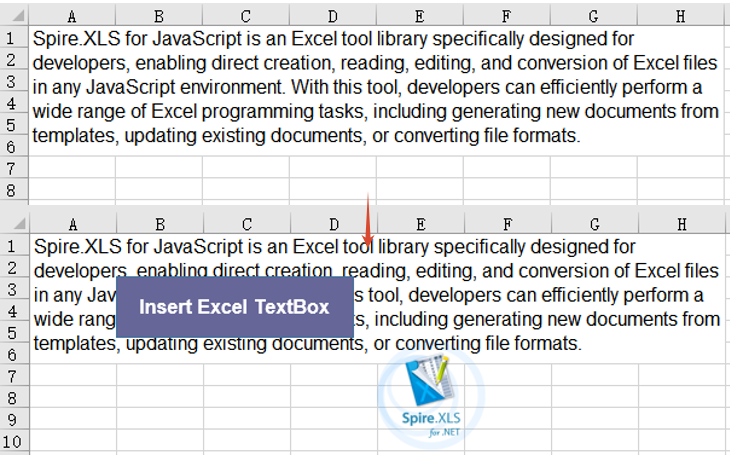
Extract Text and Image from TextBox
When you need to aggregate or reuse annotation information in existing documents, you can iterate through the textboxes and extract their text content and fill images. Spire.XLS for JavaScript gets the number of textboxes with Worksheet.TextBoxes.Count and iterates over each textbox with the Worksheet.TextBoxes.get() method: it reads the Text property to obtain the text content, checks the fill type through Fill.FillType, and extracts the fill image through the Fill.Picture property, finally saving the results as a txt file and a png image file respectively. The main steps are as follows:
- Create a
Workbookobject and use theLoadFromFile()method to load the Excel document. - Use the
Workbook.Worksheets.get()method to get a specific worksheet. - Iterate over each textbox in the
TextBoxescollection withWorksheet.TextBoxes.CountandWorksheet.TextBoxes.get(). - Read the
Textproperty of each textbox to collect the text content. - For a textbox filled with a picture, get its fill image through the
Fill.Pictureproperty and save it as a png file. - Write the collected text into a txt file.
Here is a complete code example showing how to extract text and images from a textbox in React:
function App() {
  const extractTextAndImage = async () => {
    // Get the Spire.XLS WASM module
    const xlsModule = window.wasmModule?.spirexls;

    // Check whether the module is ready
    if (!xlsModule) {
      alert('Spire.Xls is not ready yet');
      return;
    }

    // Load the font and Excel file into the VFS
    await window.spire.FetchFileToVFS('ARIAL.TTF', '/Library/Fonts/', `${process.env.PUBLIC_URL}/font/`);
    const inputFileName = 'TextBox.xlsx';
    await window.spire.FetchFileToVFS(inputFileName, '', `${process.env.PUBLIC_URL}data/`);

    // Load the workbook
    const workbook = new xlsModule.Workbook();
    workbook.LoadFromFile({ fileName: inputFileName });

    // Get the first worksheet
    const sheet = workbook.Worksheets.get(0);

    // Iterate over all textboxes in the worksheet and extract text and pictures
    const textLines = [];
    const pictureFiles = [];
    for (let i = sheet.TextBoxes.Count - 1; i >= 0; i--) {
      const shape = sheet.TextBoxes.get(i);

      // Extract the text in the textbox
      if (shape.Text) {
        textLines.push(shape.Text);
      }

      // Extract the fill picture of the textbox
      if (shape.Fill.FillType === xlsModule.ShapeFillType.Picture) {
        const picture = shape.Fill.Picture;
        const imageFile = 'ExtractedImage' + i + '.png';
        picture.Save(imageFile);
        pictureFiles.push(imageFile);
      }
    }

    // Save the extracted text as a txt file
    const textFile = 'ExtractedText.txt';
    window.dotnetRuntime.Module.FS.writeFile(textFile, textLines.join('\r\n'));

    // Release resources
    workbook.Dispose();

    // Read the extracted txt file from the VFS and trigger the download
    const txtArray = window.dotnetRuntime.Module.FS.readFile(textFile);
    const txtBlob = new Blob([txtArray], { type: 'text/plain' });
    const txtUrl = URL.createObjectURL(txtBlob);
    const txtAnchor = document.createElement('a');
    txtAnchor.href = txtUrl;
    txtAnchor.download = textFile;
    txtAnchor.click();
    URL.revokeObjectURL(txtUrl);

    // Read the extracted picture files from the VFS and trigger the downloads
    for (const imageFile of pictureFiles) {
      const imageArray = window.dotnetRuntime.Module.FS.readFile(imageFile);
      const imageBlob = new Blob([imageArray], { type: 'application/png' });
      const imageUrl = URL.createObjectURL(imageBlob);
      const imageAnchor = document.createElement('a');
      imageAnchor.href = imageUrl;
      imageAnchor.download = imageFile;
      imageAnchor.click();
      URL.revokeObjectURL(imageUrl);
    }
  };

  return (
    <div style={{ textAlign: 'center', height: '300px' }}>
      <h1>Extract Text And Image From TextBox</h1>
      <button onClick={extractTextAndImage}>
        Start
      </button>
    </div>
  );
}

export default App;
The result of extracting the text and image from the textbox 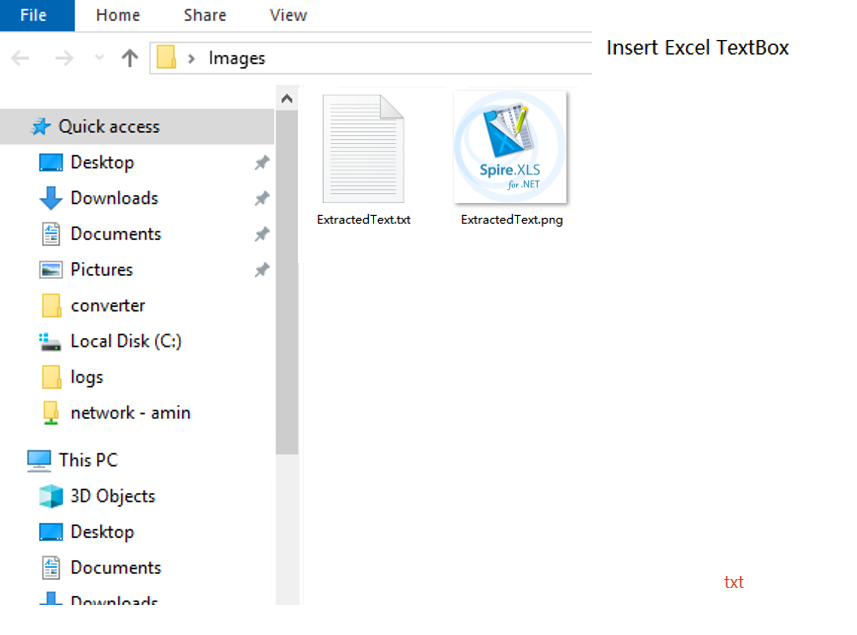
Remove TextBox
When annotation information in a document is no longer needed, you can delete it to keep the worksheet tidy. Spire.XLS for JavaScript deletes a specified textbox by index with the Worksheet.TextBoxes.RemoveAt() method. The main steps are as follows:
- Create a
Workbookobject and use theLoadFromFile()method to load the Excel document. - Use the
Workbook.Worksheets.get()method to get a specific worksheet. - Use the
Worksheet.TextBoxes.RemoveAt()method to delete the textbox at a specified index. - Use the
Workbook.SaveToFile()method to save the document to a specified path.
Here is a complete code example showing how to remove a textbox from a worksheet in React:
function App() {
  const removeTextBox = async () => {
    // Get the Spire.XLS WASM module
    const xlsModule = window.wasmModule?.spirexls;

    // Check whether the module is ready
    if (!xlsModule) {
      alert('Spire.Xls is not ready yet');
      return;
    }

    // Load the font and Excel file into the VFS
    await window.spire.FetchFileToVFS('ARIAL.TTF', '/Library/Fonts/', `${process.env.PUBLIC_URL}/font/`);
    const inputFileName = 'TextBox.xlsx';
    await window.spire.FetchFileToVFS(inputFileName, '', `${process.env.PUBLIC_URL}data/`);

    // Load the workbook
    const workbook = new xlsModule.Workbook();
    workbook.LoadFromFile({ fileName: inputFileName });

    // Get the first worksheet
    const sheet = workbook.Worksheets.get(0);

    // Remove the first textbox
    sheet.TextBoxes.RemoveAt(0);

    // Save the document
    const outputFileName = 'RemoveTextBox_output.xlsx';
    workbook.SaveToFile({ fileName: outputFileName });

    // Release resources
    workbook.Dispose();

    // Read the converted file from the VFS and trigger the download
    const fileArray = window.dotnetRuntime.Module.FS.readFile(outputFileName);
    const blob = new Blob([fileArray], { type: 'application/vnd.openxmlformats-officedocument.spreadsheetml.sheet' });
    const url = URL.createObjectURL(blob);
    const a = document.createElement('a');
    a.href = url;
    a.download = outputFileName;
    a.click();
    URL.revokeObjectURL(url);
  };

  return (
    <div style={{ textAlign: 'center', height: '300px' }}>
      <h1>Remove TextBox</h1>
      <button onClick={removeTextBox}>
        Start
      </button>
    </div>
  );
}

export default App;
The result of removing the textbox 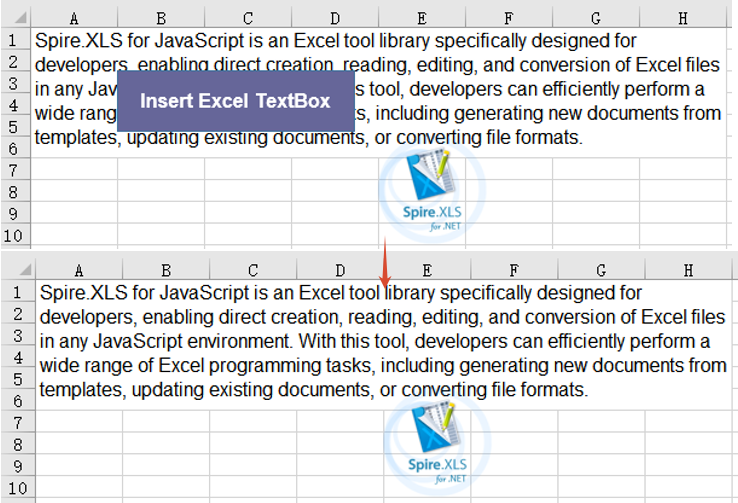
Frequently Asked Questions
The added textbox does not display in the result document
Cause: The row and column coordinates specified in the AddTextBox() method are out of range, or the font file was not loaded into the VFS, so the text in the textbox cannot be rendered properly.
Solution: Make sure the row and column coordinates are within the worksheet range, and ensure the required font has been loaded via FetchFileToVFS() before use, for example:
await window.spire.FetchFileToVFS(
  'ARIAL.TTF', '/Library/Fonts/', '/'
);
An error occurs when extracting an image due to the fill type
Cause: Accessing the Fill.Picture property directly only works for textboxes filled with a picture. If no image fill is set on the textbox (for example, a solid-color fill), accessing this property throws an exception.
Solution: Check whether the Fill.FillType of the textbox is Picture before accessing Fill.Picture; only then get the picture and call the Save() method to save it.
Obtain a Free License
Spire.XLS for JavaScript offers a 30-day full-featured free trial license with no functional limitations. Apply here to evaluate before purchasing.
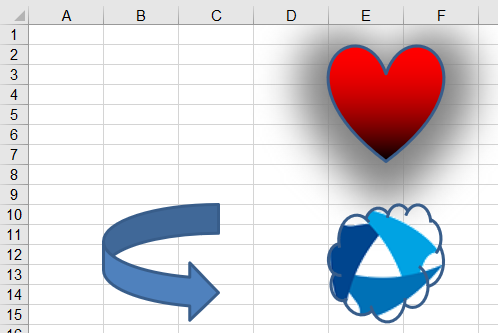
Shapes are graphic elements in Excel that enhance the visual appeal of a worksheet and convey information intuitively, such as arrows, rectangles, ovals, and stars. With shapes, you can add annotations, process-flow indicators, or decorative elements next to your data, making reports more vivid and easier to read. Spire.XLS for JavaScript runs entirely in the browser via WebAssembly, using a virtual file system (VFS) to manage input and output files — no backend server required. It provides a complete API for adding shapes and customizing their appearance (such as fill, rotation angle, text, and shadow), reading text and images from shapes, and deleting specified or all shapes.
This article covers three core features:
For installation and project setup, refer to Integrating Spire.XLS for JavaScript in a React Project. The examples below assume Spire.XLS is installed and the WebAssembly module is initialized.
Add Shapes to Excel
Adding shapes to Excel can highlight key data and beautify the layout of a worksheet. With Spire.XLS for JavaScript, you can add a shape and set its position (row, column) and size (width, height) at once using the PrstGeomShapes.AddPrstGeomShape() method, and then customize its appearance through the shape's properties — set solid, gradient, texture, or picture fill via Fill, add text via Text, set the rotation angle via Rotation, apply a shadow effect via Shadow, and control visibility via Visible. The steps are as follows:
- Create a
Workbookobject and get the default worksheet. - Add shapes using
PrstGeomShapes.AddPrstGeomShape(), setting the shape type, position, and size through the parameters. - Set solid, gradient, texture, or picture fill for the shapes via the
Fillproperty. - Add text to a shape via the
Textproperty, and set the rotation angle via theRotationproperty. - Set a shadow effect for a shape via the
Shadowproperty. - Save the workbook to an Excel file using
SaveToFile().
Below is a complete code example demonstrating how to add and customize various shapes in React:
function App() {
  const addShapes = async () => {
    // Get the Spire.XLS WASM module
    const xlsModule = window.wasmModule?.spirexls;

    // Check if the module is ready
    if (!xlsModule) {
      alert('Spire.Xls is not ready yet');
      return;
    }

    // Load the picture into the virtual file system (VFS)
    await window.spire.FetchFileToVFS('SpireXls.png', '', `${process.env.PUBLIC_URL}/image/`);

    // Create a new workbook and get the default worksheet
    const workbook = new xlsModule.Workbook();
    let sheet = workbook.Worksheets.get(0);

    // Add a triangle shape and fill it with a solid color
    let triangle = sheet.PrstGeomShapes.AddPrstGeomShape(2, 2, 100, 100, xlsModule.PrstGeomShapeType.Triangle);
    triangle.Fill.ForeColor = xlsModule.Color.get_Yellow();
    triangle.Fill.FillType = xlsModule.ShapeFillType.SolidColor;
    // Add text to the triangle and set its rotation angle
    triangle.Text = 'Triangle';
    triangle.Rotation = 45;

    // Add a heart shape and fill it with a gradient color
    let heart = sheet.PrstGeomShapes.AddPrstGeomShape(2, 5, 100, 100, xlsModule.PrstGeomShapeType.Heart);
    heart.Fill.ForeColor = xlsModule.Color.get_Red();
    heart.Fill.FillType = xlsModule.ShapeFillType.Gradient;
    // Set the shadow style for the heart
    heart.Shadow.Angle = 90;
    heart.Shadow.Distance = 10;
    heart.Shadow.Size = 150;
    heart.Shadow.Color = xlsModule.Color.get_Gray();
    heart.Shadow.Blur = 30;
    heart.Shadow.Transparency = 1;
    heart.Shadow.HasCustomStyle = true;

    // Add an arrow shape
    let arrow = sheet.PrstGeomShapes.AddPrstGeomShape(10, 2, 100, 100, xlsModule.PrstGeomShapeType.CurvedRightArrow);

    // Add a cloud shape and fill it with a picture
    let cloud = sheet.PrstGeomShapes.AddPrstGeomShape(10, 5, 100, 100, xlsModule.PrstGeomShapeType.Cloud);
    cloud.Fill.CustomPicture({ im: new xlsModule.Stream('SpireXls.png'), name: 'SpireXls.png' });

    // Save the workbook
    const outputFileName = 'AddShapes.xlsx';
    workbook.SaveToFile(outputFileName);
    workbook.Dispose();

    // Read the file from VFS and trigger download
    const fileArray = window.dotnetRuntime.Module.FS.readFile(outputFileName);
    const blob = new Blob([fileArray], { type: 'application/vnd.openxmlformats-officedocument.spreadsheetml.sheet' });
    const url = URL.createObjectURL(blob);
    const a = document.createElement('a');
    a.href = url;
    a.download = outputFileName;
    a.click();
    URL.revokeObjectURL(url);
  };

  return (
    <div style={{ textAlign: 'center', height: '300px' }}>
      <h1>Add Shapes</h1>
      <button onClick={addShapes}>
        Generate
      </button>
    </div>
  );
}

export default App;
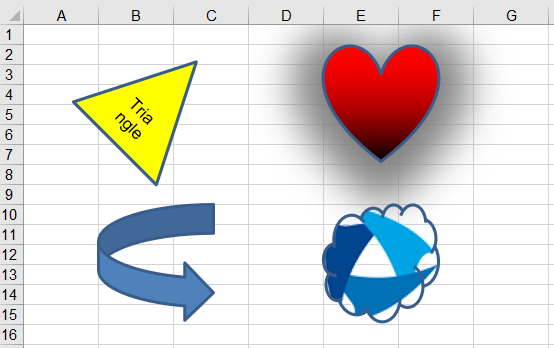
Shapes added to Excel with Spire.XLS for JavaScript
Read Text and Images from Excel Shapes
Reading the text and images from shapes helps you extract the data inside shapes in batch, or reuse and archive shape resources. With Spire.XLS for JavaScript, you can load an Excel file containing shapes, get a specified shape by index via PrstGeomShapes.get(), then read its text content via the Text property and get its fill picture via Fill.Picture. The steps are as follows:
- Create a
Workbookobject and load an existing Excel file containing shapes. - Get the worksheet via
workbook.Worksheets.get(). - Get a specified shape by index using
sheet.PrstGeomShapes.get(). - Read the text in the shape via the
Textproperty. - Read the fill picture in the shape via the
Fill.Pictureproperty. - Save the read text and image as txt and png files.
Below is a complete code example demonstrating how to read text and images from shapes in React (the example loads the AddShapes.xlsx file generated in the previous section):
function App() {
  const readShapes = async () => {
    // Get the Spire.XLS WASM module
    const xlsModule = window.wasmModule?.spirexls;

    // Check if the module is ready
    if (!xlsModule) {
      alert('Spire.Xls is not ready yet');
      return;
    }

    // Load the sample file containing shapes into the virtual file system (VFS)
    let excelFileName = 'AddShapes.xlsx';
    await window.spire.FetchFileToVFS(excelFileName, '', `${process.env.PUBLIC_URL}data/`);

    // Create a workbook object and load the existing file
    const workbook = new xlsModule.Workbook();
    workbook.LoadFromFile({ fileName: excelFileName });

    // Get the first worksheet
    let sheet = workbook.Worksheets.get(0);

    // Get the first shape (triangle) and read the text inside it
    let triangle = sheet.PrstGeomShapes.get(0);
    let text = triangle.Text;

    // Get the fourth shape (cloud) and read the picture inside it
    let cloud = sheet.PrstGeomShapes.get(3);
    let image = cloud.Fill.Picture;
    const imageFileName = 'ExtractImageFromShape.png';
    image.Save(imageFileName);

    workbook.Dispose();

    // Save the read text to a txt file and trigger download
    const textFileName = 'ExtractTextFromShape.txt';
    const textBlob = new Blob([`The text in the first shape is: ${text}`], { type: 'text/plain;charset=utf-8' });
    const textUrl = URL.createObjectURL(textBlob);
    const a1 = document.createElement('a');
    a1.href = textUrl;
    a1.download = textFileName;
    a1.click();
    URL.revokeObjectURL(textUrl);

    // Read the image file from VFS and trigger download
    const fileArray = window.dotnetRuntime.Module.FS.readFile(imageFileName);
    const blob = new Blob([fileArray], { type: 'application/png' });
    const url = URL.createObjectURL(blob);
    const a = document.createElement('a');
    a.href = url;
    a.download = imageFileName;
    a.click();
    URL.revokeObjectURL(url);
  };

  return (
    <div style={{ textAlign: 'center', height: '300px' }}>
      <h1>Read Text and Image from Shapes</h1>
      <button onClick={readShapes}>
        Generate
      </button>
    </div>
  );
}

export default App;
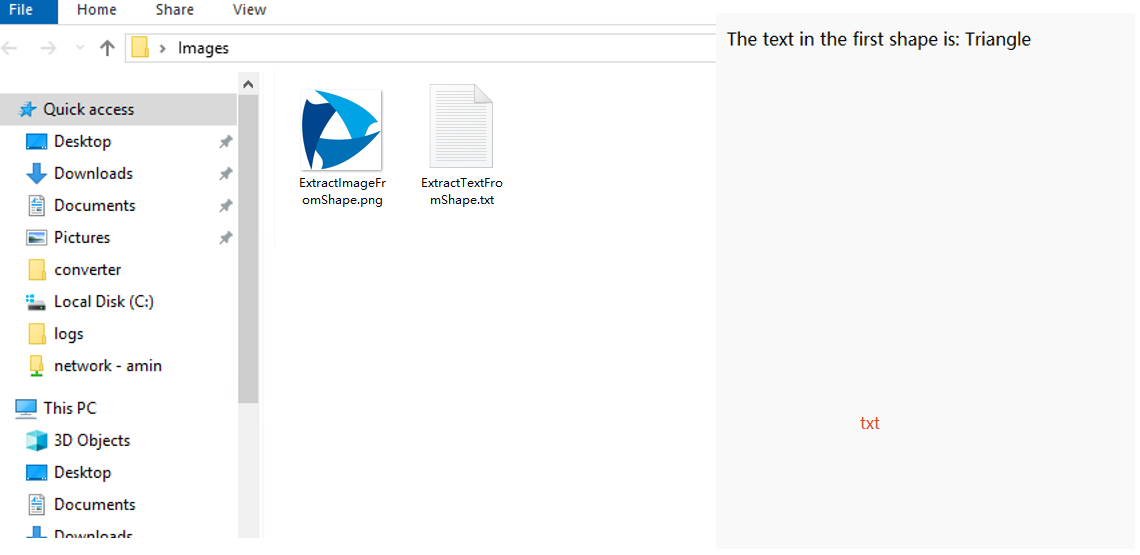
Text and images read from Excel shapes with Spire.XLS for JavaScript
Delete Shapes in Excel
When shapes are no longer needed, deleting them in time keeps the worksheet clean and reduces the file size. With Spire.XLS for JavaScript, you can delete a specified shape via the Remove() method, or iterate through the shape collection and call Remove() on each shape to clear all shapes in a worksheet. The steps are as follows:
- Create a
Workbookobject and load an existing Excel file containing shapes. - Get the worksheet via
workbook.Worksheets.get(). - Get a specified shape using
sheet.PrstGeomShapes.get(), and call itsRemove()method to delete the shape. - Save the workbook to an Excel file using
SaveToFile().
Below is a complete code example demonstrating how to delete shapes in React (the example loads the AddShapes.xlsx file generated in the previous section):
function App() {
  const deleteShapes = async () => {
    // Get the Spire.XLS WASM module
    const xlsModule = window.wasmModule?.spirexls;

    // Check if the module is ready
    if (!xlsModule) {
      alert('Spire.Xls is not ready yet');
      return;
    }

    // Load the sample file containing shapes into the virtual file system (VFS)
    let excelFileName = 'AddShapes.xlsx';
    await window.spire.FetchFileToVFS(excelFileName, '', `${process.env.PUBLIC_URL}data/`);

    // Create a workbook object and load the existing file
    const workbook = new xlsModule.Workbook();
    workbook.LoadFromFile({ fileName: excelFileName });

    // Get the first worksheet
    let sheet = workbook.Worksheets.get(0);

    // Delete the first shape in the worksheet
    sheet.PrstGeomShapes.get(0).Remove();

    // Delete all the shapes in the worksheet
    // for (let i = sheet.PrstGeomShapes.Count - 1; i >= 0; i--) {
    //   sheet.PrstGeomShapes.get(i).Remove();
    // }

    // Save the workbook
    const outputFileName = 'DeleteShapes.xlsx';
    workbook.SaveToFile(outputFileName);
    workbook.Dispose();

    // Read the file from VFS and trigger download
    const fileArray = window.dotnetRuntime.Module.FS.readFile(outputFileName);
    const blob = new Blob([fileArray], { type: 'application/vnd.openxmlformats-officedocument.spreadsheetml.sheet' });
    const url = URL.createObjectURL(blob);
    const a = document.createElement('a');
    a.href = url;
    a.download = outputFileName;
    a.click();
    URL.revokeObjectURL(url);
  };

  return (
    <div style={{ textAlign: 'center', height: '300px' }}>
      <h1>Delete Shapes</h1>
      <button onClick={deleteShapes}>
        Generate
      </button>
    </div>
  );
}

export default App;
Specified shape deleted from Excel with Spire.XLS for JavaScript
FAQ
How to get the name and type of a shape?
Cause: When a worksheet contains many shapes, you may need to identify and locate shapes by their name or type rather than by index.
Solution: Read the Name and PrstShapeType properties of the shape to get its name and type:
// Get the worksheet
let sheet = workbook.Worksheets.get(0);
// Get the first shape
let shape = sheet.PrstGeomShapes.get(0);
// Get the name of the shape
let shapeName = shape.Name;
// Get the type of the shape
let shapeType = shape.PrstShapeType;
How to check whether a shape is currently visible?
Cause: After loading shapes from a file, you may need to determine whether a shape is hidden so that you can decide whether to process it further.
Solution: Read the Visible property of the shape to know its visibility state:
// Get the worksheet
let sheet = workbook.Worksheets.get(0);
// Get the first shape
let shape = sheet.PrstGeomShapes.get(0);
// Check whether the shape is visible
let isVisible = shape.Visible;
Get a Free License
Spire.XLS for JavaScript offers a 30-day full-featured free trial license with no functional limitations. Apply here to evaluate before purchasing.
