Autofit Text and Shapes in PowerPoint with JavaScript in React
When building slides, the amount of text rarely matches the size of its shape: a paragraph that is a little too long spills past the border, while a short caption leaves a large empty area. Fixing this by hand — reducing font sizes or dragging shape edges page by page — is slow and hard to keep consistent across a deck. Autofit rules let the text and the shape accommodate each other automatically, so later content changes do not require another round of layout work.
This article uses Spire.Presentation for JavaScript to control the relative size of text and shapes through the AutofitType property of a TextFrame, which offers three modes: keep the shape size, shrink the text, or resize the shape. The whole process runs locally in the browser through WebAssembly, requires no Office installation and no back-end service, and keeps the presentation from leaving the user's device.
This article covers two features:
For installation and project configuration, see Integrating Spire.Presentation for JavaScript in a React Project. The examples below assume that Spire.Presentation for JavaScript is installed and the WebAssembly module has been initialized.
Shrink overflowing text to fit the shape
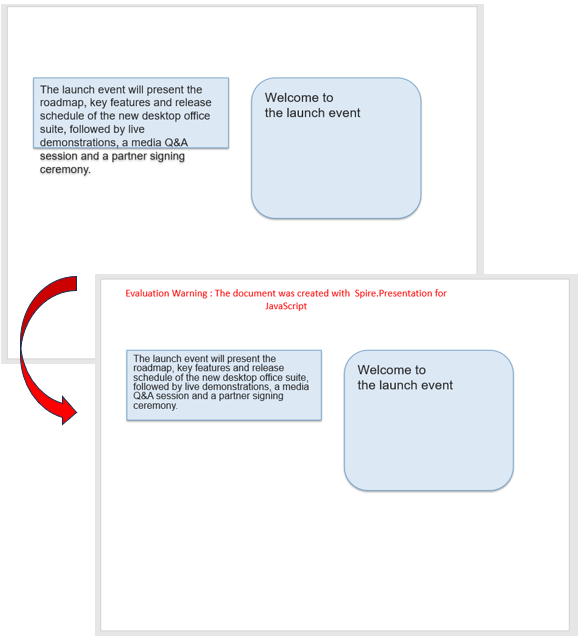
When text runs past the edge of its shape, the extra lines sit outside the border and break the layout; reducing the font size by hand, on the other hand, may shrink other text that was already fine. Setting the TextFrame autofit mode to shrink text on overflow keeps the shape at its original size and only scales down the text that does not fit, so the content still lands inside the original outline.
| Usage | Result |
|---|---|
slide.Shapes.get_Item(index) |
Gets a shape on the slide by index, starting from 0 |
shape.TextFrame.AutofitType = TextAutofitType.Normal |
Shrinks the text when it overflows, keeping the shape size unchanged |
The steps are:
- Get the Spire.Presentation WASM module and make sure it is ready, then load the font file and the presentation into the VFS.
- Create a
Presentationobject, load the presentation withLoadFromFile(), and get the first slide withSlides.get_Item(0). - Get the shape whose text overflows its border with
Shapes.get_Item(index). - Set the shape's
TextFrame.AutofitTypetoTextAutofitType.Normalso the overflowing text shrinks to fit the shape. - Save the presentation with
SaveToFile(), release it withPresentation.Dispose(), then read the file from the VFS and trigger the download.
The code for shrinking overflowing text to fit the shape is as follows:
function App() {
  const shrinkTextOnOverflow = async () => {
    // Get the Spire.Presentation WASM module
    const pptModule = window.wasmModule?.spirepresentation;

    // Check that the module is ready
    if (!pptModule) {
      alert('Spire.Presentation is not ready yet');
      return;
    }

    // Load the font and the presentation into the VFS
    await window.spire.FetchFileToVFS('ARIAL.TTF', '/Library/Fonts/', `${process.env.PUBLIC_URL}/font/`);
    const inputFileName = 'PresentationFit.pptx';
    await window.spire.FetchFileToVFS(inputFileName, '', `${process.env.PUBLIC_URL}data/`);

    // Load the presentation and get the first slide
    const ppt = new pptModule.Presentation();
    ppt.LoadFromFile(inputFileName);
    const slide = ppt.Slides.get_Item(0);

    // Take the rectangle whose text overflows and shrink the text to fit the shape
    const shape = slide.Shapes.get_Item(0);
    shape.TextFrame.AutofitType = pptModule.TextAutofitType.Normal;

    // Save the presentation
    const outputFileName = 'ShrinkText_result.pptx';
    ppt.SaveToFile({ file: outputFileName, fileFormat: pptModule.FileFormat.Pptx2013 });
    ppt.Dispose();

    // Read the result file from the VFS and trigger the download
    const fileArray = window.dotnetRuntime.Module.FS.readFile(outputFileName);
    const blob = new Blob([fileArray], { type: 'application/vnd.openxmlformats-officedocument.presentationml.presentation' });
    const url = URL.createObjectURL(blob);
    const a = document.createElement('a');
    a.href = url;
    a.download = outputFileName;
    a.click();
    URL.revokeObjectURL(url);
  };

  return (
    <div style={{ textAlign: 'center', height: '300px' }}>
      <h1>Shrink Text</h1>
      <button onClick={shrinkTextOnOverflow}>
        Start
      </button>
    </div>
  );
}

export default App;
Presentation after shrinking overflowing text to fit the shape:
Resize a shape to fit its text
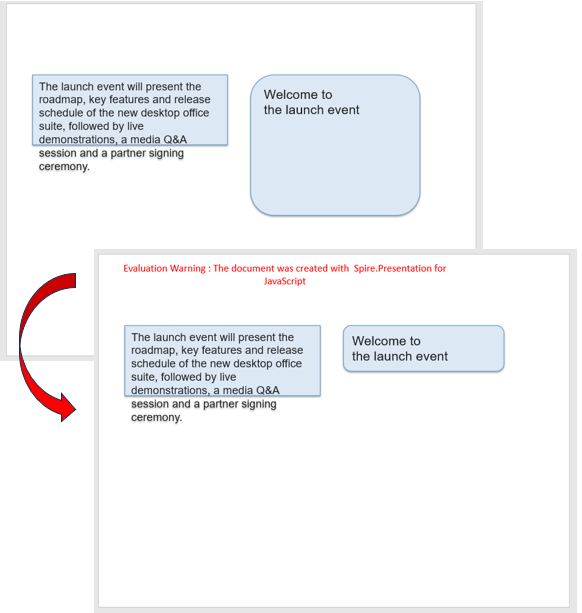
A shape that is much taller or wider than its text leaves a large blank area on the slide and makes neighboring elements hard to align. Setting the autofit mode to resize the shape to fit its text keeps the font size unchanged and recalculates the shape from the amount of text, so the outline hugs the content and the layout becomes more compact.
| Usage | Result |
|---|---|
slide.Shapes.get_Item(index) |
Gets a shape on the slide by index |
shape.TextFrame.AutofitType = TextAutofitType.Shape |
Resizes the shape to fit its text, keeping the font size unchanged |
The steps are:
- Get the Spire.Presentation WASM module and make sure it is ready, then load the font file and the presentation into the VFS.
- Create a
Presentationobject, load the presentation withLoadFromFile(), and get the first slide withSlides.get_Item(0). - Get the shape that is much taller than its text with
Shapes.get_Item(index). - Set the shape's
TextFrame.AutofitTypetoTextAutofitType.Shapeso the shape shrinks to fit the content. - Save the presentation with
SaveToFile(), release it withPresentation.Dispose(), then read the file from the VFS and trigger the download.
The code for resizing a shape to fit its text is as follows:
function App() {
  const resizeShapeToFitText = async () => {
    // Get the Spire.Presentation WASM module
    const pptModule = window.wasmModule?.spirepresentation;

    // Check that the module is ready
    if (!pptModule) {
      alert('Spire.Presentation is not ready yet');
      return;
    }

    // Load the font and the presentation into the VFS
    await window.spire.FetchFileToVFS('ARIAL.TTF', '/Library/Fonts/', `${process.env.PUBLIC_URL}/font/`);
    const inputFileName = 'PresentationFit.pptx';
    await window.spire.FetchFileToVFS(inputFileName, '', `${process.env.PUBLIC_URL}data/`);

    // Load the presentation and get the first slide
    const ppt = new pptModule.Presentation();
    ppt.LoadFromFile(inputFileName);
    const slide = ppt.Slides.get_Item(0);

    // Take the tall rounded rectangle and shrink the shape to fit its text
    const shape = slide.Shapes.get_Item(1);
    shape.TextFrame.AutofitType = pptModule.TextAutofitType.Shape;

    // Save the presentation
    const outputFileName = 'FitShape_result.pptx';
    ppt.SaveToFile({ file: outputFileName, fileFormat: pptModule.FileFormat.Pptx2013 });
    ppt.Dispose();

    // Read the result file from the VFS and trigger the download
    const fileArray = window.dotnetRuntime.Module.FS.readFile(outputFileName);
    const blob = new Blob([fileArray], { type: 'application/vnd.openxmlformats-officedocument.presentationml.presentation' });
    const url = URL.createObjectURL(blob);
    const a = document.createElement('a');
    a.href = url;
    a.download = outputFileName;
    a.click();
    URL.revokeObjectURL(url);
  };

  return (
    <div style={{ textAlign: 'center', height: '300px' }}>
      <h1>Fit Shape</h1>
      <button onClick={resizeShapeToFitText}>
        Start
      </button>
    </div>
  );
}

export default App;
Presentation after resizing a shape to fit its text:
FAQ
How do I turn autofit off and restore the original text size
Cause: After text has been shrunk, it is displayed at the reduced size; to restore it, the autofit mode has to be set back to no autofit.
Solution: Set the shape's AutofitType to TextAutofitType.None:
shape.TextFrame.AutofitType = pptModule.TextAutofitType.None;
The saved presentation then carries no autofit rule, so the text keeps its original font size and overflows the shape when it is too long.
What is the difference between the three autofit modes
Cause: TextAutofitType decides which side stays unchanged — the text or the shape — and has three values.
Solution: Choose one according to the layout:
TextAutofitType.None: both the shape size and the font size stay unchanged, and text that does not fit keeps overflowing.TextAutofitType.Normal: the shape size stays unchanged, and the text is scaled down when it does not fit.TextAutofitType.Shape: the font size stays unchanged, and the shape is recalculated from the amount of text.
Get a Free License
If you wish to delete the evaluation message from the resulting documents, or to get rid of function limitations, please contact sales to obtain a valid 30-day temporary license.
Add Text Boxes to PowerPoint Slides with JavaScript in React
Titles, explanations and key points on a slide are mostly presented as text. Inserting a text box and adjusting its formatting page by page takes time and is hard to keep consistent across batch-generated documents; writing the text directly into fixed layout placeholders also limits control over position and style. Creating text boxes through code lets you write the text and control the layout while the presentation is generated, so the content and its appearance stay stable and reusable.
This article uses Spire.Presentation for JavaScript to add text boxes to PowerPoint slides in the browser. The whole process runs locally on the user's device through WebAssembly, requires no Office installation and no back-end service, and keeps the presentation from leaving the browser.
This article covers two core features:
For installation and project configuration, see Integrating Spire.Presentation for JavaScript in a React Project. The examples below assume that Spire.Presentation for JavaScript is installed and the WebAssembly module has been initialized.
Add a Text Box to a PowerPoint Slide
A text box carries a piece of text that stands on its own, can be placed anywhere on the page, and is not tied to the placeholders of a layout. When adding a text box, define its position and size first and then write the text, so the content lands exactly where it is expected; removing the default fill and outline leaves only the text visible.
| Usage | Result |
|---|---|
slide.Shapes.AppendShape({ shapeType, rectangle }) |
Add a rectangle inside the given area to serve as a text box |
RectangleF.FromLTRB(left, top, right, bottom) |
Define the position and size of the text box with its top-left and bottom-right coordinates |
shape.Fill.FillType = FillFormatType.None |
Remove the fill of the text box |
shape.Line.FillType = FillFormatType.None |
Remove the outline of the text box |
shape.AppendTextFrame(text) |
Write a piece of text into the text box |
shape.TextFrame.TextRange |
Get the text in the text box to set its size and color |
shape.TextFrame.Paragraphs.get_Item(index).Alignment |
Set the horizontal alignment of a paragraph inside the text box |
The steps are:
- Get the Spire.Presentation WASM module and make sure it is ready, load the font file into the VFS, and create a
Presentationobject. - Get the first slide with
Presentation.Slides.get_Item(0). - Add a
ShapeType.Rectangleshape withShapes.AppendShape(), and define its position and size withRectangleF.FromLTRB(). - Set
Fill.FillTypeandLine.FillTypetoFillFormatType.Noneto remove the fill and the outline of the text box. - Call
shape.AppendTextFrame()to write the text, then set the font size and the text color throughTextFrame.TextRange, and center the paragraph. - Call
Presentation.SaveToFile()to save the result file andDispose()to release the presentation, then read the file from the VFS and trigger the download.
The code for adding a text box to a PowerPoint slide is as follows:
function App() {
  const addTextBox = async () => {
    // Get the Spire.Presentation WASM module
    const pptModule = window.wasmModule?.spirepresentation;

    // Check that the module is ready
    if (!pptModule) {
      alert('Spire.Presentation is not ready yet');
      return;
    }

    // Load the font file into the VFS
    await window.spire.FetchFileToVFS('ARIAL.TTF', '/Library/Fonts/', `${process.env.PUBLIC_URL}/font/`);

    // Create a presentation and get the first slide
    const ppt = new pptModule.Presentation();
    const slide = ppt.Slides.get_Item(0);

    // Add a rectangle shape to serve as a text box
    const shape = slide.Shapes.AppendShape({
      shapeType: pptModule.ShapeType.Rectangle,
      rectangle: pptModule.RectangleF.FromLTRB(60, 180, 660, 360),
    });

    // Remove the fill and the outline, leaving only the text
    shape.Fill.FillType = pptModule.FillFormatType.None;
    shape.Line.FillType = pptModule.FillFormatType.None;

    // Write text into the text box
    shape.AppendTextFrame('Quarterly Business Review');

    // Set the font size and the text color
    const textRange = shape.TextFrame.TextRange;
    textRange.FontHeight = 40;
    textRange.Fill.FillType = pptModule.FillFormatType.Solid;
    textRange.Fill.SolidColor.Color = pptModule.Color.get_Black();
    shape.TextFrame.Paragraphs.get_Item(0).Alignment = pptModule.TextAlignmentType.Center;

    // Save the result file
    const outputFileName = 'AddTextBox_result.pptx';
    ppt.SaveToFile({ file: outputFileName, fileFormat: pptModule.FileFormat.Pptx2013 });
    ppt.Dispose();

    // Read the generated file from the VFS and trigger the download
    const fileArray = window.dotnetRuntime.Module.FS.readFile(outputFileName);
    const blob = new Blob([fileArray], { type: 'application/vnd.openxmlformats-officedocument.presentationml.presentation' });
    const url = URL.createObjectURL(blob);
    const a = document.createElement('a');
    a.href = url;
    a.download = outputFileName;
    a.click();
    URL.revokeObjectURL(url);
  };

  return (
    <div style={{ textAlign: 'center', height: '300px' }}>
      <h1>Add a Text Box</h1>
      <button onClick={addTextBox}>
        Add a text box
      </button>
    </div>
  );
}

export default App;
Presentation after adding a text box to a blank slide:

Style a Text Box with Fill, Border, Shadow and Rotation
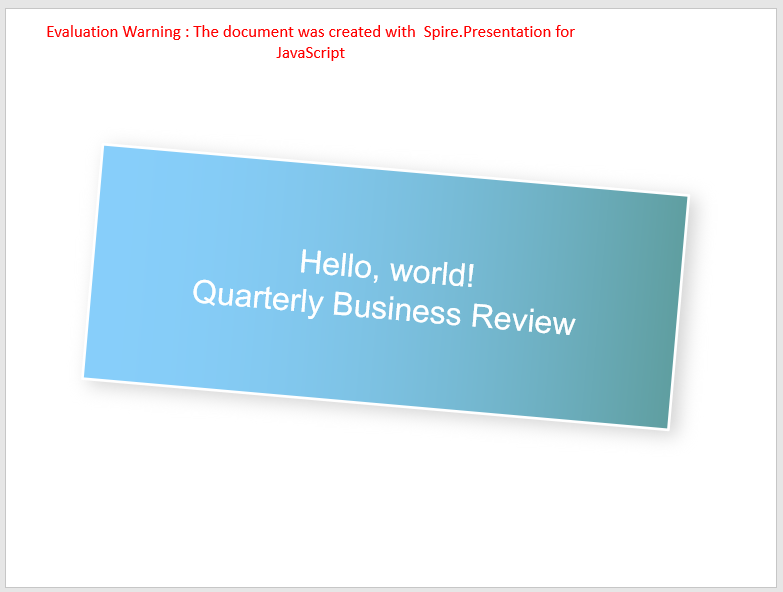
A newly added text box is only an area for text and often looks plain on a designed page. Giving it a gradient fill, a border and an outer shadow, and rotating it slightly, turns it into a distinct block of information that stands apart from the background and other elements; the text color is adjusted as well so it stays legible on the darker fill.
| Usage | Result |
|---|---|
shape.Fill.FillType = FillFormatType.Gradient |
Set the fill of the text box to a gradient |
shape.Fill.Gradient.GradientShape = GradientShapeType.Linear |
Set the gradient type to linear |
shape.Fill.Gradient.GradientStops.Append({ position, color }) |
Add color stops to the gradient and determine its direction and colors |
shape.Line.FillType = FillFormatType.Solid |
Set the border of the text box to a solid line |
shape.Line.Width = n |
Set the width of the border |
shape.Line.SolidFillColor.Color = Color.get_xxx() |
Set the border color |
new OuterShadowEffect() |
Create an outer shadow effect object |
shadowEffect.BlurRadius, shadowEffect.Direction, shadowEffect.Distance |
Set the blur radius, direction and distance of the shadow |
shadowEffect.ColorFormat.Color = Color.get_xxx() |
Set the shadow color |
shape.EffectDag.OuterShadowEffect = shadowEffect |
Apply the outer shadow to the text box |
shape.Rotation = n |
Rotate the text box by an angle |
textRange.FontHeight = n |
Set the font size of the text in the text box |
textRange.Fill.SolidColor.Color = Color.get_xxx() |
Set the text color |
The steps are:
- Get the Spire.Presentation WASM module and make sure it is ready, load the font file into the VFS, create a
Presentationobject and get the first slide. - Add a rectangle text box with
Shapes.AppendShape(), and write two lines of text withshape.AppendTextFrame(). - Through
TextFrame.TextRange, set the text to white at 30 points, specify the fonts withLatinFontandEastAsianFont, and center each paragraph. - Set
Line.FillTypetoFillFormatType.Solid, and useLine.WidthandLine.SolidFillColor.Colorto give the text box a white border. - Set
Fill.FillTypetoFillFormatType.Gradient, specify a linear gradient withGradientShape, and add the light blue and cadet blue stops withGradientStops.Append(). - Create an
OuterShadowEffect, setBlurRadius,Direction,DistanceandColorFormat.Color, and assign it toEffectDag.OuterShadowEffect. - Rotate the text box 5 degrees clockwise with
Rotation, then save the result file, release the presentation and read the file from the VFS to trigger the download.
The code for styling the text box is as follows:
function App() {
  const styleTextBox = async () => {
    // Get the Spire.Presentation WASM module
    const pptModule = window.wasmModule?.spirepresentation;

    // Check that the module is ready
    if (!pptModule) {
      alert('Spire.Presentation is not ready yet');
      return;
    }

    // Load the font file into the VFS
    await window.spire.FetchFileToVFS('ARIAL.TTF', '/Library/Fonts/', `${process.env.PUBLIC_URL}/font/`);

    // Create a presentation and get the first slide
    const ppt = new pptModule.Presentation();
    const slide = ppt.Slides.get_Item(0);

    // Add a rectangle text box
    const shape = slide.Shapes.AppendShape({
      shapeType: pptModule.ShapeType.Rectangle,
      rectangle: pptModule.RectangleF.FromLTRB(80, 150, 630, 370),
    });

    // Write two lines of text and set them to white, 30 points
    shape.AppendTextFrame('Hello, world!\nQuarterly Business Review');
    const textRange = shape.TextFrame.TextRange;
    textRange.Fill.FillType = pptModule.FillFormatType.Solid;
    textRange.Fill.SolidColor.Color = pptModule.Color.get_White();
    textRange.FontHeight = 30;
    textRange.LatinFont = new pptModule.TextFont('Arial');
    textRange.EastAsianFont = new pptModule.TextFont('Arial');
    for (let i = 0; i < shape.TextFrame.Paragraphs.Count; i++) {
      shape.TextFrame.Paragraphs.get_Item(i).Alignment = pptModule.TextAlignmentType.Center;
    }

    // Give the text box a white solid outline
    shape.Line.FillType = pptModule.FillFormatType.Solid;
    shape.Line.Width = 2.5;
    shape.Line.SolidFillColor.Color = pptModule.Color.get_White();

    // Fill the text box with a linear gradient from light sky blue to cadet blue
    shape.Fill.FillType = pptModule.FillFormatType.Gradient;
    shape.Fill.Gradient.GradientShape = pptModule.GradientShapeType.Linear;
    shape.Fill.Gradient.GradientStops.Append({ position: 0, color: pptModule.Color.get_LightSkyBlue() });
    shape.Fill.Gradient.GradientStops.Append({ position: 1, color: pptModule.Color.get_CadetBlue() });

    // Add an outer shadow
    const shadowEffect = new pptModule.OuterShadowEffect();
    shadowEffect.BlurRadius = 20;
    shadowEffect.Direction = 30;
    shadowEffect.Distance = 8;
    shadowEffect.ColorFormat.Color = pptModule.Color.get_LightGray();
    shape.EffectDag.OuterShadowEffect = shadowEffect;

    // Rotate the text box 5 degrees clockwise
    shape.Rotation = 5;

    // Save the result file
    const outputFileName = 'StyleTextBox_result.pptx';
    ppt.SaveToFile({ file: outputFileName, fileFormat: pptModule.FileFormat.Pptx2013 });
    ppt.Dispose();

    // Read the generated file from the VFS and trigger the download
    const fileArray = window.dotnetRuntime.Module.FS.readFile(outputFileName);
    const blob = new Blob([fileArray], { type: 'application/vnd.openxmlformats-officedocument.presentationml.presentation' });
    const url = URL.createObjectURL(blob);
    const a = document.createElement('a');
    a.href = url;
    a.download = outputFileName;
    a.click();
    URL.revokeObjectURL(url);
  };

  return (
    <div style={{ textAlign: 'center', height: '300px' }}>
      <h1>Style the Text Box</h1>
      <button onClick={styleTextBox}>
        Style the text box
      </button>
    </div>
  );
}

export default App;
Presentation after styling a text box with a gradient fill, border, shadow and rotation:
FAQ
How to keep long text from wrapping
Cause: A text box wraps at its boundary by default, and a long sentence split into several lines can disrupt the layout.
Solution: Set WordWrap to false so the text stays on one line and runs beyond the text box:
shape.TextFrame.WordWrap = false;
How to set vertical text in a text box
Cause: Text is arranged horizontally by default, so a vertical title or side label needs an explicit direction.
Solution: Set VerticalTextType to VerticalTextType.Vertical to turn the text into a vertical layout; use VerticalTextType.EastAsianVertical if CJK characters should stay upright:
shape.TextFrame.VerticalTextType = pptModule.VerticalTextType.Vertical;
How to adjust the distance between text and the text box border
Cause: Text sits close to the edge by default and can look cramped when there is a lot of text or a thick border.
Solution: Set the four inner margin properties to control the distance:
shape.TextFrame.MarginLeft = 60;
shape.TextFrame.MarginTop = 40;
shape.TextFrame.MarginRight = 20;
shape.TextFrame.MarginBottom = 10;
How to remove a text box from a slide
Cause: A text box is an item in the shape collection of the slide; changing its text does not remove the text box itself.
Solution: Get the text box object and remove it with Remove() on the shape collection:
const shape = slide.Shapes.get_Item(0);
slide.Shapes.Remove(shape);
Get a Free License
If you wish to delete the evaluation message from the resulting documents, or to get rid of function limitations, please contact sales to obtain a valid 30-day temporary license.
Create SmartArt Graphics in PowerPoint with JavaScript in React
When a process, hierarchy, or cycle is written as a list of sentences, readers have to compare line after line to work out the order and the relationships. A SmartArt graphic arranges the nodes according to a layout and draws the connections directly, and it re-flows as nodes are added to it. Drawing the same diagram by hand in PowerPoint is slow and makes consistent spacing and alignment hard to keep.
This article uses Spire.Presentation for JavaScript to create and adjust SmartArt graphics in PowerPoint in the browser. The whole process runs locally on the user's device through WebAssembly, requires no Office installation and no back-end service, and the presentation never leaves the browser.
The article covers two features:
For installation and project configuration, see Integrating Spire.Presentation for JavaScript in a React Project. The examples below assume that Spire.Presentation for JavaScript is installed and the WebAssembly module has been initialized.
Create SmartArt Graphics in PowerPoint
To create SmartArt graphics in PowerPoint, start by choosing a layout that matches the relationship in the content, then write the text into the nodes. The layout decides how the nodes are arranged and where the connectors run; it is specified once at creation, and only the node text needs to be maintained afterwards. Once inserted, the graphic can still be moved and resized like any other shape.
| What you write | What you get |
|---|---|
slide.Shapes.AppendSmartArt(x, y, width, height, layoutType) |
Adds a SmartArt graphic of the given layout at the specified position and size |
smartArt.Nodes.Count |
The number of nodes currently in the graphic |
smartArt.Nodes.RemoveNode({ index: i }) |
Removes the node at index i |
smartArt.Nodes.AddNode() |
Appends a node to the end of the node collection |
node.TextFrame.Text |
Sets or reads the text of a node |
The steps are:
- Get the Spire.Presentation WASM module, make sure it is ready, and load the font file and the presentation into the VFS.
- Create a
Presentationobject, callLoadFromFile()to load the presentation, and useSlides.get_Item()to get the slide that will hold the graphic. - Call
Shapes.AppendSmartArt()with the position, size, and aSmartArtLayoutTypeto get theISmartArtobject. - Walk from
Nodes.Countdownwards and callNodes.RemoveNode()to remove the placeholder nodes that come with the layout. - Call
Nodes.AddNode()in order and write the text throughTextFrame.Text. - Call
Presentation.SaveToFile()to save the result, release the presentation withDispose(), then read the file from the VFS and trigger the download.
The code for creating SmartArt graphics in PowerPoint is shown below:
function App() {
  const createSmartArt = async () => {
    // Get the Spire.Presentation WASM module
    const pptModule = window.wasmModule?.spirepresentation;

    // Check that the module is ready
    if (!pptModule) {
      alert('Spire.Presentation is not ready yet');
      return;
    }

    // Load the font and the presentation into the VFS
    await window.spire.FetchFileToVFS('ARIAL.TTF', '/Library/Fonts/', `${process.env.PUBLIC_URL}/font/`);
    const inputFileName = 'SmartArt.pptx';
    await window.spire.FetchFileToVFS(inputFileName, '', `${process.env.PUBLIC_URL}data/`);

    // Load the presentation and get the first slide
    const ppt = new pptModule.Presentation();
    ppt.LoadFromFile(inputFileName);
    const slide = ppt.Slides.get_Item(0);

    // Add a process-layout SmartArt at the specified position and size
    const smartArt = slide.Shapes.AppendSmartArt(50, 160, 620, 200, pptModule.SmartArtLayoutType.BasicProcess);

    // Remove the placeholder nodes that come with the layout
    for (let i = smartArt.Nodes.Count - 1; i >= 0; i--) {
      smartArt.Nodes.RemoveNode({ index: i });
    }

    // Add the nodes in process order and write their text
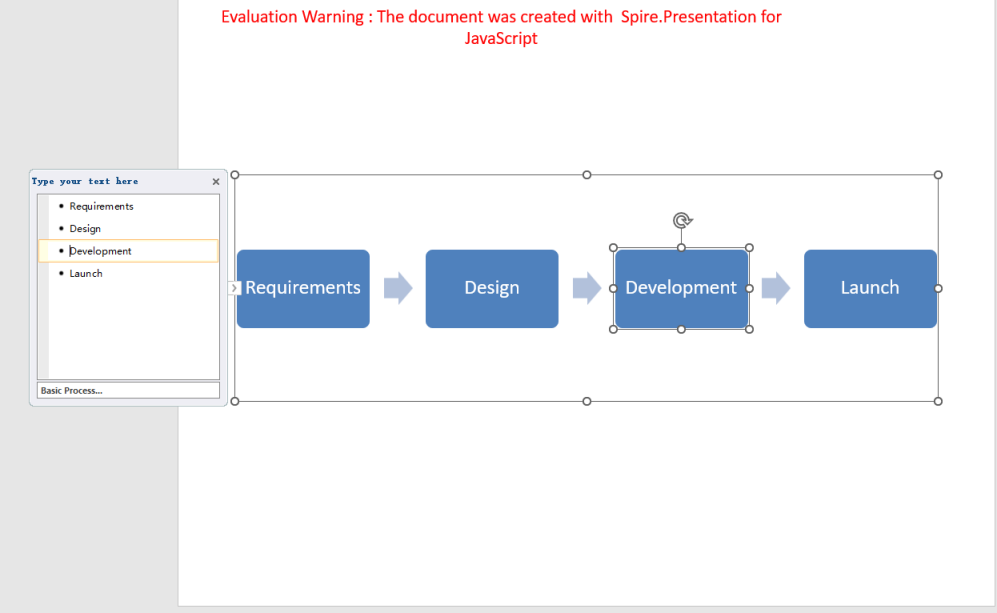
    const steps = ['Requirements', 'Design', 'Development', 'Launch'];
    for (const text of steps) {
      const node = smartArt.Nodes.AddNode();
      node.TextFrame.Text = text;
    }

    // Save the result file
    const outputFileName = 'CreateSmartArt.pptx';
    ppt.SaveToFile({ file: outputFileName, fileFormat: pptModule.FileFormat.Pptx2013 });
    ppt.Dispose();

    // Read the generated file from the VFS and trigger the download
    const fileArray = window.dotnetRuntime.Module.FS.readFile(outputFileName);
    const blob = new Blob([fileArray], { type: 'application/vnd.openxmlformats-officedocument.presentationml.presentation' });
    const url = URL.createObjectURL(blob);
    const a = document.createElement('a');
    a.href = url;
    a.download = outputFileName;
    a.click();
    URL.revokeObjectURL(url);
  };

  return (
    <div style={{ textAlign: 'center', height: '300px' }}>
      <h1>Create SmartArt Graphics</h1>
      <button onClick={createSmartArt}>
        Create SmartArt
      </button>
    </div>
  );
}

export default App;
Presentation after creating a SmartArt graphic in PowerPoint:
Add Nodes to a SmartArt Graphic
When you add nodes to a SmartArt graphic, you can build the hierarchy level by level: add a top-level node first, then add subordinate nodes to its child node collection, or insert one at a given position so the new node lands in the right order. The text and reporting relations of the existing nodes stay as they are, and the graphic re-flows around the new node count.
| What you write | What you get |
|---|---|
smartArt.Nodes.AddNode() |
Adds a node at the top level of the graphic |
node.ChildNodes.AddNode() |
Appends a child node under the specified node |
node.ChildNodes.AddNodeByPosition(position) |
Inserts a child node at the specified position under the node and shifts the following children back |
node.TextFrame.Text |
Sets the text of the new node |
The steps are:
- Get the Spire.Presentation WASM module, make sure it is ready, and load the font file and the presentation into the VFS.
- Create a
Presentationobject, callLoadFromFile()to load the presentation, useSlides.get_Item()to get the slide, and add an organization-chart SmartArt withShapes.AppendSmartArt(). - Iterate the node collection backwards and clear the placeholder nodes that come with the layout with
Nodes.RemoveNode(). - Call
Nodes.AddNode()to add the top-level node and write its text withTextFrame.Text. - Add departments under the top-level node with
ChildNodes.AddNode(), then insert one at a given position withChildNodes.AddNodeByPosition(). - Call
AddNode()on a department'sChildNodesto add the next level. - Call
Presentation.SaveToFile()to save the result, release the presentation withDispose(), then read the file from the VFS and trigger the download.
The code for adding nodes to a SmartArt graphic is shown below:
function App() {
  const addNodes = async () => {
    // Get the Spire.Presentation WASM module
    const pptModule = window.wasmModule?.spirepresentation;

    // Check that the module is ready
    if (!pptModule) {
      alert('Spire.Presentation is not ready yet');
      return;
    }

    // Load the font and the presentation into the VFS
    await window.spire.FetchFileToVFS('ARIAL.TTF', '/Library/Fonts/', `${process.env.PUBLIC_URL}/font/`);
    const inputFileName = 'SmartArt.pptx';
    await window.spire.FetchFileToVFS(inputFileName, '', `${process.env.PUBLIC_URL}data/`);

    // Load the presentation and get the first slide
    const ppt = new pptModule.Presentation();
    ppt.LoadFromFile(inputFileName);
    const slide = ppt.Slides.get_Item(0);

    // Add an organization-chart SmartArt and clear its placeholder nodes
    const smartArt = slide.Shapes.AppendSmartArt(50, 160, 620, 200, pptModule.SmartArtLayoutType.OrganizationChart);
    for (let i = smartArt.Nodes.Count - 1; i >= 0; i--) {
      smartArt.Nodes.RemoveNode({ index: i });
    }

    // Top-level node
    const root = smartArt.Nodes.AddNode();
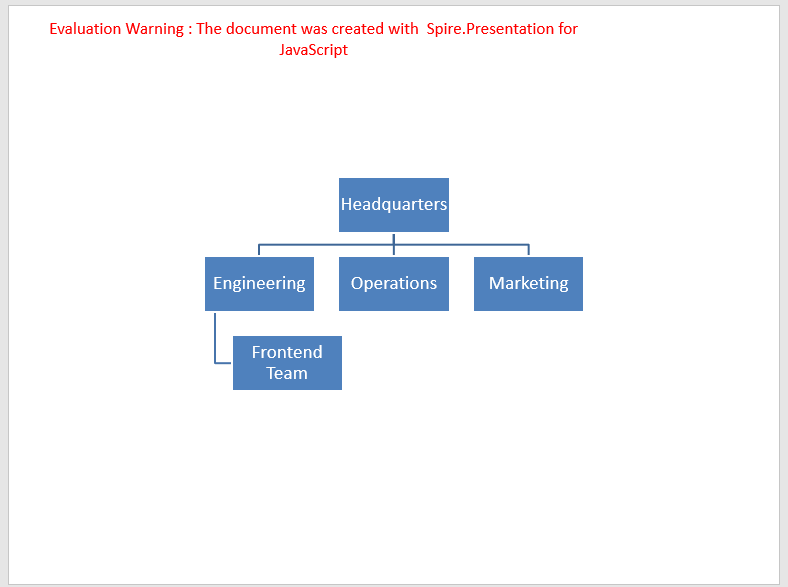
    root.TextFrame.Text = 'Headquarters';

    // Add departments under the top-level node
    const dev = root.ChildNodes.AddNode();
    dev.TextFrame.Text = 'Engineering';
    const mkt = root.ChildNodes.AddNode();
    mkt.TextFrame.Text = 'Marketing';

    // Insert a department at a given position
    const ops = root.ChildNodes.AddNodeByPosition(1);
    ops.TextFrame.Text = 'Operations';

    // Add a team under the engineering department
    const team = dev.ChildNodes.AddNode();
    team.TextFrame.Text = 'Frontend Team';

    // Save the result file
    const outputFileName = 'AddSmartArtNodes.pptx';
    ppt.SaveToFile({ file: outputFileName, fileFormat: pptModule.FileFormat.Pptx2013 });
    ppt.Dispose();

    // Read the generated file from the VFS and trigger the download
    const fileArray = window.dotnetRuntime.Module.FS.readFile(outputFileName);
    const blob = new Blob([fileArray], { type: 'application/vnd.openxmlformats-officedocument.presentationml.presentation' });
    const url = URL.createObjectURL(blob);
    const a = document.createElement('a');
    a.href = url;
    a.download = outputFileName;
    a.click();
    URL.revokeObjectURL(url);
  };

  return (
    <div style={{ textAlign: 'center', height: '300px' }}>
      <h1>Add SmartArt Nodes</h1>
      <button onClick={addNodes}>
        Add Nodes
      </button>
    </div>
  );
}

export default App;
Presentation after adding nodes to the SmartArt graphic:
FAQ
What is the difference between Nodes and ChildNodes
Cause: Nodes returns the nodes at every level of the graphic, while ChildNodes returns only the direct children of one node. The two collections serve different purposes.
Solution: Use Nodes to walk the whole graphic, and a node's ChildNodes to read, add, or remove its direct children:
// Every node in the graphic
for (let i = 0; i < smartArt.Nodes.Count; i++) {
  console.log(smartArt.Nodes.get_Item(i).TextFrame.Text);
}

// The direct children of one node
const root = smartArt.Nodes.get_Item(0);
for (let i = 0; i < root.ChildNodes.Count; i++) {
  console.log(root.ChildNodes.get_Item(i).TextFrame.Text);
}
Why does a node added as a child end up at the top level
Cause: smartArt.Nodes.AddNode() adds a node at the top level of the graphic instead of under the current node. On an organization chart the new node becomes another top-level node and stays at level 0.
Solution: To add a node as a subordinate, call ChildNodes.AddNode() on that node; to insert it at a position, use ChildNodes.AddNodeByPosition():
const root = smartArt.Nodes.get_Item(0);
const child = root.ChildNodes.AddNode();
child.TextFrame.Text = 'New node';
Get a Free License
If you wish to delete the evaluation message from the resulting documents, or to get rid of function limitations, please contact sales to obtain a valid 30-day temporary license.
Extract SmartArt Text and Delete Nodes with JavaScript in React
SmartArt graphics condense processes, hierarchies and cycles into a clear visual layout, but the text inside them can only be read or copied node by node. Turning the node contents into a checklist, importing them into another system, or searching them as plain text is slow and easy to miss by hand; outdated steps and redundant nodes also have to be removed one at a time in the editor.
This article uses Spire.Presentation for JavaScript to extract the text of PowerPoint SmartArt graphics in the browser, save it as text files, and delete unwanted nodes from a graphic. The whole process runs locally on the user's device through WebAssembly, requires no Office installation and no back-end service, and the presentation never leaves the browser.
The article covers two feature points:
For installation and project configuration, see Integrating Spire.Presentation for JavaScript in a React Project. The examples below assume that Spire.Presentation for JavaScript is installed and the WebAssembly module has been initialized.
Extract Text from Every SmartArt Graphic in the Presentation
A presentation often contains more than one graphic, and opening each slide to copy text by hand is slow. Collecting the SmartArt text from the whole file into a single text file makes the content easy to review, search and archive.
| Code | Result |
|---|---|
ppt.Slides.Count |
The total number of slides in the presentation |
shape instanceof pptModule.ISmartArt |
Checks whether a shape is a SmartArt graphic |
shape.Nodes.Count |
The number of nodes in the graphic |
shape.Nodes.get_Item(i).TextFrame.Text |
The text of the node at index i |
window.dotnetRuntime.Module.FS.writeFile(fileName, text) |
Writes a string to a text file in the VFS |
The steps are:
- Get the Spire.Presentation WASM module and make sure it is ready, then load the font and the presentation into the VFS.
- Create a
Presentationobject and callLoadFromFile()to load the presentation. - Iterate the slides with
Slides.Count, and check every shape on each slide forISmartArt. - For each graphic found, write a source heading, then iterate its nodes with
Nodes.Countand read each text withTextFrame.Textinto the list. - Join the collected lines with
\r\nand callwindow.dotnetRuntime.Module.FS.writeFile()to write them to a.txtfile. - Read the text file from the VFS to start the download, and release the presentation with
Dispose().
The code to extract text from every SmartArt graphic in the presentation is as follows:
function App() {
  const extractAllSmartArt = async () => {
    // Get the Spire.Presentation WASM module
    const pptModule = window.wasmModule?.spirepresentation;

    // Check that the module is ready
    if (!pptModule) {
      alert('Spire.Presentation is not ready yet');
      return;
    }

    // Load the font and the presentation into the VFS
    await window.spire.FetchFileToVFS('ARIAL.TTF', '/Library/Fonts/', `${process.env.PUBLIC_URL}/font/`);
    const inputFileName = 'SmartArt.pptx';
    await window.spire.FetchFileToVFS(inputFileName, '', `${process.env.PUBLIC_URL}data/`);

    // Load the presentation
    const ppt = new pptModule.Presentation();
    ppt.LoadFromFile(inputFileName);

    // Collect SmartArt text from every shape on every slide
    const lines = [];
    for (let s = 0; s < ppt.Slides.Count; s++) {
      const slide = ppt.Slides.get_Item(s);
      let graphicNo = 0;
      for (let i = 0; i < slide.Shapes.Count; i++) {
        const shape = slide.Shapes.get_Item(i);
        if (!(shape instanceof pptModule.ISmartArt)) continue;

        graphicNo++;
        lines.push(`Slide ${s + 1} · SmartArt ${graphicNo}`);
        for (let k = 0; k < shape.Nodes.Count; k++) {
          lines.push(shape.Nodes.get_Item(k).TextFrame.Text);
        }
      }
    }

    // Write the summary to a text file
    const outputFileName = 'ExtractAllSmartArtText.txt';
    window.dotnetRuntime.Module.FS.writeFile(outputFileName, lines.join('\r\n'));

    // Read the generated text file from the VFS and trigger the download
    const fileArray = window.dotnetRuntime.Module.FS.readFile(outputFileName);
    const blob = new Blob([fileArray], { type: 'text/plain' });
    const url = URL.createObjectURL(blob);
    const a = document.createElement('a');
    a.href = url;
    a.download = outputFileName;
    a.click();
    URL.revokeObjectURL(url);

    ppt.Dispose();
  };

  return (
    <div style={{ textAlign: 'center', height: '300px' }}>
      <h1>Summarize SmartArt Text</h1>
      <button onClick={extractAllSmartArt}>
        Summarize All
      </button>
    </div>
  );
}

export default App;
Text file after extracting text from every SmartArt graphic in the presentation:

Delete Nodes from a SmartArt Graphic
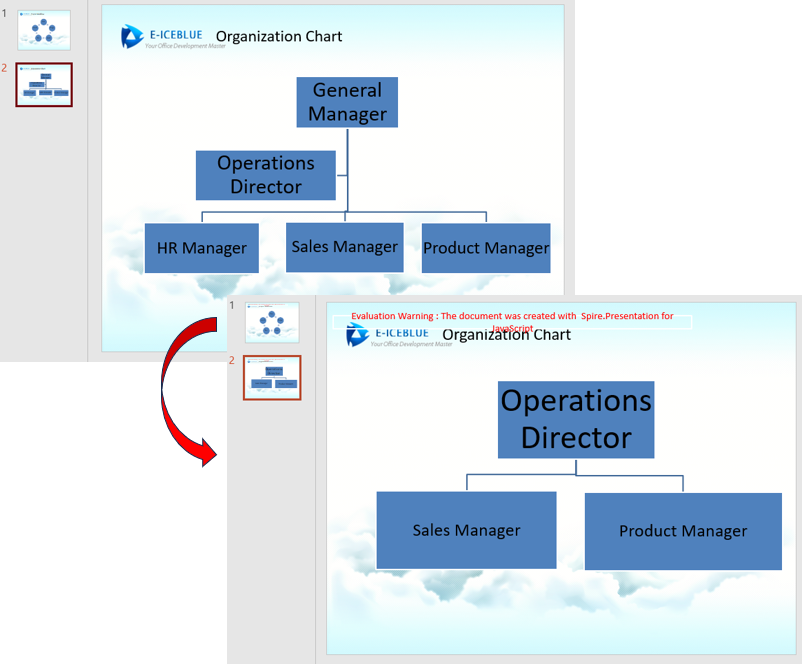
Placeholder steps and outdated stages make a graphic look cluttered. An organization chart arranges content by level, so deleting a node also means naming the level it sits on: you can remove a subordinate node from a node's child node collection, or delete the top-level node outright. The graphic re-flows around the remaining nodes and the other node texts stay unchanged; the result is saved to a new file, so the original presentation stays intact.
| Code | Result |
|---|---|
smartArt.Nodes.get_Item(0) |
Gets the top-level node of the graphic |
node.ChildNodes.RemoveNodeByPosition(position) |
Removes the child node at the given position under that node; later children move forward |
smartArt.Nodes.RemoveNodeByPosition(position) |
Removes the top-level node at the given position; the remaining nodes re-flow |
ppt.SaveToFile({ file, fileFormat }) |
Saves the modified presentation to a file in the VFS |
The steps are:
- Get the Spire.Presentation WASM module and make sure it is ready, then load the font and the presentation into the VFS.
- Create a
Presentationobject, callLoadFromFile()to load the presentation, get the slide that holds the organization chart withSlides.get_Item(), and find the SmartArt graphic by iterating its shapes. - Get the top-level root node with
Nodes.get_Item(0)and callChildNodes.RemoveNodeByPosition()to remove the child at the given position, where positions start at0. - Call
Nodes.RemoveNodeByPosition()to remove the root node itself; the remaining nodes re-flow. - Call
Presentation.SaveToFile()to save the modified presentation as a new.pptxfile. - Read the result file from the VFS to start the download, and release the presentation with
Dispose().
The code to delete nodes from a SmartArt graphic is as follows:
function App() {
  const removeSmartArtNode = async () => {
    // Get the Spire.Presentation WASM module
    const pptModule = window.wasmModule?.spirepresentation;

    // Check that the module is ready
    if (!pptModule) {
      alert('Spire.Presentation is not ready yet');
      return;
    }

    // Load the font and the presentation into the VFS
    await window.spire.FetchFileToVFS('ARIAL.TTF', '/Library/Fonts/', `${process.env.PUBLIC_URL}/font/`);
    const inputFileName = 'SmartArt.pptx';
    await window.spire.FetchFileToVFS(inputFileName, '', `${process.env.PUBLIC_URL}data/`);

    // Load the presentation and get the second slide, which holds the organization chart
    const ppt = new pptModule.Presentation();
    ppt.LoadFromFile(inputFileName);
    const slide = ppt.Slides.get_Item(1);

    // Find the SmartArt graphic on the slide
    let smartArt = null;
    for (let i = 0; i < slide.Shapes.Count; i++) {
      const shape = slide.Shapes.get_Item(i);
      if (shape instanceof pptModule.ISmartArt) {
        smartArt = shape;
        break;
      }
    }

    // Get the top-level root node
    const root = smartArt.Nodes.get_Item(0);

    // Remove the child node at position 1 under the root (positions start at 0)
    root.ChildNodes.RemoveNodeByPosition(1);

    // Remove the root node itself
    smartArt.Nodes.RemoveNodeByPosition(0);

    // Save the result file
    const outputFileName = 'RemoveSmartArtNode.pptx';
    ppt.SaveToFile({ file: outputFileName, fileFormat: pptModule.FileFormat.Pptx2013 });

    // Read the generated file from the VFS and trigger the download
    const fileArray = window.dotnetRuntime.Module.FS.readFile(outputFileName);
    const blob = new Blob([fileArray], { type: 'application/vnd.openxmlformats-officedocument.presentationml.presentation' });
    const url = URL.createObjectURL(blob);
    const a = document.createElement('a');
    a.href = url;
    a.download = outputFileName;
    a.click();
    URL.revokeObjectURL(url);

    ppt.Dispose();
  };

  return (
    <div style={{ textAlign: 'center', height: '300px' }}>
      <h1>Delete SmartArt Node</h1>
      <button onClick={removeSmartArtNode}>
        Delete Node
      </button>
    </div>
  );
}

export default App;
Presentation after deleting nodes from a SmartArt graphic:
FAQ
How to read child node text in a multi-level SmartArt graphic
Cause: Every node, including child nodes, is stored in the Nodes collection; ChildNodes returns only the direct children of a single node, so the two collections serve different purposes.
Solution: Iterate Nodes when every node text is needed; to read only the nodes under one specific node, read that node's ChildNodes:
for (let i = 0; i < smartArt.Nodes.Count; i++) {
  lines.push(smartArt.Nodes.get_Item(i).TextFrame.Text);
}

// read only the direct child nodes of the first node
const firstNode = smartArt.Nodes.get_Item(0);
for (let i = 0; i < firstNode.ChildNodes.Count; i++) {
  lines.push(firstNode.ChildNodes.get_Item(i).TextFrame.Text);
}
Why are the wrong nodes removed when deleting several nodes at once
Cause: Each removal moves the following nodes forward and renumbers their positions and indexes; continuing with positions recorded before the deletion then hits different nodes.
Solution: Iterate the collection backwards before deleting:
for (let i = smartArt.Nodes.Count - 1; i >= 0; i--) {
  const node = smartArt.Nodes.get_Item(i);
  if (node.TextFrame.Text === 'target text') {
    smartArt.Nodes.RemoveNode({ index: i });
  }
}
Does deleting the root node of an organization chart also delete its child nodes
Cause: RemoveNodeByPosition() removes only the node at the given position; it does not cascade to child nodes.
Solution: Remove the root node with a single call:
smartArt.Nodes.RemoveNodeByPosition(0);
The child nodes remain, one child is promoted to Level 0, the others keep Level 1, and positions are renumbered. To clear the whole graphic, remove the SmartArt shape with slide.Shapes.Remove(shape).
Get a Free License
If you wish to delete the evaluation message from the resulting documents, or to get rid of function limitations, please contact sales to obtain a valid 30-day temporary license.
Rotate, Move, and Reorder PowerPoint Shapes in React
Laying out a slide often means adjusting the rotation angle, position, and stacking order of shapes over and over: a tilted label adds movement, an element pushed into a corner unbalances the page, and when shapes overlap, a shape added later can hide content that should stand out. Dragging by hand is intuitive, but it is hard to reproduce the same angle and coordinates exactly, and batch changes take even longer.
Spire.Presentation for JavaScript controls a shape's orientation, position, and overlap through its rotation angle, top-left coordinates, and stacking order. The whole process runs locally in the browser through WebAssembly, requires no Office installation and no back-end service, and the presentation never leaves the user's device.
The article covers three features:
For installation and project configuration, see Integrating Spire.Presentation for JavaScript in a React Project. The examples below assume that Spire.Presentation for JavaScript is installed and the WebAssembly module has been initialized.
Rotate PowerPoint Shapes
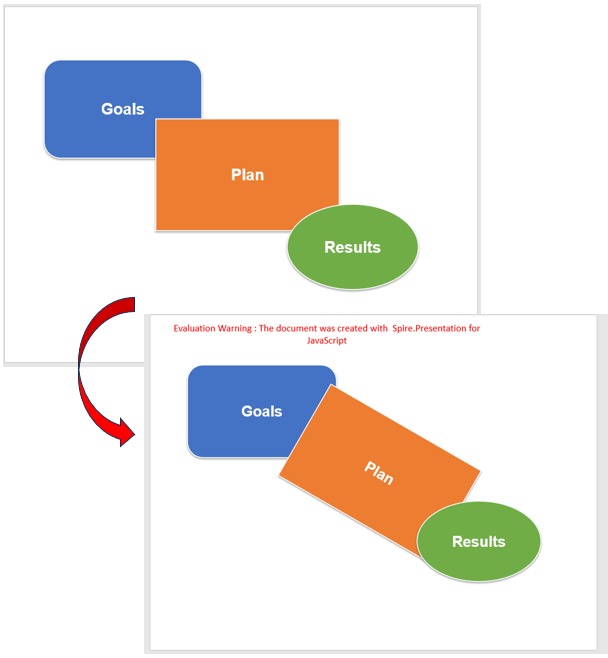
Rotating a shape is a common way to emphasize an element or add a sense of movement. Reproducing the same angle by hand is difficult, and adjusting shapes one by one takes time. The Rotation property sets the angle in degrees; positive values rotate clockwise, the shape turns around its own center, and any text inside the shape tilts with it.
| Code | Result |
|---|---|
Shapes.get_Item(index) |
Gets a shape on the slide by index |
shape.Rotation |
Sets the rotation angle in degrees; positive values rotate clockwise |
The steps are:
- Get the Spire.Presentation WASM module and confirm it is ready, then load the font file and the presentation into the VFS.
- Create a
Presentationobject, load the presentation withLoadFromFile(), and get the first slide withSlides.get_Item(0). - Get the shape to rotate with
Shapes.get_Item(index); the index starts at0. - Assign the angle in degrees to
shape.Rotation; positive values rotate clockwise. Rotation happens around the shape center, whileLeft,Top,Width, andHeightstay unchanged. - Call
SaveToFile()to save the presentation, callPresentation.Dispose()to release resources, then read the file from the VFS and trigger the download.
The code for rotating a PowerPoint shape is shown below:
function App() {
  const rotateShape = async () => {
    // Get the Spire.Presentation WASM module
    const pptModule = window.wasmModule?.spirepresentation;

    // Check that the module is ready
    if (!pptModule) {
      alert('Spire.Presentation is not ready yet');
      return;
    }

    // Load the font file and the presentation into the VFS
    await window.spire.FetchFileToVFS('ARIAL.TTF', '/Library/Fonts/', `${process.env.PUBLIC_URL}/font/`);
    const inputFileName = 'ShapeLayout.pptx';
    await window.spire.FetchFileToVFS(inputFileName, '', `${process.env.PUBLIC_URL}data/`);

    // Load the presentation and get the first slide
    const ppt = new pptModule.Presentation();
    ppt.LoadFromFile(inputFileName);
    const slide = ppt.Slides.get_Item(0);

    // Get the shape to rotate
    const shape = slide.Shapes.get_Item(1);

    // Rotate 30 degrees clockwise
    shape.Rotation = 30;

    // Save the presentation
    const outputFileName = 'RotateShape_result.pptx';
    ppt.SaveToFile({ file: outputFileName, fileFormat: pptModule.FileFormat.Pptx2013 });

    // Release the presentation
    ppt.Dispose();

    // Read the result file from the VFS and trigger the download
    const fileArray = window.dotnetRuntime.Module.FS.readFile(outputFileName);
    const blob = new Blob([fileArray], { type: 'application/vnd.openxmlformats-officedocument.presentationml.presentation' });
    const url = URL.createObjectURL(blob);
    const a = document.createElement('a');
    a.href = url;
    a.download = outputFileName;
    a.click();
    URL.revokeObjectURL(url);
  };

  return (
    <div style={{ textAlign: 'center', height: '300px' }}>
      <h1>Rotate Shape</h1>
      <button onClick={rotateShape}>
        Rotate
      </button>
    </div>
  );
}

export default App;
Presentation after rotating a shape clockwise:
Move PowerPoint Shapes
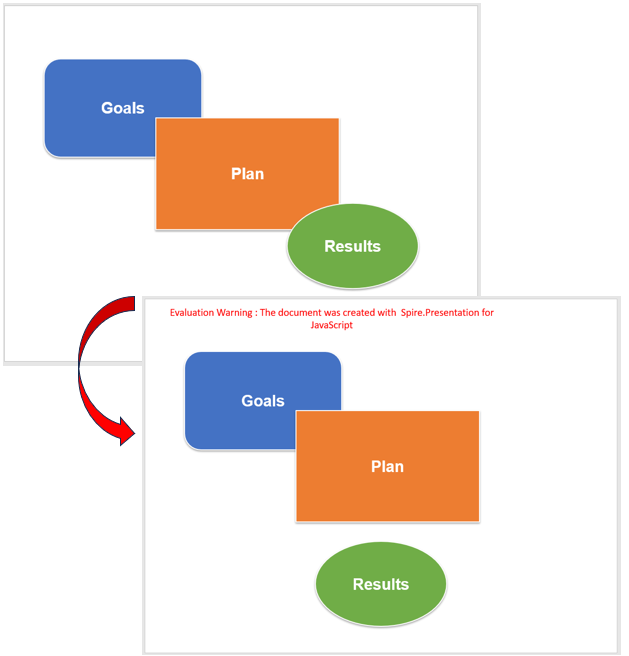
A shape's position is determined by its top-left coordinates in points, with the origin at the top-left corner of the slide. Compared with dragging, setting coordinates directly makes alignment exact and lets you compute centered or edge-aligned positions from the slide size, without drift caused by canvas zoom.
| Code | Result |
|---|---|
shape.Left |
Distance from the shape's left edge to the slide's left edge |
shape.Top |
Distance from the shape's top edge to the slide's top edge |
ppt.SlideSize.Size.Width |
Slide width |
ppt.SlideSize.Size.Height |
Slide height |
shape.Width / shape.Height |
Shape dimensions, used to compute the centered position |
The steps are:
- Get the Spire.Presentation WASM module and confirm it is ready, then load the font file and the presentation into the VFS.
- Create a
Presentationobject, load the presentation withLoadFromFile(), and get the first slide withSlides.get_Item(0). - Get the shape to move with
Shapes.get_Item(index). - Read the slide size with
ppt.SlideSize.Size.Widthandppt.SlideSize.Size.Height, then use the shape'sWidthandHeightto compute the horizontally centered position and the bottom margin. - Assign the results to
shape.Leftandshape.Top, save the presentation, release resources, and download the result.
The code for moving a PowerPoint shape is shown below:
function App() {
  const moveShape = async () => {
    // Get the Spire.Presentation WASM module
    const pptModule = window.wasmModule?.spirepresentation;

    // Check that the module is ready
    if (!pptModule) {
      alert('Spire.Presentation is not ready yet');
      return;
    }

    // Load the font file and the presentation into the VFS
    await window.spire.FetchFileToVFS('ARIAL.TTF', '/Library/Fonts/', `${process.env.PUBLIC_URL}/font/`);
    const inputFileName = 'ShapeLayout.pptx';
    await window.spire.FetchFileToVFS(inputFileName, '', `${process.env.PUBLIC_URL}data/`);

    // Load the presentation and get the first slide
    const ppt = new pptModule.Presentation();
    ppt.LoadFromFile(inputFileName);
    const slide = ppt.Slides.get_Item(0);

    // Get the shape to move
    const shape = slide.Shapes.get_Item(2);

    // Compute a horizontally centered position with a 40-point bottom margin from the slide size
    const margin = 40;
    shape.Left = (ppt.SlideSize.Size.Width - shape.Width) / 2;
    shape.Top = ppt.SlideSize.Size.Height - shape.Height - margin;

    // Save the presentation
    const outputFileName = 'MoveShape_result.pptx';
    ppt.SaveToFile({ file: outputFileName, fileFormat: pptModule.FileFormat.Pptx2013 });

    // Release the presentation
    ppt.Dispose();

    // Read the result file from the VFS and trigger the download
    const fileArray = window.dotnetRuntime.Module.FS.readFile(outputFileName);
    const blob = new Blob([fileArray], { type: 'application/vnd.openxmlformats-officedocument.presentationml.presentation' });
    const url = URL.createObjectURL(blob);
    const a = document.createElement('a');
    a.href = url;
    a.download = outputFileName;
    a.click();
    URL.revokeObjectURL(url);
  };

  return (
    <div style={{ textAlign: 'center', height: '300px' }}>
      <h1>Move Shape</h1>
      <button onClick={moveShape}>
        Move
      </button>
    </div>
  );
}

export default App;
Presentation after moving a shape to the bottom center:
Reorder PowerPoint Shapes
Shapes on a slide are stacked in the order they were added, so a later shape covers an earlier one. When elements overlap, content that should stand out can end up underneath, and a background block can hide text. SetShapeArrange() provides four adjustments—bring forward, send backward, bring to front, and send to back—for fine-grained control over the stacking order.
| Code | Result |
|---|---|
shape.SetShapeArrange(ShapeArrange.BringForward) |
Moves the shape one layer forward |
shape.SetShapeArrange(ShapeArrange.SendBackward) |
Moves the shape one layer backward |
shape.SetShapeArrange(ShapeArrange.BringToFront) |
Moves the shape to the front |
shape.SetShapeArrange(ShapeArrange.SendToBack) |
Moves the shape to the back |
The steps are:
- Get the Spire.Presentation WASM module and confirm it is ready, then load the font file and the presentation into the VFS.
- Create a
Presentationobject, load the presentation withLoadFromFile(), and get the first slide withSlides.get_Item(0). - Get the shape whose stacking order should change with
Shapes.get_Item(index), then callSetShapeArrange()with the requiredShapeArrangevalue. - Call
SaveToFile()to save the presentation, callPresentation.Dispose()to release resources, then read the file from the VFS and trigger the download.
The code for bringing a PowerPoint shape to the front is shown below:
function App() {
  const bringShapeToFront = async () => {
    // Get the Spire.Presentation WASM module
    const pptModule = window.wasmModule?.spirepresentation;

    // Check that the module is ready
    if (!pptModule) {
      alert('Spire.Presentation is not ready yet');
      return;
    }

    // Load the font file and the presentation into the VFS
    await window.spire.FetchFileToVFS('ARIAL.TTF', '/Library/Fonts/', `${process.env.PUBLIC_URL}/font/`);
    const inputFileName = 'ShapeLayout.pptx';
    await window.spire.FetchFileToVFS(inputFileName, '', `${process.env.PUBLIC_URL}data/`);

    // Load the presentation and get the first slide
    const ppt = new pptModule.Presentation();
    ppt.LoadFromFile(inputFileName);
    const slide = ppt.Slides.get_Item(0);

    // Get the shape whose stacking order should change and bring it to the front
    const shape = slide.Shapes.get_Item(0);
    shape.SetShapeArrange(pptModule.ShapeArrange.BringToFront);

    // Save the presentation
    const outputFileName = 'BringToFront_result.pptx';
    ppt.SaveToFile({ file: outputFileName, fileFormat: pptModule.FileFormat.Pptx2013 });

    // Release the presentation
    ppt.Dispose();

    // Read the result file from the VFS and trigger the download
    const fileArray = window.dotnetRuntime.Module.FS.readFile(outputFileName);
    const blob = new Blob([fileArray], { type: 'application/vnd.openxmlformats-officedocument.presentationml.presentation' });
    const url = URL.createObjectURL(blob);
    const a = document.createElement('a');
    a.href = url;
    a.download = outputFileName;
    a.click();
    URL.revokeObjectURL(url);
  };

  return (
    <div style={{ textAlign: 'center', height: '300px' }}>
      <h1>Adjust Stacking Order</h1>
      <button onClick={bringShapeToFront}>
        Bring to Front
      </button>
    </div>
  );
}

export default App;
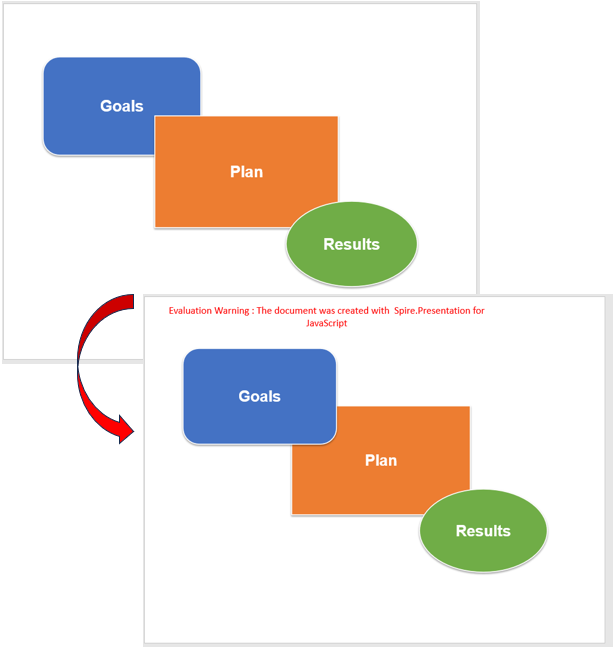
Presentation after bringing a shape to the front:
FAQ
Does a shape's position change after rotation
Reason: Rotation only changes the rotation angle; it does not modify Left, Top, Width, or Height. The shape rotates around its center, so the rotated footprint can extend beyond the original rectangle.
Solution: When reserving space for a rotated shape, estimate margins from the rotated footprint rather than the original width and height.
What happens when the rotation angle exceeds 360 degrees
Reason: Rotation is normalized modulo 360. Setting 390 reads back as 30, setting 360 reads back as 0, and the normalized angle is what gets saved in the presentation.
Solution: Set the required angle in the 0–360 range directly; there is no need to add whole turns.
Does the text rotate with the shape
Reason: Rotation applies to the whole shape. Text inside the shape is part of it, so it tilts along with the shape.
Solution: Reserve space for the tilted text when laying out the slide. If the text must stay horizontal, do not put it inside the shape being rotated; use a separate text box and handle it independently from the graphic.
Get a Free License
If you wish to delete the evaluation message from the resulting documents, or to get rid of function limitations, please contact sales to obtain a valid 30-day temporary license.
Save PowerPoint Shapes as Images with JavaScript in React
When preparing training material, product handbooks or web illustrations, a single graphic from a slide often needs to be reused on its own. A full-slide screenshot brings the title, the background and every other element along with it, and cropping by hand rarely produces a clean edge. Rendering each shape as a separate image keeps only the shape itself and makes later layout and composition much easier.
This article uses Spire.Presentation for JavaScript to save PowerPoint shapes as images in the browser. PNG keeps the shape's picture and its transparent areas, while SVG records lines and text as vectors that stay sharp at any scale. The whole process runs locally on the user's device through WebAssembly, requires no Office installation and no back-end service, and the presentation never leaves the browser.
The article covers three features:
- Export All Shapes on a Slide as PNG Images
- Export a Specific Shape as an SVG Image
- Export a Group Shape as a Single Image
For installation and project configuration, see Integrating Spire.Presentation for JavaScript in a React Project. The examples below assume that Spire.Presentation for JavaScript is installed and the WebAssembly module has been initialized.
Export All Shapes on a Slide as PNG Images
A slide usually combines several shapes: rectangles, charts, pictures and other elements. When each one is needed separately, taking screenshots one by one is slow and produces images of inconsistent size. Iterating over the shape collection renders every shape into its own PNG image. The image contains only the shape, transparent areas stay transparent, and the result can be placed into other documents or web pages.
| Code | Result |
|---|---|
slide.Shapes.Count |
The total number of shapes on the current slide |
slide.Shapes.get_Item(i) |
The shape at index i |
shape.SaveAsImage() |
Renders the shape to an image stream |
image.Save(fileName) |
Saves the image stream as a PNG file |
image.Dispose() |
Releases the resources held by the image stream |
The steps are:
- Get the Spire.Presentation WASM module and confirm it is ready, then load the font file and the presentation into the VFS.
- Create a
Presentationobject, load the presentation withLoadFromFile(), and get the first slide withSlides.get_Item(0). - Loop from
0toShapes.Count - 1and get each shape withShapes.get_Item(i). - Call
SaveAsImage()on each shape to get an image stream, write it to a PNG file withimage.Save(), and release the stream withDispose(). - Call
Presentation.Dispose(), then read each image from the VFS and trigger its download.
The code for exporting all shapes on a slide as PNG images is shown below:
function App() {
  const exportAllShapesToPng = async () => {
    // Get the Spire.Presentation WASM module
    const pptModule = window.wasmModule?.spirepresentation;

    // Check that the module is ready
    if (!pptModule) {
      alert('Spire.Presentation is not ready yet');
      return;
    }

    // Load the font and the presentation into the VFS
    await window.spire.FetchFileToVFS('ARIAL.TTF', '/Library/Fonts/', `${process.env.PUBLIC_URL}/font/`);
    const inputFileName = 'Shapes.pptx';
    await window.spire.FetchFileToVFS(inputFileName, '', `${process.env.PUBLIC_URL}data/`);

    // Load the presentation and get the first slide
    const ppt = new pptModule.Presentation();
    ppt.LoadFromFile(inputFileName);
    const slide = ppt.Slides.get_Item(0);

    // Save every shape as a PNG image
    const outputNames = [];
    for (let i = 0; i < slide.Shapes.Count; i++) {
      const shape = slide.Shapes.get_Item(i);
      const image = shape.SaveAsImage();
      const outputFileName = `Shape-${i + 1}.png`;
      image.Save(outputFileName);
      image.Dispose();
      outputNames.push(outputFileName);
    }

    ppt.Dispose();

    // Read each image from the VFS and trigger the downloads
    const fsModule = window.dotnetRuntime.Module.FS;
    for (const outputFileName of outputNames) {
      const fileArray = fsModule.readFile(outputFileName);
      const blob = new Blob([fileArray], { type: 'image/png' });
      const url = URL.createObjectURL(blob);
      const a = document.createElement('a');
      a.href = url;
      a.download = outputFileName;
      a.click();
      URL.revokeObjectURL(url);
    }
  };

  return (
    <div style={{ textAlign: 'center', height: '300px' }}>
      <h1>Export Shapes as Images</h1>
      <button onClick={exportAllShapesToPng}>
        Export All Shapes
      </button>
    </div>
  );
}

export default App;
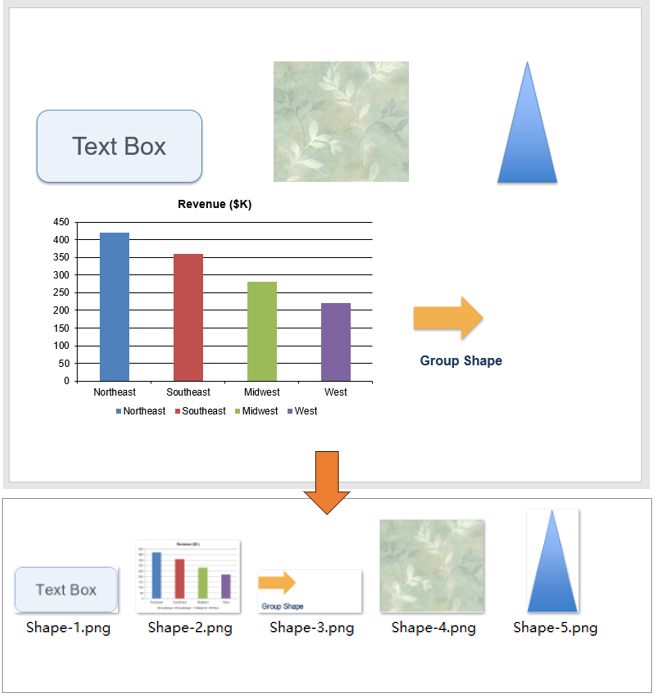
PNG images after exporting each shape on the slide:
Export a Specific Shape as an SVG Image
PNG is made of pixels, so its edges soften when enlarged, especially for text and charts at projection or print size. SVG describes a picture with paths and text, stays sharp at any scale, and is easier to reference from a web page or edit further. SaveAsSvg() exports a single shape as a standalone SVG document and returns the file content as bytes, which can be written to the virtual file system and downloaded.
| Code | Result |
|---|---|
shape.SaveAsSvg() |
Exports the shape as SVG and returns the file content as bytes |
FS.writeFile(fileName, bytes) |
Writes the bytes to a file in the VFS |
The steps are:
- Get the Spire.Presentation WASM module and confirm it is ready, then load the font file and the presentation into the VFS.
- Create a
Presentationobject, load the presentation withLoadFromFile(), and get the first slide withSlides.get_Item(0). - Get the target shape with
Shapes.get_Item(index); the index starts at0. - Call
shape.SaveAsSvg(); the method returns the SVG file content as aUint8Array. - Write the bytes to a
.svgfile withFS.writeFile(), callPresentation.Dispose(), then read the file from the VFS and trigger its download.
The code for exporting a specific shape as an SVG image is shown below:
function App() {
  const exportShapeToSvg = async () => {
    // Get the Spire.Presentation WASM module
    const pptModule = window.wasmModule?.spirepresentation;

    // Check that the module is ready
    if (!pptModule) {
      alert('Spire.Presentation is not ready yet');
      return;
    }

    // Load the font and the presentation into the VFS
    await window.spire.FetchFileToVFS('ARIAL.TTF', '/Library/Fonts/', `${process.env.PUBLIC_URL}/font/`);
    const inputFileName = 'Shapes.pptx';
    await window.spire.FetchFileToVFS(inputFileName, '', `${process.env.PUBLIC_URL}data/`);

    // Load the presentation and get the first slide
    const ppt = new pptModule.Presentation();
    ppt.LoadFromFile(inputFileName);
    const slide = ppt.Slides.get_Item(0);

    // Get the shape to export by its index
    const shape = slide.Shapes.get_Item(1);

    // Export the shape as SVG; the method returns the SVG file content
    const svgBytes = shape.SaveAsSvg();
    const outputFileName = 'Chart.svg';
    window.dotnetRuntime.Module.FS.writeFile(outputFileName, svgBytes);

    ppt.Dispose();

    // Read the SVG from the VFS and trigger the download
    const fileArray = window.dotnetRuntime.Module.FS.readFile(outputFileName);
    const blob = new Blob([fileArray], { type: 'image/svg+xml' });
    const url = URL.createObjectURL(blob);
    const a = document.createElement('a');
    a.href = url;
    a.download = outputFileName;
    a.click();
    URL.revokeObjectURL(url);
  };

  return (
    <div style={{ textAlign: 'center', height: '300px' }}>
      <h1>Export Shapes as Images</h1>
      <button onClick={exportShapeToSvg}>
        Export as SVG
      </button>
    </div>
  );
}

export default App;
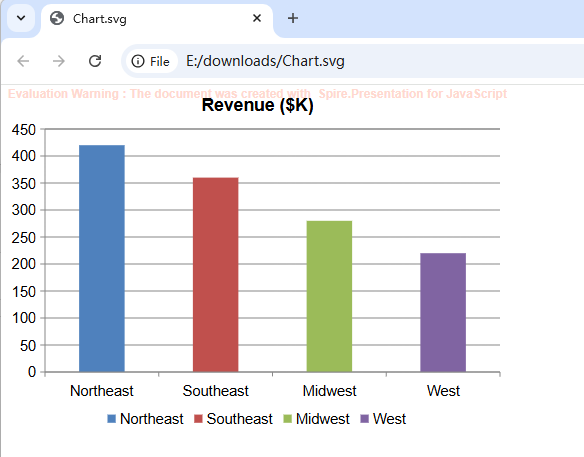
The SVG image after exporting the specific shape:
Export a Group Shape as a Single Image
A group shape binds multiple elements, such as an arrow and a caption, into one unit, so they move and resize together and keep their relative positions. Exporting a group renders all of its elements into a single image, which is convenient for lifting one step of a process or a callout from the page. If only one element is needed, a child shape can also be taken out of the group and exported on its own.
| Code | Result |
|---|---|
group.SaveAsImage() |
Renders the whole group as one image |
group.Shapes.Count |
The number of child shapes in the group |
group.Shapes.get_Item(i) |
The child shape at index i in the group |
child.SaveAsImage() |
Renders a single child shape as an image |
The steps are:
- Get the Spire.Presentation WASM module and confirm it is ready, then load the font file and the presentation into the VFS.
- Create a
Presentationobject, load the presentation withLoadFromFile(), and get the first slide withSlides.get_Item(0). - Get the group shape with
Shapes.get_Item(index);group.Shapes.Countgives the number of child shapes it contains. - Call
SaveAsImage()on the group to render the whole group as one PNG image and save it, then callDispose(). - Take a child out with
group.Shapes.get_Item(0)and export it on its own withSaveAsImage(). - Call
Presentation.Dispose(), then read both images from the VFS and trigger their downloads.
The code for exporting a group shape as a single image is shown below:
function App() {
  const exportGroupShapeToPng = async () => {
    // Get the Spire.Presentation WASM module
    const pptModule = window.wasmModule?.spirepresentation;

    // Check that the module is ready
    if (!pptModule) {
      alert('Spire.Presentation is not ready yet');
      return;
    }

    // Load the font and the presentation into the VFS
    await window.spire.FetchFileToVFS('ARIAL.TTF', '/Library/Fonts/', `${process.env.PUBLIC_URL}/font/`);
    const inputFileName = 'Shapes.pptx';
    await window.spire.FetchFileToVFS(inputFileName, '', `${process.env.PUBLIC_URL}data/`);

    // Load the presentation and get the first slide
    const ppt = new pptModule.Presentation();
    ppt.LoadFromFile(inputFileName);
    const slide = ppt.Slides.get_Item(0);

    // Get the group shape by its index and export it as one image
    const group = slide.Shapes.get_Item(2);
    const groupImage = group.SaveAsImage();
    groupImage.Save('Group.png');
    groupImage.Dispose();

    // A single child of the group can also be exported on its own
    const child = group.Shapes.get_Item(0);
    const childImage = child.SaveAsImage();
    childImage.Save('GroupChild.png');
    childImage.Dispose();

    ppt.Dispose();

    // Read the images from the VFS and trigger the downloads
    const fsModule = window.dotnetRuntime.Module.FS;
    for (const outputFileName of ['Group.png', 'GroupChild.png']) {
      const fileArray = fsModule.readFile(outputFileName);
      const blob = new Blob([fileArray], { type: 'image/png' });
      const url = URL.createObjectURL(blob);
      const a = document.createElement('a');
      a.href = url;
      a.download = outputFileName;
      a.click();
      URL.revokeObjectURL(url);
    }
  };

  return (
    <div style={{ textAlign: 'center', height: '300px' }}>
      <h1>Export Shapes as Images</h1>
      <button onClick={exportGroupShapeToPng}>
        Export Group Shape
      </button>
    </div>
  );
}

export default App;
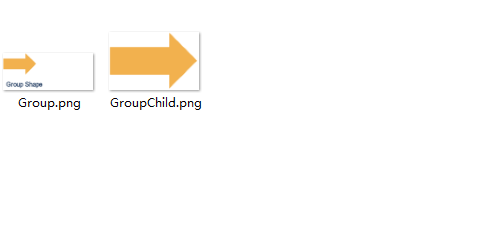
PNG images after exporting the group shape and one of its children:
FAQ
Why does the text in an exported image show as boxes
Reason: The font file has to be in the VFS before the presentation is created and loaded. SaveAsImage() lays out the text when the presentation is opened; adding the font afterwards does not re-layout shapes that are already loaded.
Solution: Call FetchFileToVFS() for the font used in the presentation before LoadFromFile().
Are hidden shapes exported as well
Reason: IsHidden only controls whether a shape appears on the slide; it does not stop SaveAsImage().
Solution: If hidden shapes should be left out of the export, check IsHidden while iterating and skip them:
for (let i = 0; i < slide.Shapes.Count; i++) {
  const shape = slide.Shapes.get_Item(i);

  // Skip hidden shapes
  if (shape.IsHidden) continue;

  const image = shape.SaveAsImage();
  image.Save(`Shape-${i + 1}.png`);
  image.Dispose();
}
What is the difference between SaveAsSvg() and SaveAsSvgInSlide()
Reason: The two methods use different canvases. SaveAsSvg() crops to the shape's own bounds, so the SVG is only as large as the shape; SaveAsSvgInSlide() keeps the full slide canvas and places the shape at its position on the slide.
Solution: Use SaveAsSvg() for an isolated graphic, and SaveAsSvgInSlide() when the position relative to the page matters, for example when overlaying the result on a slide background. Both return SVG bytes and are written to the VFS in the same way.
Get a Free License
If you wish to delete the evaluation message from the resulting documents, or to get rid of function limitations, please contact sales to obtain a valid 30-day temporary license.
Set, Get and Find Alternative Text of PowerPoint Shapes in React
A shape on a slide carries no description of its own: when a screen reader reaches a rectangle or an oval, it can only announce the shape type, which says nothing about what the shape represents. Adding alternative text gives every shape a short caption, so the reading experience is clearer and automation scripts can identify a shape by its text. Filling in and checking these captions by hand becomes slow and error-prone as a deck grows.
This article uses Spire.Presentation for JavaScript to set and get the alternative text of PowerPoint shapes in the browser. The whole process runs locally on the user's device through WebAssembly, requires no Office installation and no back-end service, and the presentation never leaves the browser.
The article covers four features:
- Set Alternative Text for PowerPoint Shapes
- Get Alternative Text from PowerPoint Shapes
- Find PowerPoint Shapes by Alternative Text
- Read Alternative Text Inside Group Shapes
For installation and project configuration, see Integrating Spire.Presentation for JavaScript in a React Project. The examples below assume that Spire.Presentation for JavaScript is installed and the WebAssembly module has been initialized.
Set Alternative Text for PowerPoint Shapes
A shape carries visual information only, and a screen reader cannot infer its meaning from the shape type. Setting alternative text attaches a description to the shape, so it can explain what the shape stands for when read aloud; the same text also serves as a stable identifier for scripts that need to locate a shape by content. Besides the description, a shape can carry a short title, and the two together make up its accessible description.
| Syntax | Result |
|---|---|
slide.Shapes.Count |
The total number of shapes on the current slide |
slide.Shapes.get_Item(i) |
Gets a shape by index |
shape.AlternativeText = '…' |
Sets the alternative text of a shape |
shape.AlternativeTitle = '…' |
Sets the alternative title of a shape |
The steps are:
- Get the Spire.Presentation WASM module and make sure it is ready, then load the font file and the presentation into the VFS.
- Create a
Presentationobject, load the presentation withLoadFromFile(), and get the first slide withSlides.get_Item(0). - Loop from 0 to
Shapes.Countand get each shape on the slide withShapes.get_Item(i). - Assign the prepared descriptions and titles to the
AlternativeTextandAlternativeTitleproperties of the shapes in turn. - Save the result with
Presentation.SaveToFile()and release the presentation withDispose(). - Read the result file from the VFS and trigger the browser download.
The code for setting alternative text for PowerPoint shapes is as follows:
function App() {
  const setAlternativeText = async () => {
    // Get the Spire.Presentation WASM module
    const pptModule = window.wasmModule?.spirepresentation;

    // Check whether the module is ready
    if (!pptModule) {
      alert('Spire.Presentation is not ready yet');
      return;
    }

    // Load the font and the presentation into the VFS
    await window.spire.FetchFileToVFS('ARIAL.TTF', '/Library/Fonts/', `${process.env.PUBLIC_URL}/font/`);
    const inputFileName = 'AlternativeText.pptx';
    await window.spire.FetchFileToVFS(inputFileName, '', `${process.env.PUBLIC_URL}data/`);

    // Load the presentation and get the first slide
    const ppt = new pptModule.Presentation();
    ppt.LoadFromFile(inputFileName);
    const slide = ppt.Slides.get_Item(0);

    // Set the alternative text and its title for the four process shapes in turn
    const labels = ['Step 1: Plan', 'Step 2: Do', 'Step 3: Check', 'Step 4: Act'];
    const titles = ['Plan progress', 'Execution', 'Check results', 'Improvement'];
    for (let i = 0; i < slide.Shapes.Count; i++) {
      const shape = slide.Shapes.get_Item(i);
      if (i < labels.length) {
        shape.AlternativeText = labels[i];
        shape.AlternativeTitle = titles[i];
      }
    }

    // Save the result file
    const outputFileName = 'SetAlternativeText.pptx';
    ppt.SaveToFile({ file: outputFileName, fileFormat: pptModule.FileFormat.Pptx2013 });
    ppt.Dispose();

    // Read the generated file from the VFS and trigger the download
    const fileArray = window.dotnetRuntime.Module.FS.readFile(outputFileName);
    const blob = new Blob([fileArray], { type: 'application/vnd.openxmlformats-officedocument.presentationml.presentation' });
    const url = URL.createObjectURL(blob);
    const a = document.createElement('a');
    a.href = url;
    a.download = outputFileName;
    a.click();
    URL.revokeObjectURL(url);
  };

  return (
    <div style={{ textAlign: 'center', height: '300px' }}>
      <h1>Alternative Text</h1>
      <button onClick={setAlternativeText}>
        Set Alternative Text
      </button>
    </div>
  );
}

export default App;
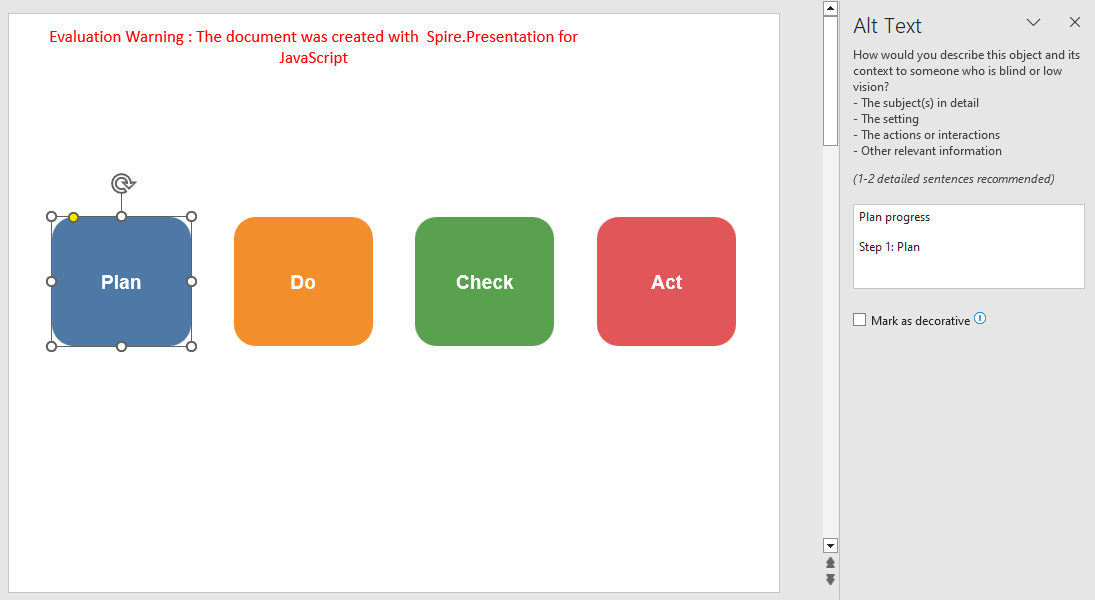
The presentation after setting alternative text for the shapes on the slide:
Get Alternative Text from PowerPoint Shapes
Alternative text can be reviewed one shape at a time, or read in bulk by a script. Looping over the shape collection and gathering the descriptions in one place makes it easy to see which shapes already have text and which are still blank, so gaps can be filled before publishing.
| Syntax | Result |
|---|---|
shape.AlternativeText |
Reads the alternative text of a shape; empty when none is set |
shape.AlternativeTitle |
Reads the alternative title of a shape; empty when none is set |
new TextEncoder().encode(text) |
Encodes the text into bytes for writing |
window.dotnetRuntime.Module.FS.writeFile(fileName, bytes) |
Writes the bytes to a file in the VFS |
The steps are:
- Get the Spire.Presentation WASM module and make sure it is ready, then load the presentation into the VFS.
- Create a
Presentationobject, load the presentation withLoadFromFile(), and get the second slide that holds the shapes withSlides.get_Item(1). - Loop over
Shapes.Count, get each shape withShapes.get_Item(i), read itsAlternativeTextandAlternativeTitle, and collect the non-empty values. - Join the collected texts by line breaks, encode them with
TextEncoder, and write them toGetAlternativeText.txtwithFS.writeFile(). - Release the presentation with
Dispose(), then read the text file from the VFS and trigger the download.
The code for getting alternative text from PowerPoint shapes is as follows:
function App() {
  const getAlternativeText = async () => {
    // Get the Spire.Presentation WASM module
    const pptModule = window.wasmModule?.spirepresentation;

    if (!pptModule) {
      alert('Spire.Presentation is not ready yet');
      return;
    }

    const inputFileName = 'AlternativeText.pptx';
    await window.spire.FetchFileToVFS(inputFileName, '', `${process.env.PUBLIC_URL}data/`);

    // Load the presentation and get the second slide
    const ppt = new pptModule.Presentation();
    ppt.LoadFromFile(inputFileName);
    const slide = ppt.Slides.get_Item(1);

    // Read the alternative text of each shape, skipping shapes without one
    const lines = [];
    for (let i = 0; i < slide.Shapes.Count; i++) {
      const shape = slide.Shapes.get_Item(i);
      if (shape.AlternativeText) {
        const title = shape.AlternativeTitle ? ` (Title: ${shape.AlternativeTitle})` : '';
        lines.push(`Shape ${i + 1}: ${shape.AlternativeText}${title}`);
      }
    }

    // Write the result into a text file
    const outputFileName = 'GetAlternativeText.txt';
    window.dotnetRuntime.Module.FS.writeFile(outputFileName, new TextEncoder().encode(lines.join('\n')));
    ppt.Dispose();

    // Read the generated text file from the VFS and trigger the download
    const fileArray = window.dotnetRuntime.Module.FS.readFile(outputFileName);
    const blob = new Blob([fileArray], { type: 'text/plain;charset=utf-8' });
    const url = URL.createObjectURL(blob);
    const a = document.createElement('a');
    a.href = url;
    a.download = outputFileName;
    a.click();
    URL.revokeObjectURL(url);
  };

  return (
    <div style={{ textAlign: 'center', height: '300px' }}>
      <h1>Alternative Text</h1>
      <button onClick={getAlternativeText}>
        Get Alternative Text
      </button>
    </div>
  );
}

export default App;
The text file generated after reading the alternative text of each shape:
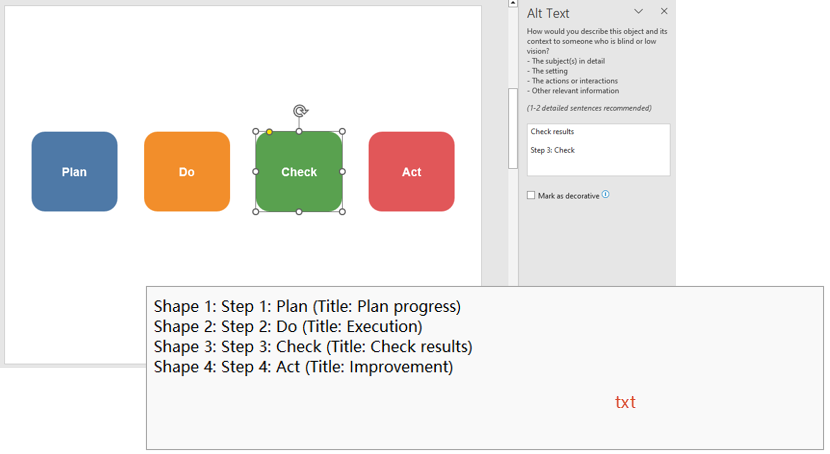
Find PowerPoint Shapes by Alternative Text
The order of shapes in a collection changes as shapes are added or removed, so locating one by index is not reliable. When a shape has alternative text, the text can be used as the search key: look up the shape in the collection first, then process it, for example by changing its fill and outline to flag a position that needs review.
| Syntax | Result |
|---|---|
slide.Shapes.get_Item(i) |
Gets a shape by index |
shape.AlternativeText === target |
Checks whether a shape's alternative text matches the target value |
shape.Fill.FillType and Fill.SolidColor.Color |
Changes the fill of the found shape |
shape.Line.Width and Line.SolidFillColor.Color |
Changes the outline of the found shape |
The steps are:
- Get the Spire.Presentation WASM module and make sure it is ready, then load the font file and the presentation into the VFS.
- Create a
Presentationobject, load the presentation withLoadFromFile(), and get the third slide withSlides.get_Item(2). - Loop from 0 to
Shapes.Count, get each shape withShapes.get_Item(i), compare itsAlternativeTextwith the target text, and keep the shape and stop the loop once it matches. - Set the
FillTypeof the found shape toFillFormatType.Solidand change its color withFill.SolidColor.Color; then set theLine.FillTypeto solid and adjust the outline withLine.WidthandLine.SolidFillColor.Color. - Save the result with
Presentation.SaveToFile(), release the presentation withDispose(), then read the file from the VFS and trigger the download.
The code for finding PowerPoint shapes by alternative text is as follows:
function App() {
  const findShapeByAlternativeText = async () => {
    // Get the Spire.Presentation WASM module
    const pptModule = window.wasmModule?.spirepresentation;

    if (!pptModule) {
      alert('Spire.Presentation is not ready yet');
      return;
    }

    await window.spire.FetchFileToVFS('ARIAL.TTF', '/Library/Fonts/', `${process.env.PUBLIC_URL}/font/`);
    const inputFileName = 'AlternativeText.pptx';
    await window.spire.FetchFileToVFS(inputFileName, '', `${process.env.PUBLIC_URL}data/`);

    // Load the presentation and get the third slide
    const ppt = new pptModule.Presentation();
    ppt.LoadFromFile(inputFileName);
    const slide = ppt.Slides.get_Item(2);

    // Find the logo shape by its alternative text
    const target = 'Brand logo';
    let found = null;
    for (let i = 0; i < slide.Shapes.Count; i++) {
      const shape = slide.Shapes.get_Item(i);
      if (shape.AlternativeText === target) {
        found = shape;
        break;
      }
    }

    // Recolor the found shape so the result is easy to confirm
    if (found) {
      found.Fill.FillType = pptModule.FillFormatType.Solid;
      found.Fill.SolidColor.Color = pptModule.Color.get_Purple();
      found.Line.FillType = pptModule.FillFormatType.Solid;
      found.Line.Width = 4;
      found.Line.SolidFillColor.Color = pptModule.Color.get_LightGray();
    }

    // Save the result file
    const outputFileName = 'FindShapeByAlternativeText.pptx';
    ppt.SaveToFile({ file: outputFileName, fileFormat: pptModule.FileFormat.Pptx2013 });
    ppt.Dispose();

    // Read the generated file from the VFS and trigger the download
    const fileArray = window.dotnetRuntime.Module.FS.readFile(outputFileName);
    const blob = new Blob([fileArray], { type: 'application/vnd.openxmlformats-officedocument.presentationml.presentation' });
    const url = URL.createObjectURL(blob);
    const a = document.createElement('a');
    a.href = url;
    a.download = outputFileName;
    a.click();
    URL.revokeObjectURL(url);
  };

  return (
    <div style={{ textAlign: 'center', height: '300px' }}>
      <h1>Alternative Text</h1>
      <button onClick={findShapeByAlternativeText}>
        Find by Alternative Text
      </button>
    </div>
  );
}

export default App;
The presentation after locating and marking the target shape by alternative text:
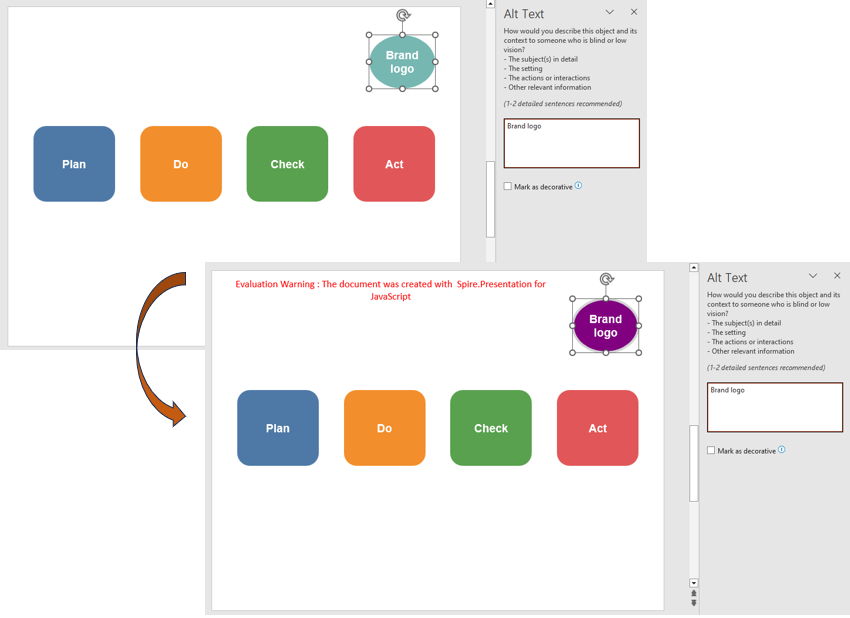
Read Alternative Text Inside Group Shapes
A group shape gathers several shapes into one unit, while each child shape keeps its own alternative text. Reading the property on the outer group does not return these descriptions: the group's shape collection has to be traversed so that every description inside the group is collected.
| Syntax | Result |
|---|---|
shape instanceof pptModule.GroupShape |
Checks whether a shape is a group |
shape.Shapes.Count |
The number of shapes inside the group |
shape.Shapes.get_Item(j) |
Gets the j-th shape inside the group |
shape.Shapes.get_Item(j).AlternativeText |
Reads the alternative text of a shape inside the group |
shape.Shapes.get_Item(j).AlternativeTitle |
Reads the alternative title of a shape inside the group |
new TextEncoder().encode(text) |
Encodes the collected text into bytes |
window.dotnetRuntime.Module.FS.writeFile(fileName, bytes) |
Writes the collected result to a text file in the VFS |
The steps are:
- Get the Spire.Presentation WASM module and make sure it is ready, then load the presentation into the VFS.
- Create a
Presentationobject, load the presentation withLoadFromFile(), and get the fourth slide withSlides.get_Item(3). - Loop from 0 to
Shapes.Count, get each shape withShapes.get_Item(i), and test whether it is a group withshape instanceof pptModule.GroupShape. - Inside the group, loop from 0 to
shape.Shapes.Count, get each child withshape.Shapes.get_Item(j)and read itsAlternativeTextandAlternativeTitle. - Join the collected texts by line breaks, encode them with
TextEncoder, and write them toGetGroupAlternativeText.txtwithFS.writeFile(). - Release the presentation with
Dispose(), then read the text file from the VFS and trigger the download.
The code for reading alternative text inside group shapes is as follows:
function App() {
  const getGroupAlternativeText = async () => {
    // Get the Spire.Presentation WASM module
    const pptModule = window.wasmModule?.spirepresentation;

    if (!pptModule) {
      alert('Spire.Presentation is not ready yet');
      return;
    }

    const inputFileName = 'AlternativeText.pptx';
    await window.spire.FetchFileToVFS(inputFileName, '', `${process.env.PUBLIC_URL}data/`);

    // Load the presentation and get the fourth slide
    const ppt = new pptModule.Presentation();
    ppt.LoadFromFile(inputFileName);
    const slide = ppt.Slides.get_Item(3);

    // Find the group shape and read the alternative text of its children
    const lines = [];
    for (let i = 0; i < slide.Shapes.Count; i++) {
      const shape = slide.Shapes.get_Item(i);
      if (shape instanceof pptModule.GroupShape) {
        for (let j = 0; j < shape.Shapes.Count; j++) {
          const child = shape.Shapes.get_Item(j);
          const title = child.AlternativeTitle ? ` (Title: ${child.AlternativeTitle})` : '';
          lines.push(`Child ${j + 1}: ${child.AlternativeText}${title}`);
        }
      }
    }

    // Write the result into a text file
    const outputFileName = 'GetGroupAlternativeText.txt';
    window.dotnetRuntime.Module.FS.writeFile(outputFileName, new TextEncoder().encode(lines.join('\n')));
    ppt.Dispose();

    // Read the generated text file from the VFS and trigger the download
    const fileArray = window.dotnetRuntime.Module.FS.readFile(outputFileName);
    const blob = new Blob([fileArray], { type: 'text/plain;charset=utf-8' });
    const url = URL.createObjectURL(blob);
    const a = document.createElement('a');
    a.href = url;
    a.download = outputFileName;
    a.click();
    URL.revokeObjectURL(url);
  };

  return (
    <div style={{ textAlign: 'center', height: '300px' }}>
      <h1>Alternative Text</h1>
      <button onClick={getGroupAlternativeText}>
        Get Group Alternative Text
      </button>
    </div>
  );
}

export default App;
The text file generated after reading the alternative text inside the group:
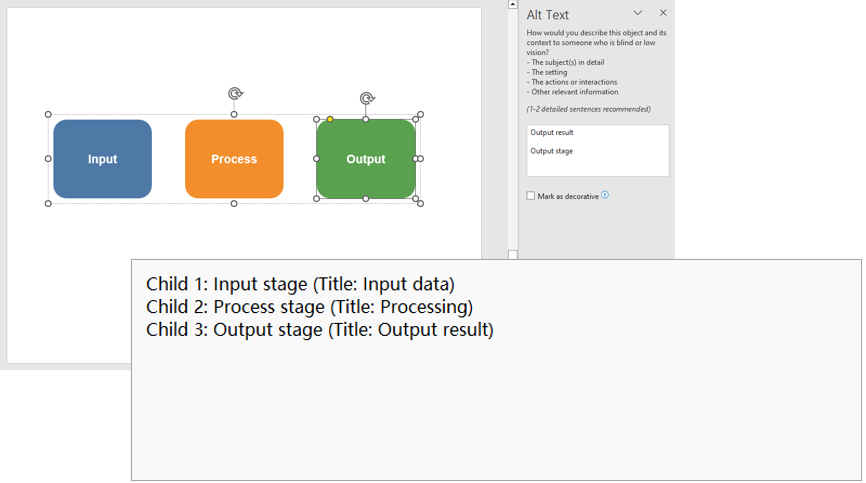
FAQ
What is the difference between alternative text and the shape name
Solution: AlternativeText is the description read by screen readers and used for searching, matching the "Alt Text" setting in PowerPoint; Name is the internal name of the shape in the file and is mainly used for programmatic reference. They are independent, so changing one does not affect the other.
What is the difference between the alternative text and its title
Solution: AlternativeText is the full description read aloud by screen readers; AlternativeTitle is a short title that summarizes the shape. They are stored as two separate properties of the shape and are independent, so you can set either one or both.
Can alternative text still be read from a hidden shape
Cause: Hiding only changes the display state, and the shape itself stays on the slide.
Solution: After IsHidden is set to true, the shape remains in the Shapes collection, and both AlternativeText and AlternativeTitle can still be read. The hidden state is saved with the file, and the text stays unchanged when the shape is shown again.
Can the group shape itself have alternative text
Cause: A group is also a kind of shape, while the descriptions of its children belong to each child shape.
Solution: You can assign AlternativeText and AlternativeTitle directly to the GroupShape; the child shapes are still read and written one by one through group.Shapes, and the two levels do not affect each other.
Get a Free License
If you wish to delete the evaluation message from the resulting documents, or to get rid of function limitations, please contact sales to obtain a valid 30-day temporary license.
Delete and Hide Shapes in PowerPoint with JavaScript in React
When a presentation is generated from a template, the pages often still carry material from the previous version: outdated logos, temporary decoration, or diagrams that are no longer needed. Deleting them by hand page by page takes time and is easy to miss; shapes that are only hidden for now are even harder to find once they have been deleted.
This article uses Spire.Presentation for JavaScript to delete and hide shapes in PowerPoint in the browser. The whole process runs locally on the user's device through WebAssembly, requires no Office installation and no back-end service.
This article covers two core features:
For installation and project configuration, see Integrating Spire.Presentation for JavaScript in a React Project. The examples below assume that Spire.Presentation for JavaScript is installed and the WebAssembly module has been initialized.
Delete PowerPoint Shapes
There are two common ways to delete shapes on a slide: when the target shape's index in the collection is known, delete it by index directly; when the index is not known and the shape has alternative text, loop over the shape collection and delete it by matching that text.
| Usage | Result |
|---|---|
slide.Shapes.Count |
The total number of shapes on the current slide |
slide.Shapes.RemoveAt(index) |
Delete the shape at the given index (indexes start at 0) |
slide.Shapes.get_Item(i) |
Get the i-th shape by index |
shape.AlternativeText |
Read the alternative text of a shape |
slide.Shapes.Remove(shape) |
Delete the given shape object |
The steps are:
- Get the Spire.Presentation WASM module and make sure it is ready, then load the font file and the presentation into the VFS.
- Create a
Presentationobject, load the presentation withLoadFromFile(), and get the first slide withSlides.get_Item(0). - Delete the shape at the given index with
Shapes.RemoveAt(). - Loop from
Shapes.Count - 1backwards, get each shape withShapes.get_Item(i), check whetherAlternativeTextcontains the marker, and callShapes.Remove(shape)when it matches. - Save the result file with
Presentation.SaveToFile()and release the presentation withDispose(). - Read the result file from the VFS and trigger the browser download.
The following code deletes PowerPoint shapes:
function App() {
  const removeShapes = async () => {
    // Get the Spire.Presentation WASM module
    const pptModule = window.wasmModule?.spirepresentation;

    // Check that the module is ready
    if (!pptModule) {
      alert('Spire.Presentation is not ready yet');
      return;
    }

    // Load the font and the presentation into the VFS
    await window.spire.FetchFileToVFS('ARIAL.TTF', '/Library/Fonts/', `${process.env.PUBLIC_URL}/font/`);
    const inputFileName = 'Shapes.pptx';
    await window.spire.FetchFileToVFS(inputFileName, '', `${process.env.PUBLIC_URL}data/`);

    // Load the presentation and get the first slide
    const ppt = new pptModule.Presentation();
    ppt.LoadFromFile(inputFileName);
    const slide = ppt.Slides.get_Item(0);

    // Delete the shape at index 1 (the second shape; the index starts at 0)
    slide.Shapes.RemoveAt(1);

    // Delete the shapes whose alternative text contains "Deco"
    for (let i = slide.Shapes.Count - 1; i >= 0; i--) {
      const shape = slide.Shapes.get_Item(i);
      if (shape.AlternativeText.includes('Deco')) {
        slide.Shapes.Remove(shape);
      }
    }

    // Save the result file
    const outputFileName = 'RemoveShapes.pptx';
    ppt.SaveToFile({ file: outputFileName, fileFormat: pptModule.FileFormat.Pptx2013 });
    ppt.Dispose();

    // Read the generated file from the VFS and trigger the download
    const fileArray = window.dotnetRuntime.Module.FS.readFile(outputFileName);
    const blob = new Blob([fileArray], { type: 'application/vnd.openxmlformats-officedocument.presentationml.presentation' });
    const url = URL.createObjectURL(blob);
    const a = document.createElement('a');
    a.href = url;
    a.download = outputFileName;
    a.click();
    URL.revokeObjectURL(url);
  };

  return (
    <div style={{ textAlign: 'center', height: '300px' }}>
      <h1>Delete Shapes</h1>
      <button onClick={removeShapes}>
        Delete Shape
      </button>
    </div>
  );
}

export default App;
Presentation after deleting shapes by index and by alternative text:
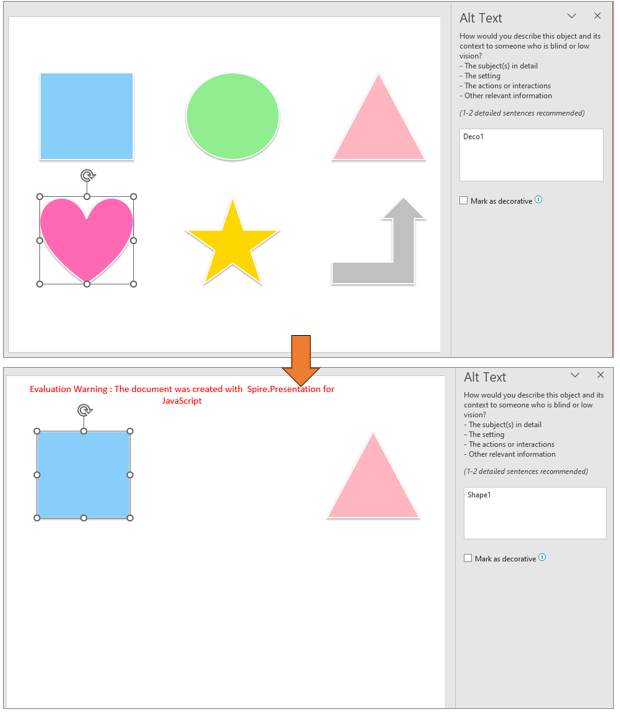
Hide and Show PowerPoint Shapes
Some shapes are only temporarily unwanted in the current version, and deleting them makes them inconvenient to restore. In that case, keep the shape and hide only its display: set the shape's IsHidden to true, and the shape stays in the file; set it back to false later to restore it. The difference from deletion is that hiding keeps the shape itself and its styles.
| Usage | Result |
|---|---|
slide.Shapes.get_Item(index) |
Get the shape object at the given index |
shape.IsHidden = true |
Hide the shape; it stays in the file |
shape.IsHidden = false |
Show a hidden shape again |
The steps are:
- Get the Spire.Presentation WASM module and make sure it is ready, then load the font file and the presentation into the VFS.
- Create a
Presentationobject, load the presentation withLoadFromFile(), and get the first slide withSlides.get_Item(0). - Get the shape to hide with
Shapes.get_Item()by index, and setIsHiddentotrue. - Save the result file with
Presentation.SaveToFile(), release the presentation withDispose(), and read the file from the VFS to trigger the download.
The following code hides shapes:
function App() {
  const hideShapes = async () => {
    // Get the Spire.Presentation WASM module
    const pptModule = window.wasmModule?.spirepresentation;

    // Check that the module is ready
    if (!pptModule) {
      alert('Spire.Presentation is not ready yet');
      return;
    }

    // Load the font and the presentation into the VFS
    await window.spire.FetchFileToVFS('ARIAL.TTF', '/Library/Fonts/', `${process.env.PUBLIC_URL}/font/`);
    const inputFileName = 'Shapes.pptx';
    await window.spire.FetchFileToVFS(inputFileName, '', `${process.env.PUBLIC_URL}data/`);

    // Load the presentation and get the first slide
    const ppt = new pptModule.Presentation();
    ppt.LoadFromFile(inputFileName);
    const slide = ppt.Slides.get_Item(0);

    // Get the shape at index 1 (the second shape) and hide it
    const shape = slide.Shapes.get_Item(1);
    shape.IsHidden = true;

    // Save the result file
    const outputFileName = 'HideShapes.pptx';
    ppt.SaveToFile({ file: outputFileName, fileFormat: pptModule.FileFormat.Pptx2013 });
    ppt.Dispose();

    // Read the generated file from the VFS and trigger the download
    const fileArray = window.dotnetRuntime.Module.FS.readFile(outputFileName);
    const blob = new Blob([fileArray], { type: 'application/vnd.openxmlformats-officedocument.presentationml.presentation' });
    const url = URL.createObjectURL(blob);
    const a = document.createElement('a');
    a.href = url;
    a.download = outputFileName;
    a.click();
    URL.revokeObjectURL(url);
  };

  return (
    <div style={{ textAlign: 'center', height: '300px' }}>
      <h1>Hide Shapes</h1>
      <button onClick={hideShapes}>
        Hide Shapes
      </button>
    </div>
  );
}

export default App;
Presentation after hiding the specified shape:
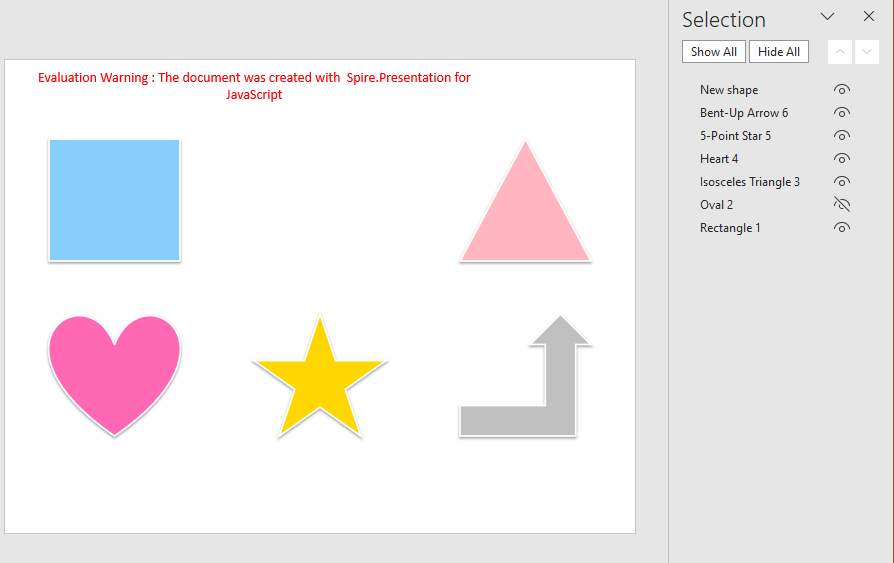
To show a shape again, set IsHidden back to false on the same shape; its content and styles are kept:
shape.IsHidden = false;
FAQ
What is the difference between hiding and deleting a shape
Cause: The two operations affect the file in different ways.
Solution: Shapes.Remove() / Shapes.RemoveAt() take the shape away from the slide, and it can no longer be found through the collection; IsHidden = true only changes the display state, so the shape and its styles stay in the file and can be restored by setting it back to false.
How to delete every shape on a slide
Cause: When clearing a page, deleting by ascending index skips shapes because the indexes move forward.
Solution: Loop from the end and delete without any condition:
for (let i = slide.Shapes.Count - 1; i >= 0; i--) {
  slide.Shapes.RemoveAt(i);
}
Can hidden shapes still be read
Cause: Hiding only changes the display state; the shape object still belongs to the slide's shape collection.
Solution: The shape can still be retrieved while looping over Shapes. Check shape.IsHidden to see whether it is hidden, and then decide whether to show it or skip it.
Get a Free License
If you wish to delete the evaluation message from the resulting documents, or to get rid of function limitations, please contact sales to obtain a valid 30-day temporary license.
Remove Duplicate Rows in Excel with JavaScript in React
Tables exported from multiple systems or entered by hand often contain duplicate records: the same record written twice, or the same entry appearing on adjacent rows. These duplicate rows inflate sums and counts, skew pivot results, and make later filtering and reconciliation harder. Spire.XLS for JavaScript removes duplicate rows in the browser through WebAssembly, with input and output files managed in a virtual file system (VFS) and no back-end service required.
This article covers three core features:
- Remove all duplicate rows in a worksheet
- Remove duplicate rows in a specified range
- Remove duplicate rows by columns and header
For installation and project configuration, see Integrating Spire.XLS for JavaScript in a React Project. The examples below assume that Spire.XLS is installed and the WebAssembly module has been initialized.
Remove all duplicate rows in a worksheet
When an entire sheet records the same set of fields, two rows are duplicates if every cell in them is identical. Calling RemoveDuplicates() directly compares rows across the used range of the whole worksheet, keeps the first row of each duplicate group, deletes the rest, and shifts the following rows up. This form treats the first row as ordinary data as well: it is kept as the first occurrence, while a data row identical to it is treated as a duplicate and deleted.
Writing and result for removing all duplicate rows in a worksheet:
| Writing | Result |
|---|---|
sheet.RemoveDuplicates() |
Compares every column across the used range, keeps the first occurrence, and deletes identical later rows |
The steps are:
- Load the font file and the Excel test file into the VFS with
window.spire.FetchFileToVFS. - Create a workbook with
new Workbook()and load the test file throughworkbook.LoadFromFile. - Get the first worksheet with
workbook.Worksheets.get(0). - Call
sheet.RemoveDuplicates()to delete rows whose cells are identical across all columns. - Write
RemoveAllDuplicates.xlsxwithworkbook.SaveToFile, release resources withworkbook.Dispose, and read the workbook from the VFS to trigger the download.
Below is the complete code example that removes all duplicate rows in a worksheet:
function App() {
  const removeAllDuplicates = async () => {
    // Get the Spire.XLS WASM module
    const xlsModule = window.wasmModule?.spirexls;

    // Check that the module is ready
    if (!xlsModule) {
      alert('Spire.Xls is not ready yet');
      return;
    }

    // Load the font and the test data file into the VFS
    await window.spire.FetchFileToVFS('ARIAL.TTF', '/Library/Fonts/', `${process.env.PUBLIC_URL}/font/`);
    const inputFileName = 'RemoveDuplicateRows.xlsx';
    await window.spire.FetchFileToVFS(inputFileName, '', `${process.env.PUBLIC_URL}data/`);

    // Load the workbook
    const workbook = new xlsModule.Workbook();
    workbook.LoadFromFile({ fileName: inputFileName });

    // Get the first worksheet
    const sheet = workbook.Worksheets.get(0);

    // Remove duplicate rows across all columns in the worksheet
    sheet.RemoveDuplicates();

    // Save the de-duplicated workbook into the VFS
    const outputFileName = 'RemoveAllDuplicates.xlsx';
    workbook.SaveToFile({ fileName: outputFileName });

    // Dispose of the workbook to release its resources
    workbook.Dispose();

    // Read the result back out of the VFS and trigger the download
    const fileArray = window.dotnetRuntime.Module.FS.readFile(outputFileName);
    const blob = new Blob([fileArray], { type: 'application/vnd.openxmlformats-officedocument.spreadsheetml.sheet' });
    const url = URL.createObjectURL(blob);
    const a = document.createElement('a');
    a.href = url;
    a.download = outputFileName;
    a.click();
    URL.revokeObjectURL(url);
  };

  return (
    <div style={{ textAlign: 'center', height: '300px' }}>
      <h1>Remove Duplicate Rows in Excel in React</h1>
      <button id="remove-all-duplicates" onClick={removeAllDuplicates}>Remove All Duplicates</button>
    </div>
  );
}

export default App;
Workbook after removing all duplicate rows in the worksheet:
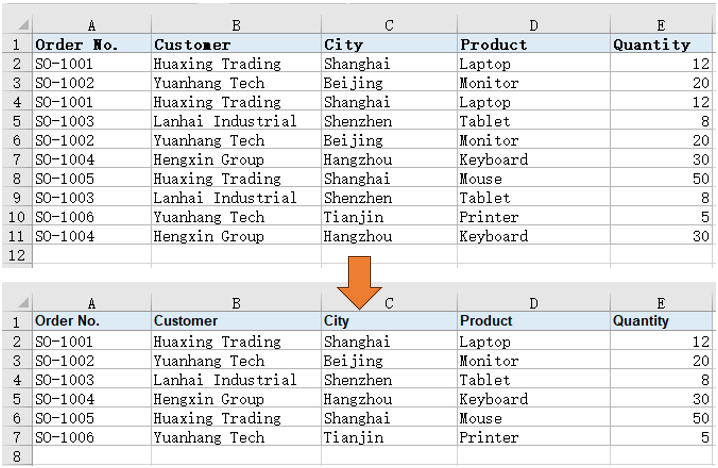
Remove duplicate rows in a specified range
Whole-sheet deduplication processes every record in the used range, but sometimes only one block of detail should be cleaned, for example when a worksheet holds two unrelated blocks of records and only one block needs deduplication. Specifying a start and an end position limits the operation to that range, leaving rows outside it untouched while comparing whole rows inside it. Row and column numbers are 1-based, and both endpoints are included.
Writing and result for removing duplicate rows in a specified range:
| Writing | Result |
|---|---|
sheet.RemoveDuplicates(startRow, startColumn, endRow, endColumn) |
Processes only the specified range and deletes identical duplicate rows inside it |
The steps are:
- Load the font file and the Excel test file into the VFS with
window.spire.FetchFileToVFS. - Create a workbook with
new Workbook()and load the test file throughworkbook.LoadFromFile. - Get the second worksheet that holds the range data with
workbook.Worksheets.get(1). - Call
sheet.RemoveDuplicates(2, 1, 7, 5)to deduplicate only rows 2-7 and columns 1-5. - Write
RemoveDuplicatesInRange.xlsxwithworkbook.SaveToFile, release resources withworkbook.Dispose, and read the workbook from the VFS to trigger the download.
Below is the complete code example that removes duplicate rows in a specified range:
function App() {
  const removeDuplicatesInRange = async () => {
    // Get the Spire.XLS WASM module
    const xlsModule = window.wasmModule?.spirexls;

    // Check that the module is ready
    if (!xlsModule) {
      alert('Spire.Xls is not ready yet');
      return;
    }

    // Load the font and the test data file into the VFS
    await window.spire.FetchFileToVFS('ARIAL.TTF', '/Library/Fonts/', `${process.env.PUBLIC_URL}/font/`);
    const inputFileName = 'RemoveDuplicateRows.xlsx';
    await window.spire.FetchFileToVFS(inputFileName, '', `${process.env.PUBLIC_URL}data/`);

    // Load the workbook
    const workbook = new xlsModule.Workbook();
    workbook.LoadFromFile({ fileName: inputFileName });

    // Get the second worksheet that holds the range data
    const sheet = workbook.Worksheets.get(1);

    // Remove duplicates only in rows 2-7 and columns 1-5
    sheet.RemoveDuplicates(2, 1, 7, 5);

    // Save the de-duplicated workbook into the VFS
    const outputFileName = 'RemoveDuplicatesInRange.xlsx';
    workbook.SaveToFile({ fileName: outputFileName });

    // Dispose of the workbook to release its resources
    workbook.Dispose();

    // Read the result back out of the VFS and trigger the download
    const fileArray = window.dotnetRuntime.Module.FS.readFile(outputFileName);
    const blob = new Blob([fileArray], { type: 'application/vnd.openxmlformats-officedocument.spreadsheetml.sheet' });
    const url = URL.createObjectURL(blob);
    const a = document.createElement('a');
    a.href = url;
    a.download = outputFileName;
    a.click();
    URL.revokeObjectURL(url);
  };

  return (
    <div style={{ textAlign: 'center', height: '300px' }}>
      <h1>Remove Duplicate Rows in Excel in React</h1>
      <button id="remove-duplicates-in-range" onClick={removeDuplicatesInRange}>Remove Duplicates in Range</button>
    </div>
  );
}

export default App;
Workbook after removing duplicate rows in the specified range:
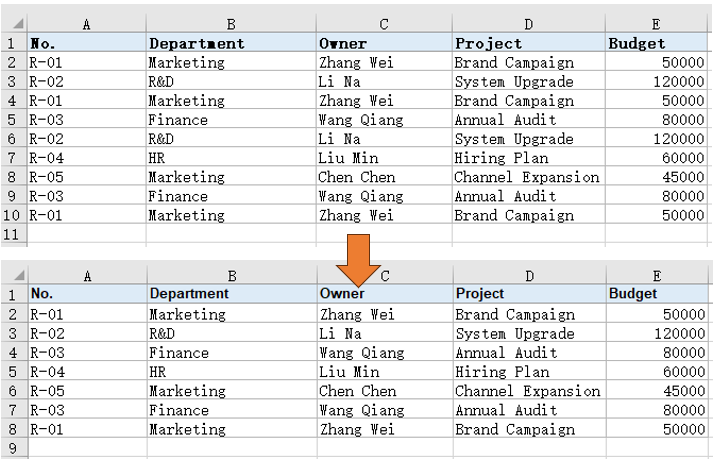
Remove duplicate rows by columns and header
Duplicates in business tables are often not identical rows but repeated key fields: several detail rows may share the same key fields while differing in the rest, yet only one record should remain when reporting by those keys. Declaring whether the first row is a header and choosing which columns take part in the comparison lets you match duplicates by key fields. When the first row is declared as a header, it is kept and excluded from the comparison; column numbers are counted from 0 relative to the start column, so [0, 1] means the start column and the column immediately to its right.
Writing and result for removing duplicate rows by columns and header:
| Writing | Result |
|---|---|
sheet.RemoveDuplicates(startRow, startColumn, endRow, endColumn, hasHeaders, columnOffsets) |
Keeps the header row and compares the selected columns |
The steps are:
- Load the font file and the Excel test file into the VFS with
window.spire.FetchFileToVFS. - Create a workbook with
new Workbook()and load the test file throughworkbook.LoadFromFile. - Get the third worksheet that holds the column-based data with
workbook.Worksheets.get(2). - Call
sheet.RemoveDuplicates(1, 1, 9, 5, true, [0, 1])to keep the header and compare the customer and region columns. - Write
RemoveDuplicatesByColumns.xlsxwithworkbook.SaveToFile, release resources withworkbook.Dispose, and read the workbook from the VFS to trigger the download.
Below is the complete code example that removes duplicate rows by columns and header:
function App() {
  const removeDuplicatesByColumns = async () => {
    // Get the Spire.XLS WASM module
    const xlsModule = window.wasmModule?.spirexls;

    // Check that the module is ready
    if (!xlsModule) {
      alert('Spire.Xls is not ready yet');
      return;
    }

    // Load the font and the test data file into the VFS
    await window.spire.FetchFileToVFS('ARIAL.TTF', '/Library/Fonts/', `${process.env.PUBLIC_URL}/font/`);
    const inputFileName = 'RemoveDuplicateRows.xlsx';
    await window.spire.FetchFileToVFS(inputFileName, '', `${process.env.PUBLIC_URL}data/`);

    // Load the workbook
    const workbook = new xlsModule.Workbook();
    workbook.LoadFromFile({ fileName: inputFileName });

    // Get the third worksheet that holds the column-based data
    const sheet = workbook.Worksheets.get(2);

    // Keep the header row and compare the customer and region columns
    sheet.RemoveDuplicates(1, 1, 9, 5, true, [0, 1]);

    // Save the de-duplicated workbook into the VFS
    const outputFileName = 'RemoveDuplicatesByColumns.xlsx';
    workbook.SaveToFile({ fileName: outputFileName });

    // Dispose of the workbook to release its resources
    workbook.Dispose();

    // Read the result back out of the VFS and trigger the download
    const fileArray = window.dotnetRuntime.Module.FS.readFile(outputFileName);
    const blob = new Blob([fileArray], { type: 'application/vnd.openxmlformats-officedocument.spreadsheetml.sheet' });
    const url = URL.createObjectURL(blob);
    const a = document.createElement('a');
    a.href = url;
    a.download = outputFileName;
    a.click();
    URL.revokeObjectURL(url);
  };

  return (
    <div style={{ textAlign: 'center', height: '300px' }}>
      <h1>Remove Duplicate Rows in Excel in React</h1>
      <button id="remove-duplicates-by-columns" onClick={removeDuplicatesByColumns}>Remove Duplicates by Columns</button>
    </div>
  );
}

export default App;
Workbook after removing duplicate rows by columns and header:
FAQ
Are hidden or filtered-out rows deleted
Cause: RemoveDuplicates decides duplicates solely by cell content and does not check whether a row is visible. Rows hidden manually or hidden by a filter still take part in the comparison and are deleted if they match another row. A hidden row that survives stays hidden.
Solution: Hiding or filtering cannot exclude rows from the comparison. Narrow the range to the data you want to process, or copy the rows you want to keep to a separate worksheet first.
How can I tell how many rows were deleted
Solution: Read LastRow before and after the call; the difference is the number of rows deleted:
const before = sheet.LastRow;
sheet.RemoveDuplicates(1, 1, 9, 5, true, [0, 1]);
const removed = before - sheet.LastRow;
Get a Free License
If you wish to delete the evaluation message from the resulting documents, or to get rid of function limitations, please contact sales to obtain a valid 30-day temporary license.
Create Dropdown Lists in Excel with JavaScript in React
When collecting or summarizing data, manual entry easily leads to inconsistent spelling and inconsistent names. A dropdown list fixes the available options so that entry only requires a selection, and when the options come from worksheet data, editing the source updates the list. This article uses Spire.XLS for JavaScript to create dropdown lists in the browser, with input and output files managed in a virtual file system (VFS) and no back-end service.
This article covers five core features:
- Create a dropdown list with fixed options
- Create a dropdown list from data on the same worksheet
- Create a dropdown list from data on another worksheet
- Create a dependent dropdown list
- Create a dependent dropdown list across worksheets
For installation and project configuration, see Integrating Spire.XLS for JavaScript in a React Project. The examples below assume that Spire.XLS is installed and the WebAssembly module has been initialized.
Create a dropdown list with fixed options
Fixed options suit scenarios with a small number of choices that do not change with the worksheet data, such as categories or statuses. Once a set of values is assigned as the available content of the target cell, the file opens with a dropdown list, and other input is handled according to the validation settings.
Writing and result for creating a dropdown list with fixed options:
| Writing | Result |
|---|---|
range.DataValidation.Values = values |
Assigns a set of fixed options to the target range |
The steps are:
- Load the font file and the Excel test file into the VFS with
window.spire.FetchFileToVFS. - Create a workbook with
new Workbook()and load the test file throughworkbook.LoadFromFile. - Get the entry worksheet with
workbook.Worksheets.get(0). - Assign the fixed option array to
sheet.Range.get('B2').DataValidation.Values. - Write the result file with
workbook.SaveToFile, release resources withworkbook.Dispose, and read the workbook from the VFS to trigger the download.
Below is the complete code example that creates a dropdown list with fixed options:
function App() {
  const createFixedDropdown = async () => {
    // Get the Spire.XLS WASM module
    const xlsModule = window.wasmModule?.spirexls;

    // Check that the module is ready
    if (!xlsModule) {
      alert('Spire.Xls is not ready yet');
      return;
    }

    // Load the font and the test data file into the VFS
    await window.spire.FetchFileToVFS('ARIAL.TTF', '/Library/Fonts/', `${process.env.PUBLIC_URL}/font/`);
    const inputFileName = 'DropdownData.xlsx';
    await window.spire.FetchFileToVFS(inputFileName, '', `${process.env.PUBLIC_URL}data/`);

    // Load the workbook
    const workbook = new xlsModule.Workbook();
    workbook.LoadFromFile({ fileName: inputFileName });

    // Get the entry worksheet
    const sheet = workbook.Worksheets.get(0);

    // Assign the fixed options to cell B2
    sheet.Range.get('B2').DataValidation.Values = ['North', 'East', 'South', 'Southwest'];

    // Save the result into the VFS
    const outputFileName = 'FixedOptionsDropdown.xlsx';
    workbook.SaveToFile({ fileName: outputFileName });

    // Dispose of the workbook to release its resources
    workbook.Dispose();

    // Read the result back out of the VFS and trigger the download
    const fileArray = window.dotnetRuntime.Module.FS.readFile(outputFileName);
    const blob = new Blob([fileArray], { type: 'application/vnd.openxmlformats-officedocument.spreadsheetml.sheet' });
    const url = URL.createObjectURL(blob);
    const a = document.createElement('a');
    a.href = url;
    a.download = outputFileName;
    a.click();
    URL.revokeObjectURL(url);
  };

  return (
    <div style={{ textAlign: 'center', height: '300px' }}>
      <h1>Create Excel Dropdown Lists in React</h1>
      <button id="fixed-options" onClick={createFixedDropdown}>Fixed Options</button>
    </div>
  );
}

export default App;
Workbook after creating a dropdown list with fixed options:
Create a dropdown list from data on the same worksheet
When the options are already stored in a column on the same worksheet, reference that range directly. The dropdown list stays linked to the source data, so editing the source updates the options without maintaining a second copy in code.
Writing and result for creating a dropdown list from data on the same worksheet:
| Writing | Result |
|---|---|
range.DataValidation.DataRange = sourceRange |
Uses the source range as the option source for the target range |
The steps are:
- Load the font file and the Excel test file into the VFS with
window.spire.FetchFileToVFS. - Create a workbook with
new Workbook()and load the test file throughworkbook.LoadFromFile. - Get the worksheet that holds the options with
workbook.Worksheets.get(1). - Assign the
D2:D5range of that worksheet toDataValidation.DataRangeof cell F2. - Write the result file with
workbook.SaveToFile, release resources withworkbook.Dispose, and read the workbook from the VFS to trigger the download.
Below is the complete code example that creates a dropdown list from data on the same worksheet:
function App() {
  const createSameSheetDropdown = async () => {
    // Get the Spire.XLS WASM module
    const xlsModule = window.wasmModule?.spirexls;

    // Check that the module is ready
    if (!xlsModule) {
      alert('Spire.Xls is not ready yet');
      return;
    }

    // Load the font and the test data file into the VFS
    await window.spire.FetchFileToVFS('ARIAL.TTF', '/Library/Fonts/', `${process.env.PUBLIC_URL}/font/`);
    const inputFileName = 'DropdownData.xlsx';
    await window.spire.FetchFileToVFS(inputFileName, '', `${process.env.PUBLIC_URL}data/`);

    // Load the workbook
    const workbook = new xlsModule.Workbook();
    workbook.LoadFromFile({ fileName: inputFileName });

    // Get the worksheet that holds the options
    const sheet = workbook.Worksheets.get(1);

    // Use D2:D5 as the dropdown options for cell F2
    sheet.Range.get('F2').DataValidation.DataRange = sheet.Range.get('D2:D5');

    // Save the result into the VFS
    const outputFileName = 'SameSheetDropdown.xlsx';
    workbook.SaveToFile({ fileName: outputFileName });

    // Dispose of the workbook to release its resources
    workbook.Dispose();

    // Read the result back out of the VFS and trigger the download
    const fileArray = window.dotnetRuntime.Module.FS.readFile(outputFileName);
    const blob = new Blob([fileArray], { type: 'application/vnd.openxmlformats-officedocument.spreadsheetml.sheet' });
    const url = URL.createObjectURL(blob);
    const a = document.createElement('a');
    a.href = url;
    a.download = outputFileName;
    a.click();
    URL.revokeObjectURL(url);
  };

  return (
    <div style={{ textAlign: 'center', height: '300px' }}>
      <h1>Create Excel Dropdown Lists in React</h1>
      <button id="same-sheet" onClick={createSameSheetDropdown}>Same-Sheet Data</button>
    </div>
  );
}

export default App;
Workbook after creating a dropdown list from data on the same worksheet:
Create a dropdown list from data on another worksheet
When the options live on another worksheet, the source data and the entry interface can be separated: the entry worksheet keeps only the cells to fill in, while the options are maintained in a data worksheet. Before referencing another worksheet, data validation must be allowed to use ranges outside the current sheet.
Writing and result for creating a dropdown list from data on another worksheet:
| Writing | Result |
|---|---|
workbook.Allow3DRangesInDataValidation = true |
Allows data validation to reference other worksheets |
range.DataValidation.DataRange = sourceRange |
Uses a source range on another worksheet as the option source |
The steps are:
- Load the font file and the Excel test file into the VFS with
window.spire.FetchFileToVFS. - Create a workbook with
new Workbook()and load the test file throughworkbook.LoadFromFile. - Get the entry worksheet with
workbook.Worksheets.get(0)and the options worksheet withworkbook.Worksheets.get(2). - Set
workbook.Allow3DRangesInDataValidationtotrue. - Assign the
A2:A5range of the options worksheet toDataValidation.DataRangeof cell B2 on the entry worksheet. - Write the result file with
workbook.SaveToFile, release resources withworkbook.Dispose, and read the workbook from the VFS to trigger the download.
Below is the complete code example that creates a dropdown list from data on another worksheet:
function App() {
  const createCrossSheetDropdown = async () => {
    // Get the Spire.XLS WASM module
    const xlsModule = window.wasmModule?.spirexls;

    // Check that the module is ready
    if (!xlsModule) {
      alert('Spire.Xls is not ready yet');
      return;
    }

    // Load the font and the test data file into the VFS
    await window.spire.FetchFileToVFS('ARIAL.TTF', '/Library/Fonts/', `${process.env.PUBLIC_URL}/font/`);
    const inputFileName = 'DropdownData.xlsx';
    await window.spire.FetchFileToVFS(inputFileName, '', `${process.env.PUBLIC_URL}data/`);

    // Load the workbook
    const workbook = new xlsModule.Workbook();
    workbook.LoadFromFile({ fileName: inputFileName });

    // Get the entry worksheet and the worksheet that holds the options
    const sheet = workbook.Worksheets.get(0);
    const backupSheet = workbook.Worksheets.get(2);

    // Allow data validation to reference other worksheets
    workbook.Allow3DRangesInDataValidation = true;

    // Use A2:A5 on the other worksheet as the dropdown options for cell B2
    sheet.Range.get('B2').DataValidation.DataRange = backupSheet.Range.get('A2:A5');

    // Save the result into the VFS
    const outputFileName = 'CrossSheetDropdown.xlsx';
    workbook.SaveToFile({ fileName: outputFileName });

    // Dispose of the workbook to release its resources
    workbook.Dispose();

    // Read the result back out of the VFS and trigger the download
    const fileArray = window.dotnetRuntime.Module.FS.readFile(outputFileName);
    const blob = new Blob([fileArray], { type: 'application/vnd.openxmlformats-officedocument.spreadsheetml.sheet' });
    const url = URL.createObjectURL(blob);
    const a = document.createElement('a');
    a.href = url;
    a.download = outputFileName;
    a.click();
    URL.revokeObjectURL(url);
  };

  return (
    <div style={{ textAlign: 'center', height: '300px' }}>
      <h1>Create Excel Dropdown Lists in React</h1>
      <button id="other-sheet" onClick={createCrossSheetDropdown}>Cross-Sheet Data</button>
    </div>
  );
}

export default App;
Workbook after creating a dropdown list from data on another worksheet:
Create a dependent dropdown list
A dependent dropdown list links two lists: after the first cell selects a category, the second cell shows only the matching options. Each group of options is first defined as a named range, and INDIRECT switches the reference according to the value of the first cell, so no separate branch is needed for each category.
Writing and result for creating a dependent dropdown list:
| Writing | Result |
|---|---|
workbook.NameRanges.Add(name) |
Creates a named range with the given name |
namedRange.RefersToRange = sourceRange |
Points the named range to the option list |
range.DataValidation.AllowType = xlsModule.CellDataType.User |
Uses a custom formula to determine the available content |
range.DataValidation.Formula1 = formulaText |
Switches the option list according to the selected category |
The steps are:
- Load the font file and the Excel test file into the VFS with
window.spire.FetchFileToVFS. - Create a workbook with
new Workbook()and load the test file throughworkbook.LoadFromFile. - Get the worksheet that holds the categories and options with
workbook.Worksheets.get(1). - Use
workbook.NameRanges.Addto create the Fruit and Color named ranges, and point each one to its option list withRefersToRange. - Set up the category dropdown list in cell B2 of the entry worksheet, using the category column as the options.
- Set
DataValidation.AllowTypeof cell C2 toxlsModule.CellDataType.User, then setDataValidation.Formula1to=INDIRECT($B$2). - Write the result file with
workbook.SaveToFile, release resources withworkbook.Dispose, and read the workbook from the VFS to trigger the download.
Below is the complete code example that creates a dependent dropdown list:
function App() {
  const createDependentDropdown = async () => {
    // Get the Spire.XLS WASM module
    const xlsModule = window.wasmModule?.spirexls;

    // Check that the module is ready
    if (!xlsModule) {
      alert('Spire.Xls is not ready yet');
      return;
    }

    // Load the font and the test data file into the VFS
    await window.spire.FetchFileToVFS('ARIAL.TTF', '/Library/Fonts/', `${process.env.PUBLIC_URL}/font/`);
    const inputFileName = 'DropdownData.xlsx';
    await window.spire.FetchFileToVFS(inputFileName, '', `${process.env.PUBLIC_URL}data/`);

    // Load the workbook
    const workbook = new xlsModule.Workbook();
    workbook.LoadFromFile({ fileName: inputFileName });

    // Get the entry worksheet and the worksheet that holds the options
    const sheet = workbook.Worksheets.get(0);
    const listsSheet = workbook.Worksheets.get(1);

    // Create the Fruit named range and point it to the fruit option list
    const fruitName = workbook.NameRanges.Add('Fruit');
    fruitName.RefersToRange = listsSheet.Range.get('B2:B4');

    // Create the Color named range and point it to the color option list
    const colorName = workbook.NameRanges.Add('Color');
    colorName.RefersToRange = listsSheet.Range.get('C2:C4');

    // Set up the category dropdown list in B2
    sheet.Range.get('B2').DataValidation.DataRange = listsSheet.Range.get('A2:A3');

    // Set up the dependent dropdown list in C2
    sheet.Range.get('C2').DataValidation.AllowType = xlsModule.CellDataType.User;
    sheet.Range.get('C2').DataValidation.Formula1 = '=INDIRECT($B$2)';

    // Save the result into the VFS
    const outputFileName = 'DependentDropdown.xlsx';
    workbook.SaveToFile({ fileName: outputFileName });

    // Dispose of the workbook to release its resources
    workbook.Dispose();

    // Read the result back out of the VFS and trigger the download
    const fileArray = window.dotnetRuntime.Module.FS.readFile(outputFileName);
    const blob = new Blob([fileArray], { type: 'application/vnd.openxmlformats-officedocument.spreadsheetml.sheet' });
    const url = URL.createObjectURL(blob);
    const a = document.createElement('a');
    a.href = url;
    a.download = outputFileName;
    a.click();
    URL.revokeObjectURL(url);
  };

  return (
    <div style={{ textAlign: 'center', height: '300px' }}>
      <h1>Create Excel Dropdown Lists in React</h1>
      <button id="dependent" onClick={createDependentDropdown}>Dependent List</button>
    </div>
  );
}

export default App;
Workbook after creating a dependent dropdown list:
Create a dependent dropdown list across worksheets
When the entry worksheet and the options worksheet are separate, the dependent formula can reference the first dropdown cell across worksheets. The entry interface, the option data, and the dependent result can then be kept on different worksheets for easier maintenance.
Writing and result for creating a dependent dropdown list across worksheets:
| Writing | Result |
|---|---|
workbook.Allow3DRangesInDataValidation = true |
Allows data validation to reference other worksheets |
range.DataValidation.AllowType = xlsModule.CellDataType.User |
Uses a custom formula to determine the available content |
range.DataValidation.Formula1 = formulaText |
Switches the option list according to the selected category on another worksheet |
The steps are:
- Load the font file and the Excel test file into the VFS with
window.spire.FetchFileToVFS. - Create a workbook with
new Workbook()and load the test file throughworkbook.LoadFromFile. - Get the entry worksheet with
workbook.Worksheets.get(0), the options worksheet withworkbook.Worksheets.get(1), and the second entry worksheet withworkbook.Worksheets.get(2). - Use
workbook.NameRanges.Addto create the Fruit and Color named ranges, and point them to the option lists withRefersToRange. - Set
workbook.Allow3DRangesInDataValidationtotrueand set up the category dropdown list in cell B2 of the entry worksheet. - Set
DataValidation.AllowTypeof cell C2 on the second entry worksheet toxlsModule.CellDataType.User, then setDataValidation.Formula1to=INDIRECT(Form!$B$2). - Write the result file with
workbook.SaveToFile, release resources withworkbook.Dispose, and read the workbook from the VFS to trigger the download.
Below is the complete code example that creates a dependent dropdown list across worksheets:
function App() {
  const createCrossSheetDependentDropdown = async () => {
    // Get the Spire.XLS WASM module
    const xlsModule = window.wasmModule?.spirexls;

    // Check that the module is ready
    if (!xlsModule) {
      alert('Spire.Xls is not ready yet');
      return;
    }

    // Load the font and the test data file into the VFS
    await window.spire.FetchFileToVFS('ARIAL.TTF', '/Library/Fonts/', `${process.env.PUBLIC_URL}/font/`);
    const inputFileName = 'DropdownData.xlsx';
    await window.spire.FetchFileToVFS(inputFileName, '', `${process.env.PUBLIC_URL}data/`);

    // Load the workbook
    const workbook = new xlsModule.Workbook();
    workbook.LoadFromFile({ fileName: inputFileName });

    // Get the entry worksheet, the options worksheet, and the second entry worksheet
    const sheet = workbook.Worksheets.get(0);
    const listsSheet = workbook.Worksheets.get(1);
    const backupSheet = workbook.Worksheets.get(2);

    // Create the Fruit named range and point it to the fruit option list
    const fruitName = workbook.NameRanges.Add('Fruit');
    fruitName.RefersToRange = listsSheet.Range.get('B2:B4');

    // Create the Color named range and point it to the color option list
    const colorName = workbook.NameRanges.Add('Color');
    colorName.RefersToRange = listsSheet.Range.get('C2:C4');

    // Allow data validation to reference other worksheets
    workbook.Allow3DRangesInDataValidation = true;

    // Set up the category dropdown list in B2 of the entry worksheet
    sheet.Range.get('B2').DataValidation.DataRange = listsSheet.Range.get('A2:A3');

    // Set up the cross-sheet dependent dropdown list in C2 of the second entry worksheet
    backupSheet.Range.get('C2').DataValidation.AllowType = xlsModule.CellDataType.User;
    backupSheet.Range.get('C2').DataValidation.Formula1 = '=INDIRECT(Form!$B$2)';

    // Save the result into the VFS
    const outputFileName = 'CrossSheetDependentDropdown.xlsx';
    workbook.SaveToFile({ fileName: outputFileName });

    // Dispose of the workbook to release its resources
    workbook.Dispose();

    // Read the result back out of the VFS and trigger the download
    const fileArray = window.dotnetRuntime.Module.FS.readFile(outputFileName);
    const blob = new Blob([fileArray], { type: 'application/vnd.openxmlformats-officedocument.spreadsheetml.sheet' });
    const url = URL.createObjectURL(blob);
    const a = document.createElement('a');
    a.href = url;
    a.download = outputFileName;
    a.click();
    URL.revokeObjectURL(url);
  };

  return (
    <div style={{ textAlign: 'center', height: '300px' }}>
      <h1>Create Excel Dropdown Lists in React</h1>
      <button id="cross-sheet-dependent" onClick={createCrossSheetDependentDropdown}>Cross-Sheet Dependent List</button>
    </div>
  );
}

export default App;
Workbook after creating a dependent dropdown list across worksheets:
FAQ
How can I hide the dropdown arrow
Cause: The arrow at the right edge of the cell is controlled by the IsSuppressDropDownArrow setting of the data validation. Its default is false, so the arrow is shown once a dropdown list is set.
Solution: Set the property to true; the arrow is hidden while the validation stays active:
const validation = sheet.Range.get('B2').DataValidation;
validation.Values = ['North', 'East', 'South', 'Southwest'];
validation.IsSuppressDropDownArrow = true;
Why does the dropdown list contain blank items
Cause: When the range assigned to DataValidation.DataRange contains empty cells, those empty cells are also treated as list items; the larger the range, the more blank items appear.
Solution: Point DataRange to the range that actually contains values. For example, when the options occupy only D2:D5, use sheet.Range.get('D2:D5') instead of expanding to D2:D8; adjust the range when new options are added.
Get a Free License
If you wish to delete the evaluation message from the resulting documents, or to get rid of function limitations, please contact sales to obtain a valid 30-day temporary license.