Laying out a slide often means adjusting the rotation angle, position, and stacking order of shapes over and over: a tilted label adds movement, an element pushed into a corner unbalances the page, and when shapes overlap, a shape added later can hide content that should stand out. Dragging by hand is intuitive, but it is hard to reproduce the same angle and coordinates exactly, and batch changes take even longer.
Spire.Presentation for JavaScript controls a shape's orientation, position, and overlap through its rotation angle, top-left coordinates, and stacking order. The whole process runs locally in the browser through WebAssembly, requires no Office installation and no back-end service, and the presentation never leaves the user's device.
The article covers three features:
For installation and project configuration, see Integrating Spire.Presentation for JavaScript in a React Project. The examples below assume that Spire.Presentation for JavaScript is installed and the WebAssembly module has been initialized.
Rotate PowerPoint Shapes
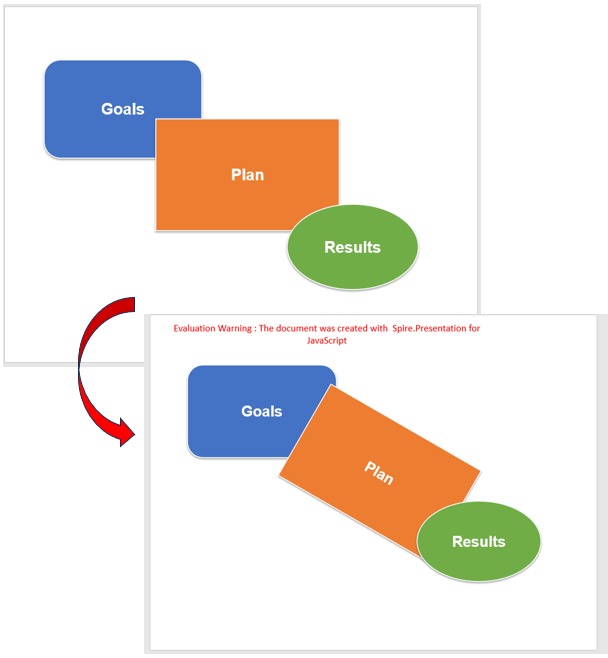
Rotating a shape is a common way to emphasize an element or add a sense of movement. Reproducing the same angle by hand is difficult, and adjusting shapes one by one takes time. The Rotation property sets the angle in degrees; positive values rotate clockwise, the shape turns around its own center, and any text inside the shape tilts with it.
| Code | Result |
|---|---|
Shapes.get_Item(index) |
Gets a shape on the slide by index |
shape.Rotation |
Sets the rotation angle in degrees; positive values rotate clockwise |
The steps are:
- Get the Spire.Presentation WASM module and confirm it is ready, then load the font file and the presentation into the VFS.
- Create a
Presentationobject, load the presentation withLoadFromFile(), and get the first slide withSlides.get_Item(0). - Get the shape to rotate with
Shapes.get_Item(index); the index starts at0. - Assign the angle in degrees to
shape.Rotation; positive values rotate clockwise. Rotation happens around the shape center, whileLeft,Top,Width, andHeightstay unchanged. - Call
SaveToFile()to save the presentation, callPresentation.Dispose()to release resources, then read the file from the VFS and trigger the download.
The code for rotating a PowerPoint shape is shown below:
function App() {
  const rotateShape = async () => {
    // Get the Spire.Presentation WASM module
    const pptModule = window.wasmModule?.spirepresentation;

    // Check that the module is ready
    if (!pptModule) {
      alert('Spire.Presentation is not ready yet');
      return;
    }

    // Load the font file and the presentation into the VFS
    await window.spire.FetchFileToVFS('ARIAL.TTF', '/Library/Fonts/', `${process.env.PUBLIC_URL}/font/`);
    const inputFileName = 'ShapeLayout.pptx';
    await window.spire.FetchFileToVFS(inputFileName, '', `${process.env.PUBLIC_URL}data/`);

    // Load the presentation and get the first slide
    const ppt = new pptModule.Presentation();
    ppt.LoadFromFile(inputFileName);
    const slide = ppt.Slides.get_Item(0);

    // Get the shape to rotate
    const shape = slide.Shapes.get_Item(1);

    // Rotate 30 degrees clockwise
    shape.Rotation = 30;

    // Save the presentation
    const outputFileName = 'RotateShape_result.pptx';
    ppt.SaveToFile({ file: outputFileName, fileFormat: pptModule.FileFormat.Pptx2013 });

    // Release the presentation
    ppt.Dispose();

    // Read the result file from the VFS and trigger the download
    const fileArray = window.dotnetRuntime.Module.FS.readFile(outputFileName);
    const blob = new Blob([fileArray], { type: 'application/vnd.openxmlformats-officedocument.presentationml.presentation' });
    const url = URL.createObjectURL(blob);
    const a = document.createElement('a');
    a.href = url;
    a.download = outputFileName;
    a.click();
    URL.revokeObjectURL(url);
  };

  return (
    <div style={{ textAlign: 'center', height: '300px' }}>
      <h1>Rotate Shape</h1>
      <button onClick={rotateShape}>
        Rotate
      </button>
    </div>
  );
}

export default App;
Presentation after rotating a shape clockwise:
Move PowerPoint Shapes
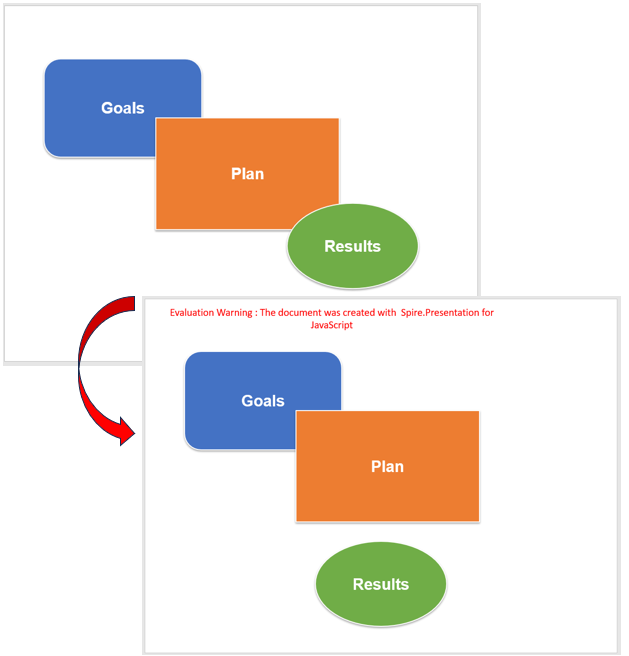
A shape's position is determined by its top-left coordinates in points, with the origin at the top-left corner of the slide. Compared with dragging, setting coordinates directly makes alignment exact and lets you compute centered or edge-aligned positions from the slide size, without drift caused by canvas zoom.
| Code | Result |
|---|---|
shape.Left |
Distance from the shape's left edge to the slide's left edge |
shape.Top |
Distance from the shape's top edge to the slide's top edge |
ppt.SlideSize.Size.Width |
Slide width |
ppt.SlideSize.Size.Height |
Slide height |
shape.Width / shape.Height |
Shape dimensions, used to compute the centered position |
The steps are:
- Get the Spire.Presentation WASM module and confirm it is ready, then load the font file and the presentation into the VFS.
- Create a
Presentationobject, load the presentation withLoadFromFile(), and get the first slide withSlides.get_Item(0). - Get the shape to move with
Shapes.get_Item(index). - Read the slide size with
ppt.SlideSize.Size.Widthandppt.SlideSize.Size.Height, then use the shape'sWidthandHeightto compute the horizontally centered position and the bottom margin. - Assign the results to
shape.Leftandshape.Top, save the presentation, release resources, and download the result.
The code for moving a PowerPoint shape is shown below:
function App() {
  const moveShape = async () => {
    // Get the Spire.Presentation WASM module
    const pptModule = window.wasmModule?.spirepresentation;

    // Check that the module is ready
    if (!pptModule) {
      alert('Spire.Presentation is not ready yet');
      return;
    }

    // Load the font file and the presentation into the VFS
    await window.spire.FetchFileToVFS('ARIAL.TTF', '/Library/Fonts/', `${process.env.PUBLIC_URL}/font/`);
    const inputFileName = 'ShapeLayout.pptx';
    await window.spire.FetchFileToVFS(inputFileName, '', `${process.env.PUBLIC_URL}data/`);

    // Load the presentation and get the first slide
    const ppt = new pptModule.Presentation();
    ppt.LoadFromFile(inputFileName);
    const slide = ppt.Slides.get_Item(0);

    // Get the shape to move
    const shape = slide.Shapes.get_Item(2);

    // Compute a horizontally centered position with a 40-point bottom margin from the slide size
    const margin = 40;
    shape.Left = (ppt.SlideSize.Size.Width - shape.Width) / 2;
    shape.Top = ppt.SlideSize.Size.Height - shape.Height - margin;

    // Save the presentation
    const outputFileName = 'MoveShape_result.pptx';
    ppt.SaveToFile({ file: outputFileName, fileFormat: pptModule.FileFormat.Pptx2013 });

    // Release the presentation
    ppt.Dispose();

    // Read the result file from the VFS and trigger the download
    const fileArray = window.dotnetRuntime.Module.FS.readFile(outputFileName);
    const blob = new Blob([fileArray], { type: 'application/vnd.openxmlformats-officedocument.presentationml.presentation' });
    const url = URL.createObjectURL(blob);
    const a = document.createElement('a');
    a.href = url;
    a.download = outputFileName;
    a.click();
    URL.revokeObjectURL(url);
  };

  return (
    <div style={{ textAlign: 'center', height: '300px' }}>
      <h1>Move Shape</h1>
      <button onClick={moveShape}>
        Move
      </button>
    </div>
  );
}

export default App;
Presentation after moving a shape to the bottom center:
Reorder PowerPoint Shapes
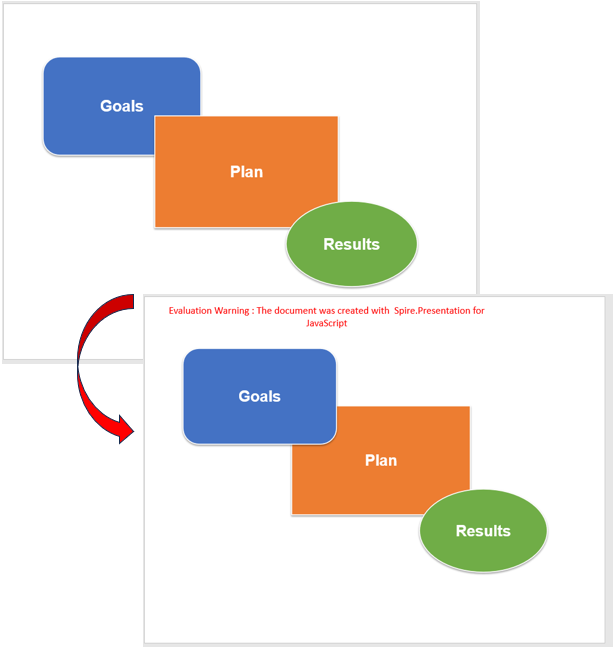
Shapes on a slide are stacked in the order they were added, so a later shape covers an earlier one. When elements overlap, content that should stand out can end up underneath, and a background block can hide text. SetShapeArrange() provides four adjustments—bring forward, send backward, bring to front, and send to back—for fine-grained control over the stacking order.
| Code | Result |
|---|---|
shape.SetShapeArrange(ShapeArrange.BringForward) |
Moves the shape one layer forward |
shape.SetShapeArrange(ShapeArrange.SendBackward) |
Moves the shape one layer backward |
shape.SetShapeArrange(ShapeArrange.BringToFront) |
Moves the shape to the front |
shape.SetShapeArrange(ShapeArrange.SendToBack) |
Moves the shape to the back |
The steps are:
- Get the Spire.Presentation WASM module and confirm it is ready, then load the font file and the presentation into the VFS.
- Create a
Presentationobject, load the presentation withLoadFromFile(), and get the first slide withSlides.get_Item(0). - Get the shape whose stacking order should change with
Shapes.get_Item(index), then callSetShapeArrange()with the requiredShapeArrangevalue. - Call
SaveToFile()to save the presentation, callPresentation.Dispose()to release resources, then read the file from the VFS and trigger the download.
The code for bringing a PowerPoint shape to the front is shown below:
function App() {
  const bringShapeToFront = async () => {
    // Get the Spire.Presentation WASM module
    const pptModule = window.wasmModule?.spirepresentation;

    // Check that the module is ready
    if (!pptModule) {
      alert('Spire.Presentation is not ready yet');
      return;
    }

    // Load the font file and the presentation into the VFS
    await window.spire.FetchFileToVFS('ARIAL.TTF', '/Library/Fonts/', `${process.env.PUBLIC_URL}/font/`);
    const inputFileName = 'ShapeLayout.pptx';
    await window.spire.FetchFileToVFS(inputFileName, '', `${process.env.PUBLIC_URL}data/`);

    // Load the presentation and get the first slide
    const ppt = new pptModule.Presentation();
    ppt.LoadFromFile(inputFileName);
    const slide = ppt.Slides.get_Item(0);

    // Get the shape whose stacking order should change and bring it to the front
    const shape = slide.Shapes.get_Item(0);
    shape.SetShapeArrange(pptModule.ShapeArrange.BringToFront);

    // Save the presentation
    const outputFileName = 'BringToFront_result.pptx';
    ppt.SaveToFile({ file: outputFileName, fileFormat: pptModule.FileFormat.Pptx2013 });

    // Release the presentation
    ppt.Dispose();

    // Read the result file from the VFS and trigger the download
    const fileArray = window.dotnetRuntime.Module.FS.readFile(outputFileName);
    const blob = new Blob([fileArray], { type: 'application/vnd.openxmlformats-officedocument.presentationml.presentation' });
    const url = URL.createObjectURL(blob);
    const a = document.createElement('a');
    a.href = url;
    a.download = outputFileName;
    a.click();
    URL.revokeObjectURL(url);
  };

  return (
    <div style={{ textAlign: 'center', height: '300px' }}>
      <h1>Adjust Stacking Order</h1>
      <button onClick={bringShapeToFront}>
        Bring to Front
      </button>
    </div>
  );
}

export default App;
Presentation after bringing a shape to the front:
FAQ
Does a shape's position change after rotation
Reason: Rotation only changes the rotation angle; it does not modify Left, Top, Width, or Height. The shape rotates around its center, so the rotated footprint can extend beyond the original rectangle.
Solution: When reserving space for a rotated shape, estimate margins from the rotated footprint rather than the original width and height.
What happens when the rotation angle exceeds 360 degrees
Reason: Rotation is normalized modulo 360. Setting 390 reads back as 30, setting 360 reads back as 0, and the normalized angle is what gets saved in the presentation.
Solution: Set the required angle in the 0–360 range directly; there is no need to add whole turns.
Does the text rotate with the shape
Reason: Rotation applies to the whole shape. Text inside the shape is part of it, so it tilts along with the shape.
Solution: Reserve space for the tilted text when laying out the slide. If the text must stay horizontal, do not put it inside the shape being rotated; use a separate text box and handle it independently from the graphic.
Get a Free License
If you wish to delete the evaluation message from the resulting documents, or to get rid of function limitations, please contact sales to obtain a valid 30-day temporary license.