When building slides, the amount of text rarely matches the size of its shape: a paragraph that is a little too long spills past the border, while a short caption leaves a large empty area. Fixing this by hand — reducing font sizes or dragging shape edges page by page — is slow and hard to keep consistent across a deck. Autofit rules let the text and the shape accommodate each other automatically, so later content changes do not require another round of layout work.
This article uses Spire.Presentation for JavaScript to control the relative size of text and shapes through the AutofitType property of a TextFrame, which offers three modes: keep the shape size, shrink the text, or resize the shape. The whole process runs locally in the browser through WebAssembly, requires no Office installation and no back-end service, and keeps the presentation from leaving the user's device.
This article covers two features:
For installation and project configuration, see Integrating Spire.Presentation for JavaScript in a React Project. The examples below assume that Spire.Presentation for JavaScript is installed and the WebAssembly module has been initialized.
Shrink overflowing text to fit the shape
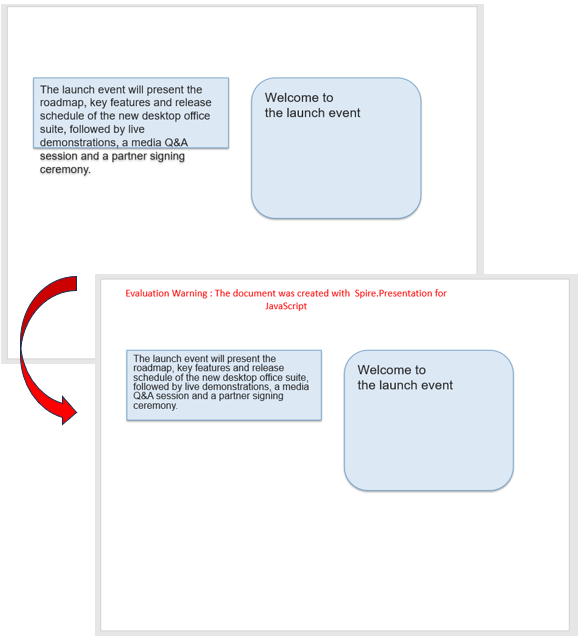
When text runs past the edge of its shape, the extra lines sit outside the border and break the layout; reducing the font size by hand, on the other hand, may shrink other text that was already fine. Setting the TextFrame autofit mode to shrink text on overflow keeps the shape at its original size and only scales down the text that does not fit, so the content still lands inside the original outline.
| Usage | Result |
|---|---|
slide.Shapes.get_Item(index) |
Gets a shape on the slide by index, starting from 0 |
shape.TextFrame.AutofitType = TextAutofitType.Normal |
Shrinks the text when it overflows, keeping the shape size unchanged |
The steps are:
- Get the Spire.Presentation WASM module and make sure it is ready, then load the font file and the presentation into the VFS.
- Create a
Presentationobject, load the presentation withLoadFromFile(), and get the first slide withSlides.get_Item(0). - Get the shape whose text overflows its border with
Shapes.get_Item(index). - Set the shape's
TextFrame.AutofitTypetoTextAutofitType.Normalso the overflowing text shrinks to fit the shape. - Save the presentation with
SaveToFile(), release it withPresentation.Dispose(), then read the file from the VFS and trigger the download.
The code for shrinking overflowing text to fit the shape is as follows:
function App() {
  const shrinkTextOnOverflow = async () => {
    // Get the Spire.Presentation WASM module
    const pptModule = window.wasmModule?.spirepresentation;

    // Check that the module is ready
    if (!pptModule) {
      alert('Spire.Presentation is not ready yet');
      return;
    }

    // Load the font and the presentation into the VFS
    await window.spire.FetchFileToVFS('ARIAL.TTF', '/Library/Fonts/', `${process.env.PUBLIC_URL}/font/`);
    const inputFileName = 'PresentationFit.pptx';
    await window.spire.FetchFileToVFS(inputFileName, '', `${process.env.PUBLIC_URL}data/`);

    // Load the presentation and get the first slide
    const ppt = new pptModule.Presentation();
    ppt.LoadFromFile(inputFileName);
    const slide = ppt.Slides.get_Item(0);

    // Take the rectangle whose text overflows and shrink the text to fit the shape
    const shape = slide.Shapes.get_Item(0);
    shape.TextFrame.AutofitType = pptModule.TextAutofitType.Normal;

    // Save the presentation
    const outputFileName = 'ShrinkText_result.pptx';
    ppt.SaveToFile({ file: outputFileName, fileFormat: pptModule.FileFormat.Pptx2013 });
    ppt.Dispose();

    // Read the result file from the VFS and trigger the download
    const fileArray = window.dotnetRuntime.Module.FS.readFile(outputFileName);
    const blob = new Blob([fileArray], { type: 'application/vnd.openxmlformats-officedocument.presentationml.presentation' });
    const url = URL.createObjectURL(blob);
    const a = document.createElement('a');
    a.href = url;
    a.download = outputFileName;
    a.click();
    URL.revokeObjectURL(url);
  };

  return (
    <div style={{ textAlign: 'center', height: '300px' }}>
      <h1>Shrink Text</h1>
      <button onClick={shrinkTextOnOverflow}>
        Start
      </button>
    </div>
  );
}

export default App;
Presentation after shrinking overflowing text to fit the shape:
Resize a shape to fit its text
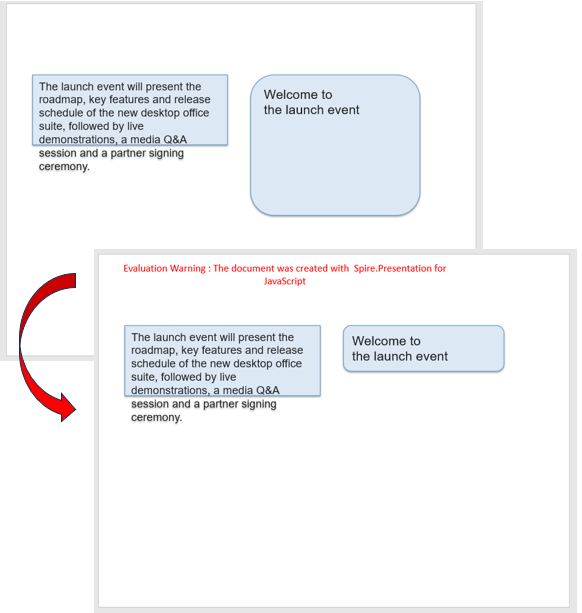
A shape that is much taller or wider than its text leaves a large blank area on the slide and makes neighboring elements hard to align. Setting the autofit mode to resize the shape to fit its text keeps the font size unchanged and recalculates the shape from the amount of text, so the outline hugs the content and the layout becomes more compact.
| Usage | Result |
|---|---|
slide.Shapes.get_Item(index) |
Gets a shape on the slide by index |
shape.TextFrame.AutofitType = TextAutofitType.Shape |
Resizes the shape to fit its text, keeping the font size unchanged |
The steps are:
- Get the Spire.Presentation WASM module and make sure it is ready, then load the font file and the presentation into the VFS.
- Create a
Presentationobject, load the presentation withLoadFromFile(), and get the first slide withSlides.get_Item(0). - Get the shape that is much taller than its text with
Shapes.get_Item(index). - Set the shape's
TextFrame.AutofitTypetoTextAutofitType.Shapeso the shape shrinks to fit the content. - Save the presentation with
SaveToFile(), release it withPresentation.Dispose(), then read the file from the VFS and trigger the download.
The code for resizing a shape to fit its text is as follows:
function App() {
  const resizeShapeToFitText = async () => {
    // Get the Spire.Presentation WASM module
    const pptModule = window.wasmModule?.spirepresentation;

    // Check that the module is ready
    if (!pptModule) {
      alert('Spire.Presentation is not ready yet');
      return;
    }

    // Load the font and the presentation into the VFS
    await window.spire.FetchFileToVFS('ARIAL.TTF', '/Library/Fonts/', `${process.env.PUBLIC_URL}/font/`);
    const inputFileName = 'PresentationFit.pptx';
    await window.spire.FetchFileToVFS(inputFileName, '', `${process.env.PUBLIC_URL}data/`);

    // Load the presentation and get the first slide
    const ppt = new pptModule.Presentation();
    ppt.LoadFromFile(inputFileName);
    const slide = ppt.Slides.get_Item(0);

    // Take the tall rounded rectangle and shrink the shape to fit its text
    const shape = slide.Shapes.get_Item(1);
    shape.TextFrame.AutofitType = pptModule.TextAutofitType.Shape;

    // Save the presentation
    const outputFileName = 'FitShape_result.pptx';
    ppt.SaveToFile({ file: outputFileName, fileFormat: pptModule.FileFormat.Pptx2013 });
    ppt.Dispose();

    // Read the result file from the VFS and trigger the download
    const fileArray = window.dotnetRuntime.Module.FS.readFile(outputFileName);
    const blob = new Blob([fileArray], { type: 'application/vnd.openxmlformats-officedocument.presentationml.presentation' });
    const url = URL.createObjectURL(blob);
    const a = document.createElement('a');
    a.href = url;
    a.download = outputFileName;
    a.click();
    URL.revokeObjectURL(url);
  };

  return (
    <div style={{ textAlign: 'center', height: '300px' }}>
      <h1>Fit Shape</h1>
      <button onClick={resizeShapeToFitText}>
        Start
      </button>
    </div>
  );
}

export default App;
Presentation after resizing a shape to fit its text:
FAQ
How do I turn autofit off and restore the original text size
Cause: After text has been shrunk, it is displayed at the reduced size; to restore it, the autofit mode has to be set back to no autofit.
Solution: Set the shape's AutofitType to TextAutofitType.None:
shape.TextFrame.AutofitType = pptModule.TextAutofitType.None;
The saved presentation then carries no autofit rule, so the text keeps its original font size and overflows the shape when it is too long.
What is the difference between the three autofit modes
Cause: TextAutofitType decides which side stays unchanged — the text or the shape — and has three values.
Solution: Choose one according to the layout:
TextAutofitType.None: both the shape size and the font size stay unchanged, and text that does not fit keeps overflowing.TextAutofitType.Normal: the shape size stays unchanged, and the text is scaled down when it does not fit.TextAutofitType.Shape: the font size stays unchanged, and the shape is recalculated from the amount of text.
Get a Free License
If you wish to delete the evaluation message from the resulting documents, or to get rid of function limitations, please contact sales to obtain a valid 30-day temporary license.