Titles, explanations and key points on a slide are mostly presented as text. Inserting a text box and adjusting its formatting page by page takes time and is hard to keep consistent across batch-generated documents; writing the text directly into fixed layout placeholders also limits control over position and style. Creating text boxes through code lets you write the text and control the layout while the presentation is generated, so the content and its appearance stay stable and reusable.
This article uses Spire.Presentation for JavaScript to add text boxes to PowerPoint slides in the browser. The whole process runs locally on the user's device through WebAssembly, requires no Office installation and no back-end service, and keeps the presentation from leaving the browser.
This article covers two core features:
For installation and project configuration, see Integrating Spire.Presentation for JavaScript in a React Project. The examples below assume that Spire.Presentation for JavaScript is installed and the WebAssembly module has been initialized.
Add a Text Box to a PowerPoint Slide
A text box carries a piece of text that stands on its own, can be placed anywhere on the page, and is not tied to the placeholders of a layout. When adding a text box, define its position and size first and then write the text, so the content lands exactly where it is expected; removing the default fill and outline leaves only the text visible.
| Usage | Result |
|---|---|
slide.Shapes.AppendShape({ shapeType, rectangle }) |
Add a rectangle inside the given area to serve as a text box |
RectangleF.FromLTRB(left, top, right, bottom) |
Define the position and size of the text box with its top-left and bottom-right coordinates |
shape.Fill.FillType = FillFormatType.None |
Remove the fill of the text box |
shape.Line.FillType = FillFormatType.None |
Remove the outline of the text box |
shape.AppendTextFrame(text) |
Write a piece of text into the text box |
shape.TextFrame.TextRange |
Get the text in the text box to set its size and color |
shape.TextFrame.Paragraphs.get_Item(index).Alignment |
Set the horizontal alignment of a paragraph inside the text box |
The steps are:
- Get the Spire.Presentation WASM module and make sure it is ready, load the font file into the VFS, and create a
Presentationobject. - Get the first slide with
Presentation.Slides.get_Item(0). - Add a
ShapeType.Rectangleshape withShapes.AppendShape(), and define its position and size withRectangleF.FromLTRB(). - Set
Fill.FillTypeandLine.FillTypetoFillFormatType.Noneto remove the fill and the outline of the text box. - Call
shape.AppendTextFrame()to write the text, then set the font size and the text color throughTextFrame.TextRange, and center the paragraph. - Call
Presentation.SaveToFile()to save the result file andDispose()to release the presentation, then read the file from the VFS and trigger the download.
The code for adding a text box to a PowerPoint slide is as follows:
function App() {
  const addTextBox = async () => {
    // Get the Spire.Presentation WASM module
    const pptModule = window.wasmModule?.spirepresentation;

    // Check that the module is ready
    if (!pptModule) {
      alert('Spire.Presentation is not ready yet');
      return;
    }

    // Load the font file into the VFS
    await window.spire.FetchFileToVFS('ARIAL.TTF', '/Library/Fonts/', `${process.env.PUBLIC_URL}/font/`);

    // Create a presentation and get the first slide
    const ppt = new pptModule.Presentation();
    const slide = ppt.Slides.get_Item(0);

    // Add a rectangle shape to serve as a text box
    const shape = slide.Shapes.AppendShape({
      shapeType: pptModule.ShapeType.Rectangle,
      rectangle: pptModule.RectangleF.FromLTRB(60, 180, 660, 360),
    });

    // Remove the fill and the outline, leaving only the text
    shape.Fill.FillType = pptModule.FillFormatType.None;
    shape.Line.FillType = pptModule.FillFormatType.None;

    // Write text into the text box
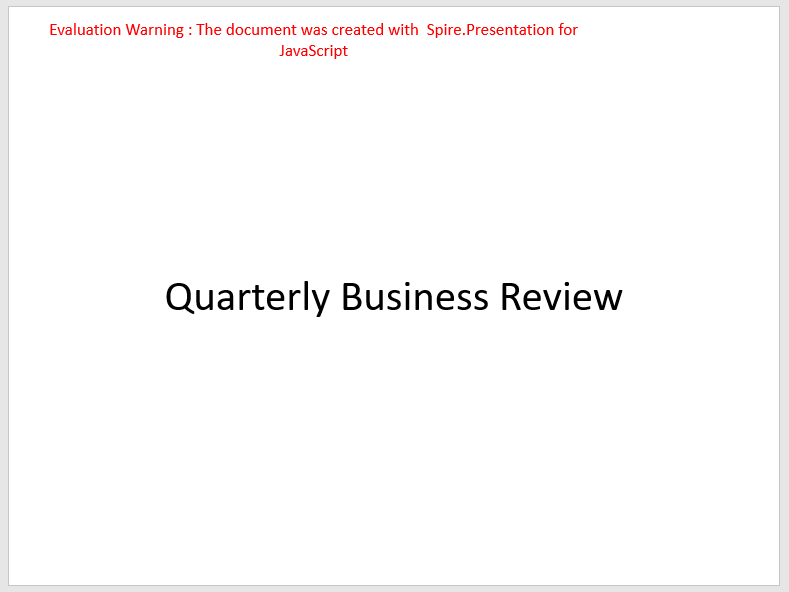
    shape.AppendTextFrame('Quarterly Business Review');

    // Set the font size and the text color
    const textRange = shape.TextFrame.TextRange;
    textRange.FontHeight = 40;
    textRange.Fill.FillType = pptModule.FillFormatType.Solid;
    textRange.Fill.SolidColor.Color = pptModule.Color.get_Black();
    shape.TextFrame.Paragraphs.get_Item(0).Alignment = pptModule.TextAlignmentType.Center;

    // Save the result file
    const outputFileName = 'AddTextBox_result.pptx';
    ppt.SaveToFile({ file: outputFileName, fileFormat: pptModule.FileFormat.Pptx2013 });
    ppt.Dispose();

    // Read the generated file from the VFS and trigger the download
    const fileArray = window.dotnetRuntime.Module.FS.readFile(outputFileName);
    const blob = new Blob([fileArray], { type: 'application/vnd.openxmlformats-officedocument.presentationml.presentation' });
    const url = URL.createObjectURL(blob);
    const a = document.createElement('a');
    a.href = url;
    a.download = outputFileName;
    a.click();
    URL.revokeObjectURL(url);
  };

  return (
    <div style={{ textAlign: 'center', height: '300px' }}>
      <h1>Add a Text Box</h1>
      <button onClick={addTextBox}>
        Add a text box
      </button>
    </div>
  );
}

export default App;
Presentation after adding a text box to a blank slide:
Style a Text Box with Fill, Border, Shadow and Rotation
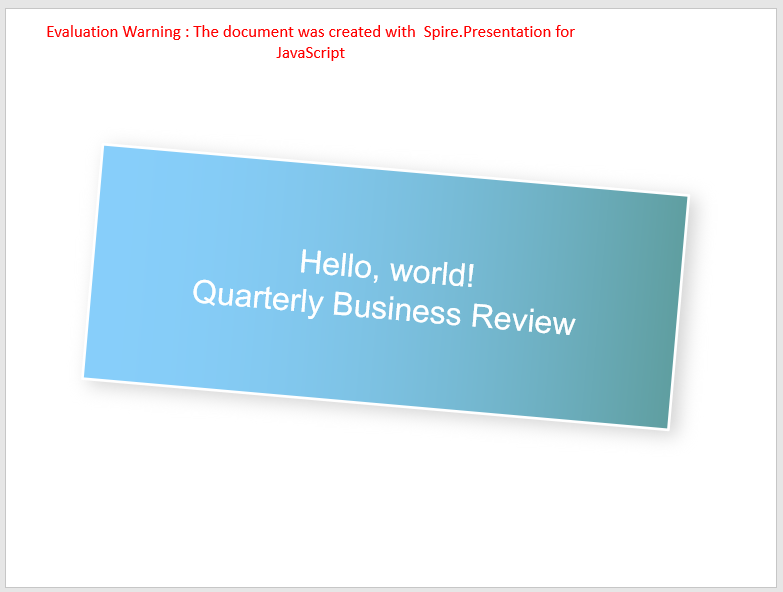
A newly added text box is only an area for text and often looks plain on a designed page. Giving it a gradient fill, a border and an outer shadow, and rotating it slightly, turns it into a distinct block of information that stands apart from the background and other elements; the text color is adjusted as well so it stays legible on the darker fill.
| Usage | Result |
|---|---|
shape.Fill.FillType = FillFormatType.Gradient |
Set the fill of the text box to a gradient |
shape.Fill.Gradient.GradientShape = GradientShapeType.Linear |
Set the gradient type to linear |
shape.Fill.Gradient.GradientStops.Append({ position, color }) |
Add color stops to the gradient and determine its direction and colors |
shape.Line.FillType = FillFormatType.Solid |
Set the border of the text box to a solid line |
shape.Line.Width = n |
Set the width of the border |
shape.Line.SolidFillColor.Color = Color.get_xxx() |
Set the border color |
new OuterShadowEffect() |
Create an outer shadow effect object |
shadowEffect.BlurRadius, shadowEffect.Direction, shadowEffect.Distance |
Set the blur radius, direction and distance of the shadow |
shadowEffect.ColorFormat.Color = Color.get_xxx() |
Set the shadow color |
shape.EffectDag.OuterShadowEffect = shadowEffect |
Apply the outer shadow to the text box |
shape.Rotation = n |
Rotate the text box by an angle |
textRange.FontHeight = n |
Set the font size of the text in the text box |
textRange.Fill.SolidColor.Color = Color.get_xxx() |
Set the text color |
The steps are:
- Get the Spire.Presentation WASM module and make sure it is ready, load the font file into the VFS, create a
Presentationobject and get the first slide. - Add a rectangle text box with
Shapes.AppendShape(), and write two lines of text withshape.AppendTextFrame(). - Through
TextFrame.TextRange, set the text to white at 30 points, specify the fonts withLatinFontandEastAsianFont, and center each paragraph. - Set
Line.FillTypetoFillFormatType.Solid, and useLine.WidthandLine.SolidFillColor.Colorto give the text box a white border. - Set
Fill.FillTypetoFillFormatType.Gradient, specify a linear gradient withGradientShape, and add the light blue and cadet blue stops withGradientStops.Append(). - Create an
OuterShadowEffect, setBlurRadius,Direction,DistanceandColorFormat.Color, and assign it toEffectDag.OuterShadowEffect. - Rotate the text box 5 degrees clockwise with
Rotation, then save the result file, release the presentation and read the file from the VFS to trigger the download.
The code for styling the text box is as follows:
function App() {
  const styleTextBox = async () => {
    // Get the Spire.Presentation WASM module
    const pptModule = window.wasmModule?.spirepresentation;

    // Check that the module is ready
    if (!pptModule) {
      alert('Spire.Presentation is not ready yet');
      return;
    }

    // Load the font file into the VFS
    await window.spire.FetchFileToVFS('ARIAL.TTF', '/Library/Fonts/', `${process.env.PUBLIC_URL}/font/`);

    // Create a presentation and get the first slide
    const ppt = new pptModule.Presentation();
    const slide = ppt.Slides.get_Item(0);

    // Add a rectangle text box
    const shape = slide.Shapes.AppendShape({
      shapeType: pptModule.ShapeType.Rectangle,
      rectangle: pptModule.RectangleF.FromLTRB(80, 150, 630, 370),
    });

    // Write two lines of text and set them to white, 30 points
    shape.AppendTextFrame('Hello, world!\nQuarterly Business Review');
    const textRange = shape.TextFrame.TextRange;
    textRange.Fill.FillType = pptModule.FillFormatType.Solid;
    textRange.Fill.SolidColor.Color = pptModule.Color.get_White();
    textRange.FontHeight = 30;
    textRange.LatinFont = new pptModule.TextFont('Arial');
    textRange.EastAsianFont = new pptModule.TextFont('Arial');
    for (let i = 0; i < shape.TextFrame.Paragraphs.Count; i++) {
      shape.TextFrame.Paragraphs.get_Item(i).Alignment = pptModule.TextAlignmentType.Center;
    }

    // Give the text box a white solid outline
    shape.Line.FillType = pptModule.FillFormatType.Solid;
    shape.Line.Width = 2.5;
    shape.Line.SolidFillColor.Color = pptModule.Color.get_White();

    // Fill the text box with a linear gradient from light sky blue to cadet blue
    shape.Fill.FillType = pptModule.FillFormatType.Gradient;
    shape.Fill.Gradient.GradientShape = pptModule.GradientShapeType.Linear;
    shape.Fill.Gradient.GradientStops.Append({ position: 0, color: pptModule.Color.get_LightSkyBlue() });
    shape.Fill.Gradient.GradientStops.Append({ position: 1, color: pptModule.Color.get_CadetBlue() });

    // Add an outer shadow
    const shadowEffect = new pptModule.OuterShadowEffect();
    shadowEffect.BlurRadius = 20;
    shadowEffect.Direction = 30;
    shadowEffect.Distance = 8;
    shadowEffect.ColorFormat.Color = pptModule.Color.get_LightGray();
    shape.EffectDag.OuterShadowEffect = shadowEffect;

    // Rotate the text box 5 degrees clockwise
    shape.Rotation = 5;

    // Save the result file
    const outputFileName = 'StyleTextBox_result.pptx';
    ppt.SaveToFile({ file: outputFileName, fileFormat: pptModule.FileFormat.Pptx2013 });
    ppt.Dispose();

    // Read the generated file from the VFS and trigger the download
    const fileArray = window.dotnetRuntime.Module.FS.readFile(outputFileName);
    const blob = new Blob([fileArray], { type: 'application/vnd.openxmlformats-officedocument.presentationml.presentation' });
    const url = URL.createObjectURL(blob);
    const a = document.createElement('a');
    a.href = url;
    a.download = outputFileName;
    a.click();
    URL.revokeObjectURL(url);
  };

  return (
    <div style={{ textAlign: 'center', height: '300px' }}>
      <h1>Style the Text Box</h1>
      <button onClick={styleTextBox}>
        Style the text box
      </button>
    </div>
  );
}

export default App;
Presentation after styling a text box with a gradient fill, border, shadow and rotation:
FAQ
How to keep long text from wrapping
Cause: A text box wraps at its boundary by default, and a long sentence split into several lines can disrupt the layout.
Solution: Set WordWrap to false so the text stays on one line and runs beyond the text box:
shape.TextFrame.WordWrap = false;
How to set vertical text in a text box
Cause: Text is arranged horizontally by default, so a vertical title or side label needs an explicit direction.
Solution: Set VerticalTextType to VerticalTextType.Vertical to turn the text into a vertical layout; use VerticalTextType.EastAsianVertical if CJK characters should stay upright:
shape.TextFrame.VerticalTextType = pptModule.VerticalTextType.Vertical;
How to adjust the distance between text and the text box border
Cause: Text sits close to the edge by default and can look cramped when there is a lot of text or a thick border.
Solution: Set the four inner margin properties to control the distance:
shape.TextFrame.MarginLeft = 60;
shape.TextFrame.MarginTop = 40;
shape.TextFrame.MarginRight = 20;
shape.TextFrame.MarginBottom = 10;
How to remove a text box from a slide
Cause: A text box is an item in the shape collection of the slide; changing its text does not remove the text box itself.
Solution: Get the text box object and remove it with Remove() on the shape collection:
const shape = slide.Shapes.get_Item(0);
slide.Shapes.Remove(shape);
Get a Free License
If you wish to delete the evaluation message from the resulting documents, or to get rid of function limitations, please contact sales to obtain a valid 30-day temporary license.