
SmartArt (2)
Create SmartArt Graphics in PowerPoint with JavaScript in React
2026-11-13 09:46:49 Written by liu taliaWhen a process, hierarchy, or cycle is written as a list of sentences, readers have to compare line after line to work out the order and the relationships. A SmartArt graphic arranges the nodes according to a layout and draws the connections directly, and it re-flows as nodes are added to it. Drawing the same diagram by hand in PowerPoint is slow and makes consistent spacing and alignment hard to keep.
This article uses Spire.Presentation for JavaScript to create and adjust SmartArt graphics in PowerPoint in the browser. The whole process runs locally on the user's device through WebAssembly, requires no Office installation and no back-end service, and the presentation never leaves the browser.
The article covers two features:
For installation and project configuration, see Integrating Spire.Presentation for JavaScript in a React Project. The examples below assume that Spire.Presentation for JavaScript is installed and the WebAssembly module has been initialized.
Create SmartArt Graphics in PowerPoint
To create SmartArt graphics in PowerPoint, start by choosing a layout that matches the relationship in the content, then write the text into the nodes. The layout decides how the nodes are arranged and where the connectors run; it is specified once at creation, and only the node text needs to be maintained afterwards. Once inserted, the graphic can still be moved and resized like any other shape.
| What you write | What you get |
|---|---|
slide.Shapes.AppendSmartArt(x, y, width, height, layoutType) |
Adds a SmartArt graphic of the given layout at the specified position and size |
smartArt.Nodes.Count |
The number of nodes currently in the graphic |
smartArt.Nodes.RemoveNode({ index: i }) |
Removes the node at index i |
smartArt.Nodes.AddNode() |
Appends a node to the end of the node collection |
node.TextFrame.Text |
Sets or reads the text of a node |
The steps are:
- Get the Spire.Presentation WASM module, make sure it is ready, and load the font file and the presentation into the VFS.
- Create a
Presentationobject, callLoadFromFile()to load the presentation, and useSlides.get_Item()to get the slide that will hold the graphic. - Call
Shapes.AppendSmartArt()with the position, size, and aSmartArtLayoutTypeto get theISmartArtobject. - Walk from
Nodes.Countdownwards and callNodes.RemoveNode()to remove the placeholder nodes that come with the layout. - Call
Nodes.AddNode()in order and write the text throughTextFrame.Text. - Call
Presentation.SaveToFile()to save the result, release the presentation withDispose(), then read the file from the VFS and trigger the download.
The code for creating SmartArt graphics in PowerPoint is shown below:
function App() {
  const createSmartArt = async () => {
    // Get the Spire.Presentation WASM module
    const pptModule = window.wasmModule?.spirepresentation;

    // Check that the module is ready
    if (!pptModule) {
      alert('Spire.Presentation is not ready yet');
      return;
    }

    // Load the font and the presentation into the VFS
    await window.spire.FetchFileToVFS('ARIAL.TTF', '/Library/Fonts/', `${process.env.PUBLIC_URL}/font/`);
    const inputFileName = 'SmartArt.pptx';
    await window.spire.FetchFileToVFS(inputFileName, '', `${process.env.PUBLIC_URL}data/`);

    // Load the presentation and get the first slide
    const ppt = new pptModule.Presentation();
    ppt.LoadFromFile(inputFileName);
    const slide = ppt.Slides.get_Item(0);

    // Add a process-layout SmartArt at the specified position and size
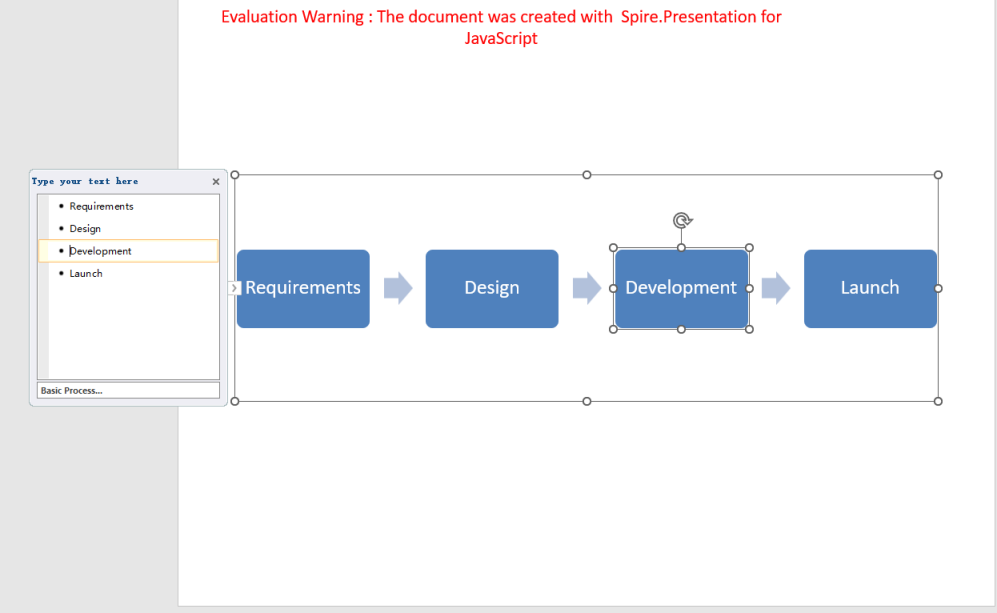
    const smartArt = slide.Shapes.AppendSmartArt(50, 160, 620, 200, pptModule.SmartArtLayoutType.BasicProcess);

    // Remove the placeholder nodes that come with the layout
    for (let i = smartArt.Nodes.Count - 1; i >= 0; i--) {
      smartArt.Nodes.RemoveNode({ index: i });
    }

    // Add the nodes in process order and write their text
    const steps = ['Requirements', 'Design', 'Development', 'Launch'];
    for (const text of steps) {
      const node = smartArt.Nodes.AddNode();
      node.TextFrame.Text = text;
    }

    // Save the result file
    const outputFileName = 'CreateSmartArt.pptx';
    ppt.SaveToFile({ file: outputFileName, fileFormat: pptModule.FileFormat.Pptx2013 });
    ppt.Dispose();

    // Read the generated file from the VFS and trigger the download
    const fileArray = window.dotnetRuntime.Module.FS.readFile(outputFileName);
    const blob = new Blob([fileArray], { type: 'application/vnd.openxmlformats-officedocument.presentationml.presentation' });
    const url = URL.createObjectURL(blob);
    const a = document.createElement('a');
    a.href = url;
    a.download = outputFileName;
    a.click();
    URL.revokeObjectURL(url);
  };

  return (
    <div style={{ textAlign: 'center', height: '300px' }}>
      <h1>Create SmartArt Graphics</h1>
      <button onClick={createSmartArt}>
        Create SmartArt
      </button>
    </div>
  );
}

export default App;
Presentation after creating a SmartArt graphic in PowerPoint:
Add Nodes to a SmartArt Graphic
When you add nodes to a SmartArt graphic, you can build the hierarchy level by level: add a top-level node first, then add subordinate nodes to its child node collection, or insert one at a given position so the new node lands in the right order. The text and reporting relations of the existing nodes stay as they are, and the graphic re-flows around the new node count.
| What you write | What you get |
|---|---|
smartArt.Nodes.AddNode() |
Adds a node at the top level of the graphic |
node.ChildNodes.AddNode() |
Appends a child node under the specified node |
node.ChildNodes.AddNodeByPosition(position) |
Inserts a child node at the specified position under the node and shifts the following children back |
node.TextFrame.Text |
Sets the text of the new node |
The steps are:
- Get the Spire.Presentation WASM module, make sure it is ready, and load the font file and the presentation into the VFS.
- Create a
Presentationobject, callLoadFromFile()to load the presentation, useSlides.get_Item()to get the slide, and add an organization-chart SmartArt withShapes.AppendSmartArt(). - Iterate the node collection backwards and clear the placeholder nodes that come with the layout with
Nodes.RemoveNode(). - Call
Nodes.AddNode()to add the top-level node and write its text withTextFrame.Text. - Add departments under the top-level node with
ChildNodes.AddNode(), then insert one at a given position withChildNodes.AddNodeByPosition(). - Call
AddNode()on a department'sChildNodesto add the next level. - Call
Presentation.SaveToFile()to save the result, release the presentation withDispose(), then read the file from the VFS and trigger the download.
The code for adding nodes to a SmartArt graphic is shown below:
function App() {
  const addNodes = async () => {
    // Get the Spire.Presentation WASM module
    const pptModule = window.wasmModule?.spirepresentation;

    // Check that the module is ready
    if (!pptModule) {
      alert('Spire.Presentation is not ready yet');
      return;
    }

    // Load the font and the presentation into the VFS
    await window.spire.FetchFileToVFS('ARIAL.TTF', '/Library/Fonts/', `${process.env.PUBLIC_URL}/font/`);
    const inputFileName = 'SmartArt.pptx';
    await window.spire.FetchFileToVFS(inputFileName, '', `${process.env.PUBLIC_URL}data/`);

    // Load the presentation and get the first slide
    const ppt = new pptModule.Presentation();
    ppt.LoadFromFile(inputFileName);
    const slide = ppt.Slides.get_Item(0);

    // Add an organization-chart SmartArt and clear its placeholder nodes
    const smartArt = slide.Shapes.AppendSmartArt(50, 160, 620, 200, pptModule.SmartArtLayoutType.OrganizationChart);
    for (let i = smartArt.Nodes.Count - 1; i >= 0; i--) {
      smartArt.Nodes.RemoveNode({ index: i });
    }

    // Top-level node
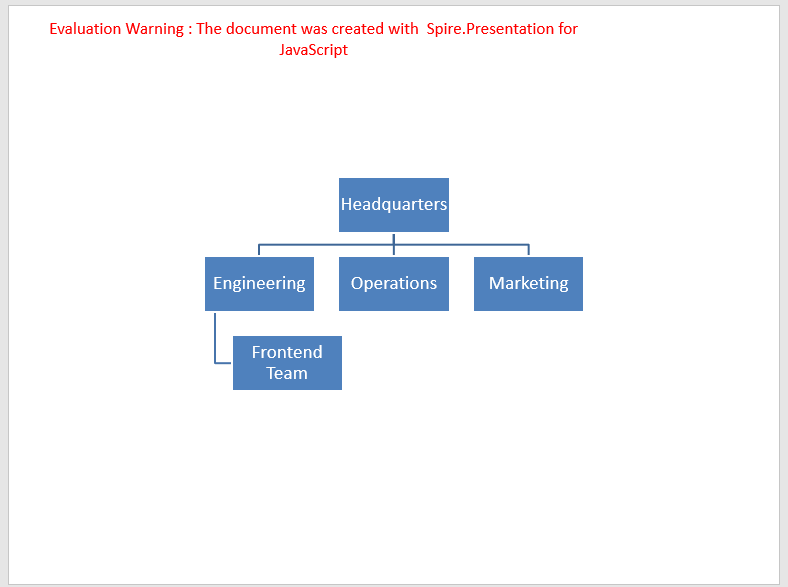
    const root = smartArt.Nodes.AddNode();
    root.TextFrame.Text = 'Headquarters';

    // Add departments under the top-level node
    const dev = root.ChildNodes.AddNode();
    dev.TextFrame.Text = 'Engineering';
    const mkt = root.ChildNodes.AddNode();
    mkt.TextFrame.Text = 'Marketing';

    // Insert a department at a given position
    const ops = root.ChildNodes.AddNodeByPosition(1);
    ops.TextFrame.Text = 'Operations';

    // Add a team under the engineering department
    const team = dev.ChildNodes.AddNode();
    team.TextFrame.Text = 'Frontend Team';

    // Save the result file
    const outputFileName = 'AddSmartArtNodes.pptx';
    ppt.SaveToFile({ file: outputFileName, fileFormat: pptModule.FileFormat.Pptx2013 });
    ppt.Dispose();

    // Read the generated file from the VFS and trigger the download
    const fileArray = window.dotnetRuntime.Module.FS.readFile(outputFileName);
    const blob = new Blob([fileArray], { type: 'application/vnd.openxmlformats-officedocument.presentationml.presentation' });
    const url = URL.createObjectURL(blob);
    const a = document.createElement('a');
    a.href = url;
    a.download = outputFileName;
    a.click();
    URL.revokeObjectURL(url);
  };

  return (
    <div style={{ textAlign: 'center', height: '300px' }}>
      <h1>Add SmartArt Nodes</h1>
      <button onClick={addNodes}>
        Add Nodes
      </button>
    </div>
  );
}

export default App;
Presentation after adding nodes to the SmartArt graphic:
FAQ
What is the difference between Nodes and ChildNodes
Cause: Nodes returns the nodes at every level of the graphic, while ChildNodes returns only the direct children of one node. The two collections serve different purposes.
Solution: Use Nodes to walk the whole graphic, and a node's ChildNodes to read, add, or remove its direct children:
// Every node in the graphic
for (let i = 0; i < smartArt.Nodes.Count; i++) {
  console.log(smartArt.Nodes.get_Item(i).TextFrame.Text);
}

// The direct children of one node
const root = smartArt.Nodes.get_Item(0);
for (let i = 0; i < root.ChildNodes.Count; i++) {
  console.log(root.ChildNodes.get_Item(i).TextFrame.Text);
}
Why does a node added as a child end up at the top level
Cause: smartArt.Nodes.AddNode() adds a node at the top level of the graphic instead of under the current node. On an organization chart the new node becomes another top-level node and stays at level 0.
Solution: To add a node as a subordinate, call ChildNodes.AddNode() on that node; to insert it at a position, use ChildNodes.AddNodeByPosition():
const root = smartArt.Nodes.get_Item(0);
const child = root.ChildNodes.AddNode();
child.TextFrame.Text = 'New node';
Get a Free License
If you wish to delete the evaluation message from the resulting documents, or to get rid of function limitations, please contact sales to obtain a valid 30-day temporary license.
Extract SmartArt Text and Delete Nodes with JavaScript in React
2026-11-13 09:46:37 Written by liu taliaSmartArt graphics condense processes, hierarchies and cycles into a clear visual layout, but the text inside them can only be read or copied node by node. Turning the node contents into a checklist, importing them into another system, or searching them as plain text is slow and easy to miss by hand; outdated steps and redundant nodes also have to be removed one at a time in the editor.
This article uses Spire.Presentation for JavaScript to extract the text of PowerPoint SmartArt graphics in the browser, save it as text files, and delete unwanted nodes from a graphic. The whole process runs locally on the user's device through WebAssembly, requires no Office installation and no back-end service, and the presentation never leaves the browser.
The article covers two feature points:
For installation and project configuration, see Integrating Spire.Presentation for JavaScript in a React Project. The examples below assume that Spire.Presentation for JavaScript is installed and the WebAssembly module has been initialized.
Extract Text from Every SmartArt Graphic in the Presentation
A presentation often contains more than one graphic, and opening each slide to copy text by hand is slow. Collecting the SmartArt text from the whole file into a single text file makes the content easy to review, search and archive.
| Code | Result |
|---|---|
ppt.Slides.Count |
The total number of slides in the presentation |
shape instanceof pptModule.ISmartArt |
Checks whether a shape is a SmartArt graphic |
shape.Nodes.Count |
The number of nodes in the graphic |
shape.Nodes.get_Item(i).TextFrame.Text |
The text of the node at index i |
window.dotnetRuntime.Module.FS.writeFile(fileName, text) |
Writes a string to a text file in the VFS |
The steps are:
- Get the Spire.Presentation WASM module and make sure it is ready, then load the font and the presentation into the VFS.
- Create a
Presentationobject and callLoadFromFile()to load the presentation. - Iterate the slides with
Slides.Count, and check every shape on each slide forISmartArt. - For each graphic found, write a source heading, then iterate its nodes with
Nodes.Countand read each text withTextFrame.Textinto the list. - Join the collected lines with
\r\nand callwindow.dotnetRuntime.Module.FS.writeFile()to write them to a.txtfile. - Read the text file from the VFS to start the download, and release the presentation with
Dispose().
The code to extract text from every SmartArt graphic in the presentation is as follows:
function App() {
  const extractAllSmartArt = async () => {
    // Get the Spire.Presentation WASM module
    const pptModule = window.wasmModule?.spirepresentation;

    // Check that the module is ready
    if (!pptModule) {
      alert('Spire.Presentation is not ready yet');
      return;
    }

    // Load the font and the presentation into the VFS
    await window.spire.FetchFileToVFS('ARIAL.TTF', '/Library/Fonts/', `${process.env.PUBLIC_URL}/font/`);
    const inputFileName = 'SmartArt.pptx';
    await window.spire.FetchFileToVFS(inputFileName, '', `${process.env.PUBLIC_URL}data/`);

    // Load the presentation
    const ppt = new pptModule.Presentation();
    ppt.LoadFromFile(inputFileName);

    // Collect SmartArt text from every shape on every slide
    const lines = [];
    for (let s = 0; s < ppt.Slides.Count; s++) {
      const slide = ppt.Slides.get_Item(s);
      let graphicNo = 0;
      for (let i = 0; i < slide.Shapes.Count; i++) {
        const shape = slide.Shapes.get_Item(i);
        if (!(shape instanceof pptModule.ISmartArt)) continue;

        graphicNo++;
        lines.push(`Slide ${s + 1} · SmartArt ${graphicNo}`);
        for (let k = 0; k < shape.Nodes.Count; k++) {
          lines.push(shape.Nodes.get_Item(k).TextFrame.Text);
        }
      }
    }

    // Write the summary to a text file
    const outputFileName = 'ExtractAllSmartArtText.txt';
    window.dotnetRuntime.Module.FS.writeFile(outputFileName, lines.join('\r\n'));

    // Read the generated text file from the VFS and trigger the download
    const fileArray = window.dotnetRuntime.Module.FS.readFile(outputFileName);
    const blob = new Blob([fileArray], { type: 'text/plain' });
    const url = URL.createObjectURL(blob);
    const a = document.createElement('a');
    a.href = url;
    a.download = outputFileName;
    a.click();
    URL.revokeObjectURL(url);

    ppt.Dispose();
  };

  return (
    <div style={{ textAlign: 'center', height: '300px' }}>
      <h1>Summarize SmartArt Text</h1>
      <button onClick={extractAllSmartArt}>
        Summarize All
      </button>
    </div>
  );
}

export default App;
Text file after extracting text from every SmartArt graphic in the presentation:

Delete Nodes from a SmartArt Graphic
Placeholder steps and outdated stages make a graphic look cluttered. An organization chart arranges content by level, so deleting a node also means naming the level it sits on: you can remove a subordinate node from a node's child node collection, or delete the top-level node outright. The graphic re-flows around the remaining nodes and the other node texts stay unchanged; the result is saved to a new file, so the original presentation stays intact.
| Code | Result |
|---|---|
smartArt.Nodes.get_Item(0) |
Gets the top-level node of the graphic |
node.ChildNodes.RemoveNodeByPosition(position) |
Removes the child node at the given position under that node; later children move forward |
smartArt.Nodes.RemoveNodeByPosition(position) |
Removes the top-level node at the given position; the remaining nodes re-flow |
ppt.SaveToFile({ file, fileFormat }) |
Saves the modified presentation to a file in the VFS |
The steps are:
- Get the Spire.Presentation WASM module and make sure it is ready, then load the font and the presentation into the VFS.
- Create a
Presentationobject, callLoadFromFile()to load the presentation, get the slide that holds the organization chart withSlides.get_Item(), and find the SmartArt graphic by iterating its shapes. - Get the top-level root node with
Nodes.get_Item(0)and callChildNodes.RemoveNodeByPosition()to remove the child at the given position, where positions start at0. - Call
Nodes.RemoveNodeByPosition()to remove the root node itself; the remaining nodes re-flow. - Call
Presentation.SaveToFile()to save the modified presentation as a new.pptxfile. - Read the result file from the VFS to start the download, and release the presentation with
Dispose().
The code to delete nodes from a SmartArt graphic is as follows:
function App() {
  const removeSmartArtNode = async () => {
    // Get the Spire.Presentation WASM module
    const pptModule = window.wasmModule?.spirepresentation;

    // Check that the module is ready
    if (!pptModule) {
      alert('Spire.Presentation is not ready yet');
      return;
    }

    // Load the font and the presentation into the VFS
    await window.spire.FetchFileToVFS('ARIAL.TTF', '/Library/Fonts/', `${process.env.PUBLIC_URL}/font/`);
    const inputFileName = 'SmartArt.pptx';
    await window.spire.FetchFileToVFS(inputFileName, '', `${process.env.PUBLIC_URL}data/`);

    // Load the presentation and get the second slide, which holds the organization chart
    const ppt = new pptModule.Presentation();
    ppt.LoadFromFile(inputFileName);
    const slide = ppt.Slides.get_Item(1);

    // Find the SmartArt graphic on the slide
    let smartArt = null;
    for (let i = 0; i < slide.Shapes.Count; i++) {
      const shape = slide.Shapes.get_Item(i);
      if (shape instanceof pptModule.ISmartArt) {
        smartArt = shape;
        break;
      }
    }

    // Get the top-level root node
    const root = smartArt.Nodes.get_Item(0);

    // Remove the child node at position 1 under the root (positions start at 0)
    root.ChildNodes.RemoveNodeByPosition(1);

    // Remove the root node itself
    smartArt.Nodes.RemoveNodeByPosition(0);

    // Save the result file
    const outputFileName = 'RemoveSmartArtNode.pptx';
    ppt.SaveToFile({ file: outputFileName, fileFormat: pptModule.FileFormat.Pptx2013 });

    // Read the generated file from the VFS and trigger the download
    const fileArray = window.dotnetRuntime.Module.FS.readFile(outputFileName);
    const blob = new Blob([fileArray], { type: 'application/vnd.openxmlformats-officedocument.presentationml.presentation' });
    const url = URL.createObjectURL(blob);
    const a = document.createElement('a');
    a.href = url;
    a.download = outputFileName;
    a.click();
    URL.revokeObjectURL(url);

    ppt.Dispose();
  };

  return (
    <div style={{ textAlign: 'center', height: '300px' }}>
      <h1>Delete SmartArt Node</h1>
      <button onClick={removeSmartArtNode}>
        Delete Node
      </button>
    </div>
  );
}

export default App;
Presentation after deleting nodes from a SmartArt graphic:

FAQ
How to read child node text in a multi-level SmartArt graphic
Cause: Every node, including child nodes, is stored in the Nodes collection; ChildNodes returns only the direct children of a single node, so the two collections serve different purposes.
Solution: Iterate Nodes when every node text is needed; to read only the nodes under one specific node, read that node's ChildNodes:
for (let i = 0; i < smartArt.Nodes.Count; i++) {
  lines.push(smartArt.Nodes.get_Item(i).TextFrame.Text);
}

// read only the direct child nodes of the first node
const firstNode = smartArt.Nodes.get_Item(0);
for (let i = 0; i < firstNode.ChildNodes.Count; i++) {
  lines.push(firstNode.ChildNodes.get_Item(i).TextFrame.Text);
}
Why are the wrong nodes removed when deleting several nodes at once
Cause: Each removal moves the following nodes forward and renumbers their positions and indexes; continuing with positions recorded before the deletion then hits different nodes.
Solution: Iterate the collection backwards before deleting:
for (let i = smartArt.Nodes.Count - 1; i >= 0; i--) {
  const node = smartArt.Nodes.get_Item(i);
  if (node.TextFrame.Text === 'target text') {
    smartArt.Nodes.RemoveNode({ index: i });
  }
}
Does deleting the root node of an organization chart also delete its child nodes
Cause: RemoveNodeByPosition() removes only the node at the given position; it does not cascade to child nodes.
Solution: Remove the root node with a single call:
smartArt.Nodes.RemoveNodeByPosition(0);
The child nodes remain, one child is promoted to Level 0, the others keep Level 1, and positions are renumbered. To clear the whole graphic, remove the SmartArt shape with slide.Shapes.Remove(shape).
Get a Free License
If you wish to delete the evaluation message from the resulting documents, or to get rid of function limitations, please contact sales to obtain a valid 30-day temporary license.
