
Cells (11)
Add or Remove Cell Borders in Excel in React with JavaScript
2026-09-29 02:58:28 Written by liu taliaThe real dividers in a spreadsheet are not blank cells but borders: financial reports use lines of different weights to separate the header row from the totals, while data handed to a downstream system has to go out with the frames stripped off. Doing that by hand — selecting each block and opening Format Cells — is slow and hard to repeat. Spire.XLS for JavaScript does the same work in the browser on top of WebAssembly, using a virtual file system (VFS) for input and output files, so no back-end service is needed.
This article covers four feature points:
- Add a border to a selected cell or a cell range
- Add a border to the range that holds the data
- Add left, top, right, bottom and diagonal borders to a cell
- Remove the borders of a cell or a cell range
For installation and project setup, see Integrating Spire.XLS for JavaScript in a React Project. The examples below assume Spire.XLS is installed and the WebAssembly module has been initialised.
Add a border to a selected cell or a cell range
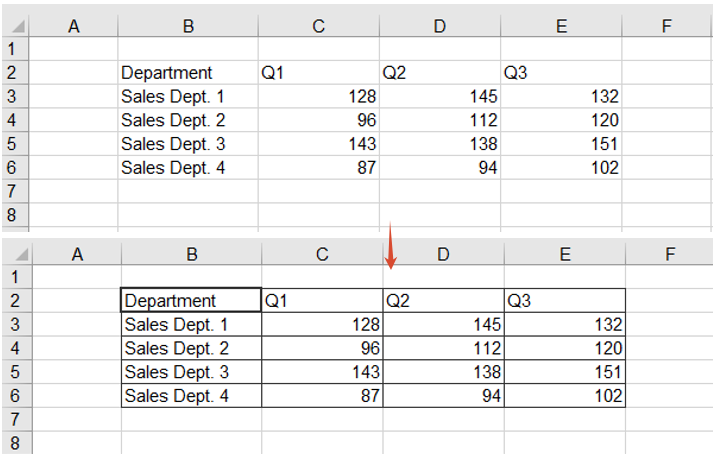
Given a table with no lines at all, the most direct approach is to put the frame back with BorderAround and BorderInside: the first one draws the outline, the second one the grid lines inside the range. Together they frame a whole block of data in one go, and they can also single out one cell — the header cell, say — so that it stands out from a sheet full of identical lines.
The steps are:
- Take the cell range you want to frame with
Range.get, by address - Call
BorderAroundto draw the outline, with the line style taken from theLineStyleTypeenumeration - Call
BorderInsideto add the separators between the cells inside the range - Take the header cell on its own and call
BorderAroundagain on it, this time with a medium line
The line style is passed in object notation, as { borderLine }.
function App() {
  const addBorderToCells = async () => {
    // Get the Spire.XLS WASM module
    const xlsModule = window.wasmModule?.spirexls;

    // Check that the module is ready
    if (!xlsModule) {
      alert('Spire.Xls is not ready yet');
      return;
    }

    // Load the font and the input file into the VFS
    await window.spire.FetchFileToVFS('ARIAL.TTF', '/Library/Fonts/', `${process.env.PUBLIC_URL}/font/`);
    const inputFileName = 'CellBorders.xlsx';
    await window.spire.FetchFileToVFS(inputFileName, '', `${process.env.PUBLIC_URL}data/`);

    // Load the workbook and take the first worksheet
    const workbook = new xlsModule.Workbook();
    workbook.LoadFromFile({ fileName: inputFileName });
    const sheet = workbook.Worksheets.get(0);

    // Take the B2:E6 range, frame it with thin lines and add thin inner lines
    const dataRange = sheet.Range.get('B2:E6');
    dataRange.BorderAround({ borderLine: xlsModule.LineStyleType.Thin });
    dataRange.BorderInside({ borderLine: xlsModule.LineStyleType.Thin });

    // Give the B2 header cell a medium border on all four sides
    sheet.Range.get('B2').BorderAround({ borderLine: xlsModule.LineStyleType.Medium });

    // Save the result file
    const outputFileName = 'AddBorderToCells.xlsx';
    workbook.SaveToFile({ fileName: outputFileName, version: xlsModule.ExcelVersion.Version2010 });

    // Dispose of the workbook object to free resources
    workbook.Dispose();

    // Read the result file back out of the VFS and download it
    const fileArray = window.dotnetRuntime.Module.FS.readFile(outputFileName);
    const blob = new Blob([fileArray], { type: 'application/vnd.openxmlformats-officedocument.spreadsheetml.sheet' });
    const url = URL.createObjectURL(blob);
    const a = document.createElement('a');
    a.href = url;
    a.download = outputFileName;
    a.click();
    URL.revokeObjectURL(url);
  };

  return (
    <div style={{ textAlign: 'center', height: '300px' }}>
      <h1>Add or Remove Cell Borders</h1>
      <button onClick={addBorderToCells}>Add a border to a cell or range</button>
    </div>
  );
}

export default App;
The effect of adding a border to the data range and to the header cell:
Add a border to the range that holds the data
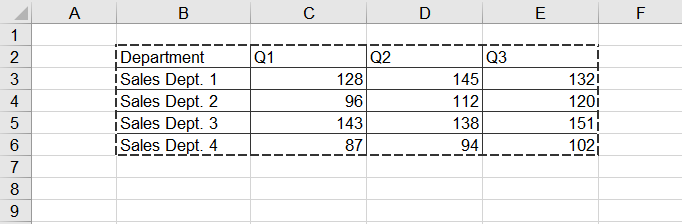
The previous section hard-codes the address B2:E6, which has to be edited as soon as rows or columns are added to the table. The AllocatedRange property returns the allocated range of a worksheet — the rectangle that actually holds the data — so the address maintains itself, and the outline can be given a different style from the header frame to set the table apart from the text around it.
The steps are:
- Get the range that holds the data through
AllocatedRange, with no address to maintain - Call
BorderAroundwith a medium dashed line, so the outline contrasts with the solid frames used elsewhere - Call
BorderInsideto add thin lines inside the range, keeping the rows separated
function App() {
  const addBorderToDataRange = async () => {
    const xlsModule = window.wasmModule?.spirexls;
    if (!xlsModule) {
      alert('Spire.Xls is not ready yet');
      return;
    }

    await window.spire.FetchFileToVFS('ARIAL.TTF', '/Library/Fonts/', `${process.env.PUBLIC_URL}/font/`);
    const inputFileName = 'CellBorders.xlsx';
    await window.spire.FetchFileToVFS(inputFileName, '', `${process.env.PUBLIC_URL}data/`);

    const workbook = new xlsModule.Workbook();
    workbook.LoadFromFile({ fileName: inputFileName });
    const sheet = workbook.Worksheets.get(0);

    // AllocatedRange returns the range that holds the data, so no address is needed
    const dataRange = sheet.AllocatedRange;

    // Give the outline a medium dashed border and the inside thin lines
    dataRange.BorderAround({ borderLine: xlsModule.LineStyleType.MediumDashed });
    dataRange.BorderInside({ borderLine: xlsModule.LineStyleType.Thin });

    const outputFileName = 'AddBorderToDataRange.xlsx';
    workbook.SaveToFile({ fileName: outputFileName, version: xlsModule.ExcelVersion.Version2010 });
    workbook.Dispose();

    const fileArray = window.dotnetRuntime.Module.FS.readFile(outputFileName);
    const blob = new Blob([fileArray], { type: 'application/vnd.openxmlformats-officedocument.spreadsheetml.sheet' });
    const url = URL.createObjectURL(blob);
    const a = document.createElement('a');
    a.href = url;
    a.download = outputFileName;
    a.click();
    URL.revokeObjectURL(url);
  };

  return (
    <div style={{ textAlign: 'center', height: '300px' }}>
      <h1>Add or Remove Cell Borders</h1>
      <button onClick={addBorderToDataRange}>Add a border to the data range</button>
    </div>
  );
}

export default App;
The effect of adding a dashed outline and thin inner lines to the data range:
Add left, top, right, bottom and diagonal borders to a cell
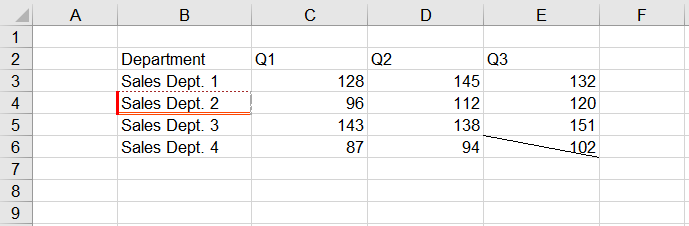
BorderAround gives all four edges the same style, which is not enough when the requirement is "a thick red line on the left and a double line along the bottom". Handling the edges one at a time solves it: Borders.get takes a single edge by its BordersLineType member, and its LineStyle and Color can then be set independently, so every edge can have its own line style and colour. The two diagonal directions are available the same way.
The steps are:
- Take the cell to style with
Range.get - Take the left, top, right and bottom edges through
Borders.get(BordersLineType.EdgeLeft)and its siblings - Set
LineStyleon each edge, using a thick line, a dotted line, a slanted dash-dot line and a double line - Set
Coloron each edge, using red, brown, dark grey and orange red - Take another cell, fetch its diagonal-down edge with
BordersLineType.DiagonalDownand set its line style
function App() {
  const addEdgeBorders = async () => {
    const xlsModule = window.wasmModule?.spirexls;
    if (!xlsModule) {
      alert('Spire.Xls is not ready yet');
      return;
    }

    await window.spire.FetchFileToVFS('ARIAL.TTF', '/Library/Fonts/', `${process.env.PUBLIC_URL}/font/`);
    const inputFileName = 'CellBorders.xlsx';
    await window.spire.FetchFileToVFS(inputFileName, '', `${process.env.PUBLIC_URL}data/`);

    const workbook = new xlsModule.Workbook();
    workbook.LoadFromFile({ fileName: inputFileName });
    const sheet = workbook.Worksheets.get(0);

    // Give each of the four edges of B4 its own line style and colour
    const cell = sheet.Range.get('B4');
    const edgeSpecs = [
      ['EdgeLeft', xlsModule.LineStyleType.Thick, xlsModule.Color.get_Red()],
      ['EdgeTop', xlsModule.LineStyleType.Dotted, xlsModule.Color.get_Brown()],
      ['EdgeRight', xlsModule.LineStyleType.SlantedDashDot, xlsModule.Color.get_DarkGray()],
      ['EdgeBottom', xlsModule.LineStyleType.Double, xlsModule.Color.get_OrangeRed()],
    ];
    for (const [edge, lineStyle, color] of edgeSpecs) {
      const border = cell.Borders.get(xlsModule.BordersLineType[edge]);
      border.LineStyle = lineStyle;
      border.Color = color;
    }

    // Add a diagonal-down border to E6
    const diagonal = sheet.Range.get('E6').Borders.get(xlsModule.BordersLineType.DiagonalDown);
    diagonal.LineStyle = xlsModule.LineStyleType.Thin;

    const outputFileName = 'AddEdgeBorders.xlsx';
    workbook.SaveToFile({ fileName: outputFileName, version: xlsModule.ExcelVersion.Version2010 });
    workbook.Dispose();

    const fileArray = window.dotnetRuntime.Module.FS.readFile(outputFileName);
    const blob = new Blob([fileArray], { type: 'application/vnd.openxmlformats-officedocument.spreadsheetml.sheet' });
    const url = URL.createObjectURL(blob);
    const a = document.createElement('a');
    a.href = url;
    a.download = outputFileName;
    a.click();
    URL.revokeObjectURL(url);
  };

  return (
    <div style={{ textAlign: 'center', height: '300px' }}>
      <h1>Add or Remove Cell Borders</h1>
      <button onClick={addEdgeBorders}>Set the four edges and a diagonal</button>
    </div>
  );
}

export default App;
The effect of styling the four edges of a cell and adding a diagonal line:
Remove the borders of a cell or a cell range
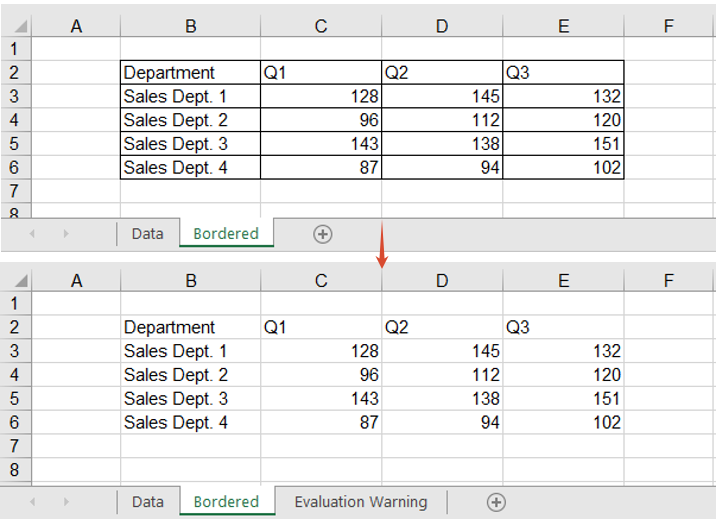
When an internal report goes out to a customer, or its data is fed to a downstream system, borders are often just noise: they make the data look like a finished report, and a parser that walks the sheet region by region can pick them up as content. Removing them is as simple as setting them — assign LineStyleType.None to the range's Borders.LineStyle and every line inside it goes at once.
The steps are:
- Take the worksheet that holds the framed report
- Take the cell range to clean up with
Range.get - Set the range's
Borders.LineStyletoLineStyleType.None, clearing every border inside it
function App() {
  const removeBorders = async () => {
    const xlsModule = window.wasmModule?.spirexls;
    if (!xlsModule) {
      alert('Spire.Xls is not ready yet');
      return;
    }

    await window.spire.FetchFileToVFS('ARIAL.TTF', '/Library/Fonts/', `${process.env.PUBLIC_URL}/font/`);
    const inputFileName = 'CellBorders.xlsx';
    await window.spire.FetchFileToVFS(inputFileName, '', `${process.env.PUBLIC_URL}data/`);

    const workbook = new xlsModule.Workbook();
    workbook.LoadFromFile({ fileName: inputFileName });

    // The second worksheet holds the same report, already framed with borders
    const sheet = workbook.Worksheets.get(1);

    // Set every border in the B2:E6 range to None
    sheet.Range.get('B2:E6').Borders.LineStyle = xlsModule.LineStyleType.None;

    const outputFileName = 'RemoveBorders.xlsx';
    workbook.SaveToFile({ fileName: outputFileName, version: xlsModule.ExcelVersion.Version2010 });
    workbook.Dispose();

    const fileArray = window.dotnetRuntime.Module.FS.readFile(outputFileName);
    const blob = new Blob([fileArray], { type: 'application/vnd.openxmlformats-officedocument.spreadsheetml.sheet' });
    const url = URL.createObjectURL(blob);
    const a = document.createElement('a');
    a.href = url;
    a.download = outputFileName;
    a.click();
    URL.revokeObjectURL(url);
  };

  return (
    <div style={{ textAlign: 'center', height: '300px' }}>
      <h1>Add or Remove Cell Borders</h1>
      <button onClick={removeBorders}>Remove cell borders</button>
    </div>
  );
}

export default App;
The effect of clearing every border inside the range:
FAQ
Setting a top edge on a whole range puts a line above every row
Cause: Borders.get(BordersLineType.EdgeTop) returns the top edge of every cell in the range, not the outline of the range itself. Used on B2:E6 as it stands, every row inside the range gets a top edge of its own, so four extra lines appear in the middle of the table.
Solution: narrow the range to a single row or column, and the edge that comes back sits on the outline. Take the top from the first row, the bottom from the last row, the left from the first column and the right from the last column:
// Top: the first row only
sheet.Range.get('B2:E2').Borders.get(xlsModule.BordersLineType.EdgeTop).LineStyle = xlsModule.LineStyleType.Thin;
// Bottom: the last row only
sheet.Range.get('B6:E6').Borders.get(xlsModule.BordersLineType.EdgeBottom).LineStyle = xlsModule.LineStyleType.Thin;
// Left: the first column only
sheet.Range.get('B2:B6').Borders.get(xlsModule.BordersLineType.EdgeLeft).LineStyle = xlsModule.LineStyleType.Thin;
// Right: the last column only
sheet.Range.get('E2:E6').Borders.get(xlsModule.BordersLineType.EdgeRight).LineStyle = xlsModule.LineStyleType.Thin;
BorderInside throws when it is called on a single cell
Cause: BorderInside means "the separators inside the range", and a single cell has no inside, so passing one throws This method doesn't support for single cell. No result file is written either.
Solution: use BorderAround to frame a single cell, or set its edges one at a time as in the previous section:
sheet.Range.get('B2').BorderAround({ borderLine: xlsModule.LineStyleType.Thin });
Get a Free License
Spire.XLS for JavaScript offers a 30-day full-featured free trial license with no functional limitations. Apply here to evaluate before purchasing.
A product list or an order detail table rarely keeps one format per cell. A description note has to be split over several lines, only a few words of a promotion line deserve to stand out, and a stock warning needs to be picked out in red. Doing that by hand means double-clicking every cell, selecting the fragment and adjusting the font one by one, which does not scale past a handful of rows. An HTML string describes exactly this kind of content — one piece of text whose parts are styled differently — and Spire.XLS for JavaScript exposes the HtmlString property, which renders a piece of HTML straight into a cell: line breaks, bold, italic, underline, color and font size all follow the tags, so a batch is one assignment inside a loop. It runs entirely in the browser on WebAssembly, managing input and output files with a virtual file system (VFS) and requiring no backend service.
This article covers two feature points:
For installation and project setup, see Integrating Spire.XLS for JavaScript in a React Project. The examples below assume Spire.XLS is installed and the WebAssembly module has been initialized.
Write HTML text with line breaks into a cell
Breaking a line inside a cell normally means pressing Alt+Enter while editing it. When the data comes from a database or a form, that manual step cannot be batched, and the <br> tag in HTML means precisely "break the line here". HtmlString parses <br>, <div> and <p> into line breaks inside the cell, so a single string written into one cell becomes several lines. The steps are as follows:
- Load the font into the VFS.
- Create a workbook, take its first worksheet and widen column A.
- Build an HTML string for each entry, splitting the parts with
<br>. - Write them into the cells of column A with
HtmlString. - Save the workbook.
The complete code example below shows how to write HTML text with line breaks into an Excel cell in React:
function App() {
  const setMultilineText = async () => {
    // Get the Spire.XLS WASM module
    const xlsModule = window.wasmModule?.spirexls;

    // Check that the module is ready
    if (!xlsModule) {
      alert('Spire.Xls is not ready yet');
      return;
    }

    // Load the font into the VFS
    await window.spire.FetchFileToVFS('ARIAL.TTF', '/Library/Fonts/', `${process.env.PUBLIC_URL}/font/`);

    // Create a workbook, take the first worksheet and widen column A so a single line stays on one line
    const workbook = new xlsModule.Workbook();
    const sheet = workbook.Worksheets.get(0);
    sheet.Range.get('A1:A5').ColumnWidth = 30;

    // Each description has three parts, separated by <br> inside the same cell
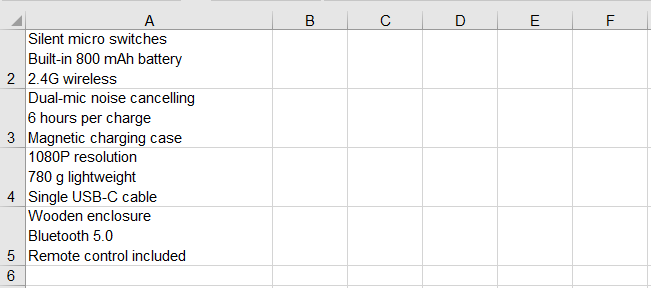
    const notes = [
      'Bluetooth 5.3 dual pairing<br>30-hour battery<br>USB-C fast charge',
      'Silent micro switches<br>Built-in 800 mAh battery<br>2.4G wireless',
      'Dual-mic noise cancelling<br>6 hours per charge<br>Magnetic charging case',
      '1080P resolution<br>780 g lightweight<br>Single USB-C cable',
      'Wooden enclosure<br>Bluetooth 5.0<br>Remote control included',
    ];

    // Write the HTML strings into column A, three lines inside one cell
    notes.forEach((html, index) => {
      sheet.Range.get(`A${index + 1}`).HtmlString = html;
    });

    // Save the workbook
    const outputFileName = 'MultilineHtmlText.xlsx';
    workbook.SaveToFile({ fileName: outputFileName });

    // Release the resources
    workbook.Dispose();

    // Read the result file out of the VFS and trigger the download
    const fileArray = window.dotnetRuntime.Module.FS.readFile(outputFileName);
    const blob = new Blob([fileArray], { type: 'application/vnd.openxmlformats-officedocument.spreadsheetml.sheet' });
    const url = URL.createObjectURL(blob);
    const a = document.createElement('a');
    a.href = url;
    a.download = outputFileName;
    a.click();
    URL.revokeObjectURL(url);
  };

  return (
    <div style={{ textAlign: 'center', height: '300px' }}>
      <h1>Excel HTML rich text</h1>
      <button onClick={setMultilineText}>Multiline HTML text</button>
    </div>
  );
}

export default App;
After running, the effect of writing HTML text with line breaks into a cell:
Format part of the text in a cell
Text inside one cell does not have to share one format. Within a single run of text, only part of it usually needs to stand out, while the rest can stay at the regular weight. HtmlString supports the <b>, <i> and <u> tags, and takes color and font size in a style attribute on a <span>. Every fragment wrapped in a tag becomes its own run of formatting without affecting the others, and the tags themselves never appear in the cell. The steps are as follows:
- As in the previous section, load the font into the VFS, create a workbook, take the first worksheet and widen column A.
- Mark the text to emphasize with
<b>,<i>and<u>, and wrap the text to highlight in<span style="color:#C00000;font-size:14pt">, giving the color as a hexadecimal value and the size in points. - Write the strings into column A; the rest of the text in the same cell keeps its original format.
- Save the workbook.
The complete code example below shows how to format part of the text in an Excel cell in React:
function App() {
  const setPartialFormatting = async () => {
    // Get the Spire.XLS WASM module
    const xlsModule = window.wasmModule?.spirexls;

    // Check that the module is ready
    if (!xlsModule) {
      alert('Spire.Xls is not ready yet');
      return;
    }

    // Load the font into the VFS
    await window.spire.FetchFileToVFS('ARIAL.TTF', '/Library/Fonts/', `${process.env.PUBLIC_URL}/font/`);

    // Create a workbook, take the first worksheet and widen column A so a single line stays on one line
    const workbook = new xlsModule.Workbook();
    const sheet = workbook.Worksheets.get(0);
    sheet.Range.get('A1:A5').ColumnWidth = 30;

    // Each part of a promotion line gets its own <b>, <i>, <u> or styled <span>;
    // bold, italic, underline, color and font size apply only to the wrapped text
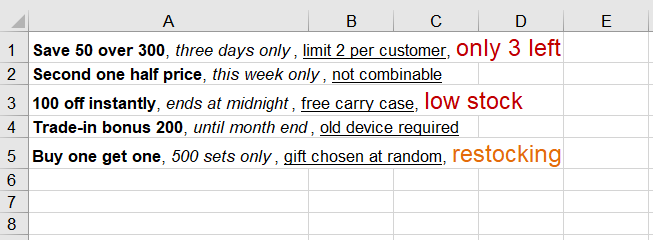
    const promotions = [
      '<b>Save 50 over 300</b>, <i>three days only</i>, <u>limit 2 per customer</u>, <span style="color:#C00000;font-size:14pt">only 3 left</span>',
      '<b>Second one half price</b>, <i>this week only</i>, <u>not combinable</u>',
      '<b>100 off instantly</b>, <i>ends at midnight</i>, <u>free carry case</u>, <span style="color:#C00000;font-size:14pt">low stock</span>',
      '<b>Trade-in bonus 200</b>, <i>until month end</i>, <u>old device required</u>',
      '<b>Buy one get one</b>, <i>500 sets only</i>, <u>gift chosen at random</u>, <span style="color:#E36C0A;font-size:14pt">restocking</span>',
    ];

    // Write the HTML strings into column A
    promotions.forEach((html, index) => {
      sheet.Range.get(`A${index + 1}`).HtmlString = html;
    });

    // Save the workbook
    const outputFileName = 'PartialFormattingHtml.xlsx';
    workbook.SaveToFile({ fileName: outputFileName });

    // Release the resources
    workbook.Dispose();

    // Read the result file out of the VFS and trigger the download
    const fileArray = window.dotnetRuntime.Module.FS.readFile(outputFileName);
    const blob = new Blob([fileArray], { type: 'application/vnd.openxmlformats-officedocument.spreadsheetml.sheet' });
    const url = URL.createObjectURL(blob);
    const a = document.createElement('a');
    a.href = url;
    a.download = outputFileName;
    a.click();
    URL.revokeObjectURL(url);
  };

  return (
    <div style={{ textAlign: 'center', height: '300px' }}>
      <h1>Excel HTML rich text</h1>
      <button onClick={setPartialFormatting}>Partial formatting</button>
    </div>
  );
}

export default App;
After running, the effect of formatting part of the text in a cell as bold, italic, underlined, colored or larger:
FAQ
Does the HTML parser swallow runs of spaces?
Cause: A browser collapses consecutive spaces into one when it renders HTML, which makes it easy to assume Spire does the same and to reach for to build any padding.
Solution: It does not. A B is still five spaces when read back out of the cell, and leading spaces survive as well. works too, but ordinary alignment does not need it.
Does writing rich text wipe out the alignment the cell already had?
Cause: HtmlString does change the cell's font properties, so it is fair to wonder whether it resets the alignment set earlier along with them.
Solution: The alignment is untouched. Set Style.HorizontalAlignment first and write the HtmlString afterwards, and the alignment reads back unchanged — setting the format before the content is safe.
const cell = sheet.Range.get('A1');
cell.Style.HorizontalAlignment = xlsModule.HorizontalAlignType.Center;
cell.HtmlString = '<b>Centered</b>';
Get a Free License
Spire.XLS for JavaScript offers a 30-day full-featured free trial license with no functional limitations. Apply here to evaluate before purchasing.
Add Gradient and Pattern Fills to Excel in React with JavaScript
2026-09-22 01:52:29 Written by liu taliaA report whose header and total rows carry nothing but data and borders is hard to scan. Tinting those cells is the usual answer, but a flat color only goes so far: sometimes a light-to-dark sweep is what marks the important row, and sometimes a light dot or stripe texture sets the totals apart without burying the numbers underneath it. Spire.XLS for JavaScript supports both gradient and pattern fills through the Interior object, performing these operations directly in the browser through WebAssembly, managing input and output files with a virtual file system (VFS) and requiring no backend service.
This article covers two core feature points:
For installation and project setup, see Integrating Spire.XLS for JavaScript in a React Project. The examples below assume Spire.XLS is installed and the WebAssembly module has been initialized.
Apply a gradient fill to cells
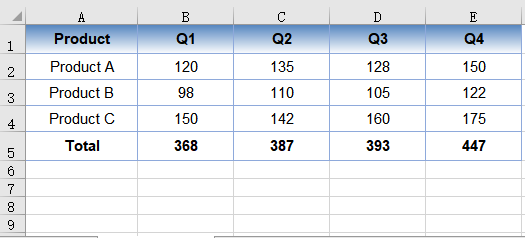
A gradient fill takes three steps: name the fill type, give the two ends their colors, and say how the transition runs. All three land on the same Interior object -- FillPattern picks the fill type, Gradient.ForeColor and Gradient.BackColor give the two ends their colors, and Gradient.TwoColorGradient takes two parameters: the direction comes from GradientStyleType, which covers horizontal, vertical, both diagonals and the spreads that radiate out from the centre or the corner, while the shading variant comes from GradientVariantsType and runs from ShadingVariants1 to ShadingVariants4. The same pair of colors reads completely differently once the direction and variant change. The steps are:
- Load the font and the sample data into the VFS.
- Create a
Workbook, load it withLoadFromFile, then get the first worksheet withWorksheets.get(0). - Take the header range with
Range.getand setStyle.Interior.FillPatterntoExcelPatternType.Gradient. - Give the two ends of the gradient their colors with
Gradient.ForeColorandGradient.BackColor. - Set the direction and the shading variant with
Gradient.TwoColorGradient. - Save the workbook with
SaveToFile.
The complete code example below shows how to apply a gradient fill to Excel cells in React:
function App() {
  const applyGradient = async () => {
    // Get the Spire.XLS WASM module
    const xlsModule = window.wasmModule?.spirexls;

    // Check if the module is ready
    if (!xlsModule) {
      alert('Spire.Xls is not ready yet');
      return;
    }

    // Load the font and the sample data into the VFS
    await window.spire.FetchFileToVFS('ARIAL.TTF', '/Library/Fonts/', `${process.env.PUBLIC_URL}/font/`);
    const inputFileName = 'FillSample_EN.xlsx';
    await window.spire.FetchFileToVFS(inputFileName, '', `${process.env.PUBLIC_URL}data/`);

    // Load the workbook and get the first worksheet
    const workbook = new xlsModule.Workbook();
    workbook.LoadFromFile({ fileName: inputFileName });
    const sheet = workbook.Worksheets.get(0);

    // Take the header row, A1:E1
    const header = sheet.Range.get('A1:E1');

    // Set the fill type to a gradient
    header.Style.Interior.FillPattern = xlsModule.ExcelPatternType.Gradient;

    // Give the two ends of the gradient their colors
    header.Style.Interior.Gradient.ForeColor = xlsModule.Color.FromArgb(255, 255, 255);
    header.Style.Interior.Gradient.BackColor = xlsModule.Color.FromArgb(79, 129, 189);

    // Two-color gradient: the first parameter sets the direction, the second the shading variant
    header.Style.Interior.Gradient.TwoColorGradient(
      xlsModule.GradientStyleType.Horizontal,
      xlsModule.GradientVariantsType.ShadingVariants1,
    );

    // Save the workbook
    const outputFileName = 'GradientFill.xlsx';
    workbook.SaveToFile({ fileName: outputFileName });

    // Dispose of the workbook object to release resources
    workbook.Dispose();

    // Read the result file from the VFS and trigger the download
    const fileArray = window.dotnetRuntime.Module.FS.readFile(outputFileName);
    const blob = new Blob([fileArray], { type: 'application/vnd.openxmlformats-officedocument.spreadsheetml.sheet' });
    const url = URL.createObjectURL(blob);
    const a = document.createElement('a');
    a.href = url;
    a.download = outputFileName;
    a.click();
    URL.revokeObjectURL(url);
  };

  return (
    <div style={{ textAlign: 'center', height: '300px' }}>
      <h1>Apply Gradient Fill</h1>
      <button onClick={applyGradient}>Start</button>
    </div>
  );
}

export default App;
After running, the effect of applying a gradient fill to the header row:
Apply a pattern fill to cells
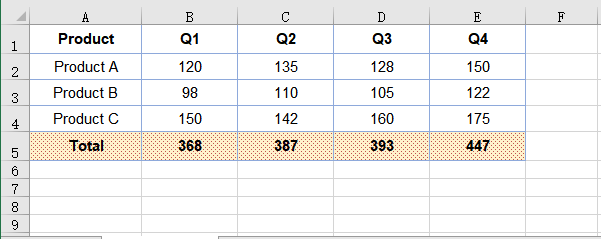
A pattern fill is not one effect but a family of built-in styles: dots, horizontal and vertical stripes, diagonals, chequerboards and more all live under ExcelPatternType, several dozen values in all, with densities running from 5% to 75%. Compared with a gradient, a pattern carries far less visual weight, so it can be laid across a whole row without getting in the way of reading, which makes it a better fit for marking a total row or setting a block of data apart.
Setting one works the same way as a gradient: Interior.FillPattern picks the style, and then two colors are needed. There is one easy trap here -- Interior.Color sets the color of the pattern itself, while Interior.PatternColor sets the backdrop underneath it, so the two property names mean the opposite of what they suggest. Give the dark color to Interior.Color and the light one to Interior.PatternColor, and the dots float on a pale ground. The steps are:
- Load the font and the sample data into the VFS.
- Create a
Workbook, load it withLoadFromFile, then get the first worksheet withWorksheets.get(0). - Take the total row with
Range.getand setStyle.Interior.FillPatternto the wantedExcelPatternTypevalue. - Give the pattern its color with
Interior.Colorand the backdrop its color withInterior.PatternColor. - Save the workbook with
SaveToFile.
The complete code example below shows how to apply a pattern fill to Excel cells in React:
function App() {
  const applyPattern = async () => {
    // Get the Spire.XLS WASM module
    const xlsModule = window.wasmModule?.spirexls;

    // Check if the module is ready
    if (!xlsModule) {
      alert('Spire.Xls is not ready yet');
      return;
    }

    // Load the font and the sample data into the VFS
    await window.spire.FetchFileToVFS('ARIAL.TTF', '/Library/Fonts/', `${process.env.PUBLIC_URL}/font/`);
    const inputFileName = 'FillSample_EN.xlsx';
    await window.spire.FetchFileToVFS(inputFileName, '', `${process.env.PUBLIC_URL}data/`);

    // Load the workbook and get the first worksheet
    const workbook = new xlsModule.Workbook();
    workbook.LoadFromFile({ fileName: inputFileName });
    const sheet = workbook.Worksheets.get(0);

    // Take the total row, A5:E5
    const total = sheet.Range.get('A5:E5');

    // Pick a built-in pattern, here a 12.5% gray dot pattern
    total.Style.Interior.FillPattern = xlsModule.ExcelPatternType.Percent125Gray;

    // Interior.Color sets the pattern itself, Interior.PatternColor the backdrop behind it
    total.Style.Interior.Color = xlsModule.Color.FromArgb(192, 80, 77);
    total.Style.Interior.PatternColor = xlsModule.Color.FromArgb(255, 242, 204);

    // Save the workbook
    const outputFileName = 'PatternFill.xlsx';
    workbook.SaveToFile({ fileName: outputFileName });

    // Dispose of the workbook object to release resources
    workbook.Dispose();

    // Read the result file from the VFS and trigger the download
    const fileArray = window.dotnetRuntime.Module.FS.readFile(outputFileName);
    const blob = new Blob([fileArray], { type: 'application/vnd.openxmlformats-officedocument.spreadsheetml.sheet' });
    const url = URL.createObjectURL(blob);
    const a = document.createElement('a');
    a.href = url;
    a.download = outputFileName;
    a.click();
    URL.revokeObjectURL(url);
  };

  return (
    <div style={{ textAlign: 'center', height: '300px' }}>
      <h1>Apply Pattern Fill</h1>
      <button onClick={applyPattern}>Start</button>
    </div>
  );
}

export default App;
After running, the effect of applying a pattern fill to the total row:
FAQ
The fill is set, so why did the cell's font style stay the same?
Cause: Style.Interior only handles the fill. Fill, font and borders are three independent members of Style, and touching one leaves the other two alone -- darken the background and the text stays the same black, which turns the cell into a smudge; recolor Style.Font and the background does not follow either.
Solution: Set the fill and the font separately, and usually change both together when contrast matters:
// Fill
sheet.Range.get('A1:E1').Style.Interior.Color = xlsModule.Color.FromArgb(79, 129, 189);

// Font
sheet.Range.get('A1:E1').Style.Font.Color = xlsModule.Color.FromArgb(255, 255, 255);
sheet.Range.get('A1:E1').Style.Font.IsBold = true;
Style.Font also carries FontName, Size, IsItalic and Underline, none of which interfere with the fill.
After filling a cell, how do I take the color off again?
Cause: Changing the color only swaps one fill for another; it does not remove the fill. The fill type is still a value other than None, so the pattern or the background color is still written into the cell's style.
Solution: Set the fill type back to ExcelPatternType.None, and the pattern and colors stop applying along with it:
sheet.Range.get('A5:E5').Style.Interior.FillPattern = xlsModule.ExcelPatternType.None;
Get a Free License
Spire.XLS for JavaScript offers a 30-day full-featured free trial license with no functional limitations. Apply here to evaluate before purchasing.
Autofit Row Heights and Column Widths in React with JavaScript
2026-09-18 01:55:27 Written by liu taliaOnce the data is in, a table usually needs one last pass before it is usable: a product name squeezed into a sliver of a column, a paragraph of remarks running along a single line until the next non-empty cell cuts it off. Dragging column borders and row dividers by hand is slow, and once there are enough columns it is easy to miss a few. Spire.XLS for JavaScript performs this work directly in the browser through WebAssembly, managing input and output files with a virtual file system (VFS) and requiring no backend service.
This article covers two key features:
- Autofit the Height of a Single Row and the Width of a Single Column
- Autofit the Heights of Multiple Rows and the Widths of Multiple Columns
For installation and project setup, see Integrating Spire.XLS for JavaScript in a React Project. The examples below assume Spire.XLS is already installed and the WebAssembly module has been initialized.
Autofit the Height of a Single Row and the Width of a Single Column
AutoFitRow works out the height of the given row from its content, and AutoFitColumn works out the width of the given column the same way. Each one affects only the row or the column it is pointed at and leaves the rest of the table untouched, which is what you want when a single overflow is the only thing in the way.
Note that row height autofit only means anything for content that needs to wrap: with wrapping turned off the text always sits on one line and the height simply follows the font size, so there is no taller value to calculate. The steps are:
- Load the workbook and get the first worksheet.
- Autofit the height of that row with
AutoFitRow. - Autofit the width of that column with
AutoFitColumn. - Save the workbook.
Here is a complete code example that autofits the height of a single row and the width of a single column in React:
function App() {
  const autoFitSingleRowColumn = async () => {
    // Get the Spire.XLS WASM module
    const xlsModule = window.wasmModule?.spirexls;

    // Check whether the module is ready
    if (!xlsModule) {
      alert('Spire.Xls is not ready yet');
      return;
    }

    // Load the font into the VFS
    await window.spire.FetchFileToVFS('ARIAL.TTF', '/Library/Fonts/', `${process.env.PUBLIC_URL}/font/`);

    // Load the Excel file into the VFS
    const inputFileName = 'AutoFitRowsAndColumns.xlsx';
    await window.spire.FetchFileToVFS(inputFileName, '', `${process.env.PUBLIC_URL}/static/data/`);

    // Load the workbook
    const workbook = new xlsModule.Workbook();
    workbook.LoadFromFile(inputFileName);

    // Get the first worksheet
    const sheet = workbook.Worksheets.get(0);

    // Autofit the height of row 2
    sheet.AutoFitRow(2);

    // Autofit the width of column 4
    sheet.AutoFitColumn(4);

    // Save the workbook
    const outputFileName = "AutoFitSingleRowColumn.xlsx";
    workbook.SaveToFile(outputFileName);

    // Dispose of the workbook object to free resources
    workbook.Dispose();

    // Read the result file from the VFS and trigger the download
    const fileArray = window.dotnetRuntime.Module.FS.readFile(outputFileName);
    const blob = new Blob([fileArray], { type: "application/vnd.openxmlformats-officedocument.spreadsheetml.sheet" });
    const url = URL.createObjectURL(blob);
    const a = document.createElement('a');
    a.href = url;
    a.download = outputFileName;
    a.click();
    URL.revokeObjectURL(url);
  };

  return (
    <div style={{ textAlign: 'center', height: '300px' }}>
      <h1>Autofit Row Height and Column Width</h1>
      <button onClick={autoFitSingleRowColumn}>Start</button>
    </div>
  );
}

export default App;
After running, the effect of autofitting a single row height and a single column width:
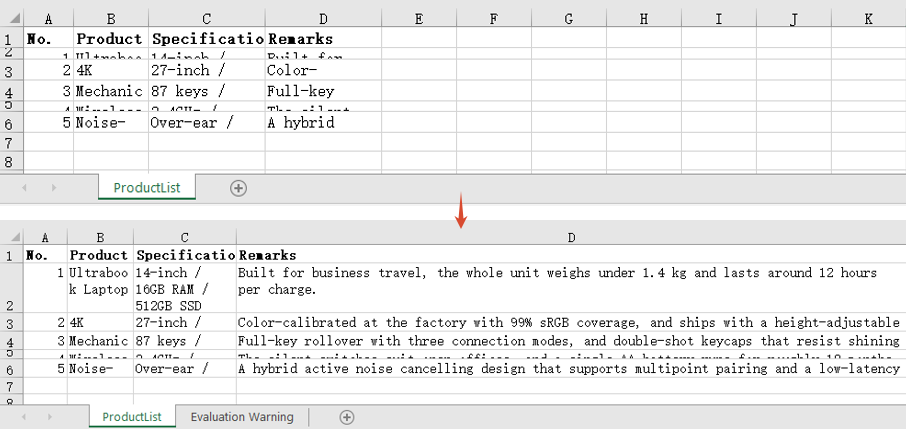
Autofit the Heights of Multiple Rows and the Widths of Multiple Columns
When the whole table needs tidying, calling the methods row by row is not realistic. Calling AutoFitRows or AutoFitColumns on a range recalculates every row and every column the range covers from its own content, so a single call lines up the whole block — the kind of pass you want before exporting a report. The steps are:
- Load the workbook and get the first worksheet.
- Autofit the heights of the rows with
AutoFitRows. - Autofit the widths of the columns with
AutoFitColumns. - Save the workbook.
Here is a complete code example that autofits the heights of multiple rows and the widths of multiple columns in React:
function App() {
  const autoFitMultipleRowsColumns = async () => {
    // Get the Spire.XLS WASM module
    const xlsModule = window.wasmModule?.spirexls;

    // Check whether the module is ready
    if (!xlsModule) {
      alert('Spire.Xls is not ready yet');
      return;
    }

    // Load the font into the VFS
    await window.spire.FetchFileToVFS('ARIAL.TTF', '/Library/Fonts/', `${process.env.PUBLIC_URL}/font/`);

    // Load the Excel file into the VFS
    const inputFileName = 'AutoFitRowsAndColumns.xlsx';
    await window.spire.FetchFileToVFS(inputFileName, '', `${process.env.PUBLIC_URL}/static/data/`);

    // Load the workbook
    const workbook = new xlsModule.Workbook();
    workbook.LoadFromFile(inputFileName);

    // Get the first worksheet
    const sheet = workbook.Worksheets.get(0);

    // Get the used range of the worksheet
    const range = sheet.AllocatedRange;

    // Autofit the height of every row in the range
    range.AutoFitRows();

    // Autofit the width of every column in the range
    range.AutoFitColumns();

    // Save the workbook
    const outputFileName = "AutoFitMultipleRowsColumns.xlsx";
    workbook.SaveToFile(outputFileName);

    // Dispose of the workbook object to free resources
    workbook.Dispose();

    // Read the result file from the VFS and trigger the download
    const fileArray = window.dotnetRuntime.Module.FS.readFile(outputFileName);
    const blob = new Blob([fileArray], { type: "application/vnd.openxmlformats-officedocument.spreadsheetml.sheet" });
    const url = URL.createObjectURL(blob);
    const a = document.createElement('a');
    a.href = url;
    a.download = outputFileName;
    a.click();
    URL.revokeObjectURL(url);
  };

  return (
    <div style={{ textAlign: 'center', height: '300px' }}>
      <h1>Autofit Row Height and Column Width</h1>
      <button onClick={autoFitMultipleRowsColumns}>Start</button>
    </div>
  );
}

export default App;
After running, the effect of autofitting multiple row heights and multiple column widths:
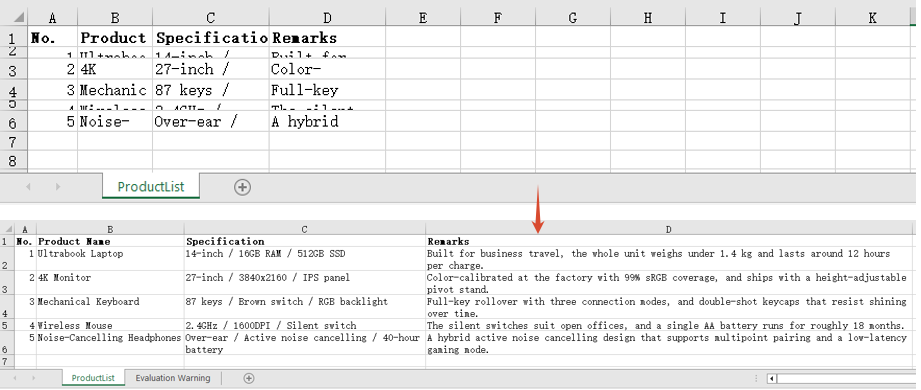
FAQ
I called AutoFitRow() and the row height did not change at all?
Cause: Row height autofit only applies to content that needs to wrap. With wrapping turned off the text stays on a single line and the height follows the font size, so autofit arrives at the same value as the existing height and appears to have done nothing.
Solution: Set WrapText to true first, then autofit the row height:
// With wrapping off, autofitting the row height changes nothing
sheet.Range.get("D2").Style.WrapText = false;
sheet.AutoFitRow(2);

// With wrapping on, the height is recalculated from the wrapped line count
sheet.Range.get("D2").Style.WrapText = true;
sheet.AutoFitRow(2);
AutoFitColumns() has no effect on merged cells?
Cause: Column width autofit measures the content of individual cells. In a merged range only the top-left cell actually holds text and every other position in the range is empty, so the width it works out is only enough for that top-left content.
Solution: Set the width of a merged range by hand with ColumnWidth:
// A7:D7 is a merged range, so autofit cannot work out its combined width
sheet.Range.get("A7:D7").Merge();
sheet.Range.get("A7:D7").AutoFitColumns();

// Set the column width by hand so the merged text fits
sheet.Range.get("A7").ColumnWidth = 40;
Get a Free License
Spire.XLS for JavaScript offers a 30-day full-featured free trial license with no functional limitations. Apply here to evaluate before purchasing.
Set Excel Background Color and Background Image with JavaScript in React
2026-09-02 09:38:17 Written by jie zouWhen creating reports, setting background colors for cells highlights headers and key data, and setting a background image for the worksheet makes the whole report more recognizable. Spire.XLS for JavaScript performs both kinds of settings directly in the browser based on WebAssembly, and manages input/output files through a virtual file system (VFS), with no backend service required.
This article covers two core features:
For installation and project configuration, refer to Integrating Spire.XLS for JavaScript in a React Project. The examples below assume Spire.XLS is installed and the WebAssembly module is initialized.
Set Cell Background Color
Setting a background color for cells highlights headers, important data, or specific regions. Spire.XLS for JavaScript sets a background color for a cell or a cell range through the CellRange.Style.Color property, with rich built-in colors supported. The main steps are as follows:
- Create a
Workbookobject and use theLoadFromFile()method to load the Excel document. - Use the
Workbook.Worksheets.get()method to get a specific worksheet. - Use the
CellRange.Style.Colorproperty to set a background color for a specific cell range. - Use the
Workbook.SaveToFile()method to save the document to a specified path.
Here is a complete code example showing how to set background colors for cell ranges in React:
function App() {
  const setBackgroundColor = async () => {
    // Get the Spire.XLS WASM module
    const xlsModule = window.wasmModule?.spirexls;

    // Check whether the module is ready
    if (!xlsModule) {
      alert('Spire.Xls is not ready yet');
      return;
    }

    // Load the font and Excel file into the VFS
    await window.spire.FetchFileToVFS('ARIAL.TTF', '/Library/Fonts/', `${process.env.PUBLIC_URL}/font/`);
    const inputFileName = 'SetBackgroundColor.xlsx';
    await window.spire.FetchFileToVFS(inputFileName, '', `${process.env.PUBLIC_URL}data/`);

    // Load the workbook
    const workbook = new xlsModule.Workbook();
    workbook.LoadFromFile({ fileName: inputFileName });

    // Get the first worksheet
    const sheet = workbook.Worksheets.get(0);

    // Set the header row to a yellow background
    sheet.Range.get("A1:E1").Style.Color = xlsModule.Color.get_Yellow();

    // Set the first two data rows to a light sky blue background
    sheet.Range.get("A2:E2").Style.Color = xlsModule.Color.get_LightSkyBlue();
    sheet.Range.get("A3:E3").Style.Color = xlsModule.Color.get_LightSkyBlue();

    // Save the document
    const outputFileName = 'SetBackgroundColor_output.xlsx';
    workbook.SaveToFile({ fileName: outputFileName, version: xlsModule.ExcelVersion.Version2010 });

    // Release resources
    workbook.Dispose();

    // Read the converted file from the VFS and trigger a download
    const fileArray = window.dotnetRuntime.Module.FS.readFile(outputFileName);
    const blob = new Blob([fileArray], { type: 'application/vnd.openxmlformats-officedocument.spreadsheetml.sheet' });
    const url = URL.createObjectURL(blob);
    const a = document.createElement('a');
    a.href = url;
    a.download = outputFileName;
    a.click();
    URL.revokeObjectURL(url);
  };

  return (
    <div style={{ textAlign: 'center', height: '300px' }}>
      <h1>Set Cell Background Color</h1>
      <button onClick={setBackgroundColor}>
        Start
      </button>
    </div>
  );
}

export default App;
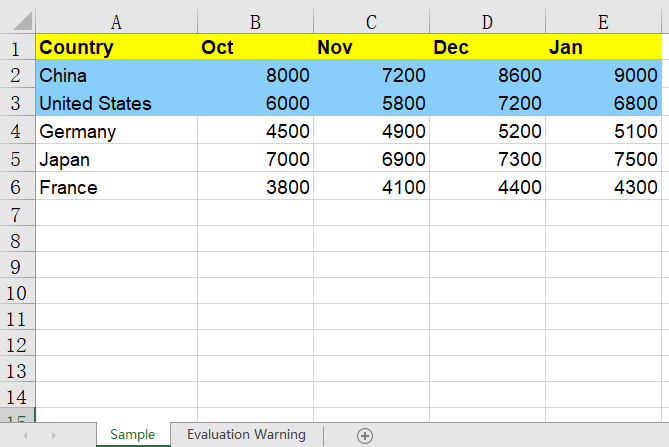
After setting the background colors, the header row is displayed with a yellow background and the first two data rows with a light sky blue background, making it easy to distinguish cells in different regions.
Set Worksheet Background Image
In addition to setting background colors for cells, you can also set a background image for the whole worksheet to make the report more recognizable. Spire.XLS for JavaScript sets an image as the worksheet background through the Worksheet.PageSetup.BackgroundImage property. The main steps are as follows:
- Create a
Workbookobject and use theLoadFromFile()method to load the Excel document. - Use the
Workbook.Worksheets.get()method to get a specific worksheet. - Use a
Streamobject to read the image file to be used as the background. - Use the
Worksheet.PageSetup.BackgroundImageproperty to set the image as the worksheet background. - Use the
Workbook.SaveToFile()method to save the document to a specified path.
Here is a complete code example showing how to set a background image for a worksheet in React:
function App() {
  const setBackgroundImage = async () => {
    // Get the Spire.XLS WASM module
    const xlsModule = window.wasmModule?.spirexls;

    // Check whether the module is ready
    if (!xlsModule) {
      alert('Spire.Xls is not ready yet');
      return;
    }

    // Load the font, image, and Excel file into the VFS
    await window.spire.FetchFileToVFS('ARIAL.TTF', '/Library/Fonts/', `${process.env.PUBLIC_URL}/font/`);
    const backgroundImageName = 'Background.png';
    await window.spire.FetchFileToVFS(backgroundImageName, '', `${process.env.PUBLIC_URL}data/`);
    const inputFileName = 'SetBackgroundColor.xlsx';
    await window.spire.FetchFileToVFS(inputFileName, '', `${process.env.PUBLIC_URL}data/`);

    // Load the workbook
    const workbook = new xlsModule.Workbook();
    workbook.LoadFromFile({ fileName: inputFileName });

    // Get the first worksheet
    const sheet = workbook.Worksheets.get(0);

    // Open the image as a stream
    const bm = new xlsModule.Stream(backgroundImageName);

    // Set the image as the worksheet background
    sheet.PageSetup.BackgroundImage = bm;

    // Save the document
    const outputFileName = 'SetBackgroundImage_output.xlsx';
    workbook.SaveToFile({ fileName: outputFileName, version: xlsModule.ExcelVersion.Version2010 });

    // Release resources
    workbook.Dispose();

    // Read the converted file from the VFS and trigger a download
    const fileArray = window.dotnetRuntime.Module.FS.readFile(outputFileName);
    const blob = new Blob([fileArray], { type: 'application/vnd.openxmlformats-officedocument.spreadsheetml.sheet' });
    const url = URL.createObjectURL(blob);
    const a = document.createElement('a');
    a.href = url;
    a.download = outputFileName;
    a.click();
    URL.revokeObjectURL(url);
  };

  return (
    <div style={{ textAlign: 'center', height: '300px' }}>
      <h1>Set Worksheet Background Image</h1>
      <button onClick={setBackgroundImage}>
        Start
      </button>
    </div>
  );
}

export default App;
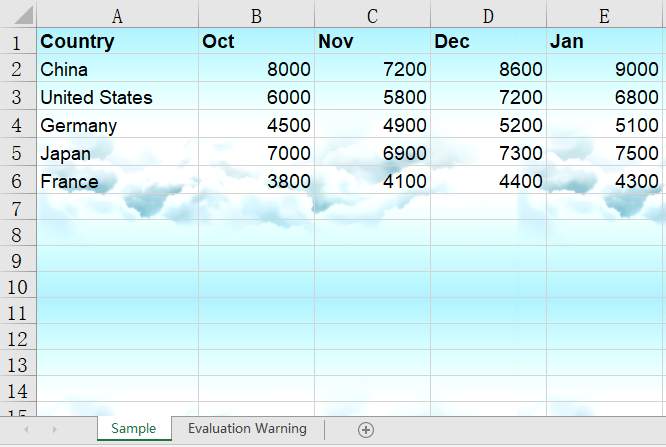
After setting the background image, the image fills the back of the worksheet as its background, while the cell contents and data remain clearly displayed on top of the image.
FAQ
The background color is lost after saving and reopening
Cause: The Style.Color property sets the background (fill) color of a cell, not the font color. If the color is overridden by other styles, or the fill pattern is not set correctly, the color may not display properly.
Solution: Set the color directly for the cell range, for example sheet.Range.get("A1:E1").Style.Color = xlsModule.Color.get_Yellow();. If you want to use a patterned fill, combine Style.Interior.FillPattern and Style.Interior.Gradient.
The background image does not appear above the data
Cause: A worksheet background image is always displayed behind the cell contents and only serves as background decoration. It neither covers the data nor is covered by it.
Solution: This is the normal display layering. If you need the image to appear on top of the data, use the Worksheet.Pictures.Add() method to insert a floating image in the worksheet instead of setting a worksheet background.
Obtain a Free License
Spire.XLS for JavaScript offers a 30-day full-featured free trial license with no functional limitations. Apply here to evaluate before purchasing.
Hide or Unhide Excel Rows and Columns with JavaScript in React
2026-08-03 02:25:05 Written by jie zouHiding and unhiding rows and columns is a common feature in daily office work. It helps protect sensitive information, simplify data views, or temporarily conceal unnecessary data. Spire.XLS for JavaScript runs entirely in the browser via WebAssembly, using a virtual file system (VFS) to manage input and output files — no backend server required. It provides a simple API for controlling the visibility of rows and columns.
This article covers four core features:
- Hide Specific Rows and Columns in Excel
- Unhide Specific Rows and Columns in Excel
- Hide Multiple Rows and Columns at Once in Excel
- Unhide All Hidden Rows and Columns in Excel
For installation and project setup, refer to Integrating Spire.XLS for JavaScript in a React Project. The examples below assume Spire.XLS is installed and the WebAssembly module is initialized.
Hide Specific Rows and Columns in Excel
Hiding specific rows and columns can keep your worksheet cleaner and more readable without compromising data integrity. Spire.XLS for JavaScript supports hiding a specific row or column using the HideRow() and HideColumn() methods. The steps are as follows:
- Create a
Workbookobject and load an existing Excel file containing data. - Use
worksheet.HideRow()to hide a specific row. - Use
worksheet.HideColumn()to hide a specific column. - Save the workbook to an Excel file using
SaveToFile().
Below is a complete code example demonstrating how to hide specific rows and columns in Excel in React:
function App() {
  const hideSpecificRowsAndColumns = async () => {
    // Get the Spire.XLS WASM module
    const xlsModule = window.wasmModule?.spirexls;

    // Check if the module is ready
    if (!xlsModule) {
      alert('Spire.Xls is not ready yet');
      return;
    }

    // Load the sample file into the virtual file system (VFS)
    let excelFileName = 'Sample.xlsx';
    await window.spire.FetchFileToVFS(excelFileName, '', `${process.env.PUBLIC_URL}data/`);

    // Create a workbook object and load the existing file
    const workbook = new xlsModule.Workbook();
    workbook.LoadFromFile({ fileName: excelFileName });
    let sheet = workbook.Worksheets.get(0);

    // Hide a specific row (row 4)
    sheet.HideRow(4);

    // Hide a specific column (column 2, i.e., column B)
    sheet.HideColumn(2);

    // Save the workbook
    const outputFileName = 'HideSpecificRowsColumns.xlsx';
    workbook.SaveToFile(outputFileName);
    workbook.Dispose();

    // Read the file from VFS and trigger download
    const fileArray = window.dotnetRuntime.Module.FS.readFile(outputFileName);
    const blob = new Blob([fileArray], { type: 'application/vnd.openxmlformats-officedocument.spreadsheetml.sheet' });
    const url = URL.createObjectURL(blob);
    const a = document.createElement('a');
    a.href = url;
    a.download = outputFileName;
    a.click();
    URL.revokeObjectURL(url);
  };

  return (
    <div style={{ textAlign: 'center', height: '300px' }}>
      <h1>Hide Specific Rows and Columns</h1>
      <button onClick={hideSpecificRowsAndColumns}>
        Generate
      </button>
    </div>
  );
}

export default App;
Specific rows and columns hidden with Spire.XLS for JavaScript
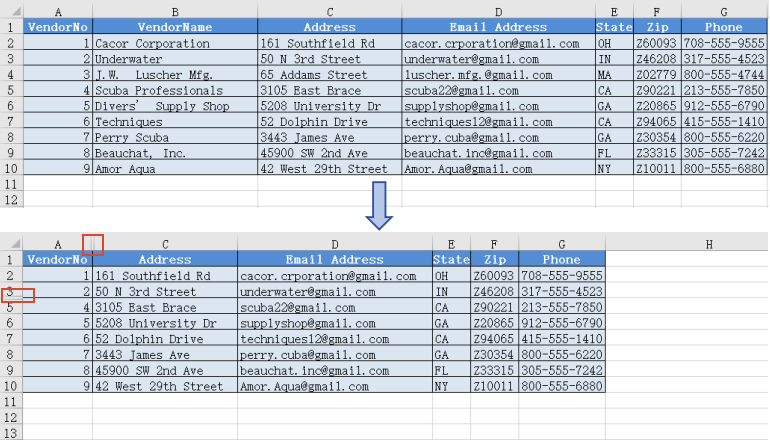
Unhide Specific Rows and Columns in Excel
When you need to view or edit specific hidden data, you can unhide a particular row or column individually. Spire.XLS for JavaScript supports unhiding a specific row or column using the ShowRow() and ShowColumn() methods. The steps are as follows:
- Create a
Workbookobject and load an existing Excel file containing hidden rows/columns. - Use
sheet.ShowRow()to unhide a specific row. - Use
sheet.ShowColumn()to unhide a specific column. - Save the workbook to an Excel file using
SaveToFile().
Below is a complete code example demonstrating how to unhide specific rows and columns in Excel in React:
function App() {
  const unhideSpecificRowsAndColumns = async () => {
    // Get the Spire.XLS WASM module
    const xlsModule = window.wasmModule?.spirexls;

    // Check if the module is ready
    if (!xlsModule) {
      alert('Spire.Xls is not ready yet');
      return;
    }

    // Load the sample file into the virtual file system (VFS)
    let excelFileName = 'HideSpecificRowsColumns.xlsx';
    await window.spire.FetchFileToVFS(excelFileName, '', `${process.env.PUBLIC_URL}data/`);

    // Create a workbook object and load the existing file
    const workbook = new xlsModule.Workbook();
    workbook.LoadFromFile({ fileName: excelFileName });

    // Get the first worksheet
    let sheet = workbook.Worksheets.get(0);

    // Unhide a specific row (row 4)
    sheet.ShowRow(4);

    // Unhide a specific column (column 2, i.e., column B)
    sheet.ShowColumn(2);

    // Save the workbook
    const outputFileName = 'UnhideSpecificRowsColumns.xlsx';
    workbook.SaveToFile(outputFileName);
    workbook.Dispose();

    // Read the file from VFS and trigger download
    const fileArray = window.dotnetRuntime.Module.FS.readFile(outputFileName);
    const blob = new Blob([fileArray], { type: 'application/vnd.openxmlformats-officedocument.spreadsheetml.sheet' });
    const url = URL.createObjectURL(blob);
    const a = document.createElement('a');
    a.href = url;
    a.download = outputFileName;
    a.click();
    URL.revokeObjectURL(url);
  };

  return (
    <div style={{ textAlign: 'center', height: '300px' }}>
      <h1>Unhide Specific Rows and Columns</h1>
      <button onClick={unhideSpecificRowsAndColumns}>
        Generate
      </button>
    </div>
  );
}

export default App;
Specific rows and columns unhidden with Spire.XLS for JavaScript
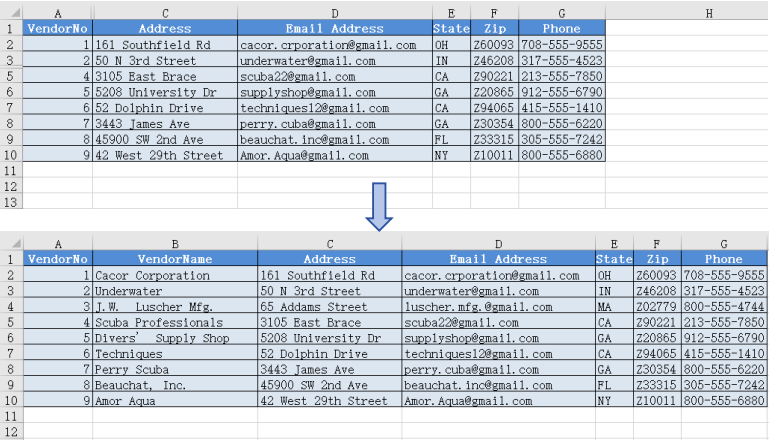
Hide Multiple Rows and Columns at Once in Excel
When there are multiple rows or columns that you don't need to display, hiding them one by one is inefficient. Spire.XLS for JavaScript supports hiding multiple rows and columns at once through loops, greatly improving operational efficiency. The steps are as follows:
- Create a
Workbookobject and load an existing Excel file containing data. - Use a loop to call
worksheet.HideRow()to hide multiple rows at once. - Use a loop to call
worksheet.HideColumn()to hide multiple columns at once. - Save the workbook to an Excel file using
SaveToFile().
Below is a complete code example demonstrating how to hide multiple rows and columns at once in Excel in React:
function App() {
  const hideMultipleRowsAndColumns = async () => {
    // Get the Spire.XLS WASM module
    const xlsModule = window.wasmModule?.spirexls;

    // Check if the module is ready
    if (!xlsModule) {
      alert('Spire.Xls is not ready yet');
      return;
    }

    // Load the sample file into the virtual file system (VFS)
    let excelFileName = 'Sample.xlsx';
    await window.spire.FetchFileToVFS(excelFileName, '', `${process.env.PUBLIC_URL}data/`);

    // Create a workbook object and load the existing file
    const workbook = new xlsModule.Workbook();
    workbook.LoadFromFile({ fileName: excelFileName });
    let sheet = workbook.Worksheets.get(0);

    // Hide multiple rows at once (rows 6 through 10)
    for (let i = 6; i <= 10; i++) {
      sheet.HideRow(i);
    }

    // Hide multiple columns at once (columns 4 through 5, i.e., columns D to E)
    for (let j = 4; j <= 5; j++) {
      sheet.HideColumn(j);
    }

    // Save the workbook
    const outputFileName = 'HideMultipleRowsColumns.xlsx';
    workbook.SaveToFile(outputFileName);
    workbook.Dispose();

    // Read the file from VFS and trigger download
    const fileArray = window.dotnetRuntime.Module.FS.readFile(outputFileName);
    const blob = new Blob([fileArray], { type: 'application/vnd.openxmlformats-officedocument.spreadsheetml.sheet' });
    const url = URL.createObjectURL(blob);
    const a = document.createElement('a');
    a.href = url;
    a.download = outputFileName;
    a.click();
    URL.revokeObjectURL(url);
  };

  return (
    <div style={{ textAlign: 'center', height: '300px' }}>
      <h1>Hide Multiple Rows and Columns</h1>
      <button onClick={hideMultipleRowsAndColumns}>
        Generate
      </button>
    </div>
  );
}

export default App;
Multiple rows and columns hidden at once with Spire.XLS for JavaScript
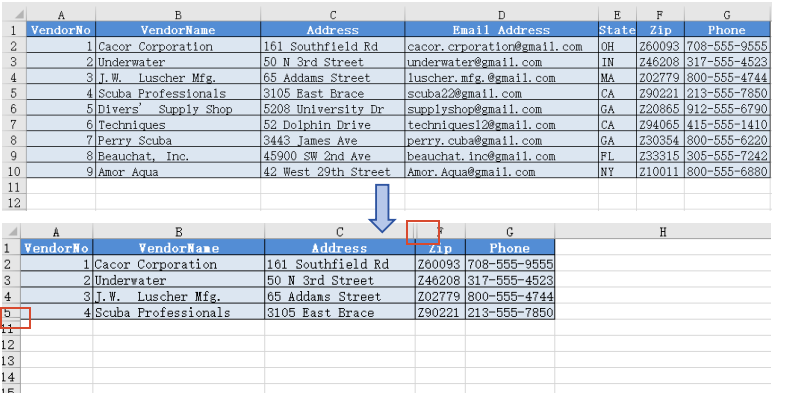
Unhide All Hidden Rows and Columns in Excel
To unhide all hidden rows and columns, iterate through the rows and columns in the worksheet, use GetRowIsHide() and GetColumnIsHide() to find hidden ones, then call ShowRow() and ShowColumn() to unhide them. The steps are as follows:
- Create a
Workbookobject and load the Excel file. - Get the worksheet.
- Iterate through rows, use
GetRowIsHide()to find hidden rows, useShowRow()to unhide. - Iterate through columns, use
GetColumnIsHide()to find hidden columns, useShowColumn()to unhide. - Save the result file using
SaveToFile().
Below is a complete code example demonstrating how to unhide all hidden rows and columns in Excel in React:
function App() {
  const unhideAllRowsAndColumns = async () => {
    // Get the Spire.XLS WASM module
    const xlsModule = window.wasmModule?.spirexls;

    // Check if the module is ready
    if (!xlsModule) {
      alert('Spire.Xls is not ready yet');
      return;
    }

    // Load the sample file into the virtual file system (VFS)
    let excelFileName = 'HideMultipleRowsColumns.xlsx';
    await window.spire.FetchFileToVFS(excelFileName, '', `${process.env.PUBLIC_URL}data/`);

    // Create a workbook object and load the existing file
    const workbook = new xlsModule.Workbook();
    workbook.LoadFromFile({ fileName: excelFileName });

    // Get the first worksheet
    let sheet = workbook.Worksheets.get(0);

    for (let i = 1; i <= sheet.Rows.length; i++) {
      if (sheet.GetRowIsHide(i)) {
        // Unhide row
        sheet.ShowRow(i);
      }
    }

    for (let j = 1; j <= sheet.Columns.length; j++) {
      if (sheet.GetColumnIsHide(j)) {
        // Unhide column
        sheet.ShowColumn(j);
      }
    }

    // Save the workbook
    const outputFileName = 'UnhideAllRowsColumns.xlsx';
    workbook.SaveToFile(outputFileName);
    workbook.Dispose();

    // Read the file from VFS and trigger download
    const fileArray = window.dotnetRuntime.Module.FS.readFile(outputFileName);
    const blob = new Blob([fileArray], { type: 'application/vnd.openxmlformats-officedocument.spreadsheetml.sheet' });
    const url = URL.createObjectURL(blob);
    const a = document.createElement('a');
    a.href = url;
    a.download = outputFileName;
    a.click();
    URL.revokeObjectURL(url);
  };

  return (
    <div style={{ textAlign: 'center', height: '300px' }}>
      <h1>Unhide All Rows and Columns</h1>
      <button onClick={unhideAllRowsAndColumns}>
        Generate
      </button>
    </div>
  );
}

export default App;
All hidden rows and columns unhidden with Spire.XLS for JavaScript
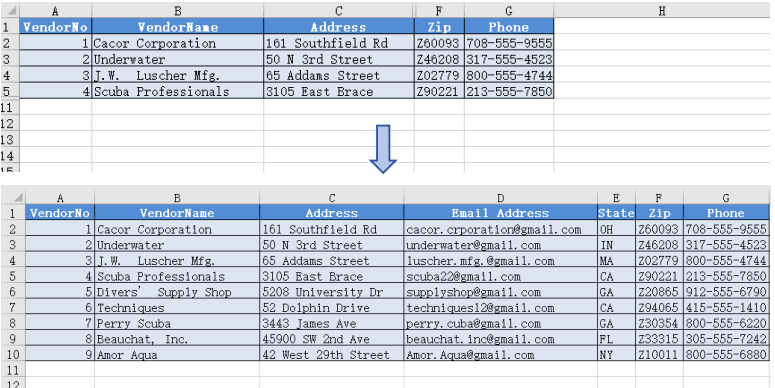
FAQ
How to check whether a row or column is hidden?
Solution: Use the GetRowIsHide() and GetColumnIsHide() methods to check:
// Check if row 3 is hidden
let rowIsHidden = sheet.GetRowIsHide(3);

// Check if column 2 (column B) is hidden
let columnIsHidden = sheet.GetColumnIsHide(2);
Are row heights or column widths preserved after hiding?
Solution: When hiding rows or columns, the original row height and column width values are preserved. After unhiding with ShowRow() or ShowColumn(), the original dimensions are automatically restored without any additional configuration.
Get a Free License
Spire.XLS for JavaScript offers a 30-day full-featured free trial license with no functional limitations. Apply here to evaluate before purchasing.
Copying data within Excel files while preserving formatting is a common requirement in web-based spreadsheet applications. Spire.XLS for JavaScript runs entirely in the browser via WebAssembly, using a virtual file system (VFS) to manage input and output files — no backend server required. It provides comprehensive APIs to copy rows, columns, and cell ranges while keeping the original styles, fonts, colors, and other formatting intact.
This article covers three core features:
For installation and project setup, refer to Integrating Spire.XLS for JavaScript in a React Project. The examples below assume Spire.XLS is installed and the WebAssembly module is initialized.
Copy Rows in Excel
With Spire.XLS for JavaScript, you can copy rows within the same worksheet or across different worksheets while preserving all formatting, formulas, and styles. This is useful when you need to duplicate structured data such as headers, summary rows, or formatted templates. Through the CopyRangeOptions parameter, you can flexibly configure copy options such as copying all formats, conditional formatting, data validation, or only formula result values. The steps are as follows:
- Create a
Workbookobject and load an existing Excel file. - Get the source and destination worksheets via
workbook.Worksheets.get(). - Get the row to copy via
sheet.Rows[index]. - Use
sheet.Copy()with the source row, destination worksheet, destination row index, andCopyRangeOptions.Allto copy the row and its formatting. - Copy the column widths from the source row cells to the corresponding destination row cells.
- Save the workbook to an Excel file using
SaveToFile().
Below is a complete code example demonstrating how to copy rows in React:
function App() {
  const copyRows = async () => {
    // Get the Spire.XLS WASM module
    const xlsModule = window.wasmModule?.spirexls;

    // Check if the module is ready
    if (!xlsModule) {
      alert('Spire.Xls is not ready yet');
      return;
    }

    // Fetch the Excel file and add it to the Virtual File System (VFS)
    let excelFileName = 'Copying.xls';
    await window.spire.FetchFileToVFS(excelFileName, '', `${process.env.PUBLIC_URL}data/`);

    // Create a new workbook and load an existing file
    const workbook = new xlsModule.Workbook();
    workbook.LoadFromFile({ fileName: excelFileName });

    // Get the source and destination worksheets
    let sheet1 = workbook.Worksheets.get(0);
    let sheet2 = workbook.Worksheets.get(1);

    // Get the row to copy
    let row = sheet1.Rows[0];

    // Copy the row to the destination worksheet with all formatting
    sheet1.Copy({ sourceRange: row, destRange: sheet2.Rows[0], copyOptions: xlsModule.CopyRangeOptions.All });

    // Copy the column widths from source row to destination row
    let columns = sheet1.Columns.length;
    for (let i = 0; i < columns; i++) {
      let columnWidth = row.Columns[i].ColumnWidth;
      sheet2.Rows[0].Columns[i].ColumnWidth = columnWidth;
    }

    // Save the workbook
    const outputFileName = 'CopyRows_out.xlsx';
    workbook.SaveToFile({ fileName: outputFileName, version: xlsModule.ExcelVersion.Version2010 });
    workbook.Dispose();

    // Read the file from VFS and trigger download
    const fileArray = window.dotnetRuntime.Module.FS.readFile(outputFileName);
    const blob = new Blob([fileArray], { type: 'application/vnd.openxmlformats-officedocument.spreadsheetml.sheet' });
    const url = URL.createObjectURL(blob);
    const a = document.createElement('a');
    a.href = url;
    a.download = outputFileName;
    a.click();
    URL.revokeObjectURL(url);
  };

  return (
    <div style={{ textAlign: 'center', height: '300px' }}>
      <h1>Copy Excel Rows</h1>
      <button onClick={copyRows}>
        Generate
      </button>
    </div>
  );
}

export default App;
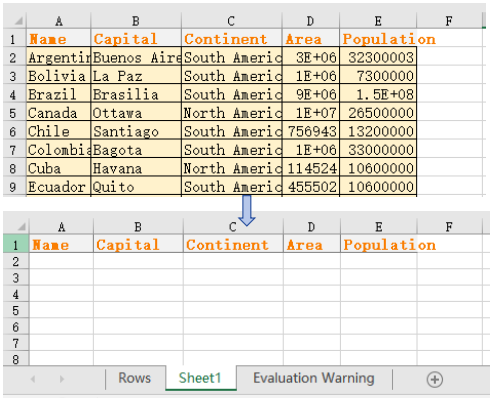
Row copy result
Copy Columns in Excel
Copying columns is equally straightforward with Spire.XLS for JavaScript. You can duplicate a column within the same worksheet or copy it to another sheet, and all cell styles, number formats, and data will be preserved. Through the CopyRangeOptions parameter, you can flexibly configure which elements to copy. This is particularly helpful for reorganizing spreadsheet layouts or replicating data structures. The steps are as follows:
- Create a
Workbookobject and load an existing Excel file. - Get the source and destination worksheets.
- Get the column to copy via
sheet.Columns[index]. - Use
sheet.Copy()with the source column, destination worksheet, destination column index, andCopyRangeOptions.Allto copy the column and its formatting. - Copy the column widths and row heights from the source column cells to the corresponding destination column cells.
- Save the workbook to an Excel file using
SaveToFile().
Below is a complete code example demonstrating how to copy columns in React:
function App() {
  const copyColumns = async () => {
    // Get the Spire.XLS WASM module
    const xlsModule = window.wasmModule?.spirexls;

    // Check if the module is ready
    if (!xlsModule) {
      alert('Spire.Xls is not ready yet');
      return;
    }

    // Fetch the Excel file and add it to the Virtual File System (VFS)
    let excelFileName = 'Copying.xls';
    await window.spire.FetchFileToVFS(excelFileName, '', `${process.env.PUBLIC_URL}data/`);

    // Create a new workbook and load an existing file
    const workbook = new xlsModule.Workbook();
    workbook.LoadFromFile({ fileName: excelFileName });

    // Get the source and destination worksheets
    let sheet1 = workbook.Worksheets.get(0);
    let sheet2 = workbook.Worksheets.get(1);

    // Get the column to copy
    let column = sheet1.Columns[0];

    // Copy the column to the destination worksheet with all formatting
    sheet1.Copy({ sourceRange: column, destRange: sheet2.Columns[0], copyOptions: xlsModule.CopyRangeOptions.All });

    // Copy the column width and row heights from source column to destination column
    sheet2.Columns[0].ColumnWidth = column.ColumnWidth;
    let rows = column.Rows.length;
    for (let i = 0; i < rows; i++) {
      let rowHeight = column.Rows[i].RowHeight;
      sheet2.Columns[0].Rows[i].RowHeight = rowHeight;
    }

    // Save the workbook
    const outputFileName = 'CopyColumns_out.xlsx';
    workbook.SaveToFile({ fileName: outputFileName, version: xlsModule.ExcelVersion.Version2010 });
    workbook.Dispose();

    // Read the file from VFS and trigger download
    const fileArray = window.dotnetRuntime.Module.FS.readFile(outputFileName);
    const blob = new Blob([fileArray], { type: 'application/vnd.openxmlformats-officedocument.spreadsheetml.sheet' });
    const url = URL.createObjectURL(blob);
    const a = document.createElement('a');
    a.href = url;
    a.download = outputFileName;
    a.click();
    URL.revokeObjectURL(url);
  };

  return (
    <div style={{ textAlign: 'center', height: '300px' }}>
      <h1>Copy Excel Columns</h1>
      <button onClick={copyColumns}>
        Generate
      </button>
    </div>
  );
}

export default App;
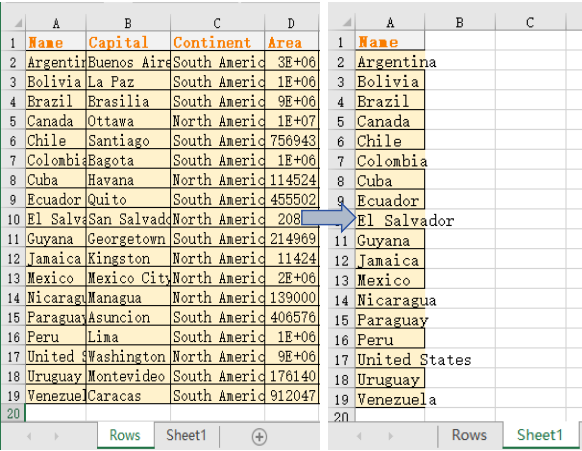
Column copy result
Copy Cells in Excel
Beyond copying entire rows and columns, Spire.XLS for JavaScript also allows you to copy specific cell ranges from one location to another while preserving all formatting. The CellRange.Copy() method provides this capability with flexible options. This gives you fine-grained control over which cells to duplicate. You can copy a range of cells within the same worksheet or to a different worksheet. The steps are as follows:
- Create a
Workbookobject and load an existing Excel file. - Get the source and destination worksheets.
- Get the source cell range and destination cell range via
sheet.Range.get(). - Use
sourceRange.Copy()with the destination range andCopyRangeOptions.Allto copy the cell range with all formatting. - Copy the column widths and row heights from the source range to the destination range.
- Save the workbook to an Excel file using
SaveToFile().
Below is a complete code example demonstrating how to copy cells in React:
function App() {
  const copyCells = async () => {
    // Get the Spire.XLS WASM module
    const xlsModule = window.wasmModule?.spirexls;

    // Check if the module is ready
    if (!xlsModule) {
      alert('Spire.Xls is not ready yet');
      return;
    }

    // Fetch the Excel file and add it to the Virtual File System (VFS)
    let excelFileName = 'Copying.xls';
    await window.spire.FetchFileToVFS(excelFileName, '', `${process.env.PUBLIC_URL}data/`);

    // Create a new workbook and load an existing file
    const workbook = new xlsModule.Workbook();
    workbook.LoadFromFile({ fileName: excelFileName });

    // Get the source and destination worksheets
    let sheet1 = workbook.Worksheets.get(0);
    let sheet2 = workbook.Worksheets.get(1);

    // Get the source cell range and destination cell range
    let range1 = sheet1.Range.get("A1:E7");
    let range2 = sheet2.Range.get("A1:E7");

    // Copy the source range to the destination range with all formatting
    range1.Copy({ destRange: range2, copyOptions: xlsModule.CopyRangeOptions.All });

    // Copy the row heights and column widths from source to destination
    for (let i = 0; i < range1.Rows.length; i++) {
      let row = range1.Rows[i];
      for (let j = 0; j < row.Columns.length; j++) {
        let column = row.Columns[j];
        range2.Rows[i].Columns[j].ColumnWidth = column.ColumnWidth;
        range2.Rows[i].RowHeight = row.RowHeight;
      }
    }

    // Save the workbook
    const outputFileName = 'CopyCells.xlsx';
    workbook.SaveToFile({ fileName: outputFileName, version: xlsModule.ExcelVersion.Version2010 });
    workbook.Dispose();

    // Read the file from VFS and trigger download
    const fileArray = window.dotnetRuntime.Module.FS.readFile(outputFileName);
    const blob = new Blob([fileArray], { type: 'application/vnd.openxmlformats-officedocument.spreadsheetml.sheet' });
    const url = URL.createObjectURL(blob);
    const a = document.createElement('a');
    a.href = url;
    a.download = outputFileName;
    a.click();
    URL.revokeObjectURL(url);
  };

  return (
    <div style={{ textAlign: 'center', height: '300px' }}>
      <h1>Copy Excel Cells</h1>
      <button onClick={copyCells}>
        Generate
      </button>
    </div>
  );
}

export default App;
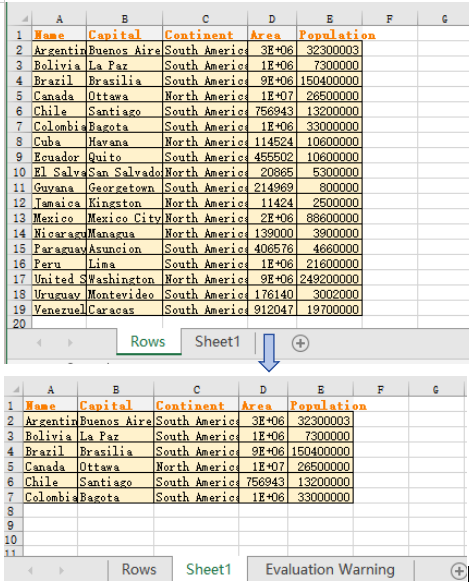
Cell copy result
FAQ
What happens if the target location already contains data
Cause: By default, the Copy() method overwrites existing data at the target location without merging or preserving the original content.
Solution: Choose an empty area as the destination range, or check whether the target range is empty before performing the copy. You can also back up the target data first, then execute the copy operation.
Can I copy only values without formulas
Cause: CopyRangeOptions.All copies formulas themselves, but sometimes you only need the calculated result values without preserving the formula logic.
Solution: Use the CopyRangeOptions.OnlyCopyFormulaValue option to copy only the calculated result values, not the formulas themselves:
sourceRange.Copy({ destRange: destRange, copyOptions: xlsModule.CopyRangeOptions.OnlyCopyFormulaValue });
Get a Free License
Spire.XLS for JavaScript offers a 30-day full-featured free trial license with no functional limitations. Apply here to evaluate before purchasing.
Insert Rows and Columns in Excel with JavaScript in React
2025-04-07 00:56:21 Written by AdministratorWhen dealing with Excel worksheets, there are times when the existing layout needs to be adjusted. Inserting rows and columns serves as an effective solution for such scenarios. It allows users to seamlessly expand their data, add new information, or re-structure the spreadsheet in a way that optimizes both data entry and analysis. This action not only makes room for more content, but also enhances the overall organization and readability of the data. In this article, you will learn how to insert rows and columns in Excel in React using Spire.XLS for JavaScript.
- Insert a Row and a Column in Excel in JavaScript
- Insert Multiple Rows and Columns in Excel in JavaScript
Install Spire.XLS for JavaScript
To get started with inserting or deleting picture in Excel in a React application, you can either download Spire.XLS for JavaScript from our website or install it via npm with the following command:
npm i spire.office
The downloaded product package has been integrated Spire.Doc for JavaScript,Spire.XLS for JavaScript,Spire.PDF for JavaScript,Spire.Presentation for JavaScript. To use the functionality of Spire.XLS for JavaScript, you need to copy the corresponding files (spire.xls.js, Spire.Xls.Wasm.zip, spire.common.js, Spire.Common.Wasm.zip, and _framework) to the project's "public" folder. At the same time, in order to ensure text rendering, the related font files can be added with custom paths. In the following example, the font addition path is: public\static\font.
For more details, refer to the documentation: How to Integrate Spire.XLS for JavaScript in a React Project
Insert a Row and a Column in Excel in JavaScript
Using Spire.XLS for JavaScript, a blank row or a blank column can be inserted into an Excel worksheet via the Worksheet.InsertRow(rowIndex) or Worksheet.InsertColumn(columnIndex) method. The following are the main steps.
- Create a Workbook object using the new wasmModule.Workbook() method.
- Get a specific worksheet using the Workbook.Worksheets.get() method.
- Insert a row into the worksheet using the Worksheet.InsertRow(rowIndex) method.
- Insert a column into the worksheet using the Worksheet.InsertColumn(columnIndex) method.
- Save the result file using the Workbook.SaveToFile() method.
- JavaScript
import React, { useState, useEffect } from 'react';
function App() {
  const [wasmModule, setWasmModule] = useState(null);
  // Load Spire.XLS
  useEffect(() => {
    (async () => {
      try {
        const publicUrl = process.env.PUBLIC_URL || '';
        const spireModule = await import(/* webpackIgnore: true */ `${publicUrl}/spire.xls.js`);
        const rawModule = spireModule.default || spireModule;
        window.wasmModule = typeof rawModule === 'function'
          ? await rawModule({ locateFile: p => p.endsWith('.wasm') ? `${publicUrl}/${p}` : p })
          : rawModule;
        setWasmModule(window.wasmModule);
      } catch (error) {
        console.error('Failed to load spire.xls.js WASM module:', error);
      }
    })();
  }, []);

  //  Function to insert a row and a column
  const InsertRowColumn = async () => {
    const wasmModule = window.wasmModule.spirexls;

    if (wasmModule) {
      // Load font into Virtual File System (VFS)
      await window.spire.FetchFileToVFS('Arial.ttf', '/Library/Fonts/', `${process.env.PUBLIC_URL}/static/font/`);


      // Load the Excel files into the virtual file system (VFS)
      let inputFileName = 'merged.xlsx';
      await window.spire.FetchFileToVFS(inputFileName, '', `${process.env.PUBLIC_URL}/static/data/`);


      // Create a new workbook
      let workbook = new wasmModule.Workbook();


      // Load an Excel document
      workbook.LoadFromFile({ fileName: inputFileName });

      // Get the first worksheet
      let worksheet = workbook.Worksheets.get(0);

      // Insert a blank row as the 5th row in the worksheet
      worksheet.InsertRow(5);

      // Insert a blank column as the 4th column in the worksheet
      worksheet.InsertColumn(4);

      //Save result file
      const outputFileName = 'InsertRowAndColumn.xlsx';
      workbook.SaveToFile({ fileName: outputFileName, version: wasmModule.ExcelVersion.Version2016 });

      // Read the saved file and convert to Blob object
      const modifiedFileArray = window.dotnetRuntime.Module.FS.readFile(outputFileName);
      const modifiedFile = new Blob([modifiedFileArray], { type: 'application/vnd.openxmlformats-officedocument.spreadsheetml.sheet' });

      // Create a URL for the Blob and initiate download
      const url = URL.createObjectURL(modifiedFile);
      const a = document.createElement('a');
      a.href = url;
      a.download = outputFileName;
      document.body.appendChild(a);
      a.click();
      document.body.removeChild(a);
      URL.revokeObjectURL(url);

      // Clean up resources used by the workbook
      workbook.Dispose();
    }
  };

  return (
    <div style={{ textAlign: 'center', height: '300px' }}>
      <h1>Insert Row and Column in Excel Using JavaScript in React </h1>
      <button onClick={InsertRowColumn} disabled={!wasmModule}>
        Process
      </button>
    </div>
  );
}

export default App;
Run the code to launch the React app at localhost:3000. Once it's running, click the "Process" button to insert rows and columns in Excel:
Below is the result file:
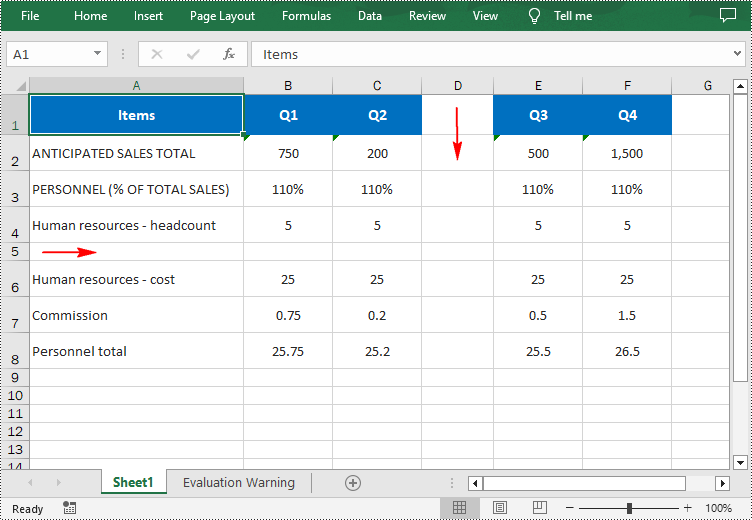
Insert Multiple Rows and Columns in Excel in JavaScript
To insert multiple rows or columns, use the Worksheet.InsertRow(rowIndex: number, rowCount: number) or Worksheet.InsertColumn(columnIndex: number, columnCount: number) methods. The first parameter represents the index at which the new row/column will be inserted, and the second argument represents the number of rows/columns to be inserted. The following are the main steps.
- Create a Workbook object using the new wasmModule.Workbook() method.
- Load an Excel file using the Workbook.LoadFromFile() method.
- Get a specific worksheet using the Workbook.Worksheets.get() method.
- Insert multiple rows into the worksheet using the Worksheet.InsertRow(rowIndex: number, rowCount: number) method.
- Insert multiple columns into the worksheet using Worksheet.InsertColumn(columnIndex: number, columnCount: number) method.
- Save the result file using the Workbook.SaveToFile() method.
- JavaScript
import React, { useState, useEffect } from 'react';
function App() {
  const [wasmModule, setWasmModule] = useState(null);
  // Load Spire.XLS
  useEffect(() => {
    (async () => {
      try {
        const publicUrl = process.env.PUBLIC_URL || '';
        const spireModule = await import(/* webpackIgnore: true */ `${publicUrl}/spire.xls.js`);
        const rawModule = spireModule.default || spireModule;
        window.wasmModule = typeof rawModule === 'function'
          ? await rawModule({ locateFile: p => p.endsWith('.wasm') ? `${publicUrl}/${p}` : p })
          : rawModule;
        setWasmModule(window.wasmModule);
      } catch (error) {
        console.error('Failed to load spire.xls.js WASM module:', error);
      }
    })();
  }, []);

  // Function to insert multiple rows and columns
  const InsertRowsColumns = async () => {
    const wasmModule = window.wasmModule.spirexls;

    if (wasmModule) {
      // Load font into Virtual File System (VFS)
      await window.spire.FetchFileToVFS('Arial.ttf', '/Library/Fonts/', `${process.env.PUBLIC_URL}/static/font/`);


      // Load the Excel files into the virtual file system (VFS)
      let inputFileName = 'merged.xlsx';
      await window.spire.FetchFileToVFS(inputFileName, '', `${process.env.PUBLIC_URL}/static/data/`);


      // Create a new workbook
      let workbook = new wasmModule.Workbook();


      // Load an Excel document
      workbook.LoadFromFile({ fileName: inputFileName });

      // Get the first worksheet
      let worksheet = workbook.Worksheets.get(0);

      // Insert three blank rows into the worksheet
      worksheet.InsertRow({ rowIndex: 5, rowCount: 3 });

      // Insert two blank columns into the worksheet
      worksheet.InsertColumn({ columnIndex: 4, columnCount: 2 });

      //Save result file
      const outputFileName = 'InsertRowsAndColumns.xlsx';
      workbook.SaveToFile({ fileName: outputFileName, version: wasmModule.ExcelVersion.Version2016 });

      // Read the saved file and convert to Blob object
      const modifiedFileArray = window.dotnetRuntime.Module.FS.readFile(outputFileName);
      const modifiedFile = new Blob([modifiedFileArray], { type: 'application/vnd.openxmlformats-officedocument.spreadsheetml.sheet' });

      // Create a URL for the Blob and initiate download
      const url = URL.createObjectURL(modifiedFile);
      const a = document.createElement('a');
      a.href = url;
      a.download = outputFileName;
      document.body.appendChild(a);
      a.click();
      document.body.removeChild(a);
      URL.revokeObjectURL(url);

      // Clean up resources used by the workbook
      workbook.Dispose();
    }
  };

  return (
  <div style={{ textAlign: 'center', height: '300px' }}>
    <h1>Insert Rows and Columns in Excel Using JavaScript in React</h1>
    <button onClick={InsertRowsColumns} disabled={!wasmModule}>
      Process
    </button>
      </div>
  );
}

export default App;
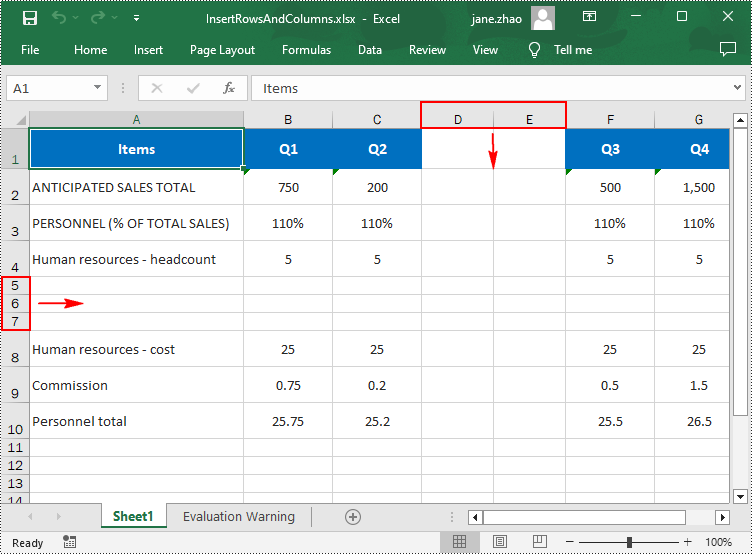
Get a Free License
To fully experience the capabilities of Spire.XLS for JavaScript without any evaluation limitations, you can request a free 30-day trial license.
Set Row Height and Column Width in Excel with JavaScript in React
2025-02-17 01:01:16 Written by AdministratorWhen working with Excel files, setting the proper row height and column width is crucial for data presentation and readability. For example, if there are long text entries in a column, increasing the column width ensures that the entire text is clearly visible without truncation. Similarly, for rows that contain large fonts or multiple lines of text, adjusting the row height is necessary. In this article, you will learn how to set row height and column width in Excel in React using Spire.XLS for JavaScript.
Install Spire.XLS for JavaScript
To get started with setting row height or column width in a React application, you can either download Spire.XLS for JavaScript from our website or install it via npm with the following command:
npm i spire.office
The downloaded product package has been integrated Spire.Doc for JavaScript,Spire.XLS for JavaScript,Spire.PDF for JavaScript,Spire.Presentation for JavaScript. To use the functionality of Spire.XLS for JavaScript, you need to copy the corresponding files (spire.xls.js, Spire.Xls.Wasm.zip, spire.common.js, Spire.Common.Wasm.zip, and _framework) to the project's "public" folder. At the same time, in order to ensure text rendering, the related font files can be added with custom paths. In the following example, the font addition path is: public\static\font.
For more details, refer to the documentation: How to Integrate Spire.XLS for JavaScript in a React Project
Set Row Height in Excel with JavaScript
Spire.XLS for JavaScript provides the Worksheet.SetRowHeight() method to set the height of a specified row in an Excel worksheet. The following are the main steps.
- Create a Workbook object using the new wasmModule.Workbook() method.
- Load an Excel file using the Workbook.LoadFromFile() method.
- Get a specific worksheet using the Workbook.Worksheets.get() method.
- Set the height of a specified row using the Worksheet. SetRowHeight() method.
- Save the result file using the Workbook.SaveToFile() method.
- JavaScript
import React, { useState, useEffect } from 'react';
function App() {
  const [wasmModule, setWasmModule] = useState(null);
  // Load Spire.XLS
  useEffect(() => {
    (async () => {
      try {
        const publicUrl = process.env.PUBLIC_URL || '';
        const spireModule = await import(/* webpackIgnore: true */ `${publicUrl}/spire.xls.js`);
        const rawModule = spireModule.default || spireModule;
        window.wasmModule = typeof rawModule === 'function'
          ? await rawModule({ locateFile: p => p.endsWith('.wasm') ? `${publicUrl}/${p}` : p })
          : rawModule;
        setWasmModule(window.wasmModule);
      } catch (error) {
        console.error('Failed to load spire.xls.js WASM module:', error);
      }
    })();
  }, []);

  // Function to delete a specified row and column
  const SetRowHeight  = async () => {
    const wasmModule = window.wasmModule.spirexls;

    if (wasmModule) {
      // Load font into Virtual File System (VFS)
      await window.spire.FetchFileToVFS('Arial.ttf', '/Library/Fonts/', `${process.env.PUBLIC_URL}/static/font/`);


      // Load the Excel files into the virtual file system (VFS)
      let inputFileName = 'merged.xlsx';
      await window.spire.FetchFileToVFS(inputFileName, '', `${process.env.PUBLIC_URL}/static/data/`);


      // Create a new workbook
      let workbook = new wasmModule.Workbook();


      // Load an Excel document
      workbook.LoadFromFile({ fileName: inputFileName });

      // Get the first worksheet
      let sheet = workbook.Worksheets.get(0);

      // Set the height of the first row to 30
      sheet.SetRowHeight(1, 30)

      //Save result file
      const outputFileName = 'SetRowHeight.xlsx';
      workbook.SaveToFile({fileName: outputFileName, version:wasmModule.ExcelVersion.Version2016});

      // Read the saved file and convert to Blob object
      const modifiedFileArray = window.dotnetRuntime.Module.FS.readFile(outputFileName);
      const modifiedFile = new Blob([modifiedFileArray], { type: 'application/vnd.openxmlformats-officedocument.spreadsheetml.sheet' });

      // Create a URL for the Blob and initiate download
      const url = URL.createObjectURL(modifiedFile);
      const a = document.createElement('a');
      a.href = url;
      a.download = outputFileName;
      document.body.appendChild(a);
      a.click();
      document.body.removeChild(a);
      URL.revokeObjectURL(url);

      // Clean up resources used by the workbook
      workbook.Dispose();
    }
  };

  return (
    <div style={{ textAlign: 'center', height: '300px' }}>
      <h1>Set Row Height in Excel Using JavaScript in React</h1>
      <button onClick={SetRowHeight} disabled={!wasmModule}>
        Process
      </button>
    </div>
  );
}

export default App;
Run the code to launch the React app at localhost:3000. Once it's running, click the "Process" button to set the row height in Excel:
Below is the result file:
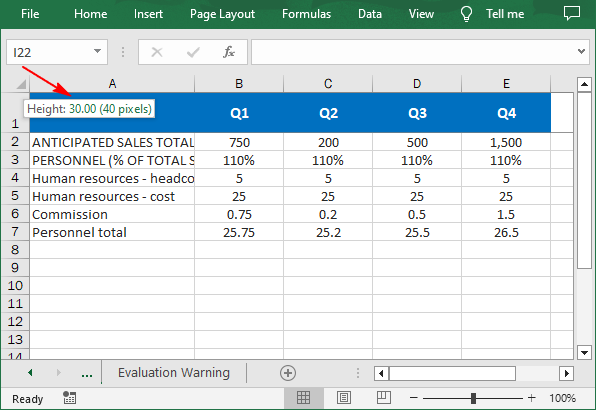
Set Column Width in Excel with JavaScript
Worksheet.SetColumnWidth() method can be used to set the width of a specified column. The default unit of measure is points, and if you want to set column width in pixels, you can use the Worksheet.SetColumnWidthInPixels() method. The following are the main steps.
- Create a Workbook object using the new wasmModule.Workbook() method.
- Load an Excel file using the Workbook.LoadFromFile() method.
- Get a specific worksheet using the Workbook.Worksheets.get() method.
- Set the width of a specified column in points using the Worksheet.SetColumnWidth() method.
- Set the width of a specified column in pixels using the Worksheet.SetColumnWidthInPixels() method.
- Save the result file using the Workbook.SaveToFile() method.
- JavaScript
import React, { useState, useEffect } from 'react';
function App() {
  const [wasmModule, setWasmModule] = useState(null);
  // Load Spire.XLS
  useEffect(() => {
    (async () => {
      try {
        const publicUrl = process.env.PUBLIC_URL || '';
        const spireModule = await import(/* webpackIgnore: true */ `${publicUrl}/spire.xls.js`);
        const rawModule = spireModule.default || spireModule;
        window.wasmModule = typeof rawModule === 'function'
          ? await rawModule({ locateFile: p => p.endsWith('.wasm') ? `${publicUrl}/${p}` : p })
          : rawModule;
        setWasmModule(window.wasmModule);
      } catch (error) {
        console.error('Failed to load spire.xls.js WASM module:', error);
      }
    })();
  }, []);

  //  Function to delete a specified row and column
  const SetColumnWidth = async () => {
    const wasmModule = window.wasmModule.spirexls;

    if (wasmModule) {
      // Load font into Virtual File System (VFS)
      await window.spire.FetchFileToVFS('Arial.ttf', '/Library/Fonts/', `${process.env.PUBLIC_URL}/static/font/`);


      // Load the Excel files into the virtual file system (VFS)
      let inputFileName = 'merged.xlsx';
      await window.spire.FetchFileToVFS(inputFileName, '', `${process.env.PUBLIC_URL}/static/data/`);


      // Create a new workbook
      let workbook = new wasmModule.Workbook();


      // Load an Excel document
      workbook.LoadFromFile({ fileName: inputFileName });

      // Get the first worksheet
      let sheet = workbook.Worksheets.get(0);

      // Set the width of the first colum to 30 points
      sheet.SetColumnWidth(1, 30);

      // Set the width of the third column to 200 pixels
      sheet.SetColumnWidthInPixels(3, 200);

      //Save result file
      const outputFileName = 'SetColumnWidth.xlsx';
      workbook.SaveToFile({ fileName: outputFileName, version: wasmModule.ExcelVersion.Version2016 });

      // Read the saved file and convert to Blob object
      const modifiedFileArray = window.dotnetRuntime.Module.FS.readFile(outputFileName);
      const modifiedFile = new Blob([modifiedFileArray], { type: 'application/vnd.openxmlformats-officedocument.spreadsheetml.sheet' });

      // Create a URL for the Blob and initiate download
      const url = URL.createObjectURL(modifiedFile);
      const a = document.createElement('a');
      a.href = url;
      a.download = outputFileName;
      document.body.appendChild(a);
      a.click();
      document.body.removeChild(a);
      URL.revokeObjectURL(url);

      // Clean up resources used by the workbook
      workbook.Dispose();
    }
  };

  return (
    <div style={{ textAlign: 'center', height: '300px' }}>
      <h1>Set Column Width in Excel Using JavaScript in React</h1>
      <button onClick={SetColumnWidth} disabled={!wasmModule}>
        Process
      </button>
    </div>
  );
}

export default App;
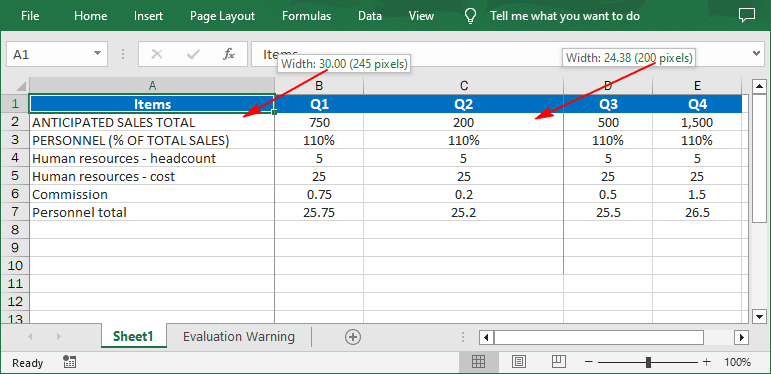
Get a Free License
To fully experience the capabilities of Spire.XLS for JavaScript without any evaluation limitations, you can request a free 30-day trial license.
Merge or Unmerge Cells in Excel with JavaScript in React
2025-02-13 08:57:13 Written by AdministratorMerging and unmerging cells in Excel is a useful feature that enhances the organization and presentation of data in worksheets. By combining multiple cells into a single cell or separating a merged cell back into its original state, you can better format your data for readability and aesthetic appeal. In this article, we will demonstrate how to merge and unmerge cells in Excel in React using Spire.XLS for JavaScript.
Install Spire.XLS for JavaScript
To get started with merging and unmerging cells in Excel in a React application, you can either download Spire.XLS for JavaScript from our website or install it via npm with the following command:
npm i spire.office
The downloaded product package has been integrated Spire.Doc for JavaScript,Spire.XLS for JavaScript,Spire.PDF for JavaScript,Spire.Presentation for JavaScript. To use the functionality of Spire.XLS for JavaScript, you need to copy the corresponding files (spire.xls.js, Spire.Xls.Wasm.zip, spire.common.js, Spire.Common.Wasm.zip, and _framework) to the project's "public" folder. At the same time, in order to ensure text rendering, the related font files can be added with custom paths. In the following example, the font addition path is: public\static\font.
For more details, refer to the documentation: How to Integrate Spire.XLS for JavaScript in a React Project
Merge Specific Cells in Excel
Merging cells allows users to create a header that spans multiple columns or rows, making the data more visually structured and easier to read. With Spire.XLS for JavaScript, developers are able to merge specific adjacent cells into a single cell by using the CellRange.Merge() method. The detailed steps are as follows.
- Create a Workbook object using the new wasmModule.Workbook() method.
- Load the Excel file using the Workbook.LoadFromFile() method.
- Get a specific worksheet using the Workbook.Worksheets.get(index) method.
- Get the range of cells that need to be merged using the Worksheet.Range.get() method.
- Merge the cells into one using the CellRange.Merge() method.
- Save the resulting workbook using the Workbook.SaveToFile() method.
- JavaScript
import React, { useState, useEffect } from 'react';
function App() {
  const [wasmModule, setWasmModule] = useState(null);
  // Load Spire.XLS
  useEffect(() => {
    (async () => {
      try {
        const publicUrl = process.env.PUBLIC_URL || '';
        const spireModule = await import(/* webpackIgnore: true */ `${publicUrl}/spire.xls.js`);
        const rawModule = spireModule.default || spireModule;
        window.wasmModule = typeof rawModule === 'function'
          ? await rawModule({ locateFile: p => p.endsWith('.wasm') ? `${publicUrl}/${p}` : p })
          : rawModule;
        setWasmModule(window.wasmModule);
      } catch (error) {
        console.error('Failed to load spire.xls.js WASM module:', error);
      }
    })();
  }, []);

  // Function to merge cells in an Excel worksheet
  const MergeCells = async () => {
    const wasmModule = window.wasmModule.spirexls;

    if (wasmModule) {
      // Load font into Virtual File System (VFS)
      await window.spire.FetchFileToVFS('Arial.ttf', '/Library/Fonts/', `${process.env.PUBLIC_URL}/static/font/`);


      // Load the Excel files into the virtual file system (VFS)
      let inputFileName = 'sample.xlsx';
      await window.spire.FetchFileToVFS(inputFileName, '', `${process.env.PUBLIC_URL}/static/data/`);


      // Create a new workbook
      let workbook = new wasmModule.Workbook();


      // Load an Excel document
      workbook.LoadFromFile({ fileName: inputFileName });

      // Get the first worksheet
      let sheet = workbook.Worksheets.get(0);

      // Merge the particular cells in the worksheet
      sheet.Range.get("A1:D1").Merge();

      // Define the output file name
      const outputFileName = "MergeCells_output.xlsx";

      // Save the workbook to the specified path
      workbook.SaveToFile({ fileName: outputFileName, version: wasmModule.ExcelVersion.Version2013 });

      // Read the saved file and convert to Blob object
      const modifiedFileArray = window.dotnetRuntime.Module.FS.readFile(outputFileName);
      const modifiedFile = new Blob([modifiedFileArray], { type: 'application/vnd.openxmlformats-officedocument.spreadsheetml.sheet' });

      // Create a URL for the Blob and initiate download
      const url = URL.createObjectURL(modifiedFile);
      const a = document.createElement('a');
      a.href = url;
      a.download = outputFileName;
      document.body.appendChild(a);
      a.click();
      document.body.removeChild(a);
      URL.revokeObjectURL(url);

      // Clean up resources used by the workbook
      workbook.Dispose();
    }
  };

  return (
    <div style={{ textAlign: 'center', height: '300px' }}>
      <h1>Merge Cells in an Excel Worksheet into One Using JavaScript in React</h1>
      <button onClick={MergeCells} disabled={!wasmModule}>
        Merge
      </button>
    </div>
  );
}

export default App;
Run the code to launch the React app at localhost:3000. Once it's running, click on the "Merge" button to merge specific cells in an Excel worksheet into one:
The output Excel worksheet appears as follows:

Unmerge Specific Cells in Excel
Unmerging cells allows users to restore previously merged cells to their original individual state, enabling better data manipulation and formatting flexibility. With Spire.XLS for JavaScript, developers can unmerge specific merged cells using the CellRange.UnMerge() method. The detailed steps are as follows.
- Create a Workbook object using the new wasmModule.Workbook() method.
- Load the Excel file using the Workbook.LoadFromFile() method.
- Get a specific worksheet using the Workbook.Worksheets.get(index) method.
- Get the cell that needs to be unmerged using the Worksheet.Range.get() method.
- Unmerge the cell using the CellRange.UnMerge() method.
- Save the resulting workbook using the Workbook.SaveToFile() method.
- JavaScript
import React, { useState, useEffect } from 'react';
function App() {
  const [wasmModule, setWasmModule] = useState(null);
  // Load Spire.XLS
  useEffect(() => {
    (async () => {
      try {
        const publicUrl = process.env.PUBLIC_URL || '';
        const spireModule = await import(/* webpackIgnore: true */ `${publicUrl}/spire.xls.js`);
        const rawModule = spireModule.default || spireModule;
        window.wasmModule = typeof rawModule === 'function'
          ? await rawModule({ locateFile: p => p.endsWith('.wasm') ? `${publicUrl}/${p}` : p })
          : rawModule;
        setWasmModule(window.wasmModule);
      } catch (error) {
        console.error('Failed to load spire.xls.js WASM module:', error);
      }
    })();
  }, []);

  // Function to unmerge cells in an Excel worksheet
  const UnmergeCells = async () => {
    const wasmModule = window.wasmModule.spirexls;

    if (wasmModule) {
      // Load font into Virtual File System (VFS)
      await window.spire.FetchFileToVFS('Arial.ttf', '/Library/Fonts/', `${process.env.PUBLIC_URL}/static/font/`);


      // Load the Excel files into the virtual file system (VFS)
      let inputFileName = 'merged.xlsx';
      await window.spire.FetchFileToVFS(inputFileName, '', `${process.env.PUBLIC_URL}/static/data/`);


      // Create a new workbook
      let workbook = new wasmModule.Workbook();


      // Load an Excel document
      workbook.LoadFromFile({ fileName: inputFileName });

      // Get the first worksheet
      let sheet = workbook.Worksheets.get(0);

      // Unmerge the particular cell in the worksheet
      sheet.Range.get("A1").UnMerge();

      // Define the output file name
      const outputFileName = "UnmergeCells.xlsx";

      // Save the workbook to the specified path
      workbook.SaveToFile({ fileName: outputFileName, version: wasmModule.ExcelVersion.Version2010 });

      // Read the saved file and convert to Blob object
      const modifiedFileArray = window.dotnetRuntime.Module.FS.readFile(outputFileName);
      const modifiedFile = new Blob([modifiedFileArray], { type: 'application/vnd.openxmlformats-officedocument.spreadsheetml.sheet' });

      // Create a URL for the Blob and initiate download
      const url = URL.createObjectURL(modifiedFile);
      const a = document.createElement('a');
      a.href = url;
      a.download = outputFileName;
      document.body.appendChild(a);
      a.click();
      document.body.removeChild(a);
      URL.revokeObjectURL(url);

      // Clean up resources used by the workbook
      workbook.Dispose();
    }
  };

  return (
    <div style={{ textAlign: 'center', height: '300px' }}>
      <h1>Unmerge Cells in an Excel Worksheet Using JavaScript in React</h1>
      <button onClick={UnmergeCells} disabled={!wasmModule}>
        Unmerge
      </button>
    </div>
  );
}

export default App;
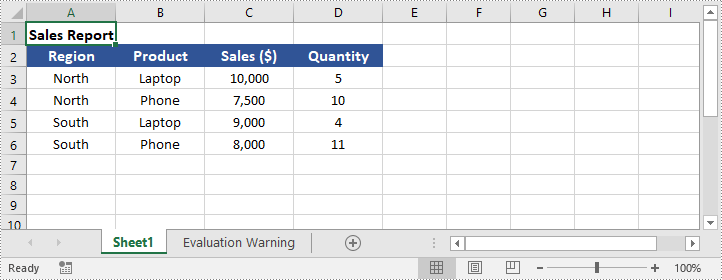
Unmerge All Merged Cells in Excel
When dealing with spreadsheets containing multiple merged cells, unmerging them all at once can help restore the original cell structure. With Spire.XLS for JavaScript, developers can easily find all merged cells in a worksheet using the Worksheet.MergedCells property and unmerge them with the CellRange.UnMerge() method. The detailed steps are as follows.
- Create a Workbook object using the new wasmModule.Workbook() method.
- Load the Excel file using the Workbook.LoadFromFile() method.
- Get a specific worksheet using the Workbook.Worksheets.get(index) method.
- Get all merged cell ranges in the worksheet using the Worksheet.MergedCells property.
- Loop through the merged cell ranges and unmerge them using the CellRange.UnMerge() method.
- Save the resulting workbook using the Workbook.SaveToFile() method.
- JavaScript
import React, { useState, useEffect } from 'react';
function App() {
  const [wasmModule, setWasmModule] = useState(null);
  // Load Spire.XLS
  useEffect(() => {
    (async () => {
      try {
        const publicUrl = process.env.PUBLIC_URL || '';
        const spireModule = await import(/* webpackIgnore: true */ `${publicUrl}/spire.xls.js`);
        const rawModule = spireModule.default || spireModule;
        window.wasmModule = typeof rawModule === 'function'
          ? await rawModule({ locateFile: p => p.endsWith('.wasm') ? `${publicUrl}/${p}` : p })
          : rawModule;
        setWasmModule(window.wasmModule);
      } catch (error) {
        console.error('Failed to load spire.xls.js WASM module:', error);
      }
    })();
  }, []);

  // Function to unmerge cells in an Excel worksheet
  const UnmergeCells = async () => {
    const wasmModule = window.wasmModule.spirexls;

    if (wasmModule) {
      // Load font into Virtual File System (VFS)
      await window.spire.FetchFileToVFS('Arial.ttf', '/Library/Fonts/', `${process.env.PUBLIC_URL}/static/font/`);


      // Load the Excel files into the virtual file system (VFS)
      let inputFileName = 'merged.xlsx';
      await window.spire.FetchFileToVFS(inputFileName, '', `${process.env.PUBLIC_URL}/static/data/`);


      // Create a new workbook
      let workbook = new wasmModule.Workbook();


      // Load an Excel document
      workbook.LoadFromFile({ fileName: inputFileName });

      // Get the first worksheet
      let sheet = workbook.Worksheets.get(0);

      // Get all merged cell ranges in the worksheet and put them into a CellRange array
      let range = sheet.MergedCells;

      // Loop through the array and unmerge all merged cell ranges
      for (let cell of range) {
        cell.UnMerge();
      }

      // Define the output file name
      const outputFileName = "UnmergeAllMergedCells.xlsx";

      // Save the workbook to the specified path
      workbook.SaveToFile({ fileName: outputFileName, version: wasmModule.ExcelVersion.Version2010 });

      // Read the saved file and convert to Blob object
      const modifiedFileArray = window.dotnetRuntime.Module.FS.readFile(outputFileName);
      const modifiedFile = new Blob([modifiedFileArray], { type: 'application/vnd.openxmlformats-officedocument.spreadsheetml.sheet' });

      // Create a URL for the Blob and initiate download
      const url = URL.createObjectURL(modifiedFile);
      const a = document.createElement('a');
      a.href = url;
      a.download = outputFileName;
      document.body.appendChild(a);
      a.click();
      document.body.removeChild(a);
      URL.revokeObjectURL(url);

      // Clean up resources used by the workbook
      workbook.Dispose();
    }
  };

  return (
    <div style={{ textAlign: 'center', height: '300px' }}>
      <h1>Unmerge Cells in an Excel Worksheet Using JavaScript in React</h1>
      <button onClick={UnmergeCells} disabled={!wasmModule}>
        Unmerge
      </button>
    </div>
  );
}

export default App;
Get a Free License
To fully experience the capabilities of Spire.XLS for JavaScript without any evaluation limitations, you can request a free 30-day trial license.
