Retrieve Style Information from a Word Document with JavaScript in React
A well-formatted document is worth more than its looks: the style a paragraph carries is structured information in its own right. Whether a heading paragraph is on Heading 1 or Heading 2, and which style the body copy uses, both say something about how the document is organised. The same works in reverse — when the headings of a document have to be pulled out to build a table of contents or a summary, the reliable way is to select them by style name rather than to guess which line looks bigger.
In Spire.Doc for JavaScript every paragraph carries a StyleName property, and reading it returns the style that paragraph is currently using. Both examples in this article write their output to a TXT file.
This article covers two core features:
For installation and project setup, refer to Integrating Spire.Doc for JavaScript in a React Project. The examples below assume Spire.Doc is installed and the WebAssembly module is initialized.
Export the Style Names of a Document
The paragraphs of a document are organised in two levels, section then paragraph: doc.Sections is the collection of sections, and each section's Paragraphs is the collection of paragraphs. Walk both with Count + get_Item(index), read the StyleName of each paragraph and join the results up.
function App() {
  const RetrieveStyle = async () => {
    const docModule = window.wasmModule?.spiredoc;
    if (!docModule) {
      alert('Spire.Doc is not ready yet');
      return;
    }

    // Load the sample file into the virtual file system (VFS)
    let inputFileName = "RetrieveStyle.docx";
    await window.spire.FetchFileToVFS(inputFileName, "", `${process.env.PUBLIC_URL}static/data/`);

    // Load the document
    let doc = new docModule.Document();
    doc.LoadFromFile(inputFileName);

    // Walk every section -> paragraph and read each paragraph's StyleName
    let styleName = "";
    for (let i = 0; i < doc.Sections.Count; i++) {
      let section = doc.Sections.get_Item(i);
      for (let j = 0; j < section.Paragraphs.Count; j++) {
        let paragraph = section.Paragraphs.get_Item(j);
        styleName += paragraph.StyleName + "\r\n";
      }
    }

    // Define the output file name
    const outputFileName = "RetrieveStyle-result.txt";

    // Write the content to the TXT file (straight into the VFS, not through SaveToFile)
    window.dotnetRuntime.Module.FS.writeFile(outputFileName, styleName);
    doc.Close();

    // Read the written file and wrap it in a Blob
    const modifiedFileArray = window.dotnetRuntime.Module.FS.readFile(outputFileName);
    const blob = new Blob([modifiedFileArray], { type: "text/plain" });
    const url = URL.createObjectURL(blob);
    const a = document.createElement('a');
    a.href = url;
    a.download = outputFileName;
    a.click();
    URL.revokeObjectURL(url);
  };

  return (
    <div style={{ textAlign: 'center', height: '300px' }}>
      <h1>Read the Style Name of Every Paragraph</h1>
      <button onClick={RetrieveStyle}>Generate</button>
    </div>
  );
}
export default App;
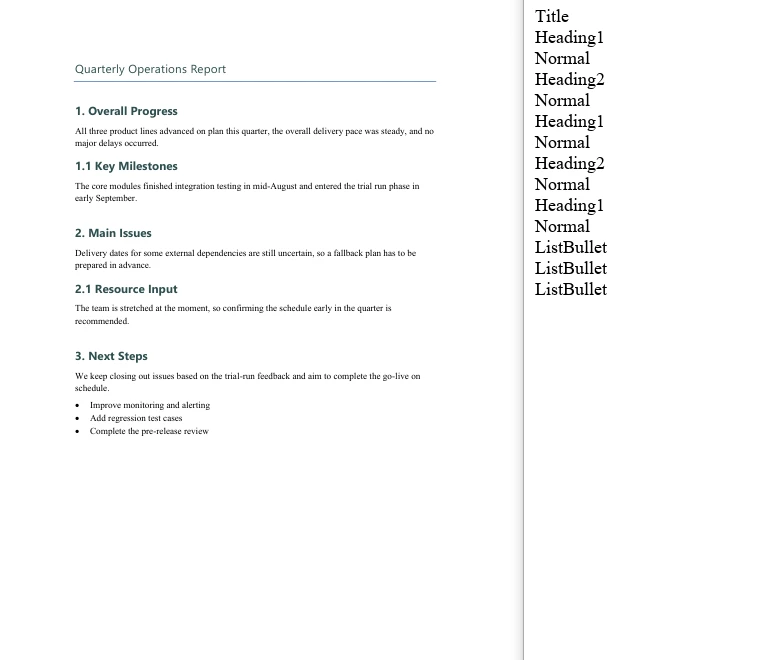
The sample document holds 14 paragraphs, and the exported TXT lists one style name per line, in paragraph order:
Title
Heading1
Normal
Heading2
Normal
Heading1
Normal
Heading2
Normal
Heading1
Normal
ListBullet
ListBullet
ListBullet
Note that the built-in style names come back without the space — Heading1 rather than Heading 1, ListBullet rather than List Bullet. That matters a great deal once a style name is used in a comparison.
The style name list exported for each paragraph of the sample document
Extract Paragraph Text by Style Name
The same two-level walk applies; all it takes is one extra test per paragraph — only when StyleName equals the target style name does paragraph.Text go into the result. The sample document holds 3 Heading1 paragraphs, with a Title, Heading 2 and body paragraphs around them, which shows that the filter really does pick out the target style alone.
function App() {
  const GetTextByStyleName = async () => {
    const docModule = window.wasmModule?.spiredoc;
    if (!docModule) {
      alert('Spire.Doc is not ready yet');
      return;
    }

    // Load the sample file into the virtual file system (VFS)
    let inputFileName = "GetTextByStyleName.docx";
    await window.spire.FetchFileToVFS(inputFileName, "", `${process.env.PUBLIC_URL}static/data/`);

    // Load the document
    let doc = new docModule.Document();
    doc.LoadFromFile(inputFileName);

    // Collect the text of the paragraphs that match
    let builder = [];

    // Walk every section -> paragraph
    for (let i = 0; i < doc.Sections.Count; i++) {
      let section = doc.Sections.get_Item(i);
      for (let j = 0; j < section.Paragraphs.Count; j++) {
        let para = section.Paragraphs.get_Item(j);

        // Take only the paragraphs whose style name is Heading1
        if (para.StyleName == "Heading1") {
          builder.push(para.Text);
        }
      }
    }

    // Define the output file name
    const outputFileName = "GetTextByStyleName-result.txt";

    // Write the content to the TXT file
    window.dotnetRuntime.Module.FS.writeFile(outputFileName, builder.join("\n"));
    doc.Close();

    // Read the written file and wrap it in a Blob
    const modifiedFileArray = window.dotnetRuntime.Module.FS.readFile(outputFileName);
    const blob = new Blob([modifiedFileArray], { type: "text/plain" });
    const url = URL.createObjectURL(blob);
    const a = document.createElement('a');
    a.href = url;
    a.download = outputFileName;
    a.click();
    URL.revokeObjectURL(url);
  };

  return (
    <div style={{ textAlign: 'center', height: '300px' }}>
      <h1>Extract Paragraph Text by Style Name</h1>
      <button onClick={GetTextByStyleName}>Generate</button>
    </div>
  );
}
export default App;
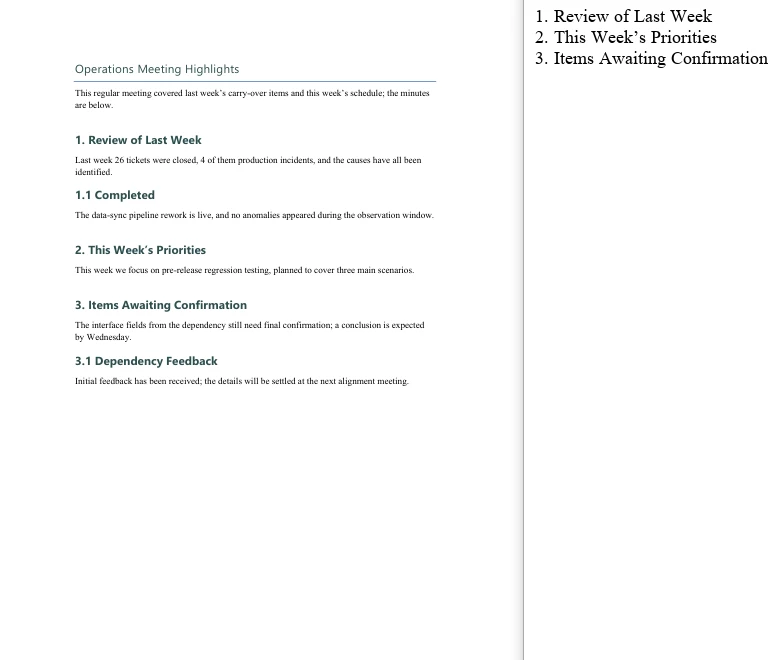
The exported TXT holds just 3 lines, which are exactly the Heading1 paragraphs of the document:
1. Review of Last Week
2. This Week’s Priorities
3. Items Awaiting Confirmation
Only the paragraphs on the target style reached the exported TXT
FAQ
Filtering by style name matches no paragraph at all
Cause: The StyleName of a built-in style is the space-free form, so writing "Heading 1" matches nothing.
Solution: Use the name without the space. In the sample, "Heading1" matches 3 paragraphs while "Heading 1" matches 0:
// Right
if (para.StyleName == "Heading1") { ... }

// Matches nothing
if (para.StyleName == "Heading 1") { ... }
Names are case-sensitive as well, so run the style-name export first to confirm the names the document actually uses before writing the condition.
The exported TXT has a blank line between every line
Cause: The text is joined both ways at once — push(text + "\n") and then join("\n"). Every element already carries a newline and join adds another one, so a blank line appears between every pair.
Solution: Keep only one of the two — either leave the newline off the elements and let join add it, or keep it on the elements and join with join(""):
// Let join supply the line breaks
builder.push(para.Text);
window.dotnetRuntime.Module.FS.writeFile(outputFileName, builder.join("\n"));
The downloaded file opens as garbled text
Cause: The MIME type of the Blob is set to docx, or the text is treated as a binary document when it is read back, so opening it in Word naturally shows nonsense.
Solution: A TXT output has to declare text/plain, and it should be opened in a text editor such as Notepad:
const modifiedFile = new Blob([modifiedFileArray], { type: "text/plain" });
Paragraphs inside tables are missed when walking Sections and Paragraphs
Cause: section.Paragraphs holds the body paragraphs only — paragraphs inside table cells are not in it. Table content hangs off section.Tables, and the Paragraphs of every cell has to be walked separately.
Solution: If the document contains tables and they need to be processed too, walk them outside the body loop:
for (let t = 0; t < section.Tables.Count; t++) {
  let table = section.Tables.get_Item(t);
  for (let r = 0; r < table.Rows.Count; r++) {
    for (let c = 0; c < table.Rows.get_Item(r).Cells.Count; c++) {
      let cell = table.Rows.get_Item(r).Cells.get_Item(c);
      // cell.Paragraphs holds the paragraphs inside the cell
    }
  }
}
Get a Free License
Spire.Doc for JavaScript offers a 30-day full-featured free trial license with no functional limitations. Apply here to evaluate before purchasing.
Restart List Numbering and Customize Bullets in Word with JavaScript in React
A consecutive sequence is often all a list needs — but real documents regularly ask for a new group that starts at a chosen number, or for a more distinctive glyph than the default dot. Neither change touches the paragraphs: both are level parameters of the list style itself, and both hang off ListRef.Levels — StartAt for the starting number, BulletCharacter for the glyph. Spire.Doc for JavaScript reads and writes these parameters directly in the browser via WebAssembly, with no backend server required.
This article covers two core features:
For installation and project setup, refer to Integrating Spire.Doc for JavaScript in a React Project. The examples below assume Spire.Doc is installed and the WebAssembly module is initialized.
Restart a List at a Specific Number
When two lists share one style object, Word treats them as a single numbering sequence and the second group simply carries on from the first. To make the second group count again, the most direct approach is to create a separate list style for it and set the StartAt property of level 0 on that style — it decides which number the level starts at.
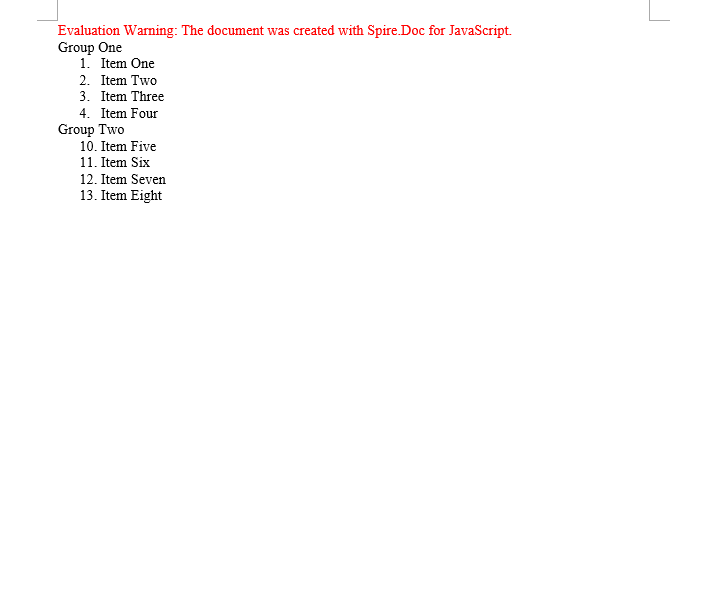
StartAt follows the same indexing as ListLevelNumber: get_Item(0) is the first level. The sample sets the second list to 10, so its first entry renders as 10.:
function App() {
  const RestartList = async () => {
    const docModule = window.wasmModule?.spiredoc;
    if (!docModule) {
      alert('Spire.Doc is not ready yet');
      return;
    }

    // Create the document and the section
    let doc = new docModule.Document();
    let section = doc.AddSection();

    // Group heading
    let paragraph = section.AddParagraph();
    paragraph.AppendText("Group One");

    // The first list style: starts at 1 by default
    let numberList = doc.Styles.Add({ listType: docModule.ListType.Numbered, name: "Numbered1" });
    doc.Styles.Add(numberList);

    // Apply the style paragraph by paragraph
    paragraph = section.AddParagraph();
    paragraph.AppendText("Item One");
    paragraph.ListFormat.ApplyStyle(numberList.Name);

    paragraph = section.AddParagraph();
    paragraph.AppendText("Item Two");
    paragraph.ListFormat.ApplyStyle(numberList.Name);

    paragraph = section.AddParagraph();
    paragraph.AppendText("Item Three");
    paragraph.ListFormat.ApplyStyle(numberList.Name);

    paragraph = section.AddParagraph();
    paragraph.AppendText("Item Four");
    paragraph.ListFormat.ApplyStyle(numberList.Name);

    // Group heading
    paragraph = section.AddParagraph();
    paragraph.AppendText("Group Two");

    // The second list style: set the starting number of level 0 to 10
    let numberList2 = doc.Styles.Add({ listType: docModule.ListType.Numbered, name: "Numbered2" });
    numberList2.ListRef.Levels.get_Item(0).StartAt = 10;
    doc.Styles.Add(numberList2);

    // Apply the second style paragraph by paragraph; the numbering starts at 10
    paragraph = section.AddParagraph();
    paragraph.AppendText("Item Five");
    paragraph.ListFormat.ApplyStyle(numberList2.Name);

    paragraph = section.AddParagraph();
    paragraph.AppendText("Item Six");
    paragraph.ListFormat.ApplyStyle(numberList2.Name);

    paragraph = section.AddParagraph();
    paragraph.AppendText("Item Seven");
    paragraph.ListFormat.ApplyStyle(numberList2.Name);

    paragraph = section.AddParagraph();
    paragraph.AppendText("Item Eight");
    paragraph.ListFormat.ApplyStyle(numberList2.Name);

    // Define the output file name
    const outputFileName = "RestartList-result.docx";

    // Save the document to the given path
    doc.SaveToFile({ fileName: outputFileName, fileFormat: docModule.FileFormat.Docx2013 });
    doc.Dispose();

    const modifiedFileArray = window.dotnetRuntime.Module.FS.readFile(outputFileName);
    const blob = new Blob([modifiedFileArray], { type: 'application/vnd.openxmlformats-officedocument.wordprocessingml.document' });
    const url = URL.createObjectURL(blob);
    const a = document.createElement('a');
    a.href = url;
    a.download = outputFileName;
    a.click();
    URL.revokeObjectURL(url);
  };

  return (
    <div style={{ textAlign: 'center', height: '300px' }}>
      <h1>Restart the Second List at a Given Number</h1>
      <button onClick={RestartList}>Generate</button>
    </div>
  );
}
export default App;
The first list is numbered 1 to 4, the second starts at 10 and runs 10 to 13
Customize the Glyph a Bullet Displays
A bulleted list uses a dot such as · by default. Switching it to another shape takes two properties:
BulletCharacter— the character itself. It is a single character and can be produced from an ASCII/Unicode code point withString.fromCharCode();CharacterFormat.FontName— the font that carries the character. The shape of a bullet is really decided by the font: one code point draws a different figure under different fonts.
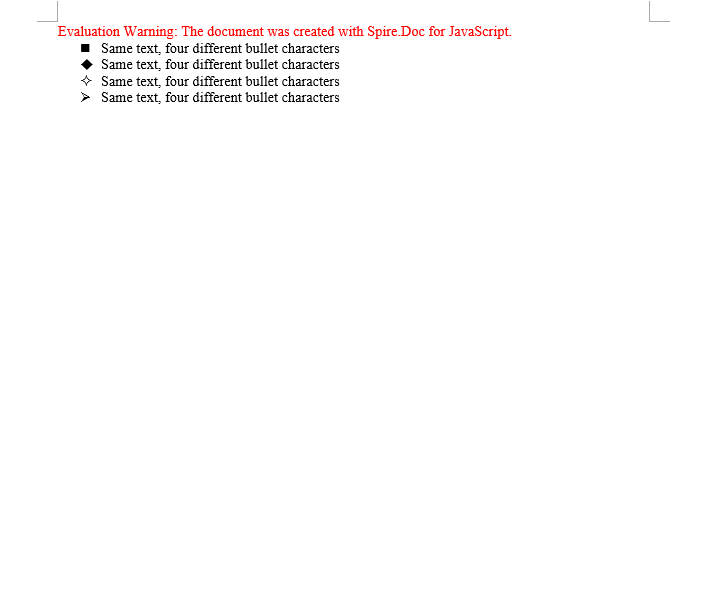
The second point is the one that matters. Symbol fonts such as Wingdings map ordinary letters onto geometric shapes, so a single character code comes out completely different under Wingdings than under a regular font. The sample below builds four list styles from four code points and applies each of them to the same sentence, so that the differences can be compared side by side:
function App() {
  const ASCIICharactersBulletStyle = async () => {
    const docModule = window.wasmModule?.spiredoc;
    if (!docModule) {
      alert('Spire.Doc is not ready yet');
      return;
    }

    // Create the document and the section
    let doc = new docModule.Document();
    let section = doc.AddSection();

    // Spell the glyph out as a character code and set the font that carries it to Wingdings
    let listStyle1 = doc.Styles.Add({ listType: docModule.ListType.Bulleted, name: "liststyle" });
    listStyle1.ListRef.Levels.get_Item(0).BulletCharacter = String.fromCharCode(0x006e);
    listStyle1.ListRef.Levels.get_Item(0).CharacterFormat.FontName = "Wingdings";

    let listStyle2 = doc.Styles.Add({ listType: docModule.ListType.Bulleted, name: "liststyle2" });
    listStyle2.ListRef.Levels.get_Item(0).BulletCharacter = String.fromCharCode(0x0075);
    listStyle2.ListRef.Levels.get_Item(0).CharacterFormat.FontName = "Wingdings";

    let listStyle3 = doc.Styles.Add({ listType: docModule.ListType.Bulleted, name: "liststyle3" });
    listStyle3.ListRef.Levels.get_Item(0).BulletCharacter = String.fromCharCode(0x00b2);
    listStyle3.ListRef.Levels.get_Item(0).CharacterFormat.FontName = "Wingdings";

    let listStyle4 = doc.Styles.Add({ listType: docModule.ListType.Bulleted, name: "liststyle4" });
    listStyle4.ListRef.Levels.get_Item(0).BulletCharacter = String.fromCharCode(0x00d8);
    listStyle4.ListRef.Levels.get_Item(0).CharacterFormat.FontName = "Wingdings";

    // Four paragraphs share one sentence, each with one of the four list styles
    let p1 = section.Body.AddParagraph();
    p1.AppendText("Same text, four different bullet characters");
    p1.ListFormat.ApplyStyle(listStyle1.Name);

    let p2 = section.Body.AddParagraph();
    p2.AppendText("Same text, four different bullet characters");
    p2.ListFormat.ApplyStyle(listStyle2.Name);

    let p3 = section.Body.AddParagraph();
    p3.AppendText("Same text, four different bullet characters");
    p3.ListFormat.ApplyStyle(listStyle3.Name);

    let p4 = section.Body.AddParagraph();
    p4.AppendText("Same text, four different bullet characters");
    p4.ListFormat.ApplyStyle(listStyle4.Name);

    // Define the output file name
    const outputFileName = "ASCIICharactersBulletStyle-result.docx";

    // Save the document to the given path
    doc.SaveToFile({ fileName: outputFileName, fileFormat: docModule.FileFormat.Docx2013 });
    doc.Dispose();

    const modifiedFileArray = window.dotnetRuntime.Module.FS.readFile(outputFileName);
    const blob = new Blob([modifiedFileArray], { type: 'application/vnd.openxmlformats-officedocument.wordprocessingml.document' });
    const url = URL.createObjectURL(blob);
    const a = document.createElement('a');
    a.href = url;
    a.download = outputFileName;
    a.click();
    URL.revokeObjectURL(url);
  };

  return (
    <div style={{ textAlign: 'center', height: '300px' }}>
      <h1>Create a Bullet Style from ASCII Characters</h1>
      <button onClick={ASCIICharactersBulletStyle}>Generate</button>
    </div>
  );
}
export default App;
Four identical lines, each with a different bullet; the difference comes from the BulletCharacter code point
FAQ
StartAt is set, but the list still continues from the previous group
Cause: The new list and the old one reuse the same style object. Every reference to one style shares a single numbering sequence, so changing StartAt moves the starting point of the whole sequence.
Solution: Add a separate style for the group that has to count again, and set StartAt on that new style:
let numberList2 = document.Styles.Add({ listType: wasmModule.ListType.Numbered, name: "Numbered2" });
numberList2.ListRef.Levels.get_Item(0).StartAt = 10;
The custom bullet shows up as a box or as garbled text
Cause: Only BulletCharacter was set and the font was left alone — or a regular font that does not contain the glyph was used. The system cannot render the code point and falls back to the missing-glyph box.
Solution: Set the symbol font to one that really contains the glyph (Wingdings, for example):
listStyle1.ListRef.Levels.get_Item(0).BulletCharacter = String.fromCharCode(0x006e);
listStyle1.ListRef.Levels.get_Item(0).CharacterFormat.FontName = "Wingdings";
The list level parameter was changed but nothing happens
Cause: ListRef.Levels is indexed from 0. Writing 1 out of habit changes the second level instead, and the first level stays exactly as it was.
Solution: Check the index — get_Item(0) is the first level:
// First level
numberList.ListRef.Levels.get_Item(0).StartAt = 10;
// Second level
numberList.ListRef.Levels.get_Item(1).NumberPrefix = "%1.";
Get a Free License
Spire.Doc for JavaScript offers a 30-day full-featured free trial license with no functional limitations. Apply here to evaluate before purchasing.
Set Font and Font Color in Word with JavaScript in React
The font name, the font size and the text color are the most basic character-level formatting properties a Word document has, and also the ones you reach for most often: normalizing the font across a whole document, giving the headings a more striking face, or marking a key conclusion in a color that stands out. Spire.Doc for JavaScript performs all of this in the browser via WebAssembly, using a virtual file system (VFS) to manage input and output files — no backend server required.
This article covers two core features:
For installation and project setup, refer to Integrating Spire.Doc for JavaScript in a React Project. The examples below assume Spire.Doc is installed and the WebAssembly module is initialized.
Set the Font
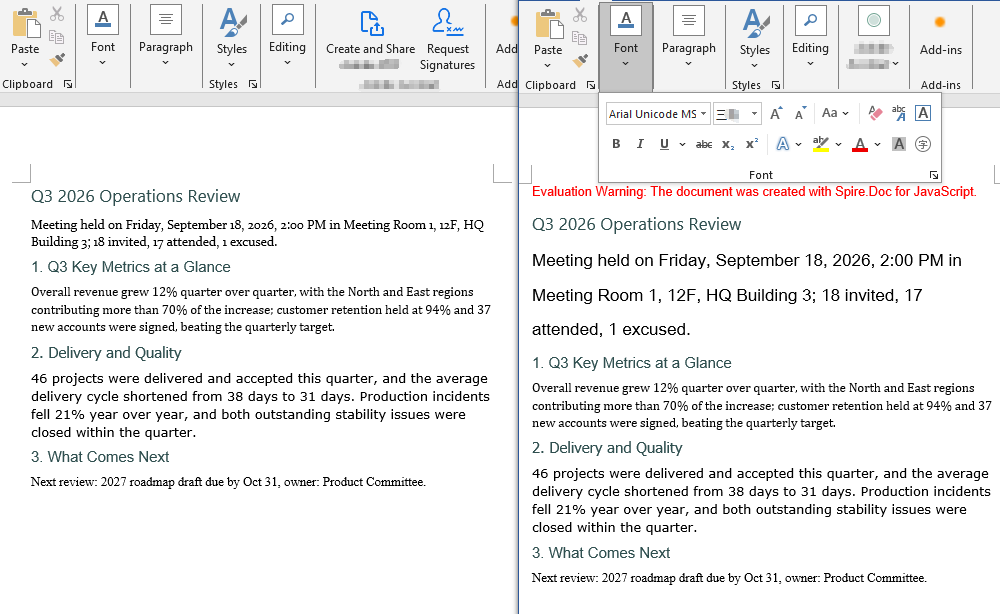
Setting the font involves three steps: first, load the font file and the target Word document into the WASM virtual file system via FetchFileToVFS; then instantiate a Document, load the document, create a CharacterFormat object and set its FontName and FontSize, walk through the child objects of the target paragraph and call ApplyCharacterFormat on every object whose type is TextRange; finally, read the saved file back from VFS, wrap it as a Blob and trigger a browser download.
One detail deserves attention: the CharacterFormat constructor must be passed the Document instance the format belongs to. That is the convention shared by every standalone format object in Spire.Doc.
function App() {
  const SetFont = async () => {
    const docModule = window.wasmModule?.spiredoc;
    if (!docModule) {
      alert('Spire.Doc is not ready yet');
      return;
    }

    // Load the font file into VFS
    await window.spire.FetchFileToVFS("ARIALUNI.TTF", "/Library/Fonts/", `${process.env.PUBLIC_URL}static/font/`);

    // Load the target Word document into VFS
    const inputFileName = "SetFont.docx";
    await window.spire.FetchFileToVFS(inputFileName, "", `${process.env.PUBLIC_URL}static/data/`);

    // Create a Document instance and load the document
    const doc = new docModule.Document();
    doc.LoadFromFile(inputFileName);

    // Get the second paragraph of the first section
    const p = doc.Sections.get_Item(0).Paragraphs.get_Item(1);

    // Create a CharacterFormat and set the font name and the font size
    const format = new docModule.CharacterFormat(doc);
    format.FontName = "Arial Unicode MS";
    format.FontSize = 16;

    // Walk through the child objects of the paragraph and apply the character format to the text ranges
    for (let i = 0; i < p.ChildObjects.Count; i++) {
      const childObj = p.ChildObjects.get_Item(i);
      if (childObj instanceof docModule.TextRange) {
        childObj.ApplyCharacterFormat(format);
      }
    }

    // Define the output file name
    const outputFileName = "SetFont_out.docx";

    // Save the document to VFS
    doc.SaveToFile({ fileName: outputFileName, fileFormat: docModule.FileFormat.Docx2013 });
    doc.Dispose();

    const modifiedFileArray = window.dotnetRuntime.Module.FS.readFile(outputFileName);
    const blob = new Blob([modifiedFileArray], { type: 'application/vnd.openxmlformats-officedocument.wordprocessingml.document' });
    const url = URL.createObjectURL(blob);
    const a = document.createElement('a');
    a.href = url;
    a.download = outputFileName;
    a.click();
    URL.revokeObjectURL(url);
  };

  return (
    <div style={{ textAlign: 'center', height: '300px' }}>
      <h1>Set the Font of a Word Document</h1>
      <button onClick={SetFont}>Generate</button>
    </div>
  );
}
export default App;
The document produced after the font has been set
Change the Font Color
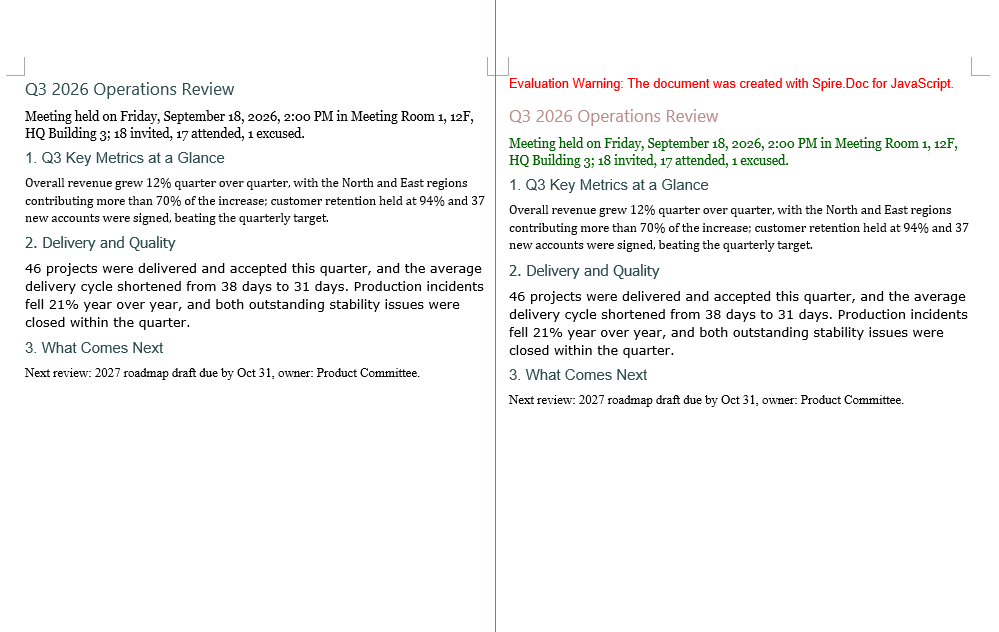
Changing the font color follows the same three steps as setting the font. The difference is that there is no need to create a separate CharacterFormat object: the color is a single property, so you assign to CharacterFormat.TextColor of the TextRange itself. The color values come from the predefined properties of Color, whose names match .NET's KnownColor — get_RosyBrown() and get_DarkGreen(), for example; when you need an exact color value, use Color.FromArgb(r, g, b) instead.
function App() {
  const ChangeFontColor = async () => {
    const docModule = window.wasmModule?.spiredoc;
    if (!docModule) {
      alert('Spire.Doc is not ready yet');
      return;
    }

    // Load the target Word document into VFS
    const inputFileName = "ChangeFontColor.docx";
    await window.spire.FetchFileToVFS(inputFileName, "", `${process.env.PUBLIC_URL}static/data/`);

    // Create a Document instance and load the document
    const doc = new docModule.Document();
    doc.LoadFromFile(inputFileName);

    // Get the first section
    const section = doc.Sections.get_Item(0);

    // Turn the text of the first paragraph rosy brown
    const p1 = section.Paragraphs.get_Item(0);
    for (let i = 0; i < p1.ChildObjects.Count; i++) {
      const childObj = p1.ChildObjects.get_Item(i);
      if (childObj instanceof docModule.TextRange) {
        childObj.CharacterFormat.TextColor = docModule.Color.get_RosyBrown();
      }
    }

    // Turn the text of the second paragraph dark green
    const p2 = section.Paragraphs.get_Item(1);
    for (let i = 0; i < p2.ChildObjects.Count; i++) {
      const childObj = p2.ChildObjects.get_Item(i);
      if (childObj instanceof docModule.TextRange) {
        childObj.CharacterFormat.TextColor = docModule.Color.get_DarkGreen();
      }
    }

    // Define the output file name
    const outputFileName = "ChangeFontColor_out.docx";

    // Save the document to VFS
    doc.SaveToFile({ fileName: outputFileName, fileFormat: docModule.FileFormat.Docx2013 });
    doc.Dispose();

    const modifiedFileArray = window.dotnetRuntime.Module.FS.readFile(outputFileName);
    const blob = new Blob([modifiedFileArray], { type: 'application/vnd.openxmlformats-officedocument.wordprocessingml.document' });
    const url = URL.createObjectURL(blob);
    const a = document.createElement('a');
    a.href = url;
    a.download = outputFileName;
    a.click();
    URL.revokeObjectURL(url);
  };

  return (
    <div style={{ textAlign: 'center', height: '300px' }}>
      <h1>Change the Font Color of a Word Document</h1>
      <button onClick={ChangeFontColor}>Generate</button>
    </div>
  );
}
export default App;
The document produced after the font color has been changed
FAQ
Only a few words in a paragraph need to change, not the whole paragraph
Cause: The examples above treat a paragraph as the smallest unit — they walk through every child object of the paragraph and assign unconditionally to anything that is a TextRange, so once a paragraph has been processed the whole paragraph ends up in the same color or the same font. To work at word level you first have to locate the TextRange that holds the target text, and then set its character format on its own.
Solution: Use FindAllString to find the text in the document. Every TextSelection it returns gives you the matching TextRange through GetAsOneRange(), so you can change just that one occurrence:
// Find every occurrence of "key conclusion"; the arguments are: search text, case sensitivity, whole-word matching
const selections = doc.FindAllString("key conclusion", false, true);

for (let i = 0; i < selections.length; i++) {
  // Only this short run of text gets the new color; the rest of the paragraph is untouched
  selections[i].GetAsOneRange().CharacterFormat.TextColor = docModule.Color.get_Red();
}
If only the first occurrence matters, replace FindAllString with FindString, which returns a single TextSelection object.
The font is set, but the document shows a different font on another computer
Cause: FontName only writes the font name into the character properties of the document; it does not bring the font file itself along with it. The font loaded by FetchFileToVFS only serves the rendering and the text measurement of this browser session. When the document is opened in Word on another machine and that font is not installed there, Word falls back to another font according to its own font substitution table, and the font size and the line spacing can change with it.
Solution: If the target font is a common one (Arial or Times New Roman, for example), there is usually nothing to do. If a particular font has to be used, embed the font file into the document together with the content, so that the document still renders correctly on machines where the font is not installed. See "Embed a Private Font" in the next article for the details.
Get a Free License
Spire.Doc for JavaScript offers a 30-day full-featured free trial license with no functional limitations. Apply here to evaluate before purchasing.
Get Used Fonts and Embed Private Fonts in Word with JavaScript in React
When a Word document has to travel between machines and environments, fonts are the part most likely to break: open a carefully laid out document on another computer and the glyph shapes, the font sizes and even the pagination can change. The safe approach is to first take stock of the fonts the document actually uses, then embed the fonts that must be preserved together with the document itself. Spire.Doc for JavaScript performs all of this in the browser via WebAssembly, using a virtual file system (VFS) to manage input and output files — no backend server required.
This article covers two core features:
For installation and project setup, refer to Integrating Spire.Doc for JavaScript in a React Project. The examples below assume Spire.Doc is installed and the WebAssembly module is initialized.
Get the List of Fonts Used in the Document
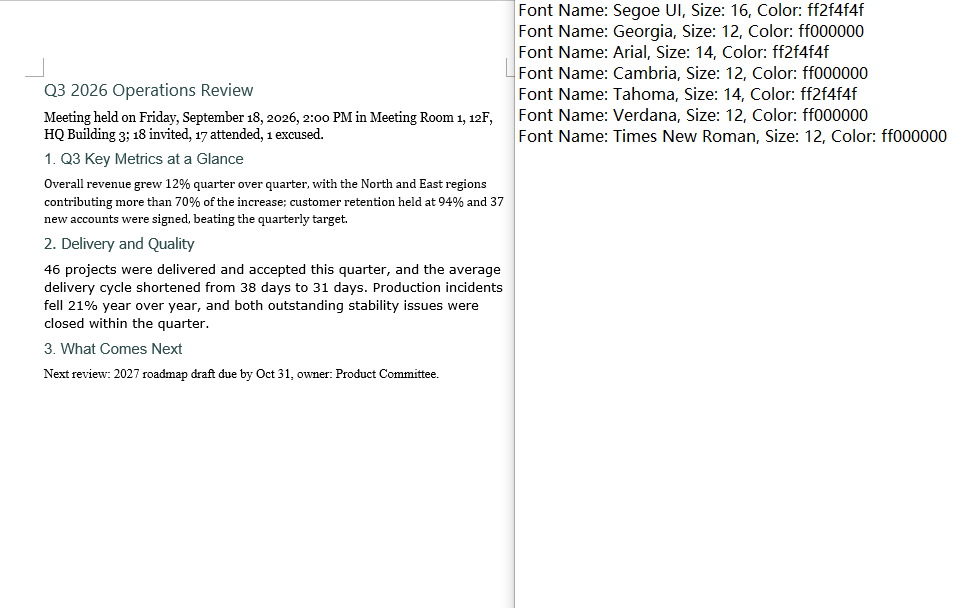
Listing the fonts involves three steps: first, load the target Word document into the WASM virtual file system via FetchFileToVFS; then instantiate a Document, load the document, walk down through section → paragraph → child object and read the font name, the font size and the text color from the CharacterFormat of every TextRange, de-duplicating on the combination of the three; finally, join the results into text and write it to VFS, read it back and wrap it as a Blob to trigger a browser download.
The de-duplication step deserves attention: a Map key has to be a primitive type that can be compared by value. Use an object such as { size, name } as the key and every iteration creates a brand-new reference, so Map never finds an existing entry and the de-duplication silently does nothing. The key here is therefore a string built from the font name, the font size and the color.
function App() {
  const GetListOfUsingFonts = async () => {
    const docModule = window.wasmModule?.spiredoc;
    if (!docModule) {
      alert('Spire.Doc is not ready yet');
      return;
    }

    // Load the target Word document into VFS
    const inputFileName = "GetListOfUsingFonts.docx";
    await window.spire.FetchFileToVFS(inputFileName, "", `${process.env.PUBLIC_URL}static/data/`);

    // Create a Document instance and load the document
    const doc = new docModule.Document();
    doc.LoadFromFile(inputFileName);

    // De-duplicate on "font name|size|color"
    const fontMap = new Map();

    // Walk through every section
    for (let i = 0; i < doc.Sections.Count; i++) {
      const section = doc.Sections.get_Item(i);

      // Walk through every paragraph in the section
      for (let j = 0; j < section.Body.Paragraphs.Count; j++) {
        const paragraph = section.Body.Paragraphs.get_Item(j);

        // Walk through every child object in the paragraph
        for (let k = 0; k < paragraph.ChildObjects.Count; k++) {
          const obj = paragraph.ChildObjects.get_Item(k);
          if (!(obj instanceof docModule.TextRange)) continue;

          const format = obj.CharacterFormat;
          const key = `${format.FontName}|${format.FontSize}|${format.TextColor.Name}`;

          fontMap.set(key, {
            name: format.FontName,
            size: format.FontSize,
            color: format.TextColor.Name
          });
        }
      }
    }

    // Build the output content
    const lines = [];
    for (const font of fontMap.values()) {
      lines.push(`Font Name: ${font.name}, Size: ${font.size}, Color: ${font.color}`);
    }

    // Define the output file name and write it to VFS
    const outputFileName = "GetListOfUsingFonts_out.txt";
    window.dotnetRuntime.Module.FS.writeFile(outputFileName, lines.join("\n"));

    const modifiedFileArray = window.dotnetRuntime.Module.FS.readFile(outputFileName);
    const blob = new Blob([modifiedFileArray], { type: 'text/plain' });
    const url = URL.createObjectURL(blob);
    const a = document.createElement('a');
    a.href = url;
    a.download = outputFileName;
    a.click();
    URL.revokeObjectURL(url);

    doc.Dispose();
  };

  return (
    <div style={{ textAlign: 'center', height: '300px' }}>
      <h1>Get the Fonts Used in a Word Document</h1>
      <button onClick={GetListOfUsingFonts}>Generate</button>
    </div>
  );
}
export default App;
The text file produced by the font list sample
Embed a Private Font
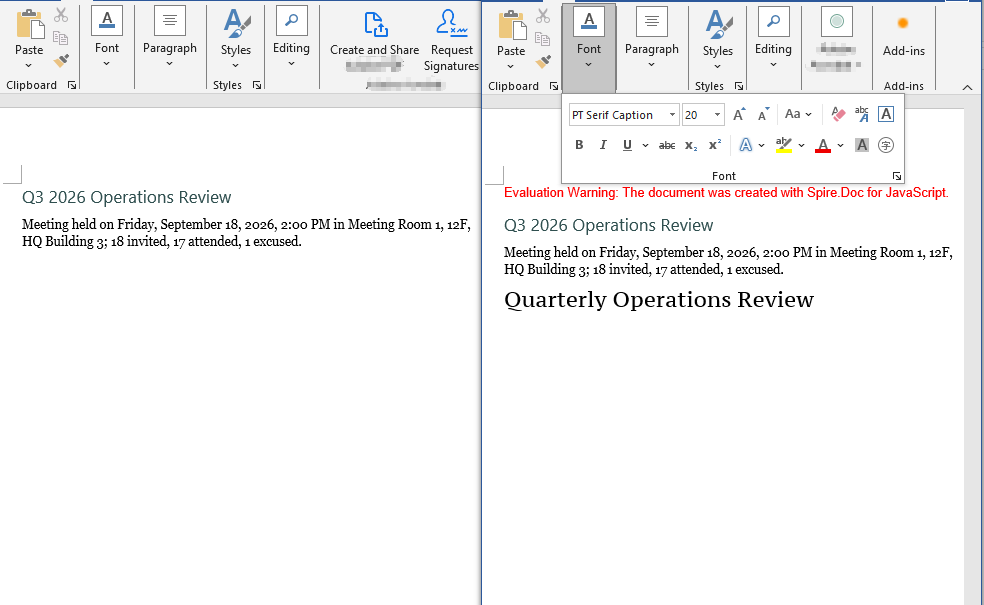
Embedding a private font also involves three steps: first, load the font file to embed together with the document into the WASM virtual file system via FetchFileToVFS; then instantiate a Document, load the document, write a run that uses the font, set EmbedFontsInFile to true and call AddPrivateFont to register the path and the registration name of the font file; finally, save the document, read it back from VFS and wrap it as a Blob to trigger a browser download.
EmbedFontsInFile and AddPrivateFont only take effect at save time and must both be called before SaveToFile. The first argument of PrivateFontPath is the name the font is registered under inside the document, and it has to match the value assigned to CharacterFormat.FontName exactly, or Word will not find a match.
function App() {
  const EmbedPrivateFont = async () => {
    const docModule = window.wasmModule?.spiredoc;
    if (!docModule) {
      alert('Spire.Doc is not ready yet');
      return;
    }

    // Load the private font file to embed into VFS
    await window.spire.FetchFileToVFS("PT Serif Caption.ttf", "/Library/Fonts/", `${process.env.PUBLIC_URL}static/font/`);

    // Load the target Word document into VFS
    const inputFileName = "EmbedPrivateFont.docx";
    await window.spire.FetchFileToVFS(inputFileName, "", `${process.env.PUBLIC_URL}static/data/`);

    // Create a Document instance and load the document
    const doc = new docModule.Document();
    doc.LoadFromFile(inputFileName);

    // Append a paragraph at the end of the first section and apply the private font
    const p = doc.Sections.get_Item(0).AddParagraph();
    const range = p.AppendText("Quarterly Operations Review");
    range.CharacterFormat.FontName = "PT Serif Caption";
    range.CharacterFormat.FontSize = 20;

    // Turn on font embedding and register the private font file with the document
    doc.EmbedFontsInFile = true;
    doc.AddPrivateFont(new docModule.PrivateFontPath("PT Serif Caption", "PT Serif Caption.ttf"));

    // Define the output file name
    const outputFileName = "EmbedPrivateFont_out.docx";

    // Save the document to VFS
    doc.SaveToFile({ fileName: outputFileName, fileFormat: docModule.FileFormat.Docx2013 });
    doc.Dispose();

    const modifiedFileArray = window.dotnetRuntime.Module.FS.readFile(outputFileName);
    const blob = new Blob([modifiedFileArray], { type: 'application/vnd.openxmlformats-officedocument.wordprocessingml.document' });
    const url = URL.createObjectURL(blob);
    const a = document.createElement('a');
    a.href = url;
    a.download = outputFileName;
    a.click();
    URL.revokeObjectURL(url);
  };

  return (
    <div style={{ textAlign: 'center', height: '300px' }}>
      <h1>Embed a Private Font in a Word Document</h1>
      <button onClick={EmbedPrivateFont}>Generate</button>
    </div>
  );
}
export default App;
The document produced after the private font has been embedded
FAQ
The same font appears many times in the output font list
Cause: If the code follows the pattern "store the font name and the font size in an object, then use that object as the Map key", the de-duplication never works. Objects are reference types in JavaScript and Map compares keys by reference rather than by value; every object created inside the loop is a fresh reference, so fontMap.has(font) always returns false. The list then ends up with one line for every TextRange in the document, and the same font repeats over and over.
Solution: Use a primitive type as the key instead — join the fields that take part in the de-duplication into a string (such as font name|size|color), so that fonts with identical content get the same key:
const format = obj.CharacterFormat;

// Use a string as the key: identical content means the same entry, so de-duplication works
const key = `${format.FontName}|${format.FontSize}|${format.TextColor.Name}`;
fontMap.set(key, {
  name: format.FontName,
  size: format.FontSize,
  color: format.TextColor.Name
});
If all you need is de-duplication at the level of font names, collect format.FontName in a Set instead.
The font is embedded, but another computer still shows a substitute
Cause: There are three common cases. The first is the timing of the call — AddPrivateFont only registers the font file with the in-memory document object, while the font table and the font parts are actually written into the docx during the save, so EmbedFontsInFile = true and AddPrivateFont(...) both have to come before SaveToFile; leave out EmbedFontsInFile and the font file is not written at all. The second is a font name mismatch — the first argument of PrivateFontPath is the registration name used inside the document and must match the value of CharacterFormat.FontName exactly, spaces and letter case included, or the match fails over a single character. The third is the embedding permission of the font file itself — the fsType bits in the OS/2 table of some commercial fonts forbid embedding, and Word simply ignores those fonts, in which case the only options are to use another font or a licensed version that permits embedding.
Solution: Keep every font embedding setting together before the save, and make sure the registration name matches the font name character for character:
// Keep the font name and the registration name exactly the same
const FONT_NAME = "PT Serif Caption";

const range = p.AppendText("Quarterly Operations Review");
range.CharacterFormat.FontName = FONT_NAME;
range.CharacterFormat.FontSize = 20;

// Turn on embedding and register the font file; both must come before SaveToFile
doc.EmbedFontsInFile = true;
doc.AddPrivateFont(new docModule.PrivateFontPath(FONT_NAME, "PT Serif Caption.ttf"));

doc.SaveToFile({ fileName: outputFileName, fileFormat: docModule.FileFormat.Docx2013 });
Get a Free License
Spire.Doc for JavaScript offers a 30-day full-featured free trial license with no functional limitations. Apply here to evaluate before purchasing.
Create, Modify and Copy Word Styles with JavaScript in React
Styles are the way Word reuses formatting: give a set of formatting — the font, the size, the colour, the paragraph spacing — a name and save it, and from then on every paragraph that carries that style name picks the whole set up automatically. Change the style definition and every paragraph that references it updates along with it, which is exactly what setting the formatting on a paragraph directly cannot do. Spire.Doc for JavaScript performs all of this in the browser via WebAssembly, using a virtual file system (VFS) to manage input and output files — no backend server required.
Structurally a paragraph style holds two parts at once: character formatting and paragraph formatting. Once a built-in style has been taken, ParagraphStyle.CharacterFormat changes the text-level properties and ParagraphStyle.ParagraphFormat changes the paragraph-level ones. The library maps this model onto the Document.Styles collection in full.
This article covers two core features:
For installation and project setup, refer to Integrating Spire.Doc for JavaScript in a React Project. The examples below assume Spire.Doc is installed and the WebAssembly module is initialized.
Modify the Built-in Styles
Word ships with a batch of built-in styles — Title, Normal, Heading 1 to Heading 9 and so on. document.AddStyle({ builtinStyle }) takes the named built-in style (creating it if it does not exist yet) and returns its object, and once you have it, it can be rewritten.
Note that the return type of AddStyle is the generic Style, so before changing the paragraph format you have to confirm that the object really is a paragraph style — instanceof wasmModule.ParagraphStyle is the check. Normal is the base style of the body text, and changing it also affects every style that inherits from it, so it is usually used only to unify the body font and the font size.
function App() {
  const Styles = async () => {
    const docModule = window.wasmModule?.spiredoc;
    if (!docModule) {
      alert('Spire.Doc is not ready yet');
      return;
    }

    await window.spire.FetchFileToVFS("ARIALUNI.TTF", "/Library/Fonts/", `${process.env.PUBLIC_URL}static/font/`);

    // Create the document and the section
    let doc = new docModule.Document();
    let sec = doc.AddSection();

    // Take the built-in Title style and rewrite it with a custom colour scheme:
    // a bottom border and left alignment
    let titleStyle = doc.AddStyle({ builtinStyle: docModule.BuiltinStyle.Title });

    // Check whether it is a paragraph style; if it is, set the paragraph format too
    if (titleStyle instanceof docModule.ParagraphStyle) {
      let ps = titleStyle;
      ps.CharacterFormat.FontName = "Arial Unicode MS";
      ps.CharacterFormat.FontSize = 28;
      ps.CharacterFormat.TextColor = docModule.Color.FromArgb(42, 123, 136);
      ps.ParagraphFormat.Borders.Bottom.BorderType = docModule.BorderStyle.Single;
      ps.ParagraphFormat.Borders.Bottom.Color = docModule.Color.FromArgb(42, 123, 136);
      ps.ParagraphFormat.Borders.Bottom.LineWidth = 1.5;
      ps.ParagraphFormat.HorizontalAlignment = docModule.HorizontalAlignment.Left;
    }

    // Body style: one font and one size for the body text
    let normalStyle = doc.AddStyle({ builtinStyle: docModule.BuiltinStyle.Normal });
    normalStyle.CharacterFormat.FontName = "Arial Unicode MS";
    normalStyle.CharacterFormat.FontSize = 11;

    // Heading 1 style
    let heading1Style = doc.AddStyle({ builtinStyle: docModule.BuiltinStyle.Heading1 });
    heading1Style.CharacterFormat.FontName = "Arial Unicode MS";
    heading1Style.CharacterFormat.FontSize = 14;
    heading1Style.CharacterFormat.Bold = true;
    heading1Style.CharacterFormat.TextColor = docModule.Color.FromArgb(42, 123, 136);

    // Heading 2 style
    let heading2Style = doc.AddStyle({ builtinStyle: docModule.BuiltinStyle.Heading2 });
    heading2Style.CharacterFormat.FontName = "Arial Unicode MS";
    heading2Style.CharacterFormat.FontSize = 12;
    heading2Style.CharacterFormat.Bold = true;

    // Custom bulleted list style
    let bulletList = doc.Styles.Add({ listType: docModule.ListType.Bulleted, name: "bulletList" });
    doc.Styles.Add({ style: bulletList });

    // Apply the styles: built-in styles by builtinStyle, custom styles by name
    let paragraph = sec.AddParagraph();
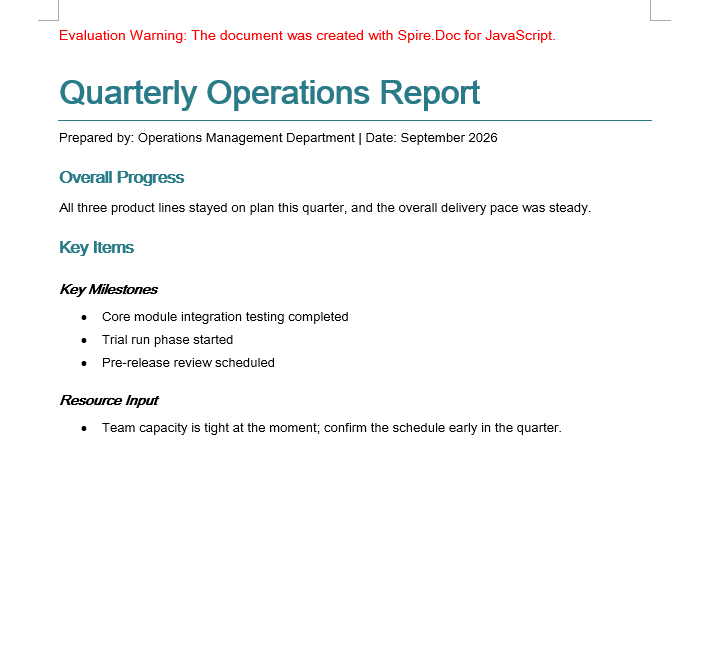
    paragraph.AppendText("Quarterly Operations Report");
    paragraph.ApplyStyle({ builtinStyle: docModule.BuiltinStyle.Title });

    paragraph = sec.AddParagraph();
    paragraph.AppendText("Prepared by: Operations Management Department | Date: September 2026");
    paragraph.ApplyStyle({ builtinStyle: docModule.BuiltinStyle.Normal });

    paragraph = sec.AddParagraph();
    paragraph.AppendText("Overall Progress");
    paragraph.ApplyStyle({ builtinStyle: docModule.BuiltinStyle.Heading1 });

    paragraph = sec.AddParagraph();
    paragraph.AppendText("All three product lines stayed on plan this quarter, and the overall delivery pace was steady.");
    paragraph.ApplyStyle({ builtinStyle: docModule.BuiltinStyle.Normal });

    paragraph = sec.AddParagraph();
    paragraph.AppendText("Key Items");
    paragraph.ApplyStyle({ builtinStyle: docModule.BuiltinStyle.Heading1 });

    paragraph = sec.AddParagraph();
    paragraph.AppendText("Key Milestones");
    paragraph.ApplyStyle({ builtinStyle: docModule.BuiltinStyle.Heading2 });

    paragraph = sec.AddParagraph();
    paragraph.AppendText("Core module integration testing completed");
    paragraph.ListFormat.ApplyStyle("bulletList");

    paragraph = sec.AddParagraph();
    paragraph.AppendText("Trial run phase started");
    paragraph.ListFormat.ApplyStyle("bulletList");

    paragraph = sec.AddParagraph();
    paragraph.AppendText("Pre-release review scheduled");
    paragraph.ListFormat.ApplyStyle("bulletList");

    paragraph = sec.AddParagraph();
    paragraph.AppendText("Resource Input");
    paragraph.ApplyStyle({ builtinStyle: docModule.BuiltinStyle.Heading2 });

    paragraph = sec.AddParagraph();
    paragraph.AppendText("Team capacity is tight at the moment; confirm the schedule early in the quarter.");
    paragraph.ListFormat.ApplyStyle("bulletList");

    // Define the output file name
    const outputFileName = "Styles-result.docx";

    // Save the document to the given path
    doc.SaveToFile({ fileName: outputFileName, fileFormat: docModule.FileFormat.Docx2013 });
    doc.Dispose();

    const modifiedFileArray = window.dotnetRuntime.Module.FS.readFile(outputFileName);
    const blob = new Blob([modifiedFileArray], { type: 'application/vnd.openxmlformats-officedocument.wordprocessingml.document' });
    const url = URL.createObjectURL(blob);
    const a = document.createElement('a');
    a.href = url;
    a.download = outputFileName;
    a.click();
    URL.revokeObjectURL(url);
  };

  return (
    <div style={{ textAlign: 'center', height: '300px' }}>
      <h1>Create Styles and Apply Them to Paragraphs</h1>
      <button onClick={Styles}>Generate</button>
    </div>
  );
}
export default App;
The built-in Title, Heading 1 and Heading 2 have been rewritten into one teal colour scheme, and the custom bulletList supplies the bullets
Copy Styles Between Documents
Companies often keep a "style master" document whose styles new documents have to follow. Rebuilding those styles one at a time by hand is slow and easy to miss something, so walk the Styles collection of the source document and add every style object to the target document instead.
document.Styles supports Count and get_Item(index), so the collection can be walked completely by index. Once the styles of the source document have been added to the target document, the paragraphs in the target that reference those style names immediately show the formatting of the source document.
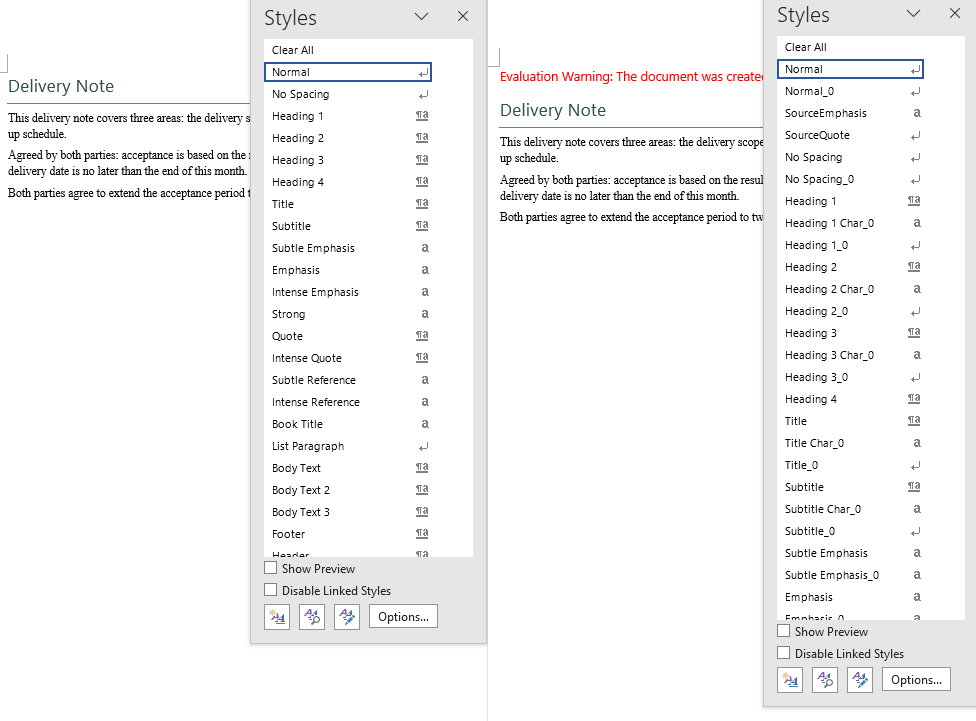
This example uses two sample documents: CopyDocumentStyles1.docx is the source document with custom styles, and CopyDocumentStyles2.docx is the target document — some of its paragraphs reference style names that only the source document defines, but it does not define them itself, so before the copy those paragraphs are displayed with the default formatting.
function App() {
  const CopyDocumentStyles = async () => {
    const docModule = window.wasmModule?.spiredoc;
    if (!docModule) {
      alert('Spire.Doc is not ready yet');
      return;
    }

    // Load the two sample files into the virtual file system (VFS)
    let inputFileName_1 = "CopyDocumentStyles1.docx";
    await window.spire.FetchFileToVFS(inputFileName_1, "", `${process.env.PUBLIC_URL}static/data/`);

    let inputFileName_2 = "CopyDocumentStyles2.docx";
    await window.spire.FetchFileToVFS(inputFileName_2, "", `${process.env.PUBLIC_URL}static/data/`);

    // Load the source document (with the custom styles)
    let srcDoc = new docModule.Document();
    srcDoc.LoadFromFile(inputFileName_1);

    // Load the target document (built-in styles only)
    let destDoc = new docModule.Document();
    destDoc.LoadFromFile(inputFileName_2);

    // Take the style collection of the source document
    let styles = srcDoc.Styles;

    // Add them to the target document one by one
    for (let i = 0; i < styles.Count; i++) {
      let style = styles.get_Item(i);
      destDoc.Styles.Add(style);
    }

    // Define the output file name
    const outputFileName = "CopyDocumentStyles_result.docx";

    // Save the document to the given path
    destDoc.SaveToFile({ fileName: outputFileName, fileFormat: docModule.FileFormat.Docx2013 });
    destDoc.Dispose();
    srcDoc.Dispose();

    const modifiedFileArray = window.dotnetRuntime.Module.FS.readFile(outputFileName);
    const blob = new Blob([modifiedFileArray], { type: 'application/vnd.openxmlformats-officedocument.wordprocessingml.document' });
    const url = URL.createObjectURL(blob);
    const a = document.createElement('a');
    a.href = url;
    a.download = outputFileName;
    a.click();
    URL.revokeObjectURL(url);
  };

  return (
    <div style={{ textAlign: 'center', height: '300px' }}>
      <h1>Copy the Styles of the Source Document into the Target Document</h1>
      <button onClick={CopyDocumentStyles}>Generate</button>
    </div>
  );
}
export default App;
After the copy the target document has the custom styles of the source document, and the paragraphs that "referenced a style without carrying its formatting" are displayed correctly again
FAQ
The Normal style was changed, but not every body paragraph followed
Cause: Only styles that inherit from Normal are affected by it. If a paragraph carries direct formatting of its own (a per-paragraph CharacterFormat.FontName, for example), the direct formatting has a higher priority than the style and covers up what the style sets.
Solution: Control the appearance through styles consistently and remove the direct formatting from the paragraphs and the runs. Normal is commonly used to unify the body font and the font size:
let normalStyle = document.AddStyle({ builtinStyle: wasmModule.BuiltinStyle.Normal });
normalStyle.CharacterFormat.FontName = "Arial Unicode MS";
normalStyle.CharacterFormat.FontSize = 11;
The number of styles in the target document doubled after the copy
Cause: The walk copies every style of the source document across, and that includes a large number of built-in styles. Those style names usually already exist in the target document, and adding them one at a time creates duplicate entries.
Solution: This is the actual behaviour of the sample (the style collection grows noticeably). If a real project only needs the custom styles, filter by name first and copy only the styles the target document does not have yet:
for (let i = 0; i < srcDoc.Styles.Count; i++) {
  let style = srcDoc.Styles.get_Item(i);

  // Check whether the target document already has a style with the same name
  let exists = false;
  for (let j = 0; j < destDoc.Styles.Count; j++) {
    if (destDoc.Styles.get_Item(j).Name === style.Name) {
      exists = true;
      break;
    }
  }

  // Only add the styles that the target document is missing
  if (!exists) {
    destDoc.Styles.Add(style);
  }
}
A custom style does not take effect when it is applied to a paragraph
Cause: ApplyStyle is called differently for built-in and custom styles — a built-in style takes a { builtinStyle } object, a custom style takes the style name as a string. Passing the wrong form is ignored silently.
Solution: Choose the form that matches where the style comes from:
// Built-in style
paragraph.ApplyStyle({ builtinStyle: wasmModule.BuiltinStyle.Heading1 });

// Custom style (the string name, which has to match the name used in Add)
paragraph.ListFormat.ApplyStyle("bulletList");
Get a Free License
Spire.Doc for JavaScript offers a 30-day full-featured free trial license with no functional limitations. Apply here to evaluate before purchasing.
Convert Between Word and OpenXML with JavaScript in React
Converting between Word documents and OpenXML is one of the most frequent needs in document processing: exporting a Word document to XML lifts the body content out of the binary package structure, which makes cross-system exchange, bulk extraction and archiving much easier, while turning XML back into a Word document lets you generate a standard document directly from structured data you already have. Spire.Doc for JavaScript performs the conversion in both directions in the browser via WebAssembly, using a virtual file system (VFS) to manage fonts and files — no backend server required. OpenXML flat files come in two formats: WordML for Word 2003 and WordXml (Flat OPC) for Word 2007 and later, so the one you save as depends on the target Word version.
This article covers three core features:
For installation and project setup, refer to Integrating Spire.Doc for JavaScript in a React Project. The examples below assume Spire.Doc is installed and the WebAssembly module is initialized.
Word to OpenXML (WordML)
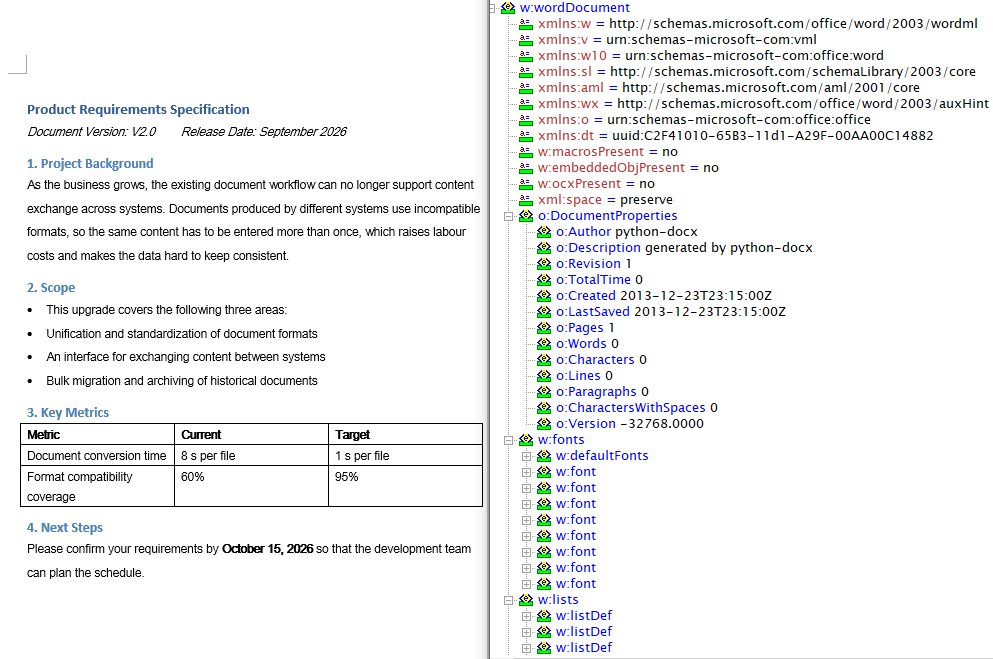
Converting a Word document to OpenXML involves three steps: first, load the font files and the target Word document into the WASM virtual file system via FetchFileToVFS; then instantiate a Document, load the file and call SaveToFile with FileFormat.WordML to save the document as a Word 2003 XML flat file; finally, read the generated XML file from VFS, wrap it as a Blob and trigger a browser download.
function App() {
  const WordToWordML = async () => {
    const docModule = window.wasmModule?.spiredoc;
    if (!docModule) {
      alert('Spire.Doc is not ready yet');
      return;
    }

    // Load the sample file into VFS
    let inputFileName = 'WordToWordXML.docx';
    await window.spire.FetchFileToVFS(inputFileName, '', `${process.env.PUBLIC_URL}/static/data/`);

    // Create a document instance
    const doc = new docModule.Document();

    // Load the document from the virtual file system
    doc.LoadFromFile(inputFileName);

    // Define the output file name and save it as a Word 2003 OpenXML file
    const outputFileName = 'WordToWordXML-result.xml';
    doc.SaveToFile({ fileName: outputFileName, fileFormat: docModule.FileFormat.WordML });

    // Release resources
    doc.Dispose();

    const modifiedFileArray = window.dotnetRuntime.Module.FS.readFile(outputFileName);
    const blob = new Blob([modifiedFileArray], { type: 'application/vnd.openxmlformats-officedocument.wordprocessingml.document' });
    const url = URL.createObjectURL(blob);
    const a = document.createElement('a');
    a.href = url;
    a.download = outputFileName;
    a.click();
    URL.revokeObjectURL(url);
  };

 return (
    <div style={{ textAlign: 'center', height: '300px' }}>
      <h1>Convert Word To WordML</h1>
      <button onClick={WordToWordML}>Generate</button>
    </div>
  );
}
export default App;
With FileFormat.WordML passed to SaveToFile, the Word document is converted into a Word 2003 XML flat file
Word to OpenXML (WordXml)
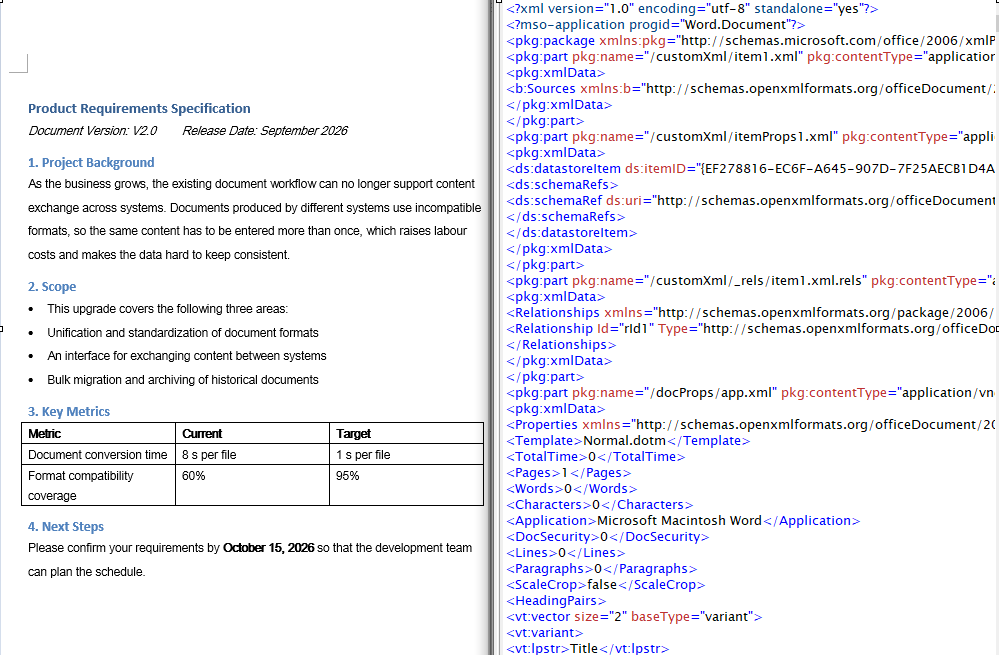
The flat file format of Word 2007 and later is called WordXml (Flat OPC): it packs the individual parts of the docx package — body, styles, relationships and so on — into a single XML file whose root element is <pkg:package>, and Word can open it directly just the same. The conversion flow is identical to WordML; only the save format differs. It again involves three steps: first, load the font files and the target Word document into the WASM virtual file system via FetchFileToVFS; then instantiate a Document, load the file and call SaveToFile with FileFormat.WordXml to save the document as a Word 2007 XML file; finally, read the generated XML file from VFS, wrap it as a Blob and trigger a browser download.
function App() {
  const WordToWordXml = async () => {
    const docModule = window.wasmModule?.spiredoc;
    if (!docModule) {
      alert('Spire.Doc is not ready yet');
      return;
    }

    // Load the sample file into VFS
    let inputFileName = 'WordToWordXML.docx';
    await window.spire.FetchFileToVFS(inputFileName, '', `${process.env.PUBLIC_URL}/static/data/`);

    // Create a document instance
    const doc = new docModule.Document();

    // Load the document from the virtual file system
    doc.LoadFromFile(inputFileName);

    // Define the output file name and save it as a Word 2007 OpenXML file
    const outputFileName = 'WordToWordXML-result-2007.xml';
    doc.SaveToFile({ fileName: outputFileName, fileFormat: docModule.FileFormat.WordXml });

    // Release resources
    doc.Dispose();

    const modifiedFileArray = window.dotnetRuntime.Module.FS.readFile(outputFileName);
    const blob = new Blob([modifiedFileArray], { type: 'application/vnd.openxmlformats-officedocument.wordprocessingml.document' });
    const url = URL.createObjectURL(blob);
    const a = document.createElement('a');
    a.href = url;
    a.download = outputFileName;
    a.click();
    URL.revokeObjectURL(url);
  };

 return (
    <div style={{ textAlign: 'center', height: '300px' }}>
      <h1>Convert Word To WordXml</h1>
      <button onClick={WordToWordXml}>Generate</button>
    </div>
  );
}
export default App;
With FileFormat.WordXml passed to SaveToFile, the parts of the Word document are merged into a single Word 2007 Flat OPC XML file
OpenXML to Word
Converting OpenXML to Word involves three steps: first, load the font files and the target XML file into the WASM virtual file system via FetchFileToVFS; then instantiate a Document and load the XML file directly with LoadFromFile — Spire.Doc recognizes the WordML and WordXml formats from the file contents automatically — and call SaveToFile to save it as a Docx2013 Word document; finally, read the generated .docx file from VFS, wrap it as a Blob and trigger a browser download.
function App() {
  const XMLToWord = async () => {
    const docModule = window.wasmModule?.spiredoc;
    if (!docModule) {
      alert('Spire.Doc is not ready yet');
      return;
    }

    // Load the sample file into VFS
    let inputFileName = 'XMLToWord.xml';
    await window.spire.FetchFileToVFS(inputFileName, '', `${process.env.PUBLIC_URL}/static/data/`);

    // Create a document instance
    const doc = new docModule.Document();

    // Load the OpenXML file from the virtual file system
    doc.LoadFromFile(inputFileName);

    // Define the output file name and save it as a Word document
    const outputFileName = 'XMLToWord-result.docx';
    doc.SaveToFile({ fileName: outputFileName, fileFormat: docModule.FileFormat.Docx2013 });

    // Release resources
    doc.Dispose();

    const modifiedFileArray = window.dotnetRuntime.Module.FS.readFile(outputFileName);
    const blob = new Blob([modifiedFileArray], { type: 'application/vnd.openxmlformats-officedocument.wordprocessingml.document' });
    const url = URL.createObjectURL(blob);
    const a = document.createElement('a');
    a.href = url;
    a.download = outputFileName;
    a.click();
    URL.revokeObjectURL(url);
  };

 return (
    <div style={{ textAlign: 'center', height: '300px' }}>
      <h1>Convert XML To Word</h1>
      <button onClick={XMLToWord}>Generate</button>
    </div>
  );
}
export default App;
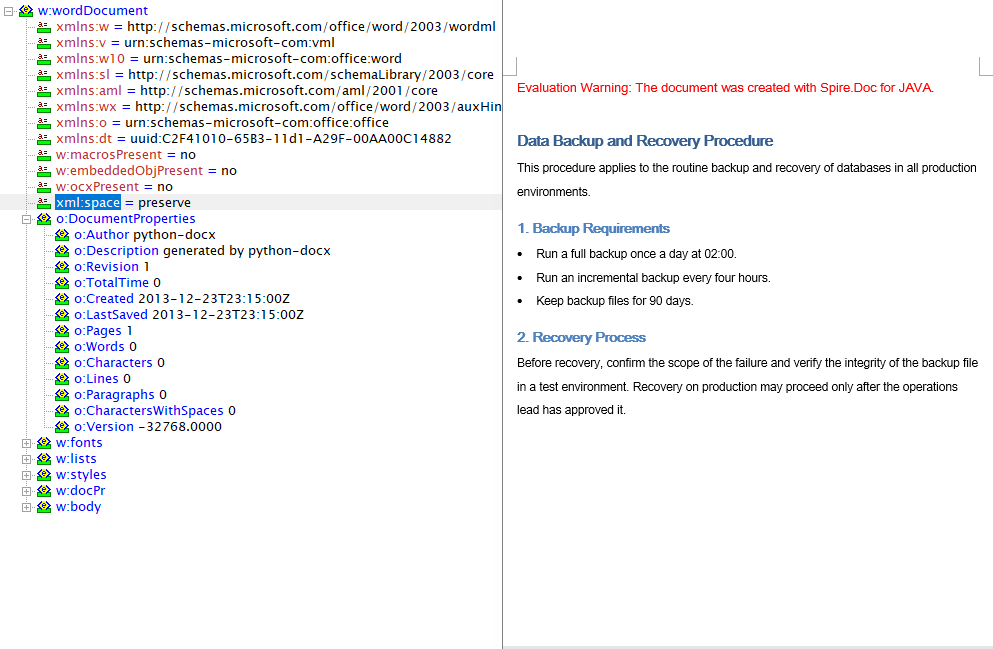
After the OpenXML file is loaded with LoadFromFile and saved as a Word document, the paragraphs, lists and tables it contains are restored in full
FAQ
The generated XML reports a format error when opened in Word
Cause: The save format does not match the target Word version. FileFormat.WordML maps to the Word 2003 XML format and FileFormat.WordXml to the Word 2007 and later Flat OPC format; the two have different structures, so opening a file saved in the newer format with an older version of Word fails.
Solution: Pick the enum value that matches the target Word version, and name the output file .xml:
// Word 2003 and earlier
doc.SaveToFile({ fileName: 'out.xml', fileFormat: wasmModule.FileFormat.WordML });

// Word 2007 and later
doc.SaveToFile({ fileName: 'out.xml', fileFormat: wasmModule.FileFormat.WordXml });
Loading the XML fails, or the converted document comes out empty
Cause: OpenXML to Word requires the input to be a complete WordprocessingML flat file; an ordinary custom data XML cannot be recognized by LoadFromFile.
Solution: Make sure the input XML was exported by Word or Spire.Doc — the root element of the WordML format is <w:wordDocument> and that of the WordXml format is <pkg:package>:
const doc = new wasmModule.Document();
doc.LoadFromFile('XMLToWord.xml');
Get a Free License
Spire.Doc for JavaScript offers a 30-day full-featured free trial license with no functional limitations. Apply here to evaluate before purchasing.
Convert Between Word and TXT with JavaScript in React
Plain text (TXT) is the lightest text carrier there is, commonly used for log export, data exchange and content archiving, while Word takes care of layout and formal delivery. Converting between the two in the browser is a common document-processing need: TXT to Word turns collected plain text into a well-formed document, and Word to TXT extracts body text that a program can keep processing. Spire.Doc for JavaScript performs the conversion in both directions in the browser via WebAssembly, using a virtual file system (VFS) to manage fonts and files — no backend server required.
It should be said up front that TXT is a plain-text format which carries no layout information of its own, so both directions only hold at the level of text: the styles, table structure and images on the Word side never reach the TXT file, and a Word document produced from TXT contains nothing but body paragraphs. Being clear about that boundary before you use the API keeps your expectations of the result realistic.
This article covers two core features:
For installation and project setup, refer to Integrating Spire.Doc for JavaScript in a React Project. The examples below assume Spire.Doc is installed and the WebAssembly module is initialized.
Convert TXT to Word
Converting TXT to Word involves three steps: first, load the font files and the target TXT file into the WASM virtual file system via FetchFileToVFS; then instantiate a Document and load the file with LoadFromFile — no fileFormat is passed here, so Spire.Doc identifies it as plain text from the file extension; finally, call SaveToFile to save the result as docx, read the generated file from VFS, wrap it as a Blob and trigger a browser download.
function App() {
  const TxtToWord = async () => {
    const docModule = window.wasmModule?.spiredoc;
    if (!docModule) {
      alert('Spire.Doc is not ready yet');
      return;
    }

    // Load the sample file into VFS
    let inputFileName = "TxtToWord.txt";
    await window.spire.FetchFileToVFS(inputFileName, "", `${process.env.PUBLIC_URL}/static/data/`);

    // Create a document instance
    const doc = new docModule.Document();

    // Load the document from the virtual file system
    doc.LoadFromFile(inputFileName);

    // Define the output file name
    const outputFileName = "TxtToWord-result.docx";

    // Save the document in the specified format
    doc.SaveToFile({fileName: outputFileName, fileFormat: docModule.FileFormat.Docx2013});

    // Release resources
    doc.Dispose();

    const modifiedFileArray = window.dotnetRuntime.Module.FS.readFile(outputFileName);
    const blob = new Blob([modifiedFileArray], { type: 'application/vnd.openxmlformats-officedocument.wordprocessingml.document' });
    const url = URL.createObjectURL(blob);
    const a = document.createElement('a');
    a.href = url;
    a.download = outputFileName;
    a.click();
    URL.revokeObjectURL(url);
  };

 return (
    <div style={{ textAlign: 'center', height: '300px' }}>
      <h1>Convert TXT To Word</h1>
      <button onClick={TxtToWord}>Generate</button>
    </div>
  );
}
export default App;
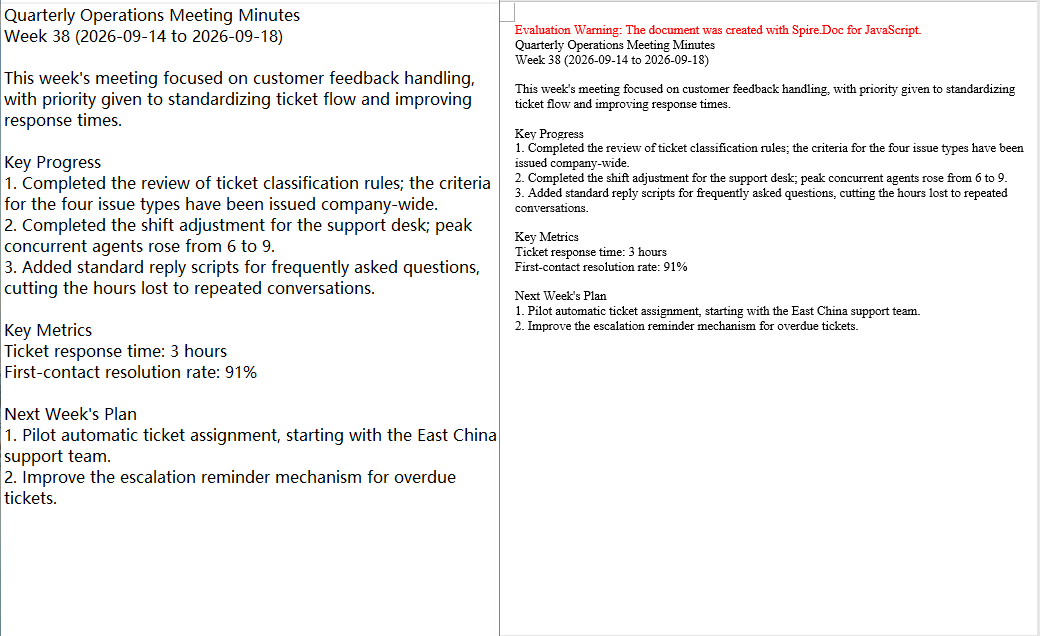
Because TXT carries no style information, the result is decided entirely by the default layout rules of Spire.Doc, and there are two things to keep in mind: every line break in the file is turned into a paragraph in Word, while blank lines are kept as empty paragraphs, so a file that ends with a line break gains an extra empty paragraph at the end; and every paragraph in the output uses the default Normal style, so headings, numbering and bullet levels are not created automatically — the 1., - and similar characters written in the TXT are kept as ordinary characters only.
After a TXT file is loaded with LoadFromFile and saved as a Word document, the text is restored to paragraphs line by line, all in the Normal style
Convert Word to TXT
Converting Word to TXT follows the same three steps as the other direction: load the font files and the target Word document into the virtual file system via FetchFileToVFS, then instantiate a Document and load the document with LoadFromFile. The difference is that FileFormat.Txt is specified when saving, so Spire.Doc extracts the document content by plain-text rules; finally, read the generated txt file from VFS, wrap it as a text/plain Blob and trigger a browser download.
function App() {
  const WordToTxt = async () => {
    const docModule = window.wasmModule?.spiredoc;
    if (!docModule) {
      alert('Spire.Doc is not ready yet');
      return;
    }

    // Load the sample file into VFS
    let inputFileName = "WordToTxt.docx";
    await window.spire.FetchFileToVFS(inputFileName, "", `${process.env.PUBLIC_URL}/static/data/`);

    // Create a document instance
    const doc = new docModule.Document();

    // Load the document from the virtual file system
    doc.LoadFromFile(inputFileName);

    // Define the output file name
    const outputFileName = "WordToTxt-result.txt";

    // Save the document as plain text
    doc.SaveToFile({fileName: outputFileName, fileFormat: docModule.FileFormat.Txt});

    // Release resources
    doc.Dispose();

    const modifiedFileArray = window.dotnetRuntime.Module.FS.readFile(outputFileName);
    const blob = new Blob([modifiedFileArray], { type: 'application/vnd.openxmlformats-officedocument.wordprocessingml.document' });
    const url = URL.createObjectURL(blob);
    const a = document.createElement('a');
    a.href = url;
    a.download = outputFileName;
    a.click();
    URL.revokeObjectURL(url);
  };

 return (
    <div style={{ textAlign: 'center', height: '300px' }}>
      <h1>Convert Word To TXT</h1>
      <button onClick={WordToTxt}>Generate</button>
    </div>
  );
}
export default App;
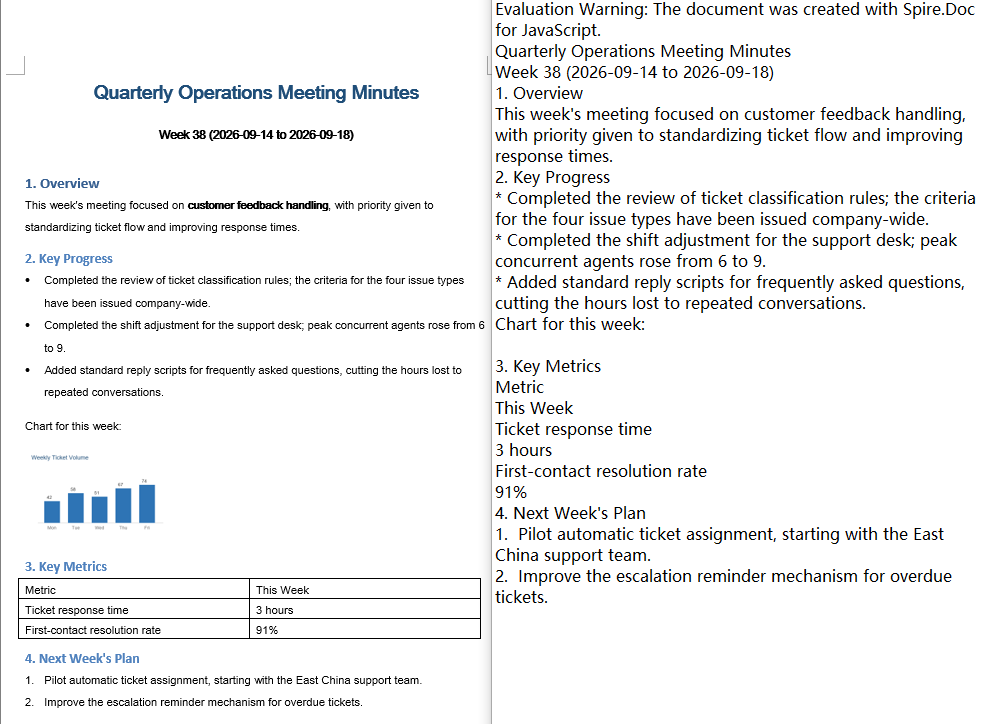
The FileFormat.Txt export follows a "text only" rule. Taking a Word document that contains a heading, a bullet list, a numbered list, a table and an image as the example, the exported result can be summed up as follows:
- The font, font size, colour and bold formatting of headings, body text and list items are all dropped, and everything is reduced to ordinary text lines;
- Bullet list items are written with a
*prefix and numbered items with a1.prefix, and the list level information is lost along with them; - The table is expanded cell by cell into separate lines, so the correspondence between rows and columns no longer holds;
- Images are not exported, and the paragraph that held one becomes an empty line.
In addition, the exported txt is UTF-8 encoded with a BOM and uses CRLF line breaks, so wrapping the Blob with the text/plain type is all that is needed.
With FileFormat.Txt passed to SaveToFile, the styles, tables and images of the Word document are not preserved and only the text content is written out in order
FAQ
Table columns shift and list markers turn into asterisks after converting Word to TXT
Cause: TXT has no concept of rows, columns or list structure, and FileFormat.Txt only extracts text: the table is written out line by line in cell order, bullets are replaced with * and numbering with the number text. This is a limitation of the format itself rather than a conversion failure.
Solution: If all the downstream consumer needs is readable text, restore the structure on the reading side using the rules above; if the table and list layout has to be preserved, use a format that can carry structure instead, such as HTML or OpenXML.
The converted Word document has no heading or list styles
Cause: TXT carries no style information, so when LoadFromFile loads plain text it can only write each line as a paragraph with the default Normal style — the 1., - and similar characters in the TXT are ordinary characters and are not parsed as headings or lists.
Solution: Set the styles of the paragraphs you care about again after the conversion; if setting them paragraph by paragraph is not acceptable, complete this step with an input format that already carries structure (such as HTML) instead.
Loading a TXT file reports that the file type cannot be detected
Cause: When LoadFromFile is called without fileFormat, the format is judged from the file extension. When the extension of the input file is not .txt (for example .log, .dat, or no extension at all), Spire.Doc cannot identify it and throws an exception such as Cannot detect current file type.
Solution: Specify the plain-text format explicitly:
doc.LoadFromFile({ fileName: inputFileName, fileFormat: wasmModule.FileFormat.Txt });
Get a Free License
Spire.Doc for JavaScript offers a 30-day full-featured free trial license with no functional limitations. Apply here to evaluate before purchasing.
Convert HTML to Word with JavaScript in React
HTML is the most universal carrier for presenting content on the web and for editing rich text, while Word remains the standard format for delivering and archiving documents. Converting between the two comes up frequently in scenarios such as report export, content archiving, and storing rich text in a database. Spire.Doc for JavaScript performs this conversion directly in the browser via WebAssembly, using a virtual file system (VFS) to manage input and output files — no backend server required.
This article covers two core features:
For installation and project setup, refer to Integrating Spire.Doc for JavaScript in a React Project. The examples below assume Spire.Doc is installed and the WebAssembly module is initialized.
HTML File to Word
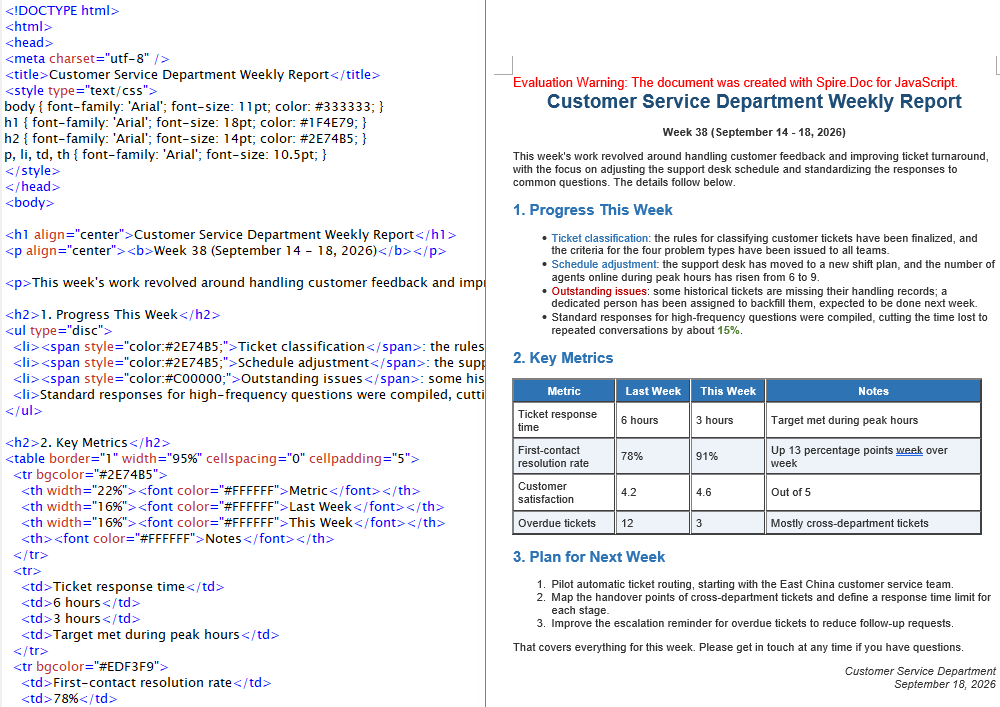
Converting an HTML file to Word breaks down into three stages: first, load the font file and the target HTML file into the WASM virtual file system via FetchFileToVFS; then instantiate a Document and call LoadFromFile with FileFormat.Html, so that Spire.Doc parses the tags, lists, and table structures in the file; finally, call SaveToFile to save the result as a docx, read the generated file from VFS, wrap it in a Blob, and trigger a browser download.
function App() {
  const htmlFileToWord = async () => {
    const docModule = window.wasmModule?.spiredoc;
    if (!docModule) {
      alert('Spire.Doc is not ready yet');
      return;
    }

    const inputFileName = 'HtmlFileToWord.html';
    await window.spire.FetchFileToVFS(inputFileName, '', `${process.env.PUBLIC_URL}data/`);

    // Create a Document instance and load the file in HTML format
    const doc = new docModule.Document();
    doc.LoadFromFile({
      fileName: inputFileName,
      fileFormat: docModule.FileFormat.Html,
      validationType: docModule.XHTMLValidationType.None,
    });

    // Define the output file name and save it as Word
    const outputFileName = 'HtmlFileToWord-result.docx';
    doc.SaveToFile({ fileName: outputFileName, fileFormat: docModule.FileFormat.Docx });

    // Release resources
    doc.Dispose();

    const modifiedFileArray = window.dotnetRuntime.Module.FS.readFile(outputFileName);
    const blob = new Blob([modifiedFileArray], { type: 'application/vnd.openxmlformats-officedocument.wordprocessingml.document' });
    const url = URL.createObjectURL(blob);
    const a = document.createElement('a');
    a.href = url;
    a.download = outputFileName;
    a.click();
    URL.revokeObjectURL(url);
  };

 return (
    <div style={{ textAlign: 'center', height: '300px' }}>
      <h1>Convert an HTML File to a Word Document</h1>
      <button onClick={htmlFileToWord}>Generate</button>
    </div>
  );
}
export default App;
The Word document generated by converting an HTML file via LoadFromFile
HTML String to Word
In real projects the HTML waiting to be converted usually does not live on disk. It is the submitted result of a rich text editor, a fragment returned by a backend API, or a string assembled from a front-end template. Input like this does not need to be loaded from a file — appending the string to a paragraph is enough, and the rest of the flow matches HTML file to Word.
function App() {
  const htmlStringToWord = async () => {
    const docModule = window.wasmModule?.spiredoc;
    if (!docModule) {
      alert('Spire.Doc is not ready yet');
      return;
    }

    // Load the font into VFS
    await window.spire.FetchFileToVFS("ARIALUNI.TTF","/Library/Fonts/",`${process.env.PUBLIC_URL}static/font/`);

    // Define the HTML string to be converted
    let HTML = "<html><head><meta charset=\"utf-8\" /><style type=\"text/css\">body{font-family:'Arial Unicode MS';font-size:11pt;}h2{font-family:'Arial Unicode MS';font-size:16pt;color:#1F4E79;}p,li,td,th{font-family:'Arial Unicode MS';font-size:11pt;}</style></head><body>";
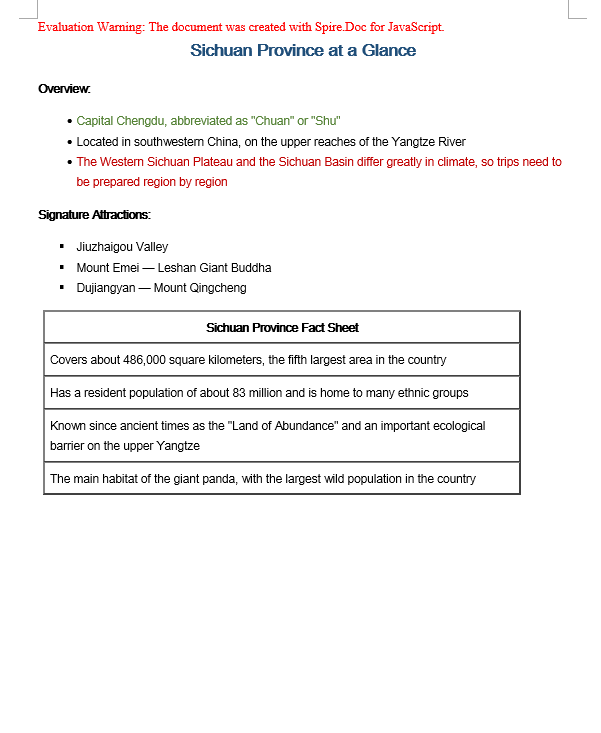
  HTML += "<h2 align=\"center\">Sichuan Province at a Glance</h2><p><b>Overview:</b></p> ";
  HTML += "<ul type=\"disc\"><li><span style='color:#548235;'>Capital Chengdu, abbreviated as \"Chuan\" or \"Shu\"</span></li><li>Located in southwestern China, on the upper reaches of the Yangtze River</li><li><span style='color:#C00000'>The Western Sichuan Plateau and the Sichuan Basin differ greatly in climate, so trips need to be prepared region by region</span></li></ul><p><b>Signature Attractions:</b></p>";
  HTML += "<ul type=\"square\"><li>Jiuzhaigou Valley</li><li>Mount Emei — Leshan Giant Buddha</li><li>Dujiangyan — Mount Qingcheng</li></ul>";
  HTML += "<table border=\"1\" width=\"90%\" cellspacing=\"0\" cellpadding=\"6\"><tr><th>Sichuan Province Fact Sheet</th></tr><tr><td>Covers about 486,000 square kilometers, the fifth largest area in the country</td></tr><tr><td>Has a resident population of about 83 million and is home to many ethnic groups</td></tr>";
  HTML += "<tr><td>Known since ancient times as the \"Land of Abundance\" and an important ecological barrier on the upper Yangtze</td></tr><tr><td>The main habitat of the giant panda, with the largest wild population in the country</td></tr></table></body></html>";
    // Create a document and add a section and a paragraph
    const doc = new docModule.Document();
    const section = doc.AddSection();
    const paragraph = section.AddParagraph();

    // Append the HTML string to the paragraph
    paragraph.AppendHTML(HTML);

    // Define the output file name and save it as Word
    const outputFileName = 'HtmlStringToWord-result.docx';
    doc.SaveToFile({ fileName: outputFileName, fileFormat: docModule.FileFormat.Docx2013 });

    // Release resources
    doc.Dispose();

    const modifiedFileArray = window.dotnetRuntime.Module.FS.readFile(outputFileName);
    const blob = new Blob([modifiedFileArray], { type: 'application/vnd.openxmlformats-officedocument.wordprocessingml.document' });
    const url = URL.createObjectURL(blob);
    const a = document.createElement('a');
    a.href = url;
    a.download = outputFileName;
    a.click();
    URL.revokeObjectURL(url);
  };

 return (
    <div style={{ textAlign: 'center', height: '300px' }}>
      <h1>Write an HTML String into a Word Document</h1>
      <button onClick={htmlStringToWord}>Generate</button>
    </div>
  );
}
export default App;
The Word document generated by converting an HTML string via AppendHTML
FAQ
Converted Word text displays as boxes or garbled characters
Cause: The font files required for rendering are missing from the WASM virtual file system. LoadFromFile matches fonts for the text while it parses the HTML, and content written by AppendHTML also needs glyphs looked up by font name — if the matching font is not present in VFS, non-ASCII characters such as Chinese will display as boxes or garbled text.
Solution: Load the font file into VFS via FetchFileToVFS before converting:
await window.spire.FetchFileToVFS(
  'ARIALUNI.TTF', '/Library/Fonts/', '/'
);
A validation-related exception is thrown when loading an HTML file
Cause: XHTMLValidationType is set too strictly. Real-world HTML files usually contain unclosed tags, inconsistently cased attributes, or non-standard markup, so they do not conform to the XHTML specification — strict validation throws during the parsing stage.
Solution: For HTML from uncontrolled sources, turn validation off with XHTMLValidationType.None:
wordDocument.LoadFromFile({
  fileName: inputFileName,
  fileFormat: docModule.FileFormat.Html,
  validationType: docModule.XHTMLValidationType.None,
});
Get a Free License
Spire.Doc for JavaScript offers a 30-day full-featured free trial license with no functional limitations. Apply here to evaluate before purchasing.
Add and Remove Word Page Breaks with JavaScript in React
Inserting a page break in a Word document is the most common way to control where a chapter begins and to keep a heading from being split from its body text across a page boundary; cleaning up the redundant page breaks in a document, on the other hand, is the key step in dealing with the blank pages left behind after content is copied from another document. Spire.Doc for JavaScript carries out these operations directly in the browser via WebAssembly, using a virtual file system (VFS) to manage input and output files — no backend server required.
This article covers two core features:
For installation and project setup, refer to Integrating Spire.Doc for JavaScript in a React Project. The examples below assume Spire.Doc is installed and the WebAssembly module is initialized.
Insert a Page Break
Inserting a page break involves three steps: first, load the font files and the target Word document into the WASM virtual file system via FetchFileToVFS; then instantiate a Document, load the document, locate the target paragraph and call AppendBreak with BreakType.PageBreak, which appends the page break to the end of that paragraph as one of its child objects; finally, read the saved file from VFS, wrap it as a Blob and trigger a browser download.
function App() {
  const InsertPageBreak = async () => {
    const docModule = window.wasmModule?.spiredoc;
    if (!docModule) {
      alert('Spire.Doc is not ready yet');
      return;
    }

    // Load the target Word document into VFS
    const inputFileName = "Template_Docx_1.docx";
    await window.spire.FetchFileToVFS(inputFileName, "", `${process.env.PUBLIC_URL}static/data/`);

    // Create a Document instance and load the document
    const doc = new docModule.Document();
    doc.LoadFromFile(inputFileName);

    // Locate the fourth paragraph of the first section and append a page break to its end
    doc.Sections.get_Item(0).Paragraphs.get_Item(3).AppendBreak(docModule.BreakType.PageBreak);

    // Define the output file name
    const outputFileName = "InsertPageBreak_out.docx";

    // Save the document to VFS
    doc.SaveToFile({ fileName: outputFileName, fileFormat: docModule.FileFormat.Docx2013 });

    doc.Dispose();

    const modifiedFileArray = window.dotnetRuntime.Module.FS.readFile(outputFileName);
    const blob = new Blob([modifiedFileArray], { type: 'application/vnd.openxmlformats-officedocument.wordprocessingml.document' });
    const url = URL.createObjectURL(blob);
    const a = document.createElement('a');
    a.href = url;
    a.download = outputFileName;
    a.click();
    URL.revokeObjectURL(url);
  };

 return (
    <div style={{ textAlign: 'center', height: '300px' }}>
      <h1>Insert a Page Break into a Word Document</h1>
      <button onClick={InsertPageBreak}>Generate</button>
    </div>
  );
}
export default App;
The document after a page break is appended to the end of the fourth paragraph
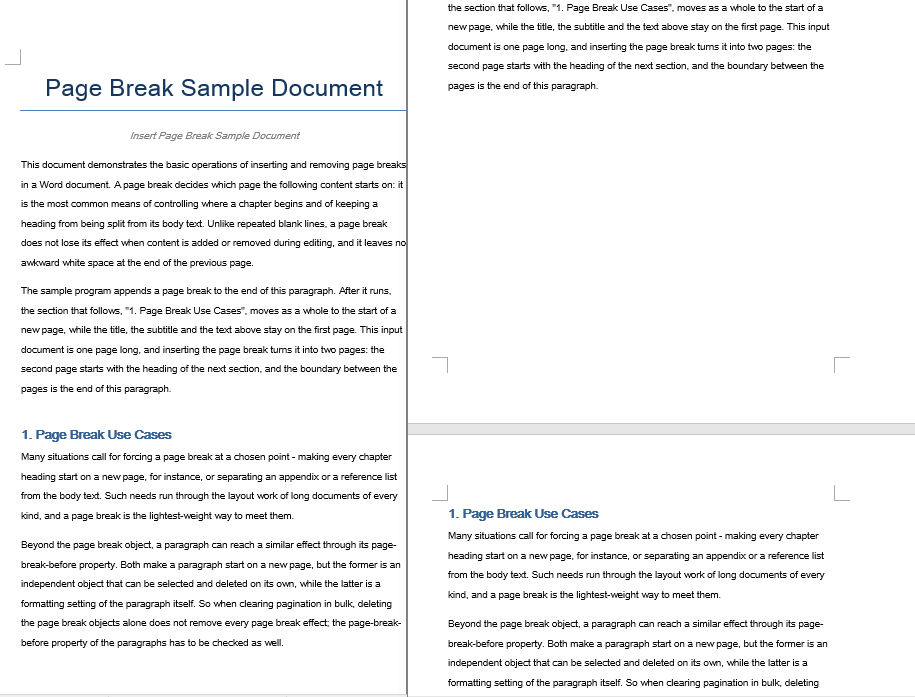
Remove Page Breaks
Removing page breaks also involves three steps: first, load the font files and the Word document that contains the page breaks into the WASM virtual file system via FetchFileToVFS; then instantiate a Document, load the document, walk through the child objects of every paragraph in each section, test with DocumentObjectType whether an object is a page break, and remove it with ChildObjects.Remove; finally, read the saved file from VFS, wrap it as a Blob and trigger a browser download.
function App() {
  const RemovePageBreaks = async () => {
    const docModule = window.wasmModule?.spiredoc;
    if (!docModule) {
      alert('Spire.Doc is not ready yet');
      return;
    }

    // Load the target Word document into VFS
    const inputFileName = "Template_Docx_4.docx";
    await window.spire.FetchFileToVFS(inputFileName, "", `${process.env.PUBLIC_URL}static/data/`);

    // Create a Document instance and load the document
    const doc = new docModule.Document();
    doc.LoadFromFile(inputFileName);

    // Get the first section
    const section = doc.Sections.get_Item(0);

    // Walk through every paragraph in the section
    for (let j = 0; j < section.Paragraphs.Count; j++) {
        const p = section.Paragraphs.get_Item(j);

        // Walk the paragraph's child objects backwards, so that removing an element does not shift the indices still to come
        for (let i = p.ChildObjects.Count - 1; i >= 0; i--) {
            const obj = p.ChildObjects.get_Item(i);

            // Test whether the object is a page break
            if (obj.DocumentObjectType == docModule.DocumentObjectType.Break
                && obj.BreakType == docModule.BreakType.PageBreak) {
                // Remove the page break from the paragraph
                p.ChildObjects.Remove(obj);
            }
        }
    }

    // Define the output file name
    const outputFileName = "RemovePageBreaks_out.docx";

    // Save the document to VFS
    doc.SaveToFile({ fileName: outputFileName, fileFormat: docModule.FileFormat.Docx2013 });
    doc.Dispose();

    const modifiedFileArray = window.dotnetRuntime.Module.FS.readFile(outputFileName);
    const blob = new Blob([modifiedFileArray], { type: 'application/vnd.openxmlformats-officedocument.wordprocessingml.document' });
    const url = URL.createObjectURL(blob);
    const a = document.createElement('a');
    a.href = url;
    a.download = outputFileName;
    a.click();
    URL.revokeObjectURL(url);
  };

 return (
    <div style={{ textAlign: 'center', height: '300px' }}>
      <h1>Remove Page Breaks from a Word Document</h1>
      <button onClick={RemovePageBreaks}>Generate</button>
    </div>
  );
}
export default App;
The document after every page break has been removed
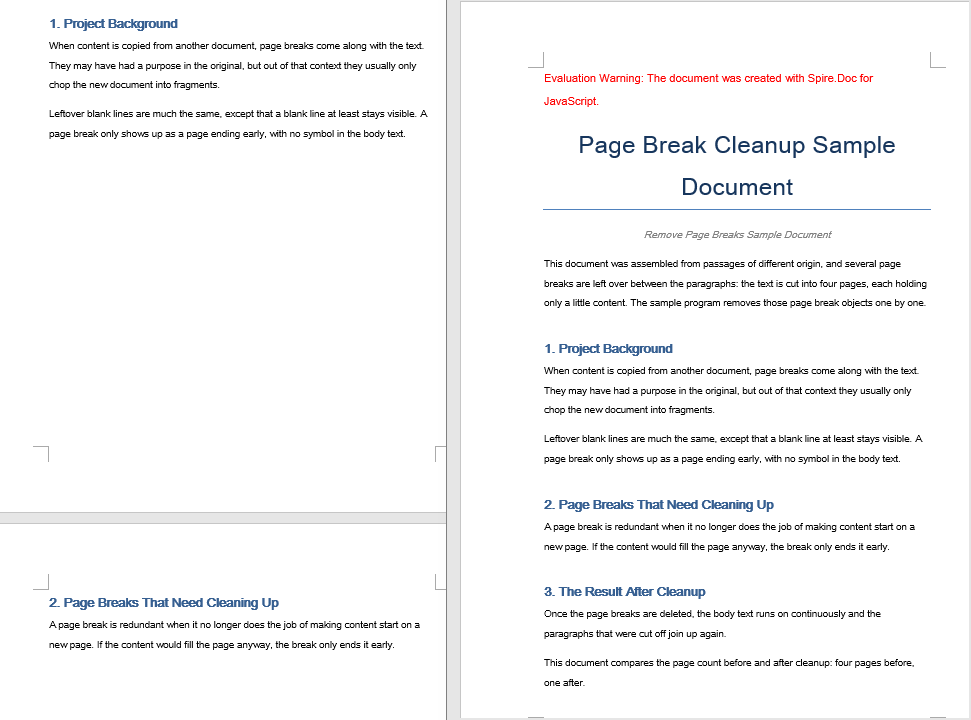
FAQ
An extra blank line appears at the top of the new page after inserting a page break
Cause: AppendBreak appends the page break to the end of the target paragraph, so that paragraph's own spacing after it is carried over to the start of the new page along with the page break, which shows up as a strip of white space at the top of the new page. If the paragraph has automatic spacing enabled, the height of that strip also changes with the font size.
Solution: Clear the spacing after the target paragraph before inserting the page break:
const para = document.Sections.get_Item(0).Paragraphs.get_Item(3);

// Turn off automatic spacing after the paragraph and set the space after it to 0
para.Format.AfterAutoSpacing = false;
para.Format.AfterSpacing = 0;

// Then insert the page break
para.AppendBreak(wasmModule.BreakType.PageBreak);
The document is still paginated after the page breaks are removed
Cause: Not every page break in a document comes from a page break object. If a paragraph itself has the page-break-before property set, that paragraph will still start on a new page even after the page break objects have been removed; walking ChildObjects and deleting DocumentObjectType.Break objects alone cannot take that kind of pagination out.
Solution: Reset the paragraph's page-break-before property at the same time as the page break objects are removed:
const section = document.Sections.get_Item(0);

for (let j = 0; j < section.Paragraphs.Count; j++) {
  const p = section.Paragraphs.get_Item(j);

  // Clear the page-break-before property set on the paragraph
  if (p.Format.PageBreakBefore) {
    p.Format.PageBreakBefore = false;
  }
}
Get a Free License
Spire.Doc for JavaScript offers a 30-day full-featured free trial license with no functional limitations. Apply here to evaluate before purchasing.
Add and Set the Gutter Position in Word with JavaScript in React
A gutter is the extra white space a page sets aside for binding, so that the body text is not hidden by the staples or the glued spine once the document is printed and bound. Because it is part of the page setup, it has to be fixed when the document is generated and cannot be added later at the printing stage. Spire.Doc for JavaScript performs page setup directly in the browser via WebAssembly, using a virtual file system (VFS) to manage input and output files — no backend server required.
This article covers two core features:
For installation and project setup, refer to Integrating Spire.Doc for JavaScript in a React Project. The examples below assume Spire.Doc is installed and the WebAssembly module is initialized.
Add a Gutter
Adding a gutter involves three steps: first, load the font files and the target Word document into the WASM virtual file system via FetchFileToVFS; then instantiate a Document, load the document, get the target section and set the gutter width through PageSetup.Gutter — the value is in points and applies to the left side of the page by default; finally, read the saved file from VFS, wrap it as a Blob and trigger a browser download.
function App() {
  const AddGutter = async () => {
    const docModule = window.wasmModule?.spiredoc;
    if (!docModule) {
      alert('Spire.Doc is not ready yet');
      return;
    }

    // Load the target Word document into VFS
    const inputFileName = "GutterSample.docx";
    await window.spire.FetchFileToVFS(inputFileName, "", `${process.env.PUBLIC_URL}static/data/`);

    // Create a Document instance and load the document
    const doc = new docModule.Document();
    doc.LoadFromFile(inputFileName);

    // Get the first section
    const section = doc.Sections.get_Item(0);

    // Set the gutter width in points; it applies to the left side of the page by default
    section.PageSetup.Gutter = 100;

    // Define the output file name
    const outputFileName = "AddGutter_out.docx";

    // Save the document to VFS
    doc.SaveToFile({ fileName: outputFileName, fileFormat: docModule.FileFormat.Docx2013 });

    // Release resources
    doc.Dispose();

    const modifiedFileArray = window.dotnetRuntime.Module.FS.readFile(outputFileName);
    const blob = new Blob([modifiedFileArray], { type: 'application/vnd.openxmlformats-officedocument.wordprocessingml.document' });
    const url = URL.createObjectURL(blob);
    const a = document.createElement('a');
    a.href = url;
    a.download = outputFileName;
    a.click();
    URL.revokeObjectURL(url);
  };

 return (
    <div style={{ textAlign: 'center', height: '300px' }}>
      <h1>Add a Gutter to a Word Document</h1>
      <button onClick={AddGutter}>Generate</button>
    </div>
  );
}
export default App;
The document after a gutter has been added
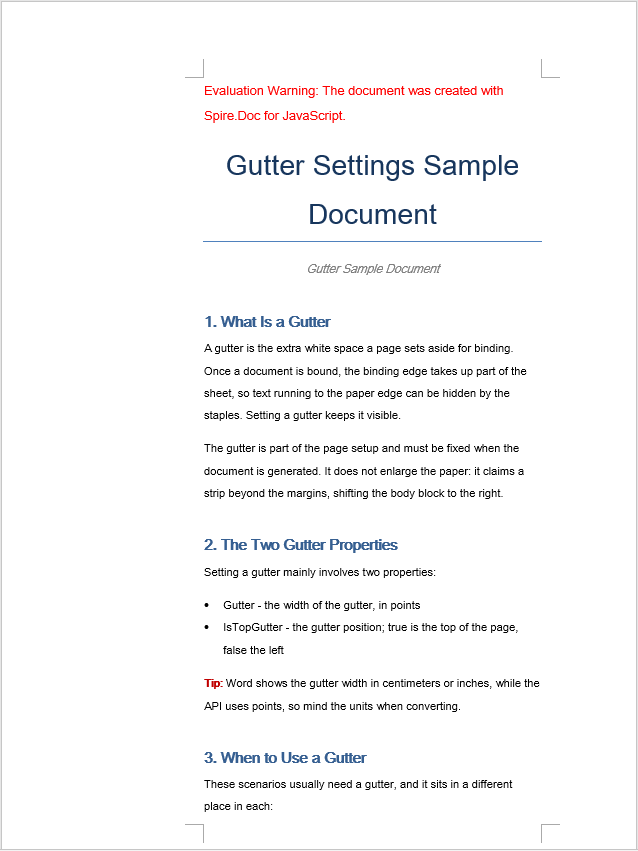
Set the Gutter Position
The gutter position decides which side of the page the strip of white space is added to: PageSetup.IsTopGutter set to true means a top gutter, and false (the default) means a left gutter. The steps are the same three as before: first, load the font files and the target Word document into the WASM virtual file system via FetchFileToVFS; then instantiate a Document, load the document, get the target section and set PageSetup.IsTopGutter to true to turn on the top gutter, then set the gutter width through PageSetup.Gutter; finally, read the saved file from VFS, wrap it as a Blob and trigger a browser download.
function App() {
  const SetGutterPosition = async () => {
    const docModule = window.wasmModule?.spiredoc;
    if (!docModule) {
      alert('Spire.Doc is not ready yet');
      return;
    }

    // Load the target Word document into VFS
    const inputFileName = "GutterSample.docx";
    await window.spire.FetchFileToVFS(inputFileName, "", `${process.env.PUBLIC_URL}static/data/`);

    // Create a Document instance and load the document
    const doc = new docModule.Document();
    doc.LoadFromFile(inputFileName);

    // Get the first section
    const section = doc.Sections.get_Item(0);

    // Set the gutter position to the top
    section.PageSetup.IsTopGutter = true;

    // Set the gutter width in points
    section.PageSetup.Gutter = 100;

    // Define the output file name
    const outputFileName = "SetGutterPosition_out.docx";

    // Save the document to VFS
    doc.SaveToFile({ fileName: outputFileName, fileFormat: docModule.FileFormat.Docx2013 });

    // Release resources
    doc.Dispose();

    const modifiedFileArray = window.dotnetRuntime.Module.FS.readFile(outputFileName);
    const blob = new Blob([modifiedFileArray], { type: 'application/vnd.openxmlformats-officedocument.wordprocessingml.document' });
    const url = URL.createObjectURL(blob);
    const a = document.createElement('a');
    a.href = url;
    a.download = outputFileName;
    a.click();
    URL.revokeObjectURL(url);
  };

 return (
    <div style={{ textAlign: 'center', height: '300px' }}>
      <h1>Set the Gutter Position in a Word Document</h1>
      <button onClick={SetGutterPosition}>Generate</button>
    </div>
  );
}
export default App;
The document after the top gutter has been set
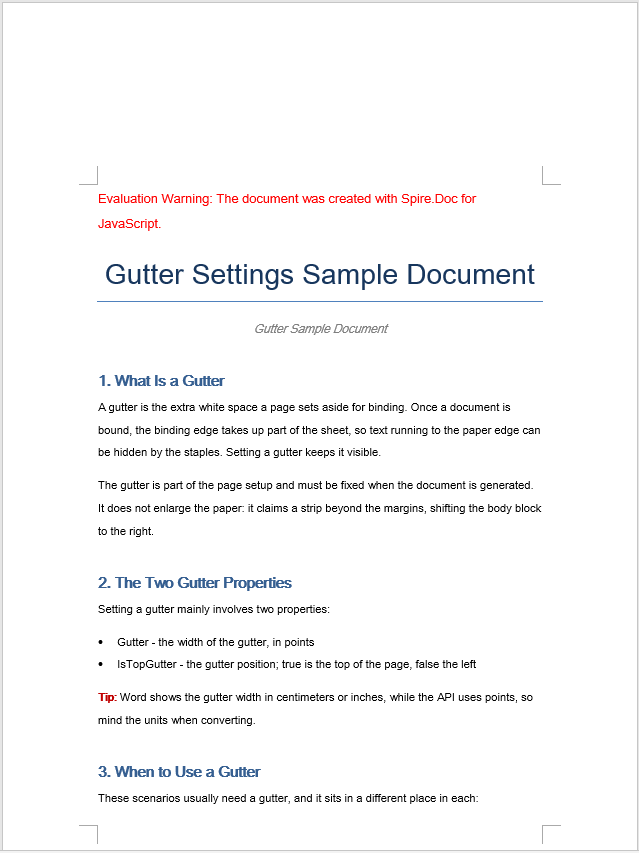
FAQ
The gutter width does not match the value shown in the Word interface
Cause: PageSetup.Gutter is measured in points, while the Word Page Setup dialog box displays centimeters or inches by default. Passing 100 directly, as the examples do, means 100 points — about 3.53 centimeters — which is noticeably wide on an A4 page.
Solution: Convert the unit before passing the value in. One point is 1/72 inch and one inch is 2.54 centimeters, so the formula for converting centimeters to points is points = centimeters ÷ 2.54 × 72:
// Convert a 1.5-centimeter gutter width to points
const gutterInPoints = (1.5 / 2.54) * 72;
section.PageSetup.Gutter = gutterInPoints;
The text area becomes too narrow after a gutter is set
Cause: The gutter claims space in addition to the margins; it does not enlarge the page but squeezes the text area inwards. If the existing margins were already generous, adding a gutter narrows the usable width further, leaving too few characters per line and making paragraphs wrap far more often.
Solution: Reduce the margin on the same side at the same time as the gutter is set, so that the usable text width is preserved:
const pageSetup = section.PageSetup;

// Set a 1.5-centimeter gutter (centimeters converted to points)
pageSetup.Gutter = (1.5 / 2.54) * 72;

// The gutter takes up space on the left, so reduce the left margin accordingly
pageSetup.Margins.Left = 60;
Get a Free License
Spire.Doc for JavaScript offers a 30-day full-featured free trial license with no functional limitations. Apply here to evaluate before purchasing.