Set Word Document Backgrounds with JavaScript in React
Setting a page background for a Word document is one of the most common ways to polish contracts, official papers and brand materials: a soft base color, or a background image that matches the corporate visual identity, is enough to give the whole document a consistent visual tone. Spire.Doc for JavaScript performs this setting directly in the browser via WebAssembly, using a virtual file system (VFS) to manage input and output files — no backend server required.
This article covers three core features:
For installation and project setup, refer to Integrating Spire.Doc for JavaScript in a React Project. The examples below assume Spire.Doc is installed and the WebAssembly module is initialized.
Set a Solid Color Background
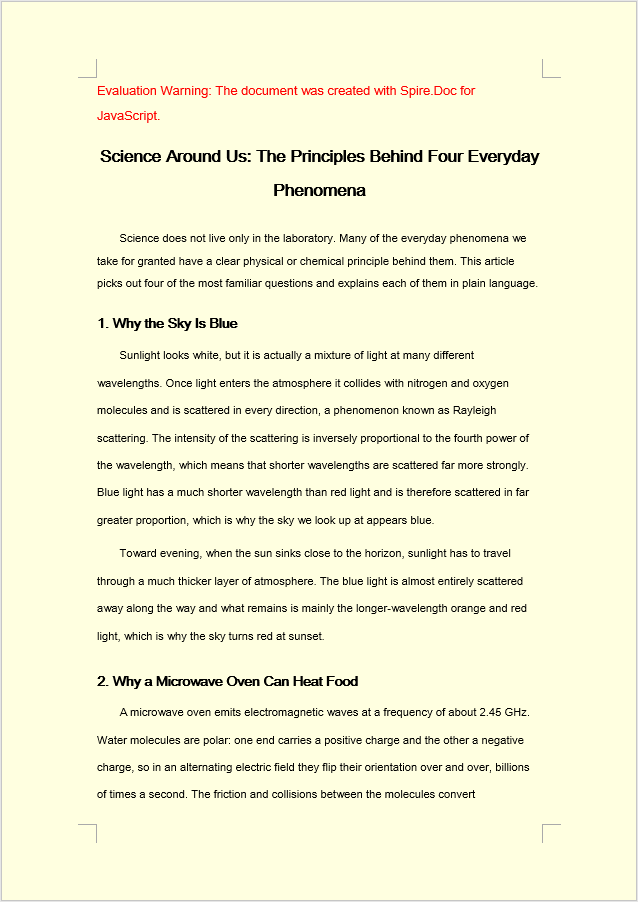
The solid color background involves three stages: first, load the font files and the target Word file into the WASM virtual file system via FetchFileToVFS; then instantiate a Document and load the file, set Background.Type to BackgroundType.Color, and assign a built-in color value to Background.Color; finally, save the document to the VFS with SaveToFile, read the generated docx file from it, wrap it as a Blob, and trigger a browser download.
function App() {
  const SetSolidColorBackground = async () => {
    const docModule = window.wasmModule?.spiredoc;
    if (!docModule) {
      alert('Spire.Doc is not ready yet');
      return;
    }
    // Load the sample file into the virtual file system (VFS)
    let inputFileName = "ScienceTemplate.docx";
    await window.spire.FetchFileToVFS(inputFileName, "", `${process.env.PUBLIC_URL}static/data/`);

    // Create Word document
    let doc = new docModule.Document();

    // Load the file
    doc.LoadFromFile(inputFileName);

    // Set the background type as Color
    doc.Background.Type = docModule.BackgroundType.Color;

    // Set the background color
    doc.Background.Color = docModule.Color.get_LightYellow();

    // Define the output file name
    const outputFileName = "SetSolidColorBackground_out.docx";

    // Save the document to the specified path
    doc.SaveToFile({ fileName: outputFileName, fileFormat: docModule.FileFormat.Docx2013 });

    doc.Dispose();

    const modifiedFileArray = window.dotnetRuntime.Module.FS.readFile(outputFileName);
    const blob = new Blob([modifiedFileArray], { type: 'application/vnd.openxmlformats-officedocument.wordprocessingml.document' });
    const url = URL.createObjectURL(blob);
    const a = document.createElement('a');
    a.href = url;
    a.download = outputFileName;
    a.click();
    URL.revokeObjectURL(url);
  };

 return (
    <div style={{ textAlign: 'center', height: '300px' }}>
      <h1>Set a Solid Color Background for a Word Document</h1>
      <button onClick={SetSolidColorBackground}>Generate</button>
    </div>
  );
}
export default App;
After Background.Color has been applied, the whole page is filled with the built-in LightYellow background color.
Set a Gradient Background
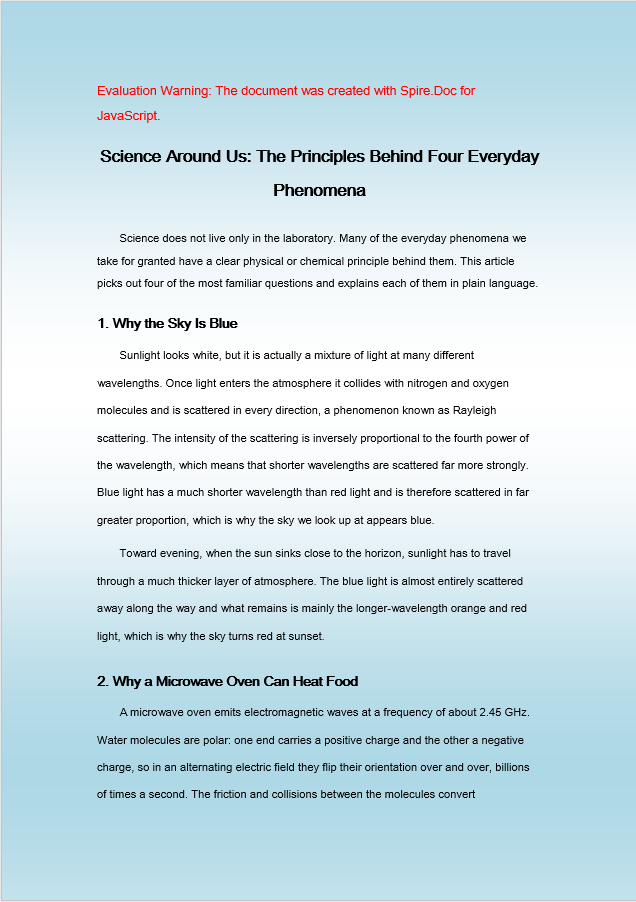
A gradient background follows the same flow as a solid color background; only the middle stage differs. Set Background.Type to BackgroundType.Gradient, retrieve the background gradient object through Background.Gradient, set the start color Color1 and the end color Color2 separately, and then use ShadingStyle and ShadingVariant to control the direction of the gradient and the way it transitions.
function App() {
  const SetGradientBackground = async () => {
    const docModule = window.wasmModule?.spiredoc;
    if (!docModule) {
      alert('Spire.Doc is not ready yet');
      return;
    }
    // Load the sample file into the virtual file system (VFS)
    let inputFileName = "ScienceTemplate.docx";
    await window.spire.FetchFileToVFS(inputFileName, "", `${process.env.PUBLIC_URL}static/data/`);

    // Create Word document
    let doc = new docModule.Document();

    // Load the file
    doc.LoadFromFile(inputFileName);

    // Set the background type as Gradient
    doc.Background.Type = docModule.BackgroundType.Gradient;
    let gradient = doc.Background.Gradient;

    // Set the start color and the end color of the gradient
    gradient.Color1 = docModule.Color.get_White();
    gradient.Color2 = docModule.Color.get_LightBlue();

    // Set the shading style and variant of the gradient
    gradient.ShadingVariant = docModule.GradientShadingVariant.ShadingDown;
    gradient.ShadingStyle = docModule.GradientShadingStyle.Horizontal;

    // Define the output file name
    const outputFileName = "SetGradientBackground_out.docx";

    // Save the document to the specified path
    doc.SaveToFile({ fileName: outputFileName, fileFormat: docModule.FileFormat.Docx2013 });

    doc.Dispose();

    const modifiedFileArray = window.dotnetRuntime.Module.FS.readFile(outputFileName);
    const blob = new Blob([modifiedFileArray], { type: 'application/vnd.openxmlformats-officedocument.wordprocessingml.document' });
    const url = URL.createObjectURL(blob);
    const a = document.createElement('a');
    a.href = url;
    a.download = outputFileName;
    a.click();
    URL.revokeObjectURL(url);
  };

 return (
    <div style={{ textAlign: 'center', height: '300px' }}>
      <h1>Set a Gradient Background for a Word Document</h1>
      <button onClick={SetGradientBackground}>Generate</button>
    </div>
  );
}
export default App;
After Background.Gradient has been applied, the page background is filled with a white and light blue gradient.
Set a Picture Background
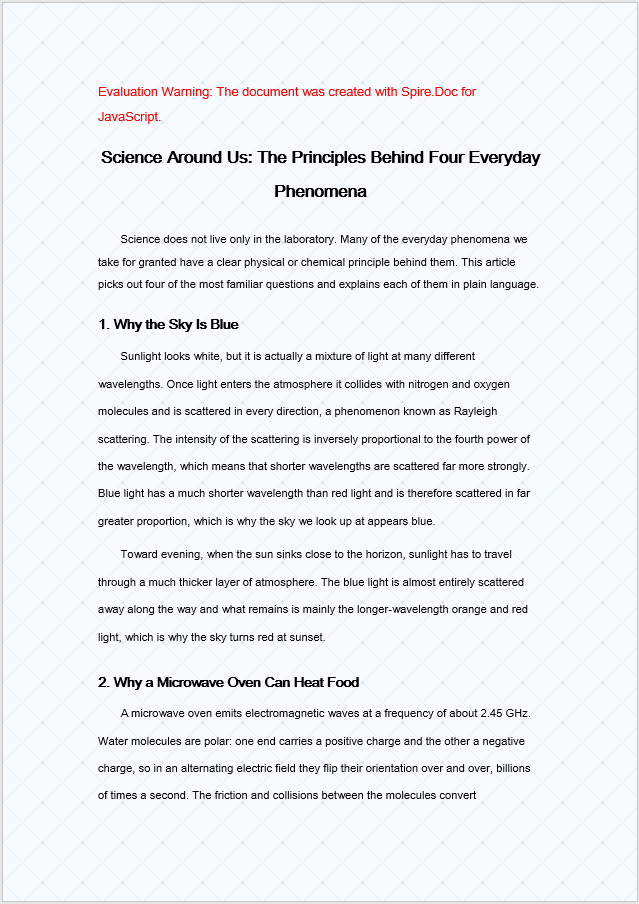
A picture background is similar to the two backgrounds above; the difference lies in how the resources are prepared and assigned. At the loading stage the background image has to be loaded into the VFS together with the font files and the target Word file; then set Background.Type to BackgroundType.Picture and call Background.SetPicture with the path of the image inside the VFS to tile the image across the whole page as the background.
function App() {
  const SetImageBackground = async () => {
    const docModule = window.wasmModule?.spiredoc;
    if (!docModule) {
      alert('Spire.Doc is not ready yet');
      return;
    }
    // Load the sample file into the virtual file system (VFS)
    let inputFileName1 = "ScienceTemplate.docx";
    await window.spire.FetchFileToVFS(inputFileName1, "", `${process.env.PUBLIC_URL}static/data/`);

    // Load the background image into the virtual file system (VFS)
    let inputFileName2 = "Background.png";
    await window.spire.FetchFileToVFS(inputFileName2, "", `${process.env.PUBLIC_URL}static/data/`);

    // Load a Word document
    let doc = new docModule.Document();
    doc.LoadFromFile(inputFileName1);

    // Set the background type as Picture
    doc.Background.Type = docModule.BackgroundType.Picture;

    // Set the background picture
    doc.Background.SetPicture(inputFileName2);

    // Define the output file name
    const outputFileName = "SetImageBackground_out.docx";

    // Save the document to the specified path
    doc.SaveToFile({ fileName: outputFileName, fileFormat: docModule.FileFormat.Docx2013 });

    doc.Dispose();

    const modifiedFileArray = window.dotnetRuntime.Module.FS.readFile(outputFileName);
    const blob = new Blob([modifiedFileArray], { type: 'application/vnd.openxmlformats-officedocument.wordprocessingml.document' });
    const url = URL.createObjectURL(blob);
    const a = document.createElement('a');
    a.href = url;
    a.download = outputFileName;
    a.click();
    URL.revokeObjectURL(url);
  };

 return (
    <div style={{ textAlign: 'center', height: '300px' }}>
      <h1>Set a Picture Background in a Word Document</h1>
      <button onClick={SetImageBackground}>Generate</button>
    </div>
  );
}
export default App;
After Background.SetPicture has been applied, the image is tiled across the whole page as the background.
FAQ
The background does not appear in print
Cause: Word does not print page background colors or background pictures by default. This is a printing setting of the Word client, not a lost background setting in the document. The background displays normally while the document is open and is only ignored in the printed output.
Solution: To keep the background in a printed copy, select Print background colors and images under File > Options > Display in Word before printing. If the background has to be output in every environment, use a full-page shape in the header or a watermark to simulate it instead.
The picture background has no effect
Cause: Background.Type was not set to BackgroundType.Picture before SetPicture was called, or the background image was not loaded into the VFS via FetchFileToVFS, so SetPicture cannot find the image file.
Solution: Set the background type first, then pass the name of the image that has already been loaded into the VFS:
document.Background.Type = wasmModule.BackgroundType.Picture;
document.Background.SetPicture("Background.png");
Get a Free License
Spire.Doc for JavaScript offers a 30-day full-featured free trial license with no functional limitations. Apply here to evaluate before purchasing.
Protect Word Documents and Restrict Editing with JavaScript in React
In document distribution and collaboration, controlling what a reader may do with a document often matters more than controlling who may open it — when a contract template goes to a client, the client should fill in the blank items without touching the agreed clauses; when a final draft goes to the team, comments should be allowed but the body text should not be edited directly. Requirements like these are met by restricting editing, which is a different concept from setting an open password. Spire.Doc for JavaScript processes Word documents directly in the browser via WebAssembly, using a virtual file system (VFS) to manage fonts and file resources — no backend server required.
This article covers two core features:
For installation and project setup, refer to Integrating Spire.Doc for JavaScript in a React Project. The examples below assume Spire.Doc is installed and the WebAssembly module is initialized.
Protect a Document with a Specified Protection Type
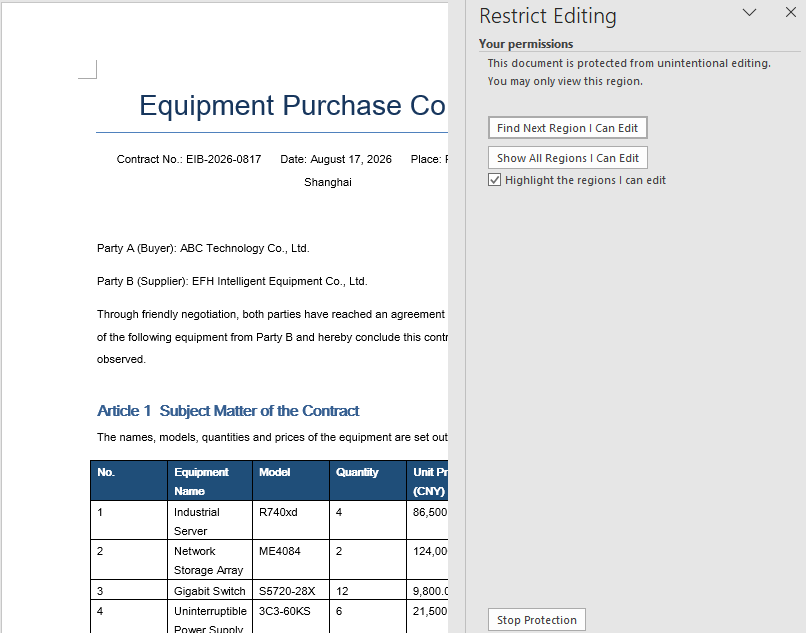
Word's editing restrictions come in five protection types, each covering a different editable scope: NoProtection (no restriction), AllowOnlyComments (comments only), AllowOnlyFormFields (form fields only), AllowOnlyReading (reading only), and AllowOnlyRevisions (tracked changes only). Calling the Protect method with a ProtectionType enum value and a password applies a restriction to the whole document as required.
Protecting a document with a specified protection type involves three stages: first, load the font files and the target Word document into the WASM virtual file system via FetchFileToVFS; then instantiate a Document and load the file, and call the Protect method to specify the protection type together with the password that lifts the restriction; finally, save the document, read the generated file from VFS, wrap it as a Blob, and trigger a browser download.
function App() {
  const protectWithSpecifiedType = async () => {
    const docModule = window.wasmModule?.spiredoc;
    if (!docModule) {
      alert('Spire.Doc is not ready yet');
      return;
    }

    const inputFileName = 'Template.docx';
    await window.spire.FetchFileToVFS(inputFileName, '', `${process.env.PUBLIC_URL}/data/`);

    // Load the document
    const doc = new docModule.Document();
    doc.LoadFromFile(inputFileName);

    // Protect the document with the "AllowOnlyReading" type; the password lifts the restriction
    doc.Protect({ type: docModule.ProtectionType.AllowOnlyReading, password: "123456" });

    // Define the output file name and save
    const outputFileName = "SpecifiedProtectionType.docx";
    doc.SaveToFile({ fileName: outputFileName, fileFormat: docModule.FileFormat.Docx2013 });
    doc.Dispose();

    const modifiedFileArray = window.dotnetRuntime.Module.FS.readFile(outputFileName);
    const blob = new Blob([modifiedFileArray], { type: 'application/vnd.openxmlformats-officedocument.wordprocessingml.document' });
    const url = URL.createObjectURL(blob);
    const a = document.createElement('a');
    a.href = url;
    a.download = outputFileName;
    a.click();
    URL.revokeObjectURL(url);
  };

 return (
    <div style={{ textAlign: 'center', height: '300px' }}>
      <h1>Protect a Document with a Specified Type</h1>
      <button onClick={protectWithSpecifiedType}>Generate</button>
    </div>
  );
}
export default App;
Once the document is protected with the AllowOnlyReading type, its content can only be viewed and the editing commands on the ribbon are restricted.
Lock Only Specified Sections
Protecting the whole document uniformly is not always appropriate. In templates such as contracts and quotations, usually only a few places need to be filled in while every other clause has to stay locked. In that case, protect the whole document with AllowOnlyFormFields first, then release the section that may be edited through the ProtectForm property, which gives per-section control over the permissions.
Locking only specified sections involves three stages: first, load the font files into the WASM virtual file system via FetchFileToVFS; then instantiate a Document, create several sections with AddSection and write content into them, call Protect to protect the whole document for form fields only, and set the ProtectForm property of the section to be released to false; finally, save the document, read the generated file from VFS, wrap it as a Blob, and trigger a browser download.
function App() {
  const lockSpecifiedSections = async () => {
    const docModule = window.wasmModule?.spiredoc;
    if (!docModule) {
      alert('Spire.Doc is not ready yet');
      return;
    }

    // Create a new document and add two sections
    const doc = new docModule.Document();
    let s1 = doc.AddSection();
    let s2 = doc.AddSection();

    // Write content into each of the two sections
    s1.AddParagraph().AppendText("Spire.Doc demo, section 1");
    s2.AddParagraph().AppendText("Spire.Doc demo, section 2");

    // Protect the whole document for form fields only
    doc.Protect({ type: docModule.ProtectionType.AllowOnlyFormFields, password: "123" });

    // Release section 2 on its own so that it can be edited
    s2.ProtectForm = false;

    // Define the output file name and save
    const outputFileName = 'LockSpecifiedSections.docx';
    doc.SaveToFile({ fileName: outputFileName, fileFormat: docModule.FileFormat.Docx2013 });
    doc.Dispose();

    const modifiedFileArray = window.dotnetRuntime.Module.FS.readFile(outputFileName);
    const blob = new Blob([modifiedFileArray], { type: 'application/vnd.openxmlformats-officedocument.wordprocessingml.document' });
    const url = URL.createObjectURL(blob);
    const a = document.createElement('a');
    a.href = url;
    a.download = outputFileName;
    a.click();
    URL.revokeObjectURL(url);
  };

 return (
    <div style={{ textAlign: 'center', height: '300px' }}>
      <h1>Lock Specified Sections of a Word Document</h1>
      <button onClick={lockSpecifiedSections}>Generate</button>
    </div>
  );
}
export default App;
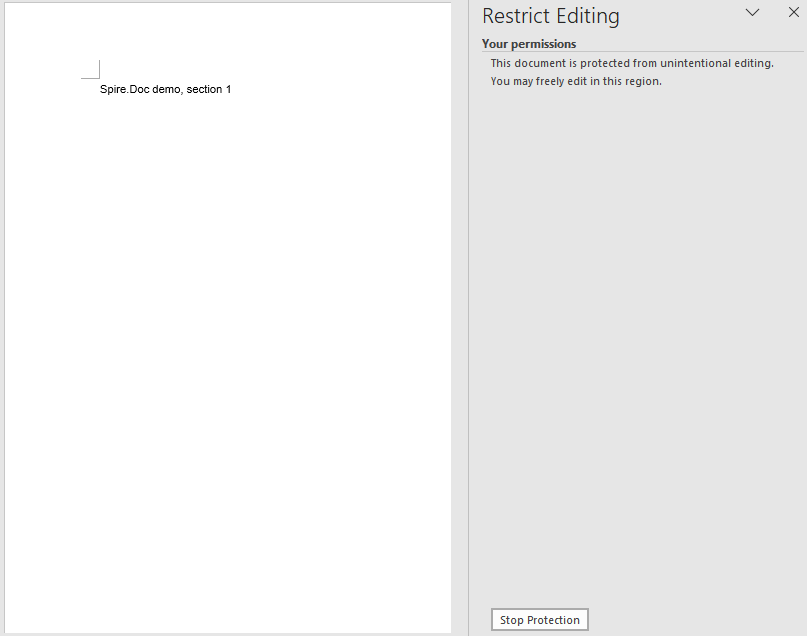
Once section 2 has been released, only section 1 keeps its editing restriction in the document.
FAQ
A section is still not editable after ProtectForm = false
Cause: ProtectForm only takes effect while the document is protected with AllowOnlyFormFields (form fields only). If the document uses another protection type such as AllowOnlyReading, releasing a single section has no effect.
Solution: Make sure the protection type passed to Protect matches the operation that releases the section:
doc.Protect({ type: wasmModule.ProtectionType.AllowOnlyFormFields, password: "123" });
s2.ProtectForm = false;
A protected document can still be selected and copied
Cause: Every protection type restricts editing behaviour, not reading behaviour. AllowOnlyReading only blocks changes to the body text; it does not affect selection, copying or searching. To restrict reading as well, an open password should be used rather than editing restrictions.
Solution: Choose the means for the actual purpose — use document encryption when the content must not be taken away, and use editing restrictions only when the content must not be changed:
doc.Protect({ type: wasmModule.ProtectionType.AllowOnlyReading, password: "123456" });
Get a Free License
Spire.Doc for JavaScript offers a 30-day full-featured free trial license with no functional limitations. Apply here to evaluate before purchasing.
Set and Remove Editable Ranges in Word Documents with JavaScript in React
In documents such as contracts, forms, and official templates, you often want the person filling them in to modify only a few specific places — signature details, project name, acceptance conclusion — while every other clause has to stay exactly as it is. Setting an editable range on a document pins down "what may be changed" precisely and leaves everything else read-only. Spire.Doc for JavaScript does this entirely in the browser via WebAssembly, using a virtual file system (VFS) to manage fonts and file resources — no backend server required.
This article covers two core features:
For installation and project setup, refer to Integrating Spire.Doc for JavaScript in a React Project. The examples below assume Spire.Doc is installed and the WebAssembly module is initialized.
Set an Editable Range
Setting an editable range involves three stages: first, load the font files and the target Word document into the WASM virtual file system via FetchFileToVFS; then instantiate a Document and load the file, call Protect to make the whole document read-only, and create a pair of PermissionStart and PermissionEnd markers that share the same id to mark the specified paragraph as an editable range; finally, save the document, read the generated file from VFS, wrap it as a Blob, and trigger a browser download.
function App() {
  const SetEditableRange = async () => {
    const docModule = window.wasmModule?.spiredoc;
    if (!docModule) {
      alert('Spire.Doc is not ready yet');
      return;
    }

    // Load the input document into VFS
    const inputFileName = "SetEditableRange.docx";
    await window.spire.FetchFileToVFS(inputFileName, "", `${process.env.PUBLIC_URL}static/data/`);

    // Create a document object and load the document
    const doc = new docModule.Document();
    doc.LoadFromFile(inputFileName);

    // Protect the whole document: everything outside the editable range is read-only
    doc.Protect({ type: docModule.ProtectionType.AllowOnlyReading, password: "password" });

    // Create the permission markers: a start and an end with the same id form one editable range
    const start = new docModule.PermissionStart(doc, "testID");
    const end = new docModule.PermissionEnd(doc, "testID");

    // Insert the markers into the first paragraph: the start at the beginning, the end appended at the end
    doc.Sections.get_Item(0).Paragraphs.get_Item(0).ChildObjects.Insert(0, start);
    doc.Sections.get_Item(0).Paragraphs.get_Item(0).ChildObjects.Add(end);

    // Save the document
    const outputFileName = "Set Editable Range.docx";
    doc.SaveToFile({ fileName: outputFileName, fileFormat: docModule.FileFormat.Docx2013 });
    doc.Dispose();

    const modifiedFileArray = window.dotnetRuntime.Module.FS.readFile(outputFileName);
    const blob = new Blob([modifiedFileArray], { type: 'application/vnd.openxmlformats-officedocument.wordprocessingml.document' });
    const url = URL.createObjectURL(blob);
    const a = document.createElement('a');
    a.href = url;
    a.download = outputFileName;
    a.click();
    URL.revokeObjectURL(url);
  };

 return (
    <div style={{ textAlign: 'center', height: '300px' }}>
      <h1>Set Editable Range in a Word Document</h1>
      <button onClick={SetEditableRange}>
        Generate
      </button>
    </div>
  );
}
export default App;
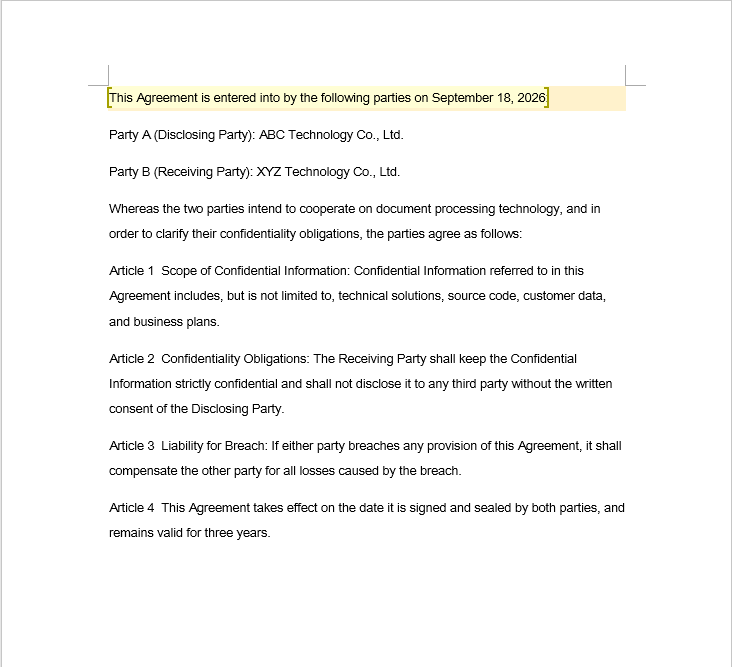
In the sample document, the places that need to be filled in are highlighted with light shading (a visual hint only — it has nothing to do with how the editable range is set). Once the editable range has been set, only the shaded paragraph can be modified, and the remaining clauses are read-only in Word.
Remove an Editable Range
Removing an editable range takes a single pass: walk each section and each paragraph of the document in turn, look for the PermissionStart and PermissionEnd objects in the paragraph's ChildObjects collection, and remove each one you find from the collection.
There is one detail that is easy to trip over: ChildObjects.Remove shrinks the collection immediately, so the indexes of the remaining elements all shift forward. The index must therefore not be incremented while removing, or every marker you delete causes the one right behind it to be skipped, leaving markers behind.
function App() {
  const RemoveEditableRange = async () => {
    const docModule = window.wasmModule?.spiredoc;
    if (!docModule) {
      alert('Spire.Doc is not ready yet');
      return;
    }

      // Load the input document into VFS
      const inputFileName = "RemoveEditableRange.docx";
      await window.spire.FetchFileToVFS(inputFileName, "", `${process.env.PUBLIC_URL}static/data/`);

      // Create a document object and load the document
      const doc = new docModule.Document();
      doc.LoadFromFile(inputFileName);

      // Iterate over every section and paragraph and delete the permission markers
      for (let i = 0; i < doc.Sections.Count; i++) {
        const section = doc.Sections.get_Item(i);
        for (let j = 0; j < section.Body.Paragraphs.Count; j++) {
          const paragraph = section.Body.Paragraphs.get_Item(j);

          // Remove on a match; the collection shrinks, so the index is not incremented
          for (let k = 0; k < paragraph.ChildObjects.Count;) {
            const obj = paragraph.ChildObjects.get_Item(k);
            if (obj instanceof docModule.PermissionStart || obj instanceof docModule.PermissionEnd) {
              paragraph.ChildObjects.Remove(obj);
            } else {
              k++;
            }
          }
        }
      }

      // Save the document
      const outputFileName = "Remove Editable Range.docx";
      doc.SaveToFile({ fileName: outputFileName, fileFormat: docModule.FileFormat.Docx2013 });

    // Release resources
    doc.Dispose();

    const modifiedFileArray = window.dotnetRuntime.Module.FS.readFile(outputFileName);
    const blob = new Blob([modifiedFileArray], { type: 'application/vnd.openxmlformats-officedocument.wordprocessingml.document' });
    const url = URL.createObjectURL(blob);
    const a = document.createElement('a');
    a.href = url;
    a.download = outputFileName;
    a.click();
    URL.revokeObjectURL(url);
  };

 return (
    <div style={{ textAlign: 'center', height: '300px' }}>
      <h1>Remove Editable Ranges from a Word Document</h1>
      <button onClick={RemoveEditableRange}>
        Generate
      </button>
    </div>
  );
}
export default App;
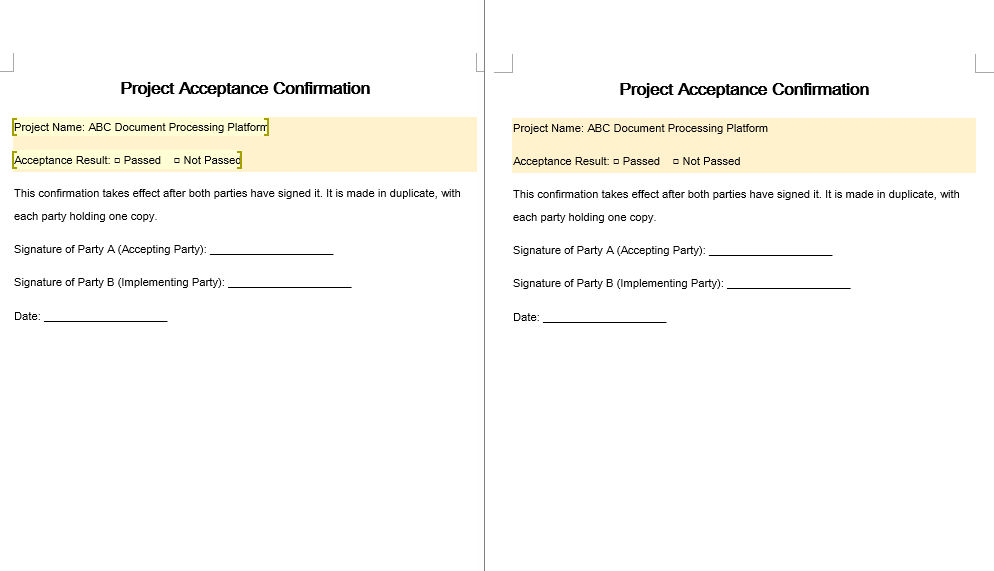
Removing the markers only affects how the editable area is divided; the text content and the formatting of the document do not change in any way.
FAQ
The editable range is set, but the content inside it still cannot be edited
Cause: The permission markers only take effect together with the document's editing restriction. If PermissionStart and PermissionEnd are inserted without calling Protect, the document never enters the protected state and the markers have no effect whatsoever; on top of that, the ids of the two markers must match exactly before Word recognizes them as one single editable range.
Solution: Enable the editing restriction first, and then create the paired markers with the same id:
// Enable protection first so that the markers mean something
document.Protect({ type: wasmModule.ProtectionType.AllowOnlyReading, password: "password" });

// The start and the end must use the same id
const start = new wasmModule.PermissionStart(document, "testID");
const end = new wasmModule.PermissionEnd(document, "testID");
Some markers are missed when removing editable ranges
Cause: ChildObjects.Remove shifts the indexes of all the subsequent elements in the collection forward. If the index is incremented while removing inside a for loop, every object that is removed causes the one right behind it to be skipped, and the more markers are left in the document, the more obvious the misses become.
Solution: Switch to "remove on a match, do not increment the index", or collect the objects to be removed first and then iterate backwards:
for (let k = 0; k < paragraph.ChildObjects.Count;) {
  const obj = paragraph.ChildObjects.get_Item(k);
  if (obj instanceof wasmModule.PermissionStart || obj instanceof wasmModule.PermissionEnd) {
    paragraph.ChildObjects.Remove(obj);
    // Do not increment k here: check the new object at the current index
  } else {
    k++;
  }
}
The document is still read-only after the markers are removed
Cause: PermissionStart and PermissionEnd only mark "which areas may be edited"; removing them does not turn off the document's editing restriction. The protection is still in effect, so at that point the whole document cannot be edited.
Solution: If the protection is no longer needed, call Unprotect after removing the markers; if the document was protected with a password, pass the password that was used at the time:
document.Unprotect("password");
Get a Free License
Spire.Doc for JavaScript offers a 30-day full-featured free trial license with no functional limitations. Apply here to evaluate before purchasing.
Add, Delete, and Replace Images in Word with JavaScript in React
Working with images in Word documents is one of the most common requirements in day-to-day office development. Whether you are adding a company logo to a contract template, cleaning up leftover placeholder pictures in a document, or batch-replacing the stamps and icons in a report, manipulating images dynamically keeps document content in sync with your business data. Spire.Doc for JavaScript handles Word image processing entirely in the browser via WebAssembly, using a virtual file system (VFS) to manage fonts, documents, and image resources — no backend server required.
This article covers three core features:
- Add an image to a Word document
- Delete images from a Word document
- Replace images in a Word document
For installation and project setup, refer to Integrating Spire.Doc for JavaScript in a React Project. The examples below assume Spire.Doc is installed and the WebAssembly module is initialized.
Add an Image to a Word Document
Adding an image involves three phases: first, load the font files, the target Word document, and the image to be inserted into the WASM virtual file system via FetchFileToVFS; then instantiate a Document and load the file, get the target section and create a DocPicture object, call LoadImage to load the image and set its position, size, and text wrapping style, then use ChildObjects.Insert to insert the picture at the specified position in the specified paragraph; finally, save the document, read the generated file from VFS, wrap it as a Blob, and trigger a browser download.
function App() {
  const insertImage = async () => {
    const docModule = window.wasmModule?.spiredoc;
    if (!docModule) {
      alert('Spire.Doc is not ready yet');
      return;
    }
    // Load the input document into VFS
    const inputFileName = "BlankTemplate.docx";
    await window.spire.FetchFileToVFS(inputFileName, "", `${process.env.PUBLIC_URL}static/data/`);

    // Load the image file to be inserted into VFS
    const inputImgFileName = "Word.png";
    await window.spire.FetchFileToVFS(inputImgFileName, "", `${process.env.PUBLIC_URL}static/data/`);

    // Load the document
    let doc = new docModule.Document();
    doc.LoadFromFile(inputFileName);

    // Get the first section
    let section = doc.Sections.get_Item(0);

    // Add a heading paragraph
    let paragraph = section.AddParagraph();
    paragraph.AppendText("The sample demonstrates how to insert an image into a document.");
    paragraph.ApplyStyle({ builtinStyle: docModule.BuiltinStyle.Heading2 });

    // Add a new paragraph to hold the picture
    paragraph = section.AddParagraph();
    paragraph.AppendText("This is a picture.");

    // Create a picture object and load the image file
    let picture = new docModule.DocPicture(doc);
    picture.LoadImage({ imgFile: inputImgFileName });

    // Set the position of the picture
    picture.HorizontalPosition = 50.0;
    picture.VerticalPosition = 60.0;

    // Set the size of the picture
    picture.Width = 200;
    picture.Height = 200;

    // Set the text wrapping style of the picture
    picture.TextWrappingStyle = docModule.TextWrappingStyle.Through;

    // Insert the picture at the beginning of the paragraph (index 0)
    paragraph.ChildObjects.Insert(0, picture);

    // Save the document
    const outputFileName = "Insert Image.docx";
    doc.SaveToFile({ fileName: outputFileName, fileFormat: docModule.FileFormat.Docx });
    // Release resources
    doc.Dispose();

    const modifiedFileArray = window.dotnetRuntime.Module.FS.readFile(outputFileName);
    const blob = new Blob([modifiedFileArray], { type: 'application/vnd.openxmlformats-officedocument.wordprocessingml.document' });
    const url = URL.createObjectURL(blob);
    const a = document.createElement('a');
    a.href = url;
    a.download = outputFileName;
    a.click();
    URL.revokeObjectURL(url);
  };

 return (
    <div style={{ textAlign: 'center', height: '300px' }}>
      <h1>Insert an Image into a Word Document</h1>
      <button onClick={insertImage}>
        Generate
      </button>
    </div>
  );
}
export default App;
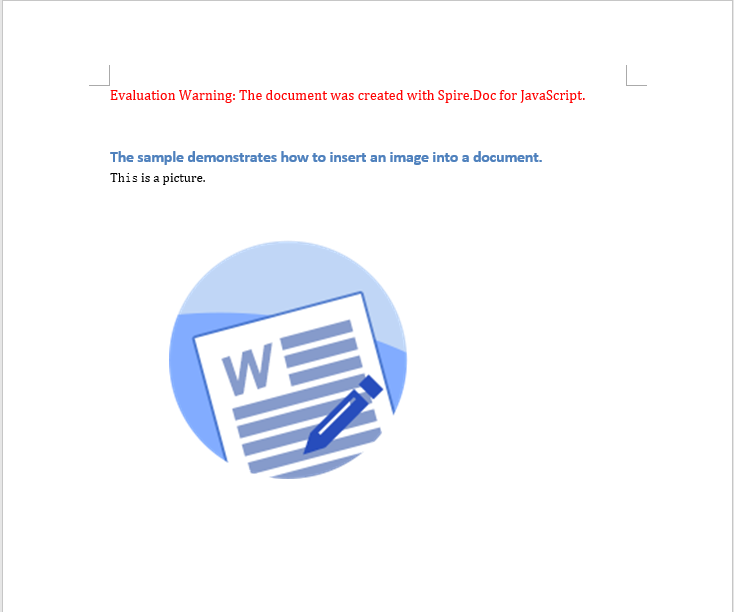
The code above loads the picture through DocPicture, sets its absolute position to (50, 60) and its size to 200×200, applies the Through text wrapping style, and finally inserts it at the beginning of the second paragraph
Delete Images from a Word Document
Deleting images also involves three phases: first, load the font files and the Word document to be processed into the WASM virtual file system via FetchFileToVFS; then instantiate a Document and load the file, walk the sections, the paragraphs, and the child objects inside each paragraph level by level, and use DocumentObjectType.Picture to determine whether an object is a picture — if it is, call ChildObjects.Remove to remove it from the paragraph; finally, save the document, read the generated file from VFS, wrap it as a Blob, and trigger a browser download.
function App() {
  const RemoveImage = async () => {
    const docModule = window.wasmModule?.spiredoc;
    if (!docModule) {
      alert('Spire.Doc is not ready yet');
      return;
    }
   // Load the input document into VFS
      const inputFileName = "ImageTemplate.docx";
      await window.spire.FetchFileToVFS(inputFileName, "", `${process.env.PUBLIC_URL}/static/data/`);

      // Load the document
      let doc = new docModule.Document();
      doc.LoadFromFile(inputFileName);

      let removedCount = 0;

      // Iterate over every section and paragraph and delete the pictures in each paragraph
      for (let i = 0; i < doc.Sections.Count; i++) {
        let sec = doc.Sections.get_Item(i);
        for (let j = 0; j < sec.Paragraphs.Count; j++) {
          let para = sec.Paragraphs.get_Item(j);

          // Collect all the picture objects in the paragraph
          let pictures = [];
          for (let k = 0; k < para.ChildObjects.Count; k++) {
            let docObj = para.ChildObjects.get_Item(k);
            if (docObj.DocumentObjectType == docModule.DocumentObjectType.Picture) {
              pictures.push(docObj);
            }
          }

          // Remove the pictures from the paragraph one by one
          for (let m = 0; m < pictures.length; m++) {
            para.ChildObjects.Remove(pictures[m]);
            removedCount++;
          }
        }
      }

      // Save the document
      const outputFileName = "Delete Image.docx";
      doc.SaveToFile({ fileName: outputFileName, fileFormat: docModule.FileFormat.Docx });
    // Release resources
    doc.Dispose();

    const modifiedFileArray = window.dotnetRuntime.Module.FS.readFile(outputFileName);
    const blob = new Blob([modifiedFileArray], { type: 'application/vnd.openxmlformats-officedocument.wordprocessingml.document' });
    const url = URL.createObjectURL(blob);
    const a = document.createElement('a');
    a.href = url;
    a.download = outputFileName;
    a.click();
    URL.revokeObjectURL(url);
  };

 return (
    <div style={{ textAlign: 'center', height: '300px' }}>
      <h1>Delete Images from a Word Document</h1>
      <button onClick={RemoveImage}>
        Generate
      </button>
    </div>
  );
}
export default App;
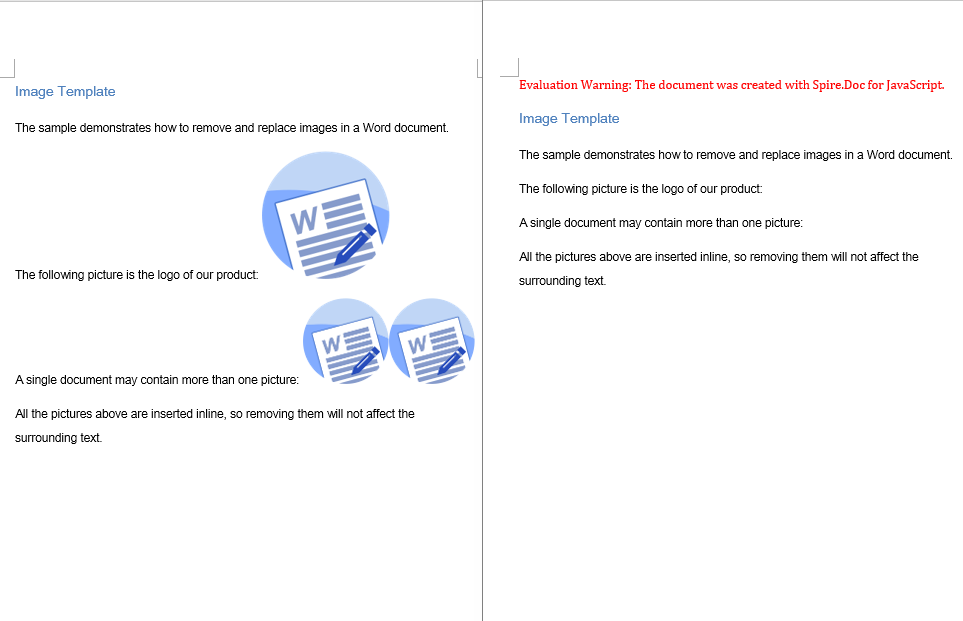
The code above walks the document structure and removes every picture object, while the text content and formatting in the paragraphs stay unchanged. The picture on the left is the document before deletion, and the one on the right is the same document after all the images have been removed
Replace Images in a Word Document
Replacing an image can be seen as a combination of deleting and adding. It involves three phases: first, load the font files, the target Word document, and the new image file into the WASM virtual file system via FetchFileToVFS; then walk the sections and paragraphs, locate the picture objects and record their index within the paragraph, their original size, and their text wrapping style, call ChildObjects.Remove to remove the old picture, and then create a new DocPicture and insert it at the original index with the same parameters; finally, save the document, read the generated file from VFS, wrap it as a Blob, and trigger a browser download.
function App() {
  const ReplaceImage = async () => {
    const docModule = window.wasmModule?.spiredoc;
    if (!docModule) {
      alert('Spire.Doc is not ready yet');
      return;
    }

      // Load the input document into VFS
      const inputFileName = "ImageTemplate.docx";
      await window.spire.FetchFileToVFS(inputFileName, "", `${process.env.PUBLIC_URL}/static/data/`);

      // Load the new picture that will take the place of the old ones into VFS
      const inputImgFileName = "NewLogo.png";
      await window.spire.FetchFileToVFS(inputImgFileName, "", `${process.env.PUBLIC_URL}/static/data/`);

      // Load the document
      let doc = new docModule.Document();
      doc.LoadFromFile(inputFileName);

      // Iterate over every section and paragraph and replace the pictures in each paragraph
      for (let i = 0; i < doc.Sections.Count; i++) {
        let sec = doc.Sections.get_Item(i);
        for (let j = 0; j < sec.Paragraphs.Count; j++) {
          let para = sec.Paragraphs.get_Item(j);

          // Collect the picture objects in the paragraph along with their index in ChildObjects
          let pictures = [];
          for (let k = 0; k < para.ChildObjects.Count; k++) {
            let docObj = para.ChildObjects.get_Item(k);
            if (docObj.DocumentObjectType == docModule.DocumentObjectType.Picture) {
              pictures.push({ index: k, picture: docObj });
            }
          }

          // Iterate backwards so that removing an object does not shift the remaining indexes
          for (let m = pictures.length - 1; m >= 0; m--) {
            let index = pictures[m].index;
            let picture = pictures[m].picture;

            // Record the size and the text wrapping style of the original picture
            let width = picture.Width;
            let height = picture.Height;
            let wrappingStyle = picture.TextWrappingStyle;

            // Remove the original picture
            para.ChildObjects.Remove(picture);

            // Create a new picture that keeps the size and wrapping style of the original one
            let newPicture = new docModule.DocPicture(doc);
            newPicture.LoadImage({ imgFile: inputImgFileName });
            newPicture.Width = width;
            newPicture.Height = height;
            newPicture.TextWrappingStyle = wrappingStyle;

            // Insert the new picture at the original index
            para.ChildObjects.Insert(index, newPicture);
          }
        }
      }

      // Save the document
      const outputFileName = "Replace Image.docx";
      doc.SaveToFile({ fileName: outputFileName, fileFormat: docModule.FileFormat.Docx });
    // Release resources
    doc.Dispose();

    const modifiedFileArray = window.dotnetRuntime.Module.FS.readFile(outputFileName);
    const blob = new Blob([modifiedFileArray], { type: 'application/vnd.openxmlformats-officedocument.wordprocessingml.document' });
    const url = URL.createObjectURL(blob);
    const a = document.createElement('a');
    a.href = url;
    a.download = outputFileName;
    a.click();
    URL.revokeObjectURL(url);
  };

 return (
    <div style={{ textAlign: 'center', height: '300px' }}>
      <h1>Replace Images in a Word Document</h1>
      <button onClick={ReplaceImage}>
        Generate
      </button>
    </div>
  );
}
export default App;
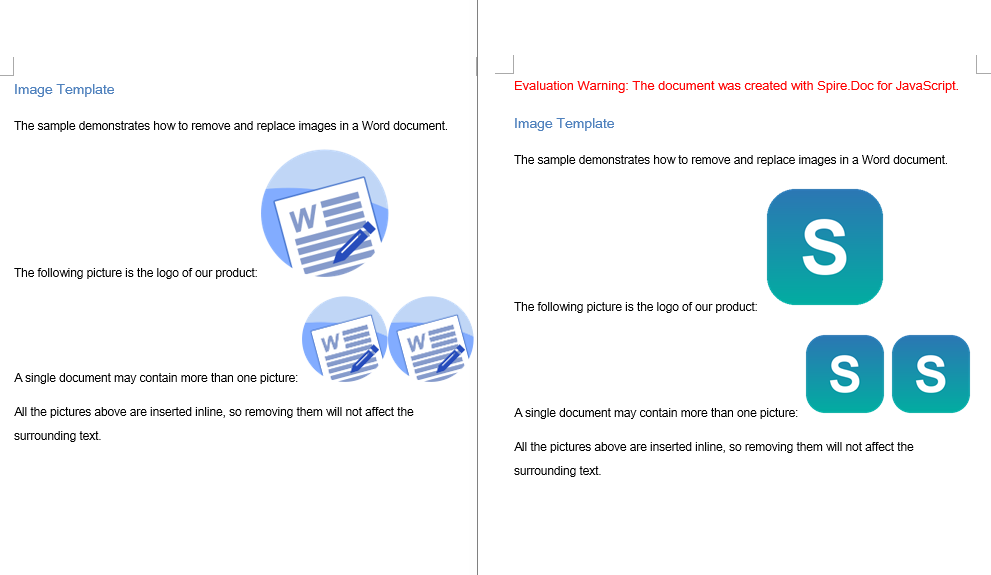
The code above removes each original picture while inserting the new picture at the index the original one occupied, reusing its size and its wrapping style, so the layout of the document is exactly the same as before the replacement
FAQ
The inserted image does not show up, or the image file cannot be found
Cause: The image file has not been loaded into the WASM virtual file system, or the path passed to FetchFileToVFS does not match the actual location of the file, so LoadImage cannot read the image data from VFS.
Solution: Load the image into VFS with FetchFileToVFS before inserting it, and make sure the target file name matches the file name passed to LoadImage:
await window.spire.FetchFileToVFS(
  'Word.png', '', `${process.env.PUBLIC_URL}static/data/`
);
let picture = new wasmModule.DocPicture(doc);
picture.LoadImage({ imgFile: 'Word.png' });
Images are left behind, or end up misplaced, after deletion or replacement
Cause: ChildObjects.Remove shifts the indexes of all subsequent child objects forward. If you read ChildObjects.Count while removing objects in the same loop, some of the pictures are skipped; and when replacing, inserting at the new index taken after the removal puts the picture at the wrong position.
Solution: Collect the picture objects and their original indexes in one pass first, then iterate backwards over that collection, and insert the new picture at the original index that was recorded:
// Collect the pictures and their indexes first
pictures.push({ index: k, picture: docObj });

// Then iterate backwards, removing each picture and inserting the new one back at its original index
for (let m = pictures.length - 1; m >= 0; m--) {
  para.ChildObjects.Remove(pictures[m].picture);
  para.ChildObjects.Insert(pictures[m].index, newPicture);
}
Get a Free License
Spire.Doc for JavaScript offers a 30-day full-featured free trial license with no functional limitations. Apply here to evaluate before purchasing.
Add, Delete, and Modify Shapes in Word with JavaScript in React
Working with shapes in Word documents is one of the most common requirements in day-to-day office development. Whether you are stamping a rounded-rectangle signature box onto a contract template, annotating approval steps with a group of flowchart shapes, cleaning up leftover decorative shapes in a document, or restyling the shapes in an old template to match a new brand palette, manipulating shapes dynamically keeps document content in sync with your business data. Spire.Doc for JavaScript handles Word shapes entirely in the browser via WebAssembly, using a virtual file system (VFS) to manage fonts, documents, and image resources — no backend server required.
This article covers three core features:
For installation and project setup, refer to Integrating Spire.Doc for JavaScript in a React Project. The examples below assume Spire.Doc is installed and the WebAssembly module is initialized.
Add Shapes to a Word Document
Adding shapes involves three phases: first, load the font files into the WASM virtual file system via FetchFileToVFS; then instantiate a Document, add a section and a paragraph in turn, and call Paragraph.AppendShape to insert a shape of the specified type and size into the paragraph, anchoring it to the page with HorizontalOrigin/VerticalOrigin while setting its absolute coordinates through HorizontalPosition/VerticalPosition; finally, save the document, read the generated file from VFS, wrap it as a Blob, and trigger a browser download.
function App() {
  const appendShape = async () => {

    const docModule = window.wasmModule?.spiredoc;

    if (!docModule) {
      alert('Spire.Doc is not ready yet');
      return;
    }

      // Create a new document
    const doc = new docModule.Document();

      // Add a section
    let sec = doc.AddSection();

      // Add a paragraph to hold the shapes
    let paragraph = sec.AddParagraph();

    let x = 60, y = 40, lineCount = 0;
    for (let i = 1; i < 20; i++) {
      if (lineCount > 0 && lineCount % 8 == 0) {
        // Start a new page once 8 rows are filled, and reset the starting coordinates
        paragraph.AppendBreak(docModule.BreakType.PageBreak);
        x = 60;
        y = 40;
        lineCount = 0;
      }

        // Add a shape and set its size
      let shape = paragraph.AppendShape(50, 50, docModule.ShapeType.fromValue(i));

      // Position the shape in absolute coordinates relative to the page
      shape.HorizontalOrigin = docModule.HorizontalOrigin.Page;
      shape.HorizontalPosition = x;
      shape.VerticalOrigin = docModule.VerticalOrigin.Page;
      shape.VerticalPosition = y + 50;

      // Calculate the coordinates of the next shape
      x = x + shape.Width + 50;
      if (i > 0 && i % 5 == 0) {
        y = y + shape.Height + 120;
        lineCount++;
        x = 60;
        }
    }

    // Save the document
    const outputFileName = "Add Shapes.docx";
    doc.SaveToFile({ fileName: outputFileName, fileFormat: docModule.FileFormat.Docx });
    // Release resources
    doc.Dispose();

    const modifiedFileArray = window.dotnetRuntime.Module.FS.readFile(outputFileName);
    const blob = new Blob([modifiedFileArray], { type: 'application/vnd.openxmlformats-officedocument.wordprocessingml.document' });
    const url = URL.createObjectURL(blob);
    const a = document.createElement('a');
    a.href = url;
    a.download = outputFileName;
    a.click();
    URL.revokeObjectURL(url);
  };

 return (
    <div style={{ textAlign: 'center', height: '300px' }}>
      <h1>Add Shapes to a Word Document</h1>
      <button onClick={appendShape}>
        Generate
      </button>
    </div>
  );
}
export default App;
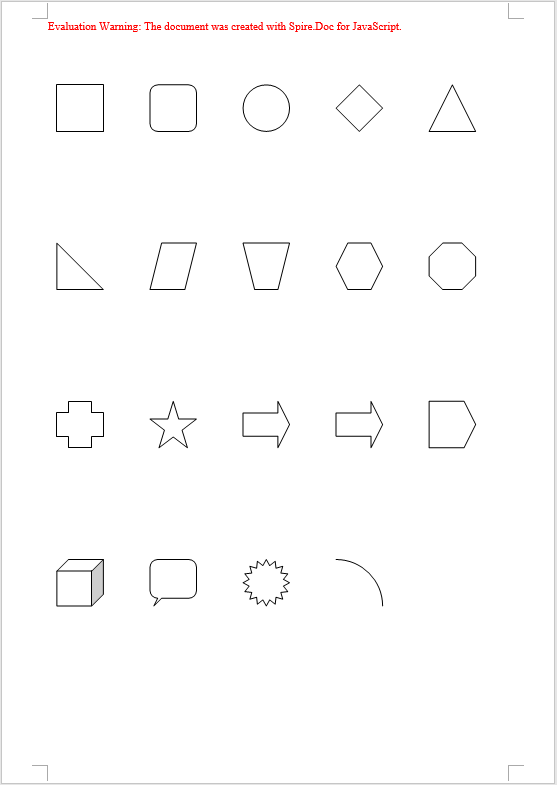
The code above inserts 19 different preset shapes in a loop, each 50×50, retrieving the shape type one by one with ShapeType.fromValue(i) and laying them out in rows and columns from the page origin — 5 shapes per row, and an automatic page break via AppendBreak once 8 rows are filled
When you need to insert several related shapes at once — building a flowchart out of rectangles, parallelograms, and arrows, for example — you can instead call Paragraph.AppendShapeGroup to create a shape group first, then add text boxes, arrows, and other child shapes to it with ChildObjects.Add so they are laid out together. Coordinates inside a shape group are relative to the group itself, so you need to work out the scale factor with Width / 1000.0 and Height / 1000.0, then divide the target coordinates of each child shape by that factor before assigning them to HorizontalPosition/VerticalPosition. A text box is created with new wasmModule.TextBox(doc) and its outline specified through SetShapeType; its Format.LineColor sets the stroke color in exactly the same way as StrokeColor does for a regular shape.
Delete Shapes from a Word Document
Deleting shapes involves three phases: first, load the font files and the Word document to be processed into the WASM virtual file system via FetchFileToVFS; then instantiate a Document and load the file, walk the sections and paragraphs of the document level by level, and use DocumentObjectType to determine whether a child object in a paragraph is a shape — regular shapes and text boxes in a document both exist as type Shape, shape groups are ShapeGroup, while a text box created in memory with new wasmModule.TextBox(doc) and not yet saved is reported separately as TextBox, so all three types must be checked; once identified, collect the objects and remove them from the paragraph one by one with ChildObjects.Remove; finally, save the document, read the generated file from VFS, wrap it as a Blob, and trigger a browser download.
function App() {
  const removeShape = async () => {
    const docModule = window.wasmModule?.spiredoc;
    if (!docModule) {
      alert('Spire.Doc is not ready yet');
      return;
    }
    const inputFileName = 'ShapeTemplate.docx';
    await window.spire.FetchFileToVFS(inputFileName, '', `${process.env.PUBLIC_URL}static/data/`);

   // Load the document
    let doc = new docModule.Document();
    doc.LoadFromFile(inputFileName);

    let removedCount = 0;

    // Iterate over every section and paragraph and delete the shapes in each paragraph
    for (let i = 0; i < doc.Sections.Count; i++) {
      let sec = doc.Sections.get_Item(i);
      for (let j = 0; j < sec.Paragraphs.Count; j++) {
        let para = sec.Paragraphs.get_Item(j);

        // Collect the shapes in the paragraph in one pass: regular shapes and text boxes are Shape, shape groups are ShapeGroup
        let shapes = [];
        for (let k = 0; k < para.ChildObjects.Count; k++) {
          let docObj = para.ChildObjects.get_Item(k);
          let objType = docObj.DocumentObjectType;
          if (objType == docModule.DocumentObjectType.Shape
            || objType == docModule.DocumentObjectType.ShapeGroup
            || objType == docModule.DocumentObjectType.TextBox) {
              shapes.push(docObj);
    }
        }

        // Remove the shapes from the paragraph one by one
        for (let m = 0; m < shapes.length; m++) {
         para.ChildObjects.Remove(shapes[m]);
         removedCount++;
        }
      }
    }

    // Save the document
    const outputFileName = "Delete Shapes.docx";
    doc.SaveToFile({ fileName: outputFileName, fileFormat: docModule.FileFormat.Docx });

    // Release resources
    doc.Dispose();

    const modifiedFileArray = window.dotnetRuntime.Module.FS.readFile(outputFileName);
    const blob = new Blob([modifiedFileArray], { type: 'application/vnd.openxmlformats-officedocument.wordprocessingml.document' });
    const url = URL.createObjectURL(blob);
    const a = document.createElement('a');
    a.href = url;
    a.download = outputFileName;
    a.click();
    URL.revokeObjectURL(url);
  };

 return (
    <div style={{ textAlign: 'center', height: '300px' }}>
      <h1>Delete Shapes from a Word Document</h1>
      <button onClick={removeShape}>
        Generate
      </button>
    </div>
  );
}
export default App;
The code above walks the document structure and removes every shape on the page, while the text content and formatting in the paragraphs stay unchanged
Modify Shapes in a Word Document
Modifying shapes involves three phases: first, load the font files and the Word document to be processed into the WASM virtual file system via FetchFileToVFS; then instantiate a Document and load the file, walk the sections and paragraphs to locate the shape objects within them, and for regular shapes and text boxes set FillColor and StrokeColor directly to change the colors and set Rotation, Width, and Height to adjust the rotation angle and size, while for a shape group you drill down into its ChildObjects and modify each child shape in turn; finally, save the document, read the generated file from VFS, wrap it as a Blob, and trigger a browser download.
function App() {
  const modifyShape = async () => {
    const docModule = window.wasmModule?.spiredoc;
    if (!docModule) {
      alert('Spire.Doc is not ready yet');
      return;
    }
    const inputFileName = 'ShapeTemplate.docx';
    await window.spire.FetchFileToVFS(inputFileName, '', `${process.env.PUBLIC_URL}static/data/`);

    // Load the document
    let doc = new docModule.Document();
    doc.LoadFromFile(inputFileName);

    // Iterate over every section and paragraph and modify the shapes in each paragraph
    for (let i = 0; i < doc.Sections.Count; i++) {
      let sec = doc.Sections.get_Item(i);
      for (let j = 0; j < sec.Paragraphs.Count; j++) {
        let para = sec.Paragraphs.get_Item(j);
        for (let k = 0; k < para.ChildObjects.Count; k++) {
          let docObj = para.ChildObjects.get_Item(k);
          let objType = docObj.DocumentObjectType;

          // Modify the fill color, outline color, rotation, and size of regular shapes and text boxes
          if (objType == docModule.DocumentObjectType.Shape) {
            docObj.FillColor = docModule.Color.get_Orange();
            docObj.StrokeColor = docModule.Color.get_Red();
            docObj.Rotation = 15;
            docObj.Width = docObj.Width * 1.2;
            docObj.Height = docObj.Height * 1.2;
          }

          // Modify a shape group: drill into the group and change the outline color of each child shape
          if (objType == docModule.DocumentObjectType.ShapeGroup) {
            for (let n = 0; n < docObj.ChildObjects.Count; n++) {
              let child = docObj.ChildObjects.get_Item(n);
              child.StrokeColor = docModule.Color.get_Purple();
            }
          }
        }
      }
    }

    // Save the document
    const outputFileName = "Modify Shapes.docx";
    doc.SaveToFile({ fileName: outputFileName, fileFormat: docModule.FileFormat.Docx });

    // Release resources
    doc.Dispose();

    const modifiedFileArray = window.dotnetRuntime.Module.FS.readFile(outputFileName);
    const blob = new Blob([modifiedFileArray], { type: 'application/vnd.openxmlformats-officedocument.wordprocessingml.document' });
    const url = URL.createObjectURL(blob);
    const a = document.createElement('a');
    a.href = url;
    a.download = outputFileName;
    a.click();
    URL.revokeObjectURL(url);
  };

 return (
    <div style={{ textAlign: 'center', height: '300px' }}>
      <h1>Modify Existing Shapes in a Word Document</h1>
      <button onClick={modifyShape}>
        Generate
      </button>
    </div>
  );
}
export default App;
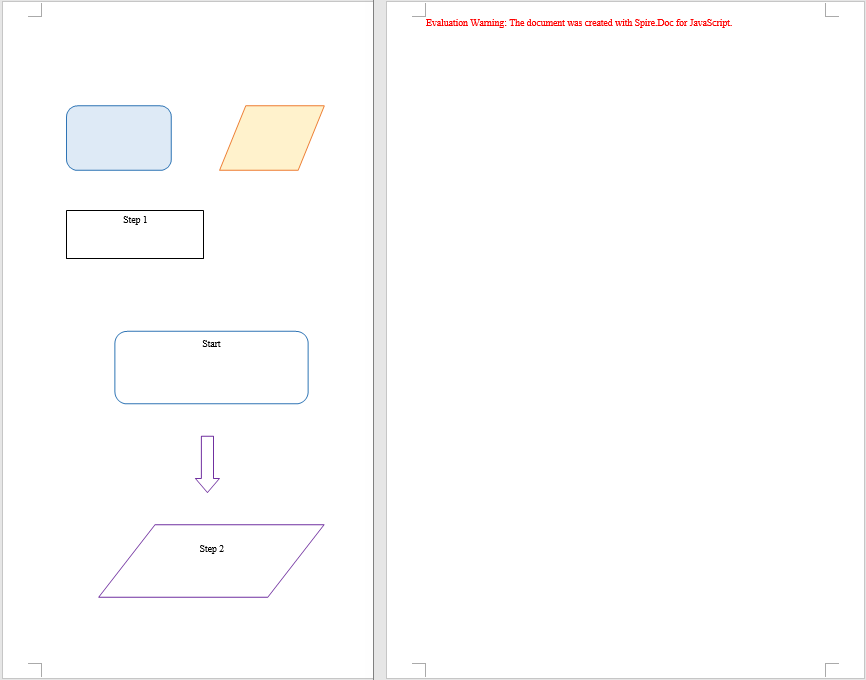
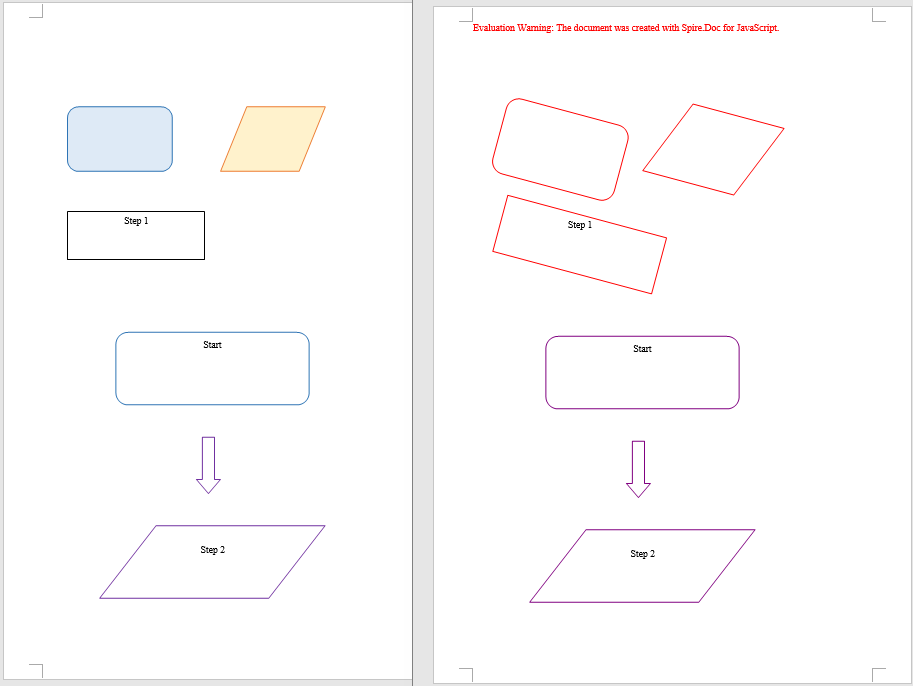
The code above keeps each shape's original position and text while restyling every shape in the document with an orange fill and a red outline, scaling it up to 120% and rotating it 15 degrees, and the child shapes inside shape groups get the new outline color as well
FAQ
Shapes end up misplaced or pushed off the page after being added
Cause: The meaning of the coordinates in HorizontalPosition/VerticalPosition depends on the frame of reference (the origin). If HorizontalOrigin/VerticalOrigin are not set explicitly, the coordinates default to the paragraph or the column, so they shift along with paragraph indentation and page margins, and the shape drifts away from the intended position.
Solution: Specify the frame of reference with HorizontalOrigin/VerticalOrigin first, and then set the coordinate values:
// Position the shape relative to the page
shape.HorizontalOrigin = wasmModule.HorizontalOrigin.Page;
shape.HorizontalPosition = x;
shape.VerticalOrigin = wasmModule.VerticalOrigin.Page;
shape.VerticalPosition = y + 50;
Some objects are missed when deleting shapes
Cause: In Spire.Doc a shape does not have just one DocumentObjectType: regular shapes and text boxes are uniformly Shape, shape groups are ShapeGroup, and a text box created in memory and not yet saved is TextBox. Checking only for Shape will miss shape groups and unsaved text boxes. On top of that, ChildObjects.Remove shifts the indexes of all subsequent child objects forward, so reading ChildObjects.Count while removing during the same loop will also skip some objects.
Solution: Collect all three types into an array in one pass first, then process the array one item at a time; when modifying the child shapes inside a shape group, drill down into its ChildObjects and iterate separately:
// Collect the shape objects of all three types first
if (objType == wasmModule.DocumentObjectType.Shape
  || objType == wasmModule.DocumentObjectType.ShapeGroup
  || objType == wasmModule.DocumentObjectType.TextBox) {
  shapes.push(docObj);
}

// Then remove them together
for (let m = 0; m < shapes.length; m++) {
  para.ChildObjects.Remove(shapes[m]);
}
Get a Free License
Spire.Doc for JavaScript offers a 30-day full-featured free trial license with no functional limitations. Apply here to evaluate before purchasing.
Convert Word to HTML with JavaScript in React
Converting a Word document to HTML preserves the original paragraph structure, styles, and images while rendering directly in the browser, which makes it widely useful for online preview, content publishing, and full-text search. Spire.Doc for JavaScript performs this conversion entirely in the browser via WebAssembly, using a virtual file system (VFS) to manage input and output files — no backend server required.
This article covers two core features:
For installation and project setup, refer to Integrating Spire.Doc for JavaScript in a React Project. The examples below assume Spire.Doc is installed and the WebAssembly module is initialized.
Convert Word to HTML
Converting Word to HTML involves three stages: first, load the font file and the target Word file into the WASM virtual file system via FetchFileToVFS; then instantiate a Document, load the file, use HtmlExportOptions to specify that both CSS and images are output in embedded form, and call SaveToFile to save the document as HTML; finally, read the generated HTML file from VFS, wrap it as a Blob, and trigger a browser download.
function App() {
  const wordToHtml = async () => {
    // Get the Spire.Doc WASM module
    const docModule = window.wasmModule?.spiredoc;

    // Check if the module is ready
    if (!docModule) {
      alert('Spire.Doc is not ready yet');
      return;
    }

    // Load fonts and the Word file into VFS
    await window.spire.FetchFileToVFS('ARIALUNI.TTF', '/Library/Fonts/', `${process.env.PUBLIC_URL}/static/font/`);
    const inputFileName = 'ToHtml.docx';
    await window.spire.FetchFileToVFS(inputFileName, '', `${process.env.PUBLIC_URL}/static/data/`);

    // Load the Word document
    const wordDocument = new docModule.Document();
    wordDocument.LoadFromFile(inputFileName);

    // Embed the CSS styles into the HTML and embed images as Base64
    wordDocument.HtmlExportOptions.CssStyleSheetType = docModule.CssStyleSheetType.Internal;
    wordDocument.HtmlExportOptions.ImageEmbedded = true;

    // Convert the document to HTML
    const outputFileName = 'ToHtml-result.html';
    wordDocument.SaveToFile({ fileName: outputFileName, fileFormat: docModule.FileFormat.Html });

    // Read the converted file from VFS and trigger download
    const fileArray = window.dotnetRuntime.Module.FS.readFile(outputFileName);
    const blob = new Blob([fileArray], { type: 'text/html;charset=utf-8' });
    const url = URL.createObjectURL(blob);
    const a = window.document.createElement('a');
    a.href = url;
    a.download = outputFileName;
    a.click();
    URL.revokeObjectURL(url);

    // Release resources
    wordDocument.Dispose();
  };

  return (
    <div style={{ textAlign: 'center', height: '300px' }}>
      <h1>Convert Word To HTML</h1>
      <button onClick={wordToHtml}>
        Generate
      </button>
    </div>
  );
}

export default App;
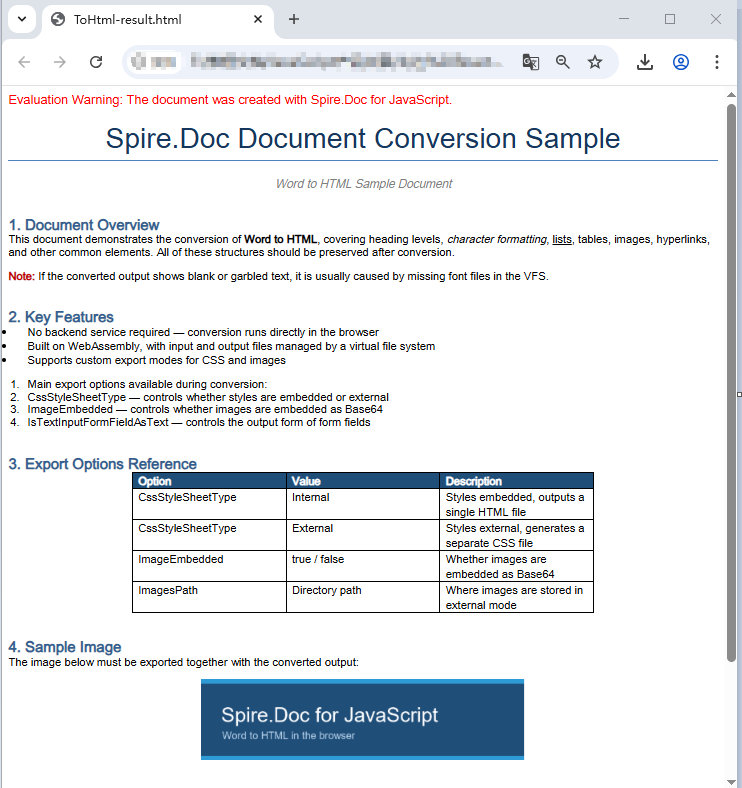
HTML page generated from a Word document via SaveToFile
Convert Word to HTML with export options
The output in the previous section is a single HTML file with CSS and images embedded in it. When a document is large, or when you want to maintain styles centrally and reuse image resources, you usually need to export CSS and images as separate files. HtmlExportOptions provides the corresponding settings, allowing HTML, style sheets, and images to be output separately.
The conversion flow is similar to the previous section, except that the result is a directory: you need to create the directory in VFS first, then use properties such as CssStyleSheetFileName and ImagesPath to specify where each type of resource is stored. Once conversion is complete, read that directory recursively, package everything into a zip, and download it in one go.
import JSZip from 'jszip';

function App() {
  const wordToHtmlWithOptions = async () => {
    // Get the Spire.Doc WASM module
    const docModule = window.wasmModule?.spiredoc;

    // Check if the module is ready
    if (!docModule) {
      alert('Spire.Doc is not ready yet');
      return;
    }

    // Load fonts and the Word file into VFS
    await window.spire.FetchFileToVFS('ARIALUNI.TTF', '/Library/Fonts/', `${process.env.PUBLIC_URL}/static/font/`);
    const inputFileName = 'ToHtml.docx';
    await window.spire.FetchFileToVFS(inputFileName, '', `${process.env.PUBLIC_URL}/static/data/`);

    // Create the output directory in VFS
    const outputDirectoryName = 'ToHTMLFolder/';
    window.dotnetRuntime.Module.FS.mkdirTree(outputDirectoryName);

    // Load the Word document
    const wordDocument = new docModule.Document();
    wordDocument.LoadFromFile(inputFileName);

    // Export the CSS styles to a separate file
    wordDocument.HtmlExportOptions.CssStyleSheetFileName = outputDirectoryName + 'sample.css';
    wordDocument.HtmlExportOptions.CssStyleSheetType = docModule.CssStyleSheetType.External;

    // Export images to a separate directory
    wordDocument.HtmlExportOptions.ImageEmbedded = false;
    wordDocument.HtmlExportOptions.ImagesPath = outputDirectoryName + 'Demo/';

    // Export form fields as plain text
    wordDocument.HtmlExportOptions.IsTextInputFormFieldAsText = true;

    // Convert the document to HTML
    const outputFileName = 'ToHtmlExportOption-out.html';
    wordDocument.SaveToFile({ fileName: outputFileName, fileFormat: docModule.FileFormat.Html });

    // Release resources
    wordDocument.Dispose();

    // Read the output directory recursively and write each level of files into the zip
    const zip = new JSZip();
    const addFilesToZip = async (folderPath, zipFolder) => {
      let items = await window.dotnetRuntime.Module.FS.readdir(folderPath);
      items = items.filter((item) => item !== '.' && item !== '..');
      for (const item of items) {
        const itemPath = `${folderPath}/${item}`;
        try {
          const fileData = await window.dotnetRuntime.Module.FS.readFile(itemPath);
          zipFolder.file(item, fileData);
        } catch (error) {
          const zipSubFolder = zipFolder.folder(item);
          await addFilesToZip(itemPath, zipSubFolder);
        }
      }
    };

    // Package the HTML file together with the resource directory
    zip.file(outputFileName, window.dotnetRuntime.Module.FS.readFile(outputFileName));
    await addFilesToZip(outputDirectoryName, zip);
    const zipBlob = await zip.generateAsync({ type: 'blob' });
    const url = URL.createObjectURL(zipBlob);

    // Trigger download
    const a = window.document.createElement('a');
    a.href = url;
    a.download = 'ToHTMLFolder.zip';
    a.click();
    URL.revokeObjectURL(url);
  };

  return (
    <div style={{ textAlign: 'center', height: '300px' }}>
      <h1>Convert Word To HTML With Export Options</h1>
      <button onClick={wordToHtmlWithOptions}>
        Generate
      </button>
    </div>
  );
}

export default App;
HTML, CSS, and image files generated after configuring the export options
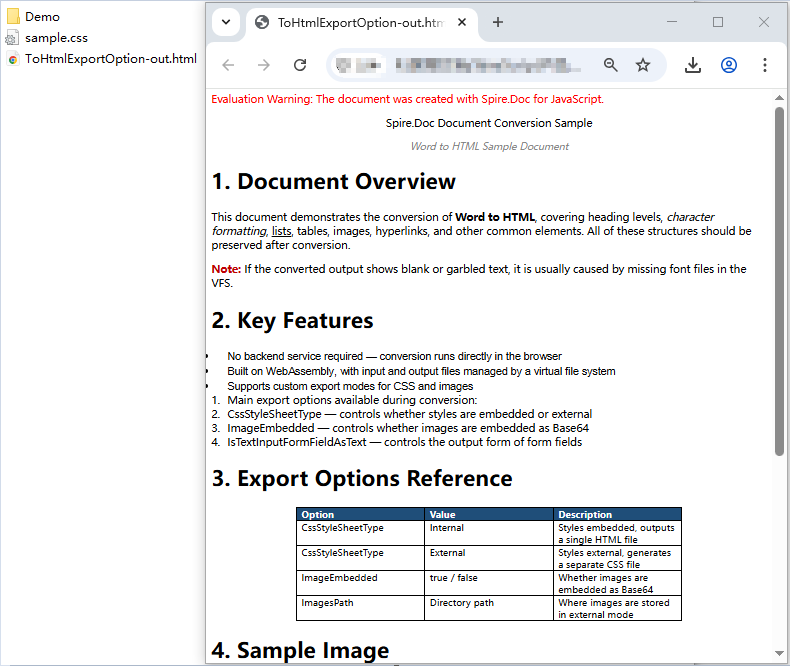
Note that Spire.Doc does not write images directly into the directory pointed to by ImagesPath. Instead, it creates an external_images subdirectory underneath it to hold the images. As a result, the output directory typically forms a hierarchy such as Demo/external_images/*.png, which must be read level by level — this is why addFilesToZip is implemented recursively in the example above.
FAQ
Fonts in the exported HTML do not match the original document
Cause: The font files are missing from the WASM virtual file system. Spire.Doc reads fonts from VFS during conversion to perform layout calculations and font name resolution. If the fonts are not preloaded, the fonts used in the original document are replaced with substitute fonts, and the font-family in the exported CSS will not match the original. If the original document uses a symbol font such as Wingdings, the corresponding characters will also appear garbled.
Solution: Load the font files into VFS via FetchFileToVFS before conversion. For Chinese, Japanese, and Korean documents, use a font with broad coverage such as ARIALUNI.TTF:
await window.spire.FetchFileToVFS(
  'ARIALUNI.TTF', '/Library/Fonts/', '/'
);
Exported HTML loses its styles and images when opened
Cause: In external mode (CssStyleSheetType.External combined with ImageEmbedded = false), CSS and images are output as separate files to the specified directory, and the HTML keeps only relative path references. If you download the HTML file on its own, the browser cannot find the corresponding style sheet and images, and the page degrades into unstyled plain text.
Solution: Package the HTML file together with the resource directory and download them as a whole, so that the relative path references remain valid (see the addFilesToZip example above). If you do not need separate resource files, you can switch to embedded mode instead:
wordDocument.HtmlExportOptions.CssStyleSheetType = docModule.CssStyleSheetType.Internal;
wordDocument.HtmlExportOptions.ImageEmbedded = true;
Get a Free License
Spire.Doc for JavaScript offers a 30-day full-featured free trial license with no functional limitations. Apply here to evaluate before purchasing.
Convert Word to Image with JavaScript in React
Converting a Word document to images is the most common approach for online preview, thumbnail generation, and preventing content from being copied at will — the resulting images keep a consistent layout on any device. Spire.Doc for JavaScript performs this conversion directly in the browser via WebAssembly, managing input and output files through a virtual file system (VFS) — no backend server required.
This article covers two core features:
For installation and project setup, refer to Integrating Spire.Doc for JavaScript in a React Project. The examples below assume Spire.Doc is installed and the WebAssembly module is initialized.
Page to Image
Converting a document page to an image involves three stages: first, load the font file and the target Word document into the WASM virtual file system via FetchFileToVFS; then instantiate a Document, load the document, call SaveImageToStreams with a pageIndex to render the specified page as an image, and save it to VFS; finally, read the generated image file from VFS, wrap it as a Blob, and create a download link.
import React from 'react';

function App() {
  const ToImage = async () => {
    // Get the Spire.Doc WASM module
    const docModule = window.wasmModule?.spiredoc;

    if (!docModule) {
      alert('Spire.Doc is not ready yet');
      return;
    }

    // Load the font file into the virtual file system (VFS)
    await window.spire.FetchFileToVFS('ARIALUNI.TTF', '/Library/Fonts/', `${process.env.PUBLIC_URL}/font/`);
    const inputFileName = 'ToImage.docx';
    // Load the target Word document into VFS
    await window.spire.FetchFileToVFS(inputFileName, '', `${process.env.PUBLIC_URL}data/`);

    // Create a Document instance and load the document
    const doc = new docModule.Document();
    doc.LoadFromFile(inputFileName);

    // Define the output file name
    const outputFileName = "ToImage-result.png";

    // Convert the first page to an image stream and save it to VFS
    let img = doc.SaveImageToStreams({ pageIndex: 0, type: docModule.ImageType.Bitmap });
    img.Save(outputFileName);

    // Release resources
    doc.Dispose();

    // Read the generated file from VFS and wrap it as a Blob
    const modifiedFileArray = window.dotnetRuntime.Module.FS.readFile(outputFileName);
    const blob = new Blob([modifiedFileArray], {  type: 'image/png'});
    const url = URL.createObjectURL(blob);
    const a = document.createElement('a');
    a.href = url;
    a.download = outputFileName;
    a.click();
    URL.revokeObjectURL(url);
  };

  return (
    <div style={{ textAlign: 'center', height: '300px' }}>
      <h1>Convert a Specified Page to an Image</h1>
      <button onClick={ToImage}>
        Generate
      </button>
    </div>
  );
}

export default App;
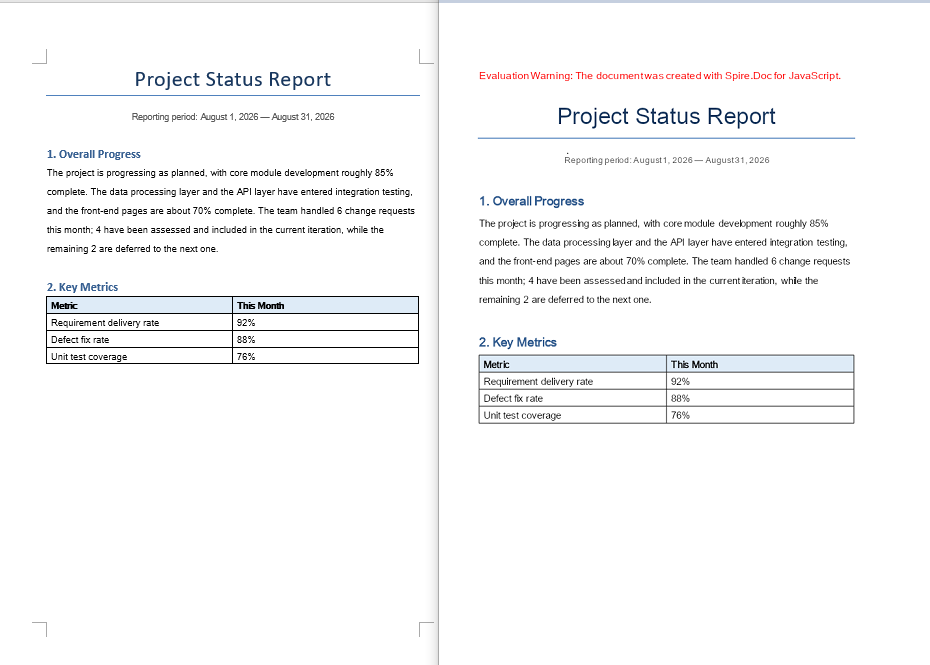
PNG image generated from a document page via SaveImageToStreams
Document Object to Image
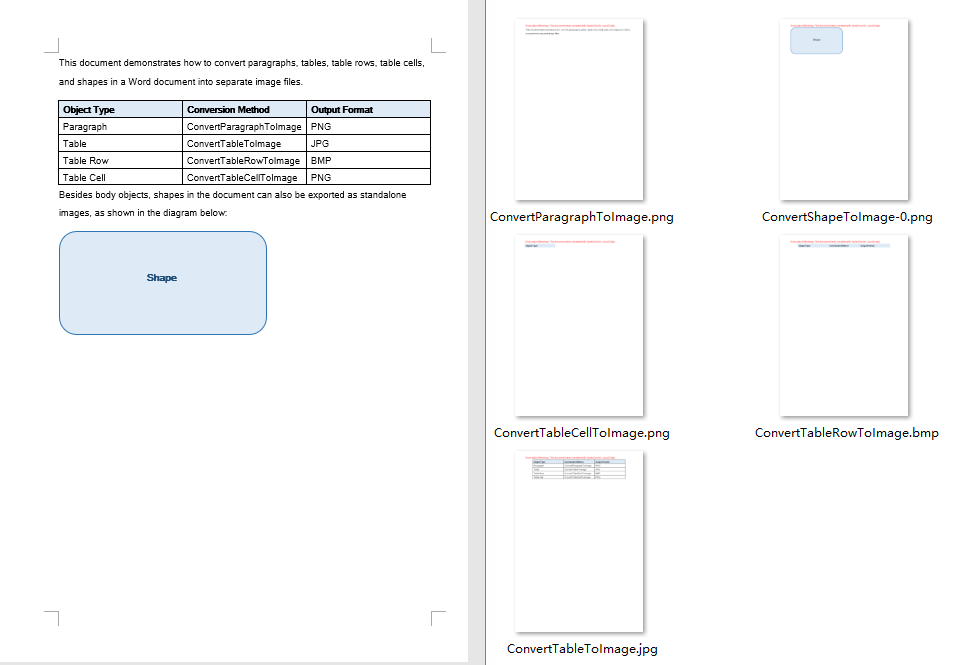
Besides whole-page conversion, real projects often need to export a single element of a document as an image — for example, generating a preview image for a table, or extracting a shape from a document as standalone material. Paragraphs, tables, table rows, table cells, and shapes can all be copied into a newly created Document via the Clone method, and then rendered into an image with SaveImageToStreams. The conversion results are written uniformly to an output directory in VFS, and finally packaged into a single ZIP file with JSZip for the user to download.
Note that a shape cannot be added directly to a paragraph of a newly created document. The example first saves the document to a memory stream and then reloads it, so that the shape obtains a complete layout context in the new document before being rendered.
import React from 'react';
import JSZip from "jszip";

function App() {
  const ToImage = async () => {
    // Get the Spire.Doc WASM module
    const docModule = window.wasmModule?.spiredoc;

    if (!docModule) {
      alert('Spire.Doc is not ready yet');
      return;
    }

    // Load the font file into the virtual file system (VFS)
    await window.spire.FetchFileToVFS('ARIALUNI.TTF', '/Library/Fonts/', `${process.env.PUBLIC_URL}/font/`);
    // Load the target Word document into VFS
    const inputFileName = "ConvertObjectToImage.docx";
    await window.spire.FetchFileToVFS(inputFileName, "", `${process.env.PUBLIC_URL}/data/`);

    // Define and create the output directory in VFS
    const outputDirectoryName = "outputFolder/";
    await window.dotnetRuntime.Module.FS.mkdirTree(outputDirectoryName);

    // Create a Document instance and load the document
    const doc = new docModule.Document();
    doc.LoadFromFile(inputFileName);

    // Get the first section and its body
    let section = doc.Sections.get_Item(0);
    let body = section.Body;

    // Get the first paragraph and convert it to an image
    let paragraph = body.Paragraphs.get_Item(0);
    let imageStream1 = ConvertParagraphToImage(paragraph, docModule);
    let imageFile1 = outputDirectoryName + "ConvertParagraphToImage.png";
    window.dotnetRuntime.Module.FS.writeFile(imageFile1, imageStream1.Save());

    // Get the first table and convert it to an image
    let table = body.Tables.get_Item(0);
    let imageStream2 = ConvertTableToImage(table, docModule);
    let imageFile2 = outputDirectoryName + "ConvertTableToImage.jpg";
    window.dotnetRuntime.Module.FS.writeFile(imageFile2, imageStream2.Save());

    // Get the first row of the first table and convert it to an image
    let row = table.Rows.get_Item(0);
    let imageStream3 = ConvertTableRowToImage(row, docModule);
    let imageFile3 = outputDirectoryName + "ConvertTableRowToImage.bmp";
    window.dotnetRuntime.Module.FS.writeFile(imageFile3, imageStream3.Save());

    // Get the first cell of the first row and convert it to an image
    let cell = row.Cells.get_Item(0);
    let imageStream4 = ConvertTableCellToImage(cell, docModule);
    let imageFile4 = outputDirectoryName + "ConvertTableCellToImage.png";
    window.dotnetRuntime.Module.FS.writeFile(imageFile4, imageStream4.Save());

    // Iterate over the paragraphs and convert the shapes in them to images
    for (let i = 0; i < section.Paragraphs.Count; i++) {
      let para = section.Body.Paragraphs.get_Item(i);
      for (let j = 0; j < para.ChildObjects.Count; j++) {
        let docObj = para.ChildObjects.get_Item(j);
        if (docObj.DocumentObjectType == docModule.DocumentObjectType.Shape) {
          let imageStream5 = ConvertShapeToImage(docObj, docModule);
          let imageFile5 = outputDirectoryName + "ConvertShapeToImage-" + j + ".png";

          window.dotnetRuntime.Module.FS.writeFile(imageFile5, imageStream5.Save());
          i++;
        }
      }
    }

    // Release resources
    doc.Dispose();

    // Package all images in the output directory into a ZIP file
    const zip = new JSZip();
    const addFilesToZip = async (folderPath, zipFolder) => {
      let items = await window.dotnetRuntime.Module.FS.readdir(folderPath);
      items = items.filter((item) => item !== "." && item !== "..");
      for (const item of items) {
        const itemPath = `${folderPath}/${item}`;
        try {
          const fileData = await window.dotnetRuntime.Module.FS.readFile(itemPath);
          zipFolder.file(item, fileData);
        } catch (error) {
          const zipSubFolder = zipFolder.folder(item);
          await addFilesToZip(itemPath, zipSubFolder);
        }
      }
    };

    await addFilesToZip(outputDirectoryName, zip);
    const zipBlob = await zip.generateAsync({ type: "blob" });
    // Read the generated file from VFS and wrap it as a Blob
    const url = URL.createObjectURL(zipBlob);
    const a = document.createElement('a');
    a.href = url;
    a.download = "ConvertObjectToImage_out.zip";
    a.click();
    URL.revokeObjectURL(url);
  };

  // Convert a paragraph to an image
  function ConvertParagraphToImage(paragraph, docModule) {
    let doc = new docModule.Document();
    let section = doc.AddSection();

    section.Body.ChildObjects.Add(paragraph.Clone());
    let imageStream = doc.SaveImageToStreams({ pageIndex: 0, type: docModule.ImageType.Bitmap });
    doc.Close();
    return imageStream;
  }

  // Convert a table to an image
  function ConvertTableToImage(table, docModule) {
    let doc = new docModule.Document();
    let section = doc.AddSection();

    section.Body.ChildObjects.Add(table.Clone());

    let imageStream = doc.SaveImageToStreams({ pageIndex: 0, type: docModule.ImageType.Bitmap });
    doc.Close();
    return imageStream;
  }

  // Convert a table row to an image
  function ConvertTableRowToImage(tableRow, docModule) {
    let doc = new docModule.Document();
    let section = doc.AddSection();
    let table = section.AddTable();
    table.Rows.Add(tableRow.Clone());
    let imageStream = doc.SaveImageToStreams({ pageIndex: 0, type: docModule.ImageType.Bitmap });
    doc.Close();
    return imageStream;
  }

  // Convert a table cell to an image
  function ConvertTableCellToImage(tableCell, docModule) {
    let doc = new docModule.Document();
    let section = doc.AddSection();
    let table = section.AddTable();
    table.AddRow().Cells.Add(tableCell.Clone());
    let imageStream = doc.SaveImageToStreams({ pageIndex: 0, type: docModule.ImageType.Bitmap });
    doc.Close();
    return imageStream;
  }

  // Convert a shape to an image
  function ConvertShapeToImage(shape, docModule) {
    let doc = new docModule.Document();
    let section = doc.AddSection();
    section.AddParagraph().ChildObjects.Add(shape.Clone());
    let memoryStream = new docModule.Stream();
    doc.SaveToStream({ stream: memoryStream, fileFormat: docModule.FileFormat.Docx });
    doc.LoadFromStream({ stream: memoryStream, fileFormat: docModule.FileFormat.Docx });
    let imageStream = doc.SaveImageToStreams({ pageIndex: 0, type: docModule.ImageType.Bitmap });
    memoryStream.Close();
    doc.Close();
    return imageStream;
  }

  return (
    <div style={{ textAlign: 'center', height: '300px' }}>
      <h1>Convert Elements to Images</h1>
      <button onClick={ToImage}>
        Generate
      </button>
    </div>
  );
}

export default App;
Images inside the ZIP file generated after converting the document objects
FAQ
Missing or garbled text in the generated image
Cause: The font files required for rendering are missing from the WASM virtual file system. SaveImageToStreams reads fonts from VFS when rendering text — if they are not preloaded, text areas will be left blank or appear garbled.
Solution: Load the font files into VFS via FetchFileToVFS before conversion:
await window.spire.FetchFileToVFS(
  'ARIALUNI.TTF', '/Library/Fonts/',
  `${process.env.PUBLIC_URL}/static/font/`
);
Only the first page is generated
Cause: Each call to SaveImageToStreams renders only the single page specified by pageIndex. The example always passes 0, so a multi-page document only outputs an image of the first page.
Solution: Get the total page count via PageCount and iterate page by page, generating a separate image file for each page:
for (let i = 0; i < doc.PageCount; i++) {
  let img = doc.SaveImageToStreams({
    pageIndex: i, type: wasmModule.ImageType.Bitmap
  });
  img.Save(`ToImage-page-${i + 1}.png`);
}
Get a Free License
If you wish to remove the evaluation message from the resulting document, or to eliminate functional limitations, please contact our sales team to request a 30-day temporary license.
Add a Table of Contents to an Existing Word Document with JavaScript in React
A more common situation in real-world work is a document that is already written and has a complete chapter structure, but no table of contents was generated at the time. There is no need to rearrange the content — adding a TOC field on top of the existing heading styles is enough to produce a complete table of contents with page numbers and hyperlinks. Spire.Doc for JavaScript opens and edits Word documents directly in the browser via WebAssembly, managing input and output files through a virtual file system (VFS) — no backend server required.
Compared with creating a new document, adding a table of contents to an existing document involves two extra key steps: loading the original document from VFS with LoadFromFile, and moving the table of contents paragraph to the very beginning of the document with Paragraphs.Insert, instead of appending it to the end by default.
This article covers two core features:
For installation and project setup, refer to Integrating Spire.Doc for JavaScript in a React Project. The examples below assume Spire.Doc is installed and the WebAssembly module is initialized.
Add a Default Table of Contents
Adding a default table of contents to an existing document has three phases: first, load the font file and the Word document to be processed into the WASM virtual file system via FetchFileToVFS; then instantiate a Document and load the document with LoadFromFile, create a new paragraph and insert the TOC field with AppendTOC, and move it to the very beginning of the document with Paragraphs.Insert(0, tocPara); finally, call UpdateTableOfContents to fill in the entries and page numbers, save the document, read the generated file from VFS, wrap it as a Blob, and trigger a browser download.
The input document used in the example, AddTocToExisting.docx, is a technical report with three chapters and eleven multi-level headings but no table of contents yet.
function App() {
  const AddTableOfContentsToExistingDocument = async () => {
    // Get the Spire.Doc WASM module
    const docModule = window.wasmModule?.spiredoc;

    // Make sure the WASM module has fully loaded
    if (!docModule) {
      alert('Spire.Doc is not ready yet');
      return;
    }

    // Load the font and the existing Word document into VFS
    await window.spire.FetchFileToVFS('ARIAL.TTF', '/Library/Fonts/', `${process.env.PUBLIC_URL}/font/`);
    const inputFileName = 'AddTocToExisting.docx';
    await window.spire.FetchFileToVFS(inputFileName, '', `${process.env.PUBLIC_URL}data/`);

    // Create a document instance and load the existing document
    const doc = new docModule.Document();
    doc.LoadFromFile({ fileName: inputFileName });

    // Get the first section of the document
    let section = doc.Sections.get_Item(0);

    // Create a new paragraph and insert the TOC field, collecting Heading 1 through Heading 3 entries
    let tocPara = section.AddParagraph();
    tocPara.AppendTOC(1, 3);

    // Move the table of contents paragraph to the very beginning of the document
    section.Paragraphs.Insert(0, tocPara);

    // Update the table of contents to fill in entries and page numbers
    doc.UpdateTableOfContents();

    // Define the output file name and save
    const outputFileName = "Add a Default TOC to an Existing Document.docx";
    doc.SaveToFile({ fileName: outputFileName, fileFormat: docModule.FileFormat.Docx2013 });

    // Release resources
    doc.Dispose();

    // Read the generated file from VFS and trigger the download
    const modifiedFileArray = window.dotnetRuntime.Module.FS.readFile(outputFileName);
    const blob = new Blob([modifiedFileArray], { type: 'application/vnd.openxmlformats-officedocument.wordprocessingml.document' });
    const url = URL.createObjectURL(blob);
    const a = document.createElement('a');
    a.href = url;
    a.download = outputFileName;
    a.click();
    URL.revokeObjectURL(url);
  };

  return (
    <div style={{ textAlign: 'center', height: '300px' }}>
      <h1>Click the button below to add a default table of contents to an existing document</h1>
      <button onClick={AddTableOfContentsToExistingDocument}>
        Generate
      </button>
    </div>
  );
}

export default App;
After the existing document is loaded with LoadFromFile and a TOC field is inserted, the table of contents is placed at the very beginning, while the original chapter content and layout remain unchanged
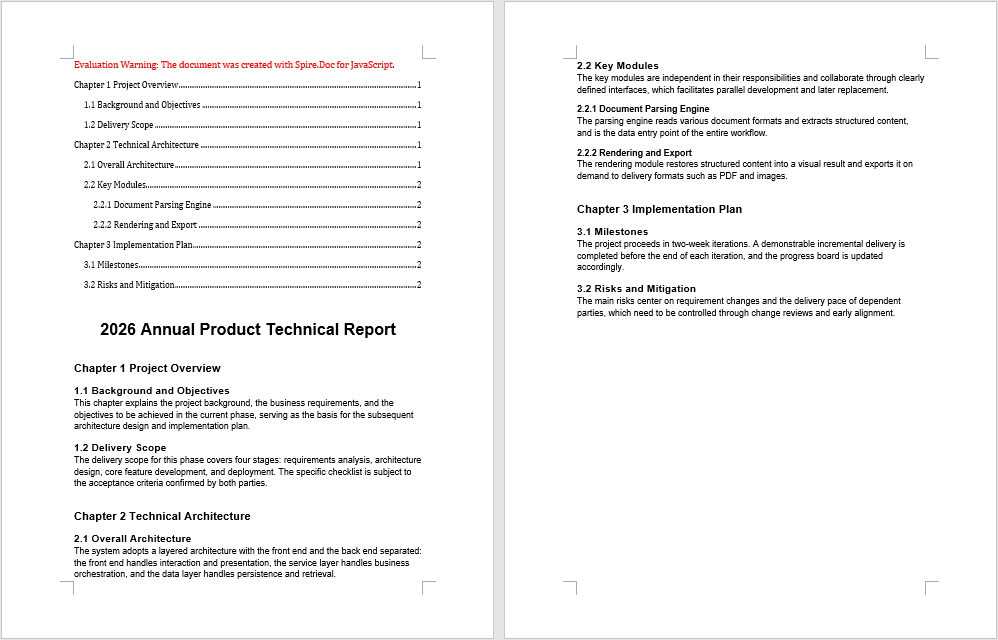
Add a Custom Table of Contents
The table of contents generated by AppendTOC uses Word's default field switches. When you need to control its exact behavior, you can construct a TableOfContent object directly and specify the switch string instead. The difference from the previous feature lies in how it is inserted: you must manually add the table of contents object to a paragraph, supply the field separator and field end marks, and assign the object to document.TOC. The commonly used field switches and their meanings are as follows:
| Switch | Description |
|---|---|
\o "1-3" |
Collects entries by built-in heading styles; here it means including Heading 1 through Heading 3 |
\h |
Turns table of contents entries into hyperlinks that jump to the corresponding chapter when clicked |
\z |
Hides page numbers and tab leaders in Web Layout view |
\u |
Collects entries by the outline level of the paragraphs |
If you want the table of contents to occupy its own page and be separated from the body, add a page break to the same section after inserting the table of contents paragraph:
tocPara.AppendBreak(docModule.BreakType.PageBreak);
function App() {
  const CustomizeTableOfContent = async () => {
    // Get the Spire.Doc WASM module
    const docModule = window.wasmModule?.spiredoc;

    // Make sure the WASM module has fully loaded
    if (!docModule) {
      alert('Spire.Doc is not ready yet');
      return;
    }

    // Load the font and the existing Word document into VFS
    await window.spire.FetchFileToVFS('ARIAL.TTF', '/Library/Fonts/', `${process.env.PUBLIC_URL}/font/`);
    const inputFileName = 'AddTocToExisting.docx';
    await window.spire.FetchFileToVFS(inputFileName, '', `${process.env.PUBLIC_URL}data/`);

    // Create a document instance and load the existing document
    const doc = new docModule.Document();
    doc.LoadFromFile({ fileName: inputFileName });

    // Get the first section of the document
    let section = doc.Sections.get_Item(0);

    // Construct a table of contents object with custom field switches
    let toc = new docModule.TableOfContent(doc, "{\\o \"1-3\" \\h \\z \\u}");

    // Add the table of contents object to a paragraph
    let tocPara = section.AddParagraph();
    tocPara.Items.Add(toc);

    // Supply the field separator and field end marks
    tocPara.AppendFieldMark(docModule.FieldMarkType.FieldSeparator);
    tocPara.AppendText("TOC");
    tocPara.AppendFieldMark(docModule.FieldMarkType.FieldEnd);

    // Bind this table of contents to the document
    doc.TOC = toc;

    // Move the table of contents paragraph to the very beginning of the document
    section.Paragraphs.Insert(0, tocPara);

    // Update the table of contents to fill in entries and page numbers
    doc.UpdateTableOfContents();

    // Define the output file name and save
    const outputFileName = "Add a Custom TOC to an Existing Document.docx";
    doc.SaveToFile({ fileName: outputFileName, fileFormat: docModule.FileFormat.Docx2013 });

    // Release resources
    doc.Dispose();

    // Read the generated file from VFS and trigger the download
    const modifiedFileArray = window.dotnetRuntime.Module.FS.readFile(outputFileName);
    const blob = new Blob([modifiedFileArray], { type: 'application/vnd.openxmlformats-officedocument.wordprocessingml.document' });
    const url = URL.createObjectURL(blob);
    const a = document.createElement('a');
    a.href = url;
    a.download = outputFileName;
    a.click();
    URL.revokeObjectURL(url);
  };

  return (
    <div style={{ textAlign: 'center', height: '300px' }}>
      <h1>Click the button below to add a custom table of contents to an existing document</h1>
      <button onClick={CustomizeTableOfContent}>
        Generate
      </button>
    </div>
  );
}

export default App;
The table of contents generated with a TableOfContent object and custom field switches has its entry levels, hyperlinks, and page numbers all determined by the switch string
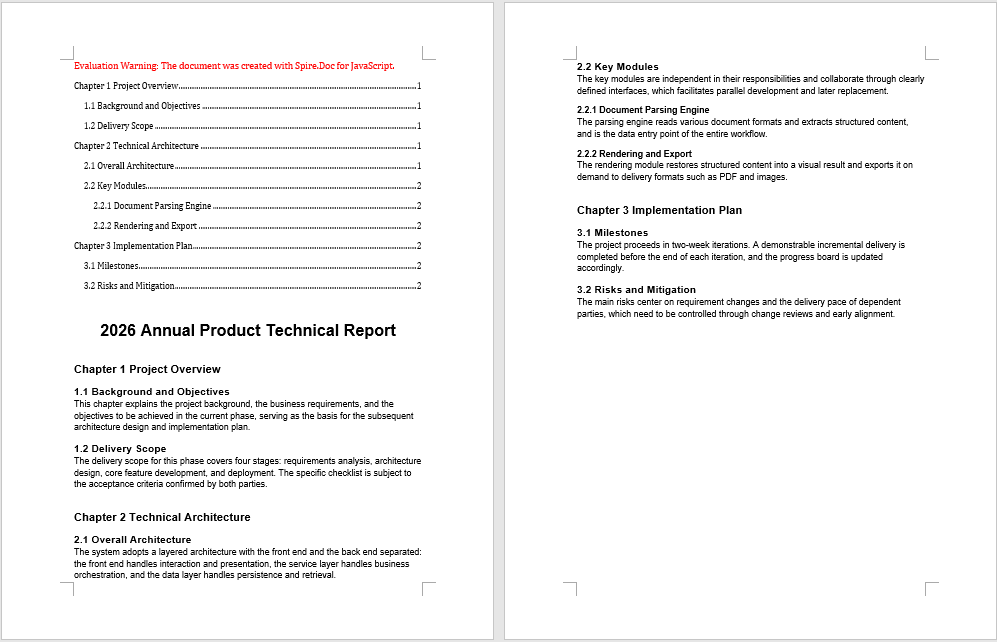
FAQ
The table of contents appears at the end of the document instead of the beginning
Cause: AddParagraph appends a new paragraph to the end of its section by default, so inserting the TOC field directly on it naturally places the table of contents at the end as well. The content of an existing document has already been laid out, so the insertion position must be specified explicitly.
Solution: Create the table of contents paragraph first, then move it to the very beginning of the document with Paragraphs.Insert:
let tocPara = section.AddParagraph();
tocPara.AppendTOC(1, 3);
section.Paragraphs.Insert(0, tocPara);
The table of contents is empty
Cause: A TOC field collects entries by heading style. If the chapter headings in the original document were only manually bolded and enlarged without built-in heading styles such as Heading1 to Heading3 applied, no entries will appear in the table of contents after updating.
Solution: First check whether the headings in the original document use built-in heading styles. If not, re-apply the style to those paragraphs after loading the document:
let heading = section.Paragraphs.get_Item(2);
heading.ApplyStyle({ builtinStyle: docModule.BuiltinStyle.Heading1 });
Page numbers in the table of contents are missing or incorrect
Cause: AppendTOC only inserts the TOC field itself; the field content must be updated explicitly. If UpdateTableOfContents is not called before saving, the generated table of contents contains only the field code, with no entries or page numbers.
Solution: Call the update method before SaveToFile:
doc.UpdateTableOfContents();
doc.SaveToFile({ fileName: outputFileName, fileFormat: docModule.FileFormat.Docx2013 });
Get a Free License
Spire.Doc for JavaScript offers a 30-day full-featured free trial license with no functional limitations. Apply here to evaluate before purchasing.
Add a Table of Contents to a New Word Document with JavaScript in React
Creating a table of contents for a long document lets readers locate chapters quickly, and makes it easy to re-sync entries and page numbers after the document structure changes. Using a "Spire.Doc Developer Guide" as an example, this article shows how to build a Word document with multi-level headings from scratch and add a table of contents to it. Spire.Doc for JavaScript builds and edits Word documents directly in the browser via WebAssembly, managing font resources through a virtual file system (VFS) — no backend server required.
This article covers two core features:
For installation and project setup, refer to Integrating Spire.Doc for JavaScript in a React Project. The examples below assume Spire.Doc is installed and the WebAssembly module is initialized.
Add a Default Table of Contents
In Word, a table of contents is essentially a TOC field whose entries come from the paragraphs in the document that have a heading style applied. Creating a default table of contents has three phases: first, load the font file into the WASM virtual file system via FetchFileToVFS; then instantiate a Document and build the content with AddSection and AddParagraph, calling ApplyStyle on the paragraphs that should appear in the table of contents to apply heading styles, and inserting the TOC field at the beginning of the document with AppendTOC; finally, call UpdateTableOfContents to fill in the entries and page numbers, save the document, read the generated file from VFS, wrap it as a Blob, and trigger a browser download.
The sample document contains three chapters and twelve multi-level headings in total, spanning Heading 1 through Heading 3, which makes it easy to observe how the table of contents collects multi-level headings.
function App() {
  const AddTableOfContentsToNewDocument = async () => {
    // Get the Spire.Doc WASM module
    const docModule = window.wasmModule?.spiredoc;

    // Make sure the WASM module has fully loaded
    if (!docModule) {
      alert('Spire.Doc is not ready yet');
      return;
    }

    // Load the font into VFS
    await window.spire.FetchFileToVFS('ARIAL.TTF', '/Library/Fonts/', `${process.env.PUBLIC_URL}/font/`);

    // Create a document instance and add a section
    const doc = new docModule.Document();
    let section = doc.AddSection();

    // Insert a TOC field at the beginning of the document, collecting Heading 1 through Heading 3 entries
    let tocPara = section.AddParagraph();
    tocPara.AppendTOC(1, 3);

    // Add the document title
    let characterFormat = new docModule.CharacterFormat(doc);
    characterFormat.FontName ="Arial";
    let title = section.AddParagraph();
    let titleRun = title.AppendText("Spire.Doc Developer Guide");
    titleRun.ApplyCharacterFormat(characterFormat);
    titleRun.CharacterFormat.FontSize = 24;
    title.Format.HorizontalAlignment = docModule.HorizontalAlignment.Center;

    // Chapter 1 Overview (Heading 1)
    let p = section.AddParagraph();
    p.AppendText("Chapter 1 Overview").ApplyCharacterFormat(characterFormat);;
    p.ApplyStyle({ builtinStyle: docModule.BuiltinStyle.Heading1 });
    section.AddParagraph().AppendText("Spire.Doc for JavaScript lets developers create, edit, and save Word documents directly in the browser, with no backend service involved at any point.").ApplyCharacterFormat(characterFormat);;

    // 1.1 What Is Spire.Doc for JavaScript (Heading 2)
    p = section.AddParagraph();
    p.AppendText("1.1 What Is Spire.Doc for JavaScript").ApplyCharacterFormat(characterFormat);;
    p.ApplyStyle({ builtinStyle: docModule.BuiltinStyle.Heading2 });
    section.AddParagraph().AppendText("It is a Word document processing library built on WebAssembly that manages fonts and document files through a virtual file system (VFS) and exposes an API shaped the same as the .NET version.").ApplyCharacterFormat(characterFormat);;

    // 1.2 Use Cases (Heading 2)
    p = section.AddParagraph();
    p.AppendText("1.2 Use Cases").ApplyCharacterFormat(characterFormat);;
    p.ApplyStyle({ builtinStyle: docModule.BuiltinStyle.Heading2 });
    section.AddParagraph().AppendText("It suits scenarios that require document processing on the client side, such as online contract signing, batch report generation, and resume template filling.").ApplyCharacterFormat(characterFormat);;

    // Chapter 2 Core Capabilities (Heading 1)
    p = section.AddParagraph();
    p.AppendText("Chapter 2 Core Capabilities").ApplyCharacterFormat(characterFormat);;
    p.ApplyStyle({ builtinStyle: docModule.BuiltinStyle.Heading1 });
    section.AddParagraph().AppendText("Spire.Doc for JavaScript covers the entire document processing chain, from content construction and layout adjustment to format export, all of which can be completed in the browser.").ApplyCharacterFormat(characterFormat);;

    // 2.1 Document Processing (Heading 2)
    p = section.AddParagraph();
    p.AppendText("2.1 Document Processing").ApplyCharacterFormat(characterFormat);;
    p.ApplyStyle({ builtinStyle: docModule.BuiltinStyle.Heading2 });
    section.AddParagraph().AppendText("It supports creating and modifying common document elements such as paragraphs, styles, tables, images, headers, and footers, while preserving the original layout information.").ApplyCharacterFormat(characterFormat);;

    // 2.1.1 Paragraphs and Styles (Heading 3)
    p = section.AddParagraph();
    p.AppendText("2.1.1 Paragraphs and Styles").ApplyCharacterFormat(characterFormat);;
    p.ApplyStyle({ builtinStyle: docModule.BuiltinStyle.Heading3 });
    section.AddParagraph().AppendText("Add a paragraph with AddParagraph and apply a built-in style with ApplyStyle to quickly build a clearly structured document skeleton.").ApplyCharacterFormat(characterFormat);;

    // 2.1.2 Tables and Images (Heading 3)
    p = section.AddParagraph();
    p.AppendText("2.1.2 Tables and Images").ApplyCharacterFormat(characterFormat);;
    p.ApplyStyle({ builtinStyle: docModule.BuiltinStyle.Heading3 });
    section.AddParagraph().AppendText("Tables and images can be written directly into a specified paragraph or nested inside a textbox, meeting the layout needs of complex documents.").ApplyCharacterFormat(characterFormat);;

    // 2.2 Format Conversion (Heading 2)
    p = section.AddParagraph();
    p.AppendText("2.2 Format Conversion").ApplyCharacterFormat(characterFormat);;
    p.ApplyStyle({ builtinStyle: docModule.BuiltinStyle.Heading2 });
    section.AddParagraph().AppendText("SaveToFile converts documents to PDF, HTML, Markdown, and other formats, with the whole conversion completed in the browser.").ApplyCharacterFormat(characterFormat);;

    // 2.3 Batch Processing (Heading 2)
    p = section.AddParagraph();
    p.AppendText("2.3 Batch Processing").ApplyCharacterFormat(characterFormat);;
    p.ApplyStyle({ builtinStyle: docModule.BuiltinStyle.Heading2 });
    section.AddParagraph().AppendText("Combined with the runtime efficiency of WebAssembly, multiple documents can be loaded at once and processed in sequence, avoiding frequent file uploads and downloads.").ApplyCharacterFormat(characterFormat);;

    // Chapter 3 Getting Started (Heading 1)
    p = section.AddParagraph();
    p.AppendText("Chapter 3 Getting Started").ApplyCharacterFormat(characterFormat);;
    p.ApplyStyle({ builtinStyle: docModule.BuiltinStyle.Heading1 });
    section.AddParagraph().AppendText("This chapter covers the preparation needed to integrate Spire.Doc for JavaScript into a React project and produce your first document.").ApplyCharacterFormat(characterFormat);;

    // 3.1 Environment Setup (Heading 2)
    p = section.AddParagraph();
    p.AppendText("3.1 Environment Setup").ApplyCharacterFormat(characterFormat);;
    p.ApplyStyle({ builtinStyle: docModule.BuiltinStyle.Heading2 });
    section.AddParagraph().AppendText("Install Spire.Doc for JavaScript in your React project and place the font files and WASM resources in the public directory to get started.").ApplyCharacterFormat(characterFormat);;

    // 3.2 The First Example (Heading 2)
    p = section.AddParagraph();
    p.AppendText("3.2 The First Example").ApplyCharacterFormat(characterFormat);;
    p.ApplyStyle({ builtinStyle: docModule.BuiltinStyle.Heading2 });
    section.AddParagraph().AppendText("After initializing the module, create a Document instance, add content, and save it; then read the resulting file from VFS to trigger a browser download.").ApplyCharacterFormat(characterFormat);;

    // Update the table of contents to fill in entries and page numbers
    doc.UpdateTableOfContents();

    // Define the output file name and save
    const outputFileName = "Create a Default TOC in Word Document.docx";
    doc.SaveToFile({ fileName: outputFileName, fileFormat: docModule.FileFormat.Docx2013 });

    // Release resources
    doc.Dispose();

    // Read the generated file from VFS and trigger the download
    const modifiedFileArray = window.dotnetRuntime.Module.FS.readFile(outputFileName);
    const blob = new Blob([modifiedFileArray], { type: 'application/vnd.openxmlformats-officedocument.wordprocessingml.document' });
    const url = URL.createObjectURL(blob);
    const a = document.createElement('a');
    a.href = url;
    a.download = outputFileName;
    a.click();
    URL.revokeObjectURL(url);
  };

  return (
    <div style={{ textAlign: 'center', height: '300px' }}>
      <h1>Click the button below to create a default table of contents in a Word document</h1>
      <button onClick={AddTableOfContentsToNewDocument}>
        Generate
      </button>
    </div>
  );
}

export default App;
After a TOC field is inserted with AppendTOC and updated, the beginning of the document holds a default table of contents that collects three heading levels, complete with page numbers and hyperlinks.
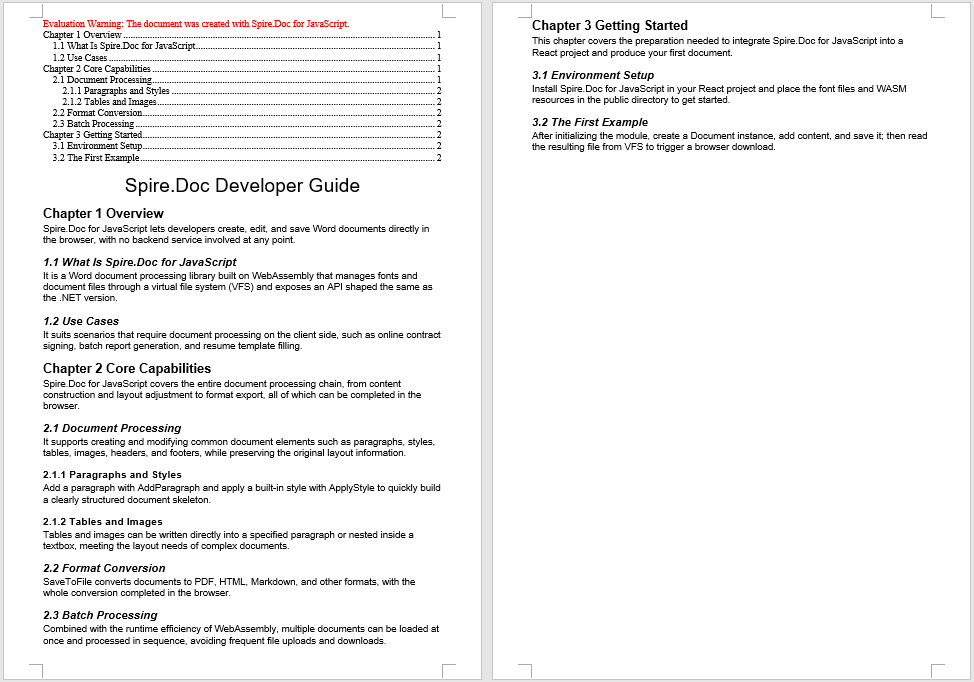
Add a Custom Table of Contents
The table of contents generated by AppendTOC uses Word's default field switches. When you need to control its exact behavior, you can construct a TableOfContent object directly and specify the switch string instead. The difference from the previous feature lies in how it is inserted: you must manually add the table of contents object to a paragraph, supply the field separator and field end marks, and assign the object to document.TOC. The commonly used field switches and their meanings are as follows:
| Switch | Description |
|---|---|
\o "1-3" |
Collects entries by built-in heading styles; here it means including Heading 1 through Heading 3 |
\h |
Turns table of contents entries into hyperlinks that jump to the corresponding chapter when clicked |
\z |
Hides page numbers and tab leaders in Web Layout view |
\u |
Collects entries by the outline level of the paragraphs |
For example, changing the switch string to \o "1-2" means only Heading 1 and Heading 2 entries are collected, and Heading 3 no longer appears in the table of contents; removing \h means the entries no longer support jumping.
function App() {
  const CustomizeTableOfContent = async () => {
    // Get the Spire.Doc WASM module
    const docModule = window.wasmModule?.spiredoc;

    // Make sure the WASM module has fully loaded
    if (!docModule) {
      alert('Spire.Doc is not ready yet');
      return;
    }

    // Load the font into VFS
    await window.spire.FetchFileToVFS('ARIAL.TTF', '/Library/Fonts/', `${process.env.PUBLIC_URL}/font/`);

    // Create a document instance and add a section
    const doc = new docModule.Document();
    let section = doc.AddSection();

    // Construct a table of contents object with custom field switches
    let toc = new docModule.TableOfContent(doc, "{\\o \"1-2\" \\h \\z \\u}");

    // Add the table of contents object to a paragraph
    let tocPara = section.AddParagraph();
    tocPara.Items.Add(toc);

    // Supply the field separator and field end marks
    tocPara.AppendFieldMark(docModule.FieldMarkType.FieldSeparator);
    tocPara.AppendText("TOC");
    tocPara.AppendFieldMark(docModule.FieldMarkType.FieldEnd);

    // Bind this table of contents to the document
    doc.TOC = toc;

    // Add the document title
    let characterFormat = new docModule.CharacterFormat(doc);
    characterFormat.FontName ="Arial";
    let title = section.AddParagraph();
    let titleRun = title.AppendText("Spire.Doc Developer Guide");
    titleRun.ApplyCharacterFormat(characterFormat);
    titleRun.CharacterFormat.FontSize = 24;
    title.Format.HorizontalAlignment = docModule.HorizontalAlignment.Center;

    // Chapter 1 Overview (Heading 1)
    let p = section.AddParagraph();
    p.AppendText("Chapter 1 Overview").ApplyCharacterFormat(characterFormat);
    p.ApplyStyle({ builtinStyle: docModule.BuiltinStyle.Heading1 });
    section.AddParagraph().AppendText("Spire.Doc for JavaScript lets developers create, edit, and save Word documents directly in the browser, with no backend service involved at any point.").ApplyCharacterFormat(characterFormat);

    // 1.1 What Is Spire.Doc for JavaScript (Heading 2)
    p = section.AddParagraph();
    p.AppendText("1.1 What Is Spire.Doc for JavaScript").ApplyCharacterFormat(characterFormat);
    p.ApplyStyle({ builtinStyle: docModule.BuiltinStyle.Heading2 });
    section.AddParagraph().AppendText("It is a Word document processing library built on WebAssembly that manages fonts and document files through a virtual file system (VFS) and exposes an API shaped the same as the .NET version.").ApplyCharacterFormat(characterFormat);

    // 1.2 Use Cases (Heading 2)
    p = section.AddParagraph();
    p.AppendText("1.2 Use Cases").ApplyCharacterFormat(characterFormat);
    p.ApplyStyle({ builtinStyle: docModule.BuiltinStyle.Heading2 });
    section.AddParagraph().AppendText("It suits scenarios that require document processing on the client side, such as online contract signing, batch report generation, and resume template filling.").ApplyCharacterFormat(characterFormat);

    // Chapter 2 Core Capabilities (Heading 1)
    p = section.AddParagraph();
    p.AppendText("Chapter 2 Core Capabilities").ApplyCharacterFormat(characterFormat);
    p.ApplyStyle({ builtinStyle: docModule.BuiltinStyle.Heading1 });
    section.AddParagraph().AppendText("Spire.Doc for JavaScript covers the entire document processing chain, from content construction and layout adjustment to format export, all of which can be completed in the browser.").ApplyCharacterFormat(characterFormat);

    // 2.1 Document Processing (Heading 2)
    p = section.AddParagraph();
    p.AppendText("2.1 Document Processing").ApplyCharacterFormat(characterFormat);
    p.ApplyStyle({ builtinStyle: docModule.BuiltinStyle.Heading2 });
    section.AddParagraph().AppendText("It supports creating and modifying common document elements such as paragraphs, styles, tables, images, headers, and footers, while preserving the original layout information.").ApplyCharacterFormat(characterFormat);

    // 2.1.1 Paragraphs and Styles (Heading 3)
    p = section.AddParagraph();
    p.AppendText("2.1.1 Paragraphs and Styles").ApplyCharacterFormat(characterFormat);
    p.ApplyStyle({ builtinStyle: docModule.BuiltinStyle.Heading3 });
    section.AddParagraph().AppendText("Add a paragraph with AddParagraph and apply a built-in style with ApplyStyle to quickly build a clearly structured document skeleton.").ApplyCharacterFormat(characterFormat);

    // 2.1.2 Tables and Images (Heading 3)
    p = section.AddParagraph();
    p.AppendText("2.1.2 Tables and Images").ApplyCharacterFormat(characterFormat);
    p.ApplyStyle({ builtinStyle: docModule.BuiltinStyle.Heading3 });
    section.AddParagraph().AppendText("Tables and images can be written directly into a specified paragraph or nested inside a textbox, meeting the layout needs of complex documents.").ApplyCharacterFormat(characterFormat);

    // 2.2 Format Conversion (Heading 2)
    p = section.AddParagraph();
    p.AppendText("2.2 Format Conversion").ApplyCharacterFormat(characterFormat);
    p.ApplyStyle({ builtinStyle: docModule.BuiltinStyle.Heading2 });
    section.AddParagraph().AppendText("SaveToFile converts documents to PDF, HTML, Markdown, and other formats, with the whole conversion completed in the browser.").ApplyCharacterFormat(characterFormat);

    // 2.3 Batch Processing (Heading 2)
    p = section.AddParagraph();
    p.AppendText("2.3 Batch Processing").ApplyCharacterFormat(characterFormat);
    p.ApplyStyle({ builtinStyle: docModule.BuiltinStyle.Heading2 });
    section.AddParagraph().AppendText("Combined with the runtime efficiency of WebAssembly, multiple documents can be loaded at once and processed in sequence, avoiding frequent file uploads and downloads.").ApplyCharacterFormat(characterFormat);

    // Chapter 3 Getting Started (Heading 1)
    p = section.AddParagraph();
    p.AppendText("Chapter 3 Getting Started").ApplyCharacterFormat(characterFormat);
    p.ApplyStyle({ builtinStyle: docModule.BuiltinStyle.Heading1 });
    section.AddParagraph().AppendText("This chapter covers the preparation needed to integrate Spire.Doc for JavaScript into a React project and produce your first document.").ApplyCharacterFormat(characterFormat);

    // 3.1 Environment Setup (Heading 2)
    p = section.AddParagraph();
    p.AppendText("3.1 Environment Setup").ApplyCharacterFormat(characterFormat);
    p.ApplyStyle({ builtinStyle: docModule.BuiltinStyle.Heading2 });
    section.AddParagraph().AppendText("Install Spire.Doc for JavaScript in your React project and place the font files and WASM resources in the public directory to get started.").ApplyCharacterFormat(characterFormat);

    // 3.2 The First Example (Heading 2)
    p = section.AddParagraph();
    p.AppendText("3.2 The First Example").ApplyCharacterFormat(characterFormat);
    p.ApplyStyle({ builtinStyle: docModule.BuiltinStyle.Heading2 });
    section.AddParagraph().AppendText("After initializing the module, create a Document instance, add content, and save it; then read the resulting file from VFS to trigger a browser download.").ApplyCharacterFormat(characterFormat);

    // Update the table of contents to fill in entries and page numbers
    doc.UpdateTableOfContents();

    // Define the output file name and save
    const outputFileName = "Create a Custom TOC in Word Document.docx";
    doc.SaveToFile({ fileName: outputFileName, fileFormat: docModule.FileFormat.Docx2013 });

    // Release resources
    doc.Dispose();

    // Read the generated file from VFS and trigger the download
    const modifiedFileArray = window.dotnetRuntime.Module.FS.readFile(outputFileName);
    const blob = new Blob([modifiedFileArray], { type: 'application/vnd.openxmlformats-officedocument.wordprocessingml.document' });
    const url = URL.createObjectURL(blob);
    const a = document.createElement('a');
    a.href = url;
    a.download = outputFileName;
    a.click();
    URL.revokeObjectURL(url);
  };

  return (
    <div style={{ textAlign: 'center', height: '300px' }}>
      <h1>Click the button below to create a custom table of contents in a Word document</h1>
      <button onClick={CustomizeTableOfContent}>
        Generate
      </button>
    </div>
  );
}

export default App;
The table of contents generated with a TableOfContent object and custom field switches has its entry levels, hyperlinks, and page numbers all determined by the switch string.
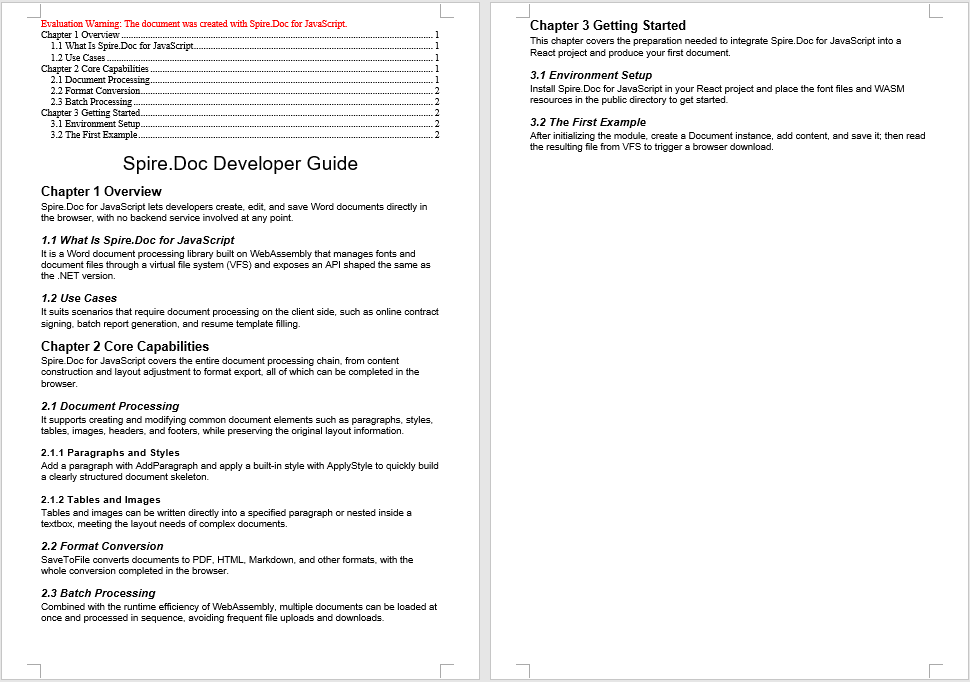
FAQ
The generated table of contents is empty
Cause: A TOC field collects entries by heading style. If the paragraphs do not have built-in heading styles such as Heading1 to Heading3 applied, no entries will appear in the table of contents after updating, even if the TOC field was inserted successfully.
Solution: Call ApplyStyle on the paragraphs that should appear in the table of contents to apply a heading style:
p.AppendText("Chapter 1 Overview");
p.ApplyStyle({ builtinStyle: docModule.BuiltinStyle.Heading1 });
The table of contents contains fewer heading levels than expected
Cause: The two parameters of AppendTOC correspond to the starting and ending heading levels collected by the table of contents. If you pass AppendTOC(1, 2), Heading 3 will not appear in the table of contents. With custom switches, \o "1-2" produces the same result.
Solution: Adjust the parameter range to the levels you need to collect — for example, to include Heading 1 through Heading 3:
tocPara.AppendTOC(1, 3);
Page numbers in the table of contents are missing or incorrect
Cause: AppendTOC only inserts the TOC field itself; the field content must be updated explicitly. If UpdateTableOfContents is not called before saving, the generated table of contents contains only the field code, with no entries or page numbers.
Solution: Call the update method before SaveToFile:
doc.UpdateTableOfContents();
doc.SaveToFile({ fileName: outputFileName, fileFormat: docModule.FileFormat.Docx2013 });
Get a Free License
If you wish to remove the evaluation message from the resulting document, or to eliminate functional limitations, please contact our sales team to request a 30-day temporary license.
Replace Placeholders in Word Documents with HTML or Paragraphs from Another Document Using JavaScript in React
Replacing placeholders in documents with HTML content or paragraphs from another document is a highly practical need in document automation — for example, inserting rich HTML content authored in a WYSIWYG editor into placeholder positions in a Word template, or extracting specific paragraphs from a standard clause library and replacing corresponding placeholders in a contract template. Spire.Doc for JavaScript handles such replacement operations entirely in the browser via WebAssembly, using a virtual file system (VFS) to manage fonts and document files — no backend server required.
This article covers two core features:
For installation and project setup, refer to Integrating Spire.Doc for JavaScript in a React Project. The examples below assume Spire.Doc is installed and the WebAssembly module is initialized.
Replace Placeholder with HTML
Replacing a placeholder with HTML involves three stages: first, load the font files, the HTML file, and the target Word document into the WASM virtual file system via FetchFileToVFS; then, create a temporary Section, render the HTML string into document objects using AppendHTML, collect them into a replacement list, find all [#placeholder] occurrences with FindAllString, sort the matched positions, and insert the replacement content one by one via ChildObjects.Insert while removing the original text; finally, remove the temporary Section, save the document, read the generated file from VFS, wrap it as a Blob, and trigger a browser download.
import React, { useState } from 'react';

function App() {
  // Define the placeholder replacement logic
  function ReplacedWithHTML(location, replacement) {
    let textRange = location.Text;
    let index = location.Index;
    let paragraph = location.Owner;
    let sectionBody = paragraph.OwnerTextBody;
    let paragraphIndex = sectionBody.ChildObjects.IndexOf(paragraph);

    let replacementIndex = -1;
    if (index === 0) {
      paragraph.ChildObjects.RemoveAt(0);
      replacementIndex = sectionBody.ChildObjects.IndexOf(paragraph);
    } else if (index === paragraph.ChildObjects.Count - 1) {
      paragraph.ChildObjects.RemoveAt(index);
      replacementIndex = paragraphIndex + 1;
    } else {
      let paragraph1 = paragraph.Clone();
      while (paragraph.ChildObjects.Count > index) {
        paragraph.ChildObjects.RemoveAt(index);
      }
      let i = 0;
      let count = index + 1;
      while (i < count) {
        paragraph1.ChildObjects.RemoveAt(0);
        i += 1;
      }
      sectionBody.ChildObjects.Insert(paragraphIndex + 1, paragraph1);
      replacementIndex = paragraphIndex + 1;
    }

    for (let i = 0; i <= replacement.length - 1; i++) {
      sectionBody.ChildObjects.Insert(replacementIndex + i, replacement[i].Clone());
    }
  }

  function TextRangeLocation(TextRange) {
    this.Text = TextRange;
    this.Owner = this.Text.OwnerParagraph;
    this.Index = this.Owner.ChildObjects.IndexOf(this.Text);
    this.CompareTo = function (other) {
      return -(this.Index - other.Index);
    };
  }

  const ReplaceWithHTML = async () => {
    // Get the Spire.Doc WASM module
    const docModule = window.wasmModule?.spiredoc;

    // Check if the module is ready
    if (!docModule) {
      alert('Spire.Doc is not ready yet');
      return;
    }

    // Load the font file into the virtual file system (VFS)
    await window.spire.FetchFileToVFS('arial.ttf', '/Library/Fonts/', `${process.env.PUBLIC_URL}/font/`);

    // Load the HTML file and Word document into VFS
    let HTMLName = 'InputHtml.txt';
    await window.spire.FetchFileToVFS(HTMLName, '', `${process.env.PUBLIC_URL}/data/`);
    const HTML = window.dotnetRuntime.Module.FS.readFile(HTMLName);

    let inputFileName = 'ReplaceWithHtml.docx';
    await window.spire.FetchFileToVFS(inputFileName, '', `${process.env.PUBLIC_URL}/data/`);

    // Load the document
    let doc = new docModule.Document();
    doc.LoadFromFile(inputFileName);

    // Create a temporary Section and render the HTML
    let replacement = [];
    let tempSection = doc.AddSection();
    let par = tempSection.AddParagraph();
    const decoder = new TextDecoder('utf-8');
    const HTMLString = decoder.decode(HTML);
    par.AppendHTML(HTMLString);

    // Collect the rendered document objects
    for (let i = 0; i < tempSection.Body.ChildObjects.Count; i++) {
      let docObj = tempSection.Body.ChildObjects.get_Item(i);
      replacement.push(docObj);
    }

    // Find all placeholders and sort
    let selections = doc.FindAllString('[#placeholder]', false, true);
    let locations = [];
    for (let selection of selections) {
      locations.push(new TextRangeLocation(selection.GetAsOneRange()));
    }
    locations.sort();

    // Replace one by one
    for (let location of locations) {
      ReplacedWithHTML(location, replacement);
    }

    // Remove the temporary Section
    doc.Sections.Remove(tempSection);

    // Define the output file name and save
    const outputFileName = 'ReplaceWithHtml_output.docx';
    doc.SaveToFile({ fileName: outputFileName, fileFormat: docModule.FileFormat.Docx2013 });

    // Release resources
    doc.Dispose();

    // Read the generated file from VFS and trigger download
    const modifiedFileArray = window.dotnetRuntime.Module.FS.readFile(outputFileName);
    const blob = new Blob([modifiedFileArray], { type: 'application/vnd.openxmlformats-officedocument.wordprocessingml.document' });
    const url = URL.createObjectURL(blob);
    const a = document.createElement('a');
    a.href = url;
    a.download = outputFileName;
    a.click();
    URL.revokeObjectURL(url);
  };

  return (
    <div style={{ textAlign: 'center', height: '300px' }}>
      <h1>Replace Placeholder with HTML in a Word Document</h1>
      <button onClick={ReplaceWithHTML}>
        Generate
      </button>
    </div>
  );
}

export default App;
The [#placeholder] placeholders in the document are replaced with rich text content rendered from HTML
![The [#placeholder] placeholders in the document are replaced with rich text content rendered from HTML](https://cdn.e-iceblue.com/images/art_images/replace-placeholder-with-html-or-paragraph-en-1.webp)
Replace Placeholder with Paragraphs from Another Document
Replacing a placeholder with paragraphs from another document involves three stages: first, load the font files and two Word documents into the WASM virtual file system via FetchFileToVFS; then, load the main document and the source document separately, use FindAllPattern with a regular expression to find placeholders (such as [MY_DOCUMENT]), iterate through all Sections and Paragraphs of the source document, insert each paragraph into the corresponding position in the main document using ChildObjects.Insert, and finally remove the original placeholder text; lastly, save the document, read the generated file from VFS, wrap it as a Blob, and trigger a browser download.
import React, { useState } from 'react';

function App() {
  const ReplaceContentWithDoc = async () => {
    // Get the Spire.Doc WASM module
    const docModule = window.wasmModule?.spiredoc;

    // Check if the module is ready
    if (!docModule) {
      alert('Spire.Doc is not ready yet');
      return;
    }

    // Load the two Word documents into VFS
    let inputFileName1 = 'ReplaceContentWithDoc.docx';
    await window.spire.FetchFileToVFS(inputFileName1, '', `${process.env.PUBLIC_URL}/data/`);

    let inputFileName2 = 'Insert.docx';
    await window.spire.FetchFileToVFS(inputFileName2, '', `${process.env.PUBLIC_URL}/data/`);

    // Load the main document
    let document1 = new docModule.Document();
    document1.LoadFromFile(inputFileName1);

    // Load the source document (contains paragraphs to insert)
    let document2 = new docModule.Document();
    document2.LoadFromFile(inputFileName2);

    // Get the first Section of the main document
    let section1 = document1.Sections.get_Item(0);

    // Create a regex to find the placeholder
    let regex = new docModule.Regex('\\[MY_DOCUMENT\\]', docModule.RegexOptions.None);

    // Find all matching placeholders
    let textSections = document1.FindAllPattern({ pattern: regex });

    // Iterate through each match
    for (let i = 0; i < textSections.length; i++) {
      let selection = textSections[i];
      let para = selection.GetAsOneRange().OwnerParagraph;
      let textRange = selection.GetAsOneRange();
      let index = section1.Body.ChildObjects.IndexOf(para);

      // Insert all paragraphs from the source document at the placeholder position
      for (let i = 0; i < document2.Sections.Count; i++) {
        let section2 = document2.Sections.get_Item(i);
        for (let j = 0; j < section2.Paragraphs.Count; j++) {
          let paragraph = section2.Paragraphs.get_Item(j);
          section1.Body.ChildObjects.Insert(index++, paragraph.Clone());
        }
      }

      // Remove the original placeholder text
      para.ChildObjects.Remove(textRange);
    }

    // Define the output file name and save
    const outputFileName = 'ReplaceContentWithDoc_output.docx';
    document1.SaveToFile({ fileName: outputFileName, fileFormat: docModule.FileFormat.Docx2013 });

    // Release resources
    document1.Dispose();

    // Read the generated file from VFS and trigger download
    const modifiedFileArray = window.dotnetRuntime.Module.FS.readFile(outputFileName);
    const blob = new Blob([modifiedFileArray], { type: 'application/vnd.openxmlformats-officedocument.wordprocessingml.document' });
    const url = URL.createObjectURL(blob);
    const a = document.createElement('a');
    a.href = url;
    a.download = outputFileName;
    a.click();
    URL.revokeObjectURL(url);
  };

  return (
    <div style={{ textAlign: 'center', height: '300px' }}>
      <h1>Replace Placeholder with Paragraphs from Another Document</h1>
      <button onClick={ReplaceContentWithDoc}>
        Generate
      </button>
    </div>
  );
}

export default App;
The [MY_DOCUMENT] placeholder in the main document is replaced with all paragraphs from the source document
![The [MY_DOCUMENT] placeholder in the main document is replaced with all paragraphs from the source document](https://cdn.e-iceblue.com/images/art_images/replace-placeholder-with-html-or-paragraph-en-2.webp)
FAQ
HTML content formatting is not displayed correctly
Cause: The AppendHTML method supports a limited range of HTML tags, only recognizing basic block-level and inline tags (such as <p>, <b>, <i>, <table>, etc.). Complex CSS styles, JavaScript code, or HTML5-specific tags are ignored.
Solution: Ensure the input HTML uses only basic tags and defines formatting through inline styles (such as style="color:red") rather than CSS class names:
<p style="font-size:14pt; color:#2E75B6;">This is blue heading text</p>
<ul><li>Item one</li><li>Item two</li></ul>
Inserted paragraph order does not match expectations
Cause: When replacing multiple placeholders, the matched positions are not sorted before processing. Replacing sequentially from beginning to end causes the indices of subsequent positions to shift, leading to paragraphs being inserted at incorrect locations.
Solution: Sort all matched positions in descending order by index (replacing from the end of the document backward), or track the original index offset for each position:
let locations = [];
for (let selection of selections) {
  locations.push(new TextRangeLocation(selection.GetAsOneRange()));
}
locations.sort(); // Descending order, replace from back to front
Get a Free License
Spire.Doc for JavaScript offers a 30-day full-featured free trial license with no functional limitations. Apply here to evaluate before purchasing.