
Font (3)
The font name, the font size and the text color are the most basic character-level formatting properties a Word document has, and also the ones you reach for most often: normalizing the font across a whole document, giving the headings a more striking face, or marking a key conclusion in a color that stands out. Spire.Doc for JavaScript performs all of this in the browser via WebAssembly, using a virtual file system (VFS) to manage input and output files — no backend server required.
This article covers two core features:
For installation and project setup, refer to Integrating Spire.Doc for JavaScript in a React Project. The examples below assume Spire.Doc is installed and the WebAssembly module is initialized.
Set the Font
Setting the font involves three steps: first, load the font file and the target Word document into the WASM virtual file system via FetchFileToVFS; then instantiate a Document, load the document, create a CharacterFormat object and set its FontName and FontSize, walk through the child objects of the target paragraph and call ApplyCharacterFormat on every object whose type is TextRange; finally, read the saved file back from VFS, wrap it as a Blob and trigger a browser download.
One detail deserves attention: the CharacterFormat constructor must be passed the Document instance the format belongs to. That is the convention shared by every standalone format object in Spire.Doc.
function App() {
  const SetFont = async () => {
    const docModule = window.wasmModule?.spiredoc;
    if (!docModule) {
      alert('Spire.Doc is not ready yet');
      return;
    }

    // Load the font file into VFS
    await window.spire.FetchFileToVFS("ARIALUNI.TTF", "/Library/Fonts/", `${process.env.PUBLIC_URL}static/font/`);

    // Load the target Word document into VFS
    const inputFileName = "SetFont.docx";
    await window.spire.FetchFileToVFS(inputFileName, "", `${process.env.PUBLIC_URL}static/data/`);

    // Create a Document instance and load the document
    const doc = new docModule.Document();
    doc.LoadFromFile(inputFileName);

    // Get the second paragraph of the first section
    const p = doc.Sections.get_Item(0).Paragraphs.get_Item(1);

    // Create a CharacterFormat and set the font name and the font size
    const format = new docModule.CharacterFormat(doc);
    format.FontName = "Arial Unicode MS";
    format.FontSize = 16;

    // Walk through the child objects of the paragraph and apply the character format to the text ranges
    for (let i = 0; i < p.ChildObjects.Count; i++) {
      const childObj = p.ChildObjects.get_Item(i);
      if (childObj instanceof docModule.TextRange) {
        childObj.ApplyCharacterFormat(format);
      }
    }

    // Define the output file name
    const outputFileName = "SetFont_out.docx";

    // Save the document to VFS
    doc.SaveToFile({ fileName: outputFileName, fileFormat: docModule.FileFormat.Docx2013 });
    doc.Dispose();

    const modifiedFileArray = window.dotnetRuntime.Module.FS.readFile(outputFileName);
    const blob = new Blob([modifiedFileArray], { type: 'application/vnd.openxmlformats-officedocument.wordprocessingml.document' });
    const url = URL.createObjectURL(blob);
    const a = document.createElement('a');
    a.href = url;
    a.download = outputFileName;
    a.click();
    URL.revokeObjectURL(url);
  };

  return (
    <div style={{ textAlign: 'center', height: '300px' }}>
      <h1>Set the Font of a Word Document</h1>
      <button onClick={SetFont}>Generate</button>
    </div>
  );
}
export default App;
The document produced after the font has been set

Change the Font Color
Changing the font color follows the same three steps as setting the font. The difference is that there is no need to create a separate CharacterFormat object: the color is a single property, so you assign to CharacterFormat.TextColor of the TextRange itself. The color values come from the predefined properties of Color, whose names match .NET's KnownColor — get_RosyBrown() and get_DarkGreen(), for example; when you need an exact color value, use Color.FromArgb(r, g, b) instead.
function App() {
  const ChangeFontColor = async () => {
    const docModule = window.wasmModule?.spiredoc;
    if (!docModule) {
      alert('Spire.Doc is not ready yet');
      return;
    }

    // Load the target Word document into VFS
    const inputFileName = "ChangeFontColor.docx";
    await window.spire.FetchFileToVFS(inputFileName, "", `${process.env.PUBLIC_URL}static/data/`);

    // Create a Document instance and load the document
    const doc = new docModule.Document();
    doc.LoadFromFile(inputFileName);

    // Get the first section
    const section = doc.Sections.get_Item(0);

    // Turn the text of the first paragraph rosy brown
    const p1 = section.Paragraphs.get_Item(0);
    for (let i = 0; i < p1.ChildObjects.Count; i++) {
      const childObj = p1.ChildObjects.get_Item(i);
      if (childObj instanceof docModule.TextRange) {
        childObj.CharacterFormat.TextColor = docModule.Color.get_RosyBrown();
      }
    }

    // Turn the text of the second paragraph dark green
    const p2 = section.Paragraphs.get_Item(1);
    for (let i = 0; i < p2.ChildObjects.Count; i++) {
      const childObj = p2.ChildObjects.get_Item(i);
      if (childObj instanceof docModule.TextRange) {
        childObj.CharacterFormat.TextColor = docModule.Color.get_DarkGreen();
      }
    }

    // Define the output file name
    const outputFileName = "ChangeFontColor_out.docx";

    // Save the document to VFS
    doc.SaveToFile({ fileName: outputFileName, fileFormat: docModule.FileFormat.Docx2013 });
    doc.Dispose();

    const modifiedFileArray = window.dotnetRuntime.Module.FS.readFile(outputFileName);
    const blob = new Blob([modifiedFileArray], { type: 'application/vnd.openxmlformats-officedocument.wordprocessingml.document' });
    const url = URL.createObjectURL(blob);
    const a = document.createElement('a');
    a.href = url;
    a.download = outputFileName;
    a.click();
    URL.revokeObjectURL(url);
  };

  return (
    <div style={{ textAlign: 'center', height: '300px' }}>
      <h1>Change the Font Color of a Word Document</h1>
      <button onClick={ChangeFontColor}>Generate</button>
    </div>
  );
}
export default App;
The document produced after the font color has been changed

FAQ
Only a few words in a paragraph need to change, not the whole paragraph
Cause: The examples above treat a paragraph as the smallest unit — they walk through every child object of the paragraph and assign unconditionally to anything that is a TextRange, so once a paragraph has been processed the whole paragraph ends up in the same color or the same font. To work at word level you first have to locate the TextRange that holds the target text, and then set its character format on its own.
Solution: Use FindAllString to find the text in the document. Every TextSelection it returns gives you the matching TextRange through GetAsOneRange(), so you can change just that one occurrence:
// Find every occurrence of "key conclusion"; the arguments are: search text, case sensitivity, whole-word matching
const selections = doc.FindAllString("key conclusion", false, true);

for (let i = 0; i < selections.length; i++) {
  // Only this short run of text gets the new color; the rest of the paragraph is untouched
  selections[i].GetAsOneRange().CharacterFormat.TextColor = docModule.Color.get_Red();
}
If only the first occurrence matters, replace FindAllString with FindString, which returns a single TextSelection object.
The font is set, but the document shows a different font on another computer
Cause: FontName only writes the font name into the character properties of the document; it does not bring the font file itself along with it. The font loaded by FetchFileToVFS only serves the rendering and the text measurement of this browser session. When the document is opened in Word on another machine and that font is not installed there, Word falls back to another font according to its own font substitution table, and the font size and the line spacing can change with it.
Solution: If the target font is a common one (Arial or Times New Roman, for example), there is usually nothing to do. If a particular font has to be used, embed the font file into the document together with the content, so that the document still renders correctly on machines where the font is not installed. See "Embed a Private Font" in the next article for the details.
Get a Free License
Spire.Doc for JavaScript offers a 30-day full-featured free trial license with no functional limitations. Apply here to evaluate before purchasing.
Get Used Fonts and Embed Private Fonts in Word with JavaScript in React
2026-09-30 08:16:24 Written by Amy ZhaoWhen a Word document has to travel between machines and environments, fonts are the part most likely to break: open a carefully laid out document on another computer and the glyph shapes, the font sizes and even the pagination can change. The safe approach is to first take stock of the fonts the document actually uses, then embed the fonts that must be preserved together with the document itself. Spire.Doc for JavaScript performs all of this in the browser via WebAssembly, using a virtual file system (VFS) to manage input and output files — no backend server required.
This article covers two core features:
For installation and project setup, refer to Integrating Spire.Doc for JavaScript in a React Project. The examples below assume Spire.Doc is installed and the WebAssembly module is initialized.
Get the List of Fonts Used in the Document
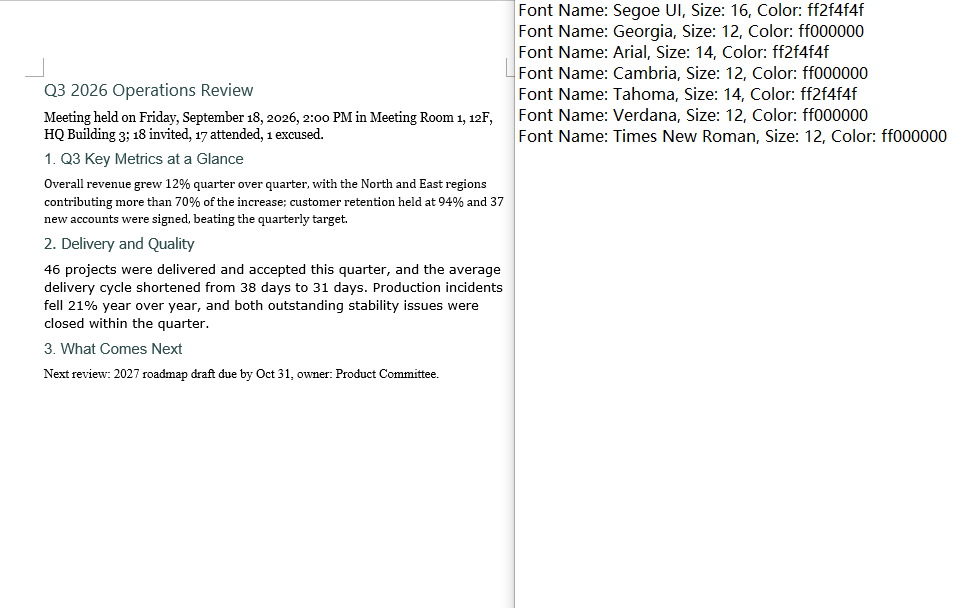
Listing the fonts involves three steps: first, load the target Word document into the WASM virtual file system via FetchFileToVFS; then instantiate a Document, load the document, walk down through section → paragraph → child object and read the font name, the font size and the text color from the CharacterFormat of every TextRange, de-duplicating on the combination of the three; finally, join the results into text and write it to VFS, read it back and wrap it as a Blob to trigger a browser download.
The de-duplication step deserves attention: a Map key has to be a primitive type that can be compared by value. Use an object such as { size, name } as the key and every iteration creates a brand-new reference, so Map never finds an existing entry and the de-duplication silently does nothing. The key here is therefore a string built from the font name, the font size and the color.
function App() {
  const GetListOfUsingFonts = async () => {
    const docModule = window.wasmModule?.spiredoc;
    if (!docModule) {
      alert('Spire.Doc is not ready yet');
      return;
    }

    // Load the target Word document into VFS
    const inputFileName = "GetListOfUsingFonts.docx";
    await window.spire.FetchFileToVFS(inputFileName, "", `${process.env.PUBLIC_URL}static/data/`);

    // Create a Document instance and load the document
    const doc = new docModule.Document();
    doc.LoadFromFile(inputFileName);

    // De-duplicate on "font name|size|color"
    const fontMap = new Map();

    // Walk through every section
    for (let i = 0; i < doc.Sections.Count; i++) {
      const section = doc.Sections.get_Item(i);

      // Walk through every paragraph in the section
      for (let j = 0; j < section.Body.Paragraphs.Count; j++) {
        const paragraph = section.Body.Paragraphs.get_Item(j);

        // Walk through every child object in the paragraph
        for (let k = 0; k < paragraph.ChildObjects.Count; k++) {
          const obj = paragraph.ChildObjects.get_Item(k);
          if (!(obj instanceof docModule.TextRange)) continue;

          const format = obj.CharacterFormat;
          const key = `${format.FontName}|${format.FontSize}|${format.TextColor.Name}`;

          fontMap.set(key, {
            name: format.FontName,
            size: format.FontSize,
            color: format.TextColor.Name
          });
        }
      }
    }

    // Build the output content
    const lines = [];
    for (const font of fontMap.values()) {
      lines.push(`Font Name: ${font.name}, Size: ${font.size}, Color: ${font.color}`);
    }

    // Define the output file name and write it to VFS
    const outputFileName = "GetListOfUsingFonts_out.txt";
    window.dotnetRuntime.Module.FS.writeFile(outputFileName, lines.join("\n"));

    const modifiedFileArray = window.dotnetRuntime.Module.FS.readFile(outputFileName);
    const blob = new Blob([modifiedFileArray], { type: 'text/plain' });
    const url = URL.createObjectURL(blob);
    const a = document.createElement('a');
    a.href = url;
    a.download = outputFileName;
    a.click();
    URL.revokeObjectURL(url);

    doc.Dispose();
  };

  return (
    <div style={{ textAlign: 'center', height: '300px' }}>
      <h1>Get the Fonts Used in a Word Document</h1>
      <button onClick={GetListOfUsingFonts}>Generate</button>
    </div>
  );
}
export default App;
The text file produced by the font list sample
Embed a Private Font
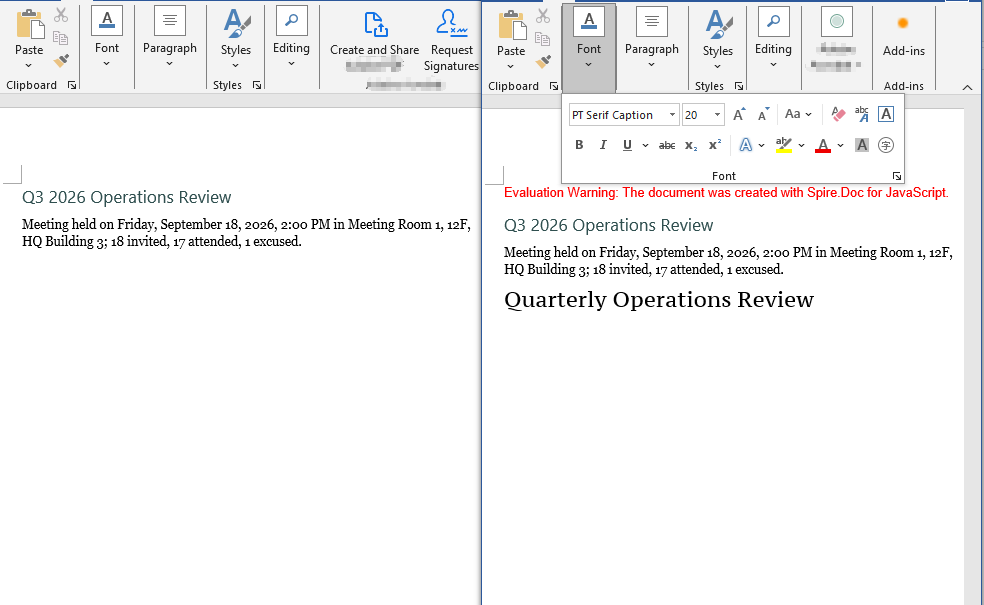
Embedding a private font also involves three steps: first, load the font file to embed together with the document into the WASM virtual file system via FetchFileToVFS; then instantiate a Document, load the document, write a run that uses the font, set EmbedFontsInFile to true and call AddPrivateFont to register the path and the registration name of the font file; finally, save the document, read it back from VFS and wrap it as a Blob to trigger a browser download.
EmbedFontsInFile and AddPrivateFont only take effect at save time and must both be called before SaveToFile. The first argument of PrivateFontPath is the name the font is registered under inside the document, and it has to match the value assigned to CharacterFormat.FontName exactly, or Word will not find a match.
function App() {
  const EmbedPrivateFont = async () => {
    const docModule = window.wasmModule?.spiredoc;
    if (!docModule) {
      alert('Spire.Doc is not ready yet');
      return;
    }

    // Load the private font file to embed into VFS
    await window.spire.FetchFileToVFS("PT Serif Caption.ttf", "/Library/Fonts/", `${process.env.PUBLIC_URL}static/font/`);

    // Load the target Word document into VFS
    const inputFileName = "EmbedPrivateFont.docx";
    await window.spire.FetchFileToVFS(inputFileName, "", `${process.env.PUBLIC_URL}static/data/`);

    // Create a Document instance and load the document
    const doc = new docModule.Document();
    doc.LoadFromFile(inputFileName);

    // Append a paragraph at the end of the first section and apply the private font
    const p = doc.Sections.get_Item(0).AddParagraph();
    const range = p.AppendText("Quarterly Operations Review");
    range.CharacterFormat.FontName = "PT Serif Caption";
    range.CharacterFormat.FontSize = 20;

    // Turn on font embedding and register the private font file with the document
    doc.EmbedFontsInFile = true;
    doc.AddPrivateFont(new docModule.PrivateFontPath("PT Serif Caption", "PT Serif Caption.ttf"));

    // Define the output file name
    const outputFileName = "EmbedPrivateFont_out.docx";

    // Save the document to VFS
    doc.SaveToFile({ fileName: outputFileName, fileFormat: docModule.FileFormat.Docx2013 });
    doc.Dispose();

    const modifiedFileArray = window.dotnetRuntime.Module.FS.readFile(outputFileName);
    const blob = new Blob([modifiedFileArray], { type: 'application/vnd.openxmlformats-officedocument.wordprocessingml.document' });
    const url = URL.createObjectURL(blob);
    const a = document.createElement('a');
    a.href = url;
    a.download = outputFileName;
    a.click();
    URL.revokeObjectURL(url);
  };

  return (
    <div style={{ textAlign: 'center', height: '300px' }}>
      <h1>Embed a Private Font in a Word Document</h1>
      <button onClick={EmbedPrivateFont}>Generate</button>
    </div>
  );
}
export default App;
The document produced after the private font has been embedded
FAQ
The same font appears many times in the output font list
Cause: If the code follows the pattern "store the font name and the font size in an object, then use that object as the Map key", the de-duplication never works. Objects are reference types in JavaScript and Map compares keys by reference rather than by value; every object created inside the loop is a fresh reference, so fontMap.has(font) always returns false. The list then ends up with one line for every TextRange in the document, and the same font repeats over and over.
Solution: Use a primitive type as the key instead — join the fields that take part in the de-duplication into a string (such as font name|size|color), so that fonts with identical content get the same key:
const format = obj.CharacterFormat;

// Use a string as the key: identical content means the same entry, so de-duplication works
const key = `${format.FontName}|${format.FontSize}|${format.TextColor.Name}`;
fontMap.set(key, {
  name: format.FontName,
  size: format.FontSize,
  color: format.TextColor.Name
});
If all you need is de-duplication at the level of font names, collect format.FontName in a Set instead.
The font is embedded, but another computer still shows a substitute
Cause: There are three common cases. The first is the timing of the call — AddPrivateFont only registers the font file with the in-memory document object, while the font table and the font parts are actually written into the docx during the save, so EmbedFontsInFile = true and AddPrivateFont(...) both have to come before SaveToFile; leave out EmbedFontsInFile and the font file is not written at all. The second is a font name mismatch — the first argument of PrivateFontPath is the registration name used inside the document and must match the value of CharacterFormat.FontName exactly, spaces and letter case included, or the match fails over a single character. The third is the embedding permission of the font file itself — the fsType bits in the OS/2 table of some commercial fonts forbid embedding, and Word simply ignores those fonts, in which case the only options are to use another font or a licensed version that permits embedding.
Solution: Keep every font embedding setting together before the save, and make sure the registration name matches the font name character for character:
// Keep the font name and the registration name exactly the same
const FONT_NAME = "PT Serif Caption";

const range = p.AppendText("Quarterly Operations Review");
range.CharacterFormat.FontName = FONT_NAME;
range.CharacterFormat.FontSize = 20;

// Turn on embedding and register the font file; both must come before SaveToFile
doc.EmbedFontsInFile = true;
doc.AddPrivateFont(new docModule.PrivateFontPath(FONT_NAME, "PT Serif Caption.ttf"));

doc.SaveToFile({ fileName: outputFileName, fileFormat: docModule.FileFormat.Docx2013 });
Get a Free License
Spire.Doc for JavaScript offers a 30-day full-featured free trial license with no functional limitations. Apply here to evaluate before purchasing.
Apply Fonts in a Word Document with JavaScript in React
2025-01-15 00:59:57 Written by AdministratorApplying fonts in a Word document significantly enhances its visual appeal and readability. The choice of font can influence how the content is perceived, allowing you to convey tone and mood effectively. By selecting appropriate fonts, you can emphasize key points, guide the reader's attention, and create a cohesive and polished presentation.
In this article, you will learn how to apply fonts in a Word document in React using Spire.Doc for JavaScript.
- Apply a Font Style to a Paragraph in Word
- Apply Multiple Font Styles to a Paragraph in Word
- Apply a Private Font in a Word Document
Install Spire.Doc for JavaScript
To get started with applying fonts in Word in a React application, you can either download Spire.Doc for JavaScript from our website or install it via npm with the following command:
npm i spire.officeThe downloaded product package integrates Spire.Doc for JavaScript, Spire.XLS for JavaScript, Spire.PDF for JavaScript, and Spire.Presentation for JavaScript. To use the features of Spire.Doc for JavaScript, you need to copy the corresponding files (spire.doc.js, Spire.Doc.Wasm.zip, spire.common.js, Spire.Common.Wasm.zip, and the _framework folder) to the public folder of your project. To ensure proper text rendering, you can add relevant font files with a custom path. In the following example, the font is added to the path: public\static\font.
For more details, refer to the documentation: How to Integrate Spire.Doc for JavaScript in a React Project
Apply a Font Style to a Paragraph in Word
Applying a font style to a paragraph in Microsoft Word is a fundamental skill that enhances the readability and overall appearance of your document.
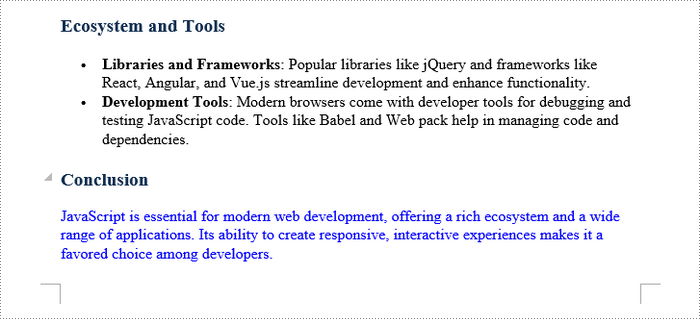
Spire.Doc for JavaScript provides the ParagraphStyle class, enabling developers to define multiple text attributes, including font name, size, style, and color, all within a single object. After the style object is created, you can easily format a paragraph by using the Paragraph.ApplyStyle() method.
The following are the steps to apply a font style to a paragraph with JavaScript in React:
- Create a Document object using the new wasmModule.Document() method.
- Load the Word file using the Document.LoadFromFile() method.
- Add a paragraph to the document using the Document.LastSection.AddParagraph() method.
- Create a ParagraphStyle object, specifying the font name, font size, font style, and text color.
- Add the style to the document using the Document.Styles.Add() method.
- Apply the style to the paragraph using the Paragraph.ApplyStyle() method.
- Save the document to a different Word file.
- JavaScript
import React, { useState, useEffect } from 'react';

function App() {
  const [wasmModule, setWasmModule] = useState(null);
  // Load Spire.Doc
  useEffect(() => {
    (async () => {
      try {
        const publicUrl = process.env.PUBLIC_URL || '';
        const spireModule = await import(/* webpackIgnore: true */ `${publicUrl}/spire.doc.js`);
        const rawModule = spireModule.default || spireModule;
        window.wasmModule = typeof rawModule === 'function'
          ? await rawModule({ locateFile: p => p.endsWith('.wasm') ? `${publicUrl}/${p}` : p })
          : rawModule;
        setWasmModule(window.wasmModule);
      } catch (error) {
        console.error('Failed to load spire.doc.js WASM module:', error);
      }
    })();
  }, []);

  // Function to set font
  const SetFont = async () => {
    const wasmModule = window.wasmModule.spiredoc;

    if (wasmModule) {
      // Load the font files into the virtual file system (VFS)
      await window.spire.FetchFileToVFS('times.ttf', '/Library/Fonts/', `${process.env.PUBLIC_URL}/static/font/`);
      await window.spire.FetchFileToVFS('timesbd.ttf', '/Library/Fonts/', `${process.env.PUBLIC_URL}/static/font/`);
      await window.spire.FetchFileToVFS('timesbi.ttf', '/Library/Fonts/', `${process.env.PUBLIC_URL}/static/font/`);
      await window.spire.FetchFileToVFS('timesi.ttf', '/Library/Fonts/', `${process.env.PUBLIC_URL}/static/font/`);

      // Specify the input file name and the output file name
      const inputFileName = 'input.docx';
      const outputFileName = 'output.docx';

      // Fetch the input file and add it to the VFS
      await window.spire.FetchFileToVFS(inputFileName, '', `${process.env.PUBLIC_URL}/static/data/`);

      // Create an instance of the Document class
      const doc = new wasmModule.Document();

      // Load the Word file
      doc.LoadFromFile(inputFileName);

      // Add a section
      let section = doc.LastSection;

      // Add a paragraph
      let paragraph = section.AddParagraph();

      // Append text to the paragraph
      paragraph.AppendText('JavaScript is essential for modern web development, offering a rich ecosystem and ' +
        'a wide range of applications. Its ability to create responsive, interactive experiences ' +
        'makes it a favored choice among developers.');

      // Create a paragraph style,specifying font name, font size, and text color
      let paragraphStyle = new wasmModule.ParagraphStyle(doc);
      paragraphStyle.Name = 'newStyle';
      paragraphStyle.CharacterFormat.FontName = 'Times New Roman'
      paragraphStyle.CharacterFormat.FontSize = 13;
      paragraphStyle.CharacterFormat.TextColor = wasmModule.Color.get_Blue();

      // Add the style to the document
      doc.Styles.Add(paragraphStyle);

      // Apply the style to the paragraph
      paragraph.ApplyStyle(paragraphStyle.Name);


      // Save the document to the specified path
      doc.SaveToFile({ fileName: outputFileName, fileFormat: wasmModule.FileFormat.Docx2013 });

      // Read the generated Word file
      const modifiedFileArray = window.dotnetRuntime.Module.FS.readFile(outputFileName);

      // Create a Blob object from the Word file
      const modifiedFile = new Blob([modifiedFileArray], { type: 'application/vnd.openxmlformats-officedocument.wordprocessingml.document' });

      // Create a URL for the Blob
      const url = URL.createObjectURL(modifiedFile);

      // Create an anchor element to trigger the download
      const a = document.createElement('a');
      a.href = url;
      a.download = outputFileName;
      document.body.appendChild(a);
      a.click();
      document.body.removeChild(a);
      URL.revokeObjectURL(url);

      // Clean up resources
      doc.Dispose();
    }
  };

  return (
    <div style={{ textAlign: 'center', height: '300px' }}>
      <h1>Apply Fonts in a Word Document in React</h1>
      <button onClick={SetFont} disabled={!wasmModule}>
        Apply
      </button>
    </div>
  );
}

export default App;
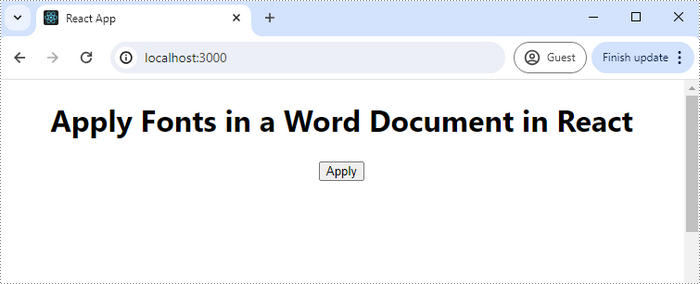
Run the code to launch the React app at localhost:3000. Click "Apply", and a "Save As" window will appear, prompting you to save the output file in your chosen folder.
Below is a screenshot of the generated Word document:
Apply Multiple Font Styles to a Paragraph in Word
Applying multiple font styles to different parts of a paragraph allows you to highlight key points or sections, making your content more engaging for readers.
The Paragraph.AppendText() method returns a TextRange object, which offers simple APIs for formatting text within that range. When you call AppendText() multiple times, the paragraph's text is divided into distinct text ranges, allowing for individual styling with different fonts.
The following are the steps to apply multiple font styles to a paragraph using JavaScript in React:
- Load the font files you plan to use and the input Word file into the virtual file system (VFS).
- Create a Document object using the new wasmModule.Document() method.
- Load the Word file using the Document.LoadFromFile() method.
- Add a paragraph to the document using the Document.LastSection.AddParagraph() method.
- Append text to the paragraph using the Paragraph.AppendText() method, which returns a TextRange object.
- Append more text that needs to be styled differently to the paragraph and return different TextRange objects.
- Create a ParagraphStyle object with the basic font information and apply it to the paragraph.
- Change the font name, style, size and text color of the specified text range using the properties under the specific TextRange object.
- Save the document to a different Word file.
- JavaScript
import React, { useState, useEffect } from 'react';

function App() {
  const [wasmModule, setWasmModule] = useState(null);
  // Load Spire.Doc
  useEffect(() => {
    (async () => {
      try {
        const publicUrl = process.env.PUBLIC_URL || '';
        const spireModule = await import(/* webpackIgnore: true */ `${publicUrl}/spire.doc.js`);
        const rawModule = spireModule.default || spireModule;
        window.wasmModule = typeof rawModule === 'function'
          ? await rawModule({ locateFile: p => p.endsWith('.wasm') ? `${publicUrl}/${p}` : p })
          : rawModule;
        setWasmModule(window.wasmModule);
      } catch (error) {
        console.error('Failed to load spire.doc.js WASM module:', error);
      }
    })();
  }, []);

  // Function to set font
  const SetFont = async () => {
    const wasmModule = window.wasmModule.spiredoc;

    if (wasmModule) {
      // Load the font files into the virtual file system (VFS)
      await window.spire.FetchFileToVFS('times.ttf', '/Library/Fonts/', `${process.env.PUBLIC_URL}/static/font/`);
      await window.spire.FetchFileToVFS('timesbd.ttf', '/Library/Fonts/', `${process.env.PUBLIC_URL}/static/font/`);
      await window.spire.FetchFileToVFS('timesbi.ttf', '/Library/Fonts/', `${process.env.PUBLIC_URL}/static/font/`);
      await window.spire.FetchFileToVFS('timesi.ttf', '/Library/Fonts/', `${process.env.PUBLIC_URL}/static/font/`);

      // Specify the input file name and the output file name
      const inputFileName = 'input.docx';
      const outputFileName = 'output.docx';

      // Fetch the input file and add it to the VFS
      await window.spire.FetchFileToVFS(inputFileName, '', `${process.env.PUBLIC_URL}/static/data/`);

      // Create an instance of the Document class
      const doc = new wasmModule.Document();

      // Load the Word file
      doc.LoadFromFile(inputFileName);

      // Add a section
      let section = doc.LastSection;

      // Add a paragraph
      let paragraph = section.AddParagraph();

      // Append text to the paragraph
      let range_one = paragraph.AppendText('JavaScript is essential for ');
      let range_two = paragraph.AppendText('modern web development');
      let range_three = paragraph.AppendText(', offering a rich ecosystem and a wide range of applications. Its ability to create ');
      let range_four = paragraph.AppendText('responsive, interactive experiences')
      let range_five = paragraph.AppendText(' makes it a favored choice among developers.')

      // Create a paragraph style
      let paragraphStyle = new wasmModule.ParagraphStyle(doc);
      paragraphStyle.Name = 'newStyle';
      paragraphStyle.CharacterFormat.FontName = 'Times New Roman'
      paragraphStyle.CharacterFormat.FontSize = 13;
      paragraphStyle.CharacterFormat.TextColor = wasmModule.Color.get_Black();

      // Add the style to the document
      doc.Styles.Add(paragraphStyle);

      // Apply the style to the paragraph
      paragraph.ApplyStyle(paragraphStyle.Name);

      // Change the font style of the second text range
      range_two.CharacterFormat.TextColor = wasmModule.Color.get_Blue();
      range_two.CharacterFormat.Bold = true;
      range_two.CharacterFormat.UnderlineStyle = wasmModule.UnderlineStyle.Single;

      // Change the font style of the fourth text range
      range_four.CharacterFormat.TextColor = wasmModule.Color.get_Blue();
      range_four.CharacterFormat.Italic = true;

      // Save the document to the specified path
      doc.SaveToFile({ fileName: outputFileName, fileFormat: wasmModule.FileFormat.Docx2013 });

      // Read the generated Word file
      const modifiedFileArray = window.dotnetRuntime.Module.FS.readFile(outputFileName);

      // Create a Blob object from the Word file
      const modifiedFile = new Blob([modifiedFileArray], { type: 'application/vnd.openxmlformats-officedocument.wordprocessingml.document' });

      // Create a URL for the Blob
      const url = URL.createObjectURL(modifiedFile);

      // Create an anchor element to trigger the download
      const a = document.createElement('a');
      a.href = url;
      a.download = outputFileName;
      document.body.appendChild(a);
      a.click();
      document.body.removeChild(a);
      URL.revokeObjectURL(url);

      // Clean up resources
      doc.Dispose();
    }
  };

  return (
    <div style={{ textAlign: 'center', height: '300px' }}>
      <h1>Set Fonts in a Word Document in React</h1>
      <button onClick={SetFont} disabled={!wasmModule}>
        Apply Multiple Fonts
      </button>
    </div>
  );
}

export default App;
Apply a Private Font in a Word Document
Using a private font in a Word document can give your project a unique flair and reflect your personal or brand identity.
To apply a private font, use the TextRange.CharacterFormat.FontName property. To maintain a uniform look on various devices, it's advisable to embed the font within the document. You can do this by first loading the font file into the virtual file system using window.spire.FetchFileToVFS.
Then, employ the Document.AddPrivateFont() method to include the font in the document. Additionally, activate font embedding by setting Document.EmbedFontsInFile to true, which ensures the private font is retained in the final document.
The following are the steps to apply a private font in Word using JavaScript:
- Load the font files you plan to use and the input Word file into the virtual file system (VFS).
- Create a Document object using the new wasmModule.Document() method.
- Load the Word file using the Document.LoadFromFile() method.
- Add a paragraph to the document using the Document.LastSection.AddParagraph() method.
- Append text to the paragraph using the Paragraph.AppendText() method, which returns a TextRange object.
- Apply the font to the paragraph using the TextRange.CharacterFormat.FontName property.
- Add the font to document using the Document.AddPrivateFont() method.
- Embed the font in the document by setting Document.EmbedFontsInFile to true.
- Save the document to a different Word file.
- JavaScript
import React, { useState, useEffect } from 'react';

function App() {
  const [wasmModule, setWasmModule] = useState(null);
  // Load Spire.Doc
  useEffect(() => {
    (async () => {
      try {
        const publicUrl = process.env.PUBLIC_URL || '';
        const spireModule = await import(/* webpackIgnore: true */ `${publicUrl}/spire.doc.js`);
        const rawModule = spireModule.default || spireModule;
        window.wasmModule = typeof rawModule === 'function'
          ? await rawModule({ locateFile: p => p.endsWith('.wasm') ? `${publicUrl}/${p}` : p })
          : rawModule;
        setWasmModule(window.wasmModule);
      } catch (error) {
        console.error('Failed to load spire.doc.js WASM module:', error);
      }
    })();
  }, []);

  // Function to set font
  const SetFont = async () => {
    const wasmModule = window.wasmModule.spiredoc;

    if (wasmModule) {
      // Load the font files into the virtual file system (VFS)
      await window.spire.FetchFileToVFS('FreebrushScriptPLng.ttf', '/Library/Fonts/', `${process.env.PUBLIC_URL}/static/font/`);

      // Specify the input file name and the output file name
      const inputFileName = 'input.docx';
      const outputFileName = 'output.docx';

      // Fetch the input file and add it to the VFS
      await window.spire.FetchFileToVFS(inputFileName, '', `${process.env.PUBLIC_URL}/static/data/`);

      // Create an instance of the Document class
      const doc = new wasmModule.Document();

      // Load the Word file
      doc.LoadFromFile(inputFileName);

      // Add a section
      let section = doc.LastSection;

      // Add a paragraph
      let paragraph = section.AddParagraph();

      // Append text to the paragraph
      let textRange = paragraph.AppendText('JavaScript is essential for modern web development, offering a rich ecosystem and '+
                          'a wide range of applications. Its ability to create responsive, interactive experiences '+
                          'makes it a favored choice among developers.');

      // Apply the private font to the text range
      textRange.CharacterFormat.FontName = 'Freebrush Script'
      textRange.CharacterFormat.FontSize = 13;
      textRange.CharacterFormat.TextColor = wasmModule.Color.get_Blue();

      // Embed the private font in the document
      doc.AddPrivateFont(new wasmModule.PrivateFontPath("Freebrush Script",  "FreebrushScriptPLng.ttf"))

      // Allow embedding font in document
      doc.EmbedFontsInFile = true;

      // Save the document to the specified path
      doc.SaveToFile({fileName: outputFileName, fileFormat: wasmModule.FileFormat.Docx2013});

      // Read the generated Word file
      const modifiedFileArray =window.dotnetRuntime.Module.FS.readFile(outputFileName);

      // Create a Blob object from the Word file
      const modifiedFile = new Blob([modifiedFileArray], { type: 'application/vnd.openxmlformats-officedocument.wordprocessingml.document' });

      // Create a URL for the Blob
      const url = URL.createObjectURL(modifiedFile);

      // Create an anchor element to trigger the download
      const a = document.createElement('a');
      a.href = url;
      a.download = outputFileName;
      document.body.appendChild(a);
      a.click();
      document.body.removeChild(a);
      URL.revokeObjectURL(url);

      // Clean up resources
      doc.Dispose();
    }
  };

  return (
    <div style={{ textAlign: 'center', height: '300px' }}>
      <h1>Apply Fonts in a Word Document in React</h1>
      <button onClick={SetFont} disabled={!wasmModule}>
        Apply
      </button>
    </div>
  );
}

export default App;
Get a Free License
To fully experience the capabilities of Spire.Doc for JavaScript without any evaluation limitations, you can request a free 30-day trial license.
