
JavaScript (209)
Create Exploded Pie and Doughnut Charts in Excel with JavaScript in React
2026-09-10 08:16:03 Written by liu taliaPie charts and doughnut charts are the most intuitive chart types for showing the proportion of each data item. An exploded pie chart or exploded doughnut chart pulls all the slices apart, which makes every part stand out more clearly. Spire.XLS for JavaScript completes this directly in the browser based on WebAssembly, managing input/output files through a virtual file system (VFS), with no backend service required.
This article introduces two core features:
For installation and project configuration, refer to Integrating Spire.XLS for JavaScript in a React Project. The examples below assume Spire.XLS is installed and the WebAssembly module is initialized.
Create an Exploded Pie Chart
The slices of an exploded pie chart are separated from each other, which is suitable for highlighting the proportion of each data item. To create an exploded pie chart, follow these steps:
- Create a
Workbookobject and use theLoadFromFile()method to load the Excel file that contains the data. - Use the
Workbook.Worksheets.get()method to get the worksheet that contains the data. - Call the
Charts.Add()method to add a chart and set theChartTypetoExcelChartType.PieExploded. - Use the
Series.CategoryLabelsandSeries.Valuesproperties to specify the categories and values of the chart. - Set properties such as the chart title, position and data labels.
- Use the
Workbook.SaveToFile()method to save the workbook.
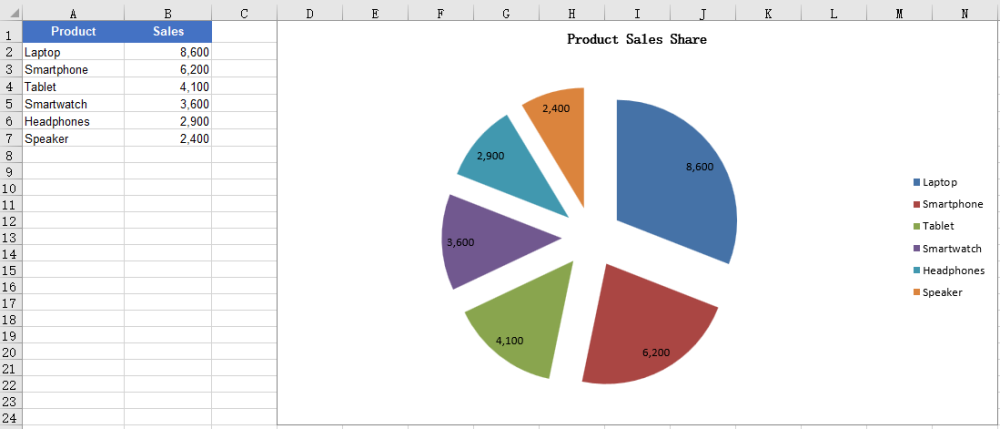
Here is a complete code example showing how to create an exploded pie chart from the product sales data in a worksheet in React:
function App() {
  const createExplodedPieChart = async () => {
    // Get the Spire.XLS WASM module
    const xlsModule = window.wasmModule?.spirexls;

    // Check whether the module is ready
    if (!xlsModule) {
      alert('Spire.Xls is not ready yet');
      return;
    }

    // Load the font and Excel file into the VFS
    await window.spire.FetchFileToVFS('ARIAL.TTF', '/Library/Fonts/', `${process.env.PUBLIC_URL}/font/`);
    const inputFileName = 'SalesData.xlsx';
    await window.spire.FetchFileToVFS(inputFileName, '', `${process.env.PUBLIC_URL}data/`);

    // Load the workbook and get the worksheet that contains the data
    const workbook = new xlsModule.Workbook();
    workbook.LoadFromFile({ fileName: inputFileName });
    const sheet = workbook.Worksheets.get(0);

    // Add a chart and set its chart type to an exploded pie chart
    const chart = sheet.Charts.Add();
    chart.ChartType = xlsModule.ExcelChartType.PieExploded;

    // Set the data range and the title of the chart
    chart.DataRange = sheet.Range.get("B2:B7");
    chart.SeriesDataFromRange = false;
    chart.ChartTitle = "Product Sales Share";
    chart.ChartTitleArea.IsBold = true;
    chart.ChartTitleArea.Size = 12;

    // Set the category labels and the values of the chart, and show the value labels
    const cs = chart.Series.get(0);
    cs.CategoryLabels = sheet.Range.get("A2:A7");
    cs.Values = sheet.Range.get("B2:B7");
    cs.DataPoints.DefaultDataPoint.DataLabels.HasValue = true;

    // Set the position of the chart
    chart.LeftColumn = 4;
    chart.TopRow = 1;
    chart.RightColumn = 15;
    chart.BottomRow = 25;

    // Hide the background of the plot area and set the position of the legend
    chart.PlotArea.Fill.Visible = false;
    chart.Legend.Position = xlsModule.LegendPositionType.Right;

    // Save the document
    const outputFileName = 'ExplodedPieChart_output.xlsx';
    workbook.SaveToFile({ fileName: outputFileName });

    // Release resources
    workbook.Dispose();

    // Read the converted file from the VFS and trigger a download
    const fileArray = window.dotnetRuntime.Module.FS.readFile(outputFileName);
    const blob = new Blob([fileArray], { type: 'application/vnd.openxmlformats-officedocument.spreadsheetml.sheet' });
    const url = URL.createObjectURL(blob);
    const a = document.createElement('a');
    a.href = url;
    a.download = outputFileName;
    a.click();
    URL.revokeObjectURL(url);
  };

  return (
    <div style={{ textAlign: 'center', height: '300px' }}>
      <h1>Create Exploded Pie Chart</h1>
      <button onClick={createExplodedPieChart}>
        Start
      </button>
    </div>
  );
}

export default App;
After running the code, you can see the effect of the exploded pie chart:
Create an Exploded Doughnut Chart
A doughnut chart is similar to a pie chart, but it has a hole in the center and can also show the proportion of each part in the whole. An exploded doughnut chart further pulls the slices apart. To create an exploded doughnut chart, follow these steps:
- Create a
Workbookobject and use theLoadFromFile()method to load the Excel file that contains the data. - Use the
Workbook.Worksheets.get()method to get the worksheet that contains the data. - Call the
Charts.Add()method to add a chart and set theChartTypetoExcelChartType.DoughnutExploded. - Use the
Series.CategoryLabelsandSeries.Valuesproperties to specify the categories and values of the chart. - Set properties such as the chart title, position and data labels.
- Use the
Workbook.SaveToFile()method to save the workbook.
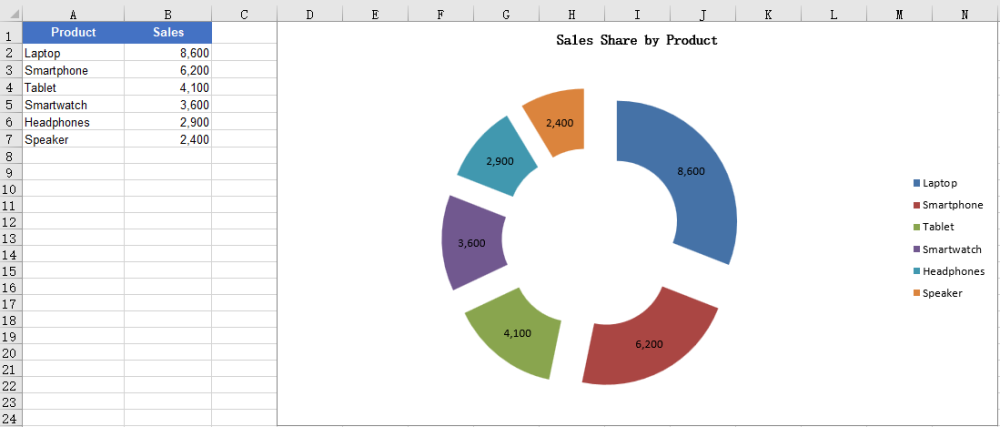
Here is a complete code example showing how to create an exploded doughnut chart from the product sales data in a worksheet in React:
function App() {
  const createExplodedDoughnutChart = async () => {
    // Get the Spire.XLS WASM module
    const xlsModule = window.wasmModule?.spirexls;

    // Check whether the module is ready
    if (!xlsModule) {
      alert('Spire.Xls is not ready yet');
      return;
    }

    // Load the font and Excel file into the VFS
    await window.spire.FetchFileToVFS('ARIAL.TTF', '/Library/Fonts/', `${process.env.PUBLIC_URL}/font/`);
    const inputFileName = 'SalesData.xlsx';
    await window.spire.FetchFileToVFS(inputFileName, '', `${process.env.PUBLIC_URL}data/`);

    // Load the workbook and get the worksheet that contains the data
    const workbook = new xlsModule.Workbook();
    workbook.LoadFromFile({ fileName: inputFileName });
    const sheet = workbook.Worksheets.get(0);

    // Add a chart and set its chart type to an exploded doughnut chart
    const chart = sheet.Charts.Add();
    chart.ChartType = xlsModule.ExcelChartType.DoughnutExploded;

    // Set the data range and the title of the chart
    chart.DataRange = sheet.Range.get("B2:B7");
    chart.SeriesDataFromRange = false;
    chart.ChartTitle = "Sales Share by Product";
    chart.ChartTitleArea.IsBold = true;
    chart.ChartTitleArea.Size = 12;

    // Set the category labels and the values of the chart, and show the value labels
    const cs = chart.Series.get(0);
    cs.CategoryLabels = sheet.Range.get("A2:A7");
    cs.Values = sheet.Range.get("B2:B7");
    cs.DataPoints.DefaultDataPoint.DataLabels.HasValue = true;

    // Set the position of the chart
    chart.LeftColumn = 4;
    chart.TopRow = 1;
    chart.RightColumn = 15;
    chart.BottomRow = 25;

    // Hide the background of the plot area and set the position of the legend
    chart.PlotArea.Fill.Visible = false;
    chart.Legend.Position = xlsModule.LegendPositionType.Right;

    // Save the document
    const outputFileName = 'ExplodedDoughnutChart_output.xlsx';
    workbook.SaveToFile({ fileName: outputFileName });

    // Release resources
    workbook.Dispose();

    // Read the converted file from the VFS and trigger a download
    const fileArray = window.dotnetRuntime.Module.FS.readFile(outputFileName);
    const blob = new Blob([fileArray], { type: 'application/vnd.openxmlformats-officedocument.spreadsheetml.sheet' });
    const url = URL.createObjectURL(blob);
    const a = document.createElement('a');
    a.href = url;
    a.download = outputFileName;
    a.click();
    URL.revokeObjectURL(url);
  };

  return (
    <div style={{ textAlign: 'center', height: '300px' }}>
      <h1>Create Exploded Doughnut Chart</h1>
      <button onClick={createExplodedDoughnutChart}>
        Start
      </button>
    </div>
  );
}

export default App;
After running the code, you can see the effect of the exploded doughnut chart:
FAQ
The created chart is blank with no slices
Cause: The chart has no valid data series. For example, the DataRange or Values points to an empty range or a range without numbers, so the chart has no data to draw.
Solution: Assign a data range that contains the data to the chart, for example:
chart.DataRange = sheet.Range.get("A1:B7");

const cs = chart.Series.get(0);
cs.CategoryLabels = sheet.Range.get("A2:A7");
cs.Values = sheet.Range.get("B2:B7");
Want to show percentages instead of values in the data labels
Cause: Pie and doughnut charts are usually used to show proportions, but the data labels show values by default, or the percentage labels are not enabled.
Solution: Disable the value labels and enable the percentage labels, for example:
const cs = chart.Series.get(0);
cs.DataPoints.DefaultDataPoint.DataLabels.HasValue = false;
cs.DataPoints.DefaultDataPoint.DataLabels.HasPercentage = true;
Obtain a Free License
Spire.XLS for JavaScript offers a 30-day full-featured free trial license with no functional limitations. Apply here to evaluate before purchasing.
Different Headers and Footers in Excel with JavaScript in React
2026-09-10 08:09:34 Written by liu taliaBy default, Excel displays the same header and footer at the top and bottom of every page. However, when printing formal reports, manuals, or theses, it is often necessary for different pages to show different headers and footers — for example, odd and even pages can use different headers, or the first page can have no header/footer while only the body pages show the page number. Spire.XLS for JavaScript completes this directly in the browser based on WebAssembly, managing input/output files through a virtual file system (VFS), with no backend service required.
This article introduces two core features:
- Set Different Headers and Footers for Odd and Even Pages
- Set a Different Header and Footer on the First Page
For installation and project configuration, refer to Integrating Spire.XLS for JavaScript in a React Project. The examples below assume Spire.XLS is installed and the WebAssembly module is initialized.
Set Different Headers and Footers for Odd and Even Pages
In books, papers or reports printed on both sides of the page, odd and even pages usually use different headers and footers, for example the header of odd pages shows the chapter name and the header of even pages shows the book title. To set different headers and footers for odd and even pages with Spire.XLS for JavaScript, follow these steps:
- Create a
Workbookobject and use theLoadFromFile()method to load the Excel file. - Use the
Workbook.Worksheets.get()method to get the specified worksheet. - Set the
PageSetup.DifferentOddEvenproperty to1to enable different headers and footers for odd and even pages. - Use the
PageSetup.OddHeaderStringandPageSetup.OddFooterStringproperties to set the header and footer of odd pages. - Use the
PageSetup.EvenHeaderStringandPageSetup.EvenFooterStringproperties to set the header and footer of even pages. - Use the
Workbook.SaveToFile()method to save the workbook.
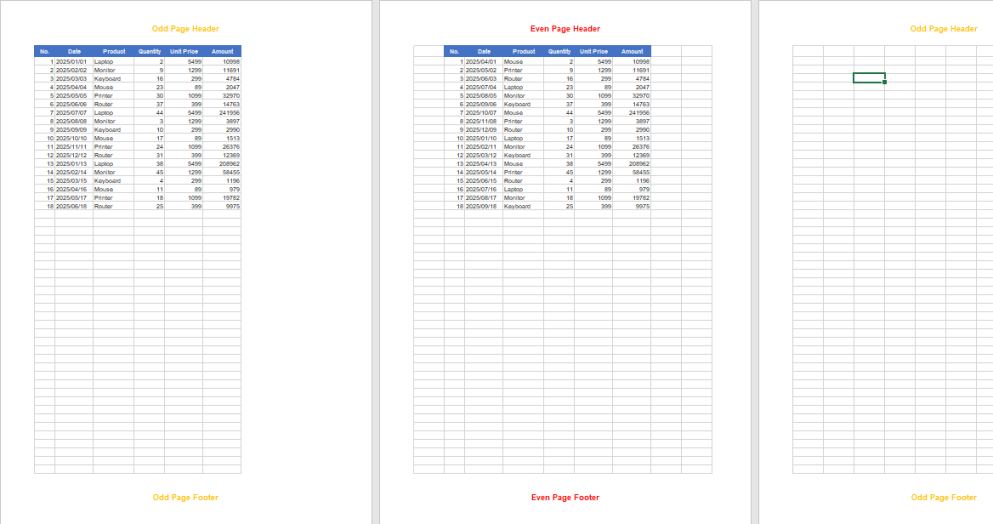
Here is a complete code example showing how to set different headers and footers for the odd and even pages of a worksheet in React (the sample input file contains data that spans multiple pages, making it easy to observe the effect on different pages):
function App() {
  const setOddEvenHeaderFooter = async () => {
    // Get the Spire.XLS WASM module
    const xlsModule = window.wasmModule?.spirexls;

    // Check whether the module is ready
    if (!xlsModule) {
      alert('Spire.Xls is not ready yet');
      return;
    }

    // Load the font and Excel file into the VFS
    await window.spire.FetchFileToVFS('ARIAL.TTF', '/Library/Fonts/', `${process.env.PUBLIC_URL}/font/`);
    const inputFileName = 'DifferentHeaderFooter.xlsx';
    await window.spire.FetchFileToVFS(inputFileName, '', `${process.env.PUBLIC_URL}data/`);

    // Load the workbook
    const workbook = new xlsModule.Workbook();
    workbook.LoadFromFile({ fileName: inputFileName });

    // Get the first worksheet
    const sheet = workbook.Worksheets.get(0);

    // Enable different headers and footers for odd and even pages
    sheet.PageSetup.DifferentOddEven = 1;

    // Set the header and footer for odd pages (orange, bold)
    sheet.PageSetup.OddHeaderString = "&\"Arial\"&12&B&KFFC000Odd Page Header";
    sheet.PageSetup.OddFooterString = "&\"Arial\"&12&B&KFFC000Odd Page Footer";

    // Set the header and footer for even pages (red, bold)
    sheet.PageSetup.EvenHeaderString = "&\"Arial\"&12&B&KFF0000Even Page Header";
    sheet.PageSetup.EvenFooterString = "&\"Arial\"&12&B&KFF0000Even Page Footer";

    // Switch to Page Layout view to preview the header and footer
    sheet.ViewMode = xlsModule.ViewMode.Layout;

    // Save the document
    const outputFileName = 'DifferentHeaderFooterOddEven_output.xlsx';
    workbook.SaveToFile({ fileName: outputFileName, version: xlsModule.ExcelVersion.Version2010 });

    // Release resources
    workbook.Dispose();

    // Read the converted file from the VFS and trigger a download
    const fileArray = window.dotnetRuntime.Module.FS.readFile(outputFileName);
    const blob = new Blob([fileArray], { type: 'application/vnd.openxmlformats-officedocument.spreadsheetml.sheet' });
    const url = URL.createObjectURL(blob);
    const a = document.createElement('a');
    a.href = url;
    a.download = outputFileName;
    a.click();
    URL.revokeObjectURL(url);
  };

  return (
    <div style={{ textAlign: 'center', height: '300px' }}>
      <h1>Set Different Header and Footer for Odd and Even Pages</h1>
      <button onClick={setOddEvenHeaderFooter}>
        Start
      </button>
    </div>
  );
}

export default App;
After this setting, different headers and footers are applied to odd and even pages.
Set a Different Header and Footer on the First Page
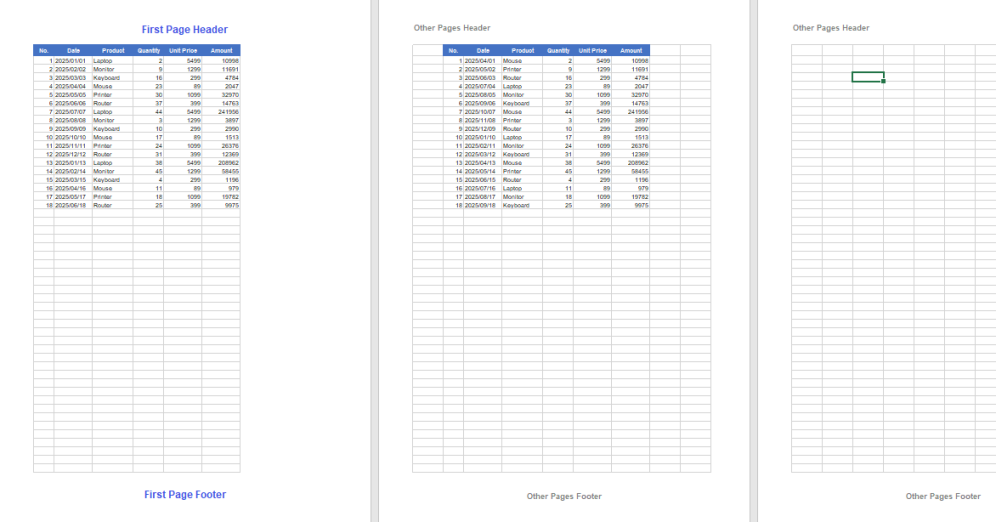
Many formal documents require the first page (cover page) to display no header/footer or a dedicated header/footer, while the body pages display a header and footer carrying document information. In this case, you can enable "different first page" and set the header and footer of the first page separately. The steps are as follows:
- Create a
Workbookobject and use theLoadFromFile()method to load the Excel file. - Use the
Workbook.Worksheets.get()method to get the specified worksheet. - Set the
PageSetup.DifferentFirstproperty to1to enable a header and footer on the first page that differ from those on the other pages. - Use the
PageSetup.FirstHeaderStringandPageSetup.FirstFooterStringproperties to set the header and footer of the first page. - Use properties such as
PageSetup.LeftHeaderandPageSetup.CenterFooterto set the header and footer of the other pages. - Use the
Workbook.SaveToFile()method to save the workbook.
Here is a complete code example showing how to set a different header and footer on the first page of a worksheet in React:
function App() {
  const setFirstPageHeaderFooter = async () => {
    // Get the Spire.XLS WASM module
    const xlsModule = window.wasmModule?.spirexls;

    // Check whether the module is ready
    if (!xlsModule) {
      alert('Spire.Xls is not ready yet');
      return;
    }

    // Load the font and Excel file into the VFS
    await window.spire.FetchFileToVFS('ARIAL.TTF', '/Library/Fonts/', `${process.env.PUBLIC_URL}/font/`);
    const inputFileName = 'DifferentHeaderFooter.xlsx';
    await window.spire.FetchFileToVFS(inputFileName, '', `${process.env.PUBLIC_URL}data/`);

    // Load the workbook
    const workbook = new xlsModule.Workbook();
    workbook.LoadFromFile({ fileName: inputFileName });

    // Get the first worksheet
    const sheet = workbook.Worksheets.get(0);

    // Enable a different header and footer on the first page
    sheet.PageSetup.DifferentFirst = 1;

    // Set the header and footer for the first page (blue, bold)
    sheet.PageSetup.FirstHeaderString = "&\"Arial\"&16&B&K4253E2First Page Header";
    sheet.PageSetup.FirstFooterString = "&\"Arial\"&16&B&K4253E2First Page Footer";

    // Set the header and footer for the other pages (gray, bold)
    sheet.PageSetup.LeftHeader = "&\"Arial\"&12&B&K808080Other Pages Header";
    sheet.PageSetup.CenterFooter = "&\"Arial\"&12&B&K808080Other Pages Footer";

    // Switch to Page Layout view to preview the header and footer
    sheet.ViewMode = xlsModule.ViewMode.Layout;

    // Save the document
    const outputFileName = 'DifferentHeaderFooterFirstPage_output.xlsx';
    workbook.SaveToFile({ fileName: outputFileName, version: xlsModule.ExcelVersion.Version2010 });

    // Release resources
    workbook.Dispose();

    // Read the converted file from the VFS and trigger a download
    const fileArray = window.dotnetRuntime.Module.FS.readFile(outputFileName);
    const blob = new Blob([fileArray], { type: 'application/vnd.openxmlformats-officedocument.spreadsheetml.sheet' });
    const url = URL.createObjectURL(blob);
    const a = document.createElement('a');
    a.href = url;
    a.download = outputFileName;
    a.click();
    URL.revokeObjectURL(url);
  };

  return (
    <div style={{ textAlign: 'center', height: '300px' }}>
      <h1>Set Different Header and Footer on the First Page</h1>
      <button onClick={setFirstPageHeaderFooter}>
        Start
      </button>
    </div>
  );
}

export default App;
After this setting, the first page uses a different header and footer from the other pages.
FAQ
The header and footer on the first page is not applied
Cause: The "different first page" option was not enabled. If only FirstHeaderString/FirstFooterString are set without setting PageSetup.DifferentFirst to 1, Excel ignores the first-page header and footer.
Solution: Enable sheet.PageSetup.DifferentFirst = 1; before setting the header and footer of the first page.
Header/footer text shows as garbled characters or boxes
Cause: Browser-side Excel processing depends on font files. If the font used by the text (such as ARIAL.TTF) has not been loaded into the virtual file system (VFS), the text may not render correctly.
Solution: Load the font into the VFS with FetchFileToVFS() before calling Workbook.LoadFromFile(), for example:
await window.spire.FetchFileToVFS(
  'ARIAL.TTF', '/Library/Fonts/', `${process.env.PUBLIC_URL}/font/`
);
Obtain a Free License
Spire.XLS for JavaScript offers a 30-day full-featured free trial license with no functional limitations. Apply here to evaluate before purchasing.
How to Add, Hide and Delete PDF Layers with JavaScript in React
2026-09-10 08:04:31 Written by Nina TangPDF layers partition the content on a page into multiple "Optional Content Groups" (OCGs). This is most commonly seen in CAD drawings where walls, furniture, and electrical plans are separated onto layers, in maps where roads, water systems, and labels are separated, and in pages that need to switch between several plans or several languages on demand. Unlike erasing content, layers let you hide content and then bring it back at any time without destroying the document structure, which greatly increases the reuse value of the same PDF.
Spire.PDF for JavaScript runs on WebAssembly and completes the loading, drawing, and saving of PDFs entirely in the browser, managing input and output files through a virtual file system (VFS) with no backend required.
This article covers three core functions:
For installation and project configuration, refer to Integrating Spire.PDF for JavaScript in a React Project. The examples below assume Spire.PDF is installed and the WebAssembly module has been initialized.
Adding Layers to a PDF
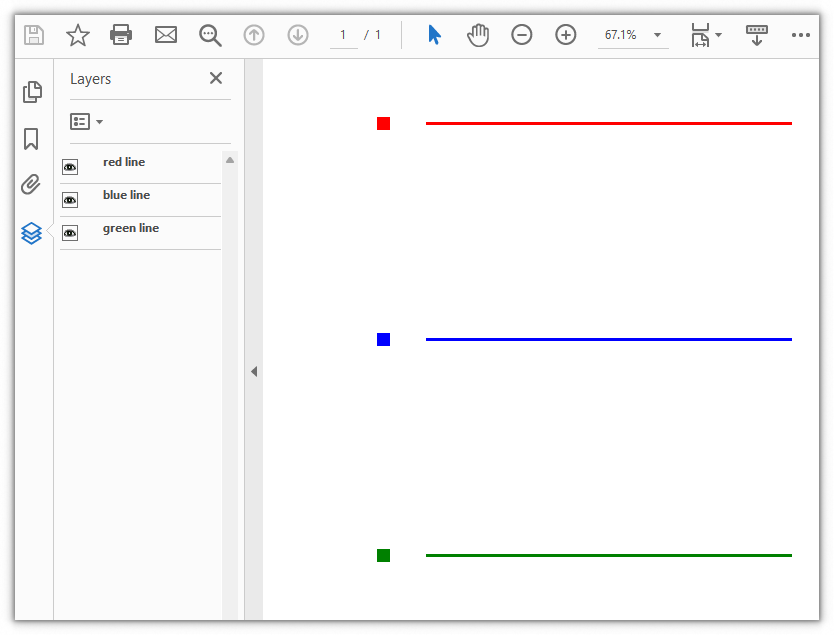
To add a layer, first create a document and add a page, then create a named layer with doc.Layers.AddLayer({ name, state }) (the state argument lets you specify the initial visibility), and call the layer's layer.CreateGraphics(page.Canvas) to obtain a drawing context bound to the page canvas. From then on, methods such as DrawLine and DrawRectangle can draw lines, color blocks, and other content "into" that layer. The example below creates three layers named red line, blue line, and green line, draws one horizontal line and one small color block of the corresponding color into each layer, and staggers the three lines at different heights.
function App() {
  const addLayers = async () => {
    // Get the Spire.PDF WASM module
    const pdfModule = window.wasmModule?.spirepdf;

    // Check that the module is ready
    if (!pdfModule) {
      alert('Spire.PDF is not ready yet');
      return;
    }

    // Create a PdfDocument and add a page
    let doc = new pdfModule.PdfDocument();
    let page = doc.Pages.Add();

    // Get the page size for positioning content relative to the page
    const width = page.Canvas.Size.Width;
    const height = page.Canvas.Size.Height;

    // Define a local function that draws a horizontal line with a small
    // color block of the same color into the layer with the given name
    const drawRow = (layerName, centerY, brush) => {
      // Add a layer to the document and set its initial state to visible
      let layer = doc.Layers.AddLayer({ name: layerName, state: pdfModule.PdfVisibility.On });

      // Get the drawing context of the layer
      let g = layer.CreateGraphics(page.Canvas);

      // Draw a colored horizontal line that spans about 20% to 80% of the page width
      g.DrawLine({
        pen: new pdfModule.PdfPen({ brush: brush, width: 2 }),
        point1: new pdfModule.PointF(width * 0.2, centerY),
        point2: new pdfModule.PointF(width * 0.8, centerY)
      });

      // Draw a small color block at the left end of the line as an indicator of the layer color
      g.DrawRectangle({
        brush: brush,
        rectangle: new pdfModule.RectangleF({ x: width * 0.12, y: centerY - 6, width: 12, height: 12 })
      });
    };

    // Place the three lines from top to bottom at 25%, 50%, and 75% of the page height
    drawRow('red line', height * 0.25, pdfModule.PdfBrushes.get_Red());
    drawRow('blue line', height * 0.5, pdfModule.PdfBrushes.get_Blue());
    drawRow('green line', height * 0.75, pdfModule.PdfBrushes.get_Green());

    // Define the output file name and save the document
    const outputFileName = 'AddLayers.pdf';
    doc.SaveToFile(outputFileName);
    doc.Close();

    // Read the generated file from the VFS and trigger a download
    const fileArray = window.dotnetRuntime.Module.FS.readFile(outputFileName);
    const blob = new Blob([fileArray], { type: 'application/pdf' });
    const url = URL.createObjectURL(blob);
    const a = document.createElement('a');
    a.href = url;
    a.download = outputFileName;
    a.click();
    URL.revokeObjectURL(url);
  };

  return (
    <div style={{ textAlign: 'center', height: '300px' }}>
      <h1>Add Layers To PDF</h1>
      <button onClick={addLayers}>
        Generate
      </button>
    </div>
  );
}

export default App;
PDF page after adding the red line, blue line and green line layers
Hiding a Specified Layer
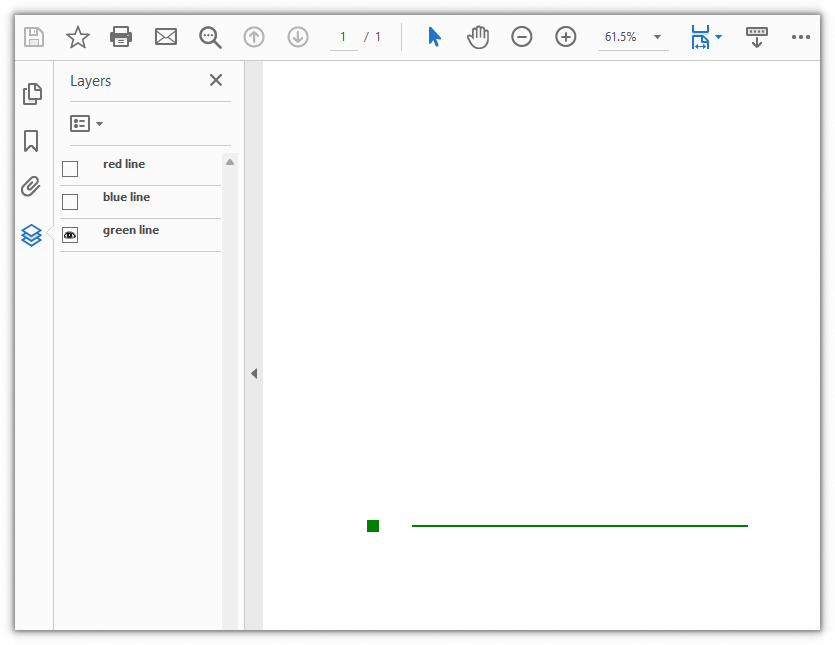
When the content of a layer should not be shown temporarily but may be needed again later, you do not have to delete it. Simply set the Visibility property of the layer to PdfVisibility.Off to "hide" it. The content then no longer displays, but the layer and the objects inside it are still kept in the PDF, and readers can turn them back on any time in the Layers panel of a PDF viewer. The example below takes the AddLayers.pdf produced in the previous section (it already contains the red line, blue line, and green line layers), fetches two of the layers by name with get_Item({ name }), and sets their Visibility to invisible, so only the green line layer remains on the page.
function App() {
  const hideLayers = async () => {
    // Get the Spire.PDF WASM module
    const pdfModule = window.wasmModule?.spirepdf;

    // Check that the module is ready
    if (!pdfModule) {
      alert('Spire.PDF is not ready yet');
      return;
    }

    // Load the PDF that contains the layers into the VFS
    const inputFileName = 'AddLayers.pdf';
    await window.spire.FetchFileToVFS(inputFileName, "", `${process.env.PUBLIC_URL}/data/`);

    // Create a PdfDocument object and load the PDF document
    let doc = new pdfModule.PdfDocument();
    doc.LoadFromFile(inputFileName);

    // Get the "red line" and "blue line" layers by name and set them to invisible,
    // so only "green line" remains on the page
    doc.Layers.get_Item({ name: 'red line' }).Visibility = pdfModule.PdfVisibility.Off;
    doc.Layers.get_Item({ name: 'blue line' }).Visibility = pdfModule.PdfVisibility.Off;

    // Define the output file name and save the document
    const outputFileName = 'HideLayers.pdf';
    doc.SaveToFile(outputFileName);
    doc.Close();

    // Read the generated file from the VFS and trigger a download
    const fileArray = window.dotnetRuntime.Module.FS.readFile(outputFileName);
    const blob = new Blob([fileArray], { type: 'application/pdf' });
    const url = URL.createObjectURL(blob);
    const a = document.createElement('a');
    a.href = url;
    a.download = outputFileName;
    a.click();
    URL.revokeObjectURL(url);
  };

  return (
    <div style={{ textAlign: 'center', height: '300px' }}>
      <h1>Hide Layers In PDF</h1>
      <button onClick={hideLayers}>
        Generate
      </button>
    </div>
  );
}

export default App;
After hiding the red line and blue line layers, only the green line layer remains on the page
Deleting a Layer
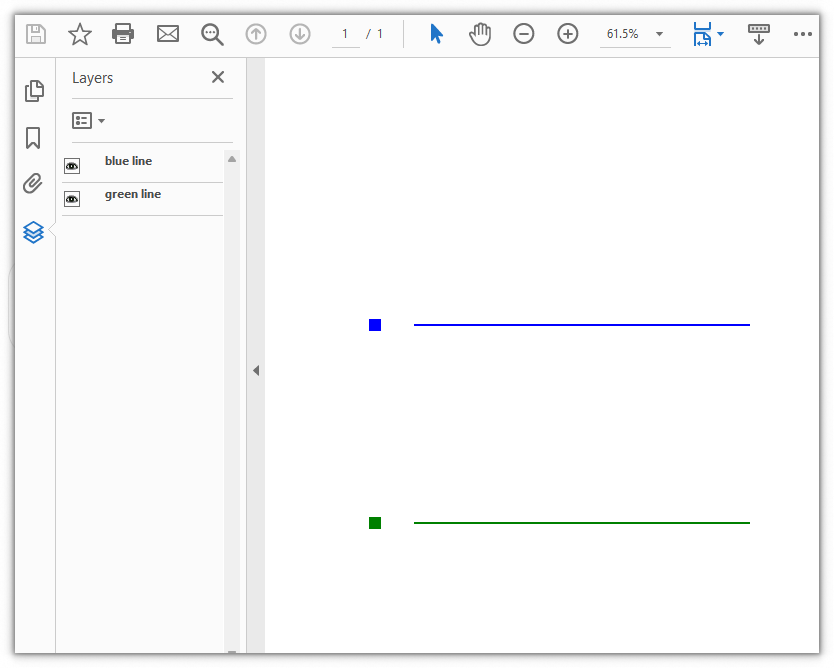
When a layer and its content are no longer needed, you can remove it from the document's layer collection with doc.Layers.RemoveLayer: just pass the layer name, for example RemoveLayer({ name: 'red line' }) removes the entire layer named red line. The content of that layer no longer displays afterward and cannot be restored through the Layers panel either. The example below takes the AddLayers.pdf produced in the first section (it already contains the red line, blue line, and green line layers), and deletes the red line layer by name, so only the blue line and green line layers remain on the page.
function App() {
  const deleteLayer = async () => {
    // Get the Spire.PDF WASM module
    const pdfModule = window.wasmModule?.spirepdf;

    // Check that the module is ready
    if (!pdfModule) {
      alert('Spire.PDF is not ready yet');
      return;
    }

    // Load the PDF that contains the layers into the VFS
    const inputFileName = 'AddLayers.pdf';
    await window.spire.FetchFileToVFS(inputFileName, "", `${process.env.PUBLIC_URL}/data/`);

    // Create a PdfDocument object and load the PDF document
    let doc = new pdfModule.PdfDocument();
    doc.LoadFromFile(inputFileName);

    // Delete the "red line" layer by name; its content no longer shows on the page
    doc.Layers.RemoveLayer({ name: 'red line' });

    // Define the output file name and save the document
    const outputFileName = 'DeleteLayers.pdf';
    doc.SaveToFile(outputFileName);
    doc.Close();

    // Read the generated file from the VFS and trigger a download
    const fileArray = window.dotnetRuntime.Module.FS.readFile(outputFileName);
    const blob = new Blob([fileArray], { type: 'application/pdf' });
    const url = URL.createObjectURL(blob);
    const a = document.createElement('a');
    a.href = url;
    a.download = outputFileName;
    a.click();
    URL.revokeObjectURL(url);
  };

  return (
    <div style={{ textAlign: 'center', height: '300px' }}>
      <h1>Delete PDF Layer</h1>
      <button onClick={deleteLayer}>
        Generate
      </button>
    </div>
  );
}

export default App;
After deleting the red line layer, only the blue line and green line layers remain on the page
FAQ
What is the difference between hiding and deleting a layer
Reason: Both hiding and deleting make content "invisible" on the page, so it is easy to confuse the difference between the two in terms of the document structure.
Solution: Hiding sets the Visibility of a layer to Off; the layer and the objects inside it are still kept in the PDF, and you can turn them back on at any time in the Layers panel of the viewer. Deleting, on the other hand, removes the layer from doc.Layers entirely with RemoveLayer, and its content no longer displays and cannot be restored. In short: hide it when you do not need to see it for a while, delete it when you will never need it again:
// Hide: the content stays in the document and can be turned back on at any time
doc.Layers.get_Item({ name: 'red line' }).Visibility = pdfModule.PdfVisibility.Off;

// Delete: the layer is removed from the collection and cannot be turned back on
doc.Layers.RemoveLayer({ name: 'red line' });
How do I control whether a layer is visible when I add it
Reason: A layer created by AddLayer is visible by default, but sometimes you want a layer to start out hidden (for example, an alternative plan that is preset but not shown yet).
Solution: The state argument of AddLayer specifies the initial visibility of a layer. Passing PdfVisibility.Off creates it as invisible, while passing On (or omitting it) makes it visible immediately after creation. After creation you can switch it at any time with the Visibility property:
// Create a new layer that is invisible initially
doc.Layers.AddLayer({ name: 'Alternative Plan', state: pdfModule.PdfVisibility.Off });
How do I locate a layer by name or index
Reason: With a document that contains multiple layers, you often need to operate on one particular layer, and the Layers collection holds several elements, so you need an accurate way to locate it.
Solution: doc.Layers is the layer collection. Count gives the total number of layers, get_Item({ name }) retrieves a layer by its name, and get_Item(i) retrieves one by its index. To control layers in bulk, iterate through all of them, for example to set every layer invisible at once:
// Iterate through the layer collection and set all layers to invisible
for (let i = 0; i < doc.Layers.Count; i++) {
  doc.Layers.get_Item(i).Visibility = pdfModule.PdfVisibility.Off;
}
Get a Free Temporary License
If you want to remove the evaluation message from the result documents, or get rid of the function limitations, please contact our sales team to get a temporary license that is valid for 30 days.
How to Create and Identify PDF Portfolios with JavaScript in React
2026-09-10 02:41:48 Written by Nina TangPDF keeps its layout fixed and renders consistently across devices, which makes it ideal for distributing contracts, manuals, and reports. In business, however, a set of materials often consists of multiple related PDFs: a product manual, for example, usually goes together with a quotation, a technical specification, and frequently asked questions. Sending each file separately is scattered and easy to miss. The PDF "portfolio" mechanism provides a standard way to solve this problem — it lets you package several documents into a single PDF. The recipient opens one file and can view, expand, and save each member file from the portfolio view of their PDF viewer, which makes unified delivery and archiving convenient.
Spire.PDF for JavaScript runs on WebAssembly and completes the loading, drawing, and saving of PDFs entirely in the browser, managing input and output files through a virtual file system (VFS) with no backend required. Two operations are commonly used around portfolios: creating one — load a main document with PdfDocument, then add each member file that has been loaded into the VFS one by one through the file collection's root folder doc.Collection.Folders and its AddFile method, using CreateSubfolder to build subfolders and group members when needed; and identifying one — read the doc.IsPortfolio property directly to tell whether a PDF is a portfolio.
This article covers two core functions:
For installation and project configuration, refer to Integrating Spire.PDF for JavaScript in a React Project. The examples below assume Spire.PDF is installed and the WebAssembly module has been initialized.
Creating a PDF Portfolio
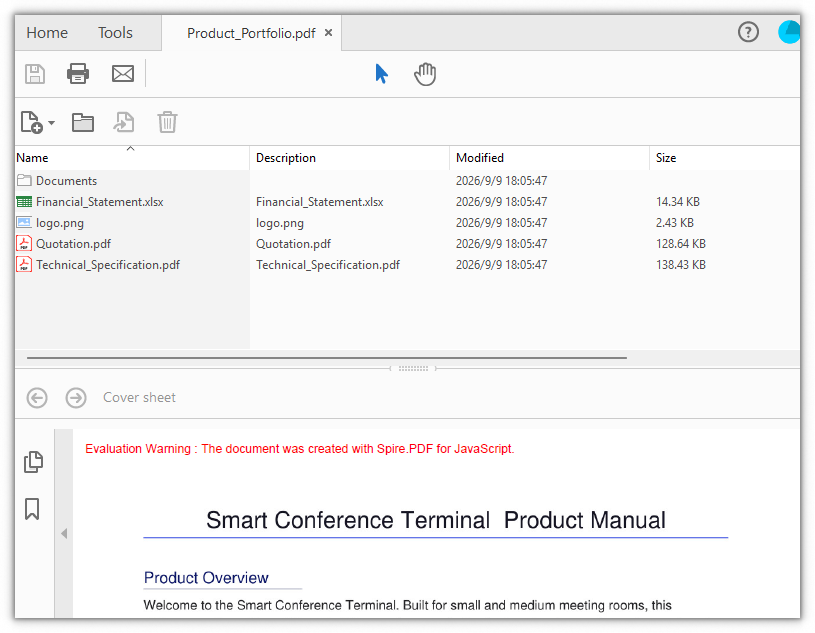
Portfolio members are not limited to PDFs — Word, Excel, and image files can be added as well, and subfolders can be used to group them. The packaging logic is straightforward: first load a main document with PdfDocument to act as the carrier of the portfolio; load each member file to be packaged into the virtual file system with FetchFileToVFS; then iterate over the members and add each one to the file collection's root folder with doc.Collection.Folders.AddFile({ filePath }). If you want some files to live in a subfolder of their own, create the subfolder first with CreateSubfolder, then call AddFile on it to add the files. When every member has been added, save the document to obtain a PDF portfolio that packages the main document together with all of its member files.
function App() {
  const createPortfolio = async () => {
    // Get the Spire.PDF WASM module
    const pdfModule = window.wasmModule?.spirepdf;

    // Check whether the module is ready
    if (!pdfModule) {
      alert('Spire.PDF is not ready yet');
      return;
    }

    // Load the PDF used as the main document of the portfolio into the VFS
    const mainFileName = 'Product_Manual.pdf';
    await window.spire.FetchFileToVFS(mainFileName, "", `${process.env.PUBLIC_URL}/data/`);

    // Create a PdfDocument object and load the main document
    let doc = new pdfModule.PdfDocument();
    doc.LoadFromFile(mainFileName);

    // Load each member file placed under the root of the portfolio into the VFS and add it to the folder of the file collection
    const rootFiles = ['Quotation.pdf', 'Technical_Specification.pdf', 'logo.png', 'Financial_Statement.xlsx'];
    for (let i = 0; i < rootFiles.length; i++) {
      await window.spire.FetchFileToVFS(rootFiles[i], "", `${process.env.PUBLIC_URL}/data/`);
      doc.Collection.Folders.AddFile({ filePath: rootFiles[i] });
    }

    // Load the Word document to be placed in a subfolder into the VFS
    await window.spire.FetchFileToVFS('test.docx', "", `${process.env.PUBLIC_URL}/data/`);
    // Create a subfolder named "Documents" in the file collection and add the Word document to it
    const subFolder = doc.Collection.Folders.CreateSubfolder('Documents');
    subFolder.AddFile({ filePath: 'test.docx' });

    // Define the output file name and save the document
    const outputFileName = 'Product_Portfolio.pdf';
    doc.SaveToFile(outputFileName);
    doc.Close();

    // Read the generated file from the VFS and trigger a download
    const fileArray = window.dotnetRuntime.Module.FS.readFile(outputFileName);
    const blob = new Blob([fileArray], { type: 'application/pdf' });
    const url = URL.createObjectURL(blob);
    const a = document.createElement('a');
    a.href = url;
    a.download = outputFileName;
    a.click();
    URL.revokeObjectURL(url);
  };

  return (
    <div style={{ textAlign: 'center', height: '300px' }}>
      <h1>Create PDF Portfolio</h1>
      <button onClick={createPortfolio}>
        Generate
      </button>
    </div>
  );
}

export default App;
The resulting PDF portfolio after creation
Identifying a PDF Portfolio
When you receive a PDF and need to tell whether it is a portfolio, use the PdfDocument.IsPortfolio property: load the document with LoadFromFile and read the Boolean property. A return value of true means the PDF is a portfolio, while false means it is a regular PDF document. This example loads a product portfolio sample to identify it, writes the "is a portfolio" result to a downloaded txt file, and also shows it below on the page so the conclusion can be seen at a glance.
function App() {
  const identifyPortfolio = async () => {
    // Get the Spire.PDF WASM module
    const pdfModule = window.wasmModule?.spirepdf;

    // Check whether the module is ready
    if (!pdfModule) {
      alert('Spire.PDF is not ready yet');
      return;
    }

    // Load the PDF to be identified into the VFS
    const inputFileName = 'Product_Portfolio.pdf';
    await window.spire.FetchFileToVFS(inputFileName, "", `${process.env.PUBLIC_URL}/data/`);

    // Create a PdfDocument object and load the PDF document
    let doc = new pdfModule.PdfDocument();
    doc.LoadFromFile(inputFileName);

    // Judge whether this PDF is a portfolio
    const isPortfolio = doc.IsPortfolio;
    const message = isPortfolio ? 'This PDF is a portfolio.' : 'This PDF is not a portfolio.';
    doc.Close();

    // Show the result below on the page
    const resultEl = document.getElementById('identify-result');
    if (resultEl) resultEl.innerText = message;

    // Write the result to a txt file and trigger a download
    const outputFileName = 'Identification_Result.txt';
    window.dotnetRuntime.Module.FS.writeFile(outputFileName, message);
    const fileArray = window.dotnetRuntime.Module.FS.readFile(outputFileName);
    const blob = new Blob([fileArray], { type: 'text/plain' });
    const url = URL.createObjectURL(blob);
    const a = document.createElement('a');
    a.href = url;
    a.download = outputFileName;
    a.click();
    URL.revokeObjectURL(url);
  };

  return (
    <div style={{ textAlign: 'center', height: '300px' }}>
      <h1>Identify PDF Portfolio</h1>
      <button onClick={identifyPortfolio}>
        Check
      </button>
      <p id="identify-result" style={{ marginTop: '20px', fontWeight: 'bold' }}></p>
    </div>
  );
}

export default App;
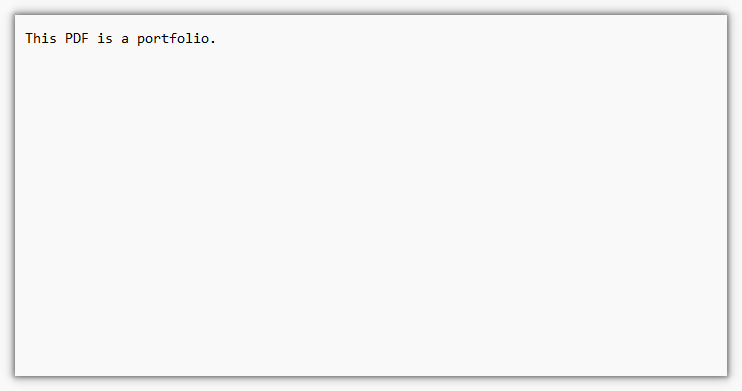
The identification result shows that the PDF is a portfolio
FAQ
How can I confirm that the file is really a portfolio after creating it
Reason: A portfolio only "packages" the member files into the same PDF, so it may not be obvious at a glance whether the saving succeeded.
Solution: Use doc.IsPortfolio for a second check on the saved result — reload the generated file and a return value of true means it is a portfolio:
// Reload the generated file and check whether it is a portfolio
let doc = new pdfModule.PdfDocument();
doc.LoadFromFile('Product_Portfolio.pdf');
const isPortfolio = doc.IsPortfolio;
What is the difference between a portfolio and ordinary PDF attachments
Reason: Both portfolios and attachments "stuff" files into a PDF, so it is easy to confuse their purposes and how to tell them apart.
Solution: A PDF attachment (Attachment) attaches a file as an embedded file that appears in the attachment panel of the document, while the body itself is usually an independent document. A portfolio, on the other hand, organizes member files around a file collection (Collection), and the members can be several documents that appear as separate files in the portfolio view and can be expanded and saved individually. To tell them apart, use doc.Attachments to inspect attachments and doc.IsPortfolio to check whether the document is a portfolio; the two do not substitute for each other.
Can only PDF files be added to a portfolio
Reason: The example presents the PDF members first, which makes it easy to assume a portfolio can only hold PDFs.
Solution: AddFile adds any file that exists in the virtual file system, not just PDFs. Load the target file into the VFS with FetchFileToVFS and add it with { filePath: fileName }; to group files into one place, create a subfolder with CreateSubfolder and add the files to it. Word, Excel, images, and other files can all be packaged into a portfolio as members:
// Load an Excel file and add it as a portfolio member
await window.spire.FetchFileToVFS('Financial_Statement.xlsx', "", `${process.env.PUBLIC_URL}/data/`);
doc.Collection.Folders.AddFile({ filePath: 'Financial_Statement.xlsx' });
Get a Free Temporary License
If you want to remove the evaluation message from the result documents, or get rid of the function limitations, please contact our sales team to get a temporary license that is valid for 30 days.
Create and Remove Multi-level Groups in Excel with JavaScript in React
2026-09-10 02:39:45 Written by Nina TangWhen managing data with many rows and columns, such as project plans or financial reports, you often need to group some rows (Group / Outline) so that they can be collapsed into a layered structure, letting you view only the summary rows or the content of a certain phase. When the structure is no longer needed, you can remove the groups at any time to restore the flat layout of the rows. Spire.XLS for JavaScript completes this directly in the browser based on WebAssembly, and manages input/output files through a virtual file system (VFS), with no backend service required.
This article covers two core features:
For installation and project configuration, refer to Integrating Spire.XLS for JavaScript in a React Project. The examples below assume Spire.XLS is installed and the WebAssembly module is initialized.
Create Multi-level (Nested) Groups
A multi-level group consists of an "outer group" plus "inner groups". For example, in a project plan, the whole execution phase (several rows) can be one level of group, while the detail rows of each sub-phase are the second level of group. When creating it, you should call GroupByRows() on the larger outer range first, and then on the smaller inner ranges, so that Excel generates the collapse buttons of different levels. The main steps are as follows:
- Create a
Workbookobject and get the first worksheet. - Add a named style and set its font (used for titles and similar cells).
- Set
Worksheet.PageSetup.IsSummaryRowBelow = falseso that the summary rows are shown above the detail rows. - Write the sample data into the cells.
- Call
GroupByRows()on the outer row range (rows 2-9) first, then callGroupByRows()on the nested inner row ranges (rows 4-5 and rows 8-9). - Save the workbook with the
Workbook.SaveToFile()method.
Here is a complete code example showing how to create two-level (nested) row groups for a worksheet in React:
function App() {
  const createNestedGroup = async () => {
    // Get the Spire.XLS WASM module
    const xlsModule = window.wasmModule?.spirexls;

    // Check whether the module is ready
    if (!xlsModule) {
      alert('Spire.Xls is not ready yet');
      return;
    }

    // Load the font into the VFS for text measurement
    await window.spire.FetchFileToVFS('ARIAL.TTF', '/Library/Fonts/', `${process.env.PUBLIC_URL}/font/`);

    // Create a new workbook and get the first worksheet
    const workbook = new xlsModule.Workbook();
    const sheet = workbook.Worksheets.get(0);

    // Add a named style for the title rows
    const style = workbook.Styles.Add("style");
    style.Font.Color = xlsModule.Color.get_CadetBlue();
    style.Font.IsBold = true;

    // Make the summary rows appear above the detail rows
    sheet.PageSetup.IsSummaryRowBelow = false;

    // Write the sample data
    sheet.Range.get("A1").Value = "Project plan for project X";
    sheet.Range.get("A1").CellStyleName = style.Name;

    sheet.Range.get("A3").Value = "Set up";
    sheet.Range.get("A3").CellStyleName = style.Name;
    sheet.Range.get("A4").Value = "Task 1";
    sheet.Range.get("A5").Value = "Task 2";
    sheet.Range.get("A4:A5").BorderAround(xlsModule.LineStyleType.Thin);
    sheet.Range.get("A4:A5").BorderInside(xlsModule.LineStyleType.Thin);

    sheet.Range.get("A7").Value = "Launch";
    sheet.Range.get("A7").CellStyleName = style.Name;
    sheet.Range.get("A8").Value = "Task 1";
    sheet.Range.get("A9").Value = "Task 2";
    sheet.Range.get("A8:A9").BorderAround(xlsModule.LineStyleType.Thin);
    sheet.Range.get("A8:A9").BorderInside(xlsModule.LineStyleType.Thin);

    // Group the outer rows first, then the nested inner rows, to form multi-level groups
    sheet.GroupByRows(2, 9, false);
    sheet.GroupByRows(4, 5, false);
    sheet.GroupByRows(8, 9, false);

    // Save the document
    const outputFileName = 'MultiLevelGroup.xlsx';
    workbook.SaveToFile({ fileName: outputFileName, version: xlsModule.ExcelVersion.Version2010 });

    // Release resources
    workbook.Dispose();

    // Read the converted file from the VFS and trigger a download
    const fileArray = window.dotnetRuntime.Module.FS.readFile(outputFileName);
    const blob = new Blob([fileArray], { type: 'application/vnd.openxmlformats-officedocument.spreadsheetml.sheet' });
    const url = URL.createObjectURL(blob);
    const a = document.createElement('a');
    a.href = url;
    a.download = outputFileName;
    a.click();
    URL.revokeObjectURL(url);
  };

  return (
    <div style={{ textAlign: 'center', height: '300px' }}>
      <h1>Create Nested Group</h1>
      <button onClick={createNestedGroup}>
        Start
      </button>
    </div>
  );
}

export default App;
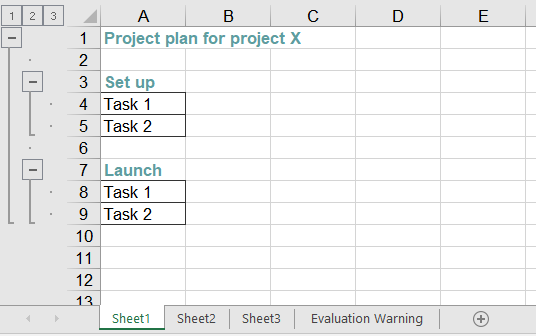
Effect of creating multi-level groups
Remove (Delete) Multi-level Groups
When a workbook already contains multi-level groups and you need to remove a particular outer "large group" or inner "small group", you can load the file and call the Worksheet.UngroupByRows() method on the corresponding range. Grouping only affects the collapsed display of rows; removing a group never deletes any cell content. After the outer large group is removed, the inner small groups that were nested inside it remain as independent single-level groups and can be removed one by one. The main steps are as follows:
- Create a
Workbookobject and load the workbook that already contains multi-level groups with theWorkbook.LoadFromFile()method. - Get the worksheet with the
Workbook.Worksheets.get()method. - Call
UngroupByRows()on the outer row range (rows 2-9) to remove the large group. - Call
UngroupByRows()on the inner row range (rows 4-5) to remove the small group. - Save the workbook with the
Workbook.SaveToFile()method.
Here is a complete code example showing how to load an already-grouped Excel file in React and remove a large group and a small group:
function App() {
  const ungroupRows = async () => {
    // Get the Spire.XLS WASM module
    const xlsModule = window.wasmModule?.spirexls;

    // Check whether the module is ready
    if (!xlsModule) {
      alert('Spire.Xls is not ready yet');
      return;
    }

    // Load the font into the VFS for text measurement
    await window.spire.FetchFileToVFS('ARIAL.TTF', '/Library/Fonts/', `${process.env.PUBLIC_URL}/font/`);

    // Load the Excel file that already contains multi-level groups
    const inputFileName = 'MultiLevelGroup.xlsx';
    await window.spire.FetchFileToVFS(inputFileName, '', `${process.env.PUBLIC_URL}data/`);

    // Create a Workbook object and load the workbook
    const workbook = new xlsModule.Workbook();
    workbook.LoadFromFile({ fileName: inputFileName });

    // Get the first worksheet
    const sheet = workbook.Worksheets.get(0);

    // Remove the outer large group (rows 2-9)
    sheet.UngroupByRows(2, 9);

    // Remove the inner small group (rows 4-5)
    sheet.UngroupByRows(4, 5);

    // Save the document
    const outputFileName = 'UngroupRows_output.xlsx';
    workbook.SaveToFile({ fileName: outputFileName, version: xlsModule.ExcelVersion.Version2010 });

    // Release resources
    workbook.Dispose();

    // Read the converted file from the VFS and trigger a download
    const fileArray = window.dotnetRuntime.Module.FS.readFile(outputFileName);
    const blob = new Blob([fileArray], { type: 'application/vnd.openxmlformats-officedocument.spreadsheetml.sheet' });
    const url = URL.createObjectURL(blob);
    const a = document.createElement('a');
    a.href = url;
    a.download = outputFileName;
    a.click();
    URL.revokeObjectURL(url);
  };

  return (
    <div style={{ textAlign: 'center', height: '300px' }}>
      <h1>Ungroup Rows</h1>
      <button onClick={ungroupRows}>
        Start
      </button>
    </div>
  );
}

export default App;
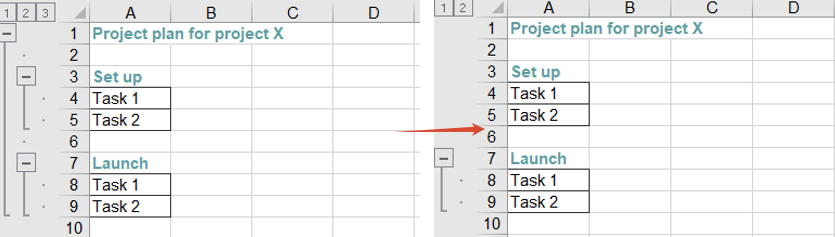
Effect of removing multi-level groups
FAQ
Why does calling GroupByRows several times not produce multi-level groups
Cause: A multi-level group requires the range of the inner group to be completely contained within the range of the outer group. If two grouped ranges do not contain each other, Excel treats them as two groups of the same level instead of nested multi-level groups.
Solution: Call GroupByRows() on the larger outer range first, and then on the smaller inner range, for example call GroupByRows(2, 9, false) first and then GroupByRows(4, 5, false).
How can I make a group collapsed by default (or keep it expanded)?
Cause: The third Boolean parameter of GroupByRows(startRow, endRow, isCollapsed) decides whether the detail rows of a group are collapsed by default after the group is created. true collapses them by default, while false keeps them expanded (the examples in this article use false). When the saved file is opened, it is shown in that state.
Solution: Set the third parameter to true to collapse the group by default, for example sheet.GroupByRows(4, 5, true). To collapse or expand a group at runtime, call CollapseGroup() / ExpandGroup() on the grouped range.
Obtain a Free License
Spire.XLS for JavaScript offers a 30-day full-featured free trial license with no functional limitations. Apply here to evaluate before purchasing.
PDF keeps its layout fixed and identical across devices, which makes it the format of choice for distributing contracts, reports, and photo albums. But PDFs that contain many high-resolution images or embedded fonts are often very large: they eat up storage space and slow down emailing, web uploads, and downloads. If the document can be “slimmed down” directly in the browser while keeping it readable, distribution and loading get noticeably better — without uploading the file to a server and waiting for processing.
Spire.PDF for JavaScript runs on WebAssembly and completes the loading, compression, and saving of PDFs entirely in the browser, managing input and output files through a virtual file system (VFS) with no backend required. It ships a dedicated PdfCompressor, whose Options control the compression strategy along three dimensions: first ImageCompressionOptions resizes and re-compresses the images in the document, second TextCompressionOptions compresses font data or even removes embedded fonts, and third CompressContents re-compresses the page content streams. The three can be freely combined in a single pass to balance visual quality against file size.
This article first introduces the three compression dimensions of PdfCompressor, and then gives a complete runnable example that combines them:
- Compressing Images in a PDF
- Compressing Fonts and Unembedding Fonts in a PDF
- Compressing PDF Content Streams
- Combining All Three Approaches to Compress a PDF
For installation and project configuration, refer to Integrating Spire.PDF for JavaScript in a React Project. The examples below assume Spire.PDF is installed and the WebAssembly module has been initialized.
Compressing Images in a PDF
High-resolution bitmaps on a page are usually the main source of a PDF's size. Options.ImageCompressionOptions controls image scaling and re-encoding with three properties:
| Property | What it does | Effect and trade-off |
|---|---|---|
ResizeImages |
Scales images down proportionally and re-encodes them | Noticeably reduces the size; suited to very large, high-resolution images |
CompressImage |
Performs lossy compression on images | Smaller file at the cost of a little image quality |
ImageQuality |
Controls the quality tier used for re-encoding | High gives better quality but a larger file; Low gives a smaller file but images may look softer |
For an image-heavy document, a typical approach is to enable ResizeImages and CompressImage first, then pick the ImageQuality tier that matches your tolerance for quality loss:
// Compress images in the document: resize, re-compress, and lower the quality
compressor.Options.ImageCompressionOptions.ResizeImages = true;
compressor.Options.ImageCompressionOptions.CompressImage = true;
compressor.Options.ImageCompressionOptions.ImageQuality = pdfModule.ImageQuality.Low;
Compressing Fonts and Unembedding Fonts in a PDF
A PDF embeds the fonts used in its text as subsets inside the file, and several fonts with multiple weights can add up to a fair amount of size. Options.TextCompressionOptions offers two ways to handle fonts:
| Property | What it does | Effect and trade-off |
|---|---|---|
CompressFonts |
Compresses the embedded font data and keeps the fonts | Same rendering, smaller file, no display risk |
UnembedFonts |
Removes the fonts and lets the reader render with system fonts | Even smaller file; glyphs may be substituted if the target system lacks the fonts |
UnembedFonts shrinks the file further but carries a display risk, so whether to enable it depends on where the document will be viewed:
// Compress font data; UnembedFonts goes further and removes the embedded fonts
compressor.Options.TextCompressionOptions.CompressFonts = true;
compressor.Options.TextCompressionOptions.UnembedFonts = true;
Compressing PDF Content Streams
The text and vector drawing commands on a PDF page are stored as “content streams”. They are usually compressed when generated, but after repeated edits or processing by different tools they can still hold redundancy. Options.CompressContents re-compresses the document's content streams, which can also free up some space in text-heavy, layout-complex documents:
// Re-compress the document content streams
compressor.Options.CompressContents = true;
Combining All Three Approaches to Compress a PDF
Combining the three approaches above gives a complete compression flow that balances effect and speed: after loading the PDF, enable image, font, and content compression in one pass, then call CompressToFile to write the result to a new file. The example below enables ResizeImages, CompressImage (with the High quality tier), CompressFonts, UnembedFonts, and CompressContents all at once on a PDF that contains both high-resolution images and text, and produces a new document that is clearly smaller:
function App() {
  const compressPdfDocument = async () => {
    // Get the Spire.PDF WASM module
    const pdfModule = window.wasmModule?.spirepdf;

    // Check that the module is ready
    if (!pdfModule) {
      alert('Spire.PDF is not ready yet');
      return;
    }

    // Load the PDF to be compressed into the VFS
    const inputFileName = 'ImageDocument.pdf';
    await window.spire.FetchFileToVFS(inputFileName, "", `${process.env.PUBLIC_URL}/data/`);

    // Create a PdfCompressor and point it at the PDF to compress
    let compressor = new pdfModule.PdfCompressor({ filePath: inputFileName });

    // 1. Image compression: resize and re-compress images, with a higher quality tier
    compressor.Options.ImageCompressionOptions.ResizeImages = true;
    compressor.Options.ImageCompressionOptions.CompressImage = true;
    compressor.Options.ImageCompressionOptions.ImageQuality = pdfModule.ImageQuality.High;

    // 2. Font compression: compress font data and remove embedded fonts
    compressor.Options.TextCompressionOptions.CompressFonts = true;
    compressor.Options.TextCompressionOptions.UnembedFonts = true;

    // 3. Content compression: re-compress the document content streams
    compressor.Options.CompressContents = true;

    // Define the output file name and compress to it
    const outputFileName = 'CompressedDocument.pdf';
    compressor.CompressToFile(outputFileName);

    // Read the generated file from the VFS and trigger the download
    const fileArray = window.dotnetRuntime.Module.FS.readFile(outputFileName);
    const blob = new Blob([fileArray], { type: 'application/pdf' });
    const url = URL.createObjectURL(blob);
    const a = document.createElement('a');
    a.href = url;
    a.download = outputFileName;
    a.click();
    URL.revokeObjectURL(url);
  };

  return (
    <div style={{ textAlign: 'center', height: '300px' }}>
      <h1>Compress PDF Document</h1>
      <button onClick={compressPdfDocument}>
        Generate
      </button>
    </div>
  );
}

export default App;
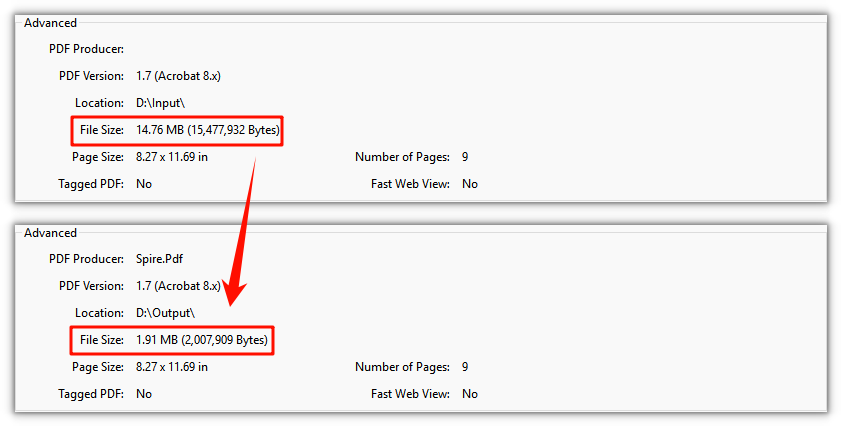
PDF document compressed by combining all three approaches
FAQ
Why is the file still large after compression when the PDF has few images
Reason: The size does not always come from images. When the pages are text-heavy, the size is more likely to come from the embedded fonts and the page content streams, so enabling image compression alone helps little.
Solution: Cover the other dimensions as well — compress font data with TextCompressionOptions (using UnembedFonts to remove embedded fonts when appropriate) and re-compress the content streams with CompressContents, so that text-heavy documents also shrink noticeably.
Will unembedding fonts cause the text to display incorrectly
Reason: UnembedFonts removes the font programs from the PDF, so the reader renders the text with fonts installed on the system; if the target environment lacks those fonts, glyph substitution or spacing changes may occur.
Solution: For documents distributed to users whose font environments are unknown, keep the fonts embedded and only use CompressFonts to compress the font data; enable UnembedFonts only when you are sure the target system has the corresponding fonts:
// Keep fonts embedded but compress the font data to avoid display risks after unembedding
compressor.Options.TextCompressionOptions.UnembedFonts = false;
compressor.Options.TextCompressionOptions.CompressFonts = true;
How should I trade off the image quality tier against the compression methods
Reason: ImageQuality only affects the quality and size of the re-encoded images; depending on the document, the part that contributes the most to its size differs, so a single dimension rarely reaches an ideal compression ratio.
Solution: For image-heavy documents, enable ResizeImages and CompressImage first and choose between the High/Low tiers; for text-heavy documents, focus on font compression and content compression. If fonts must stay embedded, just turn off UnembedFonts — the other compression options are unaffected:
// For image-heavy documents, choose the lower quality tier for a smaller file
compressor.Options.ImageCompressionOptions.ImageQuality = pdfModule.ImageQuality.Low;
Get a Free License
If you want to remove the evaluation message from the result documents or get rid of feature limitations, please contact sales to obtain a free 30-day temporary license.
PDF is a fixed-layout format that is easy to distribute, yet a single PDF usually carries only the body of a document. In practice you often want to hand over supporting material together with the main document, such as a contract bundled with its signed images, or a report bundled with the source data behind it, so that everything stays together for archiving and circulation. PDF attachments (embedded files) provide a standard way to do this: a PDF can carry files of any type in its embedded-file tree, and a recipient who opens one PDF finds both the main document and the supporting files in the viewer’s “Attachments” panel, with no need to request them separately.
Spire.PDF for JavaScript is built on WebAssembly, so it loads, draws, and saves PDFs directly in the browser and manages input and output files through a virtual file system (VFS), with no backend service required. Working with attachments comes down to two operations: adding—wrap a file into an attachment with PdfAttachment and add it to the document’s attachment collection through doc.Attachments.Add; and removing—delete a specified attachment from the doc.Attachments collection with Attachments.RemoveAt(index). Both revolve around the PdfDocument.Attachments collection.
This article covers two key operations:
For installation and project setup, refer to How to Integrate Spire.PDF for JavaScript in a React Project. The examples below assume Spire.PDF is installed and the WebAssembly module has been initialized.
Add an Attachment to a PDF Document
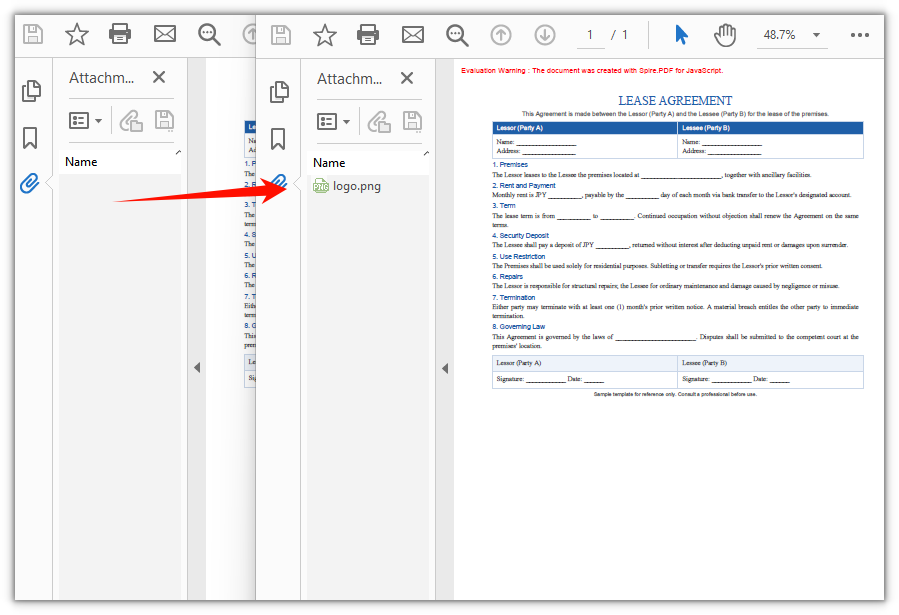
To add an attachment, first load the container PDF and the file to embed into the virtual file system, then wrap the file with PdfAttachment (name, data, description, and MIME type) and add it to doc.Attachments. The attachment is not drawn on the page; it is stored in the PDF’s embedded-file tree, where you can view and save it from the viewer’s “Attachments” panel. This example embeds a logo.png into a lease agreement.
function App() {
  const addAttachment = async () => {
    // Get the Spire.PDF WASM module
    const pdfModule = window.wasmModule?.spirepdf;

    // Check whether the module is ready
    if (!pdfModule) {
      alert('Spire.PDF is not ready yet');
      return;
    }

    // Load the container PDF file into the VFS
    const inputFileName = 'Lease_Agreement_EN.pdf';
    await window.spire.FetchFileToVFS(inputFileName, "", `${process.env.PUBLIC_URL}/data/`);

    // Load the image file to embed as an attachment into the VFS
    const attachFileName = 'logo.png';
    await window.spire.FetchFileToVFS(attachFileName, "", `${process.env.PUBLIC_URL}/data/`);

    // Create a PdfDocument object and load the PDF document
    let doc = new pdfModule.PdfDocument();
    doc.LoadFromFile(inputFileName);

    // Create the attachment and set its file name, description, and MIME type
    let attachment = new pdfModule.PdfAttachment({ fileName: attachFileName });
    attachment.Data = window.dotnetRuntime.Module.FS.readFile(attachFileName);
    attachment.Description = 'Company logo attached to the agreement';
    attachment.MimeType = 'image/png';

    // Add the attachment to the document's attachment collection
    doc.Attachments.Add({ attachment: attachment });

    // Define the output file name and save the document
    const outputFileName = 'Agreement_With_Attachment.pdf';
    doc.SaveToFile(outputFileName);
    doc.Close();

    // Read the generated file from the VFS and trigger a download
    const fileArray = window.dotnetRuntime.Module.FS.readFile(outputFileName);
    const blob = new Blob([fileArray], { type: 'application/pdf' });
    const url = URL.createObjectURL(blob);
    const a = document.createElement('a');
    a.href = url;
    a.download = outputFileName;
    a.click();
    URL.revokeObjectURL(url);
  };

  return (
    <div style={{ textAlign: 'center', height: '300px' }}>
      <h1>Add Attachment To PDF</h1>
      <button onClick={addAttachment}>
        Generate
      </button>
    </div>
  );
}

export default App;
Agreement with the logo.png attachment embedded
Remove an Attachment from a PDF Document
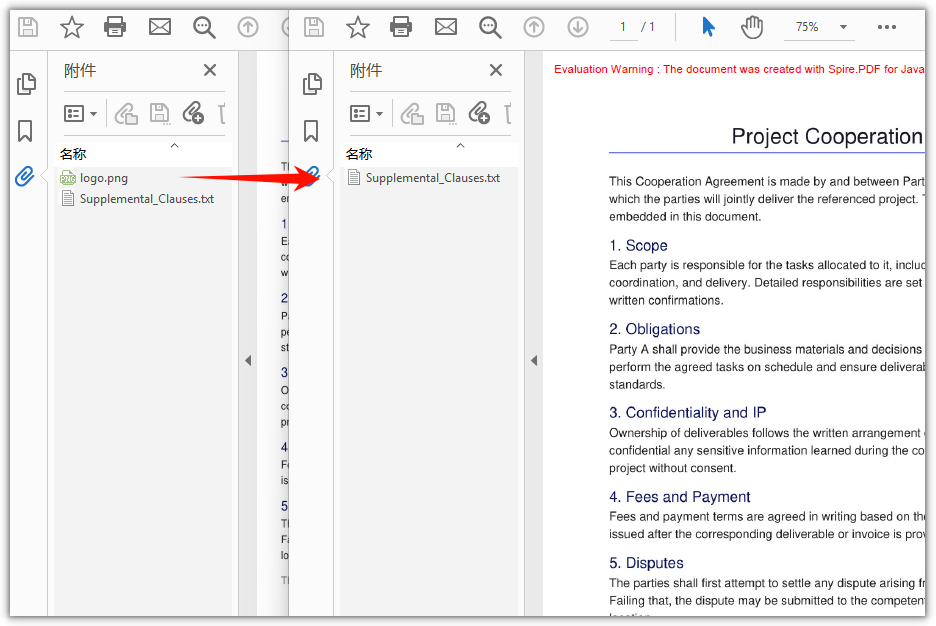
To remove a specified attachment, call Attachments.RemoveAt(index) on the attachment collection; the index is zero-based (check Count first to confirm how many attachments there are). This example loads a sample document that already contains attachments and deletes its first one. To remove every attachment from the document at once, call attachments.Clear() instead.
function App() {
  const deleteAttachments = async () => {
    // Get the Spire.PDF WASM module
    const pdfModule = window.wasmModule?.spirepdf;

    // Check whether the module is ready
    if (!pdfModule) {
      alert('Spire.PDF is not ready yet');
      return;
    }

    // Load the PDF file that contains attachments into the VFS
    const inputFileName = 'SampleWithAttachments.pdf';
    await window.spire.FetchFileToVFS(inputFileName, "", `${process.env.PUBLIC_URL}/data/`);

    // Create a PdfDocument object and load the PDF document
    let doc = new pdfModule.PdfDocument();
    doc.LoadFromFile(inputFileName);

    // Get the document's attachment collection
    let attachments = doc.Attachments;

    // Remove the attachment at the given index (zero-based; here the first one)
    attachments.RemoveAt(0);

    // Define the output file name and save the document
    const outputFileName = 'Attachment_Removed.pdf';
    doc.SaveToFile(outputFileName);
    doc.Close();

    // Read the generated file from the VFS and trigger a download
    const fileArray = window.dotnetRuntime.Module.FS.readFile(outputFileName);
    const blob = new Blob([fileArray], { type: 'application/pdf' });
    const url = URL.createObjectURL(blob);
    const a = document.createElement('a');
    a.href = url;
    a.download = outputFileName;
    a.click();
    URL.revokeObjectURL(url);
  };

  return (
    <div style={{ textAlign: 'center', height: '300px' }}>
      <h1>Delete Attachments From PDF</h1>
      <button onClick={deleteAttachments}>
        Generate
      </button>
    </div>
  );
}

export default App;
PDF document after the first attachment is removed
Frequently Asked Questions
How do I check whether a PDF contains attachments and how many there are
Reason: Before removing or reading attachments, you usually want to know whether the document has any attachments and how many, to avoid invalid operations on an empty collection.
Solution: All attachments of a document live in the doc.Attachments collection; its Count property returns the number of attachments, and a value of 0 means there are none. To read a single attachment, access it by index with get_Item(index):
// Get the document's attachment collection and the number of attachments
let attachments = doc.Attachments;
let count = attachments.Count;
Which properties should I set when adding an attachment
Reason: If you only assign the file bytes without a name and description, the item is displayed incompletely in the viewer’s “Attachments” panel and the recipient cannot tell what the file is.
Solution: The commonly used properties of PdfAttachment are fileName (the file name the recipient sees), Description (a one-line description), and MimeType (the content type); assign the file bytes to Data. After setting them, Add the attachment to the collection so the panel shows it with its name and description:
// Create the attachment and set its file name, data, description, and MIME type
let attachment = new pdfModule.PdfAttachment({ fileName: 'logo.png' });
attachment.Data = window.dotnetRuntime.Module.FS.readFile('logo.png');
attachment.Description = 'Company logo attached to the agreement';
attachment.MimeType = 'image/png';
doc.Attachments.Add({ attachment: attachment });
Can I embed file types other than images as attachments
Reason: Examples often demonstrate attachments with images, which can make it look as if PDF attachments only accept images.
Solution: A PDF attachment is essentially an embedded file that carries arbitrary bytes, with no restriction on the type. As long as you load the file into the virtual file system, read its bytes into Data with FS.readFile, and set MimeType to the matching content type, files such as Word, Excel, PDF, or archives can all be embedded as attachments. Embedding a PDF appendix, for example:
// Load the PDF appendix to embed and add it as an attachment
const attachName = 'Product_Appendix.pdf';
await window.spire.FetchFileToVFS(attachName, "", `${process.env.PUBLIC_URL}/data/`);
let attachment = new pdfModule.PdfAttachment({ fileName: attachName });
attachment.Data = window.dotnetRuntime.Module.FS.readFile(attachName);
attachment.MimeType = 'application/pdf';
doc.Attachments.Add({ attachment: attachment });
Get a Free License
If you wish to delete the evaluation message from the resulting documents, or to get rid of function limitations, please contact sales to obtain a valid 30-day temporary license.
Add, Read, Modify, and Delete Excel Hyperlinks with JavaScript in React
2026-09-09 08:58:49 Written by Nina TangHyperlinks are a common element in Excel for quickly jumping to web pages, email addresses, or other resources, and they often appear in tables such as product websites, contact information, and reference materials. Spire.XLS for JavaScript uses WebAssembly to add, read, modify, and delete hyperlinks directly in the browser and manages input/output files through a virtual file system (VFS) without any backend support.
This article demonstrates the following common features:
For installation and project configuration, please refer to Integrating Spire.XLS for JavaScript in a React Project. The examples below assume that Spire.XLS is installed and the WebAssembly module has been initialized.
Add a Hyperlink to Text
For cells that contain text such as company names, website names, or email addresses, you can add hyperlinks to the text so that users can click to jump to a web page or send an email.
function App() {
  const addHyperlinkToText = async () => {
    // Get the Spire.XLS WASM module
    const xlsModule = window.wasmModule?.spirexls;

    // Check whether the module is ready
    if (!xlsModule) {
      alert('Spire.Xls is not ready yet');
      return;
    }

    // Load the font and the Excel file into the VFS
    await window.spire.FetchFileToVFS('ARIAL.TTF', '/Library/Fonts/', `${process.env.PUBLIC_URL}/font/`);
    const inputFileName = 'HyperlinksSample.xlsx';
    await window.spire.FetchFileToVFS(inputFileName, '', `${process.env.PUBLIC_URL}data/`);

    // Load the workbook
    const workbook = new xlsModule.Workbook();
    workbook.LoadFromFile({ fileName: inputFileName });

    // Get the first worksheet
    const sheet = workbook.Worksheets.get(0);

    // Add a web hyperlink to the text in cell D10
    const urlLink = sheet.HyperLinks.Add({ range: sheet.Range.get('D10') });
    urlLink.TextToDisplay = sheet.Range.get('D10').Text;
    urlLink.Type = xlsModule.HyperLinkType.Url;
    urlLink.Address = 'https://www.e-iceblue.com/';

    // Add an email hyperlink to the text in cell E10
    const mailLink = sheet.HyperLinks.Add({ range: sheet.Range.get('E10') });
    mailLink.TextToDisplay = sheet.Range.get('E10').Text;
    mailLink.Type = xlsModule.HyperLinkType.Url;
    mailLink.Address = 'mailto:[email protected]';

    // Save the workbook
    const outputFileName = 'AddHyperlinkToText_output.xlsx';
    workbook.SaveToFile({ fileName: outputFileName, version: xlsModule.ExcelVersion.Version2010 });

    // Dispose of the workbook
    workbook.Dispose();

    // Read the generated file from the VFS and trigger the download
    const fileArray = window.dotnetRuntime.Module.FS.readFile(outputFileName);
    const blob = new Blob([fileArray], { type: 'application/vnd.openxmlformats-officedocument.spreadsheetml.sheet' });
    const url = URL.createObjectURL(blob);
    const a = document.createElement('a');
    a.href = url;
    a.download = outputFileName;
    a.click();
    URL.revokeObjectURL(url);
  };

  return (
    <div style={{ textAlign: 'center', height: '300px' }}>
      <h1>Add Hyperlink To Text</h1>
      <button onClick={addHyperlinkToText}>Start</button>
    </div>
  );
}

export default App;
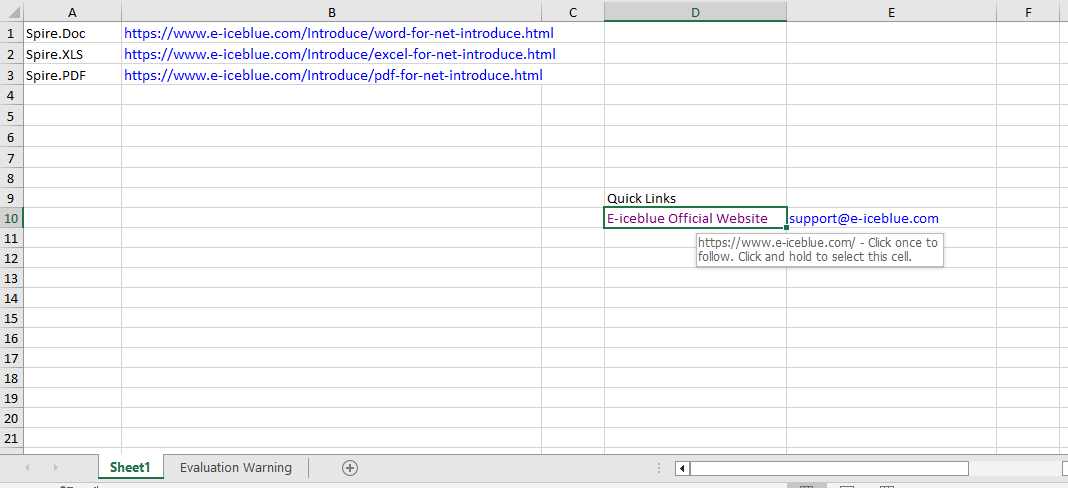
After running, the text in cell D10 becomes a clickable web link, and the email address in cell E10 becomes an email link that can be used to send an email.
Read Hyperlinks
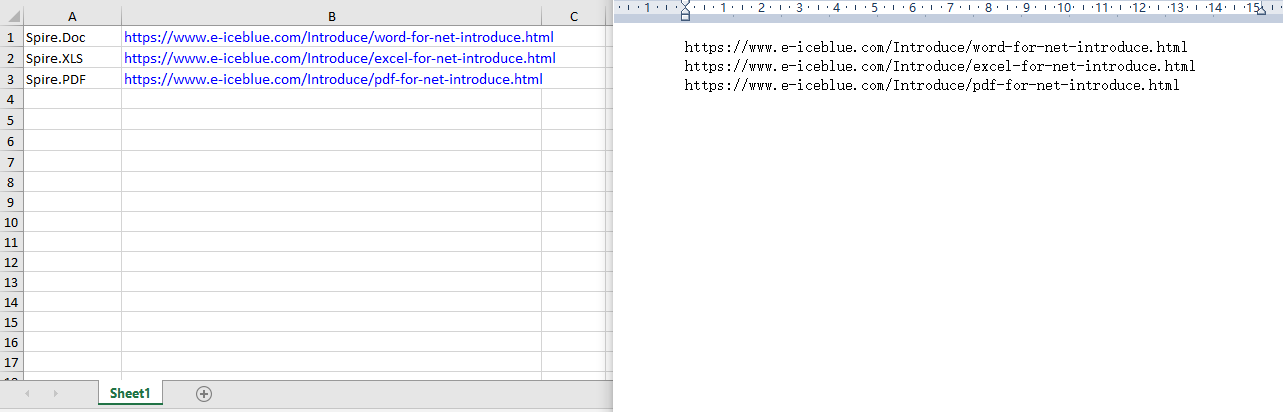
Through the Worksheet.HyperLinks collection, you can get all the hyperlinks in a worksheet and access the target address of each hyperlink by index.
function App() {
  const readHyperlinks = async () => {
    // Get the Spire.XLS WASM module
    const xlsModule = window.wasmModule?.spirexls;

    // Check whether the module is ready
    if (!xlsModule) {
      alert('Spire.Xls is not ready yet');
      return;
    }

    // Load the Excel file into the VFS
    const inputFileName = 'HyperlinksSample.xlsx';
    await window.spire.FetchFileToVFS(inputFileName, '', `${process.env.PUBLIC_URL}data/`);

    // Load the workbook
    const workbook = new xlsModule.Workbook();
    workbook.LoadFromFile({ fileName: inputFileName });

    // Get the first worksheet
    const sheet = workbook.Worksheets.get(0);

    // Read the target addresses of all hyperlinks
    const hyperlinkCount = sheet.HyperLinks.Count;
    let allAddresses = '';

    for (let i = 0; i < hyperlinkCount; i++) {
        const address = sheet.HyperLinks.get(i).Address;
        allAddresses += address + '\n';
    }

    // Save the hyperlink addresses as a txt file
    const outputFileName = 'ReadHyperlinks_output.txt';
    window.dotnetRuntime.Module.FS.writeFile(outputFileName, allAddresses);
    workbook.Dispose();

    // Read the generated file from the VFS and trigger the download
    const fileArray = window.dotnetRuntime.Module.FS.readFile(outputFileName);
    const blob = new Blob([fileArray], { type: 'text/plain' });
    const url = URL.createObjectURL(blob);
    const a = document.createElement('a');
    a.href = url;
    a.download = outputFileName;
    a.click();
    URL.revokeObjectURL(url);
  };

  return (
    <div style={{ textAlign: 'center', height: '300px' }}>
      <h1>Read Hyperlinks</h1>
      <button onClick={readHyperlinks}>Start</button>
    </div>
  );
}

export default App;
Use the HyperLinks.Count property to get the total number of hyperlinks in the worksheet.
Modify a Hyperlink
After getting a hyperlink by index with HyperLinks.get(0), you can reset its display text and target address to modify the hyperlink.
function App() {
  const modifyHyperlink = async () => {
    // Get the Spire.XLS WASM module
    const xlsModule = window.wasmModule?.spirexls;

    // Check whether the module is ready
    if (!xlsModule) {
      alert('Spire.Xls is not ready yet');
      return;
    }

    // Load the font and the Excel file into the VFS
    await window.spire.FetchFileToVFS('ARIAL.TTF', '/Library/Fonts/', `${process.env.PUBLIC_URL}/font/`);
    const inputFileName = 'HyperlinksSample.xlsx';
    await window.spire.FetchFileToVFS(inputFileName, '', `${process.env.PUBLIC_URL}data/`);

    // Load the workbook
    const workbook = new xlsModule.Workbook();
    workbook.LoadFromFile({ fileName: inputFileName });

    // Get the first worksheet
    const sheet = workbook.Worksheets.get(0);

    // Get all hyperlinks in the worksheet
    const links = sheet.HyperLinks;

    // Modify the display text and target address of the first hyperlink
    links.get(0).TextToDisplay = 'E-iceblue';
    links.get(0).Address = 'https://www.e-iceblue.com/';

    // Save the workbook
    const outputFileName = 'ModifyHyperlink_output.xlsx';
    workbook.SaveToFile({ fileName: outputFileName, version: xlsModule.ExcelVersion.Version2010 });

    // Dispose of the workbook
    workbook.Dispose();

    // Read the generated file from the VFS and trigger the download
    const fileArray = window.dotnetRuntime.Module.FS.readFile(outputFileName);
    const blob = new Blob([fileArray], { type: 'application/vnd.openxmlformats-officedocument.spreadsheetml.sheet' });
    const url = URL.createObjectURL(blob);
    const a = document.createElement('a');
    a.href = url;
    a.download = outputFileName;
    a.click();
    URL.revokeObjectURL(url);
  };

  return (
    <div style={{ textAlign: 'center', height: '300px' }}>
      <h1>Modify Hyperlink</h1>
      <button onClick={modifyHyperlink}>Start</button>
    </div>
  );
}

export default App;
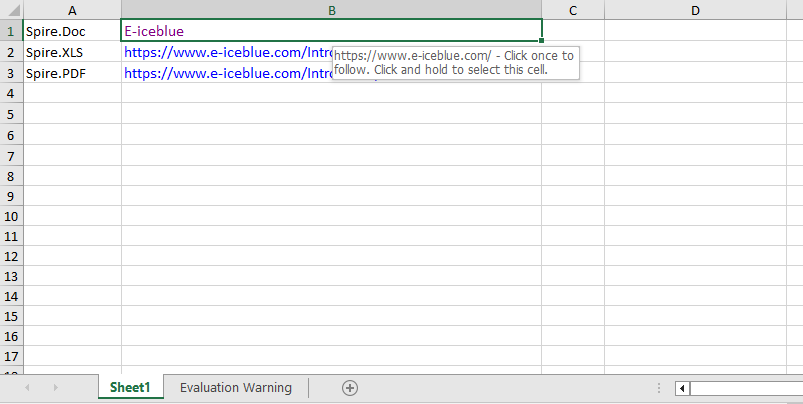
After modification, both the display text and the target address of the first hyperlink are updated.
Remove Hyperlinks
Use the HyperLinks.RemoveAt(index) method to only remove the hyperlink and keep the text, or use the Range.ClearAll() method to clear all content in the cell, including the hyperlink.
function App() {
  const removeHyperlinks = async () => {
    // Get the Spire.XLS WASM module
    const xlsModule = window.wasmModule?.spirexls;

    // Check whether the module is ready
    if (!xlsModule) {
      alert('Spire.Xls is not ready yet');
      return;
    }

    // Load the font and the Excel file into the VFS
    await window.spire.FetchFileToVFS('ARIAL.TTF', '/Library/Fonts/', `${process.env.PUBLIC_URL}/font/`);
    const inputFileName = 'HyperlinksSample.xlsx';
    await window.spire.FetchFileToVFS(inputFileName, '', `${process.env.PUBLIC_URL}data/`);

    // Load the workbook
    const workbook = new xlsModule.Workbook();
    workbook.LoadFromFile({ fileName: inputFileName });

    // Get the first worksheet
    const sheet = workbook.Worksheets.get(0);

    // Get all hyperlinks in the worksheet
    const links = sheet.HyperLinks;

    // Clear all content in the linked cells
    // sheet.Range.get('A1').ClearAll();
    // sheet.Range.get('A2').ClearAll();
    // sheet.Range.get('A3').ClearAll();

    // Only remove the hyperlink and keep the original text
    sheet.HyperLinks.RemoveAt(0);

    // Save the workbook
    const outputFileName = 'RemoveHyperlinks_output.xlsx';
    workbook.SaveToFile({ fileName: outputFileName, version: xlsModule.ExcelVersion.Version2010 });

    // Dispose of the workbook
    workbook.Dispose();

    // Read the generated file from the VFS and trigger the download
    const fileArray = window.dotnetRuntime.Module.FS.readFile(outputFileName);
    const blob = new Blob([fileArray], { type: 'application/vnd.openxmlformats-officedocument.spreadsheetml.sheet' });
    const url = URL.createObjectURL(blob);
    const a = document.createElement('a');
    a.href = url;
    a.download = outputFileName;
    a.click();
    URL.revokeObjectURL(url);
  };

  return (
    <div style={{ textAlign: 'center', height: '300px' }}>
      <h1>Remove Hyperlinks</h1>
      <button onClick={removeHyperlinks}>Start</button>
    </div>
  );
}

export default App;
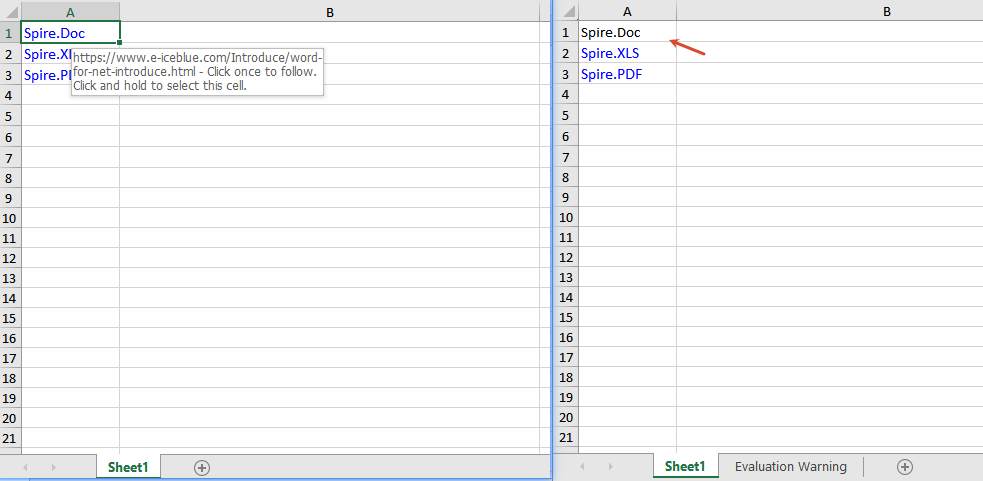
Frequently Asked Questions
The target address is not updated after modifying the hyperlink
Reason: The wrong hyperlink index was modified, or there is no hyperlink on the target cell.
Solution: Make sure a hyperlink already exists in the worksheet, access it at the correct index such as sheet.HyperLinks.get(0), and then set its Address property.
Get a Free License
If you want to remove the evaluation message from the result documents or get rid of feature limitations, please contact sales to obtain a temporary license valid for 30 days.
When organizing data such as sales records or statistical reports, converting a plain data range into an Excel table (Table / ListObject) gives the data a dedicated header row, automatic filter drop-downs, banded styling, and a "total row", which makes later browsing and summarizing more convenient. After the table is created, its appearance can also be adjusted at any time through built-in styles and various display options. Spire.XLS for JavaScript completes all of these operations directly in the browser based on WebAssembly, and manages input/output files through a virtual file system (VFS), with no backend service required.
This article covers two core features:
For installation and project configuration, refer to Integrating Spire.XLS for JavaScript in a React Project. The examples below assume Spire.XLS is installed and the WebAssembly module is initialized.
Create a Table in Excel
Converting a data range into a table is a quick way to obtain a structured range that has built-in filter buttons and banded styling. In this example, a sales detail list (Product, Region, Month, Quantity, Sales Amount) is first written into the worksheet, then the A1:E13 range is converted into a table named "Table1" with ListObjects.Create(), and finally the built-in light style TableStyleLight9 is applied. The main steps are as follows:
- Create a
Workbookobject and get the first worksheet. - Write the headers and the sample data into the cells.
- Call the
Worksheet.ListObjects.Create()method to convert the range that contains the headers into a table. - Apply a built-in style to the table through the
IListObject.BuiltInTableStyleproperty. - Save the workbook with the
Workbook.SaveToFile()method.
Here is a complete code example showing how to create an Excel table for a worksheet in React:
function App() {
  const createTable = async () => {
    // Get the Spire.XLS WASM module
    const xlsModule = window.wasmModule?.spirexls;

    // Check whether the module is ready
    if (!xlsModule) {
      alert('Spire.Xls is not ready yet');
      return;
    }

    // Load the font into the VFS for text measurement and column auto-fit
    await window.spire.FetchFileToVFS('ARIAL.TTF', '/Library/Fonts/', `${process.env.PUBLIC_URL}/font/`);

    // Create a new workbook and get the first worksheet
    const workbook = new xlsModule.Workbook();
    const sheet = workbook.Worksheets.get(0);

    // Write the headers
    sheet.Range.get('A1').Value = 'Product';
    sheet.Range.get('B1').Value = 'Region';
    sheet.Range.get('C1').Value = 'Month';
    sheet.Range.get('D1').Value = 'Quantity';
    sheet.Range.get('E1').Value = 'Sales Amount';

    // Write the sample data
    sheet.Range.get('A2').Value = 'Laptop';
    sheet.Range.get('B2').Value = 'North';
    sheet.Range.get('C2').Value = 'Jan';
    sheet.Range.get('D2').NumberValue = 120;
    sheet.Range.get('E2').NumberValue = 239760;

    sheet.Range.get('A3').Value = 'Monitor';
    sheet.Range.get('B3').Value = 'East';
    sheet.Range.get('C3').Value = 'Jan';
    sheet.Range.get('D3').NumberValue = 80;
    sheet.Range.get('E3').NumberValue = 103920;

    sheet.Range.get('A4').Value = 'Keyboard';
    sheet.Range.get('B4').Value = 'South';
    sheet.Range.get('C4').Value = 'Jan';
    sheet.Range.get('D4').NumberValue = 200;
    sheet.Range.get('E4').NumberValue = 59800;

    sheet.Range.get('A5').Value = 'Laptop';
    sheet.Range.get('B5').Value = 'East';
    sheet.Range.get('C5').Value = 'Feb';
    sheet.Range.get('D5').NumberValue = 150;
    sheet.Range.get('E5').NumberValue = 299700;

    sheet.Range.get('A6').Value = 'Mouse';
    sheet.Range.get('B6').Value = 'North';
    sheet.Range.get('C6').Value = 'Feb';
    sheet.Range.get('D6').NumberValue = 300;
    sheet.Range.get('E6').NumberValue = 26700;

    sheet.Range.get('A7').Value = 'Printer';
    sheet.Range.get('B7').Value = 'South';
    sheet.Range.get('C7').Value = 'Feb';
    sheet.Range.get('D7').NumberValue = 60;
    sheet.Range.get('E7').NumberValue = 65940;

    sheet.Range.get('A8').Value = 'Monitor';
    sheet.Range.get('B8').Value = 'West';
    sheet.Range.get('C8').Value = 'Feb';
    sheet.Range.get('D8').NumberValue = 90;
    sheet.Range.get('E8').NumberValue = 116910;

    sheet.Range.get('A9').Value = 'Keyboard';
    sheet.Range.get('B9').Value = 'North';
    sheet.Range.get('C9').Value = 'Mar';
    sheet.Range.get('D9').NumberValue = 180;
    sheet.Range.get('E9').NumberValue = 53820;

    sheet.Range.get('A10').Value = 'Router';
    sheet.Range.get('B10').Value = 'East';
    sheet.Range.get('C10').Value = 'Mar';
    sheet.Range.get('D10').NumberValue = 70;
    sheet.Range.get('E10').NumberValue = 27930;

    sheet.Range.get('A11').Value = 'Laptop';
    sheet.Range.get('B11').Value = 'West';
    sheet.Range.get('C11').Value = 'Mar';
    sheet.Range.get('D11').NumberValue = 140;
    sheet.Range.get('E11').NumberValue = 279860;

    sheet.Range.get('A12').Value = 'Printer';
    sheet.Range.get('B12').Value = 'North';
    sheet.Range.get('C12').Value = 'Apr';
    sheet.Range.get('D12').NumberValue = 110;
    sheet.Range.get('E12').NumberValue = 120890;

    sheet.Range.get('A13').Value = 'Mouse';
    sheet.Range.get('B13').Value = 'South';
    sheet.Range.get('C13').Value = 'Apr';
    sheet.Range.get('D13').NumberValue = 260;
    sheet.Range.get('E13').NumberValue = 23140;

    // Convert the A1:E13 data range into an Excel table (ListObject)
    const table = sheet.ListObjects.Create('Table1', sheet.Range.get({ row: 1, column: 1, lastRow: 13, lastColumn: 5 }));

    // Apply a built-in light table style
    table.BuiltInTableStyle = xlsModule.TableBuiltInStyles.TableStyleLight9;

    // Auto-fit the columns so that the contents are fully shown
    sheet.AllocatedRange.AutoFitColumns();

    // Save the workbook
    const outputFileName = 'CreateTable.xlsx';
    workbook.SaveToFile({ fileName: outputFileName, version: xlsModule.ExcelVersion.Version2010 });

    // Release resources
    workbook.Dispose();

    // Read the saved file from the VFS and trigger the download
    const fileArray = window.dotnetRuntime.Module.FS.readFile(outputFileName);
    const blob = new Blob([fileArray], { type: 'application/vnd.openxmlformats-officedocument.spreadsheetml.sheet' });
    const url = URL.createObjectURL(blob);
    const a = document.createElement('a');
    a.href = url;
    a.download = outputFileName;
    a.click();
    URL.revokeObjectURL(url);
  };

  return (
    <div style={{ textAlign: 'center', height: '300px' }}>
      <h1>Create Table</h1>
      <button onClick={createTable}>Start</button>
    </div>
  );
}

export default App;
Effect of creating the table:
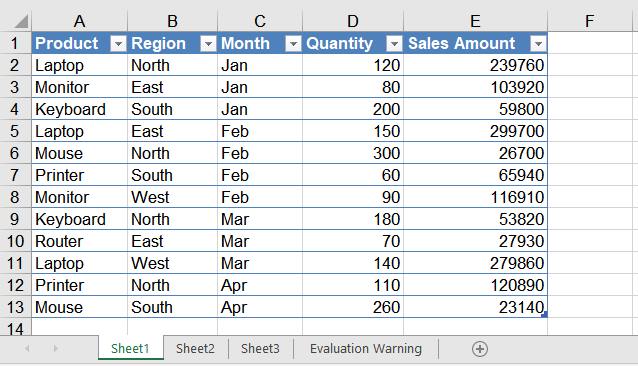
Set the Table Style, Total Row and Stripes
A created table can be restyled at any time: for example, replace the light style with the built-in Medium dark style, show a total row at the bottom of the table and let the "Quantity" and "Sales Amount" columns be summed automatically, and enable both row and column stripes to make the data easier to read. The main steps are as follows:
- Create a
Workbookobject and load a workbook that already contains a table with theWorkbook.LoadFromFile()method. - Get the worksheet with the
Workbook.Worksheets.get()method, and then get the table object withListObjects.get(). - Assign a new built-in style through the
BuiltInTableStyleproperty. - Set
DisplayTotalRowtotrueto show the total row, and useColumns[].TotalsRowLabelandColumns[].TotalsCalculationto set the label and the calculation of the total row columns. - Enable row and column stripes with
ShowTableStyleRowStripesandShowTableStyleColumnStripes. - Save the workbook with the
Workbook.SaveToFile()method.
Here is a complete code example showing how to load a created table in React and set its style and total row:
function App() {
  const formatTable = async () => {
    // Get the Spire.XLS WASM module
    const xlsModule = window.wasmModule?.spirexls;

    // Check whether the module is ready
    if (!xlsModule) {
      alert('Spire.Xls is not ready yet');
      return;
    }

    // Load the font into the VFS for text measurement and column auto-fit
    await window.spire.FetchFileToVFS('ARIAL.TTF', '/Library/Fonts/', `${process.env.PUBLIC_URL}/font/`);

    // Load the Excel file created in the previous section, which already contains a table
    const inputFileName = 'CreateTable.xlsx';
    await window.spire.FetchFileToVFS(inputFileName, '', `${process.env.PUBLIC_URL}data/`);

    // Create a Workbook object and load the workbook
    const workbook = new xlsModule.Workbook();
    workbook.LoadFromFile({ fileName: inputFileName });

    // Get the first worksheet and the table in it
    const sheet = workbook.Worksheets.get(0);
    const table = sheet.ListObjects.get(0);

    // Apply a built-in Medium table style
    table.BuiltInTableStyle = xlsModule.TableBuiltInStyles.TableStyleMedium9;

    // Show the total row
    table.DisplayTotalRow = true;

    // Set the label of the first column of the total row to "Total"
    table.Columns.get(0).TotalsRowLabel = 'Total';

    // Do not calculate the text columns, and sum the "Quantity" and "Sales Amount" columns automatically
    table.Columns.get(1).TotalsCalculation = xlsModule.ExcelTotalsCalculation.None;
    table.Columns.get(2).TotalsCalculation = xlsModule.ExcelTotalsCalculation.None;
    table.Columns.get(3).TotalsCalculation = xlsModule.ExcelTotalsCalculation.Sum;
    table.Columns.get(4).TotalsCalculation = xlsModule.ExcelTotalsCalculation.Sum;

    // Show the row stripes and column stripes
    table.ShowTableStyleRowStripes = true;
    table.ShowTableStyleColumnStripes = true;

    // Auto-fit the columns so that the contents are fully shown
    sheet.AllocatedRange.AutoFitColumns();

    // Save the workbook
    const outputFileName = 'FormatTable_out.xlsx';
    workbook.SaveToFile({ fileName: outputFileName, version: xlsModule.ExcelVersion.Version2010 });

    // Release resources
    workbook.Dispose();

    // Read the saved file from the VFS and trigger the download
    const fileArray = window.dotnetRuntime.Module.FS.readFile(outputFileName);
    const blob = new Blob([fileArray], { type: 'application/vnd.openxmlformats-officedocument.spreadsheetml.sheet' });
    const url = URL.createObjectURL(blob);
    const a = document.createElement('a');
    a.href = url;
    a.download = outputFileName;
    a.click();
    URL.revokeObjectURL(url);
  };

  return (
    <div style={{ textAlign: 'center', height: '300px' }}>
      <h1>Format Table</h1>
      <button onClick={formatTable}>Start</button>
    </div>
  );
}

export default App;
Effect of setting the table style:
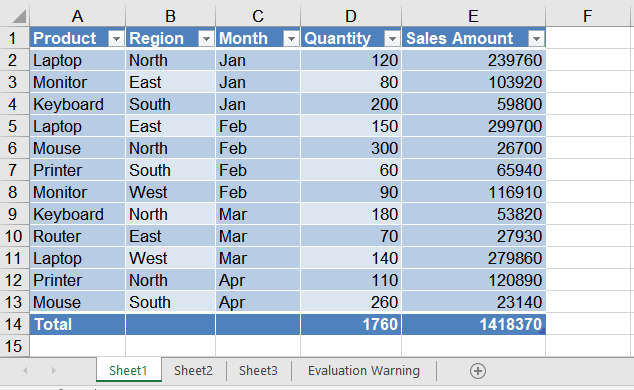
Frequently Asked Questions
How do I change the built-in style of a table? What styles are available?
Reason: The BuiltInTableStyle property was not reassigned after the table was created, or the wrong enum type was assigned to the property.
Solution: Reassign the IListObject.BuiltInTableStyle property. Its values come from the TableBuiltInStyles enum, which provides multiple built-in styles including Light (TableStyleLight1 ~ TableStyleLight21), Medium (TableStyleMedium1 ~ TableStyleMedium28) and Dark (TableStyleDark1 ~ TableStyleDark11). For example, this article first applies TableStyleLight9 and then switches to TableStyleMedium9.
How do I name a table or rename it? What happens if two tables have the same name?
Reason: The first parameter of ListObjects.Create() is the table name, e.g. Create("Table1", ...). Within the same worksheet, table names must be unique; otherwise creating another table with the same name raises an error.
Solution: Pass a unique name when creating the table (e.g. "SalesTable1"). To rename an existing table, set its DisplayName property directly, for example table.DisplayName = "SalesTable2025";.
Get a Free License
Spire.XLS for JavaScript offers a 30-day full-featured free trial license with no functional limitations. Apply here to evaluate before purchasing.
Accept or Reject Tracked Changes in Excel with JavaScript in React
2026-09-09 08:12:04 Written by liu taliaWhen multiple users collaborate on an Excel document with tracking changes (Track Changes) enabled, every insertion, modification and deletion made to cells is recorded. When reviewing these changes, you often need to accept all tracked changes (to formally merge the changes of others into the document) or reject all tracked changes (to revert all changes and restore the state before the edits). Handling these changes one by one in Excel is tedious and error-prone, while processing them in bulk through code in a web application is far more efficient. Spire.XLS for JavaScript completes this directly in the browser based on WebAssembly, and manages input/output files through a virtual file system (VFS), with no backend service required.
Spire.XLS for JavaScript provides revision-handling capabilities through the workbook object: after loading a workbook that contains revision records, call the AcceptAllTrackedChanges() method to accept all tracked changes in the document, or call the RejectAllTrackedChanges() method to reject all tracked changes in the document.
This article covers two core features:
For installation and project configuration, refer to Integrating Spire.XLS for JavaScript in a React Project. The examples below assume Spire.XLS is installed and the WebAssembly module is initialized.
Accept All Tracked Changes in Excel
When a workbook containing revision records has been edited by multiple users and passes review, all the changes need to be formally merged into the document, that is, the tracked changes are "accepted". After the changes are accepted, they become the official content of the document and the revision records are cleared. The main steps are as follows:
- Create a
Workbookobject. - Load the workbook containing revision records with the
Workbook.LoadFromFile()method. - Call the
Workbook.AcceptAllTrackedChanges()method to accept all tracked changes in the document. - Save the workbook with the
Workbook.SaveToFile()method.
Here is a complete code example showing how to accept all tracked changes in an Excel workbook in React:
function App() {
  const acceptTrackedChanges = async () => {
    // Get the Spire.XLS WASM module
    const xlsModule = window.wasmModule?.spirexls;

    // Check whether the module is ready
    if (!xlsModule) {
      alert('Spire.Xls is not ready yet');
      return;
    }

    // Load the font and the Excel file into the VFS
    await window.spire.FetchFileToVFS('ARIAL.TTF', '/Library/Fonts/', `${process.env.PUBLIC_URL}/font/`);
    const inputFileName = 'TrackChanges.xlsx';
    await window.spire.FetchFileToVFS(inputFileName, '', `${process.env.PUBLIC_URL}data/`);

    // Create a Workbook object and load the workbook containing tracked changes
    const workbook = new xlsModule.Workbook();
    workbook.LoadFromFile({ fileName: inputFileName });

    // Accept all tracked changes in the document
    workbook.AcceptAllTrackedChanges();

    // Save the document
    const outputFileName = 'AcceptTrackedChanges_output.xlsx';
    workbook.SaveToFile({ fileName: outputFileName, version: xlsModule.ExcelVersion.Version2010 });

    // Release resources
    workbook.Dispose();

    // Read the converted file from the VFS and trigger a download
    const fileArray = window.dotnetRuntime.Module.FS.readFile(outputFileName);
    const blob = new Blob([fileArray], { type: 'application/vnd.openxmlformats-officedocument.spreadsheetml.sheet' });
    const url = URL.createObjectURL(blob);
    const a = document.createElement('a');
    a.href = url;
    a.download = outputFileName;
    a.click();
    URL.revokeObjectURL(url);
  };

  return (
    <div style={{ textAlign: 'center', height: '300px' }}>
      <h1>Accept All Tracked Changes</h1>
      <button onClick={acceptTrackedChanges}>
        Start
      </button>
    </div>
  );
}

export default App;
Effect of accepting all tracked changes
Reject All Tracked Changes in Excel
When the tracked changes are disputed or no longer needed, the reviewer can reject all of them at once so that the document returns to the state before the edits. The main steps are as follows:
- Create a
Workbookobject. - Load the workbook containing revision records with the
Workbook.LoadFromFile()method. - Call the
Workbook.RejectAllTrackedChanges()method to reject all tracked changes in the document. - Save the workbook with the
Workbook.SaveToFile()method.
Here is a complete code example showing how to reject all tracked changes in an Excel workbook in React:
function App() {
  const rejectTrackedChanges = async () => {
    // Get the Spire.XLS WASM module
    const xlsModule = window.wasmModule?.spirexls;

    // Check whether the module is ready
    if (!xlsModule) {
      alert('Spire.Xls is not ready yet');
      return;
    }

    // Load the font and the Excel file into the VFS
    await window.spire.FetchFileToVFS('ARIAL.TTF', '/Library/Fonts/', `${process.env.PUBLIC_URL}/font/`);
    const inputFileName = 'TrackChanges.xlsx';
    await window.spire.FetchFileToVFS(inputFileName, '', `${process.env.PUBLIC_URL}data/`);

    // Create a Workbook object and load the workbook containing tracked changes
    const workbook = new xlsModule.Workbook();
    workbook.LoadFromFile({ fileName: inputFileName });

    // Reject all tracked changes in the document
    workbook.RejectAllTrackedChanges();

    // Save the document
    const outputFileName = 'RejectTrackedChanges_output.xlsx';
    workbook.SaveToFile({ fileName: outputFileName, version: xlsModule.ExcelVersion.Version2010 });

    // Release resources
    workbook.Dispose();

    // Read the converted file from the VFS and trigger a download
    const fileArray = window.dotnetRuntime.Module.FS.readFile(outputFileName);
    const blob = new Blob([fileArray], { type: 'application/vnd.openxmlformats-officedocument.spreadsheetml.sheet' });
    const url = URL.createObjectURL(blob);
    const a = document.createElement('a');
    a.href = url;
    a.download = outputFileName;
    a.click();
    URL.revokeObjectURL(url);
  };

  return (
    <div style={{ textAlign: 'center', height: '300px' }}>
      <h1>Reject All Tracked Changes</h1>
      <button onClick={rejectTrackedChanges}>
        Start
      </button>
    </div>
  );
}

export default App;
Effect of rejecting all tracked changes
FAQ
The content is not restored to its pre-edit state after rejecting tracked changes
Cause: RejectAllTrackedChanges() rejects only the cell changes that were recorded by the Track Changes feature. If some changes were made before tracking was enabled, or were written by other means and never recorded, they are not revisions that can be rejected, so they keep their current values and the document will not fully return to the original baseline.
Can I accept or reject only part of the tracked changes instead of all of them
Cause: AcceptAllTrackedChanges() and RejectAllTrackedChanges() process all the revisions of a whole workbook at once. They do not provide APIs for filtering individual revisions by user, time or cell range.
Obtain a Free License
Spire.XLS for JavaScript offers a 30-day full-featured free trial license with no functional limitations. Apply here to evaluate before purchasing.
