Set the Theme of an Excel Workbook in React with JavaScript
A finished report is often reused for a different brand or a different department, and the colours have to follow. The awkward part is that a workbook holds two kinds of colour. One is a hard-coded RGB value that belongs to the single cell it sits in. The other points at a theme slot: the title bar, the header row, the banded rows and the borders all look different, yet all of them read from the same set of slots. The first kind has to be changed cell by cell, and one missed cell gives the old palette away. The second kind repaints the entire sheet from a single slot. Spire.XLS for JavaScript does this in the browser on top of WebAssembly, managing input and output files through a virtual file system (VFS), with no backend service required.
This article covers three key features:
For installation and project setup, see Integrating Spire.XLS for JavaScript in a React Project. The examples below assume Spire.XLS is installed and the WebAssembly module has been initialised.
Replace an accent colour in the theme
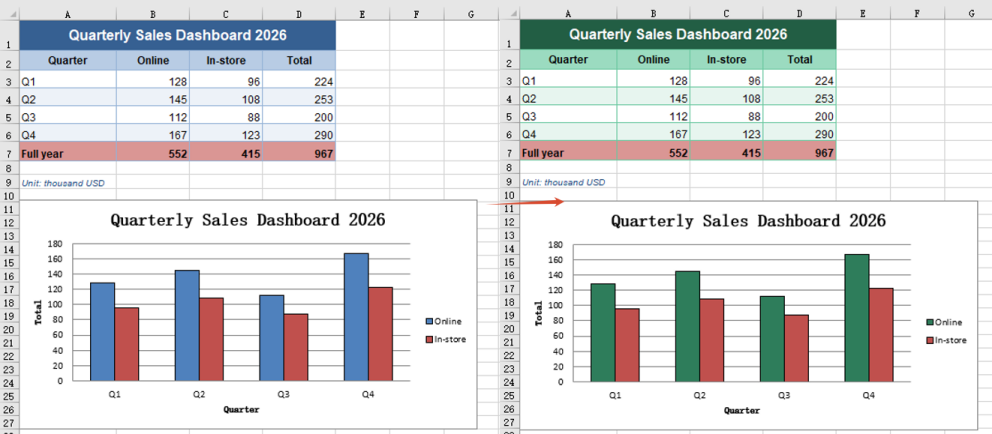
Most reports lean on a single colour: the header row is filled with it, the title bar takes a darker shade, the banded rows a lighter one, and the borders a paler one still. Those shades were not mixed by hand one at a time — they are the same slot read at different tint levels. Reskinning therefore needs no colour picking at all: replace that one slot with the new brand colour and every shade is recomputed, so the whole sheet, chart included, lands on the new palette. The steps are:
- Load the font and the test data file into the VFS.
- Load the workbook with
workbook.LoadFromFile. - Replace the
xlsModule.ThemeColorType.Accent1slot withworkbook.SetThemeColor, giving the new colour throughxlsModule.Color.FromArgb. - Save the workbook with
workbook.SaveToFile; the title bar, header row, banded rows and borders change together.
The complete code example below shows how to replace an accent colour in the theme in React:
function App() {
  const setThemeColor = async () => {
    // Get the Spire.XLS WASM module
    const xlsModule = window.wasmModule?.spirexls;

    // Check that the module is ready
    if (!xlsModule) {
      alert('Spire.Xls is not ready yet');
      return;
    }

    // Load the font and the test data into the VFS
    await window.spire.FetchFileToVFS('ARIAL.TTF', '/Library/Fonts/', `${process.env.PUBLIC_URL}/font/`);
    const inputFileName = 'ThemeSource.xlsx';
    await window.spire.FetchFileToVFS(inputFileName, '', `${process.env.PUBLIC_URL}data/`);

    // Load the workbook
    const workbook = new xlsModule.Workbook();
    workbook.LoadFromFile({ fileName: inputFileName });

    // Replace accent 1 of the theme: the title bar, the header row, the banded rows and the
    // borders all follow it
    workbook.SetThemeColor(
      xlsModule.ThemeColorType.Accent1,
      xlsModule.Color.FromArgb(255, 46, 125, 91),
    );

    // Save the workbook
    const outputFileName = "SetThemeColor.xlsx";
    workbook.SaveToFile({ fileName: outputFileName });

    // Dispose of the workbook object to release resources
    workbook.Dispose();

    // Read the result file from the VFS and trigger the download
    const fileArray = window.dotnetRuntime.Module.FS.readFile(outputFileName);
    const blob = new Blob([fileArray], { type: 'application/vnd.openxmlformats-officedocument.spreadsheetml.sheet' });
    const url = URL.createObjectURL(blob);
    const a = document.createElement('a');
    a.href = url;
    a.download = outputFileName;
    a.click();
    URL.revokeObjectURL(url);
  };

  return (
    <div style={{ textAlign: 'center', height: '300px' }}>
      <h1>Set Workbook Theme</h1>
      <button id="set-theme-color" onClick={setThemeColor}>Replace a Theme Colour</button>
    </div>
  );
}

export default App;
After running, replacing an accent colour in the theme:
Apply a custom colour scheme
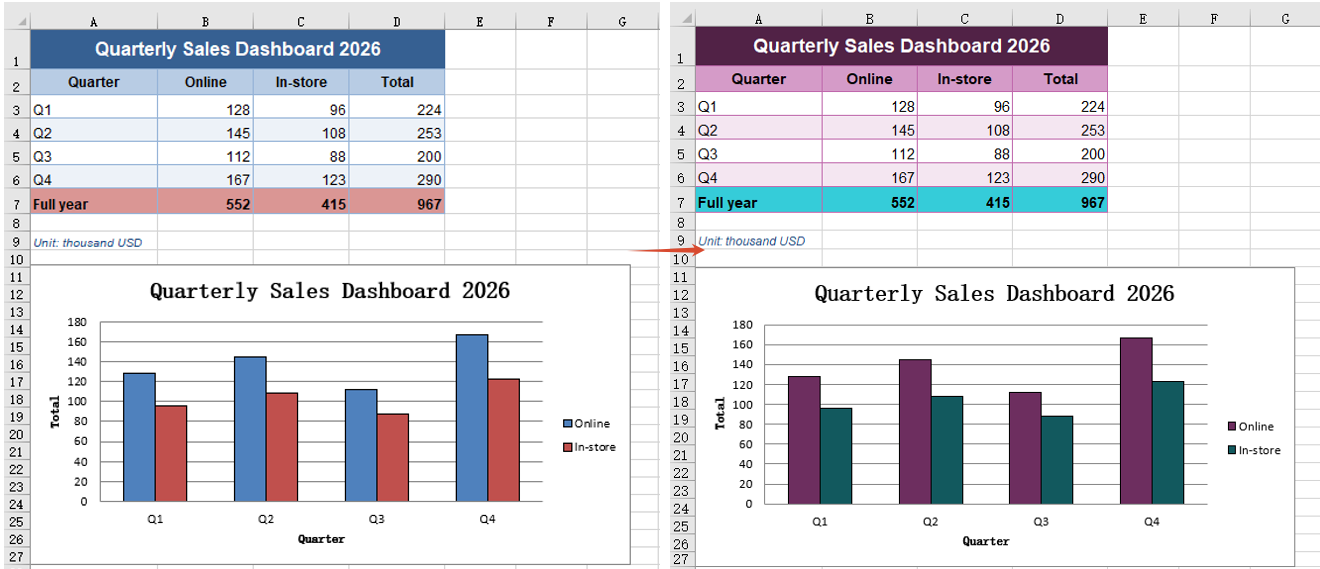
Replacing one accent colour unifies the body of the table, but the other series in the chart, the total row and any warning colour stay on the old palette — they read from other slots in the theme. To move a document onto a different scheme outright, change all six accent slots together, so every element that references the theme lands on the new colours at once instead of one changing and a string of others lagging behind. Reading the current values first leaves a baseline to check the result against. The steps are:
- Load the font and the test data file into the VFS.
- Load the workbook with
workbook.LoadFromFile, then read theR,GandBof the current accent 1 withworkbook.GetThemeColorto keep as a baseline. - Put the six slot-and-colour pairs into an array, the colours again built with
xlsModule.Color.FromArgb. - Walk the array and call
workbook.SetThemeColoron each entry, so all six accent colours change in one pass. - Save the workbook with
workbook.SaveToFile.
The complete code example below shows how to apply a custom colour scheme in React:
function App() {
  const applyThemeScheme = async () => {
    // Get the Spire.XLS WASM module
    const xlsModule = window.wasmModule?.spirexls;

    // Check that the module is ready
    if (!xlsModule) {
      alert('Spire.Xls is not ready yet');
      return;
    }

    // Load the font and the test data into the VFS
    await window.spire.FetchFileToVFS('ARIAL.TTF', '/Library/Fonts/', `${process.env.PUBLIC_URL}/font/`);
    const inputFileName = 'ThemeSource.xlsx';
    await window.spire.FetchFileToVFS(inputFileName, '', `${process.env.PUBLIC_URL}data/`);

    // Load the workbook
    const workbook = new xlsModule.Workbook();
    workbook.LoadFromFile({ fileName: inputFileName });

    // Read the current accent colour back first, so it can be compared with the new one
    const before = workbook.GetThemeColor(xlsModule.ThemeColorType.Accent1);
    console.log(`Accent 1 before the change: R=${before.R} G=${before.G} B=${before.B}`);

    // All six accent colours change in one go, so the whole scheme moves together
    const scheme = [
      [xlsModule.ThemeColorType.Accent1, xlsModule.Color.FromArgb(255, 109, 46, 95)],
      [xlsModule.ThemeColorType.Accent2, xlsModule.Color.FromArgb(255, 18, 89, 94)],
      [xlsModule.ThemeColorType.Accent3, xlsModule.Color.FromArgb(255, 138, 106, 22)],
      [xlsModule.ThemeColorType.Accent4, xlsModule.Color.FromArgb(255, 47, 93, 58)],
      [xlsModule.ThemeColorType.Accent5, xlsModule.Color.FromArgb(255, 67, 48, 122)],
      [xlsModule.ThemeColorType.Accent6, xlsModule.Color.FromArgb(255, 138, 59, 46)],
    ];
    for (const [themeColorType, color] of scheme) {
      workbook.SetThemeColor(themeColorType, color);
    }

    // Save the workbook
    const outputFileName = "ApplyThemeScheme.xlsx";
    workbook.SaveToFile({ fileName: outputFileName });

    // Dispose of the workbook object to release resources
    workbook.Dispose();

    // Read the result file from the VFS and trigger the download
    const fileArray = window.dotnetRuntime.Module.FS.readFile(outputFileName);
    const blob = new Blob([fileArray], { type: 'application/vnd.openxmlformats-officedocument.spreadsheetml.sheet' });
    const url = URL.createObjectURL(blob);
    const a = document.createElement('a');
    a.href = url;
    a.download = outputFileName;
    a.click();
    URL.revokeObjectURL(url);
  };

  return (
    <div style={{ textAlign: 'center', height: '300px' }}>
      <h1>Set Workbook Theme</h1>
      <button id="apply-theme-scheme" onClick={applyThemeScheme}>Apply a Custom Colour Scheme</button>
    </div>
  );
}

export default App;
After running, applying a custom colour scheme:
Reuse another workbook's theme
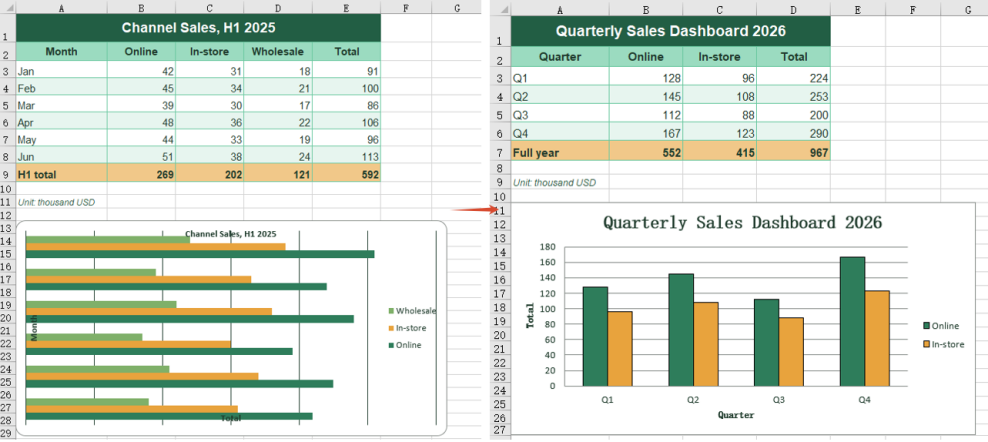
Once a colour scheme is signed off it usually already lives in a workbook — the designer's sample, last quarter's report, or the company template. Copying the hex values slot by slot is tedious and easy to get a digit wrong. The theme is itself part of the workbook, so the whole theme can be taken across, carrying both dark and light background pairs and the hyperlink colours with it, and every theme-referenced colour in the target workbook is repainted. The workbook the theme comes from need not match the target's layout at all — how many rows and columns it holds, which data sits in them and which kind of chart it draws make no difference. What crosses over is the theme; the target's own data and chart are left untouched. The steps are:
- Load the font and both workbook files into the VFS.
- Load the target workbook with
workbook.LoadFromFile, then the theme provider withthemeWorkbook.LoadFromFile. - Copy the provider's theme across in one piece with
workbook.CopyTheme(themeWorkbook). - Save the target workbook with
workbook.SaveToFile, then callDisposeon bothworkbookobjects.
The complete code example below shows how to reuse another workbook's theme in React:
function App() {
const copyWorkbookTheme = async () => {
// Get the Spire.XLS WASM module
const xlsModule = window.wasmModule?.spirexls;
// Check that the module is ready
if (!xlsModule) {
alert('Spire.Xls is not ready yet');
return;
}
// Load the font and both workbooks into the VFS
await window.spire.FetchFileToVFS('ARIAL.TTF', '/Library/Fonts/', `${process.env.PUBLIC_URL}/font/`);
const inputFileName = 'ThemeSource.xlsx';
const themeFileName = 'ThemeAlt.xlsx';
await window.spire.FetchFileToVFS(inputFileName, '', `${process.env.PUBLIC_URL}data/`);
await window.spire.FetchFileToVFS(themeFileName, '', `${process.env.PUBLIC_URL}data/`);
// Load the workbook that is to be reskinned
const workbook = new xlsModule.Workbook();
workbook.LoadFromFile({ fileName: inputFileName });
// Load the workbook the theme comes from
const themeWorkbook = new xlsModule.Workbook();
themeWorkbook.LoadFromFile({ fileName: themeFileName });
// Copy the theme of the source workbook over in one piece
workbook.CopyTheme(themeWorkbook);
// Save the workbook
const outputFileName = "CopyWorkbookTheme.xlsx";
workbook.SaveToFile({ fileName: outputFileName });
// Dispose of both workbook objects to release resources
workbook.Dispose();
themeWorkbook.Dispose();
// Read the result file from the VFS and trigger the download
const fileArray = window.dotnetRuntime.Module.FS.readFile(outputFileName);
const blob = new Blob([fileArray], { type: 'application/vnd.openxmlformats-officedocument.spreadsheetml.sheet' });
const url = URL.createObjectURL(blob);
const a = document.createElement('a');
a.href = url;
a.download = outputFileName;
a.click();
URL.revokeObjectURL(url);
};
return (
<div style={{ textAlign: 'center', height: '300px' }}>
<h1>Set Workbook Theme</h1>
<button id="copy-workbook-theme" onClick={copyWorkbookTheme}>Reuse Another Workbook's Theme</button>
</div>
);
}
export default App;
After running, reusing another workbook's theme:
FAQ
Which colours change with the theme, and which do not
Cause: Colours fall into two kinds. A colour taken from Theme Colors in Excel changes together with the theme; a colour taken from Standard Colors is a fixed value and stays as it is.
Solution: To have a colour change with the theme, select the cell in Excel and pick it from Theme Colors. Colours written in code are all fixed values and do not change with the theme:
const cell = sheet.Range.get('A1');

// A fixed colour: it does not change with the theme
cell.Style.Interior.Color = xlsModule.Color.FromArgb(255, 192, 0, 0);
Can the chart alone be restyled, leaving the table untouched?
Cause: The theme belongs to the whole workbook and makes no distinction between the table and the chart. When the theme changes, every object that takes its colour from the theme changes with it, and the chart is one of them. A chart series holds no colour of its own — it takes the colour from the theme at draw time — so the chart always follows, and one side cannot change on its own.
Solution: To restyle only the chart, leave the theme alone and set the colour on the series directly. That writes a fixed colour into the chart, which the theme does not affect:
const chart = sheet.Charts.get(0);
const serie = chart.Series.get(0);

serie.Format.Fill.FillType = xlsModule.ShapeFillType.SolidColor;
serie.Format.Fill.ForeColor = xlsModule.Color.FromArgb(255, 46, 125, 91);
Get a Free License
Spire.XLS for JavaScript offers a 30-day full-featured free trial license with no functional limitations. Apply here to evaluate before purchasing.
Set Excel Workbook Summary and Custom Properties in React
A workbook exported by a reporting system usually carries nothing but the system name as its author, with the title, subject and keywords left blank; teams meanwhile need to attach fields the export does not produce — an export batch, an owner, an approval state — for archiving and searching. None of this takes up a cell: it all lives in the workbook's document properties, which Excel shows under "File > Info > Properties". Spire.XLS for JavaScript writes them in the browser on top of WebAssembly, using a virtual file system (VFS) for input and output files, so no back-end service is needed.
This article covers three feature points:
- Set the summary properties of a workbook
- Add custom properties
- Update the value of a custom property
For installation and project setup, see Integrating Spire.XLS for JavaScript in a React Project. The examples below assume Spire.XLS is installed and the WebAssembly module has been initialised.
Set the summary properties of a workbook
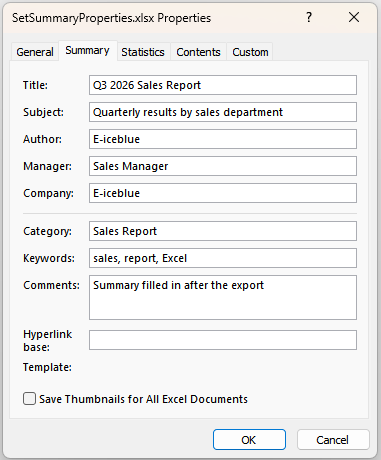
The summary properties are the layer of description Excel shows in File Explorer and under "File > Info", and the first thing a search of the archive picks up. A workbook produced by a program usually has only the system name as its author and leaves the other entries blank; filling them in gives the file a readable context as it moves between people. The text entries take a plain assignment, while the two date entries have to be given a date object. The steps are:
- Load the workbook and take the summary property collection from
workbook.DocumentProperties. - Assign the text entries —
Title,Subject,Author,Keywords,CommentsandCategory— directly. - Assign
CompanyandManagerthe same way; Excel carries these two in its extended properties. - Set
CreatedTimeandLastSaveTimetoDateobjects. - Save the workbook.
Here is a complete code example showing how to set the summary properties of a workbook in React:
function App() {
  const setSummaryProperties = async () => {
    // Get the Spire.XLS WASM module
    const xlsModule = window.wasmModule?.spirexls;

    // Check that the module is ready
    if (!xlsModule) {
      alert('Spire.Xls is not ready yet');
      return;
    }

    // Load the font into the VFS
    await window.spire.FetchFileToVFS('ARIAL.TTF', '/Library/Fonts/', `${process.env.PUBLIC_URL}/font/`);

    // Load the Excel file into the VFS
    const inputFileName = 'WorkbookProperties.xlsx';
    await window.spire.FetchFileToVFS(inputFileName, '', `${process.env.PUBLIC_URL}data/`);

    // Load the workbook
    const workbook = new xlsModule.Workbook();
    workbook.LoadFromFile(inputFileName);

    // Set the text entries of the summary properties
    const summary = workbook.DocumentProperties;
    summary.Title = 'Q3 2026 Sales Report';
    summary.Subject = 'Quarterly results by sales department';
    summary.Author = 'E-iceblue';
    summary.Keywords = 'sales, report, Excel';
    summary.Comments = 'Summary filled in after the export';
    summary.Category = 'Sales Report';

    // Set the entries carried by the extended properties
    summary.Company = 'E-iceblue';
    summary.Manager = 'Sales Manager';

    // Set the document dates; a Date object is required here
    summary.CreatedTime = new Date(2026, 8, 1);
    summary.LastSaveTime = new Date(2026, 8, 20);

    // Save the workbook
    const outputFileName = 'SetSummaryProperties.xlsx';
    workbook.SaveToFile(outputFileName);

    // Release resources
    workbook.Dispose();

    // Read the result file back out of the VFS and download it
    const fileArray = window.dotnetRuntime.Module.FS.readFile(outputFileName);
    const blob = new Blob([fileArray], { type: "application/vnd.openxmlformats-officedocument.spreadsheetml.sheet" });
    const url = URL.createObjectURL(blob);
    const a = document.createElement('a');
    a.href = url;
    a.download = outputFileName;
    a.click();
    URL.revokeObjectURL(url);
  };

  return (
    <div style={{ textAlign: 'center', height: '300px' }}>
      <h1>Set workbook summary properties</h1>
      <button onClick={setSummaryProperties}>Start</button>
    </div>
  );
}

export default App;
The effect of setting the summary properties of a workbook:
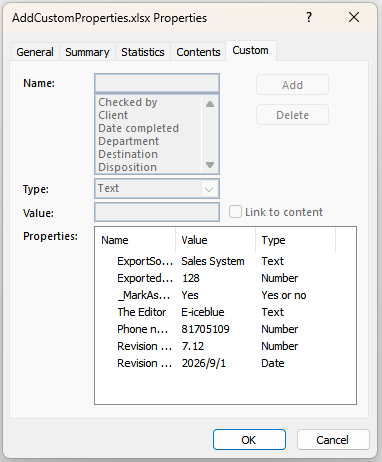
Add custom properties
Custom properties carry the business fields the summary properties have no room for, such as an export batch, a contact phone number, a revision number or an approval date. Unlike the summary properties they have no fixed set of entries: the caller decides the name and the type, and Excel accepts text, integer, decimal, boolean and date-and-time values. The steps are:
- Load the workbook and take the custom property collection from
workbook.CustomDocumentProperties. - Call
Addto append a property; the name and the value can be written as a named object such as{ strName, boolValue }, or passed directly as two arguments. - Pick the member that matches the type of the value:
intValuefor an integer,dblValuefor a decimal. - Pass a
Dateobject asdtValuefor a date-and-time value. - Save the workbook.
Here is a complete code example showing how to add custom properties to a workbook in React:
function App() {
  const addCustomProperties = async () => {
    // Get the Spire.XLS WASM module
    const xlsModule = window.wasmModule?.spirexls;

    // Check that the module is ready
    if (!xlsModule) {
      alert('Spire.Xls is not ready yet');
      return;
    }

    // Load the font into the VFS
    await window.spire.FetchFileToVFS('ARIAL.TTF', '/Library/Fonts/', `${process.env.PUBLIC_URL}/font/`);

    // Load the Excel file into the VFS
    const inputFileName = 'WorkbookProperties.xlsx';
    await window.spire.FetchFileToVFS(inputFileName, '', `${process.env.PUBLIC_URL}data/`);

    // Load the workbook
    const workbook = new xlsModule.Workbook();
    workbook.LoadFromFile(inputFileName);

    // Add a boolean property; _MarkAsFinal marks the document as final
    workbook.CustomDocumentProperties.Add({ strName: '_MarkAsFinal', boolValue: true });

    // Add a text property; a name and a value can also be passed directly
    workbook.CustomDocumentProperties.Add('The Editor', 'E-iceblue');

    // Add an integer property
    workbook.CustomDocumentProperties.Add({ strName: 'Phone number', intValue: 81705109 });

    // Add a decimal property
    workbook.CustomDocumentProperties.Add({ strName: 'Revision number', dblValue: 7.12 });

    // Add a date and time property
    workbook.CustomDocumentProperties.Add({ strName: 'Revision date', dtValue: new Date(2026, 8, 1) });

    // Save the workbook
    const outputFileName = 'AddCustomProperties.xlsx';
    workbook.SaveToFile(outputFileName);

    // Release resources
    workbook.Dispose();

    // Read the result file back out of the VFS and download it
    const fileArray = window.dotnetRuntime.Module.FS.readFile(outputFileName);
    const blob = new Blob([fileArray], { type: "application/vnd.openxmlformats-officedocument.spreadsheetml.sheet" });
    const url = URL.createObjectURL(blob);
    const a = document.createElement('a');
    a.href = url;
    a.download = outputFileName;
    a.click();
    URL.revokeObjectURL(url);
  };

  return (
    <div style={{ textAlign: 'center', height: '300px' }}>
      <h1>Add custom properties</h1>
      <button onClick={addCustomProperties}>Start</button>
    </div>
  );
}

export default App;
The effect of adding custom properties:
Update the value of a custom property
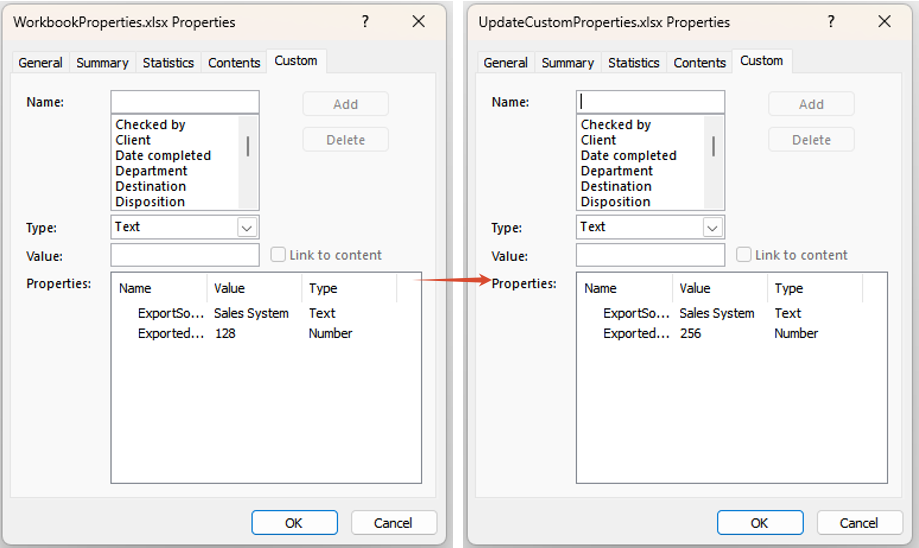
The value of a business field changes with the way it is counted: an export record count, say, has to be rewritten to a new figure once the data is topped up. Custom properties offer no member that assigns a value directly, but Add is keyed on the name — calling it again for a name that already exists does not append a duplicate entry, it replaces the value of the existing one. The steps are:
- Load the workbook and take the custom property collection from
workbook.CustomDocumentProperties. - Call
Addagain, passing the same name as the existing entry together with the new value. - Save the workbook.
Here is a complete code example showing how to update a custom property of a workbook in React:
function App() {
  const updateCustomProperties = async () => {
    // Get the Spire.XLS WASM module
    const xlsModule = window.wasmModule?.spirexls;

    // Check that the module is ready
    if (!xlsModule) {
      alert('Spire.Xls is not ready yet');
      return;
    }

    // Load the font into the VFS
    await window.spire.FetchFileToVFS('ARIAL.TTF', '/Library/Fonts/', `${process.env.PUBLIC_URL}/font/`);

    // Load the Excel file into the VFS
    const inputFileName = 'WorkbookProperties.xlsx';
    await window.spire.FetchFileToVFS(inputFileName, '', `${process.env.PUBLIC_URL}data/`);

    // Load the workbook
    const workbook = new xlsModule.Workbook();
    workbook.LoadFromFile(inputFileName);

    // Rewrite the exported record count; adding an existing name overwrites it
    workbook.CustomDocumentProperties.Add({ strName: 'ExportedRecords', intValue: 256 });

    // Save the workbook
    const outputFileName = 'UpdateCustomProperties.xlsx';
    workbook.SaveToFile(outputFileName);

    // Release resources
    workbook.Dispose();

    // Read the result file back out of the VFS and download it
    const fileArray = window.dotnetRuntime.Module.FS.readFile(outputFileName);
    const blob = new Blob([fileArray], { type: "application/vnd.openxmlformats-officedocument.spreadsheetml.sheet" });
    const url = URL.createObjectURL(blob);
    const a = document.createElement('a');
    a.href = url;
    a.download = outputFileName;
    a.click();
    URL.revokeObjectURL(url);
  };

  return (
    <div style={{ textAlign: 'center', height: '300px' }}>
      <h1>Update the value of a custom property</h1>
      <button onClick={updateCustomProperties}>Start</button>
    </div>
  );
}

export default App;
The effect of updating the value of a custom property:
FAQ
Why does assigning to CreatedTime throw "Assert failed: Value is not a Date"
Cause: CreatedTime and LastSaveTime take a JavaScript Date object and nothing else. A date string such as '2026-09-01', a timestamp number, or a hand-made object that only carries a toISOString() method all fail the type check and throw Assert failed: Value is not a Date.
Solution: build the Date with new Date(...) first, then assign it:
// 1 September 2026; months count from 0, so 8 means September
workbook.DocumentProperties.CreatedTime = new Date(2026, 8, 1);
Why does assigning to the Value of a custom property throw ArgumentNull_Generic
Cause: the Value property only reads. Assigning to it throws ArgumentNull_Generic Arg_ParamName_Name, value, and the original value does not change. Updating an existing property has to go through Add.
Solution: overwrite the original value with a same-name Add:
workbook.CustomDocumentProperties.Add({ strName: 'ExportedRecords', intValue: 256 });
Get a Free License
Spire.XLS for JavaScript offers a 30-day full-featured free trial license with no functional limitations. Apply here to evaluate before purchasing.
Create and Remove Multi-level Groups in Excel with JavaScript in React
When managing data with many rows and columns, such as project plans or financial reports, you often need to group some rows (Group / Outline) so that they can be collapsed into a layered structure, letting you view only the summary rows or the content of a certain phase. When the structure is no longer needed, you can remove the groups at any time to restore the flat layout of the rows. Spire.XLS for JavaScript completes this directly in the browser based on WebAssembly, and manages input/output files through a virtual file system (VFS), with no backend service required.
This article covers two core features:
For installation and project configuration, refer to Integrating Spire.XLS for JavaScript in a React Project. The examples below assume Spire.XLS is installed and the WebAssembly module is initialized.
Create Multi-level (Nested) Groups
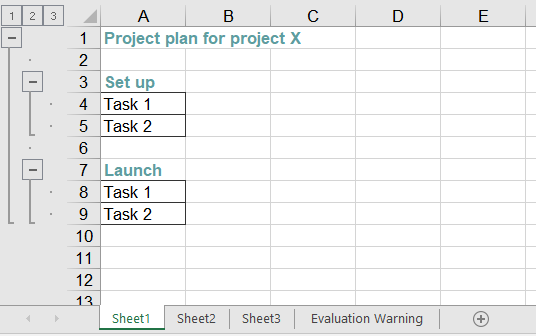
A multi-level group consists of an "outer group" plus "inner groups". For example, in a project plan, the whole execution phase (several rows) can be one level of group, while the detail rows of each sub-phase are the second level of group. When creating it, you should call GroupByRows() on the larger outer range first, and then on the smaller inner ranges, so that Excel generates the collapse buttons of different levels. The main steps are as follows:
- Create a
Workbookobject and get the first worksheet. - Add a named style and set its font (used for titles and similar cells).
- Set
Worksheet.PageSetup.IsSummaryRowBelow = falseso that the summary rows are shown above the detail rows. - Write the sample data into the cells.
- Call
GroupByRows()on the outer row range (rows 2-9) first, then callGroupByRows()on the nested inner row ranges (rows 4-5 and rows 8-9). - Save the workbook with the
Workbook.SaveToFile()method.
Here is a complete code example showing how to create two-level (nested) row groups for a worksheet in React:
function App() {
  const createNestedGroup = async () => {
    // Get the Spire.XLS WASM module
    const xlsModule = window.wasmModule?.spirexls;

    // Check whether the module is ready
    if (!xlsModule) {
      alert('Spire.Xls is not ready yet');
      return;
    }

    // Load the font into the VFS for text measurement
    await window.spire.FetchFileToVFS('ARIAL.TTF', '/Library/Fonts/', `${process.env.PUBLIC_URL}/font/`);

    // Create a new workbook and get the first worksheet
    const workbook = new xlsModule.Workbook();
    const sheet = workbook.Worksheets.get(0);

    // Add a named style for the title rows
    const style = workbook.Styles.Add("style");
    style.Font.Color = xlsModule.Color.get_CadetBlue();
    style.Font.IsBold = true;

    // Make the summary rows appear above the detail rows
    sheet.PageSetup.IsSummaryRowBelow = false;

    // Write the sample data
    sheet.Range.get("A1").Value = "Project plan for project X";
    sheet.Range.get("A1").CellStyleName = style.Name;

    sheet.Range.get("A3").Value = "Set up";
    sheet.Range.get("A3").CellStyleName = style.Name;
    sheet.Range.get("A4").Value = "Task 1";
    sheet.Range.get("A5").Value = "Task 2";
    sheet.Range.get("A4:A5").BorderAround(xlsModule.LineStyleType.Thin);
    sheet.Range.get("A4:A5").BorderInside(xlsModule.LineStyleType.Thin);

    sheet.Range.get("A7").Value = "Launch";
    sheet.Range.get("A7").CellStyleName = style.Name;
    sheet.Range.get("A8").Value = "Task 1";
    sheet.Range.get("A9").Value = "Task 2";
    sheet.Range.get("A8:A9").BorderAround(xlsModule.LineStyleType.Thin);
    sheet.Range.get("A8:A9").BorderInside(xlsModule.LineStyleType.Thin);

    // Group the outer rows first, then the nested inner rows, to form multi-level groups
    sheet.GroupByRows(2, 9, false);
    sheet.GroupByRows(4, 5, false);
    sheet.GroupByRows(8, 9, false);

    // Save the document
    const outputFileName = 'MultiLevelGroup.xlsx';
    workbook.SaveToFile({ fileName: outputFileName, version: xlsModule.ExcelVersion.Version2010 });

    // Release resources
    workbook.Dispose();

    // Read the converted file from the VFS and trigger a download
    const fileArray = window.dotnetRuntime.Module.FS.readFile(outputFileName);
    const blob = new Blob([fileArray], { type: 'application/vnd.openxmlformats-officedocument.spreadsheetml.sheet' });
    const url = URL.createObjectURL(blob);
    const a = document.createElement('a');
    a.href = url;
    a.download = outputFileName;
    a.click();
    URL.revokeObjectURL(url);
  };

  return (
    <div style={{ textAlign: 'center', height: '300px' }}>
      <h1>Create Nested Group</h1>
      <button onClick={createNestedGroup}>
        Start
      </button>
    </div>
  );
}

export default App;
Effect of creating multi-level groups
Remove (Delete) Multi-level Groups
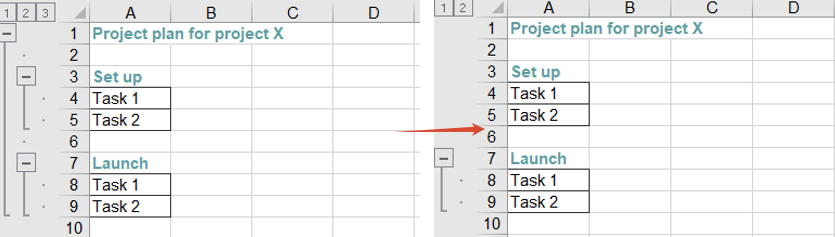
When a workbook already contains multi-level groups and you need to remove a particular outer "large group" or inner "small group", you can load the file and call the Worksheet.UngroupByRows() method on the corresponding range. Grouping only affects the collapsed display of rows; removing a group never deletes any cell content. After the outer large group is removed, the inner small groups that were nested inside it remain as independent single-level groups and can be removed one by one. The main steps are as follows:
- Create a
Workbookobject and load the workbook that already contains multi-level groups with theWorkbook.LoadFromFile()method. - Get the worksheet with the
Workbook.Worksheets.get()method. - Call
UngroupByRows()on the outer row range (rows 2-9) to remove the large group. - Call
UngroupByRows()on the inner row range (rows 4-5) to remove the small group. - Save the workbook with the
Workbook.SaveToFile()method.
Here is a complete code example showing how to load an already-grouped Excel file in React and remove a large group and a small group:
function App() {
  const ungroupRows = async () => {
    // Get the Spire.XLS WASM module
    const xlsModule = window.wasmModule?.spirexls;

    // Check whether the module is ready
    if (!xlsModule) {
      alert('Spire.Xls is not ready yet');
      return;
    }

    // Load the font into the VFS for text measurement
    await window.spire.FetchFileToVFS('ARIAL.TTF', '/Library/Fonts/', `${process.env.PUBLIC_URL}/font/`);

    // Load the Excel file that already contains multi-level groups
    const inputFileName = 'MultiLevelGroup.xlsx';
    await window.spire.FetchFileToVFS(inputFileName, '', `${process.env.PUBLIC_URL}data/`);

    // Create a Workbook object and load the workbook
    const workbook = new xlsModule.Workbook();
    workbook.LoadFromFile({ fileName: inputFileName });

    // Get the first worksheet
    const sheet = workbook.Worksheets.get(0);

    // Remove the outer large group (rows 2-9)
    sheet.UngroupByRows(2, 9);

    // Remove the inner small group (rows 4-5)
    sheet.UngroupByRows(4, 5);

    // Save the document
    const outputFileName = 'UngroupRows_output.xlsx';
    workbook.SaveToFile({ fileName: outputFileName, version: xlsModule.ExcelVersion.Version2010 });

    // Release resources
    workbook.Dispose();

    // Read the converted file from the VFS and trigger a download
    const fileArray = window.dotnetRuntime.Module.FS.readFile(outputFileName);
    const blob = new Blob([fileArray], { type: 'application/vnd.openxmlformats-officedocument.spreadsheetml.sheet' });
    const url = URL.createObjectURL(blob);
    const a = document.createElement('a');
    a.href = url;
    a.download = outputFileName;
    a.click();
    URL.revokeObjectURL(url);
  };

  return (
    <div style={{ textAlign: 'center', height: '300px' }}>
      <h1>Ungroup Rows</h1>
      <button onClick={ungroupRows}>
        Start
      </button>
    </div>
  );
}

export default App;
Effect of removing multi-level groups
FAQ
Why does calling GroupByRows several times not produce multi-level groups
Cause: A multi-level group requires the range of the inner group to be completely contained within the range of the outer group. If two grouped ranges do not contain each other, Excel treats them as two groups of the same level instead of nested multi-level groups.
Solution: Call GroupByRows() on the larger outer range first, and then on the smaller inner range, for example call GroupByRows(2, 9, false) first and then GroupByRows(4, 5, false).
How can I make a group collapsed by default (or keep it expanded)?
Cause: The third Boolean parameter of GroupByRows(startRow, endRow, isCollapsed) decides whether the detail rows of a group are collapsed by default after the group is created. true collapses them by default, while false keeps them expanded (the examples in this article use false). When the saved file is opened, it is shown in that state.
Solution: Set the third parameter to true to collapse the group by default, for example sheet.GroupByRows(4, 5, true). To collapse or expand a group at runtime, call CollapseGroup() / ExpandGroup() on the grouped range.
Obtain a Free License
Spire.XLS for JavaScript offers a 30-day full-featured free trial license with no functional limitations. Apply here to evaluate before purchasing.
Accept or Reject Tracked Changes in Excel with JavaScript in React
When multiple users collaborate on an Excel document with tracking changes (Track Changes) enabled, every insertion, modification and deletion made to cells is recorded. When reviewing these changes, you often need to accept all tracked changes (to formally merge the changes of others into the document) or reject all tracked changes (to revert all changes and restore the state before the edits). Handling these changes one by one in Excel is tedious and error-prone, while processing them in bulk through code in a web application is far more efficient. Spire.XLS for JavaScript completes this directly in the browser based on WebAssembly, and manages input/output files through a virtual file system (VFS), with no backend service required.
Spire.XLS for JavaScript provides revision-handling capabilities through the workbook object: after loading a workbook that contains revision records, call the AcceptAllTrackedChanges() method to accept all tracked changes in the document, or call the RejectAllTrackedChanges() method to reject all tracked changes in the document.
This article covers two core features:
For installation and project configuration, refer to Integrating Spire.XLS for JavaScript in a React Project. The examples below assume Spire.XLS is installed and the WebAssembly module is initialized.
Accept All Tracked Changes in Excel
When a workbook containing revision records has been edited by multiple users and passes review, all the changes need to be formally merged into the document, that is, the tracked changes are "accepted". After the changes are accepted, they become the official content of the document and the revision records are cleared. The main steps are as follows:
- Create a
Workbookobject. - Load the workbook containing revision records with the
Workbook.LoadFromFile()method. - Call the
Workbook.AcceptAllTrackedChanges()method to accept all tracked changes in the document. - Save the workbook with the
Workbook.SaveToFile()method.
Here is a complete code example showing how to accept all tracked changes in an Excel workbook in React:
function App() {
  const acceptTrackedChanges = async () => {
    // Get the Spire.XLS WASM module
    const xlsModule = window.wasmModule?.spirexls;

    // Check whether the module is ready
    if (!xlsModule) {
      alert('Spire.Xls is not ready yet');
      return;
    }

    // Load the font and the Excel file into the VFS
    await window.spire.FetchFileToVFS('ARIAL.TTF', '/Library/Fonts/', `${process.env.PUBLIC_URL}/font/`);
    const inputFileName = 'TrackChanges.xlsx';
    await window.spire.FetchFileToVFS(inputFileName, '', `${process.env.PUBLIC_URL}data/`);

    // Create a Workbook object and load the workbook containing tracked changes
    const workbook = new xlsModule.Workbook();
    workbook.LoadFromFile({ fileName: inputFileName });

    // Accept all tracked changes in the document
    workbook.AcceptAllTrackedChanges();

    // Save the document
    const outputFileName = 'AcceptTrackedChanges_output.xlsx';
    workbook.SaveToFile({ fileName: outputFileName, version: xlsModule.ExcelVersion.Version2010 });

    // Release resources
    workbook.Dispose();

    // Read the converted file from the VFS and trigger a download
    const fileArray = window.dotnetRuntime.Module.FS.readFile(outputFileName);
    const blob = new Blob([fileArray], { type: 'application/vnd.openxmlformats-officedocument.spreadsheetml.sheet' });
    const url = URL.createObjectURL(blob);
    const a = document.createElement('a');
    a.href = url;
    a.download = outputFileName;
    a.click();
    URL.revokeObjectURL(url);
  };

  return (
    <div style={{ textAlign: 'center', height: '300px' }}>
      <h1>Accept All Tracked Changes</h1>
      <button onClick={acceptTrackedChanges}>
        Start
      </button>
    </div>
  );
}

export default App;
Effect of accepting all tracked changes
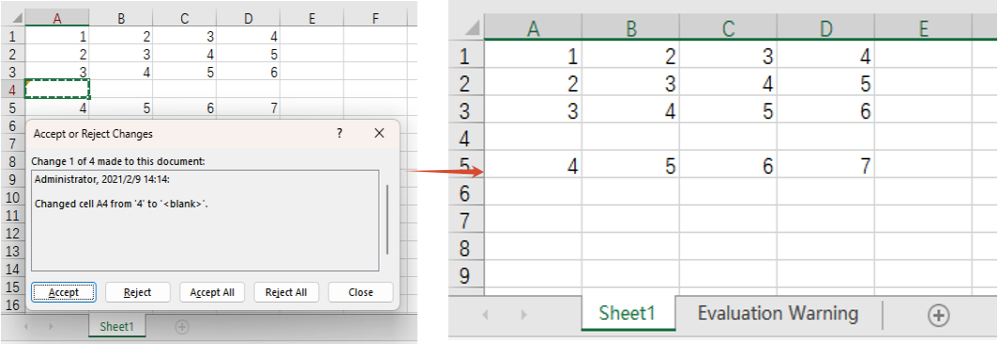
Reject All Tracked Changes in Excel
When the tracked changes are disputed or no longer needed, the reviewer can reject all of them at once so that the document returns to the state before the edits. The main steps are as follows:
- Create a
Workbookobject. - Load the workbook containing revision records with the
Workbook.LoadFromFile()method. - Call the
Workbook.RejectAllTrackedChanges()method to reject all tracked changes in the document. - Save the workbook with the
Workbook.SaveToFile()method.
Here is a complete code example showing how to reject all tracked changes in an Excel workbook in React:
function App() {
  const rejectTrackedChanges = async () => {
    // Get the Spire.XLS WASM module
    const xlsModule = window.wasmModule?.spirexls;

    // Check whether the module is ready
    if (!xlsModule) {
      alert('Spire.Xls is not ready yet');
      return;
    }

    // Load the font and the Excel file into the VFS
    await window.spire.FetchFileToVFS('ARIAL.TTF', '/Library/Fonts/', `${process.env.PUBLIC_URL}/font/`);
    const inputFileName = 'TrackChanges.xlsx';
    await window.spire.FetchFileToVFS(inputFileName, '', `${process.env.PUBLIC_URL}data/`);

    // Create a Workbook object and load the workbook containing tracked changes
    const workbook = new xlsModule.Workbook();
    workbook.LoadFromFile({ fileName: inputFileName });

    // Reject all tracked changes in the document
    workbook.RejectAllTrackedChanges();

    // Save the document
    const outputFileName = 'RejectTrackedChanges_output.xlsx';
    workbook.SaveToFile({ fileName: outputFileName, version: xlsModule.ExcelVersion.Version2010 });

    // Release resources
    workbook.Dispose();

    // Read the converted file from the VFS and trigger a download
    const fileArray = window.dotnetRuntime.Module.FS.readFile(outputFileName);
    const blob = new Blob([fileArray], { type: 'application/vnd.openxmlformats-officedocument.spreadsheetml.sheet' });
    const url = URL.createObjectURL(blob);
    const a = document.createElement('a');
    a.href = url;
    a.download = outputFileName;
    a.click();
    URL.revokeObjectURL(url);
  };

  return (
    <div style={{ textAlign: 'center', height: '300px' }}>
      <h1>Reject All Tracked Changes</h1>
      <button onClick={rejectTrackedChanges}>
        Start
      </button>
    </div>
  );
}

export default App;
Effect of rejecting all tracked changes
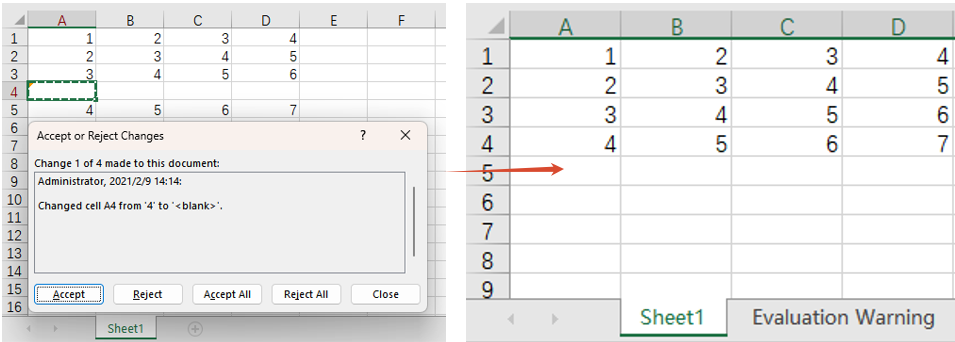
FAQ
The content is not restored to its pre-edit state after rejecting tracked changes
Cause: RejectAllTrackedChanges() rejects only the cell changes that were recorded by the Track Changes feature. If some changes were made before tracking was enabled, or were written by other means and never recorded, they are not revisions that can be rejected, so they keep their current values and the document will not fully return to the original baseline.
Can I accept or reject only part of the tracked changes instead of all of them
Cause: AcceptAllTrackedChanges() and RejectAllTrackedChanges() process all the revisions of a whole workbook at once. They do not provide APIs for filtering individual revisions by user, time or cell range.
Obtain a Free License
Spire.XLS for JavaScript offers a 30-day full-featured free trial license with no functional limitations. Apply here to evaluate before purchasing.
How to Read Excel with JavaScript in React
Reading Excel files directly in a web application is useful for many scenarios, such as displaying spreadsheet data on a webpage, importing business records, analyzing worksheet content, or extracting specific data for further processing. In React applications, developers may also need to distinguish between different Excel data types, including text, numbers, formulas, dates, and Boolean values.
Spire.XLS for JavaScript provides APIs for loading and manipulating Excel files in JavaScript applications. With it, you can access worksheets and cells, retrieve different types of cell values, and extract embedded images without requiring Microsoft Excel. This article demonstrates how to read Excel files with JavaScript in React, including reading worksheet data, retrieving different cell value types, and extracting images.
On this page:
- Install Spire.XLS for JavaScript in a React Project
- Read Excel Data with JavaScript in React
- Read Different Types of Cell Data from Excel
- Read Images from Excel Worksheets
- Conclusion
- FAQs
Install Spire.XLS for JavaScript in a React Project
Before working with Excel files, install Spire.XLS for JavaScript in your React project.
Open a terminal in the project directory and run:
npm i spire.office
After installing the package, copy the required Spire.XLS JavaScript and WebAssembly runtime files to the public directory of the React project.
For detailed instructions on setting up the library and its WebAssembly runtime, refer to: How to Integrate Spire.XLS for JavaScript in a React Project
Once the runtime is configured, Excel files can be loaded into the Spire virtual file system and processed in the browser.
Read Excel Data with JavaScript in React
A common requirement when reading Excel files is to retrieve all used data from a worksheet and display it in a web interface.
Spire.XLS provides the AllocatedRange property to obtain the range of cells that are currently in use. You can then loop through its rows and columns and retrieve each cell's value.
The main steps are as follows:
- Load and initialize the Spire.XLS WebAssembly module.
- Load the Excel file into the Spire virtual file system.
- Create a
Workbookobject and load the Excel file. - Access the desired worksheet.
- Get the worksheet's allocated range.
- Iterate through the cells and retrieve their values.
- Store the extracted values in React state and display them in an HTML table.
The following example reads data from the first worksheet of an Excel file named Data.xlsx and displays the retrieved values in a React table.
import React, { useState, useEffect } from 'react';

function App() {
  const [wasmModule, setWasmModule] = useState(null);
  const [tableData, setTableData] = useState([]);
  const [status, setStatus] = useState('Loading Excel runtime...');
  const [error, setError] = useState('');

  useEffect(() => {
    (async () => {
      try {
        const publicUrl = process.env.PUBLIC_URL || '';
        const spireModule = await import(
          /* webpackIgnore: true */
          `${publicUrl}/spire.xls.js`
        );

        const xlsModule = spireModule.spirexls || window.spirexls;

        if (!xlsModule) {
          throw new Error('Spire XLS module was not initialized.');
        }

        window.wasmModule = xlsModule;
        setWasmModule(xlsModule);
        setStatus('Excel runtime ready.');
      } catch (err) {
        console.error('Failed to load Spire XLS runtime:', err);
        setError(err.message || 'Failed to load Spire XLS runtime.');
        setStatus('');
      }
    })();
  }, []);

  const loadExcelToVfs = async (fileName) => {
    const publicUrl = process.env.PUBLIC_URL || '';
    const response = await fetch(`${publicUrl}/${fileName}`);

    if (!response.ok) {
      throw new Error(
        `Failed to load ${fileName}: ${response.status} ${response.statusText}`
      );
    }

    if (!window.dotnetRuntime?.Module?.FS) {
      throw new Error('Spire virtual file system is not ready.');
    }

    const fileBytes = new Uint8Array(await response.arrayBuffer());

    window.dotnetRuntime.Module.FS.writeFile(
      fileName,
      fileBytes,
      { flags: 'w+' }
    );

    return fileName;
  };

  const readExcelData = async () => {
    if (!wasmModule) {
      setError('Excel runtime is not ready yet.');
      return;
    }

    setError('');
    setStatus('Reading Excel file...');

    const workbook = new wasmModule.Workbook();

    try {
      const inputFile = await loadExcelToVfs('Data.xlsx');
      workbook.LoadFromFile(inputFile);

      const sheet = workbook.Worksheets.get(0);
      const range = sheet.AllocatedRange;
      const rows = [];

      if (range) {
        const firstRow = range.Row;
        const firstColumn = range.Column;

        const lastRow =
          range.LastRow || firstRow + range.RowCount - 1;

        const lastColumn =
          range.LastColumn || firstColumn + range.ColumnCount - 1;

        for (let r = firstRow; r <= lastRow; r++) {
          const row = [];

          for (let c = firstColumn; c <= lastColumn; c++) {
            row.push(sheet.get(r, c).Value);
          }

          rows.push(row);
        }
      }

      setTableData(rows);
      setStatus(`Loaded ${rows.length} rows.`);
    } catch (err) {
      console.error('Failed to read Excel file:', err);
      setError(err.message || 'Failed to read Excel file.');
      setStatus('');
    } finally {
      workbook.Dispose();
    }
  };

  return (
    <div style={{ textAlign: 'center', padding: 30 }}>
      <h1>Read Excel in JavaScript</h1>

      <button onClick={readExcelData} disabled={!wasmModule}>
        Read Excel File
      </button>

      {status && <p>{status}</p>}

      {error && (
        <p style={{ color: 'crimson' }}>
          {error}
        </p>
      )}

      {tableData.length > 0 && (
        <table
          border="1"
          cellPadding="8"
          style={{
            margin: '20px auto',
            borderCollapse: 'collapse'
          }}
        >
          <tbody>
            {tableData.map((row, ri) => (
              <tr key={ri}>
                {row.map((cell, ci) => (
                  <td key={ci}>{cell}</td>
                ))}
              </tr>
            ))}
          </tbody>
        </table>
      )}
    </div>
  );
}

export default App;
Code Explanation
The example first dynamically loads the Spire.XLS JavaScript runtime:
const spireModule = await import(
  /* webpackIgnore: true */
  `${publicUrl}/spire.xls.js`
);

const xlsModule = spireModule.spirexls || window.spirexls;
Since Spire.XLS uses a WebAssembly runtime, the source Excel file is then loaded into its virtual file system:
const fileBytes = new Uint8Array(await response.arrayBuffer());

window.dotnetRuntime.Module.FS.writeFile(
  fileName,
  fileBytes,
  { flags: 'w+' }
);
Next, create a Workbook object and load the Excel file:
const workbook = new wasmModule.Workbook();
workbook.LoadFromFile(inputFile);
The first worksheet can be accessed using:
const sheet = workbook.Worksheets.get(0);
To avoid iterating through unnecessary empty cells, the example retrieves the worksheet's used area through AllocatedRange:
const range = sheet.AllocatedRange;
The starting and ending rows and columns are then determined from this range. A nested loop is used to access each cell:
for (let r = firstRow; r <= lastRow; r++) {
  const row = [];

  for (let c = firstColumn; c <= lastColumn; c++) {
    row.push(sheet.get(r, c).Value);
  }

  rows.push(row);
}
Finally, the resulting two-dimensional array is stored in the tableData React state and rendered as an HTML table.
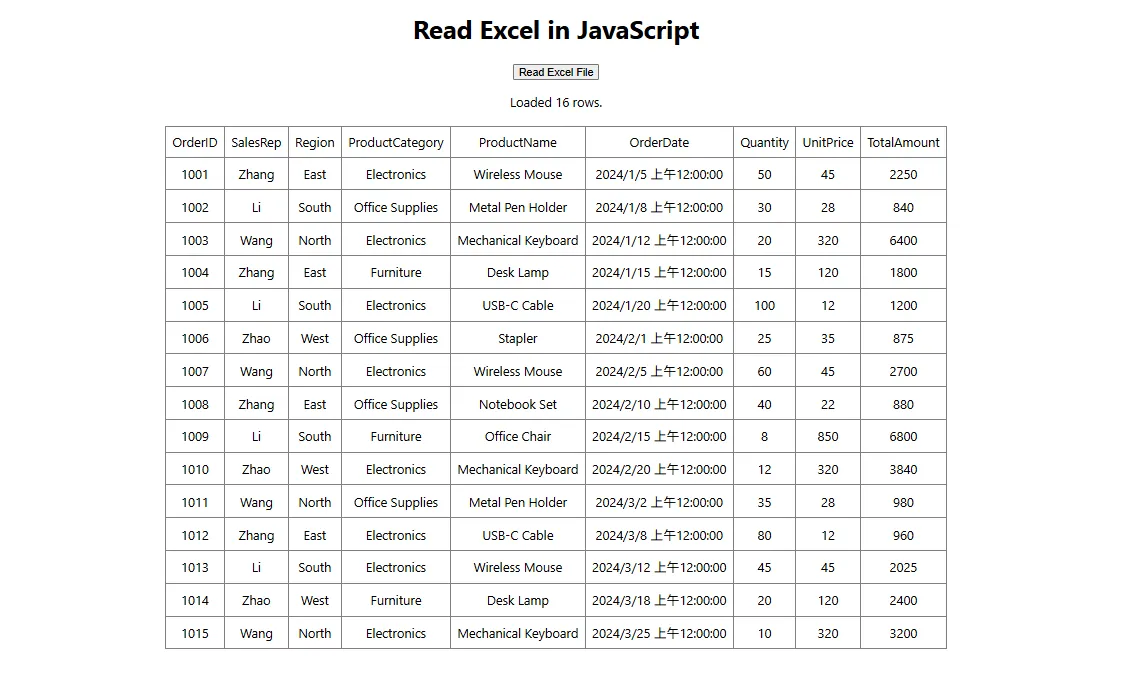
This approach is useful when building spreadsheet viewers, Excel import interfaces, reporting pages, or other applications where worksheet data needs to be presented directly in the browser.
Read Different Types of Cell Data from Excel
Excel cells can contain different kinds of data. Depending on the content you need to retrieve, Spire.XLS provides different properties or methods for accessing the underlying cell value.
The following table lists some commonly used options:
| Data to Read | API |
|---|---|
| Text | cell.Text |
| Number | cell.NumberValue |
| Formula | cell.Formula |
| Formula calculation result | cell.FormulaValue |
| Date and time | cell.DateTimeValue |
| Boolean value | cell.BooleanValue |
| Number or text value | cell.Value |
| Date, Boolean, or other value | cell.Value2 |
For example, first access a particular cell:
const cell = sheet.get(rowIndex, colIndex);
You can then retrieve its content according to the expected data type.
Read Text
Use the Text property to retrieve the text representation of a cell:
const text = sheet.get(rowIndex, colIndex).Text;
This is useful when the displayed textual content of a cell is required.
Read Numbers
To obtain a numeric value, use NumberValue:
const number = sheet.get(rowIndex, colIndex).NumberValue;
This can be useful when worksheet values will be used for calculations or numeric processing in JavaScript.
Read Formulas and Formula Results
Excel cells may contain formulas rather than static values. The formula expression itself can be retrieved through the Formula property:
const formula = sheet.get(rowIndex, colIndex).Formula;
For example, a formula cell may contain an expression such as:
=SUM(B2:B10)
If you need the calculated result of the formula instead of the formula expression, use:
const formulaResult = sheet.get(rowIndex, colIndex).FormulaValue;
Being able to retrieve both the formula and its result is useful for spreadsheet analysis and auditing applications.
Read Dates
Excel stores date and time information as a specialized cell value. You can retrieve it using:
const date = sheet.get(rowIndex, colIndex).DateTimeValue;
The returned date value can then be formatted or processed according to the requirements of the React application.
Read Boolean Values
For cells containing Boolean values such as TRUE or FALSE, use:
const bool = sheet.get(rowIndex, colIndex).BooleanValue;
Read General Cell Values
When a cell may contain either a number or text, the Value property provides a convenient general-purpose option:
const value = sheet.get(rowIndex, colIndex).Value;
For values such as dates, Boolean values, or other underlying Excel data types, Value2 can also be used:
const value = sheet.get(rowIndex, colIndex).Value2;
Choosing the appropriate property based on the expected Excel data type makes it easier to preserve the original meaning of the worksheet content when processing it in JavaScript.
Read Images from Excel Worksheets
In addition to cell data, Excel worksheets can contain embedded pictures. Spire.XLS for JavaScript allows you to access these images through the worksheet's Pictures collection.
The following example retrieves the first picture from a worksheet and saves it as a PNG file:
let pic = sheet.Pictures.get(0);

const outputFileName = 'ReadImages-out.png';

pic.Picture.Save(outputFileName);
Because the image is saved inside the Spire WebAssembly virtual file system, it can then be read back into JavaScript:
const modifiedFileArray = window.dotnetRuntime.Module.FS.readFile(outputFileName);
Next, create a JavaScript Blob from the resulting image data:
const modifiedFile = new Blob(
  [modifiedFileArray],
  { type: 'image/png' }
);
The resulting Blob can be used for further browser-side operations. For example, you can create an object URL and display the extracted image directly in a React component:
const imageUrl = URL.createObjectURL(modifiedFile);
Then use the generated URL as the source of an HTML image element:
<img src={imageUrl} alt="Extracted from Excel" />
If a worksheet contains multiple pictures, you can iterate through the Pictures collection and process each image individually.
This capability is useful for applications that need to extract product images, logos, charts saved as pictures, document assets, or other visual content embedded in Excel worksheets.
Conclusion
Reading Excel files in React makes it possible to bring spreadsheet data directly into browser-based workflows. With Spire.XLS for JavaScript, developers can load Excel workbooks, access worksheets and used ranges, iterate through cells, and retrieve data without relying on Microsoft Excel.
In addition to general cell values, Spire.XLS allows JavaScript applications to access specific data types such as text, numbers, formulas, formula results, dates, and Boolean values. Embedded worksheet images can also be retrieved and converted into browser-compatible objects for display or further processing.
These features can be used to build Excel viewers, data import tools, reporting systems, spreadsheet analysis interfaces, and other React applications that need to work with Excel content.
FAQs
Can JavaScript Read Excel Files in a React Application?
Yes. JavaScript can read Excel files in React with the help of an Excel-processing library such as Spire.XLS for JavaScript. After loading the Excel file into the WebAssembly virtual file system, you can access its worksheets, cells, formulas, images, and other spreadsheet content directly in the browser.
How Do I Read All Used Cells in an Excel Worksheet?
You can use the worksheet's AllocatedRange property to determine the range that contains data. After obtaining its starting and ending rows and columns, iterate through the range and access individual cells using:
sheet.get(rowIndex, colIndex)
This avoids unnecessarily iterating through large areas of empty worksheet cells.
How Can I Read an Excel Formula and Its Calculated Result Separately?
Use the Formula property to retrieve the formula expression:
const formula = sheet.get(rowIndex, colIndex).Formula;
Use CalculatedValue when you need the calculated value of the formula:
const result = sheet.get(rowIndex, colIndex).FormulaValue;
This makes it possible to inspect both the formula logic and its resulting value.
Can I Extract Images from Excel with JavaScript?
Yes. Images embedded in a worksheet can be accessed through the Pictures collection. After retrieving a picture, you can save it to the Spire virtual file system, read the generated image bytes, and convert them into a JavaScript Blob. The Blob can then be displayed, downloaded, or processed further in the browser.
Get a Free License
Spire.XLS for JavaScript offers a 30-day full-featured free trial license with no functional limitations. Apply here to evaluate before purchasing.
Create and Save Excel Files through Streams with JavaScript in React
Operating Excel files as streams in web applications allows developers to dynamically create, load, modify, and save Excel files, enabling flexible and efficient data processing. Spire.XLS for JavaScript runs entirely in the browser via WebAssembly, using a virtual file system (VFS) to manage input and output files — no backend server is required. It provides a simple, easy-to-use Stream API that makes creating and saving Excel files through streams more convenient.
Working with streams greatly reduces direct disk I/O operations, improving application performance and responsiveness, especially in scenarios that involve real-time data processing or limited storage. With Spire.XLS for JavaScript, you can dynamically create an Excel file and save it to a stream, load and read workbook data from a stream, or modify content in a stream and save it as a new Excel file — all directly in the browser, simplifying data exchange and system integration.
This article covers three core features:
- Dynamically Create an Excel File and Save It to a Stream
- Load and Read an Excel File from a Stream
- Modify and Save an Excel File in a Stream
For installation and project setup, refer to Integrating Spire.XLS for JavaScript in a React Project. The examples below assume Spire.XLS is installed and the WebAssembly module is initialized.
Dynamically Create an Excel File and Save It to a Stream
With Spire.XLS for JavaScript, you can dynamically create an Excel file in the browser, fill it with data and formatting, and then save the workbook to a file stream via the SaveToStream() method. This approach eliminates the need to store files directly on disk while improving application performance and responsiveness. The steps are as follows:
- Create a
Workbookinstance to generate a new Excel workbook, clear the default worksheets, and add a new worksheet. - Access a specific worksheet using the
Worksheets.get()method. - Define the data to write to the worksheet, for example, organizing data with a two-dimensional array.
- Use the
Range.get_Item()method to access cells and set their values one by one. - Format the worksheet cells, such as setting colors, fonts, borders, or adjusting column widths.
- Create a
Streamobject and save the workbook to the file stream using theSaveToStream()method. The saved stream can be used for further processing, such as downloading as a file or transferring over the network.
Below is a complete code example demonstrating how to dynamically create an Excel file and save it to a stream in React:
function App() {
  const createAndSaveToStream = async () => {
    // Get the Spire.XLS WASM module
    const xlsModule = window.wasmModule?.spirexls;

    // Check if the module is ready
    if (!xlsModule) {
      alert('Spire.Xls is not ready yet');
      return;
    }

    // Load the font file to ensure proper text rendering
    await window.spire.FetchFileToVFS('ARIAL.TTF', '/Library/Fonts/', `${process.env.PUBLIC_URL}font/`);

    // Create a new workbook instance
    const workbook = new xlsModule.Workbook();

    // Clear the default worksheets and add a new worksheet
    workbook.Worksheets.Clear();
    const sheet = workbook.Worksheets.Add('Data');

    // Define the sample data to write to the worksheet (two-dimensional array)
    const headers = ['ID', 'Name', 'Age', 'Country', 'Salary (¥)'];
    const data = [
      [1, 'Zhang Wei', 29, 'China', 8000],
      [2, 'Li Na', 35, 'China', 12000],
      [3, 'Wang Qiang', 42, 'China', 15000],
      [4, 'Jack', 26, 'USA', 9500],
      [5, 'Chen Si', 31, 'China', 11000],
      [6, 'Ishihara Yasuko', 28, 'Japan', 8800]
    ];

    // Write the headers to the first row
    for (let col = 0; col < headers.length; col++) {
      sheet.Range.get_Item({ row: 1, column: col + 1 }).Text = headers[col];
    }

    // Write the data to the following rows
    for (let row = 0; row < data.length; row++) {
      for (let col = 0; col < data[row].length; col++) {
        sheet.Range.get_Item({ row: row + 2, column: col + 1 }).Text = String(data[row][col]);
      }
    }

    // Format the header row
    sheet.Range.get('A1:E1').Style.Color = xlsModule.Color.get_LightSkyBlue();
    sheet.Range.get('A1:E1').Style.Font.FontName = 'Arial';
    sheet.Range.get('A1:E1').Style.Font.Size = 12;
    sheet.Range.get('A1:E1').Style.Font.IsBold = true;

    // Format the data rows
    for (let i = 2; i <= data.length + 1; i++) {
      const dataRange = sheet.Range.get({
        row: i, column: 1,
        lastRow: i, lastColumn: headers.length
      });
      dataRange.Style.Color = xlsModule.Color.get_LightGray();
      dataRange.Style.Font.FontName = 'Arial';
      dataRange.Style.Font.Size = 11;
    }

    // Add borders to the header and all data cells
    const usedRange = sheet.Range.get({
      row: 1, column: 1,
      lastRow: data.length + 1,
      lastColumn: headers.length
    });
    usedRange.Borders.LineStyle = xlsModule.LineStyleType.Thin;
    usedRange.Borders.Color = xlsModule.Color.get_LightSteelBlue();

    // Adjust column widths to fit the content
    for (let col = 1; col <= headers.length; col++) {
      sheet.AutoFitColumn(col);
    }

    // Create a stream and save the workbook to it
    const outputFileName = 'CreateExcelToStream.xlsx';
    const fileStream = new xlsModule.Stream(outputFileName);
    workbook.SaveToStream(fileStream, xlsModule.FileFormat.Version2010);

    // Dispose of the workbook object to release resources
    workbook.Dispose();

    // Read the file from VFS and trigger download
    const fileArray = window.dotnetRuntime.Module.FS.readFile(outputFileName);
    const blob = new Blob([fileArray], { type: 'application/vnd.openxmlformats-officedocument.spreadsheetml.sheet' });
    const url = URL.createObjectURL(blob);
    const a = document.createElement('a');
    a.href = url;
    a.download = outputFileName;
    a.click();
    URL.revokeObjectURL(url);
  };

  return (
    <div style={{ textAlign: 'center', height: '300px' }}>
      <h1>Create Excel and Save to Stream</h1>
      <button onClick={createAndSaveToStream}>
        Generate
      </button>
    </div>
  );
}

export default App;
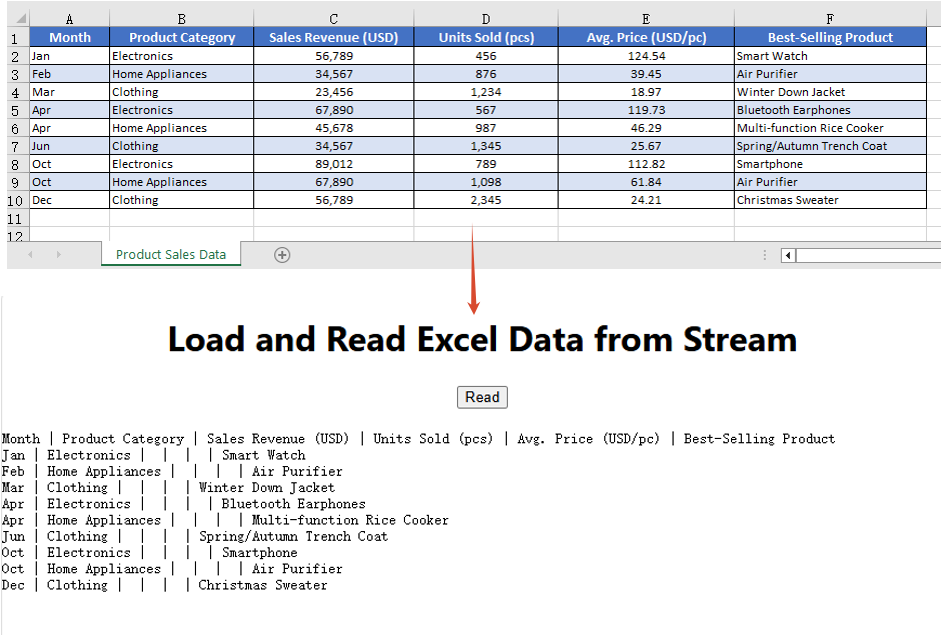
Excel file dynamically created and saved to a stream with Spire.XLS for JavaScript
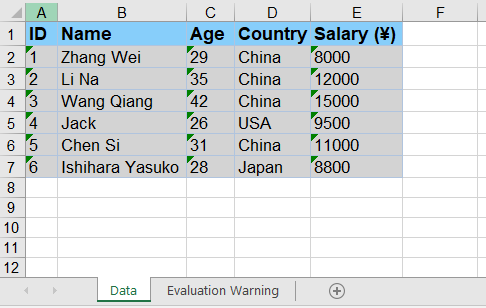
Load and Read an Excel File from a Stream
With Spire.XLS for JavaScript, you can load an Excel file directly from a stream using the LoadFromStream() method. Once loaded, the cell data of the Excel file in the stream can be easily read, enabling fast and flexible data processing without file I/O operations. The steps are as follows:
- Create a
Streamobject pointing to the Excel file to be loaded. - Create a
Workbookobject and load the file from the stream using theLoadFromStream()method. - Get the first worksheet using the
Worksheets.get()method. - Iterate through the rows and columns of the worksheet and extract cell data using the
Range.get()method. - Display the extracted data on the page, or use it for other operations.
Below is a complete code example demonstrating how to load and read an Excel file from a stream in React:
import React, { useState } from 'react';

function App() {
  const [extractedData, setExtractedData] = useState('');

  const loadAndReadFromStream = async () => {
    // Get the Spire.XLS WASM module
    const xlsModule = window.wasmModule?.spirexls;

    // Check if the module is ready
    if (!xlsModule) {
      alert('Spire.Xls is not ready yet');
      return;
    }

    // Load the font file to ensure proper text rendering
    await window.spire.FetchFileToVFS('ARIAL.TTF', '/Library/Fonts/', `${process.env.PUBLIC_URL}font/`);

    // Load the sample Excel file into VFS
    await window.spire.FetchFileToVFS('Sample.xlsx', '', `${process.env.PUBLIC_URL}data/`);

    // Create a workbook object and load the Excel file from a stream
    const workbook = new xlsModule.Workbook();
    const fileStream = new xlsModule.Stream('Sample.xlsx');
    workbook.LoadFromStream(fileStream, xlsModule.FileFormat.Auto);

    // Get the first worksheet of the workbook
    const sheet = workbook.Worksheets.get(0);

    // Iterate through the rows and columns to extract cell data
    const data = [];
    for (let row = sheet.FirstRow; row <= sheet.LastRow; row++) {
      const line = [];
      for (let col = sheet.FirstColumn; col <= sheet.LastColumn; col++) {
        line.push(sheet.Range.get({ row: row, column: col }).Text);
      }
      data.push(line.join(' | '));
    }

    // Dispose of the workbook object to release resources
    workbook.Dispose();

    // Display the extracted data on the page
    setExtractedData(data.join('\n'));
  };

  return (
    <div style={{ textAlign: 'center', height: '300px' }}>
      <h1>Load and Read Excel Data from Stream</h1>
      <button onClick={loadAndReadFromStream}>
        Read
      </button>
      <pre style={{ marginTop: '20px', textAlign: 'left' }}>{extractedData}</pre>
    </div>
  );
}

export default App;
Excel file loaded and read from a stream with Spire.XLS for JavaScript
Modify and Save an Excel File in a Stream
With Spire.XLS for JavaScript, you can modify an Excel file in memory. First load the Excel file in the stream into a Workbook object via the LoadFromStream() method; after completing modifications such as changing cell styles or content, save the file back to a stream using the SaveToStream() method. This enables real-time changes to Excel file data without relying on direct file storage operations. The steps are as follows:
- Create a
Streamobject pointing to the Excel file and load the file from the stream via theLoadFromStream()method. - Access the worksheet using the
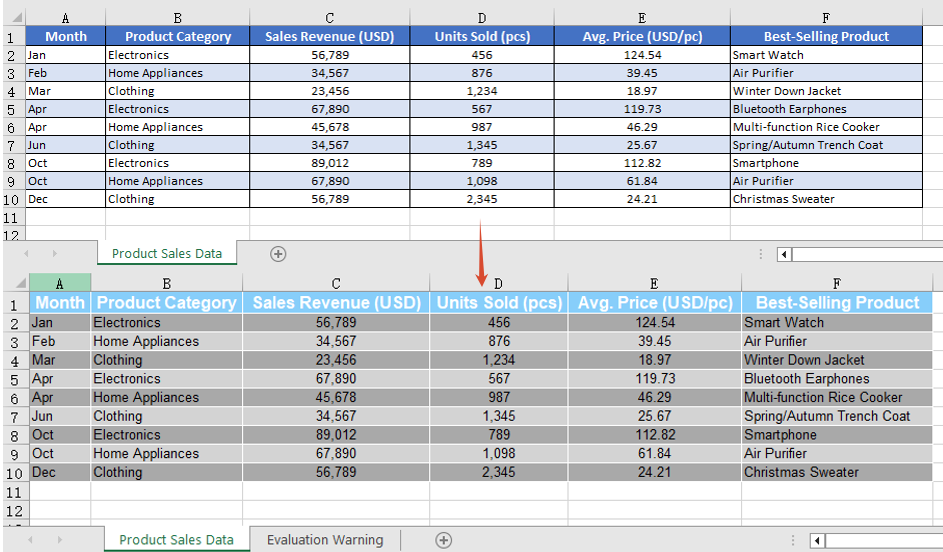
Worksheets.get()method. - Modify the styles of the header row and data rows (font name, size, background color, etc.) through the
CellRange.Styleproperty. - Use the
AutoFitColumn()method to automatically adjust column widths to fit the content. - Set the border style of the cells.
- Create a new
Streamobject, save the modified workbook to the stream using theSaveToStream()method, read the result file from VFS, and trigger the download.
Below is a complete code example demonstrating how to modify and save an Excel file in a stream in React:
function App() {
  const modifyAndSaveInStream = async () => {
    // Get the Spire.XLS WASM module
    const xlsModule = window.wasmModule?.spirexls;

    // Check if the module is ready
    if (!xlsModule) {
      alert('Spire.Xls is not ready yet');
      return;
    }

    // Load the font file to ensure proper text rendering
    await window.spire.FetchFileToVFS('ARIAL.TTF', '/Library/Fonts/', `${process.env.PUBLIC_URL}font/`);

    // Load the sample Excel file into VFS
    await window.spire.FetchFileToVFS('Sample.xlsx', '', `${process.env.PUBLIC_URL}data/`);

    // Create a workbook object and load the Excel file from a stream
    const workbook = new xlsModule.Workbook();
    const fileStream = new xlsModule.Stream('Sample.xlsx');
    workbook.LoadFromStream(fileStream, xlsModule.FileFormat.Auto);

    // Get the first worksheet of the workbook
    const sheet = workbook.Worksheets.get(0);

    // Modify the style of the header row
    const headerRow = sheet.Range.get({
      row: sheet.FirstRow, column: sheet.FirstColumn,
      lastRow: sheet.FirstRow, lastColumn: sheet.LastColumn
    });
    headerRow.Style.Font.FontName = 'Arial';
    headerRow.Style.Font.Size = 12;
    headerRow.Style.Font.IsBold = true;
    headerRow.Style.Color = xlsModule.Color.get_LightSkyBlue();

    // Modify the styles of the data rows, with alternating colors (even rows)
    for (let i = sheet.FirstRow + 1; i <= sheet.LastRow; i++) {
      const dataRow = sheet.Range.get({
        row: i, column: sheet.FirstColumn,
        lastRow: i, lastColumn: sheet.LastColumn
      });
      dataRow.Style.Font.FontName = 'Arial';
      dataRow.Style.Font.Size = 10;
      dataRow.Style.Color = xlsModule.Color.get_LightGray();
      if (i % 2 === 0) {
        dataRow.Style.Color = xlsModule.Color.get_DarkGray();
      }
    }

    // Adjust column widths to fit the content
    for (let col = sheet.FirstColumn; col <= sheet.LastColumn; col++) {
      sheet.AutoFitColumn(col);
    }

    // Set the border color
    sheet.AllocatedRange.Borders.Color = xlsModule.Color.get_White();

    // Save the modified workbook to a new stream
    const outputFileName = 'ModifyExcelInStream.xlsx';
    const outStream = new xlsModule.Stream(outputFileName);
    workbook.SaveToStream(outStream, xlsModule.FileFormat.Version2010);

    // Dispose of the workbook object to release resources
    workbook.Dispose();

    // Read the file from VFS and trigger download
    const fileArray = window.dotnetRuntime.Module.FS.readFile(outputFileName);
    const blob = new Blob([fileArray], { type: 'application/vnd.openxmlformats-officedocument.spreadsheetml.sheet' });
    const url = URL.createObjectURL(blob);
    const a = document.createElement('a');
    a.href = url;
    a.download = outputFileName;
    a.click();
    URL.revokeObjectURL(url);
  };

  return (
    <div style={{ textAlign: 'center', height: '300px' }}>
      <h1>Modify and Save Excel in Stream</h1>
      <button onClick={modifyAndSaveInStream}>
        Generate
      </button>
    </div>
  );
}

export default App;
Excel file modified and saved in a stream with Spire.XLS for JavaScript
FAQ
How to handle the stream-saved file being unable to open in Excel?
Cause: When saving a workbook via the SaveToStream() method, if the correct output file format is not specified through the FileFormat parameter, the generated file format may not match its extension, causing it to fail to open properly.
Solution: Specify a concrete file format enum value when saving to a stream, such as xlsModule.FileFormat.Version2010:
const fileStream = new xlsModule.Stream(outputFileName);
workbook.SaveToStream(fileStream, xlsModule.FileFormat.Version2010);
How to ensure the workbook loaded from a stream correctly recognizes the file format?
Cause: The LoadFromStream() method needs to identify the file type based on the actual format of the stream data. If the format parameter is set incorrectly, loading may fail or data parsing may produce errors.
Solution: Use xlsModule.FileFormat.Auto when loading so that the library automatically detects the format of the file in the stream:
const fileStream = new xlsModule.Stream('Sample.xlsx');
workbook.LoadFromStream(fileStream, xlsModule.FileFormat.Auto);
Get a Free License
Spire.XLS for JavaScript offers a 30-day full-featured free trial license with no functional limitations. Apply here to evaluate before purchasing.
Read or Delete Excel Document Properties with JavaScript in React
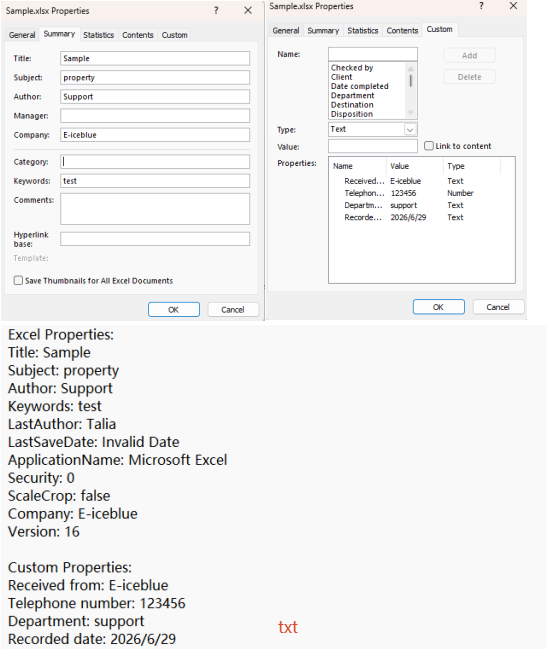
Excel document properties — such as title, author, category, and other metadata — are essential for file management and information retrieval. Spire.XLS for JavaScript runs entirely in the browser via WebAssembly, using a virtual file system (VFS) to manage input and output files. It provides a complete API for accessing and managing both DocumentProperties (standard/built-in properties) and CustomDocumentProperties (user-defined name-value pairs).
Spire.XLS categorizes document properties into two types: standard and custom. Standard document properties are predefined built-in metadata like title, subject, author, category, keywords, and comments. Custom document properties are user-defined name-value pairs that can contain text, numbers, dates, or boolean values.
This article covers two core features:
For installation and project setup, refer to Integrating Spire.XLS for JavaScript in a React Project. The examples below assume Spire.XLS is installed and the WebAssembly module is initialized.
Read Standard and Custom Document Properties
Reading document properties is the first step in understanding an Excel file's metadata. Through the DocumentProperties and CustomDocumentProperties collections, you can easily access all property information stored in the file. The steps are as follows:
- Create a
Workbookobject and load an existing Excel file. - Retrieve the standard document properties collection via
workbook.DocumentProperties. - Iterate through the
DocumentPropertiescollection to read each property's name and value. - Retrieve the custom document properties collection via
workbook.CustomDocumentProperties. - Iterate through the
CustomDocumentPropertiescollection to read each custom property's name and value. - Output the retrieved property information to a text file.
Below is a complete code example demonstrating how to read Excel document properties in React:
function App() {
  const readDocumentProperties = async () => {
    // Get the Spire.XLS WASM module
    const xlsModule = window.wasmModule?.spirexls;

    // Check if the module is ready
    if (!xlsModule) {
      alert('Spire.Xls is not ready yet');
      return;
    }

    // Load the sample file into VFS
    await window.spire.FetchFileToVFS('Sample.xlsx', '', `${process.env.PUBLIC_URL}data/`);

    const workbook = new xlsModule.Workbook();
    workbook.LoadFromFile({ fileName: 'Sample.xlsx' });

    // Get standard document properties
    let properties1 = workbook.DocumentProperties;
    let sb = [];
    sb.push("Excel Properties:");
    for (let i = 0; i < properties1.Count; i++) {
      let name = properties1.get(i).Name;
      let obj = properties1.get(i).Value;
      let t = properties1.get(i).PropertyType;
      let value = null;
      if (t === xlsModule.PropertyType.Double) {
        value = xlsModule.Double.Convert(obj).Value;
      } else if (t === xlsModule.PropertyType.DateTime) {
        // Convert OADate to JavaScript Date and format as date string
        let oaDate = xlsModule.DateTime.Convert(obj).Value;
        let jsDate = new Date((oaDate - 25569) * 86400 * 1000);
        value = jsDate.toLocaleDateString();
      } else if (t === xlsModule.PropertyType.Bool) {
        value = xlsModule.Boolean.Convert(obj).Value;
      } else if (
        t === xlsModule.PropertyType.Int ||
        t === xlsModule.PropertyType.Int32
      ) {
        value = xlsModule.Int32.Convert(obj).Value;
      } else {
        value = xlsModule.String.Convert(obj).Value;
      }
      sb.push(name + ": " + String(value));
    }
    sb.push("");

    // Get custom document properties
    let properties2 = workbook.CustomDocumentProperties;
    sb.push("Custom Properties:");
    for (let i = 0; i < properties2.Count; i++) {
      let name = properties2.get(i).Name;
      let t = properties2.get(i).PropertyType;
      let obj = properties2.get(i).Value;
      let value = null;
      if (t === xlsModule.PropertyType.Double) {
        value = xlsModule.Double.Convert(obj).Value;
      } else if (t === xlsModule.PropertyType.DateTime) {
        // Convert OADate to JavaScript Date and format as date string
        let oaDate = xlsModule.DateTime.Convert(obj).Value;
        let jsDate = new Date((oaDate - 25569) * 86400 * 1000);
        value = jsDate.toLocaleDateString();
      } else if (t === xlsModule.PropertyType.Bool) {
        value = xlsModule.Boolean.Convert(obj).Value;
      } else if (
        t === xlsModule.PropertyType.Int ||
        t === xlsModule.PropertyType.Int32
      ) {
        value = xlsModule.Int32.Convert(obj).Value;
      } else {
        value = xlsModule.String.Convert(obj).Value;
      }
      sb.push(name + ": " + String(value));
    }

    // Save the property information to a text file
    const outputFileName = 'DocumentProperties.txt';
    window.dotnetRuntime.Module.FS.writeFile(outputFileName, sb.join("\n"));
    workbook.Dispose();

    // Read the file from VFS and trigger download
    const fileArray = window.dotnetRuntime.Module.FS.readFile(outputFileName);
    const blob = new Blob([fileArray], { type: 'text/plain' });
    const url = URL.createObjectURL(blob);
    const a = document.createElement('a');
    a.href = url;
    a.download = outputFileName;
    a.click();
    URL.revokeObjectURL(url);
  };

  return (
    <div style={{ textAlign: 'center', height: '300px' }}>
      <h1>Read Excel Document Properties</h1>
      <button onClick={readDocumentProperties}>
        Generate
      </button>
    </div>
  );
}

export default App;
Document properties read with Spire.XLS for JavaScript
Delete Standard and Custom Document Properties
In some scenarios, you may need to clear sensitive or outdated metadata from Excel files. Spire.XLS for JavaScript allows you to delete both standard and custom document properties through straightforward API calls. The steps are as follows:
- Create a
Workbookobject and load an existing Excel file. - Retrieve the standard document properties collection via
workbook.DocumentProperties. - Clear standard properties by setting their values to empty strings.
- Retrieve the custom document properties collection via
workbook.CustomDocumentProperties. - Iterate through the collection and use the
Remove()method to delete each custom property. - Save the modified workbook to a new Excel file.
Below is a complete code example demonstrating how to delete Excel document properties in React:
function App() {
  const deleteDocumentProperties = async () => {
    // Get the Spire.XLS WASM module
    const xlsModule = window.wasmModule?.spirexls;

    // Check if the module is ready
    if (!xlsModule) {
      alert('Spire.Xls is not ready yet');
      return;
    }

    // Load the sample file into VFS
    await window.spire.FetchFileToVFS('Sample.xlsx', '', `${process.env.PUBLIC_URL}data/`);

    const workbook = new xlsModule.Workbook();
    workbook.LoadFromFile({ fileName: 'Sample.xlsx' });

    // Get the standard document properties collection and clear their values
    let standardProperties = workbook.DocumentProperties;
    standardProperties.Title = "";
    standardProperties.Subject = "";
    standardProperties.Manager = "";
    standardProperties.Category = "";
    standardProperties.Keywords = "";
    standardProperties.Comments = "";
    standardProperties.Author = "";
    standardProperties.Company = "";

    // Get the custom document properties collection, iterate and remove all properties
    let customProperties = workbook.CustomDocumentProperties;
    for (let i = customProperties.Count - 1; i >= 0; i--) {
      customProperties.Remove(customProperties.get(i).Name);
    }

    // Save the workbook
    const outputFileName = 'DeleteProperties.xlsx';
    workbook.SaveToFile(outputFileName);
    workbook.Dispose();

    // Read the file from VFS and trigger download
    const fileArray = window.dotnetRuntime.Module.FS.readFile(outputFileName);
    const blob = new Blob([fileArray], { type: 'application/vnd.openxmlformats-officedocument.spreadsheetml.sheet' });
    const url = URL.createObjectURL(blob);
    const a = document.createElement('a');
    a.href = url;
    a.download = outputFileName;
    a.click();
    URL.revokeObjectURL(url);
  };

  return (
    <div style={{ textAlign: 'center', height: '300px' }}>
      <h1>Delete Excel Document Properties</h1>
      <button onClick={deleteDocumentProperties}>
        Generate
      </button>
    </div>
  );
}

export default App;
Document properties deleted with Spire.XLS for JavaScript
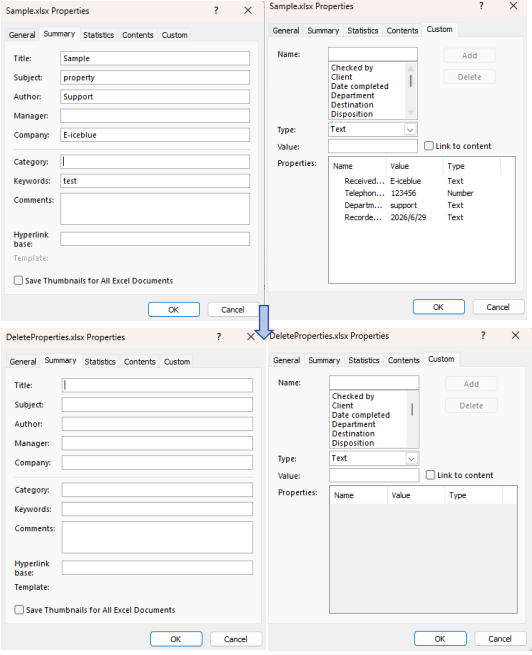
FAQ
Why can't standard document properties be removed using Remove() like custom properties?
Cause: Standard document properties are part of the Excel file structure, each with a fixed definition position that cannot be removed from the collection.
Solution: Clear standard properties by setting their values to empty strings instead of removing the properties themselves:
standardProperties.Title = "";
standardProperties.Author = "";
Custom properties can be directly deleted using the Remove() method.
How to handle reading non-text property types such as dates, booleans, and numbers?
Cause: Using String.Convert() directly on date or boolean properties may produce results in an unexpected format.
Solution: Check the PropertyType to determine the type and use the appropriate conversion method:
if (t === xlsModule.PropertyType.DateTime) {
  let oaDate = xlsModule.DateTime.Convert(obj).Value;
  let jsDate = new Date((oaDate - 25569) * 86400 * 1000);
  value = jsDate.toLocaleDateString();
} else if (t === xlsModule.PropertyType.Bool) {
  value = xlsModule.Boolean.Convert(obj).Value;
}
Get a Free License
Spire.XLS for JavaScript offers a 30-day full-featured free trial license with no functional limitations. Apply here to evaluate before purchasing.
Adjust Excel Page Setup with JavaScript in React
Configuring page setup is essential for preparing Excel documents for printing or PDF export. Spire.XLS for JavaScript runs entirely in the browser via WebAssembly, using a virtual file system (VFS) to manage input and output files — no backend server required. It provides comprehensive page setup capabilities through the PageSetup object, allowing you to control margins, orientation, paper size, print area, zoom scaling, and fit-to-page options.
The PageSetup object in Spire.XLS offers a rich set of properties for controlling how a worksheet is printed or displayed. Key properties include:
| Property | Description |
|---|---|
| TopMargin / BottomMargin / LeftMargin / RightMargin | Sets the page margins |
| Orientation | Sets the page orientation (Portrait or Landscape) |
| PaperSize | Sets the paper size (A4, Letter, etc.) |
| PrintArea | Specifies the cell range to print |
| Zoom | Sets the worksheet zoom scaling percentage |
| FitToPagesTall / FitToPagesWide | Scales the worksheet to fit a specified number of pages |
This article covers six core features:
- Adjust Excel Page Margins
- Adjust Excel Page Orientation
- Adjust Excel Paper Size
- Adjust Excel Print Area
- Adjust Excel Zoom Scale
- Fit Excel Table to 1 Page
For installation and project setup, refer to Integrating Spire.XLS for JavaScript in a React Project. The examples below assume Spire.XLS is installed and the WebAssembly module is initialized.
Adjust Excel Page Margins
Page margins define the blank space around the edges of a printed worksheet. The steps are as follows:
- Create a
Workbookobject usingnew xlsModule.Workbook(). - Get the default worksheet using the
workbook.Worksheets.get(index)method. - Access the
PageSetupobject throughsheet.PageSetup. - Set page margins using the
TopMargin,BottomMargin,LeftMargin, andRightMarginproperties. - Save the workbook to an Excel file using the
workbook.SaveToFile()method.
Below is a complete code example demonstrating how to adjust page margins in React:
function App() {
  const adjustPageMargins = async () => {
    // Get the Spire.XLS WASM module
    const xlsModule = window.wasmModule?.spirexls;

    // Check if the module is ready
    if (!xlsModule) {
      alert('Spire.Xls is not ready yet');
      return;
    }

    // Create a workbook and load the existing file
    await window.spire.FetchFileToVFS('Sample.xlsx', '', `${process.env.PUBLIC_URL}data/`);

    const workbook = new xlsModule.Workbook();
    workbook.LoadFromFile({ fileName: 'Sample.xlsx' });
    const sheet = workbook.Worksheets.get(0);

    // Get the PageSetup object
    const pageSetup = sheet.PageSetup;

    // Set the top, bottom, left, right, header, and footer margins
    pageSetup.TopMargin = 1;
    pageSetup.BottomMargin = 1;
    pageSetup.LeftMargin = 0.75;
    pageSetup.RightMargin = 0.75;

    // Save the workbook
    const outputFileName = 'AdjustMargins.xlsx';
    workbook.SaveToFile(outputFileName);
    workbook.Dispose();

    // Read the file from VFS and trigger download
    const fileArray = window.dotnetRuntime.Module.FS.readFile(outputFileName);
    const blob = new Blob([fileArray], { type: 'application/vnd.openxmlformats-officedocument.spreadsheetml.sheet' });
    const url = URL.createObjectURL(blob);
    const a = document.createElement('a');
    a.href = url;
    a.download = outputFileName;
    a.click();
    URL.revokeObjectURL(url);
  };

  return (
    <div style={{ textAlign: 'center', height: '300px' }}>
      <h1>Adjust Page Margins</h1>
      <button onClick={adjustPageMargins}>
        Generate
      </button>
    </div>
  );
}

export default App;
Page margins adjusted with Spire.XLS for JavaScript
Adjust Excel Page Orientation
Page orientation determines whether a worksheet is printed in portrait (vertical) or landscape (horizontal) layout. Landscape orientation is especially useful for wide tables with many columns. The steps are as follows:
- Create a
Workbookobject usingnew xlsModule.Workbook(). - Get the default worksheet using the
workbook.Worksheets.get(index)method. - Access the
PageSetupobject throughsheet.PageSetup. - Set the page orientation using the
Orientationproperty. - Save the workbook to an Excel file using the
workbook.SaveToFile()method.
Below is a complete code example demonstrating how to set the page orientation to landscape in React:
function App() {
  const setPageOrientation = async () => {
    // Get the Spire.XLS WASM module
    const xlsModule = window.wasmModule?.spirexls;

    // Check if the module is ready
    if (!xlsModule) {
      alert('Spire.Xls is not ready yet');
      return;
    }

    // Create a workbook and load the existing file
    // Load the sample file into VFS
    await window.spire.FetchFileToVFS('Sample.xlsx', '', `${process.env.PUBLIC_URL}data/`);

    const workbook = new xlsModule.Workbook();
    workbook.LoadFromFile({ fileName: 'Sample.xlsx' });
    const sheet = workbook.Worksheets.get(0);

    // Set the page orientation to Landscape
    sheet.PageSetup.Orientation = xlsModule.PageOrientationType.Landscape;

    // Save the workbook
    const outputFileName = 'SetOrientation.xlsx';
    workbook.SaveToFile(outputFileName);
    workbook.Dispose();

    // Read the file from VFS and trigger download
    const fileArray = window.dotnetRuntime.Module.FS.readFile(outputFileName);
    const blob = new Blob([fileArray], { type: 'application/vnd.openxmlformats-officedocument.spreadsheetml.sheet' });
    const url = URL.createObjectURL(blob);
    const a = document.createElement('a');
    a.href = url;
    a.download = outputFileName;
    a.click();
    URL.revokeObjectURL(url);
  };

  return (
    <div style={{ textAlign: 'center', height: '300px' }}>
      <h1>Set Page Orientation</h1>
      <button onClick={setPageOrientation}>
        Generate
      </button>
    </div>
  );
}

export default App;
Page orientation set to landscape with Spire.XLS for JavaScript
Adjust Excel Paper Size
Different printers and regions use different standard paper sizes. Spire.XLS for JavaScript supports a wide range of paper sizes through the PaperSizeType enumeration, including A4, Letter, A3, and many more. The steps are as follows:
- Create a
Workbookobject usingnew xlsModule.Workbook(). - Get the default worksheet using the
workbook.Worksheets.get(index)method. - Access the
PageSetupobject throughsheet.PageSetup. - Set the paper size using the
PaperSizeproperty. - Save the workbook to an Excel file using the
workbook.SaveToFile()method.
Below is a complete code example demonstrating how to set the paper size to A3 in React:
function App() {
  const setPaperSize = async () => {
    // Get the Spire.XLS WASM module
    const xlsModule = window.wasmModule?.spirexls;

    // Check if the module is ready
    if (!xlsModule) {
      alert('Spire.Xls is not ready yet');
      return;
    }

    // Create a workbook and load the existing file
    // Load the sample file into VFS
    await window.spire.FetchFileToVFS('Sample.xlsx', '', `${process.env.PUBLIC_URL}data/`);

    const workbook = new xlsModule.Workbook();
    workbook.LoadFromFile({ fileName: 'Sample.xlsx' });
    const sheet = workbook.Worksheets.get(0);

    // Get the PageSetup object
    const pageSetup = sheet.PageSetup;

    // Set the paper size to A3
    pageSetup.PaperSize = xlsModule.PaperSizeType.PaperA3;

    // Save the workbook
    const outputFileName = 'SetPaperSize.xlsx';
    workbook.SaveToFile(outputFileName);
    workbook.Dispose();

    // Read the file from VFS and trigger download
    const fileArray = window.dotnetRuntime.Module.FS.readFile(outputFileName);
    const blob = new Blob([fileArray], { type: 'application/vnd.openxmlformats-officedocument.spreadsheetml.sheet' });
    const url = URL.createObjectURL(blob);
    const a = document.createElement('a');
    a.href = url;
    a.download = outputFileName;
    a.click();
    URL.revokeObjectURL(url);
  };

  return (
    <div style={{ textAlign: 'center', height: '300px' }}>
      <h1>Set Paper Size</h1>
      <button onClick={setPaperSize}>
        Generate
      </button>
    </div>
  );
}

export default App;
Paper size set to A3 with Spire.XLS for JavaScript
Adjust Excel Print Area
The print area defines which portion of a worksheet will be printed. The steps are as follows:
- Create a
Workbookobject usingnew xlsModule.Workbook(). - Get the default worksheet using the
workbook.Worksheets.get(index)method. - Populate sample data using the
sheet.Rangeproperty. - Access the
PageSetupobject throughsheet.PageSetup. - Set the print area using the
PrintAreaproperty. - Save the workbook to an Excel file using the
workbook.SaveToFile()method.
Below is a complete code example demonstrating how to set the print area in React:
function App() {
  const setPrintArea = async () => {
    // Get the Spire.XLS WASM module
    const xlsModule = window.wasmModule?.spirexls;

    // Check if the module is ready
    if (!xlsModule) {
      alert('Spire.Xls is not ready yet');
      return;
    }

    // Create a workbook and load the existing file
    // Load the sample file into VFS
    await window.spire.FetchFileToVFS('Sample.xlsx', '', `${process.env.PUBLIC_URL}data/`);

    const workbook = new xlsModule.Workbook();
    workbook.LoadFromFile({ fileName: 'Sample.xlsx' });
    const sheet = workbook.Worksheets.get(0);

    // Set the print area to A1:E3
    sheet.PageSetup.PrintArea = "A1:E3";

    // Save the workbook
    const outputFileName = 'SetPrintArea.xlsx';
    workbook.SaveToFile(outputFileName);
    workbook.Dispose();

    // Read the file from VFS and trigger download
    const fileArray = window.dotnetRuntime.Module.FS.readFile(outputFileName);
    const blob = new Blob([fileArray], { type: 'application/vnd.openxmlformats-officedocument.spreadsheetml.sheet' });
    const url = URL.createObjectURL(blob);
    const a = document.createElement('a');
    a.href = url;
    a.download = outputFileName;
    a.click();
    URL.revokeObjectURL(url);
  };

  return (
    <div style={{ textAlign: 'center', height: '300px' }}>
      <h1>Set Print Area</h1>
      <button onClick={setPrintArea}>
        Generate
      </button>
    </div>
  );
}

export default App;
Print area set with Spire.XLS for JavaScript
Adjust Excel Zoom Scale
The zoom scale controls the magnification level at which a worksheet is displayed on screen. The value ranges from 10 to 400, representing a percentage of normal size. The steps are as follows:
- Create a
Workbookobject usingnew xlsModule.Workbook(). - Get the default worksheet using the
workbook.Worksheets.get(index)method. - Set the zoom scale using the
Zoomproperty. - Save the workbook to an Excel file using the
workbook.SaveToFile()method.
Below is a complete code example demonstrating how to set the zoom scale in React:
function App() {
  const setZoomScale = async () => {
    // Get the Spire.XLS WASM module
    const xlsModule = window.wasmModule?.spirexls;

    // Check if the module is ready
    if (!xlsModule) {
      alert('Spire.Xls is not ready yet');
      return;
    }

    // Create a workbook and load the existing file
    // Load the sample file into VFS
    await window.spire.FetchFileToVFS('Sample.xlsx', '', `${process.env.PUBLIC_URL}data/`);

    const workbook = new xlsModule.Workbook();
    workbook.LoadFromFile({ fileName: 'Sample.xlsx' });
    const sheet = workbook.Worksheets.get(0);

    // Set the zoom scale to 85%
    const pageSetup = sheet.PageSetup;
    pageSetup.Zoom = 85;

    // Save the workbook
    const outputFileName = 'SetZoomScale.xlsx';
    workbook.SaveToFile(outputFileName);
    workbook.Dispose();

    // Read the file from VFS and trigger download
    const fileArray = window.dotnetRuntime.Module.FS.readFile(outputFileName);
    const blob = new Blob([fileArray], { type: 'application/vnd.openxmlformats-officedocument.spreadsheetml.sheet' });
    const url = URL.createObjectURL(blob);
    const a = document.createElement('a');
    a.href = url;
    a.download = outputFileName;
    a.click();
    URL.revokeObjectURL(url);
  };

  return (
    <div style={{ textAlign: 'center', height: '300px' }}>
      <h1>Set Zoom Scale</h1>
      <button onClick={setZoomScale}>
        Generate
      </button>
    </div>
  );
}

export default App;
Zoom scale set to 85% with Spire.XLS for JavaScript
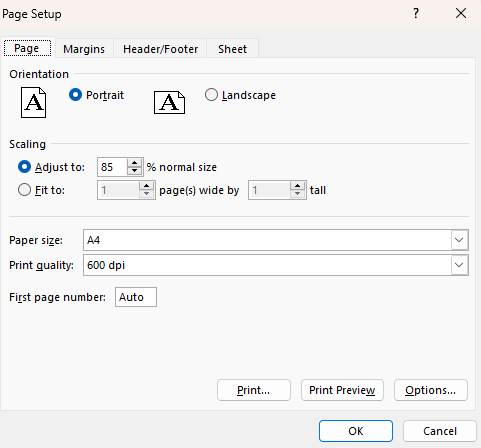
Fit Excel Table to 1 Page
When printing a large worksheet, the content may span multiple pages, making it difficult to read. The steps are as follows:
- Create a
Workbookobject usingnew xlsModule.Workbook(). - Get the default worksheet using the
workbook.Worksheets.get(index)method. - Populate sample data using the
sheet.Rangeproperty. - Access the
PageSetupobject throughsheet.PageSetup. - Set the fit-to-page properties using the
FitToPagesTallandFitToPagesWideproperties. - Save the workbook to an Excel file using the
workbook.SaveToFile()method.
Below is a complete code example demonstrating how to fit a worksheet to one page in React:
function App() {
  const fitToPage = async () => {
    // Get the Spire.XLS WASM module
    const xlsModule = window.wasmModule?.spirexls;

    // Check if the module is ready
    if (!xlsModule) {
      alert('Spire.Xls is not ready yet');
      return;
    }

    // Create a workbook and load the existing file
    // Load the sample file into VFS
    await window.spire.FetchFileToVFS('Sample.xlsx', '', `${process.env.PUBLIC_URL}data/`);

    const workbook = new xlsModule.Workbook();
    workbook.LoadFromFile({ fileName: 'Sample.xlsx' });
    const sheet = workbook.Worksheets.get(0);

    // Fit the worksheet content to 1 page
    const pageSetup = sheet.PageSetup;
    pageSetup.FitToPagesTall = 1;
    pageSetup.FitToPagesWide = 1;

    // Save the workbook
    const outputFileName = 'FitToPage.xlsx';
    workbook.SaveToFile(outputFileName);
    workbook.Dispose();

    // Read the file from VFS and trigger download
    const fileArray = window.dotnetRuntime.Module.FS.readFile(outputFileName);
    const blob = new Blob([fileArray], { type: 'application/vnd.openxmlformats-officedocument.spreadsheetml.sheet' });
    const url = URL.createObjectURL(blob);
    const a = document.createElement('a');
    a.href = url;
    a.download = outputFileName;
    a.click();
    URL.revokeObjectURL(url);
  };

  return (
    <div style={{ textAlign: 'center', height: '300px' }}>
      <h1>Fit Worksheet to 1 Page</h1>
      <button onClick={fitToPage}>
        Generate
      </button>
    </div>
  );
}

export default App;
Worksheet scaled to fit one page with Spire.XLS for JavaScript
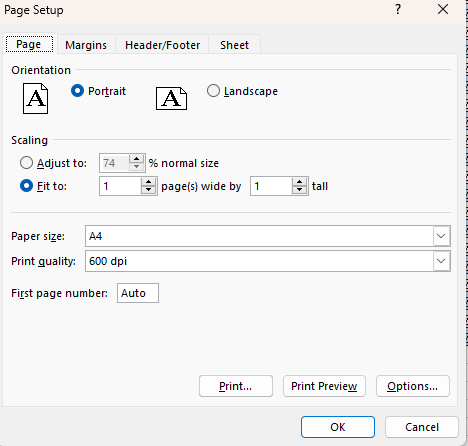
FAQ
How to print gridlines or row/column headings
Cause: By default, gridlines and row/column headings are not printed, which can make the data harder to read on paper.
Solution: Use the IsPrintGridlines and IsPrintHeadings properties of the PageSetup object:
pageSetup.IsPrintGridlines = true;
pageSetup.IsPrintHeadings = true;
How to get the actual page dimensions
Cause: You may need to know the actual width and height of the current paper size to adjust content layout.
Solution: Retrieve the values using the PageWidth and PageHeight properties of the PageSetup object:
var pageWidth = pageSetup.PageWidth;
var pageHeight = pageSetup.PageHeight;
Get a Free License
Spire.XLS for JavaScript offers a 30-day full-featured free trial license with no functional limitations. Apply here to evaluate before purchasing.
Detect and Remove Digital Signatures in Excel with JavaScript in React
Digital signatures ensure the authenticity of an Excel file's source and verify that its content has not been tampered with. Spire.XLS for JavaScript runs entirely in the browser via WebAssembly, using a virtual file system (VFS) to manage input and output files — no backend server required.
This article covers two core features:
For installation and project setup, refer to Integrating Spire.XLS for JavaScript in a React Project. The examples below assume Spire.XLS is installed and the WebAssembly module is initialized.
Detect Whether an Excel File Is Signed
Before processing a signed Excel file, checking its signature status can prevent unintended operations. Spire.XLS provides the IsDigitallySigned property to determine whether a workbook contains digital signatures. The core process consists of three stages: first, load the font files and the target Excel file into the WASM virtual file system via FetchFileToVFS; then, instantiate a Workbook and load the file; finally, retrieve the signature status through the IsDigitallySigned property.
function App() {
  const detectDigitalSignature = async () => {
    // Get the Spire.XLS WASM module
    const xlsModule = window.wasmModule?.spirexls;

    // Check if the module is ready
    if (!xlsModule) {
      alert('Spire.Xls is not ready yet');
      return;
    }

    // Load fonts and Excel file into VFS
    await window.spire.FetchFileToVFS('arial.ttf', '/Library/Fonts/', `${process.env.PUBLIC_URL}/font/`);
    const inputFileName = 'Sample.xlsx';
    await window.spire.FetchFileToVFS(inputFileName, '', `${process.env.PUBLIC_URL}data/`);

    // Load the workbook
    const workbook = new xlsModule.Workbook();
    workbook.LoadFromFile({ fileName: inputFileName });

    // Detect if the workbook contains digital signatures
    const isSigned = workbook.IsDigitallySigned;

    // Dispose of the workbook object to release resources
    workbook.Dispose();

    // Show the detection result
    alert(isSigned ? 'The file is signed' : 'The file is not signed');
  };

  return (
    <div style={{ textAlign: 'center', height: '300px' }}>
      <h1>Detect Digital Signature</h1>
      <button onClick={detectDigitalSignature}>
        Detect
      </button>
    </div>
  );
}

export default App;
Detection result dialog showing whether the file is signed
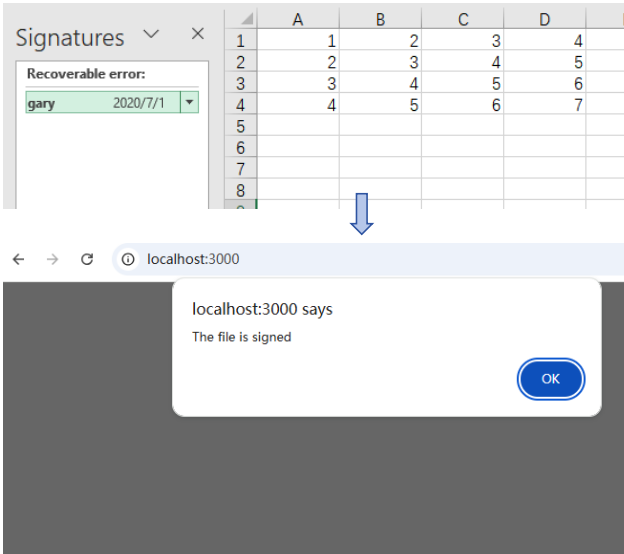
Remove Digital Signatures from an Excel File
In cases where signature information needs to be updated, certificates replaced, or digital authentication canceled, the existing digital signatures must be removed from the Excel file. Using Spire.XLS, the core process consists of three stages: first, load the font files and the signed Excel file into the WASM virtual file system via FetchFileToVFS; then, instantiate a Workbook and load the file, calling RemoveAllDigitalSignatures to remove all digital signatures from the workbook at once; finally, save the workbook file with signatures removed via SaveToFile.
function App() {
  const removeDigitalSignatures = async () => {
    // Get the Spire.XLS WASM module
    const xlsModule = window.wasmModule?.spirexls;

    // Check if the module is ready
    if (!xlsModule) {
      alert('Spire.Xls is not ready yet');
      return;
    }

    // Load fonts and Excel file into VFS
    await window.spire.FetchFileToVFS('arial.ttf', '/Library/Fonts/', `${process.env.PUBLIC_URL}/font/`);
    const inputFileName = 'Sample.xlsx';
    await window.spire.FetchFileToVFS(inputFileName, '', `${process.env.PUBLIC_URL}data/`);

    // Load the signed workbook
    const workbook = new xlsModule.Workbook();
    workbook.LoadFromFile({ fileName: inputFileName });

    // Remove all digital signatures
    workbook.RemoveAllDigitalSignatures();

    // Save the workbook without signatures
    const outputFileName = 'SignatureRemoved.xlsx';
    workbook.SaveToFile({ fileName: outputFileName, version: xlsModule.ExcelVersion.Version2010 });

    // Dispose of the workbook object to release resources
    workbook.Dispose();

    // Read the file from VFS and trigger download
    const fileArray = window.dotnetRuntime.Module.FS.readFile(outputFileName);
    const blob = new Blob([fileArray], { type: 'application/vnd.openxmlformats-officedocument.spreadsheetml.sheet' });
    const url = URL.createObjectURL(blob);
    const a = document.createElement('a');
    a.href = url;
    a.download = outputFileName;
    a.click();
    URL.revokeObjectURL(url);
  };

  return (
    <div style={{ textAlign: 'center', height: '300px' }}>
      <h1>Remove Digital Signatures</h1>
      <button onClick={removeDigitalSignatures}>
        Remove Signatures
      </button>
    </div>
  );
}

export default App;
Output document after removing digital signatures
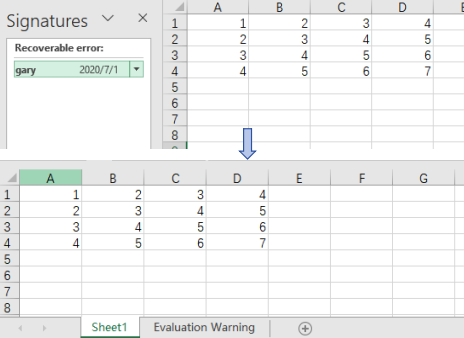
FAQ
Can I detect a signature on a specific worksheet instead of the entire workbook?
Cause: Digital signatures are applied to the entire workbook, not individual worksheets.
Solution: Digital signatures operate at the workbook level. It is not possible to detect or remove signatures on a single worksheet. Both IsDigitallySigned and RemoveAllDigitalSignatures are workbook-level methods.
How do I batch detect or remove signatures from multiple Excel files?
Cause: Real-world projects often involve processing large numbers of files, making manual processing inefficient.
Solution: Use a loop to process files in batch:
const files = ['report1.xlsx', 'report2.xlsx', 'report3.xlsx'];
for (const file of files) {
  await window.spire.FetchFileToVFS(file, '', dataPath);
  const wb = new xlsModule.Workbook();
  wb.LoadFromFile({ fileName: file });
  if (wb.IsDigitallySigned) {
    wb.RemoveAllDigitalSignatures();
  }
  wb.SaveToFile({ fileName: `unsigned_${file}`, version: xlsModule.ExcelVersion.Version2016 });
  wb.Dispose();
}
Get a Free License
Spire.XLS for JavaScript offers a 30-day full-featured free trial license with no functional limitations. Apply here to evaluate before purchasing.
Split Excel Files with JavaScript in React
Splitting Excel files into separate files by worksheet, by row, or by column is a common requirement for data distribution and management. Spire.XLS for JavaScript performs the splitting process entirely in the browser via WebAssembly, using a virtual file system (VFS) to manage input and output files — no backend server required.
This article covers three core features:
For installation and project setup, refer to Integrating Spire.XLS for JavaScript in a React Project. The examples below assume Spire.XLS is installed and the WebAssembly module is initialized.
Split by Worksheet
Splitting by worksheet exports each sheet in a multi-sheet workbook as an independent Excel file. When a workbook contains multiple worksheets, each representing different data such as separate departments or months, you can split each worksheet into its own file. Spire.XLS accomplishes this by iterating through all worksheets in the source file, creating new workbooks, and copying each sheet. The steps are as follows:
- Create a
Workbookobject and load the source Excel document withLoadFromFile(). - Iterate through all worksheets in the source document.
- Create a new
Workbookobject. - Copy the source worksheet to the default worksheet of the new workbook using the
CopyFrommethod. - Get the worksheet name via
sheet.Nameas the output file name. - Save the new workbook as an Excel file with
SaveToFile().
Below is a complete code example demonstrating how to split worksheets into separate Excel files:
function App() {
  const splitByWorksheet = async () => {
    // Get the Spire.XLS WASM module
    const xlsModule = window.wasmModule?.spirexls;

    // Check if the module is ready
    if (!xlsModule) {
      alert('Spire.Xls is not ready yet');
      return;
    }

    // Load fonts and the Excel file into VFS
    await window.spire.FetchFileToVFS('arial.ttf', '/Library/Fonts/', `${process.env.PUBLIC_URL}/font/`);
    const inputFileName = 'Sample.xlsx';
    await window.spire.FetchFileToVFS(inputFileName, '', `${process.env.PUBLIC_URL}data/`);

    // Load the workbook
    const workbook = new xlsModule.Workbook();
    workbook.LoadFromFile({ fileName: inputFileName });

    // Iterate through each worksheet and export it as a separate file
    for (let i = 0; i < workbook.Worksheets.Count; i++) {
      let sheet = workbook.Worksheets.get(i);

      // Create a new workbook and copy the current worksheet
      let newWorkbook = new xlsModule.Workbook();
      let newSheet = newWorkbook.Worksheets.get(0);
      newSheet.CopyFrom(sheet);

      // Use the worksheet name as the output file name
      const outputFileName = `${sheet.Name}.xlsx`;
      newWorkbook.SaveToFile({ fileName: outputFileName, version: xlsModule.ExcelVersion.Version2010 });
      newWorkbook.Dispose();

      // Read the split file from VFS and trigger a browser download
      const fileArray = window.dotnetRuntime.Module.FS.readFile(outputFileName);
      const blob = new Blob([fileArray], { type: 'application/vnd.openxmlformats-officedocument.spreadsheetml.sheet' });
      const url = URL.createObjectURL(blob);
      const a = document.createElement('a');
      a.href = url;
      a.download = outputFileName;
      a.click();
      URL.revokeObjectURL(url);
    }

    // Release resources
    workbook.Dispose();
  };

  return (
    <div style={{ textAlign: 'center', height: '300px' }}>
      <h1>Split Excel By Worksheet</h1>
      <button onClick={splitByWorksheet}>
        Generate
      </button>
    </div>
  );
}

export default App;
After splitting by worksheet, each resulting file contains a single worksheet from the original workbook
Split by Row
Splitting by row is suitable for breaking up large tables into multiple smaller files by a fixed number of rows, making pagination and distribution easier. When a worksheet contains a large amount of data rows that need to be split into multiple files, Spire.XLS accomplishes this by copying source rows one by one into a new workbook. The steps are as follows:
- Create a
Workbookobject, load the source Excel document withLoadFromFile(), and retrieve the first worksheet. - Create a new
Workbookobject. - Use a loop to call the
Copymethod row by row, copying specified rows from the source worksheet to the new worksheet. - Copy the column widths from the source worksheet to the new worksheet.
- Save the new workbook as an Excel file with
SaveToFile(). - Repeat the steps above to create more split files, copying the header row separately when needed.
Below is a complete code example demonstrating how to split a worksheet into multiple Excel files by row:
function App() {
  const splitByRow = async () => {
    // Get the Spire.XLS WASM module
    const xlsModule = window.wasmModule?.spirexls;

    // Check if the module is ready
    if (!xlsModule) {
      alert('Spire.Xls is not ready yet');
      return;
    }

    // Load fonts and the Excel file into VFS
    await window.spire.FetchFileToVFS('arial.ttf', '/Library/Fonts/', `${process.env.PUBLIC_URL}/font/`);
    const inputFileName = 'Sample.xlsx';
    await window.spire.FetchFileToVFS(inputFileName, '', `${process.env.PUBLIC_URL}data/`);

    // Load the workbook and get the first worksheet
    const workbook = new xlsModule.Workbook();
    workbook.LoadFromFile({ fileName: inputFileName });
    const sheet = workbook.Worksheets.get(0);

    // Create a new workbook (comes with one default worksheet)
    let newWorkbook1 = new xlsModule.Workbook();
    let newSheet1 = newWorkbook1.Worksheets.get(0);

    // Copy rows 1-5 to the target file
    let destRow = 1;
    for (let i = 0; i < 5; i++) {
      sheet.Copy({
        sourceRange: sheet.Rows[i],
        worksheet: newSheet1,
        destRow: destRow,
        destColumn: 1,
        copyStyle: true
      });
      destRow++;
    }

    // Copy column widths
    for (let c = 0; c < sheet.Columns.length; c++) {
      newSheet1.SetColumnWidth(c + 1, sheet.GetColumnWidth(c + 1));
    }

    // Save the first split file
    const outputFileName1 = "Rows1-5.xlsx";
    newWorkbook1.SaveToFile({ fileName: outputFileName1, version: xlsModule.ExcelVersion.Version2010 });
    newWorkbook1.Dispose();

    // Read file data from VFS
    const fileData1 = window.dotnetRuntime.Module.FS.readFile(outputFileName1);

    // Create a second new workbook
    let newWorkbook2 = new xlsModule.Workbook();
    let newSheet2 = newWorkbook2.Worksheets.get(0);

    destRow = 1;

    // Copy the header row
    sheet.Copy({
      sourceRange: sheet.Rows[0],
      worksheet: newSheet2,
      destRow: destRow,
      destColumn: 1,
      copyStyle: true
    });
    destRow++;

    // Copy rows 6-10 to the second target file
    for (let i = 5; i < 10; i++) {
      sheet.Copy({
        sourceRange: sheet.Rows[i],
        worksheet: newSheet2,
        destRow: destRow,
        destColumn: 1,
        copyStyle: true
      });
      destRow++;
    }

    // Copy column widths
    for (let c = 0; c < sheet.Columns.length; c++) {
      newSheet2.SetColumnWidth(c + 1, sheet.GetColumnWidth(c + 1));
    }

    // Save the second split file
    const outputFileName2 = "Rows6-10.xlsx";
    newWorkbook2.SaveToFile({ fileName: outputFileName2, version: xlsModule.ExcelVersion.Version2010 });
    newWorkbook2.Dispose();

    // Read file data from VFS
    const fileData2 = window.dotnetRuntime.Module.FS.readFile(outputFileName2);

    // Package the split files into a ZIP for download
    const zip = new JSZip();
    zip.file(outputFileName1, fileData1);
    zip.file(outputFileName2, fileData2);
    const zipBlob = await zip.generateAsync({ type: 'blob' });
    const zipUrl = URL.createObjectURL(zipBlob);
    const a = document.createElement('a');
    a.href = zipUrl;
    a.download = "SplitByRows.zip";
    a.click();
    URL.revokeObjectURL(zipUrl);

    // Release resources
    workbook.Dispose();
  };

  return (
    <div style={{ textAlign: 'center', height: '300px' }}>
      <h1>Split Excel By Row</h1>
      <button onClick={splitByRow}>
        Generate
      </button>
    </div>
  );
}

export default App;
After splitting by row, each file contains the header row and the specified number of data rows
Split by Column
Splitting by column is suitable for breaking up wide tables into multiple files by column groups, making the data structure clearer. When a worksheet contains many columns and you need to split different column groups into separate files, Spire.XLS accomplishes this by copying source columns one by one into a new workbook. The steps are as follows:
- Create a
Workbookobject, load the source Excel document withLoadFromFile(), and retrieve the first worksheet. - Create a new
Workbookobject. - Use a loop to call the
Copymethod column by column, copying specified columns from the source worksheet to the new worksheet. - Copy the column widths from the source worksheet to the new worksheet.
- Save the new workbook as an Excel file with
SaveToFile(). - Repeat the steps above to create more split files.
Below is a complete code example demonstrating how to split a worksheet into multiple Excel files by column:
function App() {
  const splitByColumn = async () => {
    // Get the Spire.XLS WASM module
    const xlsModule = window.wasmModule?.spirexls;

    // Check if the module is ready
    if (!xlsModule) {
      alert('Spire.Xls is not ready yet');
      return;
    }

    // Load fonts and the Excel file into VFS
    await window.spire.FetchFileToVFS('arial.ttf', '/Library/Fonts/', `${process.env.PUBLIC_URL}/font/`);
    const inputFileName = 'Sample.xlsx';
    await window.spire.FetchFileToVFS(inputFileName, '', `${process.env.PUBLIC_URL}data/`);

    // Load the workbook and get the first worksheet
    const workbook = new xlsModule.Workbook();
    workbook.LoadFromFile({ fileName: inputFileName });
    const sheet = workbook.Worksheets.get(0);

    // Create a new workbook and copy columns 1-2 (columns A-B) to the new file
    let newWorkbook1 = new xlsModule.Workbook();
    let newSheet1 = newWorkbook1.Worksheets.get(0);

    for (let i = 1; i <= 2; i++) {
      sheet.Copy({
        sourceRange: sheet.Columns[i - 1],
        worksheet: newSheet1,
        destRow: 1,
        destColumn: i,
        copyStyle: true
      });
    }

    // Copy column widths
    for (let i = 1; i <= 2; i++) {
      newSheet1.SetColumnWidth(i, sheet.GetColumnWidth(i));
    }

    // Save the first split file
    const outputFileName1 = "ColumnsAB.xlsx";
    newWorkbook1.SaveToFile({ fileName: outputFileName1, version: xlsModule.ExcelVersion.Version2010 });
    newWorkbook1.Dispose();

    // Read file data from VFS
    const fileData1 = window.dotnetRuntime.Module.FS.readFile(outputFileName1);

    // Create a second new workbook and copy columns 3-4 (columns C-D) to the new file
    let newWorkbook2 = new xlsModule.Workbook();
    let newSheet2 = newWorkbook2.Worksheets.get(0);

    for (let i = 3; i <= 4; i++) {
      sheet.Copy({
        sourceRange: sheet.Columns[i - 1],
        worksheet: newSheet2,
        destRow: 1,
        destColumn: i - 2,
        copyStyle: true
      });
    }

    // Copy column widths
    for (let i = 3; i <= 4; i++) {
      newSheet2.SetColumnWidth(i - 2, sheet.GetColumnWidth(i));
    }

    // Save the second split file
    const outputFileName2 = "ColumnsCD.xlsx";
    newWorkbook2.SaveToFile({ fileName: outputFileName2, version: xlsModule.ExcelVersion.Version2010 });
    newWorkbook2.Dispose();

    // Read file data from VFS
    const fileData2 = window.dotnetRuntime.Module.FS.readFile(outputFileName2);

    // Package the split files into a ZIP for download
    const zip = new JSZip();
    zip.file(outputFileName1, fileData1);
    zip.file(outputFileName2, fileData2);
    const zipBlob = await zip.generateAsync({ type: 'blob' });
    const zipUrl = URL.createObjectURL(zipBlob);
    const a = document.createElement('a');
    a.href = zipUrl;
    a.download = "SplitByColumns.zip";
    a.click();
    URL.revokeObjectURL(zipUrl);

    // Release resources
    workbook.Dispose();
  };

  return (
    <div style={{ textAlign: 'center', height: '300px' }}>
      <h1>Split Excel By Column</h1>
      <button onClick={splitByColumn}>
        Generate
      </button>
    </div>
  );
}

export default App;
After splitting by column, each file contains a portion of the columns from the original worksheet
FAQ
Worksheet name shows as default (Sheet1) instead of the original name
Cause: The CopyFrom method only copies worksheet content — it does not retain the original worksheet name. The new workbook's default worksheet keeps its default name.
Solution: Manually set the worksheet name after copying using newSheet.Name = sheet.Name:
let newSheet = newWorkbook.Worksheets.get(0);
newSheet.CopyFrom(sheet);
newSheet.Name = sheet.Name;
VFS file loading fails or path is incorrect
Cause: The file path or VFS file name is incorrect, or the required font files have not been loaded into VFS, causing the workbook to fail to load.
Solution: Verify that the FetchFileToVFS parameters use the correct paths. The font file path should be /Library/Fonts/, and ensure the font file name matches exactly (e.g., arial.ttf):
await window.spire.FetchFileToVFS('arial.ttf', '/Library/Fonts/', fontSourcePath);
Get a Free License
Spire.XLS for JavaScript offers a 30-day full-featured free trial license with no functional limitations. Apply here to evaluate before purchasing.