Modify, Hide and Delete Named Ranges in React with JavaScript
A named range is not something you set up once and forget. As the data table is restructured, the original name may no longer fit, and the referred range can go stale when rows are added or removed. Some named ranges exist only as an intermediate helper for a formula and have no business showing up in the Name Manager. And named ranges that are no longer used, if kept forever, turn the name list into something long and hard to search. Modifying, hiding and deleting are therefore just as much a part of working with named ranges as creating them. Spire.XLS for JavaScript provides a complete named range management API and can perform all of the above in the browser through WebAssembly, with no backend service required.
This article covers three key features:
For installation and project setup, see Integrating Spire.XLS for JavaScript in a React Project. The examples below assume Spire.XLS is already installed and the WebAssembly module has been initialized.
Modify a Named Range
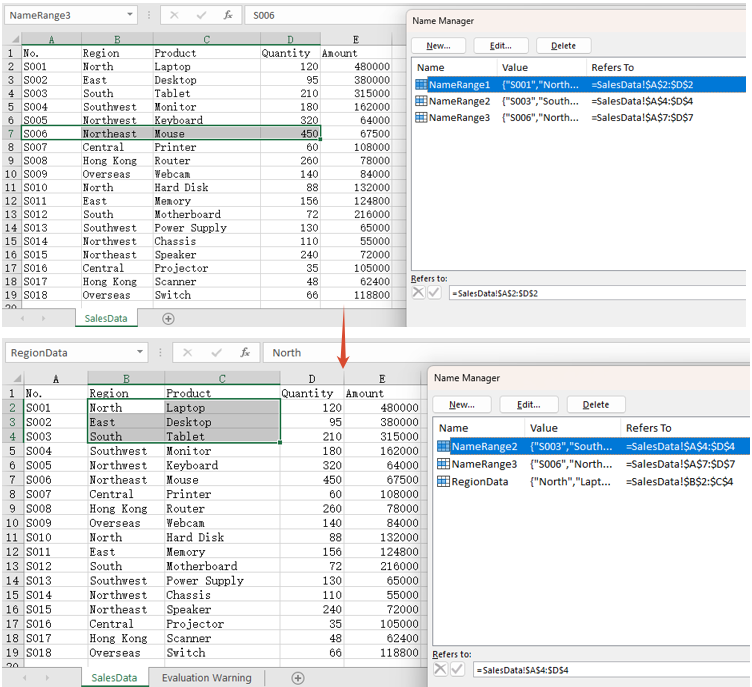
Modifying covers two independent aspects: the name itself and the referred range. The name is reassigned through the Name property and the referred range through the RefersToRange property. The two can be changed separately, or together as in the example below. The steps are:
- Load the workbook and get the first worksheet.
- Take the named range to modify with
workbook.NameRanges.get(0). - Set
Nameto the new name. - Point
RefersToRangeat the new cell range. - Save the workbook.
The following is a complete code example that shows how to modify a named range in React:
function App() {
  const modifyNamedRange = async () => {
    // Get the Spire.XLS WASM module
    const xlsModule = window.wasmModule?.spirexls;

    // Check if the module is ready
    if (!xlsModule) {
      alert('Spire.Xls is not ready yet');
      return;
    }

    // Load the font into VFS
    await window.spire.FetchFileToVFS('ARIAL.TTF', '/Library/Fonts/', `${process.env.PUBLIC_URL}/font/`);

    // Load the Excel file into VFS
    const inputFileName = 'AllNamedRanges.xlsx';
    await window.spire.FetchFileToVFS(inputFileName, '', `${process.env.PUBLIC_URL}/static/data/`);

    // Load the workbook
    const workbook = new xlsModule.Workbook();
    workbook.LoadFromFile(inputFileName);

    // Get the first worksheet
    let sheet = workbook.Worksheets.get(0);

    // Change the name of the named range
    workbook.NameRanges.get(0).Name = "RegionData";

    // Change the cell range the named range refers to
    workbook.NameRanges.get(0).RefersToRange = sheet.Range.get("B2:C4");

    // Save the workbook
    const outputFileName = 'ModifyNamedRange.xlsx';
    workbook.SaveToFile(outputFileName);

    // Release resources
    workbook.Dispose();

    // Read the result file from VFS and trigger the download
    const fileArray = window.dotnetRuntime.Module.FS.readFile(outputFileName);
    const blob = new Blob([fileArray], { type: "application/vnd.openxmlformats-officedocument.spreadsheetml.sheet" });
    const url = URL.createObjectURL(blob);
    const a = document.createElement('a');
    a.href = url;
    a.download = outputFileName;
    a.click();
    URL.revokeObjectURL(url);
  };

  return (
    <div style={{ textAlign: 'center', height: '300px' }}>
      <h1>Modify Named Range</h1>
      <button onClick={modifyNamedRange}>Start</button>
    </div>
  );
}

export default App;
After running, the effect of modifying a named range:
Hide a Named Range
Set the Visible property to false and the named range is hidden. A hidden named range is still stored in the workbook and formulas that refer to it are unaffected — it simply no longer appears in Excel's Name Manager and name box, which keeps the name list tidy. After hiding it, the example below also writes the formula =SUM(NameRange1) into cell F2: the formula still calculates normally, which is exactly what shows that the named range is only hidden, not deleted. The steps are:
- Load the workbook and get the first worksheet.
- Take the named range to hide.
- Set
Visibletofalse. - Write a formula that refers to the named range into a cell, to confirm it still works.
- Save the workbook.
The following is a complete code example that shows how to hide a named range in React:
function App() {
  const hideNamedRange = async () => {
    // Get the Spire.XLS WASM module
    const xlsModule = window.wasmModule?.spirexls;

    // Check if the module is ready
    if (!xlsModule) {
      alert('Spire.Xls is not ready yet');
      return;
    }

    // Load the font into VFS
    await window.spire.FetchFileToVFS('ARIAL.TTF', '/Library/Fonts/', `${process.env.PUBLIC_URL}/font/`);

    // Load the Excel file into VFS
    const inputFileName = 'AllNamedRanges.xlsx';
    await window.spire.FetchFileToVFS(inputFileName, '', `${process.env.PUBLIC_URL}/static/data/`);

    // Load the workbook
    const workbook = new xlsModule.Workbook();
    workbook.LoadFromFile(inputFileName);

    // Get the first worksheet
    let sheet = workbook.Worksheets.get(0);

    // Hide the first named range
    workbook.NameRanges.get(0).Visible = false;

    // Write a formula that refers to the hidden named range, proving it still exists and works
    sheet.Range.get("F1").Text = "Sum After Hiding";
    sheet.Range.get("F2").Formula = "=SUM(NameRange1)";

    // Calculate the formulas so the saved file shows the result as soon as it is opened
    workbook.CalculateAllValue();

    // Save the workbook
    const outputFileName = 'HideNamedRange.xlsx';
    workbook.SaveToFile(outputFileName);

    // Release resources
    workbook.Dispose();

    // Read the result file from VFS and trigger the download
    const fileArray = window.dotnetRuntime.Module.FS.readFile(outputFileName);
    const blob = new Blob([fileArray], { type: "application/vnd.openxmlformats-officedocument.spreadsheetml.sheet" });
    const url = URL.createObjectURL(blob);
    const a = document.createElement('a');
    a.href = url;
    a.download = outputFileName;
    a.click();
    URL.revokeObjectURL(url);
  };

  return (
    <div style={{ textAlign: 'center', height: '300px' }}>
      <h1>Hide Named Range</h1>
      <button onClick={hideNamedRange}>Start</button>
    </div>
  );
}

export default App;
After running, the effect of hiding a named range:
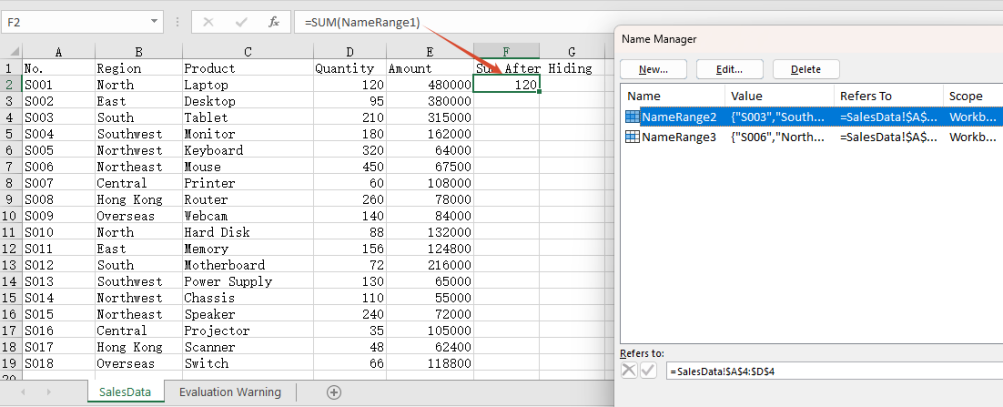
Note: The formula in cell F2 refers to the hidden NameRange1, and it still calculates 120. That shows the named range has only been hidden from view, not removed from the workbook.
Delete a Named Range
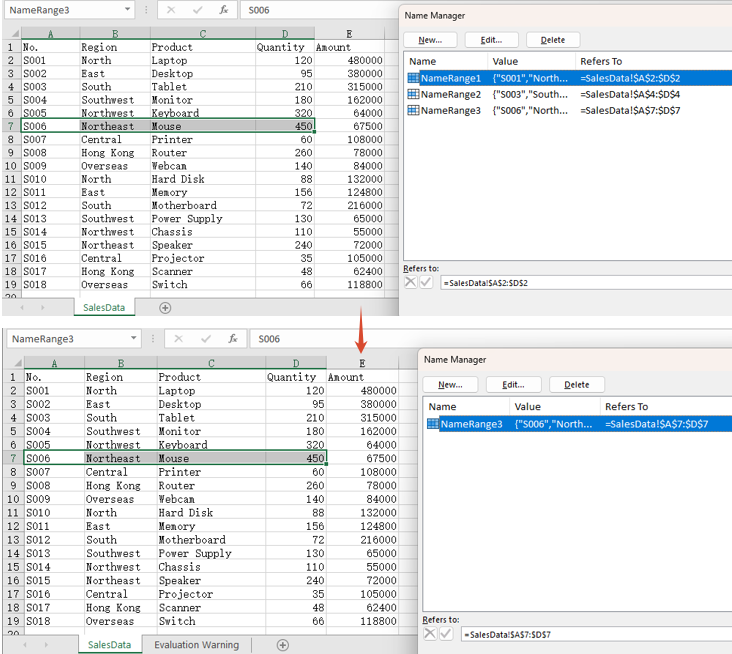
There are two ways to delete a named range: call Remove() when the name is known, or RemoveAt() when the position is known. Both remove the named range from the workbook entirely. The steps are:
- Load the workbook.
- Call
Remove()to delete a named range by name. - Call
RemoveAt()to delete a named range by index. - Save the workbook.
The following is a complete code example that shows how to delete a named range in React:
function App() {
  const deleteNamedRange = async () => {
    // Get the Spire.XLS WASM module
    const xlsModule = window.wasmModule?.spirexls;

    // Check if the module is ready
    if (!xlsModule) {
      alert('Spire.Xls is not ready yet');
      return;
    }

    // Load the font into VFS
    await window.spire.FetchFileToVFS('ARIAL.TTF', '/Library/Fonts/', `${process.env.PUBLIC_URL}/font/`);

    // Load the Excel file into VFS
    const inputFileName = 'AllNamedRanges.xlsx';
    await window.spire.FetchFileToVFS(inputFileName, '', `${process.env.PUBLIC_URL}/static/data/`);

    // Load the workbook
    const workbook = new xlsModule.Workbook();
    workbook.LoadFromFile(inputFileName);

    // Delete a named range by name
    workbook.NameRanges.Remove("NameRange2");

    // Delete a named range by index
    workbook.NameRanges.RemoveAt(0);

    // Save the workbook
    const outputFileName = 'DeleteNamedRange.xlsx';
    workbook.SaveToFile(outputFileName);

    // Release resources
    workbook.Dispose();

    // Read the result file from VFS and trigger the download
    const fileArray = window.dotnetRuntime.Module.FS.readFile(outputFileName);
    const blob = new Blob([fileArray], { type: "application/vnd.openxmlformats-officedocument.spreadsheetml.sheet" });
    const url = URL.createObjectURL(blob);
    const a = document.createElement('a');
    a.href = url;
    a.download = outputFileName;
    a.click();
    URL.revokeObjectURL(url);
  };

  return (
    <div style={{ textAlign: 'center', height: '300px' }}>
      <h1>Delete Named Range</h1>
      <button onClick={deleteNamedRange}>Start</button>
    </div>
  );
}

export default App;
After running, the effect of deleting a named range:
FAQ
Why is the result of a formula missing when the saved file is opened?
Cause: Setting only the Formula property of a cell does not make Spire calculate it. The saved file then contains the formula itself but no calculated result value, so the cell comes up blank when the file is opened.
Solution: Call workbook.CalculateAllValue() before saving, to evaluate the formulas first:
// Calculate all formulas so the result value is written into the saved file
workbook.CalculateAllValue();
Can I pass a named range object to the delete API?
Cause: Remove() takes a name string. Passing a NameRange object does not match the expected type and throws Assert failed: Value is not a String, and nothing is deleted.
Solution: Pass the name when it is known, or the index when the position is known:
// Delete by name
workbook.NameRanges.Remove("NameRange2");

// Delete by index
workbook.NameRanges.RemoveAt(0);
Get a Free License
Spire.XLS for JavaScript offers a 30-day full-featured free trial license with no functional limitations. Apply here to evaluate before purchasing.
Create Named Ranges in React with JavaScript
In Excel, formulas usually have to hard-code a specific cell range, such as =SUM(D2:D10). As such formulas multiply, maintenance costs rise: when the data range changes, every related formula must be updated one by one, and a single missed edit produces a wrong result. A named range is designed to solve exactly this problem — give a cell range a meaningful name and refer to that name in the formula. The range and the formula are thereby separated: changing the range takes a single edit, every formula that refers to it updates automatically, and the result is both less error-prone and easier to read. Spire.XLS for JavaScript ships a complete named range API and can create both global (workbook-level) and local (worksheet-level) named ranges in the browser through WebAssembly, with no backend service required.
This article covers two key features:
For installation and project setup, see Integrating Spire.XLS for JavaScript in a React Project. The examples below assume Spire.XLS is already installed and the WebAssembly module has been initialized.
Global Named Range
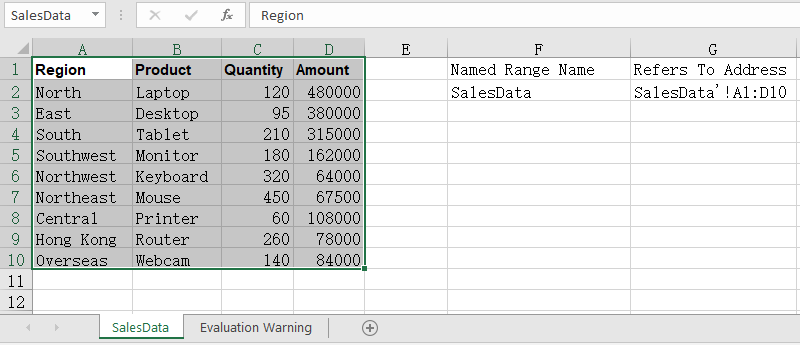
A global named range is stored in the workbook's name collection Workbook.NameRanges, its name is unique across the whole workbook, and any worksheet can refer to it directly. Create it with Workbook.NameRanges.Add() and point it at a cell range through the RefersToRange property. The steps are:
- Load the Excel file that contains the data and get the first worksheet.
- Create a global named range with
workbook.NameRanges.Add("SalesData"). - Set
namedRange.RefersToRangetosheet.Range.get("A1:D10"), that is, the range A1:D10. - Read
namedRange.NameandnamedRange.RefersToRange.RangeAddressand write the name and the referred address back into cells. - Save the workbook with the
Workbook.SaveToFile()method.
The following is a complete code example that shows how to create a global named range in React:
function App() {
  const createGlobalNamedRange = async () => {
    // Get the Spire.XLS WASM module
    const xlsModule = window.wasmModule?.spirexls;

    // Check if the module is ready
    if (!xlsModule) {
      alert('Spire.Xls is not ready yet');
      return;
    }

    // Load the font into VFS
    await window.spire.FetchFileToVFS('ARIAL.TTF', '/Library/Fonts/', `${process.env.PUBLIC_URL}/font/`);

    // Load the Excel file into VFS
    const inputFileName = 'NamedRanges.xlsx';
    await window.spire.FetchFileToVFS(inputFileName, '', `${process.env.PUBLIC_URL}/static/data/`);

    // Load the workbook
    const workbook = new xlsModule.Workbook();
    workbook.LoadFromFile(inputFileName);

    // Get the first worksheet
    let sheet = workbook.Worksheets.get(0);

    // Create a workbook-level (global) named range
    let namedRange = workbook.NameRanges.Add("SalesData");

    // Set the cell range the named range refers to
    namedRange.RefersToRange = sheet.Range.get("A1:D10");

    // Read the name and the referred address
    sheet.Range.get("F1").Text = "Named Range Name";
    sheet.Range.get("F2").Text = namedRange.Name;
    sheet.Range.get("G1").Text = "Refers To Address";
    sheet.Range.get("G2").Text = namedRange.RefersToRange.RangeAddress;

    // Auto-fit the columns
    sheet.AllocatedRange.AutoFitColumns();

    // Save the workbook
    const outputFileName = 'GlobalNamedRange.xlsx';
    workbook.SaveToFile(outputFileName);

    // Release resources
    workbook.Dispose();

    // Read the result file from VFS and trigger the download
    const fileArray = window.dotnetRuntime.Module.FS.readFile(outputFileName);
    const blob = new Blob([fileArray], { type: "application/vnd.openxmlformats-officedocument.spreadsheetml.sheet" });
    const url = URL.createObjectURL(blob);
    const a = document.createElement('a');
    a.href = url;
    a.download = outputFileName;
    a.click();
    URL.revokeObjectURL(url);
  };

  return (
    <div style={{ textAlign: 'center', height: '300px' }}>
      <h1>Create Global Named Range</h1>
      <button onClick={createGlobalNamedRange}>Start</button>
    </div>
  );
}

export default App;
After running, the effect of creating a global named range:
Local Named Range
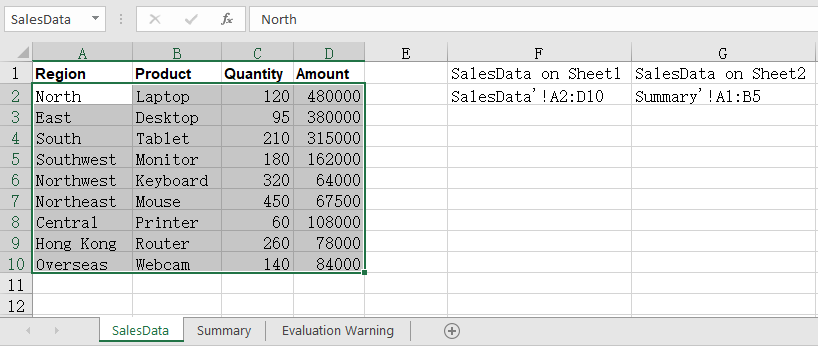
A global named range requires its name to be unique across the entire workbook. When different worksheets all want to use the same name while pointing at different data areas, switch to a local named range instead — added through Worksheet.Names.Add(), its name only takes effect inside the owning worksheet, so same-named ranges can live on several worksheets at once without interfering with each other. The steps are:
- Load the workbook and get the first worksheet.
- Create a local named range on the first worksheet with
sheet.Names.Add("SalesData"), pointing atA2:D10. - Add another worksheet with
workbook.Worksheets.Add()and create a same-named local named range on it, pointing at a different area. - Read the referred address of both ranges back into cells.
- Save the workbook.
The following is a complete code example that shows how to create a local named range in React:
function App() {
  const createLocalNamedRange = async () => {
    // Get the Spire.XLS WASM module
    const xlsModule = window.wasmModule?.spirexls;

    // Check if the module is ready
    if (!xlsModule) {
      alert('Spire.Xls is not ready yet');
      return;
    }

    // Load the font into VFS
    await window.spire.FetchFileToVFS('ARIAL.TTF', '/Library/Fonts/', `${process.env.PUBLIC_URL}/font/`);

    // Load the Excel file into VFS
    const inputFileName = 'NamedRanges.xlsx';
    await window.spire.FetchFileToVFS(inputFileName, '', `${process.env.PUBLIC_URL}/static/data/`);

    // Load the workbook
    const workbook = new xlsModule.Workbook();
    workbook.LoadFromFile(inputFileName);

    // Get the first worksheet
    let sheet = workbook.Worksheets.get(0);

    // Create a local named range on the first worksheet
    let localRange = sheet.Names.Add("SalesData");
    localRange.RefersToRange = sheet.Range.get("A2:D10");

    // Add another worksheet and create a same-named local range on it
    let sheet2 = workbook.Worksheets.Add("Summary");
    let localRange2 = sheet2.Names.Add("SalesData");
    localRange2.RefersToRange = sheet2.Range.get("A1:B5");

    // Read the addresses of the same-named ranges in both worksheets
    sheet.Range.get("F1").Text = "SalesData on Sheet1";
    sheet.Range.get("F2").Text = localRange.RefersToRange.RangeAddress;
    sheet.Range.get("G1").Text = "SalesData on Sheet2";
    sheet.Range.get("G2").Text = localRange2.RefersToRange.RangeAddress;

    // Auto-fit the columns
    sheet.AllocatedRange.AutoFitColumns();

    // Save the workbook
    const outputFileName = 'LocalNamedRange.xlsx';
    workbook.SaveToFile(outputFileName);

    // Release resources
    workbook.Dispose();

    // Read the result file from VFS and trigger the download
    const fileArray = window.dotnetRuntime.Module.FS.readFile(outputFileName);
    const blob = new Blob([fileArray], { type: "application/vnd.openxmlformats-officedocument.spreadsheetml.sheet" });
    const url = URL.createObjectURL(blob);
    const a = document.createElement('a');
    a.href = url;
    a.download = outputFileName;
    a.click();
    URL.revokeObjectURL(url);
  };

  return (
    <div style={{ textAlign: 'center', height: '300px' }}>
      <h1>Create Local Named Range</h1>
      <button onClick={createLocalNamedRange}>Start</button>
    </div>
  );
}

export default App;
After running, the effect of creating a local named range:
FAQ
How do I use a named range in a formula?
Cause: The real value of a named range is being referenced from formulas. Once the amount column is defined as a named range, the formula no longer needs a literal address, and the summed range expands automatically when rows are inserted later.
Solution: Simply write the name of the named range into the formula:
let namedRange = workbook.NameRanges.Add("SalesAmount");
namedRange.RefersToRange = sheet.Range.get("D2:D10");

// Refer to the named range in a formula
sheet.Range.get("F2").Formula = "=SUM(SalesAmount)";
How do I read the named ranges that already exist in a workbook?
Cause: A named range is saved together with the workbook, so it has to be read back before you can tell which names currently exist and which area each one points to.
Solution: Walk the NameRanges collection: take the count first, then read the name and the refers-to address of each entry by index:
// Total number of named ranges
let count = workbook.NameRanges.Count;

// Read the name and the refers-to address of each one
for (let i = 0; i < count; i++) {
  let namedRange = workbook.NameRanges.get(i);
  sheet.Range.get(`F${i + 2}`).Text = namedRange.Name;
  sheet.Range.get(`G${i + 2}`).Text = namedRange.RefersToRange.RangeAddress;
}
This walks workbook-level named ranges; worksheet-level ones are read through sheet.Names, in exactly the same way.
Get a Free License
Spire.XLS for JavaScript offers a 30-day full-featured free trial license with no functional limitations. Apply here to evaluate before purchasing.
Insert or Read Functions and Formulas in Excel Worksheets with JavaScript in React
In Excel document processing, formulas and functions are among the most essential capabilities — whether summing, averaging, or performing date and trigonometric operations, formulas make data processing automated and efficient. Spire.XLS for JavaScript completes the insertion and reading of formulas and functions directly in the browser based on WebAssembly, and manages input and output files through a virtual file system (VFS), with no backend service required.
This article covers two core features:
- Insert Formulas and Functions into an Excel Worksheet
- Read Formulas and Functions from an Excel Worksheet
For installation and project configuration, refer to Integrating Spire.XLS for JavaScript in a React Project. The examples below assume Spire.XLS is installed and the WebAssembly module is initialized.
Insert Formulas and Functions into an Excel Worksheet
The Formula property of the cell Range object returned by the Worksheet.Range.get() method in Spire.XLS for JavaScript can be used to add formulas or functions to specified cells in an Excel worksheet. The main steps for adding formulas and functions to an Excel worksheet are as follows:
- Create a
Workbookobject. - Use the
Workbook.Worksheets.get()method to get a specific worksheet. - Write data into cells and set the cell formatting.
- Use the
Range.Formulaproperty to add formulas and functions to the specified cells of the worksheet. - Use the
Workbook.SaveToFile()method to save the workbook.
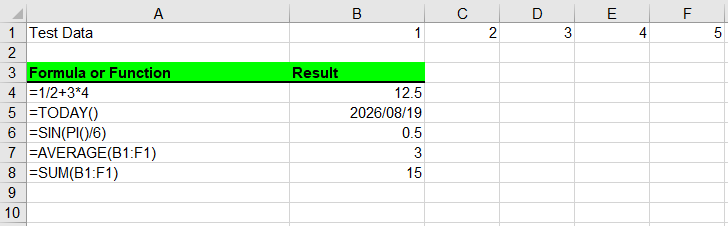
Here is a complete code example showing how to insert mathematical operations, date functions, trigonometric functions, average functions, and sum functions into an Excel worksheet in React:
function App() {
  const insertFormulasAndFunctions = async () => {
    // Get the Spire.XLS WASM module
    const xlsModule = window.wasmModule?.spirexls;

    // Check whether the module is ready
    if (!xlsModule) {
      alert('Spire.Xls is not ready yet');
      return;
    }

    // Load the font into the VFS
    await window.spire.FetchFileToVFS('ARIAL.TTF', '/Library/Fonts/', `${process.env.PUBLIC_URL}/font/`);

    // Create a Workbook object
    const workbook = new xlsModule.Workbook();

    // Get the first worksheet
    const sheet = workbook.Worksheets.get(0);

    // Declare two variables: currentRow and currentFormula
    let currentRow = 1;
    let currentFormula = "";

    // Set the column width
    sheet.SetColumnWidth(1, 32);
    sheet.SetColumnWidth(2, 16);

    // Write data into cells
    sheet.Range.get({ row: currentRow, column: 1 }).Value = "Test Data";
    sheet.Range.get({ row: currentRow, column: 2 }).NumberValue = 1;
    sheet.Range.get({ row: currentRow, column: 3 }).NumberValue = 2;
    sheet.Range.get({ row: currentRow, column: 4 }).NumberValue = 3;
    sheet.Range.get({ row: currentRow, column: 5 }).NumberValue = 4;
    sheet.Range.get({ row: currentRow, column: 6 }).NumberValue = 5;
    currentRow += 2;
    sheet.Range.get({ row: currentRow, column: 1 }).Value = "Formula or Function";
    sheet.Range.get({ row: currentRow, column: 2 }).Value = "Result";

    // Set the cell formatting
    let range = sheet.Range.get({ row: currentRow, column: 1, lastRow: currentRow, lastColumn: 2 });
    range.Style.Font.FontName = "Arial";
    range.Style.KnownColor = xlsModule.ExcelColors.LightGreen;
    range.Style.FillPattern = xlsModule.ExcelPatternType.Solid;
    range.Style.Borders.get(xlsModule.BordersLineType.EdgeBottom).LineStyle = xlsModule.LineStyleType.Medium;
    range.Style.Font.IsBold = true;

    // Mathematical operation
    currentFormula = "=1/2+3*4";
    currentRow += 1;
    sheet.Range.get({ row: currentRow, column: 1 }).NumberFormat = "@";
    sheet.Range.get({ row: currentRow, column: 1 }).Text = currentFormula;
    sheet.Range.get({ row: currentRow, column: 2 }).Formula = currentFormula;

    // Date function
    currentFormula = "=TODAY()";
    currentRow += 1;
    sheet.Range.get({ row: currentRow, column: 1 }).NumberFormat = "@";
    sheet.Range.get({ row: currentRow, column: 1 }).Text = currentFormula;
    sheet.Range.get({ row: currentRow, column: 2 }).Formula = currentFormula;
    sheet.Range.get({ row: currentRow, column: 2 }).Style.NumberFormat = "YYYY/MM/DD";

    // Trigonometric function
    currentFormula = "=SIN(PI()/6)";
    currentRow += 1;
    sheet.Range.get({ row: currentRow, column: 1 }).NumberFormat = "@";
    sheet.Range.get({ row: currentRow, column: 1 }).Text = currentFormula;
    sheet.Range.get({ row: currentRow, column: 2 }).Formula = currentFormula;

    // Average function
    currentFormula = "=AVERAGE(B1:F1)";
    currentRow += 1;
    sheet.Range.get({ row: currentRow, column: 1 }).NumberFormat = "@";
    sheet.Range.get({ row: currentRow, column: 1 }).Text = currentFormula;
    sheet.Range.get({ row: currentRow, column: 2 }).Formula = currentFormula;

    // Sum function
    currentFormula = "=SUM(B1:F1)";
    currentRow += 1;
    sheet.Range.get({ row: currentRow, column: 1 }).NumberFormat = "@";
    sheet.Range.get({ row: currentRow, column: 1 }).Text = currentFormula;
    sheet.Range.get({ row: currentRow, column: 2 }).Formula = currentFormula;

    // Save the workbook
    const outputFileName = 'InsertFormulasAndFunctions_output.xlsx';
    workbook.SaveToFile({ fileName: outputFileName, version: xlsModule.ExcelVersion.Version2010 });

    // Release resources
    workbook.Dispose();

    // Read the converted file from the VFS and trigger a download
    const fileArray = window.dotnetRuntime.Module.FS.readFile(outputFileName);
    const blob = new Blob([fileArray], { type: 'application/vnd.openxmlformats-officedocument.spreadsheetml.sheet' });
    const url = URL.createObjectURL(blob);
    const a = document.createElement('a');
    a.href = url;
    a.download = outputFileName;
    a.click();
    URL.revokeObjectURL(url);
  };

  return (
    <div style={{ textAlign: 'center', height: '300px' }}>
      <h1>Insert Formulas and Functions</h1>
      <button onClick={insertFormulasAndFunctions}>
        Start
      </button>
    </div>
  );
}

export default App;
Insert formulas and function results into Excel worksheets
Read Formulas and Functions from an Excel Worksheet
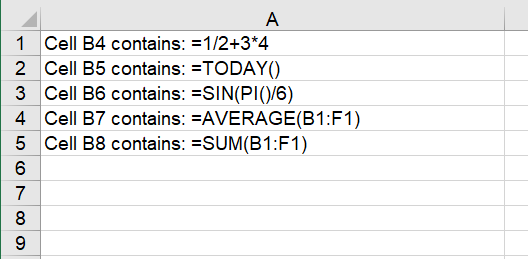
To read formulas and functions from an Excel worksheet, you need to loop through all the used cells in the worksheet, then use the HasFormula property of a cell to find the cells that contain formulas or functions, and finally use the Range.Formula property to get the formulas or functions in those cells. The detailed steps are as follows:
- Create a
Workbookobject. - Use the
Workbook.LoadFromFile()method to load an Excel workbook. - Use the
Workbook.Worksheets.get()method to get the first worksheet. - Loop through the used cells in the worksheet.
- Use the
HasFormulaproperty to detect whether a cell contains a formula or function. If so, use theRange.RangeAddressLocalproperty and theRange.Formulaproperty to get the cell name and its formula or function, and output the retrieved content.
Here is a complete code example showing how to loop through a worksheet and read the formulas and functions in React:
function App() {
  const readFormulasAndFunctions = async () => {
    // Get the Spire.XLS WASM module
    const xlsModule = window.wasmModule?.spirexls;

    // Check whether the module is ready
    if (!xlsModule) {
      alert('Spire.Xls is not ready yet');
      return;
    }

    // Load the font and Excel file into the VFS
    await window.spire.FetchFileToVFS('ARIAL.TTF', '/Library/Fonts/', `${process.env.PUBLIC_URL}/font/`);
    const inputFileName = 'FormulasAndFunctions.xlsx';
    await window.spire.FetchFileToVFS(inputFileName, '', `${process.env.PUBLIC_URL}data/`);

    // Create a Workbook object
    const workbook = new xlsModule.Workbook();

    // Load the Excel workbook
    workbook.LoadFromFile({ fileName: inputFileName });

    // Get the first worksheet
    const sheet = workbook.Worksheets.get(0);

    // Get the used cell range of the worksheet
    const usedRange = sheet.AllocatedRange;

    // Create an output workbook
    const output = new xlsModule.Workbook();
    const outSheet = output.Worksheets.get(0);
    let outRow = 1;

    // Loop through the used cells
    for (const cell of usedRange.Cells) {
      // Check whether the cell contains a formula or function
      if (cell.HasFormula) {
        // Get the cell name
        const cellname = cell.RangeAddressLocal;

        // Get the formula or function in the cell
        const formula = cell.Formula;

        // Write the cell name and formula that were read
        outSheet.Range.get({ row: outRow, column: 1 }).Value = "Cell " + cellname + " contains: " + formula;
        outRow += 1;
      }
    }

    // Set the output column width so the text displays completely
    outSheet.SetColumnWidth(1, 45);

    // Save the output workbook
    const outputFileName = 'ReadFormulasAndFunctions_output.xlsx';
    output.SaveToFile({ fileName: outputFileName, version: xlsModule.ExcelVersion.Version2010 });

    // Release resources
    output.Dispose();

    // Read the converted file from the VFS and trigger a download
    const fileArray = window.dotnetRuntime.Module.FS.readFile(outputFileName);
    const blob = new Blob([fileArray], { type: 'application/vnd.openxmlformats-officedocument.spreadsheetml.sheet' });
    const url = URL.createObjectURL(blob);
    const a = document.createElement('a');
    a.href = url;
    a.download = outputFileName;
    a.click();
    URL.revokeObjectURL(url);
  };

  return (
    <div style={{ textAlign: 'center', height: '300px' }}>
      <h1>Read Formulas and Functions</h1>
      <button onClick={readFormulasAndFunctions}>
        Start
      </button>
    </div>
  );
}

export default App;
Read formulas and function results from Excel worksheets
Frequently Asked Questions
HasFormula cannot detect the formula, and the loop returns no results
Cause: The formula in the target cell was actually written as text (using the Text/Value property instead of the Formula property), and HasFormula only returns true for real formulas.
Solution: Make sure to use the Range.Formula property when inserting; otherwise, re-assign the text as a formula before reading.
Confusing the Formula and FormulaNumberValue properties
Cause: The Formula property returns the formula string in the cell, while the FormulaNumberValue property returns the numeric result after the formula is calculated. The two return different content.
Solution: Use cell.Formula when you need the formula string, and cell.FormulaNumberValue when you need the numeric result after calculation. Choose the appropriate property based on your actual needs.
Get a Free License
Spire.XLS for JavaScript offers a 30-day full-featured free trial license with no functional limitations. Apply here to evaluate before purchasing.