
Image (4)
Compress, Resize or Move Excel Pictures in React with JavaScript
2026-09-18 01:57:13 Written by AdministratorOnce a report has accumulated a few pictures, the awkward part is rarely the text: a few hundred kilobytes of product photos pushed straight into a worksheet will swell the file until sending and archiving become painful, and pictures copied in from elsewhere rarely share one size—a large one covers an entire block of data while a small one sits unreadable in a corner. Fixing these by hand in Excel is bearable, but there is no entry point once the work has to be done in code.Spire.XLS for JavaScript performs this work directly in the browser through WebAssembly, managing input and output files with a virtual file system (VFS) and requiring no backend service.
This article covers three key features:
For installation and project setup, see Integrating Spire.XLS for JavaScript in a React Project. The examples below assume Spire.XLS is already installed and the WebAssembly module has been initialized.
Compress Pictures in Excel
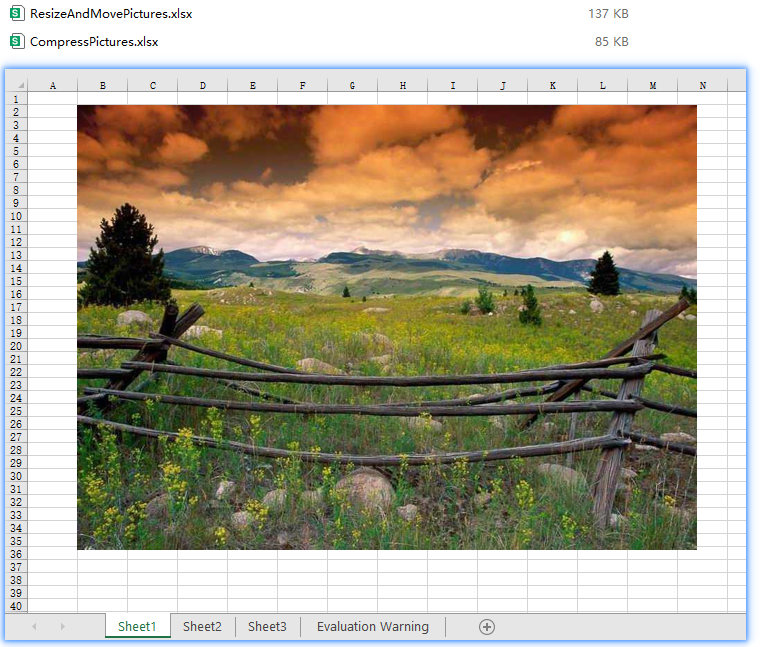
Compress() re-encodes a picture at the quality ratio you pass in: a value of 50 brings the picture quality down to 50%. The lower the quality, the less data the picture takes up and the lighter the workbook becomes. Compression only touches the picture's own data—the picture keeps its position and its display size on the worksheet—so it is the right move when you want a smaller file without disturbing the layout. The steps are:
- Load the workbook.
- Walk every picture of every worksheet.
- Call
Compressto bring each picture down to 50% quality. - Save the workbook.
The following is a complete code example that compresses the pictures in an Excel file in React:
function App() {
  const compressPictures = async () => {
    // Get the Spire.XLS WASM module
    const xlsModule = window.wasmModule?.spirexls;

    // Check if the module is ready
    if (!xlsModule) {
      alert('Spire.Xls is not ready yet');
      return;
    }

    // Load the font into VFS
    await window.spire.FetchFileToVFS('ARIAL.TTF', '/Library/Fonts/', `${process.env.PUBLIC_URL}/font/`);

    // Load the Excel file into VFS
    const inputFileName = 'ResizeAndMovePictures.xlsx';
    await window.spire.FetchFileToVFS(inputFileName, '', `${process.env.PUBLIC_URL}/static/data/`);

    // Load the workbook
    const workbook = new xlsModule.Workbook();
    workbook.LoadFromFile(inputFileName);

    // Walk every picture of every worksheet
    for (const sheet of workbook.Worksheets) {
      for (const picture of sheet.Pictures) {
        // Compress the picture quality down to 50%
        picture.Compress(50);
      }
    }

    // Save the workbook
    const outputFileName = "CompressPictures.xlsx";
    workbook.SaveToFile(outputFileName);

    // Release resources
    workbook.Dispose();

    // Read the result file from VFS and trigger the download
    const fileArray = window.dotnetRuntime.Module.FS.readFile(outputFileName);
    const blob = new Blob([fileArray], { type: "application/vnd.openxmlformats-officedocument.spreadsheetml.sheet" });
    const url = URL.createObjectURL(blob);
    const a = document.createElement('a');
    a.href = url;
    a.download = outputFileName;
    a.click();
    URL.revokeObjectURL(url);
  };

  return (
    <div style={{ textAlign: 'center', height: '300px' }}>
      <h1>Compress, Resize or Move Pictures in Excel</h1>
      <button onClick={compressPictures}>Start</button>
    </div>
  );
}

export default App;
Compress handles every picture it reaches in one pass; the compressed pictures stay where they were and only lose some image quality.
After running, the effect of compressing pictures in Excel:
Resize a Picture in Excel
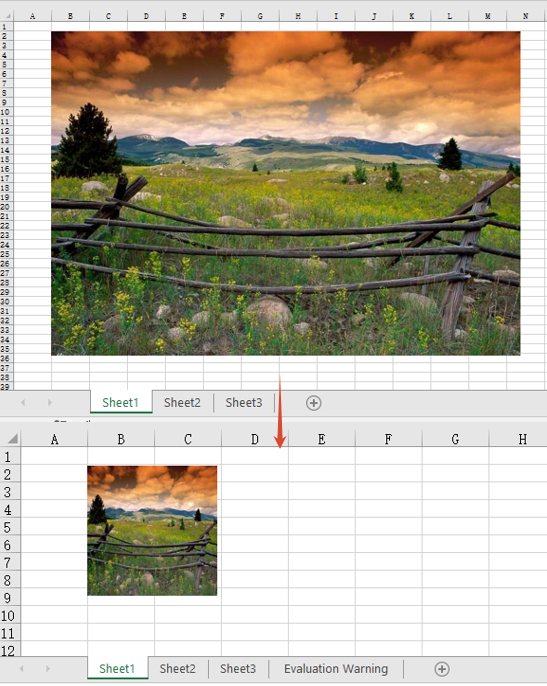
The size a picture is displayed at on a worksheet is controlled by two properties, Width and Height, measured in pixels. Assigning new values to them brings the picture to the size you want—a shrunken picture no longer covers the data next to it, and an enlarged one can fill a reserved picture slot. The steps are:
- Load the workbook and get the first worksheet.
- Get the first picture of the worksheet with
sheet.Pictures.get(0). - Set
WidthandHeightto resize the picture. - Save the workbook.
The following is a complete code example that resizes a picture in Excel in React:
function App() {
  const resizePicture = async () => {
    // Get the Spire.XLS WASM module
    const xlsModule = window.wasmModule?.spirexls;

    // Check if the module is ready
    if (!xlsModule) {
      alert('Spire.Xls is not ready yet');
      return;
    }

    // Load the font into VFS
    await window.spire.FetchFileToVFS('ARIAL.TTF', '/Library/Fonts/', `${process.env.PUBLIC_URL}/font/`);

    // Load the Excel file into VFS
    const inputFileName = 'ResizeAndMovePictures.xlsx';
    await window.spire.FetchFileToVFS(inputFileName, '', `${process.env.PUBLIC_URL}/static/data/`);

    // Load the workbook
    const workbook = new xlsModule.Workbook();
    workbook.LoadFromFile(inputFileName);

    // Get the first worksheet
    const sheet = workbook.Worksheets.get(0);

    // Get the first picture of the worksheet
    const picture = sheet.Pictures.get(0);

    // Resize the picture to 140 pixels wide and 140 pixels high
    picture.Width = 140;
    picture.Height = 140;

    // Save the workbook
    const outputFileName = "ResizePicture.xlsx";
    workbook.SaveToFile(outputFileName);

    // Release resources
    workbook.Dispose();

    // Read the result file from VFS and trigger the download
    const fileArray = window.dotnetRuntime.Module.FS.readFile(outputFileName);
    const blob = new Blob([fileArray], { type: "application/vnd.openxmlformats-officedocument.spreadsheetml.sheet" });
    const url = URL.createObjectURL(blob);
    const a = document.createElement('a');
    a.href = url;
    a.download = outputFileName;
    a.click();
    URL.revokeObjectURL(url);
  };

  return (
    <div style={{ textAlign: 'center', height: '300px' }}>
      <h1>Compress, Resize or Move Pictures in Excel</h1>
      <button onClick={resizePicture}>Start</button>
    </div>
  );
}

export default App;
Width and Height map to the picture's width and height and take effect independently, so the picture shows at its new size as soon as they are assigned. Note that this sets the size of the picture frame rather than scaling proportionally—when the new width and height do not match the original ratio, the picture is stretched. See the FAQ below for how to handle that.
After running, the effect of resizing a picture in Excel:
Move a Picture in Excel
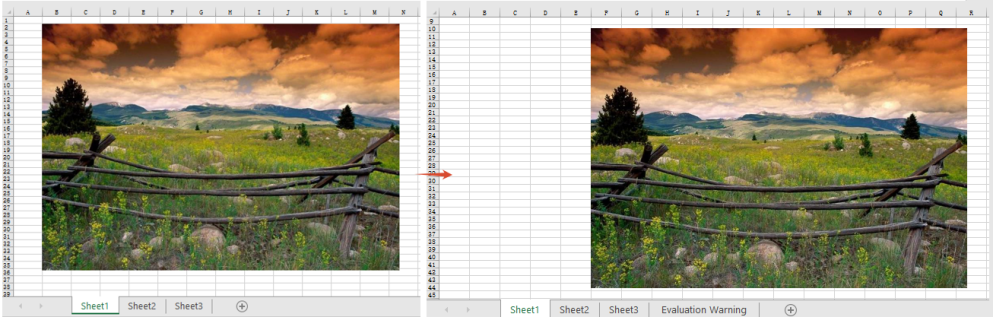
A picture in Excel is a floating object anchored to a cell, so setting its size alone does not change where it shows up. The Left and Top properties are measured in pixels and give the distance from the top-left corner of the worksheet to the top-left corner of the picture; assigning them moves the picture to the new coordinates, which is how you push a picture out of a block of data or line several pictures up in the same column. The steps are:
- Load the workbook and get the first worksheet.
- Get the first picture of the worksheet with
sheet.Pictures.get(0). - Set
LeftandTopto move the picture. - Save the workbook.
The following is a complete code example that moves a picture in Excel in React:
function App() {
  const movePicture = async () => {
    // Get the Spire.XLS WASM module
    const xlsModule = window.wasmModule?.spirexls;

    // Check if the module is ready
    if (!xlsModule) {
      alert('Spire.Xls is not ready yet');
      return;
    }

    // Load the font into VFS
    await window.spire.FetchFileToVFS('ARIAL.TTF', '/Library/Fonts/', `${process.env.PUBLIC_URL}/font/`);

    // Load the Excel file into VFS
    const inputFileName = 'ResizeAndMovePictures.xlsx';
    await window.spire.FetchFileToVFS(inputFileName, '', `${process.env.PUBLIC_URL}/static/data/`);

    // Load the workbook
    const workbook = new xlsModule.Workbook();
    workbook.LoadFromFile(inputFileName);

    // Get the first worksheet
    const sheet = workbook.Worksheets.get(0);

    // Get the first picture of the worksheet
    const picture = sheet.Pictures.get(0);

    // Move the top-left corner of the picture 360 pixels from the left and 180 pixels from the top
    picture.Left = 360;
    picture.Top = 180;

    // Save the workbook
    const outputFileName = "MovePicture.xlsx";
    workbook.SaveToFile(outputFileName);

    // Release resources
    workbook.Dispose();

    // Read the result file from VFS and trigger the download
    const fileArray = window.dotnetRuntime.Module.FS.readFile(outputFileName);
    const blob = new Blob([fileArray], { type: "application/vnd.openxmlformats-officedocument.spreadsheetml.sheet" });
    const url = URL.createObjectURL(blob);
    const a = document.createElement('a');
    a.href = url;
    a.download = outputFileName;
    a.click();
    URL.revokeObjectURL(url);
  };

  return (
    <div style={{ textAlign: 'center', height: '300px' }}>
      <h1>Compress, Resize or Move Pictures in Excel</h1>
      <button onClick={movePicture}>Start</button>
    </div>
  );
}

export default App;
Left and Top describe the absolute coordinates of the picture's top-left corner on the worksheet, regardless of which row or column the picture was originally anchored to.
After running, the effect of moving a picture in Excel:
FAQ
Why does a picture look stretched after resizing?
Cause: Width and Height are two independent properties, and assigning them separately does not preserve the picture's original aspect ratio. Give a rectangular picture the same value for width and height and it is forced into a square.
Solution: read the picture's current width and height first, work out the ratio, and derive the other dimension from it. The size properties only accept integers, so round the result:
// Read the picture's current width and height to work out the ratio
const picture = sheet.Pictures.get(0);
const ratio = picture.Height / picture.Width;

// Fix the width and derive the height from the ratio so the picture is not distorted
picture.Width = 140;
picture.Height = Math.round(140 * ratio);
Does IsLockAspectRatio keep a picture from being distorted?
Cause: no. The property is true by default, and what it sets is the picture's lock flag, which constrains resizing by hand in Excel. It does not scale the other side for you when Width / Height are assigned from code—setting Width to 140 left Height at its original 300 whether IsLockAspectRatio was true or false.
Solution: proportional resizing still has to be computed by hand. The property reads and writes fine and survives a save, so set it when the file's lock state needs to match:
// The lock flag: true by default; setting it to false is written to the file and reads back as false
picture.IsLockAspectRatio = false;

// But it takes no part in the width / height conversion: change Width alone and Height stays put
picture.Width = 140;

// To scale proportionally, work out the ratio first
const ratio = picture.Height / picture.Width;
picture.Width = 140;
picture.Height = Math.round(140 * ratio);
Get a Free License
Spire.XLS for JavaScript offers a 30-day full-featured free trial license with no functional limitations. Apply here to evaluate before purchasing.
When creating flowcharts, relationship diagrams, or data annotations, inserting lines into an Excel worksheet is a common requirement. Spire.XLS for JavaScript provides rich line APIs for creating various line types (straight lines, curved lines, elbow connectors, etc.) and arrow-tipped connectors. All operations are performed directly in the browser based on WebAssembly, with no backend service required.
This article covers two core features:
For installation and project configuration, refer to Integrating Spire.XLS for JavaScript in a React Project. The examples below assume Spire.XLS is installed and the WebAssembly module is initialized.
Insert Different Types of Lines
The sheet.Lines.AddLine() method inserts line shapes at a specified position. Using the LineShapeType enum, you can create various line types: straight lines (Line), curved lines (CurveLine), elbow connectors (ElbowLine), and inverted lines (LineInv). The appearance of lines can be customized through properties such as DashStyle (dash style), Color (color), and Weight (thickness).
The main steps are as follows:
- Create a
Workbookobject and get the first worksheet. - Call the
Worksheet.Lines.AddLine()method, passing position parameters andLineShapeTypeto specify the line type. - Customize line appearance through the
DashStyle,Color,Weight, andEndArrowHeadStyleproperties. - Save the workbook with the
Workbook.SaveToFile()method.
Here is a complete code example showing how to insert four different types of lines into Excel in React:
function App() {
  const addLineShapes = async () => {
    // Get the Spire.XLS WASM module
    const xlsModule = window.wasmModule?.spirexls;

    // Check whether the module is ready
    if (!xlsModule) {
      alert('Spire.Xls is not ready yet');
      return;
    }

    // Load the font into the VFS for text measurement and column auto-fit
    await window.spire.FetchFileToVFS('ARIAL.TTF', '/Library/Fonts/', `${process.env.PUBLIC_URL}/font/`);

    // Create a new workbook and get the first worksheet
    const workbook = new xlsModule.Workbook();
    const sheet = workbook.Worksheets.get(0);

    // Add a straight line - solid, CadetBlue, weight 2, with arrow
    let line1 = sheet.Lines.AddLine({ row: 10, column: 2, width: 200, height: 1, lineShapeType: xlsModule.LineShapeType.Line });
    line1.DashStyle = xlsModule.ShapeDashLineStyleType.Solid;
    line1.Color = xlsModule.Color.get_CadetBlue();
    line1.Weight = 2;
    line1.EndArrowHeadStyle = xlsModule.ShapeArrowStyleType.LineArrow;

    // Add a curved line - dotted, OrangeRed, weight 2
    let line2 = sheet.Lines.AddLine({ row: 12, column: 2, width: 200, height: 1, lineShapeType: xlsModule.LineShapeType.CurveLine });
    line2.DashStyle = xlsModule.ShapeDashLineStyleType.Dotted;
    line2.Color = xlsModule.Color.get_OrangeRed();
    line2.Weight = 2;

    // Add an elbow connector - DashDotDot, Purple, weight 2
    let line3 = sheet.Lines.AddLine({ row: 14, column: 2, width: 200, height: 1, lineShapeType: xlsModule.LineShapeType.ElbowLine });
    line3.DashStyle = xlsModule.ShapeDashLineStyleType.DashDotDot;
    line3.Color = xlsModule.Color.get_Purple();
    line3.Weight = 2;

    // Add an inverted line - Dashed, Green, weight 2
    let line4 = sheet.Lines.AddLine({ row: 16, column: 2, width: 200, height: 1, lineShapeType: xlsModule.LineShapeType.LineInv });
    line4.DashStyle = xlsModule.ShapeDashLineStyleType.Dashed;
    line4.Color = xlsModule.Color.get_Green();
    line4.Weight = 2;

    // Save the workbook
    const outputFileName = 'AddLineShapes.xlsx';
    workbook.SaveToFile({ fileName: outputFileName, version: xlsModule.ExcelVersion.Version2010 });

    // Release resources
    workbook.Dispose();

    // Read the saved file from the VFS and trigger the download
    const fileArray = window.dotnetRuntime.Module.FS.readFile(outputFileName);
    const blob = new Blob([fileArray], { type: 'application/vnd.openxmlformats-officedocument.spreadsheetml.sheet' });
    const url = URL.createObjectURL(blob);
    const a = document.createElement('a');
    a.href = url;
    a.download = outputFileName;
    a.click();
    URL.revokeObjectURL(url);
  };

  return (
    <div style={{ textAlign: 'center', height: '300px' }}>
      <h1>Add Line Shapes</h1>
      <button onClick={addLineShapes}>Start</button>
    </div>
  );
}

export default App;
Effect of inserting different line types:

Insert Arrow-Tipped Lines
The sheet.TypedLines.AddLine() method inserts arrow-tipped lines. Unlike Lines.AddLine(), TypedLines supports precise positioning using pixel coordinates or row/column coordinates, and supports setting different arrow head styles on both ends (beginning BeginArrowHeadStyle and end EndArrowHeadStyle).
The main steps are as follows:
- Create a
Workbookobject and get the first worksheet. - Call the
Worksheet.TypedLines.AddLine()method to create a line. - Set line position through the
Top,Left,Width, andHeightproperties (in pixels). - Set arrow styles on both ends through
BeginArrowHeadStyleandEndArrowHeadStyle. - Specify the line type through
LineShapeType(straight, elbow, curved, etc.). - Save the workbook with the
Workbook.SaveToFile()method.
Here is a complete code example showing how to insert six different types of arrow lines into Excel in React:
function App() {
  const addArrowLines = async () => {
    // Get the Spire.XLS WASM module
    const xlsModule = window.wasmModule?.spirexls;

    // Check whether the module is ready
    if (!xlsModule) {
      alert('Spire.Xls is not ready yet');
      return;
    }

    // Load the font into the VFS for text measurement and column auto-fit
    await window.spire.FetchFileToVFS('ARIAL.TTF', '/Library/Fonts/', `${process.env.PUBLIC_URL}/font/`);

    // Create a new workbook and get the first worksheet
    const workbook = new xlsModule.Workbook();
    const sheet = workbook.Worksheets.get(0);

    // Add a double-arrow line - solid blue
    let line = sheet.TypedLines.AddLine();
    line.Top = 10;
    line.Left = 20;
    line.Width = 100;
    line.Height = 0;
    line.Color = xlsModule.Color.get_Blue();
    line.BeginArrowHeadStyle = xlsModule.ShapeArrowStyleType.LineArrow;
    line.EndArrowHeadStyle = xlsModule.ShapeArrowStyleType.LineArrow;

    // Add a single-arrow line - solid red
    let line_1 = sheet.TypedLines.AddLine();
    line_1.Top = 50;
    line_1.Left = 30;
    line_1.Width = 100;
    line_1.Height = 100;
    line_1.Color = xlsModule.Color.get_Red();
    line_1.BeginArrowHeadStyle = xlsModule.ShapeArrowStyleType.LineNoArrow;
    line_1.EndArrowHeadStyle = xlsModule.ShapeArrowStyleType.LineArrow;

    // Add an elbow arrow connector
    let line3 = sheet.TypedLines.AddLine();
    line3.LineShapeType = xlsModule.LineShapeType.ElbowLine;
    line3.Width = 30;
    line3.Height = 50;
    line3.EndArrowHeadStyle = xlsModule.ShapeArrowStyleType.LineArrow;
    line3.Top = 100;
    line3.Left = 50;

    // Add an elbow double-arrow connector
    let line2 = sheet.TypedLines.AddLine();
    line2.LineShapeType = xlsModule.LineShapeType.ElbowLine;
    line2.Width = 50;
    line2.Height = 50;
    line2.EndArrowHeadStyle = xlsModule.ShapeArrowStyleType.LineArrow;
    line2.BeginArrowHeadStyle = xlsModule.ShapeArrowStyleType.LineArrow;
    line2.Left = 120;
    line2.Top = 100;

    // Add a curved arrow connector
    line3 = sheet.TypedLines.AddLine();
    line3.LineShapeType = xlsModule.LineShapeType.CurveLine;
    line3.Width = 30;
    line3.Height = 50;
    line3.EndArrowHeadStyle = xlsModule.ShapeArrowStyleType.LineArrowOpen;
    line3.Top = 100;
    line3.Left = 200;

    // Add a curved double-arrow connector
    line2 = sheet.TypedLines.AddLine();
    line2.LineShapeType = xlsModule.LineShapeType.CurveLine;
    line2.Width = 30;
    line2.Height = 50;
    line2.EndArrowHeadStyle = xlsModule.ShapeArrowStyleType.LineArrowOpen;
    line2.BeginArrowHeadStyle = xlsModule.ShapeArrowStyleType.LineArrowOpen;
    line2.Left = 250;
    line2.Top = 100;

    // Save the workbook
    const outputFileName = 'AddArrowLines.xlsx';
    workbook.SaveToFile({ fileName: outputFileName, version: xlsModule.ExcelVersion.Version2010 });

    // Release resources
    workbook.Dispose();

    // Read the saved file from the VFS and trigger the download
    const fileArray = window.dotnetRuntime.Module.FS.readFile(outputFileName);
    const blob = new Blob([fileArray], { type: 'application/vnd.openxmlformats-officedocument.spreadsheetml.sheet' });
    const url = URL.createObjectURL(blob);
    const a = document.createElement('a');
    a.href = url;
    a.download = outputFileName;
    a.click();
    URL.revokeObjectURL(url);
  };

  return (
    <div style={{ textAlign: 'center', height: '300px' }}>
      <h1>Add Arrow Lines</h1>
      <button onClick={addArrowLines}>Start</button>
    </div>
  );
}

export default App;
Effect of inserting arrow-tipped lines:

Frequently Asked Questions
How do I retrieve and modify existing lines in a worksheet?
Reason: An Excel file with existing lines was imported, but it's unclear how to read or modify them.
Solution: Traverse the sheet.Shapes collection to retrieve line shape objects, then modify their properties via the ILineShape interface. For example, sheet.Shapes.get(0) gets the first shape, and after confirming it's a line type, you can modify properties like color, dash style, etc.
How do I delete lines from an Excel worksheet?
Reason: Need to remove excess lines that were created or imported.
Solution: Use sheet.Shapes.Remove(index) to delete a line object at a specified index from the shapes collection, or iterate through the Shapes collection to delete them one by one based on name or type conditions.
Get a Free License
Spire.XLS for JavaScript offers a 30-day full-featured free trial license with no functional limitations. Apply here to evaluate before purchasing.
In office automation workflows, you often need to batch-extract product images from Excel reports, replace outdated logos, or export a specific image individually. Spire.XLS for JavaScript handles all of these image operations directly in the browser via WebAssembly, using a virtual file system (VFS) to manage input and output files — no backend server is required.
This article covers three core features:
- Extract All Images from a Worksheet
- Extract a Specific Image
- Replace an Existing Image in a Worksheet
For installation and project setup, refer to Integrating Spire.XLS for JavaScript in a React Project. The examples below assume Spire.XLS is installed and the WebAssembly module is initialized.
Extract All Images from a Worksheet
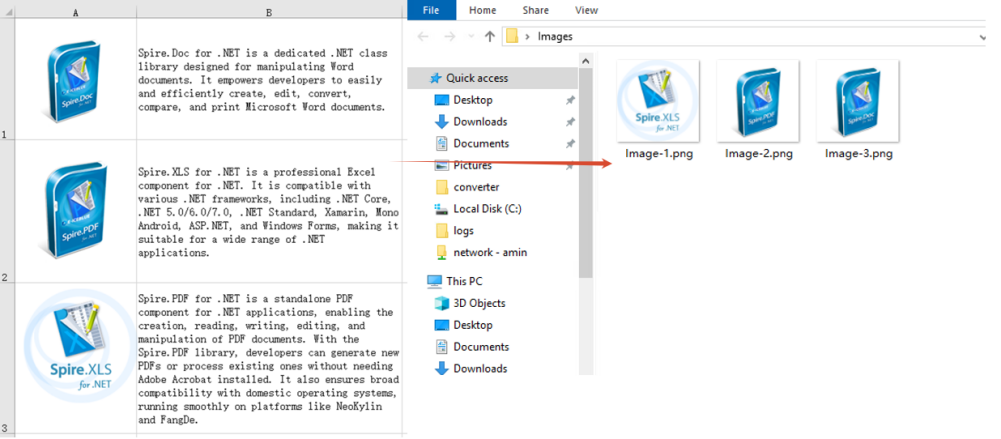
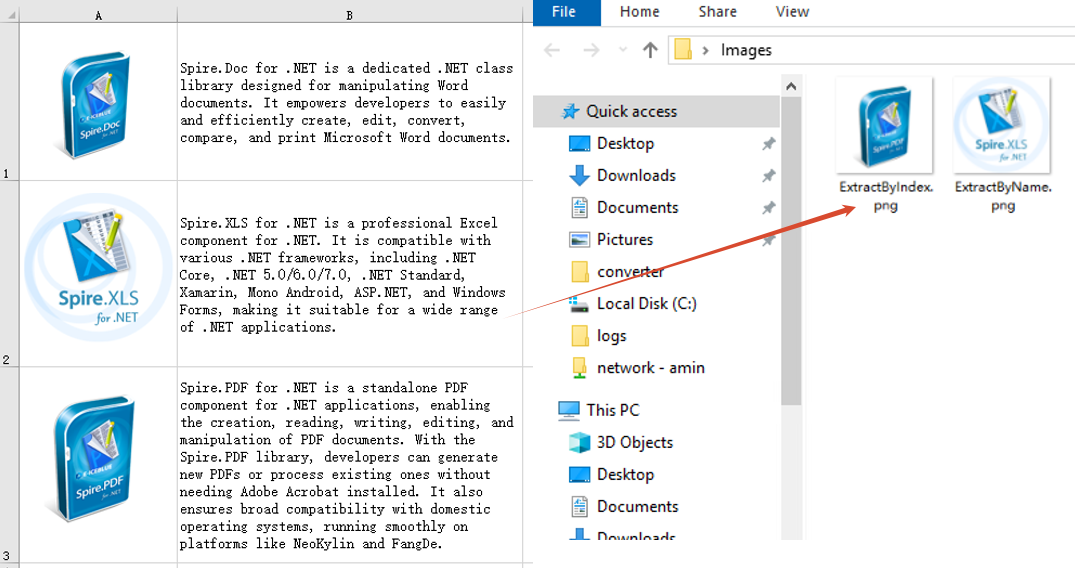
Batch-extracting all images from a worksheet is useful for backing up embedded images in reports, migrating product materials, and similar scenarios. The process consists of three steps: iterate over the Worksheet.Pictures collection, call the Picture.Save method on each image to save it to the VFS, then read each file and trigger a browser download.
function App() {
  const extractAllImages = async () => {
    // Get the Spire.XLS WASM module
    const xlsModule = window.wasmModule?.spirexls;

    // Check if the module is ready
    if (!xlsModule) {
      alert('Spire.Xls is not ready yet');
      return;
    }

    // Load the Excel file into VFS
    const inputFileName = 'ReadImages.xlsx';
    await window.spire.FetchFileToVFS(inputFileName, '', `${process.env.PUBLIC_URL}data/`);

    // Load the workbook and get the first worksheet
    const workbook = new xlsModule.Workbook();
    workbook.LoadFromFile({ fileName: inputFileName });
    const sheet = workbook.Worksheets.get(0);

    // Iterate through all pictures in the worksheet and export each one
    for (let i = 0; i < sheet.Pictures.Count; i++) {
      const pic = sheet.Pictures.get(i);
      const outputFileName = `Image-${i + 1}.png`;
      pic.Picture.Save(outputFileName);

      // Read the exported image file from VFS and trigger download
      const fileArray = window.dotnetRuntime.Module.FS.readFile(outputFileName);
      const blob = new Blob([fileArray], { type: "image/png" });
      const url = URL.createObjectURL(blob);
      const a = document.createElement('a');
      a.href = url;
      a.download = outputFileName;
      a.click();
      URL.revokeObjectURL(url);
    }

    // Release resources
    workbook.Dispose();
  };

  return (
    <div style={{ textAlign: 'center', height: '300px' }}>
      <h1>Extract All Images from Worksheet</h1>
      <button onClick={extractAllImages}>
        Extract All Images
      </button>
    </div>
  );
}

export default App;
Image files extracted and downloaded from the worksheet in batch
Extract a Specific Image
There are two common ways to extract a specific image from a worksheet: retrieve it directly by index, or iterate through pictures by name to find a match. The index approach suits scenarios where the picture position is known (for example, the first picture), while the name approach is better when you know the picture identifier in advance. The process consists of two steps: first locate the target image by index or name, then export it as a local file.
function App() {
  const extractImage = async () => {
    // Get the Spire.XLS WASM module
    const xlsModule = window.wasmModule?.spirexls;

    if (!xlsModule) {
      alert('Spire.Xls is not ready yet');
      return;
    }

    // Load the Excel file into VFS
    const inputFileName = 'ReadImages.xlsx';
    await window.spire.FetchFileToVFS(inputFileName, '', `${process.env.PUBLIC_URL}data/`);

    // Load the workbook and get the first worksheet
    const workbook = new xlsModule.Workbook();
    workbook.LoadFromFile({ fileName: inputFileName });
    const sheet = workbook.Worksheets.get(0);

    // Method 1: Extract by index (e.g., extract the second picture)
    const pic = sheet.Pictures.get(1);
    const outputFileName = 'ExtractByIndex.png';

    // // Method 2: Iterate through pictures by name to find a match
    // let pic = null;
    // const targetName = 'SpireXLS';
    // for (let i = 0; i < sheet.Pictures.Count; i++) {
    //   if (sheet.Pictures.get(i).Name === targetName) {
    //     pic = sheet.Pictures.get(i);
    //     break;
    //   }
    // }
    // const outputFileName = 'ExtractByName.png';

    // Save the picture to VFS and trigger download
    pic.Picture.Save(outputFileName);
    const fileArray = window.dotnetRuntime.Module.FS.readFile(outputFileName);
    const blob = new Blob([fileArray], { type: "image/png" });
    const url = URL.createObjectURL(blob);
    const a = document.createElement('a');
    a.href = url;
    a.download = outputFileName;
    a.click();
    URL.revokeObjectURL(url);

    workbook.Dispose();
  };

  return (
    <div style={{ textAlign: 'center', height: '300px' }}>
      <h1>Extract a Specific Image</h1>
      <button onClick={extractImage}>
        Extract Image
      </button>
    </div>
  );
}

export default App;
Specific image extracted and downloaded by index or name
Replace an Existing Image in a Worksheet
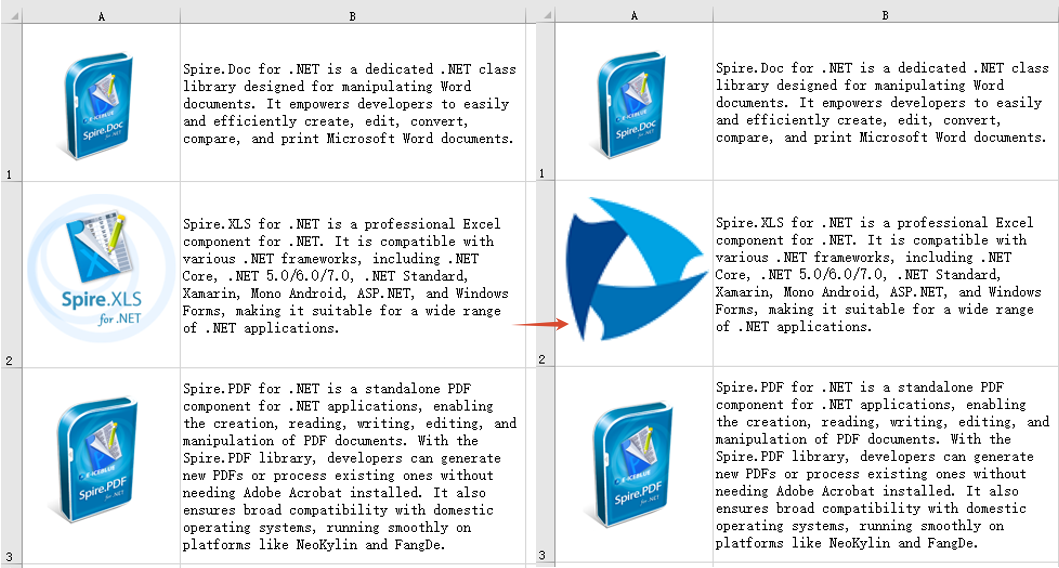
Replacing an existing image in a worksheet is a common requirement when updating report logos, changing product display images, and in similar scenarios. The approach is to first retrieve the position and size information of the target image, then delete it via XlsShape.Convert, and finally insert a new image at the same position, setting the new image's size and offsets to match the original.
function App() {
  const replaceImage = async () => {
    // Get the Spire.XLS WASM module
    const xlsModule = window.wasmModule?.spirexls;

    // Check if the module is ready
    if (!xlsModule) {
      alert('Spire.Xls is not ready yet');
      return;
    }

    // Load the Excel file and the new image into VFS
    const inputFileName = 'ReadImages.xlsx';
    await window.spire.FetchFileToVFS(inputFileName, '', `${process.env.PUBLIC_URL}data/`);
    const newImageFile = 'Logo.png';
    await window.spire.FetchFileToVFS(newImageFile, '', `${process.env.PUBLIC_URL}data/`);

    // Load the workbook and get the first worksheet
    const workbook = new xlsModule.Workbook();
    workbook.LoadFromFile({ fileName: inputFileName });
    const sheet = workbook.Worksheets.get(0);

    // Get the first picture and its position and size information
    const oldPic = sheet.Pictures.get(0);
    const topRow = oldPic.TopRow;
    const leftColumn = oldPic.LeftColumn;
    const leftColumnOffset = oldPic.LeftColumnOffset;
    const topRowOffset = oldPic.TopRowOffset;
    const width = oldPic.Width;
    const height = oldPic.Height;

    // Delete the original picture
    xlsModule.XlsShape.Convert(oldPic).Remove();

    // Insert the new picture at the same position
    let picture = sheet.Pictures.Add({ topRow: topRow, leftColumn: leftColumn, fileName: newImageFile });

    // Set the new picture's size and offsets to match the original
    picture.Width = width;
    picture.Height = height;
    picture.LeftColumnOffset = leftColumnOffset;
    picture.TopRowOffset = topRowOffset;

    const outputFileName = 'ReplaceImage-out.xlsx';
    // Save the modified workbook
    workbook.SaveToFile({ fileName: outputFileName, version: xlsModule.ExcelVersion.Version2010 });
    // Release resources
    workbook.Dispose();

    // Read the generated file from VFS and trigger download
    const fileArray = window.dotnetRuntime.Module.FS.readFile(outputFileName);
    const blob = new Blob([fileArray], { type: "application/vnd.openxmlformats-officedocument.spreadsheetml.sheet" });
    const url = URL.createObjectURL(blob);
    const a = document.createElement('a');
    a.href = url;
    a.download = outputFileName;
    a.click();
    URL.revokeObjectURL(url);
  };

  return (
    <div style={{ textAlign: 'center', height: '300px' }}>
      <h1>Replace Image in Worksheet</h1>
      <button onClick={replaceImage}>
        Replace Image
      </button>
    </div>
  );
}

export default App;
The Excel worksheet after the image is replaced
FAQ
Extracted images cannot be opened or the format is incorrect
Cause: The correct file extension was not specified when saving the image, or the MIME type does not match the image format.
Solution: Make sure the file extension used in the Picture.Save method matches the actual image format. If the image is in PNG format, the file extension should be .png; if it is in JPEG format, use .jpg. The Blob type used for the download should be set accordingly:
// PNG format
const blob = new Blob([fileArray], { type: "image/png" });

// JPEG format
const blob = new Blob([fileArray], { type: "image/jpeg" });
The position or size of the image changes after replacement
Cause: The position and size properties of the original image were not recorded before deletion, so the new image cannot be precisely aligned to the original position or retain its original size.
Solution: Save the position properties such as TopRow, LeftColumn, LeftColumnOffset, TopRowOffset and the size properties Width, Height before deleting the image. After inserting the new image, set these properties on the new picture so it matches the original:
// Insert the new picture (specify the row and column position)
let picture = sheet.Pictures.Add({ topRow: topRow, leftColumn: leftColumn, fileName: newImageFile });

// Set size and offsets to match the original
picture.Width = width;
picture.Height = height;
picture.LeftColumnOffset = leftColumnOffset;
picture.TopRowOffset = topRowOffset;
Get a Free License
Spire.XLS for JavaScript offers a 30-day full-featured free trial license with no functional limitations. Apply here to evaluate before purchasing.
Insert or Delete Images in Excel with JavaScript in React
2025-03-03 01:05:21 Written by AdministratorImages in Excel can add a visual element to your data, making it more engaging and easier to understand. From adding company logos to embedding charts or diagrams, images can convey complex information more effectively than text alone. There are also times that you need to remove the images that are no longer relevant or cluttering your worksheet. This article will demonstrate how to insert or delete images in an Excel worksheet in React using Spire.XLS for JavaScript.
Install Spire.XLS for JavaScript
To get started with inserting or deleting picture in Excel in a React application, you can either download Spire.XLS for JavaScript from our website or install it via npm with the following command:
npm i spire.office
The downloaded product package has been integrated Spire.Doc for JavaScript,Spire.XLS for JavaScript,Spire.PDF for JavaScript,Spire.Presentation for JavaScript. To use the functionality of Spire.XLS for JavaScript, you need to copy the corresponding files (spire.xls.js, Spire.Xls.Wasm.zip, spire.common.js, Spire.Common.Wasm.zip, and _framework) to the project's "public" folder. At the same time, in order to ensure text rendering, the related font files can be added with custom paths. In the following example, the font addition path is: public\static\font.
For more details, refer to the documentation: How to Integrate Spire.XLS for JavaScript in a React Project
Insert Images in Excel in JavaScript
Spire.XLS for JavaScript provides the Worksheet.Pictures.Add() method to add a picture to a specified cell in an Excel worksheet. The following are the main steps.
- Create a Workbook object using the new wasmModule.Workbook() method.
- Get a specific worksheet using the Workbook.Worksheets.get() method.
- Insert a picture into a specific cell using the Worksheet.Pictures.Add() method and return an object of ExcelPicture.
- Set the width and height of the picture, as well as the distance between the picture and the cell border through the properties under the ExcelPicture object.
- Save the result file using the Workbook.SaveToFile() method.
- JavaScript
import React, { useState, useEffect } from 'react';
function App() {
  const [wasmModule, setWasmModule] = useState(null);
  // Load Spire.XLS
  useEffect(() => {
    (async () => {
      try {
        const publicUrl = process.env.PUBLIC_URL || '';
        const spireModule = await import(/* webpackIgnore: true */ `${publicUrl}/spire.xls.js`);
        const rawModule = spireModule.default || spireModule;
        window.wasmModule = typeof rawModule === 'function'
          ? await rawModule({ locateFile: p => p.endsWith('.wasm') ? `${publicUrl}/${p}` : p })
          : rawModule;
        setWasmModule(window.wasmModule);
      } catch (error) {
        console.error('Failed to load spire.xls.js WASM module:', error);
      }
    })();
  }, []);

  // Function to insert an image in Excel
  const InsertExcelImage = async () => {
    const wasmModule = window.wasmModule.spirexls;

    if (wasmModule) {
      // Load font into Virtual File System (VFS)
      await window.spire.FetchFileToVFS('Arial.ttf', '/Library/Fonts/', `${process.env.PUBLIC_URL}/static/font/`);


      // Load the image files into the virtual file system (VFS)
      let inputFileName = 'logo.png';
      await window.spire.FetchFileToVFS(inputFileName, '', `${process.env.PUBLIC_URL}/static/data/`);


      // Create a new workbook
      let workbook = new wasmModule.Workbook();

      // Get the first worksheet.
      let sheet = workbook.Worksheets.get(0);

      // Add a picture to the specific cell
      let picture = sheet.Pictures.Add({ topRow: 2, leftColumn: 3, fileName: inputFileName });

      // Set the picture width and height
      picture.Width = 150
      picture.Height = 150

      // Adjust the column width and row height to accommodate the picture
      sheet.SetRowHeight(2, 135);
      sheet.SetColumnWidth(3, 25);

      // Set the distance between cell border and picture
      picture.LeftColumnOffset = 90
      picture.TopRowOffset = 20

      // Save the modified workbook to the specified file
      const outputFileName = 'InsertExcelImage.xlsx';
      workbook.SaveToFile({ fileName: outputFileName, version: wasmModule.ExcelVersion.Version2016 });

      // Read the saved file and convert to Blob object
      const modifiedFileArray = window.dotnetRuntime.Module.FS.readFile(outputFileName);
      const modifiedFile = new Blob([modifiedFileArray], { type: 'application/vnd.openxmlformats-officedocument.spreadsheetml.sheet' });

      // Create a URL for the Blob and initiate download
      const url = URL.createObjectURL(modifiedFile);
      const a = document.createElement('a');
      a.href = url;
      a.download = outputFileName;
      document.body.appendChild(a);
      a.click();
      document.body.removeChild(a);
      URL.revokeObjectURL(url);

      // Clean up resources used by the workbook
      workbook.Dispose();
    }
  };

  return (
    <div style={{ textAlign: 'center', height: '300px' }}>
      <h1>Insert an Image to a Specified Cell in Excel Using JavaScript in React</h1>
      <button onClick={InsertExcelImage} disabled={!wasmModule}>
        Process
      </button>
    </div>
  );
}

export default App;
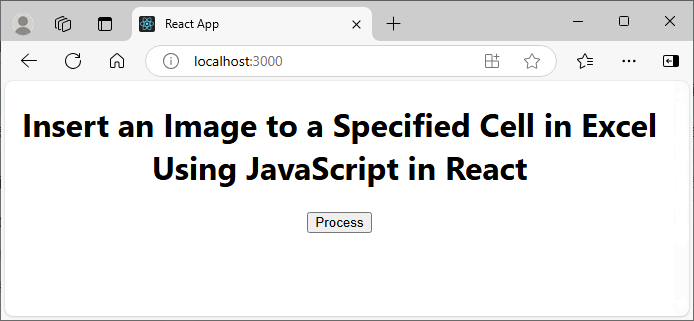
Run the code to launch the React app at localhost:3000. Once it's running, click the "Process" button to insert image in Excel:
Below is the result file:

Delete Images in Excel in JavaScript
To delete all pictures in an Excel worksheet, you need to iterate through each picture and then remove them through the Worksheet.Pictures.get().Remove() method. The following are the main steps.
- Create a Workbook object using the new wasmModule.Workbook() method.
- Load an Excel file using the Workbook.LoadFromFile() method.
- Get a specific worksheet using the Workbook.Worksheets.get() method.
- Iterate through all pictures in the worksheet and then remove them using the Worksheet.Pictures.get().Remove() method.
- Save the result file using the Workbook.SaveToFile() method.
- JavaScript
import React, { useState, useEffect } from 'react';
function App() {
  const [wasmModule, setWasmModule] = useState(null);
  // Load Spire.XLS
  useEffect(() => {
    (async () => {
      try {
        const publicUrl = process.env.PUBLIC_URL || '';
        const spireModule = await import(/* webpackIgnore: true */ `${publicUrl}/spire.xls.js`);
        const rawModule = spireModule.default || spireModule;
        window.wasmModule = typeof rawModule === 'function'
          ? await rawModule({ locateFile: p => p.endsWith('.wasm') ? `${publicUrl}/${p}` : p })
          : rawModule;
        setWasmModule(window.wasmModule);
      } catch (error) {
        console.error('Failed to load spire.xls.js WASM module:', error);
      }
    })();
  }, []);

  // Function to delete images from Excel
  const DeleteExcelImage = async () => {
    const wasmModule = window.wasmModule.spirexls;

    if (wasmModule) {
      // Load font into Virtual File System (VFS)
      await window.spire.FetchFileToVFS('Arial.ttf', '/Library/Fonts/', `${process.env.PUBLIC_URL}/static/font/`);


      // Load the excel files into the virtual file system (VFS)
      let inputFileName = 'InsertExcelImage.xlsx';
      await window.spire.FetchFileToVFS(inputFileName, '', `${process.env.PUBLIC_URL}/static/data/`);


      // Create a new workbook
      let workbook = new wasmModule.Workbook();

      // Load the Excel document
      workbook.LoadFromFile({ fileName: inputFileName });

      // Get the first worksheet
      let sheet = workbook.Worksheets.get(0);

      // Delete all images from the worksheet
      for (let i = sheet.Pictures.Count - 1; i >= 0; i--) {
        sheet.Pictures.get(i).Remove();
      }

      // Save the result file
      const outputFileName = 'DeleteImages.xlsx';
      workbook.SaveToFile({ fileName: outputFileName, version: wasmModule.ExcelVersion.Version2016 });

      // Read the saved file and convert to Blob object
      const modifiedFileArray = window.dotnetRuntime.Module.FS.readFile(outputFileName);
      const modifiedFile = new Blob([modifiedFileArray], { type: 'application/vnd.openxmlformats-officedocument.spreadsheetml.sheet' });

      // Create a URL for the Blob and initiate download
      const url = URL.createObjectURL(modifiedFile);
      const a = document.createElement('a');
      a.href = url;
      a.download = outputFileName;
      document.body.appendChild(a);
      a.click();
      document.body.removeChild(a);
      URL.revokeObjectURL(url);

      // Clean up resources used by the workbook
      workbook.Dispose();
    }
  };

  return (
    <div style={{ textAlign: 'center', height: '300px' }}>
      <h1>Delete Images from Excel Using JavaScript in React</h1>
      <button onClick={DeleteExcelImage} disabled={!wasmModule}>
        Process
      </button>
    </div>
  );
}

export default App;
Get a Free License
To fully experience the capabilities of Spire.XLS for JavaScript without any evaluation limitations, you can request a free 30-day trial license.
