How to add Controls to Toolbox in C#
In this document, I will introduce you how to add Spire. Barcode controls to Toolbox for Windows Forms application.
If you have already installed Spire.Barcode, you can add controls this way:
"Start" → "Programs" → "e-iceblue" → "Spire.Barcode": Click "Add Controls into VS Toolbox".
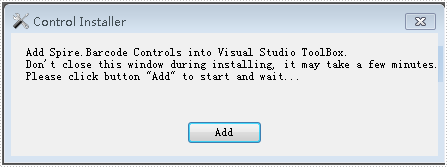
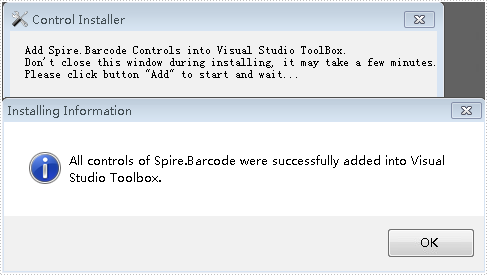
Click "Add" to add controls.
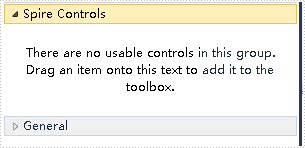
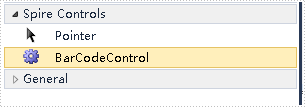
Right-click on the blank part of the Toolbox - "Add Ta" - name the new Tab "Spire Controls":
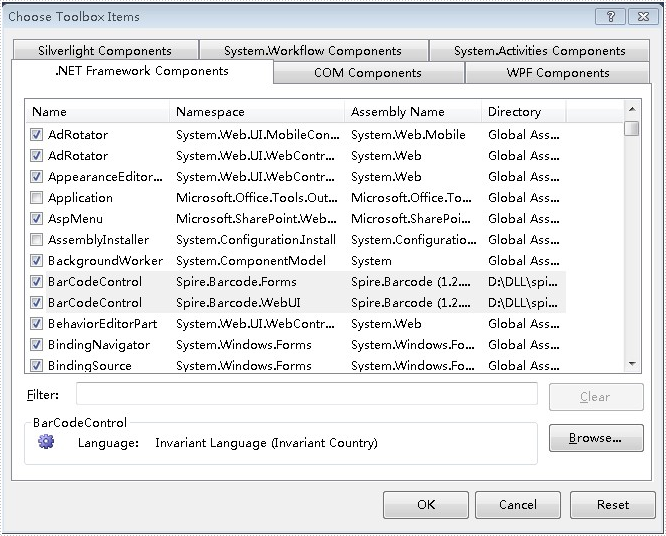
Right-click on the blank part below "Spire Controls" → "Choose Items" → ".NET Framework Components" → "Browse" to the "Bin" folder → find the file "Spire.Barcode.dll" → "Open".
Click "OK". Then you have added controls to Toolbox successfully.
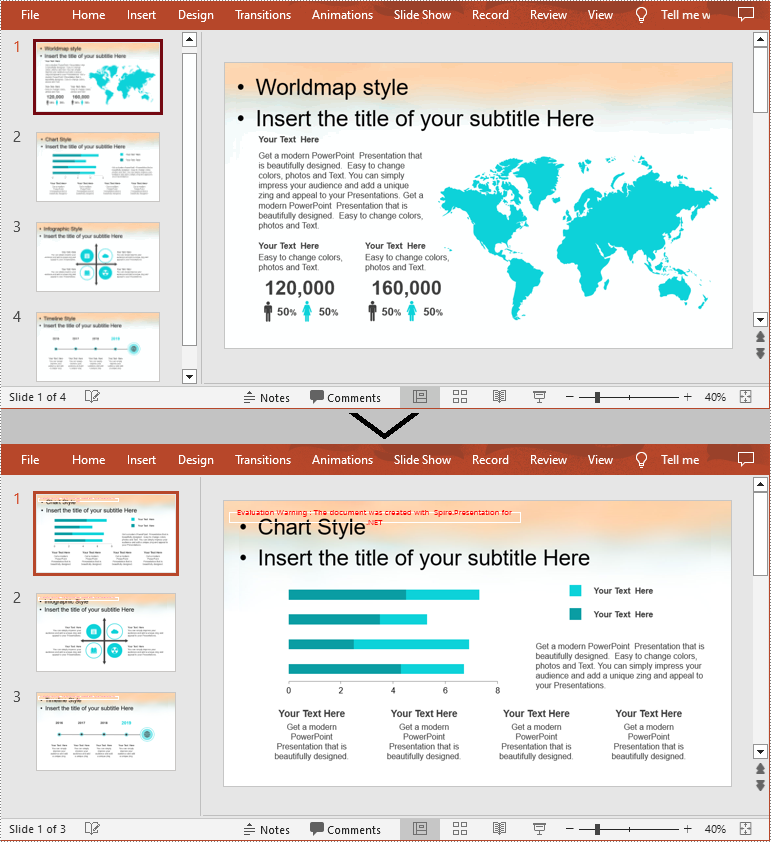
Spire.Presentation for .NET Program Guide Content
Spire.Presentation for .NET is a professional PowerPoint® compatible API that enables developers to create, read, write, modify, convert and Print PowerPoint documents on any .NET platform ( Target .NET Framework, .NET Core, .NET Standard, .NET 5.0, .NET 6.0, Xamarin & Mono Android ). As an independent PowerPoint .NET API, Spire.Presentation for .NET doesn't need Microsoft PowerPoint to be installed on machines.
Spire.Presentation for .NET supports PPT, PPS, PPTX and PPSX presentation formats. It provides functions such as managing text, image, shapes, tables, animations, audio and video on slides. It also supports exporting presentation slides to EMF, JPG, TIFF, PDF, XPS, SVG, HTML format etc.
Convert HTML String to PDF in C#
Besides convert HTML URL to PDF and HTML file to PDF, now Spire.PDF starts to support converting HTML string to PDF. This article will show you how to convert HTML string into PDF file in C#. We support tables, text and Hyperlinks in the HTML strings. Please check the steps as below:
- Download Spire.PDF for .NET (Version 3.0.27 above) and install it correctly. The Spire.PDF installation is clean, professional and wrapped up in a MSI installer.
- Add Spire.Pdf.dll as reference in the downloaded Bin folder though the below path: "..\Spire.Pdf\Bin\NET4.0\ Spire.Pdf.dll".
- Here comes to the codes:
Step 1: Create a new PDF document.
PdfDocument pdf = new PdfDocument();
Step 2: Set the layout and page setting
PdfHtmlLayoutFormat htmlLayoutFormat = new PdfHtmlLayoutFormat();
//webBrowser load html whether Waiting
htmlLayoutFormat.IsWaiting = false;
//page setting
PdfPageSettings setting = new PdfPageSettings();
setting.Size = PdfPageSize.A4;
Step 3: Load the HTML string code and generate the PDF file.
string htmlCode = File.ReadAllText("..\\..\\2.html");

//use single thread to generate the pdf from above html code
Thread thread = new Thread(() =>
{ pdf.LoadFromHTML(htmlCode, false, setting, htmlLayoutFormat);});
thread.SetApartmentState(ApartmentState.STA);
thread.Start();
thread.Join();
Step 4: Save the file to PDF and preview it.
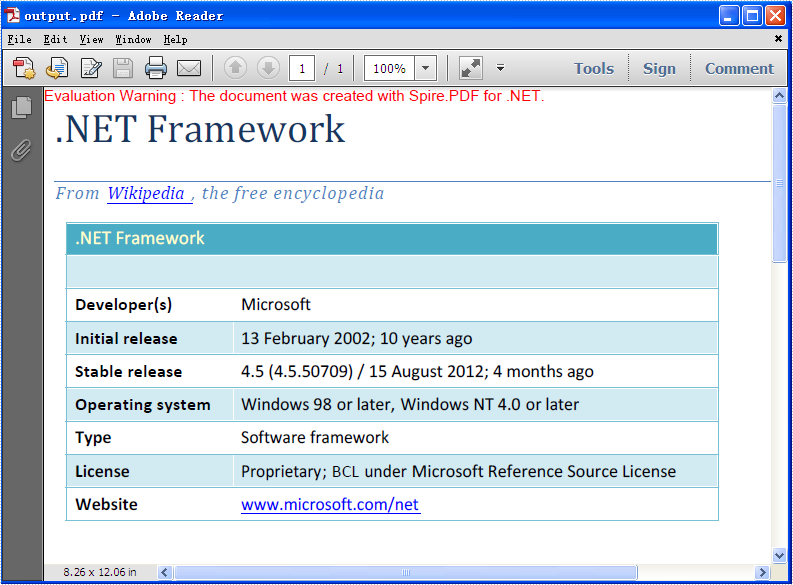
pdf.SaveToFile("output.pdf");
System.Diagnostics.Process.Start("output.pdf");
Please check the effective screenshot:
Full codes:
using Spire.Pdf;
using Spire.Pdf.HtmlConverter;
using System.IO;
using System.Threading;

namespace LoadFromHTML
{
    class Program
    {
        static void Main(string[] args)
        {
            PdfDocument pdf = new PdfDocument();
            PdfHtmlLayoutFormat htmlLayoutFormat = new PdfHtmlLayoutFormat();
            htmlLayoutFormat.IsWaiting = false;
            PdfPageSettings setting = new PdfPageSettings();
            setting.Size = PdfPageSize.A4;
            string htmlCode = File.ReadAllText("..\\..\\2.html");

            Thread thread = new Thread(() =>
            { pdf.LoadFromHTML(htmlCode, false, setting, htmlLayoutFormat); });
            thread.SetApartmentState(ApartmentState.STA);
            thread.Start();
            thread.Join();

            pdf.SaveToFile("output.pdf");
            System.Diagnostics.Process.Start("output.pdf");
        }
    }
}
C#: Change Slide Size in PowerPoint
Changing slide size is one way to maintain the visual integrity of your PowerPoint presentation. By adjusting the slide size to the specific aspect ratio and dimensions of the target screen or projection device, you can avoid issues such as content appearing cropped, stretched, or distorted. In this article, you will learn how to change the slide size of a PowerPoint presentation in C# using Spire.Presentation for .NET.
Install Spire.Presentation for .NET
To begin with, you need to add the DLL files included in the Spire.Presentation for.NET package as references in your .NET project. The DLL files can be either downloaded from this link or installed via NuGet.
PM> Install-Package Spire.Presentation
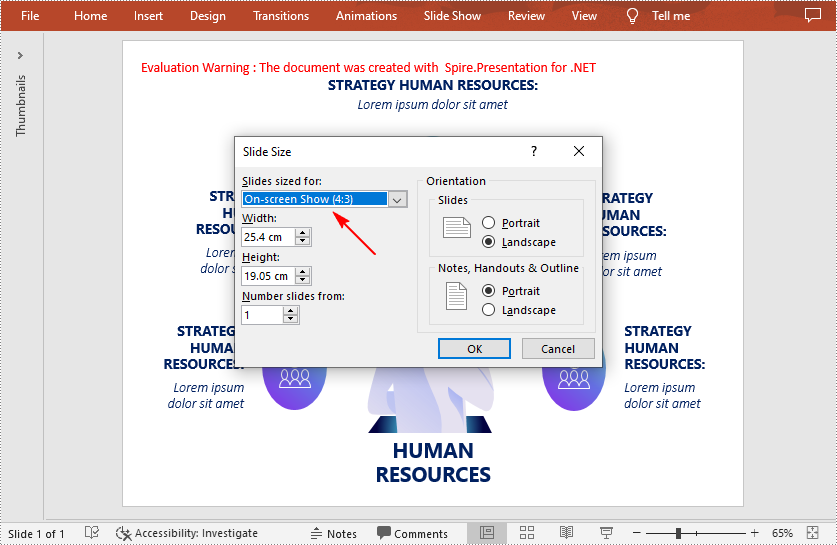
Change the Slide Size to a Preset Size in C#
Spire.Presentation for .NET provides the Presentation.SlideSize.Type property to set or change the slide size to a preset size. The following are the detailed steps.
- Create a Presentation instance.
- Load a PowerPoint presentation using Presentation.LoadFromFile() method.
- Change the slide type of the presentation using Presentation.SlideSize.Type property.
- Save the result document using Presentation.SaveToFile() method.
- C#
using Spire.Presentation;

namespace CreateCombination
{
    class Program
    {
        static void Main(string[] args)
        {
            //Create a Presentation instance
            Presentation ppt = new Presentation();

            //Load a presentation file
            ppt.LoadFromFile("sample.pptx");

            //Change the slide size of the presentation
            ppt.SlideSize.Type = SlideSizeType.Screen4x3;

            //Save the result file
            ppt.SaveToFile("SlideSize.pptx", FileFormat.Pptx2013);
            ppt.Dispose();
        }
    }
}
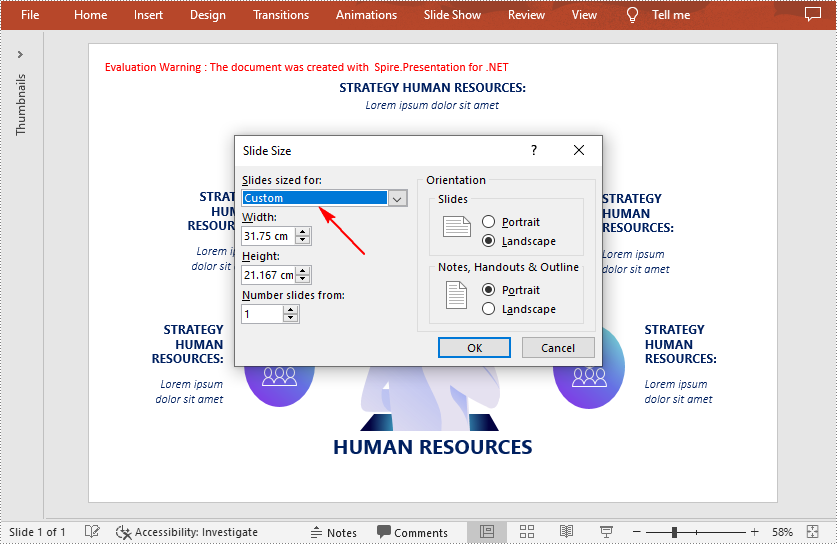
Change the Slide Size to a Custom Size in C#
Customizing the size of slides requires changing the slide size type to Custom first, and then you can set a desired size through the Presentation.SlideSize.Size property. The following are the detailed steps.
- Create a Presentation instance.
- Load a PowerPoint presentation using Presentation.LoadFromFile() method.
- Change the slide size type to custom using Presentation.SlideSize.Type property.
- Customize the slide size using Presentation.SlideSize.Size property.
- Save the result document using Presentation.SaveToFile() method.
- C#
using Spire.Presentation;
using System.Drawing;

namespace CreateCombination
{
    class Program
    {
        static void Main(string[] args)
        {
            //Create a Presentation instance
            Presentation ppt = new Presentation();

            //Load a presentation file
            ppt.LoadFromFile("sample.pptx");

            //Change the slide size type to custom
            ppt.SlideSize.Type = SlideSizeType.Custom;

            //Set the slide size
            ppt.SlideSize.Size = new SizeF(900, 600);

            //Save the presentation file
            ppt.SaveToFile("CustomSize.pptx", FileFormat.Pptx2013);
            ppt.Dispose();
        }
    }
}
Apply for a Temporary License
If you'd like to remove the evaluation message from the generated documents, or to get rid of the function limitations, please request a 30-day trial license for yourself.
C#/VB.NET: Insert, Replace or Extract Videos in PowerPoint
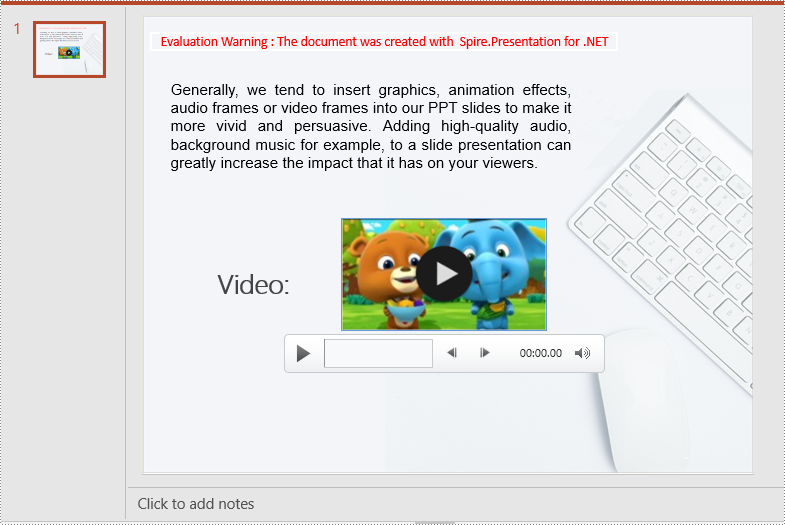
Sometimes, audiences may feel bored when they see slides with only text and images. Inserting a video is a great way to add visual interest to your presentation and make it more engaging for your audience. In this article, you will learn how to insert videos as well as replace and extract videos in PowerPoint in C# and VB.NET using Spire.Presentation for .NET.
- Insert a Video into a PowerPoint Presentation
- Replace a Video in a PowerPoint Presentation
- Extract Videos from a PowerPoint Presentation
Install Spire.Presentation for .NET
To begin with, you need to add the DLL files included in the Spire.Presentation for.NET package as references in your .NET project. The DLL files can be either downloaded from this link or installed via NuGet.
PM> Install-Package Spire.Presentation
Insert a Video into a PowerPoint Presentation in C# and VB.NET
By inserting a video into your presentation, you can share the video with your audience instantly without having to look for it on your computer while presenting. The following steps demonstrate how to insert a video into a PowerPoint presentation:
- Create an instance of the Presentation class.
- Load a PowerPoint document using Presentation.LoadFromFile() method.
- Get a specific slide by its index through Presentation.Slides[int] property.
- Create an instance of the RectangleF class.
- Add a video to the slide using ISlide.Shapes.AppendVideoMedia(string, RectangleF) method.
- Set a thumbnail image for the video through IVideo.PictureFill.Picture.Url property.
- Save the result document using Presentation.SaveToFile() method.
- C#
- VB.NET
using Spire.Presentation;
using Spire.Presentation.Drawing;
using System.Drawing;

namespace InsertVideoInPPT
{
    class Program
    {
        static void Main(string[] args)
        {
            //Create a Presentation instance
            Presentation presentation = new Presentation();
            //Load a PowerPoint document
            presentation.LoadFromFile(@"Input.pptx");

            //Get the first slide
            ISlide slide = presentation.Slides[0];

            //Add description text
            RectangleF rec_title = new RectangleF(50, 280, 160, 50);
            IAutoShape shape_title = slide.Shapes.AppendShape(ShapeType.Rectangle, rec_title);
            shape_title.ShapeStyle.LineColor.Color = Color.Transparent;
            shape_title.Fill.FillType = FillFormatType.None;
            TextParagraph para_title = new TextParagraph();
            para_title.Text = "Video:";
            para_title.Alignment = TextAlignmentType.Center;
            para_title.TextRanges[0].LatinFont = new TextFont("Myriad Pro Light");
            para_title.TextRanges[0].FontHeight = 32;
            para_title.TextRanges[0].IsBold = TriState.True;
            para_title.TextRanges[0].Fill.FillType = FillFormatType.Solid;
            para_title.TextRanges[0].Fill.SolidColor.Color = Color.FromArgb(68, 68, 68);
            shape_title.TextFrame.Paragraphs.Append(para_title);

            //Add a video to the first slide
            RectangleF videoRect = new RectangleF(presentation.SlideSize.Size.Width / 2 - 125, 240, 240, 130);
            IVideo video = slide.Shapes.AppendVideoMedia("Video.mp4", videoRect);
            //Set a thumbnail image for the video
            video.PictureFill.Picture.Url = @"Picture.png";

            //Save the result document
            presentation.SaveToFile("InsertVideo.pptx", FileFormat.Pptx2010);
        }
    }
}
Replace a Video in a PowerPoint Presentation in C# and VB.NET
If you think an existing video cannot support your statements well, you can replace it with another suitable one. The following steps demonstrate how to replace an existing video with another video in a PowerPoint presentation:
- Create an instance of the Presentation class.
- Load a PowerPoint document using Presentation.LoadFromFile() method.
- Get a specific slide by its index through Presentation.Slides[int] property.
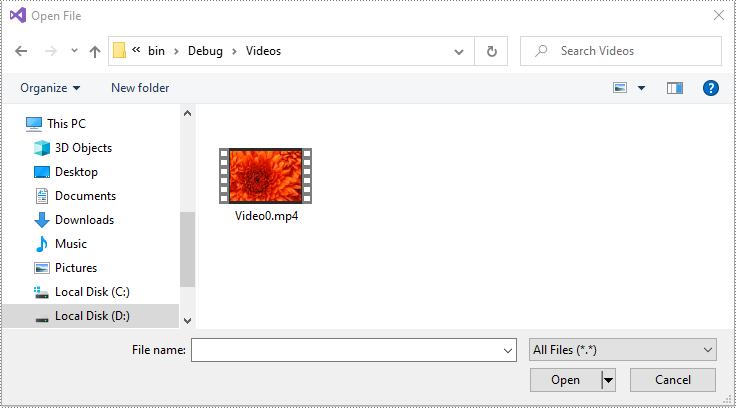
- Load a video into a byte array using File.ReadAllBytes() method.
- Add the loaded video to the video collection of the document using Presentation.Videos.Append(byte[]) method.
- Loop through all shapes on the slide and find the video shape.
- Replace the original video with the loaded video through IVideo.EmbeddedVideoData property. Then change the thumbnail image of the video through IVideo.PictureFill.Picture.Url property.
- Save the result document using Presentation.SaveToFile() method.
- C#
- VB.NET
using Spire.Presentation;
using System.IO;

namespace ReplaceVideoInPPT
{
    class Program
    {
        static void Main(string[] args)
        {
            //Create a Presentation instance
            Presentation ppt = new Presentation();
            //Load a PowerPoint document
            ppt.LoadFromFile("InsertVideo.pptx");

            //Get the first slide
            ISlide slide = ppt.Slides[0];

            //Load a video into a byte array
            byte[] bts = File.ReadAllBytes(@"NewVideo.mp4");
            //Add the loaded video to the video collection of the document
            VideoData videoData = ppt.Videos.Append(bts);

            //Loop through all shapes on the first slide
            foreach (Shape shape in slide.Shapes)
            {
                //Check if the shape is of IVideo type
                if (shape is IVideo)
                {
                    //Typecast the shape as IVideo
                    IVideo video = shape as IVideo;
                    //Replace the original video with the loaded video
                    video.EmbeddedVideoData = videoData;
                    //Change the thumbnail image of the video
                    video.PictureFill.Picture.Url = @"Picture1.png";
                }
            }

            //Save the result document
            ppt.SaveToFile("ReplaceVideo.pptx", FileFormat.Pptx2010);
        }
    }
}

Extract Videos from a PowerPoint Presentation in C# and VB.NET
If you like the videos in a PowerPoint presentation and want to use them in other places, you can extract and save them to your disk. The following steps demonstrate how to extract videos from a PowerPoint presentation:
- Create an instance of the Presentation class.
- Load a PowerPoint document using Presentation.LoadFromFile() method.
- Loop through all slides in the document.
- Loop through all shapes on each slide.
- Find the video shapes, then save the videos to disk using IVideo.EmbeddedVideoData.SaveToFile() method.
- C#
- VB.NET
using Spire.Presentation;

namespace ExtractVideosInPPT
{
    class Program
    {
        static void Main(string[] args)
        {
            //Create a Presentation instance
            Presentation presentation = new Presentation();
            //Load a PowerPoint document
            presentation.LoadFromFile(@"ReplaceVideo.pptx");

            int i = 0;
            //Specify the output file path
            string result = string.Format(@"Videos\Video{0}.mp4", i);

            //Loop through all slides in the document
            foreach (ISlide slide in presentation.Slides)
            {
                //Loop through all shapes on each slide
                foreach (IShape shape in slide.Shapes)
                {
                    //Check if the shape is of IVideo type
                    if (shape is IVideo)
                    {
                        //Save the video to the specified path
                        (shape as IVideo).EmbeddedVideoData.SaveToFile(result);
                        i++;
                    }
                }
            }
        }
    }
}
Apply for a Temporary License
If you'd like to remove the evaluation message from the generated documents, or to get rid of the function limitations, please request a 30-day trial license for yourself.
C#/VB.NET: Add or Delete Slides in PowerPoint
Slides are the most basic component of a PowerPoint document. Each PowerPoint presentation can be composed of a series of slides containing different elements, such as text, shapes, tables, and images. When you are working on a PowerPoint document, adding and removing slides are probably some of the most required actions. In this article, you will learn how to programmatically add or delete a PowerPoint slide using Spire.Presentation for .NET.
- Add a New Slide at the End of the PowerPoint Document
- Insert a New Slide Before a Specific Slide in PowerPoint
- Delete a Specific Slide from a PowerPoint Document
Install Spire.Presentation for .NET
To begin with, you need to add the DLL files included in the Spire.Presentation for.NET package as references in your .NET project. The DLL files can be either downloaded from this link or installed via NuGet.
PM> Install-Package Spire.Presentation
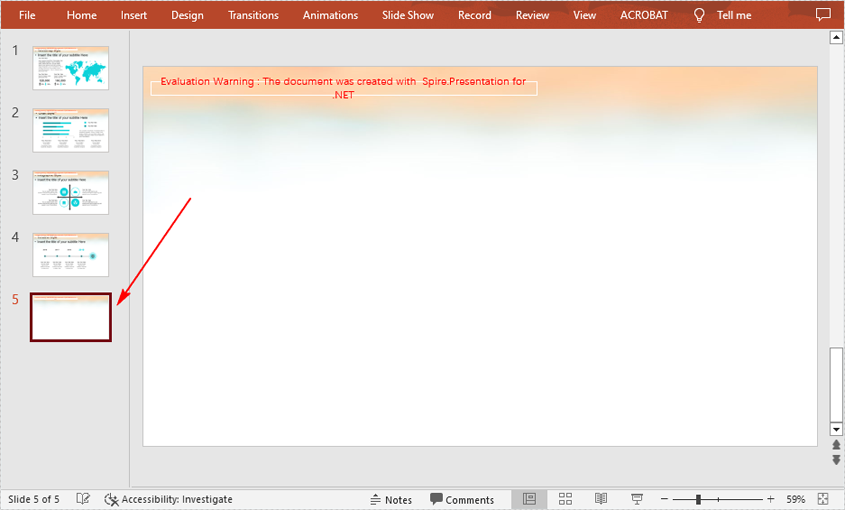
Add a New Slide at the End of the PowerPoint Document
The Presentation.Slides.Append() method provided by Spire.Presentation for .NET allows you to append a new slide after the last slide of a PowerPoint document. The detailed steps are as follows.
- Initialize an instance of Presentation class.
- Load a PowerPoint document using Presentation.LoadFromFile() method.
- Add a new blank slide at the end of the document using Presentation.Slides.Append() method.
- Save the result document using Presentation.SaveToFile() method.
- C#
- VB.NET
using Spire.Presentation;

namespace AddNewSlideinPowerPoint
{
    class Program
    {
        static void Main(string[] args)
        {
            // Initialize an instance of Presentation class
            Presentation presentation = new Presentation();

            //Load a sample PowerPoint document
            presentation.LoadFromFile("Sample.pptx");

            //Add a new slide at the end of the document
            presentation.Slides.Append();

            //Save the result document
            presentation.SaveToFile("AddSlide.pptx", FileFormat.Pptx2013);
        }
    }
}
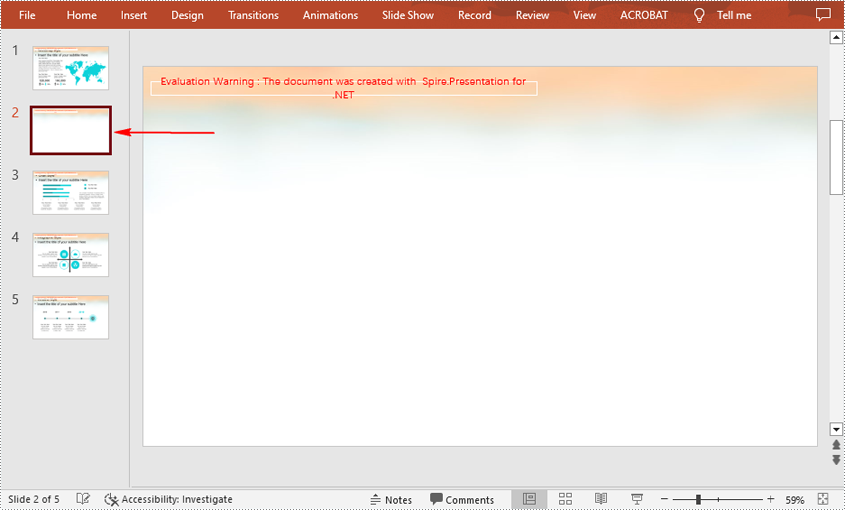
Insert a New Slide Before a Specific Slide in PowerPoint
Sometimes you may also need to insert a slide before a specific slide to add additional supporting information, and below are the detailed steps to accomplish the task.
- Initialize an instance of Presentation class.
- Load a PowerPoint document using Presentation.LoadFromFile() method.
- Insert a blank slide before a specified slide using Presentation.Slides.Insert() method.
- Save the result document using Presentation.SaveToFile() method.
- C#
- VB.NET
using Spire.Presentation;

namespace InsertSlideinPowerPoint
{
    class Program
    {
        static void Main(string[] args)
        {
            //Create a Presentation object
            Presentation presentation = new Presentation();

            //Load a sample PowerPoint document
            presentation.LoadFromFile("Sample.pptx");

            //Insert a blank slide before the second slide
            presentation.Slides.Insert(1);

            //Save the result document
            presentation.SaveToFile("InsertSlide.pptx", FileFormat.Pptx2013);
        }
    }
}
Delete a Specific Slide from a PowerPoint Document
If you want to remove a unnecessary slide from the document, you can use the Presentation.Slides.RemoveAt(int index) method. The detailed steps are as follows.
- Initialize an instance of Presentation class.
- Load a PowerPoint document using Presentation.LoadFromFile() method.
- Remove a specified slide from the document using Presentation.Slides.RemoveAt() method.
- Save the result document using Presentation.SaveToFile() method.
- C#
- VB.NET
using Spire.Presentation;

namespace DeletePowerPointSlide
{
    class Program
    {
        static void Main(string[] args)
        {
            //Create a Presentation object
            Presentation presentation = new Presentation();

            //Load a sample PowerPoint document
            presentation.LoadFromFile("Sample.pptx");

            //Remove the first slide
            presentation.Slides.RemoveAt(0);

            //Save the result document
            presentation.SaveToFile("RemoveSlide.pptx", FileFormat.Pptx2013);
        }
    }
}
Apply for a Temporary License
If you'd like to remove the evaluation message from the generated documents, or to get rid of the function limitations, please request a 30-day trial license for yourself.
How to Set Animations on Shapes in PowerPoint in C#
Animation is a great way to emphasize important points, to control the flow of information, and to increase viewer interest in your presentation. You can animate text, pictures, shapes, tables, SmartArt graphics, and other objects in PowerPoint slide to give them visual effects. This article will focus on how to apply animation effect to a shape using Spire.Presentation in C#.
Step 1: Initialize an instance of Presentation class and get the first slide from the presentation.
Presentation ppt = new Presentation();
ISlide slide = ppt.Slides[0];
Step 2: Insert a rectangle in the slide and fill the shape with purple.
IAutoShape shape = slide.Shapes.AppendShape(ShapeType.Rectangle, new RectangleF(50, 50, 200, 80));
shape.Fill.FillType = FillFormatType.Solid;
shape.Fill.SolidColor.Color = Color.Purple;
shape.ShapeStyle.LineColor.Color = Color.White;
Step 3: Apply FadedSwivel animation effect to the shape.
shape.Slide.Timeline.MainSequence.AddEffect(shape, AnimationEffectType.FadedSwivel);
Step 4: Save the file.
ppt.SaveToFile("animations.pptx", FileFormat.Pptx2010);
Output:

Full Code:
using Spire.Presentation;
using Spire.Presentation.Drawing.Animation;
using System.Drawing;
using Spire.Presentation.Drawing;

namespace SetAnimationsOnShapes
{
    class Program
    {
        static void Main(string[] args)
        {
            Presentation ppt = new Presentation();
            ISlide slide = ppt.Slides[0];

            IAutoShape shape = slide.Shapes.AppendShape(ShapeType.Rectangle, new RectangleF(50, 50, 200, 80));
            shape.Fill.FillType = FillFormatType.Solid;
            shape.Fill.SolidColor.Color = Color.Purple;
            shape.ShapeStyle.LineColor.Color = Color.White;
            shape.AppendTextFrame("Animated Shape");
            shape.Slide.Timeline.MainSequence.AddEffect(shape, AnimationEffectType.FadedSwivel);

            ppt.SaveToFile("animations.pptx", FileFormat.Pptx2010);
        }
    }
}
How to Convert PowerPoint Document to TIFF Image in C#, VB.NET
Conversion from PowerPoint to TIFF may be useful in order to fax the presentation files or send them off for printing. Spire.Presentation provides straightforward method SaveToFile to do the conversion, which automatically detects presentation slides and convert them to TIFF image (one image per slide).
Step 1: Create an instance of Presentation class.
Presentation ppt = new Presentation();
Step 2: Load a PowerPoint file.
ppt.LoadFromFile("template.pptx");
Step 3: Save to TIFF format file.
ppt.SaveToFile("toTIFF.tiff", FileFormat.Tiff);
Output:

Full Code:
using Spire.Presentation;
namespace PPTtoTIFF
{
    class Program
    {
        static void Main(string[] args)
        {
            Presentation ppt = new Presentation();
            ppt.LoadFromFile("template.pptx");
            ppt.SaveToFile("toTIFF.tiff", FileFormat.Tiff);
        }
    }
}
Imports Spire.Presentation
Namespace PPTtoTIFF
	Class Program
		Private Shared Sub Main(args As String())
			Dim ppt As New Presentation()
			ppt.LoadFromFile("template.pptx")
			ppt.SaveToFile("toTIFF.tiff", FileFormat.Tiff)
		End Sub
	End Class
End Namespace
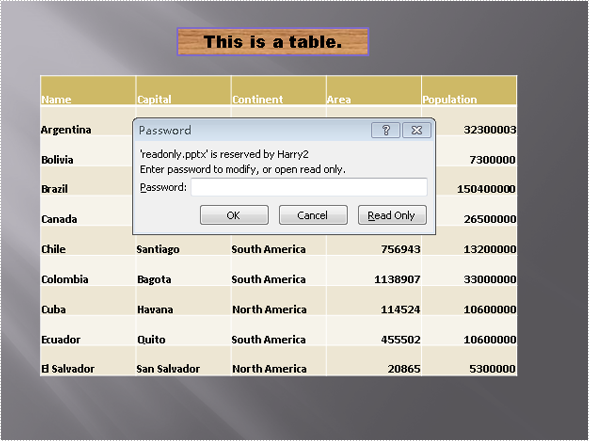
How to Use Password to Protect a PowerPoint Document Using C#
Spire.Presentation for .NET is designed to help .NET developers to create, access, copy and edit PowerPoint documents as well as protect PowerPoint documents. By using Spire.Presentation, developers can save PowerPoint files with write protection to allow the presentation to be read in read only mode. This section aims to provide guidance for how to save PowerPoint documents as ReadOnly using Spire.Presentation component.
To begin with, create or open a .NET class application in Visual Studio 2005 or above versions, add Spire.Presentation.dll to your .NET project assemblies. Then, you are able to set a PPT documents to ReadOnly using the sample demo C# code we have offered below.
Step 1: Create a PPT document
Presentation presentation = new Presentation();
Step 2: Load PPT file from disk
presentation.LoadFromFile(@"..\..\..\..\..\..\Data\sample.pptx");
Step 3: Protect the document with a string password
presentation.Protect("test");
Step 4: Save and preview
presentation.SaveToFile("readonly.pptx", FileFormat.Pptx2007);
System.Diagnostics.Process.Start("readonly.pptx");
Screen effect:
Full code:
//create PPT document
Presentation presentation = new Presentation();

//load PPT file from disk
presentation.LoadFromFile(@"..\..\..\..\..\..\Data\sample.pptx");

//protect the document with password "test"
presentation.Protect("test");

//save the document
presentation.SaveToFile("readonly.ppt", FileFormat.PPT);
System.Diagnostics.Process.Start("readonly.ppt");
'create PPT document
Dim presentation As New Presentation()

'load PPT file from disk
presentation.LoadFromFile("..\..\..\..\..\..\Data\sample.pptx")

protect the document with password "test"
presentation.Protect("test")

'save the document
presentation.SaveToFile("readonly.ppt", FileFormat.PPT)
System.Diagnostics.Process.Start("readonly.ppt")
Insert chart in PowerPoint document
Inserting charts to your PPT document is an easy and eye catching way to display important information. Spire.Presentation includes many different types of data charts including column charts, cylinder charts, cone charts, pyramid charts, clustered charts, line charts, pie charts, bar charts, area charts, scatter charts, stock charts, surface charts, contour charts, doughnut charts, bubble charts and radar charts.
Spire.Presentation for .NET, a reliable .NET PPT component, enables you to generate, read, edit, convert even print your PPT documents without installing Microsoft PowerPoint on your machine. Using Spire.Presentation for .NET, you also can insert charts in your PPT document with C#. Please see the target PPT document with chart as below picture:
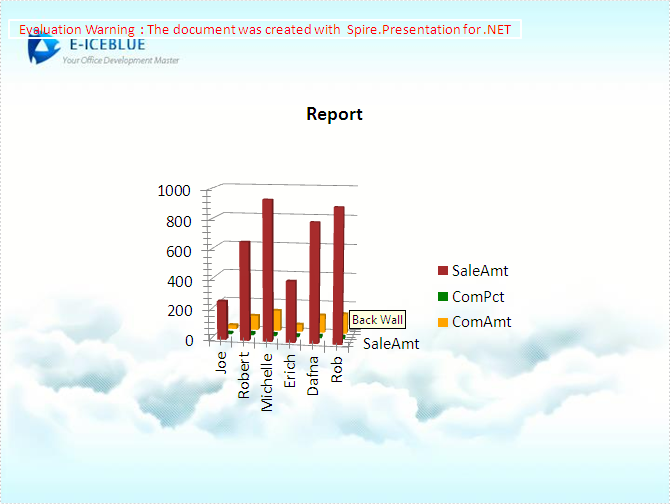
The steps of method are:
Step 1: Create the PPT document.
Presentation presentation = new Presentation();
Step 2: Insert chart, set title and style of the chart.
RectangleF rect = new RectangleF(presentation.SlideSize.Size.Width / 2 - 200, 100, 400, 400);
IChart chart = presentation.Slides[0].Shapes.AppendChart(Spire.Presentation.Charts.ChartType.Cylinder3DClustered, rect);
chart.ChartTitle.TextProperties.Text = "Report";
chart.ChartTitle.TextProperties.IsCentered = true;
chart.ChartTitle.Height = 30;
chart.HasTitle = true;
Step 3: Prepare data for the chart. Load a simple DataTable from XML file via LoadData() method.
DataTable dataTable = LoadData();
private DataTable LoadData()
{
    DataSet ds = new DataSet();
    ds.ReadXmlSchema("data-schema.xml");
    ds.ReadXml("data.xml");
    return ds.Tables[0];
}
Step 4: Attach the data to chart. We can use chart.ChartData[rowIndex, columnIndex] to get/set the value of the specified cell in the data table of chart. Using the property chart.ChartData[rowIndex, columnIndex].Text to get/set the text value. Using the property chart.ChartData[rowIndex, columnIndex].Value to get/set numeric value. In this article we define a method InitChartData to attach the Data of the chart.
private void InitChartData(IChart chart, DataTable dataTable)
{
    for (int c = 0; c < dataTable.Columns.Count; c++)
    {
        chart.ChartData[0, c].Text = dataTable.Columns[c].Caption;
    }

    for (int r = 0; r < dataTable.Rows.Count; r++)
    {
        object[] data = dataTable.Rows[r].ItemArray;
        for (int c = 0; c < data.Length; c++)
        {
            chart.ChartData[r + 1, c].Value = data[c];
        }
    }
}
Step 5: Set the Series label and Category label.
chart.Series.SeriesLabel = chart.ChartData["B1", "D1"];
chart.Categories.CategoryLabels = chart.ChartData["A2", "A7"];
Step 6: Assign data to each Series and set each Series' fill color.
chart.Series[0].Values = chart.ChartData["B2", "B7"];
chart.Series[0].Fill.FillType = FillFormatType.Solid;
chart.Series[0].Fill.SolidColor.KnownColor = KnownColors.Brown;
chart.Series[1].Values = chart.ChartData["C2", "C7"];
chart.Series[1].Fill.FillType = FillFormatType.Solid;
chart.Series[1].Fill.SolidColor.KnownColor = KnownColors.Green;
chart.Series[2].Values = chart.ChartData["D2", "D7"];
chart.Series[2].Fill.FillType = FillFormatType.Solid;
chart.Series[2].Fill.SolidColor.KnownColor = KnownColors.Orange;
Step 7: Set the 3D rotation.
chart.RotationThreeD.XDegree = 10;
chart.RotationThreeD.YDegree = 10;
Step 8: Save the document.
presentation.SaveToFile("chart.pptx", FileFormat.Pptx2010);
Download and install Spire.Presentation for .NET and use below code to experience this method to insert charts in PPT document.
The full code:
using Spire.Presentation;
using Spire.Presentation.Charts;
using Spire.Presentation.Drawing;
using System;
using System.Data;
using System.Drawing;

namespace InsertChart
{

    class Program
    {


        private void btnRun_Click(object sender, EventArgs e)
        {
            //create PPT document
            Presentation presentation = new Presentation();

            //set background Image
            string ImageFile = "bg.png";
            RectangleF rect2 = new RectangleF(0, 0, presentation.SlideSize.Size.Width, presentation.SlideSize.Size.Height);
            presentation.Slides[0].Shapes.AppendEmbedImage(ShapeType.Rectangle, ImageFile, rect2);
            presentation.Slides[0].Shapes[0].Line.FillFormat.SolidFillColor.Color = Color.FloralWhite;

            //insert chart
            RectangleF rect = new RectangleF(presentation.SlideSize.Size.Width / 2 - 200, 100, 400, 400);
            IChart chart = presentation.Slides[0].Shapes.AppendChart(Spire.Presentation.Charts.ChartType.Cylinder3DClustered, rect);

            //add chart Title
            chart.ChartTitle.TextProperties.Text = "Report";
            chart.ChartTitle.TextProperties.IsCentered = true;
            chart.ChartTitle.Height = 30;
            chart.HasTitle = true;

            //load data from XML file to datatable
            DataTable dataTable = LoadData();
            //load data from datatable to chart
            InitChartData(chart, dataTable);
            chart.Series.SeriesLabel = chart.ChartData["B1", "D1"];
            chart.Categories.CategoryLabels = chart.ChartData["A2", "A7"];
            chart.Series[0].Values = chart.ChartData["B2", "B7"];
            chart.Series[0].Fill.FillType = FillFormatType.Solid;
            chart.Series[0].Fill.SolidColor.KnownColor = KnownColors.Brown;
            chart.Series[1].Values = chart.ChartData["C2", "C7"];
            chart.Series[1].Fill.FillType = FillFormatType.Solid;
            chart.Series[1].Fill.SolidColor.KnownColor = KnownColors.Green;
            chart.Series[2].Values = chart.ChartData["D2", "D7"];
            chart.Series[2].Fill.FillType = FillFormatType.Solid;
            chart.Series[2].Fill.SolidColor.KnownColor = KnownColors.Orange;
            //set the 3D rotation
            chart.RotationThreeD.XDegree = 10;
            chart.RotationThreeD.YDegree = 10;
            //save the document
            presentation.SaveToFile("chart.pptx", FileFormat.Pptx2010);
            System.Diagnostics.Process.Start("chart.pptx");

        }

        //function to load data from XML file to DataTable
        private DataTable LoadData()
        {
            DataSet ds = new DataSet();
            ds.ReadXmlSchema("data-schema.xml");
            ds.ReadXml("data.xml");
            return ds.Tables[0];
        }

        //function to load data from DataTable to IChart
        private void InitChartData(IChart chart, DataTable dataTable)
        {
            for (int c = 0; c < dataTable.Columns.Count; c++)
            {
                chart.ChartData[0, c].Text = dataTable.Columns[c].Caption;
            }
            for (int r = 0; r < dataTable.Rows.Count; r++)
            {
                object[] data = dataTable.Rows[r].ItemArray;
                for (int c = 0; c < data.Length; c++)
                {
                    chart.ChartData[r + 1, c].Value = data[c];
                }
            }
        }

    }
}
Imports Spire.Presentation
Imports Spire.Presentation.Charts
Imports Spire.Presentation.Drawing
Imports System.Data
Imports System.Drawing

Namespace InsertChart

	Class Program


		Private Sub btnRun_Click(sender As Object, e As EventArgs)
			'create PPT document
			Dim presentation As New Presentation()

			'set background Image
			Dim ImageFile As String = "bg.png"
			Dim rect2 As New RectangleF(0, 0, presentation.SlideSize.Size.Width, presentation.SlideSize.Size.Height)
			presentation.Slides(0).Shapes.AppendEmbedImage(ShapeType.Rectangle, ImageFile, rect2)
			presentation.Slides(0).Shapes(0).Line.FillFormat.SolidFillColor.Color = Color.FloralWhite

			'insert chart
			Dim rect As New RectangleF(presentation.SlideSize.Size.Width / 2 - 200, 100, 400, 400)
			Dim chart As IChart = presentation.Slides(0).Shapes.AppendChart(Spire.Presentation.Charts.ChartType.Cylinder3DClustered, rect)

			'add chart Title
			chart.ChartTitle.TextProperties.Text = "Report"
			chart.ChartTitle.TextProperties.IsCentered = True
			chart.ChartTitle.Height = 30
			chart.HasTitle = True

			'load data from XML file to datatable
			Dim dataTable As DataTable = LoadData()
			'load data from datatable to chart
			InitChartData(chart, dataTable)
			chart.Series.SeriesLabel = chart.ChartData("B1", "D1")
			chart.Categories.CategoryLabels = chart.ChartData("A2", "A7")
			chart.Series(0).Values = chart.ChartData("B2", "B7")
			chart.Series(0).Fill.FillType = FillFormatType.Solid
			chart.Series(0).Fill.SolidColor.KnownColor = KnownColors.Brown
			chart.Series(1).Values = chart.ChartData("C2", "C7")
			chart.Series(1).Fill.FillType = FillFormatType.Solid
			chart.Series(1).Fill.SolidColor.KnownColor = KnownColors.Green
			chart.Series(2).Values = chart.ChartData("D2", "D7")
			chart.Series(2).Fill.FillType = FillFormatType.Solid
			chart.Series(2).Fill.SolidColor.KnownColor = KnownColors.Orange
			'set the 3D rotation
			chart.RotationThreeD.XDegree = 10
			chart.RotationThreeD.YDegree = 10
			'save the document
			presentation.SaveToFile("chart.pptx", FileFormat.Pptx2010)
			System.Diagnostics.Process.Start("chart.pptx")

		End Sub

		'function to load data from XML file to DataTable
		Private Function LoadData() As DataTable
			Dim ds As New DataSet()
			ds.ReadXmlSchema("data-schema.xml")
			ds.ReadXml("data.xml")
			Return ds.Tables(0)
		End Function

		'function to load data from DataTable to IChart
		Private Sub InitChartData(chart As IChart, dataTable As DataTable)
			For c As Integer = 0 To dataTable.Columns.Count - 1
				chart.ChartData(0, c).Text = dataTable.Columns(c).Caption
			Next
			For r As Integer = 0 To dataTable.Rows.Count - 1
				Dim data As Object() = dataTable.Rows(r).ItemArray
				For c As Integer = 0 To data.Length - 1
					chart.ChartData(r + 1, c).Value = data(c)
				Next
			Next
		End Sub

	End Class
End Namespace