
Document Operation (27)
Extract Background Images from PowerPoint Presentations using C# .NET
2025-05-16 09:01:16 Written by Administrator
PowerPoint presentations often contain background images that enhance the visual appeal of slides. Extracting these background images can be crucial for designers and content managers who wish to reuse, analyze, or archive slide visuals independently of the slide content.
This guide provides a clear, step-by-step approach to extracting background images from PowerPoint presentations in .NET using C# and the Spire.Presentation for .NET library.
Table of Contents
- Why Extract Background Images from PowerPoint
- Install .NET PowerPoint Library – Spire.Presentation for .NET
- Extract Background Images from PowerPoint in .NET using C#
- FAQs
- Conclusion
Why Extract Background Images from PowerPoint
Extracting background images from PowerPoint provides several key benefits:
- Reuse Designs: Repurpose background images in other presentations or design projects.
- Analyze Slides: Review and understand slide designs by examining background images separately.
- Archive Visuals: Store background images for documentation, backup, or future use.
Install .NET PowerPoint Library – Spire.Presentation for .NET
Spire.Presentation for .NET is a robust .NET PowerPoint library that enables developers to create, manipulate, and convert PowerPoint presentations without the need for Microsoft PowerPoint.
Key Features of Spire.Presentation for .NET
Here are some key features of Spire.Presentation for .NET:
- Create and edit PowerPoint presentations.
- Convert PowerPoint to other formats such as PDF, Images, HTML, Markdown, and XPS.
- Secure PowerPoint presentations
- Merge/split PowerPoint presentations.
- Slides management, including adding/removing slides, setting/extracting/removing backgrounds, and more.
- Image/shape/chart/smartart insertion and manipulation.
- Animate text/shapes.
Install Spire.Presentation for .NET
Before starting the background image extraction process, you will need to install Spire.Presentation for .NET into your C# project using one of the following methods:
Option1. Install via NuGet (Recommended)
Install-Package Spire.PresentationOption 2: Manually Add DLLs to Your Project
- Download the Spire.Presentation package and extract the files.
- In Visual Studio, right-click References > Add Reference > Browse, then select the appropriate Spire.Presentation.dll based on your target framework.
Extract Background Images from PowerPoint in .NET using C#
Background images in PowerPoint can be applied directly to individual slides or inherited from slide masters. This section demonstrates how to extract both types of background images using Spire.Presentation.
Extract Background Images from Individual Slides
To extract background images from individual slides in PowerPoint, follow these steps:
- Create a Presentation object and load the presentation.
- Loop through all slides in the presentation.
- Check if the slide’s background fill type is image fill (FillFormatType.Picture).
- If yes, retrieve and save the background image.
Sample Code
- C#
using Spire.Presentation;
using Spire.Presentation.Drawing;
using System.IO;

namespace ExtractSlideBackgroundImages
{
    internal class Program
    {
        static void Main(string[] args)
        {
            // Specify the input file path and output folder
            string inputFile = @"example1.pptx";
            string outputFolder = @"ExtractedBackgrounds\Slides";

            // Load the PowerPoint presentation
            Presentation presentation = new Presentation();
            presentation.LoadFromFile(inputFile);

            // Create the output folder
            Directory.CreateDirectory(outputFolder);

            // Loop through all slides
            for (int i = 0; i < presentation.Slides.Count; i++)
            {
                // Check if the slide's background fill type is image fill
                var fill = presentation.Slides[i].SlideBackground.Fill;
                if (fill.FillType == FillFormatType.Picture)
                {
                    // Extract and save the background image
                    var image = fill.PictureFill.Picture.EmbedImage;
                    if (image != null)
                    {
                        string outputPath = Path.Combine(outputFolder, $"SlideBackground_{i + 1}.png");
                        image.Image.Save(outputPath, ImageFormat.Png);
                    }
                }
            }
        }
    }
}
Extract Background Images from Slide Masters
Slide masters define the design and layout of slides, including background images. To extract background images from slide masters:
- Create a Presentation object and load the presentation.
- Loop through all slide masters in the presentation.
- For each master, check if its background fill type is image fill.
- If yes, extract and save the background image.
Sample Code
- C#
using Spire.Presentation;
using Spire.Presentation.Drawing;
using System.Drawing.Imaging;
using System.IO;

namespace ExtractBackgroundImages
{
    internal class Program
    {
        static void Main(string[] args)
        {
            // Specify the input file path and output folder
            string inputFile = @"example2.pptx";
            string outputFolder = @"C:\ExtractedBackgrounds\Masters";

            // Load the PowerPoint presentation
            Presentation presentation = new Presentation();
            presentation.LoadFromFile(inputFile);

            // Create the output folder
            Directory.CreateDirectory(outputFolder);

            // Loop through all slide masters
            for (int i = 0; i < presentation.Masters.Count; i++)
            {
                // Check if the slide master's background fill type is image fill
                var fill = presentation.Masters[i].SlideBackground.Fill;
                if (fill.FillType == FillFormatType.Picture)
                {
                    // Extract and save the background image
                    var image = fill.PictureFill.Picture.EmbedImage;
                    if (image != null)
                    {
                        string outputPath = Path.Combine(outputFolder, $"MasterBackground_{i + 1}.png");
                        image.Image.Save(outputPath, ImageFormat.Png);
                    }
                }
            }

        }
    }
}
Conclusion
Extracting background images from PowerPoint presentations is a crucial technique for developers and designers who want to access slide visuals independently of content. By leveraging the Spire.Presentation for .NET library with C#, you can programmatically extract background images from both individual slides and slide masters with ease.
FAQs
Q: What image formats are supported for extraction?
A: Extracted images can be saved in PNG, JPEG, BMP, or other formats supported by .NET.
Q: In addition to background images, can I extract other images from PowerPoint slides?
A: Yes, you can extract other images, such as those embedded within slide content or shapes, using Spire.Presentation.
Q: Does Spire.Presentation supports extracting text from PowerPoint presentations?
A: Yes, Spire.Presentation can also extract text from slides, including text in shapes, tables, and more.
Get a Free License
To fully experience the capabilities of Spire.Presentation for .NET without any evaluation limitations, you can request a free 30-day trial license.
C#: Insert, Retrieve, Reorder and Remove Slides in PowerPoint Sections
2024-11-15 01:03:47 Written by KoohjiSections in PowerPoint let you group related slides together, making it easy to segment a presentation by topics, chapters, or any other logical structure. When working with large, multi-section presentations, automating slide operations - such as insertion, retrieval, reordering, and removal - can significantly improve productivity. In this article, we will explain how to insert, retrieve, reorder, and remove slides in PPT sections in C# using Spire.Presentation for .NET.
- Insert Slides into a PowerPoint Section in C#
- Retrieve Slides from a PowerPoint Section in C#
- Reorder Slides in a PowerPoint Section in C#
- Remove Slides from a PowerPoint Section in C#
Install Spire.Presentation for .NET
To begin with, you need to add the DLL files included in the Spire.Presentation for.NET package as references in your .NET project. The DLL files can be either downloaded from this link or installed via NuGet.
PM> Install-Package Spire.Presentation
Insert Slides into a PowerPoint Section in C#
Inserting slides is often needed when you need to add new content to a section. With Spire.Presentation for .NET, you can insert a slide into a section using the Section.Insert() method. The detailed steps are as follows.
- Create an instance of the Presentation class.
- Load a PowerPoint presentation using the Presentation.LoadFromFile() method.
- Get a specific section through its index (0-based) using the Presentation.SectionList(index) property.
- Add a new slide to presentation, then insert it into the section using the Section.Insert() method.
- Remove the added slide from the presentation.
- Save the resulting presentation using the Presentation.SaveToFile() method.
- C#
using Spire.Presentation;
using System.Collections.Generic;

namespace InsertSlidesInSection
{
    internal class Program
    {
        static void Main(string[] args)
        {
            // Create an instance of the Presentation class
            using (Presentation presentation = new Presentation())
            {
                // Load a PowerPoint presentation
                presentation.LoadFromFile("Example.pptx");

                // Access the first section
                Section firstSection = presentation.SectionList[0];

                // Add a new slide to the presentation and insert it at the start of the section
            ISlide slide = presentation.Slides.Append();
            firstSection.Insert(0, slide);
            // Remove the added slide from the presentation
            presentation.Slides.Remove(slide);

                // Save the modified presentation
                presentation.SaveToFile("InsertSlidesInSection.pptx", FileFormat.Pptx2016);
            }
        }
    }
}

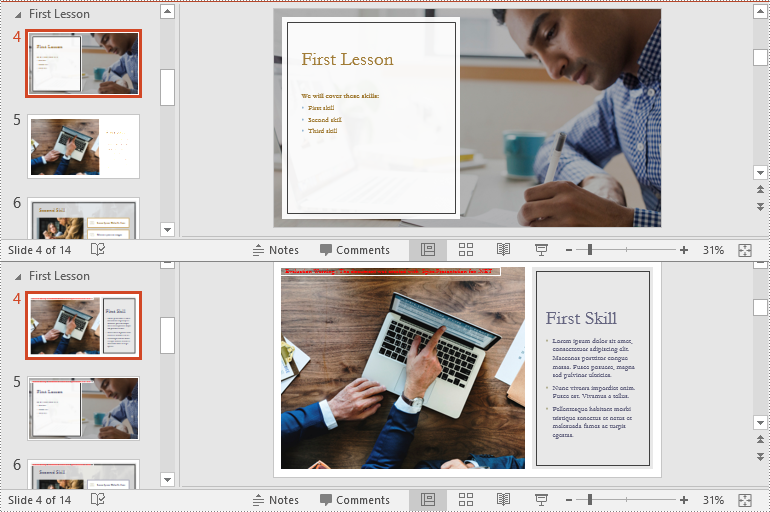
Retrieve Slides from a PowerPoint Section in C#
Extracting slides from a specific section allows you to focus on a subset of slides for targeted operations, like slide reordering or applying specific formatting. Using the Section.GetSlides() method in Spire.Presentation for .NET, you can easily retrieve all slides within a given section. The detailed steps are as follows.
- Create an instance of the Presentation class.
- Load a PowerPoint presentation using the Presentation.LoadFromFile() method.
- Get a specific section through its index (0-based) using the Presentation.SectionList(index) property.
- Retrieve the slides within the section using the Section.GetSlides() method.
- Iterate through the retrieved slides and get the slide number (1-based) of each slide.
- C#
using Spire.Presentation;
using System;

namespace RetrieveSlidesInSection
{
    internal class Program
    {
        static void Main(string[] args)
        {
            // Create an instance of the Presentation class
            using (Presentation presentation = new Presentation())
            {
                // Load a PowerPoint presentation
                presentation.LoadFromFile("Example.pptx");

                // Retrieve the slides in the 3rd section
                Section section = presentation.SectionList[2];
                ISlide[] slides = section.GetSlides();

                // Output the slide number for each slide in the section
                foreach (ISlide slide in slides)
                {
                    Console.Write(slide.SlideNumber + " ");
                }
                Console.ReadKey();
            }
        }
    }
}
Reorder Slides in a PowerPoint Section in C#
Reordering slides is essential for ensuring that related content follows a logical sequence. Spire.Presentation for .NET offers the Section.Move() method for moving a slide in a section to another position. The detailed steps are as follows.
- Create an instance of the Presentation class.
- Load a PowerPoint presentation using the Presentation.LoadFromFile() method.
- Get a specific section through its index (0-based) using the Presentation.SectionList(index) property.
- Move a specific slide in the section to another position using the Section.Move() method.
- Save the resulting presentation using the Presentation.SaveToFile() method.
- C#
using Spire.Presentation;

namespace ReorderSlidesInSection
{
    internal class Program
    {
        static void Main(string[] args)
        {
            // Create an instance of the Presentation class
            using (Presentation presentation = new Presentation())
            {
		   // Load a PowerPoint presentation
                presentation.LoadFromFile("Example.pptx");

                // Access the 3rd section
                Section section = presentation.SectionList[2];

                // Retrieve the slides in the section
                ISlide[] slides = section.GetSlides();

                // Move the 1st slide in the section to the specified position
                section.Move(2, slides[0]);

                // Save the modified presentation
                presentation.SaveToFile("ReorderSlidesInSection.pptx", FileFormat.Pptx2016);
            }
        }
    }
}
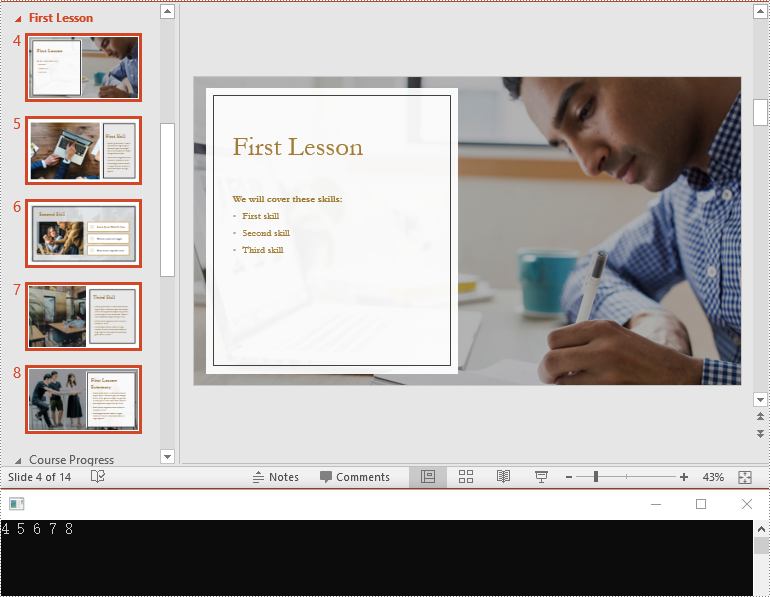
Remove Slides from a PowerPoint Section in C#
Removing slides from a section helps streamline your presentation, especially when certain slides become outdated or irrelevant. With the Section.RemoveAt() or Section.RemoveRange() method in Spire.Presentation for .NET, you can easily delete an individual slide or a range of slides from a section. The detailed steps are as follows.
- Create an instance of the Presentation class.
- Load a PowerPoint presentation using the Presentation.LoadFromFile() method.
- Get a specific section through its index (0-based) using the Presentation.SectionList(index) property.
- Remove a specific slide or a range of slides from the presentation using the Section.RemoveAt() or Section.RemoveRange() method.
- Save the resulting presentation using the Presentation.SaveToFile() method.
- C#
using Spire.Presentation;

namespace RemoveSlidesInSection
{
    internal class Program
    {
        static void Main(string[] args)
        {
            // Create an instance of the Presentation class
            using (Presentation presentation = new Presentation())
            {
                // Load a PowerPoint presentation
                presentation.LoadFromFile("Course.pptx");

                // Access the 3rd section
                Section section = presentation.SectionList[2];

                // Remove the first slide from the section
                section.RemoveAt(0);

                // Or remove a range of slides from the section
                //section.RemoveRange(0, 2);

                // Save the modified presentation
                presentation.SaveToFile("RemoveSlidesInSection.pptx", FileFormat.Pptx2016);
            }
        }
    }
}
Apply for a Temporary License
If you'd like to remove the evaluation message from the generated documents, or to get rid of the function limitations, please request a 30-day trial license for yourself.
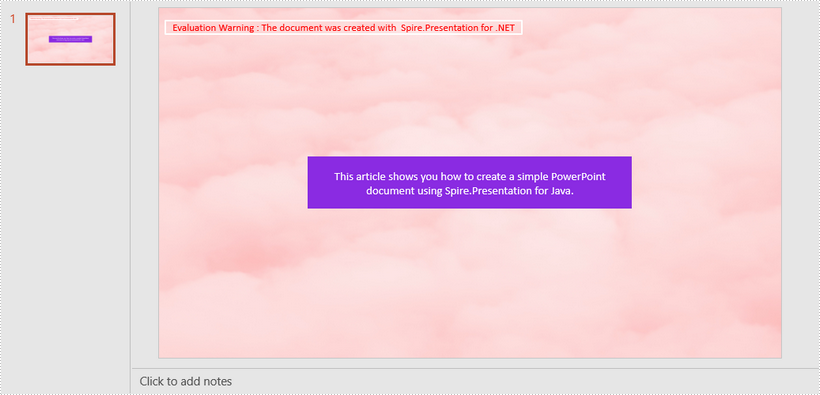
PowerPoint is a presentation document that is typically used for product introductions, performance reports, teaching, and other purposes. Since the design of PowerPoint is a visual behavior and needs constant fine-tuning, it is not recommended to create PowerPoint from scratch programmatically. But if you do have the requirement to create PowerPoint documents in C# or VB.NET, you can try this solution provided by Spire.Presentation for .NET.
Install Spire.Presentation for .NET
To begin with, you need to add the DLL files included in the Spire.Presentation for.NET package as references in your .NET project. The DLL files can be either downloaded from this link or installed via NuGet.
PM> Install-Package Spire.Presentation
Create a Simple PowerPoint Document
Spire.Presentation for .NET offers the Presentation class and the ISlide interface to represent a PowerPoint document and a slide respectively. It is quite straightforward and simple for developers to use the properties and methods under them to create or manipulate PowerPoint files. The following are the steps to generate a simple PowerPoint document using it.
- Create a Presentation object, and set the slide size type to screen 16x9 through the Presentation.SlideSize.Type property.
- Get the first slide through the Presentation.Slides[] property.
- Set the background image of the slide using ISlide.SlideBackground property.
- Add a rectangle to the slide using ISlide.Shapes.AppendShape() method, positioning the shape at the center of the slide using IAutoShape.SetShapeAlignment() method.
- Set the fill color, line style, font color, and text of the shape through other properties under the IAutoShape object.
- Save the presentation to a .pptx file using Presentation.SaveToFile() method.
- C#
- VB.NET
using System.Drawing;
using Spire.Presentation;
using Spire.Presentation.Drawing;

namespace CreatePowerPoint
{
    class Program
    {
        static void Main(string[] args)
        {
            //Create a Presentation object
            Presentation presentation = new Presentation();

            //Set the slide size type to screen 16x9
            presentation.SlideSize.Type = SlideSizeType.Screen16x9;

            //Get the first slide
            ISlide slide = presentation.Slides[0];

            //Set the background image
            string imgPath = @"C:\Users\Administrator\Desktop\bgImage.jpg";
            IImageData imageData = presentation.Images.Append(Image.FromFile(imgPath));
            slide.SlideBackground.Type = Spire.Presentation.Drawing.BackgroundType.Custom;
            slide.SlideBackground.Fill.FillType = Spire.Presentation.Drawing.FillFormatType.Picture;
            slide.SlideBackground.Fill.PictureFill.FillType = PictureFillType.Stretch;
            slide.SlideBackground.Fill.PictureFill.Picture.EmbedImage = imageData;

            //Insert a rectangle shape
            Rectangle rect = new Rectangle(100, 100, 500, 80);
            IAutoShape shape = slide.Shapes.AppendShape(ShapeType.Rectangle, rect);

            //Position the shape at the center of the slide
            shape.SetShapeAlignment(ShapeAlignment.AlignCenter);
            shape.SetShapeAlignment(ShapeAlignment.DistributeVertically);

            //Set the fill color, line style and font color of the shape
            shape.Fill.FillType = FillFormatType.Solid;
            shape.Fill.SolidColor.Color = Color.BlueViolet;
            shape.ShapeStyle.LineStyleIndex = 0;//no line
            shape.ShapeStyle.FontColor.Color = Color.White;

            //Set the text of the shape
            shape.TextFrame.Text = "This article shows you how to create a simple PowerPoint document using Spire.Presentation for Java.";

            //Save to file
            presentation.SaveToFile("CreatePowerPoint.pptx", FileFormat.Pptx2013);
        }
    }
}
Apply for a Temporary License
If you'd like to remove the evaluation message from the generated documents, or to get rid of the function limitations, please request a 30-day trial license for yourself.
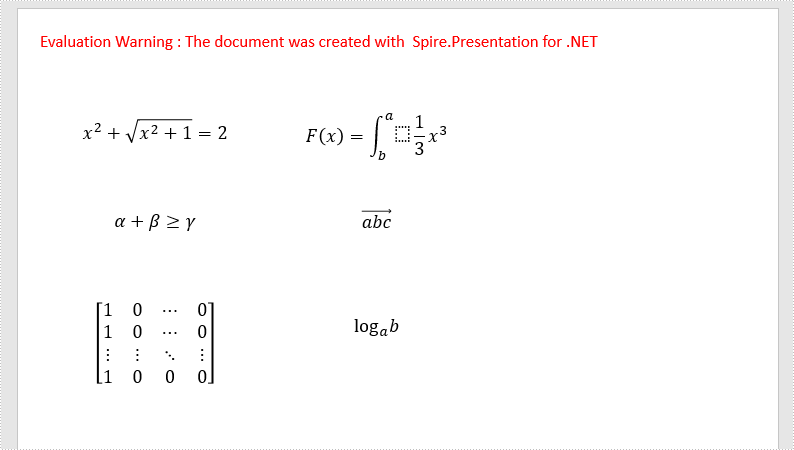
LaTeX is a powerful tool to typeset mathematical equations. It supports plenty of mathematical symbols and notations to create mathematical equations, for instance, fractions, integrals and more.
Spire.Presentation API provides developers with the ability to create and add mathematical equations to PowerPoint shape using LaTeX code. The following steps demonstrate how to achieve this function using Spire.Presentation:
- Create a Presentation instance.
- Get the reference of a slide by using its index.
- Use ShapeList.AppendShape method to add a shape to the first slide.
- Use ParagraphCollection.AddParagraphFromLatexMathCode(string) method to create a mathematical equation from LaTeX code and add it to the shape.
- Save the result document using Presentation.SaveToFile(string, FileFormat) method.
The following code shows how to add mathematical equations to PowerPoint in C#.
using Spire.Presentation;
using System.Drawing;

namespace MathEquations
{
    class Program
    {
        static void Main(string[] args)
        {
            //The LaTeX codes
            string latexCode1 = @"x^{2} + \sqrt{x^{2}+1}=2";
            string latexCode2 = @"F(x) &= \int^a_b \frac{1}{3}x^3";
            string latexCode3 = @"\alpha + \beta  \geq \gamma";
            string latexCode4 = @"\overrightarrow{abc}";
            string latexCode5 = @"\begin{bmatrix} 1 & 0 & \cdots & 0\\ 1 & 0 & \cdots & 0\\ \vdots & \vdots & \ddots & \vdots\\ 1 & 0 & 0 & 0 \end{bmatrix}";
            string latexCode6 = @"\log_a{b}";

            //Create a Presentation instance
            Presentation ppt = new Presentation();

            //Get the first slide by using its index
            ISlide slide = ppt.Slides[0];

            //Add a shape to the slide
            IAutoShape shape = slide.Shapes.AppendShape(ShapeType.Rectangle, new RectangleF(30, 100, 200, 30));
            shape.TextFrame.Paragraphs.Clear();
            //Add a math equation to the shape using the LaTeX code
            shape.TextFrame.Paragraphs.AddParagraphFromLatexMathCode(latexCode1);

            //Add a shape to the slide
            shape = slide.Shapes.AppendShape(ShapeType.Rectangle, new RectangleF(240, 100, 200, 40));
            shape.TextFrame.Paragraphs.Clear();
            //Add a math equation to the shape using the LaTeX code
            shape.TextFrame.Paragraphs.AddParagraphFromLatexMathCode(latexCode2);

            //Add a shape to the slide
            shape = slide.Shapes.AppendShape(ShapeType.Rectangle, new RectangleF(30, 180, 200, 40));
            shape.TextFrame.Paragraphs.Clear();
            //Add a math equation to the shape using the LaTeX code
            shape.TextFrame.Paragraphs.AddParagraphFromLatexMathCode(latexCode3);

            //Add a shape to the slide
            shape = slide.Shapes.AppendShape(ShapeType.Rectangle, new RectangleF(240, 180, 200, 40));
            shape.TextFrame.Paragraphs.Clear();
            //Add a math equation to the shape using the LaTeX code
            shape.TextFrame.Paragraphs.AddParagraphFromLatexMathCode(latexCode4);

            //Add a shape to the slide
            shape = slide.Shapes.AppendShape(ShapeType.Rectangle, new RectangleF(30, 280, 200, 70));
            shape.TextFrame.Paragraphs.Clear();
            //Add a math equation to the shape using the LaTeX code
            shape.TextFrame.Paragraphs.AddParagraphFromLatexMathCode(latexCode5);

            //Add a shape to the slide
            shape = slide.Shapes.AppendShape(ShapeType.Rectangle, new RectangleF(240, 280, 200, 40));
            shape.TextFrame.Paragraphs.Clear();
            //Add a math equation to the shape using the LaTeX code
            shape.TextFrame.Paragraphs.AddParagraphFromLatexMathCode(latexCode6);

            for (int i = 0; i < slide.Shapes.Count; i++)
            {
                slide.Shapes[i].Fill.FillType = Spire.Presentation.Drawing.FillFormatType.None;
                slide.Shapes[i].Line.FillType = Spire.Presentation.Drawing.FillFormatType.None;
            }

            //Save the result document
            ppt.SaveToFile("MathEquations.pptx", FileFormat.Pptx2013);
        }
    }
}
The following code shows how to add mathematical equations to PowerPoint in VB.NET.
Imports Spire.Presentation
Imports System.Drawing

Namespace MathEquations
    Friend Class Program
        Private Shared Sub Main(ByVal args As String())
            'The LaTeX codes
            Dim latexCode1 As String = "x^{2} + \sqrt{x^{2}+1}=2"
            Dim latexCode2 As String = "F(x) &= \int^a_b \frac{1}{3}x^3"
            Dim latexCode3 As String = "\alpha + \beta  \geq \gamma"
            Dim latexCode4 As String = "\overrightarrow{abc}"
            Dim latexCode5 As String = "\begin{bmatrix} 1 & 0 & \cdots & 0\\ 1 & 0 & \cdots & 0\\ \vdots & \vdots & \ddots & \vdots\\ 1 & 0 & 0 & 0 \end{bmatrix}"
            Dim latexCode6 As String = "\log_a{b}"

            'Create a Presentation instance
            Dim ppt As Presentation = New Presentation()

            'Get the first slide by using its index
            Dim slide As ISlide = ppt.Slides(0)

            'Add a shape to the slide
            Dim shape As IAutoShape = slide.Shapes.AppendShape(ShapeType.Rectangle, New RectangleF(30, 100, 200, 30))
            shape.TextFrame.Paragraphs.Clear()
            'Add a math equation to the shape using the LaTeX code
            shape.TextFrame.Paragraphs.AddParagraphFromLatexMathCode(latexCode1)

            'Add a shape to the slide
            shape = slide.Shapes.AppendShape(ShapeType.Rectangle, New RectangleF(240, 100, 200, 40))
            shape.TextFrame.Paragraphs.Clear()
            'Add a math equation to the shape using the LaTeX code
            shape.TextFrame.Paragraphs.AddParagraphFromLatexMathCode(latexCode2)

            'Add a shape to the slide
            shape = slide.Shapes.AppendShape(ShapeType.Rectangle, New RectangleF(30, 180, 200, 40))
            shape.TextFrame.Paragraphs.Clear()
            'Add a math equation to the shape using the LaTeX code
            shape.TextFrame.Paragraphs.AddParagraphFromLatexMathCode(latexCode3)

            'Add a shape to the slide
            shape = slide.Shapes.AppendShape(ShapeType.Rectangle, New RectangleF(240, 180, 200, 40))
            shape.TextFrame.Paragraphs.Clear()
            'Add a math equation to the shape using the LaTeX code
            shape.TextFrame.Paragraphs.AddParagraphFromLatexMathCode(latexCode4)

            'Add a shape to the slide
            shape = slide.Shapes.AppendShape(ShapeType.Rectangle, New RectangleF(30, 280, 200, 70))
            shape.TextFrame.Paragraphs.Clear()
            'Add a math equation to the shape using the LaTeX code
            shape.TextFrame.Paragraphs.AddParagraphFromLatexMathCode(latexCode5)

            'Add a shape to the slide
            shape = slide.Shapes.AppendShape(ShapeType.Rectangle, New RectangleF(240, 280, 200, 40))
            shape.TextFrame.Paragraphs.Clear()
            'Add a math equation to the shape using the LaTeX code
            shape.TextFrame.Paragraphs.AddParagraphFromLatexMathCode(latexCode6)

            For i As Integer = 0 To slide.Shapes.Count - 1
                slide.Shapes(i).Fill.FillType = Spire.Presentation.Drawing.FillFormatType.None
                slide.Shapes(i).Line.FillType = Spire.Presentation.Drawing.FillFormatType.None
            Next

            'Save the result document
            ppt.SaveToFile("MathEquations.pptx", FileFormat.Pptx2013)
        End Sub
    End Class
End Namespace
The following is the output document after adding mathematical equations:
Apply for a Temporary License
If you'd like to remove the evaluation message from the generated documents, or to get rid of the function limitations, please request a 30-day trial license for yourself.
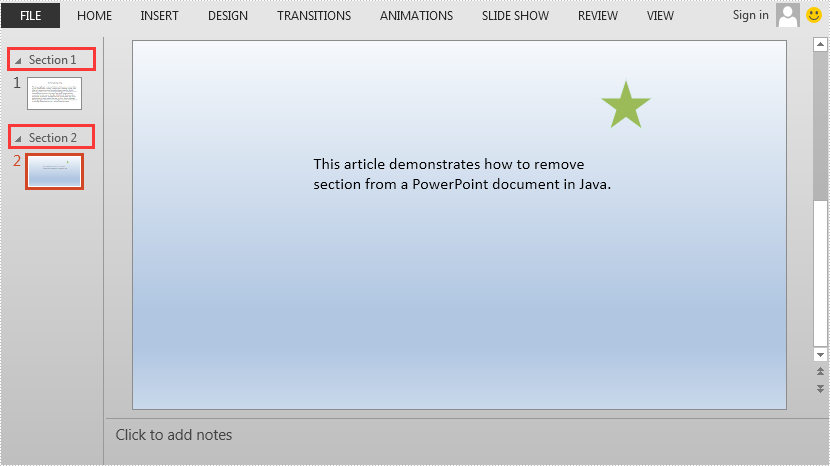
This article demonstrates how to remove a specific section or all the sections but keep the slide(s) in the section(s) in PowerPoint by using Spire.Presentation for .NET.
Below is the screenshot of the input PowerPoint document which contains two sections:
//Create a Presentation instance
Presentation ppt = new Presentation();
//Load a PowerPoint document
ppt.LoadFromFile("AddSection.pptx");

//Remove the second section
ppt.SectionList.RemoveAt(1);

//Remove all the sections
//ppt.SectionList.RemoveAll();

//Save the result document
ppt.SaveToFile("RemoveSection.pptx", FileFormat.Pptx2013);
'Create a Presentation instance
Dim ppt As Presentation = New Presentation
'Load a PowerPoint document
ppt.LoadFromFile("AddSection.pptx")
'Remove the second section
ppt.SectionList.RemoveAt(1)
'Remove all the sections
'ppt.SectionList.RemoveAll()
'Save the result document
ppt.SaveToFile("RemoveSection.pptx", FileFormat.Pptx2013)
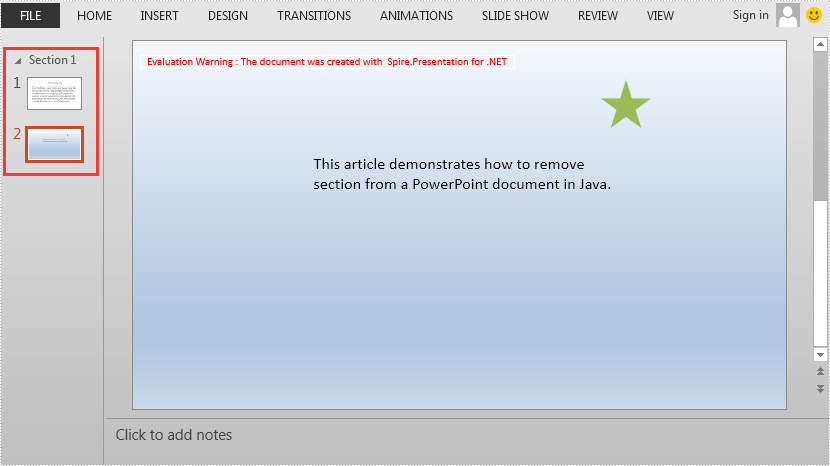
The output PowerPoint document after removing the second section:
Sections in PowerPoint is a feature that allows you to organize slides into different groups/segments for easy management. Adding sections with unique names can help keep track of specific groups of slides, or can also help outline the topics of a PowerPoint presentation. In this article, you will learn how to programmatically add or remove sections in a PowerPoint document using Spire.Presentation for .NET.
- Add a Section at the End of a PowerPoint Document in C# and VB.NET
- Insert a Section Before a Specified Section in PowerPoint in C# and VB.NET
- Add a Section Before a Specified Slide in PowerPoint in C# and VB.NET
- Remove a Section from a PowerPoint Document in C# and VB.NET
Install Spire.Presentation for .NET
To begin with, you need to add the DLL files included in the Spire.Presentation for.NET package as references in your .NET project. The DLL files can be either downloaded from this link or installed via NuGet.
PM> Install-Package Spire.Presentation
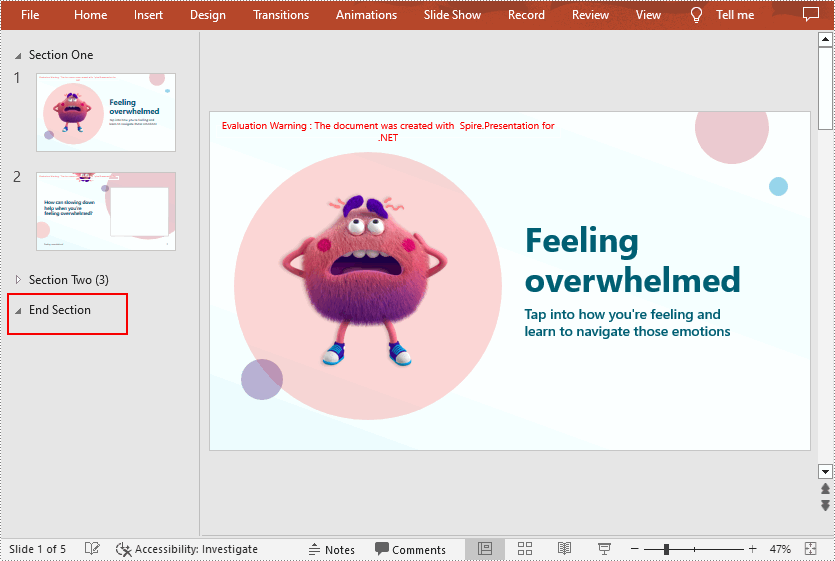
Add a Section at the End of a PowerPoint Document in C# and VB.NET
Spire.Presentation for .NET provides the Presentation.SectionList.Append(string sectionName) method to append a section with section name at the end of a PowerPoint document. The detailed steps are as follows.
- Initialize an instance of Presentation class.
- Load a PowerPoint document using Presentation.LoadFromFile() method.
- Append a section at the end of the document using Presentation.SectionList.Append(string sectionName) method.
- Save the result document using Presentation.SaveToFile() method.
- C#
- VB.NET
using Spire.Presentation;

namespace AppendSectionAtEnd
{
    class Program
    {
        static void Main(string[] args)
        {
            //Create a Presentation instance
            Presentation ppt = new Presentation();

            //Load a sample PowerPoint document
            ppt.LoadFromFile("Test.pptx");

            //Add a section at the end of the document
            Section section = ppt.SectionList.Append("End Section");

            //Save the result document
            ppt.SaveToFile("AddSectionAtEnd.pptx", FileFormat.Pptx2013);
        }
    }
}
Insert a Section Before a Specified Section in PowerPoint in C# and VB.NET
If you want to insert a section before an existing section to make the document more logical, Spire.Presentation for .NET provides the Presentation.SectionList.Insert(int sectionIndex, string sectionName) method. The following are the steps to insert a section at a specified position by section index.
- Initialize an instance of Presentation class.
- Load a PowerPoint document using Presentation.LoadFromFile() method.
- Insert a new section before the specified section using Presentation.SectionList.Insert(int sectionIndex, string sectionName) method.
- Save the result document using Presentation.SaveToFile() method.
- C#
- VB.NET
using Spire.Presentation;

namespace InsertSectionAtSpecifiedPosition
{
    class Program
    {
        static void Main(string[] args)
        {
            //Create a Presentation instance
            Presentation ppt = new Presentation();

            //Load a sample PowerPoint document
            ppt.LoadFromFile("Test.pptx");

            //Insert a section before the second section
            Section section = ppt.SectionList.Insert(1, "New Section");

            //Save the result document
            ppt.SaveToFile("InsertSectionAtSpecifiedPosition.pptx", FileFormat.Pptx2013);
        }
    }
}

Add a Section Before a Specified Slide in PowerPoint in C# and VB.NET
To divided the existing PowerPoint slides into different sections, you can use the Presentation.SectionList.Add(string sectionName, ISlide slide) method to insert a section before a specified slide. The detailed steps are as follows.
- Initialize an instance of Presentation class.
- Load a PowerPoint document using Presentation.LoadFromFile() method.
- Get a specified slide using Presentation.Slides property.
- Add a section before the specified slide using Presentation.SectionList.Add(string sectionName, ISlide slide) method.
- Save the result document using Presentation.SaveToFile() method.
- C#
- VB.NET
using Spire.Presentation;

namespace AddSectionBeforeSlide
{
    class Program
    {
        static void Main(string[] args)
        {
            //Create a Presentation instance
            Presentation ppt = new Presentation();

            //Load a sample PowerPoint document
            ppt.LoadFromFile("Test.pptx");

            //Get the second slide in the document
            ISlide slide = ppt.Slides[1];

            //Add a section before the second slide
            Section section = ppt.SectionList.Add("New Section", slide);

            //Save the result document
            ppt.SaveToFile("AddSectionBeforeSlide.pptx", FileFormat.Pptx2013);
        }
    }
}

Remove a Section from a PowerPoint Document in C# and VB.NET
If you do not need a particular section, you can simply remove it using Presentation.SectionList.RemoveAt(int index) method. Note that removing a section does not remove the slides in that section. The following are the steps to remove a specified section but keep the slides in it.
- Initialize an instance of Presentation class.
- Load a PowerPoint document using Presentation.LoadFromFile() method.
- Remove a specified section using Presentation.SectionList.RemoveAt(int index) method. Or you can remove all the sections in the document using Presentation.SectionList.RemoveAll() method.
- Save the result document using Presentation.SaveToFile() method.
- C#
- VB.NET
using Spire.Presentation;

namespace RemoveSection
{
    class Program
    {
        static void Main(string[] args)
        {
            //Create a Presentation instance
            Presentation ppt = new Presentation();

            //Load a sample PowerPoint document
            ppt.LoadFromFile("Test.pptx");

            //Remove the second section
            ppt.SectionList.RemoveAt(1);

            //Remove all the sections
            //ppt.SectionList.RemoveAll();

            //Save the result document
            ppt.SaveToFile("RemoveSection.pptx", FileFormat.Pptx2013);
        }
    }
}
Apply for a Temporary License
If you'd like to remove the evaluation message from the generated documents, or to get rid of the function limitations, please request a 30-day trial license for yourself.
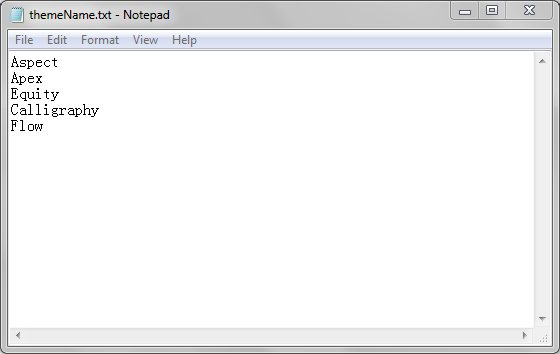
This article demonstrates how to detect the used themes in a PowerPoint document using Spire.Presentation.
Detail steps:
Step 1: Instantiate a Presentation object and load the PowerPoint document.
Presentation ppt = new Presentation();
ppt.LoadFromFile(@"Sample.pptx");
Step 2: Get the theme name of each slide in the document.
StringBuilder sb = new StringBuilder();
string themeName = null;

foreach (ISlide slide in ppt.Slides)
{
    themeName = slide.Theme.Name;
    sb.AppendLine(themeName);
}
Step 3: Save to a .txt file.
File.WriteAllText("themeName.txt", sb.ToString());
Output:
Full code:
using Spire.Presentation;
using System.IO;
using System.Text;
namespace DetectThemes
{
    class Program
    {
        static void Main(string[] args)
        {
            //Instantiate a Presentation object
            Presentation ppt = new Presentation();
            //Load the PowerPoint document
            ppt.LoadFromFile(@"Sample.pptx");

            StringBuilder sb = new StringBuilder();
            string themeName = null;

            //Get the theme name of each slide in the document
            foreach (ISlide slide in ppt.Slides)
            {
                themeName = slide.Theme.Name;
                sb.AppendLine(themeName);
            }

            //Save to a .txt file
            File.WriteAllText("themeName.txt", sb.ToString());

            }
        }
    }
Create Multiple Slide Maters and Apply Them to Individual Slides in C#, VB.NET
2018-05-03 09:09:22 Written by KoohjiWhen you want to use multiple themes in one presentation, you’ll need multiple slide masters. In this article, you will learn how create additional slide masters and apply them to different slides, by using Spire.Presentation with C# and VB.NET.
Step 1: Create a PowerPoint document and insert four slides to it. There are five slides in total including the default slide.
Presentation ppt = new Presentation();
for (int i = 0; i < 4; i++)
{
    ppt.Slides.Append();
}
Step 2: Get the first default slide master.
IMasterSlide first_master = ppt.Masters[0];
Step 3: Append another slide master.
ppt.Masters.AppendSlide(first_master);
IMasterSlide second_master = ppt.Masters[1];
Step 4: Set different background image for the two slide masters.
string pic1 = @"C:\Users\Administrator\Desktop\image-1.png";
string pic2 = @"C:\Users\Administrator\Desktop\image-2.png";
RectangleF rect = new RectangleF(0, 0, ppt.SlideSize.Size.Width, ppt.SlideSize.Size.Height);
first_master.SlideBackground.Fill.FillType = FillFormatType.Picture;
IEmbedImage image1 = first_master.Shapes.AppendEmbedImage(ShapeType.Rectangle, pic1, rect);
first_master.SlideBackground.Fill.PictureFill.Picture.EmbedImage = image1 as IImageData;
second_master.SlideBackground.Fill.FillType = FillFormatType.Picture;
IEmbedImage image2 = second_master.Shapes.AppendEmbedImage(ShapeType.Rectangle, pic2, rect);
second_master.SlideBackground.Fill.PictureFill.Picture.EmbedImage = image2 as IImageData;
Step 5: Apply the first master with layout to the first slide.
ppt.Slides[0].Layout = first_master.Layouts[1];
Step 6: Apply the second master with layout to other slides.
for (int i = 1; i < ppt.Slides.Count; i++)
{
    ppt.Slides[i].Layout = second_master.Layouts[8];
}
Step 7: Save the file.
ppt.SaveToFile("result.pptx", FileFormat.Pptx2013);
Output:
Full Code:
using Spire.Presentation;
using Spire.Presentation.Drawing;
using System.Drawing;
namespace  CreateMultipleMaster
{
    class Program
    {
        static void Main(string[] args)
        {
            Presentation ppt = new Presentation();
            ppt.SlideSize.Type = SlideSizeType.Screen16x9;
            for (int i = 0; i < 4; i++)
            {
                ppt.Slides.Append();
            }

            IMasterSlide first_master = ppt.Masters[0];
            ppt.Masters.AppendSlide(first_master);
            IMasterSlide second_master = ppt.Masters[1];

            string pic1 = @"C:\Users\Administrator\Desktop\image-1.png";
            string pic2 = @"C:\Users\Administrator\Desktop\image-2.png";
            RectangleF rect = new RectangleF(0, 0, ppt.SlideSize.Size.Width, ppt.SlideSize.Size.Height);
            first_master.SlideBackground.Fill.FillType = FillFormatType.Picture;
            IEmbedImage image1 = first_master.Shapes.AppendEmbedImage(ShapeType.Rectangle, pic1, rect);
            first_master.SlideBackground.Fill.PictureFill.Picture.EmbedImage = image1 as IImageData;
            second_master.SlideBackground.Fill.FillType = FillFormatType.Picture;
            IEmbedImage image2 = second_master.Shapes.AppendEmbedImage(ShapeType.Rectangle, pic2, rect);
            second_master.SlideBackground.Fill.PictureFill.Picture.EmbedImage = image2 as IImageData;

            ppt.Slides[0].Layout = first_master.Layouts[1];
            for (int i = 1; i < ppt.Slides.Count; i++)
            {
                ppt.Slides[i].Layout = second_master.Layouts[8];
            }
            ppt.SaveToFile("result.pptx", FileFormat.Pptx2013);

            }
        }
    }
Imports Spire.Presentation
Imports Spire.Presentation.Drawing
Imports System.Drawing
Namespace CreateMultipleMaster
	Class Program
		Private Shared Sub Main(args As String())
			Dim ppt As New Presentation()
			ppt.SlideSize.Type = SlideSizeType.Screen16x9
			For i As Integer = 0 To 3
				ppt.Slides.Append()
			Next

			Dim first_master As IMasterSlide = ppt.Masters(0)
			ppt.Masters.AppendSlide(first_master)
			Dim second_master As IMasterSlide = ppt.Masters(1)

			Dim pic1 As String = "C:\Users\Administrator\Desktop\image-1.png"
			Dim pic2 As String = "C:\Users\Administrator\Desktop\image-2.png"
			Dim rect As New RectangleF(0, 0, ppt.SlideSize.Size.Width, ppt.SlideSize.Size.Height)
			first_master.SlideBackground.Fill.FillType = FillFormatType.Picture
			Dim image1 As IEmbedImage = first_master.Shapes.AppendEmbedImage(ShapeType.Rectangle, pic1, rect)
			first_master.SlideBackground.Fill.PictureFill.Picture.EmbedImage = TryCast(image1, IImageData)
			second_master.SlideBackground.Fill.FillType = FillFormatType.Picture
			Dim image2 As IEmbedImage = second_master.Shapes.AppendEmbedImage(ShapeType.Rectangle, pic2, rect)
			second_master.SlideBackground.Fill.PictureFill.Picture.EmbedImage = TryCast(image2, IImageData)

			ppt.Slides(0).Layout = first_master.Layouts(1)
			For i As Integer = 1 To ppt.Slides.Count - 1
				ppt.Slides(i).Layout = second_master.Layouts(8)
			Next
			ppt.SaveToFile("result.pptx", FileFormat.Pptx2013)

		End Sub
	End Class
End Namespace
Every PowerPoint presentation has a slide master which contains all the styles for your slides. You can quickly change the look of your entire presentation by selecting the slide master, and then adopting a theme, adding a background picture or changing the color scheme.
In this article, you will learn how to access and customize the slide master in an existing presentation.
Source File:
Detail steps:
Step 1: Load the source file.
Presentation ppt = new Presentation();
ppt.LoadFromFile(@"sample.pptx");
Step 2: Get the first slide master from the presentation.
IMasterSlide masterSlide = ppt.Masters[0];
Step 3: Customize the background of the slide master.
string backgroundPic = "background.png";
RectangleF rect = new RectangleF(0, 0, ppt.SlideSize.Size.Width, ppt.SlideSize.Size.Height);
masterSlide.SlideBackground.Fill.FillType = FillFormatType.Picture;
IEmbedImage image = masterSlide.Shapes.AppendEmbedImage(ShapeType.Rectangle, backgroundPic, rect);
masterSlide.SlideBackground.Fill.PictureFill.Picture.EmbedImage = image as IImageData;
Step 4: Change the color scheme.
masterSlide.Theme.ColorScheme.Accent1.Color = Color.Red;
masterSlide.Theme.ColorScheme.Accent2.Color = Color.RosyBrown;
masterSlide.Theme.ColorScheme.Accent3.Color = Color.Ivory;
masterSlide.Theme.ColorScheme.Accent4.Color = Color.Lavender;
masterSlide.Theme.ColorScheme.Accent5.Color = Color.Black;
Step 5: Add an image to the slide master. If you want, you can add any other document elements to slide master so that they can display on each slide.
string logo = "logo.png";
IEmbedImage imageShape = masterSlide.Shapes.AppendEmbedImage(ShapeType.Rectangle, logo, new RectangleF(40, 40, 240, 65));
imageShape.Line.FillFormat.FillType = FillFormatType.None;
Step 6: Save the document.
ppt.SaveToFile("result.pptx", FileFormat.Pptx2013);
Result:
Full code:
using Spire.Presentation;
using Spire.Presentation.Drawing;
using System.Drawing;
namespace ApplySlideMaster
{
    class Program
    {
        static void Main(string[] args)
        {
            Presentation ppt = new Presentation();
            ppt.LoadFromFile(@"sample.pptx");

            IMasterSlide masterSlide = ppt.Masters[0];
            string backgroundPic = "background.png";
            string logo = "logo.png";
            RectangleF rect = new RectangleF(0, 0, ppt.SlideSize.Size.Width, ppt.SlideSize.Size.Height);
            masterSlide.SlideBackground.Fill.FillType = FillFormatType.Picture;
            IEmbedImage image = masterSlide.Shapes.AppendEmbedImage(ShapeType.Rectangle, backgroundPic, rect);
            masterSlide.SlideBackground.Fill.PictureFill.Picture.EmbedImage = image as IImageData;
            masterSlide.Theme.ColorScheme.Accent1.Color = Color.Red;
            masterSlide.Theme.ColorScheme.Accent2.Color = Color.RosyBrown;
            masterSlide.Theme.ColorScheme.Accent3.Color = Color.Ivory;
            masterSlide.Theme.ColorScheme.Accent4.Color = Color.Lavender;
            masterSlide.Theme.ColorScheme.Accent5.Color = Color.Black;
            IEmbedImage imageShape = masterSlide.Shapes.AppendEmbedImage
            (ShapeType.Rectangle, logo, new RectangleF(40, 40, 240, 65));
            imageShape.Line.FillFormat.FillType = FillFormatType.None;

            ppt.SaveToFile("result.pptx", FileFormat.Pptx2013);

            }
        }
    }
Imports Spire.Presentation
Imports Spire.Presentation.Drawing
Imports System.Drawing
Namespace ApplySlideMaster
	Class Program
		Private Shared Sub Main(args As String())
			Dim ppt As New Presentation()
			ppt.LoadFromFile("sample.pptx")

			Dim masterSlide As IMasterSlide = ppt.Masters(0)
			Dim backgroundPic As String = "background.png"
			Dim logo As String = "logo.png"
			Dim rect As New RectangleF(0, 0, ppt.SlideSize.Size.Width, ppt.SlideSize.Size.Height)
			masterSlide.SlideBackground.Fill.FillType = FillFormatType.Picture
			Dim image As IEmbedImage = masterSlide.Shapes.AppendEmbedImage(ShapeType.Rectangle, backgroundPic, rect)
			masterSlide.SlideBackground.Fill.PictureFill.Picture.EmbedImage = TryCast(image, IImageData)
			masterSlide.Theme.ColorScheme.Accent1.Color = Color.Red
			masterSlide.Theme.ColorScheme.Accent2.Color = Color.RosyBrown
			masterSlide.Theme.ColorScheme.Accent3.Color = Color.Ivory
			masterSlide.Theme.ColorScheme.Accent4.Color = Color.Lavender
			masterSlide.Theme.ColorScheme.Accent5.Color = Color.Black
			Dim imageShape As IEmbedImage = masterSlide.Shapes.AppendEmbedImage(ShapeType.Rectangle, logo, New RectangleF(40, 40, 240, 65))
			imageShape.Line.FillFormat.FillType = FillFormatType.None

			ppt.SaveToFile("result.pptx", FileFormat.Pptx2013)

		End Sub
	End Class
End Namespace
Animation is a great way to draw viewers' attention to a presentation. We can apply animation effects to text, shapes or any other objects on PowerPoint slides. To make the animations more attractive, we usually set sound effects for them. This article demonstrates how to obtain these sound effects by using Spire.Presentation and C#.
Below shape is set with a fly in animation which has a sound effect named "Applause".
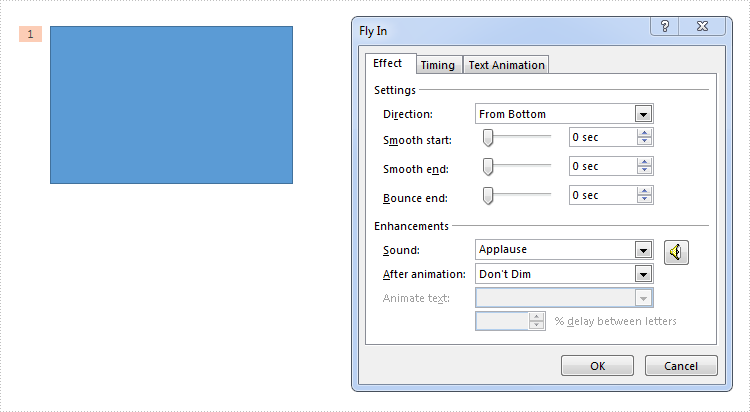
Refer below steps to get the sound effect from the shape:
Step 1: Load the PowerPoint document.
Presentation ppt = new Presentation(@"test.pptx", FileFormat.Pptx2013);
Step 2: Get the audio in a time node.
ISlide slide = ppt.Slides[0];
TimeNodeAudio audio = slide.Timeline.MainSequence[0].TimeNodeAudios[0];
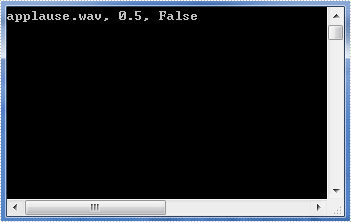
Step 3: Now we can get the properties of the audio, such as sound name, volume or detect if it's mute.
string soundName = audio.SoundName;
float volume = audio.Volume;
bool isMute = audio.IsMute;
Output:
Full code:
using System;
using Spire.Presentation;
using Spire.Presentation.Drawing.TimeLine;

namespace Get_Sound_Effect
{
    class Program
    {
        static void Main(string[] args)
        {
            Presentation ppt = new Presentation(@"test.pptx", FileFormat.Pptx2013);
            ISlide slide = ppt.Slides[0];
            TimeNodeAudio audio = slide.Timeline.MainSequence[0].TimeNodeAudios[0];
            string soundName = audio.SoundName;
            float volume = audio.Volume;
            bool isMute = audio.IsMute;
            Console.WriteLine("{0}, {1}, {2}", soundName, volume, isMute);
            Console.ReadKey();
        }
    }
}
