Spire.Doc for Java 12.4.6 supports loading, manipulating, and converting Markdown documents
We are excited to announce the release of Spire.Doc for Java 12.4.6. This version supports manipulating and converting Markdown documents. It also enhances the conversion from Word to PDF, HTML, and SVG. Moreover, some known issues are fixed successfully in this version, such as the issue that the rest content of the document was changed after replacing the bookmark content. More details are listed below.
Here is a list of changes made in this release
| Category | ID | Description |
| New feature | SPIREDOC-10091 | Supports loading and operating MarkDown documents, or converting word documents to MarkDown.
Document doc = new Document();
//load .md file
doc.loadFromFile("input.md");
//save to .md file
doc.saveToFile("output.md", com.spire.doc.FileFormat.Markdown);
//save to .docx file
//doc.saveToFile("output.docx", com.spire.doc.FileFormat.Docx);
//save to .doc file
//doc.saveToFile("output.doc", com.spire.doc.FileFormat.Doc);
//save to .pdf file
//doc.saveToFile("output.pdf", com.spire.doc.FileFormat.PDF);
doc.close();

Document doc = new Document();
//load .docx file
doc.loadFromFile("input.docx");
//load .doc file
//doc.loadFromFile("input.doc");
//save to .md file
doc.saveToFile("output.md", com.spire.doc.FileFormat.Markdown);
doc.close();
|
| Bug | SPIREDOC-9801 | Fixes the issue that the content format was inconsistent after converting Word to PDF. |
| Bug | SPIREDOC-10038 | Fixes the issue that the rest content of the document was changed after replacing the content of bookmarks. |
| Bug | SPIREDOC-10073 | Optimizes the document size of Word to PDF conversion results. |
| Bug | SPIREDOC-10183 | Fixes the issue that the result document of comparison reported an error when opening. |
| Bug | SPIREDOC-10237 | Fixes the issue that the content was not formatted correctly after converting Word to HTML. |
| Bug | SPIREDOC-10283 | Fixes the issue that it reported "Cannot found font insatlled on the system" error when converting Word to PDF on linux environment without any fonts installed. |
| Bug | SPIREDOC-10292 | Fixes the issue that the number of pages was incorrect after converting Word to SVG. |
| Bug | SPIREDOC-10364 | Fixes the issue that it reported "Error loading file: Unsupported file format" error when loading ODT file. |
| Bug | SPIREDOC-10369 | Fixes the issue that the generated Word documents could not be opened by WeChat on Apple mobile devices. |
| Bug | SPIREDOC-10387 | Optimizes FixedLayoutLine.getRectangle() method to get its height and width, i.e. FixedLayoutLine.getRectangle().width and FixedLayoutLine.getRectangle().height. |
Cómo convertir PDF a Word gratis
Tabla de contenido
Instalado a través de NuGet
PM> Install-Package Spire.PDF
enlaces relacionados
Los archivos PDF (Portable Document Format) se han convertido en el estándar para compartir documentos debido a su portabilidad y compatibilidad universal. Sin embargo, los mismos atributos que hacen que los archivos PDF sean ideales para compartir también significan que generalmente no están diseñados para editarlos fácilmente. Cuando necesita modificar el contenido de un PDF, ya sea para corregir errores, actualizar datos o simplemente agregar nueva información, la solución suele ser convertirlo a un formato más flexible como Word (Doc o Docx). En este artículo, exploraremos diferentes métodos y herramientas para convertir archivos PDF a formato Word de forma gratuita.
- Convierta PDF a Word usando herramientas en línea gratuitas
- Convierta PDF a Word utilizando la función integrada de MS Word
- Convierta PDF a Word mediante programación utilizando la biblioteca .NET gratuita
Convierta PDF a Word usando herramientas en línea gratuitas
Una de las formas más sencillas de convertir un PDF a Word es utilizar herramientas de conversión en línea. Estas herramientas están ampliamente disponibles y son fáciles de usar sin necesidad de instalación de software. Aquí presentaremos dos convertidores en línea gratuitos comunes y brindaremos guías paso a paso para usarlos.
1. Convertidor en línea iLovePDF
iLovePDF proporciona una solución en línea confiable para convertir archivos PDF en documentos de Word editables. Ya sea que necesite extraer o editar contenido de archivos PDF, se recomienda el conversor gratuito de PDF a Word de iLovePDF.
Los siguientes son los pasos para convertir PDF a Word usando iLovePDF:
Paso 1: acceda al convertidor de PDF a Word de iLovePDF a través de: https://www.ilovepdf.com/pdf_to_word
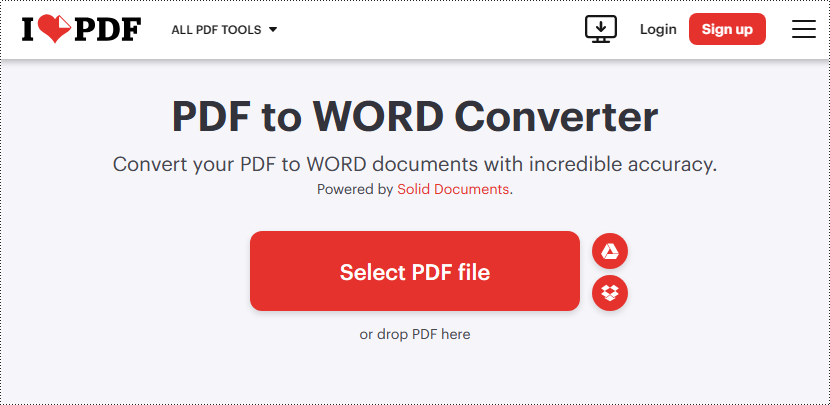
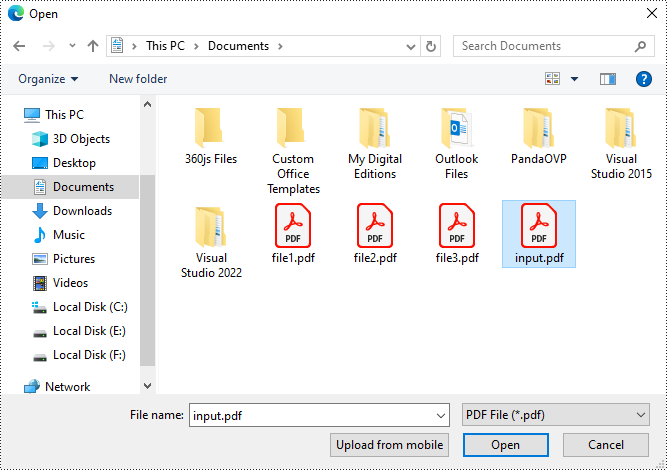
Paso 2: cargue un archivo PDF haciendo clic en el botón "Seleccionar archivo PDF" o arrastrándolo y soltándolo en el área de colocación de PDF (también permite cargar PDF desde Google Drive y DropBox).
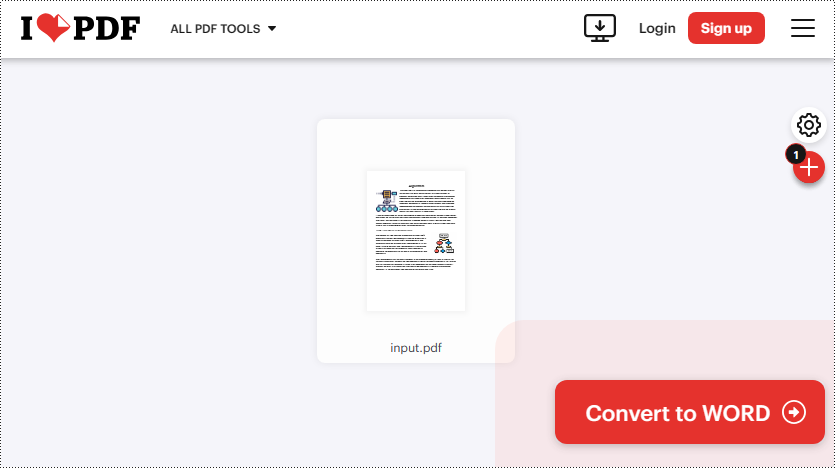
Paso 3: Haga clic en "Convertir a WORD" para convertir el archivo PDF cargado.
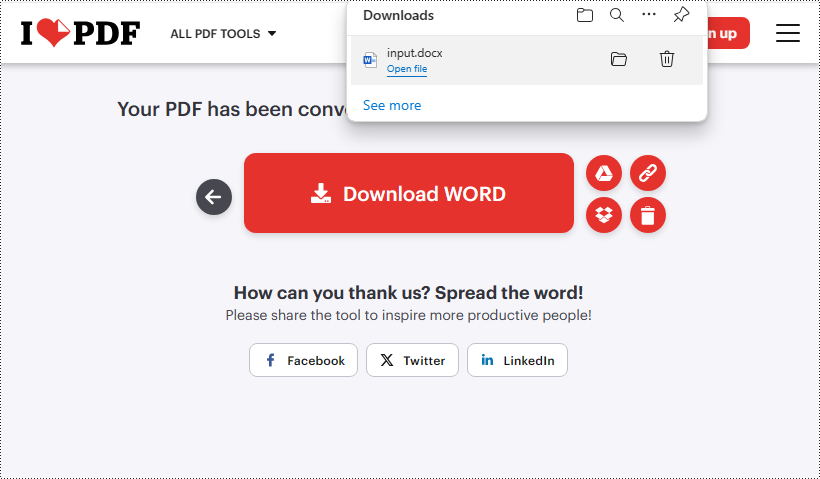
Paso 4: Haga clic en "Descargar WORD" para guardar el documento de Word convertido.
2. Convertidor en línea de Smallpdf
Smallpdf es otra herramienta confiable que permite a los usuarios transformar sin problemas archivos PDF en documentos de Word editables de forma gratuita. Con sus resultados de conversión precisos y sus rápidas velocidades de procesamiento, el conversor de PDF a Word de Smallpdf simplifica la tarea de conversión.
Los siguientes son los pasos para convertir PDF a Word usando Smallpdf:
Paso 1: acceda al convertidor de PDF a Word de Smallpdf a través de: https://smallpdf.com/pdf-to-word
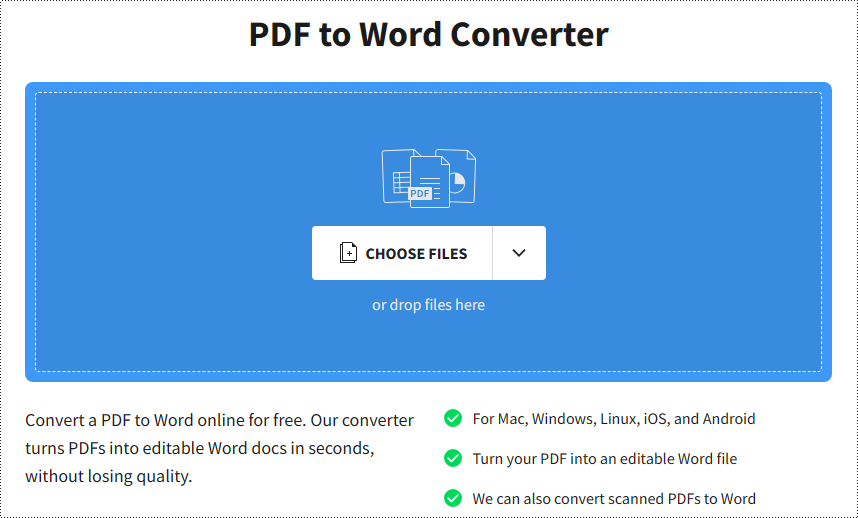
Paso 2: Haga clic en "ELEGIR ARCHIVOS" para importar su archivo PDF o arrástrelo y suéltelo en el área designada (también se admite la importación desde DropBox o Google Drive).
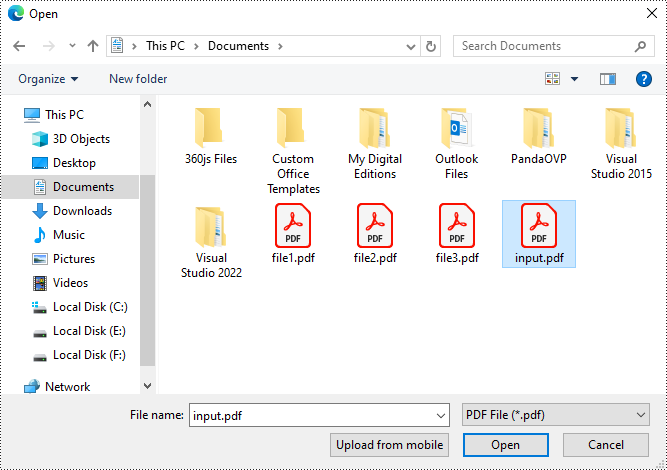
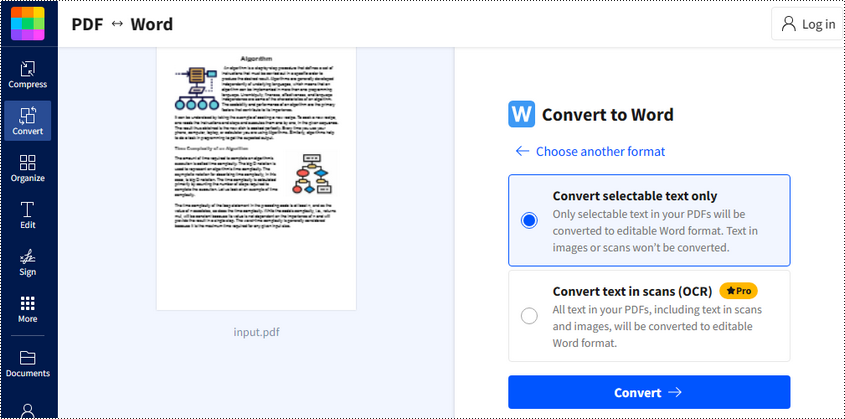
Paso3: Elija "Convertir sólo texto seleccionable" y haga clic en "Convertir". Tenga en cuenta que convertir un archivo PDF escaneado a un archivo de Word editable es una función Pro que no es gratuita.
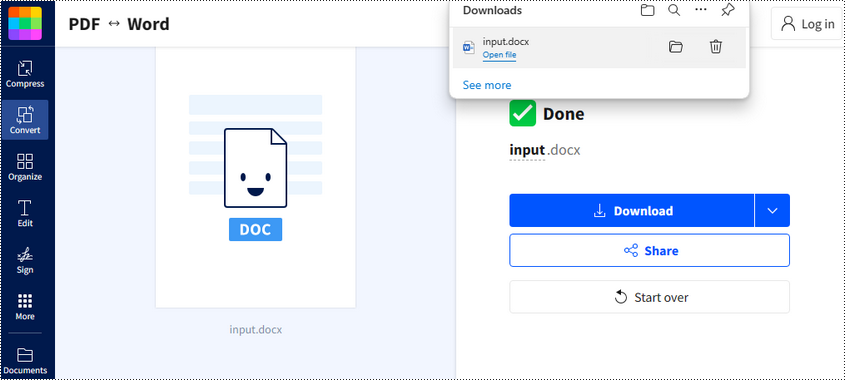
Paso4: Haga clic en "Descargar" para guardar el archivo de Word convertido.
Convierta PDF a Word utilizando la función integrada de MS Word
Si tiene Microsoft Word instalado en su computadora, puede usar su función incorporada para convertir archivos PDF al formato Word. Cuando se utilizan convertidores en línea, el problema de seguridad es una gran preocupación. Si bien convertir PDF a Word de esta manera reduce el riesgo de exponer información confidencial y la conversión se puede realizar sin una conexión a Internet. Lo más conveniente es que puede editar o reformatear el archivo de Word convertido directamente en MS Word.
Los siguientes son los pasos para convertir PDF a Word usando MS Word:
Paso1: abre Microsoft Word en tu computadora.
Paso2: Haga clic en "Archivo" en la barra de menú y seleccione "Abrir".
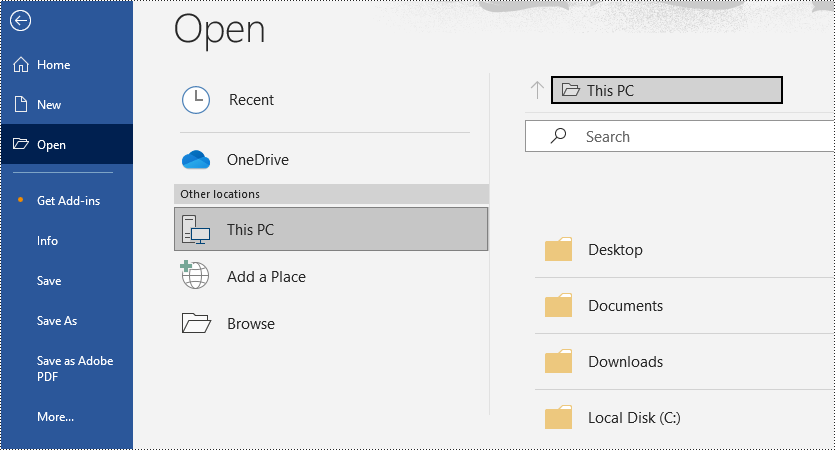
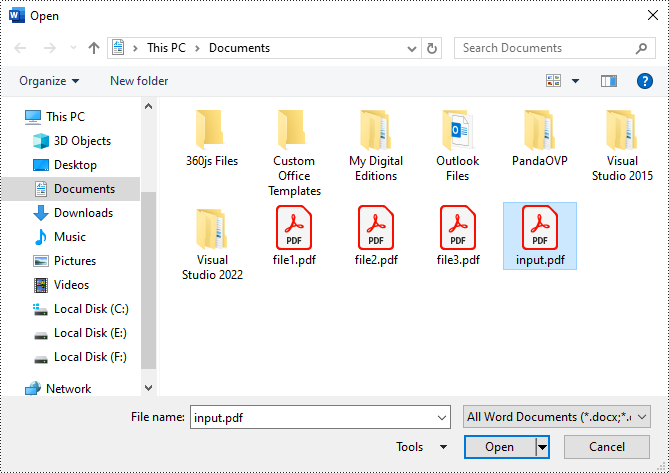
Paso3: elija el archivo PDF que desea convertir y ábralo en Word.
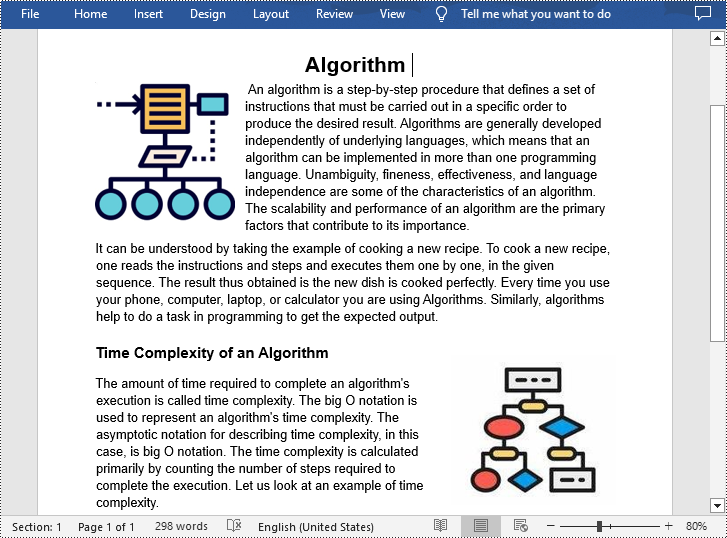
Paso 4: MS Word convertirá automáticamente el archivo PDF en un documento de Word editable. Puede guardarlo yendo a "Archivo" > "Guardar como" y seleccionando el formato de archivo deseado (.docx o.doc).
Conversión de PDF a Word mediante programación utilizando la biblioteca .NET gratuita
Para los desarrolladores que buscan una solución para automatizar el proceso de conversión de PDF a Word, un enfoque programático siempre es esencial. En comparación con el uso de convertidores en línea o MS Word, la conversión de PDF a Word mediante programación no sólo garantiza la seguridad de documentos sensibles o confidenciales, sino que también permite conversiones por lotes rápidas.
Existe una biblioteca .NET gratuita llamada Free Spire.PDF for .NET que puede convertir PDF a varios formatos de archivo en C#. Con esta biblioteca Free Spire.PDF, los desarrolladores pueden integrar la funcionalidad de PDF a Word en sus aplicaciones para crear sus propios convertidores de PDF.
El siguiente es el código de muestra para convertir un archivo PDF a formato Doc o Docx en C#:
- C#
using Spire.Pdf;

namespace ConvertPdfToFixedLayoutWord
{
    class Program
    {
        static void Main(string[] args)
        {
            //Create a PdfDocument object
            PdfDocument pdf = new PdfDocument();

            //Load a PDF document
            pdf.LoadFromFile("sample.pdf");

            //Convert PDF to Doc and save it to a specified path
            pdf.SaveToFile("ToDoc.doc", FileFormat.DOC);

            //Convert PDF to Docx and save it to a specified path
            pdf.SaveToFile("ToDocx.docx", FileFormat.DOCX);
            pdf.Close();
        }
    }
}
Free Spire.PDF permite la conversión de PDF a Word con sólo tres líneas de código, pero tenga en cuenta que la versión gratuita tiene ciertas limitaciones de páginas, por ejemplo, sólo las tres primeras páginas de un PDF se pueden convertir correctamente.
Si necesita el uso sin restricciones de Spire.PDF para sus proyectos de desarrollo, pruebe la versión comercial.Para obtener una guía más detallada sobre esto, consulte esto: Convertir PDF a Word en C#
Conclusión
En general, esta publicación proporcionó varias formas gratuitas y eficientes de convertir archivos PDF estáticos en documentos de Word editables, incluidas herramientas de conversión en línea, funciones integradas disponibles en Microsoft Word y programación. Si sigue esta guía completa y selecciona el método que mejor se adapte a sus necesidades o preferencias, podrá lograr fácilmente la conversión de PDF a Word y desbloquear el potencial de edición y colaboración de documentos sin problemas.
무료로 PDF를 Word 로 변환하는 방법
목차
NuGet 을 통해 설치됨
PM> Install-Package Spire.PDF
관련된 링크들
PDF (Portable Document Format) 파일은 휴대성과 범용 호환성으로 인해 문서 공유의 표준이 되었습니다. 그러나 PDF 를 공유에 이상적으로 만드는 특성은 PDF 가 일반적으로 쉽게 편집할 수 있도록 설계되지 않았다는 의미이기도 합니다. 오류 수정, 데이터 업데이트, 단순히 새 정보 추가 등 PDF 내용을 수정해야 하는 경우 Word (Doc 또는 Docx) 와 같은 보다 유연한 형식으로 변환하는 것이 해결책인 경우가 많습니다. 이 기사에서는 PDF 파일을 Word 형식으로 무료로 변환하는 다양한 방법과 도구를 살펴보겠습니다.
- 무료 온라인 도구를 사용하여 PDF 를 Word 로 변환
- MS Word의 내장 기능을 사용하여 PDF 를 Word 로 변환
- 무료 .NET 라이브러리를 사용하여 프로그래밍 방식으로 PDF 를 Word 로 변환
무료 온라인 도구를 사용하여 PDF 를 Word 로 변환
PDF 를 Word 로 변환하는 가장 쉬운 방법 중 하나는 온라인 변환 도구를 사용하는 것입니다. 이러한 도구는 널리 사용 가능하며 소프트웨어 설치가 필요 없이 사용하기 쉽습니다. 여기서는 두 가지 일반적인 무료 온라인 변환기를 소개하고 이를 사용하기 위한 단계별 가이드를 제공합니다.
1. iLovePDF 온라인 변환기
iLovePDF 는 PDF 파일을 편집 가능한 Word 문서로 변환하기 위한 안정적인 온라인 솔루션을 제공합니다. PDF 파일에서 콘텐츠를 추출하거나 편집해야 하는 경우 iLovePDF 의 PDF-Word 무료 변환기를 권장합니다.
다음은 iLovePDF 를 사용하여 PDF 를 Word 로 변환하는 단계입니다.
1 단계: https://www.ilovepdf.com/pdf_to_word 를 통해 iLovePDF PDF-Word 변환기에 액세스합니다

2 단계: "PDF 파일 선택" 버튼을 클릭하거나 PDF 드롭 영역으로 끌어다 놓아 PDF 파일을 업로드합니다 (Google Drive 및 DropBox 에서 PDF 를 로드할 수도 있음).

3 단계: "WORD 로 변환" 을 클릭하여 로드된 PDF 파일을 변환합니다.

4 단계: "WORD 다운로드" 를 클릭하여 변환된 Word 문서를 저장하세요.

2. Smallpdf 온라인 변환기
Smallpdf 는 사용자가 PDF 파일을 편집 가능한 Word 문서로 무료로 원활하게 변환할 수 있는 또 다른 신뢰할 수 있는 도구입니다. 정확한 변환 결과와 빠른 처리 속도를 갖춘 Smallpdf 의 PDF-Word 변환기는 변환 작업을 단순화합니다.
다음은 Smallpdf 를 사용하여 PDF 를 Word 로 변환하는 단계입니다.
1 단계: https://smallpdf.com/pdf-to-word 를 통해 Smallpdf PDF-Word 변환기에 액세스합니다.

2 단계: "파일 선택" 을 클릭하여 PDF 파일을 가져오거나 지정된 영역으로 끌어서 놓습니다 (DropBox 또는 Google Drive 에서 가져오기도 지원됨).

3 단계: "선택 가능한 텍스트만 변환" 을 선택하고 "변환" 을 클릭하세요. 스캔한 PDF 파일을 편집 가능한 Word 파일로 변환하는 것은 무료가 아닌 Pro 기능입니다.

4 단계: "다운로드" 를 클릭하여 변환된 Word 파일을 저장하세요.

MS Word 의 내장 기능을 사용하여 PDF 를 Word 로 변환
컴퓨터에 Microsoft Word 가 설치되어 있는 경우 내장된 기능을 사용하여 PDF 파일을 Word 형식으로 변환할 수 있습니다. 온라인 변환기를 사용할 때 보안 문제는 큰 관심사입니다. 이러한 방식으로 PDF 를 Word 로 변환하면 민감한 정보가 노출될 위험이 줄어들고 인터넷 연결 없이도 변환이 가능합니다. 가장 편리하게는 변환된 Word 파일을 MS Word 에서 직접 편집하거나 형식을 다시 지정할 수 있습니다.
다음은 MS Word 를 사용하여 PDF 를 Word 로 변환하는 단계입니다.
1 단계: 컴퓨터에서 Microsoft Word 를 엽니다.
2 단계: 메뉴 표시줄에서 "파일"을 클릭하고 "열기"를 선택합니다.

3 단계: 변환하려는 PDF 파일을 선택하고 Word 에서 엽니다.

4 단계: MS Word 는 PDF 파일을 편집 가능한 Word 문서로 자동 변환합니다. "파일" > "다른 이름으로 저장" 으로 이동하여 원하는 파일 형식 (.docx 또는 .doc) 을 선택하여 저장할 수 있습니다.

무료 .NET 라이브러리를 사용하여 프로그래밍 방식으로 PDF 를 Word 로 변환
PDF 를 Word 로 변환하는 프로세스를 자동화하는 솔루션을 찾는 개발자에게는 프로그래밍 방식의 접근 방식이 항상 필수적입니다. 온라인 변환기나 MS Word 를 사용하는 것과 비교하여 프로그래밍 방식으로 PDF 를 Word 로 변환하면 민감하거나 기밀인 문서의 보안이 보장될 뿐만 아니라 빠른 일괄 변환도 가능합니다.
PDF 를 C# 의 다양한 파일 형식으로 변환할 수 있는 Free Spire.PDF for .NET 이라는 무료 .NET 라이브러리가 있습니다 . 이 무료 Spire.PDF 라이브러리를 사용하면 개발자는 PDF 를 Word 로 변환하는 기능을 응용 프로그램에 통합하여 자신만의 PDF 변환기를 만들 수 있습니다.
다음은 C#에서 PDF 파일을 Doc 또는 Docx 형식으로 변환하기 위한 샘플 코드입니다.
- C#
using Spire.Pdf;

namespace ConvertPdfToFixedLayoutWord
{
    class Program
    {
        static void Main(string[] args)
        {
            //Create a PdfDocument object
            PdfDocument pdf = new PdfDocument();

            //Load a PDF document
            pdf.LoadFromFile("sample.pdf");

            //Convert PDF to Doc and save it to a specified path
            pdf.SaveToFile("ToDoc.doc", FileFormat.DOC);

            //Convert PDF to Docx and save it to a specified path
            pdf.SaveToFile("ToDocx.docx", FileFormat.DOCX);
            pdf.Close();
        }
    }
}
무료 Spire.PDF 를 사용하면 단 3 줄의 코드만으로 PDF 에서 Word 로 변환할 수 있습니다. 그러나 무료 버전에는 특정 페이지 제한이 있습니다. 예를 들어 PDF 의 처음 3 페이지만 성공적으로 변환할 수 있습니다.
개발 프로젝트에 Spire.PDF 를 제한 없이 사용하려면 상용 버전을 사용해 보십시오 . 이에 대한 자세한 가이드는 다음을 확인하세요 C#에서 PDF 를 Word 로 변환
결론
전반적으로 이 게시물은 온라인 변환 도구, Microsoft Word 에서 사용할 수 있는 내장 기능 및 프로그래밍을 포함하여 정적 PDF 파일을 편집 가능한 Word 문서로 변환하는 여러 가지 무료 및 효율적인 방법을 제공했습니다. 이 포괄적인 가이드를 따르고 귀하의 필요나 선호도에 가장 적합한 방법을 선택하면 PDF 를 Word 로 쉽게 변환하고 원활한 문서 편집 및 공동 작업의 잠재력을 활용할 수 있습니다.
Come convertire PDF in Word gratuitamente
Sommario
Installato tramite NuGet
PM> Install-Package Spire.PDF
Link correlati
I file PDF (Portable Document Format) sono diventati lo standard per la condivisione di documenti grazie alla loro portabilità e compatibilità universale. Tuttavia, gli stessi attributi che rendono i PDF ideali per la condivisione significano anche che generalmente non sono progettati per essere facilmente modificati. Quando è necessario modificare il contenuto di un PDF, sia che si tratti di correggere errori, aggiornare dati o semplicemente aggiungere nuove informazioni, convertirlo in un formato più flessibile come Word (Doc o Docx) è spesso la soluzione. In questo articolo esploreremo diversi metodi e strumenti per convertire gratuitamente i file PDF in formato Word.
- Converti PDF in Word utilizzando strumenti online gratuiti
- Converti PDF in Word utilizzando la funzionalità integrata di MS Word
- Converti PDF in Word a livello di codice utilizzando la libreria .NET gratuita
Converti PDF in Word utilizzando strumenti online gratuiti
Uno dei modi più semplici per convertire un PDF in Word è utilizzare gli strumenti di conversione online. Questi strumenti sono ampiamente disponibili e facili da usare e non richiedono l'installazione di software. Qui presenteremo due comuni convertitori online gratuiti e forniremo guide dettagliate per il loro utilizzo.
1. Convertitore online iLovePDF
iLovePDF fornisce una soluzione online affidabile per convertire file PDF in documenti Word modificabili. Se hai bisogno di estrarre o modificare contenuti da file PDF, ti consigliamo il convertitore gratuito da PDF a Word di iLovePDF.
Di seguito sono riportati i passaggi per convertire PDF in Word utilizzando iLovePDF:
Passaggio 1: accesso al convertitore da PDF a Word di iLovePDF tramite: https://www.ilovepdf.com/pdf_to_word

Passaggio 2: carica un file PDF facendo clic sul pulsante "Seleziona file PDF" o trascinandolo nell'area di rilascio PDF (consente anche di caricare PDF da Google Drive e DropBox).

Passaggio 3: fare clic su "Converti in WORD" per convertire il file PDF caricato.

Passaggio 4: fare clic su "Scarica WORD" per salvare il documento Word convertito.

2. Convertitore online Smallpdf
Smallpdf è un altro strumento affidabile che consente agli utenti di trasformare facilmente e gratuitamente i file PDF in documenti Word modificabili. Con i suoi risultati di conversione accurati e le elevate velocità di elaborazione, il convertitore da PDF a Word di Smallpdf semplifica l'attività di conversione.
Di seguito sono riportati i passaggi per convertire PDF in Word utilizzando Smallpdf:
Passaggio 1: accedi al convertitore Smallpdf da PDF a Word tramite:https://smallpdf.com/pdf-to-word

Passaggio 2: fai clic su "SCEGLI FILE" per importare il tuo file PDF o trascinalo e rilascialo nell'area designata (è supportata anche l'importazione da DropBox o Google Drive).

Passaggio3: Scegli "Converti solo testo selezionabile" e fai clic su "Converti". Tieni presente che la conversione di un file PDF scansionato in un file Word modificabile è una funzionalità Pro non gratuita.

Passaggio4: fare clic su "Scarica" per salvare il file Word convertito.

Converti PDF in Word utilizzando la funzionalità integrata di MS Word
Se hai Microsoft Word installato sul tuo computer, puoi utilizzare la sua funzionalità integrata per convertire i file PDF in formato Word. Quando si utilizzano convertitori online, il problema della sicurezza è una grande preoccupazione. Convertire PDF in Word in questo modo riduce il rischio di esporre informazioni sensibili e la conversione può essere eseguita senza una connessione Internet. La soluzione più comoda è che puoi modificare o riformattare il file Word convertito direttamente in MS Word.
Di seguito sono riportati i passaggi per convertire PDF in Word utilizzando MS Word:
Passaggio1: apri Microsoft Word sul tuo computer.
Passaggio2: fare clic su "File" nella barra dei menu e selezionare "Apri".

Passaggio3: scegli il file PDF che desideri convertire e aprilo in Word.

Passaggio 4: MS Word convertirà automaticamente il file PDF in un documento Word modificabile. Puoi salvarlo andando su "File" > "Salva con nome" e selezionando il formato file desiderato (.docx o.doc).

Conversione di PDF in Word a livello di codice utilizzando la libreria .NET gratuita
Per gli sviluppatori che cercano una soluzione per automatizzare il processo di conversione da PDF a Word, un approccio programmatico è sempre essenziale. Rispetto all'utilizzo di convertitori online o MS Word, la conversione programmatica di PDF in Word non solo garantisce la sicurezza di documenti sensibili o riservati, ma consente anche conversioni batch rapide.
Esiste una libreria .NET gratuita chiamata Free Spire.PDF for .NET che può convertire PDF in vari formati di file in C#. Con questa libreria Spire.PDF gratuita, gli sviluppatori possono integrare la funzionalità da PDF a Word nelle loro applicazioni per creare i propri convertitori PDF.
Di seguito è riportato il codice di esempio per convertire un file PDF in formato Doc o Docx in C#:
- C#
using Spire.Pdf;

namespace ConvertPdfToFixedLayoutWord
{
    class Program
    {
        static void Main(string[] args)
        {
            //Create a PdfDocument object
            PdfDocument pdf = new PdfDocument();

            //Load a PDF document
            pdf.LoadFromFile("sample.pdf");

            //Convert PDF to Doc and save it to a specified path
            pdf.SaveToFile("ToDoc.doc", FileFormat.DOC);

            //Convert PDF to Docx and save it to a specified path
            pdf.SaveToFile("ToDocx.docx", FileFormat.DOCX);
            pdf.Close();
        }
    }
}
Spire.PDF gratuito consente la conversione da PDF a Word con solo tre righe di codice, ma tieni presente che la versione gratuita presenta alcune limitazioni di pagina, ad esempio solo le prime tre pagine di un PDF possono essere convertite con successo.
Se hai bisogno di un utilizzo illimitato di Spire.PDF per i tuoi progetti di sviluppo, prova la versione commerciale. Per una guida più dettagliata al riguardo, consulta questo: Converti PDF in Word in C#
Conclusione
Nel complesso, questo post fornisce diversi modi gratuiti ed efficienti per convertire file PDF statici in documenti Word modificabili, inclusi strumenti di conversione online, funzionalità integrate disponibili in Microsoft Word e programmazione. Seguendo questa guida completa e selezionando il metodo che meglio si adatta alle tue esigenze o preferenze, puoi facilmente ottenere la conversione da PDF a Word e sbloccare il potenziale per la modifica e la collaborazione dei documenti senza soluzione di continuità.
Comment convertir gratuitement un PDF en Word
Table des matières
Installé via NuGet
PM> Install-Package Spire.PDF
Liens connexes
Les fichiers PDF (Portable Document Format) sont devenus la norme pour le partage de documents en raison de leur portabilité et de leur compatibilité universelle. Cependant, les attributs mêmes qui rendent les PDF idéaux pour le partage signifient également qu'ils ne sont généralement pas conçus pour une édition facile. Lorsque vous devez modifier le contenu d'un PDF, que ce soit pour corriger des erreurs, mettre à jour des données ou simplement ajouter de nouvelles informations, le convertir dans un format plus flexible tel que Word (Doc ou Docx) est souvent la solution. Dans cet article, nous explorerons différentes méthodes et outils pour convertir gratuitement des fichiers PDF au format Word.
- Convertir un PDF en Word à l'aide d'outils en ligne gratuits
- Convertir un PDF en Word à l'aide de la fonctionnalité intégrée de MS Word
- Convertir un PDF en Word par programme à l'aide de la bibliothèque .NET gratuite
- Conclusion
Convertir un PDF en Word à l'aide d'outils en ligne gratuits
L'un des moyens les plus simples de convertir un PDF en Word consiste à utiliser des outils de conversion en ligne. Ces outils sont largement disponibles et faciles à utiliser sans aucune installation de logiciel requise. Nous présenterons ici deux convertisseurs en ligne gratuits courants et fournirons des guides étape par étape pour leur utilisation.
1. Convertisseur en ligne iLovePDF
iLovePDF fournit une solution en ligne fiable pour convertir des fichiers PDF en documents Word modifiables. Que vous ayez besoin d'extraire ou de modifier le contenu de fichiers PDF, le convertisseur gratuit PDF vers Word d'iLovePDF est recommandé.
Voici les étapes pour convertir un PDF en Word à l'aide d'iLovePDF :
Étape 1 : Accès au convertisseur iLovePDF PDF vers Word via : https://www.ilovepdf.com/pdf_to_word

Étape 2: Téléchargez un fichier PDF en cliquant sur le bouton "Sélectionner un fichier PDF" ou en le faisant glisser et en le déposant dans la zone de dépôt PDF (cela permet également de charger un PDF depuis Google Drive et DropBox).

Étape 3: Cliquez sur "Convertir en WORD" pour convertir le fichier PDF chargé.

Étape 4: Cliquez sur "Télécharger WORD" pour enregistrer le document Word converti.

2. Convertisseur en ligne Smallpdf
Smallpdf est un autre outil fiable qui permet aux utilisateurs de transformer gratuitement et de manière transparente des fichiers PDF en documents Word modifiables. Grâce à ses résultats de conversion précis et à ses vitesses de traitement rapides, le convertisseur PDF en Word de Smallpdf simplifie la tâche de conversion.
Voici les étapes pour convertir un PDF en Word à l'aide de Smallpdf :
Étape 1: Accès au convertisseur Smallpdf PDF en Word via : https://smallpdf.com/pdf-to-word

Étape 2: Cliquez sur "CHOISIR LES FICHIERS" pour importer votre fichier PDF ou faites-le glisser et déposez-le dans la zone désignée (l'importation depuis DropBox ou Google Drive est également prise en charge).

Étape3: Choisissez "Convertir le texte sélectionnable uniquement" et cliquez sur "Convertir". Veuillez noter que la conversion d'un fichier PDF numérisé en un fichier Word modifiable est une fonctionnalité Pro qui n'est pas gratuite.

Étape4: Cliquez sur "Télécharger" pour enregistrer le fichier Word converti.

Convertir un PDF en Word à l'aide de la fonctionnalité intégrée de MS Word
Si Microsoft Word est installé sur votre ordinateur, vous pouvez utiliser sa fonctionnalité intégrée pour convertir des fichiers PDF au format Word. Lors de l'utilisation de convertisseurs en ligne, le problème de sécurité est une grande préoccupation. Bien que la conversion de PDF en Word de cette manière réduise le risque d'exposition d'informations sensibles, la conversion peut être effectuée sans connexion Internet. Le plus pratique est que vous pouvez modifier ou reformater le fichier Word converti directement dans MS Word.
Voici les étapes pour convertir un PDF en Word à l'aide de MS Word :
Étape1: Ouvrez Microsoft Word sur votre ordinateur.
Étape2: Cliquez sur "Fichier" dans la barre de menu et sélectionnez "Ouvrir".

Étape3: Choisissez le fichier PDF que vous souhaitez convertir et ouvrez-le dans Word.

Étape 4: MS Word convertira automatiquement le fichier PDF en un document Word modifiable. Vous pouvez l'enregistrer en allant dans "Fichier" > "Enregistrer sous" et en sélectionnant le format de fichier souhaité (.docx ou.doc).

Conversion de PDF en Word par programme à l'aide de la bibliothèque .NET gratuite
Pour les développeurs à la recherche d'une solution pour automatiser le processus de conversion PDF en Word, une approche programmatique est toujours essentielle. Par rapport à l'utilisation de convertisseurs en ligne ou de MS Word, la conversion programmée de PDF en Word garantit non seulement la sécurité des documents sensibles ou confidentiels, mais permet également des conversions par lots rapides.
Il existe une bibliothèque .NET gratuite appelée Free Spire.PDF for .NET qui peut convertir des PDF en différents formats de fichiers en C#. Avec cette bibliothèque gratuite Spire.PDF, les développeurs peuvent intégrer la fonctionnalité PDF vers Word dans leurs applications pour créer leurs propres convertisseurs PDF.
Voici l'exemple de code pour convertir un fichier PDF au format Doc ou Docx en C# :
- C#
using Spire.Pdf;

namespace ConvertPdfToFixedLayoutWord
{
    class Program
    {
        static void Main(string[] args)
        {
            //Create a PdfDocument object
            PdfDocument pdf = new PdfDocument();

            //Load a PDF document
            pdf.LoadFromFile("sample.pdf");

            //Convert PDF to Doc and save it to a specified path
            pdf.SaveToFile("ToDoc.doc", FileFormat.DOC);

            //Convert PDF to Docx and save it to a specified path
            pdf.SaveToFile("ToDocx.docx", FileFormat.DOCX);
            pdf.Close();
        }
    }
}
Free Spire.PDF permet la conversion de PDF en Word avec seulement trois lignes de code, mais veuillez noter que la version gratuite a certaines limitations de pages, par exemple seules les trois premières pages d'un PDF peuvent être converties avec succès.
Si vous avez besoin d'une utilisation illimitée de Spire.PDF pour vos projets de développement, essayez la version commerciale. Pour un guide plus détaillé à ce sujet, consultez ceci : Convertir un PDF en Word en C#
Conclusion
Dans l'ensemble, cet article propose plusieurs moyens gratuits et efficaces de convertir des fichiers PDF statiques en documents Word modifiables, notamment des outils de conversion en ligne, des fonctionnalités intégrées disponibles dans Microsoft Word et la programmation. En suivant ce guide complet et en sélectionnant la méthode qui correspond le mieux à vos besoins ou préférences, vous pouvez facilement réaliser une conversion PDF en Word et libérer le potentiel d'édition et de collaboration transparentes de documents.
Python: Set Paragraph Indentations in Word
Paragraph indentations determine the horizontal space between the page margins and the text of paragraphs. They are an important formatting tool used in various types of written documents, such as essays, reports, and articles, to improve readability and create a visual distinction between paragraphs. In this article, we will demonstrate how to set paragraph indentations in Word documents in Python using Spire.Doc for Python.
Install Spire.Doc for Python
This scenario requires Spire.Doc for Python and plum-dispatch v1.7.4. They can be easily installed in your VS Code through the following pip command.
pip install Spire.Doc
If you are unsure how to install, please refer to this tutorial: How to Install Spire.Doc for Python in VS Code
Set Paragraph Indentations in Word in Python
Microsoft Word provides four types of paragraph indent options that enable you to format your document efficiently. These options are as follows:
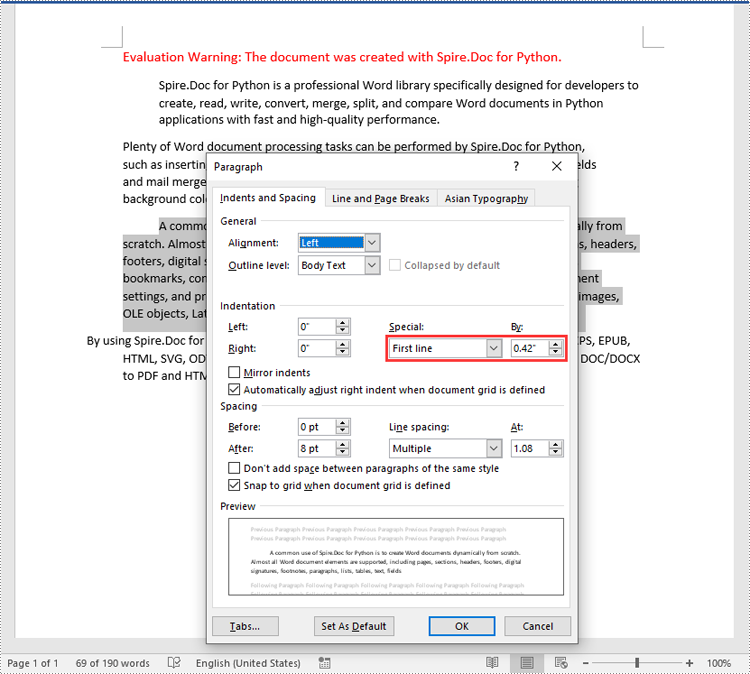
- First Line Indent: The first line indent refers to the horizontal space between the left margin and the beginning of the first line of a paragraph. It indents only the first line while keeping the subsequent lines aligned with the left margin.
- Left Indent: The left indent, also known as the paragraph indent or the left margin indent, determines the horizontal distance between the left margin and the entire paragraph. It uniformly indents the entire paragraph from the left margin.
- Right Indent: The right indent sets the horizontal distance between the right margin and the entire paragraph. It indents the paragraph from the right side, shifting the text towards the left.
- Hanging Indent: The hanging indent is a unique indentation style where the first line remains aligned with the left margin, while all subsequent lines of the paragraph are indented inward. This creates a "hanging" effect, commonly used for bibliographies, references, or citations.
Spire.Doc for Python supports all these types of indents. The table below lists some of the core classes and methods that are used to set different paragraph indents in Word with Spire.Doc for Python:
| Name | Description |
| ParagraphFormat Class | Represents the format of a paragraph. |
| ParagraphFormat.SetLeftIndent() Method | Sets the left indent value for paragraph. |
| ParagraphFormat.SetRightIndent() Method | Sets the right indent value for paragraph. |
| ParagraphFormat.SetFirstLineIndent() Method | Sets the first line or hanging indent value. Positive value represents first-line indent, and negative value represents hanging indent. |
The steps below explain how to set paragraph indents in a Word document using Spire.Doc for Python:
- Create a Document instance.
- Load a sample Word document using Document.LoadFromFile() method.
- Get a specific section using Document.Sections[] property.
- Get a specific paragraph using Section.Paragraphs[] property.
- Get the paragraph format using Paragraph.Format property, and then set the paragraph indent using the above listed methods of ParagraphFormat class.
- Save the document to another file using Document.SaveToFile() method.
- Python
from spire.doc import *
from spire.doc.common import *

# Create a Document instance
doc = Document()
# Load a sample Word document
doc.LoadFromFile("Sample6.docx")

# Get the first section
section = doc.Sections[0]

# Get the first paragraph and set the left indent
para1 = section.Paragraphs[0]
para1.Format.SetLeftIndent(30)

# Get the second paragraph and set the right indent
para2 = section.Paragraphs[1]
para2.Format.SetRightIndent(30)

# Get the third paragraph and set the first line indent
para3 = section.Paragraphs[2]
para3.Format.SetFirstLineIndent(30)

# Get the fourth paragraph and set the hanging indent
para4 = section.Paragraphs[3]
para4.Format.SetFirstLineIndent(-30)

# Save the document to file
doc.SaveToFile("SetIndents.docx", FileFormat.Docx2013)
doc.Close()
Apply for a Temporary License
If you'd like to remove the evaluation message from the generated documents, or to get rid of the function limitations, please request a 30-day trial license for yourself.
Spire.PDF for Java 10.4.4 supports getting the keyword font names and sizes
We're pleased to announce the release of Spire.PDF for Java 10.4.4. This version supports getting the keyword font names and sizes, and also fixes the issue that the converted PDFA2B file did not pass validation. More details are listed below.
Here is a list of changes made in this release
| Category | ID | Description |
| New feature | SPIREPDF-6243 SPIREPDF-6638 |
Supports getting the keyword font names and sizes.
PdfDocument pdf = new PdfDocument();
pdf.loadFromFile(inputFile);
PdfPageBase page = pdf.getPages().get(0);
PdfTextFinder finds = new PdfTextFinder(page);
finds.getOptions().setTextFindParameter(EnumSet.of(TextFindParameter.IgnoreCase));
List<PdfTextFragment> result = finds.findAllText(page);
StringBuilder str = new StringBuilder();
for (PdfTextFragment find : result)
{
	str.append("FontName:"+find.getTextStates()[0].getFontName());
	str.append("FontSize:"+find.getTextStates()[0].getFontSize());
	str.append("FontFamily:"+find.getTextStates()[0].getFontFamily());
	str.append("Bold:"+find.getTextStates()[0].isBold());
	str.append("Italic:"+find.getTextStates()[0].isItalic());
	str.append("ForegroundColor:"+find.getTextStates()[0].getForegroundColor());
}
|
| New feature | SPIREPDF-6560 | The PdfTextReplacer class supports matching through regular expressions.
PdfDocument doc = new PdfDocument();
doc.loadFromFile("input.pdf");
PdfTextReplaceOptions textReplaceOptions = new PdfTextReplaceOptions();
textReplaceOptions.setReplaceType(EnumSet.of(ReplaceActionType.Regex));
PdfPageBase page = doc.getPages().get(0);
PdfTextReplacer textReplacer = new PdfTextReplacer(page);
textReplacer.setOptions(textReplaceOptions);
String regularExpression = "\\bS\\w*L\\b";
textReplacer.replaceAllText(regularExpression, "NEW");
doc.saveToFile("output.pdf");
doc.dispose();
|
| Bug | SPIREPDF-6330 | Fixes the issue that the converted PDFA2B file did not pass validation. |
Python: Add, Modify, or Remove Footers from Powerpoint Documents
In a PowerPoint document, the footer is an area located at the bottom of each slide, typically containing textual information such as page numbers, dates, authors, and more. By adding a footer, you can give your slides a professional look and provide important information. Modifying the footer allows you to adjust the displayed content, style, and position to meet specific needs or styles. Removing the footer can clear the bottom content when extra information is not needed or to maintain a clean appearance. This article will introduce how to use Spire.Presentation for Python to add, modify, or remove footers in PowerPoint documents within a Python project.
- Python Add Footers in PowerPoint Documents
- Python Modify Footers in PowerPoint Documents
- Python Remove Footers in PowerPoint Documents
Install Spire.Presentation for Python
This scenario requires Spire.Presentation for Python and plum-dispatch v1.7.4. They can be easily installed in your VS Code through the following pip command.
pip install Spire.Presentation
If you are unsure how to install, please refer to this tutorial: How to Install Spire.Presentation for Python in VS Code
Python Add Footers in PowerPoint Documents
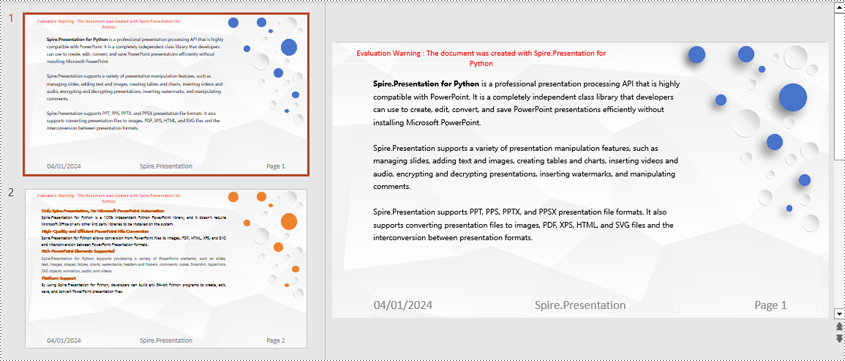
Using Spire.Presentation, you can add footers, page numbers, and time information to the bottom of each page in a PowerPoint document, ensuring consistent footer content across all pages. Here are the detailed steps:
- Create a lisentation object.
- Load a PowerPoint document using the lisentation.LoadFromFile() method.
- Set the footer visible using lisentation.FooterVisible = true and set the footer text.
- Set the slide number visible using lisentation.SlideNumberVisible = true, iterate through each slide, check for the lisence of a page number placeholder, and modify the text to the "Page X" format if found.
- Set the date visible using lisentation.DateTimeVisible = true.
- Set the format of the date using the lisentation.SetDateTime() method.
- Save the document using the lisentation.SaveToFile() method.
- Python
from spire.presentation.common import *
from spire.presentation import *

# Create a Presentation object
presentation = Presentation()

# Load the presentation from a file
presentation.LoadFromFile("Sample1.pptx")

# Set the footer visible
presentation.FooterVisible = True

# Set the footer text to "Spire.Presentation"
presentation.SetFooterText("Spire.Presentation")

# Set the slide number visible
presentation.SlideNumberVisible = True

# Iterate through each slide in the presentation
for slide in presentation.Slides:
    for shape in slide.Shapes:
        if shape.IsPlaceholder:
            # If it is a slide number placeholder
            if shape.Placeholder.Type == PlaceholderType.SlideNumber:
                autoShape = shape if isinstance(shape, IAutoShape) else None
                if autoShape is not None:
                    text = autoShape.TextFrame.TextRange.Paragraph.Text

                    # Modify the slide number text to "Page X"
                    autoShape.TextFrame.TextRange.Paragraph.Text = "Page " + text

# Set the date and time visible
presentation.DateTimeVisible = True

# Set the date and time format
presentation.SetDateTime(DateTime.get_Now(), "MM/dd/yyyy")

# Save the modified presentation to a file
presentation.SaveToFile("AddFooter.pptx", FileFormat.Pptx2016)

# Dispose of the Presentation object resources
presentation.Dispose()
Python Modify Footers in PowerPoint Documents
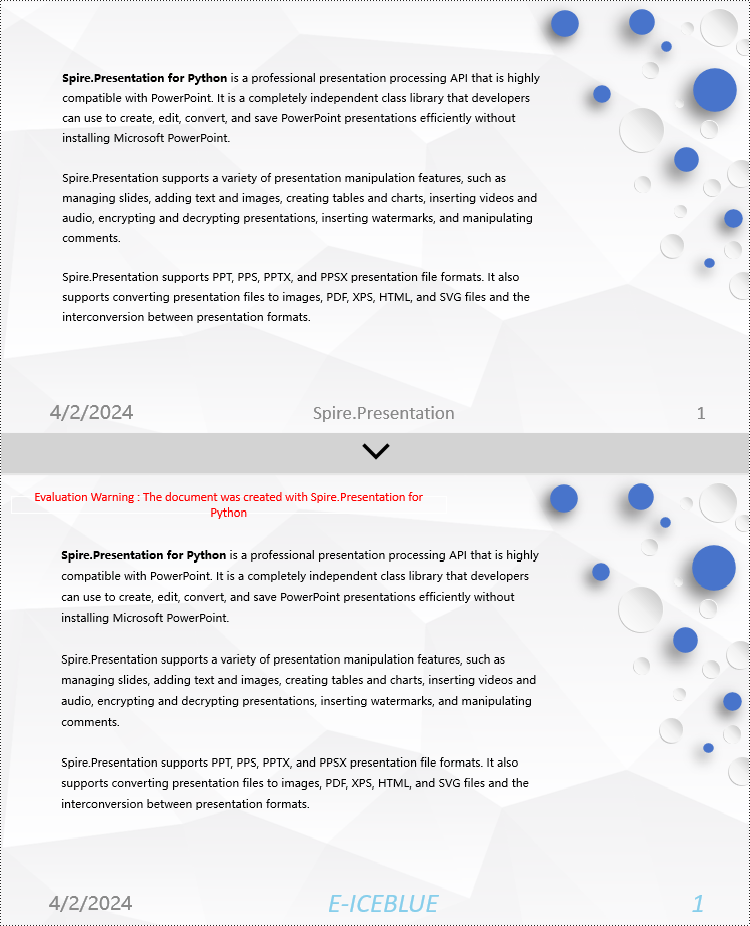
To modify the footer in a PowerPoint document, you first need to inspect the elements of each slide to locate footer and page number placeholders. Then, for each type of placeholder, set the desired content and format to ensure consistent and compliant footers throughout the document. Here are the detailed steps:
- Create a Presentation object.
- Load a PowerPoint document using the Presentation.LoadFromFile() method.
- Use the Presentation.Slides[index] property to retrieve a slide.
- Iterate through the shapes in the slide using a for loop, check each shape to determine if it is a placeholder such as a footer or page number placeholder, and then modify its content or format accordingly.
- Save the document using the Presentation.SaveToFile() method.
- Python
from spire.presentation.common import *
from spire.presentation import *

def change_font(paragraph):
    for textRange in paragraph.TextRanges:
        # Set the text style to italic
        textRange.IsItalic = TriState.TTrue

        # Set the text font
        textRange.EastAsianFont = TextFont("Times New Roman")

        # Set the text font size to 12
        textRange.FontHeight = 34

        # Set the text color
        textRange.Fill.FillType = FillFormatType.Solid
        textRange.Fill.SolidColor.Color = Color.get_SkyBlue()

# Create a Presentation object
presentation = Presentation()

# Load a presentation from a file
presentation.LoadFromFile("Sample2.pptx")

# Get the first slide
slide = presentation.Slides[0]

# Iterate through the shapes on the slide
for shape in slide.Shapes:
   # Check if the shape is a placeholder
   if shape.Placeholder is not None:
       # Get the placeholder type
       type = shape.Placeholder.Type

       # If it is a footer placeholder
       if type == PlaceholderType.Footer:
           # Convert the shape to IAutoShape type
            autoShape = shape if isinstance(shape, IAutoShape) else None
            if autoShape is not None:
                # Set the text content to "E-ICEBLUE"
                autoShape.TextFrame.Text = "E-ICEBLUE"

                # Modify the text font
                change_font(autoShape.TextFrame.Paragraphs[0])

       # If it is a slide number placeholder
       if type == PlaceholderType.SlideNumber:
            # Convert the shape to IAutoShape type
            autoShape = shape if isinstance(shape, IAutoShape) else None
            if autoShape is not None:
                # Modify the text font
                change_font(autoShape.TextFrame.Paragraphs[0])

# Save the modified presentation to a file
presentation.SaveToFile("ModifiedFooter.pptx", FileFormat.Pptx2016)

# Release the resources of the Presentation object
presentation.Dispose()
Python Remove Footers in PowerPoint Documents
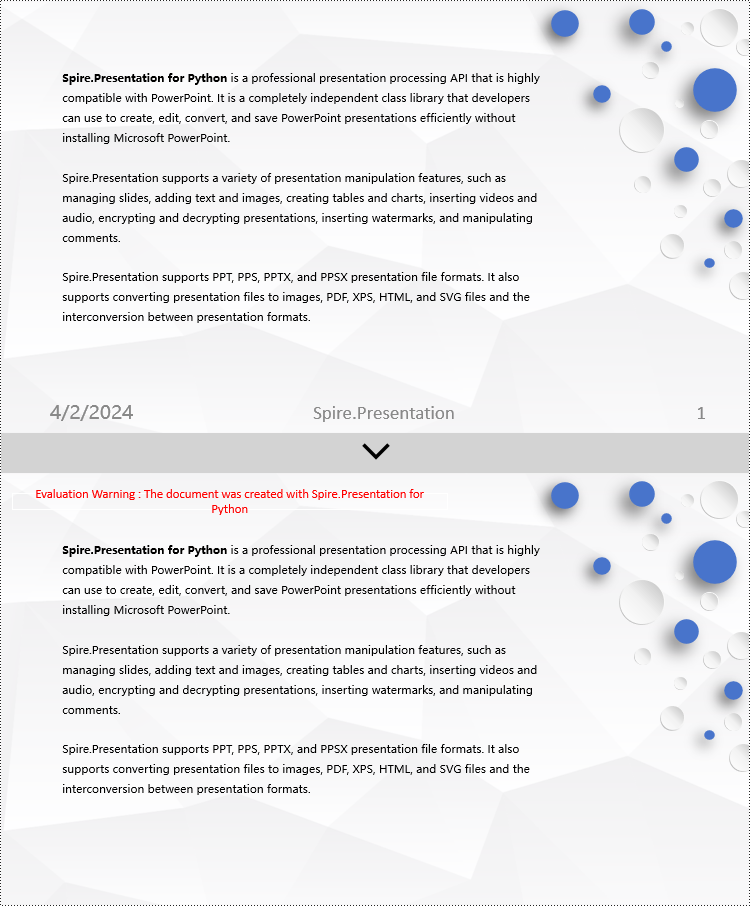
To delete footers in a PowerPoint document, you first need to locate placeholders such as footers, page numbers, and time in the slides, and then remove them from the collection of shapes in the slide to ensure complete removal of footer content. Here are the detailed steps:
- Create a Presentation object.
- Load a PowerPoint document using the Presentation.LoadFromFile() method.
- Use the Presentation.Slides[index] property to retrieve a slide.
- Iterate through the shapes in the slide using a for loop, check if they are placeholders, and if they are footer placeholders, page number placeholders, or time placeholders, remove them from the slide.
- Save the document using the Presentation.SaveToFile() method.
- Python
from spire.presentation.common import *
from spire.presentation import *

# Create a Presentation object
presentation = Presentation()

# Load a presentation from a file
presentation.LoadFromFile("Sample2.pptx")

# Get the first slide
slide = presentation.Slides[0]

# Iterate through the shapes on the slide
for i in range(len(slide.Shapes) - 1, -1, -1):
    # Check if the shape is a placeholder
    if slide.Shapes[i].Placeholder is not None:
        # Get the placeholder type
        type = slide.Shapes[i].Placeholder.Type

        # If it is a footer placeholder
        if type == PlaceholderType.Footer:
            # Remove it from the slide
            slide.Shapes.RemoveAt(i)

        # If it is a slide number placeholder
        if type == PlaceholderType.SlideNumber:
            # Remove it from the slide
            slide.Shapes.RemoveAt(i)

        # If it is a date and time placeholder
        if type == PlaceholderType.DateAndTime:
            # Remove it from the slide
            slide.Shapes.RemoveAt(i)

# Save the modified presentation to a file
presentation.SaveToFile("RemovedFooter.pptx", FileFormat.Pptx2016)

# Release the resources of the Presentation object
presentation.Dispose()
Apply for a Temporary License
If you'd like to remove the evaluation message from the generated documents, or to get rid of the function limitations, please request a 30-day trial license for yourself.
Python: AutoFit Rows and Columns in Excel
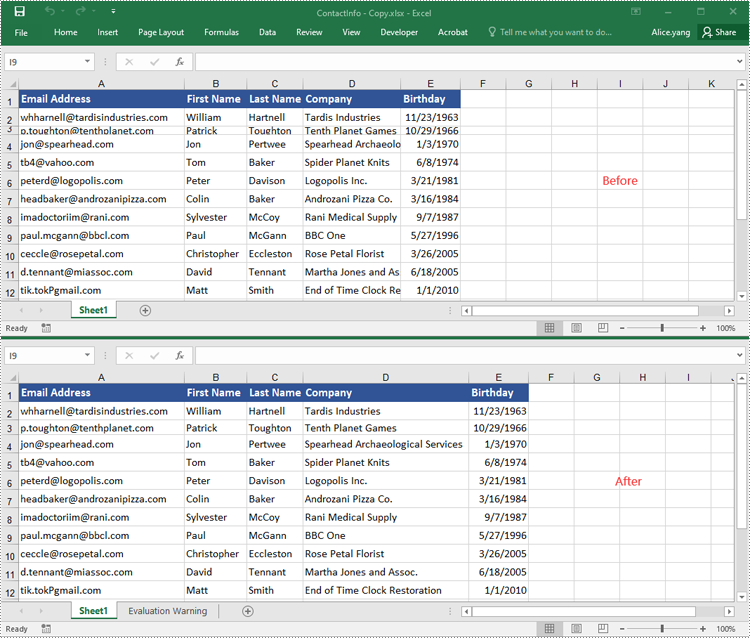
The AutoFit feature in Microsoft Excel is a handy tool that allows you to automatically adjust the height of rows or the width of columns in an Excel spreadsheet to fit the content within them. This feature is particularly useful when you have data that may vary in length or when you want to ensure that all the content is visible without having to manually adjust the column widths or row heights. In this article, we will explain how to AutoFit rows and columns in Excel in Python using Spire.XLS for Python.
Install Spire.XLS for Python
This scenario requires Spire.XLS for Python and plum-dispatch v1.7.4. They can be easily installed in your VS Code through the following pip command.
pip install Spire.XLS
If you are unsure how to install, please refer to this tutorial: How to Install Spire.XLS for Python in VS Code
AutoFit a Specific Row and Column in Python
To AutoFit a specific row and column in an Excel worksheet, you can use the Worksheet.AutoFitRow() and Worksheet.AutoFitColumn() methods. The detailed steps are as follows.
- Create an object of the Workbook class.
- Load an Excel file using Workbook.LoadFromFile() method.
- Get a specific worksheet using Workbook.Worksheets[index] property.
- AutoFit a specific row and column in the worksheet by its index (1-based) using Worksheet.AutoFitRow(rowIndex) and Worksheet.AutoFitColumn(columnIndex) methods.
- Save the result file using Workbook.SaveToFile() method.
- Python
from spire.xls import *
from spire.xls.common import *

# Create an object of the Workbook class
workbook = Workbook()
# Load an Excel file
workbook.LoadFromFile("Sample.xlsx")

# Get the first worksheet
sheet = workbook.Worksheets[0]

# Automatically adjust the height of the 3rd row in the worksheet
sheet.AutoFitRow(3)
# Automatically adjust the width of the 4th column in the worksheet
sheet.AutoFitColumn(4)

# Save the resulting file
workbook.SaveToFile("AutoFitSpecificRowAndColumn.xlsx", ExcelVersion.Version2016)
workbook.Dispose()
AutoFit Multiple Rows and Columns in Excel in Python
To AutoFit multiple rows and columns within a cell range, you can use the CellRange.AutoFitRows() and CellRange.AutoFitColumns() methods. The following are the detailed steps.
- Create an object of the Workbook class.
- Load an Excel file using Workbook.LoadFroFmFile() method.
- Get a specific worksheet using Workbook.Worksheets[index] property.
- Get a specific cell range in the worksheet using Worksheet.Range[] property.
- AutoFit the rows and columns in the cell range using CellRange.AutoFitRows() and CellRange.AutoFitColumns() methods.
- Save the result file using Workbook.SaveToFile() method.
- Python
from spire.xls import *
from spire.xls.common import *

# Create an object of the Workbook class
workbook = Workbook()
# Load an Excel file
workbook.LoadFromFile("Sample.xlsx")

# Get the first worksheet
sheet = workbook.Worksheets[0]

# Get a specific cell range in the worksheet
range = sheet.Range["A1:E14"]
# Or get the used cell range in the worksheet
# range = sheet.AllocatedRange

# Automatically adjust the heights of all rows in the cell range
range.AutoFitRows()
# Automatically adjust the widths of all columns in the cell range
range.AutoFitColumns()

# Save the resulting file
workbook.SaveToFile("AutoFitMultipleRowsAndColumns.xlsx", ExcelVersion.Version2016)
workbook.Dispose()
Apply for a Temporary License
If you'd like to remove the evaluation message from the generated documents, or to get rid of the function limitations, please request a 30-day trial license for yourself.
Spire.Presentation for Java 9.4.5 fixes an issue
We are delighted to announce the release of Spire.Presentation for Java 9.4.5. This version fixes the issue that the CPU usage reached 100 percent and memory overflowed after the end of the task in the thread pool of converting a large number of documents under multithreading. More details are listed below.
Here is a list of changes made in this release
| Category | ID | Description |
| Bug | SPIREPPT-2450 | Fixes the issue that the CPU usage reached 100 percent and memory overflowed after the end of the task in the thread pool of converting a large number of documents under multithreading. |