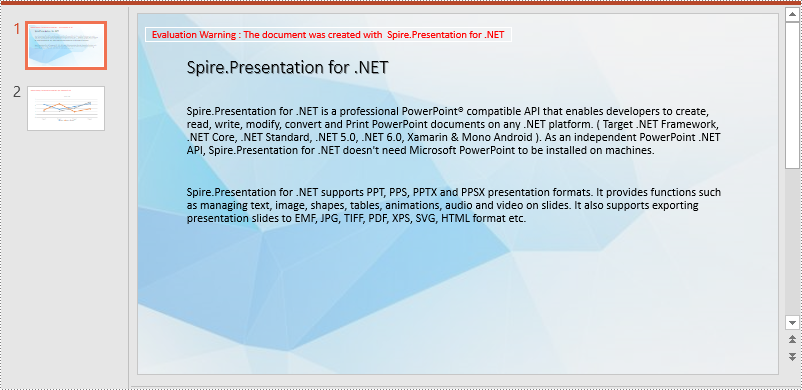
C#/VB.NET: Add Shapes to PowerPoint Presentations
Shapes in PowerPoint are excellent tools for highlighting important information or key messages within a slide. They offer an effective way to draw attention, create visual cues, and actively engage viewers. By adding shapes strategically, you can elevate the impact of your PowerPoint presentation and leave a lasting impression on your audience. In this article, we will demonstrate how to add various types of shapes to a PowerPoint Presentation in C# and VB.NET using Spire.Presentation for .NET.
Install Spire.Presentation for .NET
To begin with, you need to add the DLL files included in the Spire.Presentation for.NET package as references in your .NET project. The DLL files can be either downloaded from this link or installed via NuGet.
PM> Install-Package Spire.Presentation
Add Shapes to a PowerPoint Presentation in C# and VB.NET
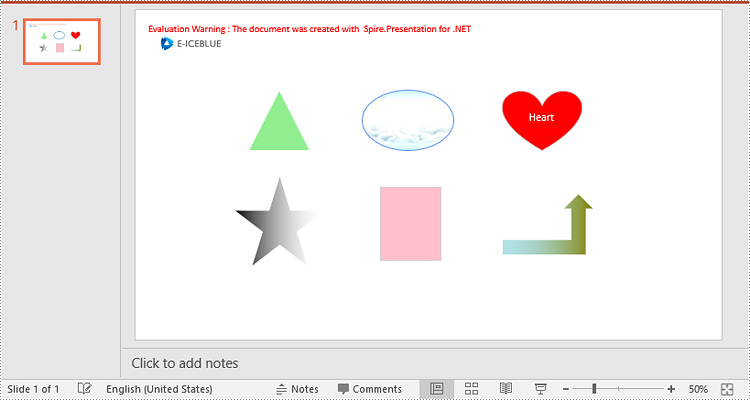
You can easily add various types of shapes such as rectangles, circles, triangles, arrows, and eclipses to a PowerPoint Presentation by using the ISlide.Shapes.AppendShape(ShapeType shapeType, RectangleF rectangle) method provided by Spire.Presentation for .NET. The detailed steps are as follows:
- Initialize an instance of the Presentation class.
- Load a PowerPoint presentation using Presentation.LoadFromFile(string fileName) method.
- Get a specific slide using Presentation.Slides[int index] property.
- Append various types of shapes to the slide using ISlide.Shapes.Append(ShapeType shapeType, RectangleF rectangle) method and then set styles for the shapes.
- Save the PowerPoint presentation using the Presentation.SaveToFile(string fileName, FileFormat fileFormat) method.
- C#
- VB.NET
using Spire.Presentation;
using Spire.Presentation.Drawing;
using System.Drawing;

namespace AddShapes
{
    internal class Program
    {
        static void Main(string[] args)
        {
            //Initialize an instance of the Presentation class
            Presentation presentation = new Presentation();
            //Load a PowerPoint presentation
            presentation.LoadFromFile("Input.pptx");

            //Get the first slide
            ISlide slide = presentation.Slides[0];

            //Append a triangle shape to the slide
            IAutoShape shape = slide.Shapes.AppendShape(ShapeType.Triangle, new RectangleF(185, 130, 100, 100));
            //Fill the shape with solid color
            shape.Fill.FillType = FillFormatType.Solid;
            shape.Fill.SolidColor.Color = Color.LightGreen;
            //Set the outline color for the shape
            shape.ShapeStyle.LineColor.Color = Color.White;

            //Append an ellipse shape to the slide
            shape = slide.Shapes.AppendShape(ShapeType.Ellipse, new RectangleF(370, 130, 150, 100));
            //Fill the shape with picture
            string picUrl = @"bg.png";
            shape.Fill.FillType = FillFormatType.Picture;
            shape.Fill.PictureFill.Picture.Url = picUrl;
            shape.Fill.PictureFill.FillType = PictureFillType.Stretch;
            //Set the outline color for the shape
            shape.ShapeStyle.LineColor.Color = Color.CornflowerBlue;

            //Append a heart shape to the slide
            shape = slide.Shapes.AppendShape(ShapeType.Heart, new RectangleF(600, 130, 130, 100));
            //Add text to the shape
            shape.TextFrame.Text = "Heart";
            //Fill the shape with solid color
            shape.Fill.FillType = FillFormatType.Solid;
            shape.Fill.SolidColor.Color = Color.Red;
            //Set the outline color for the shape
            shape.ShapeStyle.LineColor.Color = Color.LightGray;

            //Append a five-pointed star shape to the slide
            shape = slide.Shapes.AppendShape(ShapeType.FivePointedStar, new RectangleF(160, 270, 150, 150));
            //Fill the shape with gradient color
            shape.Fill.FillType = FillFormatType.Gradient;
            shape.Fill.SolidColor.Color = Color.Black;
            //Set the outline color for the shape
            shape.ShapeStyle.LineColor.Color = Color.White;

            //Append a rectangle shape to the slide
            shape = slide.Shapes.AppendShape(ShapeType.Rectangle, new RectangleF(400, 290, 100, 120));
            //Fill the shape with solid color
            shape.Fill.FillType = FillFormatType.Solid;
            shape.Fill.SolidColor.Color = Color.Pink;
            //Set the outline color for the shape
            shape.ShapeStyle.LineColor.Color = Color.LightGray;

            //Append an arrow shape to the slide
            shape = slide.Shapes.AppendShape(ShapeType.BentUpArrow, new RectangleF(600, 300, 150, 100));
            //Fill the shape with gradient color
            shape.Fill.FillType = FillFormatType.Gradient;
            shape.Fill.Gradient.GradientStops.Append(1f, KnownColors.Olive);
            shape.Fill.Gradient.GradientStops.Append(0, KnownColors.PowderBlue);
            //Set the outline color for the shape
            shape.ShapeStyle.LineColor.Color = Color.White;

            //Save the result PowerPoint presentation
            presentation.SaveToFile("AddShapes_result.pptx", FileFormat.Pptx2010);
            presentation.Dispose();
        }
    }
}
Apply for a Temporary License
If you'd like to remove the evaluation message from the generated documents, or to get rid of the function limitations, please request a 30-day trial license for yourself.
C#/VB.NET: Set Background Color or Picture for PowerPoint Slides
Setting a background for slides is a crucial step in creating a visually appealing and impactful presentation. A well-designed background can provide a consistent visual theme, drawing your audience's attention and keeping them engaged throughout your presentation. In this article, we will demonstrate how to set background color or picture for PowerPoint slides in C# and VB.NET using Spire.Presentation for .NET library.
- Set a Background Color for a PowerPoint Slide in C# and VB.NET
- Set a Gradient Background for a PowerPoint Slide in C# and VB.NET
- Set a Background Picture for a PowerPoint Slide in C# and VB.NET
- Set a Background for a Slide Master in PowerPoint in C# and VB.NET
Install Spire.Presentation for .NET
To begin with, you need to add the DLL files included in the Spire.Presentation for.NET package as references in your .NET project. The DLL files can be either downloaded from this link or installed via NuGet.
PM> Install-Package Spire.Presentation
Set a Background Color for a PowerPoint Slide in C# and VB.NET
Adding a background color for a PowerPoint slide is very simple. You just need to set the fill mode of the slide’s background as a solid fill and then set a color for the slide’s background. The detailed steps are as follows:
- Initialize an instance of the Presentation class.
- Load a PowerPoint presentation using Presentation.LoadFromFile() method.
- Get a specific slide using Presentation.Slides[int index] property.
- Access the background of the slide using ISlide.SlideBackground property.
- Set the type of the slide's background as a custom type using SlideBackground.Type property.
- Set the fill mode of the slide’s background as a solid fill using SlideBackground.Fill.FillType property.
- Set a color for the slide’s background using SlideBackground.Fill.SolidColor.Color property.
- Save the result presentation using Presentation.SaveToFile() method.
- C#
- VB.NET
using Spire.Presentation;
using Spire.Presentation.Drawing;
using System.Drawing;

namespace SolidBackground
{
    internal class Program
    {
        static void Main(string[] args)
        {
            //Initialize an instance of the Presentation class
            Presentation ppt = new Presentation();
            //Load a PowerPoint presentation
            ppt.LoadFromFile("Sample.pptx");

            //Get the first slide
            ISlide slide = ppt.Slides[0];

            //Access the background of the slide
            SlideBackground background = slide.SlideBackground;

            //Set the type of the slide's background as a custom type
            background.Type = BackgroundType.Custom;
            //Set the fill mode of the slide's background as a solid fill
            background.Fill.FillType = FillFormatType.Solid;
            //Set a color for the slide's background
            background.Fill.SolidColor.Color = Color.PaleTurquoise;

            //Save the result presentation
            ppt.SaveToFile("Solidbackground.pptx", FileFormat.Pptx2013);
            ppt.Dispose();
        }
    }
}
Set a Gradient Background for a PowerPoint Slide in C# and VB.NET
Adding a gradient background is a little complex. You need to set the fill mode of the slide’s background as a gradient fill and then set the gradient stops and colors. The detailed steps are as follows:
- Initialize an instance of the Presentation class.
- Load a PowerPoint presentation using Presentation.LoadFromFile() method.
- Get a specific slide using Presentation.Slides[int index] property.
- Access the background of the slide using ISlide.SlideBackground property.
- Set the type of the slide's background as a custom type using SlideBackground.Type property.
- Set the fill mode of the slide’s background as a gradient fill using SlideBackground.Fill.FillType property.
- Set gradient stops and colors for the slide’s background using SlideBackground.Fill.Gradient.GradientStops.Append() method.
- Set the shape type and angle for the gradient fill.
- Save the result presentation using Presentation.SaveToFile() method.
- C#
- VB.NET
using Spire.Presentation;
using Spire.Presentation.Drawing;
using System.Drawing;

namespace GradientBackground
{
    internal class Program
    {
        static void Main(string[] args)
        {
            //Initialize an instance of the Presentation class
            Presentation ppt = new Presentation();
            //Load a PowerPoint presentation
            ppt.LoadFromFile("Sample.pptx");

            //Get the first slide
            ISlide slide = ppt.Slides[0];

            //Access the background of the slide
            SlideBackground background = slide.SlideBackground;

            //Set the type of the slide's background as a custom type
            background.Type = BackgroundType.Custom;
            //Set the fill mode of the slide's background as a gradient fill
            background.Fill.FillType = FillFormatType.Gradient;

            //Set gradient stops and colors
            background.Fill.Gradient.GradientStops.Append(0.1f, Color.LightCyan);
            background.Fill.Gradient.GradientStops.Append(0.7f, Color.LightSeaGreen);

            //Set the shape type of the gradient fill
            background.Fill.Gradient.GradientShape = GradientShapeType.Linear;
            //Set the angle of the gradient fill
            background.Fill.Gradient.LinearGradientFill.Angle = 45;

            //Save the result presentation
            ppt.SaveToFile("Gradientbackground.pptx", FileFormat.Pptx2013);
            ppt.Dispose();
        }
    }
}
Set a Background Picture for a PowerPoint Slide in C# and VB.NET
To add a background picture for a PowerPoint slide, you need to set the fill mode of the slide’s background as a picture fill, then add a picture to the image collection of the presentation and set it as the slide’s background. The detailed steps are as follows:
- Initialize an instance of the Presentation class.
- Load a PowerPoint presentation using Presentation.LoadFromFile() method.
- Get a specific slide using Presentation.Slides[int index] property.
- Access the background of the slide using ISlide.SlideBackground property.
- Set the type of the slide's background as a custom type using SlideBackground.Type property.
- Set the fill mode of the slide’s background as a picture fill using SlideBackground.Fill.FillType property.
- Add an image to the image collection of the presentation using Presentation.Images.Append() method.
- Set the image as the slide’s background using background.Fill.PictureFill.Picture.EmbedImage property.
- Save the result presentation using Presentation.SaveToFile() method.
- C#
- VB.NET
using Spire.Presentation;
using Spire.Presentation.Drawing;
using System.Drawing;

namespace PictureBackground
{
    internal class Program
    {
        static void Main(string[] args)
        {
            //Initialize an instance of the Presentation class
            Presentation ppt = new Presentation();
            //Load a PowerPoint presentation
            ppt.LoadFromFile("Sample.pptx");

            //Get the first slide
            ISlide slide = ppt.Slides[0];

            //Access the background of the slide
            SlideBackground background = slide.SlideBackground;

            //Set the type of the slide's background as a custom type
            background.Type = BackgroundType.Custom;
            //Set the fill mode of the slide's background as a picture fill
            background.Fill.FillType = FillFormatType.Picture;

            Image img = Image.FromFile("bg.jpg");
            //Add an image to the image collection of the presentation
            IImageData image = ppt.Images.Append(img);
            //Set the image as the slide's background
            background.Fill.PictureFill.FillType = PictureFillType.Stretch;
            background.Fill.PictureFill.Picture.EmbedImage = image;

            //Save the result presentation
            ppt.SaveToFile("Picturebackground.pptx", FileFormat.Pptx2013);
            ppt.Dispose();
        }
    }
}
Set a Background for a Slide Master in PowerPoint in C# and VB.NET
If you don’t wish to set backgrounds for slides one by one, you can set a background for the slide master, then all slides using the same slide master will be applied with the background automatically. The following steps show how to set a solid background color for a slide master:
- Initialize an instance of the Presentation class.
- Load a PowerPoint presentation using Presentation.LoadFromFile() method.
- Get a specific slide master using Presentation.Masters[int index] property.
- Access the background of the slide using ISlide.SlideBackground property.
- Set the type of the slide's background as a custom type using SlideBackground.Type property.
- Set the fill mode of the slide’s background as a solid fill using SlideBackground.Fill.FillType property.
- Set a color for the slide’s background using SlideBackground.Fill.SolidColor.Color property.
- Save the result presentation using Presentation.SaveToFile() method.
- C#
- VB.NET
using Spire.Presentation;
using Spire.Presentation.Drawing;
using System.Drawing;

namespace AddBackgroundToSlideMaster
{
    internal class Program
    {
        static void Main(string[] args)
        {
            //Initialize an instance of the Presentation class
            Presentation ppt = new Presentation();
            //Load a PowerPoint presentation
            ppt.LoadFromFile("Sample.pptx");

            //Get the first slide master
            IMasterSlide slide = ppt.Masters[0];

            //Access the background of the slide
            SlideBackground background = slide.SlideBackground;

            //Set the type of the slide's background as a custom type
            background.Type = BackgroundType.Custom;
            //Set the fill mode of the slide's background as a solid fill
            background.Fill.FillType = FillFormatType.Solid;
            //Set a color for the slide's background
            background.Fill.SolidColor.Color = Color.PeachPuff;

            //Save the result presentation
            ppt.SaveToFile("AddBackgroundToSlideMaster.pptx", FileFormat.Pptx2013);
            ppt.Dispose();

        }
    }
}
Apply for a Temporary License
If you'd like to remove the evaluation message from the generated documents, or to get rid of the function limitations, please request a 30-day trial license for yourself.
C#/VB.NET: Add Images to PowerPoint Documents
Images are very effective in communicating information because they can be quickly noticed and easily remembered by the audience. Knowing how to add images to PowerPoint can help you create an appealing presentation and make a good impression on your audience. In this article, you will learn how to add images to PowerPoint documents in C# and VB.NET using Spire.Presentation for .NET.
Install Spire.Presentation for .NET
To begin with, you need to add the DLL files included in the Spire.Presentation for.NET package as references in your .NET project. The DLL files can be either downloaded from this link or installed via NuGet.
PM> Install-Package Spire.Presentation
Add an Image to a Slide in C# and VB.NET
Spire.Presentation offers the ISlide.Shapes.AppendEmbedImage() method to add an image to a specific slide. The following are the main steps:
- Initialize an instance of the Presentation class.
- Load a PowerPoint document using Presentation.LoadFromFile() method.
- Get a specific slide by its index through Presentation.Slides[int] property.
- Add an image to the slide using ISlide.Shapes.AppendEmbedImage() method.
- Save the result document using Presentation.SaveToFile() method.
- C#
- VB.NET
using Spire.Presentation;
using Spire.Presentation.Drawing;
using System.Drawing;

namespace AddImageToSlide
{
    class Program
    {
        static void Main(string[] args)
        {
            //Initialize an instance of Presentation class
            Presentation presentation = new Presentation();
            //Load a PowerPoint document
            presentation.LoadFromFile(@"Input.pptx");

            //Get the first slide
            ISlide slide = presentation.Slides[0];

            //Insert an image into the slide
            string ImageFile2 = @"Image.png";
            RectangleF rect = new RectangleF(presentation.SlideSize.Size.Width / 2 - 280, 140, 120, 120);
            IEmbedImage image = slide.Shapes.AppendEmbedImage(ShapeType.Rectangle, ImageFile2, rect);
            image.Line.FillType = FillFormatType.None;

            //Save the result document
            presentation.SaveToFile("InsertImageIntoSlide.pptx", FileFormat.Pptx2010);
        }
    }
}
Add an Image to a Slide Master in C# and VB.NET
A slide master is the top slide that controls all information about the theme, layout, background, color and fonts, which will be inherited by other slides in the presentation. In other words, when you modify the style of the slide master, every slide in the presentation will be changed accordingly, including the ones added later. If you want an image to appear on all your slides, you can add it to one place - the slide master.
Spire.Presentation offers the IMasterSlide.Shapes.AppendEmbedImage() method to add an image to a slide master. The following are the detailed steps:
- Initialize an instance of the Presentation class.
- Load a PowerPoint document using Presentation.LoadFromFile() method.
- Get a specific slide master in the document by its index through Presentation.Masters[int] property.
- Add an image to the slide using IMasterSlide.Shapes.AppendEmbedImage() method.
- Save the result document using Presentation.SaveToFile() method.
- C#
- VB.NET
using Spire.Presentation;
using Spire.Presentation.Drawing;
using System.Drawing;

namespace AddImageToSlideMaster
{
    class Program
    {
        static void Main(string[] args)
        {
            //Initialize an instance of the Presentation class
            Presentation presentation = new Presentation();
            //Load a PowerPoint document
            presentation.LoadFromFile(@"Sample.pptx");

            //Get the first slide master in the document
            IMasterSlide master = presentation.Masters[0];

            //Insert an image into the slide master
            string image = @"logo.png";
            RectangleF rect = new RectangleF(40, 40, 80, 80);
            IEmbedImage pic = master.Shapes.AppendEmbedImage(ShapeType.Rectangle, image, rect);
            pic.Line.FillFormat.FillType = FillFormatType.None;

            //Add a new slide to the presentation
            presentation.Slides.Append();

            //Save the result document
            presentation.SaveToFile("InsertImageIntoSlideMaster.pptx", FileFormat.Pptx2010);
        }
    }
}
Apply for a Temporary License
If you'd like to remove the evaluation message from the generated documents, or to get rid of the function limitations, please request a 30-day trial license for yourself.
C#/VB.NET: Protect or Unprotect PowerPoint Documents
By default, anyone who can access a PowerPoint document can open and edit it. If you want to prevent your PowerPoint document from unauthorized viewing or modification, you can protect it with a password. In addition to adding password protection, you can also choose other ways to protect the document, such as marking it as final to discourage editing. When you want to make the document public, you can unprotect it at any time. In this article, we will demonstrate how to protect or unprotect PowerPoint documents in C# and VB.NET using Spire.Presentation for .NET.
- Protect a PowerPoint Document with a Password
- Mark a PowerPoint Document as Final
- Remove Password Protection from a PowerPoint Document
- Remove Mark as Final Option from a PowerPoint Document
Install Spire.Presentation for .NET
To begin with, you need to add the DLL files included in the Spire.Presentation for.NET package as references in your .NET project. The DLL files can be either downloaded from this link or installed via NuGet.
PM> Install-Package Spire.Presentation
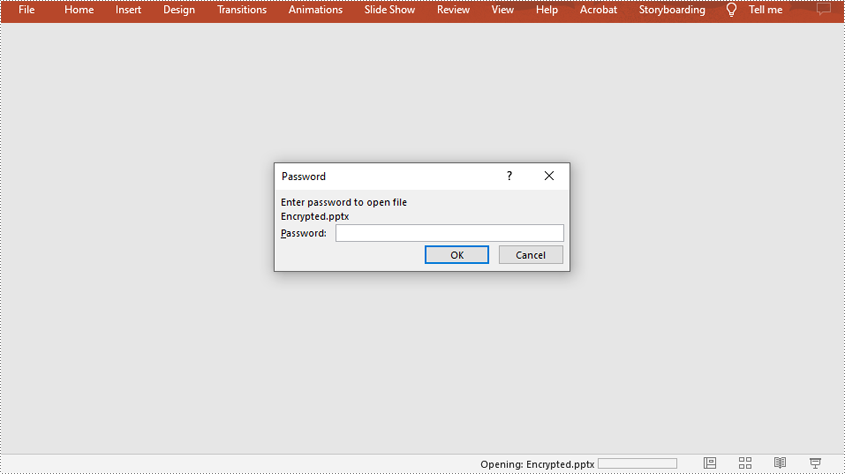
Protect a PowerPoint Document with a Password in C# and VB.NET
You can protect a PowerPoint document with a password to ensure that only the people who have the right password can view and edit it.
The following steps demonstrate how to protect a PowerPoint document with a password:
- Initialize an instance of Presentation class.
- Load a PowerPoint document using Presentation.LoadFromFile() method.
- Encrypt the document with a password using Presentation.Encrypt() method.
- Save the result document using Presentation.SaveToFile() method.
- C#
- VB.NET
using Spire.Presentation;

namespace ProtectPPTWithPassword
{
    class Program
    {
        static void Main(string[] args)
        {
            //Create a Presentation instance
            Presentation presentation = new Presentation();

            //Load a PowerPoint document
            presentation.LoadFromFile(@"Sample.pptx");

            //Encrypt the document with a password
            presentation.Encrypt("your password");

            //Save the result document
            presentation.SaveToFile("Encrypted.pptx", FileFormat.Pptx2013);
        }
    }
}
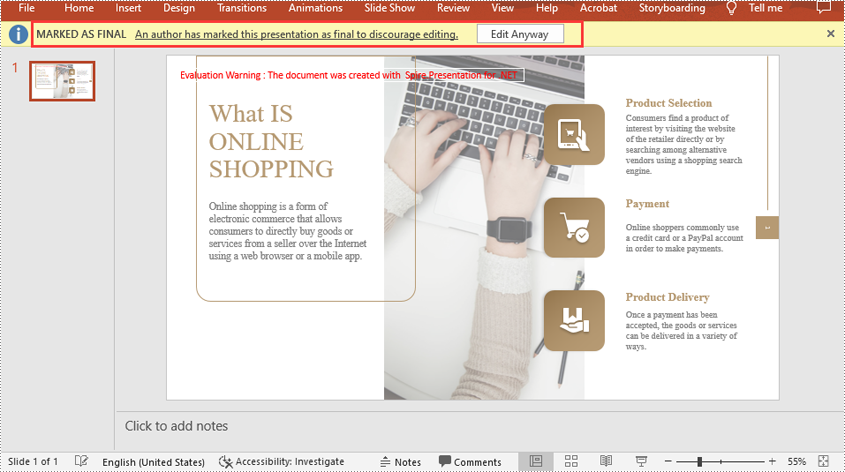
Mark a PowerPoint Document as Final in C# and VB.NET
You can mark a PowerPoint document as final to inform readers that the document is final and no further editing is expected.
The following steps demonstrate how to mark a PowerPoint document as final:
- Initialize an instance of Presentation class.
- Load a PowerPoint document using Presentation.LoadFromFile() method.
- Mark the document as final through Presentation.DocumentProperty[] property.
- Save the result document using Presentation.SaveToFile() method.
- C#
- VB.NET
using Spire.Presentation;

namespace MarkPPTAsFinal
{
    class Program
    {
        static void Main(string[] args)
        {
            //Create a Presentation instance
            Presentation ppt = new Presentation();
            //Load a PowerPoint document
            ppt.LoadFromFile(@"Sample.pptx");

            //Mark the document as final
            ppt.DocumentProperty["_MarkAsFinal"] = true;

            //Save the result document
            ppt.SaveToFile("MarkAsFinal.pptx", FileFormat.Pptx2013);
        }
    }
}
Remove Password Protection from a PowerPoint Document in C# and VB.NET
You can remove password protection from a PowerPoint document by loading the document with the correct password, then removing the password protection from it.
The following steps demonstrate how to remove password protection from a PowerPoint document:
- Initialize an instance of Presentation class.
- Load a PowerPoint document using Presentation.LoadFromFile() method.
- Mark the document as final through Presentation.RemoveEncryption() method.
- Save the result document using Presentation.SaveToFile() method.
- C#
- VB.NET
using Spire.Presentation;

namespace RemovePasswordProtectionFromPPT
{
    class Program
    {
        static void Main(string[] args)
        {
            //Create a Presentation instance
            Presentation presentation = new Presentation();

            //Load a password-protected PowerPoint document with the right password
            presentation.LoadFromFile(@"Encrypted.pptx", "your password");

            //Remove password protection from the document
            presentation.RemoveEncryption();

            //Save the result document
            presentation.SaveToFile("RemoveProtection.pptx", FileFormat.Pptx2013);
        }
    }
}

Remove Mark as Final Option from a PowerPoint Document in C# and VB.NET
The mark as final feature makes a PowerPoint document read-only to prevent further changes, if you decide to make changes to the document later, you can remove the mark as final option from it.
The following steps demonstrate how to remove mark as final option from a PowerPoint document:
- Initialize an instance of Presentation class.
- Load a PowerPoint document using Presentation.LoadFromFile() method.
- Mark the document as final through Presentation.DocumentProperty[] property.
- Save the result document using Presentation.SaveToFile() method.
- C#
- VB.NET
using Spire.Presentation;

namespace RemoveMarkAsFinalFromPPT
{
    class Program
    {
        static void Main(string[] args)
        {
            //Create a Presentation instance
            Presentation ppt = new Presentation();
            //Load a PowerPoint document
            ppt.LoadFromFile(@"MarkAsFinal.pptx");

            //Remove mark as final option from the document
            ppt.DocumentProperty["_MarkAsFinal"] = false;

            //Save the result document
            ppt.SaveToFile("RemoveMarkAsFinal.pptx", FileFormat.Pptx2013);
        }
    }
}

Apply for a Temporary License
If you'd like to remove the evaluation message from the generated documents, or to get rid of the function limitations, please request a 30-day trial license for yourself.
Print a PowerPoint document
Spire.Presentation for .NET, a reliable .NET PPT component, enables you to generate, read, edit, convert even print your PPT documents without installing Microsoft PowerPoint on your machine. Using Spire.Presentation for .NET, you can use the presentation.Print() method to print your PPT documents in a fast speed.The following article will introduce a detail method to print a PPT document with C#, VB via Spire.Presentation for .NET.
Download and install Spire.Presentation for .NET and use below code to experience this method to print PPT document.
The main steps of method are:
Step 1: Create a PPT document.
Presentation presentation = new Presentation();
Step 2: Append new shape and paragraph to add the text.
IAutoShape shape = presentation.Slides[0].Shapes.AppendShape(ShapeType.Rectangle, new RectangleF(50, 150, 600, 250));
shape.TextFrame.Paragraphs.Append(new TextParagraph());
Step 3: Set the background to DarkSeaGreen.
presentation.Slides[0].SlideBackground.Type = BackgroundType.Custom;
presentation.Slides[0].SlideBackground.Fill.FillType = FillFormatType.Solid;
presentation.Slides[0].SlideBackground.Fill.SolidColor.Color = Color.DarkSeaGreen;
Step 4: Create a printerSettings and print the PPT.
PrinterSettings printerSettings = new PrinterSettings();
presentation.Print(printerSettings);
Suppose you've succeeded use the method, the printer icon would appear in the lower right corner ofscreen. such as: 
If you couldn't successfully use the Spire.presentation, please refer the Spire.Presentation Quick Start which can guide you quickly use the Spire.presentation.
The full code:
using System.Drawing;
using System.Drawing.Printing;
using Spire.Presentation;
using Spire.Presentation.Drawing;

namespace PrintPPT
{
    class Program
    {
        static void Main(string[] args)
        {
            //create PPT document
            Presentation presentation = new Presentation();

            //append new shape
            IAutoShape shape = presentation.Slides[0].Shapes.AppendShape(ShapeType.Rectangle, new RectangleF(50, 150, 600, 250));
            shape.ShapeStyle.LineColor.Color = Color.DarkSeaGreen;
            shape.Fill.FillType = Spire.Presentation.Drawing.FillFormatType.None;

            //add text to shape
            shape.AppendTextFrame("The sample demonstrates how to Print PPT file.");

            //add new paragraph
            shape.TextFrame.Paragraphs.Append(new TextParagraph());

            //add text to paragraph
            shape.TextFrame.Paragraphs[1].TextRanges.Append(new TextRange("As an independent Office .NET component, Spire.Office doesn't need Microsoft Office to be installed on System. In addition, it is a better alternative to MS Office Automation in terms of security, stability, scalability, speed, price and features."));

            //set the Font
            foreach (TextParagraph para in shape.TextFrame.Paragraphs)
            {
                para.TextRanges[0].LatinFont = new TextFont("Arial Rounded MT Bold");
                para.TextRanges[0].Fill.FillType = FillFormatType.Solid;
                para.TextRanges[0].Fill.SolidColor.Color = Color.Black;
                para.Alignment = TextAlignmentType.Left;
                para.Indent = 35;
            }

            //set the background to DarkSeaGreen
            presentation.Slides[0].SlideBackground.Type = BackgroundType.Custom;
            presentation.Slides[0].SlideBackground.Fill.FillType = FillFormatType.Solid;
            presentation.Slides[0].SlideBackground.Fill.SolidColor.Color = Color.DarkSeaGreen;

            //print
            PrinterSettings printerSettings = new PrinterSettings();
            presentation.Print(printerSettings);
        }
    }
}
Imports System.Drawing
Imports System.Drawing.Printing
Imports Spire.Presentation
Imports Spire.Presentation.Drawing

Namespace PrintPPT
	Class Program
		Private Shared Sub Main(args As String())
			'create PPT document
			Dim presentation As New Presentation()

			'append new shape
			Dim shape As IAutoShape = presentation.Slides(0).Shapes.AppendShape(ShapeType.Rectangle, New RectangleF(50, 150, 600, 250))
			shape.ShapeStyle.LineColor.Color = Color.DarkSeaGreen
			shape.Fill.FillType = Spire.Presentation.Drawing.FillFormatType.None

			'add text to shape
			shape.AppendTextFrame("The sample demonstrates how to Print PPT file.")

			'add new paragraph
			shape.TextFrame.Paragraphs.Append(New TextParagraph())

			'add text to paragraph
			shape.TextFrame.Paragraphs(1).TextRanges.Append(New TextRange("As an independent Office .NET component, Spire.Office doesn't need Microsoft Office to be installed on System. In addition, it is a better alternative to MS Office Automation in terms of security, stability, scalability, speed, price and features."))

			'set the Font
			For Each para As TextParagraph In shape.TextFrame.Paragraphs
				para.TextRanges(0).LatinFont = New TextFont("Arial Rounded MT Bold")
				para.TextRanges(0).Fill.FillType = FillFormatType.Solid
				para.TextRanges(0).Fill.SolidColor.Color = Color.Black
				para.Alignment = TextAlignmentType.Left
				para.Indent = 35
			Next

			'set the background to DarkSeaGreen
			presentation.Slides(0).SlideBackground.Type = BackgroundType.[Custom]
			presentation.Slides(0).SlideBackground.Fill.FillType = FillFormatType.Solid
			presentation.Slides(0).SlideBackground.Fill.SolidColor.Color = Color.DarkSeaGreen

			'print
			Dim printerSettings As New PrinterSettings()
			presentation.Print(printerSettings)
		End Sub
	End Class
End Namespace
Set the properties of the PowerPoint document
Spire.Presentation, a professional .NET component especially designed for developers enables you to manipulate PPT files easily and flexibly. Using Spire.Presentation you can generate, modify, convert, render, and print documents without installing Microsoft PowerPoint on your machine. You can also set the properties of PPT document using Spire.Presentation. And it is a quiet an easy work. Here I will show you how to do so.
Step 1: Create a PPT document.
Presentation presentation = new Presentation();
Step 2: Add some context to PPT document such as image and text.
Step 3: Set the properties of the PPT document.
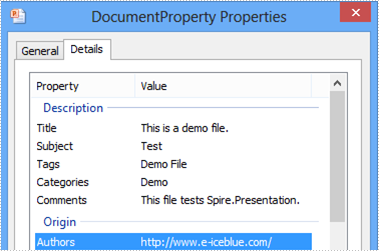
presentation.DocumentProperty.Application = "Spire.Presentation";
presentation.DocumentProperty.Author = "http://www.e-iceblue.com/";
presentation.DocumentProperty.Company = "E-iceblue";
presentation.DocumentProperty.Keywords = "Demo File";
presentation.DocumentProperty.Comments = "This file tests Spire.Presentation.";
presentation.DocumentProperty.Category = "Demo";
presentation.DocumentProperty.Title = "This is a demo file.";
presentation.DocumentProperty.Subject = "Test";
Step 4: Save the PPT document.
presentation.SaveToFile("para.pptx", FileFormat.Pptx2010);
Screenshot:
Full code:
using Spire.Presentation;
using Spire.Presentation.Drawing;
using System.Drawing;
namespace SetProperties
{
    class Program
    {
        static void Main(string[] args)
        {

            //create PPT document
            Presentation presentation = new Presentation();

            //set background Image
            string ImageFile = "bg.png";
            RectangleF rect = new RectangleF(0, 0, presentation.SlideSize.Size.Width, presentation.SlideSize.Size.Height);
            presentation.Slides[0].Shapes.AppendEmbedImage(ShapeType.Rectangle, ImageFile, rect);
            presentation.Slides[0].Shapes[0].Line.FillFormat.SolidFillColor.Color = Color.FloralWhite;

            //set the DocumentProperty of PPT document
            presentation.DocumentProperty.Application = "Spire.Presentation";
            presentation.DocumentProperty.Author = "http://www.e-iceblue.com/";
            presentation.DocumentProperty.Company = "E-iceblue";
            presentation.DocumentProperty.Keywords = "Demo File";
            presentation.DocumentProperty.Comments = "This file tests Spire.Presentation.";
            presentation.DocumentProperty.Category = "Demo";
            presentation.DocumentProperty.Title = "This is a demo file.";
            presentation.DocumentProperty.Subject = "Test";

            //append new shape
            IAutoShape shape = presentation.Slides[0].Shapes.AppendShape(ShapeType.Rectangle, new RectangleF(50, 70, 600, 250));
            shape.ShapeStyle.LineColor.Color = Color.White;
            shape.Fill.FillType = Spire.Presentation.Drawing.FillFormatType.None;

            //add text to shape
            shape.AppendTextFrame("The sample demonstrates how to Set DocumentProperty of PPT using Spire.Presentation.");

            //add new paragraph
            shape.TextFrame.Paragraphs.Append(new TextParagraph());

            //add text to paragraph
            shape.TextFrame.Paragraphs[1].TextRanges.Append(new TextRange("Spire.Office for .NET is a compilation of Enterprise-Level Office .NET component offered by E-iceblue. It includes Spire.Doc, Spire XLS, Spire.PDF, Spire.DataExport, Spire.PDFViewer, Spire.DocViewer, and Spire.BarCode. Spire.Office contains the most up-to-date versions of the above .NET components."));

            //set the Font
            foreach (TextParagraph para in shape.TextFrame.Paragraphs)
            {
                para.TextRanges[0].LatinFont = new TextFont("Arial Rounded MT Bold");
                para.TextRanges[0].Fill.FillType = FillFormatType.Solid;
                para.TextRanges[0].Fill.SolidColor.Color = Color.Black;
                para.Alignment = TextAlignmentType.Left;
                para.Indent = 35;
            }

            //save the document
            presentation.SaveToFile("DocumentProperty.pptx", FileFormat.Pptx2007);
            System.Diagnostics.Process.Start("DocumentProperty.pptx");

        }
    }
}
Imports Spire.Presentation
Imports Spire.Presentation.Drawing
Imports System.Drawing
Namespace SetProperties
	Class Program
		Private Shared Sub Main(args As String())

			'create PPT document
			Dim presentation As New Presentation()

			'set background Image
			Dim ImageFile As String = "bg.png"
			Dim rect As New RectangleF(0, 0, presentation.SlideSize.Size.Width, presentation.SlideSize.Size.Height)
			presentation.Slides(0).Shapes.AppendEmbedImage(ShapeType.Rectangle, ImageFile, rect)
			presentation.Slides(0).Shapes(0).Line.FillFormat.SolidFillColor.Color = Color.FloralWhite

			'set the DocumentProperty of PPT document
			presentation.DocumentProperty.Application = "Spire.Presentation"
			presentation.DocumentProperty.Author = "http://www.e-iceblue.com/"
			presentation.DocumentProperty.Company = "E-iceblue"
			presentation.DocumentProperty.Keywords = "Demo File"
			presentation.DocumentProperty.Comments = "This file tests Spire.Presentation."
			presentation.DocumentProperty.Category = "Demo"
			presentation.DocumentProperty.Title = "This is a demo file."
			presentation.DocumentProperty.Subject = "Test"

			'append new shape
			Dim shape As IAutoShape = presentation.Slides(0).Shapes.AppendShape(ShapeType.Rectangle, New RectangleF(50, 70, 600, 250))
			shape.ShapeStyle.LineColor.Color = Color.White
			shape.Fill.FillType = Spire.Presentation.Drawing.FillFormatType.None

			'add text to shape
			shape.AppendTextFrame("The sample demonstrates how to Set DocumentProperty of PPT using Spire.Presentation.")

			'add new paragraph
			shape.TextFrame.Paragraphs.Append(New TextParagraph())

			'add text to paragraph
			shape.TextFrame.Paragraphs(1).TextRanges.Append(New TextRange("Spire.Office for .NET is a compilation of Enterprise-Level Office .NET component offered by E-iceblue. It includes Spire.Doc, Spire XLS, Spire.PDF, Spire.DataExport, Spire.PDFViewer, Spire.DocViewer, and Spire.BarCode. Spire.Office contains the most up-to-date versions of the above .NET components."))

			'set the Font
			For Each para As TextParagraph In shape.TextFrame.Paragraphs
				para.TextRanges(0).LatinFont = New TextFont("Arial Rounded MT Bold")
				para.TextRanges(0).Fill.FillType = FillFormatType.Solid
				para.TextRanges(0).Fill.SolidColor.Color = Color.Black
				para.Alignment = TextAlignmentType.Left
				para.Indent = 35
			Next

			'save the document
			presentation.SaveToFile("DocumentProperty.pptx", FileFormat.Pptx2007)
			System.Diagnostics.Process.Start("DocumentProperty.pptx")

		End Sub
	End Class
End Namespace
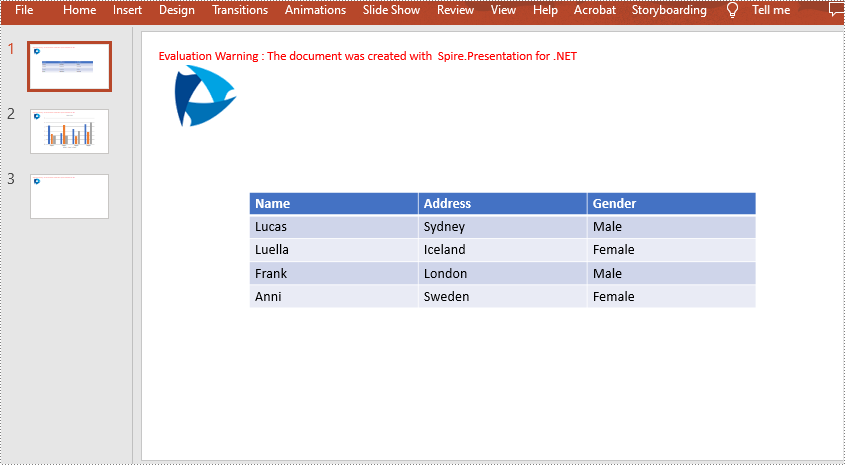
C#/VB.NET: Insert Tables in PowerPoint Presentations
Tables in PowerPoint are a powerful tool that allows you to present and organize data in a clear, concise, and visually appealing manner. By using tables, you can effectively communicate complex information to your audience, making it easier for them to understand and remember key points. In this article, you will learn how to insert a table into a PowerPoint Presentation in C# and VB.NET using Spire.Presentation for .NET.
Install Spire.Presentation for .NET
To begin with, you need to add the DLL files included in the Spire.Presentation for.NET package as references in your .NET project. The DLL files can be either downloaded from this link or installed via NuGet.
PM> Install-Package Spire.Presentation
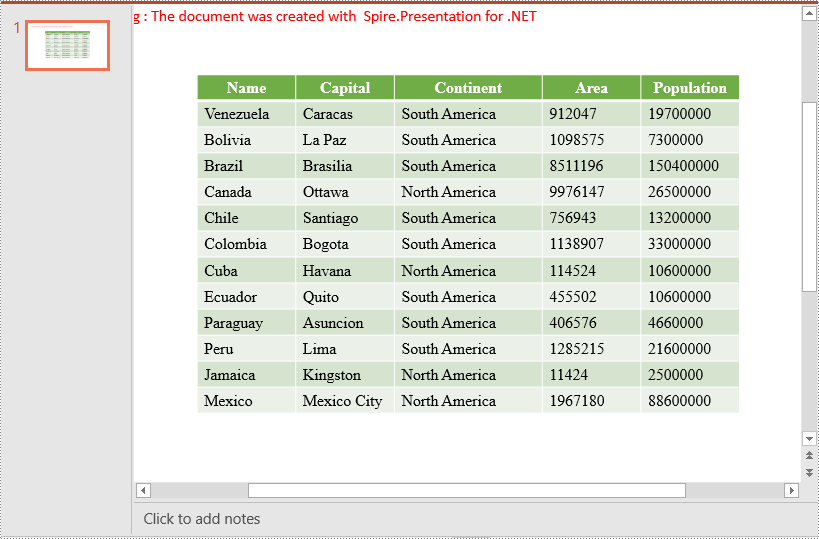
Insert a table into a PowerPoint Presentation in C# and VB.NET
You can use the ISlide.Shapes.AppendTable(float x, float y, double[] widths, double[] heights) method to add a table to a specific slide of a PowerPoint presentation. The detailed steps are as follows:
- Initialize an instance of the Presentation class.
- Load a PowerPoint presentation using Presentation.LoadFromFile(string file) method.
- Get a specific slide using Presentation.Slides[int index] property.
- Define two double arrays, widths and heights, which specify the number and size of rows and columns in table.
- Add a table with the specified number and size of rows and columns to a specific position on the slide using ISlide.Shapes.AppendTable(float x, float y, double[] widths, double[] heights) method.
- Store the table data in a two-dimensional string array.
- Loop through the string array, and assign the corresponding data to each cell of the table using ITable[int columnIndex, int rowIndex].TextFrame.Text property.
- Set the alignment of the first row of the table to center.
- Apply a built-in style to the table using ITable.StylePreset property.
- Save the presentation using Presentation.SaveToFile(string file, FileFormat fileFormat) method.
- C#
- VB.NET
using Spire.Presentation;

namespace InsertTable
{
    internal class Program
    {
        static void Main(string[] args)
        {
            //Initialize an instance of the Presentation class
            Presentation presentation = new Presentation();
            //Load a PowerPoint presentation
            presentation.LoadFromFile(@"Input.pptx");

            //Get the first slide
            ISlide slide = presentation.Slides[0];

            //Define two double arrays, widths and heights, which specify the number and size of rows and columns in table
            double[] widths = new double[] { 100, 100, 150, 100, 100 };
            double[] heights = new double[] { 15, 15, 15, 15, 15, 15, 15, 15, 15, 15, 15, 15, 15 };

            //Add a table with the specified number and size of rows and columns to a specific position on the slide
            ITable table = slide.Shapes.AppendTable(presentation.SlideSize.Size.Width / 2 - 275, 90, widths, heights);

            //Store table data in a two-dimensional string array
            string[,] data = new string[,]{
            {"Name", "Capital", "Continent", "Area", "Population"},
            {"Venezuela", "Caracas", "South America", "912047", "19700000"},
            {"Bolivia", "La Paz", "South America", "1098575", "7300000"},
            {"Brazil", "Brasilia", "South America", "8511196", "150400000"},
            {"Canada", "Ottawa", "North America", "9976147", "26500000"},
            {"Chile", "Santiago", "South America", "756943", "13200000"},
            {"Colombia", "Bogota", "South America", "1138907", "33000000"},
            {"Cuba", "Havana", "North America", "114524", "10600000"},
            {"Ecuador", "Quito", "South America", "455502", "10600000"},
            {"Paraguay", "Asuncion", "South America", "406576", "4660000"},
            {"Peru", "Lima", "South America", "1285215", "21600000"},
            {"Jamaica", "Kingston", "North America", "11424", "2500000"},
            {"Mexico", "Mexico City", "North America", "1967180", "88600000"}
            };

            //Loop through the string array and assign data to each cell of the table
            for (int i = 0; i < 13; i++)
                for (int j = 0; j < 5; j++)
                {
                    //Fill each cell of the table with data
                    table[j, i].TextFrame.Text = data[i, j];
                    //Set font name and font size
                    table[j, i].TextFrame.Paragraphs[0].TextRanges[0].LatinFont = new TextFont("Times New Roman");
                    table[j, i].TextFrame.Paragraphs[0].TextRanges[0].FontHeight = 16;
                }

            //Set the alignment of the first row of the table to center
            for (int i = 0; i < 5; i++)
            {
                table[i, 0].TextFrame.Paragraphs[0].Alignment = TextAlignmentType.Center;
            }

            //Apply a style to the table
            table.StylePreset = TableStylePreset.MediumStyle2Accent6;

            //Save the presentation to a file
            presentation.SaveToFile("InsertTable.pptx", FileFormat.Pptx2013);
            presentation.Dispose();
        }
    }
}
Apply for a Temporary License
If you'd like to remove the evaluation message from the generated documents, or to get rid of the function limitations, please request a 30-day trial license for yourself.
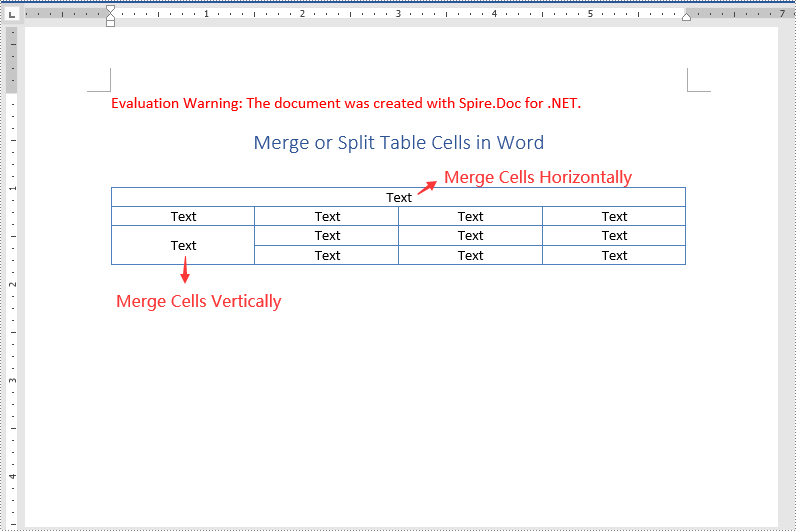
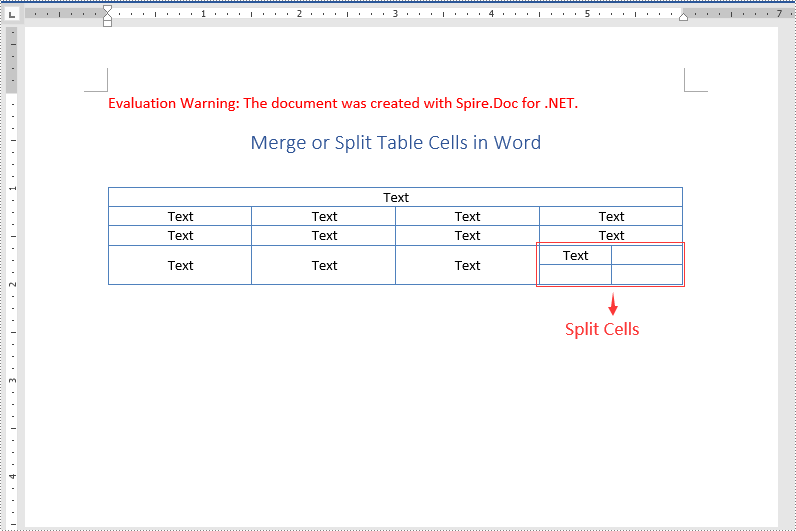
C#/VB.NET: Merge or Split Table Cells in Word
Merging cells means combining two or more cells into one larger cell, while splitting cells means dividing one cell into two or more smaller cells. When creating or editing tables in Microsoft Word, you may often need to merge or split table cells in order to better present your data. In this article, you will learn how to merge or split table cells in a Word document in C# and VB.NET using Spire.Doc for .NET.
Install Spire.Doc for .NET
To begin with, you need to add the DLL files included in the Spire.Doc for.NET package as references in your .NET project. The DLL files can be either downloaded from this link or installed via NuGet.
PM> Install-Package Spire.Doc
Merge Table Cells in Word Using C# and VB.NET
In Microsoft Word, you can merge two or more adjacent cells horizontally or vertically into a larger cell. In Spire.Doc, you can achieve the same using the Table.ApplyHorizontalMerge() or Table.ApplyVerticalMerge() method. The following are the detailed steps:
- Initialize an instance of the Document class.
- Load a Word document using Document.LoadFromFile() method.
- Get a specific section in the document by its index through Document.Sections[int] property.
- Add a table to the section using Section.AddTable() method.
- Specify the number of rows and columns of the table using Table.ResetCells() method.
- Horizontally merge specific cells in the table using Table.ApplyHorizontalMerge() method.
- Vertically merge specific cells in the table using Table.ApplyVerticalMerge() method.
- Add some data to the table.
- Apply a style to the table.
- Save the result document using Document.SaveToFile() method.
- C#
- VB.NET
using Spire.Doc;
using Spire.Doc.Documents;

namespace MergeTableCells
{
    class Program
    {
        static void Main(string[] args)
        {
            //Create a Document instance
            Document document = new Document();
            //Load a Word document
            document.LoadFromFile("Input.docx");

            //Get the first section
            Section section = document.Sections[0];

            //Add a 4 x 4 table to the section
            Table table = section.AddTable();
            table.ResetCells(4, 4);

            //Horizontally merge cells 1, 2, 3, and 4 in the first row
            table.ApplyHorizontalMerge(0, 0, 3);
            //Vertically merge cells 3 and 4 in the first column
            table.ApplyVerticalMerge(0, 2, 3);

            //Add some data to the table
            for (int row = 0; row < table.Rows.Count; row++)
            {
                for (int col = 0; col < table.Rows[row].Cells.Count; col++)
                {
                    TableCell cell = table[row, col];
                    cell.CellFormat.VerticalAlignment = VerticalAlignment.Middle;
                    Paragraph paragraph = cell.AddParagraph();
                    paragraph.Format.HorizontalAlignment = HorizontalAlignment.Center;
                    paragraph.Text = "Text";
                }
            }

            //Apply a style to the table
            table.ApplyStyle(DefaultTableStyle.LightGridAccent1);

            //Save the result document
            document.SaveToFile("MergeCells.docx", FileFormat.Docx2013);
        }
    }
}
Split Table Cells in Word Using C# and VB.NET
Spire.Doc for .NET offers the TableCell.SplitCell() method that enables you to split a cell in a Word table into two or more cells. The following are the detailed steps:
- Initialize an instance of the Document class.
- Load a Word document using Document.LoadFromFile() method.
- Get a specific section in the document by its index through Document.Sections[int] property.
- Get a specific table in the section by its index through Section.Tables[int] property.
- Get the table cell that you want to split through Table.Rows[int].Cells[int] property.
- Split the cell into specific number of columns and rows using TableCell.SplitCell() method.
- Save the result document using Document.SaveToFile() method.
- C#
- VB.NET
using Spire.Doc;

namespace SplitTableCells
{
    class Program
    {
        static void Main(string[] args)
        {
            //Create a Document instance
            Document document = new Document();
            //Load a Word Document
            document.LoadFromFile("MergeCells.docx");

            //Get the first section
            Section section = document.Sections[0];

            //Get the first table in the section
            Table table = section.Tables[0] as Table;

            //Get the 4th cell in the 4th row
            TableCell cell1 = table.Rows[3].Cells[3];
            //Split the cell into 2 columns and 2 rows
            cell1.SplitCell(2, 2);

            //save the result document
            document.SaveToFile("SplitCells.docx", FileFormat.Docx2013);
        }
    }
}
Apply for a Temporary License
If you'd like to remove the evaluation message from the generated documents, or to get rid of the function limitations, please request a 30-day trial license for yourself.
Add footer into a PowerPoint document
Footer is area in the bottom of each slide in a PPT document. The Spire.Presentation supports user to insert text or graphics in footer. For example, you can add slide numbers, the time and date, a company logo, the document title or the file name, or the author's name in document.
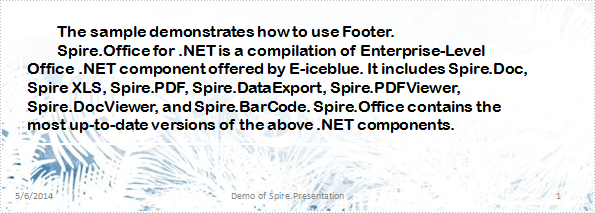
Spire.Presentation for .NET, a reliable .NET PPT component, enables you to generate, read, edit, convert even print your PPT document in a fast speed. Using Spire.Presentation for .NET, you can add footer in your PPT document with C#, VB. Please see the target PPT document with footer as below picture:
This guide will introduce the method to add footer in your PPT document with C#, VB.NET via Spire.Presentation for .NET.
The method main steps are:
Step 1: create a PPT document.
Presentation presentation = new Presentation();
Step 2: set background Image and slide.
string ImageFile = @"bg.png";
RectangleF rect = new RectangleF(0, 0, presentation.SlideSize.Size.Width, presentation.SlideSize.Size.Height);
presentation.Slides[0].Shapes.AppendEmbedImage(ShapeType.Rectangle, ImageFile, rect);
presentation.Slides[0].Shapes[0].Line.FillFormat.SolidFillColor.Color = Color.FloralWhite;
Step 3: add and set the footer and set whether show date and page number.
presentation.SetFooterText("Demo of Spire.Presentation");
presentation.SetFooterVisible(true);
presentation.SetSlideNoVisible(true);
presentation.SetDateTimeVisible(true);
Step 4: save the document.
presentation.SaveToFile("HeaderAndFooter.pptx", FileFormat.Pptx2007);
Download and install Spire.Presentation for .NET and use below code to experience this method to add footer in PPT document.
The full code:
using System;
using System.Collections.Generic;
using System.Linq;
using System.Text;
using System.Drawing;
using Spire.Presentation;
using Spire.Presentation.Drawing;
namespace AddheadersAndfooters
{
    class Program
    {
        static void Main(string[] args)
        {
            //create PPT document
            Presentation presentation = new Presentation();

            //set background Image
            string ImageFile = @"bg.png";
            RectangleF rect = new RectangleF(0, 0, presentation.SlideSize.Size.Width, presentation.SlideSize.Size.Height);
            presentation.Slides[0].Shapes.AppendEmbedImage(ShapeType.Rectangle, ImageFile, rect);
            presentation.Slides[0].Shapes[0].Line.FillFormat.SolidFillColor.Color = Color.FloralWhite;

            //add footer
            presentation.SetFooterText("Demo of Spire.Presentation");

            //set the footer visible
            presentation.SetFooterVisible(true);

            //set the page number visible
            presentation.SetSlideNoVisible(true);

            //set the date visible
            presentation.SetDateTimeVisible(true);

            //append new shape
            IAutoShape shape = presentation.Slides[0].Shapes.AppendShape(ShapeType.Rectangle, new RectangleF(50, 70, 600, 250));
            shape.ShapeStyle.LineColor.Color = Color.White;
            shape.Fill.FillType = Spire.Presentation.Drawing.FillFormatType.None;

            //add text to shape
            shape.AppendTextFrame("The sample demonstrates how to use Footer.");

            //append new Paragraph
            shape.TextFrame.Paragraphs.Append(new TextParagraph());

            //add text to Paragraph
            shape.TextFrame.Paragraphs[1].TextRanges.Append(new TextRange("Spire.Office for .NET is a compilation of Enterprise-Level Office .NET component offered by E-iceblue. It includes Spire.Doc, Spire XLS, Spire.PDF, Spire.DataExport, Spire.PDFViewer, Spire.DocViewer, and Spire.BarCode. Spire.Office contains the most up-to-date versions of the above .NET components."));
            //set the Font
            foreach (TextParagraph para in shape.TextFrame.Paragraphs)
            {
                para.TextRanges[0].LatinFont = new TextFont("Arial Rounded MT Bold");
                para.TextRanges[0].Fill.FillType = FillFormatType.Solid;
                para.TextRanges[0].Fill.SolidColor.Color = Color.Black;
                para.Alignment = TextAlignmentType.Left;
                para.Indent = 35;
            }
            //save the document
            presentation.SaveToFile("HeaderAndFooter.pptx", FileFormat.Pptx2007);
            System.Diagnostics.Process.Start("HeaderAndFooter.pptx");
        }
    }
}
Imports System.Drawing
Imports Spire.Presentation.Drawing
Imports Spire.Presentation
Module Module1

    Sub Main()
        'create PPT document
        Dim presentation As New Presentation()

        'set background Image
        Dim ImageFile As String = "D:\Spire.Presentation\Demos\Data\bg.png"
        Dim rect As New RectangleF(0, 0, presentation.SlideSize.Size.Width, presentation.SlideSize.Size.Height)
        presentation.Slides(0).Shapes.AppendEmbedImage(ShapeType.Rectangle, ImageFile, rect)
        presentation.Slides(0).Shapes(0).Line.FillFormat.SolidFillColor.Color = Color.FloralWhite

        'add footer
        presentation.SetFooterText("Demo of Spire.Presentation")

        'set the footer visible
        presentation.SetFooterVisible(True)

        'set the page number visible
        presentation.SetSlideNoVisible(True)

        'set the date visible
        presentation.SetDateTimeVisible(True)

        'append new shape
        Dim shape As IAutoShape = presentation.Slides(0).Shapes.AppendShape(ShapeType.Rectangle, New RectangleF(50, 70, 600, 250))
        shape.ShapeStyle.LineColor.Color = Color.White
        shape.Fill.FillType = Spire.Presentation.Drawing.FillFormatType.None

        'add text to shape
        shape.AppendTextFrame("The sample demonstrates how to use Footer.")

        'append new Paragraph
        shape.TextFrame.Paragraphs.Append(New TextParagraph())

        'add text to Paragraph
        shape.TextFrame.Paragraphs(1).TextRanges.Append(New TextRange("Spire.Office for .NET is a compilation of Enterprise-Level Office .NET component offered by E-iceblue. It includes Spire.Doc, Spire XLS, Spire.PDF, Spire.DataExport, Spire.PDFViewer, Spire.DocViewer, and Spire.BarCode. Spire.Office contains the most up-to-date versions of the above .NET components."))

        'set the Font
        For Each para As TextParagraph In shape.TextFrame.Paragraphs
            para.TextRanges(0).LatinFont = New TextFont("Arial Rounded MT Bold")
            para.TextRanges(0).Fill.FillType = FillFormatType.Solid
            para.TextRanges(0).Fill.SolidColor.Color = Color.Black
            para.Alignment = TextAlignmentType.Left
            para.Indent = 35
        Next
        'save the document
        presentation.SaveToFile("HeaderAndFooter.pptx", FileFormat.Pptx2007)
        System.Diagnostics.Process.Start("HeaderAndFooter.pptx")
    End Sub
End Module
If you couldn't successfully use the Spire.presentation, please refer the Spire.Presentation Quick Start which can guide you quickly use the Spire.presentation.
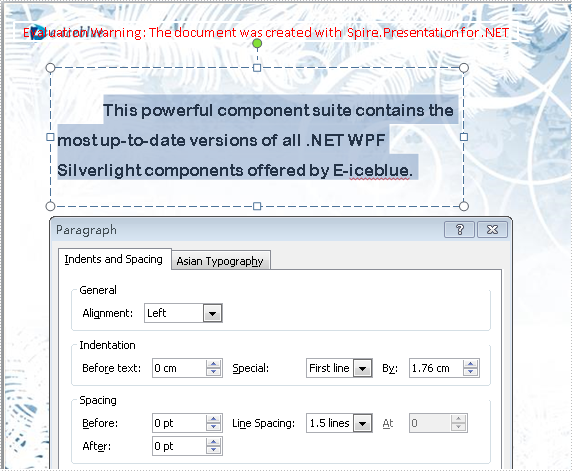
Add a Paragraph to PowerPoint file
PPT file format is a vivid and explicit way to present your stuff. PPT file can be very beautiful and powerful. And text is a basic element that PPT supports. Spire.Presentation is a powerful .NET component specially designed for developers. It enables developers to manipulate PPT files easily and flexibly. In this document, I will introduce you how to add a paragraph to PPT file using Spire.Presentation.
Step 1. Create a PPT document.
Presentation presentation = new Presentation();
Step 2. Add a new shape to the document.
IAutoShape shape = presentation.Slides[0].Shapes.AppendShape(ShapeType.Rectangle, new RectangleF(50, 70, 450, 150));
shape.Fill.FillType = FillFormatType.None;
shape.ShapeStyle.LineColor.Color = Color.White;
Shape represents a TextBox in PPT document.
Step 3. Add some text to the shape.
shape.TextFrame.Text = "This powerful component suite contains the most up-to-date versions of all .NET WPF Silverlight components offered by E-iceblue.";
These will form a new paragraph.
Step 4. Set the alignment of the paragraph.
shape.TextFrame.Paragraphs[0].Alignment = TextAlignmentType.Left;
Step 5. Set the indent of the paragraph.
shape.TextFrame.Paragraphs[0].Indent = 25*2;
Step 6. Set the line spacing of the paragraph.
shape.TextFrame.Paragraphs[0].LineSpacing = 250;
Step 7. Save the document.
presentation.SaveToFile("para.pptx", FileFormat.Pptx2010);
Full code:
using Spire.Presentation;
using Spire.Presentation.Drawing;
using System.Drawing;
namespace AddParagh
{
    class Program
    {
        static void Main(string[] args)
        {
            //create PPT document
            Presentation presentation = new Presentation();

            //set background Image
            string ImageFile = "bg.png";
            RectangleF rect = new RectangleF(0, 0, presentation.SlideSize.Size.Width, presentation.SlideSize.Size.Height);
            presentation.Slides[0].Shapes.AppendEmbedImage(ShapeType.Rectangle, ImageFile, rect);
            presentation.Slides[0].Shapes[0].Line.FillFormat.SolidFillColor.Color = Color.FloralWhite;

            //append new shape
            IAutoShape shape = presentation.Slides[0].Shapes.AppendShape(ShapeType.Rectangle, new RectangleF(50, 70, 450, 150));
            shape.Fill.FillType = FillFormatType.None;
            shape.ShapeStyle.LineColor.Color = Color.White;

            //set the alignment
            shape.TextFrame.Paragraphs[0].Alignment = TextAlignmentType.Left;
            //set the indent
            shape.TextFrame.Paragraphs[0].Indent = 50;
            //set the linespacing
            shape.TextFrame.Paragraphs[0].LineSpacing = 150;
            shape.TextFrame.Text = "This powerful component suite contains the most up-to-date versions of all .NET WPF Silverlight components offered by E-iceblue.";

            //set the Font
            shape.TextFrame.Paragraphs[0].TextRanges[0].LatinFont = new TextFont("Arial Rounded MT Bold");
            shape.TextFrame.Paragraphs[0].TextRanges[0].Fill.FillType = FillFormatType.Solid;
            shape.TextFrame.Paragraphs[0].TextRanges[0].Fill.SolidColor.Color = Color.Black;

            //save the document
            presentation.SaveToFile("para.pptx", FileFormat.Pptx2010);
            System.Diagnostics.Process.Start("para.pptx");
        }
    }
}
'create PPT document
Dim presentation As New Presentation()

'set background Image
Dim ImageFile As String = "bg.png"
Dim rect As New RectangleF(0, 0, presentation.SlideSize.Size.Width, presentation.SlideSize.Size.Height)
presentation.Slides(0).Shapes.AppendEmbedImage(ShapeType.Rectangle, ImageFile, rect)
presentation.Slides(0).Shapes(0).Line.FillFormat.SolidFillColor.Color = Color.FloralWhite

'append new shape
Dim shape As IAutoShape = presentation.Slides(0).Shapes.AppendShape(ShapeType.Rectangle, New RectangleF(50, 70, 450, 150))
shape.Fill.FillType = FillFormatType.None
shape.ShapeStyle.LineColor.Color = Color.White

'set the alignment
shape.TextFrame.Paragraphs(0).Alignment = TextAlignmentType.Left
'set the indent
shape.TextFrame.Paragraphs(0).Indent = 50
'set the linespacing
shape.TextFrame.Paragraphs(0).LineSpacing = 150
shape.TextFrame.Text = "This powerful component suite contains the most up-to-date versions of all .NET WPF Silverlight components offered by E-iceblue."

'set the Font
shape.TextFrame.Paragraphs(0).TextRanges(0).LatinFont = New TextFont("Arial Rounded MT Bold")
shape.TextFrame.Paragraphs(0).TextRanges(0).Fill.FillType = FillFormatType.Solid
shape.TextFrame.Paragraphs(0).TextRanges(0).Fill.SolidColor.Color = Color.Black

'save the document
presentation.SaveToFile("para.pptx", FileFormat.Pptx2010)
System.Diagnostics.Process.Start("para.pptx")
Screenshot: