
Knowledgebase (2337)
Children categories
Inserting subscript in Excel is a common requirement, especially when dealing with chemical formulas like CO₂, statistical footnotes, or scientific data. Using subscripts helps make data clearer and more polished, enhancing the professionalism of your documents. However, Excel’s built-in subscript feature is cumbersome and doesn’t support batch application, which can significantly slow down your workflow.
Fortunately, with the help of Java code, you can efficiently insert subscripts in Excel, freeing yourself from tedious manual work and making your tasks faster and more professional.
- Preparation
- Insert New Text with Subscript
- Apply Subscript to Existing Text
- Insert Subscript for Multiple Matches in Single Cell
- Conclusion
Preparation
Inserting a subscript in Excel using Java involves adding Java libraries. In today’s blog, we will use Spire.XLS for Java as an example to accomplish this task. Spire.XLS is a powerful Java component that works independently without relying on Microsoft Office. In addition to reading, editing, and converting Excel files, it allows users to perform advanced tasks as well.
To install it on your device, there are two options:
- If you are using Maven, add the following code to your pom.xml file:
<repositories>
    <repository>
        <id>com.e-iceblue</id>
        <name>e-iceblue</name>
        <url>https://repo.e-iceblue.com/nexus/content/groups/public/</url>
    </repository>
</repositories>
<dependencies>
    <dependency>
        <groupId>e-iceblue</groupId>
        <artifactId>spire.xls</artifactId>
        <version>16.4.1</version>
    </dependency>
</dependencies>
- If you prefer manual installation, download the Spire.XLS package and add the .jar file to your Java IDE.
Inserting Subscript in Excel: How to Insert New Text with Subscript
First, let’s see how to insert new text into an Excel cell with subscript formatting already applied. By setting the subscript when creating a new document, you can generate the final file directly without needing to reopen and adjust it later.
Steps—Inserting subscript in Excel when adding new text with Java:
- Create a Workbook and get a worksheet.
- Get a cell range using Worksheet.getCellRange() method.
- Specify text through CellRange.getRichText().setText() method.
- Create a font through Workbook.createFont() method.
- Set ExcelFont.isSubscript() to true.
- Apply the font to a text range in the cell using RichText.setFont(startIndex, endIndex, font) method.
The following code shows how to insert the text "R100-0.06" into cell B2 and set the subscript:
import com.spire.xls.*;

import java.awt.*;

public class InsertSubscriptNewText {

    public static void main(String[] args) {

        // Create a Workbook instance
        Workbook workbook = new Workbook();

        // Get the first worksheet
        Worksheet sheet = workbook.getWorksheets().get(0);

        // Insert text to B2
        sheet.getCellRange("B2").setText("This is an example of Subscript:");

        // Insert text to B3 and apply subscript effect
        CellRange range = sheet.getCellRange("B3");
        range.getRichText().setText("R100-0.06");
        ExcelFont font = workbook.createFont();
        font.isSubscript(true);
        font.setColor(Color.red);
        range.getRichText().setFont(4, 8, font);

        // Auto fit column width
        sheet.getAllocatedRange().autoFitColumns();

        // Save the document
        workbook.saveToFile("/SubscriptNewText.xlsx", ExcelVersion.Version2016);
    }
}
Result Preview:

Tip: By setting ExcelFont.isSuperscript() to true, you can apply superscript to text in Excel files.
Inserting Subscript in Excel: Apply Subscript to Existing Text
Although inserting subscripts while creating a new Excel file can simplify later work, in most cases, you’ll need to deal with existing files that already contain content. This section shows you how to quickly apply subscript formatting to existing text in Excel using Java.
Steps—Inserting subscript to Excel file with existing text:
- Create a Workbook instance and read an Excel file.
- Get a worksheet and get the cell range.
- Loop through cells in the cell range and find the text to apply subscript.
- Set the text in the cell’s rich text using RichText.setText() to preserve the existing content.
- Create a font by calling Workbook.createFont() method and configure it as Subscript by setting ExcelFont.isSubscript() to true.
- Apply the subscript using RichText.setFont(index, index, subFont) method.
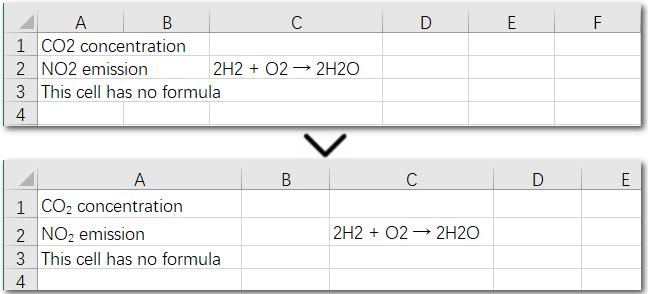
The following code demonstrates how to set subscripts for chemical formulas in the cells within the A1:A3 range:
import com.spire.xls.*;

public class SubscriptExistingContent {

    public static void main(String[] args) {
        // Create a Workbook and load an Excel file
        Workbook workbook = new Workbook();
        // Load an Excel file
        workbook.loadFromFile(("/test.xlsx"));

        // Get a worksheet
        Worksheet sheet = workbook.getWorksheets().get(0);

        // Loop through A1:A3
        for (int i = 1; i <= 3; i++) {
            CellRange cell = sheet.getCellRange("A" + i);
            String text = cell.getText();

            // Find "2" in cells
            int index = text.indexOf("2");
            if (index != -1) {
                // Set RichText to keep original text
cell.getRichText().setText(text);

                // Create font and set as subscript
                ExcelFont subFont = workbook.createFont();
                subFont.isSubscript(true);

                // Apply subscript to "2"
                cell.getRichText().setFont(index, index, subFont);
            }
        }

        // Auto fit columns
        sheet.getAllocatedRange().autoFitColumns();

        // Save the Excel file
        workbook.saveToFile("/SubscriptExistingContent.xlsx", ExcelVersion.Version2016);
    }
}
Result Preview:
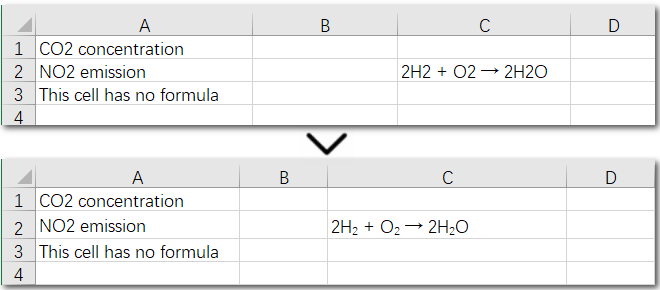
The above code helps us find and set the first matching character as a subscript in an existing cell. But what if the same character appears multiple times in the same cell? How can we apply subscripts to all of them at once? Let’s explore this in the next section.
Inserting Subscript in Excel: Handle Multiple Matches in a Single Cell
Using a search-and-apply method to set subscript formatting works well when there is only one instance in the cell that needs to be subscripted, such as in H₂. However, if the cell contains a chemical equation, the situation becomes more complex: there might be multiple places where subscripts are needed, along with normal numbers representing coefficients (e.g., 2H₂ + O₂ → 2H₂O). In this case, the solution is to set subscripts precisely by specifying the exact positions of the target characters in the text. Let’s take a look at the detailed steps.
Steps—Inserting multiple subscripts in Excel cells:
- Create a Workbook object and read an Excel file.
- Get a worksheet and a cell range.
- Read text in the cell range and set it to rich text using CellRange.getRichText().setText() method.
- Create a font by calling Workbook.createFont() method and configure it as subscript by setting ExcelFont.isSubscript() to true.
- Apply subscript to specific characters with CellRange.getRichText().setFont(index, index, subFont) method.
The following code demonstrates how to set subscripts for the necessary parts of the chemical equation “2H₂ + O₂ → 2H₂O” in cell C2:
import com.spire.xls.*;

public class SubscriptSpecificCell {

    public static void main(String[] args) {
        // Create a Workbook instance and load an Excel file
        Workbook workbook = new Workbook();
        workbook.loadFromFile(("/test.xlsx"));

        // Get the first worksheet
        Worksheet sheet = workbook.getWorksheets().get(0);

        // Get a cell range
        CellRange cell = sheet.getCellRange("C2");

        // Read text from C2
        String text = cell.getText();


        // Set text to RichText
        cell.getRichText().setText(text);

        // Create font object and set it as subscript
        ExcelFont subFont = workbook.createFont();
        subFont.isSubscript(true);

        // Set subscript for specific cell
        cell.getRichText().setFont(2, 2, subFont);
        cell.getRichText().setFont(7, 7, subFont);
        cell.getRichText().setFont(13, 13, subFont);

        // Auto fit columns
        sheet.getAllocatedRange().autoFitColumns();

        // Save the Excel file
        workbook.saveToFile("/SubscriptSpecificCell.xlsx", ExcelVersion.Version2016);
    }
}
Result Preview:
Conclusion
This guide provides a detailed explanation of how to set subscripts in Excel, whether you need to apply them to a single cell or a range of cells, and whether you’re formatting one instance or multiple occurrences. By the end of this page, inserting subscript in Excel will be a breeze for you. Give Spire.XLS a try and start creating professional Excel workbooks today!

Automating the creation of Word documents is a powerful way to generate reports, and produce professional-looking files. With Python, you can utilize various libraries for this purpose, and one excellent option is Spire.Doc for Python, specifically designed for handling Word documents.
This guide will provide a clear, step-by-step process for creating Word documents in Python using Spire.Doc. We’ll cover everything from setting up the library to adding formatted text, images, tables, and more. Whether you're generating reports, invoices, or any other type of document, thes techniques will equip you with the essential tools to enhance your workflow effectively.
Table of Contents:
- What's Sprie.Doc for Python?
- Set Up Spire.Doc in Your Python Project
- Step 1: Create a Blank Word Document
- Step 2: Add Formatted Text (Headings, Paragraphs)
- Step 3: Insert Images to a Word Document
- Step 4: Create and Format Tables
- Step 5: Add Numbered or Bulleted Lists
- Best Practices for Word Document Creation in Python
- FAQs
- Conclusion
What's Spire.Doc for Python?
Spire.Doc is a powerful library for creating, manipulating, and converting Word documents in Python. It enables developers to generate professional-quality documents programmatically without needing Microsoft Word. Here are some key features:
- Supports Multiple Formats : Works with DOCX, DOC, RTF, and HTML.
- Extensive Functionalities : Add text, images, tables, and charts.
- Styling and Formatting : Apply various styles for consistent document appearance.
- User-Friendly API: Simplifies automation of document generation processes.
- Versatile Applications : Ideal for generating reports, invoices, and other documents.
With Spire.Doc, you have the flexibility and tools to streamline your Word document creation tasks effectively.
Set Up Spire.Doc in Your Python Project
To get started with Spire.Doc in your Python project, follow these simple steps:
- Install Spire.Doc : First, you need to install the Spire.Doc library. You can do this using pip. Open your terminal or command prompt and run the following command:
pip install spire.doc
- Import the Library : Once installed, import the Spire.Doc module in your Python script to access its functionalities. You can do this with the following import statement:
from spire.doc import *
from spire.doc.common import *
With the setup complete, you can begin writing your Python code to create Word documents according to your needs.
Step 1: Create a Blank Word Document in Python
The first step in automating Word document creation is to create a blank document. To begin with, we create a Document object, which serves as the foundation of our Word document. We then add a section to organize content, and set the page size to A4 with 60-unit margins . These configurations are crucial for ensuring proper document layout and readability.
Below is the code to initialize a document and set up the page configuration:
# Create a Document object
doc = Document()

# Add a section
section = doc.AddSection()

# Set page size and page margins
section.PageSetup.PageSize = PageSize.A4()
section.PageSetup.Margins.All = 60

# Save the document
doc.SaveToFile("BlankDocument.docx")
doc.Dispose
Step 2: Add Formatted Text (Headings, Paragraphs)
1. Add Title, Headings, Paragraphs
In this step, we add text content by first creating paragraphs using the AddParagraph method, followed by inserting text with the AppendText method.
Different paragraphs can be styled using various BuiltInStyle options, such as Title , Heading1 , and Normal , allowing for quick generation of document elements. Additionally, the TextRange.CharacterFormat property can be used to adjust the font, size, and other styles of the text, ensuring a polished and organized presentation.
Below is the code to insert and format these elements:
# Add a title
title_paragraph = section.AddParagraph()
textRange = title_paragraph.AppendText("My First Document")
title_paragraph.ApplyStyle(BuiltinStyle.Title)
textRange.CharacterFormat.FontName = "Times New Properties"
textRange.CharacterFormat.FontSize = 24

# Add a heading
heading_paragraph = section.AddParagraph()
textRange = heading_paragraph.AppendText("This Is Heading1")
heading_paragraph.ApplyStyle(BuiltinStyle.Heading1)
textRange.CharacterFormat.FontName = "Times New Properties"
textRange.CharacterFormat.FontSize = 16

# Add a paragraph
normal_paragraph = section.AddParagraph()
textRange = normal_paragraph .AppendText("This is a sample paragraph.")
normal_paragraph .ApplyStyle(BuiltinStyle.Normal)
textRange.CharacterFormat.FontName = "Times New Properties"
textRange.CharacterFormat.FontSize = 12
2. Apply Formatting to Paragraph
To ensure consistent formatting across multiple paragraphs, we can create a ParagraphStyle that defines key properties such as font attributes (name, size, color, boldness) and paragraph settings (spacing, indentation, alignment) within a single object. This style can then be easily applied to the selected paragraphs for uniformity.
Below is the code to define and apply the paragraph style:
# Defined paragraph style
style = ParagraphStyle(doc)
style.Name = "paraStyle"
style.CharacterFormat.FontName = "Arial"
style.CharacterFormat.FontSize = 13
style.CharacterFormat.TextColor = Color.get_Red()
style.CharacterFormat.Bold = True
style.ParagraphFormat.AfterSpacing = 12
style.ParagraphFormat.BeforeSpacing = 12
style.ParagraphFormat.FirstLineIndent = 4
style.ParagraphFormat.LineSpacing = 10
style.ParagraphFormat.HorizontalAlignment = HorizontalAlignment.Left
doc.Styles.Add(style)

# Apply the style to the specific paragraph
normal_paragraph.ApplyStyle("paraStyle")
You may also like: How to Convert Text to Word and Word to Text in Python
Step 3: Insert Images to a Word Document
1. Insert an Image
In this step, we add an image to our document, allowing for visual enhancements that complement the text. We begin by creating a paragraph to host the image and then proceed to insert the desired image file usingthe Paragraph.AppendPicture method. After the image is inserted, we can adjust its dimensions and alignment to ensure it fits well within the document layout.
Below is the code to insert and format the image:
# Add a paragraph
paragraph = section.AddParagraph()

# Insert an image
picture = paragraph.AppendPicture("C:\\Users\\Administrator\\Desktop\\logo.png")

# Scale the image dimensions
picture.Width = picture.Width * 0.9
picture.Height = picture.Height * 0.9

# Set text wrapping style
picture.TextWrappingStyle = TextWrappingStyle.TopAndBottom

# Center-align the image horizontally
picture.HorizontalAlignment = HorizontalAlignment.Center
2. Position Image at Precise Location
To gain precise control over the positioning of images within your Word document, you can adjust both the horizontal and vertical origins and specify the image's coordinates in relation to these margins. This allows for accurate placement of the image, ensuring it aligns perfectly with the overall layout of your document.
Below is the code to set the image's position.
picture.HorizontalOrigin = HorizontalOrigin.LeftMarginArea
picture.VerticalOrigin = VerticalOrigin.TopMarginArea
picture.HorizontalPosition = 180.0
picture.VerticalPosition = 165.0
Note : Absolute positioning does not apply when using the Inline text wrapping style.
Step 4: Create and Format Tables
In this step, we will create a table within the document and customize its appearance and functionality. This includes defining the table's structure, adding header and data rows, and setting formatting options to enhance readability.
Steps for creating and customizing a table in Word:
- Add a Table : Use the Section.AddTablemethod to create a new table.
- Specify Table Data : Define the data that will populate the table.
- Set Rows and Columns : Specify the number of rows and columns with the Table.ResetCells method.
- Access Rows and Cells : Retrieve a specific row using Table.Rows[rowIndex] and a specific cell using TableRow.Cells[cellIndex] .
- Populate the Table : Add paragraphs with text to the designated cells.
- Customize Appearance : Modify the table and cell styles through the Table.TableFormat and TableCell.CellFormat properties.
The following code demonstrates how to add a teble when creating Word documents in Python:
# Add a table
table = section.AddTable(True)

# Specify table data
header_data = ["Header 1", "Header 2", "Header 3"]
row_data = [["Row 1, Col 1", "Row 1, Col 2", "Row 1, Col 3"],
            ["Row 2, Col 1", "Row 2, Col 2", "Row 2, Col 3"]]

# Set the row number and column number of table
table.ResetCells(len(row_data) + 1, len(header_data))

# Set the width of table
table.PreferredWidth = PreferredWidth(WidthType.Percentage, int(100))

# Get header row
headerRow = table.get_Item(0)
headerRow.IsHeader = True
headerRow.Height = 23
headerRow.RowFormat.BackColor = Color.get_DarkBlue()  # Header color

# Fill the header row with data and set the text formatting
for i in range(len(header_data)):
    headerRow.get_Item(i).CellFormat.VerticalAlignment = VerticalAlignment.Middle
    paragraph = headerRow.get_Item(i).AddParagraph()
    paragraph.Format.HorizontalAlignment = HorizontalAlignment.Center
    txtRange = paragraph.AppendText(header_data[i])
    txtRange.CharacterFormat.Bold = True
    txtRange.CharacterFormat.FontSize = 15
    txtRange.CharacterFormat.TextColor = Color.get_White()  # White text color

# Fill the rest rows with data and set the text formatting
for r in range(len(row_data)):
    dataRow = table.Rows.get_Item(r + 1)
    dataRow.Height = 20
    dataRow.HeightType = TableRowHeightType.Exactly

    for c in range(len(row_data[r])):
        dataRow.Cells[c].CellFormat.VerticalAlignment = VerticalAlignment.Middle
        paragraph = dataRow.Cells[c].AddParagraph()
        paragraph.Format.HorizontalAlignment = HorizontalAlignment.Center
        txtRange = paragraph.AppendText(row_data[r][c])
        txtRange.CharacterFormat.FontSize = 13

# Alternate row color
for j in range(1, table.Rows.Count):
    if j % 2 == 0:
        row2 = table.Rows[j]
        for f in range(row2.Cells.Count):
            row2.Cells[f].CellFormat.BackColor = Color.get_LightGray()  # Alternate row color

# Set the border of table
table.TableFormat.Borders.BorderType = BorderStyle.Single
table.TableFormat.Borders.LineWidth = 1.0
table.TableFormat.Borders.Color = Color.get_Black()
You may also like: How to Create Tables in Word Documents in Python
Step 5: Add Numbered or Bulleted Lists
In this step, we create and apply both numbered and bulleted lists to enhance the document's organization. Spire.Doc offers the ListStyle class to define and manage different types of lists with customizable formatting options. Once created, these styles can be applied to any paragraph in the document, ensuring a consistent look across all list items.
Steps for generating numbered/bulleted lists in Word:
- Define the List Style : Initialize a ListStyle for the numbered or bulleted list, specifying properties such as name, pattern type, and text position.
- Add the List Style to Document : Use the Document.ListStyles.Add() method to incorporate the new list style into the document's styles collection.
- Create List Items : For each item, create a paragraph and apply the corresponding list style using the Paragraph.ListFormat.ApplyStyle() method.
- Format Text Properties : Adjust font size and type for each item to ensure consistency and readability.
Below is the code to generate numbered and bulleted lists:
# Create a numbered list style
listStyle = ListStyle(doc, ListType.Numbered)
listStyle.Name = "numberedList"
listStyle.Levels[0].PatternType = ListPatternType.Arabic
listStyle.Levels[0].TextPosition = 60;
doc.ListStyles.Add(listStyle)

# Create a numbered list
for item in ["First item", "Second item", "Third item"]:
    paragraph = section.AddParagraph()
    textRange = paragraph.AppendText(item)
    textRange.CharacterFormat.FontSize = 13
    textRange.CharacterFormat.FontName = "Times New Roman"
    paragraph.ListFormat.ApplyStyle("numberedList")

# Create a bulleted list style
listStyle = ListStyle(doc, ListType.Bulleted)
listStyle.Name = "bulletedList"
listStyle.Levels[0].BulletCharacter = "\u00B7"
listStyle.Levels[0].CharacterFormat.FontName = "Symbol"
listStyle.Levels[0].TextPosition = 20
doc.ListStyles.Add(listStyle)

# Create a bulleted list
for item in ["Bullet item one", "Bullet item two", "Bullet item three"]:
    paragraph = section.AddParagraph()
    textRange = paragraph.AppendText(item)
    textRange.CharacterFormat.FontSize = 13
    textRange.CharacterFormat.FontName = "Times New Roman"
paragraph.ListFormat.ApplyStyle("bulletedList")
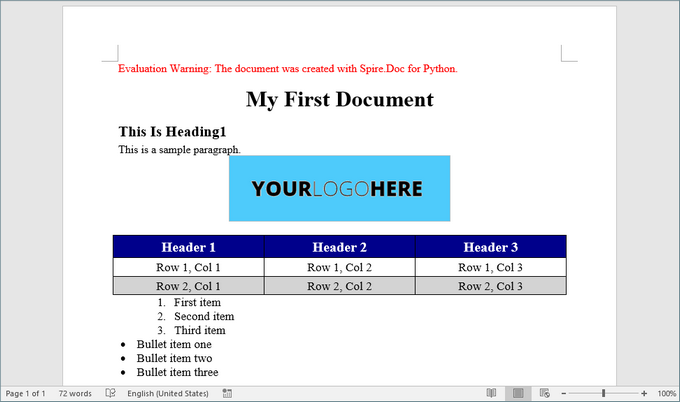
Here’s a screenshot of the Word document created using the code snippets provided above:
Best Practices for Word Document Creation in Python
- Reuse Styles : Define paragraph and list styles upfront to maintain consistency.
- Modular Code : Break document generation into functions (e.g., add_heading(), insert_table()) for reusability.
- Error Handling : Validate file paths and inputs to avoid runtime errors.
- Performance Optimization: Dispose of document objects (doc.Dispose()) to free resources.
- Use Templates : For complex documents, create MS Word templates with placeholders and replace them programmatically to save development time.
By implementing these practices, you can streamline document automation, reduce manual effort, and ensure professional-quality outputs.
FAQs
Q1: Does Spire.Doc support adding headers and footers to a Word document?
Yes, you can add and customize headers and footers, including page numbers, images, and custom text.
Q2. Can I generate Word documents on a server without Microsoft Office installed?
Yes, Spire.Doc works without Office dependencies, making it ideal for server-side automation.
Q3: Can I create Word documents from a template using Spire.Doc?
Of course, you can. Refer to the tutorial: Create Word Documents from Templates with Python
Q4: Can I convert Word documents to other formats using Spire.Doc?
Yes, Spire.Doc supports converting Word documents to various formats, including PDF, HTML, and plain text.
Q5. Can Spire.Doc edit existing Word documents?
Yes, Spire.Doc supports reading, editing, and saving DOCX/DOC files programmatically. Check out this documentation: How to Edit or Modify Word Documents in Pyhton
Conclusion
In this article, we've explored how to create Word documents in Python using the Spire.Doc library, highlighting its potential to enhance productivity while enabling the generation of highly customized and professional documents. By following the steps outlined in this guide, you can fully leverage Spire.Doc, making your document creation process both efficient and straightforward.
As you implement best practices and delve into the library's extensive functionalities, you'll discover that automating document generation significantly reduces manual effort, allowing you to concentrate on more critical tasks. Embrace the power of Python and elevate your document creation capabilities today!

Plain text (.txt) files are simple and widely used, but they lack formatting and structure. If you need to enhance a TXT file with headings, fonts, tables, or images, converting it to a Word (.docx) file is a great solution.
In this tutorial, you'll learn how to convert a .txt file to a .docx Word document in Java using Spire.Doc for Java — a powerful library for Word document processing.
Why choose Spire.Doc for Java:
- The converted Word document preserves the line breaks and content from the TXT file.
- You can further modify fonts, add styles, or insert images using Spire.Doc's rich formatting APIs.
- Supported various output formats, including converting Word to PDF, Excel, TIFF, PostScript, etc.
Prerequisites
To convert TXT to Word with Spire.Doc for Java smoothly, you should download it from its official download page and add the Spire.Doc.jar file as a dependency in your Java program.
If you are using Maven, you can easily import the JAR file by adding the following code to your project's pom.xml file:
<repositories>
    <repository>
        <id>com.e-iceblue</id>
        <name>e-iceblue</name>
        <url>https://repo.e-iceblue.com/nexus/content/groups/public/</url>
    </repository>
</repositories>
<dependencies>
    <dependency>
        <groupId>e-iceblue</groupId>
        <artifactId>spire.doc</artifactId>
        <version>13.6.2</version>
    </dependency>
</dependencies>
Steps to Convert TXT to Word in Java
Now let's take a look at how to implement it in code. With Spire.Doc for Java, the process is straightforward. You can complete the conversion with just a few lines — no need for manual formatting or additional dependencies.
To help you better understand the code:
- Document is the core class that acts as an in-memory representation of a Word document.
- loadFromFile() uses internal parsers to read .txt content and wrap it into a single Word section with default font and margins.
- When saveToFile() is called, Spire.Doc automatically converts the plain text into a .docx file by generating a structured Word document in the OpenXML format.
Below is a step-by-step code example to help you get started quickly:
import com.spire.doc.Document;
import com.spire.doc.FileFormat;

public class ConvertTextToWord {

    public static void main(String[] args) {

        // Create a Text object
        Document txt = new Document();

        // Load a Word document
        txt.loadFromFile("C:\\Users\\Administrator\\Desktop\\Input.txt");

        // Save the document to Word
        txt.saveToFile("ToWord.docx", FileFormat.Docx);

        // Dispose resources
        doc.dispose();
    }
}
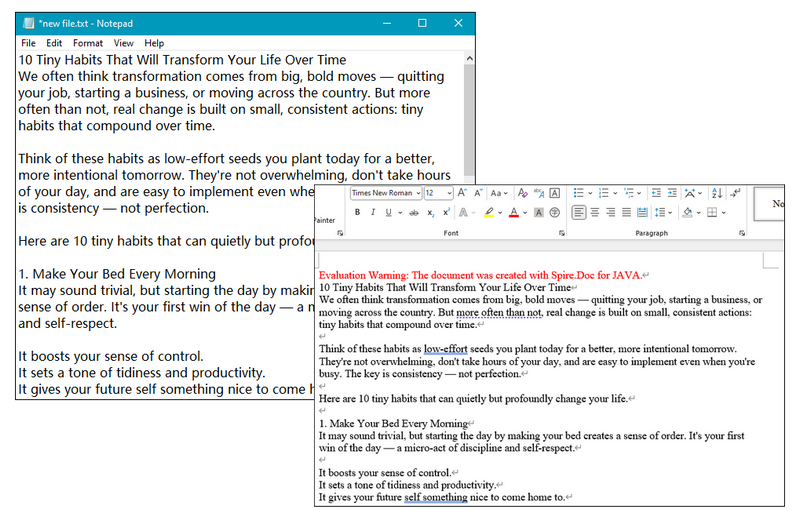
RESULT:
Tip:
After converting TXT files to DOC/DOCX, you can further customize the document's formatting as needed. To simplify this process, Spire.Doc for Java provides built-in support for editing text properties such as changing font color, inserting footnote, adding text and image watermark, etc.
How to Convert Word to TXT with Java
Except for TXT to Word conversion, Spire.Doc for Java also supports converting DOC/DOCX files to TXT format, making it easy to extract plain text from richly formatted Word documents. This functionality is especially useful when you need to strip out styling and layout to work with clean, raw content — such as for text analysis, search indexing, archiving, or importing into other systems that only support plain text.
Simply copy the code below and run the code to manage conversion:
import com.spire.doc.Document;
import com.spire.doc.FileFormat;

public class ConvertWordtoText {

    public static void main(String[] args) {

        // Create a Doc object
        Document doc = new Document();

        // Load a Word document
        doc.loadFromFile("C:\\Users\\Administrator\\Desktop\\Input.doc");

        // Save the document to Word
        doc.saveToFile("ToText.txt", FileFormat.Txt);

        // Dispose resources
        doc.dispose();
    }
}
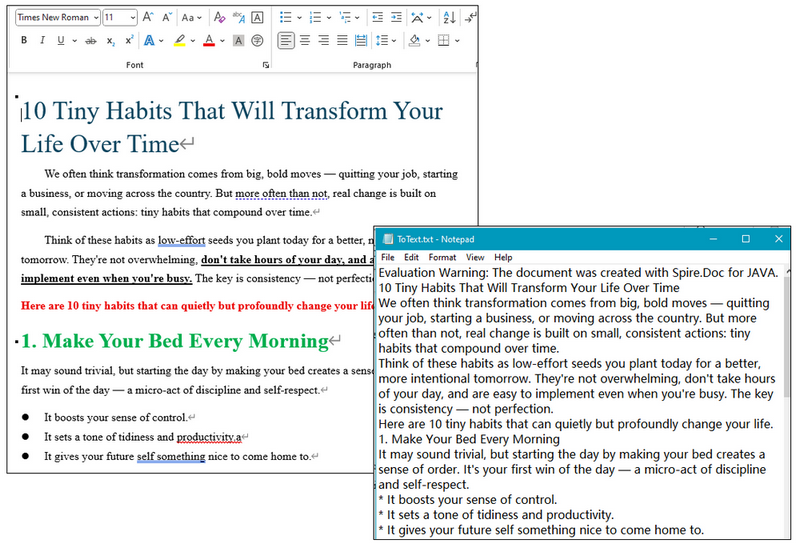
RESULT:
Get a Free License
To remove evaluation watermarks and unlock full features, you can request a free 30-day license.
Conclusion
With Spire.Doc for Java, converting TXT to Word is fast, accurate, and doesn't require Microsoft Word to be installed. This is especially useful for Java developers working on reporting, document generation, or file conversion tools. Don't hesitate and give it a try now.
