
Knowledgebase (2337)
Children categories
When printing a PDF, ensuring the content appears as intended is crucial. Depending on your needs, you may want to print the document at the actual size to maintain the original dimensions or scale it to fit the entire page for a better presentation.

To accommodate different printing needs, Spire.PDF for .NET provides flexible printing options that allow developers to control the output easily. This article will demonstrate how to print a PDF either at the actual size or fit to page in C# using the Spire.PDF for .NET library.
- Print a PDF to Fit the Page Size in C#
- Print a PDF at the Actual Size in C#
- Print a PDF at the Actual Size on Custom-Sized Paper
Install Spire.PDF for .NET
To begin with, you need to add the DLL files included in the Spire.PDF for.NET package as references in your .NET project. The DLLs files can be either downloaded from this link or installed via NuGet.
PM> Install-Package Spire.PDF
Print a PDF to Fit the Page Size in C#
When printing a PDF to fit the page, the content is automatically scaled to match the dimensions of the paper. This ensures that the document fits within the printed area, regardless of its original size.
To fit the content to the page, you can use the PdfDocument.PrintSettings.SelectSinglePageLayout(PdfSinglePageScalingMode pageScalingMode, bool autoPortraitOrLandscape) method. The detailed steps are as follows.
- Create an instance of the PdfDocument class.
- Load the PDF file using the PdfDocument.LoadFromFile() method.
- Configure print settings to scale the PDF to fit the page size for printing using the PdfDocument.PrintSettings.SelectSinglePageLayout(PdfSinglePageScalingMode pageScalingMode, bool autoPortraitOrLandscape) method.
- Call the PdfDocument.Print() method to print the PDF file.
- C#
using Spire.Pdf;
using Spire.Pdf.Print;

namespace PrintPdfToFitPageSize
{
    internal class Program
    {
        static void Main(string[] args)
        {
            // Create an instance of the PdfDocument class
            PdfDocument pdf = new PdfDocument();
            // Load the specified PDF file into the PdfDocument object
            pdf.LoadFromFile("Sample.pdf");

            // Configure print settings to scale the PDF to fit the page size for printing
            pdf.PrintSettings.SelectSinglePageLayout(PdfSinglePageScalingMode.FitSize, false);
            // Execute the print command to print the loaded PDF document
            pdf.Print();


        }
    }
}
Print a PDF at the Actual Size in C#
When printing a PDF at the actual size, the original document dimensions are preserved without scaling. This ensures that the printed output matches the PDF's defined measurements.
To print a PDF at its actual size, you can also use the PdfDocument.PrintSettings.SelectSinglePageLayout(PdfSinglePageScalingMode pageScalingMode, bool autoPortraitOrLandscape) method. The detailed steps are as follows.
- Create an instance of the PdfDocument class.
- Load the PDF file using the PdfDocument.LoadFromFile() method.
- Configure print settings to print the PDF at its actual size without scaling using the PdfDocument.PrintSettings.SelectSinglePageLayout(PdfSinglePageScalingMode pageScalingMode, bool autoPortraitOrLandscape) method.
- Call the PdfDocument.Print() method to print the PDF file.
- C#
using Spire.Pdf;
using Spire.Pdf.Print;
using System.Drawing.Printing;

namespace PrintPdfAtActualSize
{
    internal class Program
    {
        static void Main(string[] args)
        {
            // Create a new instance of the PdfDocument class
            PdfDocument pdf = new PdfDocument();
            // Load the PDF file into the PdfDocument object
            pdf.LoadFromFile("Sample.pdf");

            // Set paper margins as 0
            pdf.PrintSettings.SetPaperMargins(0, 0, 0, 0);

            // Configure print settings to print the PDF at its actual size without scaling
            pdf.PrintSettings.SelectSinglePageLayout(PdfSinglePageScalingMode.ActualSize, false);
            // Execute the print command to print the loaded PDF document
            pdf.Print();
        }
    }
}
Print a PDF at the Actual Size on Custom-Sized Paper
In some cases, you may need to print a PDF at its actual size on a specific size of paper. Spire.PDF allows you to define a custom paper size using the PaperSize class and then you can assign it to the print settings of the document using the PdfDocument.PrintSettings.PaperSize property. The detailed steps are as follows.
- Create an instance of the PdfDocument class.
- Load the PDF file using the PdfDocument.LoadFromFile() method.
- Define a custom paper size for printing using the PaperSize class.
- Assign the custom paper size to the print settings of the file using the using the PdfDocument.PrintSettings.PaperSize property.
- Configure print settings to print the PDF at its actual size without scaling using the PdfDocument.PrintSettings.SelectSinglePageLayout(PdfSinglePageScalingMode pageScalingMode, bool autoPortraitOrLandscape) method.
- Call the PdfDocument.Print() method to print the PDF file.
- C#
using Spire.Pdf;
using Spire.Pdf.Print;
using System.Drawing.Printing;

namespace PrintPdfOnCustomSizedPaper
{
    internal class Program
    {
        static void Main(string[] args)
        {
            // Create a new instance of the PdfDocument class
            PdfDocument pdf = new PdfDocument();
            // Load the specified PDF file into the PdfDocument object
            pdf.LoadFromFile("Sample.pdf");

            //// Define an A3 paper size for printing
            //PaperSize paperSize = new PaperSize
            //{
            //    // Set paper size to A3
            //    RawKind = (int)PaperKind.A3
            //};

            // Define a custom paper size for printing
            PaperSize paperSize = new PaperSize
            {
                // Set the width of the paper
                Width = 283 * 100, //inch*100
                // Set the height of the paper
                Height = 826 * 100, //inch*100
                // Set paper size to custom
                RawKind = (int)PaperKind.Custom
            };

            // Assign the custom paper size to the print settings of the PdfDocument
            pdf.PrintSettings.PaperSize = paperSize;

            // Set paper margins as 0
            pdf.PrintSettings.SetPaperMargins(0, 0, 0, 0);

            // Set print settings to print the PDF at its actual size without scaling
            pdf.PrintSettings.SelectSinglePageLayout(PdfSinglePageScalingMode.ActualSize, false);
            // Execute the print command to print the loaded PDF document
            pdf.Print();
        }
    }
}
Apply for a Temporary License
If you'd like to remove the evaluation message from the generated documents, or to get rid of the function limitations, please request a 30-day trial license for yourself.
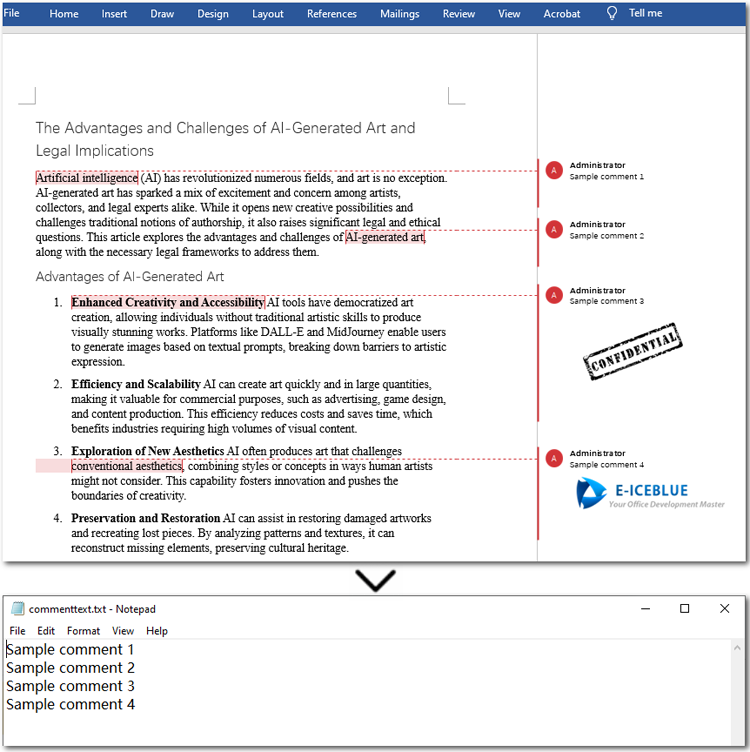
Comments in Word documents often hold valuable information, such as feedback, suggestions, and notes. Unfortunately, editors like Microsoft Word lack a built-in feature for batch-extracting comments, leaving users to rely on cumbersome methods like copying and pasting or using VBA macros. To simplify this process, this article demonstrates how to use Java to extract comments from Word documents with Spire.Doc for Java. With a streamlined approach, you can easily retrieve all comment text and images in a single operation—quickly, efficiently, and error-free. Let's explore how it’s done.
- Extract Comments Text from Word Documents in Java
- Extract Comment Images from Word Documents in Java
Install Spire.Doc for Java
First of all, you're required to add the Spire.Doc.jar file as a dependency in your Java program. The JAR file can be downloaded from this link. If you use Maven, you can easily import the JAR file in your application by adding the following code to your project's pom.xml file.
<repositories>
    <repository>
        <id>com.e-iceblue</id>
        <name>e-iceblue</name>
        <url>https://repo.e-iceblue.com/nexus/content/groups/public/</url>
    </repository>
</repositories>
<dependencies>
    <dependency>
        <groupId>e-iceblue</groupId>
        <artifactId>spire.doc</artifactId>
        <version>14.6.0</version>
    </dependency>
</dependencies>
Extract Comments Text from Word Documents in Java
Using Java to extract all comment text is easy and quick. Firstly, loop through all comments in the Word file and get the current comment using the Document.getComments().get() method offered by Spire.Doc for Java. Then iterate through all paragraphs in the comment body and get the current paragraph. Finally, text from comment paragraphs will be extracted using the Paragraph.getText() method. Let's dive into the detailed steps.
Steps to extract comment text from Word files:
- Create an object of Document class.
- Load a Word document from files using Document.loadFromFile() method.
- Iterate through all comments in the Word file.
- Get the current comment with Document.getComments().get() method.
- Loop through paragraphs in the comment and access the current paragraph through Comment.getBody().getParagraphs().get() method.
- Extract the text of the paragraphs in comments by calling Paragraph.getText() method.
- Get the current comment with Document.getComments().get() method.
- Save the extracted comments.
The code example below demonstrates how to extract all comment text from a Word document:
- Java
import com.spire.doc.*;
import com.spire.doc.documents.*;
import com.spire.doc.fields.*;
import java.io.*;

public class ExtractComments {
   public static void main(String[] args) throws IOException {

// Create a new Document instance
Document doc = new Document();

// Load the document from the specified input file
       doc.loadFromFile("/comments.docx");

// Iterate over each comment in the document
       for (int i = 0; i < doc.getComments().getCount(); i++) {
// Get the comment at the current index
Comment comment = doc.getComments().get(i);

// Iterate over each paragraph in the comment's body
           for (int j = 0; j < comment.getBody().getParagraphs().getCount(); j++) {
// Get the paragraph at the current index
Paragraph para = comment.getBody().getParagraphs().get(j);

// Get the text of the paragraph and append a line break
String result = para.getText() + "\r\n";

// Write the extracted comment a text file
writeStringToTxt(result, "/commenttext.txt");
           }
                   }

                   // Dispose of the document resources
                   doc.dispose();
   }

// Custom method to write a string to a text file
public static void writeStringToTxt(String content, String txtFileName) throws IOException {
   FileWriter fWriter = new FileWriter(txtFileName, true);
   try {
       // Write the content to the text file
       fWriter.write(content);
   } catch (IOException ex) {
       ex.printStackTrace();
   } finally {
       try {
           // Flush and close the FileWriter
           fWriter.flush();
           fWriter.close();
       } catch (IOException ex) {
           ex.printStackTrace();
       }
   }
}
}
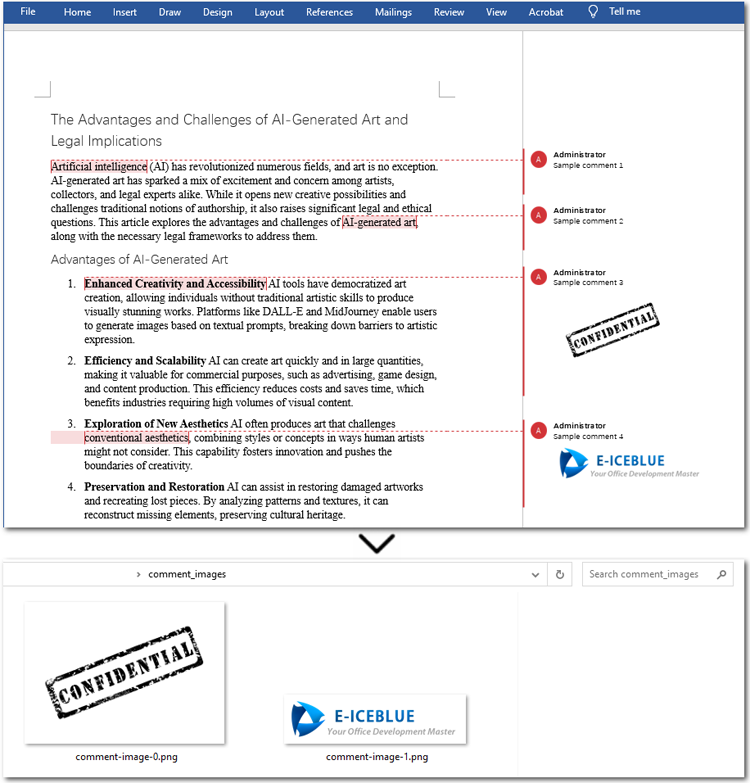
Extract Comments Images from Word Documents with Java
Sometimes, comments in a document may contain not only text but also images. With the methods provided by Spire.Doc for Java, you can easily extract all images from comments in bulk. The process is similar to extracting text: you need to iterate through each comment, the paragraphs in the comment body, and the child objects of each paragraph. Then, check if the object is a DocPicture. If it is, use the DocPicture.getImageBytes() method to extract the image.
Steps to extract comment images from Word documents:
- Create an instance of Document class.
- Specify the file path to load a source Word file through Document.loadFromFile() method.
- Create a list to store extracted data.
- Loop through comments in the Word file and get the current comment using Document.getComments().get() method.
- Loop through all paragraphs in a comment, and get the current paragraph with Comment.getBody().getParagraphs().get() method.
- Iterate through each child object of a paragraph, and access a child object through Paragraph.getChildObjects().get() method.
- Check if the child object is DocPicture, if it is, get the image data using DocPicture.getImageBytes() method.
- Loop through all paragraphs in a comment, and get the current paragraph with Comment.getBody().getParagraphs().get() method.
- Add the image data to the list and save it as image files.
Here is the code example of extracting all comment images from a Word file:
- Java
import com.spire.doc.*;
import com.spire.doc.documents.*;
import com.spire.doc.fields.*;
import java.io.*;
import java.nio.file.*;
import java.util.ArrayList;
import java.util.List;

public class ExtractCommentImages {
   public static void main(String[] args) {
       // Create an object of the Document class
       Document document = new Document();

       // Load a Word document with comments
       document.loadFromFile("/comments.docx");

       // Create a list to store the extracted image data
       List<byte[]> images = new ArrayList<>();

       // Loop through the comments in the document
       for (int i = 0; i < document.getComments().getCount(); i++) {
           Comment comment = document.getComments().get(i);

           // Iterate through the paragraphs in the comment body
           for (int j = 0; j < comment.getBody().getParagraphs().getCount(); j++) {
               Paragraph paragraph = comment.getBody().getParagraphs().get(j);

               // Loop through the child objects in the paragraph
               for (int k = 0; k < paragraph.getChildObjects().getCount(); k++) {
                   DocumentObject obj = paragraph.getChildObjects().get(k);

                   // Check if it is a picture
                   if (obj instanceof DocPicture) {
                       DocPicture picture = (DocPicture) obj;

                       // Get the image date and add it to the list
                       images.add(picture.getImageBytes());
                   }
               }
           }
       }

       // Specify the output file path
       String outputDir = "/comment_images/";
       new File(outputDir).mkdirs();

       // Save the image data as image files
       for (int i = 0; i < images.size(); i++) {
           String fileName = String.format("comment-image-%d.png", i);
           Path filePath = Paths.get(outputDir, fileName);
           try (FileOutputStream fos = new FileOutputStream(filePath.toFile())) {
               fos.write(images.get(i));
           } catch (IOException e) {
               e.printStackTrace();
           }
       }
   }
}
Apply for a Temporary License
If you'd like to remove the evaluation message from the generated documents, or to get rid of the function limitations, please request a 30-day trial license for yourself.
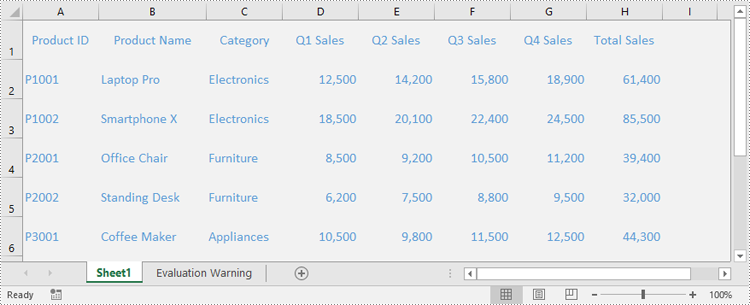
Applying styles is one of the simplest ways to enhance the professionalism and readability of Excel spreadsheets. Excel provides a wide range of built-in styles that allow users to quickly format cells, ranges, or worksheets. Additionally, users can create custom styles to specify fonts, colors, borders, number formats, and more, tailored to their individual preferences. Whether you're designing professional reports, sales presentations, or project management plans, knowing how to use styles effectively helps make data more visually appealing and easier to understand.
In this guide, you will learn how to apply styles to cells or worksheets in Excel in Python using Spire.XLS for Python.
- Apply a Built-in Style to Cells in Excel in Python
- Apply a Custom Style to Cells in Excel in Python
- Apply a Custom Style to a Worksheet in Excel in Python
Install Spire.XLS for Python
This scenario requires Spire.XLS for Python and plum-dispatch v1.7.4. They can be easily installed in your Windows through the following pip command.
pip install Spire.XLS
If you are unsure how to install, please refer to this tutorial: How to Install Spire.XLS for Python on Windows
Apply a Built-in Style to Cells in Excel in Python
Spire.XLS for Python offers the CellRange.BuiltInStyle property, which enables developers to apply built-in styles, such as Title, Heading 1, and Heading 2 to individual cells or ranges in Excel. The detailed steps are as follows.
- Create an object of the Workbook class.
- Load an Excel file using the Workbook.LoadFromFile() method.
- Get a specific worksheet by its index using the Workbook.Worksheets[index] property.
- Get the desired cell or range of cells using the Worksheet.Range[] property.
- Apply a built-in style to the cell or range of cells using the CellRange.BuiltInStyle property.
- Save the resulting file using the Workbook.SaveToFile() method.
- Python
from spire.xls import *
from spire.xls.common import *

# Create an object of the Workbook class
workbook = Workbook()
# Load the Excel file
workbook.LoadFromFile("Sample.xlsx")

# Get the first sheet
sheet = workbook.Worksheets[0]

# Get the desired cell range
range = sheet.Range["A1:H1"]
# Apply a built-in style to the cell range
range.BuiltInStyle = BuiltInStyles.Heading2

# Save the resulting file
workbook.SaveToFile("ApplyBuiltinStyle.xlsx", ExcelVersion.Version2016)
workbook.Dispose()
Apply a Custom Style to Cells in Excel in Python
Developers can use the Workbook.Styles.Add() method to create a custom style, which can then be applied to individual cells or ranges using the CellRange.Style property. The detailed steps are as follows.
- Create an object of the Workbook class.
- Load an Excel file using the Workbook.LoadFromFile() method.
- Get a specific worksheet by its index using the Workbook.Worksheets[index] property.
- Get the desired cell or range of cells using the Worksheet.Range[] property.
- Add a custom style to the workbook using the Workbook.Styles.Add() method.
- Define the formatting, such as the font size, font color, text alignment, cell borders and cell background color, using the properties of the CellStyle class.
- Apply the custom style to the cell or range of cells using the CellRange.Style property.
- Save the resulting file using the Workbook.SaveToFile() method.
- Python
from spire.xls import *
from spire.xls.common import *

# Create an object of the Workbook class
workbook = Workbook()
# Load the Excel file
workbook.LoadFromFile("Sample.xlsx")

# Get the first sheet
sheet = workbook.Worksheets[0]

# Get the desired cell range
range = sheet.Range["A1:H1"]

# Add a custom style to the workbook
style = workbook.Styles.Add("CustomCellStyle")
# Set the font size
style.Font.Size = 13
# Set the font color
style.Font.Color = Color.get_White()
# Bold the text
style.Font.IsBold = True
# Set the vertical text alignment
style.VerticalAlignment = VerticalAlignType.Bottom
# Set the horizontal text alignment
style.HorizontalAlignment = HorizontalAlignType.Left
# Set the bottom border color
style.Borders[BordersLineType.EdgeBottom].Color = Color.get_GreenYellow()
# Set the bottom border type
style.Borders[BordersLineType.EdgeBottom].LineStyle = LineStyleType.Medium
# Set the background color
style.Color = Color.get_CornflowerBlue()

# Apply the custom style to the cell range
range.Style = style

# Save the resulting file
workbook.SaveToFile("ApplyCustomStyle.xlsx", ExcelVersion.Version2016)
workbook.Dispose()
Apply a Custom Style to a Worksheet in Excel in Python
In certain cases, it may be necessary to apply a custom style to an entire worksheet rather than to specific cells or ranges. This can be accomplished using the Worksheet.ApplyStyle() method. The detailed steps are as follows.
- Create an object of the Workbook class.
- Load an Excel file using the Workbook.LoadFromFile() method.
- Get a specific worksheet by its index using the Workbook.Worksheets[index] property.
- Add a custom style to the workbook using the Workbook.Styles.Add() method.
- Define the formatting, such as the font size, font color, and cell background color, using the properties of the CellStyle class.
- Apply the custom style to the worksheet using the Worksheet.ApplyStyle() method.
- Save the resulting file using the Workbook.SaveToFile() method.
- Python
from spire.xls import *
from spire.xls.common import *

# Create an object of the Workbook class
workbook = Workbook()
# Load the Excel file
workbook.LoadFromFile("Sample.xlsx")

# Get the first sheet
sheet = workbook.Worksheets[0]

# Add a custom style to the workbook
style = workbook.Styles.Add("CustomSheetStyle")
# Set the font size
style.Font.Size = 12
# Set the font color
style.Font.Color = Color.FromRgb(91, 155, 213)
# Set the cell background color
style.Color = Color.FromRgb(242, 242, 242)

# Apply the custom style to the worksheet
sheet.ApplyStyle(style)

# Save the resulting file
workbook.SaveToFile("ApplyCustomStyleToSheet.xlsx", ExcelVersion.Version2016)
workbook.Dispose()
Apply for a Temporary License
If you'd like to remove the evaluation message from the generated documents, or to get rid of the function limitations, please request a 30-day trial license for yourself.
