
Knowledgebase (2337)
Children categories
Formatting plays an important role in making Excel spreadsheets easier to read, analyze, and present. Whether you are generating reports, invoices, financial statements, or dashboards, raw data often needs proper styling before it can be shared with end users.
In C#, Excel formatting tasks may include changing fonts, applying colors, aligning content, formatting numbers and dates, adding borders, creating tables, and configuring page layouts. Performing these tasks manually can be time-consuming, especially when dealing with large volumes of spreadsheets.
Spire.XLS for .NET provides a comprehensive set of APIs for creating, editing, formatting, and converting Excel documents without requiring Microsoft Excel to be installed. In this article, you will learn how to apply various types of formatting to Excel files in C# using Spire.XLS for .NET.
Table of Contents:
- Prepare Your C# Project for Excel Formatting
- Part 1. Format Cell Appearance
- Part 2. Format Cell Values
- Part 3. Format Ranges and Layout
- Part 4. Apply Advanced Formatting
- Part 5. Format Excel Tables and Worksheets
- Part 6. Create a Professional Report Example
- Conclusion
- FAQs
Prepare Your C# Project for Excel Formatting
Spire.XLS for .NET is a powerful Excel library that enables developers to work with XLS, XLSX, XLSM, CSV, and other spreadsheet formats programmatically. Besides formatting operations, it also supports formula calculation, chart creation, pivot tables, worksheet management, printing, and file conversion.
To install Spire.XLS for .NET, run the following NuGet command:
Install-Package Spire.XLS
Before applying formatting, load an existing Excel workbook (or create a new one) and access the worksheet you want to modify. Once all formatting operations are complete, save the result to a new Excel file using the SaveToFile() method.
using Spire.Xls;
using System.Drawing;

// Create a workbook object
Workbook workbook = new Workbook();

// Load an existing Excel file
workbook.LoadFromFile("input.xlsx");

// Get a specific worksheet
Worksheet sheet = workbook.Worksheets[0];

// Apply formatting
...

// Save the result
workbook.SaveToFile("output.xlsx", ExcelVersion.Version2016);
Note: The following examples assume that the workbook has already been loaded and the worksheet object has been obtained.
Part 1. Format Cell Appearance
Cell appearance settings control how data looks inside a worksheet. Proper formatting can significantly improve readability and help users quickly identify important information.
Format Cell Fonts
Font formatting allows you to customize the visual style of cell content. Common options include font family, font size, bold, italic, underline, and font color. These settings are frequently used for report titles, section headers, and highlighted values.
CellStyle style = workbook.Styles.Add("FontStyle");

style.Font.FontName = "Calibri";
style.Font.Size = 14;
style.Font.IsBold = true;
style.Font.IsItalic = true;
style.Font.Underline = FontUnderlineType.Single;
style.Font.Color = Color.Blue;

sheet.Range["A1"].Text = "Formatted Text";
sheet.Range["A1"].Style = style;
Set Cell Background Colors
Background colors help distinguish different sections of a worksheet and draw attention to key cells. For example, you may use a colored header row or highlight summary data with a contrasting fill color.
sheet.Range["A2"].Text = "Background Color";
sheet.Range["A2"].Style.Color = Color.LightSkyBlue;
Align Cell Content
Excel provides horizontal alignment, vertical alignment, indentation, and text rotation options. Proper alignment improves the overall layout of a worksheet and makes tabular data easier to scan.
sheet.Range["B2"].Text = "Centered Text";
CellStyle style = sheet.Range["B2"].Style;

style.HorizontalAlignment = HorizontalAlignType.Center;
style.VerticalAlignment = VerticalAlignType.Center;
style.Rotation = 45;

sheet.SetRowHeight(2, 40);
sheet.SetColumnWidth(2, 20);
Add Cell Borders
Borders are useful for separating rows and columns and defining table structures. Depending on the scenario, you can apply borders to individual cells or entire ranges and customize their styles and colors.
CellRange range = sheet.Range["A4:D6"];
range.Text = "Border";

range.Style.Borders[BordersLineType.EdgeTop].LineStyle = LineStyleType.Thin;
range.Style.Borders[BordersLineType.EdgeBottom].LineStyle = LineStyleType.Thin;
range.Style.Borders[BordersLineType.EdgeLeft].LineStyle = LineStyleType.Thin;
range.Style.Borders[BordersLineType.EdgeRight].LineStyle = LineStyleType.Thin;
range.Style.Borders[BordersLineType.EdgeTop].Color = Color.Black;
Wrap Text
When cell content exceeds the available column width, wrapping text allows multiple lines to be displayed within the same cell, preventing important information from being truncated.
sheet.Range["A8"].Text = "This is a very long sentence that will automatically wrap within the cell.";

sheet.Range["A8"].Style.WrapText = true;

sheet.SetColumnWidth(1, 20);
sheet.SetRowHeight(8, 60);
Part 2. Format Cell Values
Value formatting changes how data is displayed without modifying the underlying values. This is particularly important for business and financial spreadsheets.
Format Numbers
Numeric formats can control decimal places, thousands separators, scientific notation, and other display rules. Choosing the right format improves accuracy and readability.
sheet.Range["A10"].NumberValue = 1234567.891;
sheet.Range["A10"].NumberFormat = "#,##0.00";
Format Currency
Currency formatting automatically displays monetary symbols and decimal precision according to your requirements. This is commonly used in invoices, budgets, and financial reports.
sheet.Range["A11"].NumberValue = 5999.95;
sheet.Range["A11"].NumberFormat = "$#,##0.00";
Format Dates
Date formatting allows the same date value to be displayed in different styles, such as short dates, long dates, or custom patterns. Consistent date formats make reports easier to interpret.
sheet.Range["A12"].DateTimeValue = DateTime.Now;
sheet.Range["A12"].NumberFormat = "yyyy-MM-dd";
Part 3. Format Ranges and Layout
Instead of formatting cells one by one, you can apply styles to larger worksheet areas to improve efficiency and maintain consistency.
Format Ranges
A range may contain multiple rows and columns. Applying formatting to a range ensures that all cells share the same appearance and reduces repetitive code.
CellRange range = sheet.Range["A14:D18"];

range.Style.Color = Color.LightYellow;
range.Style.Font.IsBold = true;
range.Style.HorizontalAlignment = HorizontalAlignType.Center;
Merge Cells
Merged cells are often used for report titles and section headers. After merging, the content can be centered and styled to create a more professional appearance.
sheet.Range["A20:D20"].Merge();

sheet.Range["A20"].Text = "Monthly Sales Report";
sheet.Range["A20"].Style.Font.Size = 18;
sheet.Range["A20"].Style.Font.IsBold = true;
sheet.Range["A20"].Style.HorizontalAlignment = HorizontalAlignType.Center;
Format Rows and Columns
Formatting entire rows or columns is useful when all cells in a specific area should follow the same style, such as a header row or a currency column.
sheet.Rows[21].Style.Font.IsBold = true;
sheet.Rows[21].Style.Color = Color.LightGray;

sheet.Columns[1].Style.NumberFormat = "$#,##0.00";
AutoFit Rows and Columns
AutoFit automatically adjusts row heights and column widths based on cell content. This helps prevent clipped text and improves the presentation of generated spreadsheets.
sheet.AllocatedRange.AutoFitColumns();
sheet.AllocatedRange.AutoFitRows();
Part 4. Apply Advanced Formatting
Conditional formatting enables Excel to apply styles automatically based on cell values. Instead of manually highlighting data, rules can be configured to identify trends, exceptions, or important values.
For example, you can highlight numbers above a threshold, display data bars, apply color scales, or use icon sets to visualize performance indicators. These features make large datasets easier to analyze and understand.
sheet.Range["A25"].NumberValue = 1200;
sheet.Range["A26"].NumberValue = 800;
sheet.Range["A27"].NumberValue = 1500;

XlsConditionalFormats formats = sheet.ConditionalFormats.Add();
formats.AddRange(sheet.Range["A25:A27"]);
IConditionalFormat format = formats.AddCondition();
format.FormatType = ConditionalFormatType.CellValue;
format.FirstFormula = "1000";
format.Operator = ComparisonOperatorType.Greater;
format.BackColor = Color.LightGreen;
Part 5. Format Excel Tables and Worksheets
Formatting can also be applied at the worksheet level to improve the overall structure and appearance of a workbook.
Format Excel Tables
Excel tables provide built-in styling options such as header formatting, alternating row colors, and predefined themes. Converting a data range into a table can instantly enhance readability and organization.
sheet.Range["A30"].Text = "Product";
sheet.Range["B30"].Text = "Sales";
sheet.Range["A31"].Text = "Laptop";
sheet.Range["B31"].NumberValue = 5000;
sheet.Range["A32"].Text = "Monitor";
sheet.Range["B32"].NumberValue = 2000;

IListObject table = sheet.ListObjects.Create("SalesTable", sheet.Range["A30:B32"]);
table.BuiltInTableStyle = TableBuiltInStyles.TableStyleMedium2;
Configure Page Layout
Page layout settings determine how worksheets appear when printed or exported. Common options include page orientation, margins, print areas, scaling, and repeating header rows.
Proper page setup ensures that reports look professional both on screen and on paper.
sheet.PageSetup.Orientation = PageOrientationType.Landscape;
sheet.PageSetup.LeftMargin = 0.5;
sheet.PageSetup.RightMargin = 0.5;
sheet.PageSetup.TopMargin = 0.75;
sheet.PageSetup.BottomMargin = 0.75;
sheet.PageSetup.FitToPagesWide = 1;
sheet.PageSetup.FitToPagesTall = 1;
Part 6. Create a Professional Report Example
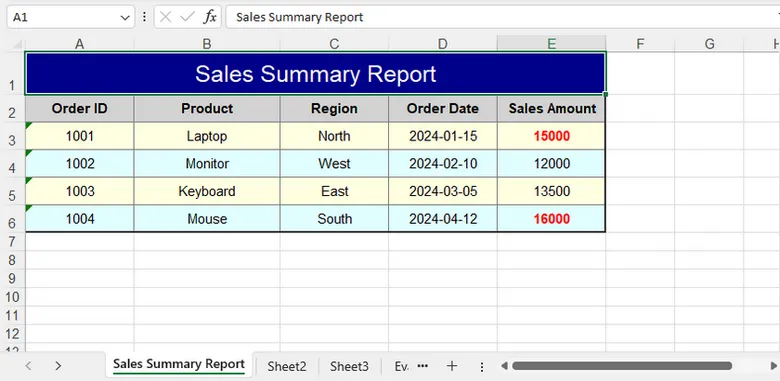
In real-world scenarios, multiple formatting techniques are often used together. A typical report may include a merged title, custom fonts, colored headers, borders, number formats, conditional formatting, and optimized page settings.
By combining these features, you can generate polished Excel documents that are ready for distribution without requiring manual editing.
using Spire.Xls;
using Spire.Xls.Core.Spreadsheet.Collections;
using Spire.Xls.Core;
using System.Drawing;

class Program
{
    static void Main()
    {
        // Create a new workbook
        Workbook workbook = new Workbook();
        Worksheet sheet = workbook.Worksheets[0];

        sheet.Name = "Sales Summary Report";

        // Title Row
        CellRange title = sheet.Range["A1:E1"];
        title.Merge();
        title.Text = "Sales Summary Report";

        title.Style.Font.FontName = "Arial";
        title.Style.Font.Size = 16;
        title.Style.Font.Color = Color.White;
        title.Style.Color = Color.DarkBlue;

        title.Style.HorizontalAlignment = HorizontalAlignType.Center;
        title.Style.VerticalAlignment = VerticalAlignType.Center;

        sheet.Rows[0].RowHeight = 30;

        // Headers
        string[] headers = { "Order ID", "Product", "Region", "Order Date", "Sales Amount" };

        for (int i = 0; i < headers.Length; i++)
        {
            CellRange cell = sheet.Range[2, i + 1];

            cell.Text = headers[i];
            cell.Style.Font.IsBold = true;
            cell.Style.Color = Color.LightGray;

            cell.Style.Borders[BordersLineType.EdgeBottom].LineStyle = LineStyleType.Medium;
            cell.Style.Borders[BordersLineType.EdgeBottom].Color = Color.DarkBlue;
        }

        // Data
        object[][] data =
        {
            new object[] { 1001, "Laptop", "North", "2024-01-15", 15000 },
            new object[] { 1002, "Monitor", "West", "2024-02-10", 12000 },
            new object[] { 1003, "Keyboard", "East", "2024-03-05", 13500 },
            new object[] { 1004, "Mouse", "South", "2024-04-12", 16000 }
        };

        for (int r = 0; r < data.Length; r++)
        {
            for (int c = 0; c < data[r].Length; c++)
            {
                CellRange cell = sheet.Range[r + 3, c + 1];
                var value = data[r][c];

                if (c == 3) // Order Date
                {
                    cell.DateTimeValue = DateTime.Parse(value.ToString());
                    cell.NumberFormat = "yyyy-MM-dd";
                }
                else if (c == 4) // Sales Amount
                {
                    cell.NumberValue = Convert.ToDouble(value);
                    cell.NumberFormat = "$#,##0.00";
                }
                else
                {
                    cell.Text = value.ToString();
                }

                // Alternate row colors
                cell.Style.Color = (r % 2 == 0)
                    ? Color.LightYellow
                    : Color.LightCyan;
            }
        }

        // Borders
        CellRange range = sheet.Range["A2:E6"];

        range.BorderAround(LineStyleType.Medium, Color.Black);
        range.BorderInside(LineStyleType.Thin, Color.Gray);

        // Auto Fit Columns
        for (int i = 1; i <= 5; i++)
        {
            sheet.AutoFitColumn(i);
        }

        // Conditional Formatting
        XlsConditionalFormats formats = sheet.ConditionalFormats.Add();
        formats.AddRange(sheet.Range["E3:E6"]);

        IConditionalFormat condition = formats.AddCondition();
        condition.FormatType = ConditionalFormatType.CellValue;
        condition.Operator = ComparisonOperatorType.Greater;
        condition.FirstFormula = "14000";

        condition.FontColor = Color.Red;
        condition.IsBold = true;

        // Align + Layout Formatting
        CellRange all = sheet.AllocatedRange;

        for (int r = 1; r < all.RowCount; r++)
        {
            all.Rows[r].HorizontalAlignment = HorizontalAlignType.Center;
           // all.Rows[r].VerticalAlignment = VerticalAlignType.Center;
            all.Rows[r].RowHeight = 20;
        }

        for (int c = 0; c < all.ColumnCount; c++)
        {
            all.Columns[c].ColumnWidth = (c == 1) ? 19 : 14;
        }

        // Save
        workbook.SaveToFile("SalesSummaryReport.xlsx", ExcelVersion.Version2016);
        workbook.Dispose();
    }
}
Output:
Conclusion
Formatting is an essential step in creating professional Excel documents. With Spire.XLS for .NET, you can efficiently customize cell appearance, control number and date formats, manage worksheet layouts, apply conditional formatting, and build visually appealing reports entirely in C#.
By using the techniques covered in this guide, you can automate Excel formatting tasks and generate polished spreadsheets suitable for business, reporting, and data analysis scenarios.
FAQs
Can I format Excel files without Microsoft Excel installed?
Yes. Spire.XLS for .NET works independently of Microsoft Excel and can create, edit, and format spreadsheets directly through code.
Does formatting change the actual cell values?
No. Most formatting operations only affect how data is displayed. The underlying values remain unchanged unless explicitly modified.
Can I apply the same style to multiple cells at once?
Yes. Styles can be applied to ranges, rows, columns, or entire worksheets, making it easy to maintain consistent formatting.
Does Spire.XLS support conditional formatting?
Yes. The library supports common conditional formatting features, including highlighting rules, data bars, color scales, and icon sets.
Which Excel formats are supported?
Spire.XLS supports XLS, XLSX, XLSM, CSV, and several other spreadsheet formats for both reading and writing.
How to Convert HTML to Markdown in C# (File, String & Stream)
2026-05-29 09:55:41 Written by alice yang
HTML is widely used for web pages, online articles, and rich text content, while Markdown (.md) is often preferred for documentation, technical writing, and text-based publishing. If you need to reuse HTML content in a Markdown-based workflow, converting it manually can be time-consuming and error-prone.
In this tutorial, we’ll show you how to convert HTML to Markdown in C# step-by-step using Spire.Doc for .NET. You’ll learn how to convert HTML files, HTML strings, streams, and multiple HTML files in batch.
Table of Contents
- When Do You Need to Convert HTML to Markdown?
- Install C# HTML to Markdown Library
- Convert an HTML File to Markdown in C#
- Convert HTML Strings to Markdown in C#
- Convert HTML Stream to Markdown in C#
- Batch Convert Multiple HTML Files
- What HTML Elements Can Be Converted to Markdown?
- Troubleshooting Common HTML to Markdown Issues
When Do You Need to Convert HTML to Markdown?
Converting HTML to Markdown is useful when you want to reuse web-based or rich-text content in a cleaner, text-friendly format. Common scenarios include:
- Moving HTML articles or CMS content into Markdown-based documentation systems.
- Preparing content for GitHub, static site generators, or developer portals.
- Converting rich text editor output into editable Markdown files.
- Simplifying HTML pages for version control, review, or long-term maintenance.
- Exporting help center articles, product descriptions, or blog content as .md files.
Install C# HTML to Markdown Library
To convert HTML to Markdown programmatically, you need to add Spire.Doc for .NET to your project. This standalone document processing library allows you to parse HTML and export it to clean Markdown without requiring Microsoft Word or Microsoft Office interop assemblies on your server.
Method 1: Install via NuGet Package Manager
Run this command in your NuGet Package Manager Console:
Install-Package Spire.Doc
Method 2: Download and Reference DLLs Manually
If your development environment is offline or you prefer not to use NuGet, you can manually download and reference the library:
- Download & Unzip: Get the Spire.Doc for .NET package from the official download page and extract it.
- Add Reference: In the Solution Explorer of Visual Studio, right-click Dependencies (or References) > Add Project Reference (or Add Reference) > Browse and select the
Spire.Doc.dllthat matches your target .NET Framework or .NET Core version.
Note: Markdown support is available in Spire.Doc for .NET version 12.3.12 or later.
Convert an HTML File to Markdown in C#
If your HTML content is stored as a local .html or .htm file, you can convert it directly using the Document object. This approach is ideal for processing static web pages, documentation exports, or offline help articles.
C# Code Example
using Spire.Doc;
using Spire.Doc.Documents;

namespace ConvertHtmlFileToMarkdown
{
    class Program
    {
        static void Main(string[] args)
        {
            // Initialize a Document instance within a using statement
            using (Document document = new Document())
            {
                // Load the local HTML file
                document.LoadFromFile("input.html", FileFormat.Html, XHTMLValidationType.None);

                // Export the HTML file to a Markdown file
                document.SaveToFile("output.md", FileFormat.Markdown);
            }
        }
    }
}
How the Code Works:
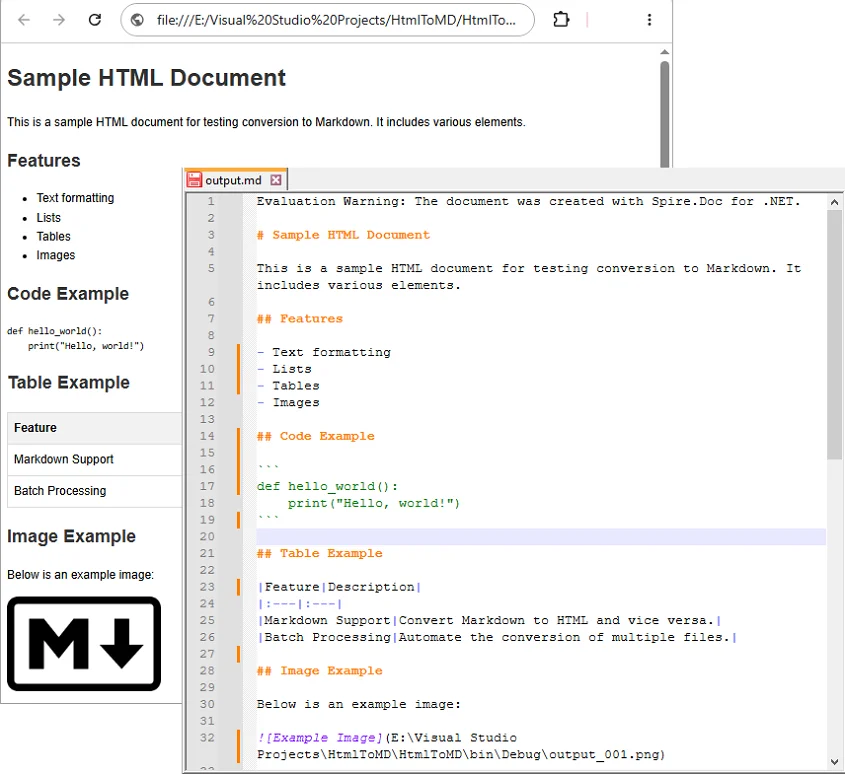
using (Document document = new Document()): Ensures theDocumentobject is properly disposed of after conversion.LoadFromFile("input.html", FileFormat.Html, XHTMLValidationType.None): Reads the source HTML file without strict XHTML validation, allowing the library to parse the HTML even if it doesn’t fully comply with XHTML rules.SaveToFile("output.md", FileFormat.Markdown): Maps the supported HTML elements such as headings, bold text, lists, images, and links into Markdown syntax, and generate the .md file.
Output:
Convert HTML Strings to Markdown in C#
When dealing with dynamic web data—such as content fetched from a database, API responses, or CMS rich-text inputs—you can convert raw HTML strings directly to Markdown without saving them as physical files first.
C# Code Example
using Spire.Doc;
using Spire.Doc.Documents;
namespace ConvertHtmlStringToMarkdown
{
class Program
{
static void Main(string[] args)
{
// Initialize a Document instance
using (Document document = new Document())
{
// Add a section and paragraph to host the dynamic html content
Section section = document.AddSection();
Paragraph paragraph = section.AddParagraph();
// Define the source HTML string
string htmlString = @"
<h1>HTML to Markdown Conversion</h1>
<p>This is a sample paragraph with a <a href='https://www.example.com'>link</a>.</p>
<ul>
<li>First item</li>
<li>Second item</li>
<li>Third item</li>
</ul>";
// Parse and append the HTML string directly into the text paragraph
paragraph.AppendHTML(htmlString);
// Save the fully compiled document model as Markdown
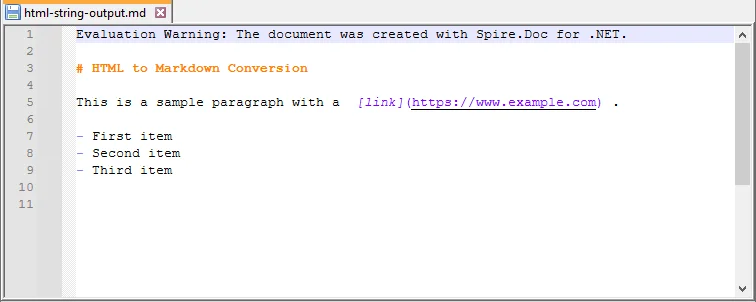
document.SaveToFile("html-string-output.md", FileFormat.Markdown);
}
}
}
}
Key Methods Explanation:
document.AddSection()§ion.AddParagraph(): An emptyDocumentobject does not contain structural layouts. You must explicitly create a parent section and a text paragraph to serve as the container before injecting raw HTML string content.paragraph.AppendHTML(htmlString): Parses the HTML string and inserts supported HTML elements into the document structure.
Output:
Convert HTML Stream to Markdown in C#
In cloud-ready or backend enterprise applications, HTML content is often processed in memory as a stream rather than being read from a fixed physical path. Using LoadFromStream() and SaveToStream(), you can convert in-memory HTML content directly to a Markdown stream.
This approach is useful for web services, ASP.NET applications, background processing tasks, or conversion APIs where files are uploaded, converted, and returned without permanent disk storage.
C# Code Example
using System.IO;
using System.Text;
using Spire.Doc;
using Spire.Doc.Documents;

namespace ConvertHtmlStreamToMarkdown
{
    class Program
    {
        static void Main(string[] args)
        {
            // Define a sample HTML string to simulate an in-memory input source
            string htmlContent = "<h1>HTML Stream to Markdown Stream</h1><p>This process happens entirely in memory.</p>";
            byte[] htmlBytes = Encoding.UTF8.GetBytes(htmlContent);

            // Create an input stream from the HTML bytes
            using (MemoryStream inputStream = new MemoryStream(htmlBytes))
            {
                // Create an empty memory stream to receive the converted Markdown data
                using (MemoryStream outputStream = new MemoryStream())
                {
                    // Initialize the Document instance
                    using (Document document = new Document())
                    {
                        // Load the HTML content directly from the input stream
                        document.LoadFromStream(inputStream, FileFormat.Html, XHTMLValidationType.None);

                        // Save the converted content directly into the output stream as Markdown
                        document.SaveToStream(outputStream, FileFormat.Markdown);
                    }

                    // Crucial: Reset the output stream position to the beginning before reading it
                    outputStream.Position = 0;

                    // Optional: Convert the output stream back to a string to verify the result (you can also save it as a .md file)
                    using (StreamReader reader = new StreamReader(outputStream, Encoding.UTF8))
                    {
                        string markdownResult = reader.ReadToEnd();
                        System.Console.WriteLine(markdownResult);
                    }
                }
            }
        }
    }
}
Batch Convert Multiple HTML Files
For large-scale publishing workflows, you can automate the conversion of multiple HTML files to Markdown using a loop.
C# Code Example
The following example converts all .html files in a source folder to .md files in an output folder.
using Spire.Doc;
using Spire.Doc.Documents;
using System;
using System.IO;

namespace BatchConvertHtmlToMarkdown
{
    internal class Program
    {
        static void Main(string[] args)
        {
            string inputFolder = @"C:\HtmlFiles";
            string outputFolder = @"C:\MarkdownFiles";

            // Create output folder if it does not exist
            Directory.CreateDirectory(outputFolder);

            // Get all HTML files
            string[] htmlFiles = Directory.GetFiles(inputFolder, "*.html");

            foreach (string htmlFile in htmlFiles)
            {
                try
                {
                    string fileName = Path.GetFileNameWithoutExtension(htmlFile);
                    string outputPath = Path.Combine(outputFolder, fileName + ".md");

                    using (Document document = new Document())
                    {
                        document.LoadFromFile(htmlFile, FileFormat.Html, XHTMLValidationType.None);
                        document.SaveToFile(outputPath, FileFormat.Markdown);
                    }

                    Console.WriteLine($"Converted: {Path.GetFileName(htmlFile)}");
                }
                catch (Exception ex)
                {
                    Console.WriteLine($"Failed to convert {Path.GetFileName(htmlFile)}");
                    Console.WriteLine($"Error: {ex.Message}");
                }
            }

            Console.WriteLine("HTML to Markdown batch conversion completed.");
        }
    }
}
What HTML Elements Can Be Converted to Markdown?
HTML has many elements, but Markdown supports only a smaller set of document structures. During conversion, content-focused elements are usually easier to preserve than layout-focused or style-heavy elements. For instance, standard Markdown tables only support basic rows and columns. If your source contains complex tables, you might want to convert HTML to Excel in C# instead.
The following table summarizes common HTML elements and how they may appear in Markdown.
| HTML Element | Markdown Syntax |
|---|---|
<h1> to <h6> |
# to ###### (Headings) |
<p> |
Plain paragraph |
<strong>, <b> |
**bold** |
<em>, <i> |
*italic* |
<ul>, <ol>, <li> |
Bulleted or numbered lists |
<a> |
[Link Text](URL) |
<img> |
 |
<table> |
Markdown table |
<code> |
Inline code |
<pre> |
Code block |
<br> |
Line break |
<div>, <section> |
Usually simplified |
| CSS styles | Limited or removed |
| JavaScript | Not supported |
Tip: Actual output may vary depending on the source HTML structure and the Markdown features supported by the target editor or platform.
Troubleshooting Common HTML to Markdown Issues
- Images not showing: Verify that all image paths are still valid after conversion; relative paths may need adjustment.
- Tables look different: Markdown supports only basic tables. For complex tables with merged cells, nested layouts, or custom styling, simplify the HTML table before conversion or manually adjust the generated Markdown table afterward.
- Special characters appear incorrectly: This is usually an encoding issue. Make sure the source HTML file uses UTF-8 encoding and open the generated Markdown file in an editor that supports UTF-8.
- Extra blank lines: Remove unnecessary empty tags, nested
divelements, or redundantbrtags from the source HTML before conversion. You can also clean the generated Markdown file afterward by opening it in a text editor like Notepad++ and then performing a find & replace.
Conclusion
With Spire.Doc for .NET, converting HTML to Markdown in C# can be implemented in just a few lines of code. This guide covered the core approaches needed for various development scenarios:
- Converting local HTML files and streams to Markdown.
- Inserting and converting dynamic HTML strings.
- Batch converting multiple HTML files simultaneously.
If your workflow also requires the reverse process, see this tutorial on how to convert Markdown to HTML in C#.
Frequently Asked Questions
Q1: Will images be preserved during HTML to Markdown conversion?
A1: Yes. Standard HTML <img> tags can be converted into Markdown image syntax (). Just ensure your source HTML links use valid URLs or correct file paths so the images can load.
Q2: Can I convert an HTML string or stream to Markdown without saving files?
A2: Yes. You can load an HTML string using AppendHTML() or a stream via LoadFromStream(), then export it entirely in memory using SaveToStream() without hitting the local disk.
Q3: Can I convert multiple HTML files to Markdown at once in C#?
A3: Yes. You can use a foreach loop in C# to scan a folder for *.html files, process each file through the converter, and output them to a destination folder in bulk.
Q4: Is Microsoft Word required for HTML to Markdown conversion?
A4: No. Spire.Doc for .NET is a standalone library, so Microsoft Word does not need to be installed.
How to Download / Export Excel Files in JavaScript & React
2026-05-28 02:21:57 Written by Allen Yang
Modern web applications often need to generate downloadable Excel reports directly in the browser without relying on backend services. Whether you're building dashboards, reporting tools, or data-heavy business applications, browser-based spreadsheet export has become a common frontend requirement.
The challenge lies in creating Excel files that work across different browsers while maintaining formatting, supporting multiple output formats, and ensuring fast downloads—all without sending sensitive data to a server. Traditional approaches often require complex server-side processing or rely on limited client-side libraries.
Spire.XLS for JavaScript enables developers to generate, export, and download Excel files using JS entirely in the browser using WebAssembly technology. This approach provides true client-side Excel generation with support for multiple formats including XLS, XLSX, XLSB, ODS, PDF, XML, and XPS.
This article demonstrates how to generate and download Excel files in modern JavaScript and React applications using browser-side processing with Spire.XLS for JavaScript. We'll cover basic file generation, stream-based exports, React integration, and HTML table conversion with practical code examples.
Quick Navigation
- Why Export Excel in Browser
- Install Spire.XLS for JavaScript
- Download Excel File in JavaScript
- Export HTML Table to Excel
- React JS Export Excel Example
- About Client-Side Excel Export
- Troubleshooting
- Conclusion
- FAQ
Why Export Excel in Browser
Browser-side Excel export provides significant advantages over traditional server-side approaches:
- Enhanced Privacy – Sensitive data never leaves the client device, reducing security risks and compliance concerns
- Faster Downloads – Eliminating server round-trips reduces latency and improves user experience
- No Server-Side Processing – Reduces backend infrastructure costs and eliminates server bottlenecks
- Works Offline – Client-side generation functions even without network connectivity
- Scalable Architecture – Each user's browser handles their own export, distributing computational load
- Framework Agnostic – Works seamlessly with React, Vue, Angular, and vanilla JavaScript applications
By implementing Excel export functionality in the browser, developers can create responsive, secure, and cost-effective solutions that scale naturally with user demand.
Install Spire.XLS for JavaScript
Before generating and downloading Excel files in JavaScript, you need to install Spire.XLS for JavaScript and configure it in your development environment.
Installation via npm
Spire.XLS for JavaScript can be installed via npm:
npm i spire.xls
After installation, include the library in your project:
import { Workbook } from '@e-iceblue/spire.xls';
Note: The current WebAssembly runtime is provided through the spire.office package structure internally, even when installing spire.xls from npm. This is why initialization imports reference /node_modules/spire.office/.
Manual Installation
Alternatively, you can download the package from the e-iceblue website and copy the dependencies to your project directory.
For detailed setup instructions, refer to the Getting Started with Spire.XLS for JavaScript.
Initialize the WASM Module
Before using Spire.XLS, you must initialize the WebAssembly module. The initialization process loads required resources and sets up the runtime:
// Import and initialize the common module first
import('/node_modules/spire.office/spire.common.js').then(async (commonModule) => {
    // Initialize the WASM runtime
    await commonModule.initializeWasm();

    // Load the XLS module
    await import('/node_modules/spire.office/spire.xls.js');

    console.log('Spire.XLS ready');
});
Important Notes:
- Initialization is required before accessing
window.spirexlsorwindow.xlswasm - The browser downloads required WebAssembly resources during first load
- Always verify the module exists before performing Excel operations
Version Note: This article uses spire.office v11.4.1+. The module is accessed via window.spirexls or window.xlswasm. Older examples using window.wasmModule.spirexls may require updates.
Spire.XLS for JavaScript integrates seamlessly with all major frontend frameworks and build tools:
- React – Use with hooks (
useState,useEffect) for state-driven Excel export components - Vue.js – Integrate with Vue's reactive data system and lifecycle methods
- Angular – Compatible with Angular services and dependency injection patterns
- Next.js – Works in client-side components for server-rendered React applications
The WebAssembly module loads once at application initialization and can be shared across components, making it efficient for multi-page applications regardless of the framework choice.
Download Excel File in JavaScript
The following example demonstrates how to generate an Excel file with Spire.XLS for JavaScript and download it directly in the browser.
Create and Download an XLSX File
// Ensure the WASM module has been initialized
if (!window.spirexls && !window.xlswasm) {
    console.error("Spire.XLS is not initialized.");
    return;
}

// Get the initialized WebAssembly module
const wasmModule = window.spirexls || window.xlswasm;

// Create a new workbook
const workbook = new wasmModule.Workbook();
const worksheet = workbook.Worksheets.get(0);

// Create sample data
const products = [
    ["Product", "Quantity", "Price"],
    ["Laptop", 10, 999.99]
    ["Mouse", 50, 24.99]
]

// Insert data into the worksheet
for (let i = 0; i < products.length; i++) {
    for (let j = 0; j < products[i].length; j++) {
        if (typeof products[i][j] === "string") {
            worksheet.Range.get({ row: i + 1, column: j + 1 }).Text = products[i][j];
        }
        else {
            worksheet.Range.get({ row: i + 1, column: j + 1 }).NumberValue = products[i][j];
        }
    }
}

// Add a total column
worksheet.Range.get({ row: 1, column: products[0].length + 1 }).Text = "Total";
worksheet.Range.get({ row: 2, column: products[0].length + 1 }).Formula = "=B2*C2";
worksheet.Range.get({ row: 3, column: products[0].length + 1 }).Formula = "=B3*C3";

// Save the workbook to the virtual file system (VFS)
const outputFileName = "Report.xlsx";

workbook.SaveToFile({
    fileName: outputFileName,
    version: wasmModule.ExcelVersion.Version2016
});

// Release workbook resources
workbook.Dispose();

// Read the generated file from VFS
const fileArray =
    window.dotnetRuntime.Module.FS.readFile(outputFileName);

// Create a Blob object
const excelBlob = new Blob(
    [fileArray],
    {
        type: "application/vnd.openxmlformats-officedocument.spreadsheetml.sheet"
    }
);

// Trigger browser download
const url = URL.createObjectURL(excelBlob);
const a = document.createElement("a");
a.href = url;
a.download = outputFileName;
document.body.appendChild(a);
a.click();
document.body.removeChild(a);
URL.revokeObjectURL(url);
Below is a preview of the generated XLSX file:
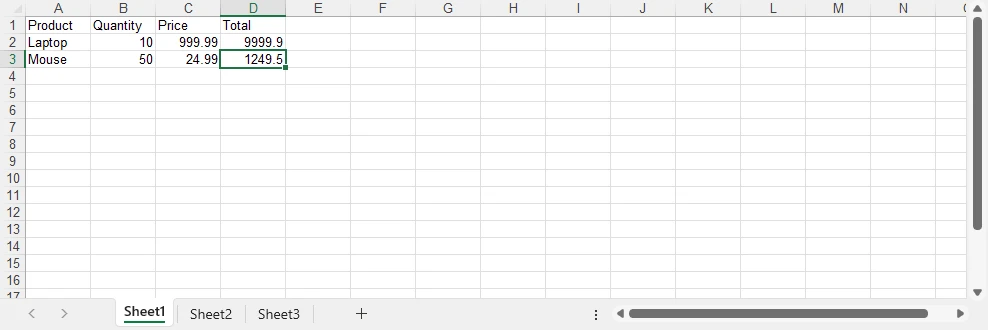
How the Export Process Works
- Create a workbook and populate worksheet data
- Save the workbook into the WebAssembly virtual file system (VFS)
- Read the generated XLSX file from VFS
- Convert the file data into a Blob object
- Trigger the browser download using a temporary URL
About the Virtual File System (VFS)
The file generated by SaveToFile() is stored in the WebAssembly virtual file system rather than the user's physical disk. This in-memory file system allows Spire.XLS to perform standard file operations securely inside the browser environment. The downloaded XLSX file is created after reading the generated file data from VFS and converting it into a browser Blob object.
Advantages of This Approach
- Works entirely in the browser
- No server-side processing required
- Uses standard browser Blob download APIs
- Supports direct XLSX file generation with Spire.XLS
If you also need to work with lightweight data exchange formats, you can further explore how to convert Excel files to CSV and import CSV data into Excel using JavaScript.
Export HTML Tables to Excel in JavaScript
In dashboard and reporting applications, business data is often displayed as HTML tables. Instead of rebuilding spreadsheet structures manually, you can directly convert existing frontend tables into Excel workbooks using Spire.XLS for JavaScript.
The following example demonstrates a complete browser-side workflow that:
- Reads an existing HTML table from the page
- Converts the HTML table into an Excel workbook
- Applies Excel-native formatting
- Downloads the generated XLSX file directly in the browser
HTML Table Export Example
async function exportTableToExcel() {

    if (!window.spirexls && !window.xlswasm) {
        alert("Spire.XLS module not loaded yet.");
        return;
    }

    const button = document.getElementById("exportBtn");

    button.disabled = true;
    button.innerText = "Exporting...";

    const wasmModule = window.spirexls || window.xlswasm;

    try {

        // Get HTML table
        const tableHtml =
            document.getElementById("salesTable").outerHTML;

        // Remove inline styles
        const safeTableHtml =
            tableHtml.replace(/style="[^"]*"/g, '');

        const htmlContent = `
            <!DOCTYPE html>
            <html>
            <head>
                <meta charset="UTF-8">
            </head>
            <body>
                ${safeTableHtml}
            </body>
            </html>
        `;

        const htmlFileName = "Table.html";

        window.dotnetRuntime.Module.FS.writeFile(
            htmlFileName,
            htmlContent
        );

        const workbook = new wasmModule.Workbook();

        workbook.LoadFromHtml(htmlFileName);

        const sheet = workbook.Worksheets.get(0);

        const lastRow = Number(sheet.LastRow);
        const lastCol = Number(sheet.LastColumn);

        const headerRow =
            sheet.Range.get_Item(1, 1, 1, lastCol);

        headerRow.BuiltInStyle =
            wasmModule.BuiltInStyles.Heading3;

        for (let i = 2; i <= lastRow; i++) {

            const row =
                sheet.Range.get_Item(i, 1, i, lastCol);

            row.BuiltInStyle =
                i % 2 === 0
                    ? wasmModule.BuiltInStyles.Accent3_20
                    : wasmModule.BuiltInStyles.Accent3_60;
        }

        for (let j = 1; j <= lastCol; j++) {
            sheet.AutoFitColumn(j);
        }

        const outputFileName = "SalesReport.xlsx";

        workbook.SaveToFile({
            fileName: outputFileName,
            version: wasmModule.ExcelVersion.Version2016
        });

        workbook.Dispose();

        const fileData =
            window.dotnetRuntime.Module.FS.readFile(outputFileName);

        const blob = new Blob([fileData], {
            type:
                "application/vnd.openxmlformats-officedocument.spreadsheetml.sheet"
        });

        const url = URL.createObjectURL(blob);

        const a = document.createElement("a");

        a.href = url;
        a.download = outputFileName;

        document.body.appendChild(a);
        a.click();

        document.body.removeChild(a);

        URL.revokeObjectURL(url);

    } catch (error) {

        alert("Export failed: " + error.message);

    } finally {

        button.disabled = false;
        button.innerText = "Export Excel";
    }
}
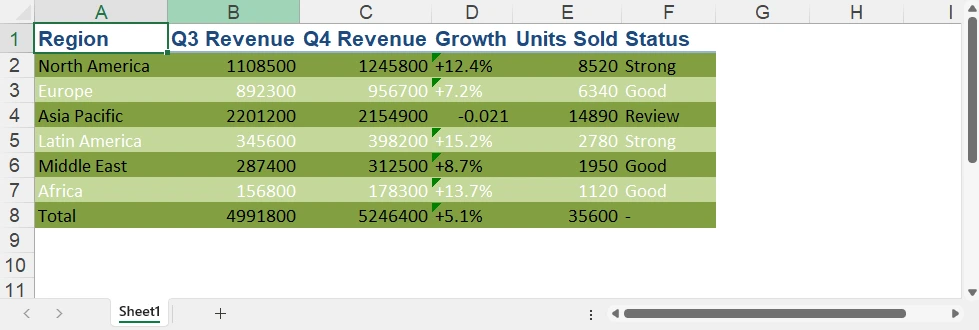
The following screenshot shows the HTML-based sales report table example displayed in the browser before export.

After exporting, the generated Excel workbook preserves the tabular structure and applies additional Excel-native formatting.
Why Use HTML-based Excel Export
Using HTML-based export provides several advantages for modern web applications:
- Reuse existing frontend tables without rebuilding spreadsheet layouts
- Reduce duplicate data formatting and export logic
- Apply Excel-native styles after importing HTML tables
- Export business reports directly from dashboard pages
With Spire.XLS for JavaScript, you can quickly convert browser-rendered HTML tables into downloadable Excel files while keeping the entire export workflow on the client side.
For scenarios that require rendering Excel spreadsheets as browser-based HTML tables, you can also refer to our article about converting Excel to HTML in JavaScript.
Export Excel in React with JavaScript
Integrating Excel export into React applications is straightforward. The key is initializing the WebAssembly runtime before rendering React components and properly releasing workbook resources after export operations.
Initialize Spire.XLS in React
Before creating export components, initialize the WebAssembly module in your app entry file (main.jsx or index.js):
import { StrictMode } from 'react';
import { createRoot } from 'react-dom/client';
import App from './App.jsx';

// Initialize Spire.XLS before mounting React
const initializeSpire = async () => {

    // Load the common runtime
    const commonModule = await import(
        '/node_modules/spire.office/spire.common.js'
    );

    // Initialize WebAssembly runtime
    await commonModule.initializeWasm();

    // Load Spire.XLS module
    await import(
        '/node_modules/spire.office/spire.xls.js'
    );

    // Optional: preload fonts if needed
    // await window.spire.FetchFileToVFS(
    //     'ARIAL.TTF',
    //     '/Library/Fonts/',
    //     '/'
    // );
};

// Start React app after initialization
initializeSpire().then(() => {

    createRoot(document.getElementById('root')).render(
        <StrictMode>
            <App />
        </StrictMode>
    );

});
Then use the React export component below in your application.
Simplified React Excel Export Component
Here's a minimal React component that demonstrates the core export pattern:
import { useState } from 'react'

const ExcelExportButton = () => {
    const [isProcessing, setIsProcessing] = useState(false);

    const handleExport = async () => {
        if ((!window.spirexls && !window.xlswasm) || isProcessing) return;

        setIsProcessing(true);
        const wasmModule = window.spirexls || window.xlswasm;

        try {
            // Create a new workbook and get the first default worksheet
            const workbook = new wasmModule.Workbook();
            const worksheet = workbook.Worksheets.get(0);

            // Insert data into the worksheet
            worksheet.Range.get("A1").Text = "Product";
            worksheet.Range.get("B1").Text = "Revenue";
            worksheet.Range.get("A2").Text = "Laptop";
            worksheet.Range.get("B2").NumberValue = 9999.90;
            worksheet.Range.get("A3").Text = "Smartphone";
            worksheet.Range.get("B3").NumberValue = 4999.99;

            const outputFileName = "Report.xlsx";

            // Save the workbook to a file in the VFS
            workbook.SaveToFile({
                fileName: outputFileName,
                version: wasmModule.ExcelVersion.Version2016
            });

            workbook.Dispose();

            const fileArray = window.dotnetRuntime.Module.FS.readFile(outputFileName);

            const excelBlob = new Blob([fileArray], {
                type: "application/vnd.openxmlformats-officedocument.spreadsheetml.sheet"
            });

            const url = URL.createObjectURL(excelBlob);

            const a = document.createElement('a');
            a.href = url;
            a.download = outputFileName;
            document.body.appendChild(a);
            a.click();
            document.body.removeChild(a);

            URL.revokeObjectURL(url);

        } catch (error) {
            console.error("Excel export failed:", error);
        } finally {
            setIsProcessing(false);
        }
    };

    return (
        <button onClick={handleExport} disabled={isProcessing}>
            {isProcessing ? "Generating..." : "Export to Excel"}
        </button>
    );
}

export default function App() {
    return (
        <div>
            <h1>Spire.XLS Demo</h1>
            <ExcelExportButton />
        </div>
    );
}
Key Implementation Details:
- Minimal state – Only track
isProcessingto disable the button during export - Direct download – Trigger download immediately without storing URLs in state
- Resource cleanup – Always call
Dispose()on workbook objects to prevent memory leaks - Error handling – Wrap export logic in try-catch blocks for robust error management
- Loading states – Disable buttons during processing to prevent duplicate exports
Usage in Your App:
import { ExcelExportButton } from './ExcelExportButton';

function App() {
    return (
        <div>
            <h1>Sales Dashboard</h1>
            <ExcelExportButton />
        </div>
    );
}
This simplified approach focuses on the essential export flow without unnecessary complexity. For more advanced scenarios like loading external files or fonts, refer to the complete documentation.
If you also need browser-side document distribution workflows, you can further explore how to convert Excel files to PDF in JavaScript and React applications.
Client-Side Excel Generation in JavaScript Without Backend
Modern web applications increasingly generate Excel files directly in the browser instead of relying on backend services. With Spire.XLS for JavaScript, spreadsheet creation, formatting, and export operations run entirely on the client side using WebAssembly.
Why No Backend Server Is Needed
Traditional Excel export workflows usually require a server to:
- Receive frontend data
- Generate spreadsheet files
- Return downloadable files to the browser
With WebAssembly-based processing, these steps happen entirely inside the browser runtime instead.
Benefits of Browser-side Excel Export
Compared with traditional server-side export workflows, client-side Excel generation provides several advantages:
| Feature | Browser-side Export | Server-side Export |
|---|---|---|
| Data Processing | Runs locally in browser | Requires backend server |
| Privacy | Data stays on client device | Data sent over network |
| Response Speed | Instant local processing | Depends on network latency |
| Infrastructure Cost | No export server required | Requires backend resources |
| Offline Support | Supported | Usually unavailable |
| Scalability | Handled by client devices | Limited by server capacity |
How Browser-side Export Works
When using Spire.XLS for JavaScript:
- The WebAssembly runtime loads in the browser
- Spreadsheet processing runs locally in memory
- Files are temporarily stored in the browser virtual file system (VFS)
- JavaScript converts the generated file into a downloadable Blob
- The browser triggers the download directly
This architecture makes browser-based Excel export especially suitable for dashboards, reporting systems, internal business tools, and privacy-sensitive applications.
Troubleshooting and Best Practices
When using Spire.XLS for JavaScript in browser environments, the following issues are commonly encountered.
WASM Module Not Initialized
If window.spirexls or window.xlswasm is undefined, ensure the WebAssembly runtime is fully initialized before using the API:
await commonModule.initializeWasm();
await import('/node_modules/spire.office/spire.xls.js');
Missing Resource or ZIP Loading Errors
If the browser console shows 404 errors or WebAssembly loading failures:
- Ensure ZIP and WASM resources are placed in the correct static directory
- Vite projects should place assets in the
public/folder - Verify the browser can successfully load
.zipand.wasmfiles
Font-related Warnings
Some environments may display warnings such as:
"Arial font is not installed"
You can preload fonts before creating workbooks:
await window.spire.FetchFileToVFS(
    'ARIAL.TTF',
    '/Library/Fonts/',
    '/'
);
Invalid or Corrupted XLSX Files
If Excel opens with repair warnings, explicitly specify the Excel version during export:
workbook.SaveToFile({
    fileName: outputFileName,
    version: wasmModule.ExcelVersion.Version2016
});
Memory Management
Always release workbook resources after export to avoid memory leaks in long-running applications:
const workbook = new wasmModule.Workbook();

try {
    // Excel operations
} finally {
    workbook.Dispose();
}
Browser-side Performance Considerations
For very large datasets, browser-side processing may become slow or memory-intensive. In such scenarios:
- Show loading indicators during export
- Avoid exporting extremely large datasets in a single operation
- Consider server-side processing for enterprise-scale reports
Conclusion
Spire.XLS for JavaScript provides a practical way to generate and export Excel files directly in modern web applications using JavaScript and WebAssembly. Its browser-based architecture makes it suitable for dashboards, reporting systems, and frontend applications that require downloadable spreadsheet generation without relying on backend services.
The examples in this article demonstrate how to build browser-based Excel export workflows using JavaScript, React, and WebAssembly while keeping spreadsheet processing entirely on the client side. You can apply for a 30-day free license to evaluate all features before purchasing.
FAQ
Q1: Can I download Excel files in JavaScript without a backend server?
A1: Yes. Spire.XLS for JavaScript uses WebAssembly technology to generate and download Excel files entirely in the browser. The workbook is created in browser memory and downloaded directly without requiring any backend API or server-side processing.
Q2: How do I export HTML tables to Excel in JavaScript?
A2: You can extract an existing HTML table from the DOM, write the HTML into the WebAssembly virtual file system, and load it into a workbook using LoadFromHtml(). This approach allows you to reuse browser-rendered tables without rebuilding spreadsheet layouts manually.
Q3: Can I use Spire.XLS for JavaScript in React applications?
A3: Yes. Spire.XLS for JavaScript works with React, Vite, and other modern frontend frameworks. You only need to initialize the WebAssembly module before rendering components and then perform Excel operations directly inside React components or utility functions.
Q4: Why does Excel show a repair warning when opening exported files?
A4: This usually happens when the Excel version is not explicitly specified during export. To avoid compatibility issues, specify the output version when calling SaveToFile():
workbook.SaveToFile({
    fileName: outputFileName,
    version: wasmModule.ExcelVersion.Version2016
});
