
Knowledgebase (2337)
Children categories
Parse Excel Files in Java Easily – Read .XLS and .XLSX Files
2026-02-04 08:53:02 Written by Allen Yang
Excel files are widely used to store and exchange structured data, such as reports, user-submitted forms, and exported records from other systems. In many Java applications, developers need to open these Excel files and extract the data for further processing.
In Java, parsing an Excel file usually means loading an .xls or .xlsx file, reading worksheets, and converting cell values into Java-friendly formats such as strings, numbers, or dates. This article shows how to parse Excel files in Java step by step using Spire.XLS for Java, with practical examples ranging from basic text reading to data type–aware parsing.
Table of Contents
- Prepare the Environment
- Load and Parse an Excel File in Java
- Read Excel Data as Text (Basic Parsing)
- Parse Excel Cells into Different Data Types
- Common Parsing Scenarios in Real Applications
- Conclusion
- Frequently Asked Questions
Prepare the Environment
Before parsing Excel files, you need to add Spire.XLS for Java to your project. The library supports both .xls and .xlsx formats and does not require Microsoft Excel to be installed.
Add the Dependency
If you are using Maven, add the following dependency to your pom.xml:
<repositories>
    <repository>
        <id>com.e-iceblue</id>
        <name>e-iceblue</name>
        <url>https://repo.e-iceblue.com/nexus/content/groups/public/</url>
    </repository>
</repositories>
<dependencies>
    <dependency>
        <groupId>e-iceblue</groupId>
        <artifactId>spire.xls</artifactId>
        <version>16.4.1</version>
    </dependency>
</dependencies>
Once the dependency is added, you are ready to load and parse Excel files in Java.
If you are not using Maven, you can also download Spire.XLS for Java and add it to your project manually.
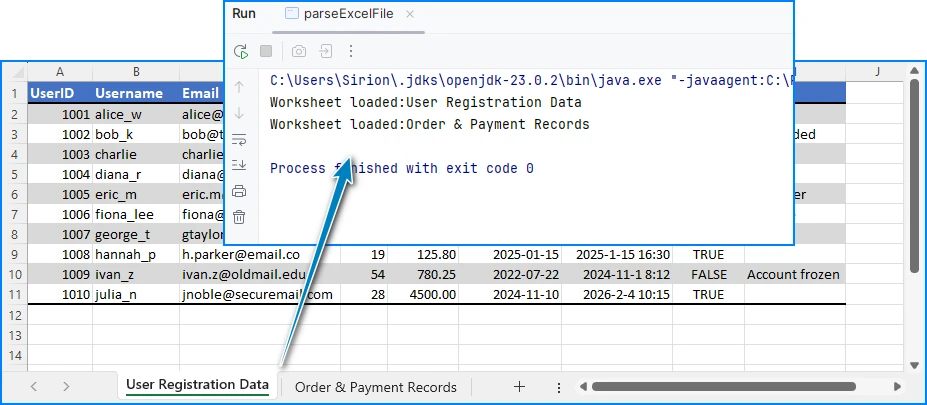
Load and Parse an Excel File in Java
The first step when parsing an Excel file is to load it into a Workbook object and access the worksheet you want to read.
import com.spire.xls.*;

public class ParseExcel {
    public static void main(String[] args) {
        Workbook workbook = new Workbook();
        workbook.loadFromFile("data.xlsx");

        Worksheet sheet = workbook.getWorksheets().get(0);
        System.out.println("Worksheet loaded: " + sheet.getName());
    }
}
Preview of the reading result:
This code works for both .xls and .xlsx files. After loading the worksheet, you can start reading rows and cells.
Read Excel Data as Text (Basic Parsing)
In many cases, developers only need to read Excel data as text, without worrying about specific data types. This approach is simple and suitable for logging, displaying data, or quick imports.
Read All Cells as Strings
for (int i = 1; i <= sheet.getLastRow(); i++) {
    for (int j = 1; j <= sheet.getLastColumn(); j++) {
        String cellText = sheet.getCellRange(i, j).getValue();
        System.out.print(cellText + "\t");
    }
    System.out.println();
}
Preview of the text reading result:
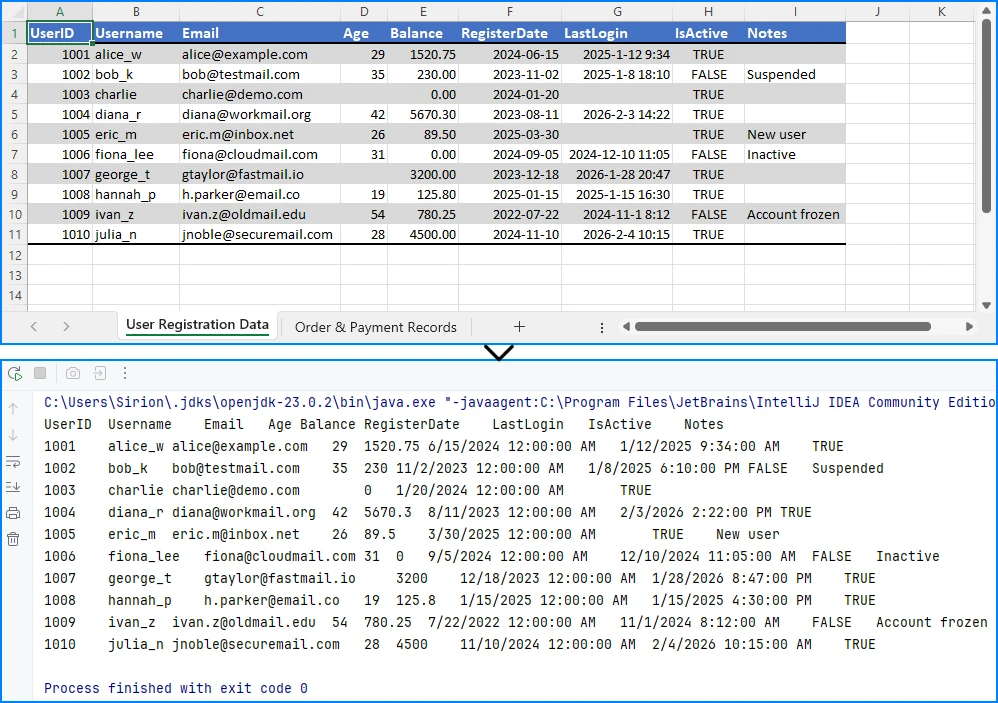
Using getValue() returns the formatted value shown in Excel. This is often the easiest way to read data when precision or data type conversion is not critical.
If your requirement goes beyond reading and involves modifying or editing Excel files, you can refer to a separate guide that demonstrates how to edit Excel documents in Java using Spire.XLS.
Parse Excel Cells into Different Data Types
For data processing, validation, or calculations, reading everything as text is usually not enough. In these cases, you need to parse Excel cell values into proper Java data types.
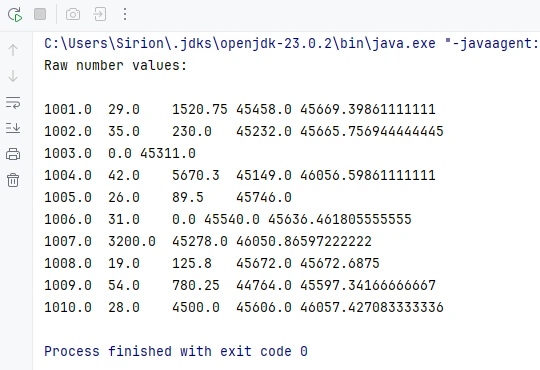
Parse Numeric Values (int / double / float)
In Excel, many cells are stored internally as numeric values, even if they are displayed as dates, currencies, or percentages. Spire.XLS for Java allows you to read these cells directly using getNumberValue().
CellRange usedRange = sheet.getAllocatedRange();
System.out.println("Raw number values:");
for (int i = usedRange.getRow(); i <= usedRange.getLastRow(); i++) {
    for (int j = usedRange.getColumn(); j <= usedRange.getLastColumn(); j++) {
        CellRange cell = sheet.getRange().get(i, j);
        if (!(Double.isNaN(cell.getNumberValue())))
            {
                System.out.print(cell.getNumberValue() + "\t");
            }
        }
    System.out.println();
}
Below is a preview of the numeric reading result:

This method returns the underlying numeric value stored in the cell, regardless of the display format applied in Excel.
Convert Numeric Values Based on Application Logic
Once you have the numeric value, you can convert it to the appropriate Java type according to your application requirements.
double numberValue = cell.getNumberValue();

// Convert to int
int intValue = (int) numberValue;

// Convert to float
float floatValue = (float) numberValue;

// Keep as double
double doubleValue = numberValue;
For example, IDs, counters, or quantities are often converted to int, while prices, balances, or measurements are better handled as double or float.
Note: Excel dates are also stored as numeric values. If a cell represents a date or time, it is recommended to read it using date-related APIs instead of treating it as a plain number. This is covered in the next section.
Parse Date and Time Values
In Excel, date and time values are internally stored as numbers, while the display format determines how they appear in the worksheet. Spire.XLS for Java provides the getDateTimeValue() method to read these values directly as Date objects, allowing you to handle date and time data more conveniently in Java.
For example, if a column is designed to store date values, you can read all cells in that range as Date objects:
CellRange usedRange = sheet.getAllocatedRange();
System.out.println("Date values:");

for (int i = 0; i < usedRange.getRowCount(); i++) {
    // Read values from column F (for example, a date column)
    CellRange cell = usedRange.get(String.format("G%d", i + 1));
    java.util.Date date = cell.getDateTimeValue();
    System.out.println(date);
}
Preview of the date reading result from the seventh column:
This approach is widely used in real-world applications such as reports, data imports, or spreadsheets with predefined columns.
Because Excel dates are stored as numeric values, getDateTimeValue() converts the numeric value into a Date object and is typically applied to columns that represent date or time information.
Parse Mixed Cell Values in a Practical Way
In real-world Excel files, a single column may contain different kinds of values, such as text, numbers, dates, booleans, or empty cells. When parsing such data in Java, a practical approach is to read cell values using different APIs and select the most appropriate representation based on your business logic.
CellRange cell = sheet.getRange().get(2, 1); // B2

// Formatted text (what is displayed in Excel)
String text = cell.getText();

// Raw string value
String value = cell.getValue();

// Generic underlying value (number, boolean, date, etc.)
Object rawValue = cell.getValue2();

// Formula, if the cell contains one
String formula = cell.getFormula();

// Evaluated result of the formula
String evaluated = cell.getEnvalutedValue();

// Numeric value
double numberValue = cell.getNumberValue();

// Date value (commonly used for columns representing dates or times)
java.util.Date dateValue = cell.getDateTimeValue();

// Boolean value
boolean booleanValue = cell.getBooleanValue();
In practice, many applications use getText() as a safe fallback for display, logging, or export scenarios. For data processing, methods like getNumberValue(), getDateTimeValue(), or getBooleanValue() are typically applied based on the known meaning of each column.
This flexible approach works well for user-generated or loosely structured Excel files and helps avoid incorrect assumptions while keeping the parsing logic simple and robust.
If your primary goal is reading Excel files in Java—for example, extracting cell values for display or reporting—you may also want to refer to a separate guide that focuses specifically on Excel data reading scenarios in Java.
Common Parsing Scenarios in Real Applications
Parse Excel Rows into Java Objects
A common use case is mapping each row in an Excel sheet to a Java object, such as a DTO or entity class.
For example, one row can represent a product or a record, and each column maps to a field in the object. After parsing, you can store the objects in a list for further processing or database insertion.
Read Excel Data into Collections
Another typical scenario is reading Excel data into a List<List
Spire.OfficeJS is a powerful front-end JavaScript library that enables users to edit, preview, and process Office documents directly in a web browser—without plugins and without installing local tools such as Microsoft Office or WPS.
This article explains how to use Spire.OfficeJS in a native JavaScript environment.
Spire.OfficeJS consists of four modules:
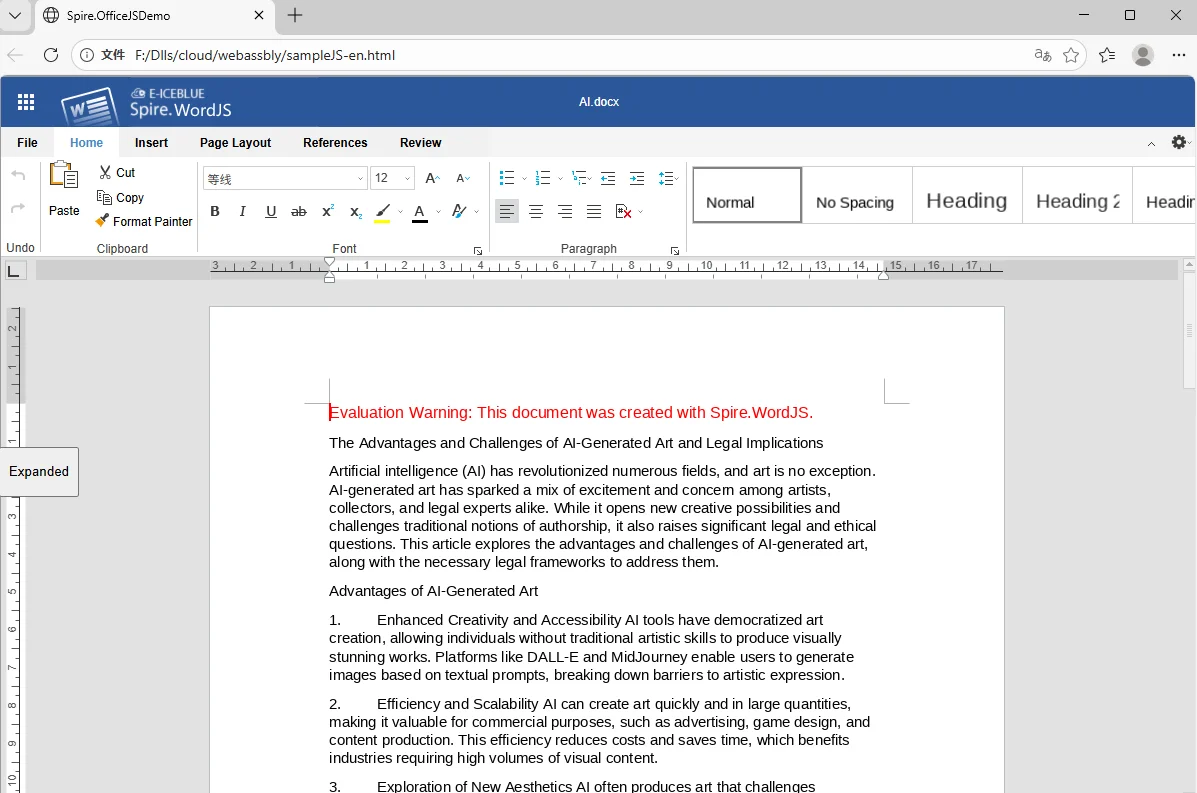
- Spire.WordJS: Provides preview and editing capabilities for Word documents, with full compatibility with Microsoft Word and WPS formats, such as .doc, .docx, .wps, and .wpt.
- Spire.ExcelJS: Enables preview and editing of Excel documents, including formats such as .xls, .xlsx, .et, and .ett.
- Spire.PresentationJS: Supports preview and editing of PowerPoint documents, including .ppt and .pptx.
- Spire.PDFJS: Provides preview functionality for PDF documents.
Table of Contents
Preparation
Spire.OfficeJS is powered by a web service. To use it in a native JavaScript environment, you must first start the web service.
The service is launched using scripts included in the product package, with the default service port set to 8001.
Step 1. Download and Extract the Installation Package
Download the Spire.OfficeJS package for your operating system, and extract it to a local directory.
Step 2. Start the Web Service
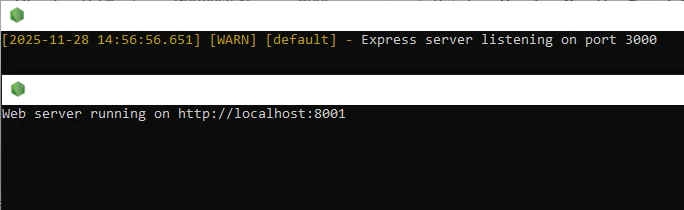
- Windows
In the extracted product directory, run the run_servers.bat file. The terminal output will be similar to the following:
Note: Port 3000 is used by the sample document management system. By default, you can access it in a browser at localhost:3000 or 127.0.0.1:3000 for testing.
- Linux (x86_64)
Run the run_servers.sh file in the extracted product directory using the command sh run_servers.sh start (to stop the service, use sh run_servers.sh stop; to restart the service, use sh run_servers.sh restart).
The terminal output is shown below:

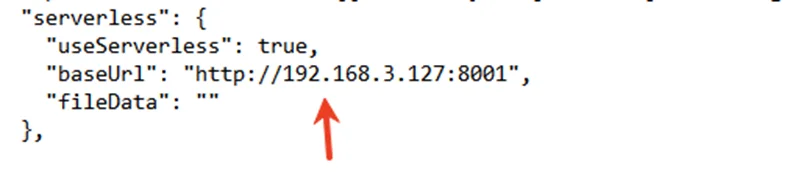
Step 3. Configure the Service Address
By default, the service uses 127.0.0.1. You can modify the baseUrl value in the example\config\default.json file to a domain name or an actual IP address, so that the service can be accessed via a domain or IP address.
After making the change, restart the service for the configuration to take effect.
Now, the client can access the sample system using the configured IP address or domain name, for example: 192.168.3.127:3000
JavaScript Integration Examples:
- Browser Preview Integration (HTML):
Script file:
To help you get started quickly, you can download the complete HTML example file using the link below and open it directly in your browser:
Demo Download
- Parameter Description:
| Parameter | Example Description | Value | ||
| fileAttrs | File Configuration Object | |||
| fileInfo | File Information Object | |||
| name | File Name Optional | Optional | ||
| ext | Document Name | docx,xlsx,pptx | ||
| primary | Document Unique Identifier | Optional | ||
| creator | Document Creator | Optional | ||
| createTime | Document Creation Time | Optional | ||
| sourceUrl | Document URL | Required. Must be accessible and have the appropriate access permissions. | ||
| createUrl | Template Document URL | Optional | ||
| user | User Configuration Object | |||
| id | User ID | Optional | ||
| name | User Name | Optional | ||
| editorAttrs | Editor Configuration Object | |||
| editorMode | Edit Mode Optional. Accepts 'edit' (edit) or 'view' (view). Default is 'edit'. | Optional. Accepts 'edit' (edit) or 'view' (view). Default is 'edit'. | ||
| editorWidth | Width | Optional. Default value is 100%. | ||
| editorHeight | Height | Optional. Default value is 100%. | ||
| editorType | Editor Type | Optional. If not specified, the editor type is determined automatically based on the file type. Must be set to document, spreadsheet, or presentation. | ||
| platform | Editor Platform Type | Required. Accepts 'desktop' (desktop view), 'mobile' (mobile view), or 'embedded' (embedded view). Must be set to one of: desktop, mobile, or embedded. | ||
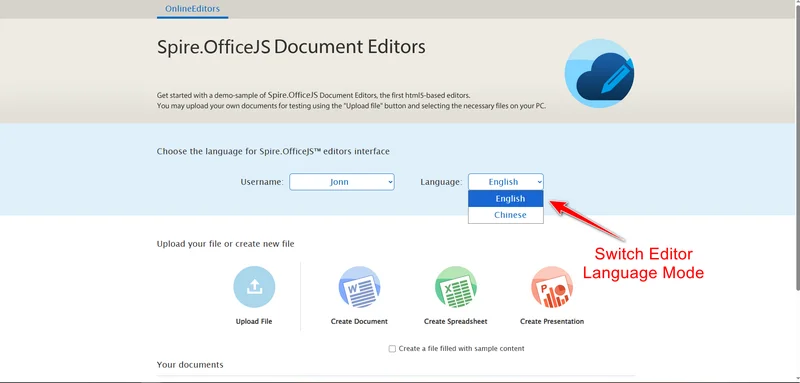
| viewLanguage | UI Language | Optional. Accepts "en" or "zh". If not specified, the browser’s default language is used. | ||
| isReadOnly | Read-Only Mode | Default is false, allowing the document to be edited. When set to true, the document is read-only. | ||
| canChat | Chat Enabled | Default is true. When set to false, chat is disabled. | ||
| canComment | Comments Enabled | Default is true. When set to false, comments are disabled. | ||
| canReview | Track Changes Enabled | Default is true. When set to false, track changes is disabled. | ||
| canDownload | Download Allowed | Default is true, allowing downloads. When set to false, downloading is not allowed. | ||
| canEdit | Edit Allowed | Default is true, allowing editing. When set to false, editing is not allowed. | ||
| canForcesave | Force Save Enabled | Default is true. When set to false, force save is disabled. | ||
| embedded | Embedded View Configuration Object | Includes saveUrl, embedUrl, shareUrl, and toolbarDocked, used to control saving, sharing, and toolbar display in embedded mode. | ||
| saveUrl | Embedded Document Save URL | Default is empty. Can be set to a URL used to save edited content. | ||
| embedUrl | Embedded Document Access URL | Default is empty. Can be set to a URL used to open the document directly. | ||
| shareUrl | Embedded Document Share URL | Default is empty. Can be set to a URL used to share the document. | ||
| toolbarDocked | Toolbar Dock Position | Default is "top". Accepts "top" or "bottom". | ||
| events | Events | |||
| plugins | Editor Plugin Configuration Object | Default is empty. Used to extend editor functionality. | ||
| pluginsData | Plugin Data Array | Default is empty. Plugins can be added as needed. | ||
| useWebAssemblyDoc | Enable WebAssembly for Word Documents | Default is true, allowing Word documents to be processed in the browser. When set to false, WebAssembly support is disabled. | ||
| spireDocJsLicense | Word WebAssembly License File URL | Default is empty. Used to activate the WebAssembly functionality. | ||
| useWebAssemblyExcel | Enable WebAssembly for Excel Documents | Default is true, allowing Excel documents to be processed in the browser. When set to false, WebAssembly support is disabled. | ||
| spireXlsJsLicense | Excel WebAssembly License File URL | Default is empty. Used to activate the WebAssembly functionality. | ||
| useWebAssemblyPpt | Enable WebAssembly for PowerPoint Documents | Default is true, allowing PowerPoint documents to be processed in the browser. When set to false, WebAssembly support is disabled. | ||
| spirePresentationJsLicense | PowerPoint WebAssembly License File URL | Default is empty. Used to activate the WebAssembly functionality. | ||
| useWebAssemblyPdf | Enable WebAssembly for PDF Documents | Default is true, allowing PDF documents to be processed in the browser. When set to false, WebAssembly support is disabled. | ||
| spirePdfJsLicense | PDF WebAssembly License File | Default is empty. Used to activate the WebAssembly functionality. | ||
| spireOfficeJsLicense | OfficeJS License File | Default is empty. Used to activate all online document editing features. | ||
| serverless | Serverless Mode Configuration Object | Includes useServerless, baseUrl, and fileData, allowing the front end to upload, edit, and download documents directly. | ||
| useSeverless | Enable Serverless Mode | Default is true. When enabled, the front end can operate on documents directly. When set to false, a server-side service is required. | ||
| baseUrl | Service URL in Serverless Mode | Default is empty. Must be set to the deployed server IP address and port. | ||
| fileData | Document Data | Default is empty. Stores the uploaded file data on the front end and is used to initialize the editor. | ||
Note: Applying a license removes the default watermark and unlocks all features. If you need a license file, please feel free to contact us at any time.
Frequently Asked Questions
During the deployment and integration of Spire.OfficeJS, you may encounter certain issues. The table below lists some common problems along with their solutions for your reference. If you have any additional questions, please contact our technical support team.
| Issue | Cause | Solution |
|---|---|---|
| Unable to access the service in the browser | Service not started / Required ports not open | Verify that the service is running and ensure ports 3000 and 8001 are open |
| Page loads but displays a blank screen | Browser cache contains outdated resources | Clear the browser cache or reopen the page in private/incognito mode |
| JavaScript file fails to load | Incorrect IP address or port | Check whether the SpireCloudEditor.js script URL is correct |
| File upload fails | baseUrl is not configured with the actual deployment address |
Update the configuration file and restart the service |
| Unable to execute the script on Linux | Insufficient script permissions | Run chmod +x run_servers.sh to grant execute permissions |
Summary
At this point, you have successfully completed the deployment and integration of Spire.OfficeJS. Your system can now view and edit documents online directly in the browser, without requiring client-side installations or additional development environments.
If you would like to explore more advanced usage scenarios or learn how to integrate Spire.OfficeJS into different types of applications, please refer to the related documentation or contact our team for further guidance.
Export DataGrid and GridView to Excel in C# (Without Interop)
2026-02-03 08:05:39 Written by zaki zou
Exporting tabular data from UI controls to Excel is a common requirement in C# applications. In both WinForms and ASP.NET projects, users often need to take the data currently displayed in a DataGrid, DataGridView, or GridView and export it to an Excel file for reporting, sharing, or further processing.
In real-world scenarios, exported Excel files are rarely used as raw data only. Readable layouts, header styles, column widths, and number formats are usually expected as part of the export result.
This article demonstrates how to export DataGridView and GridView/DataGrid data to Excel in C# using Spire.XLS for .NET, without relying on Microsoft Office Interop. The solution focuses on exporting displayed data accurately, keeping the implementation clean, and applying Excel formatting in a consistent and reusable way.
Table of Contents
- Advantages of Programmatic Excel Export in C#
- Core Concept: Export Displayed Data via a DataTable
- Step 1: Extract Displayed Data into a DataTable
- Step 2: Export DataTable to Excel in C#
- Step 3: Apply Formatting to the Exported Excel File
- Performance and Practical Considerations
- Summary
- FAQ
Advantages of Programmatic Excel Export in C#
While Microsoft Office Interop can generate Excel files, using a programmatic approach in C# provides clear benefits for exporting data from DataGrid, DataGridView, or GridView:
- Does not require Microsoft Excel to be installed on the machine
- Suitable for server-side or cloud environments
- Maintains high performance even with large datasets
- Simplifies automation and background export scenarios
By exporting data directly via code, developers can create reliable, maintainable, and scalable Excel exports that work consistently across different application types.
Core Concept: Export Displayed Data via a DataTable
Although DataGrid, DataGridView, and GridView are UI controls, they serve the same fundamental purpose: displaying structured data in rows and columns. Attempting to export these controls directly often leads to UI-dependent logic and maintenance challenges.
A more reliable and reusable workflow is:
Displayed UI data → DataTable → Excel file
In this design:
- The DataTable represents exactly what the user sees
- The Excel export logic remains independent of the UI layer
- The same approach works for WinForms and ASP.NET applications
- Formatting and layout can be applied at the Excel level
The DataTable acts as a clean intermediate structure rather than the final export target, and using Spire.XLS for .NET, DataTable can be easily exported to a well-formatted Excel file.
Step 1: Extract Displayed Data into a DataTable
The first step is to extract the currently displayed data from the UI control into a DataTable. This step focuses on capturing visible rows and columns, not on reconstructing the original data source.
Export Displayed Data from DataGridView (WinForms)
In WinForms applications, users typically expect the DataGridView content to be exported as it appears on screen. The following method converts the displayed DataGridView data into a DataTable:
DataTable ConvertDataGridViewToDataTable(DataGridView dgv)
{
    DataTable dt = new DataTable();

    foreach (DataGridViewColumn column in dgv.Columns)
    {
        dt.Columns.Add(column.HeaderText, column.ValueType ?? typeof(string));
    }

    foreach (DataGridViewRow row in dgv.Rows)
    {
        if (row.IsNewRow) continue;

        DataRow dr = dt.NewRow();
        for (int i = 0; i < dgv.Columns.Count; i++)
        {
            dr[i] = row.Cells[i].Value ?? DBNull.Value;
        }
        dt.Rows.Add(dr);
    }

    return dt;
}
This approach preserves column headers, column order, and displayed values when exporting DataGridView data to Excel in C#.
Export Displayed Data from GridView (ASP.NET)
In ASP.NET applications, GridView controls render tabular data for users to view and interact with. To export the displayed GridView data, the rendered rows can be converted into a DataTable as shown below:
DataTable ConvertGridViewToDataTable(GridView gv)
{
    DataTable dt = new DataTable();

    foreach (TableCell cell in gv.HeaderRow.Cells)
    {
        dt.Columns.Add(cell.Text);
    }

    foreach (GridViewRow row in gv.Rows)
    {
        DataRow dr = dt.NewRow();
        for (int i = 0; i < row.Cells.Count; i++)
        {
            dr[i] = row.Cells[i].Text;
        }
        dt.Rows.Add(dr);
    }

    return dt;
}
This method provides a consistent data structure that can be reused for exporting GridView data to Excel in C#, without introducing UI-specific export logic.
If you need to export data directly from a database to an Excel file, you can refer to this guide: Export Database to Excel in C#.
Step 2: Export DataTable to Excel in C#
Once the displayed data has been extracted into a DataTable, exporting it to Excel becomes a UI-independent operation.
In this example, Spire.XLS for .NET is used to generate Excel files programmatically, without requiring Microsoft Excel to be installed.
Install Spire.XLS for .NET
Spire.XLS for .NET can be installed via NuGet:
Install-Package Spire.XLS
You can also download Spire.XLS for .NET and add it to your project manually.
Basic Excel Export Example
using Spire.Xls;

Workbook workbook = new Workbook();
Worksheet worksheet = workbook.Worksheets[0];

// Import DataTable into Excel, including column headers
worksheet.InsertDataTable(exportTable, true, 1, 1);

// Save the Excel file
workbook.SaveToFile("ExportedData.xlsx", ExcelVersion.Version2016);
Below is a preview of the exported Excel file:

This export logic can be reused for DataGrid, DataGridView, and GridView scenarios without modification.
Step 3: Apply Formatting to the Exported Excel File
Formatting is a common requirement for Excel exports, regardless of how the data was sourced. Applying styles, adjusting column widths, and setting number formats significantly improves the usability of the exported file.
The following example demonstrates common formatting operations that can be applied to any exported Excel worksheet:
CellStyle headerStyle = workbook.Styles.Add("HeaderStyle");
headerStyle.Font.IsBold = true;
headerStyle.Font.Size = 13;
headerStyle.HorizontalAlignment = HorizontalAlignType.Center;
headerStyle.VerticalAlignment = VerticalAlignType.Center;
headerStyle.Color = Color.LightGray;

// Apply header style
CellRange headerRange = worksheet.Range[1, 1, 1, worksheet.AllocatedRange.Rows[0].CellsCount];
headerRange.Style = headerStyle;

// Auto-fit columns
worksheet.AllocatedRange.AutoFitColumns();

// Format date and currency columns
worksheet.Range[$"C2:C{worksheet.AllocatedRange.RowCount}"].NumberFormat = "yyyy-mm-dd";
worksheet.Range[$"F2:G{worksheet.AllocatedRange.RowCount}"].NumberFormat = "$#,##0.00";
Below is a preview of the Excel file after applying formatting:

These formatting steps can be combined or extended based on reporting requirements, without changing the data extraction logic.
Spire.XLS for .NET also supports more Excel formatting features, such as conditional formatting, charts, and more. You can check How to Create Excel Files in C# for more formating options.
Performance and Practical Considerations
When exporting large DataGrid or GridView datasets:
- Run export operations asynchronously in desktop applications
- Avoid blocking the UI thread during Excel generation
- Export only necessary or visible columns
- Generate Excel files server-side in ASP.NET applications
Because the export process operates on a DataTable rather than UI elements, it remains maintainable and scalable as data volume increases.
Summary
Exporting DataGrid, DataGridView, or GridView data to Excel in C# does not require Microsoft Office Interop. By extracting the displayed data into a DataTable and generating Excel files programmatically, developers can implement reliable and reusable Excel export functionality.
With consistent formatting support and a clear separation between UI and export logic, this approach works well for real-world reporting scenarios in both desktop and web applications. For evaluating the library or testing export functionality, you can apply for a temporary license.
FAQ
Q1: How can I export DataGridView data to Excel in C#?
A1: You can extract the displayed data from a DataGridView into a DataTable and then use Spire.XLS for .NET to generate an Excel file programmatically, without relying on Microsoft Excel.
Q2: Can I apply formatting when exporting GridView to Excel in C#?
A2: Yes, Spire.XLS allows you to apply styles, adjust column widths, and set number formats to any exported Excel worksheet, ensuring readable and professional-looking reports.
Q3: Do I need Microsoft Excel installed to export DataGrid or GridView data in C#?
A3: No. By using a programmatic library like Spire.XLS, Excel files can be generated directly from DataTable objects without requiring Excel on the machine, making it suitable for server-side and cloud applications.
