C#/VB.NET: Write Data to Excel Worksheets
Excel spreadsheets are scalable grid-based files that are used to organize data and perform calculations. People all across the world use spreadsheets to create tables for personal and business usage. To write a large amount of data into an Excel spreadsheet, it is recommended to use the programming method, which saves time and is less error-prone. In this article, you will learn how to write data into Excel in C# and VB.NET using Spire.XLS for .NET.
- Write Text or Number Values to Specific Cells
- Write Arrays to a Worksheet
- Write a DataTable to a Worksheet
Install Spire.XLS for .NET
To begin with, you need to add the DLL files included in the Spire.XLS for .NET package as references in your .NET project. The DLL files can be either downloaded from this link or installed via NuGet.
PM> Install-Package Spire.XLS
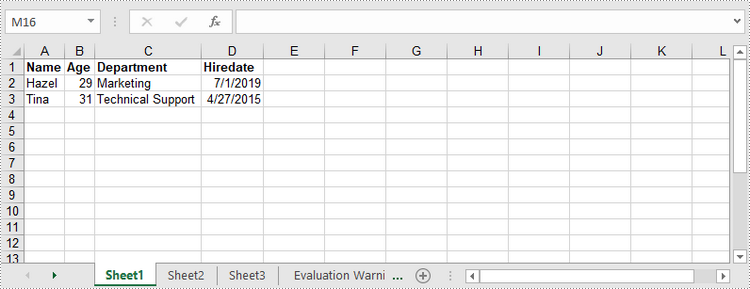
Write Text or Number Values to Specific Cells
A certain cell in a worksheet can be accessed by Worksheet.Range[int row, int column] property. Then, you can add a text value or a number value to the cell through the XlsRange.Value or XlsRange.Value2 property. The following are the detailed steps.
- Create a Workbook object.
- Get the first worksheet through Workbook.Worksheets[] property.
- Get a specific cell through Workhseet.Range[] property.
- Add a text value or a number value to the cell through XlsRange.Value or XlsRange.Value2 property.
- Save the workbook to an Excel file using Workbook.SaveToFile() method.
- C#
- VB.NET
using Spire.Xls;

namespace WriteDataToCells
{
    class Program
    {
        static void Main(string[] args)
        {
            //Create a Workbook object
            Workbook workbook = new Workbook();

            //Get the first worksheet
            Worksheet worksheet = workbook.Worksheets[0];

            //Write data to specific cells
            worksheet.Range[1, 1].Value = "Name";
            worksheet.Range[1, 2].Value = "Age";
            worksheet.Range[1, 3].Value = "Department";
            worksheet.Range[1, 4].Value = "Hiredate";
            worksheet.Range[1, 2].Value = "Hazel";
            worksheet.Range[2, 2].Value2 = 29;
            worksheet.Range[2, 3].Value = "Marketing";
            worksheet.Range[2, 4].Value = "2019-07-01";
            worksheet.Range[3, 1].Value = "Tina";
            worksheet.Range[3, 2].Value2 = 31;
            worksheet.Range[3, 3].Value = "Technical Support";
            worksheet.Range[3, 4].Value = "2015-04-27";

            //Auto fit column widths
            worksheet.AllocatedRange.AutoFitColumns();

            //Apply a style to the first row
            CellStyle style = workbook.Styles.Add("newStyle");
            style.Font.IsBold = true;
            worksheet.Range[1, 1, 1, 4].Style = style;

            //Save to an Excel file
            workbook.SaveToFile("WriteToCells.xlsx", ExcelVersion.Version2016);
        }
    }
}
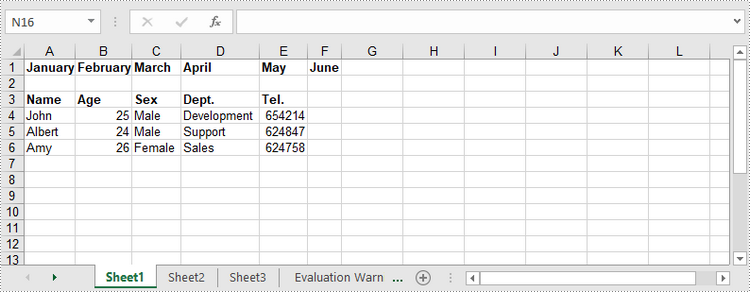
Write Arrays to a Worksheet
Spire.XLS for .NET provides the Worksheet.InsertArrary() method, allowing programmers to write one-dimensional arrays or two-dimensional arrays into the specified cell range of a worksheet. The steps to write arrays to a worksheet are as follows:
- Create a Workbook object.
- Get the first worksheet through Workbook.Worksheets[] property.
- Create a one-dimensional array and a two-dimensional array.
- Insert the arrays to worksheet using Worksheet.InsertArray() method.
- Save the workbook to an Excel file using Workbook.SaveToFile() method.
- C#
- VB.NET
using Spire.Xls;

namespace WriteArraysToWorksheet
{
    class Program
    {
        static void Main(string[] args)
        {
            //Create a Workbook instance
            Workbook workbook = new Workbook();

            //Get the first worksheet
            Worksheet worksheet = workbook.Worksheets[0];

            //Create a one-dimensional array
            string[] oneDimensionalArray = new string[] { "January", "February", "March", "April", "May", "June" };

            //Write the array to the first row of the worksheet
            worksheet.InsertArray(oneDimensionalArray, 1, 1, false);

            //Create a two-dimensional array
            string[,] twoDimensionalArray = new string[,]{

                {"Name", "Age", "Sex", "Dept.", "Tel."},
                {"John", "25", "Male", "Development","654214"},
                {"Albert", "24", "Male", "Support","624847"},
                {"Amy", "26", "Female", "Sales","624758"}
            };

            //Write the array to the worksheet starting from the cell A3
            worksheet.InsertArray(twoDimensionalArray, 3, 1);

            //Auto fit column width in the located range
            worksheet.AllocatedRange.AutoFitColumns();

            //Apply a style to the first and the third row
            CellStyle style = workbook.Styles.Add("newStyle");
            style.Font.IsBold = true;
            worksheet.Range[1, 1, 1, 6].Style = style;
            worksheet.Range[3, 1, 3, 6].Style = style;

            //Save to an Excel file
            workbook.SaveToFile("InsertArrays.xlsx", ExcelVersion.Version2016);
        }
    }
}
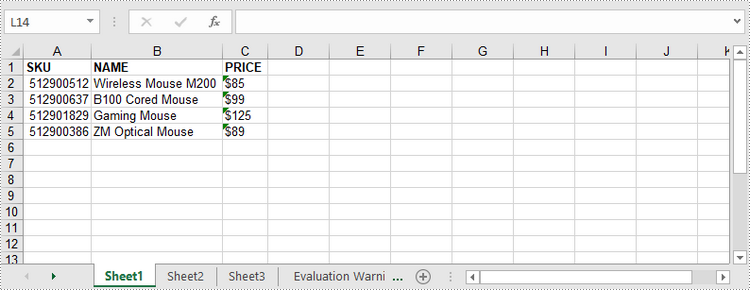
Write a DataTable to a Worksheet
To import data from a DataTable to a worksheet, use the Worksheet.InsertDataTable() method. The following are the detailed steps.
- Create a Workbook object.
- Get the first worksheet through Workbook.Worksheets[] property.
- Create a DataTable with random data.
- Write the DataTable to the worksheet at the specified location using Worksheet.InsertDataTable() method.
- Save the workbook to an Excel file using Workbook.SaveToFile() method.
- C#
- VB.NET
using System;
using System.Data;
using Spire.Xls;

namespace WriteDataTableToWorksheet
{
    class Program
    {
        static void Main(string[] args)
        {
            //Create a Workbook instance
            Workbook workbook = new Workbook();

            //Get the first worksheet
            Worksheet worksheet = workbook.Worksheets[0];

            //Create a DataTable object
            DataTable dataTable = new DataTable();
            dataTable.Columns.Add("SKU", typeof(Int32));
            dataTable.Columns.Add("NAME", typeof(String));
            dataTable.Columns.Add("PRICE", typeof(String));

            //Create rows and add data
            DataRow dr = dataTable.NewRow();
            dr[0] = 512900512;
            dr[1] = "Wireless Mouse M200";
            dr[2] = "$85";
            dataTable.Rows.Add(dr);

            dr = dataTable.NewRow();
            dr[0] = 512900637;
            dr[1] = "B100 Cored Mouse";
            dr[2] = "$99";
            dataTable.Rows.Add(dr);

            dr = dataTable.NewRow();
            dr[0] = 512901829;
            dr[1] = "Gaming Mouse";
            dr[2] = "$125";
            dataTable.Rows.Add(dr);

            dr = dataTable.NewRow();
            dr[0] = 512900386;
            dr[1] = "ZM Optical Mouse";
            dr[2] = "$89";
            dataTable.Rows.Add(dr);

            //Write datatable to the worksheet
            worksheet.InsertDataTable(dataTable, true, 1, 1, true);

            //Auto fit column width in the located range
            worksheet.AllocatedRange.AutoFitColumns();

            //Apply a style to the first and the third row
            CellStyle style = workbook.Styles.Add("newStyle");
            style.Font.IsBold = true;
            worksheet.Range[1, 1, 1, 3].Style = style;

            //Save to an Excel file
            workbook.SaveToFile("InsertDataTable.xlsx", ExcelVersion.Version2016);
        }
    }
}
Apply for a Temporary License
If you'd like to remove the evaluation message from the generated documents, or to get rid of the function limitations, please request a 30-day trial license for yourself.
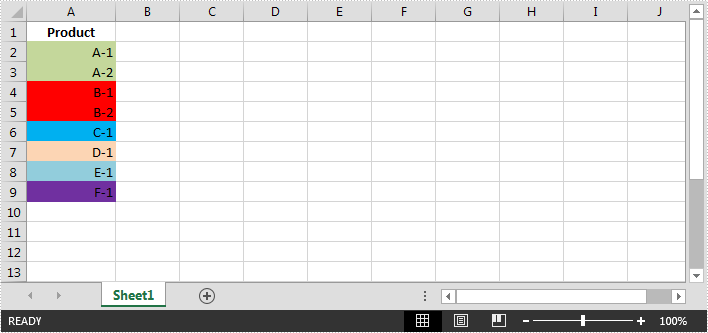
Filter cells by cell color in Excel in C#
In Excel, cells can be filtered based on the cell color. This article is going to show you how to filter rows by cell color using Spire.XLS.
The example Excel file:
Detail steps:
Step 1: Instantiate a Workbook object and load the Excel file.
Workbook workbook = new Workbook();
workbook.LoadFromFile("sample.xlsx");
Step 2: Get the first worksheet.
Worksheet sheet = workbook.Worksheets[0];
Step 3: Add a color filter to filter cells based on cell color.
//Create an auto filter in the sheet and specify the range to be filterd
sheet.AutoFilters.Range = sheet.Range["A1:A9"];
//Get the coloumn to be filterd
FilterColumn filtercolumn = (FilterColumn)sheet.AutoFilters[0];
//Add a color filter to filter the column based on cell color
sheet.AutoFilters.AddFillColorFilter(filtercolumn, Color.Red);
Step 4: Filter the data.
sheet.AutoFilters.Filter();
Step 5: Save the file.
workbook.SaveToFile("ColorFilter.xlsx", ExcelVersion.Version2013);
Screenshot:

Full code:
using Spire.Xls;
using Spire.Xls.Core.Spreadsheet.AutoFilter;
namespace FilterCells
{
    class Program
    {
        static void Main(string[] args)
        {
            //Instantiate a Workbook object
            Workbook workbook = new Workbook();
            //Load the Excel file
            workbook.LoadFromFile("sample.xlsx");

            //Get the first worksheet
            Worksheet sheet = workbook.Worksheets[0];

            //Create an auto filter in the sheet and specify the range to be filterd
            sheet.AutoFilters.Range = sheet.Range["A1:A9"];
            //Get the coloumn to be filterd
            FilterColumn filtercolumn = (FilterColumn)sheet.AutoFilters[0];
            //Add a color filter to filter the column based on cell color
            sheet.AutoFilters.AddFillColorFilter(filtercolumn, Color.Red);

            //Filter the data
            sheet.AutoFilters.Filter();

            //Save the file
            workbook.SaveToFile("ColorFilter.xlsx", ExcelVersion.Version2013);
        }
    }
}
C#: Add or Remove AutoFilter in Excel
Excel's AutoFilter is a simple yet effective tool for managing data, especially when working with large datasets. By using AutoFilters, you can quickly narrow down your focus to specific subsets of information, making it easier to identify trends, make decisions, and keep your spreadsheets organized. Upon completion of the analysis, you may need to remove the AutoFilters to restore visibility to the full dataset. In this article, you will learn how to add or remove AutoFilter in Excel in C# using Spire.XLS for .NET.
- Add AutoFilter to Excel Cells in C#
- Apply Date AutoFilter in Excel in C#
- Apply Custom AutoFilter in Excel in C#
- Remove AutoFilter in Excel in C#
Install Spire.XLS for .NET
To begin with, you need to add the DLL files included in the Spire.XLS for .NET package as references in your .NET project. The DLL files can be either downloaded from this link or installed via NuGet.
PM> Install-Package Spire.XLS
Add AutoFilter to Excel Cells in C#
Spire.XLS for .NET allows you to apply AutoFilter on a specific cell range through the Worksheet.AutoFilters.Range property. The following are the detailed steps:
- Create a Workbook instance.
- Load a sample Excel file using Workbook.LoadFromFile() method.
- Get a specified worksheet using Workbook.Worksheets[] property.
- Add an AutoFilter to a specified cell range using Worksheet.AutoFilters.Range property.
- Save the result file using Workbook.SaveToFile() method.
- C#
using Spire.Xls;

namespace AddAutoFilter
{
    class Program
    {
        static void Main(string[] args)
        {
            //Create a Workbook instance
            Workbook workbook = new Workbook();

            //Load an Excel file
            workbook.LoadFromFile(@"C:\Users\Administrator\Desktop\Data.xlsx");

            //Get the first worksheet
            Worksheet sheet = workbook.Worksheets[0];

            //Create an AutoFilter in the sheet and specify the range to be filtered
            sheet.AutoFilters.Range = sheet.Range["A1:C1"];

            //Save the result file
            workbook.SaveToFile("ExcelAutoFilter.xlsx", ExcelVersion.Version2016);
        }
    }
}

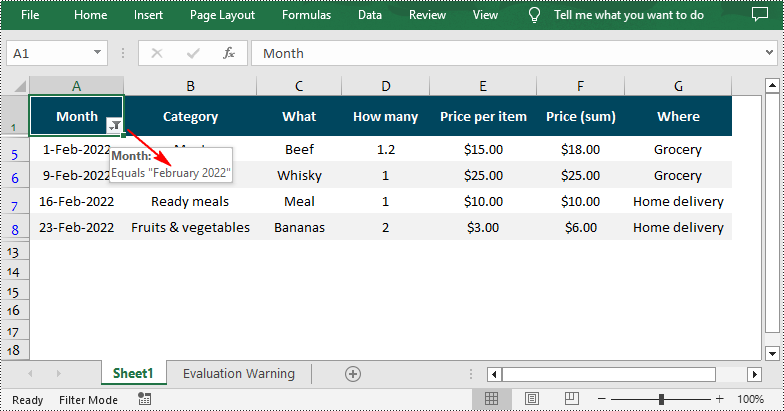
Apply Date AutoFilter in Excel in C#
If you need to explore information related to specific dates or time, you can apply a date filter to the selected range using the Workbook.AutoFilters.AddDateFilter(IAutoFilter column, DateTimeGroupingType dateTimeGroupingType, int year, int month, int day, int hour, int minute, int second) method. The following are detailed steps.
- Create a Workbook instance.
- Load a sample Excel file using Workbook.LoadFromFile() method.
- Get a specified worksheet using Workbook.Worksheets[] property.
- Add an AutoFilter to a specified range using Workbook.AutoFilters.Range property.
- Get the column to be filtered.
- Call the Workbook.AutoFilters.AddDateFilter() method to add a date filter to the column to filter data related to a specified year/month/date, etc.
- Apply the filter using Workbook.AutoFilters.Filter() method.
- Save the result file using Workbook.SaveToFile() method.
- C#
using Spire.Xls;
using Spire.Xls.Core;
using Spire.Xls.Core.Spreadsheet.AutoFilter;

namespace AddAutoFilter
{
    class Program
    {
        static void Main(string[] args)
        {
            //Create a Workbook instance
            Workbook workbook = new Workbook();

            //Load an Excel file
            workbook.LoadFromFile(@"C:\Users\Administrator\Desktop\Data.xlsx");

            //Get the first worksheet
            Worksheet sheet = workbook.Worksheets[0];

            //Create an auto filter in the sheet and specify the range to be filtered
            sheet.AutoFilters.Range = sheet.Range["A1:A12"];

            //Get the column to be filtered
            IAutoFilter filtercolumn = sheet.AutoFilters[0];

            //Add a date filter to filter data related to February 2022
            sheet.AutoFilters.AddDateFilter(filtercolumn, DateTimeGroupingType.Month, 2022, 2, 0, 0, 0, 0);

            //Apply the filter
            sheet.AutoFilters.Filter();

           //Save the result file
            workbook.SaveToFile("DateAutoFilter.xlsx", ExcelVersion.Version2016);
        }
    }
}
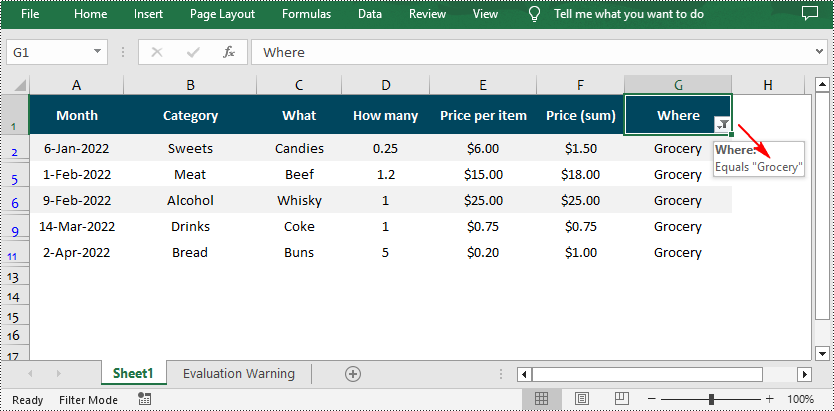
Apply Custom AutoFilter in Excel in C#
The Workbook.AutoFilters.CustomFilter(FilterColumn column, FilterOperatorType operatorType, Object criteria) method allows you to create custom filters based on certain criteria. For example, you can filter data that contains specific text. The following are detailed steps.
- Create a Workbook instance.
- Load a sample Excel file using Workbook.LoadFromFile() method.
- Get a specified worksheet using Workbook.Worksheets[] property.
- Add an AutoFilter to a specified range using Workbook.AutoFilters.Range property.
- Get the column to be filtered.
- Add a custom filter to the column to filter data containing the specified string using Workbook.AutoFilters.CustomFilter() method.
- Apply the filter using Workbook.AutoFilters.Filter() method.
- Save the result file using Workbook.SaveToFile() method.
- C#
using Spire.Xls;
using Spire.Xls.Core.Spreadsheet.AutoFilter;

namespace AddAutoFilter
{
    class Program
    {
        static void Main(string[] args)
        {
            //Create a Workbook instance
            Workbook workbook = new Workbook();

            //Load an Excel file
            workbook.LoadFromFile(@"C:\Users\Administrator\Desktop\Data.xlsx");

            //Get the first worksheet
            Worksheet sheet = workbook.Worksheets[0];

            //Create an auto filter in the sheet and specify the range to be filtered
            sheet.AutoFilters.Range = sheet.Range["G1:G12"];

            //Get the column to be filtered
            FilterColumn filtercolumn = (FilterColumn)sheet.AutoFilters[0];

            //Add a custom filter to filter data containing the string "Grocery"
            string strCrt = "Grocery";
            sheet.AutoFilters.CustomFilter(filtercolumn, FilterOperatorType.Equal, strCrt);

            //Apply the filter
            sheet.AutoFilters.Filter();

           //Save the result file
            workbook.SaveToFile("CustomAutoFilter.xlsx", ExcelVersion.Version2016);
        }
    }
}
Remove AutoFilter in Excel in C#
In addition to adding AutoFilters in Excel files, Spire.XLS for .NET also support removing or deleting the AutoFilters from Excel through the Worksheet.AutoFilters.Clear() method. The following are detailed steps.
- Create a Workbook instance.
- Load a sample Excel file using Workbook.LoadFromFile() method.
- Get a specified worksheet using Workbook.Worksheets[sheetIndex] property.
- Remove AutoFilter from the worksheet using Worksheet.AutoFilters.Clear() method.
- Save the result file using Workbook.SaveToFile() method.
- C#
using Spire.Xls;

namespace AddAutoFilter
{
    class Program
    {
        static void Main(string[] args)
        {
            //Create a Workbook instance
            Workbook workbook = new Workbook();

            //Load an Excel file
            workbook.LoadFromFile("CustomAutoFilter.xlsx");

            //Get the first worksheet
            Worksheet sheet = workbook.Worksheets[0];

            //Delete AutoFilter from the sheet
            sheet.AutoFilters.Clear();

           //Save the result file
            workbook.SaveToFile("RemoveAutoFilter.xlsx", ExcelVersion.Version2016);
        }
    }
}
Apply for a Temporary License
If you'd like to remove the evaluation message from the generated documents, or to get rid of the function limitations, please request a 30-day trial license for yourself.
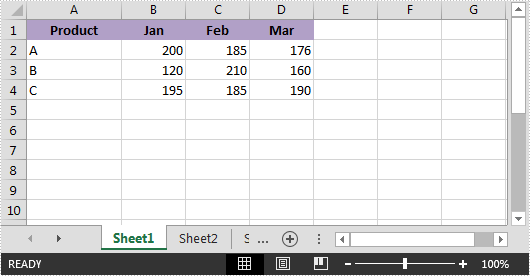
Add a Total Row to Table in Excel in C#
We can quickly total data in an Excel table by adding a total row. This article demonstrates how to add a total row to a table in Excel using Spire.XLS.
Blow is the screenshot of the example file:
Detail steps:
Step 1: Instantiate a Workbook object and load the excel file.
Workbook workbook = new Workbook();
workbook.LoadFromFile("Input.xlsx");
Step 2: Get the first worksheet.
Worksheet sheet = workbook.Worksheets[0];
Step 3: Create a table with the data from the specific cell range.
IListObject table = sheet.ListObjects.Create("Table", sheet.Range["A1:D4"]);
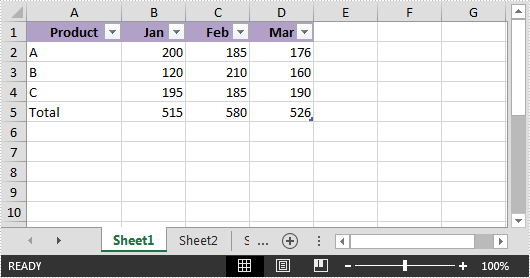
Step 4: Display total row.
table.DisplayTotalRow = true;
Step 5: Add a total row.
table.Columns[0].TotalsRowLabel = "Total";
table.Columns[1].TotalsCalculation = ExcelTotalsCalculation.Sum;
table.Columns[2].TotalsCalculation = ExcelTotalsCalculation.Sum;
table.Columns[3].TotalsCalculation = ExcelTotalsCalculation.Sum;
Step 6: Save the file.
workbook.SaveToFile("AddTotalRow.xlsx", ExcelVersion.Version2013);
Output:
Full code:
using Spire.Xls;
using Spire.Xls.Core;
namespace AddTotalRow
{
    class Program
    {
        static void Main(string[] args)
        {
            //Instantiate a Workbook object
            Workbook workbook = new Workbook();
            //Load the Excel file
            workbook.LoadFromFile("Input.xlsx");

            //Get the first worksheet
            Worksheet sheet = workbook.Worksheets[0];

            //Create a table with the data from the specific cell range
            IListObject table = sheet.ListObjects.Create("Table", sheet.Range["A1:D4"]);

            //Display total row
            table.DisplayTotalRow = true;

            //Add a total row
            table.Columns[0].TotalsRowLabel = "Total";
            table.Columns[1].TotalsCalculation = ExcelTotalsCalculation.Sum;
            table.Columns[2].TotalsCalculation = ExcelTotalsCalculation.Sum;
            table.Columns[3].TotalsCalculation = ExcelTotalsCalculation.Sum;

            //Save the file
            workbook.SaveToFile("AddTotalRow.xlsx", ExcelVersion.Version2013);
        }
    }
}
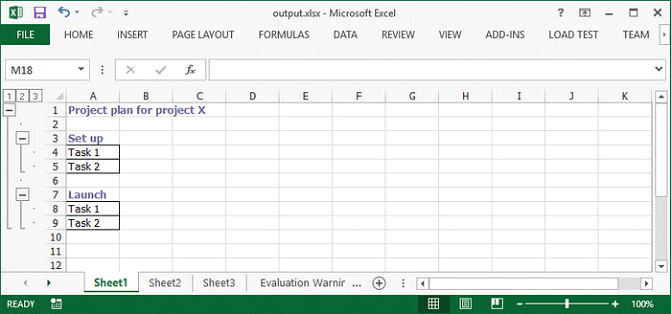
Create Nested Group in Excel in C#, VB.NET
Nested group is a group that contains multiple inner, nested groups. This article demonstrates how to create groups and how to outline the outer and inner groups using Spire.XLS with C# and VB.NET.
Step 1: Create a Workbook instance and get the first worksheet.
Workbook workbook = new Workbook();
Worksheet sheet = workbook.Worksheets[0];
Step 2: Insert sample data to cells.
sheet.Range["A1"].Value = "Project plan for project X";
sheet.Range["A3"].Value = "Set up";
sheet.Range["A4"].Value = "Task 1";
sheet.Range["A5"].Value = "Task 2";
sheet.Range["A7"].Value = "Launch";
sheet.Range["A8"].Value = "Task 1";
sheet.Range["A9"].Value = "Task 2";
Step 3: Set the IsSummaryRowBelow property as false, which indicates the summary rows appear above detail rows.
sheet.PageSetup.IsSummaryRowBelow = false;
Step 4: Group the rows that you want to group.
sheet.GroupByRows(2, 9, false);
sheet.GroupByRows(4, 5, false);
sheet.GroupByRows(8, 9, false);
Step 5: Save the file.
workbook.SaveToFile("output.xlsx", ExcelVersion.Version2013);
Output:
Full Code:
using Spire.Xls;
using System.Drawing;
namespace CreateNestedGroup
{
    class Program
    {
        static void Main(string[] args)
        {
            Workbook workbook = new Workbook();
            Worksheet sheet = workbook.Worksheets[0];

            CellStyle style = workbook.Styles.Add("style");
            style.Font.Color = Color.CadetBlue;
            style.Font.IsBold = true;

            sheet.PageSetup.IsSummaryRowBelow = false;
            sheet.Range["A1"].Value = "Project plan for project X";
            sheet.Range["A1"].CellStyleName = style.Name;

            sheet.Range["A3"].Value = "Set up";
            sheet.Range["A3"].CellStyleName = style.Name;
            sheet.Range["A4"].Value = "Task 1";
            sheet.Range["A5"].Value = "Task 2";
            sheet.Range["A4:A5"].BorderAround(LineStyleType.Thin);
            sheet.Range["A4:A5"].BorderInside(LineStyleType.Thin);

            sheet.Range["A7"].Value = "Launch";
            sheet.Range["A7"].CellStyleName = style.Name;
            sheet.Range["A8"].Value = "Task 1";
            sheet.Range["A9"].Value = "Task 2";
            sheet.Range["A8:A9"].BorderAround(LineStyleType.Thin);
            sheet.Range["A8:A9"].BorderInside(LineStyleType.Thin);

            sheet.GroupByRows(2, 9, false);
            sheet.GroupByRows(4, 5, false);
            sheet.GroupByRows(8, 9, false);
            workbook.SaveToFile("output.xlsx", ExcelVersion.Version2013);
        }
    }
}
Imports Spire.Xls
Imports System.Drawing
Namespace CreateNestedGroup
	Class Program
		Private Shared Sub Main(args As String())
			Dim workbook As New Workbook()
			Dim sheet As Worksheet = workbook.Worksheets(0)

			Dim style As CellStyle = workbook.Styles.Add("style")
			style.Font.Color = Color.CadetBlue
			style.Font.IsBold = True

			sheet.PageSetup.IsSummaryRowBelow = False
			sheet.Range("A1").Value = "Project plan for project X"
			sheet.Range("A1").CellStyleName = style.Name

			sheet.Range("A3").Value = "Set up"
			sheet.Range("A3").CellStyleName = style.Name
			sheet.Range("A4").Value = "Task 1"
			sheet.Range("A5").Value = "Task 2"
			sheet.Range("A4:A5").BorderAround(LineStyleType.Thin)
			sheet.Range("A4:A5").BorderInside(LineStyleType.Thin)

			sheet.Range("A7").Value = "Launch"
			sheet.Range("A7").CellStyleName = style.Name
			sheet.Range("A8").Value = "Task 1"
			sheet.Range("A9").Value = "Task 2"
			sheet.Range("A8:A9").BorderAround(LineStyleType.Thin)
			sheet.Range("A8:A9").BorderInside(LineStyleType.Thin)

			sheet.GroupByRows(2, 9, False)
			sheet.GroupByRows(4, 5, False)
			sheet.GroupByRows(8, 9, False)
			workbook.SaveToFile("output.xlsx", ExcelVersion.Version2013)
		End Sub
	End Class
End Namespace
Expand and Collapse Groups in Excel with C#
When we group rows or columns in Excel, we can use the expand/collapse button to show/hide the grouped data. This article demonstrates how to expand and collapse the groups in an Excel file programmatically using Spire.XLS.
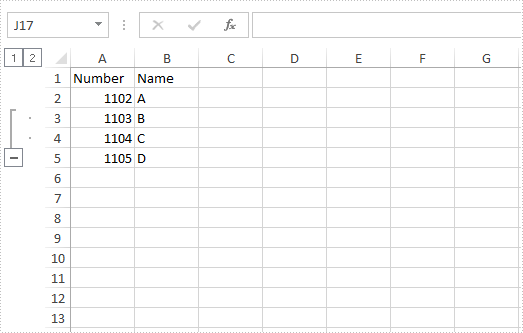
Below screenshot shows the sample Excel file with rows 3 and 4 grouped:
Detail steps:
Step 1: Create a Workbook instance and load the Excel file.
Workbook workbook = new Workbook();
workbook.LoadFromFile("Input.xlsx");
Step 2: Get the first worksheet.
Worksheet sheet = workbook.Worksheets[0];
Step 3: Expand or Collapse the grouped rows with ExpandCollapseFlags set to expand parent.
//Expand group
sheet.Range["A3:B4"].ExpandGroup(GroupByType.ByRows, ExpandCollapseFlags.ExpandParent);

//Collapse group
//sheet.Range["A3:B4"].CollapseGroup(GroupByType.ByRows);
Step 4: Save the file.
workbook.SaveToFile("Output.xlsx");
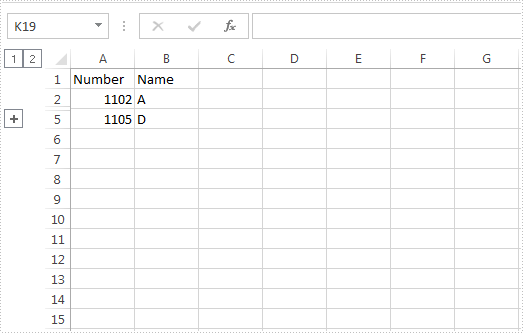
The screenshot after running the project:
Full code:
using Spire.Xls;
namespace ExpandandCollapseGroups
{
    class Program
    {
        static void Main(string[] args)
        {
            //Create Workbook instance
            Workbook workbook = new Workbook();
            //Load the Excel file
            workbook.LoadFromFile("Input.xlsx");

            //Get the first worksheet
            Worksheet sheet = workbook.Worksheets[0];

            //Expand the grouped rows with ExpandCollapseFlags set to expand parent
            sheet.Range["A3:B4"].ExpandGroup(GroupByType.ByRows, ExpandCollapseFlags.ExpandParent);

            //Collapse the grouped rows
            //sheet.Range["A3:B4"].CollapseGroup(GroupByType.ByRows);

            //Save the file
            workbook.SaveToFile("Output.xlsx");
        }
    }
}
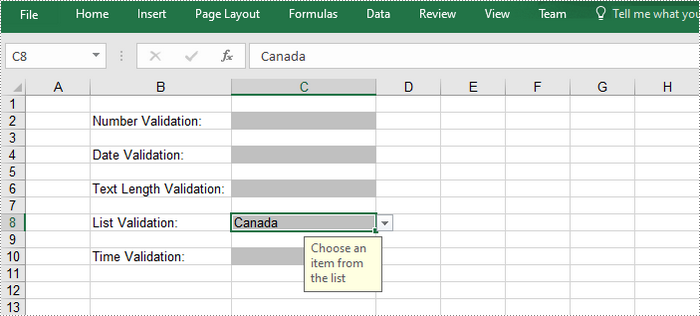
C#/VB.NET: Apply or Remove Data Validation in Excel
The data validation feature in Excel allows the user to control what data can be entered into a cell. For example, you could use data validation to make sure a numeric entry is between 1 and 5, make sure a text entry is less than 20 characters, or make sure the value entered in a cell is from a predefined list. In this article, you will learn how to apply or remove data validation in Excel in C# and VB.NET using Spire.XLS for .NET.
Install Spire.XLS for .NET
To begin with, you need to add the DLL files included in the Spire.XLS for .NET package as references in your .NET project. The DLL files can be either downloaded from this link or installed via NuGet.
PM> Install-Package Spire.XLS
Apply Data Validation to Excel Cells
The following are the steps to add various types of data validation to cells using Spire.XLS for .NET.
- Create a Workbook object
- Get the first worksheet through Workbook.Worksheets[index] property.
- Get a specific cell through Worksheet.Range property.
- Set the data type allowed in the cell through CellRange.DataValidation.AllowType property. You can select Integer, Time, Date, TextLength, Decimal, etc. as the data type.
- Set the comparison operator through CellRange.DataValiation.CompareOperator property. The comparison operators include Between, NotBetween, Less, Greater, and Equal.
- Set one or two formulas for the data validation through CellRange.DataValidation.Formula1 and CellRange.DataValidation.Formula2 properties.
- Set the input prompt through CellRange.DataValidation.InputMessage property.
- Save the workbook to an Excel file using Workbook.SaveToFile() method.
- C#
- VB.NET
using System;
using Spire.Xls;
namespace ApplyDataValidation
{
class Program
{
static void Main(string[] args)
{
//Create a Workbook object
Workbook workbook = new Workbook();
//Get the first worksheet
Worksheet sheet = workbook.Worksheets[0];
//Insert text in cells
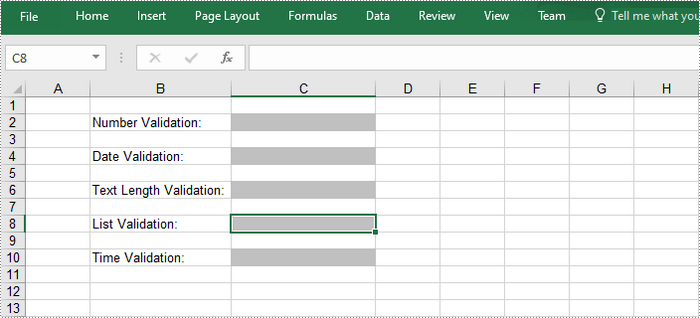
sheet.Range["B2"].Text = "Number Validation:";
sheet.Range["B4"].Text = "Date Validation:";
sheet.Range["B6"].Text = "Text Length Validation:";
sheet.Range["B8"].Text = "List Validation:";
sheet.Range["B10"].Text = "Time Validation:";
//Add a number validation to C2
CellRange rangeNumber = sheet.Range["C2"];
rangeNumber.DataValidation.AllowType = CellDataType.Integer;
rangeNumber.DataValidation.CompareOperator = ValidationComparisonOperator.Between;
rangeNumber.DataValidation.Formula1 = "1";
rangeNumber.DataValidation.Formula2 = "10";
rangeNumber.DataValidation.InputMessage = "Enter a number between 1 and 10";
rangeNumber.Style.KnownColor = ExcelColors.Gray25Percent;
//Add a date validation to C4
CellRange rangeDate = sheet.Range["C4"];
rangeDate.DataValidation.AllowType = CellDataType.Date;
rangeDate.DataValidation.CompareOperator = ValidationComparisonOperator.Between;
rangeDate.DataValidation.Formula1 = "1/1/2010";
rangeDate.DataValidation.Formula2 = "12/31/2020";
rangeDate.DataValidation.InputMessage = "Enter a date between 1/1/2010 and 12/31/2020";
rangeDate.Style.KnownColor = ExcelColors.Gray25Percent;
//Add a text length validation to C6
CellRange rangeTextLength = sheet.Range["C6"];
rangeTextLength.DataValidation.AllowType = CellDataType.TextLength;
rangeTextLength.DataValidation.CompareOperator = ValidationComparisonOperator.LessOrEqual;
rangeTextLength.DataValidation.Formula1 ="5";
rangeTextLength.DataValidation.InputMessage = "Enter text lesser than 5 characters";
rangeTextLength.Style.KnownColor = ExcelColors.Gray25Percent;
//Apply a list validation to C8
CellRange rangeList = sheet.Range["C8"];
rangeList.DataValidation.Values = new String[] { "United States", "Canada", "United Kingdom", "Germany" };
rangeList.DataValidation.IsSuppressDropDownArrow = false;
rangeList.DataValidation.InputMessage ="Choose an item from the list";
rangeList.Style.KnownColor =ExcelColors.Gray25Percent;
//Apply a time validation to C10
CellRange rangeTime = sheet.Range["C10"];
rangeTime.DataValidation.AllowType = CellDataType.Time;
rangeTime.DataValidation.CompareOperator = ValidationComparisonOperator.Between;
rangeTime.DataValidation.Formula1 = "9:00";
rangeTime.DataValidation.Formula2 = "12:00";
rangeTime.DataValidation.InputMessage = "Enter a time between 9:00 and 12:00";
rangeTime.Style.KnownColor = ExcelColors.Gray25Percent;
//Auto fit width of column 2
sheet.AutoFitColumn(2);
//Set the width of column 3
sheet.Columns[2].ColumnWidth = 20;
//Save to file
workbook.SaveToFile("ApplyDataValidation.xlsx", ExcelVersion.Version2016);
}
}
}
Remove Data Validation from Excel Cells
Below are the steps to remove data validation from the specified cell using Spire.XLS for .NET.
- Create a Workbook object.
- Load the Excel file containing data validation using Workbook.LoadFromFile() method.
- Get the first worksheet though Workbook.Worksheets[index] property.
- Create an array of rectangles, which is used to locate the cells where the validation will be removed.
- Remove the data validation from the selected cells using Worksheet.DVTable.Remove() method.
- Save the workbook to another Excel file using Workbook.SaveToFile() method.
- C#
- VB.NET
using Spire.Xls;
using System.Drawing;

namespace RemoveDataValidation
{
    class Program
    {
        static void Main(string[] args)
        {
            //Create a Workbook object
            Workbook workbook = new Workbook();

            //Load a sample Excel file
            workbook.LoadFromFile("C:\\Users\\Administrator\\Desktop\\ApplyDataValidation.xlsx");

            //Get the first worksheet
            Worksheet worksheet = workbook.Worksheets[0];

            //Create an array of rectangles, which is used to locate the ranges in worksheet
            Rectangle[] rectangles = new Rectangle[]{

                //one Rectangle(startColumnIndex, startRowIndex, endColumnIndex, endRowIndex) specifies a  cell range to remove data validation
                //the column or row index starts at 0
                new Rectangle(0, 0, 2, 9)
            };

            //Remove the data validation from the selected cells
            worksheet.DVTable.Remove(rectangles);

            //Save the workbook to an Excel file
            workbook.SaveToFile("RemoveDataValidation.xlsx");
        }
    }
}
Apply for a Temporary License
If you'd like to remove the evaluation message from the generated documents, or to get rid of the function limitations, please request a 30-day trial license for yourself.
How to Split Excel Data into Multiple Columns in C#, VB.NET
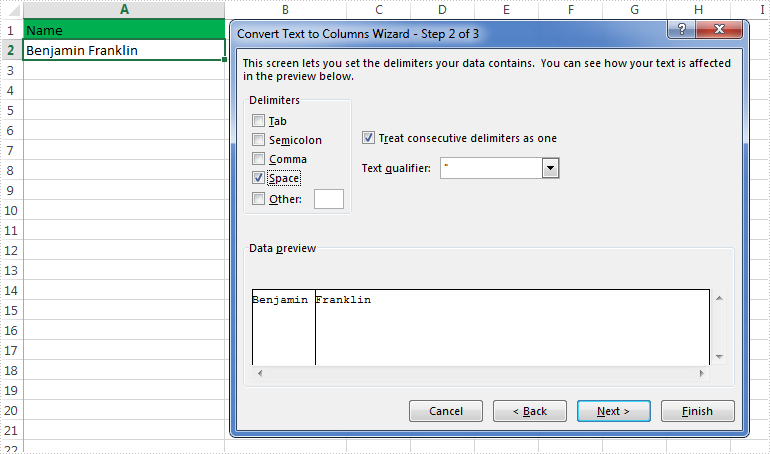
It's a straightforward task to split data into multiple columns in Microsoft Excel, as we can use the Convert Text to Columns Wizard to achieve this feature easily, for example, split a column of names into a column of first name and a column of last name. Below picture shows how we can split data in Excel:
In this article, we will introduce how to split excel data into multiple columns programmatically in C# and VB.NET using Spire.XLS for .NET.
Detail steps and code snippets:
Step 1: Create a new object of Workbook class and load the excel file.
Workbook book = new Workbook();
book.LoadFromFile("Test.xlsx");
Step 2: Get the first worksheet.
Worksheet sheet = book.Worksheets[0];
Step 3: Split data into separate columns by the delimited characters – space.
Initialize a string and a string array, loop through from the second row to the last row, and split the data by the delimited characters – space, save the split data into the array and write the array items into separate columns of the first worksheet.
string[] splitText = null;
string text = null;
for (int i = 1; i < sheet.LastRow; i++)
{
    text = sheet.Range[i + 1, 1].Text;
    splitText = text.Split(' ');
    for (int j = 0; j < splitText.Length; j++)
    {
        sheet.Range[i + 1, 1 + j + 1].Text = splitText[j];
    }
}
Step 4: Save the file.
book.SaveToFile("result.xlsx", ExcelVersion.Version2010);
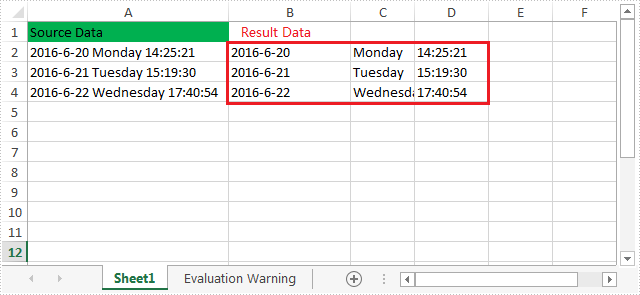
Effective screenshot:
Full codes:
using Spire.Xls;

namespace Split_Data_into_Multiple_Columns
{
    class Program
    {
        static void Main(string[] args)
        {
            Workbook book = new Workbook();
            book.LoadFromFile("Test.xlsx");
            Worksheet sheet = book.Worksheets[0];
            string[] splitText = null;
            string text = null;
            for (int i = 1; i < sheet.LastRow; i++)
            {
                text = sheet.Range[i + 1, 1].Text;
                splitText = text.Split(' ');
                for (int j = 0; j < splitText.Length; j++)
                {
                    sheet.Range[i + 1, 1 + j + 1].Text = splitText[j];
                }
            }
            book.SaveToFile("result.xlsx", ExcelVersion.Version2010);
        }
    }
}
Imports Spire.Xls

Namespace Split_Data_into_Multiple_Columns
	Class Program
		Private Shared Sub Main(args As String())
			Dim book As New Workbook()
			book.LoadFromFile("Test.xlsx")
			Dim sheet As Worksheet = book.Worksheets(0)
			Dim splitText As String() = Nothing
			Dim text As String = Nothing
			For i As Integer = 1 To sheet.LastRow - 1
				text = sheet.Range(i + 1, 1).Text
				splitText = text.Split(" "C)
				For j As Integer = 0 To splitText.Length - 1
					sheet.Range(i + 1, 1 + j + 1).Text = splitText(j)
				Next
			Next
			book.SaveToFile("result.xlsx", ExcelVersion.Version2010)
		End Sub
	End Class
End Namespace
How to clone Excel Font Style in C#
The colorful excel font makes the whole excel document attractive and it is easy to give more importance to some data we'd like to show to others. With the help of Spire.XLS, developers can easily set Excel font and copy formatting from one place and apply it to another. This article will focus on demonstrating how to clone Excel font style directly when adding the new text to Excel worksheet in C#.
Note: Before Start, please ensure that you have download the latest version of Spire.XLS (V7.8.64 or above) and add Spire.xls.dll in the bin folder as the reference of Visual Studio.
Here comes to the code snippet of how to clone cell style for the text in Excel worksheets.
Step 1: Create a new excel document instance and get the first worksheet.
Workbook book = new Workbook();
Worksheet sheet = book.Worksheets[0];
Step 2: Add the text to the Excel sheet cell range A1.
sheet.Range["A1"].Text = "Text1";
Step 3: Set A1 cell range's CellStyle.
CellStyle style = book.Styles.Add("style");
style.Font.FontName = "Calibri";
style.Font.Color = Color.Red;
style.Font.Size = 12;
style.Font.IsBold = true;
style.Font.IsItalic = true;
sheet.Range["A1"].CellStyleName = style.Name
Step 4: Use the method style.clone() to clone the same style for B2 cell range.
CellStyle csOrieign = style.clone();
sheet.Range["B2"].Text = "Text2";
sheet.Range["B2"].CellStyleName = csOrieign.Name;
Step 5: Clone the same style for C3 cell range and then reset the font color for the text.
CellStyle csGreen = style.clone();
csGreen.Font.Color = Color.Green;
sheet.Range["C3"].Text = "Text3";
sheet.Range["C3"].CellStyleName = csGreen.Name;
Step 6: Save the document to file and set the excel version.
book.SaveToFile("sample2.xlsx", ExcelVersion.Version2010);
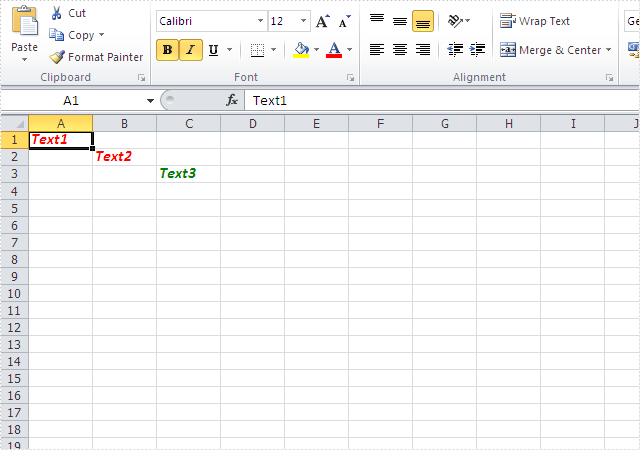
Effective screenshots:
Full codes:
using Spire.Xls;
using System.Drawing;
namespace CloneExcelFont
{
    class Program
    {
        static void Main(string[] args)
        {
            Workbook book = new Workbook();
            Worksheet sheet = book.Worksheets[0];

            sheet.Range["A1"].Text = "Text1";
            CellStyle style = book.Styles.Add("style");

            style.Font.FontName = "Calibri";
            style.Font.Color = Color.Red;
            style.Font.Size = 12;
            style.Font.IsBold = true;
            style.Font.IsItalic = true;
            sheet.Range["A1"].CellStyleName = style.Name;

            CellStyle csOrieign = style.clone();
            sheet.Range["B2"].Text = "Text2";
            sheet.Range["B2"].CellStyleName = csOrieign.Name;

            CellStyle csGreen = style.clone();
            csGreen.Font.Color = Color.Green;
            sheet.Range["C3"].Text = "Text3";
            sheet.Range["C3"].CellStyleName = csGreen.Name;

            book.SaveToFile("sample2.xlsx", ExcelVersion.Version2010);

        }
    }
}
Retrieve data from one excel worksheet and extract to a new excel file in C#
Searching data is a powerful data processing function of Microsoft excel, but it doesn't allow users to extract the selected data to a new excel file directly. It's almost impossible for us to copy data row by row manually from one excel file to another, so it cannot entirely meet our requirements especially when we want to retrieve and extract the interesting data from a large excel file.
This article will demonstrate how to retrieve data from one excel worksheet and extract to a new excel file with Spire.XLS in C#.
Note: Before start, please download and install Spire.XLS correctly. Then add Spire.XLS.dll file as reference of your project.
Below is the screenshot of the original excel worksheet:
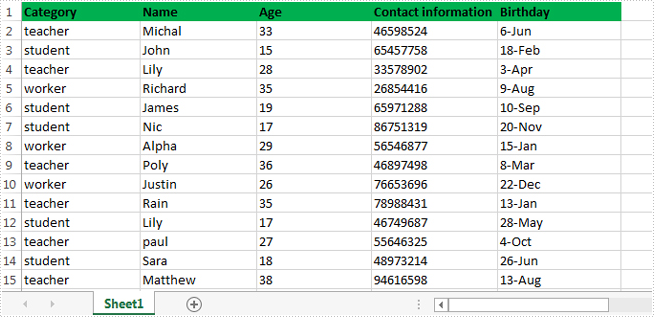
In this sample, all of the data related to teacher were extracted to a new excel file.
Detail steps overview:
Step 1: Create a new workbook instance and get the first worksheet.
Workbook newBook = new Workbook();
Worksheet newSheet = newBook.Worksheets[0];
Step 2: Create a new workbook instance and load the sample excel file.
Workbook workbook = new Workbook();
workbook.LoadFromFile("Information.xlsx");
Step 3: Get the worksheet where you want to retrieve and extract data from. In this sample, it's the first worksheet.
Worksheet sheet = workbook.Worksheets[0];
Step 4: Retrieve data and extract to the first worksheet of the new excel workbook.
int i = 1;
int columnCount = sheet.Columns.Count();
foreach (CellRange range in sheet.Columns[0])
{
    if (range.Text == "teacher")
        {
            CellRange sourceRange = sheet.Range[range.Row, 1, range.Row, columnCount];
            CellRange destRange = newSheet.Range[i, 1, i, columnCount];
            sheet.Copy(sourceRange, destRange, true);
            i++;
        }
}
Step 5: Save the target file as NewForm.xlsx.
newBook.SaveToFile("NewForm.xlsx", ExcelVersion.Version2010);
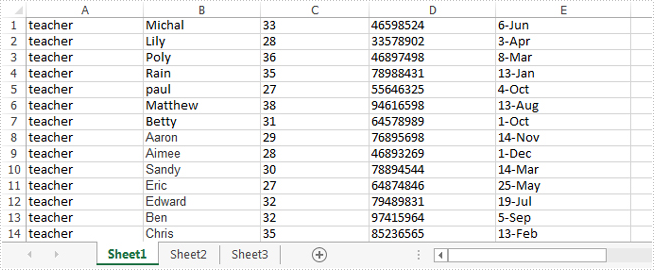
Effective screenshot:
Full codes:
using System.Linq;
using Spire.Xls;

namespace Retrieve_and_extract_data
{
    class Program
    {
        static void Main(string[] args)
        {
            Workbook newBook = new Workbook();
            Worksheet newSheet = newBook.Worksheets[0];
            Workbook workbook = new Workbook();
            workbook.LoadFromFile("Information.xlsx");
            Worksheet sheet = workbook.Worksheets[0];
            int i = 1;
            int columnCount = sheet.Columns.Count();
            foreach (CellRange range in sheet.Columns[0])
            {
                if (range.Text == "teacher")
                {
                    CellRange sourceRange = sheet.Range[range.Row, 1, range.Row, columnCount];
                    CellRange destRange = newSheet.Range[i, 1, i, columnCount];
                    sheet.Copy(sourceRange, destRange, true);
                    i++;
                }
            }
            newBook.SaveToFile("NewForm.xlsx", ExcelVersion.Version2010);

        }
    }
}