
Knowledgebase (2016)
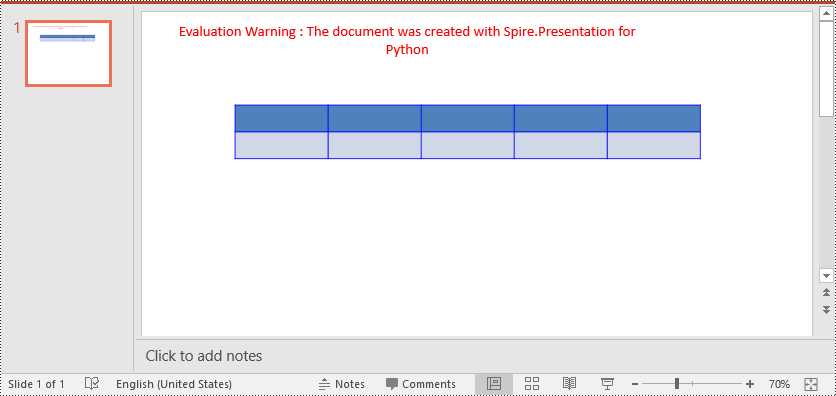
Table borders in PowerPoint refer to the visible lines or outlines that surround the cells within a table. These borders provide a visual separation between cells and help define the boundaries of the table. By setting or modifying table borders, you can customize the appearance of tables in your PowerPoint presentations. In this article, we will guide you on how to set and remove table borders in PowerPoint in Python using Spire.Presentation for Python.
Install Spire.Presentation for Python
This scenario requires Spire.Presentation for Python and plum-dispatch v1.7.4. They can be easily installed in your Windows through the following pip command.
pip install Spire.Presentation
If you are unsure how to install, please refer to this tutorial: How to Install Spire.Presentation for Python on Windows
Set Table Borders in PowerPoint in Python
Spire.Presentation for Python provides the ITable.SetTableBorder() method, which allows you to set borders for a table in PowerPoint. The detailed steps are as follows.
- Create an object of the Presentation class.
- Get the first slide of the presentation using Presentation.Slides[] property.
- Add a table to the slide using ISlide.Shapes.AppendTable() method.
- Add borders to the table and set the border type, width, and color using ITable.SetTableBorder() method.
- Save the result presentation using Presentation.SaveToFile() method.
- Python
from spire.presentation.common import *
from spire.presentation import *

# Create a Presentation object
presentation = Presentation()
# Get  the first slide of the presentation
slide = presentation.Slides[0]

# Specify the number and size of rows and columns in table
widths = [100, 100, 100, 100, 100]
heights = [20, 20]

# Add a table to the first slide
table = slide.Shapes.AppendTable(100, 100, widths, heights)

# Add borders to the table and set the border type, width, and color
table.SetTableBorder(TableBorderType.All, 1, Color.get_Blue())

# Save the result presentation
presentation.SaveToFile("SetBorders.pptx", FileFormat.Pptx2013)
presentation.Dispose()
Remove Table Borders in PowerPoint in Python
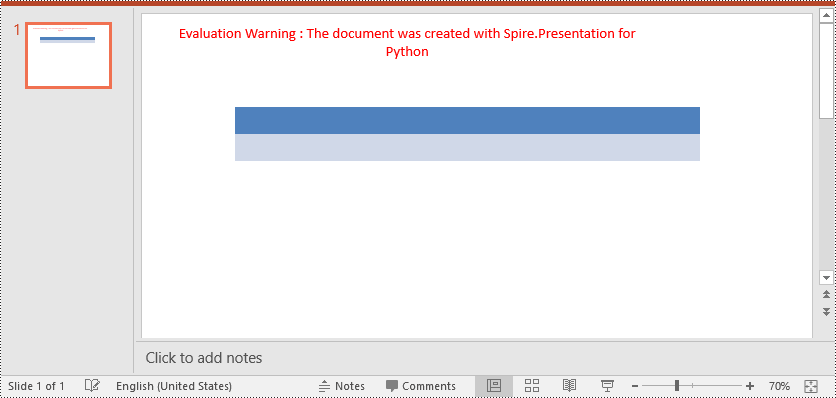
To remove borders from a table, you need to iterate through the cells in the table and then remove the borders from each cell. The detailed steps are as follows.
- Create an object of the Presentation class.
- Load a PowerPoint presentation using Presentation.LoadFromFile() method.
- Get a specific slide of the presentation using Presentation.Slides[] property.
- Get the table on the slide.
- Iterate through the rows in the table and the cells in each row.
- Remove the borders from each cell by setting the fill type of the top, bottom, left and right borders of the cell as none.
- Save the result presentation using Presentation.SaveToFile() method.
- Python
from spire.presentation.common import *
from spire.presentation import *

# Create a PowerPoint presentation
presentation = Presentation()
# Load a PowerPoint presentation
presentation.LoadFromFile("SetBorders.pptx")

# Get the first slide
slide = presentation.Slides[0]
# Get the table on the slide
table = slide.Shapes[0] if isinstance(slide.Shapes[0], ITable) else None

# Iterate through the rows and cells in the table
for row in table.TableRows:
    for cell in row:
        # Remove borders from each cell by setting the fill type of the top, bottom, left and right borders of the cell as none
        cell.BorderTop.FillType = FillFormatType.none
        cell.BorderBottom.FillType = FillFormatType.none
        cell.BorderLeft.FillType = FillFormatType.none
        cell.BorderRight.FillType = FillFormatType.none

# Save the result presentation
presentation.SaveToFile("RemoveBorders.pptx", FileFormat.Pptx2013)
presentation.Dispose()
Apply for a Temporary License
If you'd like to remove the evaluation message from the generated documents, or to get rid of the function limitations, please request a 30-day trial license for yourself.
Adding the ability to edit permission area in a Word document can help users specify certain sections for others to edit while protecting the rest of the document from accidental modifications. This is particularly useful for scenarios like collaborative documents, document reviews, and comments. On the other hand, removing editable area functionality allows the document to be restored to a read-only state when specific sections do not need to be edited, ensuring the integrity and security of the document content. This article will explain how to use Spire.Doc for .NET to add or remove editable area in a Word document within a C# project.
Install Spire.Doc for .NET
To begin with, you need to add the DLL files included in the Spire.Doc for .NET package as references in your .NET project. The DLL files can be either downloaded from this link or installed via NuGet.
PM> Install-Package Spire.Doc
Add Editable Area in a Word Document in C#
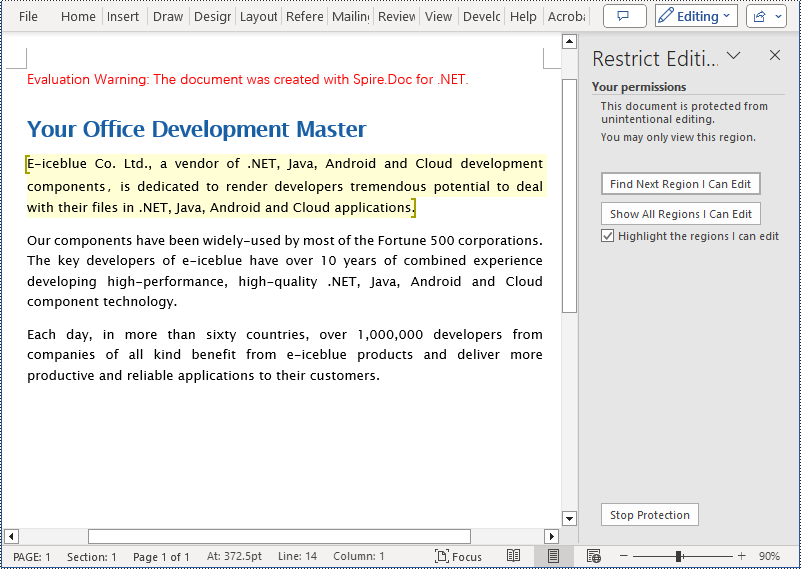
The steps to add editable area in a Word document involve inserting PermissionStart and PermissionEnd objects in the document and setting the document to read-only protection mode to ensure that the content within the specified areas can be edited while the rest remains read-only. Here are the detailed steps:
- Create a Document object.
- Load a Word document using the Document.LoadFromFile() method.
- Access a section of the document through the Document.Sections[index] property.
- Create a PermissionStart object using PermissionStart permissionStart = new PermissionStart(document, id) to mark the beginning of the editable area .
- Create a PermissionEnd object using PermissionEnd permissionEnd = new PermissionEnd(document, id) to mark the end of the editable area .
- Access a paragraph using the Section.Paragraphs[index] property.
- Insert the permission start object at the beginning of the paragraph using the Paragraph.ChildObjects.Insert(0, permissionStart) method.
- Add the permission end object at the end of the paragraph using the Paragraph.ChildObjects.Add(permissionEnd) method.
- Set the document to read-only protection mode and restrict editing permissions using the Document.Protect(ProtectionType.AllowOnlyReading, password) method.
- Save the resulting document using the Document.SaveToFile() method.
- C#
using Spire.Doc;
using Spire.Doc.Documents;

namespace SpireDocDemo
{
    internal class Program
    {
        static void Main(string[] args)
        {
            // Create a new document object
            Document document = new Document();

            // Load the document from the specified path
            document.LoadFromFile("Sample1.docx");

            // Get the first section of the document
            Section section = document.Sections[0];

            // Create a permission start object
            PermissionStart permissionStart = new PermissionStart(document, "restricted1");

            // Create a permission end object
            PermissionEnd permissionEnd = new PermissionEnd(document, "restricted1");

            // Get the second paragraph in the section
            Paragraph paragraph = section.Paragraphs[1];

            // Insert the permission start object at the beginning of the paragraph
            paragraph.ChildObjects.Insert(0, permissionStart);

            // Add the permission end object at the end of the paragraph
            paragraph.ChildObjects.Add(permissionEnd);

            // Set the document to be read-only protected
            document.Protect(ProtectionType.AllowOnlyReading, "123456");

            // Save the modified document to the specified path
            document.SaveToFile("AddedEditingPermissionsArea.docx", FileFormat.Docx);

            // Close the document and release the resources occupied by the document object
            document.Close();
            document.Dispose();
        }
  }
}
Remove Editable Area in a Word Document in C#
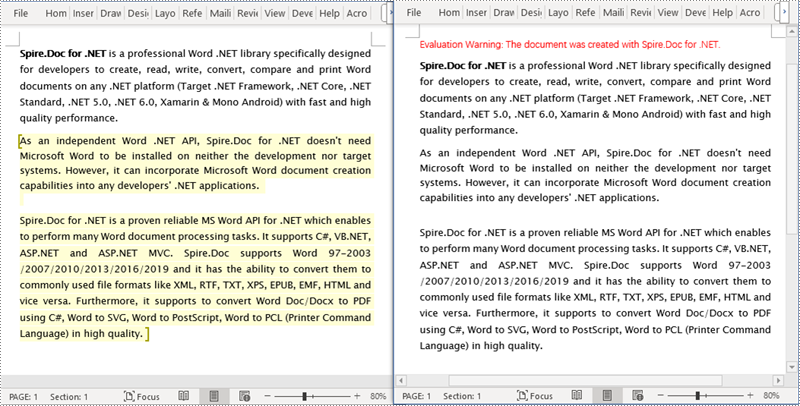
The key steps to remove editable area in a Word document involve iterating through each paragraph of the document and removing the PermissionStart and PermissionEnd objects. Here are the detailed steps:
- Create a Document object.
- Load a Word document using the Document.LoadFromFile() method.
- Iterate through each paragraph in each section of the document, check for the presence of PermissionStart or PermissionEnd objects, and remove them.
- Save the resulting document using the Document.SaveToFile() method.
- C#
using Spire.Doc;
using Spire.Doc.Documents;

namespace SpireDocDemo
{
    internal class Program
    {
        static void Main(string[] args)
        {
             // Create a new document object
            Document document = new Document();

            // Load the document from the specified path
            document.LoadFromFile("Sample2.docx");

            // Iterate through the sections of the document
            for (int a = 0; a < document.Sections.Count; a++)
            {
                // Get the body of the current section
                Body body = document.Sections[a].Body;

                // Iterate through the child objects of the body
                for (int i = 0; i < body.ChildObjects.Count; i++)
                {
                    // Check if the child object is a paragraph
                    if (body.ChildObjects[i] is Paragraph)
                    {
                        // Get the current paragraph
                        Paragraph paragraph = (Paragraph)body.ChildObjects[i];

                        // Iterate backwards from the last child object of the paragraph
                        for (int j = paragraph.ChildObjects.Count - 1; j >= 0; j--)
                        {
                            // Get the current child object
                            DocumentObject documentObject = paragraph.ChildObjects[j];

                            // Remove the current child object if it is a permission start object
                            if (documentObject.DocumentObjectType == DocumentObjectType.PermissionStart)
                            {
                                paragraph.ChildObjects.RemoveAt(j);
                            }
                            // Remove the current child object if it is a permission end object
                            else if (documentObject.DocumentObjectType == DocumentObjectType.PermissionEnd)
                            {
                                paragraph.ChildObjects.RemoveAt(j);
                            }
                        }
                    }
                }
            }

            // Save the modified document to the specified path
            document.SaveToFile("RemovedEditingPermissionsArea.docx", FileFormat.Docx);

            // Close the document and release the resources occupied by the document object
            document.Close();
            document.Dispose();
        }
    }
}
Apply for a Temporary License
If you'd like to remove the evaluation message from the generated documents, or to get rid of the function limitations, please request a 30-day trial license for yourself.
Merging multiple PowerPoint presentations can be a daunting task, often leading to a less-than-optimal presentation experience. However, there is a solution that can streamline this process and ensure seamless transitions throughout the presentation. By combining multiple PowerPoint files into a single cohesive presentation, presenters can eliminate the need to repeatedly open different files, saving time and effort. While manually copying slides can be arduous and time-consuming, Python offers a swift and efficient solution. This article is going to show how to leverage Spire.Presentation for Python to merge PowerPoint presentations effortlessly through Python programs.
- Merging PowerPoint Presentations and Retain Their Designs
- Merging PowerPoint Presentations with Consistent Design
Install Spire.PDF for Python
This scenario requires Spire.Presentation for Python and plum-dispatch v1.7.4. They can be easily installed in your Windows through the following pip command.
pip install Spire.Presentation
If you are unsure how to install, please refer to: How to Install Spire.Presentation for Python on Windows
Merging PowerPoint Presentations and Retain Their Designs
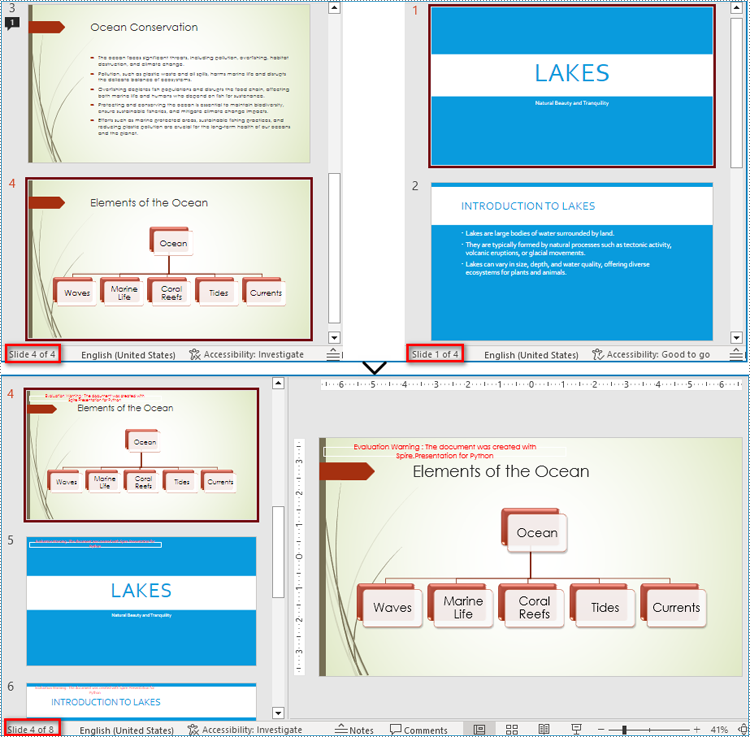
Merging PowerPoint presentations can be accomplished by reading slides from one presentation and adding them to another presentation. During the process of adding to the target presentation, developers can use Presentation.Slides.AppendBySlide(ISlide) method to add slides and retain the original design of the slides.
The detailed steps are as follows:
- Create two instances of Presentation class.
- Load two PowerPoint presentations using Presentation.LoadFromFile() method.
- Iterate through each slide in the second presentation and add them to the first presentation while keeping their design using Presentation.Slides.AppendBySlide() method.
- Save the first presentation using Presentation.SaveToFile() method.
- Python
from spire.presentation import *
from spire.presentation.common import *

# Create two instances of Presentation class
pres1 = Presentation()
pres2 = Presentation()

# Load two presentation files
pres1.LoadFromFile("Sample1.pptx")
pres2.LoadFromFile("Sample2.pptx")

# Iterate through the slides of the second presentation
for slide in pres2.Slides:
    # Add each slides to the first presentation and keep the original design
    pres1.Slides.AppendBySlide(slide)

# Save the first presentation
pres1.SaveToFile("output/MergePresentations.pptx", FileFormat.Pptx2016)
pres1.Dispose()
pres2.Dispose()
Merging PowerPoint Presentations with Consistent Design
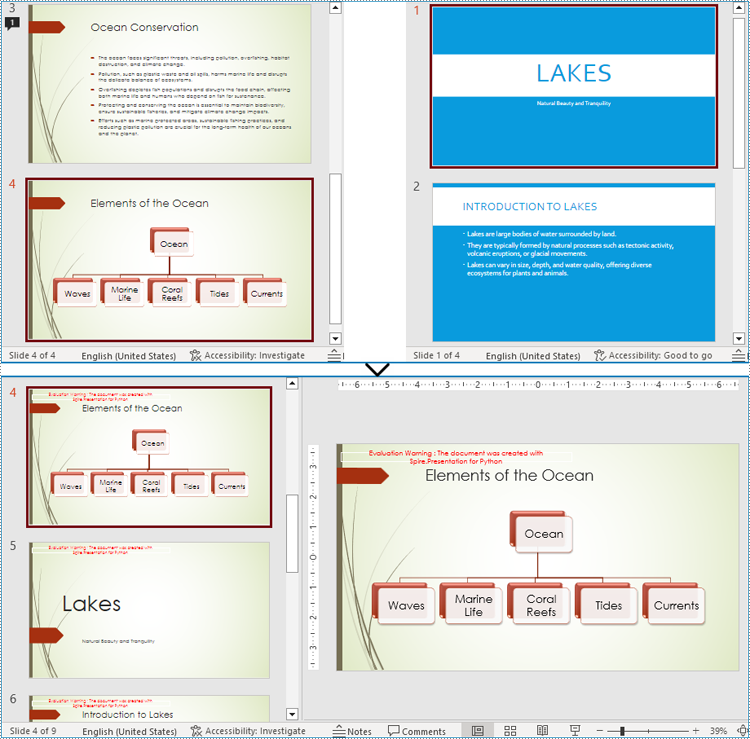
Developers can also use Presentation.Slides.AppendByMaster(slide Islide, master IMasterSlide) method to insert slides into the target presentation and change the design of the slides to the design of the target presentation. This allows for merging presentations and ensuring a consistent design.
The detailed stops are as follows:
- Create two instances of Presentation class.
- Load two PowerPoint presentations using Presentation.LoadFromFile() method.
- Iterate through each slide in the second presentation and add them to the first presentation while changing their design to the design of the first presentation using Presentation.Slides.AppendByMaster() method.
- Save the first presentation using Presentation.SaveToFile() method.
- Python
from spire.presentation import *
from spire.presentation.common import *

# Create two instances of Presentation class
pres1 = Presentation()
pres2 = Presentation()

# Load two presentation files
pres1.LoadFromFile("Sample1.pptx")
pres2.LoadFromFile("Sample2.pptx")

# Iterate through each slide in the second presentation
for slide in pres2.Slides:
    # Add each slide to the first presentation
    pres1.Slides.AppendByMaster(slide, pres1.Masters[0])

# Save the first presentation
pres1.SaveToFile("output/MergePresentationsDesign.pptx", FileFormat.Pptx2016)
pres1.Dispose()
pres2.Dispose()
Apply for a Temporary License
If you'd like to remove the evaluation message from the generated documents, or to get rid of the function limitations, please request a 30-day trial license for yourself.
