
React (58)
Children categories
Add, Delete, and Modify Shapes in Word with JavaScript in React
2026-09-21 02:33:48 Written by Amy ZhaoWorking with shapes in Word documents is one of the most common requirements in day-to-day office development. Whether you are stamping a rounded-rectangle signature box onto a contract template, annotating approval steps with a group of flowchart shapes, cleaning up leftover decorative shapes in a document, or restyling the shapes in an old template to match a new brand palette, manipulating shapes dynamically keeps document content in sync with your business data. Spire.Doc for JavaScript handles Word shapes entirely in the browser via WebAssembly, using a virtual file system (VFS) to manage fonts, documents, and image resources — no backend server required.
This article covers three core features:
For installation and project setup, refer to Integrating Spire.Doc for JavaScript in a React Project. The examples below assume Spire.Doc is installed and the WebAssembly module is initialized.
Add Shapes to a Word Document
Adding shapes involves three phases: first, load the font files into the WASM virtual file system via FetchFileToVFS; then instantiate a Document, add a section and a paragraph in turn, and call Paragraph.AppendShape to insert a shape of the specified type and size into the paragraph, anchoring it to the page with HorizontalOrigin/VerticalOrigin while setting its absolute coordinates through HorizontalPosition/VerticalPosition; finally, save the document, read the generated file from VFS, wrap it as a Blob, and trigger a browser download.
function App() {
  const appendShape = async () => {

    const docModule = window.wasmModule?.spiredoc;

    if (!docModule) {
      alert('Spire.Doc is not ready yet');
      return;
    }

      // Create a new document
    const doc = new docModule.Document();

      // Add a section
    let sec = doc.AddSection();

      // Add a paragraph to hold the shapes
    let paragraph = sec.AddParagraph();

    let x = 60, y = 40, lineCount = 0;
    for (let i = 1; i < 20; i++) {
      if (lineCount > 0 && lineCount % 8 == 0) {
        // Start a new page once 8 rows are filled, and reset the starting coordinates
        paragraph.AppendBreak(docModule.BreakType.PageBreak);
        x = 60;
        y = 40;
        lineCount = 0;
      }

        // Add a shape and set its size
      let shape = paragraph.AppendShape(50, 50, docModule.ShapeType.fromValue(i));

      // Position the shape in absolute coordinates relative to the page
      shape.HorizontalOrigin = docModule.HorizontalOrigin.Page;
      shape.HorizontalPosition = x;
      shape.VerticalOrigin = docModule.VerticalOrigin.Page;
      shape.VerticalPosition = y + 50;

      // Calculate the coordinates of the next shape
      x = x + shape.Width + 50;
      if (i > 0 && i % 5 == 0) {
        y = y + shape.Height + 120;
        lineCount++;
        x = 60;
        }
    }

    // Save the document
    const outputFileName = "Add Shapes.docx";
    doc.SaveToFile({ fileName: outputFileName, fileFormat: docModule.FileFormat.Docx });
    // Release resources
    doc.Dispose();

    const modifiedFileArray = window.dotnetRuntime.Module.FS.readFile(outputFileName);
    const blob = new Blob([modifiedFileArray], { type: 'application/vnd.openxmlformats-officedocument.wordprocessingml.document' });
    const url = URL.createObjectURL(blob);
    const a = document.createElement('a');
    a.href = url;
    a.download = outputFileName;
    a.click();
    URL.revokeObjectURL(url);
  };

 return (
    <div style={{ textAlign: 'center', height: '300px' }}>
      <h1>Add Shapes to a Word Document</h1>
      <button onClick={appendShape}>
        Generate
      </button>
    </div>
  );
}
export default App;
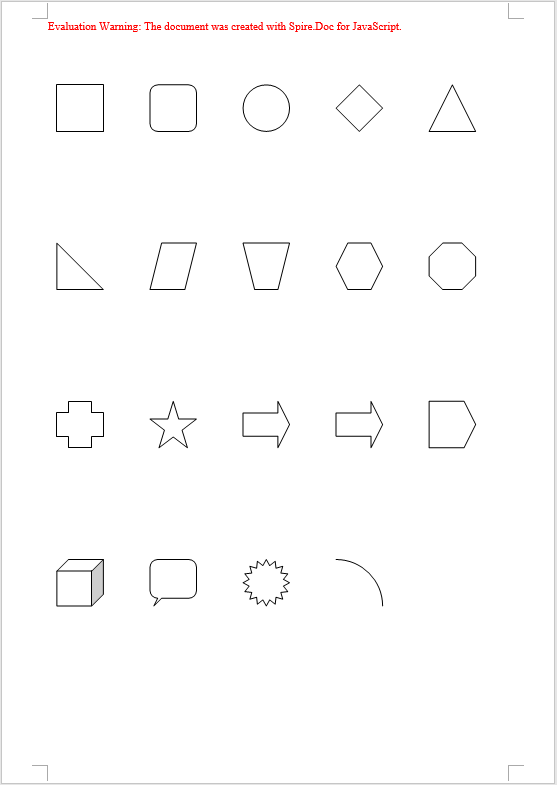
The code above inserts 19 different preset shapes in a loop, each 50×50, retrieving the shape type one by one with ShapeType.fromValue(i) and laying them out in rows and columns from the page origin — 5 shapes per row, and an automatic page break via AppendBreak once 8 rows are filled
When you need to insert several related shapes at once — building a flowchart out of rectangles, parallelograms, and arrows, for example — you can instead call Paragraph.AppendShapeGroup to create a shape group first, then add text boxes, arrows, and other child shapes to it with ChildObjects.Add so they are laid out together. Coordinates inside a shape group are relative to the group itself, so you need to work out the scale factor with Width / 1000.0 and Height / 1000.0, then divide the target coordinates of each child shape by that factor before assigning them to HorizontalPosition/VerticalPosition. A text box is created with new wasmModule.TextBox(doc) and its outline specified through SetShapeType; its Format.LineColor sets the stroke color in exactly the same way as StrokeColor does for a regular shape.
Delete Shapes from a Word Document
Deleting shapes involves three phases: first, load the font files and the Word document to be processed into the WASM virtual file system via FetchFileToVFS; then instantiate a Document and load the file, walk the sections and paragraphs of the document level by level, and use DocumentObjectType to determine whether a child object in a paragraph is a shape — regular shapes and text boxes in a document both exist as type Shape, shape groups are ShapeGroup, while a text box created in memory with new wasmModule.TextBox(doc) and not yet saved is reported separately as TextBox, so all three types must be checked; once identified, collect the objects and remove them from the paragraph one by one with ChildObjects.Remove; finally, save the document, read the generated file from VFS, wrap it as a Blob, and trigger a browser download.
function App() {
  const removeShape = async () => {
    const docModule = window.wasmModule?.spiredoc;
    if (!docModule) {
      alert('Spire.Doc is not ready yet');
      return;
    }
    const inputFileName = 'ShapeTemplate.docx';
    await window.spire.FetchFileToVFS(inputFileName, '', `${process.env.PUBLIC_URL}static/data/`);

   // Load the document
    let doc = new docModule.Document();
    doc.LoadFromFile(inputFileName);

    let removedCount = 0;

    // Iterate over every section and paragraph and delete the shapes in each paragraph
    for (let i = 0; i < doc.Sections.Count; i++) {
      let sec = doc.Sections.get_Item(i);
      for (let j = 0; j < sec.Paragraphs.Count; j++) {
        let para = sec.Paragraphs.get_Item(j);

        // Collect the shapes in the paragraph in one pass: regular shapes and text boxes are Shape, shape groups are ShapeGroup
        let shapes = [];
        for (let k = 0; k < para.ChildObjects.Count; k++) {
          let docObj = para.ChildObjects.get_Item(k);
          let objType = docObj.DocumentObjectType;
          if (objType == docModule.DocumentObjectType.Shape
            || objType == docModule.DocumentObjectType.ShapeGroup
            || objType == docModule.DocumentObjectType.TextBox) {
              shapes.push(docObj);
    }
        }

        // Remove the shapes from the paragraph one by one
        for (let m = 0; m < shapes.length; m++) {
         para.ChildObjects.Remove(shapes[m]);
         removedCount++;
        }
      }
    }

    // Save the document
    const outputFileName = "Delete Shapes.docx";
    doc.SaveToFile({ fileName: outputFileName, fileFormat: docModule.FileFormat.Docx });

    // Release resources
    doc.Dispose();

    const modifiedFileArray = window.dotnetRuntime.Module.FS.readFile(outputFileName);
    const blob = new Blob([modifiedFileArray], { type: 'application/vnd.openxmlformats-officedocument.wordprocessingml.document' });
    const url = URL.createObjectURL(blob);
    const a = document.createElement('a');
    a.href = url;
    a.download = outputFileName;
    a.click();
    URL.revokeObjectURL(url);
  };

 return (
    <div style={{ textAlign: 'center', height: '300px' }}>
      <h1>Delete Shapes from a Word Document</h1>
      <button onClick={removeShape}>
        Generate
      </button>
    </div>
  );
}
export default App;
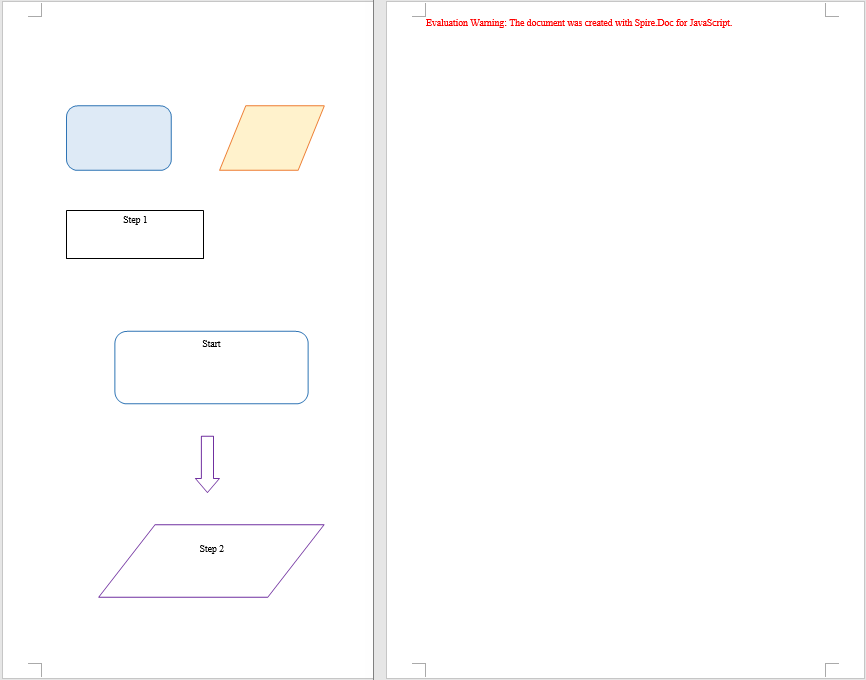
The code above walks the document structure and removes every shape on the page, while the text content and formatting in the paragraphs stay unchanged
Modify Shapes in a Word Document
Modifying shapes involves three phases: first, load the font files and the Word document to be processed into the WASM virtual file system via FetchFileToVFS; then instantiate a Document and load the file, walk the sections and paragraphs to locate the shape objects within them, and for regular shapes and text boxes set FillColor and StrokeColor directly to change the colors and set Rotation, Width, and Height to adjust the rotation angle and size, while for a shape group you drill down into its ChildObjects and modify each child shape in turn; finally, save the document, read the generated file from VFS, wrap it as a Blob, and trigger a browser download.
function App() {
  const modifyShape = async () => {
    const docModule = window.wasmModule?.spiredoc;
    if (!docModule) {
      alert('Spire.Doc is not ready yet');
      return;
    }
    const inputFileName = 'ShapeTemplate.docx';
    await window.spire.FetchFileToVFS(inputFileName, '', `${process.env.PUBLIC_URL}static/data/`);

    // Load the document
    let doc = new docModule.Document();
    doc.LoadFromFile(inputFileName);

    // Iterate over every section and paragraph and modify the shapes in each paragraph
    for (let i = 0; i < doc.Sections.Count; i++) {
      let sec = doc.Sections.get_Item(i);
      for (let j = 0; j < sec.Paragraphs.Count; j++) {
        let para = sec.Paragraphs.get_Item(j);
        for (let k = 0; k < para.ChildObjects.Count; k++) {
          let docObj = para.ChildObjects.get_Item(k);
          let objType = docObj.DocumentObjectType;

          // Modify the fill color, outline color, rotation, and size of regular shapes and text boxes
          if (objType == docModule.DocumentObjectType.Shape) {
            docObj.FillColor = docModule.Color.get_Orange();
            docObj.StrokeColor = docModule.Color.get_Red();
            docObj.Rotation = 15;
            docObj.Width = docObj.Width * 1.2;
            docObj.Height = docObj.Height * 1.2;
          }

          // Modify a shape group: drill into the group and change the outline color of each child shape
          if (objType == docModule.DocumentObjectType.ShapeGroup) {
            for (let n = 0; n < docObj.ChildObjects.Count; n++) {
              let child = docObj.ChildObjects.get_Item(n);
              child.StrokeColor = docModule.Color.get_Purple();
            }
          }
        }
      }
    }

    // Save the document
    const outputFileName = "Modify Shapes.docx";
    doc.SaveToFile({ fileName: outputFileName, fileFormat: docModule.FileFormat.Docx });

    // Release resources
    doc.Dispose();

    const modifiedFileArray = window.dotnetRuntime.Module.FS.readFile(outputFileName);
    const blob = new Blob([modifiedFileArray], { type: 'application/vnd.openxmlformats-officedocument.wordprocessingml.document' });
    const url = URL.createObjectURL(blob);
    const a = document.createElement('a');
    a.href = url;
    a.download = outputFileName;
    a.click();
    URL.revokeObjectURL(url);
  };

 return (
    <div style={{ textAlign: 'center', height: '300px' }}>
      <h1>Modify Existing Shapes in a Word Document</h1>
      <button onClick={modifyShape}>
        Generate
      </button>
    </div>
  );
}
export default App;
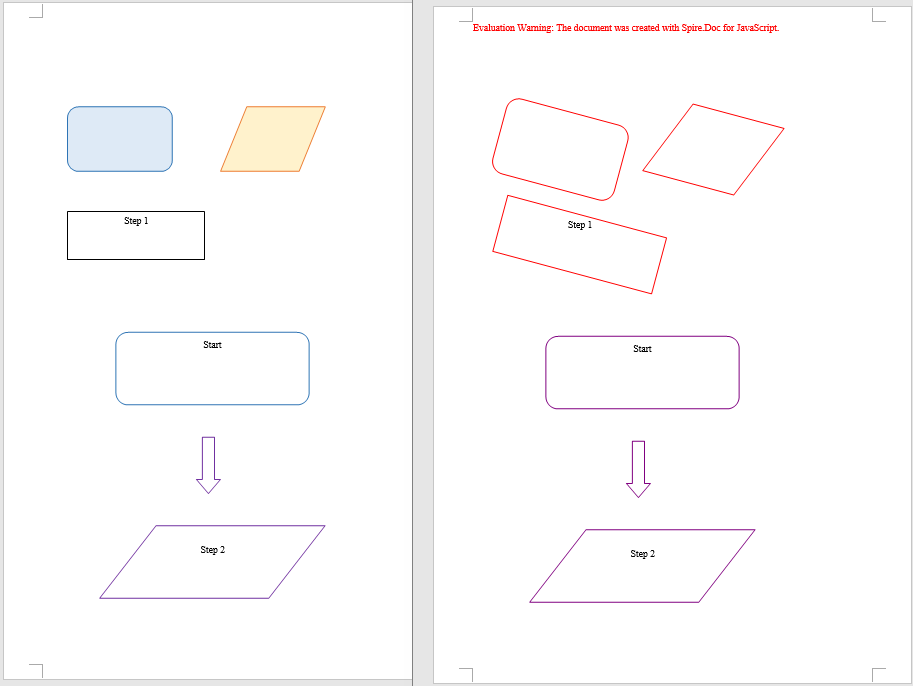
The code above keeps each shape's original position and text while restyling every shape in the document with an orange fill and a red outline, scaling it up to 120% and rotating it 15 degrees, and the child shapes inside shape groups get the new outline color as well
FAQ
Shapes end up misplaced or pushed off the page after being added
Cause: The meaning of the coordinates in HorizontalPosition/VerticalPosition depends on the frame of reference (the origin). If HorizontalOrigin/VerticalOrigin are not set explicitly, the coordinates default to the paragraph or the column, so they shift along with paragraph indentation and page margins, and the shape drifts away from the intended position.
Solution: Specify the frame of reference with HorizontalOrigin/VerticalOrigin first, and then set the coordinate values:
// Position the shape relative to the page
shape.HorizontalOrigin = wasmModule.HorizontalOrigin.Page;
shape.HorizontalPosition = x;
shape.VerticalOrigin = wasmModule.VerticalOrigin.Page;
shape.VerticalPosition = y + 50;
Some objects are missed when deleting shapes
Cause: In Spire.Doc a shape does not have just one DocumentObjectType: regular shapes and text boxes are uniformly Shape, shape groups are ShapeGroup, and a text box created in memory and not yet saved is TextBox. Checking only for Shape will miss shape groups and unsaved text boxes. On top of that, ChildObjects.Remove shifts the indexes of all subsequent child objects forward, so reading ChildObjects.Count while removing during the same loop will also skip some objects.
Solution: Collect all three types into an array in one pass first, then process the array one item at a time; when modifying the child shapes inside a shape group, drill down into its ChildObjects and iterate separately:
// Collect the shape objects of all three types first
if (objType == wasmModule.DocumentObjectType.Shape
  || objType == wasmModule.DocumentObjectType.ShapeGroup
  || objType == wasmModule.DocumentObjectType.TextBox) {
  shapes.push(docObj);
}

// Then remove them together
for (let m = 0; m < shapes.length; m++) {
  para.ChildObjects.Remove(shapes[m]);
}
Get a Free License
Spire.Doc for JavaScript offers a 30-day full-featured free trial license with no functional limitations. Apply here to evaluate before purchasing.
Converting a Word document to HTML preserves the original paragraph structure, styles, and images while rendering directly in the browser, which makes it widely useful for online preview, content publishing, and full-text search. Spire.Doc for JavaScript performs this conversion entirely in the browser via WebAssembly, using a virtual file system (VFS) to manage input and output files — no backend server required.
This article covers two core features:
For installation and project setup, refer to Integrating Spire.Doc for JavaScript in a React Project. The examples below assume Spire.Doc is installed and the WebAssembly module is initialized.
Convert Word to HTML
Converting Word to HTML involves three stages: first, load the font file and the target Word file into the WASM virtual file system via FetchFileToVFS; then instantiate a Document, load the file, use HtmlExportOptions to specify that both CSS and images are output in embedded form, and call SaveToFile to save the document as HTML; finally, read the generated HTML file from VFS, wrap it as a Blob, and trigger a browser download.
function App() {
  const wordToHtml = async () => {
    // Get the Spire.Doc WASM module
    const docModule = window.wasmModule?.spiredoc;

    // Check if the module is ready
    if (!docModule) {
      alert('Spire.Doc is not ready yet');
      return;
    }

    // Load fonts and the Word file into VFS
    await window.spire.FetchFileToVFS('ARIALUNI.TTF', '/Library/Fonts/', `${process.env.PUBLIC_URL}/static/font/`);
    const inputFileName = 'ToHtml.docx';
    await window.spire.FetchFileToVFS(inputFileName, '', `${process.env.PUBLIC_URL}/static/data/`);

    // Load the Word document
    const wordDocument = new docModule.Document();
    wordDocument.LoadFromFile(inputFileName);

    // Embed the CSS styles into the HTML and embed images as Base64
    wordDocument.HtmlExportOptions.CssStyleSheetType = docModule.CssStyleSheetType.Internal;
    wordDocument.HtmlExportOptions.ImageEmbedded = true;

    // Convert the document to HTML
    const outputFileName = 'ToHtml-result.html';
    wordDocument.SaveToFile({ fileName: outputFileName, fileFormat: docModule.FileFormat.Html });

    // Read the converted file from VFS and trigger download
    const fileArray = window.dotnetRuntime.Module.FS.readFile(outputFileName);
    const blob = new Blob([fileArray], { type: 'text/html;charset=utf-8' });
    const url = URL.createObjectURL(blob);
    const a = window.document.createElement('a');
    a.href = url;
    a.download = outputFileName;
    a.click();
    URL.revokeObjectURL(url);

    // Release resources
    wordDocument.Dispose();
  };

  return (
    <div style={{ textAlign: 'center', height: '300px' }}>
      <h1>Convert Word To HTML</h1>
      <button onClick={wordToHtml}>
        Generate
      </button>
    </div>
  );
}

export default App;
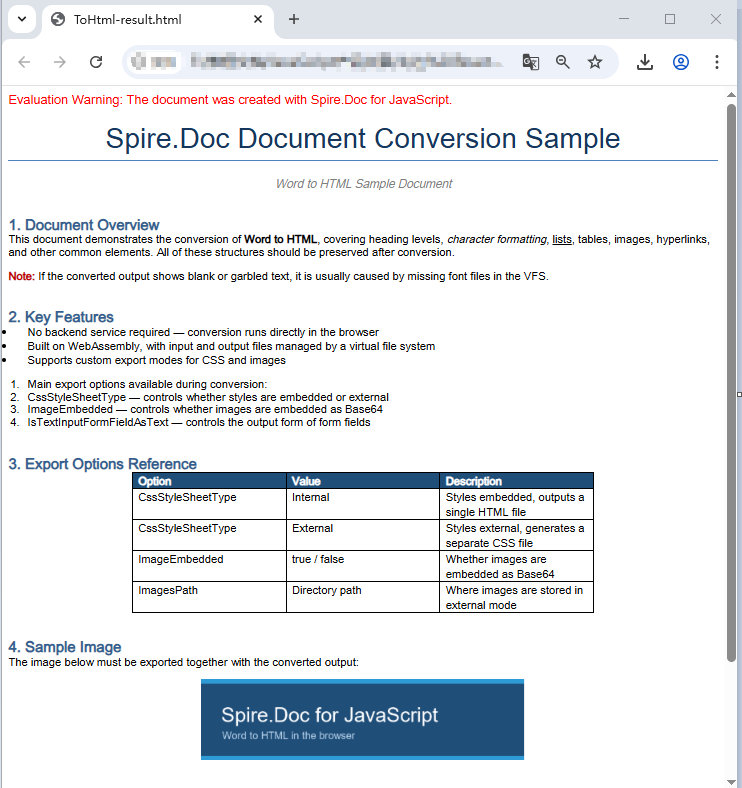
HTML page generated from a Word document via SaveToFile
Convert Word to HTML with export options
The output in the previous section is a single HTML file with CSS and images embedded in it. When a document is large, or when you want to maintain styles centrally and reuse image resources, you usually need to export CSS and images as separate files. HtmlExportOptions provides the corresponding settings, allowing HTML, style sheets, and images to be output separately.
The conversion flow is similar to the previous section, except that the result is a directory: you need to create the directory in VFS first, then use properties such as CssStyleSheetFileName and ImagesPath to specify where each type of resource is stored. Once conversion is complete, read that directory recursively, package everything into a zip, and download it in one go.
import JSZip from 'jszip';

function App() {
  const wordToHtmlWithOptions = async () => {
    // Get the Spire.Doc WASM module
    const docModule = window.wasmModule?.spiredoc;

    // Check if the module is ready
    if (!docModule) {
      alert('Spire.Doc is not ready yet');
      return;
    }

    // Load fonts and the Word file into VFS
    await window.spire.FetchFileToVFS('ARIALUNI.TTF', '/Library/Fonts/', `${process.env.PUBLIC_URL}/static/font/`);
    const inputFileName = 'ToHtml.docx';
    await window.spire.FetchFileToVFS(inputFileName, '', `${process.env.PUBLIC_URL}/static/data/`);

    // Create the output directory in VFS
    const outputDirectoryName = 'ToHTMLFolder/';
    window.dotnetRuntime.Module.FS.mkdirTree(outputDirectoryName);

    // Load the Word document
    const wordDocument = new docModule.Document();
    wordDocument.LoadFromFile(inputFileName);

    // Export the CSS styles to a separate file
    wordDocument.HtmlExportOptions.CssStyleSheetFileName = outputDirectoryName + 'sample.css';
    wordDocument.HtmlExportOptions.CssStyleSheetType = docModule.CssStyleSheetType.External;

    // Export images to a separate directory
    wordDocument.HtmlExportOptions.ImageEmbedded = false;
    wordDocument.HtmlExportOptions.ImagesPath = outputDirectoryName + 'Demo/';

    // Export form fields as plain text
    wordDocument.HtmlExportOptions.IsTextInputFormFieldAsText = true;

    // Convert the document to HTML
    const outputFileName = 'ToHtmlExportOption-out.html';
    wordDocument.SaveToFile({ fileName: outputFileName, fileFormat: docModule.FileFormat.Html });

    // Release resources
    wordDocument.Dispose();

    // Read the output directory recursively and write each level of files into the zip
    const zip = new JSZip();
    const addFilesToZip = async (folderPath, zipFolder) => {
      let items = await window.dotnetRuntime.Module.FS.readdir(folderPath);
      items = items.filter((item) => item !== '.' && item !== '..');
      for (const item of items) {
        const itemPath = `${folderPath}/${item}`;
        try {
          const fileData = await window.dotnetRuntime.Module.FS.readFile(itemPath);
          zipFolder.file(item, fileData);
        } catch (error) {
          const zipSubFolder = zipFolder.folder(item);
          await addFilesToZip(itemPath, zipSubFolder);
        }
      }
    };

    // Package the HTML file together with the resource directory
    zip.file(outputFileName, window.dotnetRuntime.Module.FS.readFile(outputFileName));
    await addFilesToZip(outputDirectoryName, zip);
    const zipBlob = await zip.generateAsync({ type: 'blob' });
    const url = URL.createObjectURL(zipBlob);

    // Trigger download
    const a = window.document.createElement('a');
    a.href = url;
    a.download = 'ToHTMLFolder.zip';
    a.click();
    URL.revokeObjectURL(url);
  };

  return (
    <div style={{ textAlign: 'center', height: '300px' }}>
      <h1>Convert Word To HTML With Export Options</h1>
      <button onClick={wordToHtmlWithOptions}>
        Generate
      </button>
    </div>
  );
}

export default App;
HTML, CSS, and image files generated after configuring the export options
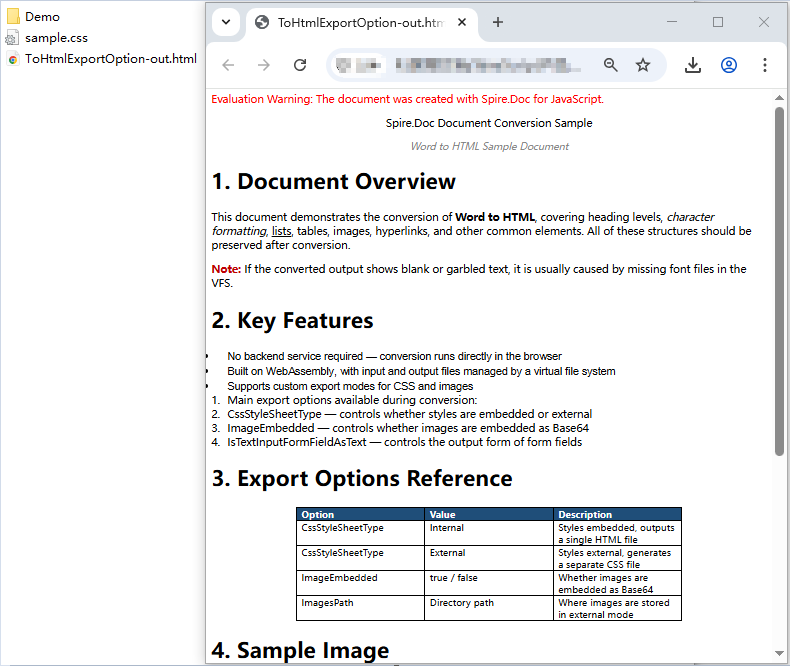
Note that Spire.Doc does not write images directly into the directory pointed to by ImagesPath. Instead, it creates an external_images subdirectory underneath it to hold the images. As a result, the output directory typically forms a hierarchy such as Demo/external_images/*.png, which must be read level by level — this is why addFilesToZip is implemented recursively in the example above.
FAQ
Fonts in the exported HTML do not match the original document
Cause: The font files are missing from the WASM virtual file system. Spire.Doc reads fonts from VFS during conversion to perform layout calculations and font name resolution. If the fonts are not preloaded, the fonts used in the original document are replaced with substitute fonts, and the font-family in the exported CSS will not match the original. If the original document uses a symbol font such as Wingdings, the corresponding characters will also appear garbled.
Solution: Load the font files into VFS via FetchFileToVFS before conversion. For Chinese, Japanese, and Korean documents, use a font with broad coverage such as ARIALUNI.TTF:
await window.spire.FetchFileToVFS(
  'ARIALUNI.TTF', '/Library/Fonts/', '/'
);
Exported HTML loses its styles and images when opened
Cause: In external mode (CssStyleSheetType.External combined with ImageEmbedded = false), CSS and images are output as separate files to the specified directory, and the HTML keeps only relative path references. If you download the HTML file on its own, the browser cannot find the corresponding style sheet and images, and the page degrades into unstyled plain text.
Solution: Package the HTML file together with the resource directory and download them as a whole, so that the relative path references remain valid (see the addFilesToZip example above). If you do not need separate resource files, you can switch to embedded mode instead:
wordDocument.HtmlExportOptions.CssStyleSheetType = docModule.CssStyleSheetType.Internal;
wordDocument.HtmlExportOptions.ImageEmbedded = true;
Get a Free License
Spire.Doc for JavaScript offers a 30-day full-featured free trial license with no functional limitations. Apply here to evaluate before purchasing.
Converting a Word document to images is the most common approach for online preview, thumbnail generation, and preventing content from being copied at will — the resulting images keep a consistent layout on any device. Spire.Doc for JavaScript performs this conversion directly in the browser via WebAssembly, managing input and output files through a virtual file system (VFS) — no backend server required.
This article covers two core features:
For installation and project setup, refer to Integrating Spire.Doc for JavaScript in a React Project. The examples below assume Spire.Doc is installed and the WebAssembly module is initialized.
Page to Image
Converting a document page to an image involves three stages: first, load the font file and the target Word document into the WASM virtual file system via FetchFileToVFS; then instantiate a Document, load the document, call SaveImageToStreams with a pageIndex to render the specified page as an image, and save it to VFS; finally, read the generated image file from VFS, wrap it as a Blob, and create a download link.
import React from 'react';

function App() {
  const ToImage = async () => {
    // Get the Spire.Doc WASM module
    const docModule = window.wasmModule?.spiredoc;

    if (!docModule) {
      alert('Spire.Doc is not ready yet');
      return;
    }

    // Load the font file into the virtual file system (VFS)
    await window.spire.FetchFileToVFS('ARIALUNI.TTF', '/Library/Fonts/', `${process.env.PUBLIC_URL}/font/`);
    const inputFileName = 'ToImage.docx';
    // Load the target Word document into VFS
    await window.spire.FetchFileToVFS(inputFileName, '', `${process.env.PUBLIC_URL}data/`);

    // Create a Document instance and load the document
    const doc = new docModule.Document();
    doc.LoadFromFile(inputFileName);

    // Define the output file name
    const outputFileName = "ToImage-result.png";

    // Convert the first page to an image stream and save it to VFS
    let img = doc.SaveImageToStreams({ pageIndex: 0, type: docModule.ImageType.Bitmap });
    img.Save(outputFileName);

    // Release resources
    doc.Dispose();

    // Read the generated file from VFS and wrap it as a Blob
    const modifiedFileArray = window.dotnetRuntime.Module.FS.readFile(outputFileName);
    const blob = new Blob([modifiedFileArray], {  type: 'image/png'});
    const url = URL.createObjectURL(blob);
    const a = document.createElement('a');
    a.href = url;
    a.download = outputFileName;
    a.click();
    URL.revokeObjectURL(url);
  };

  return (
    <div style={{ textAlign: 'center', height: '300px' }}>
      <h1>Convert a Specified Page to an Image</h1>
      <button onClick={ToImage}>
        Generate
      </button>
    </div>
  );
}

export default App;
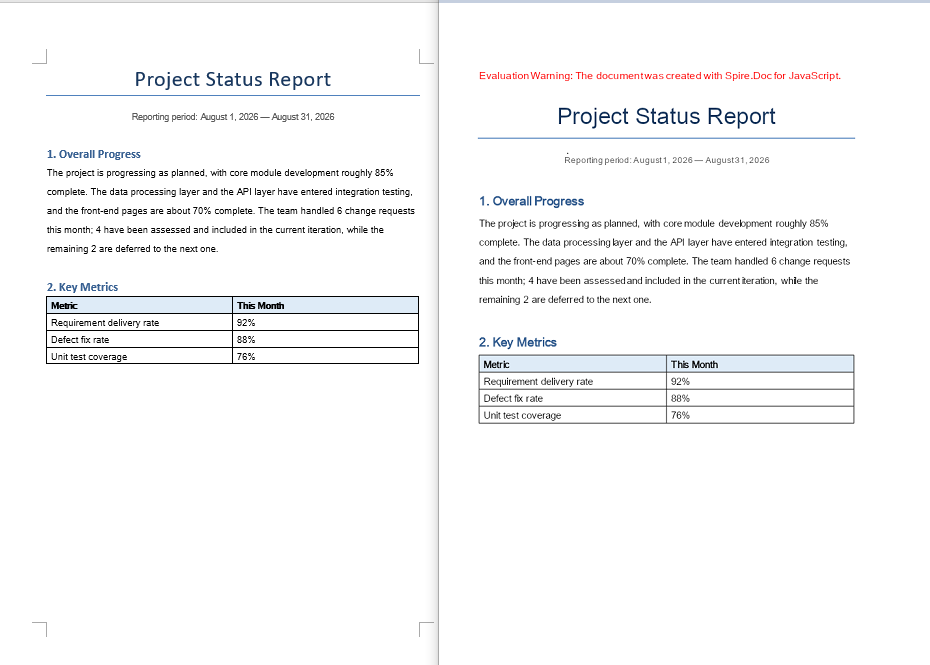
PNG image generated from a document page via SaveImageToStreams
Document Object to Image
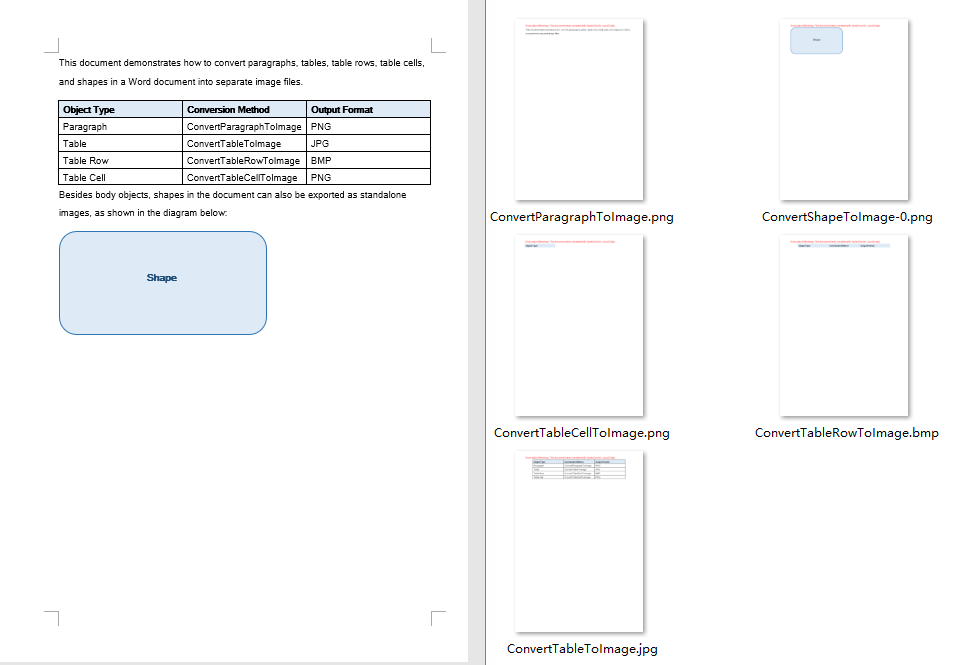
Besides whole-page conversion, real projects often need to export a single element of a document as an image — for example, generating a preview image for a table, or extracting a shape from a document as standalone material. Paragraphs, tables, table rows, table cells, and shapes can all be copied into a newly created Document via the Clone method, and then rendered into an image with SaveImageToStreams. The conversion results are written uniformly to an output directory in VFS, and finally packaged into a single ZIP file with JSZip for the user to download.
Note that a shape cannot be added directly to a paragraph of a newly created document. The example first saves the document to a memory stream and then reloads it, so that the shape obtains a complete layout context in the new document before being rendered.
import React from 'react';
import JSZip from "jszip";

function App() {
  const ToImage = async () => {
    // Get the Spire.Doc WASM module
    const docModule = window.wasmModule?.spiredoc;

    if (!docModule) {
      alert('Spire.Doc is not ready yet');
      return;
    }

    // Load the font file into the virtual file system (VFS)
    await window.spire.FetchFileToVFS('ARIALUNI.TTF', '/Library/Fonts/', `${process.env.PUBLIC_URL}/font/`);
    // Load the target Word document into VFS
    const inputFileName = "ConvertObjectToImage.docx";
    await window.spire.FetchFileToVFS(inputFileName, "", `${process.env.PUBLIC_URL}/data/`);

    // Define and create the output directory in VFS
    const outputDirectoryName = "outputFolder/";
    await window.dotnetRuntime.Module.FS.mkdirTree(outputDirectoryName);

    // Create a Document instance and load the document
    const doc = new docModule.Document();
    doc.LoadFromFile(inputFileName);

    // Get the first section and its body
    let section = doc.Sections.get_Item(0);
    let body = section.Body;

    // Get the first paragraph and convert it to an image
    let paragraph = body.Paragraphs.get_Item(0);
    let imageStream1 = ConvertParagraphToImage(paragraph, docModule);
    let imageFile1 = outputDirectoryName + "ConvertParagraphToImage.png";
    window.dotnetRuntime.Module.FS.writeFile(imageFile1, imageStream1.Save());

    // Get the first table and convert it to an image
    let table = body.Tables.get_Item(0);
    let imageStream2 = ConvertTableToImage(table, docModule);
    let imageFile2 = outputDirectoryName + "ConvertTableToImage.jpg";
    window.dotnetRuntime.Module.FS.writeFile(imageFile2, imageStream2.Save());

    // Get the first row of the first table and convert it to an image
    let row = table.Rows.get_Item(0);
    let imageStream3 = ConvertTableRowToImage(row, docModule);
    let imageFile3 = outputDirectoryName + "ConvertTableRowToImage.bmp";
    window.dotnetRuntime.Module.FS.writeFile(imageFile3, imageStream3.Save());

    // Get the first cell of the first row and convert it to an image
    let cell = row.Cells.get_Item(0);
    let imageStream4 = ConvertTableCellToImage(cell, docModule);
    let imageFile4 = outputDirectoryName + "ConvertTableCellToImage.png";
    window.dotnetRuntime.Module.FS.writeFile(imageFile4, imageStream4.Save());

    // Iterate over the paragraphs and convert the shapes in them to images
    for (let i = 0; i < section.Paragraphs.Count; i++) {
      let para = section.Body.Paragraphs.get_Item(i);
      for (let j = 0; j < para.ChildObjects.Count; j++) {
        let docObj = para.ChildObjects.get_Item(j);
        if (docObj.DocumentObjectType == docModule.DocumentObjectType.Shape) {
          let imageStream5 = ConvertShapeToImage(docObj, docModule);
          let imageFile5 = outputDirectoryName + "ConvertShapeToImage-" + j + ".png";

          window.dotnetRuntime.Module.FS.writeFile(imageFile5, imageStream5.Save());
          i++;
        }
      }
    }

    // Release resources
    doc.Dispose();

    // Package all images in the output directory into a ZIP file
    const zip = new JSZip();
    const addFilesToZip = async (folderPath, zipFolder) => {
      let items = await window.dotnetRuntime.Module.FS.readdir(folderPath);
      items = items.filter((item) => item !== "." && item !== "..");
      for (const item of items) {
        const itemPath = `${folderPath}/${item}`;
        try {
          const fileData = await window.dotnetRuntime.Module.FS.readFile(itemPath);
          zipFolder.file(item, fileData);
        } catch (error) {
          const zipSubFolder = zipFolder.folder(item);
          await addFilesToZip(itemPath, zipSubFolder);
        }
      }
    };

    await addFilesToZip(outputDirectoryName, zip);
    const zipBlob = await zip.generateAsync({ type: "blob" });
    // Read the generated file from VFS and wrap it as a Blob
    const url = URL.createObjectURL(zipBlob);
    const a = document.createElement('a');
    a.href = url;
    a.download = "ConvertObjectToImage_out.zip";
    a.click();
    URL.revokeObjectURL(url);
  };

  // Convert a paragraph to an image
  function ConvertParagraphToImage(paragraph, docModule) {
    let doc = new docModule.Document();
    let section = doc.AddSection();

    section.Body.ChildObjects.Add(paragraph.Clone());
    let imageStream = doc.SaveImageToStreams({ pageIndex: 0, type: docModule.ImageType.Bitmap });
    doc.Close();
    return imageStream;
  }

  // Convert a table to an image
  function ConvertTableToImage(table, docModule) {
    let doc = new docModule.Document();
    let section = doc.AddSection();

    section.Body.ChildObjects.Add(table.Clone());

    let imageStream = doc.SaveImageToStreams({ pageIndex: 0, type: docModule.ImageType.Bitmap });
    doc.Close();
    return imageStream;
  }

  // Convert a table row to an image
  function ConvertTableRowToImage(tableRow, docModule) {
    let doc = new docModule.Document();
    let section = doc.AddSection();
    let table = section.AddTable();
    table.Rows.Add(tableRow.Clone());
    let imageStream = doc.SaveImageToStreams({ pageIndex: 0, type: docModule.ImageType.Bitmap });
    doc.Close();
    return imageStream;
  }

  // Convert a table cell to an image
  function ConvertTableCellToImage(tableCell, docModule) {
    let doc = new docModule.Document();
    let section = doc.AddSection();
    let table = section.AddTable();
    table.AddRow().Cells.Add(tableCell.Clone());
    let imageStream = doc.SaveImageToStreams({ pageIndex: 0, type: docModule.ImageType.Bitmap });
    doc.Close();
    return imageStream;
  }

  // Convert a shape to an image
  function ConvertShapeToImage(shape, docModule) {
    let doc = new docModule.Document();
    let section = doc.AddSection();
    section.AddParagraph().ChildObjects.Add(shape.Clone());
    let memoryStream = new docModule.Stream();
    doc.SaveToStream({ stream: memoryStream, fileFormat: docModule.FileFormat.Docx });
    doc.LoadFromStream({ stream: memoryStream, fileFormat: docModule.FileFormat.Docx });
    let imageStream = doc.SaveImageToStreams({ pageIndex: 0, type: docModule.ImageType.Bitmap });
    memoryStream.Close();
    doc.Close();
    return imageStream;
  }

  return (
    <div style={{ textAlign: 'center', height: '300px' }}>
      <h1>Convert Elements to Images</h1>
      <button onClick={ToImage}>
        Generate
      </button>
    </div>
  );
}

export default App;
Images inside the ZIP file generated after converting the document objects
FAQ
Missing or garbled text in the generated image
Cause: The font files required for rendering are missing from the WASM virtual file system. SaveImageToStreams reads fonts from VFS when rendering text — if they are not preloaded, text areas will be left blank or appear garbled.
Solution: Load the font files into VFS via FetchFileToVFS before conversion:
await window.spire.FetchFileToVFS(
  'ARIALUNI.TTF', '/Library/Fonts/',
  `${process.env.PUBLIC_URL}/static/font/`
);
Only the first page is generated
Cause: Each call to SaveImageToStreams renders only the single page specified by pageIndex. The example always passes 0, so a multi-page document only outputs an image of the first page.
Solution: Get the total page count via PageCount and iterate page by page, generating a separate image file for each page:
for (let i = 0; i < doc.PageCount; i++) {
  let img = doc.SaveImageToStreams({
    pageIndex: i, type: wasmModule.ImageType.Bitmap
  });
  img.Save(`ToImage-page-${i + 1}.png`);
}
Get a Free License
If you wish to remove the evaluation message from the resulting document, or to eliminate functional limitations, please contact our sales team to request a 30-day temporary license.
Add a Table of Contents to an Existing Word Document with JavaScript in React
2026-09-18 06:15:33 Written by Amy ZhaoA more common situation in real-world work is a document that is already written and has a complete chapter structure, but no table of contents was generated at the time. There is no need to rearrange the content — adding a TOC field on top of the existing heading styles is enough to produce a complete table of contents with page numbers and hyperlinks. Spire.Doc for JavaScript opens and edits Word documents directly in the browser via WebAssembly, managing input and output files through a virtual file system (VFS) — no backend server required.
Compared with creating a new document, adding a table of contents to an existing document involves two extra key steps: loading the original document from VFS with LoadFromFile, and moving the table of contents paragraph to the very beginning of the document with Paragraphs.Insert, instead of appending it to the end by default.
This article covers two core features:
For installation and project setup, refer to Integrating Spire.Doc for JavaScript in a React Project. The examples below assume Spire.Doc is installed and the WebAssembly module is initialized.
Add a Default Table of Contents
Adding a default table of contents to an existing document has three phases: first, load the font file and the Word document to be processed into the WASM virtual file system via FetchFileToVFS; then instantiate a Document and load the document with LoadFromFile, create a new paragraph and insert the TOC field with AppendTOC, and move it to the very beginning of the document with Paragraphs.Insert(0, tocPara); finally, call UpdateTableOfContents to fill in the entries and page numbers, save the document, read the generated file from VFS, wrap it as a Blob, and trigger a browser download.
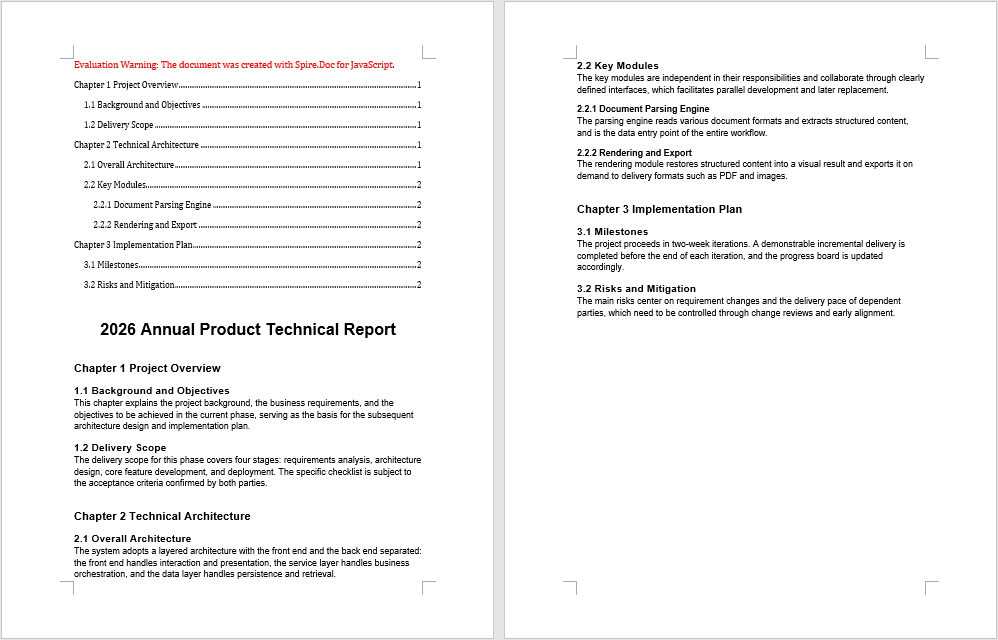
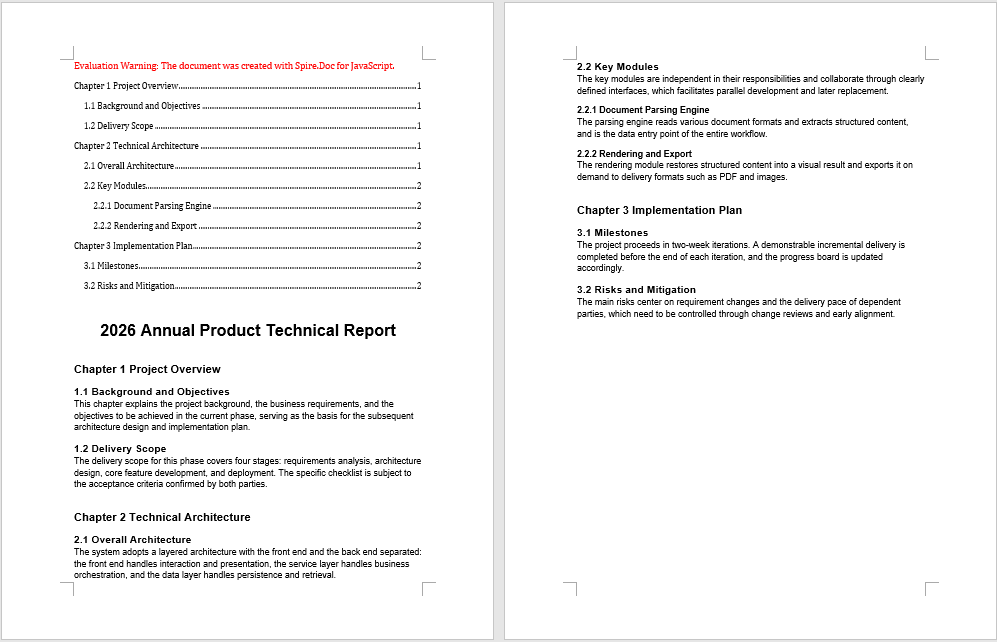
The input document used in the example, AddTocToExisting.docx, is a technical report with three chapters and eleven multi-level headings but no table of contents yet.
function App() {
  const AddTableOfContentsToExistingDocument = async () => {
    // Get the Spire.Doc WASM module
    const docModule = window.wasmModule?.spiredoc;

    // Make sure the WASM module has fully loaded
    if (!docModule) {
      alert('Spire.Doc is not ready yet');
      return;
    }

    // Load the font and the existing Word document into VFS
    await window.spire.FetchFileToVFS('ARIAL.TTF', '/Library/Fonts/', `${process.env.PUBLIC_URL}/font/`);
    const inputFileName = 'AddTocToExisting.docx';
    await window.spire.FetchFileToVFS(inputFileName, '', `${process.env.PUBLIC_URL}data/`);

    // Create a document instance and load the existing document
    const doc = new docModule.Document();
    doc.LoadFromFile({ fileName: inputFileName });

    // Get the first section of the document
    let section = doc.Sections.get_Item(0);

    // Create a new paragraph and insert the TOC field, collecting Heading 1 through Heading 3 entries
    let tocPara = section.AddParagraph();
    tocPara.AppendTOC(1, 3);

    // Move the table of contents paragraph to the very beginning of the document
    section.Paragraphs.Insert(0, tocPara);

    // Update the table of contents to fill in entries and page numbers
    doc.UpdateTableOfContents();

    // Define the output file name and save
    const outputFileName = "Add a Default TOC to an Existing Document.docx";
    doc.SaveToFile({ fileName: outputFileName, fileFormat: docModule.FileFormat.Docx2013 });

    // Release resources
    doc.Dispose();

    // Read the generated file from VFS and trigger the download
    const modifiedFileArray = window.dotnetRuntime.Module.FS.readFile(outputFileName);
    const blob = new Blob([modifiedFileArray], { type: 'application/vnd.openxmlformats-officedocument.wordprocessingml.document' });
    const url = URL.createObjectURL(blob);
    const a = document.createElement('a');
    a.href = url;
    a.download = outputFileName;
    a.click();
    URL.revokeObjectURL(url);
  };

  return (
    <div style={{ textAlign: 'center', height: '300px' }}>
      <h1>Click the button below to add a default table of contents to an existing document</h1>
      <button onClick={AddTableOfContentsToExistingDocument}>
        Generate
      </button>
    </div>
  );
}

export default App;
After the existing document is loaded with LoadFromFile and a TOC field is inserted, the table of contents is placed at the very beginning, while the original chapter content and layout remain unchanged
Add a Custom Table of Contents
The table of contents generated by AppendTOC uses Word's default field switches. When you need to control its exact behavior, you can construct a TableOfContent object directly and specify the switch string instead. The difference from the previous feature lies in how it is inserted: you must manually add the table of contents object to a paragraph, supply the field separator and field end marks, and assign the object to document.TOC. The commonly used field switches and their meanings are as follows:
| Switch | Description |
|---|---|
\o "1-3" |
Collects entries by built-in heading styles; here it means including Heading 1 through Heading 3 |
\h |
Turns table of contents entries into hyperlinks that jump to the corresponding chapter when clicked |
\z |
Hides page numbers and tab leaders in Web Layout view |
\u |
Collects entries by the outline level of the paragraphs |
If you want the table of contents to occupy its own page and be separated from the body, add a page break to the same section after inserting the table of contents paragraph:
tocPara.AppendBreak(docModule.BreakType.PageBreak);
function App() {
  const CustomizeTableOfContent = async () => {
    // Get the Spire.Doc WASM module
    const docModule = window.wasmModule?.spiredoc;

    // Make sure the WASM module has fully loaded
    if (!docModule) {
      alert('Spire.Doc is not ready yet');
      return;
    }

    // Load the font and the existing Word document into VFS
    await window.spire.FetchFileToVFS('ARIAL.TTF', '/Library/Fonts/', `${process.env.PUBLIC_URL}/font/`);
    const inputFileName = 'AddTocToExisting.docx';
    await window.spire.FetchFileToVFS(inputFileName, '', `${process.env.PUBLIC_URL}data/`);

    // Create a document instance and load the existing document
    const doc = new docModule.Document();
    doc.LoadFromFile({ fileName: inputFileName });

    // Get the first section of the document
    let section = doc.Sections.get_Item(0);

    // Construct a table of contents object with custom field switches
    let toc = new docModule.TableOfContent(doc, "{\\o \"1-3\" \\h \\z \\u}");

    // Add the table of contents object to a paragraph
    let tocPara = section.AddParagraph();
    tocPara.Items.Add(toc);

    // Supply the field separator and field end marks
    tocPara.AppendFieldMark(docModule.FieldMarkType.FieldSeparator);
    tocPara.AppendText("TOC");
    tocPara.AppendFieldMark(docModule.FieldMarkType.FieldEnd);

    // Bind this table of contents to the document
    doc.TOC = toc;

    // Move the table of contents paragraph to the very beginning of the document
    section.Paragraphs.Insert(0, tocPara);

    // Update the table of contents to fill in entries and page numbers
    doc.UpdateTableOfContents();

    // Define the output file name and save
    const outputFileName = "Add a Custom TOC to an Existing Document.docx";
    doc.SaveToFile({ fileName: outputFileName, fileFormat: docModule.FileFormat.Docx2013 });

    // Release resources
    doc.Dispose();

    // Read the generated file from VFS and trigger the download
    const modifiedFileArray = window.dotnetRuntime.Module.FS.readFile(outputFileName);
    const blob = new Blob([modifiedFileArray], { type: 'application/vnd.openxmlformats-officedocument.wordprocessingml.document' });
    const url = URL.createObjectURL(blob);
    const a = document.createElement('a');
    a.href = url;
    a.download = outputFileName;
    a.click();
    URL.revokeObjectURL(url);
  };

  return (
    <div style={{ textAlign: 'center', height: '300px' }}>
      <h1>Click the button below to add a custom table of contents to an existing document</h1>
      <button onClick={CustomizeTableOfContent}>
        Generate
      </button>
    </div>
  );
}

export default App;
The table of contents generated with a TableOfContent object and custom field switches has its entry levels, hyperlinks, and page numbers all determined by the switch string
FAQ
The table of contents appears at the end of the document instead of the beginning
Cause: AddParagraph appends a new paragraph to the end of its section by default, so inserting the TOC field directly on it naturally places the table of contents at the end as well. The content of an existing document has already been laid out, so the insertion position must be specified explicitly.
Solution: Create the table of contents paragraph first, then move it to the very beginning of the document with Paragraphs.Insert:
let tocPara = section.AddParagraph();
tocPara.AppendTOC(1, 3);
section.Paragraphs.Insert(0, tocPara);
The table of contents is empty
Cause: A TOC field collects entries by heading style. If the chapter headings in the original document were only manually bolded and enlarged without built-in heading styles such as Heading1 to Heading3 applied, no entries will appear in the table of contents after updating.
Solution: First check whether the headings in the original document use built-in heading styles. If not, re-apply the style to those paragraphs after loading the document:
let heading = section.Paragraphs.get_Item(2);
heading.ApplyStyle({ builtinStyle: docModule.BuiltinStyle.Heading1 });
Page numbers in the table of contents are missing or incorrect
Cause: AppendTOC only inserts the TOC field itself; the field content must be updated explicitly. If UpdateTableOfContents is not called before saving, the generated table of contents contains only the field code, with no entries or page numbers.
Solution: Call the update method before SaveToFile:
doc.UpdateTableOfContents();
doc.SaveToFile({ fileName: outputFileName, fileFormat: docModule.FileFormat.Docx2013 });
Get a Free License
Spire.Doc for JavaScript offers a 30-day full-featured free trial license with no functional limitations. Apply here to evaluate before purchasing.
Add a Table of Contents to a New Word Document with JavaScript in React
2026-09-18 06:01:11 Written by Amy ZhaoCreating a table of contents for a long document lets readers locate chapters quickly, and makes it easy to re-sync entries and page numbers after the document structure changes. Using a "Spire.Doc Developer Guide" as an example, this article shows how to build a Word document with multi-level headings from scratch and add a table of contents to it. Spire.Doc for JavaScript builds and edits Word documents directly in the browser via WebAssembly, managing font resources through a virtual file system (VFS) — no backend server required.
This article covers two core features:
For installation and project setup, refer to Integrating Spire.Doc for JavaScript in a React Project. The examples below assume Spire.Doc is installed and the WebAssembly module is initialized.
Add a Default Table of Contents
In Word, a table of contents is essentially a TOC field whose entries come from the paragraphs in the document that have a heading style applied. Creating a default table of contents has three phases: first, load the font file into the WASM virtual file system via FetchFileToVFS; then instantiate a Document and build the content with AddSection and AddParagraph, calling ApplyStyle on the paragraphs that should appear in the table of contents to apply heading styles, and inserting the TOC field at the beginning of the document with AppendTOC; finally, call UpdateTableOfContents to fill in the entries and page numbers, save the document, read the generated file from VFS, wrap it as a Blob, and trigger a browser download.
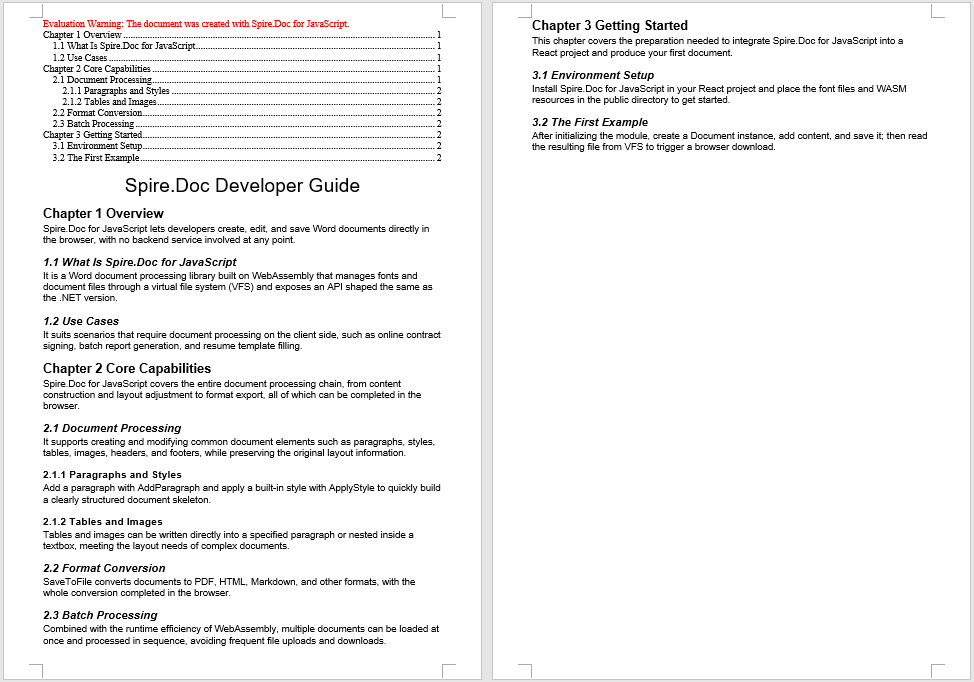
The sample document contains three chapters and twelve multi-level headings in total, spanning Heading 1 through Heading 3, which makes it easy to observe how the table of contents collects multi-level headings.
function App() {
  const AddTableOfContentsToNewDocument = async () => {
    // Get the Spire.Doc WASM module
    const docModule = window.wasmModule?.spiredoc;

    // Make sure the WASM module has fully loaded
    if (!docModule) {
      alert('Spire.Doc is not ready yet');
      return;
    }

    // Load the font into VFS
    await window.spire.FetchFileToVFS('ARIAL.TTF', '/Library/Fonts/', `${process.env.PUBLIC_URL}/font/`);

    // Create a document instance and add a section
    const doc = new docModule.Document();
    let section = doc.AddSection();

    // Insert a TOC field at the beginning of the document, collecting Heading 1 through Heading 3 entries
    let tocPara = section.AddParagraph();
    tocPara.AppendTOC(1, 3);

    // Add the document title
    let characterFormat = new docModule.CharacterFormat(doc);
    characterFormat.FontName ="Arial";
    let title = section.AddParagraph();
    let titleRun = title.AppendText("Spire.Doc Developer Guide");
    titleRun.ApplyCharacterFormat(characterFormat);
    titleRun.CharacterFormat.FontSize = 24;
    title.Format.HorizontalAlignment = docModule.HorizontalAlignment.Center;

    // Chapter 1 Overview (Heading 1)
    let p = section.AddParagraph();
    p.AppendText("Chapter 1 Overview").ApplyCharacterFormat(characterFormat);;
    p.ApplyStyle({ builtinStyle: docModule.BuiltinStyle.Heading1 });
    section.AddParagraph().AppendText("Spire.Doc for JavaScript lets developers create, edit, and save Word documents directly in the browser, with no backend service involved at any point.").ApplyCharacterFormat(characterFormat);;

    // 1.1 What Is Spire.Doc for JavaScript (Heading 2)
    p = section.AddParagraph();
    p.AppendText("1.1 What Is Spire.Doc for JavaScript").ApplyCharacterFormat(characterFormat);;
    p.ApplyStyle({ builtinStyle: docModule.BuiltinStyle.Heading2 });
    section.AddParagraph().AppendText("It is a Word document processing library built on WebAssembly that manages fonts and document files through a virtual file system (VFS) and exposes an API shaped the same as the .NET version.").ApplyCharacterFormat(characterFormat);;

    // 1.2 Use Cases (Heading 2)
    p = section.AddParagraph();
    p.AppendText("1.2 Use Cases").ApplyCharacterFormat(characterFormat);;
    p.ApplyStyle({ builtinStyle: docModule.BuiltinStyle.Heading2 });
    section.AddParagraph().AppendText("It suits scenarios that require document processing on the client side, such as online contract signing, batch report generation, and resume template filling.").ApplyCharacterFormat(characterFormat);;

    // Chapter 2 Core Capabilities (Heading 1)
    p = section.AddParagraph();
    p.AppendText("Chapter 2 Core Capabilities").ApplyCharacterFormat(characterFormat);;
    p.ApplyStyle({ builtinStyle: docModule.BuiltinStyle.Heading1 });
    section.AddParagraph().AppendText("Spire.Doc for JavaScript covers the entire document processing chain, from content construction and layout adjustment to format export, all of which can be completed in the browser.").ApplyCharacterFormat(characterFormat);;

    // 2.1 Document Processing (Heading 2)
    p = section.AddParagraph();
    p.AppendText("2.1 Document Processing").ApplyCharacterFormat(characterFormat);;
    p.ApplyStyle({ builtinStyle: docModule.BuiltinStyle.Heading2 });
    section.AddParagraph().AppendText("It supports creating and modifying common document elements such as paragraphs, styles, tables, images, headers, and footers, while preserving the original layout information.").ApplyCharacterFormat(characterFormat);;

    // 2.1.1 Paragraphs and Styles (Heading 3)
    p = section.AddParagraph();
    p.AppendText("2.1.1 Paragraphs and Styles").ApplyCharacterFormat(characterFormat);;
    p.ApplyStyle({ builtinStyle: docModule.BuiltinStyle.Heading3 });
    section.AddParagraph().AppendText("Add a paragraph with AddParagraph and apply a built-in style with ApplyStyle to quickly build a clearly structured document skeleton.").ApplyCharacterFormat(characterFormat);;

    // 2.1.2 Tables and Images (Heading 3)
    p = section.AddParagraph();
    p.AppendText("2.1.2 Tables and Images").ApplyCharacterFormat(characterFormat);;
    p.ApplyStyle({ builtinStyle: docModule.BuiltinStyle.Heading3 });
    section.AddParagraph().AppendText("Tables and images can be written directly into a specified paragraph or nested inside a textbox, meeting the layout needs of complex documents.").ApplyCharacterFormat(characterFormat);;

    // 2.2 Format Conversion (Heading 2)
    p = section.AddParagraph();
    p.AppendText("2.2 Format Conversion").ApplyCharacterFormat(characterFormat);;
    p.ApplyStyle({ builtinStyle: docModule.BuiltinStyle.Heading2 });
    section.AddParagraph().AppendText("SaveToFile converts documents to PDF, HTML, Markdown, and other formats, with the whole conversion completed in the browser.").ApplyCharacterFormat(characterFormat);;

    // 2.3 Batch Processing (Heading 2)
    p = section.AddParagraph();
    p.AppendText("2.3 Batch Processing").ApplyCharacterFormat(characterFormat);;
    p.ApplyStyle({ builtinStyle: docModule.BuiltinStyle.Heading2 });
    section.AddParagraph().AppendText("Combined with the runtime efficiency of WebAssembly, multiple documents can be loaded at once and processed in sequence, avoiding frequent file uploads and downloads.").ApplyCharacterFormat(characterFormat);;

    // Chapter 3 Getting Started (Heading 1)
    p = section.AddParagraph();
    p.AppendText("Chapter 3 Getting Started").ApplyCharacterFormat(characterFormat);;
    p.ApplyStyle({ builtinStyle: docModule.BuiltinStyle.Heading1 });
    section.AddParagraph().AppendText("This chapter covers the preparation needed to integrate Spire.Doc for JavaScript into a React project and produce your first document.").ApplyCharacterFormat(characterFormat);;

    // 3.1 Environment Setup (Heading 2)
    p = section.AddParagraph();
    p.AppendText("3.1 Environment Setup").ApplyCharacterFormat(characterFormat);;
    p.ApplyStyle({ builtinStyle: docModule.BuiltinStyle.Heading2 });
    section.AddParagraph().AppendText("Install Spire.Doc for JavaScript in your React project and place the font files and WASM resources in the public directory to get started.").ApplyCharacterFormat(characterFormat);;

    // 3.2 The First Example (Heading 2)
    p = section.AddParagraph();
    p.AppendText("3.2 The First Example").ApplyCharacterFormat(characterFormat);;
    p.ApplyStyle({ builtinStyle: docModule.BuiltinStyle.Heading2 });
    section.AddParagraph().AppendText("After initializing the module, create a Document instance, add content, and save it; then read the resulting file from VFS to trigger a browser download.").ApplyCharacterFormat(characterFormat);;

    // Update the table of contents to fill in entries and page numbers
    doc.UpdateTableOfContents();

    // Define the output file name and save
    const outputFileName = "Create a Default TOC in Word Document.docx";
    doc.SaveToFile({ fileName: outputFileName, fileFormat: docModule.FileFormat.Docx2013 });

    // Release resources
    doc.Dispose();

    // Read the generated file from VFS and trigger the download
    const modifiedFileArray = window.dotnetRuntime.Module.FS.readFile(outputFileName);
    const blob = new Blob([modifiedFileArray], { type: 'application/vnd.openxmlformats-officedocument.wordprocessingml.document' });
    const url = URL.createObjectURL(blob);
    const a = document.createElement('a');
    a.href = url;
    a.download = outputFileName;
    a.click();
    URL.revokeObjectURL(url);
  };

  return (
    <div style={{ textAlign: 'center', height: '300px' }}>
      <h1>Click the button below to create a default table of contents in a Word document</h1>
      <button onClick={AddTableOfContentsToNewDocument}>
        Generate
      </button>
    </div>
  );
}

export default App;
After a TOC field is inserted with AppendTOC and updated, the beginning of the document holds a default table of contents that collects three heading levels, complete with page numbers and hyperlinks.
Add a Custom Table of Contents
The table of contents generated by AppendTOC uses Word's default field switches. When you need to control its exact behavior, you can construct a TableOfContent object directly and specify the switch string instead. The difference from the previous feature lies in how it is inserted: you must manually add the table of contents object to a paragraph, supply the field separator and field end marks, and assign the object to document.TOC. The commonly used field switches and their meanings are as follows:
| Switch | Description |
|---|---|
\o "1-3" |
Collects entries by built-in heading styles; here it means including Heading 1 through Heading 3 |
\h |
Turns table of contents entries into hyperlinks that jump to the corresponding chapter when clicked |
\z |
Hides page numbers and tab leaders in Web Layout view |
\u |
Collects entries by the outline level of the paragraphs |
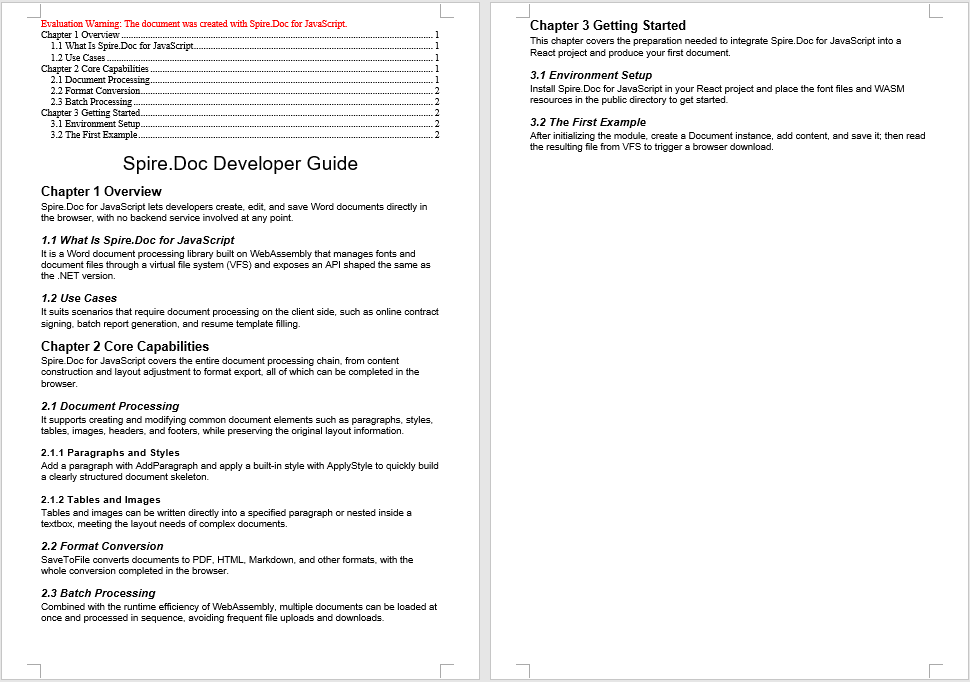
For example, changing the switch string to \o "1-2" means only Heading 1 and Heading 2 entries are collected, and Heading 3 no longer appears in the table of contents; removing \h means the entries no longer support jumping.
function App() {
  const CustomizeTableOfContent = async () => {
    // Get the Spire.Doc WASM module
    const docModule = window.wasmModule?.spiredoc;

    // Make sure the WASM module has fully loaded
    if (!docModule) {
      alert('Spire.Doc is not ready yet');
      return;
    }

    // Load the font into VFS
    await window.spire.FetchFileToVFS('ARIAL.TTF', '/Library/Fonts/', `${process.env.PUBLIC_URL}/font/`);

    // Create a document instance and add a section
    const doc = new docModule.Document();
    let section = doc.AddSection();

    // Construct a table of contents object with custom field switches
    let toc = new docModule.TableOfContent(doc, "{\\o \"1-2\" \\h \\z \\u}");

    // Add the table of contents object to a paragraph
    let tocPara = section.AddParagraph();
    tocPara.Items.Add(toc);

    // Supply the field separator and field end marks
    tocPara.AppendFieldMark(docModule.FieldMarkType.FieldSeparator);
    tocPara.AppendText("TOC");
    tocPara.AppendFieldMark(docModule.FieldMarkType.FieldEnd);

    // Bind this table of contents to the document
    doc.TOC = toc;

    // Add the document title
    let characterFormat = new docModule.CharacterFormat(doc);
    characterFormat.FontName ="Arial";
    let title = section.AddParagraph();
    let titleRun = title.AppendText("Spire.Doc Developer Guide");
    titleRun.ApplyCharacterFormat(characterFormat);
    titleRun.CharacterFormat.FontSize = 24;
    title.Format.HorizontalAlignment = docModule.HorizontalAlignment.Center;

    // Chapter 1 Overview (Heading 1)
    let p = section.AddParagraph();
    p.AppendText("Chapter 1 Overview").ApplyCharacterFormat(characterFormat);
    p.ApplyStyle({ builtinStyle: docModule.BuiltinStyle.Heading1 });
    section.AddParagraph().AppendText("Spire.Doc for JavaScript lets developers create, edit, and save Word documents directly in the browser, with no backend service involved at any point.").ApplyCharacterFormat(characterFormat);

    // 1.1 What Is Spire.Doc for JavaScript (Heading 2)
    p = section.AddParagraph();
    p.AppendText("1.1 What Is Spire.Doc for JavaScript").ApplyCharacterFormat(characterFormat);
    p.ApplyStyle({ builtinStyle: docModule.BuiltinStyle.Heading2 });
    section.AddParagraph().AppendText("It is a Word document processing library built on WebAssembly that manages fonts and document files through a virtual file system (VFS) and exposes an API shaped the same as the .NET version.").ApplyCharacterFormat(characterFormat);

    // 1.2 Use Cases (Heading 2)
    p = section.AddParagraph();
    p.AppendText("1.2 Use Cases").ApplyCharacterFormat(characterFormat);
    p.ApplyStyle({ builtinStyle: docModule.BuiltinStyle.Heading2 });
    section.AddParagraph().AppendText("It suits scenarios that require document processing on the client side, such as online contract signing, batch report generation, and resume template filling.").ApplyCharacterFormat(characterFormat);

    // Chapter 2 Core Capabilities (Heading 1)
    p = section.AddParagraph();
    p.AppendText("Chapter 2 Core Capabilities").ApplyCharacterFormat(characterFormat);
    p.ApplyStyle({ builtinStyle: docModule.BuiltinStyle.Heading1 });
    section.AddParagraph().AppendText("Spire.Doc for JavaScript covers the entire document processing chain, from content construction and layout adjustment to format export, all of which can be completed in the browser.").ApplyCharacterFormat(characterFormat);

    // 2.1 Document Processing (Heading 2)
    p = section.AddParagraph();
    p.AppendText("2.1 Document Processing").ApplyCharacterFormat(characterFormat);
    p.ApplyStyle({ builtinStyle: docModule.BuiltinStyle.Heading2 });
    section.AddParagraph().AppendText("It supports creating and modifying common document elements such as paragraphs, styles, tables, images, headers, and footers, while preserving the original layout information.").ApplyCharacterFormat(characterFormat);

    // 2.1.1 Paragraphs and Styles (Heading 3)
    p = section.AddParagraph();
    p.AppendText("2.1.1 Paragraphs and Styles").ApplyCharacterFormat(characterFormat);
    p.ApplyStyle({ builtinStyle: docModule.BuiltinStyle.Heading3 });
    section.AddParagraph().AppendText("Add a paragraph with AddParagraph and apply a built-in style with ApplyStyle to quickly build a clearly structured document skeleton.").ApplyCharacterFormat(characterFormat);

    // 2.1.2 Tables and Images (Heading 3)
    p = section.AddParagraph();
    p.AppendText("2.1.2 Tables and Images").ApplyCharacterFormat(characterFormat);
    p.ApplyStyle({ builtinStyle: docModule.BuiltinStyle.Heading3 });
    section.AddParagraph().AppendText("Tables and images can be written directly into a specified paragraph or nested inside a textbox, meeting the layout needs of complex documents.").ApplyCharacterFormat(characterFormat);

    // 2.2 Format Conversion (Heading 2)
    p = section.AddParagraph();
    p.AppendText("2.2 Format Conversion").ApplyCharacterFormat(characterFormat);
    p.ApplyStyle({ builtinStyle: docModule.BuiltinStyle.Heading2 });
    section.AddParagraph().AppendText("SaveToFile converts documents to PDF, HTML, Markdown, and other formats, with the whole conversion completed in the browser.").ApplyCharacterFormat(characterFormat);

    // 2.3 Batch Processing (Heading 2)
    p = section.AddParagraph();
    p.AppendText("2.3 Batch Processing").ApplyCharacterFormat(characterFormat);
    p.ApplyStyle({ builtinStyle: docModule.BuiltinStyle.Heading2 });
    section.AddParagraph().AppendText("Combined with the runtime efficiency of WebAssembly, multiple documents can be loaded at once and processed in sequence, avoiding frequent file uploads and downloads.").ApplyCharacterFormat(characterFormat);

    // Chapter 3 Getting Started (Heading 1)
    p = section.AddParagraph();
    p.AppendText("Chapter 3 Getting Started").ApplyCharacterFormat(characterFormat);
    p.ApplyStyle({ builtinStyle: docModule.BuiltinStyle.Heading1 });
    section.AddParagraph().AppendText("This chapter covers the preparation needed to integrate Spire.Doc for JavaScript into a React project and produce your first document.").ApplyCharacterFormat(characterFormat);

    // 3.1 Environment Setup (Heading 2)
    p = section.AddParagraph();
    p.AppendText("3.1 Environment Setup").ApplyCharacterFormat(characterFormat);
    p.ApplyStyle({ builtinStyle: docModule.BuiltinStyle.Heading2 });
    section.AddParagraph().AppendText("Install Spire.Doc for JavaScript in your React project and place the font files and WASM resources in the public directory to get started.").ApplyCharacterFormat(characterFormat);

    // 3.2 The First Example (Heading 2)
    p = section.AddParagraph();
    p.AppendText("3.2 The First Example").ApplyCharacterFormat(characterFormat);
    p.ApplyStyle({ builtinStyle: docModule.BuiltinStyle.Heading2 });
    section.AddParagraph().AppendText("After initializing the module, create a Document instance, add content, and save it; then read the resulting file from VFS to trigger a browser download.").ApplyCharacterFormat(characterFormat);

    // Update the table of contents to fill in entries and page numbers
    doc.UpdateTableOfContents();

    // Define the output file name and save
    const outputFileName = "Create a Custom TOC in Word Document.docx";
    doc.SaveToFile({ fileName: outputFileName, fileFormat: docModule.FileFormat.Docx2013 });

    // Release resources
    doc.Dispose();

    // Read the generated file from VFS and trigger the download
    const modifiedFileArray = window.dotnetRuntime.Module.FS.readFile(outputFileName);
    const blob = new Blob([modifiedFileArray], { type: 'application/vnd.openxmlformats-officedocument.wordprocessingml.document' });
    const url = URL.createObjectURL(blob);
    const a = document.createElement('a');
    a.href = url;
    a.download = outputFileName;
    a.click();
    URL.revokeObjectURL(url);
  };

  return (
    <div style={{ textAlign: 'center', height: '300px' }}>
      <h1>Click the button below to create a custom table of contents in a Word document</h1>
      <button onClick={CustomizeTableOfContent}>
        Generate
      </button>
    </div>
  );
}

export default App;
The table of contents generated with a TableOfContent object and custom field switches has its entry levels, hyperlinks, and page numbers all determined by the switch string.
FAQ
The generated table of contents is empty
Cause: A TOC field collects entries by heading style. If the paragraphs do not have built-in heading styles such as Heading1 to Heading3 applied, no entries will appear in the table of contents after updating, even if the TOC field was inserted successfully.
Solution: Call ApplyStyle on the paragraphs that should appear in the table of contents to apply a heading style:
p.AppendText("Chapter 1 Overview");
p.ApplyStyle({ builtinStyle: docModule.BuiltinStyle.Heading1 });
The table of contents contains fewer heading levels than expected
Cause: The two parameters of AppendTOC correspond to the starting and ending heading levels collected by the table of contents. If you pass AppendTOC(1, 2), Heading 3 will not appear in the table of contents. With custom switches, \o "1-2" produces the same result.
Solution: Adjust the parameter range to the levels you need to collect — for example, to include Heading 1 through Heading 3:
tocPara.AppendTOC(1, 3);
Page numbers in the table of contents are missing or incorrect
Cause: AppendTOC only inserts the TOC field itself; the field content must be updated explicitly. If UpdateTableOfContents is not called before saving, the generated table of contents contains only the field code, with no entries or page numbers.
Solution: Call the update method before SaveToFile:
doc.UpdateTableOfContents();
doc.SaveToFile({ fileName: outputFileName, fileFormat: docModule.FileFormat.Docx2013 });
Get a Free License
If you wish to remove the evaluation message from the resulting document, or to eliminate functional limitations, please contact our sales team to request a 30-day temporary license.

Markdown is convenient for writing documentation, README files, notes, and other structured content. But when the content needs to be printed, archived, or shared in a fixed-layout format, PDF is often more practical.
In a React application, you can convert Markdown to PDF using Spire.Doc for JavaScript. The library runs through WebAssembly (WASM), allowing Markdown content to be processed and PDF files to be generated locally in the browser without sending files to a server.
This tutorial covers three common conversion scenarios:
- Convert a Markdown file to PDF with JavaScript
- Convert Markdown to PDF with custom page settings
- Convert a Markdown string to PDF with JavaScript
Set Up Spire.Doc for JavaScript in React
Before converting Markdown files, you need to integrate Spire.Doc for JavaScript into your React project and prepare the required WebAssembly runtime files.
For a detailed setup guide, see How to Integrate Spire.Doc for JavaScript in a React Project.
Step 1: Install the Package
Run the following command in your React project directory to install the required package from npm:
npm i spire.office
Step 2: Add the Required Runtime Files
Copy the following files and folders from node_modules/spire.office to your project's public directory:
_framework
spire.doc.js
Spire.Doc.Wasm.zip
spire.common.js
Spire.Common.Wasm.zip
The examples below also use CALIBRI.ttf for PDF text rendering. Place the font under:
public/static/font/
For file-based conversion, place the sample Markdown file under:
public/static/data/
The relevant project structure should look like this:
public/
├── _framework/
├── spire.doc.js
├── Spire.Doc.Wasm.zip
├── spire.common.js
├── Spire.Common.Wasm.zip
└── static/
    ├── data/
    │   └── MarkdownExample.md
    └── font/
        └── CALIBRI.ttf
Note: The examples use process.env.PUBLIC_URL, which follows the Create React App convention. If your project uses Vite or another build tool, adjust the public asset paths accordingly.
Convert a Markdown File to PDF with JavaScript
Converting a Markdown file to PDF involves 4 main steps:
- Load the required font and Markdown file into the WASM virtual file system (VFS).
- Call
Document.LoadFromFile()withFileFormat.Markdownto load the Markdown file into aDocumentobject. - Call
Document.SaveToFile()withFileFormat.PDFto save the loaded document as a PDF file. - Read the generated PDF from the VFS and download it in the browser.
The following JavaScript example loads a .md file and saves it as a .pdf file:
import React, { useEffect, useState } from 'react';

function App() {
  const [wasmModule, setWasmModule] = useState(null);

  // Initialize the Spire.Doc WebAssembly module
  useEffect(() => {
    (async () => {
      try {
        const publicUrl = process.env.PUBLIC_URL || '';

        const spireModule = await import(
          /* webpackIgnore: true */
          `${publicUrl}/spire.doc.js`
        );

        const rawModule = spireModule.default || spireModule;

        window.wasmModule =
          typeof rawModule === 'function'
            ? await rawModule({
                locateFile: (path) =>
                  path.endsWith('.wasm')
                    ? `${publicUrl}/${path}`
                    : path
              })
            : rawModule;

        setWasmModule(window.wasmModule);
      } catch (error) {
        console.error(
          'Failed to load the Spire.Doc WASM module:',
          error
        );
      }
    })();
  }, []);

  // Download a file generated in the WASM virtual file system
  const downloadVfsFile = (fileName, mimeType) => {
    const fileData =
      window.dotnetRuntime.Module.FS.readFile(fileName);

    const blob = new Blob(
      [fileData],
      { type: mimeType }
    );

    const url = URL.createObjectURL(blob);
    const link = document.createElement('a');

    link.href = url;
    link.download = fileName;

    document.body.appendChild(link);
    link.click();
    document.body.removeChild(link);

    URL.revokeObjectURL(url);
  };

  const convertMarkdownToPdf = async () => {
    const docModule = window.wasmModule?.spiredoc;

    if (!docModule) return;

    const publicUrl = process.env.PUBLIC_URL || '';

    // Load the font into the VFS
    await window.spire.FetchFileToVFS(
      'CALIBRI.ttf',
      '/Library/Fonts/',
      `${publicUrl}/static/font/`
    );

    const inputFileName = 'MarkdownExample.md';
    const outputFileName = 'MarkdownToPDF.pdf';

    // Load the Markdown file into the VFS
    await window.spire.FetchFileToVFS(
      inputFileName,
      '',
      `${publicUrl}/static/data/`
    );

    const doc = new docModule.Document();

    try {
      // Load the Markdown file
      doc.LoadFromFile({
        fileName: inputFileName,
        fileFormat: docModule.FileFormat.Markdown
      });

      // Save the document as PDF
      doc.SaveToFile({
        fileName: outputFileName,
        fileFormat: docModule.FileFormat.PDF
      });

      // Download the generated PDF
      downloadVfsFile(
        outputFileName,
        'application/pdf'
      );
    } finally {
      doc.Dispose();
    }
  };

  return (
    <div style={{ textAlign: 'center', padding: '40px' }}>
      <h1>Convert Markdown to PDF</h1>

      <button
        onClick={convertMarkdownToPdf}
        disabled={!wasmModule}
      >
        Convert and Download PDF
      </button>
    </div>
  );
}

export default App;
Run the application and wait for the WASM module to finish loading. Then click Convert and Download PDF. The application will load MarkdownExample.md, convert it to MarkdownToPDF.pdf, and download the generated PDF in the browser.
Output
The generated PDF preserves the main Markdown structure, including headings, paragraphs, lists, and tables:

Convert Markdown to PDF with Custom Page Settings
The default page layout may not suit every document. A Markdown report containing a wide table, for example, may work better in landscape orientation, while printable documentation may require specific page sizes or margins.
After loading the Markdown file, you can access the document section and adjust its PageSetup properties before generating the PDF.
The following example sets the first section to A4 size, landscape orientation, and 50-point margins:
const section = doc.Sections.get_Item(0);

// Set page size
section.PageSetup.PageSize =
  docModule.PageSize.A4();

// Set page orientation
section.PageSetup.Orientation =
  docModule.PageOrientation.Landscape;

// Set page margins
section.PageSetup.Margins.All = 50;
To apply these settings during Markdown-to-PDF conversion, use the following function:
const convertMarkdownToPdfWithPageSettings = async () => {
  const docModule = window.wasmModule?.spiredoc;

  if (!docModule) return;

  const publicUrl = process.env.PUBLIC_URL || '';

  // Load the font into the VFS
  await window.spire.FetchFileToVFS(
    'CALIBRI.ttf',
    '/Library/Fonts/',
    `${publicUrl}/static/font/`
  );

  const inputFileName = 'MarkdownExample.md';
  const outputFileName =
    'MarkdownToPDFWithPageSettings.pdf';

  // Load the Markdown file into the VFS
  await window.spire.FetchFileToVFS(
    inputFileName,
    '',
    `${publicUrl}/static/data/`
  );

  const doc = new docModule.Document();

  try {
    // Load the Markdown file
    doc.LoadFromFile({
      fileName: inputFileName,
      fileFormat: docModule.FileFormat.Markdown
    });

    // Get the first section
    const section = doc.Sections.get_Item(0);

    // Set page size
    section.PageSetup.PageSize =
      docModule.PageSize.A4();

    // Set landscape orientation
    section.PageSetup.Orientation =
      docModule.PageOrientation.Landscape;

    // Set all margins to 50 points
    section.PageSetup.Margins.All = 50;

    // Save the document as PDF
    doc.SaveToFile({
      fileName: outputFileName,
      fileFormat: docModule.FileFormat.PDF
    });

    // Download the generated PDF
    downloadVfsFile(
      outputFileName,
      'application/pdf'
    );
  } finally {
    doc.Dispose();
  }
};
You can adjust the page size, orientation, and margins according to the content of your Markdown document.
Convert a Markdown String to PDF with JavaScript
Markdown does not always come from a physical .md file. In a React application, the content may already exist as a string from a Markdown editor, textarea, CMS, API response, or application state.
In this case, write the Markdown string to the WASM virtual file system using FS.writeFile(), then load the virtual .md file and convert it to PDF.
const convertMarkdownStringToPdf = async () => {
  const docModule = window.wasmModule?.spiredoc;

  if (!docModule) return;

  const publicUrl = process.env.PUBLIC_URL || '';

  // Load the font into the VFS
  await window.spire.FetchFileToVFS(
    'CALIBRI.ttf',
    '/Library/Fonts/',
    `${publicUrl}/static/font/`
  );

  const markdownString = `# Project Notes

This PDF was generated from **Markdown stored in a React string**.

## Tasks

- Review the draft
- Export the final copy
- Share the PDF

## Task Status

| Item | Status |
| --- | --- |
| Draft | Done |
| Review | Pending |
`;

  const inputFileName = 'MarkdownInput.md';
  const outputFileName = 'MarkdownStringToPDF.pdf';

  // Write the Markdown string to the VFS
  window.dotnetRuntime.Module.FS.writeFile(
    inputFileName,
    markdownString,
    { encoding: 'utf8' }
  );

  const doc = new docModule.Document();

  try {
    // Load the virtual Markdown file
    doc.LoadFromFile({
      fileName: inputFileName,
      fileFormat: docModule.FileFormat.Markdown
    });

    // Save the document as PDF
    doc.SaveToFile({
      fileName: outputFileName,
      fileFormat: docModule.FileFormat.PDF
    });

    // Download the generated PDF
    downloadVfsFile(
      outputFileName,
      'application/pdf'
    );
  } finally {
    doc.Dispose();
  }
};
In an actual application, replace the sample string with the Markdown content from your existing data source:
const markdownString = editorValue;
or:
const markdownString = apiResponse.content;
The rest of the PDF conversion workflow remains the same.
Output

Why Are Fonts Loaded into the VFS?
PDF generation requires font data to render text correctly. In the examples above, CALIBRI.ttf is loaded into the WASM virtual file system before the Markdown document is processed:
await window.spire.FetchFileToVFS(
  'CALIBRI.ttf',
  '/Library/Fonts/',
  `${publicUrl}/static/font/`
);
If the Markdown contains characters that are not supported by the selected font, load an appropriate font into /Library/Fonts/ as well.
This is particularly important when generating PDFs containing Chinese, Japanese, Korean, Arabic, or other multilingual text.
FAQs
Can I Convert a User-Uploaded Markdown File to PDF?
Yes. Instead of loading a fixed .md file from the public directory, you can read the uploaded Markdown file in the browser, write its content to the WASM virtual file system, and then load it with FileFormat.Markdown. This allows users to select and convert their own Markdown files directly in a React application.
Why Are Some Characters Missing from the Generated PDF?
This usually happens when the font required to display those characters is not available in the WASM environment. Load a font that supports the characters used in your Markdown into /Library/Fonts/ before generating the PDF. This is especially important for multilingual content.
What Should I Do If a Wide Markdown Table Is Cut Off?
Try switching the page to landscape orientation, reducing the margins, or using a larger page size before saving the document as PDF.
Why Are Images in My Markdown Missing from the PDF?
Markdown usually references images through a file path or URL rather than embedding the image data directly. Make sure the image files referenced in the Markdown are available during conversion and that their paths can be resolved by the conversion environment. Relative image paths may require additional handling depending on where the Markdown and image files are stored.
Does the Markdown-to-PDF Conversion Run Locally in the Browser?
Yes. In this React implementation, Spire.Doc for JavaScript runs through WebAssembly, while the Markdown input and generated PDF are processed through the browser-side virtual file system. A backend is not required for the conversion itself, although your application may still use one for file storage, authentication, or other server-side operations.
Conclusion
This article demonstrated how to convert Markdown to PDF with JavaScript in a React application, including basic file conversion, custom page settings, and conversion from Markdown strings.
With Spire.Doc for JavaScript, developers can load Markdown content, control PDF page layout, and generate PDF files directly in the browser through WebAssembly. This approach can be used for documentation tools, Markdown editors, reporting systems, and other applications that need to export Markdown content as PDF.
Get a Free License
To fully experience the capabilities of Spire.Doc for JavaScript without any evaluation limitations, you can request a free 30-day trial license.

TL;DR: Learn how to convert Markdown files and strings into HTML directly inside the browser using JavaScript and Spire.Doc WebAssembly (WASM) in React. No server-side processing required.
Markdown is commonly used for README files, documentation, technical articles, and other structured content. However, some applications need the content as an actual HTML file—for example, to publish it as a web page or pass it to another HTML-based workflow.
This article shows how to convert Markdown to HTML with JavaScript in a React application using Spire.Doc for JavaScript. It covers two common scenarios:
Prerequisites & Project Setup
Step 1: Install Spire.Doc for JavaScript
Open a terminal in the root directory of your React project and install the Spire.Doc package through NPM:
npm i spire.office
Step 2: Copy the Runtime Resources
After installation, copy the following runtime resources from node_modules/spire.office to the public directory of your React project:
- _framework
- spire.doc.js
- Spire.Doc.Wasm.zip
- spire.common.js
- Spire.Common.Wasm.zip
The examples also use CALIBRI.ttf for text rendering. Place the font file under public/static/font/.
For the file-based example, place the source Markdown document in public/static/data/MarkdownExample.md.
For detailed setup instructions, see How to Integrate Spire.Doc for JavaScript in a React Project.
Note: The examples use
process.env.PUBLIC_URL, which follows the Create React App convention. If your project uses Vite or another build tool, adjust the public asset paths accordingly.
Convert a Markdown File to HTML with JavaScript in React
If the Markdown content already exists as a .md file, it can be loaded into the WebAssembly virtual file system (VFS) and opened directly with Document.LoadFromFile(). The document can then be exported as HTML using Document.SaveToFile().
The file-based conversion follows four main stages:
- Module Initialization: Load and initialize the Spire.Doc WebAssembly module when the React component mounts.
- Input Loading: Add the required font and source Markdown file to the VFS using
FetchFileToVFS(). - Document Conversion: Load the
.mdfile withFileFormat.Markdownand save it withFileFormat.Html. - Output Handling: Read the generated HTML from the VFS and download it in the browser.
The following example converts MarkdownExample.md to MarkdownToHtml.html.
import React, { useState, useEffect } from 'react';

function App() {
  const [wasmModule, setWasmModule] = useState(null);

  // Load Spire.Doc
  useEffect(() => {
    (async () => {
      try {
        const publicUrl = process.env.PUBLIC_URL || '';

        const spireModule = await import(
          /* webpackIgnore: true */
          `${publicUrl}/spire.doc.js`
        );

        const rawModule = spireModule.default || spireModule;

        window.wasmModule =
          typeof rawModule === 'function'
            ? await rawModule({
                locateFile: (path) =>
                  path.endsWith('.wasm')
                    ? `${publicUrl}/${path}`
                    : path
              })
            : rawModule;

        setWasmModule(window.wasmModule);
      } catch (error) {
        console.error(
          'Failed to load spire.doc.js WASM module:',
          error
        );
      }
    })();
  }, []);

  // Convert Markdown file to HTML
  const convertMarkdownFileToHtml = async () => {
    const wasmModule = window.wasmModule?.spiredoc;

    if (!wasmModule) return;

    // Load the required font into the VFS
    await window.spire.FetchFileToVFS(
      'CALIBRI.ttf',
      '/Library/Fonts/',
      `${process.env.PUBLIC_URL}/static/font/`
    );

    // Load the Markdown file into the VFS
    const inputFileName = 'MarkdownExample.md';

    await window.spire.FetchFileToVFS(
      inputFileName,
      '',
      `${process.env.PUBLIC_URL}/static/data/`
    );

    // Create a Document instance
    const doc = new wasmModule.Document();

    try {
      // Load the Markdown document
      doc.LoadFromFile({
        fileName: inputFileName,
        fileFormat: wasmModule.FileFormat.Markdown
      });

      // Set HTML export options
      doc.HtmlExportOptions.CssStyleSheetType = wasmModule.CssStyleSheetType.Internal;
      doc.HtmlExportOptions.ImageEmbedded = true;

      // Save the document as HTML
      const outputFileName = 'MarkdownToHtml.html';

      doc.SaveToFile({
        fileName: outputFileName,
        fileFormat: wasmModule.FileFormat.Html
      });

      // Read the generated HTML from the VFS
      const htmlBytes =
        window.dotnetRuntime.Module.FS.readFile(
          outputFileName
        );

      // Download the HTML file
      const blob = new Blob(
        [htmlBytes],
        { type: 'text/html;charset=utf-8' }
      );

      const url = URL.createObjectURL(blob);
      const link = document.createElement('a');

      link.href = url;
      link.download = outputFileName;

      document.body.appendChild(link);
      link.click();
      document.body.removeChild(link);

      URL.revokeObjectURL(url);
    } finally {
      doc.Dispose();
    }
  };

  return (
    <div style={{ textAlign: 'center', height: '300px' }}>
      <h1>Convert Markdown File to HTML</h1>

      <button
        onClick={convertMarkdownFileToHtml}
        disabled={!wasmModule}
      >
        Convert and Download
      </button>
    </div>
  );
}

export default App;
Once the WebAssembly module has loaded, click Convert and Download. The application loads MarkdownExample.md from public/static/data/, converts it to HTML, and downloads the generated MarkdownToHtml.html file.
Here, FetchFileToVFS() loads the source Markdown file into the WebAssembly virtual file system, and Document.LoadFromFile() reads the file from the VFS. CssStyleSheetType.Internal and ImageEmbedded embed styles and images directly in the HTML, while Document.SaveToFile() exports the document as HTML.
Output:
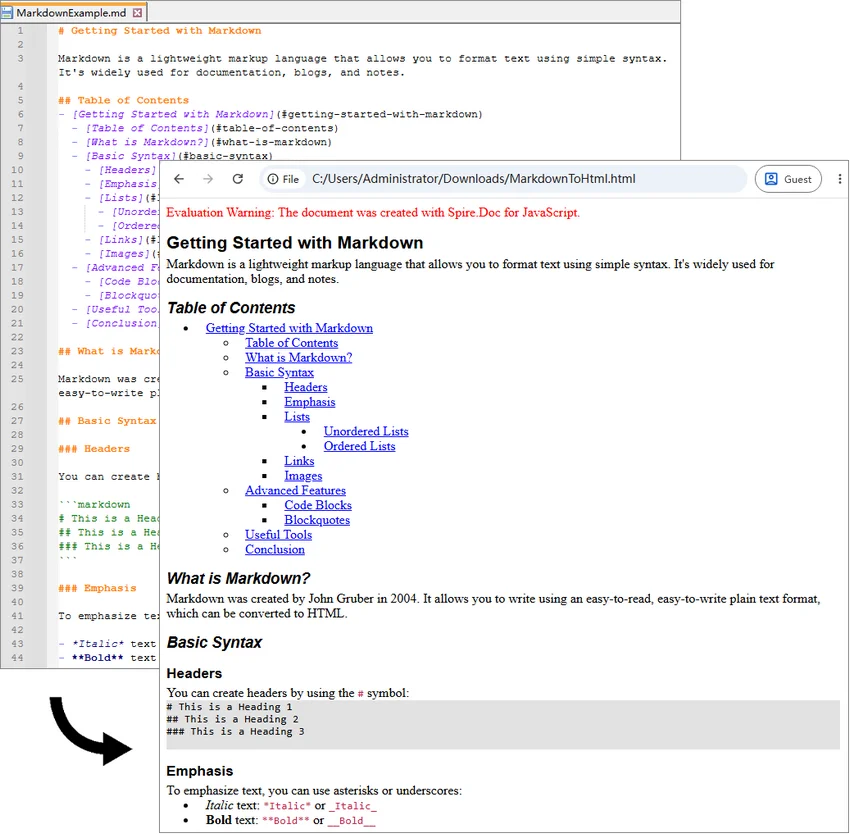
Convert a Markdown String to HTML with JavaScript in React
Markdown is also frequently generated or edited directly inside an application. Content returned by an API or CMS, for example, may already be available as a JavaScript string rather than an existing .md file.
Since Document.LoadFromFile() works with files available in the WebAssembly virtual file system, a Markdown string can first be written to a temporary .md file with FS.writeFile(). The temporary file can then be processed in the same way as a regular Markdown document.
The string-based conversion follows five main steps:
- Module Initialization: Load and initialize the Spire.Doc WebAssembly module.
- Content Preparation: Define or retrieve the Markdown string.
- VFS Creation: Write the Markdown string to a temporary
.mdfile usingFS.writeFile(). - Document Conversion: Load the virtual Markdown file and save it as HTML.
- Output Handling: Read the HTML file from the VFS and download or process it as needed.
The following example converts a Markdown string containing headings, lists, code, links, and a table.
import React, { useState, useEffect } from 'react';

function App() {
  const [wasmModule, setWasmModule] = useState(null);

  // Load Spire.Doc
  useEffect(() => {
    (async () => {
      try {
        const publicUrl = process.env.PUBLIC_URL || '';

        const spireModule = await import(
          /* webpackIgnore: true */
          `${publicUrl}/spire.doc.js`
        );

        const rawModule = spireModule.default || spireModule;

        window.wasmModule =
          typeof rawModule === 'function'
            ? await rawModule({
                locateFile: (path) =>
                  path.endsWith('.wasm')
                    ? `${publicUrl}/${path}`
                    : path
              })
            : rawModule;

        setWasmModule(window.wasmModule);
      } catch (error) {
        console.error(
          'Failed to load spire.doc.js WASM module:',
          error
        );
      }
    })();
  }, []);

  // Convert Markdown string to HTML
  const convertMarkdownStringToHtml = async () => {
    const wasmModule = window.wasmModule?.spiredoc;

    if (!wasmModule) return;

    // Load the required font into the VFS
    await window.spire.FetchFileToVFS(
      'CALIBRI.ttf',
      '/Library/Fonts/',
      `${process.env.PUBLIC_URL}/static/font/`
    );

    // Define the Markdown string
    const markdownString = `# Project Documentation

This project provides a **browser-based document converter**.

## Features

- Convert Markdown to HTML
- Process content in the browser
- Export the generated HTML

## Code Example

\`\`\`javascript
function greet(name) {
  console.log(\`Hello, \${name}!\`);
}

greet("World");
\`\`\`

## Supported Content

| Feature | Supported |
|---------|-----------|
| Headings | Yes |
| Lists | Yes |
| Tables | Yes |
| Links | Yes |

Visit [Example.com](https://example.com) for more information.
`;

    const inputFileName = 'MarkdownString.md';
    const outputFileName = 'MarkdownStringToHtml.html';

    // Write the Markdown string to the VFS
    window.dotnetRuntime.Module.FS.writeFile(
      inputFileName,
      markdownString,
      { encoding: 'utf8' }
    );

    // Create a Document instance
    const doc = new wasmModule.Document();

    try {
      // Load the Markdown document
      doc.LoadFromFile({
        fileName: inputFileName,
        fileFormat: wasmModule.FileFormat.Markdown
      });

      // Set HTML export options
      doc.HtmlExportOptions.CssStyleSheetType = wasmModule.CssStyleSheetType.Internal;
      doc.HtmlExportOptions.ImageEmbedded = true;

      // Save the document as HTML
      doc.SaveToFile({
        fileName: outputFileName,
        fileFormat: wasmModule.FileFormat.Html
      });

      // Read the generated HTML from the VFS
      const htmlBytes =
        window.dotnetRuntime.Module.FS.readFile(
          outputFileName
        );

      // Download the HTML file
      const blob = new Blob(
        [htmlBytes],
        { type: 'text/html;charset=utf-8' }
      );

      const url = URL.createObjectURL(blob);
      const link = document.createElement('a');

      link.href = url;
      link.download = outputFileName;

      document.body.appendChild(link);
      link.click();
      document.body.removeChild(link);

      URL.revokeObjectURL(url);
    } finally {
      doc.Dispose();
    }
  };

  return (
    <div style={{ textAlign: 'center', height: '300px' }}>
      <h1>Convert Markdown String to HTML</h1>

      <button
        onClick={convertMarkdownStringToHtml}
        disabled={!wasmModule}
      >
        Convert and Download
      </button>
    </div>
  );
}

export default App;
Unlike the previous example, there is no source .md file to load. The Markdown content is written directly to the VFS with FS.writeFile().
window.dotnetRuntime.Module.FS.writeFile(
  inputFileName,
  markdownString,
  { encoding: 'utf8' }
);
This approach also works with Markdown returned from an API, database, CMS, or text editor. Instead of defining markdownString directly in the code, pass the retrieved Markdown content to FS.writeFile().
Output:
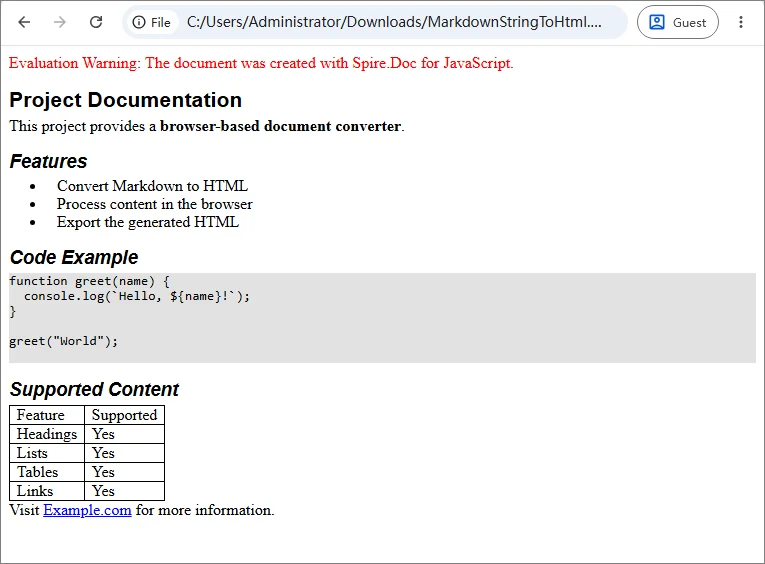
Troubleshooting Common MD to HTML Issues
Most conversion problems in a React JavaScript project relate to WebAssembly initialization, public asset paths, or files not loaded into the VFS correctly. The table below lists the most common issues and what to check first.
| Issue | Possible Cause | What to Check |
|---|---|---|
spiredoc is undefined |
The conversion starts before WASM initialization finishes | Keep the conversion button disabled until wasmModule is available |
| 404 when loading runtime files | One or more Spire.Doc assets are missing or the public path is incorrect | Check spire.doc.js, _framework/, WASM resources, and the browser Network panel |
MarkdownExample.md cannot be loaded |
The source file path passed to FetchFileToVFS() is incorrect |
Verify that the file is available under public/static/data/ |
| Font loading fails | CALIBRI.ttf is missing or the font path is incorrect |
Confirm that the font is accessible under public/static/font/ |
| Conversion works locally but fails after deployment | The deployed application uses a different public base path | Verify the generated URLs and adjust process.env.PUBLIC_URL or the equivalent build-tool setting |
| Browser memory increases after repeated conversions | Document objects are not released | Call doc.Dispose() after each conversion, preferably in a finally block |
FAQs
Q: How do I convert a user-selected Markdown file to HTML?
A: A file selected through <input type="file"> is different from a Markdown file stored in the application's public assets.
Read the selected file with the browser File API:
const markdownString = await file.text();
Then write the string to the VFS with FS.writeFile() and use the same conversion process shown in the Markdown string example.
Q: Can I preview the generated HTML instead of downloading it?
A: Yes. Read the generated HTML from the VFS and decode the returned bytes:
const htmlBytes = window.dotnetRuntime.Module.FS.readFile(outputFileName);
const html = new TextDecoder('utf-8').decode(htmlBytes);
The resulting string can then be displayed with an iframe:
<iframe
  title="HTML Preview"
  srcDoc={html}
/>
Security Note: If the Markdown comes from untrusted users or external sources, treat the generated HTML as untrusted content as well and sanitize or isolate it before rendering it in a production application.
Q: Does Markdown-to-HTML conversion require a backend?
A: No. In the examples above, document processing runs through WebAssembly in the browser. The source Markdown and generated HTML are handled through the client-side virtual file system.
A backend may still be needed if your application needs to store the generated file, retrieve protected source content, or perform other server-side operations.
Conclusion
This article showed how to convert Markdown to HTML with JavaScript in React, covering both Markdown files and Markdown strings. By running the conversion through WebAssembly in the browser, content from files, editors, APIs, or CMS platforms can be turned into HTML for download, preview, or further processing. The same core conversion logic can be reused across different Markdown sources.
Get, Replace, Delete Word Bookmark Content and Insert Elements with JavaScript in React
2026-07-17 02:45:00 Written by Nina TangBookmarks are invisible positioning markers in Word documents that act as coordinates, precisely marking a location or a range of text. But the true value of bookmarks goes beyond positioning—by programmatically retrieving content within a bookmark range, replacing placeholder text, removing unwanted content, or inserting text, paragraphs, tables, and images at bookmark positions, developers can implement advanced document processing workflows such as automatic contract template filling, dynamic report data injection, and batch form content cleanup. The combination of "read, write, delete, and insert" operations around bookmark content forms the core of Word automation.
Spire.Doc for JavaScript runs entirely in the browser via WebAssembly, handling bookmark content retrieval, replacement, deletion, and element insertion directly — all managed through a virtual file system (VFS) with no backend server required.
This article covers four core features:
- Get Bookmark Content
- Replace Bookmark Content
- Delete Bookmark Content
- Insert Text, Paragraphs, Tables, and Images at a Bookmark
For installation and project setup, refer to Integrating Spire.Doc for JavaScript in a React Project. The examples below assume Spire.Doc is installed and the WebAssembly module is initialized.
Get Bookmark Content
Getting bookmark content is the prerequisite for any bookmark operation. After locating a bookmark with BookmarksNavigator, the GetBookmarkContent method returns the content within the bookmark range as a TextBodyPart object, which developers can iterate through its BodyItems collection to retrieve elements.
function App() {
  const bookmarkContent = async () => {
    // Get the Spire.Doc WASM module
    const docModule = window.wasmModule?.spiredoc;

    // Check if the WASM module is ready
    if (!docModule) {
      alert('Spire.Doc is not ready yet');
      return;
    }

    // Load the Word file into VFS
    const inputFileName = 'ContractTemplate_en.docx';
    await window.spire.FetchFileToVFS(inputFileName, '', `${process.env.PUBLIC_URL}/data/`);

    // Load the Word document
    const doc = new docModule.Document();
    doc.LoadFromFile(inputFileName);

    // Create a BookmarksNavigator and move to the bookmark
    let navigator = new docModule.BookmarksNavigator(doc);
    navigator.MoveToBookmark("myBookmark");
    let textBodyPart = navigator.GetBookmarkContent();

    // Iterate through elements in the bookmark content and extract text
    let text = "";
    for (let i = 0; i < textBodyPart.BodyItems.Count; i++) {
      let item = textBodyPart.BodyItems.get_Item(i);
      if (item instanceof docModule.Paragraph) {
        for (let j = 0; j < item.ChildObjects.Count; j++) {
          let childObject = item.ChildObjects.get_Item(j);
          if (childObject instanceof docModule.TextRange) {
            text += childObject.Text;
          }
        }
      }
    }

    // Save as a .txt file
    const outputFileName = "GetBookmarkContent.txt";

    // Write the text file to VFS and trigger download
    window.dotnetRuntime.Module.FS.writeFile(outputFileName, text);

    const fileArray = window.dotnetRuntime.Module.FS.readFile(outputFileName);
    const blob = new Blob([fileArray], { type: 'text/plain' });
    const url = URL.createObjectURL(blob);
    const a = document.createElement('a');
    a.href = url;
    a.download = outputFileName;
    a.click();
    URL.revokeObjectURL(url);

    // Release resources
    doc.Dispose();
  };

  return (
    <div style={{ textAlign: 'center', height: '300px' }}>
      <h1>Get Bookmark Content from Word Document</h1>
      <button onClick={bookmarkContent}>
        Generate
      </button>
    </div>
  );
}

export default App;
Executing the code above extracts the text content from the bookmark "myBookmark" and saves it as a separate .txt file:
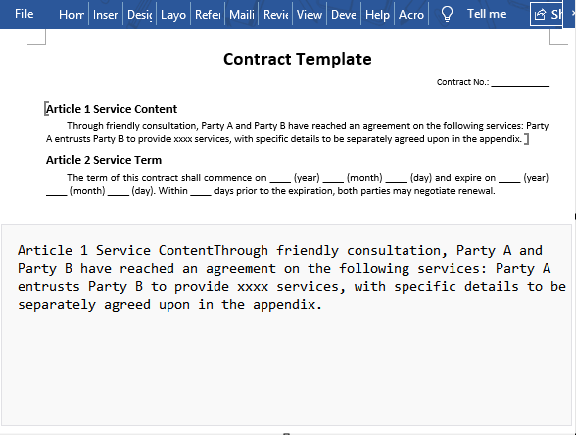
Replace Bookmark Content
Replacing bookmark content is the most common operation in document template filling. After locating a bookmark with BookmarksNavigator, the ReplaceBookmarkContent method supports replacement with both plain text and complex elements like tables, making it ideal for placeholder replacement in contract generation, report filling, and similar scenarios.
function App() {
  const replaceBookmarkContent = async () => {
    // Get the Spire.Doc WASM module
    const docModule = window.wasmModule?.spiredoc;

    // Check if the WASM module is ready
    if (!docModule) {
      alert('Spire.Doc is not ready yet');
      return;
    }

    // Load fonts and Word file into VFS
    await window.spire.FetchFileToVFS('ARIAL.TTF', '/Library/Fonts/', `${process.env.PUBLIC_URL}/font/`);
    const inputFileName = 'BookmarkSample.docx';
    await window.spire.FetchFileToVFS(inputFileName, '', `${process.env.PUBLIC_URL}/data/`);

    // Load the Word document
    const doc = new docModule.Document();
    doc.LoadFromFile(inputFileName);

    // Create a BookmarksNavigator and move to the bookmark
    let navigator = new docModule.BookmarksNavigator(doc);
    navigator.MoveToBookmark("Bookmark1");

    // Replace the content of "书签1" — with text
    navigator.ReplaceBookmarkContent({ text: "This is the text that will replace the bookmark.", saveFormatting: true });

    // Continue to replace "书签2" — with a table
    navigator.MoveToBookmark("Bookmark2");

    // Create a table
    let table = new docModule.Table(doc, true);
    table.ResetCells(4, 5);

    // Create data and fill it into the table
    let dt = [
      ["City", "Province", "Population", "Area (km²)", "Abbrev."],
      ["Beijing", "Beijing", "21.89M", "16410", "BJ"],
      ["Shanghai", "Shanghai", "24.75M", "6340", "SH"],
      ["Guangzhou", "Guangdong", "18.67M", "7434", "GZ"]];
    for (let i = 0; i < 4; i++) {
      for (let j = 0; j < 5; j++) {
        table.Rows.get_Item(i).Cells.get_Item(j).AddParagraph().AppendText(dt[i][j]);
      }
    }

    // Create a TextBodyPart instance and add the table to it
    let part = new docModule.TextBodyPart({ doc: doc });
    part.BodyItems.Add(table);

    // Replace the current bookmark content with the TextBodyPart
    navigator.ReplaceBookmarkContent({ bodyPart: part });

    // Save as a new .docx file
    const outputFileName = "ReplaceBookmark.docx";
    doc.SaveToFile({ fileName: outputFileName, fileFormat: docModule.FileFormat.Docx2013 });

    // Read the generated file from VFS and trigger download
    const fileArray = window.dotnetRuntime.Module.FS.readFile(outputFileName);
    const blob = new Blob([fileArray], { type: 'application/vnd.openxmlformats-officedocument.wordprocessingml.document' });
    const url = URL.createObjectURL(blob);
    const a = document.createElement('a');
    a.href = url;
    a.download = outputFileName;
    a.click();
    URL.revokeObjectURL(url);

    // Release resources
    doc.Dispose();
  };

  return (
    <div style={{ textAlign: 'center', height: '300px' }}>
      <h1>Replace Bookmark Content in Word</h1>
      <button onClick={replaceBookmarkContent}>
        Generate
      </button>
    </div>
  );
}

export default App;
This method supports replacing bookmark content with plain text or complex elements like tables. The bookmark marker itself is preserved after replacement, making it easy to locate again later. The figure below shows the result:
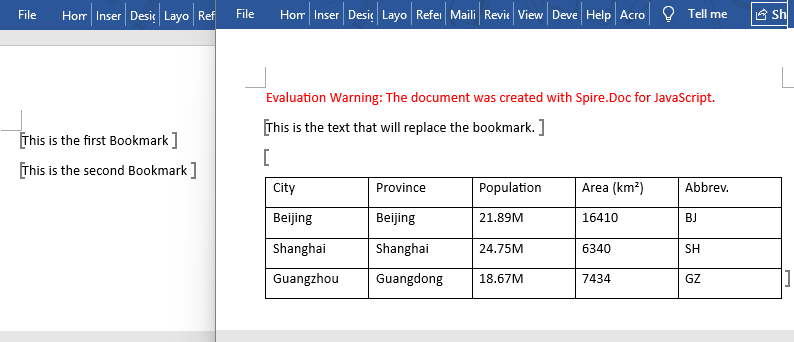
Delete Bookmark Content
Deleting bookmark content and removing a bookmark marker are two different operations. After locating a bookmark with BookmarksNavigator, calling DeleteBookmarkContent removes the text content within the bookmark range while preserving the bookmark marker itself for later refilling. If you only need to clear the content while keeping the positioning marker, this method is the preferred choice.
function App() {
  const deleteBookmarkContent = async () => {
    // Get the Spire.Doc WASM module
    const docModule = window.wasmModule?.spiredoc;

    // Check if the WASM module is ready
    if (!docModule) {
      alert('Spire.Doc is not ready yet');
      return;
    }

    // Load the Word file into VFS
    const inputFileName = 'ContractTemplate_en.docx';
    await window.spire.FetchFileToVFS(inputFileName, '', `${process.env.PUBLIC_URL}/data/`);

    // Load the Word document
    const doc = new docModule.Document();
    doc.LoadFromFile(inputFileName);

    // Create a BookmarksNavigator and move to the bookmark
    let navigator = new docModule.BookmarksNavigator(doc);
    navigator.MoveToBookmark("myBookmark");

    // Delete bookmark content, keep the bookmark marker
    navigator.DeleteBookmarkContent(true);

    // Save as a new .docx file
    const outputFileName = "RemoveBookmark.docx";

    doc.SaveToFile({ fileName: outputFileName, fileFormat: docModule.FileFormat.Docx2013 });

    // Read the generated file from VFS and trigger download
    const fileArray = window.dotnetRuntime.Module.FS.readFile(outputFileName);
    const blob = new Blob([fileArray], { type: 'application/vnd.openxmlformats-officedocument.wordprocessingml.document' });
    const url = URL.createObjectURL(blob);
    const a = document.createElement('a');
    a.href = url;
    a.download = outputFileName;
    a.click();
    URL.revokeObjectURL(url);

    // Release resources
    doc.Dispose();
  };

  return (
    <div style={{ textAlign: 'center', height: '300px' }}>
      <h1>Delete Bookmark Content in Word</h1>
      <button onClick={deleteBookmarkContent}>
        Generate
      </button>
    </div>
  );
}

export default App;
DeleteBookmarkContentremoves only the text content within the bookmark range — the bookmark marker itself remains.Bookmarks.Remove, on the other hand, removes the bookmark marker, leaving the text within the range unaffected.
After execution, the text within the bookmark "myBookmark" is removed, but the bookmark marker stays in the document:
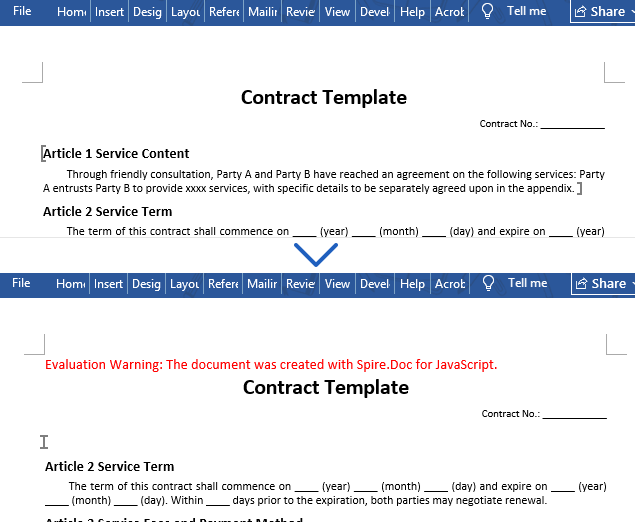
Insert Text, Paragraphs, Tables, and Images at a Bookmark
Spire.Doc supports flexibly inserting various types of document elements at bookmark positions. It provides InsertText, InsertParagraph, and InsertTable methods for inserting text, paragraphs, and tables. Elements can also be inserted based on the index of the bookmark start node within the paragraph's ChildObjects collection.
function App() {
  const insertElementsAtBookmark = async () => {
    // Get the Spire.Doc WASM module
    const docModule = window.wasmModule?.spiredoc;

    // Check if the WASM module is ready
    if (!docModule) {
      alert('Spire.Doc is not ready yet');
      return;
    }

    // Load fonts and Word file into VFS
    await window.spire.FetchFileToVFS('ARIAL.TTF', '/Library/Fonts/', `${process.env.PUBLIC_URL}/font/`);
    const inputFileName = 'BookmarkSample1.docx';
    await window.spire.FetchFileToVFS(inputFileName, '', `${process.env.PUBLIC_URL}/data/`);

    // Create a Document object and load the file
    const doc = new docModule.Document();
    doc.LoadFromFile(inputFileName);

    // Move to the bookmark position
    let navigator = new docModule.BookmarksNavigator(doc);
    navigator.MoveToBookmark("Bookmark1");

    // 1. Insert text
    navigator.InsertText("This is the inserted text content.", true);

    // 2. Insert paragraph
    let newParagraph = new docModule.Paragraph(doc);
    newParagraph.AppendText("This is the inserted paragraph content.")
    navigator.MoveToBookmark("Bookmark2");
    navigator.InsertParagraph(newParagraph);

    // 3. Insert table — 2 rows, 3 columns
    let table = new docModule.Table(doc, true);
    table.ResetCells(2, 3);
    table.Rows.get_Item(0).Cells.get_Item(0).AddParagraph().AppendText("Name");
    table.Rows.get_Item(0).Cells.get_Item(1).AddParagraph().AppendText("Quantity");
    table.Rows.get_Item(0).Cells.get_Item(2).AddParagraph().AppendText("Note");
    table.Rows.get_Item(1).Cells.get_Item(0).AddParagraph().AppendText("Product A");
    table.Rows.get_Item(1).Cells.get_Item(1).AddParagraph().AppendText("100");
    table.Rows.get_Item(1).Cells.get_Item(2).AddParagraph().AppendText("In Stock");

    navigator.MoveToBookmark("Bookmark3");
    navigator.InsertTable(table);

    // 4. Insert image
    const imageFileName = 'pic.png';
    await window.spire.FetchFileToVFS(imageFileName, '', `${process.env.PUBLIC_URL}/data/`);
    let picture = new docModule.DocPicture(doc);
    picture.LoadImage(imageFileName);
    picture.Width = 100;
    picture.Height = 200;

    navigator.MoveToBookmark("Bookmark4");
    // Get the bookmark start node
    let start = navigator.CurrentBookmark.BookmarkStart;
    // Get the paragraph containing the bookmark
    let bookmarkPara = start.OwnerParagraph;
    // Get the index of the bookmark start node in the paragraph
    let startIndex = bookmarkPara.ChildObjects.IndexOf(start);
    // Insert the image after the bookmark start node
    bookmarkPara.ChildObjects.Insert(startIndex + 1, picture);

    // Save as a .docx file
    const outputFileName = "InsertToBookmark.docx";

    doc.SaveToFile({ fileName: outputFileName, fileFormat: docModule.FileFormat.Docx2013 });

    // Read the generated file from VFS and trigger download
    const fileArray = window.dotnetRuntime.Module.FS.readFile(outputFileName);
    const blob = new Blob([fileArray], { type: 'application/vnd.openxmlformats-officedocument.wordprocessingml.document' });
    const url = URL.createObjectURL(blob);
    const a = document.createElement('a');
    a.href = url;
    a.download = outputFileName;
    a.click();
    URL.revokeObjectURL(url);

    // Release Document resources
    doc.Dispose();
  };

  return (
    <div style={{ textAlign: 'center', height: '300px' }}>
      <h1>Insert Elements at Bookmark Position</h1>
      <button onClick={insertElementsAtBookmark}>
        Generate
      </button>
    </div>
  );
}

export default App;
The figure below shows the generated document with text, paragraph, table, and image inserted at bookmark positions:
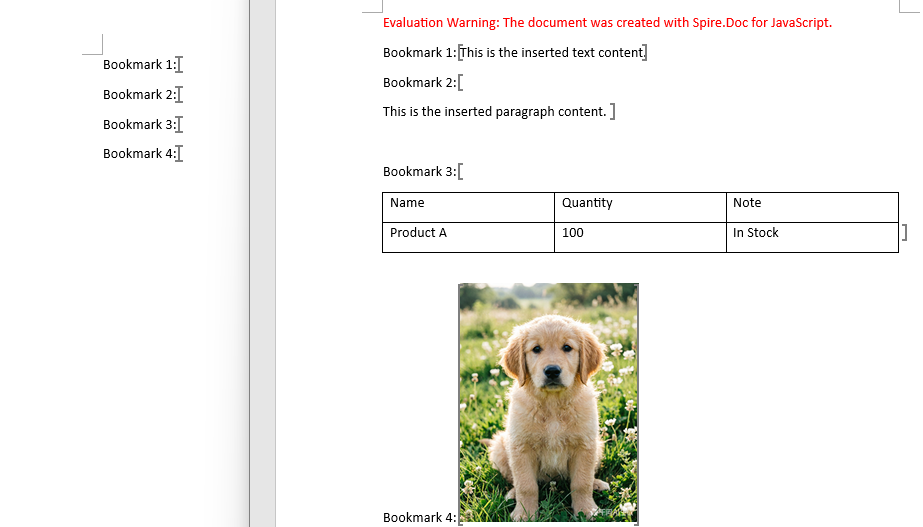
FAQ
Formatting (font, size, color) is lost after replacing bookmark content — how to keep it?
ReplaceBookmarkContent replaces with plain text by default, discarding the original formatting. To preserve the bookmark's existing formatting, pass saveFormatting: true:
navigator.ReplaceBookmarkContent({ text: "New content", saveFormatting: true });
The replacement text will then inherit the original font, size, color, and other formatting from the bookmark.
How to batch process multiple bookmarks in a document?
Iterate through the doc.Bookmarks collection, locating and operating on each bookmark one by one:
for (let i = 0; i < doc.Bookmarks.Count; i++) {
    let bookmark = doc.Bookmarks.get_Item(i);
    navigator.MoveToBookmark(bookmark.Name);
    // Perform replace, delete, or insert operations
}
What's the difference between DeleteBookmarkContent and removing a bookmark marker?
DeleteBookmarkContent: Clears only the content within the bookmark range. The bookmark marker stays in the document, so you can still locate it by name and fill in new content later.Bookmarks.Remove: Removes the bookmark marker itself. The content within the bookmark range is unaffected, but the bookmark name disappears and can no longer be located.
Choose the appropriate operation based on your needs: use DeleteBookmarkContent if you need to keep the "placeholder" capability, or remove the marker if the bookmark is no longer needed.
When inserting multiple elements at the same bookmark, why does only the last one take effect?
Methods like InsertText, InsertParagraph, and InsertTable insert based on the bookmark's current position. When inserting multiple times at the same bookmark, subsequent insertions may overwrite or shift previously inserted content. It is recommended to use separate bookmarks for each insertion, or re-locate the bookmark after each insert before proceeding with the next operation.
Get a Free License
Spire.Doc for JavaScript offers a 30-day full-featured free trial license with no functional limitations. Apply here to evaluate before purchasing.
A bookmark is like an invisible "anchor" in a Word document, able to accurately locate a specific position or selected text. Whether it's a fill-in area in a contract template, a key section to jump to in a long document, or a data insertion point when generating reports in batch, bookmarks are the critical anchor behind these operations. Developers can use bookmarks for dynamic content filling, navigation, content extraction, and other advanced features, making bookmark management one of the most commonly used capabilities in Word automation.
Spire.Doc for JavaScript runs entirely in the browser via WebAssembly, handling bookmark creation, navigation, and deletion directly — all managed through a virtual file system (VFS) with no backend server required.
This article covers three core features:
For installation and project setup, refer to Integrating Spire.Doc for JavaScript in a React Project. The examples below assume Spire.Doc is installed and the WebAssembly module is initialized.
Add a Bookmark to a Paragraph
To add a bookmark in an existing document, use AppendBookmarkStart and AppendBookmarkEnd to mark the bookmark region on a paragraph. You can add bookmark markers to existing paragraphs or append a new paragraph with a bookmark. Spire.Doc also supports nested bookmarks for building hierarchical structures.
function App() {
  const createBookmarkInWord = async () => {
    // Get the Spire.Doc WASM module
    const docModule = window.wasmModule?.spiredoc;

    // Check if the module is ready
    if (!docModule) {
      alert('Spire.Doc is not ready yet');
      return;
    }

    // Load the Word file into VFS
    const inputFileName = 'ChinaTravelGuide.docx';
    await window.spire.FetchFileToVFS(inputFileName, '', `${process.env.PUBLIC_URL}/data/`);

    // Load the document
    const doc = new docModule.Document();
    doc.LoadFromFile(inputFileName);

    // Get the first section and add bookmarks
    let section = doc.Sections.get_Item(0);

    AddBookmark(section);

    // Save as a .docx file
    const outputFileName = "AddBookmark.docx";

    doc.SaveToFile({ fileName: outputFileName, fileFormat: docModule.FileFormat.Docx2013 });

    // Read the file from VFS and trigger download
    const fileArray = window.dotnetRuntime.Module.FS.readFile(outputFileName);
    const blob = new Blob([fileArray], { type: 'application/vnd.openxmlformats-officedocument.wordprocessingml.document' });
    const url = URL.createObjectURL(blob);
    const a = document.createElement('a');
    a.href = url;
    a.download = outputFileName;
    a.click();
    URL.revokeObjectURL(url);

    // Release resources
    doc.Dispose();
  };

  function AddBookmark(section) {
    // Bookmark 1: add bookmark markers around existing paragraphs
    let paraStart = section.Paragraphs.get_Item(1);
    let paraEnd = section.Paragraphs.get_Item(3);

    paraStart.AppendBookmarkStart("Bookmark1");
    paraEnd.AppendBookmarkEnd("Bookmark1");

    // Bookmark 2: add a new paragraph with a bookmark
    let paragraph = section.AddParagraph();
    paragraph.AppendBookmarkStart("Bookmark2");
    paragraph.AppendText("This is a new paragraph");
    paragraph.AppendBookmarkEnd("Bookmark2");
  }

  return (
    <div style={{ textAlign: 'center', height: '300px' }}>
      <h1>Add Bookmark in Word</h1>
      <button onClick={createBookmarkInWord}>
        Generate
      </button>
    </div>
  );
}

export default App;
Bookmarks added to the generated Word document

Add a Bookmark to Selected Text
To add a bookmark to specific text within an existing paragraph, first locate the text with FindAllString, create bookmark objects using the BookmarkStart and BookmarkEnd constructors, then insert the start marker before and the end marker after the matched TextRange via ChildObjects.Insert.
function App() {
  const addBookmarkForMatchedText = async () => {
    // Get the Spire.Doc WASM module
    const docModule = window.wasmModule?.spiredoc;

    // Check if the WASM module is ready
    if (!docModule) {
      alert('Spire.Doc is not ready yet');
      return;
    }

    // Load the Word file into VFS
    const inputFileName = 'ChinaTravelGuide.docx';
    await window.spire.FetchFileToVFS(inputFileName, '', `${process.env.PUBLIC_URL}/data/`);

    // Load the Word document
    const doc = new docModule.Document();
    doc.LoadFromFile(inputFileName);

    // Find all occurrences of "Street" in the document
    let textSelections = doc.FindAllString('Street', false, true);

    // Iterate over each match and insert bookmark start/end markers
    for (let i = 0; i < textSelections.length; i++) {

      // Create bookmark start and end objects (named "Bookmark_0", "Bookmark_1", ...)
      let start = new docModule.BookmarkStart(doc, "Bookmark_" + i);
      let end = new docModule.BookmarkEnd(doc, "Bookmark_" + i);

      let selection = textSelections[i];

      // Get the TextRange of the matched text
      let textRange = selection.GetAsOneRange();

      // Get the paragraph containing the matched text
      let para = textRange.OwnerParagraph;

      // Get the index of the TextRange within the paragraph's child objects
      let index = para.ChildObjects.IndexOf(textRange);

      // Insert the bookmark start before the TextRange and the bookmark end after it
      para.ChildObjects.Insert(index, start);
      para.ChildObjects.Insert(index + 2, end);
    }

    // Save as a new .docx file
    const outputFileName = "AddBookmark.docx";

    doc.SaveToFile({ fileName: outputFileName, fileFormat: docModule.FileFormat.Docx2013 });

    // Read the generated file from VFS and trigger download
    const fileArray = window.dotnetRuntime.Module.FS.readFile(outputFileName);
    const blob = new Blob([fileArray], { type: 'application/vnd.openxmlformats-officedocument.wordprocessingml.document' });
    const url = URL.createObjectURL(blob);
    const a = document.createElement('a');
    a.href = url;
    a.download = outputFileName;
    a.click();
    URL.revokeObjectURL(url);

    // Release document resources
    doc.Dispose();
  };

  return (
    <div style={{ textAlign: 'center', height: '300px' }}>
      <h1>Add Bookmarks for Specific Text in Word Documents</h1>
      <button onClick={addBookmarkForMatchedText}>
        Generate
      </button>
    </div>
  );
}

export default App;
This approach is ideal for scenarios where you need to add positioning markers on top of an existing document, such as marking fill-in areas in a completed contract. The figure below shows the result after execution:
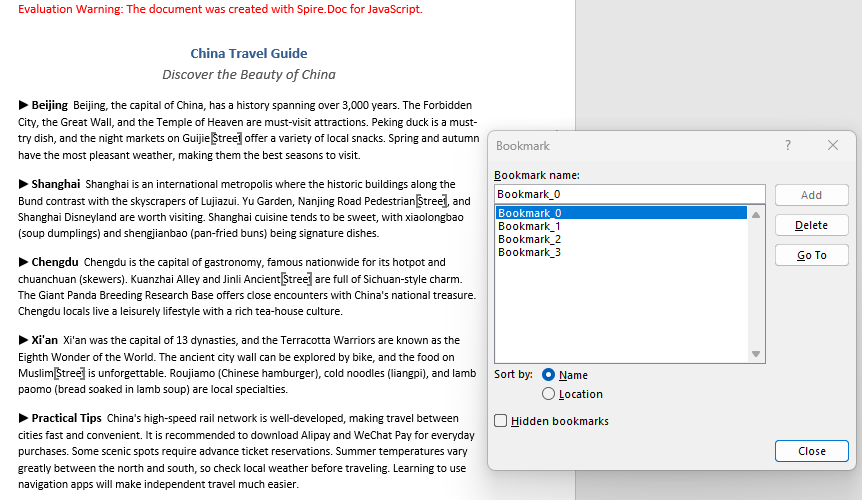
Remove a Bookmark
Removing a bookmark only removes the bookmark markers themselves — the text content within the bookmark range is preserved. Retrieve the bookmark object from the document.Bookmarks collection, then call the Remove method to delete it.
function App() {
  const deleteBookmark = async () => {
    // Get the Spire.Doc WASM module
    const docModule = window.wasmModule?.spiredoc;

    // Check if the WASM module is ready
    if (!docModule) {
      alert('Spire.Doc is not ready yet');
      return;
    }

    // Load the Word file into VFS
    const inputFileName = 'AddBookmark.docx';
    await window.spire.FetchFileToVFS(inputFileName, '', `${process.env.PUBLIC_URL}/data/`);

    // Load the Word document
    const doc = new docModule.Document();
    doc.LoadFromFile(inputFileName);

    // Get the bookmark by name
    let bookmark = doc.Bookmarks.get_Item("Bookmark_1");

    // // Get the bookmark by index
    // let bookmark = doc.Bookmarks.get_Item(0);

    // Remove the bookmark (keep its content)
    doc.Bookmarks.Remove(bookmark);

    // Save as a new .docx file
    const outputFileName = "DeleteBookmark.docx";

    doc.SaveToFile({ fileName: outputFileName, fileFormat: docModule.FileFormat.Docx2013 });

    // Read the generated file from VFS and trigger download
    const fileArray = window.dotnetRuntime.Module.FS.readFile(outputFileName);
    const blob = new Blob([fileArray], { type: 'application/vnd.openxmlformats-officedocument.wordprocessingml.document' });
    const url = URL.createObjectURL(blob);
    const a = document.createElement('a');
    a.href = url;
    a.download = outputFileName;
    a.click();
    URL.revokeObjectURL(url);

    // Release document resources
    doc.Dispose();
  };

  return (
    <div style={{ textAlign: 'center', height: '300px' }}>
      <h1>Delete Bookmark in Word Document</h1>
      <button onClick={deleteBookmark}>
        Generate
      </button>
    </div>
  );
}

export default App;
After the bookmark is removed, its markers disappear from the document, but the text within the bookmark range is preserved.
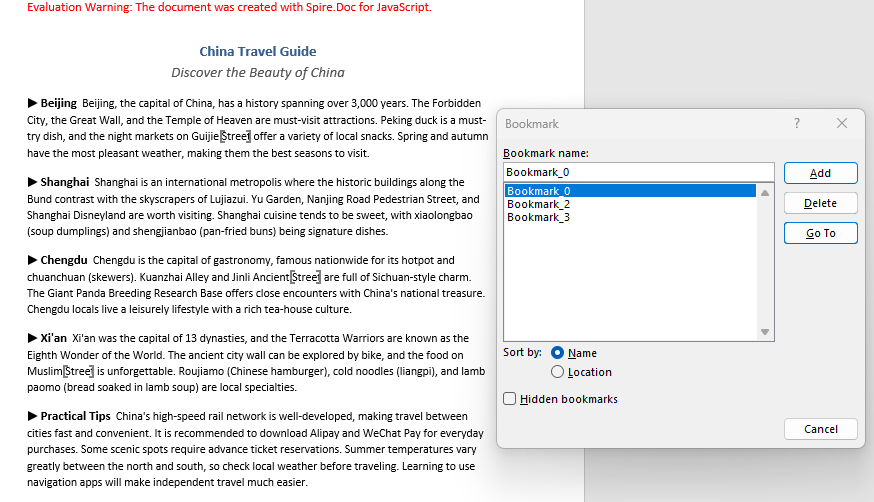
FAQ
Duplicate bookmark name error
Cause: Bookmark names must be unique within a Word document. Adding a bookmark with a duplicate name causes an error.
Solution: Check whether the name already exists before adding the bookmark:
if (document.Bookmarks.FindByName("MyBookmark") === null) {
    paragraph.AppendBookmarkStart("MyBookmark");
    paragraph.AppendText("Content");
    paragraph.AppendBookmarkEnd("MyBookmark");
}
What is the difference between removing a bookmark and deleting its content?
Cause: Spire.Doc's Bookmarks.Remove only removes the bookmark markers (start and end), leaving the text content between them untouched.
Solution: Choose the appropriate operation based on your needs:
// Remove only the bookmark markers, keep the text
document.Bookmarks.Remove(bookmark);

// Remove the bookmark and its content (via BookmarksNavigator)
let navigator = new docModule.BookmarksNavigator(doc);
navigator.MoveToBookmark("MyBookmark");
navigator.DeleteBookmarkContent();
Do AppendBookmarkStart and AppendBookmarkEnd have to be on the same paragraph?
Cause: The start and end markers can be on different paragraphs — the "Bookmark1" example in the code above demonstrates cross-paragraph usage. The key constraint is that the document object structure within the bookmark range must remain intact. Bookmarks cannot span across table cells, since cells are independent containers and doing so may cause the bookmark to be unrecognized.
Solution: If the bookmark range crosses a table cell boundary, adjust the start or end position so that the bookmark closes within the same cell.
Get a Free License
Spire.Doc for JavaScript offers a 30-day full-featured free trial license with no functional limitations. Apply here to evaluate before purchasing.
Replace Placeholders in Word Documents with HTML or Paragraphs from Another Document Using JavaScript in React
2026-07-14 03:05:11 Written by Amy ZhaoReplacing placeholders in documents with HTML content or paragraphs from another document is a highly practical need in document automation — for example, inserting rich HTML content authored in a WYSIWYG editor into placeholder positions in a Word template, or extracting specific paragraphs from a standard clause library and replacing corresponding placeholders in a contract template. Spire.Doc for JavaScript handles such replacement operations entirely in the browser via WebAssembly, using a virtual file system (VFS) to manage fonts and document files — no backend server required.
This article covers two core features:
For installation and project setup, refer to Integrating Spire.Doc for JavaScript in a React Project. The examples below assume Spire.Doc is installed and the WebAssembly module is initialized.
Replace Placeholder with HTML
Replacing a placeholder with HTML involves three stages: first, load the font files, the HTML file, and the target Word document into the WASM virtual file system via FetchFileToVFS; then, create a temporary Section, render the HTML string into document objects using AppendHTML, collect them into a replacement list, find all [#placeholder] occurrences with FindAllString, sort the matched positions, and insert the replacement content one by one via ChildObjects.Insert while removing the original text; finally, remove the temporary Section, save the document, read the generated file from VFS, wrap it as a Blob, and trigger a browser download.
import React, { useState } from 'react';

function App() {
  // Define the placeholder replacement logic
  function ReplacedWithHTML(location, replacement) {
    let textRange = location.Text;
    let index = location.Index;
    let paragraph = location.Owner;
    let sectionBody = paragraph.OwnerTextBody;
    let paragraphIndex = sectionBody.ChildObjects.IndexOf(paragraph);

    let replacementIndex = -1;
    if (index === 0) {
      paragraph.ChildObjects.RemoveAt(0);
      replacementIndex = sectionBody.ChildObjects.IndexOf(paragraph);
    } else if (index === paragraph.ChildObjects.Count - 1) {
      paragraph.ChildObjects.RemoveAt(index);
      replacementIndex = paragraphIndex + 1;
    } else {
      let paragraph1 = paragraph.Clone();
      while (paragraph.ChildObjects.Count > index) {
        paragraph.ChildObjects.RemoveAt(index);
      }
      let i = 0;
      let count = index + 1;
      while (i < count) {
        paragraph1.ChildObjects.RemoveAt(0);
        i += 1;
      }
      sectionBody.ChildObjects.Insert(paragraphIndex + 1, paragraph1);
      replacementIndex = paragraphIndex + 1;
    }

    for (let i = 0; i <= replacement.length - 1; i++) {
      sectionBody.ChildObjects.Insert(replacementIndex + i, replacement[i].Clone());
    }
  }

  function TextRangeLocation(TextRange) {
    this.Text = TextRange;
    this.Owner = this.Text.OwnerParagraph;
    this.Index = this.Owner.ChildObjects.IndexOf(this.Text);
    this.CompareTo = function (other) {
      return -(this.Index - other.Index);
    };
  }

  const ReplaceWithHTML = async () => {
    // Get the Spire.Doc WASM module
    const docModule = window.wasmModule?.spiredoc;

    // Check if the module is ready
    if (!docModule) {
      alert('Spire.Doc is not ready yet');
      return;
    }

    // Load the font file into the virtual file system (VFS)
    await window.spire.FetchFileToVFS('arial.ttf', '/Library/Fonts/', `${process.env.PUBLIC_URL}/font/`);

    // Load the HTML file and Word document into VFS
    let HTMLName = 'InputHtml.txt';
    await window.spire.FetchFileToVFS(HTMLName, '', `${process.env.PUBLIC_URL}/data/`);
    const HTML = window.dotnetRuntime.Module.FS.readFile(HTMLName);

    let inputFileName = 'ReplaceWithHtml.docx';
    await window.spire.FetchFileToVFS(inputFileName, '', `${process.env.PUBLIC_URL}/data/`);

    // Load the document
    let doc = new docModule.Document();
    doc.LoadFromFile(inputFileName);

    // Create a temporary Section and render the HTML
    let replacement = [];
    let tempSection = doc.AddSection();
    let par = tempSection.AddParagraph();
    const decoder = new TextDecoder('utf-8');
    const HTMLString = decoder.decode(HTML);
    par.AppendHTML(HTMLString);

    // Collect the rendered document objects
    for (let i = 0; i < tempSection.Body.ChildObjects.Count; i++) {
      let docObj = tempSection.Body.ChildObjects.get_Item(i);
      replacement.push(docObj);
    }

    // Find all placeholders and sort
    let selections = doc.FindAllString('[#placeholder]', false, true);
    let locations = [];
    for (let selection of selections) {
      locations.push(new TextRangeLocation(selection.GetAsOneRange()));
    }
    locations.sort();

    // Replace one by one
    for (let location of locations) {
      ReplacedWithHTML(location, replacement);
    }

    // Remove the temporary Section
    doc.Sections.Remove(tempSection);

    // Define the output file name and save
    const outputFileName = 'ReplaceWithHtml_output.docx';
    doc.SaveToFile({ fileName: outputFileName, fileFormat: docModule.FileFormat.Docx2013 });

    // Release resources
    doc.Dispose();

    // Read the generated file from VFS and trigger download
    const modifiedFileArray = window.dotnetRuntime.Module.FS.readFile(outputFileName);
    const blob = new Blob([modifiedFileArray], { type: 'application/vnd.openxmlformats-officedocument.wordprocessingml.document' });
    const url = URL.createObjectURL(blob);
    const a = document.createElement('a');
    a.href = url;
    a.download = outputFileName;
    a.click();
    URL.revokeObjectURL(url);
  };

  return (
    <div style={{ textAlign: 'center', height: '300px' }}>
      <h1>Replace Placeholder with HTML in a Word Document</h1>
      <button onClick={ReplaceWithHTML}>
        Generate
      </button>
    </div>
  );
}

export default App;
The [#placeholder] placeholders in the document are replaced with rich text content rendered from HTML
![The [#placeholder] placeholders in the document are replaced with rich text content rendered from HTML](https://cdn.e-iceblue.com/images/art_images/replace-placeholder-with-html-or-paragraph-en-1.webp)
Replace Placeholder with Paragraphs from Another Document
Replacing a placeholder with paragraphs from another document involves three stages: first, load the font files and two Word documents into the WASM virtual file system via FetchFileToVFS; then, load the main document and the source document separately, use FindAllPattern with a regular expression to find placeholders (such as [MY_DOCUMENT]), iterate through all Sections and Paragraphs of the source document, insert each paragraph into the corresponding position in the main document using ChildObjects.Insert, and finally remove the original placeholder text; lastly, save the document, read the generated file from VFS, wrap it as a Blob, and trigger a browser download.
import React, { useState } from 'react';

function App() {
  const ReplaceContentWithDoc = async () => {
    // Get the Spire.Doc WASM module
    const docModule = window.wasmModule?.spiredoc;

    // Check if the module is ready
    if (!docModule) {
      alert('Spire.Doc is not ready yet');
      return;
    }

    // Load the two Word documents into VFS
    let inputFileName1 = 'ReplaceContentWithDoc.docx';
    await window.spire.FetchFileToVFS(inputFileName1, '', `${process.env.PUBLIC_URL}/data/`);

    let inputFileName2 = 'Insert.docx';
    await window.spire.FetchFileToVFS(inputFileName2, '', `${process.env.PUBLIC_URL}/data/`);

    // Load the main document
    let document1 = new docModule.Document();
    document1.LoadFromFile(inputFileName1);

    // Load the source document (contains paragraphs to insert)
    let document2 = new docModule.Document();
    document2.LoadFromFile(inputFileName2);

    // Get the first Section of the main document
    let section1 = document1.Sections.get_Item(0);

    // Create a regex to find the placeholder
    let regex = new docModule.Regex('\\[MY_DOCUMENT\\]', docModule.RegexOptions.None);

    // Find all matching placeholders
    let textSections = document1.FindAllPattern({ pattern: regex });

    // Iterate through each match
    for (let i = 0; i < textSections.length; i++) {
      let selection = textSections[i];
      let para = selection.GetAsOneRange().OwnerParagraph;
      let textRange = selection.GetAsOneRange();
      let index = section1.Body.ChildObjects.IndexOf(para);

      // Insert all paragraphs from the source document at the placeholder position
      for (let i = 0; i < document2.Sections.Count; i++) {
        let section2 = document2.Sections.get_Item(i);
        for (let j = 0; j < section2.Paragraphs.Count; j++) {
          let paragraph = section2.Paragraphs.get_Item(j);
          section1.Body.ChildObjects.Insert(index++, paragraph.Clone());
        }
      }

      // Remove the original placeholder text
      para.ChildObjects.Remove(textRange);
    }

    // Define the output file name and save
    const outputFileName = 'ReplaceContentWithDoc_output.docx';
    document1.SaveToFile({ fileName: outputFileName, fileFormat: docModule.FileFormat.Docx2013 });

    // Release resources
    document1.Dispose();

    // Read the generated file from VFS and trigger download
    const modifiedFileArray = window.dotnetRuntime.Module.FS.readFile(outputFileName);
    const blob = new Blob([modifiedFileArray], { type: 'application/vnd.openxmlformats-officedocument.wordprocessingml.document' });
    const url = URL.createObjectURL(blob);
    const a = document.createElement('a');
    a.href = url;
    a.download = outputFileName;
    a.click();
    URL.revokeObjectURL(url);
  };

  return (
    <div style={{ textAlign: 'center', height: '300px' }}>
      <h1>Replace Placeholder with Paragraphs from Another Document</h1>
      <button onClick={ReplaceContentWithDoc}>
        Generate
      </button>
    </div>
  );
}

export default App;
The [MY_DOCUMENT] placeholder in the main document is replaced with all paragraphs from the source document
![The [MY_DOCUMENT] placeholder in the main document is replaced with all paragraphs from the source document](https://cdn.e-iceblue.com/images/art_images/replace-placeholder-with-html-or-paragraph-en-2.webp)
FAQ
HTML content formatting is not displayed correctly
Cause: The AppendHTML method supports a limited range of HTML tags, only recognizing basic block-level and inline tags (such as <p>, <b>, <i>, <table>, etc.). Complex CSS styles, JavaScript code, or HTML5-specific tags are ignored.
Solution: Ensure the input HTML uses only basic tags and defines formatting through inline styles (such as style="color:red") rather than CSS class names:
<p style="font-size:14pt; color:#2E75B6;">This is blue heading text</p>
<ul><li>Item one</li><li>Item two</li></ul>
Inserted paragraph order does not match expectations
Cause: When replacing multiple placeholders, the matched positions are not sorted before processing. Replacing sequentially from beginning to end causes the indices of subsequent positions to shift, leading to paragraphs being inserted at incorrect locations.
Solution: Sort all matched positions in descending order by index (replacing from the end of the document backward), or track the original index offset for each position:
let locations = [];
for (let selection of selections) {
  locations.push(new TextRangeLocation(selection.GetAsOneRange()));
}
locations.sort(); // Descending order, replace from back to front
Get a Free License
Spire.Doc for JavaScript offers a 30-day full-featured free trial license with no functional limitations. Apply here to evaluate before purchasing.
