Detect and Remove Blank Pages from PDF Files in Python
PDF documents may occasionally include blank pages. These pages can affect the reading experience, increase the file size and lead to paper waste during printing. To improve the professionalism and usability of a PDF document, detecting and removing blank pages is an essential step.
This article shows how to accurately detect and remove blank pages—including those that appear empty but actually contain invisible elements—using Python, Spire.PDF for Python, and Pillow.
Install Required Libraries
This tutorial requires two Python libraries:
- Spire.PDF for Python: Used for loading PDFs and detecting/removing blank pages.
- Pillow: A library for image processing that helps detect visually blank pages, which may contain invisible content.
You can easily install both libraries using pip:
pip install Spire.PDF Pillow
Need help installing Spire.PDF? Refer to this guide:
How to Install Spire.PDF for Python on Windows
How to Effectively Detect and Remove Blank Pages from PDF Files in Python
Spire.PDF provides a method called PdfPageBase.IsBlank() to check if a page is completely empty. However, some pages may appear blank but actually contain hidden content like white text, watermarks, or background images. These cannot be reliably detected using the PdfPageBase.IsBlank() method alone.
To ensure accuracy, this tutorial adopts a two-step detection strategy:
- Use the PdfPageBase.IsBlank() method to identify and remove fully blank pages.
- Convert non-blank pages to images and analyze them using Pillow to determine if they are visually blank.
⚠️ Important:
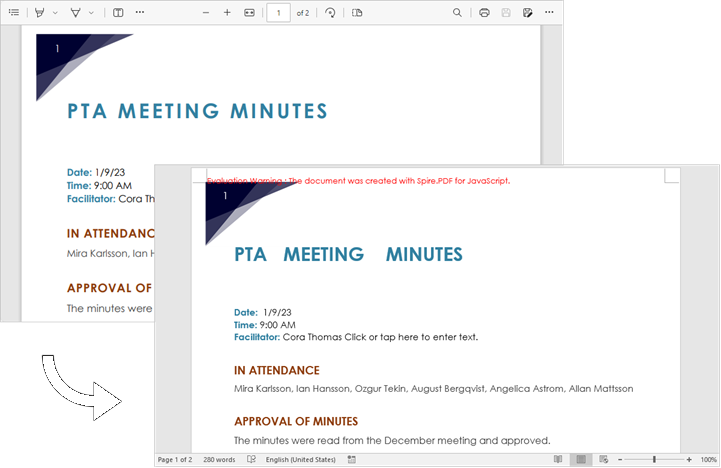
If you don’t use a valid license during the PDF-to-image conversion, an evaluation watermark will appear on the image, potentially affecting the blank page detection.
Contact the E-iceblue sales team to request a temporary license for proper functionality.
Steps to Detect and Remove Blank Pages from PDF in Python
Follow these steps to implement blank page detection and removal in Python:
1. Define a custom is_blank_image() Method
This custom function uses Pillow to check whether the converted image of a PDF page is blank (i.e., if all pixels are white).
2. Load the PDF Document
Load the PDF using the PdfDocument.LoadFromFile() method.
3. Iterate Through Pages
Loop through each page to check if it’s blank using two methods:
- If the PdfPageBase.IsBlank() method returns True, remove the page directly.
- If not, convert the page to an image using the PdfDocument.SaveAsImage() method and analyze it with the custom is_blank_image() method.
4. Save the Result PDF
Finally, save the PDF with blank pages removed using the PdfDocument.SaveToFile() method.
Code Example
- Python
import io
from spire.pdf import PdfDocument
from PIL import Image

# Custom function: Check if the image is blank (whether all pixels are white)
def is_blank_image(image):
        # Convert to RGB mode and then get the pixels
        img = image.convert("RGB")
        # Get all pixel points and check if they are all white
        white_pixel = (255, 255, 255)
        return all(pixel == white_pixel for pixel in img.getdata())

# Load the PDF document
pdf = PdfDocument()
pdf.LoadFromFile("Sample1111.pdf")

# Iterate through each page in reverse order to avoid index issues when deleting
for i in range(pdf.Pages.Count - 1, -1, -1):
    page = pdf.Pages.get_Item(i)
    # Check if the current page is completely blank
    if page.IsBlank():
        # If it's completely blank, remove it directly from the document
        pdf.Pages.RemoveAt(i)
    else:
        # Convert the current page to an image
        with pdf.SaveAsImage(i) as image_data:
            image_bytes = image_data.ToArray()
            pil_image = Image.open(io.BytesIO(image_bytes))
            # Check if the image is blank
            if is_blank_image(pil_image):
                # If it's a blank image, remove the corresponding page from the document
                pdf.Pages.RemoveAt(i)

# Save the resulting PDF
pdf.SaveToFile("RemoveBlankPages.pdf")
pdf.Close()

Frequently Asked Questions (FAQs)
Q1: What is considered a blank page in a PDF file?
A: A blank page may be truly empty or contain hidden elements such as white text, watermarks, or transparent objects. This solution detects both types using a dual-check strategy.
Q2: Can I use this method without a Spire.PDF license?
A: Yes, you can run it without a license. However, during PDF-to-image conversion, an evaluation watermark will be added to the output images, which may affect the accuracy of blank page detection. It's best to request a free temporary license for testing.
Q3: What versions of Python are compatible with Spire.PDF?
A: Spire.PDF for Python supports Python 3.7 and above. Ensure that Pillow is also installed to perform image-based blank page detection.
Q4: Can I modify the script to only detect blank pages without deleting them?
A: Absolutely. Just remove or comment out the pdf.Pages.RemoveAt(i) line and use print() or logging to list detected blank pages for further review.
Conclusion
Removing unnecessary blank pages from PDF files is an important step in optimizing documents for readability, file size, and professional presentation. With the combined power of Spire.PDF for Python and Pillow, developers can precisely identify both completely blank pages and pages that appear empty but contain invisible content. Whether you're generating reports, cleaning scanned files, or preparing documents for print, this Python-based solution ensures clean and efficient PDFs.
Get a Free License
To fully experience the capabilities of Spire.PDF for Python without any evaluation limitations, you can request a free 30-day trial license.
Insert Rows and Columns in Excel with JavaScript in React
When dealing with Excel worksheets, there are times when the existing layout needs to be adjusted. Inserting rows and columns serves as an effective solution for such scenarios. It allows users to seamlessly expand their data, add new information, or re-structure the spreadsheet in a way that optimizes both data entry and analysis. This action not only makes room for more content, but also enhances the overall organization and readability of the data. In this article, you will learn how to insert rows and columns in Excel in React using Spire.XLS for JavaScript.
- Insert a Row and a Column in Excel in JavaScript
- Insert Multiple Rows and Columns in Excel in JavaScript
Install Spire.XLS for JavaScript
To get started with inserting or deleting picture in Excel in a React application, you can either download Spire.XLS for JavaScript from our website or install it via npm with the following command:
npm i spire.office
The downloaded product package has been integrated Spire.Doc for JavaScript,Spire.XLS for JavaScript,Spire.PDF for JavaScript,Spire.Presentation for JavaScript. To use the functionality of Spire.XLS for JavaScript, you need to copy the corresponding files (spire.xls.js, Spire.Xls.Wasm.zip, spire.common.js, Spire.Common.Wasm.zip, and _framework) to the project's "public" folder. At the same time, in order to ensure text rendering, the related font files can be added with custom paths. In the following example, the font addition path is: public\static\font.
For more details, refer to the documentation: How to Integrate Spire.XLS for JavaScript in a React Project
Insert a Row and a Column in Excel in JavaScript
Using Spire.XLS for JavaScript, a blank row or a blank column can be inserted into an Excel worksheet via the Worksheet.InsertRow(rowIndex) or Worksheet.InsertColumn(columnIndex) method. The following are the main steps.
- Create a Workbook object using the new wasmModule.Workbook() method.
- Get a specific worksheet using the Workbook.Worksheets.get() method.
- Insert a row into the worksheet using the Worksheet.InsertRow(rowIndex) method.
- Insert a column into the worksheet using the Worksheet.InsertColumn(columnIndex) method.
- Save the result file using the Workbook.SaveToFile() method.
- JavaScript
import React, { useState, useEffect } from 'react';
function App() {
const [wasmModule, setWasmModule] = useState(null);
// Load Spire.XLS
useEffect(() => {
(async () => {
try {
const publicUrl = process.env.PUBLIC_URL || '';
const spireModule = await import(/* webpackIgnore: true */ `${publicUrl}/spire.xls.js`);
const rawModule = spireModule.default || spireModule;
window.wasmModule = typeof rawModule === 'function'
? await rawModule({ locateFile: p => p.endsWith('.wasm') ? `${publicUrl}/${p}` : p })
: rawModule;
setWasmModule(window.wasmModule);
} catch (error) {
console.error('Failed to load spire.xls.js WASM module:', error);
}
})();
}, []);
// Function to insert a row and a column
const InsertRowColumn = async () => {
const wasmModule = window.wasmModule.spirexls;
if (wasmModule) {
// Load font into Virtual File System (VFS)
await window.spire.FetchFileToVFS('Arial.ttf', '/Library/Fonts/', `${process.env.PUBLIC_URL}/static/font/`);
// Load the Excel files into the virtual file system (VFS)
let inputFileName = 'merged.xlsx';
await window.spire.FetchFileToVFS(inputFileName, '', `${process.env.PUBLIC_URL}/static/data/`);
// Create a new workbook
let workbook = new wasmModule.Workbook();
// Load an Excel document
workbook.LoadFromFile({ fileName: inputFileName });
// Get the first worksheet
let worksheet = workbook.Worksheets.get(0);
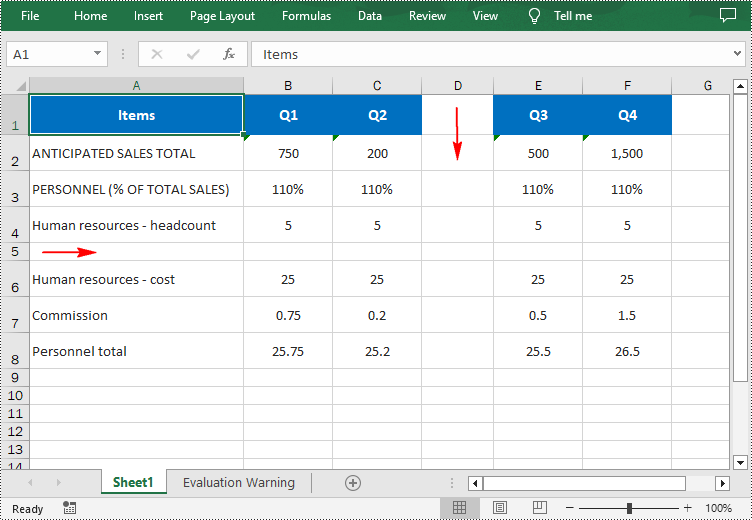
// Insert a blank row as the 5th row in the worksheet
worksheet.InsertRow(5);
// Insert a blank column as the 4th column in the worksheet
worksheet.InsertColumn(4);
//Save result file
const outputFileName = 'InsertRowAndColumn.xlsx';
workbook.SaveToFile({ fileName: outputFileName, version: wasmModule.ExcelVersion.Version2016 });
// Read the saved file and convert to Blob object
const modifiedFileArray = window.dotnetRuntime.Module.FS.readFile(outputFileName);
const modifiedFile = new Blob([modifiedFileArray], { type: 'application/vnd.openxmlformats-officedocument.spreadsheetml.sheet' });
// Create a URL for the Blob and initiate download
const url = URL.createObjectURL(modifiedFile);
const a = document.createElement('a');
a.href = url;
a.download = outputFileName;
document.body.appendChild(a);
a.click();
document.body.removeChild(a);
URL.revokeObjectURL(url);
// Clean up resources used by the workbook
workbook.Dispose();
}
};
return (
<div style={{ textAlign: 'center', height: '300px' }}>
<h1>Insert Row and Column in Excel Using JavaScript in React </h1>
<button onClick={InsertRowColumn} disabled={!wasmModule}>
Process
</button>
</div>
);
}
export default App;
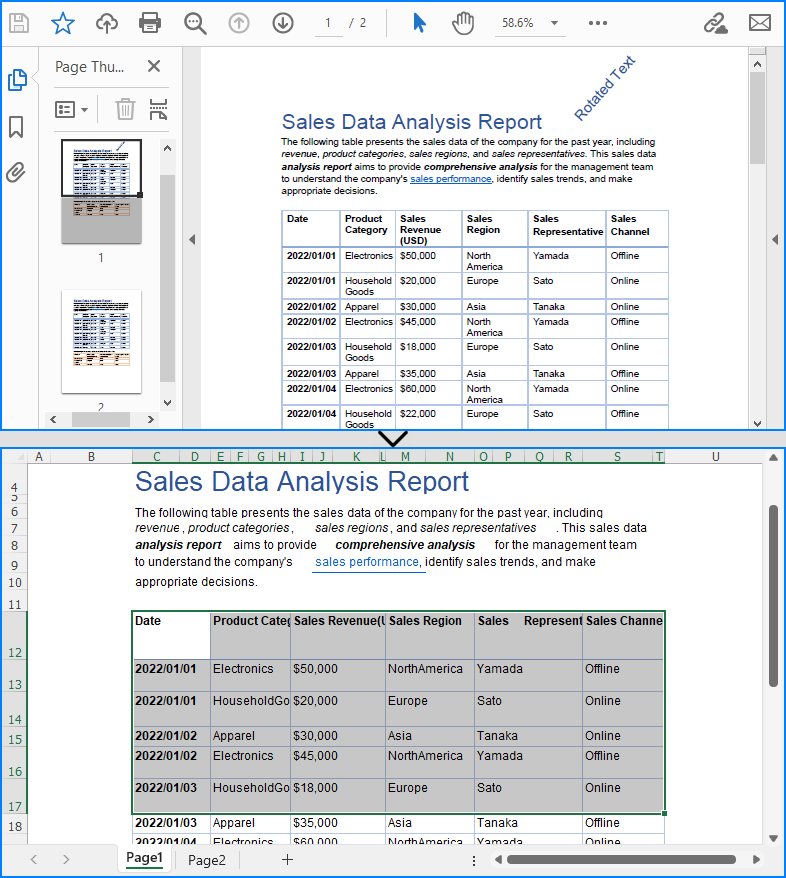
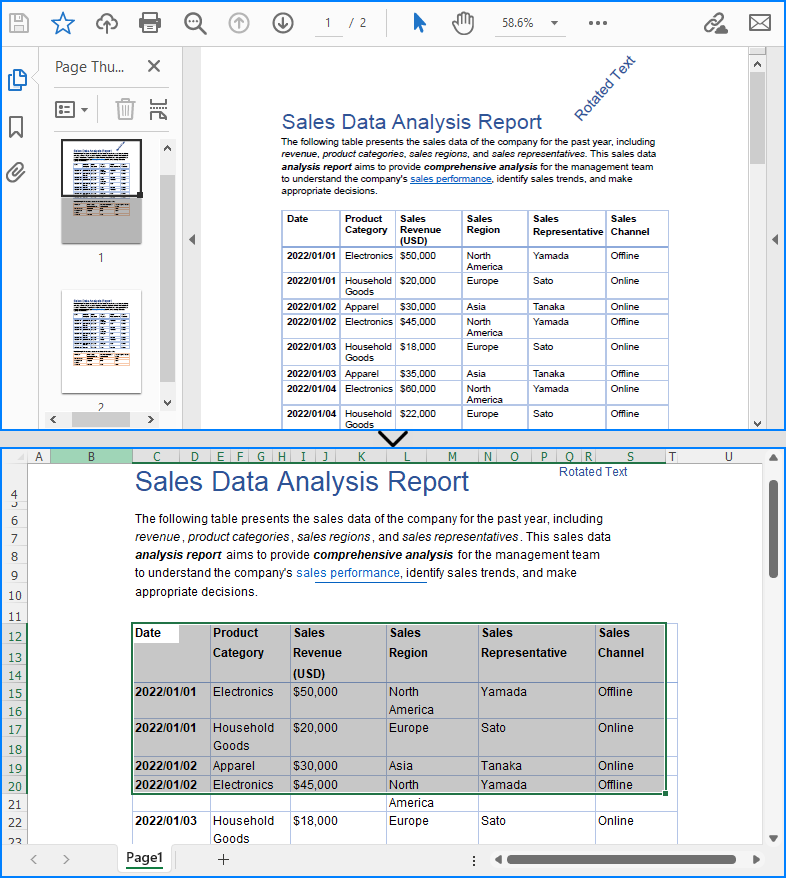
Run the code to launch the React app at localhost:3000. Once it's running, click the "Process" button to insert rows and columns in Excel:
Below is the result file:
Insert Multiple Rows and Columns in Excel in JavaScript
To insert multiple rows or columns, use the Worksheet.InsertRow(rowIndex: number, rowCount: number) or Worksheet.InsertColumn(columnIndex: number, columnCount: number) methods. The first parameter represents the index at which the new row/column will be inserted, and the second argument represents the number of rows/columns to be inserted. The following are the main steps.
- Create a Workbook object using the new wasmModule.Workbook() method.
- Load an Excel file using the Workbook.LoadFromFile() method.
- Get a specific worksheet using the Workbook.Worksheets.get() method.
- Insert multiple rows into the worksheet using the Worksheet.InsertRow(rowIndex: number, rowCount: number) method.
- Insert multiple columns into the worksheet using Worksheet.InsertColumn(columnIndex: number, columnCount: number) method.
- Save the result file using the Workbook.SaveToFile() method.
- JavaScript
import React, { useState, useEffect } from 'react';
function App() {
const [wasmModule, setWasmModule] = useState(null);
// Load Spire.XLS
useEffect(() => {
(async () => {
try {
const publicUrl = process.env.PUBLIC_URL || '';
const spireModule = await import(/* webpackIgnore: true */ `${publicUrl}/spire.xls.js`);
const rawModule = spireModule.default || spireModule;
window.wasmModule = typeof rawModule === 'function'
? await rawModule({ locateFile: p => p.endsWith('.wasm') ? `${publicUrl}/${p}` : p })
: rawModule;
setWasmModule(window.wasmModule);
} catch (error) {
console.error('Failed to load spire.xls.js WASM module:', error);
}
})();
}, []);
// Function to insert multiple rows and columns
const InsertRowsColumns = async () => {
const wasmModule = window.wasmModule.spirexls;
if (wasmModule) {
// Load font into Virtual File System (VFS)
await window.spire.FetchFileToVFS('Arial.ttf', '/Library/Fonts/', `${process.env.PUBLIC_URL}/static/font/`);
// Load the Excel files into the virtual file system (VFS)
let inputFileName = 'merged.xlsx';
await window.spire.FetchFileToVFS(inputFileName, '', `${process.env.PUBLIC_URL}/static/data/`);
// Create a new workbook
let workbook = new wasmModule.Workbook();
// Load an Excel document
workbook.LoadFromFile({ fileName: inputFileName });
// Get the first worksheet
let worksheet = workbook.Worksheets.get(0);
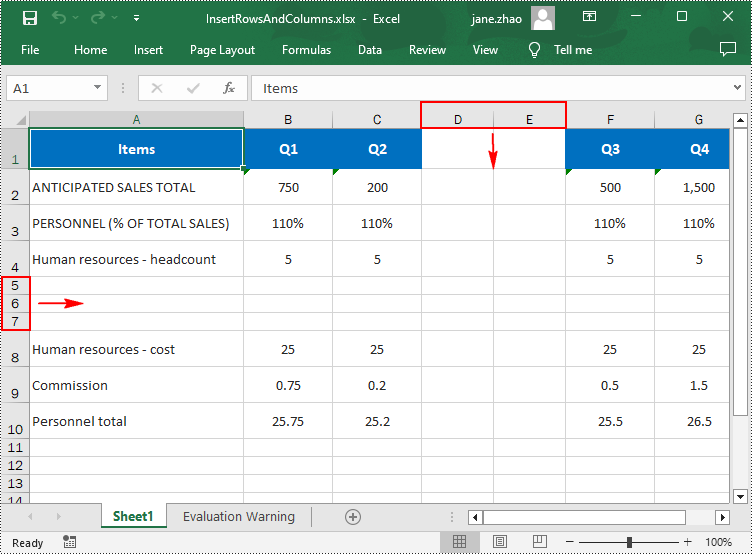
// Insert three blank rows into the worksheet
worksheet.InsertRow({ rowIndex: 5, rowCount: 3 });
// Insert two blank columns into the worksheet
worksheet.InsertColumn({ columnIndex: 4, columnCount: 2 });
//Save result file
const outputFileName = 'InsertRowsAndColumns.xlsx';
workbook.SaveToFile({ fileName: outputFileName, version: wasmModule.ExcelVersion.Version2016 });
// Read the saved file and convert to Blob object
const modifiedFileArray = window.dotnetRuntime.Module.FS.readFile(outputFileName);
const modifiedFile = new Blob([modifiedFileArray], { type: 'application/vnd.openxmlformats-officedocument.spreadsheetml.sheet' });
// Create a URL for the Blob and initiate download
const url = URL.createObjectURL(modifiedFile);
const a = document.createElement('a');
a.href = url;
a.download = outputFileName;
document.body.appendChild(a);
a.click();
document.body.removeChild(a);
URL.revokeObjectURL(url);
// Clean up resources used by the workbook
workbook.Dispose();
}
};
return (
<div style={{ textAlign: 'center', height: '300px' }}>
<h1>Insert Rows and Columns in Excel Using JavaScript in React</h1>
<button onClick={InsertRowsColumns} disabled={!wasmModule}>
Process
</button>
</div>
);
}
export default App;
Get a Free License
To fully experience the capabilities of Spire.XLS for JavaScript without any evaluation limitations, you can request a free 30-day trial license.
Add, Replace or Remove Images in PDF with JavaScript in React
PDFs are versatile documents that often contain images to enhance their visual appeal and convey information. The ability to manipulate these images - adding new ones, replacing existing ones, or removing unwanted ones - is a valuable skill. In this article, you will learn how to add, replace, or delete images in a PDF document in React using Spire.PDF for JavaScript .
- Add an Image to a PDF Document in JavaScript
- Replace an Image in a PDF Document in JavaScript
- Remove an Image from a PDF Document in JavaScript
Install Spire.PDF for JavaScript
To get started with manipulating images in PDF in a React application, you can either download Spire.PDF for JavaScript from our website or install it via npm with the following command:
npm i spire.office
The downloaded product package integrates Spire.Doc for JavaScript, Spire.XLS for JavaScript, Spire.PDF for JavaScript, and Spire.Presentation for JavaScript. To use Spire.PDF for JavaScript functionality, you need to copy the corresponding files (spire.pdf.js, Spire.Pdf.Wasm.zip, spire.common.js, Spire.Common.Wasm.zip, and the _framework folder) to the public folder of your project. Additionally, to ensure proper text rendering, font files can be added to a custom path of your choice. In the following example, the font addition path is: public\static\font.
For more details, refer to the documentation: How to Integrate Spire.PDF for JavaScript in a React Project
Add an Image to a PDF Document in JavaScript
Spire.PDF for JavaScript provides the PdfPage.Canvas.DrawImage() method to add an image at a specified location on a PDF page. The main steps are as follows.
- Load the input image into the Virtual File System (VFS).
- Create a PdfDocument object with the wasmModule.PdfDocument() method.
- Add a page to the PDF document using the PdfDocument.Pages.Add() method.
- Load the image using the wasmModule.PdfImage.FromFile() method.
- Specify the size of the image.
- Draw the image at a specified location on the page using the PdfPageBase.Canvas.DrawImage() method.
- Save the PDF document using PdfDocument.SaveToFile() method.
- Trigger the download of the resulting document.
- JavaScript
import React, { useState, useEffect } from 'react';
function App() {
const [wasmModule, setWasmModule] = useState(null);
useEffect(() => {
(async () => {
try {
const publicUrl = process.env.PUBLIC_URL || '';
const spireModule = await import(/* webpackIgnore: true */ `${publicUrl}/spire.pdf.js`);
const rawModule = spireModule.default || spireModule;
window.wasmModule = typeof rawModule === 'function'
? await rawModule({ locateFile: p => p.endsWith('.wasm') ? `${publicUrl}/${p}` : p })
: rawModule;
setWasmModule(window.wasmModule);
} catch (error) {
console.error('Failed to load spire.pdf.js:', error);
}
})();
}, []);
const AddPdfImage = async () => {
const wasmModule = window.wasmModule.spirepdf;
if (wasmModule) {
// Specify the input and output file paths
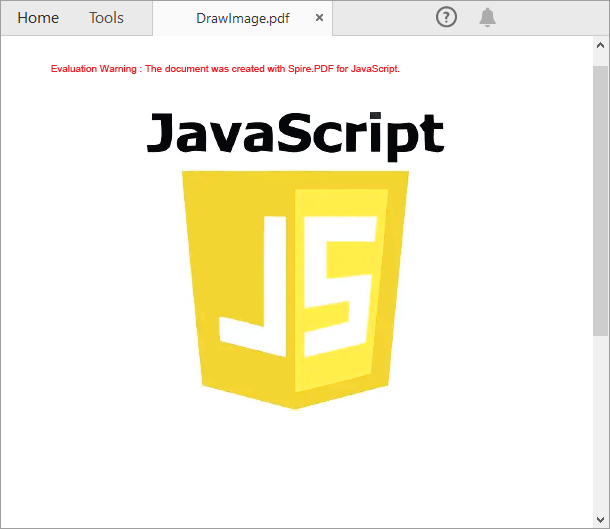
const inputFileName = "JS.png";
const outputFileName = "DrawImage.pdf";
await window.spire.FetchFileToVFS(inputFileName, "", `${process.env.PUBLIC_URL}static/data/`);
// Create a pdf instance
let pdf =new wasmModule.PdfDocument();
// Add a page
let page = pdf.Pages.Add();
// Load the image
let image = wasmModule.PdfImage.FromFile(inputFileName);
// Calculate the scaled width and height of the image
let width = image.Width * 0.6;
let height = image.Height * 0.6;
// Calculate the x-coordinate to center the image horizontally on the page
let x = (page.Canvas.ClientSize.Width - width) / 2;
// Draw the image at a specified location on the page
page.Canvas.DrawImage({image:image, x:x, y: 60, width: width, height: height});
// Save the result file
pdf.SaveToFile({fileName: outputFileName});
// Clean up resources
pdf.Close();
// Read the generated PDF file
const modifiedFileArray = window.dotnetRuntime.Module.FS.readFile(outputFileName);
// Create a Blob object from the PDF file
const modifiedFile = new Blob([modifiedFileArray], { type: "application/pdf" });
// Create a URL for the Blob
const url = URL.createObjectURL(modifiedFile);
// Create an anchor element to trigger the download
const a = document.createElement('a');
a.href = url;
a.download = outputFileName;
document.body.appendChild(a);
a.click();
document.body.removeChild(a);
URL.revokeObjectURL(url);
}
};
return (
<div style={{ textAlign: 'center', height: '300px' }}>
<h1>Add Images in PDF with JavaScript in React</h1>
<button onClick={AddPdfImage}>
Process
</button>
</div>
);
}
export default App;
Run the code to launch the React app at localhost:3000. Once it's running, click the "Process" button to insert image in PDF:
Below is the result file:
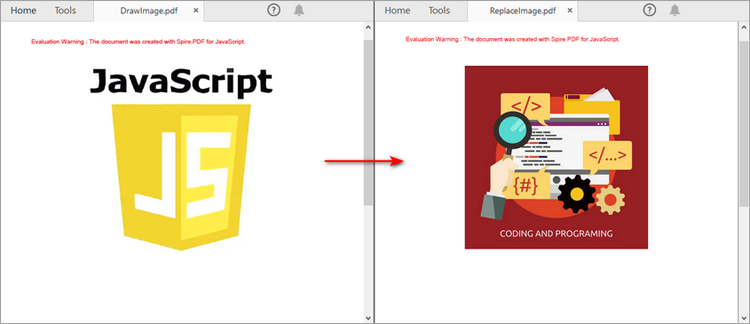
Replace an Image in a PDF Document in JavaScript
To replace an image in PDF, you can load a new image and then replace the existing image with the new one through the PdfImageHelper.ReplaceImage() method. The main steps are as follows.
- Load the input file and image into the Virtual File System (VFS).
- Create a PdfDocument object with the wasmModule.PdfDocument() method.
- Load a PDF document using the PdfDocument.LoadFromFile() method.
- Get a specific page through the PdfDocument.Pages.get_Item() method.
- Load an image using PdfImage.FromFile() method.
- Create a PdfImageHelper object with the wasmModule.PdfImageHelper() method.
- Get the image information on the page using the PdfImageHelper.GetImagesInfo() method.
- Load the input image using the wasmModule.PdfImage.FromFile() method.
- Replace an existing image in the page with the new image using the PdfImageHelper.ReplaceImage() method.
- Save the PDF document using PdfDocument.SaveToFile() method.
- Trigger the download of the resulting document.
- JavaScript
import React, { useState, useEffect } from 'react';

function App() {
   const [wasmModule, setWasmModule] = useState(null);
   useEffect(() => {
    (async () => {
      try {
        const publicUrl = process.env.PUBLIC_URL || '';
        const spireModule = await import(/* webpackIgnore: true */ `${publicUrl}/spire.pdf.js`);
        const rawModule = spireModule.default || spireModule;
        window.wasmModule = typeof rawModule === 'function'
          ? await rawModule({ locateFile: p => p.endsWith('.wasm') ? `${publicUrl}/${p}` : p })
          : rawModule;
        setWasmModule(window.wasmModule);
      } catch (error) {
        console.error('Failed to load spire.pdf.js:', error);
      }
    })();
  }, []);

  const ReplacePdfImage = async () => {
    const wasmModule = window.wasmModule.spirepdf;

    if (wasmModule) {
      // Specify the input and output file paths
      let inputFileName  = ""ReplaceImage.pdf"";
      await window.spire.FetchFileToVFS(inputFileName , '',  `${process.env.PUBLIC_URL}static/data/`);

      const inputImageName = "ChartImage.png";
      await window.spire.FetchFileToVFS(inputImageName , '',  `${process.env.PUBLIC_URL}static/data/`);

      const outputFileName = "ReplaceImage_result.pdf";

      // Create a pdf instance
      let pdf =new wasmModule.PdfDocument();

      // Load the PDF file
      pdf.LoadFromFile({fileName: inputFileName});

      // Get the first page
      let page = pdf.Pages.get_Item(0);

      // Create a PdfImageHelper instance
      let helper =new wasmModule.PdfImageHelper();

      // Get the image information from the page
      let images = helper.GetImagesInfo(page);

      // Load a new image
      let newImage = wasmModule.PdfImage.FromFile(inputImageName);

      // Replace the first image on the page with the loaded image
      helper.ReplaceImage(images[0], newImage);

      // Save the result file
      pdf.SaveToFile({fileName: outputFileName});

      // Clean up resources
      pdf.Close();

      // Read the generated PDF file
      const modifiedFileArray = window.dotnetRuntime.Module.FS.readFile(outputFileName);

      // Create a Blob object from the PDF file
      const modifiedFile = new Blob([modifiedFileArray], { type: "application/pdf" });

      // Create a URL for the Blob
      const url = URL.createObjectURL(modifiedFile);

      // Create an anchor element to trigger the download
      const a = document.createElement('a');
      a.href = url;
      a.download = outputFileName;
      document.body.appendChild(a);
      a.click();
      document.body.removeChild(a);
      URL.revokeObjectURL(url);
    }
  };

  return (
    <div style={{ textAlign: 'center', height: '300px' }}>
      <h1>Replace an Image in PDF with JavaScript in React</h1>
      <button onClick={ReplacePdfImage}>
        Process
      </button>
    </div>
  );
}


export default App;
Remove an Image from a PDF Document in JavaScript
The PdfImageHelper class also provides the DeleteImage() method to remove a specific image from a PDF page. The main steps are as follows.
- Load the input file into the Virtual File System (VFS).
- Create a PdfDocument object with the wasmModule.PdfDocument() method.
- Load a PDF document using the PdfDocument.LoadFromFile() method.
- Get a specific page using the PdfDocument.Pages.get_Item() method.
- Create a PdfImageHelper object with the wasmModule.PdfImageHelper() method.
- Get the image information on the page using the PdfImageHelper.GetImagesInfo() method.
- Delete a specified image on the page using the PdfImageHelper.DeleteImage() method.
- Save the PDF document using PdfDocument.SaveToFile() method.
- Trigger the download of the resulting document.
- JavaScript
import React, { useState, useEffect } from 'react';

function App() {
   const [wasmModule, setWasmModule] = useState(null);
   useEffect(() => {
    (async () => {
      try {
        const publicUrl = process.env.PUBLIC_URL || '';
        const spireModule = await import(/* webpackIgnore: true */ `${publicUrl}/spire.pdf.js`);
        const rawModule = spireModule.default || spireModule;
        window.wasmModule = typeof rawModule === 'function'
          ? await rawModule({ locateFile: p => p.endsWith('.wasm') ? `${publicUrl}/${p}` : p })
          : rawModule;
        setWasmModule(window.wasmModule);
      } catch (error) {
        console.error('Failed to load spire.pdf.js:', error);
      }
    })();
  }, []);

  const DeletePdfImage = async () => {
    const wasmModule = window.wasmModule.spirepdf;

    if (wasmModule) {
      // Specify the input and output file paths
      let inputFileName  = "DrawImage.pdf";
      await window.spire.FetchFileToVFS(inputFileName , '',  `${process.env.PUBLIC_URL}static/data/`);

      const outputFileName = "DeleteImage.pdf";

      // Create a pdf instance
      let pdf =new wasmModule.PdfDocument();

      // Load the PDF file
      pdf.LoadFromFile({fileName: inputFileName});

      // Get the first page
      let page = pdf.Pages.get_Item(0);

      // Create a PdfImageHelper instance
      let helper =new wasmModule.PdfImageHelper();

      // Get the image information from the page
      let images = helper.GetImagesInfo(page);

      // Delete the first image on the page
      helper.DeleteImage({imageInfo: images[0]});

      // Save the result file
      pdf.SaveToFile({fileName: outputFileName});

      // Clean up resources
      pdf.Close();

      // Read the generated PDF file
      const modifiedFileArray = window.dotnetRuntime.Module.FS.readFile(outputFileName);

      // Create a Blob object from the PDF file
      const modifiedFile = new Blob([modifiedFileArray], { type: "application/pdf" });

      // Create a URL for the Blob
      const url = URL.createObjectURL(modifiedFile);

      // Create an anchor element to trigger the download
      const a = document.createElement('a');
      a.href = url;
      a.download = outputFileName;
      document.body.appendChild(a);
      a.click();
      document.body.removeChild(a);
      URL.revokeObjectURL(url);
    }
  };

   return (
    <div style={{ textAlign: 'center', height: '300px' }}>
      <h1>Remove an Image from PDF with JavaScript in React</h1>
      <button onClick={DeletePdfImage} disabled={!wasmModule}>
        Process
      </button>
    </div>
  );
}


export default App;
Get a Free License
To fully experience the capabilities of Spire.PDF for JavaScript without any evaluation limitations, you can request a free 30-day trial license.
Convert PDF to HTML with JavaScript in React
Converting PDF to HTML is important for improving accessibility and interactivity in web environments. While PDFs are widely used for their reliable layout and ease of sharing, they can be restrictive when it comes to online use. HTML provides greater flexibility, allowing content to be displayed more effectively on websites and mobile devices. By converting a PDF document into HTML, developers can enhance search engine visibility, enable easier editing, and create more user-friendly experiences. In this article, we will demonstrate how to convert PDF to HTML in React with JavaScript and the Spire.PDF for JavaScript library.
- Convert PDF to HTML in React
- Customize PDF to HTML Conversion Settings in React
- Convert PDF to HTML Stream in React
Install Spire.PDF for JavaScript
To get started with converting PDF to HTML with JavaScript in a React application, you can either download Spire.PDF for JavaScript from our website or install it via npm with the following command:
npm i spire.office
The downloaded product package integrates Spire.Doc for JavaScript, Spire.XLS for JavaScript, Spire.PDF for JavaScript, and Spire.Presentation for JavaScript. To use Spire.PDF for JavaScript functionality, you need to copy the corresponding files (spire.pdf.js, Spire.Pdf.Wasm.zip, spire.common.js, Spire.Common.Wasm.zip, and the _framework folder) to the public folder of your project. Additionally, to ensure proper text rendering, font files can be added to a custom path of your choice. In the following example, the font addition path is: public\static\font.
For more details, refer to the documentation: How to Integrate Spire.PDF for JavaScript in a React Project
Convert PDF to HTML in React
The PdfDocument.SaveToFile() method offered by Spire.PDF for JavaScript allows developers to effortlessly convert a PDF file into HTML format. The detailed steps are as follows.
- Load the required font file and the input PDF file into the Virtual File System (VFS).
- Create a PdfDocument object with the wasmModule.PdfDocument() method.
- Load the PDF file using the PdfDocument.LoadFromFile() method.
- Save the PDF file to HTML format using the PdfDocument.SaveToFile() method.
- JavaScript
import React, { useState, useEffect } from 'react';

function App() {
   const [wasmModule, setWasmModule] = useState(null);
   useEffect(() => {
    (async () => {
      try {
        const publicUrl = process.env.PUBLIC_URL || '';
        const spireModule = await import(/* webpackIgnore: true */ `${publicUrl}/spire.pdf.js`);
        const rawModule = spireModule.default || spireModule;
        window.wasmModule = typeof rawModule === 'function'
          ? await rawModule({ locateFile: p => p.endsWith('.wasm') ? `${publicUrl}/${p}` : p })
          : rawModule;
        setWasmModule(window.wasmModule);
      } catch (error) {
        console.error('Failed to load spire.pdf.js:', error);
      }
    })();
  }, []);

  const ConvertPdfToHTML= async () => {
    // Get WASM module
    const wasmModule = window.wasmModule.spirepdf;

    if (wasmModule) {
      // Load font file to virtual file system (VFS)
      await window.spire.FetchFileToVFS("arial.ttf","/Library/Fonts/",`${process.env.PUBLIC_URL}static/font/`);

      // PDF file name to convert
      let inputFileName = "ToHTML.pdf";

      // Load PDF file to virtual file system (VFS)
      await window.spire.FetchFileToVFS(inputFileName, "", `${process.env.PUBLIC_URL}static/data/`);

      // Create a PdfDocument object
      let doc =new wasmModule.PdfDocument();

      // Load the PDF file
      doc.LoadFromFile(inputFileName);

      // Define the output file name
      const outputFileName = 'PdfToHtml.html';

      // Save the document to an HTML file
      doc.SaveToFile({fileName: outputFileName, fileFormat: wasmModule.FileFormat.HTML});

      // Read the saved file and convert to a Blob object
      const modifiedFileArray = window.dotnetRuntime.Module.FS.readFile(outputFileName);
      const modifiedFile = new Blob([modifiedFileArray], { type: "text/html" });

      // Create a URL for the Blob
      const url = URL.createObjectURL(modifiedFile);

      // Create an anchor element to trigger the download
      const a = document.createElement('a');
      a.href = url;
      a.download = outputFileName ;
      document.body.appendChild(a);
      a.click();
      document.body.removeChild(a);
      URL.revokeObjectURL(url);
    }
  };

  return (
    <div style={{ textAlign: 'center', height: '300px' }}>
      <h1>Convert PDF to HTML in React Using JavaScript</h1>
      <button onClick={ConvertPdfToHTML} disabled={!wasmModule}>
        Convert
      </button>
    </div>
  );

}

export default App;
Run the code to launch the React app at localhost:3000. Once it's running, click on the "Convert" button to convert the PDF file to HTML format:
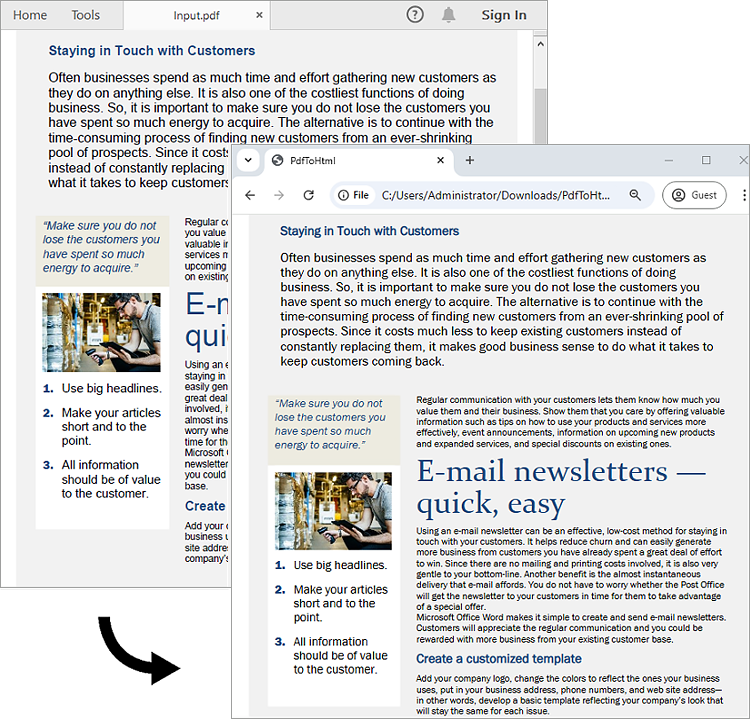
Here is the screenshot of the input PDF file and the converted HTML file:
Customize PDF to HTML Conversion Settings in React
Developers can use the PdfDocument.ConvertOptions.SetPdfToHtmlOptions() method to customize settings during the PDF to HTML conversion process. For instance, they can choose whether to embed SVG or images in the resulting HTML and set the maximum number of pages included in each HTML file. The detailed steps are as follows.
- Load the required font file and the input PDF file into the Virtual File System (VFS).
- Create a PdfDocument object with the wasmModule.PdfDocument() method.
- Load the PDF file using the PdfDocument.LoadFromFile() method.
- Customize the PDF to HTML conversion settings using the PdfDocument.ConvertOptions.SetPdfToHtmlOptions() method.
- Save the PDF document to HTML format using the PdfDocument.SaveToFile() method.
- JavaScript
import React, { useState, useEffect } from 'react';

function App() {
   const [wasmModule, setWasmModule] = useState(null);
   useEffect(() => {
    (async () => {
      try {
        const publicUrl = process.env.PUBLIC_URL || '';
        const spireModule = await import(/* webpackIgnore: true */ `${publicUrl}/spire.pdf.js`);
        const rawModule = spireModule.default || spireModule;
        window.wasmModule = typeof rawModule === 'function'
          ? await rawModule({ locateFile: p => p.endsWith('.wasm') ? `${publicUrl}/${p}` : p })
          : rawModule;
        setWasmModule(window.wasmModule);
      } catch (error) {
        console.error('Failed to load spire.pdf.js:', error);
      }
    })();
  }, []);


  const downloadFileFromVFS = (fileName) => {
    const fileArray = window.dotnetRuntime.Module.FS.readFile(fileName);
    const fileBlob = new Blob([fileArray], { type: 'text/html' });
    const url = URL.createObjectURL(fileBlob);
    const a = document.createElement('a');
    a.href = url;
    a.download = fileName;
    document.body.appendChild(a);
    a.click();
    document.body.removeChild(a);
    URL.revokeObjectURL(url);
  };

  const ConvertPdfToHTML = async () => {
    const wasmModule = window.wasmModule.spirepdf;

    if (wasmModule) {
      await window.spire.FetchFileToVFS("MSYH.TTC", "/Library/Fonts/", `${process.env.PUBLIC_URL}static/font/`);

      // Load the input PDF file into the VFS
      let inputFileName = "ToHTML.pdf";
      await window.spire.FetchFileToVFS(inputFileName, "", `${process.env.PUBLIC_URL}static/data/`);
      let doc = new wasmModule.PdfDocument();
      doc.LoadFromFile(inputFileName);

      const totalPages = doc.Pages.Count;

      // Customize the conversion settings
      doc.ConvertOptions.SetPdfToHtmlOptions({ useEmbeddedSvg: false, useEmbeddedImg: true, maxPageOneFile: 1 });

       // Save the document to an HTML file
      const outputFileName = 'PdfToHtmlOptions.html';
      doc.SaveToFile({ fileName: outputFileName, fileFormat: wasmModule.FileFormat.HTML });

      doc.Close();
      doc.Dispose();

      console.log(`totalPages: ${totalPages}`);

      for (let i = 1; i <= totalPages; i++) {
        const fileName = `PdfToHtmlOptions_${i}-${i}.html`;
        downloadFileFromVFS(fileName);
      }
    }
  };

  return (
    <div style={{ textAlign: 'center', height: '300px' }}>
      <h1>Convert PDF to HTML in React Using JavaScript</h1>
      <button onClick={ConvertPdfToHTML}>
        Convert
      </button>
    </div>
  );
}

export default App;
Convert PDF to HTML Stream in React
Spire.PDF for JavaScript also supports converting a PDF to an HTML stream using the PdfDocument.SaveToStream() method. The detailed steps are as follows.
- Load the required font file and the input PDF file into the Virtual File System (VFS).
- Create a PdfDocument object with the wasmModule.PdfDocument() method.
- Load the PDF file using the PdfDocument.LoadFromFile() method.
- Create a memory stream using the wasmModule.Stream() method.
- Save the PDF document as an HTML stream using the PdfDocument.SaveToStream() method.
- Write the content of the stream to an HTML file using the window.dotnetRuntime.Module.FS.readFile() method.
- JavaScript
import React, { useState, useEffect } from 'react';

function App() {
   const [wasmModule, setWasmModule] = useState(null);
   useEffect(() => {
    (async () => {
      try {
        const publicUrl = process.env.PUBLIC_URL || '';
        const spireModule = await import(/* webpackIgnore: true */ `${publicUrl}/spire.pdf.js`);
        const rawModule = spireModule.default || spireModule;
        window.wasmModule = typeof rawModule === 'function'
          ? await rawModule({ locateFile: p => p.endsWith('.wasm') ? `${publicUrl}/${p}` : p })
          : rawModule;
        setWasmModule(window.wasmModule);
      } catch (error) {
        console.error('Failed to load spire.pdf.js:', error);
      }
    })();
  }, []);

  const ConvertPdfToHTML = async () => {
    const wasmModule = window.wasmModule.spirepdf;

    if (wasmModule) {
      await window.spire.FetchFileToVFS("MSYH.TTC", "/Library/Fonts/", `${process.env.PUBLIC_URL}static/font/`);

      // Load the input PDF file into the VFS
      let inputFileName = "ToHTML.pdf";
      await window.spire.FetchFileToVFS(inputFileName, "", `${process.env.PUBLIC_URL}static/data/`);
      let doc = new wasmModule.PdfDocument();
      doc.LoadFromFile(inputFileName);

      // Define the output file name
      const outputFileName = 'PdfToHtmlStream.html';
      // Create a new memory stream
     let ms = new wasmModule.Stream();

     // Save the file as HTML stream
     doc.SaveToStream({stream: ms, fileformat: wasmModule.FileFormat.HTML});
     ms.Save(outputFileName);

     // Release resources
     ms.Close();
     doc.Close();

     // Read the saved HTML file and convert to a Blob object
     const modifiedFileArray = window.dotnetRuntime.Module.FS.readFile(outputFileName);
     const modifiedFile = new Blob([modifiedFileArray], { type: "text/html" });

     // Create a Blob URL and trigger download
     const url = URL.createObjectURL(modifiedFile);
     const a = document.createElement('a');
     a.href = url;
     a.download = outputFileName;
     document.body.appendChild(a);
     a.click();
     document.body.removeChild(a);
     URL.revokeObjectURL(url);
    }
  };

  return (
    <div style={{ textAlign: 'center', height: '300px' }}>
      <h1>Convert PDF to HTML in React Using JavaScript</h1>
      <button onClick={ConvertPdfToHTML}>
        Convert
      </button>
    </div>
  );
}

export default App;
Get a Free License
To fully experience the capabilities of Spire.PDF for JavaScript without any evaluation limitations, you can request a free 30-day trial license.
Convert PDF to Word with JavaScript in React
Converting PDF files to Word documents is essential for modern web applications focused on document management and editing. Using JavaScript and React, developers can easily integrate this functionality with libraries like Spire.PDF for JavaScript. This guide will walk you through implementing a PDF-to-Word conversion feature in a React application, showing how to load files, configure settings, and enable users to download their converted documents effortlessly.
Install Spire.PDF for JavaScript
To get started with converting PDF to Word with JavaScript in a React application, you can either download Spire.PDF for JavaScript from our website or install it via npm with the following command:
npm i spire.office
The downloaded product package integrates Spire.Doc for JavaScript, Spire.XLS for JavaScript, Spire.PDF for JavaScript, and Spire.Presentation for JavaScript. To use Spire.PDF for JavaScript functionality, you need to copy the corresponding files (spire.pdf.js, Spire.Pdf.Wasm.zip, spire.common.js, Spire.Common.Wasm.zip, and the _framework folder) to the public folder of your project. Additionally, to ensure proper text rendering, font files can be added to a custom path of your choice. In the following example, the font addition path is: public\static\font.
For more details, refer to the documentation: How to Integrate Spire.PDF for JavaScript in a React Project
Convert PDF to Word Using PdfToDocConverter Class
The PdfToDocConverter class from Spire.PDF for JavaScript facilitates the conversion of PDF files to Word documents. It includes the DocxOptions property, allowing developers to customize conversion settings, including document properties. The conversion is performed using the SaveToDocx() method.
Steps to convert PDF to Word using the PdfToDocConverter class in React:
- Load the necessary font files and input PDF file into the virtual file system (VFS).
- Instantiate a PdfToDocConverter object using the wasmModule.PdfToDocConverter() method, passing the PDF file path.
- Customize the generated Word file's properties using the DocxOptions property.
- Use the SaveToDocx() method to convert the PDF document.
- Trigger the download of the resulting Word file.
- JavaScript
import React, { useState, useEffect } from 'react';

function App() {
   const [wasmModule, setWasmModule] = useState(null);
   useEffect(() => {
    (async () => {
      try {
        const publicUrl = process.env.PUBLIC_URL || '';
        const spireModule = await import(/* webpackIgnore: true */ `${publicUrl}/spire.pdf.js`);
        const rawModule = spireModule.default || spireModule;
        window.wasmModule = typeof rawModule === 'function'
          ? await rawModule({ locateFile: p => p.endsWith('.wasm') ? `${publicUrl}/${p}` : p })
          : rawModule;
        setWasmModule(window.wasmModule);
      } catch (error) {
        console.error('Failed to load spire.pdf.js:', error);
      }
    })();
  }, []);

  const ConvertPdfToWord= async () => {
    // Get WASM module
    const wasmModule = window.wasmModule.spirepdf;

    if (wasmModule) {
      // Load font file to virtual file system (VFS)
      await window.spire.FetchFileToVFS("arial.ttf","/Library/Fonts/",`${process.env.PUBLIC_URL}static/font/`);

      // PDF file name to convert
      let inputFileName = "ToDocx.pdf";
      // Load PDF file to virtual file system (VFS)
      await window.spire.FetchFileToVFS(inputFileName, "", `${process.env.PUBLIC_URL}static/data/`);

      // Create a PdfToDocConverter object
      let converter =new wasmModule.PdfToDocConverter({filePath: inputFileName});

      // Set document properties of the generated Word file
      converter.DocxOptions.Subject = "Convert PDF to Word";
      converter.DocxOptions.Authors = "E-ICEBLUE"

      // Define the output file name
      const outputFileName = "ToWord.docx";

      // Convert PDF as a Docx file
      converter.SaveToDocx({fileName: outputFileName});

      // Read the saved file and convert to a Blob object
      const modifiedFileArray = window.dotnetRuntime.Module.FS.readFile(outputFileName);
      const modifiedFile = new Blob([modifiedFileArray], { type: "msword" });

      // Create a URL for the Blob
      const url = URL.createObjectURL(modifiedFile);

      // Create an anchor element to trigger the download
      const a = document.createElement('a');
      a.href = url;
      a.download = outputFileName ;
      document.body.appendChild(a);
      a.click();
      document.body.removeChild(a);
      URL.revokeObjectURL(url);
    }
  };

    return (
    <div style={{ textAlign: 'center', height: '300px' }}>
      <h1>Convert PDF to Word in React</h1>
      <button onClick={ConvertPdfToWord}>
        Convert
      </button>
    </div>
  );
}

export default App;
Run the code to launch the React app at localhost:3000. Click "Convert," and a "Save As" window will appear, prompting you to save the output file in your chosen folder.

Below is a screenshot showing the input PDF file and the output Word file:
Convert PDF to Word Using PdfDocument Class
To convert PDF to Word, you can also use the PdfDocument class. This class allows developers to load an existing PDF document, make modifications, and save it as a Word file. This feature is particularly useful for users who need to edit or enhance their PDFs before conversion.
Steps to convert PDF to Word Using the PdfDocument class in React:
- Load the necessary font files and input PDF file into the virtual file system (VFS).
- Create a PdfDocument object using the wasmModule.PdfDocument() method
- Load the PDF document using the PdfDocument.LoadFromFile() method.
- Convert the PDF document to a Word file using the PdfDocument.SaveToFile() method.
- Trigger the download of the resulting Word file.
- JavaScript
import React, { useState, useEffect } from 'react';

function App() {
   const [wasmModule, setWasmModule] = useState(null);
   useEffect(() => {
    (async () => {
      try {
        const publicUrl = process.env.PUBLIC_URL || '';
        const spireModule = await import(/* webpackIgnore: true */ `${publicUrl}/spire.pdf.js`);
        const rawModule = spireModule.default || spireModule;
        window.wasmModule = typeof rawModule === 'function'
          ? await rawModule({ locateFile: p => p.endsWith('.wasm') ? `${publicUrl}/${p}` : p })
          : rawModule;
        setWasmModule(window.wasmModule);
      } catch (error) {
        console.error('Failed to load spire.pdf.js:', error);
      }
    })();
  }, []);

  const ConvertPdfToWord= async () => {
    // Get WASM module
    const wasmModule = window.wasmModule.spirepdf;

    if (wasmModule) {
      // Load font file to virtual file system (VFS)
      await window.spire.FetchFileToVFS("arial.ttf","/Library/Fonts/",`${process.env.PUBLIC_URL}static/font/`);

      // PDF file name to convert
      let inputFileName = "ToDocx.pdf";

      // Load PDF file to virtual file system (VFS)
      await window.spire.FetchFileToVFS(inputFileName, "", `${process.env.PUBLIC_URL}static/data/`);

      // Create a PdfDocument object
      let doc =new wasmModule.PdfDocument();

      // Load the PDF file
      doc.LoadFromFile(inputFileName);

      // Define the output file name
      const outputFileName = "ToWord.docx";

      // Convert PDF as a Docx file
      doc.SaveToFile({fileName: outputFileName,fileFormat: wasmModule.FileFormat.DOCX});

      // Read the saved file and convert to a Blob object
      const modifiedFileArray = window.dotnetRuntime.Module.FS.readFile(outputFileName);
      const modifiedFile = new Blob([modifiedFileArray], { type: "msword" });

      // Create a URL for the Blob
      const url = URL.createObjectURL(modifiedFile);

      // Create an anchor element to trigger the download
      const a = document.createElement('a');
      a.href = url;
      a.download = outputFileName ;
      document.body.appendChild(a);
      a.click();
      document.body.removeChild(a);
      URL.revokeObjectURL(url);
    }
  };

  return (
    <div style={{ textAlign: 'center', height: '300px' }}>
      <h1>Convert PDF to Word in React</h1>
      <button onClick={ConvertPdfToWord}>
        Convert
      </button>
    </div>
  );

}

export default App;
Get a Free License
To fully experience the capabilities of Spire.PDF for JavaScript without any evaluation limitations, you can request a free 30-day trial license.
Convert PDF to Excel Using JavaScript in React
In data-driven workflows, converting PDF documents with tables to Excel improves accessibility and usability. While PDFs preserve document integrity, their static nature makes data extraction challenging, often leading to error-prone manual work. By leveraging JavaScript in React, developers can automate the conversion process, seamlessly transferring structured data like financial reports into Excel worksheets for real-time analysis and collaboration. This article explores how to use Spire.PDF for JavaScript to efficiently convert PDFs to Excel files with JavaScript in React applications.
- Steps to Convert PDF to Excel Using JavaScript
- Simple PDF to Excel Conversion in JavaScript
- Convert PDF to Excel with XlsxLineLayoutOptions
- Convert PDF to Excel with XlsxTextLayoutOptions
Install Spire.PDF for JavaScript
To get started with converting PDF to Excel with JavaScript in a React application, you can either download Spire.PDF for JavaScript from our website or install it via npm with the following command:
npm i spire.office
The downloaded product package integrates Spire.Doc for JavaScript, Spire.XLS for JavaScript, Spire.PDF for JavaScript, and Spire.Presentation for JavaScript. To use Spire.PDF for JavaScript functionality, you need to copy the corresponding files (spire.pdf.js, Spire.Pdf.Wasm.zip, spire.common.js, Spire.Common.Wasm.zip, and the _framework folder) to the public folder of your project. Additionally, to ensure proper text rendering, font files can be added to a custom path of your choice. In the following example, the font addition path is: public\static\font.
For more details, refer to the documentation: How to Integrate Spire.PDF for JavaScript in a React Project
Steps to Convert PDF to Excel Using JavaScript
With the Spire.PDF for JavaScript WebAssembly module, PDF documents can be loaded from the Virtual File System (VFS) using the PdfDocument.LoadFromFile() method and converted into Excel workbooks using the PdfDocument.SaveToFile() method.
In addition to direct conversion, developers can customize the process by configuring conversion options through the XlsxLineLayoutOptions and XlsxTextLayoutOptions classes, along with the PdfDocument.ConvertOptions.SetPdfToXlsxOptions() method.
The following steps demonstrate how to convert a PDF document to an Excel file using Spire.PDF for JavaScript:
- Load the Spire.Pdf.Base.js file to initialize the WebAssembly module.
- Fetch the PDF file into the Virtual File System (VFS) using the window.spire.FetchFileToVFS() method.Create an instance of the PdfDocument class using the wasmModule.PdfDocument() method.
- Fetch the font files used in the PDF document to the “/Library/Fonts/” folder in the VFS using the wasmModule.FetchFileToVFS() method.
- Create an instance of the PdfDocument class using the wasmModule.PdfDocument() method.
- Load the PDF document from the VFS into the PdfDocument instance using the PdfDocument.LoadFromFile() method.
- (Optional) Customize the conversion options:
- Create an instance of the XlsxLineLayoutOptions or XlsxTextLayoutOptions class and specify the desired conversion settings.
- Apply the conversion options using the PdfDocument.ConvertOptions.SetPdfToXlsxOptions() method.
- Convert the PDF document to an Excel file using the PdfDocument.SaveToFile({ filename: string, wasmModule.FileFormat.XLSX }) method.
- Retrieve the converted file from the VFS for download or further use.
Simple PDF to Excel Conversion in JavaScript
Developers can directly load a PDF document from the VFS and convert it to an Excel file using the default conversion settings. These settings map one PDF page to one Excel worksheet, preserve rotated and overlapped text, allow cell splitting, and enable text wrapping.
Below is a code example demonstrating this process:
- JavaScript
import React, { useState, useEffect } from 'react';

function App() {
   // Store WASM module instance
   const [wasmModule, setWasmModule] = useState(null);

   // Load WASM module when component mounts
   useEffect(() => {
    const loadSpire = async () => {
      try {
        // Get public directory path
        const publicUrl = process.env.PUBLIC_URL || '';
        // Path to WASM JS glue code
        const moduleUrl = `${publicUrl}/spire.pdf.js`;

        // Dynamically import WASM module
        const spireModule = await import(
          /* webpackIgnore: true */
          moduleUrl
        );

        // Extract module exports
        let Module = spireModule.default || spireModule;

        // Handle WASM initialization
        if (typeof Module === 'function') {
          Module = await Module({
            // Callback when WASM runtime initialization is complete
            onRuntimeInitialized: () => {
              console.log('Spire WASM runtime initialized');
              // Set module state after initialization
              setWasmModule(Module);
            },
            // Handle WASM file paths
            locateFile: (path) => {
              if (path.endsWith('.wasm')) {
                return `${publicUrl}/${path}`;
              }
              return path;
            }
          });
        } else {
          // If not a function, set module directly
          setWasmModule(Module);
        }

        // Mount module to window object for global access
        window.Module = Module;
        window.wasmModule = Module;

        return Module;

      } catch (error) {
        console.error('Failed to load spire.pdf.js:', error);
        throw error;
      }
    };

    // Execute load function
    loadSpire();
  }, []);

  const ConvertPDFToExcel= async () => {
    // Get WASM module
    const wasmModule = window.wasmModule.spirepdf;

    if (wasmModule) {
      // Load font file to virtual file system (VFS)
      await window.spire.FetchFileToVFS("arial.ttf","/Library/Fonts/",`${process.env.PUBLIC_URL}static/font/`);

      // PDF file name to convert
      let inputFileName = "ChartSample.pdf";

      // Load PDF file to virtual file system (VFS)
      await window.spire.FetchFileToVFS(inputFileName, "", `${process.env.PUBLIC_URL}static/data/`);

      // Create PDF document object
      let doc = new wasmModule.PdfDocument();

      // Load PDF file
      doc.LoadFromFile(inputFileName);

      // Define the output file name
      const outputFileName = "ToXLSX_result.xlsx";

      // Save the document to the specified path
      doc.SaveToFile({fileName: outputFileName,fileFormat: wasmModule.FileFormat.XLSX});
      doc.Close();

      // Read the saved file and convert to a Blob object
      const modifiedFileArray = window.dotnetRuntime.Module.FS.readFile(outputFileName);
      const modifiedFile = new Blob([modifiedFileArray], { type: "application/vnd.openxmlformats-officedocument.spreadsheetml.sheet" });

      // Create a URL for the Blob
      const url = URL.createObjectURL(modifiedFile);

      // Create an anchor element to trigger the download
      const a = document.createElement('a');
      a.href = url;
      a.download = outputFileName ;
      document.body.appendChild(a);
      a.click();
      document.body.removeChild(a);
      URL.revokeObjectURL(url);
    }
  };

   return (
    <div style={{ textAlign: 'center', height: '300px' }}>
      <h1>Convert PDF to Excel in React</h1>
      <button onClick={ConvertPDFToExcel}>
        Convert
      </button>
    </div>
  );
}

export default App;

Convert PDF to Excel with XlsxLineLayoutOptions
Spire.PDF for JavaScript provides the XlsxLineLayoutOptions class for configuring line-based conversion settings when converting PDFs to Excel. By adjusting these options, developers can achieve different conversion results, such as merging all PDF pages into a single worksheet.
The table below outlines the available parameters in XlsxLineLayoutOptions:
| Parameter (bool) | Function |
| convertToMultipleSheet | Specifies whether to convert each page into a separate worksheet. |
| rotatedText | Specifies whether to retain rotated text. |
| splitCell | Specifies whether to split cells. |
| wrapText | Specifies whether to wrap text within cells. |
| overlapText | Specifies whether to retain overlapped text. |
Special attention should be given to the splitCell parameter, as it significantly impacts the way tables are converted. Setting it to false preserves table cell structures, making the output table cells more faithful to the original PDF. Conversely, setting it to true allows plain text to be split smoothly in cells, which may be useful for text-based layouts rather than structured tables.
Below is a code example demonstrating PDF-to-Excel conversion using XlsxLineLayoutOptions:
- JavaScript
import React, { useState, useEffect } from 'react';

function App() {
   const [wasmModule, setWasmModule] = useState(null);
   useEffect(() => {
    (async () => {
      try {
        const publicUrl = process.env.PUBLIC_URL || '';
        const spireModule = await import(/* webpackIgnore: true */ `${publicUrl}/spire.pdf.js`);
        const rawModule = spireModule.default || spireModule;
        window.wasmModule = typeof rawModule === 'function'
          ? await rawModule({ locateFile: p => p.endsWith('.wasm') ? `${publicUrl}/${p}` : p })
          : rawModule;
        setWasmModule(window.wasmModule);
      } catch (error) {
        console.error('Failed to load spire.pdf.js:', error);
      }
    })();
  }, []);

  const ConvertPDFToExcelXlsxLineLayoutOptions = async () => {
    // Get WASM module
    const wasmModule = window.wasmModule.spirepdf;

    if (wasmModule) {
      // Load font file to virtual file system (VFS)
      await window.spire.FetchFileToVFS("arial.ttf","/Library/Fonts/",`${process.env.PUBLIC_URL}static/font/`);

      // PDF file name to convert
      let inputFileName = "PdfToExcel.pdf";

      // Load PDF file to virtual file system (VFS)
      await window.spire.FetchFileToVFS(inputFileName, "", `${process.env.PUBLIC_URL}static/data/`);

      // Create PDF document object
      let doc = new wasmModule.PdfDocument();

      // Load PDF file
      doc.LoadFromFile(inputFileName);

      doc.ConvertOptions.SetPdfToXlsxOptions(
          new wasmModule.XlsxLineLayoutOptions({convertToMultipleSheet: false, rotatedText: true, splitCell: true}));

      // Define the output file name
      const outputFileName = "PdfToExcelOptions_out.xlsx";

      // Save the document to the specified path
      doc.SaveToFile({fileName: outputFileName,fileFormat: wasmModule.FileFormat.XLSX});
      doc.Close();

      // Read the generated JPG file
      const modifiedFileArray =window.dotnetRuntime.Module.FS.readFile(outputFileName);
      // Create a Blob object from the JPG file
      const modifiedFile = new Blob([modifiedFileArray], { type: "application/vnd.openxmlformats-officedocument.spreadsheetml.sheet" });
      // Create a URL for the Blob
      const url = URL.createObjectURL(modifiedFile);

      // Create an anchor element to trigger the download
      const a = document.createElement('a');
      a.href = url;
      a.download = outputFileName;
      document.body.appendChild(a);
      a.click();
      document.body.removeChild(a);
      URL.revokeObjectURL(url);

    }
  };

   return (
    <div style={{ textAlign: 'center', height: '300px' }}>
      <h1>Convert PDF to Excel with XlsxLineLayoutOptions Using JavaScript in React</h1>
        <button onClick={ConvertPDFToExcelXlsxLineLayoutOptions}>
          Convert and Download
        </button>
    </div>
  );
}

export default App;
Convert PDF to Excel Using XlsxTextLayoutOptions
Developers can also customize conversion settings using the XlsxTextLayoutOptions class, which focuses on text-based layout formatting. The table below lists its parameters:
| Parameter (bool) | Function |
| convertToMultipleSheet | Specifies whether to convert each page into a separate worksheet. |
| rotatedText | Specifies whether to retain rotated text. |
| overlapText | Specifies whether to retain overlapped text. |
Below is a code example demonstrating PDF-to-Excel conversion using XlsxTextLayoutOptions:
- JavaScript
import React, { useState, useEffect } from 'react';

function App() {
   const [wasmModule, setWasmModule] = useState(null);
   useEffect(() => {
    (async () => {
      try {
        const publicUrl = process.env.PUBLIC_URL || '';
        const spireModule = await import(/* webpackIgnore: true */ `${publicUrl}/spire.xls.js`);
        const rawModule = spireModule.default || spireModule;
        window.wasmModule = typeof rawModule === 'function'
          ? await rawModule({ locateFile: p => p.endsWith('.wasm') ? `${publicUrl}/${p}` : p })
          : rawModule;
        setWasmModule(window.wasmModule);
      } catch (error) {
        console.error('Failed to load spire.pdf.js:', error);
      }
    })();
  }, []);

  const ConvertPDFToExcelXlsxTextLayoutOptions = async () => {
    // Get WASM module
    const wasmModule = window.wasmModule.spirepdf;

    if (wasmModule) {
      // Load font file to virtual file system (VFS)
      await window.spire.FetchFileToVFS("arial.ttf","/Library/Fonts/",`${process.env.PUBLIC_URL}static/font/`);

      // PDF file name to convert
      let inputFileName = "PdfToExcel.pdf";

      // Load PDF file to virtual file system (VFS)
      await window.spire.FetchFileToVFS(inputFileName, "", `${process.env.PUBLIC_URL}static/data/`);

      // Create PDF document object
      let doc = new wasmModule.PdfDocument();

      // Load PDF file
      doc.LoadFromFile(inputFileName);

      // Create an instance of the XlsxTextLayoutOptions class and specify the conversion options
      const options =new wasmModule.XlsxTextLayoutOptions({ convertToMultipleSheet: false, rotatedText: true, overlapText: true});

      // Set the XlsxTextLayoutOptions instance as the conversion options
      doc.ConvertOptions.SetPdfToXlsxOptions(options);

      // Define the output file name
      const outputFileName = "PDFToExcelXlsxTextLayoutOptions.xlsx";

      // Save the document to the specified path
      doc.SaveToFile({fileName: outputFileName,fileFormat: wasmModule.FileFormat.XLSX});
      doc.Close();

      // Read the generated JPG file
      const modifiedFileArray =window.dotnetRuntime.Module.FS.readFile(outputFileName);
      // Create a Blob object from the JPG file
      const modifiedFile = new Blob([modifiedFileArray], { type: "application/vnd.openxmlformats-officedocument.spreadsheetml.sheet" });
      // Create a URL for the Blob
      const url = URL.createObjectURL(modifiedFile);

      // Create an anchor element to trigger the download
      const a = document.createElement('a');
      a.href = url;
      a.download = outputFileName;
      document.body.appendChild(a);
      a.click();
      document.body.removeChild(a);
      URL.revokeObjectURL(url);

    }
  };

   return (
      <div style={{ textAlign: 'center', height: '300px' }}>
        <h1>Convert PDF to Excel with XlsxTextLayoutOptions Using JavaScript in React</h1>
        <button onClick={ConvertPDFToExcelXlsxTextLayoutOptions}>
          Convert and Download
        </button>
      </div>
  );
}

export default App;
Get a Free License
To fully experience the capabilities of Spire.PDF for JavaScript without any evaluation limitations, you can request a free 30-day trial license.
Convert PDF to Images with JavaScript in React
Transforming PDF documents into image formats like JPG or PNG is a powerful way to enhance the accessibility and usability of your content. By converting PDF pages into images, you preserve the original layout and design, making it ideal for various applications, from online sharing to incorporation in websites and presentations.
In this article, you will learn how to convert PDF files to images in React using Spire.PDF for JavaScript. We will guide you through the process step-by-step, ensuring you can easily generate high-quality images from your PDF documents.
Install Spire.PDF for JavaScript
To get started with converting PDF to images with JavaScript in a React application, you can either download Spire.PDF for JavaScript from our website or install it via npm with the following command:
npm i spire.office
The downloaded product package integrates Spire.Doc for JavaScript, Spire.XLS for JavaScript, Spire.PDF for JavaScript, and Spire.Presentation for JavaScript. To use Spire.PDF for JavaScript functionality, you need to copy the corresponding files (spire.pdf.js, Spire.Pdf.Wasm.zip, spire.common.js, Spire.Common.Wasm.zip, and the _framework folder) to the public folder of your project. Additionally, to ensure proper text rendering, font files can be added to a custom path of your choice. In the following example, the font addition path is: public\static\font.
For more details, refer to the documentation: How to Integrate Spire.PDF for JavaScript in a React Project
Convert PDF to JPG in React
Spire.PDF for JavaScript provides the PdfDocument.SaveAsImage() method to convert a specific page of a PDF into image byte data, which can then be saved as a JPG file using the Save() method. To convert all pages into individual images, iterate through each page.
The following are the steps to convert PDF to JPG in React:
- Load the required font files and the input PDF file into the Virtual File System (VFS).
- Create a PdfDocument object with the wasmModule.PdfDocument() method.
- Load the PDF using the PdfDocument.LoadFromFile() method.
- Iterate through the document's pages:
- Convert each page into image byte data using the PdfDocument.SaveAsImage() method.
- Save the image as a JPG file using the Save() method.
- Trigger the download of the generated JPG file.
- JavaScript
import React, { useState, useEffect } from 'react';

function App() {
   const [wasmModule, setWasmModule] = useState(null);
   useEffect(() => {
    (async () => {
      try {
        const publicUrl = process.env.PUBLIC_URL || '';
        const spireModule = await import(/* webpackIgnore: true */ `${publicUrl}/spire.pdf.js`);
        const rawModule = spireModule.default || spireModule;
        window.wasmModule = typeof rawModule === 'function'
          ? await rawModule({ locateFile: p => p.endsWith('.wasm') ? `${publicUrl}/${p}` : p })
          : rawModule;
        setWasmModule(window.wasmModule);
      } catch (error) {
        console.error('Failed to load spire.pdf.js:', error);
      }
    })();
  }, []);

  const ConvertPdfToJpg = async () => {
    // Get WASM module
    const wasmModule = window.wasmModule.spirepdf;

    if (wasmModule) {
      // Load font file to virtual file system (VFS)
      await window.spire.FetchFileToVFS("arial.ttf","/Library/Fonts/",`${process.env.PUBLIC_URL}static/font/`);

      // PDF file name to convert
      let inputFileName = "ToImage.pdf";

      // Load PDF file to virtual file system (VFS)
      await window.spire.FetchFileToVFS(inputFileName, "", `${process.env.PUBLIC_URL}static/data/`);

      // Create PDF document object
      let doc = new wasmModule.PdfDocument();

      // Load PDF file
      doc.LoadFromFile(inputFileName);

      let outFileName ="";
        //Save to images
        for (let i=0;i<doc.Pages.Count;i++) {
              outFileName = `ToImage-img-${i}.jpeg`;
              let pdfstream = doc.SaveAsImage({pageIndex: i});
              pdfstream.Save(outFileName);

              // Read the generated JPG file
              const modifiedFileArray =window.dotnetRuntime.Module.FS.readFile(outFileName);
              // Create a Blob object from the JPG file
              const modifiedFile = new Blob([modifiedFileArray], { type:'image/jpeg' });
              // Create a URL for the Blob
              const url = URL.createObjectURL(modifiedFile);

              // Create an anchor element to trigger the download
              const a = document.createElement('a');
              a.href = url;
              a.download = outFileName;
              document.body.appendChild(a);
              a.click();
              document.body.removeChild(a);
              URL.revokeObjectURL(url);
          }
    }
  };

   return (
    <div style={{ textAlign: 'center', height: '300px' }}>
      <h1>Convert PDF to JPG in React</h1>
      <button onClick={ConvertPdfToJpg}>
        Convert
      </button>
    </div>
    );
    }

    export default App;
Run the code to launch the React app at localhost:3000. Click "Convert," and a "Save As" window will appear, prompting you to save the output file in your chosen folder.
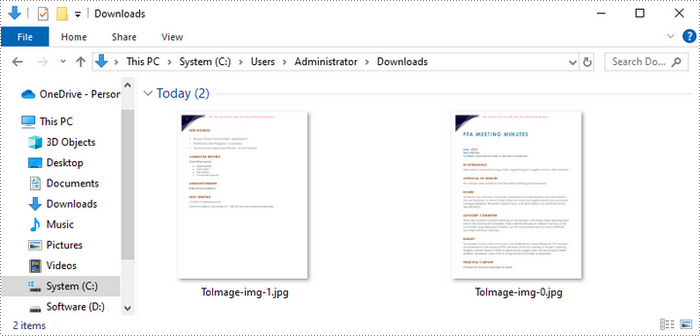
Here is a screenshot of the generated JPG files:
Convert PDF to PNG in React
To convert a PDF document into individual PNG files, iterate through its pages and use the PdfDocument.SaveAsImage() method to generate image byte data for each page. Then, save these byte data as PNG files.
The following are the steps to convert PDF to PNG in React:
- Load the required font files and the input PDF file into the Virtual File System (VFS).
- Create a PdfDocument object with the wasmModule.PdfDocument() method.
- Load the PDF using the PdfDocument.LoadFromFile() method.
- Iterate through the document's pages:
- Convert each page into image byte data using the PdfDocument.SaveAsImage() method.
- Save the image as a PNG file using the Save() method.
- Trigger the download of the generated PNG file.
- JavaScript
import React, { useState, useEffect } from 'react';

function App() {
   const [wasmModule, setWasmModule] = useState(null);
   useEffect(() => {
    (async () => {
      try {
        const publicUrl = process.env.PUBLIC_URL || '';
        const spireModule = await import(/* webpackIgnore: true */ `${publicUrl}/spire.pdf.js`);
        const rawModule = spireModule.default || spireModule;
        window.wasmModule = typeof rawModule === 'function'
          ? await rawModule({ locateFile: p => p.endsWith('.wasm') ? `${publicUrl}/${p}` : p })
          : rawModule;
        setWasmModule(window.wasmModule);
      } catch (error) {
        console.error('Failed to load spire.pdf.js:', error);
      }
    })();
  }, []);

  const ConvertPdfToPng = async () => {
    // Get WASM module
    const wasmModule = window.wasmModule.spirepdf;

    if (wasmModule) {
      // Load font file to virtual file system (VFS)
      await window.spire.FetchFileToVFS("arial.ttf", "/Library/Fonts/", `${process.env.PUBLIC_URL}/`);

      // PDF file name to convert
      let inputFileName = "ToImage.pdf";

      // Load PDF file to virtual file system (VFS)
      await window.spire.FetchFileToVFS(inputFileName, "", `${process.env.PUBLIC_URL}static/data/`);

      // Create PDF document object
      let doc = new wasmModule.PdfDocument();

      // Load PDF file
      doc.LoadFromFile(inputFileName);

      let outFileName ="";
        //Save to images
        for (let i=0;i<doc.Pages.Count;i++) {
              outFileName = "ToImage-img-${i}.png";
              let pdfstream = doc.SaveAsImage({pageIndex: i});
              pdfstream.Save(outFileName);

              // Read the generated JPG file
              const modifiedFileArray =window.dotnetRuntime.Module.FS.readFile(outFileName);
              // Create a Blob object from the JPG file
              const modifiedFile = new Blob([modifiedFileArray], { type:'image/png' });
              // Create a URL for the Blob
              const url = URL.createObjectURL(modifiedFile);

              // Create an anchor element to trigger the download
              const a = document.createElement('a');
              a.href = url;
              a.download = outFileName;
              document.body.appendChild(a);
              a.click();
              document.body.removeChild(a);
              URL.revokeObjectURL(url);
          }
    }
  };

   return (
    <div style={{ textAlign: 'center', height: '300px' }}>
      <h1>Convert PDF to PNG in React</h1>
      <button onClick={ConvertPdfToPng}>
        Convert
      </button>
    </div>
    );
    }

    export default App;

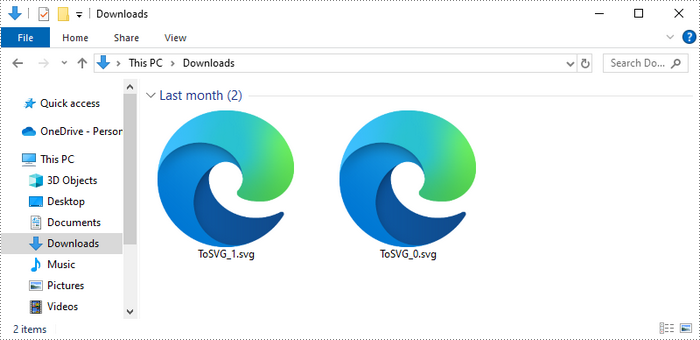
Convert PDF to SVG in React
To convert each page of a PDF document into individual SVG files, you can utilize the PdfDocument.SaveToFile() method. Here are the detailed steps:
- Load the required font files and the input PDF file into the Virtual File System (VFS).
- Create a PdfDocument object with the wasmModule.PdfDocument() method.
- Load the PDF using the PdfDocument.LoadFromFile() method.
- Iterate through the pages:
- Convert each page into an SVG file using the PdfDocument.SaveToFile() method.
- Trigger the download of the generated SVG file.
- JavaScript
import React, { useState, useEffect } from 'react';

function App() {
   const [wasmModule, setWasmModule] = useState(null);
   useEffect(() => {
    (async () => {
      try {
        const publicUrl = process.env.PUBLIC_URL || '';
        const spireModule = await import(/* webpackIgnore: true */ `${publicUrl}/spire.pdf.js`);
        const rawModule = spireModule.default || spireModule;
        window.wasmModule = typeof rawModule === 'function'
          ? await rawModule({ locateFile: p => p.endsWith('.wasm') ? `${publicUrl}/${p}` : p })
          : rawModule;
        setWasmModule(window.wasmModule);
      } catch (error) {
        console.error('Failed to load spire.pdf.js:', error);
      }
    })();
  }, []);

  const ConvertPdfToSvg = async () => {
    // Get WASM module
    const wasmModule = window.wasmModule.spirepdf;

    if (wasmModule) {
      // Load font file to virtual file system (VFS)
      await window.spire.FetchFileToVFS("arial.ttf","/Library/Fonts/",`${process.env.PUBLIC_URL}static/font/`);

      // PDF file name to convert
      let inputFileName = "ToImage.pdf";

      // Load PDF file to virtual file system (VFS)
      await window.spire.FetchFileToVFS(inputFileName, "", `${process.env.PUBLIC_URL}static/data/`);

      // Create PDF document object
      let doc = new wasmModule.PdfDocument();

      // Load PDF file
      doc.LoadFromFile(inputFileName);

      let outFileName ="";
        //Save to images
        for (let i=0;i<doc.Pages.Count;i++) {
              outFileName = `ToImage-img-${i}.svg`;
              let pdfstream = doc.SaveAsImage({pageIndex: i});
              pdfstream.Save(outFileName);

              // Read the generated JPG file
              const modifiedFileArray =window.dotnetRuntime.Module.FS.readFile(outFileName);
              // Create a Blob object from the JPG file
              const modifiedFile = new Blob([modifiedFileArray], { type:"image/svg+xml" });
              // Create a URL for the Blob
              const url = URL.createObjectURL(modifiedFile);

              // Create an anchor element to trigger the download
              const a = document.createElement('a');
              a.href = url;
              a.download = outFileName;
              document.body.appendChild(a);
              a.click();
              document.body.removeChild(a);
              URL.revokeObjectURL(url);
          }
    }
  };

   return (
    <div style={{ textAlign: 'center', height: '300px' }}>
      <h1>Convert PDF to SVG in React</h1>
      <button onClick={ConvertPdfToSvg}>
        Convert
      </button>
    </div>
    );
    }

    export default App;
Get a Free License
To fully experience the capabilities of Spire.PDF for JavaScript without any evaluation limitations, you can request a free 30-day trial license.
Lock Cells, Rows, and Columns in Excel with JavaScript in React
When working with Excel, you may sometimes need to protect critical data while allowing users to edit other parts of the worksheet. This is especially important for scenarios where certain formulas, headers, or reference values must remain unchanged to ensure data integrity. By locking specific areas, you can prevent accidental modifications, maintain consistency, and control access to key information within the spreadsheet. In this article, you will learn how to lock cells, rows, and columns in Excel in React using JavaScript and the Spire.XLS for JavaScript library.
Install Spire.XLS for JavaScript
To get started with locking cells, rows, and columns in Excel files within a React application, you can either download Spire.XLS for JavaScript from our website or install it via npm with the following command:
npm i spire.office
The downloaded product package has been integrated Spire.Doc for JavaScript,Spire.XLS for JavaScript,Spire.PDF for JavaScript,Spire.Presentation for JavaScript. To use the functionality of Spire.XLS for JavaScript, you need to copy the corresponding files (spire.xls.js, Spire.Xls.Wasm.zip, spire.common.js, Spire.Common.Wasm.zip, and _framework) to the project's "public" folder. At the same time, in order to ensure text rendering, the related font files can be added with custom paths. In the following example, the font addition path is: public\static\font.
For more details, refer to the documentation: How to Integrate Spire.XLS for JavaScript in a React Project
Lock Cells in Excel
Spire.XLS for JavaScript offers the Worksheet.Range.get().Style.Locked property, allowing you to protect critical data cells while enabling edits to the rest of the worksheet. The detailed steps are as follows.
- Create a Workbook object using the new wasmModule.Workbook() method.
- Load a sample Excel file using the Workbook.LoadFromFile() method.
- Get the first worksheet using the Workbook.Worksheets.get() method.
- Unlock all cells in the used range of the worksheet by setting the Worksheet.Range.Style.Locked property to "false".
- Set text for specific cells using the Worksheet.Range.get().Text property and then lock them by setting the Worksheet.Range.get().Style.Locked property to "true".
- Protect the worksheet with a password using the Worksheet.Protect() method.
- Save the result file using the Workbook.SaveToFile() method.
- JavaScript
import React, { useState, useEffect } from 'react';
function App() {
  const [wasmModule, setWasmModule] = useState(null);
  // Load Spire.XLS
  useEffect(() => {
    (async () => {
      try {
        const publicUrl = process.env.PUBLIC_URL || '';
        const spireModule = await import(/* webpackIgnore: true */ `${publicUrl}/spire.xls.js`);
        const rawModule = spireModule.default || spireModule;
        window.wasmModule = typeof rawModule === 'function'
          ? await rawModule({ locateFile: p => p.endsWith('.wasm') ? `${publicUrl}/${p}` : p })
          : rawModule;
        setWasmModule(window.wasmModule);
      } catch (error) {
        console.error('Failed to load spire.xls.js WASM module:', error);
      }
    })();
  }, []);

  //  Function to lock specific cells in Excel
  const LockExcelCells = async () => {
    const wasmModule = window.wasmModule.spirexls;

    if (wasmModule) {
      // Load font into Virtual File System (VFS)
      await window.spire.FetchFileToVFS('Arial.ttf', '/Library/Fonts/', `${process.env.PUBLIC_URL}/static/font/`);


      // Load the Excel files into the virtual file system (VFS)
      let inputFileName = 'sample.xlsx';
      await window.spire.FetchFileToVFS(inputFileName, '', `${process.env.PUBLIC_URL}/static/data/`);


      // Create a new workbook
      let workbook = new wasmModule.Workbook();

      // Load the Excel file from the virtual file system
      workbook.LoadFromFile({ fileName: inputFileName });

      // Get the first worksheet
      let sheet = workbook.Worksheets.get(0);

      // Unlock all cells in the used range of the worksheet
      sheet.Range.Style.Locked = false;

      // Lock a specific cell in the worksheet
      sheet.Range.get("A1").Text = "Locked";
      sheet.Range.get("A1").Style.Locked = true;

      // Lock a specific cell range in the worksheet
      sheet.Range.get("C1:E3").Text = "Locked";
      sheet.Range.get("C1:E3").Style.Locked = true;

      // Protect the worksheet with a password
      sheet.Protect({ password: "123", options: wasmModule.SheetProtectionType.All });

      let outputFileName = "LockCells.xlsx";
      // Save the resulting file
      workbook.SaveToFile({ fileName: outputFileName, version: wasmModule.ExcelVersion.Version2013 });

      // Read the saved file and convert to Blob object
      const modifiedFileArray = window.dotnetRuntime.Module.FS.readFile(outputFileName);
      const modifiedFile = new Blob([modifiedFileArray], { type: 'application/vnd.openxmlformats-officedocument.spreadsheetml.sheet' });

      // Create a URL for the Blob and initiate download
      const url = URL.createObjectURL(modifiedFile);
      const a = document.createElement('a');
      a.href = url;
      a.download = outputFileName;
      document.body.appendChild(a);
      a.click();
      document.body.removeChild(a);
      URL.revokeObjectURL(url);

      // Clean up resources used by the workbook
      workbook.Dispose();
    }
  };

  return (
    <div style={{ textAlign: 'center', height: '300px' }}>
      <h1>Lock Specific Cells in Excel Using JavaScript in React</h1>
      <button onClick={LockExcelCells} disabled={!wasmModule}>
        Lock
      </button>
    </div>
  );
}

export default App;
Run the code to launch the React app at localhost:3000. Once it's running, click on the "Lock" button to lock specific cells in the Excel file:
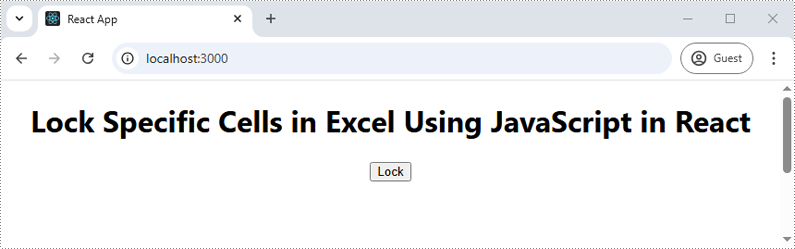
Upon opening the output Excel sheet and attempting to edit the protected cells, a dialog box will appear, notifying you that the cell you're trying to change is on a protected sheet:
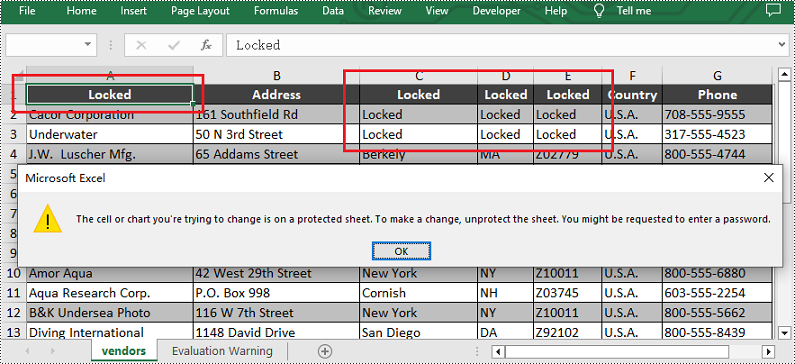
Lock Rows in Excel
If you need to preserve row-based data, such as headers or summaries, you can lock entire rows using the Worksheet.Rows.get().Style.Locked property in Spire.XLS for JavaScript. The detailed steps are as follows.
- Create a Workbook object using the new wasmModule.Workbook() method.
- Load a sample Excel file using the Workbook.LoadFromFile() method.
- Get the first worksheet using the Workbook.Worksheets.get() method.
- Unlock all cells in the used range of the worksheet by setting the Worksheet.Range.Style.Locked property to "false".
- Set text for a specific row using the Worksheet.Rows.get().Text property and then lock it by setting the Worksheet.Rows.get().Style.Locked property to "true".
- Protect the worksheet with a password using the Worksheet.Protect() method.
- Save the result file using the Workbook.SaveToFile() method.
- JavaScript
import React, { useState, useEffect } from 'react';
function App() {
  const [wasmModule, setWasmModule] = useState(null);
  // Load Spire.XLS
  useEffect(() => {
    (async () => {
      try {
        const publicUrl = process.env.PUBLIC_URL || '';
        const spireModule = await import(/* webpackIgnore: true */ `${publicUrl}/spire.xls.js`);
        const rawModule = spireModule.default || spireModule;
        window.wasmModule = typeof rawModule === 'function'
          ? await rawModule({ locateFile: p => p.endsWith('.wasm') ? `${publicUrl}/${p}` : p })
          : rawModule;
        setWasmModule(window.wasmModule);
      } catch (error) {
        console.error('Failed to load spire.xls.js WASM module:', error);
      }
    })();
  }, []);

  // Function to lock specific rows in Excel
  const LockExcelRows = async () => {
    const wasmModule = window.wasmModule.spirexls;

    if (wasmModule) {
      // Load font into Virtual File System (VFS)
      await window.spire.FetchFileToVFS('Arial.ttf', '/Library/Fonts/', `${process.env.PUBLIC_URL}/static/font/`);


      // Load the Excel files into the virtual file system (VFS)
      let inputFileName = 'sample.xlsx';
      await window.spire.FetchFileToVFS(inputFileName, '', `${process.env.PUBLIC_URL}/static/data/`);


      // Create a new workbook
      let workbook = new wasmModule.Workbook();

      // Load the Excel file from the virtual file system
      workbook.LoadFromFile({ fileName: inputFileName });

      // Get the first worksheet
      let sheet = workbook.Worksheets.get(0);

      // Unlock all cells in the used range of the worksheet
      sheet.Range.Style.Locked = false;

      // Lock the third row in the worksheet
      sheet.Rows.get(2).Text = "Locked";
      sheet.Rows.get(2).Style.Locked = true;

      // Protect the worksheet with a password
      sheet.Protect({ password: "123", options: wasmModule.SheetProtectionType.All });

      let outputFileName = "LockRows.xlsx";
      // Save the resulting file
      workbook.SaveToFile({ fileName: outputFileName, version: wasmModule.ExcelVersion.Version2013 });

      // Read the saved file and convert to Blob object
      const modifiedFileArray = window.dotnetRuntime.Module.FS.readFile(outputFileName);
      const modifiedFile = new Blob([modifiedFileArray], { type: 'application/vnd.openxmlformats-officedocument.spreadsheetml.sheet' });

      // Create a URL for the Blob and initiate download
      const url = URL.createObjectURL(modifiedFile);
      const a = document.createElement('a');
      a.href = url;
      a.download = outputFileName;
      document.body.appendChild(a);
      a.click();
      document.body.removeChild(a);
      URL.revokeObjectURL(url);

      // Clean up resources used by the workbook
      workbook.Dispose();
    }
  };

  return (
    <div style={{ textAlign: 'center', height: '300px' }}>
      <h1>Lock Specific Rows in Excel Using JavaScript in React</h1>
      <button onClick={LockExcelRows} disabled={!wasmModule}>
        Lock
      </button>
    </div>
  );
}

export default App;
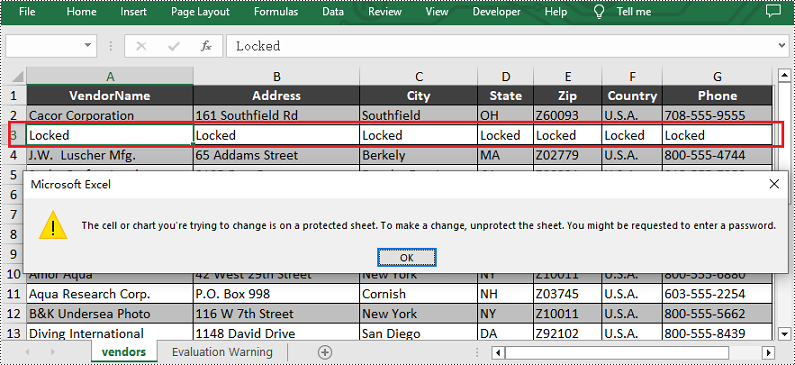
Lock Columns in Excel
To maintain the integrity of key vertical data, such as fixed identifiers or category labels, you can lock entire columns using the Worksheet.Columns.get().Style.Locked property in Spire.XLS for JavaScript. The detailed steps are as follows.
- Create a Workbook object using the new wasmModule.Workbook() method.
- Load a sample Excel file using the Workbook.LoadFromFile() method.
- Get the first worksheet using the Workbook.Worksheets.get() method.
- Unlock all cells in the used range of the worksheet by setting the Worksheet.Range.Style.Locked property to "false".
- Set text for a specific column using the Worksheet.Columns.get().Text property and then lock it by setting the Worksheet.Columns.get().Style.Locked property to "true".
- Protect the worksheet with a password using the Worksheet.Protect() method.
- Save the result file using the Workbook.SaveToFile() method.
- JavaScript
import React, { useState, useEffect } from 'react';
function App() {
  const [wasmModule, setWasmModule] = useState(null);
  // Load Spire.XLS
  useEffect(() => {
    (async () => {
      try {
        const publicUrl = process.env.PUBLIC_URL || '';
        const spireModule = await import(/* webpackIgnore: true */ `${publicUrl}/spire.xls.js`);
        const rawModule = spireModule.default || spireModule;
        window.wasmModule = typeof rawModule === 'function'
          ? await rawModule({ locateFile: p => p.endsWith('.wasm') ? `${publicUrl}/${p}` : p })
          : rawModule;
        setWasmModule(window.wasmModule);
      } catch (error) {
        console.error('Failed to load spire.xls.js WASM module:', error);
      }
    })();
  }, []);

  // Function to lock specific columns in Excel
  const LockExcelColumns = async () => {
    const wasmModule = window.wasmModule.spirexls;

    if (wasmModule) {
      // Load font into Virtual File System (VFS)
      await window.spire.FetchFileToVFS('Arial.ttf', '/Library/Fonts/', `${process.env.PUBLIC_URL}/static/font/`);


      // Load the Excel files into the virtual file system (VFS)
      let inputFileName = 'sample.xlsx';
      await window.spire.FetchFileToVFS(inputFileName, '', `${process.env.PUBLIC_URL}/static/data/`);


      // Create a new workbook
      let workbook = new wasmModule.Workbook();

      // Load the Excel file from the virtual file system
      workbook.LoadFromFile({ fileName: inputFileName });

      // Get the first worksheet
      let sheet = workbook.Worksheets.get(0);

      // Unlock all cells in the used range of the worksheet
      sheet.Range.Style.Locked = false;

      // Lock the fourth column in the worksheet
      sheet.Columns.get(3).Text = "Locked";
      sheet.Columns.get(3).Style.Locked = true;

      // Protect the worksheet with a password
      sheet.Protect({ password: "123", options: wasmModule.SheetProtectionType.All });

      let outputFileName = "LockColumns.xlsx";
      // Save the resulting file
      workbook.SaveToFile({ fileName: outputFileName, version: wasmModule.ExcelVersion.Version2013 });

      // Read the saved file and convert to Blob object
      const modifiedFileArray = window.dotnetRuntime.Module.FS.readFile(outputFileName);
      const modifiedFile = new Blob([modifiedFileArray], { type: 'application/vnd.openxmlformats-officedocument.spreadsheetml.sheet' });

      // Create a URL for the Blob and initiate download
      const url = URL.createObjectURL(modifiedFile);
      const a = document.createElement('a');
      a.href = url;
      a.download = outputFileName;
      document.body.appendChild(a);
      a.click();
      document.body.removeChild(a);
      URL.revokeObjectURL(url);

      // Clean up resources used by the workbook
      workbook.Dispose();
    }
  };

  return (
    <div style={{ textAlign: 'center', height: '300px' }}>
      <h1>Lock Specific Columns in Excel Using JavaScript in React</h1>
      <button onClick={LockExcelColumns} disabled={!wasmModule}>
        Lock
      </button>
    </div>
  );
}

export default App;
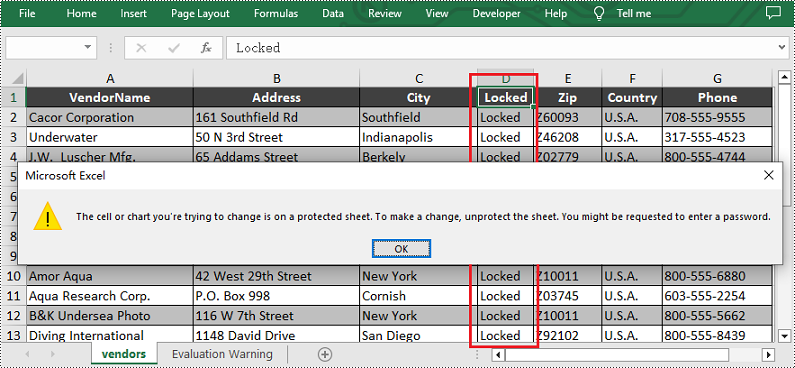
Get a Free License
To fully experience the capabilities of Spire.XLS for JavaScript without any evaluation limitations, you can request a free 30-day trial license.
Extract Text from PDF Documents with JavaScript in React
Extracting text from PDF documents directly within a React application using JavaScript provides a streamlined, self-contained solution for handling dynamic content. Given that PDFs remain a ubiquitous format for reports, forms, and data sharing, parsing their contents on the client side enables developers to build efficient applications without relying on external services. By integrating Spire.PDF for JavaScript into React, development teams gain full control over data processing, reduce latency by eliminating server-side dependencies, and deliver real-time user experiences—all while ensuring that sensitive information remains secure within the browser.
In this article, we explore how to use Spire.PDF for JavaScript to extract text from PDF documents in React applications, simplifying the integration of robust PDF content extraction features.
- General Steps for Extracting PDF Text Using JavaScript
- Extract PDF Text with Layout Preservation
- Extract PDF Text without Layout Preservation
- Extract PDF Text from Specific Page Areas
- Extract Highlighted Text from PDF
Install Spire.PDF for JavaScript
To get started with extracting text from PDF documents with JavaScript in a React application, you can either download Spire.PDF for JavaScript from our website or install it via npm with the following command:
npm i spire.office
The downloaded product package integrates Spire.Doc for JavaScript, Spire.XLS for JavaScript, Spire.PDF for JavaScript, and Spire.Presentation for JavaScript. To use Spire.PDF for JavaScript functionality, you need to copy the corresponding files (spire.pdf.js, Spire.Pdf.Wasm.zip, spire.common.js, Spire.Common.Wasm.zip, and the _framework folder) to the public folder of your project. Additionally, to ensure proper text rendering, font files can be added to a custom path of your choice. In the following example, the font addition path is: public\static\font.
For more details, refer to the documentation: How to Integrate Spire.PDF for JavaScript in a React Project
General Steps for Extracting PDF Text Using JavaScript
Spire.PDF for JavaScript provides a WebAssembly module that enables PDF document processing using simple JavaScript code in React applications. Developers can utilize the PdfTextExtractor class to handle text extraction tasks efficiently. The general steps for extracting text from PDF documents using Spire.PDF for JavaScript in React are as follows:
- Load the Spire.Pdf.Base.js file to initialize the WebAssembly module.
- Fetch the PDF files into the Virtual File System (VFS) using the window.spire.FetchFileToVFS() method.
- Create an instance of the PdfDocument class using the wasmModule.PdfDocument() method.
- Load the PDF document from the VFS into the PdfDocument instance using the PdfDocument.LoadFromFile() method.
- Create an instance of the PdfTextExtractOptions class using the wasmModule.PdfTextExtractOptions() method and configure the text extraction options.
- Retrieve a PDF page using the PdfDocument.Pages.get_Item() method or iterate through the document's pages.
- Create an instance of the PdfTextExtractor class with the page object using the wasmModule.PdfTextExtractor() method.
- Extract text from the page using the PdfTextExtractor.ExtractText() method.
- Download the extracted text or process it as needed.
The PdfTextExtractOptions class allows customization of extraction settings, supporting features such as simple extraction, extracting specific page areas, and retrieving hidden text. The following table outlines the properties of the PdfTextExtractOptions class and their functions:
| Property | Description |
| IsSimpleExtraction | Specifies whether to perform simple text extraction. |
| IsExtractAllText | Specifies whether to extract all text. |
| ExtractArea | Defines the extraction area. |
| IsShowHiddenText | Specifies whether to extract hidden text. |
Extract PDF Text with Layout Preservation
Using the PdfTextExtractor.ExtractText() method with default options enables text extraction while preserving the original text layout of the PDF pages. Below is a code example and the corresponding extraction result:
- JavaScript
import React, { useState, useEffect } from 'react';

function App() {
   const [wasmModule, setWasmModule] = useState(null);
   useEffect(() => {
    (async () => {
      try {
        const publicUrl = process.env.PUBLIC_URL || '';
        const spireModule = await import(/* webpackIgnore: true */ `${publicUrl}/spire.pdf.js`);
        const rawModule = spireModule.default || spireModule;
        window.wasmModule = typeof rawModule === 'function'
          ? await rawModule({ locateFile: p => p.endsWith('.wasm') ? `${publicUrl}/${p}` : p })
          : rawModule;
        setWasmModule(window.wasmModule);
      } catch (error) {
        console.error('Failed to load spire.pdf.js:', error);
      }
    })();
  }, []);

  const ExtractPDFText = async () => {
    const wasmModule = window.wasmModule.spirepdf;

    if (wasmModule) {
      // Load the input PDF file into the VFS
      const inputFileName = 'Sample.pdf';
      const outputFileName = 'PDFTextWithLayout.txt';
      await window.spire.FetchFileToVFS(inputFileName, "", `${process.env.PUBLIC_URL}static/data/`);
      let pdf = new wasmModule.PdfDocument();
      pdf.LoadFromFile(inputFileName);

      // Create a string object to store the extracted text
      let text = '';

      // Create an instance of the PdfTextExtractOptions class
      const extractOptions =new wasmModule.PdfTextExtractOptions();

      // Iterate through each page of the PDF document
      for (let i = 0; i < pdf.Pages.Count; i++) {
        // Get the current page
        const page = pdf.Pages.get_Item(i);
        // Create an instance of the PdfTextExtractor class
        const textExtractor =new wasmModule.PdfTextExtractor(page);
        // Extract the text from the current page and add it to the text string
        text += textExtractor.ExtractText(extractOptions);
      }

      // Create a Blob object from the text string and download it
      const blob = new Blob([text], { type: 'text/plain' });
      const url = URL.createObjectURL(blob);
      const a = document.createElement('a');
      a.href = url;
      a.download = `${outputFileName}`;
      document.body.appendChild(a);
      a.click();
      document.body.removeChild(a);
      URL.revokeObjectURL(url);

    }
  };

  return (
      <div style={{ textAlign: 'center', height: '300px' }}>
        <h1>Extract Text from PDF Using JavaScript in React</h1>
        <button onClick={ExtractPDFText}>
          Extract and Download
        </button>
      </div>
  );
}


export default App;
Extract PDF Text without Layout Preservation
Setting the PdfTextExtractOptions.IsSimpleExtraction property to true enables a simple text extraction strategy, allowing text extraction from PDF pages without preserving the layout. In this approach, blank spaces are not retained. Instead, the program tracks the Y position of each text string and inserts line breaks whenever the Y position changes.
Below is a code example demonstrating text extraction without layout preservation using Spire.PDF for JavaScript, along with the extraction result:
- JavaScript
import React, { useState, useEffect } from 'react';

function App() {
   const [wasmModule, setWasmModule] = useState(null);
   useEffect(() => {
    (async () => {
      try {
        const publicUrl = process.env.PUBLIC_URL || '';
        const spireModule = await import(/* webpackIgnore: true */ `${publicUrl}/spire.pdf.js`);
        const rawModule = spireModule.default || spireModule;
        window.wasmModule = typeof rawModule === 'function'
          ? await rawModule({ locateFile: p => p.endsWith('.wasm') ? `${publicUrl}/${p}` : p })
          : rawModule;
        setWasmModule(window.wasmModule);
      } catch (error) {
        console.error('Failed to load spire.pdf.js:', error);
      }
    })();
  }, []);

  const ExtractPDFText = async () => {
    const wasmModule = window.wasmModule.spirepdf;

    if (wasmModule) {
      // Load the input PDF file into the VFS
      const inputFileName = 'Sample.pdf';
      const outputFileName = 'PDFTextWithoutLayout.txt';

      await window.spire.FetchFileToVFS(inputFileName, "", `${process.env.PUBLIC_URL}static/data/`);
      let pdf = new wasmModule.PdfDocument();
      pdf.LoadFromFile(inputFileName);

       // Create a string object to store the extracted text
      let text = '';

      // Create an instance of the PdfTextExtractOptions class
      const extractOptions =new wasmModule.PdfTextExtractOptions();

      // Enable simple text extraction to extract text without preserving layout
      extractOptions.IsSimpleExtraction = true;

      // Iterate through each page of the PDF document
      for (let i = 0; i < pdf.Pages.Count; i++) {
        // Get the current page
        const page = pdf.Pages.get_Item(i);
        // Create an instance of the PdfTextExtractor class
        const textExtractor =new wasmModule.PdfTextExtractor(page);
        // Extract the text from the current page and add it to the text string
        text += textExtractor.ExtractText(extractOptions);
      }

      // Create a Blob object from the text string and download it
      const blob = new Blob([text], { type: 'text/plain' });
      const url = URL.createObjectURL(blob);
      const a = document.createElement('a');
      a.href = url;
      a.download = `${outputFileName}`;
      document.body.appendChild(a);
      a.click();
      document.body.removeChild(a);
      URL.revokeObjectURL(url);
    }
  };

  return (
      <div style={{ textAlign: 'center', height: '300px' }}>
        <h1>Extract Text from PDF Without Layout Preservation Using JavaScript in React</h1>
        <button onClick={ExtractPDFText} disabled={!wasmModule}>
          Extract and Download
        </button>
      </div>
  );
}


export default App;
Extract PDF Text from Specific Page Areas
The PdfTextExtractOptions.ExtractArea property allows users to define a specific area using a RectangleF object to extract only the text within that area from a PDF page. This method helps exclude unwanted fixed content from the extraction process. The following code example and extraction result illustrate this functionality:
- JavaScript
import React, { useState, useEffect } from 'react';

function App() {
   const [wasmModule, setWasmModule] = useState(null);
   useEffect(() => {
    (async () => {
      try {
        const publicUrl = process.env.PUBLIC_URL || '';
        const spireModule = await import(/* webpackIgnore: true */ `${publicUrl}/spire.pdf.js`);
        const rawModule = spireModule.default || spireModule;
        window.wasmModule = typeof rawModule === 'function'
          ? await rawModule({ locateFile: p => p.endsWith('.wasm') ? `${publicUrl}/${p}` : p })
          : rawModule;
        setWasmModule(window.wasmModule);
      } catch (error) {
        console.error('Failed to load spire.pdf.js:', error);
      }
    })();
  }, []);

  const ExtractPDFText = async () => {
    const wasmModule = window.wasmModule.spirepdf;

    if (wasmModule) {
      // Load the input PDF file into the VFS
      const inputFileName = 'Sample.pdf';
      const outputFileName = 'PDFTextPageArea.txt';

      await window.spire.FetchFileToVFS(inputFileName, "", `${process.env.PUBLIC_URL}static/data/`);
      let pdf = new wasmModule.PdfDocument();
      pdf.LoadFromFile(inputFileName);

       // Create a string object to store the extracted text
      let text = '';

      // Get a page from the PDF document
      const page = pdf.Pages.get_Item(0);

      // Create an instance of the PdfTextExtractOptions class
      const extractOptions =new wasmModule.PdfTextExtractOptions();

      // Set the page area to extract text from using a RectangleF object
      extractOptions.ExtractArea =new wasmModule.RectangleF({ x: 0, y: 500, width: page.Size.Width, height: 200});

      // Create an instance of the PdfTextExtractor class
      const textExtractor =new wasmModule.PdfTextExtractor(page);

      // Extract the text from specified area of the page
      text = textExtractor.ExtractText(extractOptions);

      // Create a Blob object from the text string and download it
      const blob = new Blob([text], { type: 'text/plain' });
      const url = URL.createObjectURL(blob);
      const a = document.createElement('a');
      a.href = url;
      a.download = `${outputFileName}`;
      document.body.appendChild(a);
      a.click();
      document.body.removeChild(a);
      URL.revokeObjectURL(url);
    }
  };

  return (
      <div style={{ textAlign: 'center', height: '300px' }}>
        <h1>Extract Text from a PDF Page Area Using JavaScript in React</h1>
        <button onClick={ExtractPDFText} disabled={!wasmModule}>
          Extract and Download
        </button>
      </div>
  );
}


export default App;
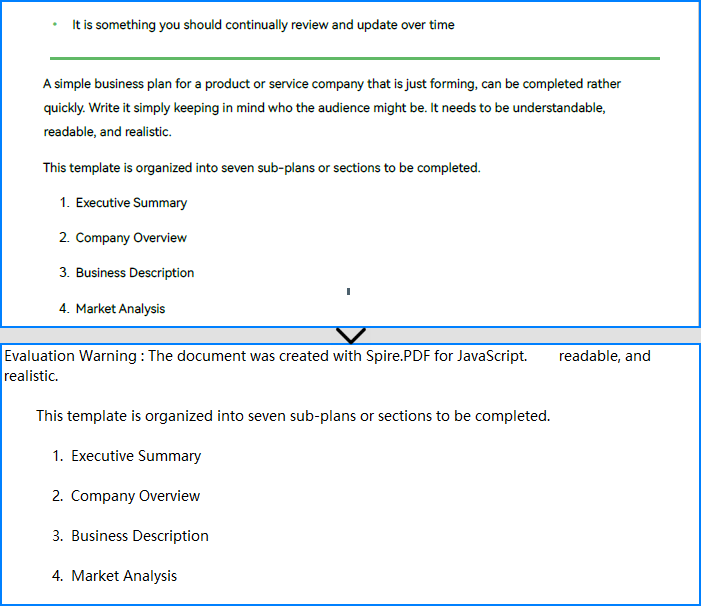
Extract Highlighted Text from PDF
Text highlighting in PDF documents is achieved using annotation features. With Spire.PDF for JavaScript, we can retrieve all annotations on a PDF page via the PdfPageBase.Annotations property. By checking whether each annotation is an instance of the PdfTextMarkupAnnotationWidget class, we can identify highlight annotations. Once identified, we can use the PdfTextExtractOptions.Bounds property to obtain the bounding rectangles of these annotations and set them as extraction areas, thereby extracting only the highlighted text.
The following code example demonstrates this process along with the extracted result:
- JavaScript
import React, { useState, useEffect } from 'react';

function App() {
   const [wasmModule, setWasmModule] = useState(null);
   useEffect(() => {
    (async () => {
      try {
        const publicUrl = process.env.PUBLIC_URL || '';
        const spireModule = await import(/* webpackIgnore: true */ `${publicUrl}/spire.pdf.js`);
        const rawModule = spireModule.default || spireModule;
        window.wasmModule = typeof rawModule === 'function'
          ? await rawModule({ locateFile: p => p.endsWith('.wasm') ? `${publicUrl}/${p}` : p })
          : rawModule;
        setWasmModule(window.wasmModule);
      } catch (error) {
        console.error('Failed to load spire.pdf.js:', error);
      }
    })();
  }, []);

  const ExtractPDFText = async () => {
    const wasmModule = window.wasmModule.spirepdf;

    if (wasmModule) {
      // Load the input PDF file into the VFS
      const inputFileName = 'Sample.pdf';
      const outputFileName = 'PDFTextHighlighted.txt';

      await window.spire.FetchFileToVFS(inputFileName, "", `${process.env.PUBLIC_URL}static/data/`);
      let pdf = new wasmModule.PdfDocument();
      pdf.LoadFromFile(inputFileName);

       // Create a string object to store the extracted text
      let text = '';

      // Iterate through each page of the PDF document
      for (let i = 0; i < pdf.Pages.Count; i++) {
        let page = pdf.Pages.get_Item(i);
        // Iterate through each annotation on the page
        for (let i = 0; i < page.Annotations.Count; i++) {
          // Get the current annotation
          const annotation = page.Annotations.get_Item(i)
          // Check if the annotation is an instance of PdfTextMarkupAnnotation
          if (annotation instanceof wasmModule.PdfTextMarkupAnnotationWidget) {
            // Get the bounds of the annotation
            const bounds = annotation.Bounds;
            // Create an instance of PdfTextExtractOptions
            const extractOptions =new wasmModule.PdfTextExtractOptions();
            // Set the bounds of the highlight annotation as the extraction area
            extractOptions.ExtractArea = bounds;
            //
            const textExtractor =new wasmModule.PdfTextExtractor(page)
            // Extract the highlighted text and append it to the text string
            text += textExtractor.ExtractText(extractOptions);
          }
        }
      }

      // Create a Blob object from the text string and download it
      const blob = new Blob([text], { type: 'text/plain' });
      const url = URL.createObjectURL(blob);
      const a = document.createElement('a');
      a.href = url;
      a.download = `${outputFileName}`;
      document.body.appendChild(a);
      a.click();
      document.body.removeChild(a);
      URL.revokeObjectURL(url);
    }
  };

  return (
      <div style={{ textAlign: 'center', height: '300px' }}>
        <h1>Extract Highlighted Text from PDF Using JavaScript in React</h1>
        <button onClick={ExtractPDFText} disabled={!wasmModule}>
          Extract and Download
        </button>
      </div>
  );
}


export default App;

Get a Free License
To fully experience the capabilities of Spire.PDF for JavaScript without any evaluation limitations, you can request a free 30-day trial license.
Merge Excel Files into One with JavaScript in React
Merging Excel files is a common task that many people encounter when working with data. As projects expand or teams collaborate, you may find yourself with multiple spreadsheets that need to be combined into one cohesive document. This process not only helps in organizing information but also makes it easier to analyze and draw insights from your data. Whether you're dealing with financial records, project updates, or any other type of data, knowing how to merge Excel files effectively can save you time and effort. In this guide, we'll explain how to programmatically merge Excel files into one in React using Spire.XLS for JavaScript.
Install Spire.XLS for JavaScript
To get started with merging Excel files into one in a React application, you can either download Spire.XLS for JavaScript from our website or install it via npm with the following command:
npm i spire.office
The downloaded product package has been integrated Spire.Doc for JavaScript,Spire.XLS for JavaScript,Spire.PDF for JavaScript,Spire.Presentation for JavaScript. To use the functionality of Spire.XLS for JavaScript, you need to copy the corresponding files (spire.xls.js, Spire.Xls.Wasm.zip, spire.common.js, Spire.Common.Wasm.zip, and _framework) to the project's "public" folder. At the same time, in order to ensure text rendering, the related font files can be added with custom paths. In the following example, the font addition path is: public\static\font.
For more details, refer to the documentation: How to Integrate Spire.XLS for JavaScript in a React Project
Merge Multiple Excel Workbooks into One
Combining multiple Excel workbooks allows you to merge distinct files into a single workbook, which simplifies the management and analysis of diverse datasets for comprehensive reporting.
With Spire.XLS for JavaScript, developers can efficiently merge multiple workbooks by copying worksheets from the source workbooks into a newly created workbook using the XlsWorksheetsCollection.AddCopy() method. The key steps are as follows.
- Put the file paths of the workbooks to be merged into a list.
- Initialize a Workbook object to create a new workbook and clear its default worksheets.
- Initialize a temporary Workbook object.
- Loop through the list of file paths.
- Load each workbook specified by the file path in the list into the temporary Workbook object using Workbook.LoadFromFile() method.
- Loop through the worksheets in the temporary workbook, then copy each worksheet from the temporary workbook to the newly created workbook using XlsWorksheetsCollection.AddCopy() method.
- Save the resulting workbook using Workbook.SaveToFile() method.
- JavaScript
import React, { useState, useEffect } from 'react';
function App() {
  const [wasmModule, setWasmModule] = useState(null);
  // Load Spire.XLS
  useEffect(() => {
    (async () => {
      try {
        const publicUrl = process.env.PUBLIC_URL || '';
        const spireModule = await import(/* webpackIgnore: true */ `${publicUrl}/spire.xls.js`);
        const rawModule = spireModule.default || spireModule;
        window.wasmModule = typeof rawModule === 'function'
          ? await rawModule({ locateFile: p => p.endsWith('.wasm') ? `${publicUrl}/${p}` : p })
          : rawModule;
        setWasmModule(window.wasmModule);
      } catch (error) {
        console.error('Failed to load spire.xls.js WASM module:', error);
      }
    })();
  }, []);

  // Function to merge Excel workbooks into one
  const MergeExcelWorkbooks = async () => {
    const wasmModule = window.wasmModule.spirexls;

    if (wasmModule) {
      // Load font into Virtual File System (VFS)
      await window.spire.FetchFileToVFS('Arial.ttf', '/Library/Fonts/', `${process.env.PUBLIC_URL}/static/font/`);


      // Load the Excel files into the virtual file system (VFS)
      const files = [
        "File1.xlsx",
        "File2.xlsx",
        "File3.xlsx",
      ];
      for (const file of files) {
        await window.spire.FetchFileToVFS(file, '', `${process.env.PUBLIC_URL}/static/data/`);
      }

      // Create a new workbook
      let newbook = new wasmModule.Workbook();
      newbook.Version = wasmModule.ExcelVersion.Version2013;

      // Clear the default worksheets
      newbook.Worksheets.Clear();

      // Create a temp workbook
      let tempbook = new wasmModule.Workbook();

      for (const file of files) {

        // Load the current file
        tempbook.LoadFromFile(file.split("/").pop());

        for (let i = 0; i < tempbook.Worksheets.Count; i++) {
          let sheet = tempbook.Worksheets.get(i);

          // Copy every sheet in the current file to the new workbook
          wasmModule.XlsWorksheetsCollection.Convert(
            newbook.Worksheets
          ).AddCopy({
            sheet: sheet,
            flags: wasmModule.WorksheetCopyType.CopyAll,
          });
        }
      }

      let outputFileName = "MergeExcelWorkbooks.xlsx";
      // Save the resulting file
      newbook.SaveToFile({ fileName: outputFileName, version: wasmModule.ExcelVersion.Version2013 });

      // Read the saved file and convert to Blob object
      const modifiedFileArray = window.dotnetRuntime.Module.FS.readFile(outputFileName);
      const modifiedFile = new Blob([modifiedFileArray], { type: 'application/vnd.openxmlformats-officedocument.spreadsheetml.sheet' });

      // Create a URL for the Blob and initiate download
      const url = URL.createObjectURL(modifiedFile);
      const a = document.createElement('a');
      a.href = url;
      a.download = outputFileName;
      document.body.appendChild(a);
      a.click();
      document.body.removeChild(a);
      URL.revokeObjectURL(url);

      // Clean up resources used by the workbook
      newbook.Dispose();
    }
  };

  return (
    <div style={{ textAlign: 'center', height: '300px' }}>
      <h1>Merge Multiple Excel Workbooks into One Using JavaScript in React</h1>
      <button onClick={MergeExcelWorkbooks} disabled={!wasmModule}>
        Merge
      </button>
    </div>
  );
}

export default App;
Run the code to launch the React app at localhost:3000. Once it's running, click on the "Merge" button to merge multiple Excel workbooks into one:
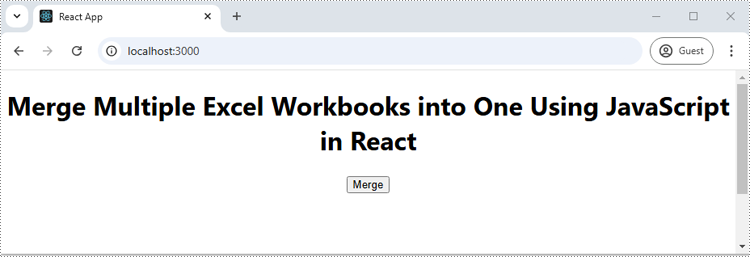
The screenshot below showcases the input workbooks and the output workbook:
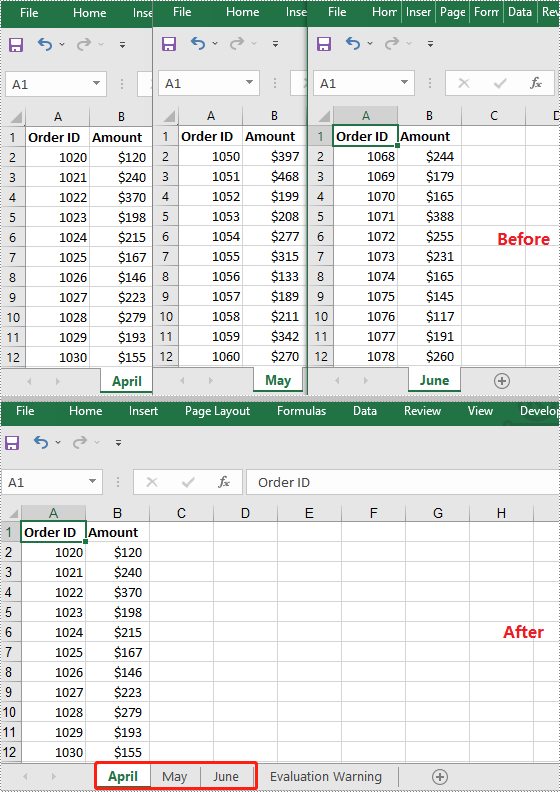
Merge Multiple Excel Worksheets into One
Consolidating multiple worksheets into a single sheet enhances clarity and provides a comprehensive overview of related information.
Using Spire.XLS for JavaScript, developers can merge multiple worksheets by copying the used data ranges in these worksheets into a single worksheet using the CellRange.Copy() method. The key steps are as follows.
- Initialize a Workbook object and load an Excel workbook using Workbook.LoadFromFile() method.
- Get the two worksheets to be merged using Workbook.Worksheets.get() method.
- Get the used data range of the second worksheet using Worksheet.AllocatedRange property.
- Specify the destination range in the first worksheet using Worksheet.Range.get() method.
- Copy the used data range from the second worksheet to the specified destination range in the first worksheet using CellRange.Copy() method.
- Remove the second worksheet from the workbook.
- Save the resulting workbook using Workbook.SaveToFile() method.
- JavaScript
import React, { useState, useEffect } from 'react';
function App() {
  const [wasmModule, setWasmModule] = useState(null);
  // Load Spire.XLS
  useEffect(() => {
    (async () => {
      try {
        const publicUrl = process.env.PUBLIC_URL || '';
        const spireModule = await import(/* webpackIgnore: true */ `${publicUrl}/spire.xls.js`);
        const rawModule = spireModule.default || spireModule;
        window.wasmModule = typeof rawModule === 'function'
          ? await rawModule({ locateFile: p => p.endsWith('.wasm') ? `${publicUrl}/${p}` : p })
          : rawModule;
        setWasmModule(window.wasmModule);
      } catch (error) {
        console.error('Failed to load spire.xls.js WASM module:', error);
      }
    })();
  }, []);

  // Function to merge worksheets in an Excel workbook into one
  const MergeWorksheets = async () => {
    const wasmModule = window.wasmModule.spirexls;

    if (wasmModule) {
      // Load font into Virtual File System (VFS)
      await window.spire.FetchFileToVFS('Arial.ttf', '/Library/Fonts/', `${process.env.PUBLIC_URL}/static/font/`);


      // Load the Excel files into the virtual file system (VFS)
      let inputFileName = 'sample.xlsx';
      await window.spire.FetchFileToVFS(inputFileName, '', `${process.env.PUBLIC_URL}/static/data/`);


      // Create a new workbook
      let workbook = new wasmModule.Workbook();

      // Load the Excel file from the virtual file system
      workbook.LoadFromFile(inputFileName);

      // Get the first worksheet
      let sheet1 = workbook.Worksheets.get(0);
      // Get the second worksheet
      let sheet2 = workbook.Worksheets.get(1);

      // Get the used range in the second worksheet
      let fromRange = sheet2.AllocatedRange;
      // Specify the destination range in the first worksheet
      let toRange = sheet1.Range.get({ row: sheet1.LastRow + 1, column: 1 });

      // Copy the used range from the second worksheet to the destination range in the first worksheet
      fromRange.Copy({ destRange: toRange });

      // Remove the second worksheet
      sheet2.Remove();

      // Define the output file name
      const outputFileName = "MergeWorksheets.xlsx";

      // Save the workbook to the specified path
      workbook.SaveToFile({ fileName: outputFileName, version: wasmModule.ExcelVersion.Version2010 });

      // Read the saved file and convert to Blob object
      const modifiedFileArray = window.dotnetRuntime.Module.FS.readFile(outputFileName);
      const modifiedFile = new Blob([modifiedFileArray], { type: 'application/vnd.openxmlformats-officedocument.spreadsheetml.sheet' });

      // Create a URL for the Blob and initiate download
      const url = URL.createObjectURL(modifiedFile);
      const a = document.createElement('a');
      a.href = url;
      a.download = outputFileName;
      document.body.appendChild(a);
      a.click();
      document.body.removeChild(a);
      URL.revokeObjectURL(url);

      // Clean up resources used by the workbook
      workbook.Dispose();
    }
  };

  return (
    <div style={{ textAlign: 'center', height: '300px' }}>
      <h1>Merge Multiple Excel Worksheets into One Using JavaScript in React</h1>
      <button onClick={MergeWorksheets} disabled={!wasmModule}>
        Merge
      </button>
    </div>
  );
}

export default App;
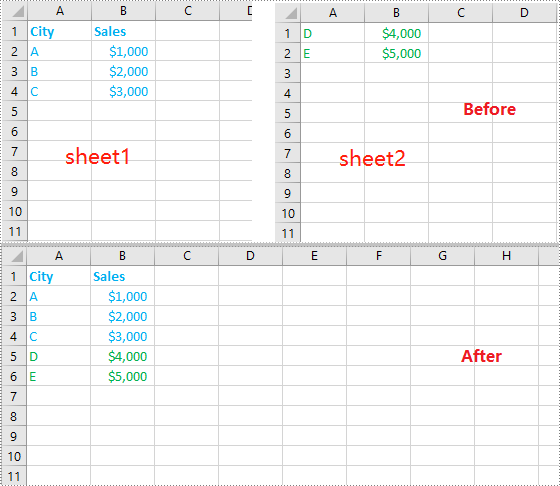
Get a Free License
To fully experience the capabilities of Spire.XLS for JavaScript without any evaluation limitations, you can request a free 30-day trial license.