Spire.Office 10.5.0 is released
We're pleased to announce the release of Spire.Office 10.5.0. This version adds many new features, for example, Spire.Doc supports writing MHTML format files; Spire.XLS supports detecting and deleting duplicate rows; Spire.PDF supports printing on Windows and Linux systems using .NET Standard DLL; Spire.Presentation supports inserting formulas in table cells. What’s more, a series of issues occurred when processing, converting Word/ Excel/ PDF/ PowerPoint files have been successfully fixed. More details are given below.
In this version, the most recent versions of Spire.Doc, Spire.PDF, Spire.XLS, Spire.Presentation, Spire.Email, Spire.DocViewer, Spire.PDFViewer, Spire.Spreadsheet, Spire.OfficeViewer, Spire.DataExport, Spire.Barcode are included.
DLL Versions:
- Spire.Doc.dll: v13.5.11
- Spire.Pdf.dll: v11.5.9
- Spire.XLS.dll: v15.5.2
- Spire.Presentation.dll: v10.5.10
- Spire.Barcode.dll: v7.3.7
- Spire.Email.dll: v6.6.3
- Spire.DocViewer.Forms.dll: v8.8.4
- Spire.PdfViewer.Asp.dll: v8.1.3
- Spire.PdfViewer.Forms.dll: v8.1.3
- Spire.Spreadsheet.dll: v7.5.2
- Spire.OfficeViewer.Forms.dll: v8.8.0
- Spire.DataExport.dll: 4.9.0
- Spire.DataExport.ResourceMgr.dll: v2.1.0
Here is a list of changes made in this release
Spire.Doc
| Category | ID | Description |
| New feature | - | Supports writing MHTML format files. |
| Adjustment | - | Upgrades the version of HarfBuzzSharp and SkiaSharp on Net (net4.6, 4.8), NetCore, and NetStandard platforms. HarfBuzzSharp -> 8.3.0.1, SkiaSharp -> 3.116.1 |
| Adjustment | - | Optimized the waiting time for downloading images from a Uri. The Netstandard reference adjustment is as follows: <PackageReference Include="HarfBuzzSharp" Version="8.3.0.1" /> |
| Adjustment | - | Adds DLL for .NET 9.0 Framework and removes DLL for .NET 7.0 Framework. System.Drawing.Common >= 9.0.0 |
| Bug | SPIREDOC-10409 | Fixes the issue that the text filled in merged cells would cause the merge to be lost. |
| Bug | SPIREDOC-10867 | Fixes the issue that the content was incorrect when converting Word documents to PDF documents. |
| Bug | SPIREDOC-11072 | Fixes the issue that the URL failed to display after converting MarkDown to Word. |
| Bug | SPIREDOC-11081 | Fixes the issue that the program threw the "InvalidOperationException" exception when converting Word to HTML stream. |
| Bug | SPIREDOC-11081 | Fixes the issue that the program threw the "Object reference not set to an instance of an object" exception when loading Word document. |
| Bug | SPIREDOC-11094 | Fixes the issue that the program threw the "NullReferenceException" exception when converting MarkDown to Word. |
| Bug | SPIREDOC-10418 SPIREDOC-10762 |
Fixes the issue where inconsistent pagination occurred when converting Word to PDF. |
| Bug | SPIREDOC-11177 | Fixes the issue that font embedding was incorrect when converting Word to PDF. |
| Bug | SPIREDOC-11220 | Fixes the issue where the "Allow row to break across pages" setting was lost when loading saved documents. |
| Bug | SPIREDOC-11230 | Fixes the issue where the program threw "System.ArgumentException" when loading a Word document. |
| Bug | SPIREDOC-11253 | Fixes the issue where the values of content controls couldn't be modified. |
| Bug | SPIREDOC-11260 | Fixes the issue where the program threw "System.ArgumentException" when merging files. |
Spire.XLS
| Category | ID | Description |
| New feature | SPIREXLS-5695 | Supports the RANK.AVG formula.workbook.Worksheets[0].Range["E9"].Formula = "=RANK.AVG(10,A1:A6)"; |
| New feature | SPIREXLS-5696 | Supports the RANK.EQ formula.//Default descending order |
| New feature | SPIREXLS-5722 | Supports the PERCENTILE.INC formula.workbook.Worksheets[0].Range["D2"].Formula = "=PERCENTILE.INC(\"\", 0.3)"; |
| New feature | SPIREXLS-5723 | Supports the PERCENTILE.EXC formula.workbook.Worksheets[0].Range["D2"].Formula = "=PERCENTILE.EXC(\"\", 0.3)"; |
| New feature | SPIREXLS-5729 | Supports the BINOM.DIST formula.workbook.Worksheets[0].Range["D2"].Formula = "=BINOM.DIST(A7, A11, A12, FALSE)"; |
| New feature | SPIREXLS-5730 | Supports the BINOM.INV formula.workbook.Worksheets[0].Range["D2"].Formula = "=BINOM.INV(A7, A12, A13)"; |
| New feature | SPIREXLS-5734 | Supports the NEGBINOM.DIST formula.workbook.Worksheets[0].Range["C10"].Formula = "=NEGBINOM.DIST(10,5,1,TRUE)"; |
| New feature | SPIREXLS-5738 | Supports the BINOM.DIST.RANGE formula.workbook.Worksheets[0].Range["C6"].Formula = "=BINOM.DIST.RANGE(10, 2, 5)"; |
| New feature | SPIREXLS-5739 | Supports the BETA.DIST formula.workbook.Worksheets[0].Range["C7"].Formula = "=BETA.DIST(3, 0, 5, TRUE, 1, 5)"; |
| New feature | SPIREXLS-5740 | Supports the BETA.INV formula.workbook.Worksheets[0].Range["C7"].Formula = "=BETA.INV(0.685470581, 8, -1, 1, 3)"; |
| New feature | SPIREXLS-5742 | Supports the ROUNDBANK formula.workbook.Worksheets[0].Range["B3"].Formula = "=ROUNDBANK(1245585, -1)"; |
| New feature | SPIREXLS-5743 | Supports the GAMMA formula.workbook.Worksheets[0].Range["B3"].Formula = "=GAMMA(ss)"; |
| New feature | SPIREXLS-5744 | Supports the GAMMA.DIST formula.workbook.Worksheets[0].Range["B10"].Formula = "=GAMMA.DIST(10.0001131, 9, 0, TRUE)"; |
| New feature | SPIREXLS-5745 | Supports the GAMMA.INV formula.workbook.Worksheets[0].Range["B10"].Formula = "=GAMMA.INV(0.068094, 0, 2)"; |
| New feature | SPIREXLS-5748 | Supports the TAKE formula.workbook.Worksheets[0].Range["J16"].Formula = "=TAKE(A1:F6,3)"; |
| New feature | SPIREXLS-5751 | Supports the HSTACK formula.workbook.Worksheets[0].Range["G26"].Formula = "=HSTACK(E1:F7,G1:G6)"; |
| New feature | SPIREXLS-5697 | Supports auto-fitting row height in merged cells spanning multiple columns in a single row.Workbook workbook = new Workbook(); |
| New feature | SPIREXLS-5746 SPIREXLS-5768 SPIREXLS-5769 SPIREXLS-5774 | Supports the GAMMALN.PRECISE, LOGNORM.INV, LOGNORM.DIST, and GAUSS formulas.sheet.Range["C2"].Formula = "=GAUSS(A1)"; |
| New feature | SPIREXLS-5787 | Supports detecting and deleting duplicate rows.// Remove duplicate rows in the worksheet |
| New feature | SPIREXLS-5793 SPIREXLS-5797 SPIREXLS-5798 SPIREXLS-5801 | Supports new functions (TRIMRANGE, ERF.PRECISE, ERFC.PRECISE, and PERMUTATIONA).sheet.Range["A45"].Formula = "=TRIMRANGE(A1:H10, 1, 1)"; |
| Bug | SPIREXLS-5653 | Fixes the issue where content was not fully displayed when converting Excel to PDF. |
| Bug | SPIREXLS-5706 | Fixes the issue where the program threw an "ArgumentOutOfRangeException" when loading Excel documents. |
| Bug | SPIREXLS-5713 | Fixes the issue where incorrect data was generated when converting Excel to PDF. |
| Bug | SPIREXLS-5716 | Fixes the issue where charts were incorrect when converting Excel to PDF. |
| Bug | SPIREXLS-5719 | Fixes the issue where content was stretched when converting Excel to PDF. |
| Bug | SPIREXLS-5721 | Fixes the issue where the structure protection password was lost when saving Excel documents. |
| Bug | SPIREXLS-5735 | Fixes the issue where setting FormatConditionType.ColorScale had no effect or produced incorrect results. |
| Bug | SPIREXLS-5749 | Improves behavior to prevent throwing "InvalidOperationException: Cannot find font installed on the system" when no fonts are available on the system. |
| Bug | SPIREXLS-5555 | Fixes the issue where data was incomplete when converting Excel to PDF with the SheetFitToPage=true property. |
| Bug | SPIREXLS-5724 | Fixes the inconsistency issue when converting Excel to PDF. |
| Bug | SPIREXLS-5725 | Fixes the issue where the text was displayed incorrectly when converting Excel to PDF. |
| Bug | SPIREXLS-5767 | Fixes the issue that the XML data for ColumnWidth did not comply with OpenXML standards. |
| Bug | SPIREXLS-5775 | Fixes the issue that it was where failed to update the associated sheets when modifying the row count in a sheet. |
| Bug | SPIREXLS-5777 | Fixes the issue where shapes were incorrect in the saved Excel file. |
| Bug | SPIREXLS-5778 | Fixed the issue that the IFERROR formula returned incorrect values. |
| Bug | SPIREXLS-5785 | Fixes the issue that getting the font of cell text was incorrect. |
| Bug | SPIREXLS-5792 | Fixes the issue that the sorting results were incorrect. |
| Bug | SPIREXLS-5796 | Fixes the issue that the program threw “ArgumentOutOfRangeExceltion” when loading an Excel document. |
Spire.PDF
| Category | ID | Description |
| New feature | SPIREPDF-7372 | Supports retrieving PdfHideAction in buttons.//Initialize an instance of the PdfDocument instance |
| New feature | SPIREPDF-7376 SPIREPDF-7391 SPIREPDF-7467 | Supports printing on Windows and Linux systems using .NET Standard DLL.PdfDocument doc = new PdfDocument(); |
| Bug | SPIREPDF-6717 | Fixes the issue that removing the checkbox's background color and border did not take effect. |
| Bug | SPIREPDF-7348 | Fixes the issue that standards validation failed when converting PDF to A1A and A1B. |
| Bug | SPIREPDF-7352 | Fixes the issue that button field actions could not be obtained. |
| Bug | SPIREPDF-7355 | Fixes the issue that transparency was incorrect when setting background colors. |
| Bug | SPIREPDF-7356 | Fixes the issue that the number of annotations in a PDF document was not correctly retrieved. |
| Bug | SPIREPDF-7358 | Fixes the issue that extra content appeared when extracting text from PDF tables. |
| Bug | SPIREPDF-7366 | Fixes the issue that the program threw the exception System.NullReferenceException: "Object reference not set to an instance of an object." when getting the destination of bookmarks. |
| Bug | SPIREPDF-7375 | Fixes the issue that the multiline content added into textbox fields was being truncated. |
| Bug | SPIREPDF-7361 | Fixes the issue that adding PdfTextMarkupAnnotation produced incorrect effects. |
| Bug | SPIREPDF-7380 | Fixes the issue where the text was garbled when converting PDF to images. |
| Bug | SPIREPDF-7388 | Fixes the issue where the application threw the “NullReferenceException” when accessing PdfDocumentLinkAnnotationWidget.Destination. |
| Bug | SPIREPDF-7414 | Fixes the issue where the text was truncated when entering multi-line content into PdfTextBoxField. |
| Bug | SPIREPDF-7420 | Fixes the issue where the application threw the “PdfDocumentException” when using the PdfDocument.IsPasswordProtected() method. |
| Bug | SPIREPDF-7424 | Fixes the issue where the application threw the “ArgumentOutOfRangeException” when converting PDF to images. |
| Bug | SPIREPDF-7426 | Fixes the issue that the/DA structure was incorrect in TextBox fields. |
| Bug | SPIREPDF-7429 | Fixes the issue where the application threw the "Empty convert-string" error when saving PDF documents. |
| Bug | SPIREPDF-7431 | Fixes the issue where the result was incorrect when setting FieldsWidget.BorderColor = PdfRGBColor.Empty. |
| Bug | SPIREPDF-7239 | Fixes the issue that the characters of formulas were lost when converting PDF to XPS. |
| Bug | SPIREPDF-7437 | Fixes the issue that the program threw “Empty convert-string” error when saving PDF documents. |
| Bug | SPIREPDF-7441 | Fixes the issue that the program threw “IndexOutOfRangeException” error when converting PDF to PDFA3B. |
Spire.Presentation
| Category | ID | Description |
| New feature | SPIREPPT-2772 | Supports reading CustomerData of Shape.Presentation ppt = new Presentation(); |
| New feature | SPIREPPT-2782 | Supports inserting formulas in table cells.//Create a PPT document |
| New feature | - | Adds a new method ‘AddFromSVGAsShape()’ to convert SVG files into shapes.Presentation ppt = new Presentation(); |
| Bug | SPIREXLS-5749 | Fixes the issue that converting PPT to SVG resulted in incorrect shapes. |
| Bug | SPIREPPT-2663 | Fixes the issue where modifying data in PPT charts resulted in incorrect output. |
| Bug | SPIREPPT-2740 | Fixes the issue that converting PPT to PDF rendered incorrectly. |
| Bug | SPIREPPT-2751 | Fixes the issue where loading a PPT document threw a "FormatException." |
| Bug | SPIREPPT-2775 | Fixes the issue that inserting HTML content into a PPT document rendered incorrectly. |
| Bug | SPIREPPT-2421 | Fixes the issue where the text was garbled when converting PowerPoint to PDF. |
| Bug | SPIREPPT-2691 | Fixes the issue that the application threw a "System.NullReferenceException" error when adding a GroupShape to a new PowerPoint file. |
| Bug | SPIREPPT-2798 | Fixes the issue where the text was lost when converting PowerPoint to PDF. |
| Bug | SPIREPPT-2804 | Fixes the issue where opening a file saved using the Presentation.GetStream() method would cause an error. |
| Bug | SPIREPPT-2824 | Fixes the issue where the position of shapes changed after using the Ungroup() method. |
| Bug | SPIREPPT-2840 | Fixes the issue that the application threw a "NullReferenceException" error when converting PowerPoint to SVG. |
| Bug | SPIREPPT-2851 | Fixes the issue where the shapes were incorrect when converting PowerPoint to SVG. |
| Bug | SPIREPPT-2858 | Fixes the issue that there was incorrect text content when converting a specific PPT document to PDF. |
| Bug | SPIREPPT-2842 | Fixes the issue where Microsoft Powerpoint displayed an error message when opening a PPT file that was directly loaded and saved. |
Spire.PDFViewer
| Category | ID | Description |
| Bug | SPIREPDFVIEWER-592 | Fixes the issue of incorrect preview of PDF content. |
| Bug | SPIREPDFVIEWER-603 | Fixes the issue of incorrect horizontal and vertical scrollbar effects. |
| Bug | SPIREPDFVIEWER-606 | Fixes the issue that the control threw “NullReferenceException” after setting the “Anchor” property. |
Spire.DocViewer
| Category | ID | Description |
| Adjustment | - | Upgrades the versions of HarfBuzzSharp and SkiaSharp on .NET (.NET 4.6 and 4.8) and .NET Core platforms.HarfBuzzSharp->8.3.0.1、SkiaSharp->3.116.1 |
Spire.Barcode
| Category | ID | Description |
| Adjustment | - | Adds a DLL adapted to .NET 9.0 Framework, and removes a DLL adapted to .NET 7.0 Framework. |
| Adjustment | - | Upgrading the version of HarfBuzzSharp and SkiaSharp on .NET (net4.6, 4.8), NetCore, and NetStandard platforms.HarfBuzzSharp->8.3.0.1、SkiaSharp->3.116.1 |
Spire.Email
| Category | ID | Description |
| Adjustment | - | Adds DLL for .NET 9.0 Framework and removes DLL for .NET 7.0 Framework. |
| Adjustment | - | Upgrades the version of HarfBuzzSharp and SkiaSharp on Net (net4.6, 4.8), NetCore, and NetStandard platforms:HarfBuzzSharp->8.3.0.1、SkiaSharp->3.116.1 |
Spire.Doc 13.5.11 enhances the conversion from Word to PDF
We are delighted to announce the release of Spire.Doc 13.5.11. The latest version enhances the conversion from Word to PDF. Furthermore, some known bugs are fixed in the new version, such as the issue that the values of content controls couldn't be modified. More details are listed below.
Here is a list of changes made in this release
| Category | ID | Description |
| Bug | SPIREDOC-10418 SPIREDOC-10762 | Fixes the issue where inconsistent pagination occurred when converting Word to PDF. |
| Bug | SPIREDOC-11177 | Fixes the issue that font embedding was incorrect when converting Word to PDF. |
| Bug | SPIREDOC-11220 | Fixes the issue where the "Allow row to break across pages" setting was lost when loading saved documents. |
| Bug | SPIREDOC-11230 | Fixes the issue where the program threw "System.ArgumentException" when loading a Word document. |
| Bug | SPIREDOC-11253 | Fixes the issue where the values of content controls couldn't be modified. |
| Bug | SPIREDOC-11260 | Fixes the issue where the program threw "System.ArgumentException" when merging files. |
Spire.Office for Java 10.5.0 is released
We're pleased to announce the release of Spire.Office for Java 10.5.0. In this version, the Spire.PDF for Java supports using the byte[] certificate data when signing with ‘digitalsignatures.PdfCertificate’. Spire.Doc for Java supports excluding table objects during document comparison and setting underline color. In addition, many known issues that occurred when converting and processing Word/ Excel/ PDF/PowerPoint files have been successfully fixed. More details are listed below.
Here is a list of changes made in this release
Spire.Doc for Java
| Category | ID | Description |
| New feature | SPIREDOC-11111 | Supports excluding table objects during document comparison.
Compareoptions compareoptions = new Compareoptions(); compareoptions.setIgnoreTable(true); docunment.compare(docunment2, "Yang Merlin", compareoptions ); |
| New feature | SPIREDOC-10501 | Supports setting underline color.
textRange.getCharacterFormat().setUnderlineColor(Color.RED); |
| Bug | SPIREDOC-10310 | Fixes the issue where the text displayed incorrectly when converting Word to PDF. |
| Bug | SPIREDOC-11087 | Fixes the issue where reading the TOC of Word document returned null. |
| Bug | SPIREDOC-11093 | Fixes the issue where extra symbols appeared when reading the TOC of Word document. |
| Bug | SPIREDOC-11108 | Fixes the issue that incorrect content was retrieved when using the ‘BookmarksNavigator.getBookmarkContent()’ method. |
| Bug | SPIREDOC-11100 | Fixes the issue that LaTeX formulas rendered incorrectly. |
| Bug | SPIREDOC-11175 | Fixes the issue that it was failed to updating the Word page number fields. |
| Bug | SPIREDOC-11176 | Fixes the issue where an "ArrayIndexOutOfBoundsException" error occurred when creating a table of contents. |
| Bug | SPIREDOC-11178 | Fixes the issue that control content retrieval returned null. |
| Bug | SPIREDOC-11190 | Fixes the issue where the characters displayed incorrectly when converting Word to PDF. |
| Bug | SPIREDOC-11200 | Fixes the issue where the characters were lost when converting Word to PDF. |
| Bug | SPIREDOC-11204 | Fixes the issue where the headers were lost when converting Word to PDF. |
| Bug | SPIREDOC-11218 | Fixes the issue that the ‘Document.updateTOCPageNumbers()’ method did not take effect. |
| Bug | SPIREDOC-11224 | Fixes the issue that the font modifications did not apply. |
| Bug | SPIREDOC-11229 | Fixes the issue that the PDFs displayed incorrectly in Chrome and WPS after converting from a Word document. |
| Bug | SPIREDOC-11232 | Fixes the issue where a "NullPointerException" occurred when converting Word to PDF. |
| Bug | SPIREDOC-11250 | Fixes the issue that incorrect results were returned when calling the ‘Paragraph.getListText()’ method. |
Spire.XLS for Java
| Category | ID | Description |
| Bug | SPIREXLS-5737 | Fixes the issue that the program threw an exception when calling Worksheet.findAllString for specific documents. |
| Bug | SPIREXLS-5750 | Fixes the issue that the images shifted upward when converting specific Excel files to HTML. |
| Bug | SPIREXLS-5765 | Fixes the issue that the program threw “ArrayIndexOutOfBoundsException” when loading specific Excel files. |
| Bug | SPIREXLS-5773 | Optimizes the issue that the time consuming for specific Excel to HTML conversion was too much. |
| Bug | SPIREXLS-5786 | Fixes the issue that the program threw “Invalid end column index” when converting specific Excel files to HTML. |
Spire.PDF for Java
| Category | ID | Description |
| New feature | SPIREPDF-7460 | Supports using the byte[] certificate data when signing with "digitalsignatures. PdfCertificate".
PdfDocument pdf = new PdfDocument();
pdf.loadFromFile(inputFile);
FileInputStream instream = new FileInputStream(inputFile_pfx);
byte[] data = FileUtil.getStreamBytes(instream);
PdfCertificate x509 = new PdfCertificate(data, "e-iceblue");
PdfOrdinarySignatureMaker signatureMaker = new PdfOrdinarySignatureMaker(pdf, x509);
signatureMaker.makeSignature("signName");
pdf.saveToFile(outputFile, FileFormat.PDF);
pdf.dispose();
|
| Bug | SPIREPDF-7457 | Fixes the problem that the program threw “NullPointerException” when setting isFlatten(true). |
| Bug | SPIREPDF-7458 | Fixes the issue that some contents were incorrect after converting PDF to PDF/A. |
| Bug | SPIREPDF-7463 | Fixes the issue that the format and font were incorrect after converting PDF to PowerPoint. |
| Bug | SPIREPDF-7462 | Fixes the issue that the data extracted from tables was incorrect. |
| Bug | SPIREPDF-7353 SPIREPDF-7489 | Fixes the issue that the PDF to PDF/A validation failed. |
| Bug | SPIREPDF-7481 | Fixes the issue that content was lost when converting SVG to PDF. |
| Bug | SPIREPDF-7484 | Fixes the issue that the program threw a NullPointerException when adding annotations |
| Bug | SPIREPDF-7492 | Fixes the issue that extra horizontal lines appeared when converting a PDF to Word. |
Spire.Presentation for Java
| Category | ID | Description |
| Bug | SPIREPPT-2882 | Fixes the issue where the program threw an "Exception in thread "main" java.lang.NullPointerException" when adding Latex formulas. |
Spire.Presentation for Java 10.5.2 fixes an issue
We are pleased to announce the release of Spire.Presentation for Java 10.5.2. The latest version fixes the issue where the program threw an "Exception in thread "main" java.lang.NullPointerException" when adding LaTeX formulas. More details are listed below.
Here is a list of changes made in this release
| Category | ID | Description |
| Bug | SPIREPPT-2882 | Fixes the issue where the program threw an "Exception in thread "main" java.lang.NullPointerException" when adding Latex formulas. |
Spire.PDF 11.5.5 enhances the conversion from PDF to XPS and PDFA3B
We are delighted to announce the release of Spire.PDF 11.5.5. This version enhances the conversion from PDF to XPS and PDFA3B. Moreover, some known issues are fixed in this version, such as the issue that the program threw “Empty convert-string” error when saving PDF documents. More details are listed below.
Here is a list of changes made in this release
| Category | ID | Description |
| Bug | SPIREPDF-7239 | Fixes the issue that the characters of formulas were lost when converting PDF to XPS. |
| Bug | SPIREPDF-7437 | Fixes the issue that the program threw “Empty convert-string” error when saving PDF documents. |
| Bug | SPIREPDF-7441 | Fixes the issue that the program threw “IndexOutOfRangeException” error when converting PDF to PDFA3B. |
Spire.Presentation 10.5.10 supports converting SVG to Shape
We're glad to announce the release of Spire.Presentation 10.5.10. This version adds a new method ‘AddFromSVGAsShape()’ to supports converting SVGs to shapes. Check below for the details.
Here is a list of changes made in this release
| Category | ID | Description |
| New feature | - | Adds a new method ‘AddFromSVGAsShape()’ to convert SVG files into shapes.
Presentation ppt = new Presentation(); ppt.Slides[0].Shapes.AddFromSVGAsShapes(file.FullName); ppt.SaveToFile(fileName + ".pptx", FileFormat.Pptx2013); ppt.Dispose(); |
Spire.XLS 15.5.2 supports detecting and removing duplicate rows
We are excited to announce the release of Spire.XLS 15.5.2. This version supports detecting and removing duplicate rows and several new functions, such as TRIMRANGE and ERF.PRECISE. Besides, some known issues are fixed in this version, such as the issue that the sorting results were incorrect. More details are listed below.
Here is a list of changes made in this release
| Category | ID | Description |
| New feature | SPIREXLS-5787 | Supports detecting and deleting duplicate rows.
// Remove duplicate rows in the worksheet sheet.RemoveDuplicates(); // Remove duplicate rows within specified range sheet.RemoveDuplicates(int startRow, int startColumn, int endRow, int endColumn); // Remove duplicate rows based on specific columns and headers sheet.RemoveDuplicates(int startRow, int startColumn, int endRow, int endColumn, boolean hasHeaders, int[] columnOffsets) |
| New feature | SPIREXLS-5793 SPIREXLS-5797 SPIREXLS-5798 SPIREXLS-5801 | Supports new functions (TRIMRANGE, ERF.PRECISE, ERFC.PRECISE, and PERMUTATIONA).
sheet.Range["A45"].Formula = "=TRIMRANGE(A1:H10, 1, 1)"; sheet.Range["B4"].Formula = "=ERF.PRECISE(1)"; sheet.Range["B4"].Formula = "=ERFC.PRECISE(NULL)"; sheet.Range["B9"].Formula = "=PERMUTATIONA(A5,A5)" |
| Bug | SPIREXLS-5785 | Fixes the issue that getting the font of cell text was incorrect. |
| Bug | SPIREXLS-5792 | Fixes the issue that the sorting results were incorrect. |
| Bug | SPIREXLS-5796 | Fixes the issue that the program threw “ArgumentOutOfRangeExceltion” when loading an Excel document. |
How to Convert TXT to Excel in Python

Text files (.txt) are a common way to store data due to their simplicity, but they lack the structure and analytical power of Excel spreadsheets. Converting TXT files to Excel allows for better data organization, visualization, and manipulation.
While manual import text file to Excel works for small datasets, automating this process saves time and reduces errors. Python, with its powerful libraries, offers an efficient solution. In this guide, you’ll learn how to convert TXT to Excel in Python using Spire.XLS for Python, a robust API for Excel file manipulation.
Prerequisites
Install Python and Spire.XLS
- Install Python on your machine from python.org.
- Install the Spire.XLS for Python library via PyPI. Open your terminal and run the following command:
pip install Spire.XLS
Prepare a TXT File
Ensure your TXT file follows a consistent structure, typically with rows separated by newlines and columns separated by delimiters (e.g., commas, tabs, or spaces). For example, a sample text file might look like this: 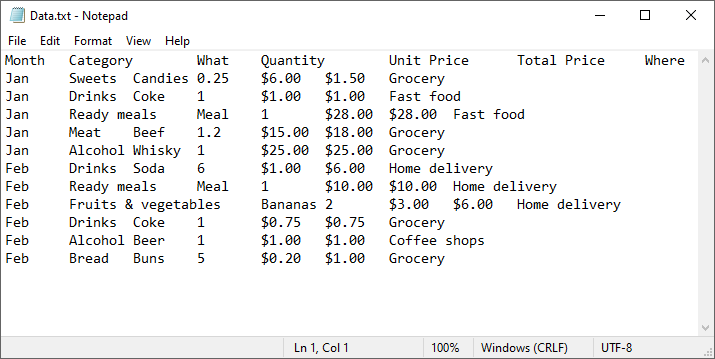
Step-by-Step Guide to Convert Text File to Excel
Step 1: Import Required Modules
In your Python script, import the necessary classes from Spire.XLS:
from spire.xls import *
from spire.xls.common import *
Step 2: Read and Parse the TXT File
Read the text file and split it into rows and columns using Python’s built-in functions. Define your delimiter (tab, in this case):
with open("Data.txt", "r") as file:
lines = file.readlines()
data = [line.strip().split("\t") for line in lines]
Note: If different delimiter was used, replace the parameter "\t" of the split() method (e.g., spaces: split(" ")).
Step 3: Create an Excel Workbook
Initialize a workbook object and access the first worksheet:
workbook = Workbook()
sheet = workbook.Worksheets[0]
Step 4: Write Data to the Worksheet
Loop through the parsed data and populate the Excel cells.
for row_num, row_data in enumerate(data):
for col_num, cell_data in enumerate(row_data):
sheet.Range[row_num + 1, col_num + 1].Value = cell_data
sheet.Range[1, col_num + 1].Style.Font.IsBold = True
Step 5: Save the Excel File
Export the workbook as an XLSX file (you can also use .xls for older formats):
workbook.SaveToFile("TXTtoExcel.xlsx", ExcelVersion.Version2016)
TXT to Excel Full Code Example
from spire.xls import *
from spire.xls.common import *
# Read TXT data
with open("Data.txt", "r") as file:
lines = file.readlines()
# Split data by delimiter
data = [line.strip().split("\t") for line in lines]
# Create an Excel workbook
workbook = Workbook()
# Get the first worksheet
sheet = workbook.Worksheets[0]
# Iterate through each row and column in the list
for row_num, row_data in enumerate(data):
for col_num, cell_data in enumerate(row_data):
# Write the data into the corresponding Excel cells
sheet.Range[row_num + 1, col_num + 1].Value = cell_data
# Set the header row to bold
sheet.Range[1, col_num + 1].Style.Font.IsBold = True
# Autofit column width
sheet.AllocatedRange.AutoFitColumns()
# Save as Excel (.xlsx or.xls) file
workbook.SaveToFile("TXTtoExcel.xlsx", ExcelVersion.Version2016)
workbook.Dispose()
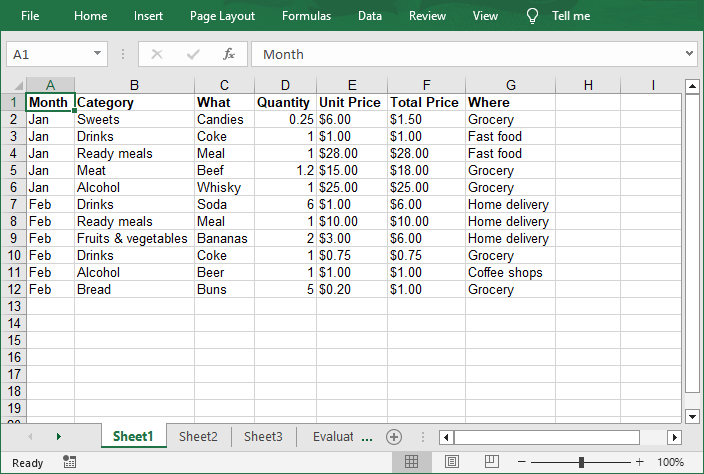
The Excel workbook converted from a text file:
Conclusion
Converting TXT files to Excel in Python using Spire.XLS automates data workflows, saving time and reducing manual effort. Whether you’re processing logs, survey results, or financial records, this method ensures structured, formatted outputs ready for analysis.
Pro Tip: Explore Spire.XLS’s advanced features—such as charts, pivot tables, and encryption—to further enhance your Excel files.
FAQs
Q1: Can Spire.XLS convert large TXT files?
Yes, the Python Excel library is optimized for performance and can process large files efficiently. However, ensure your system has sufficient memory for very large datasets (e.g., millions of rows). For optimal results, process data in chunks or use batch operations.
Q2: Can I convert Excel back to TXT using Spire.XLS?
Yes, Spire.XLS allows to read Excel cells and write their values to a text file. A comprehensive guide is available at: Convert Excel to TXT in Python
Q3: How to handle the encoding issues during conversion?
Specify encoding if the text file uses non-standard characters (e.g., utf-8):
with open("Data.txt", "r", encoding='utf-8') as file:
lines = file.readlines()
Get a Free License
To fully experience the capabilities of Spire.XLS for Python without any evaluation limitations, you can request a free 30-day trial license.
Spire.PDF for Java 11.5.2 enhances the conversions from PDF to PDF/A and Word
We're pleased to announce the release of Spire.PDF for Java 11.5.2. The latest version enhances the conversions from PDF to PDF/A and Word. Moreover, some known bugs are fixed successfully in this update, such as the issue that the program threw a NullPointerException when adding annotations. More details are listed below.
Here is a list of changes made in this release
| Category | ID | Description |
| Bug | SPIREPDF-7353 SPIREPDF-7489 | Fixes the issue that the PDF to PDF/A validation failed. |
| Bug | SPIREPDF-7481 | Fixes the issue that content was lost when converting SVG to PDF. |
| Bug | SPIREPDF-7484 | Fixes the issue that the program threw a NullPointerException when adding annotations |
| Bug | SPIREPDF-7492 | Fixes the issue that extra horizontal lines appeared when converting a PDF to Word. |
Spire.Doc for Java 13.5.3 supports excluding table objects during document comparison
We're pleased to announce the release of Spire.Doc for Java 13.5.3. This version supports excluding table objects during document comparison, and setting underline color. Meanwhile, some issues that occurred when converting Word to PDF, creating and reading TOCs of Word documents have also been successfully fixed. More details are listed below.
Here is a list of changes made in this release
| Category | ID | Description |
| New feature | SPIREDOC-11111 | Supports excluding table objects during document comparison.
Compareoptions compareoptions = new Compareoptions(); compareoptions.setIgnoreTable(true); docunment.compare(docunment2, "Yang Merlin", compareoptions ); |
| New feature | SPIREDOC-10501 | Supports setting underline color.
textRange.getCharacterFormat().setUnderlineColor(Color.RED); |
| Bug | SPIREDOC-10310 | Fixes the issue where the text displayed incorrectly when converting Word to PDF. |
| Bug | SPIREDOC-11087 | Fixes the issue where reading the TOC of Word document returned null. |
| Bug | SPIREDOC-11093 | Fixes the issue where extra symbols appeared when reading the TOC of Word document. |
| Bug | SPIREDOC-11108 | Fixes the issue that incorrect content was retrieved when using the ‘BookmarksNavigator.getBookmarkContent()’ method. |
| Bug | SPIREDOC-11100 | Fixes the issue that LaTeX formulas rendered incorrectly. |
| Bug | SPIREDOC-11175 | Fixes the issue that it was failed to updating the Word page number fields. |
| Bug | SPIREDOC-11176 | Fixes the issue where an "ArrayIndexOutOfBoundsException" error occurred when creating a table of contents. |
| Bug | SPIREDOC-11178 | Fixes the issue that control content retrieval returned null. |
| Bug | SPIREDOC-11190 | Fixes the issue where the characters displayed incorrectly when converting Word to PDF. |
| Bug | SPIREDOC-11200 | Fixes the issue where the characters were lost when converting Word to PDF. |
| Bug | SPIREDOC-11204 | Fixes the issue where the headers were lost when converting Word to PDF. |
| Bug | SPIREDOC-11218 | Fixes the issue that the ‘Document.updateTOCPageNumbers()’ method did not take effect. |
| Bug | SPIREDOC-11224 | Fixes the issue that the font modifications did not apply. |
| Bug | SPIREDOC-11229 | Fixes the issue that the PDFs displayed incorrectly in Chrome and WPS after converting from a Word document. |
| Bug | SPIREDOC-11232 | Fixes the issue where a "NullPointerException" occurred when converting Word to PDF. |
| Bug | SPIREDOC-11250 | Fixes the issue that incorrect results were returned when calling the ‘Paragraph.getListText()’ method. |