C#/VB.NET: Convert PDF to XPS or XPS to PDF
XPS is a format similar to PDF but uses XML in layout, appearance and printing information of a file. XPS format was developed by Microsoft and it is natively supported by the Windows operating systems. If you want to work with your PDF files on a Windows computer without installing other software, you can convert it to XPS format. Likewise, if you need to share a XPS file with a Mac user or use it on various devices, it is more recommended to convert it to PDF. This article will demonstrate how to programmatically convert PDF to XPS or XPS to PDF using Spire.PDF for .NET.
Install Spire.PDF for .NET
To begin with, you need to add the DLL files included in the Spire.PDF for.NET package as references in your .NET project. The DLL files can be either downloaded from this link or installed via NuGet.
PM> Install-Package Spire.PDF
Convert PDF to XPS in C# and VB.NET
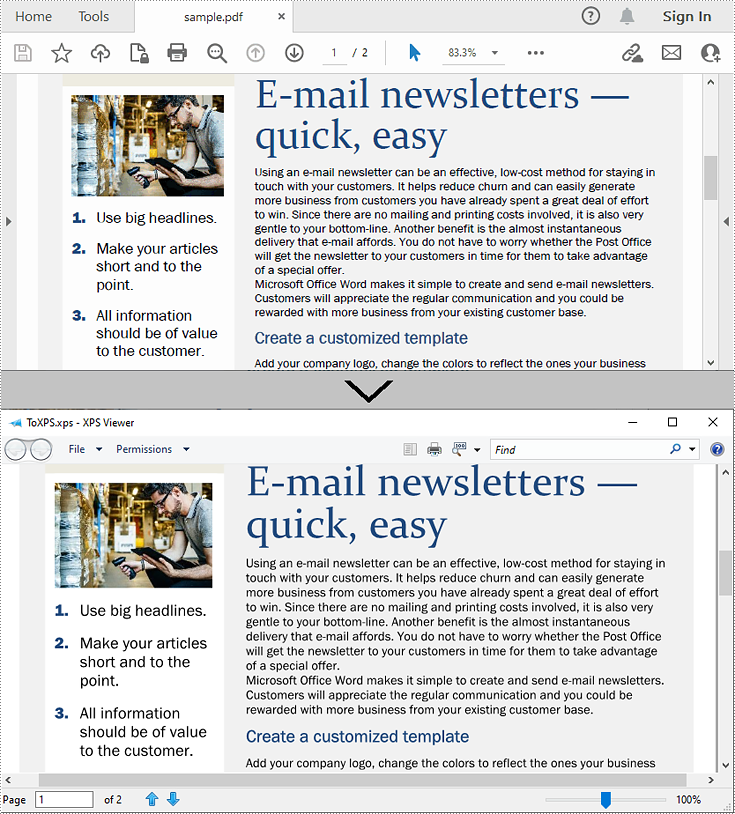
Spire.PDF for .NET supports converting PDF to various file formats, and to achieve the PDF to XPS conversion, you just need three lines of core code. The following are the detailed steps.
- Create a PdfDocument instance.
- Load a sample PDF document using PdfDocument.LoadFromFile() method.
- Convert the PDF document to an XPS file using PdfDocument.SaveToFile (string filename, FileFormat.XPS) method.
- C#
- VB.NET
using Spire.Pdf;

namespace ConvertPdfToXps
{
    class Program
    {
        static void Main(string[] args)
        {
            //Create a PdfDocument instance
            PdfDocument pdf = new PdfDocument();

            //Load sample PDF document
            pdf.LoadFromFile("sample.pdf");

            //Save it to XPS format
            pdf.SaveToFile("ToXPS.xps", FileFormat.XPS);
            pdf.Close();
        }
    }
}
Convert XPS to PDF in C# and VB.NET
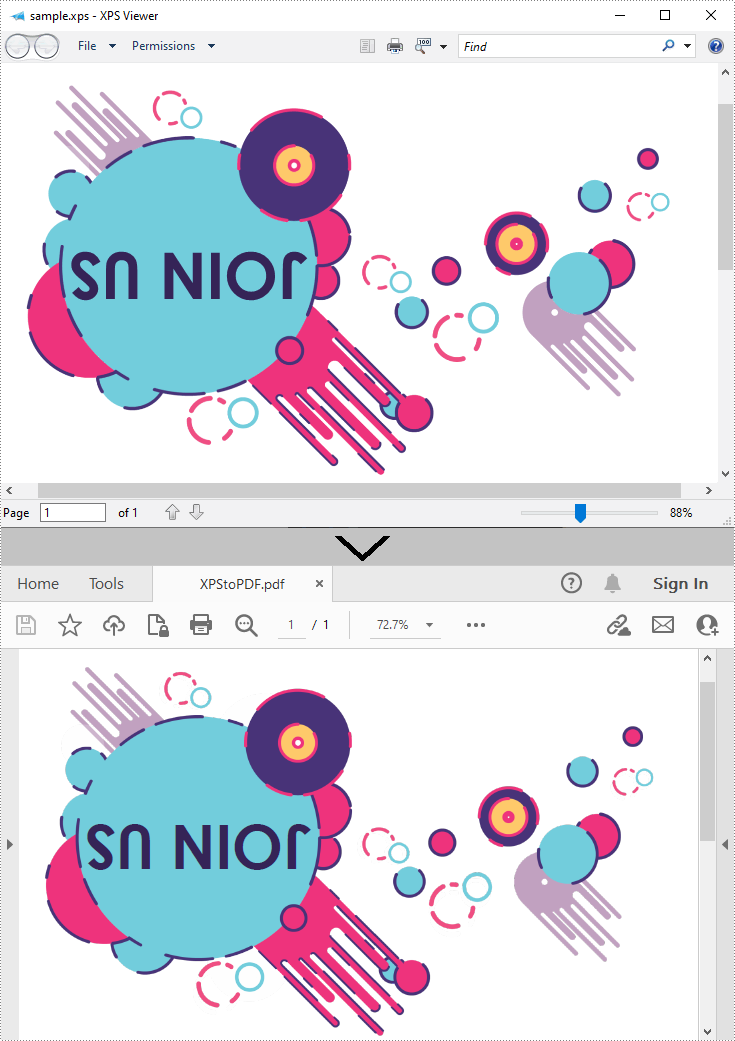
Conversion from XPS to PDF can also be achieved with Spire.PDF for .NET. While converting, you can set to keep high quality image on the generated PDF file by using the PdfDocument.ConvertOptions.SetXpsToPdfOptions() method. The following are the detailed steps.
- Create a PdfDocument instance.
- Load an XPS file using PdfDocument.LoadFromFile(string filename, FileFormat.XPS) method or PdfDocument.LoadFromXPS() method.
- While conversion, set the XPS to PDF convert options to keep high quality images using PdfDocument.ConvertOptions.SetXpsToPdfOptions() method.
- Save the XPS file to a PDF file using PdfDocument.SaveToFile(string filename, FileFormat.PDF) method.
- C#
- VB.NET
using Spire.Pdf;

namespace ConvertXPStoPDF
{
    class Program
    {
        static void Main(string[] args)
        {
            //Create a PdfDocument instance
            PdfDocument pdf = new PdfDocument();

            //Load a sample XPS file
            pdf.LoadFromFile("Sample.xps", FileFormat.XPS);
            //pdf.LoadFromXPS("Sample.xps");

            //Keep high quality images when converting XPS to PDF
            pdf.ConvertOptions.SetXpsToPdfOptions(true);

            //Save the XPS file to PDF
            pdf.SaveToFile("XPStoPDF.pdf", FileFormat.PDF);
        }
    }
}
Apply for a Temporary License
If you'd like to remove the evaluation message from the generated documents, or to get rid of the function limitations, please request a 30-day trial license for yourself.
How to Calculate Formulas in XLS Document in C#
Background
Excel is widely used to organize data manipulations like arithmetic operations. Excel provides many built-in functions which automate a number of types of calculation. Functions are pre-programmed formulate for example, the square-root function, trigonometric functions, logarithms etc. Excel has more than 300 functions covering a range of statistical, mathematical, financial and logical operations. There is no doubt that using a function offers a shortcut method.
Calculate Formulas in XLS Document
Microsoft Excel is a powerful tool which has many uses, the most basic feature of which is performing functions. The aim of this article is to help you perform simple arithmetic operations on values in programming by using excel functions. Spire.Xls for .NET can help you easily create a new excel document or load an existing excel document into program, and calculate data of designated cell by function. Applied in Console platform, WinForm and Asp.net, It provide different types of mathematical functions, statistical functions , logic functions ,and string functions to calculate data with C# codes.
The following is the method example of using Console application to show how Spire.XLS for .NET realizes the calculation formula:
Step 1: Build a console application, and add spire.XLS.dll, Spire.Common.dll assembly.
Step 2: Instantiate an object of Spire.Xls.WorkBook, and add a “WorkSheet” in WorkBook object.
Workbook workbook = new Workbook();
Worksheet sheet = workbook. Worksheets[0];
Step 3: Set the value and format in Cell A1 and Cell A3.veiwing the C# Code.
//set Column A, B, C width
sheet.SetColumnWidth(1, 32);
sheet.SetColumnWidth(2, 16);
sheet.SetColumnWidth(3, 16);

// Set value of Cell A1
sheet.Range[currentRow++, 1].Value = "Examples of formulas :";
// Set value of Cell A2.
sheet.Range[++currentRow, 1].Value = "Test data:";

// Set text format Of Cell A1
CellRange range = sheet.Range["A1"];
range.Style.Font.IsBold = true;
range.Style.FillPattern = ExcelPatternType.Solid;
range.Style.KnownColor = ExcelColors.LightGreen1;
range.Style.Borders[BordersLineType.EdgeBottom].LineStyle = LineStyleType.Medium;
Step 4: Set some cells value and then to sum up some cells data and the results will be displayed in one of the cells.
sheet.Range[currentRow, 2].NumberValue = 7.3;
sheet.Range[currentRow, 3].NumberValue = 5;
sheet.Range[currentRow, 4].NumberValue = 8.2;
sheet.Range[currentRow, 5].NumberValue = 4;
sheet.Range[currentRow, 6].NumberValue = 3;
sheet.Range[currentRow, 7].NumberValue = 11.3;
//Create arithmetic expression string about cells

currentFormula = "=Sheet1!$B$3 + Sheet1!$C$3+Sheet1!$D$3+Sheet1!$E$3+Sheet1!$F$3+Sheet1!$G$3";
//Caculate arithmetic expression about cells
formulaResult = workbook.CaculateFormulaValue(currentFormula);
value = formulaResult.ToString();
sheet.Range[currentRow, 2].Value = value;
Step 5: Respectively set value and text format of Cell A4, B4.
sheet.Range[++currentRow, 1].Value = "Formulas"; ;
sheet.Range[currentRow, 2].Value = "Results";
range = sheet.Range[currentRow, 1, currentRow, 2];
range.Style.Font.IsBold = true;
range.Style.KnownColor = ExcelColors.LightGreen1;
range.Style.FillPattern = ExcelPatternType.Solid;
range.Style.Borders[BordersLineType.EdgeBottom].LineStyle = LineStyleType.Medium;
Step 6: Realize calculation simple expression.
// Create arithmetic tables enclosed type string
currentFormula = "=33*3/4-2+10";
sheet.Range[++currentRow, 1].Text = currentFormula;
// Caculate arithmetic expression
formulaResult = workbook.CaculateFormulaValue(currentFormula);
value = formulaResult.ToString();
sheet.Range[currentRow, 2].Value = value;
Step 7: Realize some mathematic functions.
//absolute value function .
currentFormula = "=ABS(-1.21)";
sheet.Range[currentRow, 1].Text = currentFormula;
sheet.Range[currentRow++, 2].Formula = currentFormula;
Step 8: Realize some logic function.
//NOT function
//Create NOT function string
currentFormula = "=NOT(true)";
sheet.Range[currentRow, 1].Text = currentFormula;
//Caculate NOT function
formulaResult = workbook.CaculateFormulaValue(currentFormula);
value = formulaResult.ToString();
sheet.Range[currentRow, 2].Value = value;
sheet.Range[currentRow, 2].HorizontalAlignment = HorizontalAlignType.Right;
Step 9: Realize some string handling functions.
//Get the substring
// Build substring function
currentFormula = "=MID(\"world\",4,2)";
sheet.Range[++currentRow, 1].Text = currentFormula;
//Caculate substring function
formulaResult = workbook.CaculateFormulaValue(currentFormula);
value = formulaResult.ToString();
sheet.Range[currentRow, 2].Value = value;
sheet.Range[currentRow, 2].HorizontalAlignment = HorizontalAlignType.Right;
Step 10: Realize a random function.
// Random function
// Create random function string.
currentFormula = "=RAND()";
sheet.Range[++currentRow, 1].Text = currentFormula;
//Caculate random function
formulaResult = workbook.CaculateFormulaValue(currentFormula);
value = formulaResult.ToString();
sheet.Range[currentRow, 2].Value = value;
Step 11: Save workbook object as file.
workbook.SaveToFile("formulaTest.xls",ExcelVersion.Version97to2003);
Viewing the full c# code
using System;
using System.Collections.Generic;
using System.Text;
using Spire.Xls;

namespace XlsCalculateFormula
{
    class Program
    {
        static void Main(string[] args)
        {
            //Instanitate an object of Spire.Xls.Workbook
            Workbook workbook = new Workbook();
            // Add a Spire.Xls.Worksheet to Spire.Xls.Workbook
            Worksheet sheet = workbook.Worksheets[0];

            int currentRow = 1;
            string currentFormula = string.Empty;
            object formulaResult = null;
            string value = string.Empty;

            // Set width respectively of Column A ,Column B,Column C
            sheet.SetColumnWidth(1, 32);
            sheet.SetColumnWidth(2, 16);
            sheet.SetColumnWidth(3, 16);

            //Set the value of Cell A1
            sheet.Range[currentRow++, 1].Value = "Examples of formulas :";
            // Set the value of Cell A2
            sheet.Range[++currentRow, 1].Value = "Test data:";
            // Set the style of Cell A1
            CellRange range = sheet.Range["A1"];
            range.Style.Font.IsBold = true;
            range.Style.FillPattern = ExcelPatternType.Solid;
            range.Style.KnownColor = ExcelColors.LightGreen1;
            range.Style.Borders[BordersLineType.EdgeBottom].LineStyle = LineStyleType.Medium;

            // Additive operation of mutiple cells
            sheet.Range[currentRow, 2].NumberValue = 7.3;
            sheet.Range[currentRow, 3].NumberValue = 5; ;
            sheet.Range[currentRow, 4].NumberValue = 8.2;
            sheet.Range[currentRow, 5].NumberValue = 4;
            sheet.Range[currentRow, 6].NumberValue = 3;
            sheet.Range[currentRow, 7].NumberValue = 11.3;
            // Create arithmetic expression string about cells
            currentFormula = "=Sheet1!$B$3 + Sheet1!$C$3+Sheet1!$D$3+Sheet1!$E$3+Sheet1!$F$3+Sheet1!$G$3";
            //Caculate arithmetic expression  about cells
            formulaResult = workbook.CaculateFormulaValue(currentFormula);
            value = formulaResult.ToString();
            sheet.Range[currentRow, 2].Value = value;


            // Set the value and format of two head cell
            sheet.Range[++currentRow, 1].Value = "Formulas"; ;
            sheet.Range[currentRow, 2].Value = "Results";
            sheet.Range[currentRow, 2].HorizontalAlignment = HorizontalAlignType.Right;
            range = sheet.Range[currentRow, 1, currentRow, 2];
            range.Style.Font.IsBold = true;
            range.Style.KnownColor = ExcelColors.LightGreen1;
            range.Style.FillPattern = ExcelPatternType.Solid;
            range.Style.Borders[BordersLineType.EdgeBottom].LineStyle = LineStyleType.Medium;

            // Expression caculation

            // Create arithmetic tables enclosed type string
            currentFormula = "=33*3/4-2+10";
            sheet.Range[++currentRow, 1].Text = currentFormula;
            // Caculate arithmetic expression
            formulaResult = workbook.CaculateFormulaValue(currentFormula);
            value = formulaResult.ToString();
            sheet.Range[currentRow, 2].Value = value;

            /// The mathematics function ///

            //Absolute value function

            // Create abosolute value function string
            currentFormula = "=ABS(-1.21)";
            sheet.Range[++currentRow, 1].Text = currentFormula;
            // Caculate abosulte value function
            formulaResult = workbook.CaculateFormulaValue(currentFormula);
            value = formulaResult.ToString();
            sheet.Range[currentRow, 2].Value = value;


            ///  Statistical function///

            // Sum function
            // Create sum function string
            currentFormula = "=SUM(18,29)";
            sheet.Range[++currentRow, 1].Text = currentFormula;
            // Caculate sum function
            formulaResult = workbook.CaculateFormulaValue(currentFormula);
            value = formulaResult.ToString();
            sheet.Range[currentRow, 2].Value = value;

            ///logic function///

            //NOT function
            // Create NOT function string
            currentFormula = "=NOT(true)";
            sheet.Range[currentRow, 1].Text = currentFormula;
            //Caculate NOT function
            formulaResult = workbook.CaculateFormulaValue(currentFormula);
            value = formulaResult.ToString();
            sheet.Range[currentRow, 2].Value = value;
            sheet.Range[currentRow, 2].HorizontalAlignment = HorizontalAlignType.Right;

            ///String Manipulation function///
            //Get the substring
            // Build substring function
            currentFormula = "=MID(\"world\",4,2)";
            sheet.Range[++currentRow, 1].Text = currentFormula;
            //Caculate substring function
            formulaResult = workbook.CaculateFormulaValue(currentFormula);
            value = formulaResult.ToString();
            sheet.Range[currentRow, 2].Value = value;
            sheet.Range[currentRow, 2].HorizontalAlignment = HorizontalAlignType.Right;

            // Random function
            // Create random function string.
            currentFormula = "=RAND()";
            sheet.Range[++currentRow, 1].Text = currentFormula;
            //Caculate random function
            formulaResult = workbook.CaculateFormulaValue(currentFormula);
            value = formulaResult.ToString();
            sheet.Range[currentRow, 2].Value = value;

            // Save Spire.Xls.Workbook as exel file
            workbook.SaveToFile("formulaTest2.xls",ExcelVersion.Version97to2003);
            System.Diagnostics.Process.Start("formulaTest2.xls");
        }
        }
    }
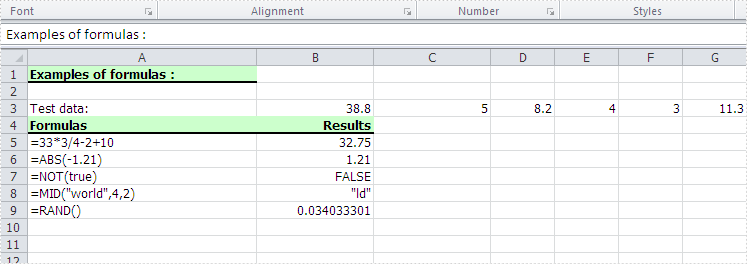
Screenshot:
Create PDF Dynamically and Send it to Client Browser Using ASP.NET
About PDF
Portable Document Format (PDF)is a fixed-layout document as an independent specification by Adobe. It encapsulates a complete description including the text fonts, graphics, and other information needed to display it.
Create PDF dynamically and send it to client browser
To generate a PDF file dynamically and then send it to client browser, you can use Spire.PDF for .NET to finish this task. In addition, Spire.PDF supports loading an existing PDF file and send it to client browser as well. In this technical article, we will combine both two functions to made a fully description about how Spire.PDF make it work. Below are the two tasks:
- Task1 Create PDF dynamically and send it to client browser.
- Task2 Load an Existing PDF file and send it to client browser(This is an additional function of Spire.PDF for .NET)
Firstly create an Asp.net application and add Spire.PDF.dll assembly. You can add two buttons on an Aspx page in VS. Appoint one of them for Task 1, and the other for Task 2.

In terms of Task 1, firstly you need initiate an object of Spire.PdfDocument
PdfDocument doc = new PdfDocument();
And add a new page in this new PDF document
PdfPageBase page = newDoc.Pages.Add();
Pay attention that related auxiliary object are need while drawing string on this pdf page.
string message = "Hello world!";
PdfFont font = new PdfFont(PdfFontFamily.Helvetica, 13f);
PdfBrush brush = PdfBrushes.Red;
PointF location = new PointF(20, 20);
Then you can draw a string in pdf page, something like this:
page.Canvas.DrawString(message, font, brush, location);
Finally you can open this newly generated PDF document in Client browser:
newDoc.SaveToHttpResponse("sample.pdf",HttpContext.Current.Response, HttpReadType.Open);
When it comes to Task 2, 3 lines of code can work it out directly.
Initiated an object of Spire.PdfDocument
pdfDocument doc = new PdfDocument();
Load a pdf file
doc.LoadFromFile(this.Server.MapPath("/sample.pdf"));
Load a pdf document ,after that ,send it to client browser as an attachment.
doc.SaveToHttpResponse("sample.pdf", this.Response, HttpReadType.Save);
To summarize above, the following is the complete code snippet needed in this two tasks:
C#
using System;
using System.Collections.Generic;
using System.Drawing;
using System.Web;
using System.Web.UI;
using System.Web.UI.WebControls;
using Spire.Pdf;
using Spire.Pdf.Graphics;

namespace SendPdfToWebBrowser
{
    public partial class WebForm_SendPdf : System.Web.UI.Page
    {
        protected void Page_Load(object sender, EventArgs e)
        {

        }
        // load a pdf document ,after that ,send it to client browser as an attachment
        protected void btnClientSavePdf_Click(object sender,EventArgs e)
        {

           // initiated an object of Spire.PdfDocument
            PdfDocument doc = new PdfDocument();
            // Load a pdf file

            doc.LoadFromFile(this.Server.MapPath("/sample.pdf"));
            // send the pdf document to client browser as an attachment
            doc.SaveToHttpResponse("sample.pdf",this.Response, HttpReadType.Save);
        }

        // Create an pdf document ,then open it in the client browser
        protected void btnClientOpenPdf_Click(object sender, EventArgs e)
        {
            // Initiate an object of Spire.PdfDocument
            PdfDocument newDoc = new PdfDocument();
            // Add a new page in this newly created pdf file
            PdfPageBase page = newDoc.Pages.Add();
            string message = "Hello world!” ;

            PdfFont font = new PdfFont(PdfFontFamily.Helvetica,13f);
            PdfBrush brush = PdfBrushes.Red;
            PointF location = new PointF(20, 20);
            // Draw a string with designated brush, a font, position in pdf page
            page.Canvas.DrawString(message, font, brush, location);
            //To open this pdf document in client browser.
            newDoc.SaveToHttpResponse("sample.pdf",HttpContext.Current.Response, HttpReadType.Open);
        }
    }
}
In the end, you can run it, and get things like this:
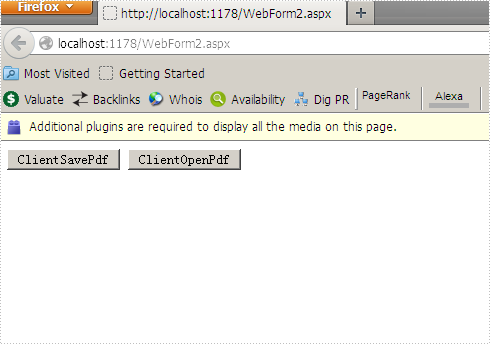
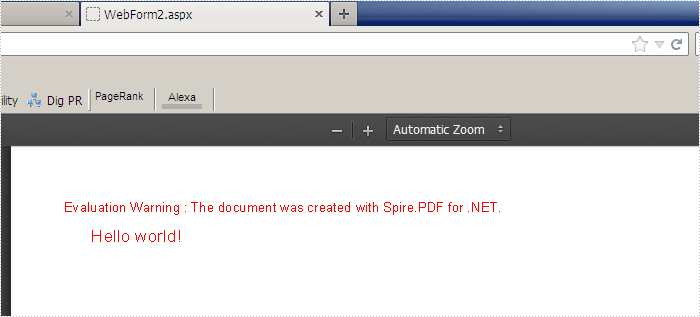
Screenshot of creating PDF dynamically and sending it to client browser
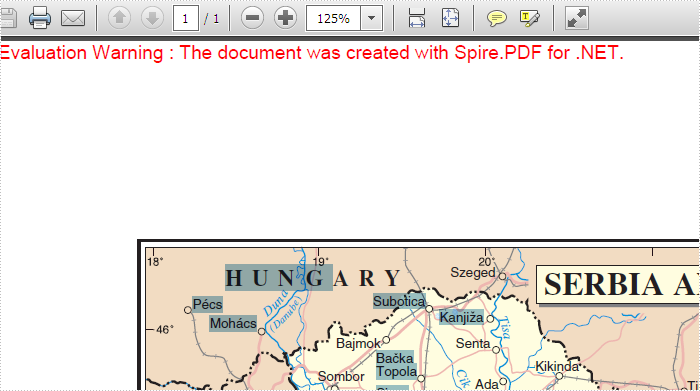
Screenshot of Loading an Existing PDF file and sending it to client browser
Export PDF Document to images
The sample demonstrates how to export PDF pages as images by PdfDocumentViewer Component.

XLS Report Silverlight
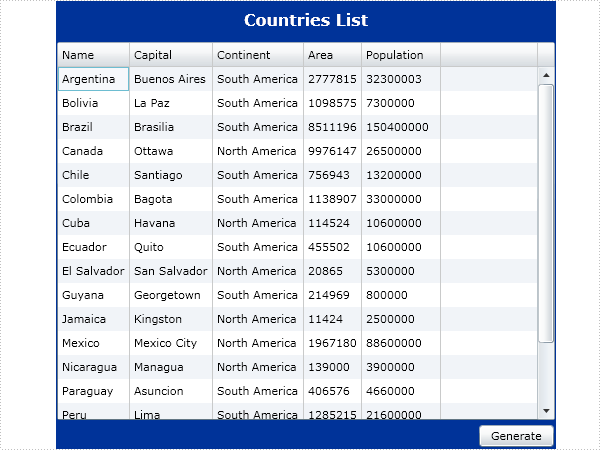
The sample demonstrates how to work with MarkerDesign in Silverlight via Spire.XLS.
XLS to PDF in C#, VB.NET
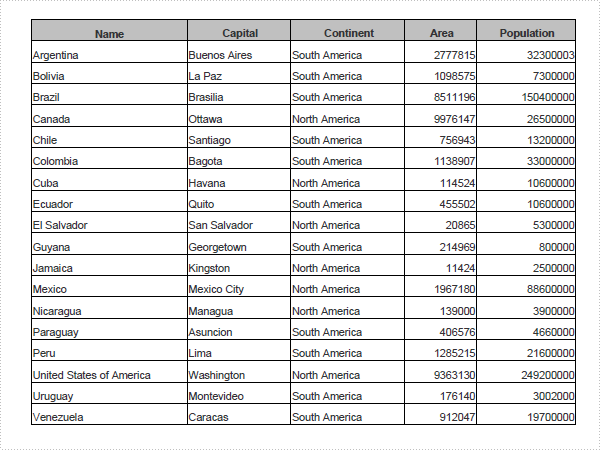
The sample demonstrates how to convert Excel workbook to PDF file via Spire.XLS.
How to Export Datatable to Excel through DataGridView?
Export DataTable to Excel can be very easy through Spire.DataExport (or Spire.Office). Furthermore, Spire.DataExport enables user to Export data to Excel through DataGridView. Through DataGridView users can preview and modify data information before exporting.
Download Spire.DataExport (or Spire.Office) with .NET Framework together. Only 2 Simple steps you can finish the whole datatable to Excel exporting process.
Step 1: Load Data Information
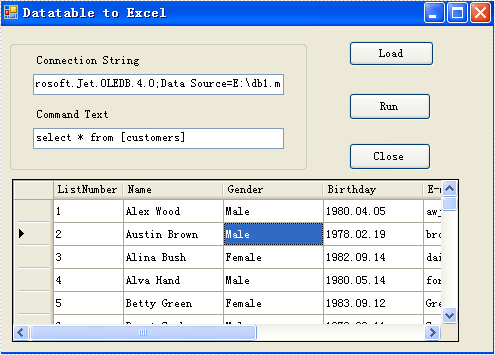
In this step, Spire.DataExport will help you load Data information from your datatable. After you put in your data source and SQL command, you can preview and modify data information in DataGridView area.
        private void btnLoad_Click(object sender, EventArgs e)
        {
            using(OleDbConnection oleDbConnection = new OleDbConnection())
            {
                oleDbConnection.ConnectionString = this.textBox1.Text;
                OleDbCommand oleDbCommand = new OleDbCommand();
                oleDbCommand.CommandText = this.textBox2.Text;
                oleDbCommand.Connection = oleDbConnection;
                using(OleDbDataAdapter da = new OleDbDataAdapter(oleDbCommand))
                {
                    DataTable dt = new DataTable();
                    da.Fill(dt);
                    dataGridView1.DataSource = dt;
                }
            }
        }
Effect Screenshot
Step 2: Set Export into Excel
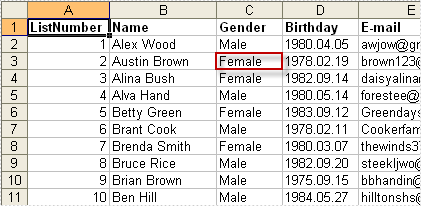
Spire.DataExport allows user to export data into most popular file formats including MS Excel, MS Word, HTML, PDF, XML, CSV, DBF, DIF, etc. Now, in this step you should give an order to Export Data into Excel file format. Spire.DataExport will create a new MS Excel Worksheet for storing Data which exported out. You can rename the excel file in this step either.
        private void btnRun_Click(object sender, EventArgs e)
        {
            Spire.DataExport.XLS.CellExport cellExport = new Spire.DataExport.XLS.CellExport();
            Spire.DataExport.XLS.WorkSheet worksheet1 = new Spire.DataExport.XLS.WorkSheet();
            worksheet1.DataSource = Spire.DataExport.Common.ExportSource.DataTable;
            worksheet1.DataTable = this.dataGridView1.DataSource as DataTable;
            worksheet1.StartDataCol = ((System.Byte)(0));
            cellExport.Sheets.Add(worksheet1);
            cellExport.ActionAfterExport = Spire.DataExport.Common.ActionType.OpenView;
            cellExport.SaveToFile("20110223.xls");
        }
Effect Screenshot
Spire.DataExport for .NET Program Guide Content
Spire.DataExport for .NET is a professional .NET DataExport library, enables users to export data from database, datatable and other datasoure to MS Excel, MS Word, PDF, MS Access, DBF, SQL Script, SYLK, DIF, CSV and MS Clipboard without MS Office, Adobe Acrobat and other third-party installed on system. With Spire.DataExport, developer can create any WinForm and Web applications to export data.
Spire.DataExport is fantastic on formatting when exporting, especially for Excel. Users can format data, import formula, insert objects (image, hyperlinks etc.) and create chart when export a large amount of data to multiple worksheets. The following sections will present how to quickly export data in details.
Doc MailMerge Silverlight
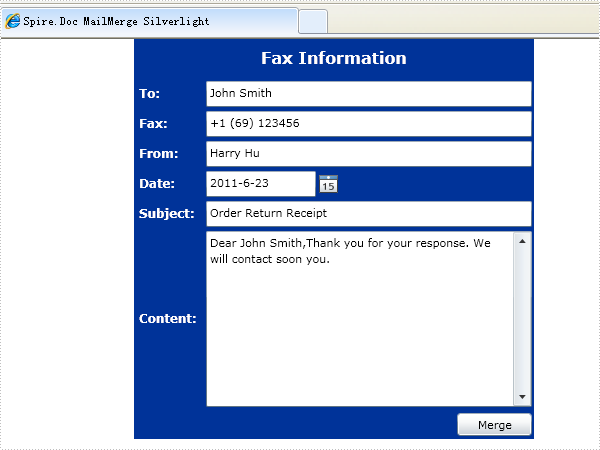
The sample demonstrates how to work with MailMerge in Silverlight via Spire.Doc.
How to Use Mail Merge to Create Report
Introduction
Mail merge is often used to print reports in bulk, such as financial statement, payroll or transcript. And the merged documents can be sent by E-mail.
In this article, I will show one way to generate mail merged reports via Spire.Doc.
Report Overview
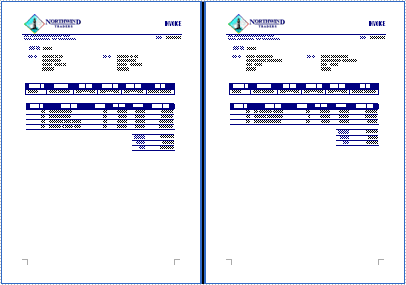
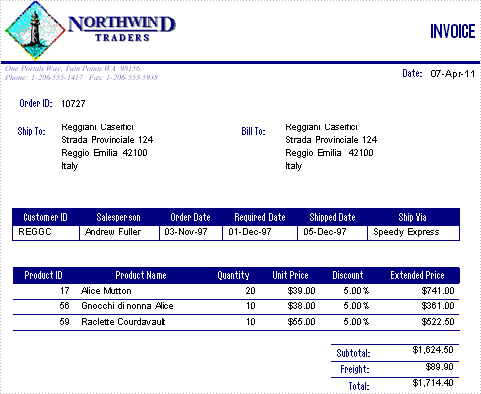
This report includes multiple invoices, and each invoice starts in a new page. Invoice logo and supplier information will present in the header of every page.
Order, shipment, customer, order details and total price make up a completed invoice.
The following pictures show the appearance of invoice:
Content details in each invoice are shown as following:
Order Data Overview
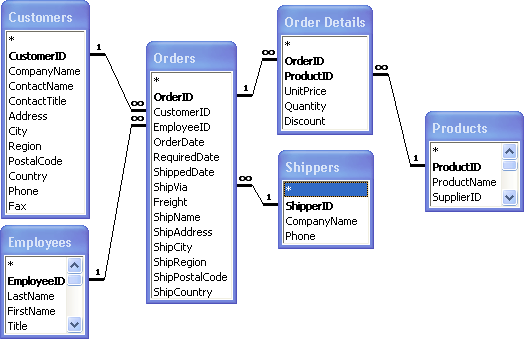
All data in this example is from Northwind database, which is a sample database provided by Microsoft Access 2003.
We will export data from table Orders, Shippers, Customers, Employees, [Order Details] and Products to generate our report. The following picture shows the relationship between the 6 tables.
Steps
We need to finish the following 3 steps to generate our report.
- Create a mail merge template.
- Load data from database.
- Merge data into template and save.
Every step includes several sub-steps and in #2 and #3 we need to write some code.
Create mail merge template
A template is a reusable document. It renders the pattern of our report. We could modify it to change our report without any modification of code.
Note: in this section, all tables mean DataTable instance, not physical table in database.
We can create the template in MS Word or by other program. Please see the following picture. It is the template we need to create. Data will be filled in the red party.
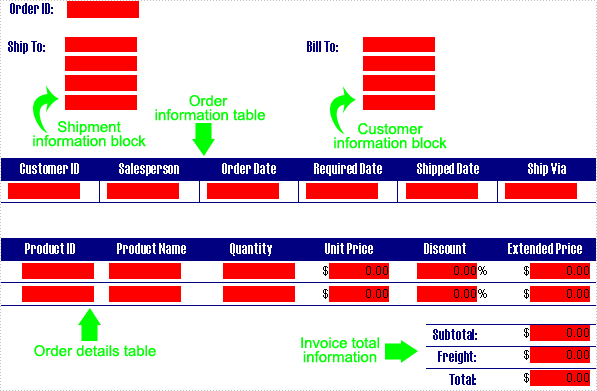
Insert mail-merge-field as placeholder into the red-block. There are three types of mail-merge-field which will be used in this example:
GeneralField is a general Word mail-merge-field. It is real data field and our data will be filled in it during merge process. We need to insert a GeneralField to every red-block and name these fields with the corresponding data name. After inserting GeneralFields, our template will looks like:
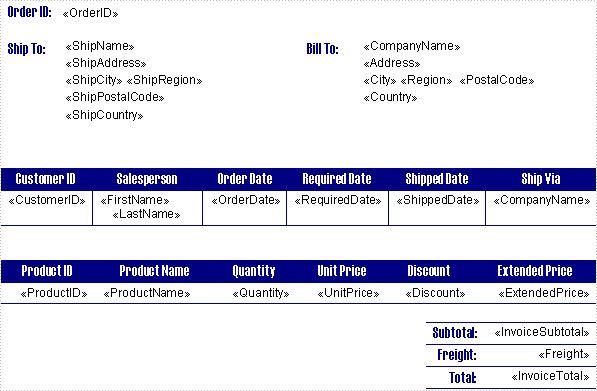
TableField is assistant mail-merge-field and used as a container of multiple related GeneralFields and other TableFields. So it is not data placeholder and no data will be filled in. It is composed of two special mail-merge-fields:
TableStart:TableName and TableEnd:TableName. During merge process, the data of related GeneralFields contained by one same TableField will be from one same data table. For example, fields in Customer information block will be filled with data from data table Customer, so we need to put them in TableField Customer.
Insert a mail-merge-field with field name TableStart:Customer immediately before the first CompanyName field and insert another mail-merge-field with field name TableEnd:Customer immediately after the field Country. And then our fields in Customer information block looks like:

During the merge process, data in column CompanyName of table Customer will be filled in the field CompanyName, Customer.Address to field Address, Customer.City to field City and so on.
Data of fields in column Salesperson in Order information table is from table Employee

Data of fields in column Ship Via in Order information table is from table Shipper

Data of fields in Order details table is from table Detail, except field ProductName. Data of field ProductName is from table Product. Data of field InvoiceSubtotal and InvoiceTotal in Invoice total information is from table Total (virtual table)

GroupField is assistant mail-merge-field too. It can contain multiple related GeneralFields and TableFields. It is composed of two special mail-merge-fields: GroupStart:GroupName and GroupEnd:GroupName. During merge process, all Word document elements included in a GroupField will be copied. One row in data table has one copy and data in the row will be filled into the fields in the copy.
If the row has sub data table, the data in sub data table will be filled into the fields included in the corresponding TableField. If the sub data table has multiple data rows, the corresponding TableField will be copied and filled too.
We need to insert a mail-merge-field named GroupStart:Order in the top of the template body and insert a mail-merge-field named GroupEnd:Order in the bottom of the template body. After this, our template looks like:
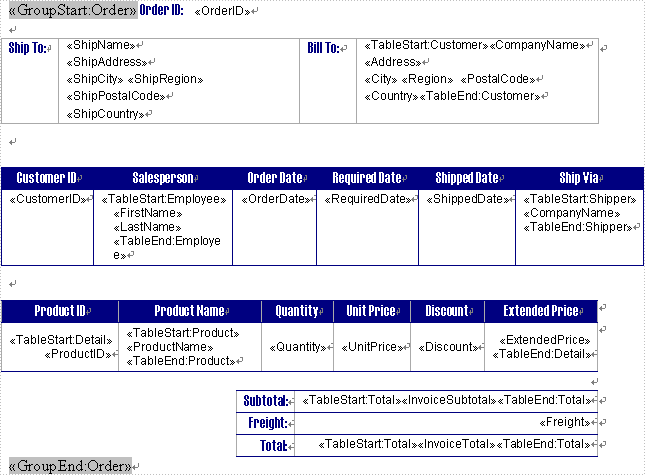
You could find the complete template named InvoiceTemplate.doc in the attached source package.
Load Data from Database
Spire.Doc provides merge data from DataSet. So we will use DataAdapter to fill data table from NorthWind database to a DataSet and merge it into our template. Difference from DataRelation of DataSet, Spire.Doc has owned table relation functionality. So we don't need to create DataRelation instance for the DataSet object. The code below just shows load Order data. Please see the attached source package for other code.
String connectionString
    = @"Provider=Microsoft.Jet.OLEDB.4.0;Data Source=Northwind.mdb";
DataSet dataSet = new DataSet();
using(OleDbConnection conn = new OleDbConnection(connectionString))
{
    //load December 1997 orders
    String sql
        = " SELECT * "
        + " FROM   Orders "
        + " WHERE  ShippedDate Between #12/1/1997# And #12/31/1997# ";
    using (OleDbDataAdapter dataAdapter = new OleDbDataAdapter(sql, conn))
    {
        dataAdapter.Fill(dataSet, "Order");
    }
}
Merge data into template and save
In this section, we need to write some code to call Spire.Doc to merge our data table and template.
Create Spire.Doc.Document object and load template.
Document document = new Document();
document.LoadFromFile("InvoiceTemplate.doc", FileFormat.Doc);
Establish relationship between data tables.
List<DictionaryEntry> list = new List<DictionaryEntry>
{
    new DictionaryEntry("Order", String.Empty),
    new DictionaryEntry("Shipper", "ShipperID = %Order.ShipVia%"),
    new DictionaryEntry("Customer", "CustomerID = %Order.CustomerID%"),
    new DictionaryEntry("Employee", "EmployeeID = %Order.EmployeeID%"),
    new DictionaryEntry("Detail", "OrderID = %Order.OrderID%"),
    new DictionaryEntry("Product", "ProductID = %Detail.ProductID%"),
    new DictionaryEntry("Total", "OrderID = %Order.OrderID%")
};
Merge data set into template and save document to file.
//clear empty value fields during merge process
document.MailMerge.ClearFields = true;

//clear empty paragraphs if it has only empty value fields.
document.MailMerge.RemoveEmptyParagraphs = true;

//merge
document.MailMerge.ExecuteWidthNestedRegion(dataSet, list);

//set word view type.
document.ViewSetup.DocumentViewType = DocumentViewType.PrintLayout;
document.SaveToFile("Invoice.doc");
In order to start each invoice in a new page, we insert a page-break-symbol immediately before the first paragraph when a new order row will be merged. To do this, we need to handle the event MergeField which is fired before a field merged.
//index of row of merged order data
int mergedRowIndex = 0;
document.MailMerge.MergeField += delegate(object sender, MergeFieldEventArgs e)
{
    if (e.TableName == "Order")
    {
        if (e.RowIndex > mergedRowIndex)
        {
            mergedRowIndex = e.RowIndex;

            //insert page break symbol before the paragraph of current field
            InsertPageBreak(e.CurrentMergeField);
        }
    }
};
Code of method InsertPageBreak
private static void InsertPageBreak(IMergeField field)
{
    //append a page break symbol
    Break pageBreak = field.OwnerParagraph.AppendBreak(BreakType.PageBreak);

    //move to the start of the paragraph
    field.OwnerParagraph.Items.Insert(0, pageBreak);
}


