
Spire.XLS for JavaScript (84)
Children categories
Create and Remove Multi-level Groups in Excel with JavaScript in React
2026-09-10 02:39:45 Written by Nina TangWhen managing data with many rows and columns, such as project plans or financial reports, you often need to group some rows (Group / Outline) so that they can be collapsed into a layered structure, letting you view only the summary rows or the content of a certain phase. When the structure is no longer needed, you can remove the groups at any time to restore the flat layout of the rows. Spire.XLS for JavaScript completes this directly in the browser based on WebAssembly, and manages input/output files through a virtual file system (VFS), with no backend service required.
This article covers two core features:
For installation and project configuration, refer to Integrating Spire.XLS for JavaScript in a React Project. The examples below assume Spire.XLS is installed and the WebAssembly module is initialized.
Create Multi-level (Nested) Groups
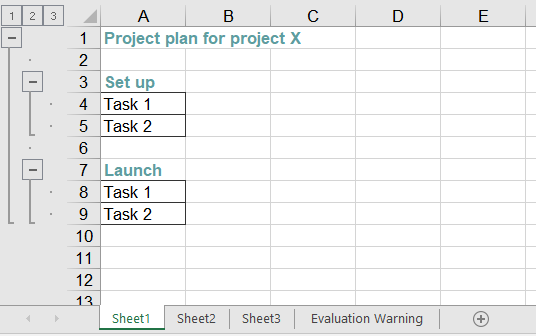
A multi-level group consists of an "outer group" plus "inner groups". For example, in a project plan, the whole execution phase (several rows) can be one level of group, while the detail rows of each sub-phase are the second level of group. When creating it, you should call GroupByRows() on the larger outer range first, and then on the smaller inner ranges, so that Excel generates the collapse buttons of different levels. The main steps are as follows:
- Create a
Workbookobject and get the first worksheet. - Add a named style and set its font (used for titles and similar cells).
- Set
Worksheet.PageSetup.IsSummaryRowBelow = falseso that the summary rows are shown above the detail rows. - Write the sample data into the cells.
- Call
GroupByRows()on the outer row range (rows 2-9) first, then callGroupByRows()on the nested inner row ranges (rows 4-5 and rows 8-9). - Save the workbook with the
Workbook.SaveToFile()method.
Here is a complete code example showing how to create two-level (nested) row groups for a worksheet in React:
function App() {
  const createNestedGroup = async () => {
    // Get the Spire.XLS WASM module
    const xlsModule = window.wasmModule?.spirexls;

    // Check whether the module is ready
    if (!xlsModule) {
      alert('Spire.Xls is not ready yet');
      return;
    }

    // Load the font into the VFS for text measurement
    await window.spire.FetchFileToVFS('ARIAL.TTF', '/Library/Fonts/', `${process.env.PUBLIC_URL}/font/`);

    // Create a new workbook and get the first worksheet
    const workbook = new xlsModule.Workbook();
    const sheet = workbook.Worksheets.get(0);

    // Add a named style for the title rows
    const style = workbook.Styles.Add("style");
    style.Font.Color = xlsModule.Color.get_CadetBlue();
    style.Font.IsBold = true;

    // Make the summary rows appear above the detail rows
    sheet.PageSetup.IsSummaryRowBelow = false;

    // Write the sample data
    sheet.Range.get("A1").Value = "Project plan for project X";
    sheet.Range.get("A1").CellStyleName = style.Name;

    sheet.Range.get("A3").Value = "Set up";
    sheet.Range.get("A3").CellStyleName = style.Name;
    sheet.Range.get("A4").Value = "Task 1";
    sheet.Range.get("A5").Value = "Task 2";
    sheet.Range.get("A4:A5").BorderAround(xlsModule.LineStyleType.Thin);
    sheet.Range.get("A4:A5").BorderInside(xlsModule.LineStyleType.Thin);

    sheet.Range.get("A7").Value = "Launch";
    sheet.Range.get("A7").CellStyleName = style.Name;
    sheet.Range.get("A8").Value = "Task 1";
    sheet.Range.get("A9").Value = "Task 2";
    sheet.Range.get("A8:A9").BorderAround(xlsModule.LineStyleType.Thin);
    sheet.Range.get("A8:A9").BorderInside(xlsModule.LineStyleType.Thin);

    // Group the outer rows first, then the nested inner rows, to form multi-level groups
    sheet.GroupByRows(2, 9, false);
    sheet.GroupByRows(4, 5, false);
    sheet.GroupByRows(8, 9, false);

    // Save the document
    const outputFileName = 'MultiLevelGroup.xlsx';
    workbook.SaveToFile({ fileName: outputFileName, version: xlsModule.ExcelVersion.Version2010 });

    // Release resources
    workbook.Dispose();

    // Read the converted file from the VFS and trigger a download
    const fileArray = window.dotnetRuntime.Module.FS.readFile(outputFileName);
    const blob = new Blob([fileArray], { type: 'application/vnd.openxmlformats-officedocument.spreadsheetml.sheet' });
    const url = URL.createObjectURL(blob);
    const a = document.createElement('a');
    a.href = url;
    a.download = outputFileName;
    a.click();
    URL.revokeObjectURL(url);
  };

  return (
    <div style={{ textAlign: 'center', height: '300px' }}>
      <h1>Create Nested Group</h1>
      <button onClick={createNestedGroup}>
        Start
      </button>
    </div>
  );
}

export default App;
Effect of creating multi-level groups
Remove (Delete) Multi-level Groups
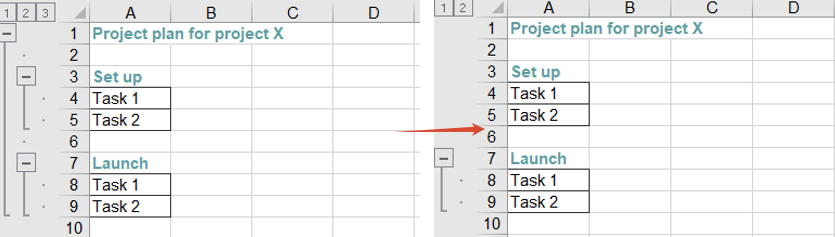
When a workbook already contains multi-level groups and you need to remove a particular outer "large group" or inner "small group", you can load the file and call the Worksheet.UngroupByRows() method on the corresponding range. Grouping only affects the collapsed display of rows; removing a group never deletes any cell content. After the outer large group is removed, the inner small groups that were nested inside it remain as independent single-level groups and can be removed one by one. The main steps are as follows:
- Create a
Workbookobject and load the workbook that already contains multi-level groups with theWorkbook.LoadFromFile()method. - Get the worksheet with the
Workbook.Worksheets.get()method. - Call
UngroupByRows()on the outer row range (rows 2-9) to remove the large group. - Call
UngroupByRows()on the inner row range (rows 4-5) to remove the small group. - Save the workbook with the
Workbook.SaveToFile()method.
Here is a complete code example showing how to load an already-grouped Excel file in React and remove a large group and a small group:
function App() {
  const ungroupRows = async () => {
    // Get the Spire.XLS WASM module
    const xlsModule = window.wasmModule?.spirexls;

    // Check whether the module is ready
    if (!xlsModule) {
      alert('Spire.Xls is not ready yet');
      return;
    }

    // Load the font into the VFS for text measurement
    await window.spire.FetchFileToVFS('ARIAL.TTF', '/Library/Fonts/', `${process.env.PUBLIC_URL}/font/`);

    // Load the Excel file that already contains multi-level groups
    const inputFileName = 'MultiLevelGroup.xlsx';
    await window.spire.FetchFileToVFS(inputFileName, '', `${process.env.PUBLIC_URL}data/`);

    // Create a Workbook object and load the workbook
    const workbook = new xlsModule.Workbook();
    workbook.LoadFromFile({ fileName: inputFileName });

    // Get the first worksheet
    const sheet = workbook.Worksheets.get(0);

    // Remove the outer large group (rows 2-9)
    sheet.UngroupByRows(2, 9);

    // Remove the inner small group (rows 4-5)
    sheet.UngroupByRows(4, 5);

    // Save the document
    const outputFileName = 'UngroupRows_output.xlsx';
    workbook.SaveToFile({ fileName: outputFileName, version: xlsModule.ExcelVersion.Version2010 });

    // Release resources
    workbook.Dispose();

    // Read the converted file from the VFS and trigger a download
    const fileArray = window.dotnetRuntime.Module.FS.readFile(outputFileName);
    const blob = new Blob([fileArray], { type: 'application/vnd.openxmlformats-officedocument.spreadsheetml.sheet' });
    const url = URL.createObjectURL(blob);
    const a = document.createElement('a');
    a.href = url;
    a.download = outputFileName;
    a.click();
    URL.revokeObjectURL(url);
  };

  return (
    <div style={{ textAlign: 'center', height: '300px' }}>
      <h1>Ungroup Rows</h1>
      <button onClick={ungroupRows}>
        Start
      </button>
    </div>
  );
}

export default App;
Effect of removing multi-level groups
FAQ
Why does calling GroupByRows several times not produce multi-level groups
Cause: A multi-level group requires the range of the inner group to be completely contained within the range of the outer group. If two grouped ranges do not contain each other, Excel treats them as two groups of the same level instead of nested multi-level groups.
Solution: Call GroupByRows() on the larger outer range first, and then on the smaller inner range, for example call GroupByRows(2, 9, false) first and then GroupByRows(4, 5, false).
How can I make a group collapsed by default (or keep it expanded)?
Cause: The third Boolean parameter of GroupByRows(startRow, endRow, isCollapsed) decides whether the detail rows of a group are collapsed by default after the group is created. true collapses them by default, while false keeps them expanded (the examples in this article use false). When the saved file is opened, it is shown in that state.
Solution: Set the third parameter to true to collapse the group by default, for example sheet.GroupByRows(4, 5, true). To collapse or expand a group at runtime, call CollapseGroup() / ExpandGroup() on the grouped range.
Obtain a Free License
Spire.XLS for JavaScript offers a 30-day full-featured free trial license with no functional limitations. Apply here to evaluate before purchasing.
Add, Read, Modify, and Delete Excel Hyperlinks with JavaScript in React
2026-09-09 08:58:49 Written by Nina TangHyperlinks are a common element in Excel for quickly jumping to web pages, email addresses, or other resources, and they often appear in tables such as product websites, contact information, and reference materials. Spire.XLS for JavaScript uses WebAssembly to add, read, modify, and delete hyperlinks directly in the browser and manages input/output files through a virtual file system (VFS) without any backend support.
This article demonstrates the following common features:
For installation and project configuration, please refer to Integrating Spire.XLS for JavaScript in a React Project. The examples below assume that Spire.XLS is installed and the WebAssembly module has been initialized.
Add a Hyperlink to Text
For cells that contain text such as company names, website names, or email addresses, you can add hyperlinks to the text so that users can click to jump to a web page or send an email.
function App() {
  const addHyperlinkToText = async () => {
    // Get the Spire.XLS WASM module
    const xlsModule = window.wasmModule?.spirexls;

    // Check whether the module is ready
    if (!xlsModule) {
      alert('Spire.Xls is not ready yet');
      return;
    }

    // Load the font and the Excel file into the VFS
    await window.spire.FetchFileToVFS('ARIAL.TTF', '/Library/Fonts/', `${process.env.PUBLIC_URL}/font/`);
    const inputFileName = 'HyperlinksSample.xlsx';
    await window.spire.FetchFileToVFS(inputFileName, '', `${process.env.PUBLIC_URL}data/`);

    // Load the workbook
    const workbook = new xlsModule.Workbook();
    workbook.LoadFromFile({ fileName: inputFileName });

    // Get the first worksheet
    const sheet = workbook.Worksheets.get(0);

    // Add a web hyperlink to the text in cell D10
    const urlLink = sheet.HyperLinks.Add({ range: sheet.Range.get('D10') });
    urlLink.TextToDisplay = sheet.Range.get('D10').Text;
    urlLink.Type = xlsModule.HyperLinkType.Url;
    urlLink.Address = 'https://www.e-iceblue.com/';

    // Add an email hyperlink to the text in cell E10
    const mailLink = sheet.HyperLinks.Add({ range: sheet.Range.get('E10') });
    mailLink.TextToDisplay = sheet.Range.get('E10').Text;
    mailLink.Type = xlsModule.HyperLinkType.Url;
    mailLink.Address = 'mailto:[email protected]';

    // Save the workbook
    const outputFileName = 'AddHyperlinkToText_output.xlsx';
    workbook.SaveToFile({ fileName: outputFileName, version: xlsModule.ExcelVersion.Version2010 });

    // Dispose of the workbook
    workbook.Dispose();

    // Read the generated file from the VFS and trigger the download
    const fileArray = window.dotnetRuntime.Module.FS.readFile(outputFileName);
    const blob = new Blob([fileArray], { type: 'application/vnd.openxmlformats-officedocument.spreadsheetml.sheet' });
    const url = URL.createObjectURL(blob);
    const a = document.createElement('a');
    a.href = url;
    a.download = outputFileName;
    a.click();
    URL.revokeObjectURL(url);
  };

  return (
    <div style={{ textAlign: 'center', height: '300px' }}>
      <h1>Add Hyperlink To Text</h1>
      <button onClick={addHyperlinkToText}>Start</button>
    </div>
  );
}

export default App;
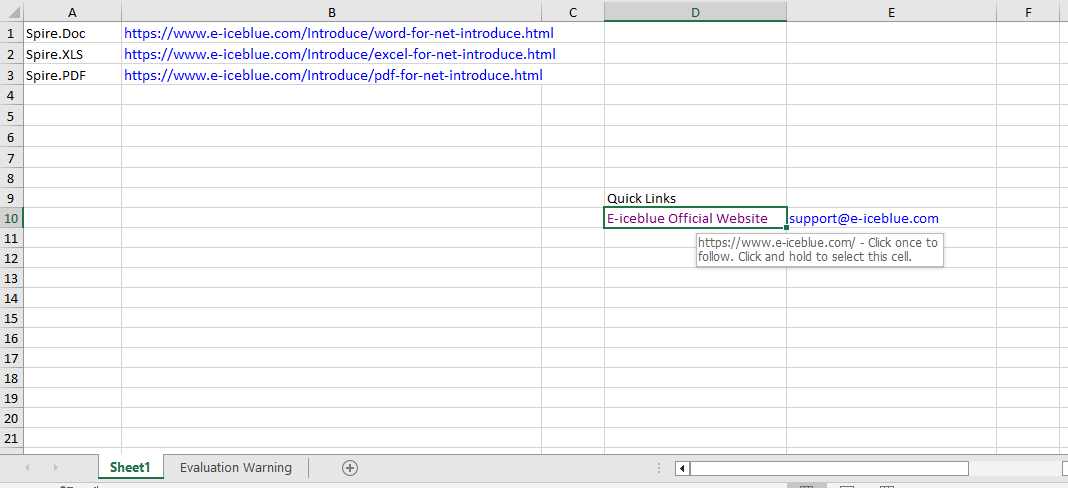
After running, the text in cell D10 becomes a clickable web link, and the email address in cell E10 becomes an email link that can be used to send an email.
Read Hyperlinks
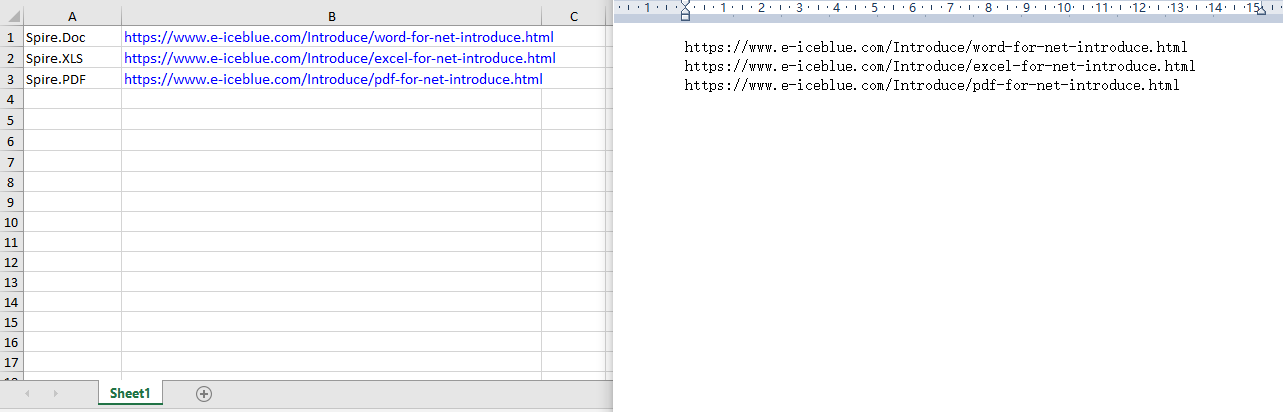
Through the Worksheet.HyperLinks collection, you can get all the hyperlinks in a worksheet and access the target address of each hyperlink by index.
function App() {
  const readHyperlinks = async () => {
    // Get the Spire.XLS WASM module
    const xlsModule = window.wasmModule?.spirexls;

    // Check whether the module is ready
    if (!xlsModule) {
      alert('Spire.Xls is not ready yet');
      return;
    }

    // Load the Excel file into the VFS
    const inputFileName = 'HyperlinksSample.xlsx';
    await window.spire.FetchFileToVFS(inputFileName, '', `${process.env.PUBLIC_URL}data/`);

    // Load the workbook
    const workbook = new xlsModule.Workbook();
    workbook.LoadFromFile({ fileName: inputFileName });

    // Get the first worksheet
    const sheet = workbook.Worksheets.get(0);

    // Read the target addresses of all hyperlinks
    const hyperlinkCount = sheet.HyperLinks.Count;
    let allAddresses = '';

    for (let i = 0; i < hyperlinkCount; i++) {
        const address = sheet.HyperLinks.get(i).Address;
        allAddresses += address + '\n';
    }

    // Save the hyperlink addresses as a txt file
    const outputFileName = 'ReadHyperlinks_output.txt';
    window.dotnetRuntime.Module.FS.writeFile(outputFileName, allAddresses);
    workbook.Dispose();

    // Read the generated file from the VFS and trigger the download
    const fileArray = window.dotnetRuntime.Module.FS.readFile(outputFileName);
    const blob = new Blob([fileArray], { type: 'text/plain' });
    const url = URL.createObjectURL(blob);
    const a = document.createElement('a');
    a.href = url;
    a.download = outputFileName;
    a.click();
    URL.revokeObjectURL(url);
  };

  return (
    <div style={{ textAlign: 'center', height: '300px' }}>
      <h1>Read Hyperlinks</h1>
      <button onClick={readHyperlinks}>Start</button>
    </div>
  );
}

export default App;
Use the HyperLinks.Count property to get the total number of hyperlinks in the worksheet.
Modify a Hyperlink
After getting a hyperlink by index with HyperLinks.get(0), you can reset its display text and target address to modify the hyperlink.
function App() {
  const modifyHyperlink = async () => {
    // Get the Spire.XLS WASM module
    const xlsModule = window.wasmModule?.spirexls;

    // Check whether the module is ready
    if (!xlsModule) {
      alert('Spire.Xls is not ready yet');
      return;
    }

    // Load the font and the Excel file into the VFS
    await window.spire.FetchFileToVFS('ARIAL.TTF', '/Library/Fonts/', `${process.env.PUBLIC_URL}/font/`);
    const inputFileName = 'HyperlinksSample.xlsx';
    await window.spire.FetchFileToVFS(inputFileName, '', `${process.env.PUBLIC_URL}data/`);

    // Load the workbook
    const workbook = new xlsModule.Workbook();
    workbook.LoadFromFile({ fileName: inputFileName });

    // Get the first worksheet
    const sheet = workbook.Worksheets.get(0);

    // Get all hyperlinks in the worksheet
    const links = sheet.HyperLinks;

    // Modify the display text and target address of the first hyperlink
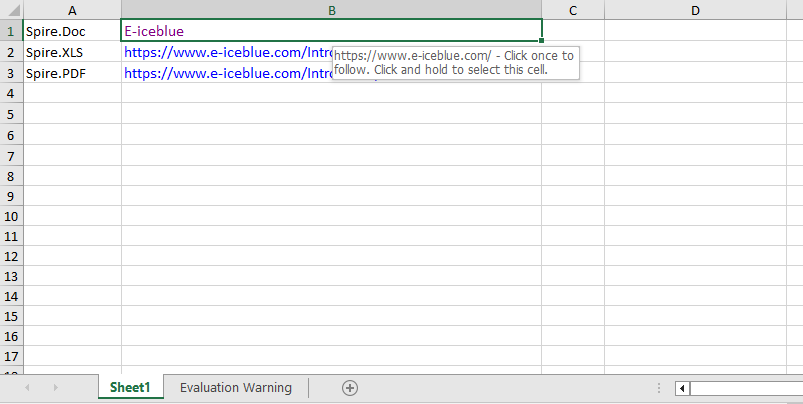
    links.get(0).TextToDisplay = 'E-iceblue';
    links.get(0).Address = 'https://www.e-iceblue.com/';

    // Save the workbook
    const outputFileName = 'ModifyHyperlink_output.xlsx';
    workbook.SaveToFile({ fileName: outputFileName, version: xlsModule.ExcelVersion.Version2010 });

    // Dispose of the workbook
    workbook.Dispose();

    // Read the generated file from the VFS and trigger the download
    const fileArray = window.dotnetRuntime.Module.FS.readFile(outputFileName);
    const blob = new Blob([fileArray], { type: 'application/vnd.openxmlformats-officedocument.spreadsheetml.sheet' });
    const url = URL.createObjectURL(blob);
    const a = document.createElement('a');
    a.href = url;
    a.download = outputFileName;
    a.click();
    URL.revokeObjectURL(url);
  };

  return (
    <div style={{ textAlign: 'center', height: '300px' }}>
      <h1>Modify Hyperlink</h1>
      <button onClick={modifyHyperlink}>Start</button>
    </div>
  );
}

export default App;
After modification, both the display text and the target address of the first hyperlink are updated.
Remove Hyperlinks
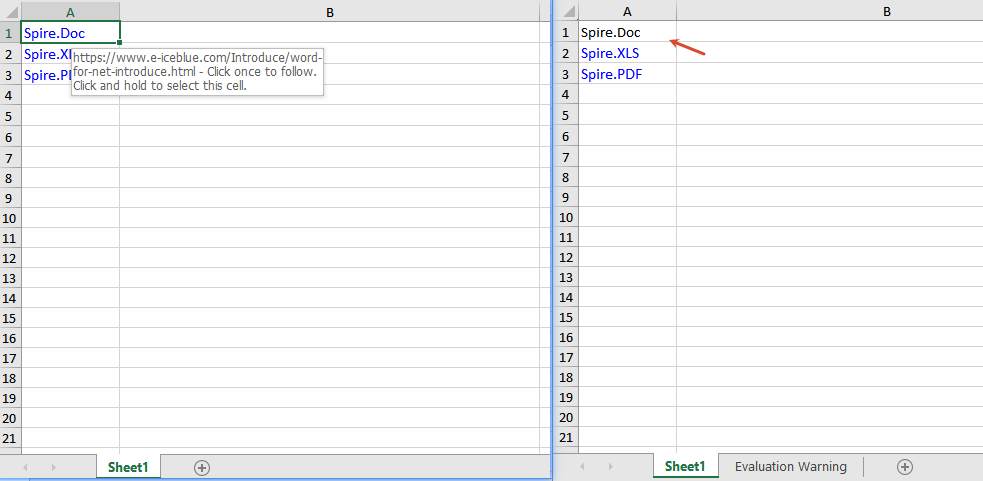
Use the HyperLinks.RemoveAt(index) method to only remove the hyperlink and keep the text, or use the Range.ClearAll() method to clear all content in the cell, including the hyperlink.
function App() {
  const removeHyperlinks = async () => {
    // Get the Spire.XLS WASM module
    const xlsModule = window.wasmModule?.spirexls;

    // Check whether the module is ready
    if (!xlsModule) {
      alert('Spire.Xls is not ready yet');
      return;
    }

    // Load the font and the Excel file into the VFS
    await window.spire.FetchFileToVFS('ARIAL.TTF', '/Library/Fonts/', `${process.env.PUBLIC_URL}/font/`);
    const inputFileName = 'HyperlinksSample.xlsx';
    await window.spire.FetchFileToVFS(inputFileName, '', `${process.env.PUBLIC_URL}data/`);

    // Load the workbook
    const workbook = new xlsModule.Workbook();
    workbook.LoadFromFile({ fileName: inputFileName });

    // Get the first worksheet
    const sheet = workbook.Worksheets.get(0);

    // Get all hyperlinks in the worksheet
    const links = sheet.HyperLinks;

    // Clear all content in the linked cells
    // sheet.Range.get('A1').ClearAll();
    // sheet.Range.get('A2').ClearAll();
    // sheet.Range.get('A3').ClearAll();

    // Only remove the hyperlink and keep the original text
    sheet.HyperLinks.RemoveAt(0);

    // Save the workbook
    const outputFileName = 'RemoveHyperlinks_output.xlsx';
    workbook.SaveToFile({ fileName: outputFileName, version: xlsModule.ExcelVersion.Version2010 });

    // Dispose of the workbook
    workbook.Dispose();

    // Read the generated file from the VFS and trigger the download
    const fileArray = window.dotnetRuntime.Module.FS.readFile(outputFileName);
    const blob = new Blob([fileArray], { type: 'application/vnd.openxmlformats-officedocument.spreadsheetml.sheet' });
    const url = URL.createObjectURL(blob);
    const a = document.createElement('a');
    a.href = url;
    a.download = outputFileName;
    a.click();
    URL.revokeObjectURL(url);
  };

  return (
    <div style={{ textAlign: 'center', height: '300px' }}>
      <h1>Remove Hyperlinks</h1>
      <button onClick={removeHyperlinks}>Start</button>
    </div>
  );
}

export default App;
Frequently Asked Questions
The target address is not updated after modifying the hyperlink
Reason: The wrong hyperlink index was modified, or there is no hyperlink on the target cell.
Solution: Make sure a hyperlink already exists in the worksheet, access it at the correct index such as sheet.HyperLinks.get(0), and then set its Address property.
Get a Free License
If you want to remove the evaluation message from the result documents or get rid of feature limitations, please contact sales to obtain a temporary license valid for 30 days.
When organizing data such as sales records or statistical reports, converting a plain data range into an Excel table (Table / ListObject) gives the data a dedicated header row, automatic filter drop-downs, banded styling, and a "total row", which makes later browsing and summarizing more convenient. After the table is created, its appearance can also be adjusted at any time through built-in styles and various display options. Spire.XLS for JavaScript completes all of these operations directly in the browser based on WebAssembly, and manages input/output files through a virtual file system (VFS), with no backend service required.
This article covers two core features:
For installation and project configuration, refer to Integrating Spire.XLS for JavaScript in a React Project. The examples below assume Spire.XLS is installed and the WebAssembly module is initialized.
Create a Table in Excel
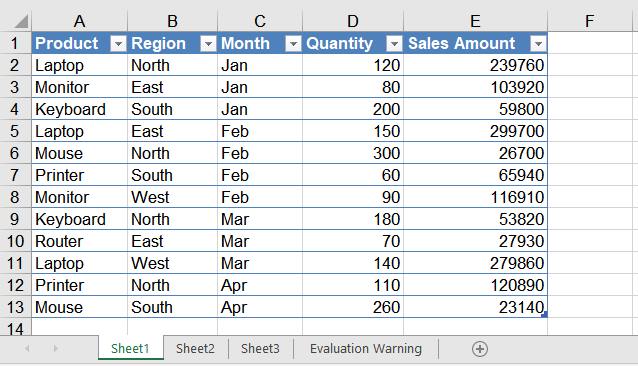
Converting a data range into a table is a quick way to obtain a structured range that has built-in filter buttons and banded styling. In this example, a sales detail list (Product, Region, Month, Quantity, Sales Amount) is first written into the worksheet, then the A1:E13 range is converted into a table named "Table1" with ListObjects.Create(), and finally the built-in light style TableStyleLight9 is applied. The main steps are as follows:
- Create a
Workbookobject and get the first worksheet. - Write the headers and the sample data into the cells.
- Call the
Worksheet.ListObjects.Create()method to convert the range that contains the headers into a table. - Apply a built-in style to the table through the
IListObject.BuiltInTableStyleproperty. - Save the workbook with the
Workbook.SaveToFile()method.
Here is a complete code example showing how to create an Excel table for a worksheet in React:
function App() {
  const createTable = async () => {
    // Get the Spire.XLS WASM module
    const xlsModule = window.wasmModule?.spirexls;

    // Check whether the module is ready
    if (!xlsModule) {
      alert('Spire.Xls is not ready yet');
      return;
    }

    // Load the font into the VFS for text measurement and column auto-fit
    await window.spire.FetchFileToVFS('ARIAL.TTF', '/Library/Fonts/', `${process.env.PUBLIC_URL}/font/`);

    // Create a new workbook and get the first worksheet
    const workbook = new xlsModule.Workbook();
    const sheet = workbook.Worksheets.get(0);

    // Write the headers
    sheet.Range.get('A1').Value = 'Product';
    sheet.Range.get('B1').Value = 'Region';
    sheet.Range.get('C1').Value = 'Month';
    sheet.Range.get('D1').Value = 'Quantity';
    sheet.Range.get('E1').Value = 'Sales Amount';

    // Write the sample data
    sheet.Range.get('A2').Value = 'Laptop';
    sheet.Range.get('B2').Value = 'North';
    sheet.Range.get('C2').Value = 'Jan';
    sheet.Range.get('D2').NumberValue = 120;
    sheet.Range.get('E2').NumberValue = 239760;

    sheet.Range.get('A3').Value = 'Monitor';
    sheet.Range.get('B3').Value = 'East';
    sheet.Range.get('C3').Value = 'Jan';
    sheet.Range.get('D3').NumberValue = 80;
    sheet.Range.get('E3').NumberValue = 103920;

    sheet.Range.get('A4').Value = 'Keyboard';
    sheet.Range.get('B4').Value = 'South';
    sheet.Range.get('C4').Value = 'Jan';
    sheet.Range.get('D4').NumberValue = 200;
    sheet.Range.get('E4').NumberValue = 59800;

    sheet.Range.get('A5').Value = 'Laptop';
    sheet.Range.get('B5').Value = 'East';
    sheet.Range.get('C5').Value = 'Feb';
    sheet.Range.get('D5').NumberValue = 150;
    sheet.Range.get('E5').NumberValue = 299700;

    sheet.Range.get('A6').Value = 'Mouse';
    sheet.Range.get('B6').Value = 'North';
    sheet.Range.get('C6').Value = 'Feb';
    sheet.Range.get('D6').NumberValue = 300;
    sheet.Range.get('E6').NumberValue = 26700;

    sheet.Range.get('A7').Value = 'Printer';
    sheet.Range.get('B7').Value = 'South';
    sheet.Range.get('C7').Value = 'Feb';
    sheet.Range.get('D7').NumberValue = 60;
    sheet.Range.get('E7').NumberValue = 65940;

    sheet.Range.get('A8').Value = 'Monitor';
    sheet.Range.get('B8').Value = 'West';
    sheet.Range.get('C8').Value = 'Feb';
    sheet.Range.get('D8').NumberValue = 90;
    sheet.Range.get('E8').NumberValue = 116910;

    sheet.Range.get('A9').Value = 'Keyboard';
    sheet.Range.get('B9').Value = 'North';
    sheet.Range.get('C9').Value = 'Mar';
    sheet.Range.get('D9').NumberValue = 180;
    sheet.Range.get('E9').NumberValue = 53820;

    sheet.Range.get('A10').Value = 'Router';
    sheet.Range.get('B10').Value = 'East';
    sheet.Range.get('C10').Value = 'Mar';
    sheet.Range.get('D10').NumberValue = 70;
    sheet.Range.get('E10').NumberValue = 27930;

    sheet.Range.get('A11').Value = 'Laptop';
    sheet.Range.get('B11').Value = 'West';
    sheet.Range.get('C11').Value = 'Mar';
    sheet.Range.get('D11').NumberValue = 140;
    sheet.Range.get('E11').NumberValue = 279860;

    sheet.Range.get('A12').Value = 'Printer';
    sheet.Range.get('B12').Value = 'North';
    sheet.Range.get('C12').Value = 'Apr';
    sheet.Range.get('D12').NumberValue = 110;
    sheet.Range.get('E12').NumberValue = 120890;

    sheet.Range.get('A13').Value = 'Mouse';
    sheet.Range.get('B13').Value = 'South';
    sheet.Range.get('C13').Value = 'Apr';
    sheet.Range.get('D13').NumberValue = 260;
    sheet.Range.get('E13').NumberValue = 23140;

    // Convert the A1:E13 data range into an Excel table (ListObject)
    const table = sheet.ListObjects.Create('Table1', sheet.Range.get({ row: 1, column: 1, lastRow: 13, lastColumn: 5 }));

    // Apply a built-in light table style
    table.BuiltInTableStyle = xlsModule.TableBuiltInStyles.TableStyleLight9;

    // Auto-fit the columns so that the contents are fully shown
    sheet.AllocatedRange.AutoFitColumns();

    // Save the workbook
    const outputFileName = 'CreateTable.xlsx';
    workbook.SaveToFile({ fileName: outputFileName, version: xlsModule.ExcelVersion.Version2010 });

    // Release resources
    workbook.Dispose();

    // Read the saved file from the VFS and trigger the download
    const fileArray = window.dotnetRuntime.Module.FS.readFile(outputFileName);
    const blob = new Blob([fileArray], { type: 'application/vnd.openxmlformats-officedocument.spreadsheetml.sheet' });
    const url = URL.createObjectURL(blob);
    const a = document.createElement('a');
    a.href = url;
    a.download = outputFileName;
    a.click();
    URL.revokeObjectURL(url);
  };

  return (
    <div style={{ textAlign: 'center', height: '300px' }}>
      <h1>Create Table</h1>
      <button onClick={createTable}>Start</button>
    </div>
  );
}

export default App;
Effect of creating the table:
Set the Table Style, Total Row and Stripes
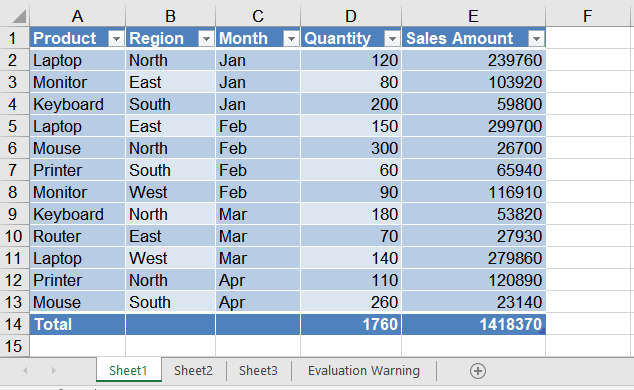
A created table can be restyled at any time: for example, replace the light style with the built-in Medium dark style, show a total row at the bottom of the table and let the "Quantity" and "Sales Amount" columns be summed automatically, and enable both row and column stripes to make the data easier to read. The main steps are as follows:
- Create a
Workbookobject and load a workbook that already contains a table with theWorkbook.LoadFromFile()method. - Get the worksheet with the
Workbook.Worksheets.get()method, and then get the table object withListObjects.get(). - Assign a new built-in style through the
BuiltInTableStyleproperty. - Set
DisplayTotalRowtotrueto show the total row, and useColumns[].TotalsRowLabelandColumns[].TotalsCalculationto set the label and the calculation of the total row columns. - Enable row and column stripes with
ShowTableStyleRowStripesandShowTableStyleColumnStripes. - Save the workbook with the
Workbook.SaveToFile()method.
Here is a complete code example showing how to load a created table in React and set its style and total row:
function App() {
  const formatTable = async () => {
    // Get the Spire.XLS WASM module
    const xlsModule = window.wasmModule?.spirexls;

    // Check whether the module is ready
    if (!xlsModule) {
      alert('Spire.Xls is not ready yet');
      return;
    }

    // Load the font into the VFS for text measurement and column auto-fit
    await window.spire.FetchFileToVFS('ARIAL.TTF', '/Library/Fonts/', `${process.env.PUBLIC_URL}/font/`);

    // Load the Excel file created in the previous section, which already contains a table
    const inputFileName = 'CreateTable.xlsx';
    await window.spire.FetchFileToVFS(inputFileName, '', `${process.env.PUBLIC_URL}data/`);

    // Create a Workbook object and load the workbook
    const workbook = new xlsModule.Workbook();
    workbook.LoadFromFile({ fileName: inputFileName });

    // Get the first worksheet and the table in it
    const sheet = workbook.Worksheets.get(0);
    const table = sheet.ListObjects.get(0);

    // Apply a built-in Medium table style
    table.BuiltInTableStyle = xlsModule.TableBuiltInStyles.TableStyleMedium9;

    // Show the total row
    table.DisplayTotalRow = true;

    // Set the label of the first column of the total row to "Total"
    table.Columns.get(0).TotalsRowLabel = 'Total';

    // Do not calculate the text columns, and sum the "Quantity" and "Sales Amount" columns automatically
    table.Columns.get(1).TotalsCalculation = xlsModule.ExcelTotalsCalculation.None;
    table.Columns.get(2).TotalsCalculation = xlsModule.ExcelTotalsCalculation.None;
    table.Columns.get(3).TotalsCalculation = xlsModule.ExcelTotalsCalculation.Sum;
    table.Columns.get(4).TotalsCalculation = xlsModule.ExcelTotalsCalculation.Sum;

    // Show the row stripes and column stripes
    table.ShowTableStyleRowStripes = true;
    table.ShowTableStyleColumnStripes = true;

    // Auto-fit the columns so that the contents are fully shown
    sheet.AllocatedRange.AutoFitColumns();

    // Save the workbook
    const outputFileName = 'FormatTable_out.xlsx';
    workbook.SaveToFile({ fileName: outputFileName, version: xlsModule.ExcelVersion.Version2010 });

    // Release resources
    workbook.Dispose();

    // Read the saved file from the VFS and trigger the download
    const fileArray = window.dotnetRuntime.Module.FS.readFile(outputFileName);
    const blob = new Blob([fileArray], { type: 'application/vnd.openxmlformats-officedocument.spreadsheetml.sheet' });
    const url = URL.createObjectURL(blob);
    const a = document.createElement('a');
    a.href = url;
    a.download = outputFileName;
    a.click();
    URL.revokeObjectURL(url);
  };

  return (
    <div style={{ textAlign: 'center', height: '300px' }}>
      <h1>Format Table</h1>
      <button onClick={formatTable}>Start</button>
    </div>
  );
}

export default App;
Effect of setting the table style:
Frequently Asked Questions
How do I change the built-in style of a table? What styles are available?
Reason: The BuiltInTableStyle property was not reassigned after the table was created, or the wrong enum type was assigned to the property.
Solution: Reassign the IListObject.BuiltInTableStyle property. Its values come from the TableBuiltInStyles enum, which provides multiple built-in styles including Light (TableStyleLight1 ~ TableStyleLight21), Medium (TableStyleMedium1 ~ TableStyleMedium28) and Dark (TableStyleDark1 ~ TableStyleDark11). For example, this article first applies TableStyleLight9 and then switches to TableStyleMedium9.
How do I name a table or rename it? What happens if two tables have the same name?
Reason: The first parameter of ListObjects.Create() is the table name, e.g. Create("Table1", ...). Within the same worksheet, table names must be unique; otherwise creating another table with the same name raises an error.
Solution: Pass a unique name when creating the table (e.g. "SalesTable1"). To rename an existing table, set its DisplayName property directly, for example table.DisplayName = "SalesTable2025";.
Get a Free License
Spire.XLS for JavaScript offers a 30-day full-featured free trial license with no functional limitations. Apply here to evaluate before purchasing.
Accept or Reject Tracked Changes in Excel with JavaScript in React
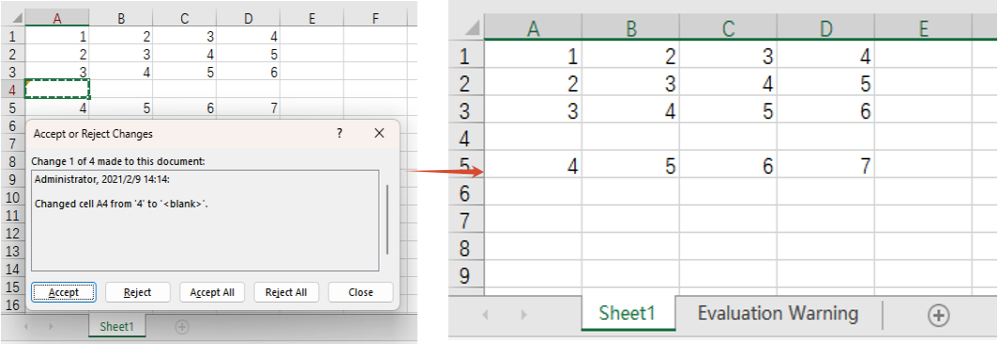
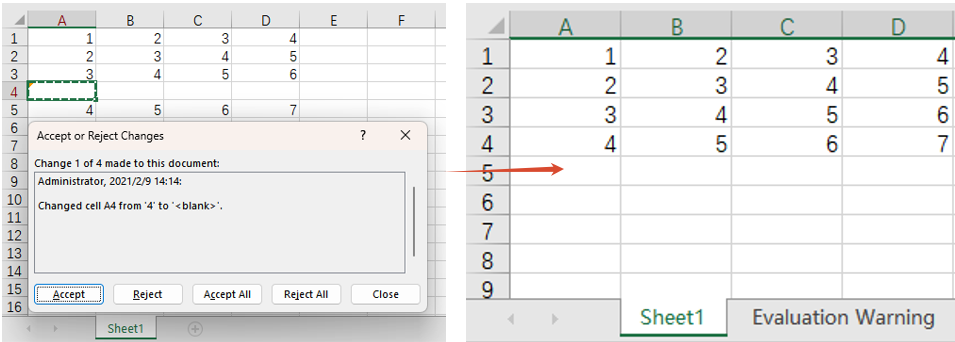
2026-09-09 08:12:04 Written by liu taliaWhen multiple users collaborate on an Excel document with tracking changes (Track Changes) enabled, every insertion, modification and deletion made to cells is recorded. When reviewing these changes, you often need to accept all tracked changes (to formally merge the changes of others into the document) or reject all tracked changes (to revert all changes and restore the state before the edits). Handling these changes one by one in Excel is tedious and error-prone, while processing them in bulk through code in a web application is far more efficient. Spire.XLS for JavaScript completes this directly in the browser based on WebAssembly, and manages input/output files through a virtual file system (VFS), with no backend service required.
Spire.XLS for JavaScript provides revision-handling capabilities through the workbook object: after loading a workbook that contains revision records, call the AcceptAllTrackedChanges() method to accept all tracked changes in the document, or call the RejectAllTrackedChanges() method to reject all tracked changes in the document.
This article covers two core features:
For installation and project configuration, refer to Integrating Spire.XLS for JavaScript in a React Project. The examples below assume Spire.XLS is installed and the WebAssembly module is initialized.
Accept All Tracked Changes in Excel
When a workbook containing revision records has been edited by multiple users and passes review, all the changes need to be formally merged into the document, that is, the tracked changes are "accepted". After the changes are accepted, they become the official content of the document and the revision records are cleared. The main steps are as follows:
- Create a
Workbookobject. - Load the workbook containing revision records with the
Workbook.LoadFromFile()method. - Call the
Workbook.AcceptAllTrackedChanges()method to accept all tracked changes in the document. - Save the workbook with the
Workbook.SaveToFile()method.
Here is a complete code example showing how to accept all tracked changes in an Excel workbook in React:
function App() {
  const acceptTrackedChanges = async () => {
    // Get the Spire.XLS WASM module
    const xlsModule = window.wasmModule?.spirexls;

    // Check whether the module is ready
    if (!xlsModule) {
      alert('Spire.Xls is not ready yet');
      return;
    }

    // Load the font and the Excel file into the VFS
    await window.spire.FetchFileToVFS('ARIAL.TTF', '/Library/Fonts/', `${process.env.PUBLIC_URL}/font/`);
    const inputFileName = 'TrackChanges.xlsx';
    await window.spire.FetchFileToVFS(inputFileName, '', `${process.env.PUBLIC_URL}data/`);

    // Create a Workbook object and load the workbook containing tracked changes
    const workbook = new xlsModule.Workbook();
    workbook.LoadFromFile({ fileName: inputFileName });

    // Accept all tracked changes in the document
    workbook.AcceptAllTrackedChanges();

    // Save the document
    const outputFileName = 'AcceptTrackedChanges_output.xlsx';
    workbook.SaveToFile({ fileName: outputFileName, version: xlsModule.ExcelVersion.Version2010 });

    // Release resources
    workbook.Dispose();

    // Read the converted file from the VFS and trigger a download
    const fileArray = window.dotnetRuntime.Module.FS.readFile(outputFileName);
    const blob = new Blob([fileArray], { type: 'application/vnd.openxmlformats-officedocument.spreadsheetml.sheet' });
    const url = URL.createObjectURL(blob);
    const a = document.createElement('a');
    a.href = url;
    a.download = outputFileName;
    a.click();
    URL.revokeObjectURL(url);
  };

  return (
    <div style={{ textAlign: 'center', height: '300px' }}>
      <h1>Accept All Tracked Changes</h1>
      <button onClick={acceptTrackedChanges}>
        Start
      </button>
    </div>
  );
}

export default App;
Effect of accepting all tracked changes
Reject All Tracked Changes in Excel
When the tracked changes are disputed or no longer needed, the reviewer can reject all of them at once so that the document returns to the state before the edits. The main steps are as follows:
- Create a
Workbookobject. - Load the workbook containing revision records with the
Workbook.LoadFromFile()method. - Call the
Workbook.RejectAllTrackedChanges()method to reject all tracked changes in the document. - Save the workbook with the
Workbook.SaveToFile()method.
Here is a complete code example showing how to reject all tracked changes in an Excel workbook in React:
function App() {
  const rejectTrackedChanges = async () => {
    // Get the Spire.XLS WASM module
    const xlsModule = window.wasmModule?.spirexls;

    // Check whether the module is ready
    if (!xlsModule) {
      alert('Spire.Xls is not ready yet');
      return;
    }

    // Load the font and the Excel file into the VFS
    await window.spire.FetchFileToVFS('ARIAL.TTF', '/Library/Fonts/', `${process.env.PUBLIC_URL}/font/`);
    const inputFileName = 'TrackChanges.xlsx';
    await window.spire.FetchFileToVFS(inputFileName, '', `${process.env.PUBLIC_URL}data/`);

    // Create a Workbook object and load the workbook containing tracked changes
    const workbook = new xlsModule.Workbook();
    workbook.LoadFromFile({ fileName: inputFileName });

    // Reject all tracked changes in the document
    workbook.RejectAllTrackedChanges();

    // Save the document
    const outputFileName = 'RejectTrackedChanges_output.xlsx';
    workbook.SaveToFile({ fileName: outputFileName, version: xlsModule.ExcelVersion.Version2010 });

    // Release resources
    workbook.Dispose();

    // Read the converted file from the VFS and trigger a download
    const fileArray = window.dotnetRuntime.Module.FS.readFile(outputFileName);
    const blob = new Blob([fileArray], { type: 'application/vnd.openxmlformats-officedocument.spreadsheetml.sheet' });
    const url = URL.createObjectURL(blob);
    const a = document.createElement('a');
    a.href = url;
    a.download = outputFileName;
    a.click();
    URL.revokeObjectURL(url);
  };

  return (
    <div style={{ textAlign: 'center', height: '300px' }}>
      <h1>Reject All Tracked Changes</h1>
      <button onClick={rejectTrackedChanges}>
        Start
      </button>
    </div>
  );
}

export default App;
Effect of rejecting all tracked changes
FAQ
The content is not restored to its pre-edit state after rejecting tracked changes
Cause: RejectAllTrackedChanges() rejects only the cell changes that were recorded by the Track Changes feature. If some changes were made before tracking was enabled, or were written by other means and never recorded, they are not revisions that can be rejected, so they keep their current values and the document will not fully return to the original baseline.
Can I accept or reject only part of the tracked changes instead of all of them
Cause: AcceptAllTrackedChanges() and RejectAllTrackedChanges() process all the revisions of a whole workbook at once. They do not provide APIs for filtering individual revisions by user, time or cell range.
Obtain a Free License
Spire.XLS for JavaScript offers a 30-day full-featured free trial license with no functional limitations. Apply here to evaluate before purchasing.
Add, Extract or Remove TextBoxes in Excel with JavaScript in React
2026-09-09 02:21:38 Written by jie zouIn daily Excel document processing, textboxes are often used to add explanatory text, annotations, or tips to data — whether adding comments to reports or extracting annotation content from existing documents, the add/remove/modify operations on textboxes are essential. Spire.XLS for JavaScript completes these operations directly in the browser based on WebAssembly, managing input and output files through a virtual file system (VFS), with no backend service required.
This article covers three core features:
For installation and project configuration, refer to Integrating Spire.XLS for JavaScript in a React Project. The examples below assume Spire.XLS is installed and the WebAssembly module is initialized.
Add TextBox
Adding textboxes to a worksheet provides supplementary explanations for data, such as operation guidance or notes. Spire.XLS for JavaScript inserts a textbox at a specified position with the Worksheet.TextBoxes.AddTextBox() method, after which you can set the text, alignment, font, and background color of the textbox, or fill it with a picture. The main steps are as follows:
- Create a
Workbookobject and use theLoadFromFile()method to load the Excel document. - Use the
Workbook.Worksheets.get()method to get a specific worksheet. - Use the
Worksheet.TextBoxes.AddTextBox()method to add the first textbox, and set its text, horizontal/vertical center alignment, font, and background color. - Use the
Worksheet.TextBoxes.AddTextBox()method to add a second textbox and fill it with a picture. - Use the
Workbook.SaveToFile()method to save the document to a specified path.
Here is a complete code example showing how to add two textboxes to a worksheet in React — one containing text and one filled with a picture:
function App() {
  const addTextBox = async () => {
    // Get the Spire.XLS WASM module
    const xlsModule = window.wasmModule?.spirexls;

    // Check whether the module is ready
    if (!xlsModule) {
      alert('Spire.Xls is not ready yet');
      return;
    }

    // Load the font, Excel file and picture into the VFS
    await window.spire.FetchFileToVFS('ARIAL.TTF', '/Library/Fonts/', `${process.env.PUBLIC_URL}/font/`);
    const inputFileName = 'TextBox.xlsx';
    await window.spire.FetchFileToVFS(inputFileName, '', `${process.env.PUBLIC_URL}data/`);
    await window.spire.FetchFileToVFS('logo.png', '', `${process.env.PUBLIC_URL}data/`);

    // Load the workbook
    const workbook = new xlsModule.Workbook();
    workbook.LoadFromFile({ fileName: inputFileName });

    // Get the first worksheet
    const sheet = workbook.Worksheets.get(0);

    // Add the first textbox and set its position and size
    const textBox = sheet.TextBoxes.AddTextBox(3, 2, 50, 196);

    // Set the text in the textbox
    textBox.Text = 'Insert Excel TextBox';

    // Set the text to be centered horizontally and vertically
    textBox.HAlignment = xlsModule.CommentHAlignType.Center;
    textBox.VAlignment = xlsModule.CommentVAlignType.Center;

    // Set the font of the textbox (bold, white, 12pt)
    const font = workbook.CreateFont();
    font.FontName = 'Arial';
    font.Size = 12;
    font.IsBold = true;
    font.Color = xlsModule.Color.get_White();
    const rt = xlsModule.RichTextShape.Convert(textBox.RichText);
    rt.SetFont(0, textBox.Text.length - 1, font);

    // Set the background color of the textbox to blue-gray
    textBox.Fill.FillType = xlsModule.ShapeFillType.SolidColor;
    textBox.Fill.ForeKnownColor = xlsModule.ExcelColors.BlueGray;

    // Add the second textbox and set its position and size
    const textBox2 = sheet.TextBoxes.AddTextBox(6, 5, 90, 90);

    // Load a picture and fill the textbox with it
    textBox2.Fill.CustomPicture('logo.png');
    textBox2.Fill.FillType = xlsModule.ShapeFillType.Picture;

    // Set the border of the second textbox to 0
    textBox2.Line.Weight = 0;

    // Save the document
    const outputFileName = 'AddTextBox_output.xlsx';
    workbook.SaveToFile({ fileName: outputFileName });

    // Release resources
    workbook.Dispose();

    // Read the converted file from the VFS and trigger the download
    const fileArray = window.dotnetRuntime.Module.FS.readFile(outputFileName);
    const blob = new Blob([fileArray], { type: 'application/vnd.openxmlformats-officedocument.spreadsheetml.sheet' });
    const url = URL.createObjectURL(blob);
    const a = document.createElement('a');
    a.href = url;
    a.download = outputFileName;
    a.click();
    URL.revokeObjectURL(url);
  };

  return (
    <div style={{ textAlign: 'center', height: '300px' }}>
      <h1>Add TextBox</h1>
      <button onClick={addTextBox}>
        Start
      </button>
    </div>
  );
}

export default App;
The result of adding the textboxes 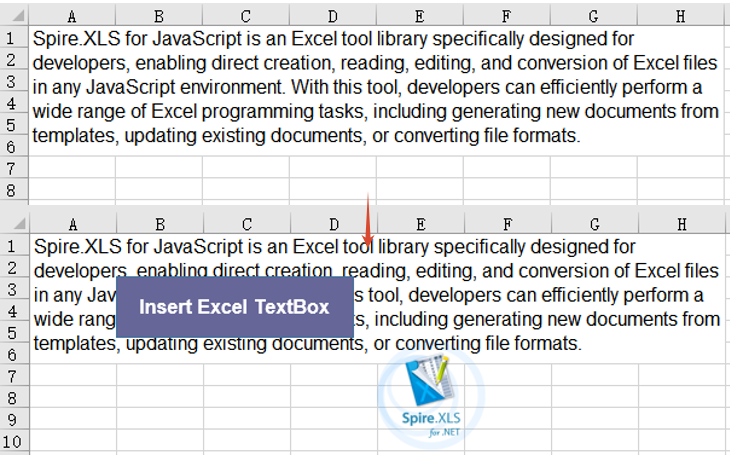
Extract Text and Image from TextBox
When you need to aggregate or reuse annotation information in existing documents, you can iterate through the textboxes and extract their text content and fill images. Spire.XLS for JavaScript gets the number of textboxes with Worksheet.TextBoxes.Count and iterates over each textbox with the Worksheet.TextBoxes.get() method: it reads the Text property to obtain the text content, checks the fill type through Fill.FillType, and extracts the fill image through the Fill.Picture property, finally saving the results as a txt file and a png image file respectively. The main steps are as follows:
- Create a
Workbookobject and use theLoadFromFile()method to load the Excel document. - Use the
Workbook.Worksheets.get()method to get a specific worksheet. - Iterate over each textbox in the
TextBoxescollection withWorksheet.TextBoxes.CountandWorksheet.TextBoxes.get(). - Read the
Textproperty of each textbox to collect the text content. - For a textbox filled with a picture, get its fill image through the
Fill.Pictureproperty and save it as a png file. - Write the collected text into a txt file.
Here is a complete code example showing how to extract text and images from a textbox in React:
function App() {
  const extractTextAndImage = async () => {
    // Get the Spire.XLS WASM module
    const xlsModule = window.wasmModule?.spirexls;

    // Check whether the module is ready
    if (!xlsModule) {
      alert('Spire.Xls is not ready yet');
      return;
    }

    // Load the font and Excel file into the VFS
    await window.spire.FetchFileToVFS('ARIAL.TTF', '/Library/Fonts/', `${process.env.PUBLIC_URL}/font/`);
    const inputFileName = 'TextBox.xlsx';
    await window.spire.FetchFileToVFS(inputFileName, '', `${process.env.PUBLIC_URL}data/`);

    // Load the workbook
    const workbook = new xlsModule.Workbook();
    workbook.LoadFromFile({ fileName: inputFileName });

    // Get the first worksheet
    const sheet = workbook.Worksheets.get(0);

    // Iterate over all textboxes in the worksheet and extract text and pictures
    const textLines = [];
    const pictureFiles = [];
    for (let i = sheet.TextBoxes.Count - 1; i >= 0; i--) {
      const shape = sheet.TextBoxes.get(i);

      // Extract the text in the textbox
      if (shape.Text) {
        textLines.push(shape.Text);
      }

      // Extract the fill picture of the textbox
      if (shape.Fill.FillType === xlsModule.ShapeFillType.Picture) {
        const picture = shape.Fill.Picture;
        const imageFile = 'ExtractedImage' + i + '.png';
        picture.Save(imageFile);
        pictureFiles.push(imageFile);
      }
    }

    // Save the extracted text as a txt file
    const textFile = 'ExtractedText.txt';
    window.dotnetRuntime.Module.FS.writeFile(textFile, textLines.join('\r\n'));

    // Release resources
    workbook.Dispose();

    // Read the extracted txt file from the VFS and trigger the download
    const txtArray = window.dotnetRuntime.Module.FS.readFile(textFile);
    const txtBlob = new Blob([txtArray], { type: 'text/plain' });
    const txtUrl = URL.createObjectURL(txtBlob);
    const txtAnchor = document.createElement('a');
    txtAnchor.href = txtUrl;
    txtAnchor.download = textFile;
    txtAnchor.click();
    URL.revokeObjectURL(txtUrl);

    // Read the extracted picture files from the VFS and trigger the downloads
    for (const imageFile of pictureFiles) {
      const imageArray = window.dotnetRuntime.Module.FS.readFile(imageFile);
      const imageBlob = new Blob([imageArray], { type: 'application/png' });
      const imageUrl = URL.createObjectURL(imageBlob);
      const imageAnchor = document.createElement('a');
      imageAnchor.href = imageUrl;
      imageAnchor.download = imageFile;
      imageAnchor.click();
      URL.revokeObjectURL(imageUrl);
    }
  };

  return (
    <div style={{ textAlign: 'center', height: '300px' }}>
      <h1>Extract Text And Image From TextBox</h1>
      <button onClick={extractTextAndImage}>
        Start
      </button>
    </div>
  );
}

export default App;
The result of extracting the text and image from the textbox 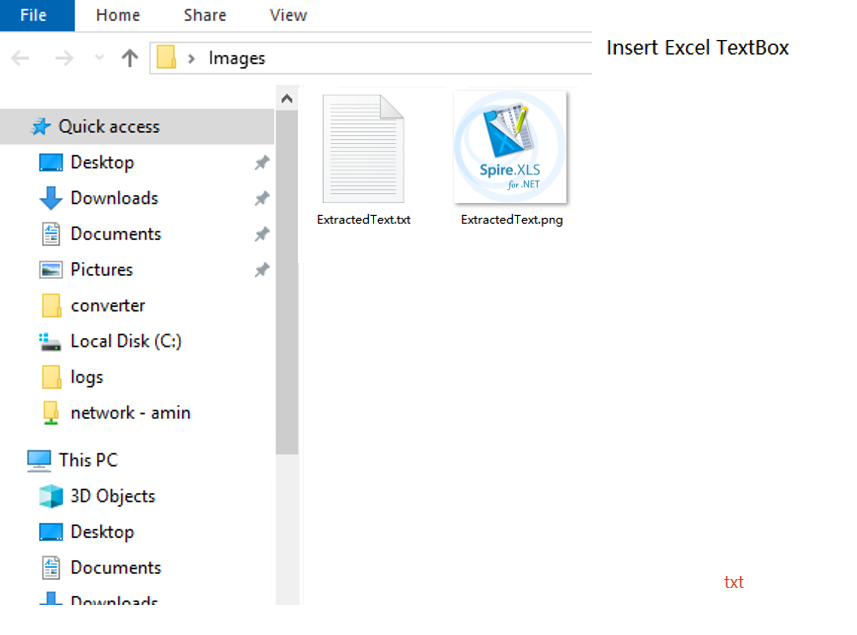
Remove TextBox
When annotation information in a document is no longer needed, you can delete it to keep the worksheet tidy. Spire.XLS for JavaScript deletes a specified textbox by index with the Worksheet.TextBoxes.RemoveAt() method. The main steps are as follows:
- Create a
Workbookobject and use theLoadFromFile()method to load the Excel document. - Use the
Workbook.Worksheets.get()method to get a specific worksheet. - Use the
Worksheet.TextBoxes.RemoveAt()method to delete the textbox at a specified index. - Use the
Workbook.SaveToFile()method to save the document to a specified path.
Here is a complete code example showing how to remove a textbox from a worksheet in React:
function App() {
  const removeTextBox = async () => {
    // Get the Spire.XLS WASM module
    const xlsModule = window.wasmModule?.spirexls;

    // Check whether the module is ready
    if (!xlsModule) {
      alert('Spire.Xls is not ready yet');
      return;
    }

    // Load the font and Excel file into the VFS
    await window.spire.FetchFileToVFS('ARIAL.TTF', '/Library/Fonts/', `${process.env.PUBLIC_URL}/font/`);
    const inputFileName = 'TextBox.xlsx';
    await window.spire.FetchFileToVFS(inputFileName, '', `${process.env.PUBLIC_URL}data/`);

    // Load the workbook
    const workbook = new xlsModule.Workbook();
    workbook.LoadFromFile({ fileName: inputFileName });

    // Get the first worksheet
    const sheet = workbook.Worksheets.get(0);

    // Remove the first textbox
    sheet.TextBoxes.RemoveAt(0);

    // Save the document
    const outputFileName = 'RemoveTextBox_output.xlsx';
    workbook.SaveToFile({ fileName: outputFileName });

    // Release resources
    workbook.Dispose();

    // Read the converted file from the VFS and trigger the download
    const fileArray = window.dotnetRuntime.Module.FS.readFile(outputFileName);
    const blob = new Blob([fileArray], { type: 'application/vnd.openxmlformats-officedocument.spreadsheetml.sheet' });
    const url = URL.createObjectURL(blob);
    const a = document.createElement('a');
    a.href = url;
    a.download = outputFileName;
    a.click();
    URL.revokeObjectURL(url);
  };

  return (
    <div style={{ textAlign: 'center', height: '300px' }}>
      <h1>Remove TextBox</h1>
      <button onClick={removeTextBox}>
        Start
      </button>
    </div>
  );
}

export default App;
The result of removing the textbox 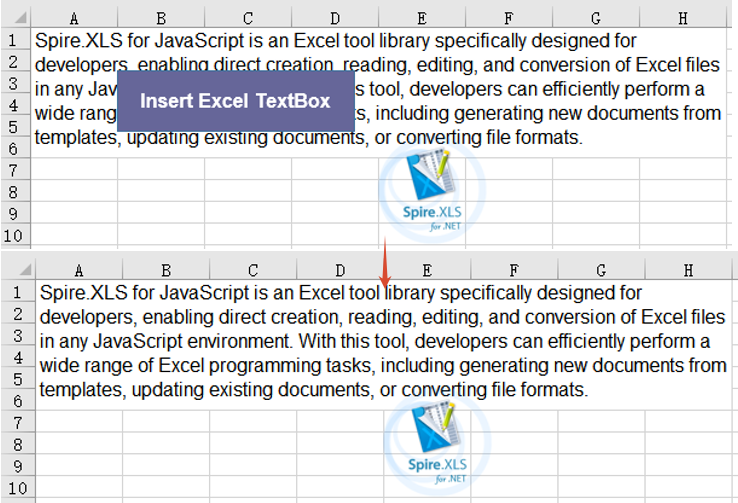
Frequently Asked Questions
The added textbox does not display in the result document
Cause: The row and column coordinates specified in the AddTextBox() method are out of range, or the font file was not loaded into the VFS, so the text in the textbox cannot be rendered properly.
Solution: Make sure the row and column coordinates are within the worksheet range, and ensure the required font has been loaded via FetchFileToVFS() before use, for example:
await window.spire.FetchFileToVFS(
  'ARIAL.TTF', '/Library/Fonts/', '/'
);
An error occurs when extracting an image due to the fill type
Cause: Accessing the Fill.Picture property directly only works for textboxes filled with a picture. If no image fill is set on the textbox (for example, a solid-color fill), accessing this property throws an exception.
Solution: Check whether the Fill.FillType of the textbox is Picture before accessing Fill.Picture; only then get the picture and call the Save() method to save it.
Obtain a Free License
Spire.XLS for JavaScript offers a 30-day full-featured free trial license with no functional limitations. Apply here to evaluate before purchasing.
Insert or Read Functions and Formulas in Excel Worksheets with JavaScript in React
2026-09-08 09:57:41 Written by jie zouIn Excel document processing, formulas and functions are among the most essential capabilities — whether summing, averaging, or performing date and trigonometric operations, formulas make data processing automated and efficient. Spire.XLS for JavaScript completes the insertion and reading of formulas and functions directly in the browser based on WebAssembly, and manages input and output files through a virtual file system (VFS), with no backend service required.
This article covers two core features:
- Insert Formulas and Functions into an Excel Worksheet
- Read Formulas and Functions from an Excel Worksheet
For installation and project configuration, refer to Integrating Spire.XLS for JavaScript in a React Project. The examples below assume Spire.XLS is installed and the WebAssembly module is initialized.
Insert Formulas and Functions into an Excel Worksheet
The Formula property of the cell Range object returned by the Worksheet.Range.get() method in Spire.XLS for JavaScript can be used to add formulas or functions to specified cells in an Excel worksheet. The main steps for adding formulas and functions to an Excel worksheet are as follows:
- Create a
Workbookobject. - Use the
Workbook.Worksheets.get()method to get a specific worksheet. - Write data into cells and set the cell formatting.
- Use the
Range.Formulaproperty to add formulas and functions to the specified cells of the worksheet. - Use the
Workbook.SaveToFile()method to save the workbook.
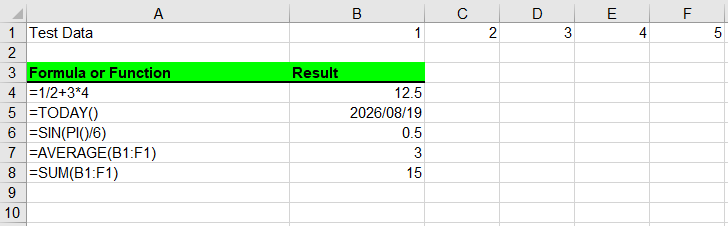
Here is a complete code example showing how to insert mathematical operations, date functions, trigonometric functions, average functions, and sum functions into an Excel worksheet in React:
function App() {
  const insertFormulasAndFunctions = async () => {
    // Get the Spire.XLS WASM module
    const xlsModule = window.wasmModule?.spirexls;

    // Check whether the module is ready
    if (!xlsModule) {
      alert('Spire.Xls is not ready yet');
      return;
    }

    // Load the font into the VFS
    await window.spire.FetchFileToVFS('ARIAL.TTF', '/Library/Fonts/', `${process.env.PUBLIC_URL}/font/`);

    // Create a Workbook object
    const workbook = new xlsModule.Workbook();

    // Get the first worksheet
    const sheet = workbook.Worksheets.get(0);

    // Declare two variables: currentRow and currentFormula
    let currentRow = 1;
    let currentFormula = "";

    // Set the column width
    sheet.SetColumnWidth(1, 32);
    sheet.SetColumnWidth(2, 16);

    // Write data into cells
    sheet.Range.get({ row: currentRow, column: 1 }).Value = "Test Data";
    sheet.Range.get({ row: currentRow, column: 2 }).NumberValue = 1;
    sheet.Range.get({ row: currentRow, column: 3 }).NumberValue = 2;
    sheet.Range.get({ row: currentRow, column: 4 }).NumberValue = 3;
    sheet.Range.get({ row: currentRow, column: 5 }).NumberValue = 4;
    sheet.Range.get({ row: currentRow, column: 6 }).NumberValue = 5;
    currentRow += 2;
    sheet.Range.get({ row: currentRow, column: 1 }).Value = "Formula or Function";
    sheet.Range.get({ row: currentRow, column: 2 }).Value = "Result";

    // Set the cell formatting
    let range = sheet.Range.get({ row: currentRow, column: 1, lastRow: currentRow, lastColumn: 2 });
    range.Style.Font.FontName = "Arial";
    range.Style.KnownColor = xlsModule.ExcelColors.LightGreen;
    range.Style.FillPattern = xlsModule.ExcelPatternType.Solid;
    range.Style.Borders.get(xlsModule.BordersLineType.EdgeBottom).LineStyle = xlsModule.LineStyleType.Medium;
    range.Style.Font.IsBold = true;

    // Mathematical operation
    currentFormula = "=1/2+3*4";
    currentRow += 1;
    sheet.Range.get({ row: currentRow, column: 1 }).NumberFormat = "@";
    sheet.Range.get({ row: currentRow, column: 1 }).Text = currentFormula;
    sheet.Range.get({ row: currentRow, column: 2 }).Formula = currentFormula;

    // Date function
    currentFormula = "=TODAY()";
    currentRow += 1;
    sheet.Range.get({ row: currentRow, column: 1 }).NumberFormat = "@";
    sheet.Range.get({ row: currentRow, column: 1 }).Text = currentFormula;
    sheet.Range.get({ row: currentRow, column: 2 }).Formula = currentFormula;
    sheet.Range.get({ row: currentRow, column: 2 }).Style.NumberFormat = "YYYY/MM/DD";

    // Trigonometric function
    currentFormula = "=SIN(PI()/6)";
    currentRow += 1;
    sheet.Range.get({ row: currentRow, column: 1 }).NumberFormat = "@";
    sheet.Range.get({ row: currentRow, column: 1 }).Text = currentFormula;
    sheet.Range.get({ row: currentRow, column: 2 }).Formula = currentFormula;

    // Average function
    currentFormula = "=AVERAGE(B1:F1)";
    currentRow += 1;
    sheet.Range.get({ row: currentRow, column: 1 }).NumberFormat = "@";
    sheet.Range.get({ row: currentRow, column: 1 }).Text = currentFormula;
    sheet.Range.get({ row: currentRow, column: 2 }).Formula = currentFormula;

    // Sum function
    currentFormula = "=SUM(B1:F1)";
    currentRow += 1;
    sheet.Range.get({ row: currentRow, column: 1 }).NumberFormat = "@";
    sheet.Range.get({ row: currentRow, column: 1 }).Text = currentFormula;
    sheet.Range.get({ row: currentRow, column: 2 }).Formula = currentFormula;

    // Save the workbook
    const outputFileName = 'InsertFormulasAndFunctions_output.xlsx';
    workbook.SaveToFile({ fileName: outputFileName, version: xlsModule.ExcelVersion.Version2010 });

    // Release resources
    workbook.Dispose();

    // Read the converted file from the VFS and trigger a download
    const fileArray = window.dotnetRuntime.Module.FS.readFile(outputFileName);
    const blob = new Blob([fileArray], { type: 'application/vnd.openxmlformats-officedocument.spreadsheetml.sheet' });
    const url = URL.createObjectURL(blob);
    const a = document.createElement('a');
    a.href = url;
    a.download = outputFileName;
    a.click();
    URL.revokeObjectURL(url);
  };

  return (
    <div style={{ textAlign: 'center', height: '300px' }}>
      <h1>Insert Formulas and Functions</h1>
      <button onClick={insertFormulasAndFunctions}>
        Start
      </button>
    </div>
  );
}

export default App;
Insert formulas and function results into Excel worksheets
Read Formulas and Functions from an Excel Worksheet
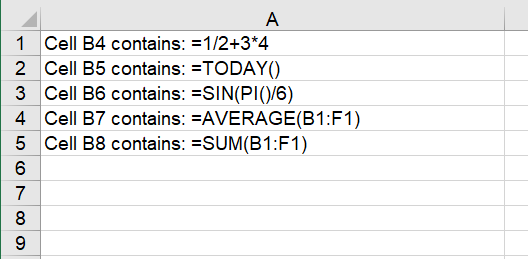
To read formulas and functions from an Excel worksheet, you need to loop through all the used cells in the worksheet, then use the HasFormula property of a cell to find the cells that contain formulas or functions, and finally use the Range.Formula property to get the formulas or functions in those cells. The detailed steps are as follows:
- Create a
Workbookobject. - Use the
Workbook.LoadFromFile()method to load an Excel workbook. - Use the
Workbook.Worksheets.get()method to get the first worksheet. - Loop through the used cells in the worksheet.
- Use the
HasFormulaproperty to detect whether a cell contains a formula or function. If so, use theRange.RangeAddressLocalproperty and theRange.Formulaproperty to get the cell name and its formula or function, and output the retrieved content.
Here is a complete code example showing how to loop through a worksheet and read the formulas and functions in React:
function App() {
  const readFormulasAndFunctions = async () => {
    // Get the Spire.XLS WASM module
    const xlsModule = window.wasmModule?.spirexls;

    // Check whether the module is ready
    if (!xlsModule) {
      alert('Spire.Xls is not ready yet');
      return;
    }

    // Load the font and Excel file into the VFS
    await window.spire.FetchFileToVFS('ARIAL.TTF', '/Library/Fonts/', `${process.env.PUBLIC_URL}/font/`);
    const inputFileName = 'FormulasAndFunctions.xlsx';
    await window.spire.FetchFileToVFS(inputFileName, '', `${process.env.PUBLIC_URL}data/`);

    // Create a Workbook object
    const workbook = new xlsModule.Workbook();

    // Load the Excel workbook
    workbook.LoadFromFile({ fileName: inputFileName });

    // Get the first worksheet
    const sheet = workbook.Worksheets.get(0);

    // Get the used cell range of the worksheet
    const usedRange = sheet.AllocatedRange;

    // Create an output workbook
    const output = new xlsModule.Workbook();
    const outSheet = output.Worksheets.get(0);
    let outRow = 1;

    // Loop through the used cells
    for (const cell of usedRange.Cells) {
      // Check whether the cell contains a formula or function
      if (cell.HasFormula) {
        // Get the cell name
        const cellname = cell.RangeAddressLocal;

        // Get the formula or function in the cell
        const formula = cell.Formula;

        // Write the cell name and formula that were read
        outSheet.Range.get({ row: outRow, column: 1 }).Value = "Cell " + cellname + " contains: " + formula;
        outRow += 1;
      }
    }

    // Set the output column width so the text displays completely
    outSheet.SetColumnWidth(1, 45);

    // Save the output workbook
    const outputFileName = 'ReadFormulasAndFunctions_output.xlsx';
    output.SaveToFile({ fileName: outputFileName, version: xlsModule.ExcelVersion.Version2010 });

    // Release resources
    output.Dispose();

    // Read the converted file from the VFS and trigger a download
    const fileArray = window.dotnetRuntime.Module.FS.readFile(outputFileName);
    const blob = new Blob([fileArray], { type: 'application/vnd.openxmlformats-officedocument.spreadsheetml.sheet' });
    const url = URL.createObjectURL(blob);
    const a = document.createElement('a');
    a.href = url;
    a.download = outputFileName;
    a.click();
    URL.revokeObjectURL(url);
  };

  return (
    <div style={{ textAlign: 'center', height: '300px' }}>
      <h1>Read Formulas and Functions</h1>
      <button onClick={readFormulasAndFunctions}>
        Start
      </button>
    </div>
  );
}

export default App;
Read formulas and function results from Excel worksheets
Frequently Asked Questions
HasFormula cannot detect the formula, and the loop returns no results
Cause: The formula in the target cell was actually written as text (using the Text/Value property instead of the Formula property), and HasFormula only returns true for real formulas.
Solution: Make sure to use the Range.Formula property when inserting; otherwise, re-assign the text as a formula before reading.
Confusing the Formula and FormulaNumberValue properties
Cause: The Formula property returns the formula string in the cell, while the FormulaNumberValue property returns the numeric result after the formula is calculated. The two return different content.
Solution: Use cell.Formula when you need the formula string, and cell.FormulaNumberValue when you need the numeric result after calculation. Choose the appropriate property based on your actual needs.
Get a Free License
Spire.XLS for JavaScript offers a 30-day full-featured free trial license with no functional limitations. Apply here to evaluate before purchasing.
Group or Ungroup Rows and Columns in Excel with JavaScript in React
2026-09-04 08:50:04 Written by jie zouIn everyday Excel spreadsheet handling, grouping rows or columns lets you collapse detail data and show only summary information, making large tables cleaner and easier to read. Spire.XLS for JavaScript performs grouping and ungrouping directly in the browser based on WebAssembly, and manages input/output files through a virtual file system (VFS), with no backend service required.
This article covers two core features:
For installation and project configuration, refer to Integrate Spire.XLS for JavaScript in a React Project. The examples below assume Spire.XLS is installed and the WebAssembly module is initialized.
Group Rows or Columns
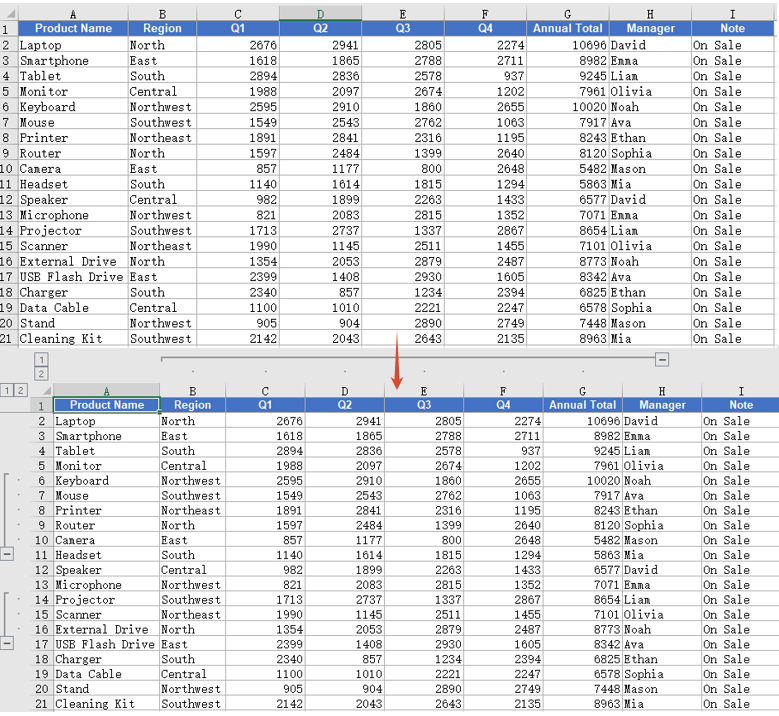
After grouping rows or columns, you can collapse the detail data inside a group and keep only the summary rows or columns you need, making the worksheet tidier. Spire.XLS for JavaScript groups rows with the GroupByRows() method and columns with the GroupByColumns() method. The main steps are as follows:
- Create a
Workbookobject and use theLoadFromFile()method to load the Excel document. - Use the
Workbook.Worksheets.get()method to get a specific worksheet. - Use the
Worksheet.GroupByRows()method to group rows. - Use the
Worksheet.GroupByColumns()method to group columns. - Use the
Workbook.SaveToFile()method to save the document to a specified path.
Here is a complete code example showing how to group rows or columns in React:
function App() {
  const groupRowsAndColumns = async () => {
    // Get the Spire.XLS WASM module
    const xlsModule = window.wasmModule?.spirexls;

    // Check whether the module is ready
    if (!xlsModule) {
      alert('Spire.Xls is not ready yet');
      return;
    }

    // Load the font and Excel file into the VFS
    await window.spire.FetchFileToVFS('ARIAL.TTF', '/Library/Fonts/', `${process.env.PUBLIC_URL}/font/`);
    const inputFileName = 'GroupRowsAndColumns.xlsx';
    await window.spire.FetchFileToVFS(inputFileName, '', `${process.env.PUBLIC_URL}data/`);

    // Load the workbook
    const workbook = new xlsModule.Workbook();
    workbook.LoadFromFile({ fileName: inputFileName });

    // Get the first worksheet
    const sheet = workbook.Worksheets.get(0);

    // Group rows
    sheet.GroupByRows(6, 10, false);
    sheet.GroupByRows(14, 16, false);

    // Group columns
    sheet.GroupByColumns(2, 7, false);

    // Save the document
    const outputFileName = 'GroupRowsAndColumns_output.xlsx';
    workbook.SaveToFile({ fileName: outputFileName, version: xlsModule.ExcelVersion.Version2010 });

    // Release resources
    workbook.Dispose();

    // Read the converted file from the VFS and trigger a download
    const fileArray = window.dotnetRuntime.Module.FS.readFile(outputFileName);
    const blob = new Blob([fileArray], { type: 'application/vnd.openxmlformats-officedocument.spreadsheetml.sheet' });
    const url = URL.createObjectURL(blob);
    const a = document.createElement('a');
    a.href = url;
    a.download = outputFileName;
    a.click();
    URL.revokeObjectURL(url);
  };

  return (
    <div style={{ textAlign: 'center', height: '300px' }}>
      <h1>Group Rows And Columns</h1>
      <button onClick={groupRowsAndColumns}>
        Start
      </button>
    </div>
  );
}

export default App;
After grouping, group markers appear on the left side of the grouped rows or above the grouped columns. Click a marker to collapse or expand the detail data.
Ungroup Rows or Columns
When the grouping structure is no longer needed, you can ungroup the existing groups so that all rows and columns return to their normal display. Spire.XLS for JavaScript ungroups rows with the UngroupByRows() method and columns with the UngroupByColumns() method. The main steps are as follows:
- Create a
Workbookobject and use theLoadFromFile()method to load the Excel document that contains groups. - Use the
Workbook.Worksheets.get()method to get a specific worksheet. - Use the
Worksheet.UngroupByRows()method to ungroup rows. - Use the
Worksheet.UngroupByColumns()method to ungroup columns. - Use the
Workbook.SaveToFile()method to save the document to a specified path.
Here is a complete code example showing how to ungroup rows or columns in React:
function App() {
  const ungroupRowsAndColumns = async () => {
    // Get the Spire.XLS WASM module
    const xlsModule = window.wasmModule?.spirexls;

    // Check whether the module is ready
    if (!xlsModule) {
      alert('Spire.Xls is not ready yet');
      return;
    }

    // Load the font and Excel file into the VFS
    await window.spire.FetchFileToVFS('ARIAL.TTF', '/Library/Fonts/', `${process.env.PUBLIC_URL}/font/`);
    const inputFileName = 'GroupRowsAndColumns.xlsx';
    await window.spire.FetchFileToVFS(inputFileName, '', `${process.env.PUBLIC_URL}data/`);

    // Load the workbook
    const workbook = new xlsModule.Workbook();
    workbook.LoadFromFile({ fileName: inputFileName });

    // Get the first worksheet
    const sheet = workbook.Worksheets.get(0);

    // Ungroup rows
    sheet.UngroupByRows(6, 10);
    sheet.UngroupByRows(14, 16);

    // Ungroup columns
    sheet.UngroupByColumns(2, 7);

    // Save the document
    const outputFileName = 'UngroupRowsAndColumns_output.xlsx';
    workbook.SaveToFile({ fileName: outputFileName, version: xlsModule.ExcelVersion.Version2010 });

    // Release resources
    workbook.Dispose();

    // Read the converted file from the VFS and trigger a download
    const fileArray = window.dotnetRuntime.Module.FS.readFile(outputFileName);
    const blob = new Blob([fileArray], { type: 'application/vnd.openxmlformats-officedocument.spreadsheetml.sheet' });
    const url = URL.createObjectURL(blob);
    const a = document.createElement('a');
    a.href = url;
    a.download = outputFileName;
    a.click();
    URL.revokeObjectURL(url);
  };

  return (
    <div style={{ textAlign: 'center', height: '300px' }}>
      <h1>Ungroup Rows And Columns</h1>
      <button onClick={ungroupRowsAndColumns}>
        Start
      </button>
    </div>
  );
}

export default App;
After ungrouping, the group markers on the rows or columns disappear and the data returns to the normal ungrouped display.
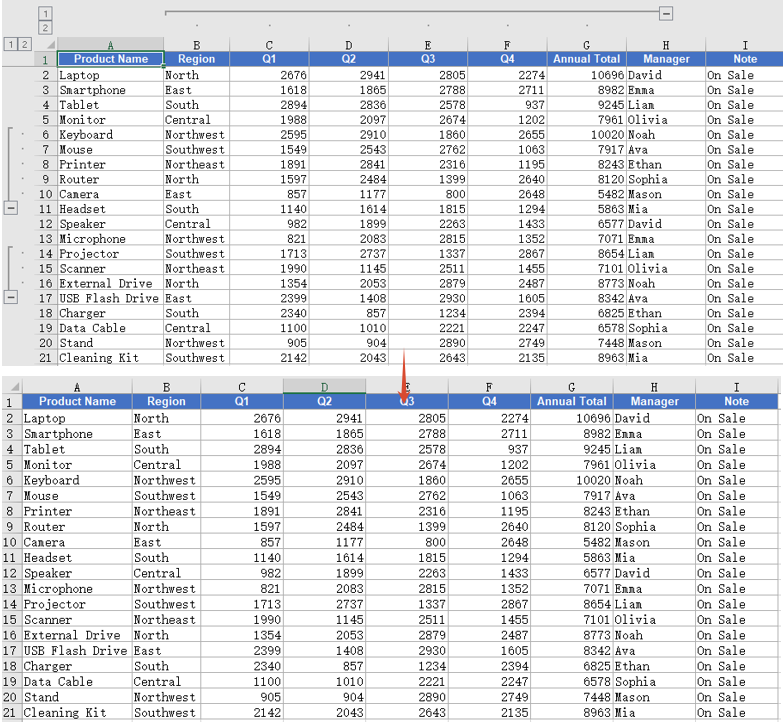
FAQ
Cannot collapse or expand detail data after grouping
Cause: The third parameter isCollapsed of the GroupByRows() and GroupByColumns() methods is set to false, so the groups are displayed expanded by default.
Solution: Set this parameter to true, and the groups will be displayed collapsed after saving:
sheet.GroupByRows(6, 10, true);
Some rows or columns still show group symbols after ungrouping
Cause: The UngroupByRows() and UngroupByColumns() methods only ungroup the rows or columns within the specified range. If these rows or columns also belong to a higher-level group, the higher-level group symbols are still retained.
Solution: Make sure the range passed when ungrouping matches the range used when grouping. If nested groups exist, call the ungroup methods repeatedly to ungroup level by level:
sheet.UngroupByRows(6, 10);
sheet.UngroupByRows(14, 16);
sheet.UngroupByColumns(2, 7);
Obtain a Free License
Spire.XLS for JavaScript offers a 30-day full-featured free trial license with no functional limitations. Apply here to evaluate before purchasing.
Reading Excel files directly in a web application is useful for many scenarios, such as displaying spreadsheet data on a webpage, importing business records, analyzing worksheet content, or extracting specific data for further processing. In React applications, developers may also need to distinguish between different Excel data types, including text, numbers, formulas, dates, and Boolean values.
Spire.XLS for JavaScript provides APIs for loading and manipulating Excel files in JavaScript applications. With it, you can access worksheets and cells, retrieve different types of cell values, and extract embedded images without requiring Microsoft Excel. This article demonstrates how to read Excel files with JavaScript in React, including reading worksheet data, retrieving different cell value types, and extracting images.
On this page:
- Install Spire.XLS for JavaScript in a React Project
- Read Excel Data with JavaScript in React
- Read Different Types of Cell Data from Excel
- Read Images from Excel Worksheets
- Conclusion
- FAQs
Install Spire.XLS for JavaScript in a React Project
Before working with Excel files, install Spire.XLS for JavaScript in your React project.
Open a terminal in the project directory and run:
npm i spire.office
After installing the package, copy the required Spire.XLS JavaScript and WebAssembly runtime files to the public directory of the React project.
For detailed instructions on setting up the library and its WebAssembly runtime, refer to: How to Integrate Spire.XLS for JavaScript in a React Project
Once the runtime is configured, Excel files can be loaded into the Spire virtual file system and processed in the browser.
Read Excel Data with JavaScript in React
A common requirement when reading Excel files is to retrieve all used data from a worksheet and display it in a web interface.
Spire.XLS provides the AllocatedRange property to obtain the range of cells that are currently in use. You can then loop through its rows and columns and retrieve each cell's value.
The main steps are as follows:
- Load and initialize the Spire.XLS WebAssembly module.
- Load the Excel file into the Spire virtual file system.
- Create a
Workbookobject and load the Excel file. - Access the desired worksheet.
- Get the worksheet's allocated range.
- Iterate through the cells and retrieve their values.
- Store the extracted values in React state and display them in an HTML table.
The following example reads data from the first worksheet of an Excel file named Data.xlsx and displays the retrieved values in a React table.
import React, { useState, useEffect } from 'react';

function App() {
  const [wasmModule, setWasmModule] = useState(null);
  const [tableData, setTableData] = useState([]);
  const [status, setStatus] = useState('Loading Excel runtime...');
  const [error, setError] = useState('');

  useEffect(() => {
    (async () => {
      try {
        const publicUrl = process.env.PUBLIC_URL || '';
        const spireModule = await import(
          /* webpackIgnore: true */
          `${publicUrl}/spire.xls.js`
        );

        const xlsModule = spireModule.spirexls || window.spirexls;

        if (!xlsModule) {
          throw new Error('Spire XLS module was not initialized.');
        }

        window.wasmModule = xlsModule;
        setWasmModule(xlsModule);
        setStatus('Excel runtime ready.');
      } catch (err) {
        console.error('Failed to load Spire XLS runtime:', err);
        setError(err.message || 'Failed to load Spire XLS runtime.');
        setStatus('');
      }
    })();
  }, []);

  const loadExcelToVfs = async (fileName) => {
    const publicUrl = process.env.PUBLIC_URL || '';
    const response = await fetch(`${publicUrl}/${fileName}`);

    if (!response.ok) {
      throw new Error(
        `Failed to load ${fileName}: ${response.status} ${response.statusText}`
      );
    }

    if (!window.dotnetRuntime?.Module?.FS) {
      throw new Error('Spire virtual file system is not ready.');
    }

    const fileBytes = new Uint8Array(await response.arrayBuffer());

    window.dotnetRuntime.Module.FS.writeFile(
      fileName,
      fileBytes,
      { flags: 'w+' }
    );

    return fileName;
  };

  const readExcelData = async () => {
    if (!wasmModule) {
      setError('Excel runtime is not ready yet.');
      return;
    }

    setError('');
    setStatus('Reading Excel file...');

    const workbook = new wasmModule.Workbook();

    try {
      const inputFile = await loadExcelToVfs('Data.xlsx');
      workbook.LoadFromFile(inputFile);

      const sheet = workbook.Worksheets.get(0);
      const range = sheet.AllocatedRange;
      const rows = [];

      if (range) {
        const firstRow = range.Row;
        const firstColumn = range.Column;

        const lastRow =
          range.LastRow || firstRow + range.RowCount - 1;

        const lastColumn =
          range.LastColumn || firstColumn + range.ColumnCount - 1;

        for (let r = firstRow; r <= lastRow; r++) {
          const row = [];

          for (let c = firstColumn; c <= lastColumn; c++) {
            row.push(sheet.get(r, c).Value);
          }

          rows.push(row);
        }
      }

      setTableData(rows);
      setStatus(`Loaded ${rows.length} rows.`);
    } catch (err) {
      console.error('Failed to read Excel file:', err);
      setError(err.message || 'Failed to read Excel file.');
      setStatus('');
    } finally {
      workbook.Dispose();
    }
  };

  return (
    <div style={{ textAlign: 'center', padding: 30 }}>
      <h1>Read Excel in JavaScript</h1>

      <button onClick={readExcelData} disabled={!wasmModule}>
        Read Excel File
      </button>

      {status && <p>{status}</p>}

      {error && (
        <p style={{ color: 'crimson' }}>
          {error}
        </p>
      )}

      {tableData.length > 0 && (
        <table
          border="1"
          cellPadding="8"
          style={{
            margin: '20px auto',
            borderCollapse: 'collapse'
          }}
        >
          <tbody>
            {tableData.map((row, ri) => (
              <tr key={ri}>
                {row.map((cell, ci) => (
                  <td key={ci}>{cell}</td>
                ))}
              </tr>
            ))}
          </tbody>
        </table>
      )}
    </div>
  );
}

export default App;
Code Explanation
The example first dynamically loads the Spire.XLS JavaScript runtime:
const spireModule = await import(
  /* webpackIgnore: true */
  `${publicUrl}/spire.xls.js`
);

const xlsModule = spireModule.spirexls || window.spirexls;
Since Spire.XLS uses a WebAssembly runtime, the source Excel file is then loaded into its virtual file system:
const fileBytes = new Uint8Array(await response.arrayBuffer());

window.dotnetRuntime.Module.FS.writeFile(
  fileName,
  fileBytes,
  { flags: 'w+' }
);
Next, create a Workbook object and load the Excel file:
const workbook = new wasmModule.Workbook();
workbook.LoadFromFile(inputFile);
The first worksheet can be accessed using:
const sheet = workbook.Worksheets.get(0);
To avoid iterating through unnecessary empty cells, the example retrieves the worksheet's used area through AllocatedRange:
const range = sheet.AllocatedRange;
The starting and ending rows and columns are then determined from this range. A nested loop is used to access each cell:
for (let r = firstRow; r <= lastRow; r++) {
  const row = [];

  for (let c = firstColumn; c <= lastColumn; c++) {
    row.push(sheet.get(r, c).Value);
  }

  rows.push(row);
}
Finally, the resulting two-dimensional array is stored in the tableData React state and rendered as an HTML table.
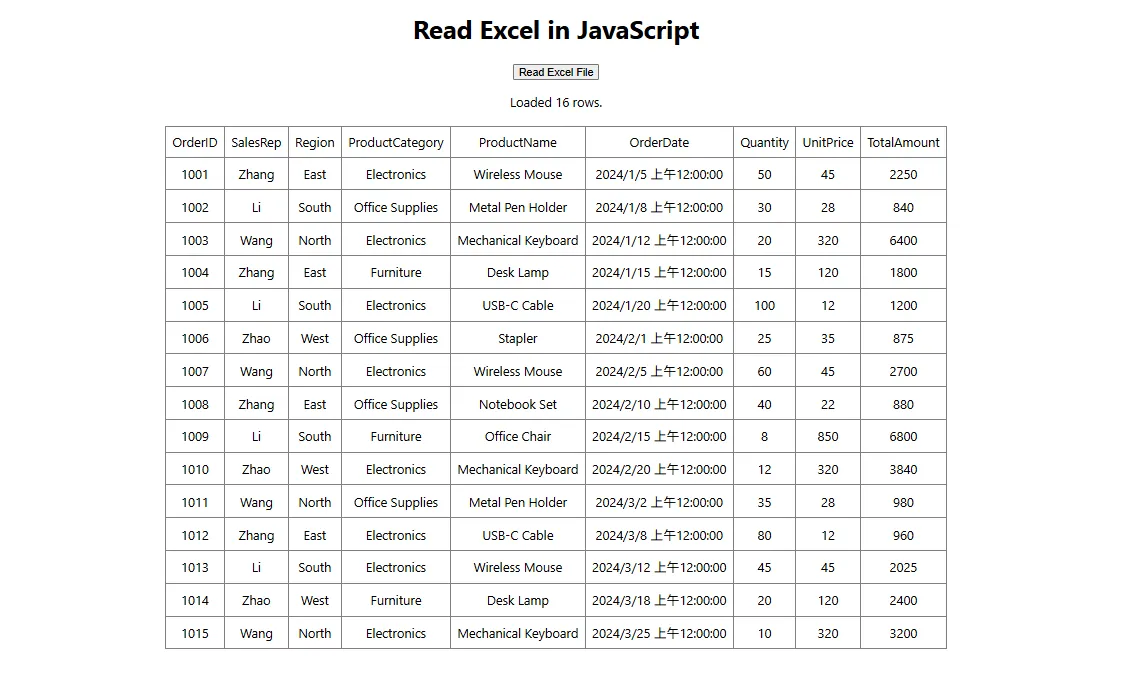
This approach is useful when building spreadsheet viewers, Excel import interfaces, reporting pages, or other applications where worksheet data needs to be presented directly in the browser.
Read Different Types of Cell Data from Excel
Excel cells can contain different kinds of data. Depending on the content you need to retrieve, Spire.XLS provides different properties or methods for accessing the underlying cell value.
The following table lists some commonly used options:
| Data to Read | API |
|---|---|
| Text | cell.Text |
| Number | cell.NumberValue |
| Formula | cell.Formula |
| Formula calculation result | cell.FormulaValue |
| Date and time | cell.DateTimeValue |
| Boolean value | cell.BooleanValue |
| Number or text value | cell.Value |
| Date, Boolean, or other value | cell.Value2 |
For example, first access a particular cell:
const cell = sheet.get(rowIndex, colIndex);
You can then retrieve its content according to the expected data type.
Read Text
Use the Text property to retrieve the text representation of a cell:
const text = sheet.get(rowIndex, colIndex).Text;
This is useful when the displayed textual content of a cell is required.
Read Numbers
To obtain a numeric value, use NumberValue:
const number = sheet.get(rowIndex, colIndex).NumberValue;
This can be useful when worksheet values will be used for calculations or numeric processing in JavaScript.
Read Formulas and Formula Results
Excel cells may contain formulas rather than static values. The formula expression itself can be retrieved through the Formula property:
const formula = sheet.get(rowIndex, colIndex).Formula;
For example, a formula cell may contain an expression such as:
=SUM(B2:B10)
If you need the calculated result of the formula instead of the formula expression, use:
const formulaResult = sheet.get(rowIndex, colIndex).FormulaValue;
Being able to retrieve both the formula and its result is useful for spreadsheet analysis and auditing applications.
Read Dates
Excel stores date and time information as a specialized cell value. You can retrieve it using:
const date = sheet.get(rowIndex, colIndex).DateTimeValue;
The returned date value can then be formatted or processed according to the requirements of the React application.
Read Boolean Values
For cells containing Boolean values such as TRUE or FALSE, use:
const bool = sheet.get(rowIndex, colIndex).BooleanValue;
Read General Cell Values
When a cell may contain either a number or text, the Value property provides a convenient general-purpose option:
const value = sheet.get(rowIndex, colIndex).Value;
For values such as dates, Boolean values, or other underlying Excel data types, Value2 can also be used:
const value = sheet.get(rowIndex, colIndex).Value2;
Choosing the appropriate property based on the expected Excel data type makes it easier to preserve the original meaning of the worksheet content when processing it in JavaScript.
Read Images from Excel Worksheets
In addition to cell data, Excel worksheets can contain embedded pictures. Spire.XLS for JavaScript allows you to access these images through the worksheet's Pictures collection.
The following example retrieves the first picture from a worksheet and saves it as a PNG file:
let pic = sheet.Pictures.get(0);

const outputFileName = 'ReadImages-out.png';

pic.Picture.Save(outputFileName);
Because the image is saved inside the Spire WebAssembly virtual file system, it can then be read back into JavaScript:
const modifiedFileArray = window.dotnetRuntime.Module.FS.readFile(outputFileName);
Next, create a JavaScript Blob from the resulting image data:
const modifiedFile = new Blob(
  [modifiedFileArray],
  { type: 'image/png' }
);
The resulting Blob can be used for further browser-side operations. For example, you can create an object URL and display the extracted image directly in a React component:
const imageUrl = URL.createObjectURL(modifiedFile);
Then use the generated URL as the source of an HTML image element:
<img src={imageUrl} alt="Extracted from Excel" />
If a worksheet contains multiple pictures, you can iterate through the Pictures collection and process each image individually.
This capability is useful for applications that need to extract product images, logos, charts saved as pictures, document assets, or other visual content embedded in Excel worksheets.
Conclusion
Reading Excel files in React makes it possible to bring spreadsheet data directly into browser-based workflows. With Spire.XLS for JavaScript, developers can load Excel workbooks, access worksheets and used ranges, iterate through cells, and retrieve data without relying on Microsoft Excel.
In addition to general cell values, Spire.XLS allows JavaScript applications to access specific data types such as text, numbers, formulas, formula results, dates, and Boolean values. Embedded worksheet images can also be retrieved and converted into browser-compatible objects for display or further processing.
These features can be used to build Excel viewers, data import tools, reporting systems, spreadsheet analysis interfaces, and other React applications that need to work with Excel content.
FAQs
Can JavaScript Read Excel Files in a React Application?
Yes. JavaScript can read Excel files in React with the help of an Excel-processing library such as Spire.XLS for JavaScript. After loading the Excel file into the WebAssembly virtual file system, you can access its worksheets, cells, formulas, images, and other spreadsheet content directly in the browser.
How Do I Read All Used Cells in an Excel Worksheet?
You can use the worksheet's AllocatedRange property to determine the range that contains data. After obtaining its starting and ending rows and columns, iterate through the range and access individual cells using:
sheet.get(rowIndex, colIndex)
This avoids unnecessarily iterating through large areas of empty worksheet cells.
How Can I Read an Excel Formula and Its Calculated Result Separately?
Use the Formula property to retrieve the formula expression:
const formula = sheet.get(rowIndex, colIndex).Formula;
Use CalculatedValue when you need the calculated value of the formula:
const result = sheet.get(rowIndex, colIndex).FormulaValue;
This makes it possible to inspect both the formula logic and its resulting value.
Can I Extract Images from Excel with JavaScript?
Yes. Images embedded in a worksheet can be accessed through the Pictures collection. After retrieving a picture, you can save it to the Spire virtual file system, read the generated image bytes, and convert them into a JavaScript Blob. The Blob can then be displayed, downloaded, or processed further in the browser.
Get a Free License
Spire.XLS for JavaScript offers a 30-day full-featured free trial license with no functional limitations. Apply here to evaluate before purchasing.
Add, Read, Edit, and Delete Excel Comments with JavaScript in React
2026-09-04 03:58:32 Written by Lisa LiComments are an important tool in Excel for providing supplementary explanations of cell contents, and are commonly used in scenarios such as data review and collaborative notes. Spire.XLS for JavaScript uses WebAssembly to add, read, edit, and delete comments directly in the browser, managing input and output files through a virtual file system (VFS) — no backend server required.
This article covers several commonly used features:
For installation and project configuration, refer to Integrating Spire.XLS for JavaScript in a React Project. The examples below assume Spire.XLS is installed and the WebAssembly module is initialized.
Add a Comment
A comment can also carry author information, making it easy to identify where the comment comes from.
function App() {
  const addCommentWithAuthor = async () => {
    // Get the Spire.XLS WASM module
    const xlsModule = window.wasmModule?.spirexls;

    // Check if the module is ready
    if (!xlsModule) {
      alert('Spire.Xls is not ready yet');
      return;
    }

    // Load the font and the Excel file into VFS
    await window.spire.FetchFileToVFS('ARIAL.TTF', '/Library/Fonts/', `${process.env.PUBLIC_URL}/font/`);
    const inputFileName = 'CommentsSample.xlsx';
    await window.spire.FetchFileToVFS(inputFileName, '', `${process.env.PUBLIC_URL}data/`);

    // Load the workbook
    const workbook = new xlsModule.Workbook();
    workbook.LoadFromFile({ fileName: inputFileName });

    // Get the first worksheet
    const sheet = workbook.Worksheets.get(0);

    // Get the cell where the comment will be added
    const range = sheet.Range.get('C1');

    // Set the author and comment content
    const author = 'E-iceblue:';
    const text = 'This is an example showing how to add a comment with an editable author property.';

    // Add a comment to the cell and set its properties
    const comment = range.AddComment();
    comment.Width = 200;
    comment.IsVisible = true;
    comment.Text = author + ':\n' + text;

    // Set the font style of the author name in the comment
    const font = workbook.CreateFont();
    font.FontName = 'Arial';
    font.KnownColor = xlsModule.ExcelColors.Black;
    font.IsBold = true;
    comment.RichText.SetFont(0, author.length, font);

    // Save the workbook
    const outputFileName = 'AddCommentWithAuthor_output.xlsx';
    workbook.SaveToFile({ fileName: outputFileName, version: xlsModule.ExcelVersion.Version2010 });

    // Release resources
    workbook.Dispose();

    // Read the generated file from VFS and trigger the download
    const fileArray = window.dotnetRuntime.Module.FS.readFile(outputFileName);
    const blob = new Blob([fileArray], { type: 'application/vnd.openxmlformats-officedocument.spreadsheetml.sheet' });
    const url = URL.createObjectURL(blob);
    const a = document.createElement('a');
    a.href = url;
    a.download = outputFileName;
    a.click();
    URL.revokeObjectURL(url);
  };

  return (
    <div style={{ textAlign: 'center', height: '300px' }}>
      <h1>Add Comment With Author</h1>
      <button onClick={addCommentWithAuthor}>Start</button>
    </div>
  );
}

export default App;
After running, a comment containing the author name and the comment text will appear on cell C1. 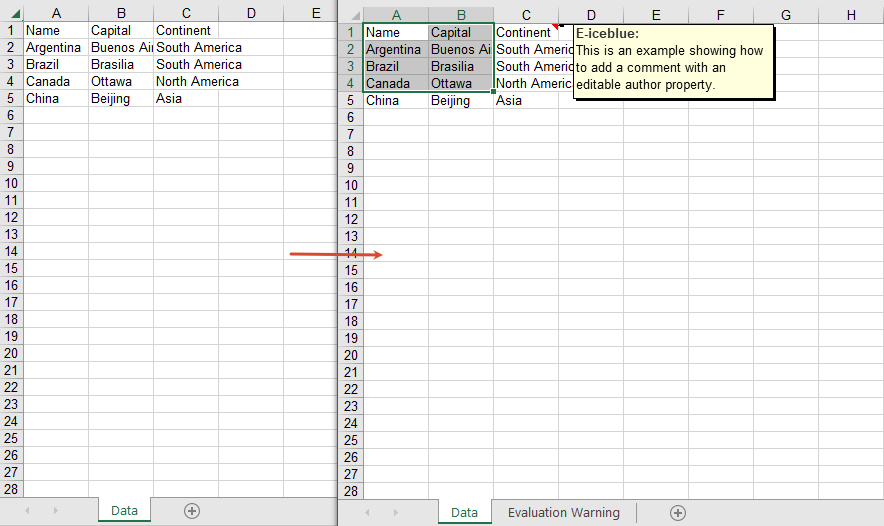
Read Comment Content
You can read the comment on a cell through the CellRange.Comment property.
function App() {
  const readComment = async () => {
    // Get the Spire.XLS WASM module
    const xlsModule = window.wasmModule?.spirexls;

    // Check if the module is ready
    if (!xlsModule) {
      alert('Spire.Xls is not ready yet');
      return;
    }

    // Load the Excel file into VFS
    const inputFileName = 'CommentsSample.xlsx';
    await window.spire.FetchFileToVFS(inputFileName, '', `${process.env.PUBLIC_URL}data/`);

    // Load the workbook
    const workbook = new xlsModule.Workbook();
    workbook.LoadFromFile({ fileName: inputFileName });

    // Get the first worksheet
    const sheet = workbook.Worksheets.get(0);

    // Get the comment text
    const builder = [];
    builder.push(sheet.Range.get('A1').Comment.Text + '\n\t');
    builder.push(sheet.Range.get('A2').Comment.Text);

    // Save the comment content to a txt file
    const outputFileName = 'ReadComment_output.txt';
    window.dotnetRuntime.Module.FS.writeFile(outputFileName, builder.join('\n'));
    workbook.Dispose();

    // Read the generated file from VFS and trigger the download
    const fileArray = window.dotnetRuntime.Module.FS.readFile(outputFileName);
    const blob = new Blob([fileArray], { type: 'text/plain' });
    const url = URL.createObjectURL(blob);
    const a = document.createElement('a');
    a.href = url;
    a.download = outputFileName;
    a.click();
    URL.revokeObjectURL(url);
  };

  return (
    <div style={{ textAlign: 'center', height: '300px' }}>
      <h1>Read Comment</h1>
      <button onClick={readComment}>Start</button>
    </div>
  );
}

export default App;
The read comment content 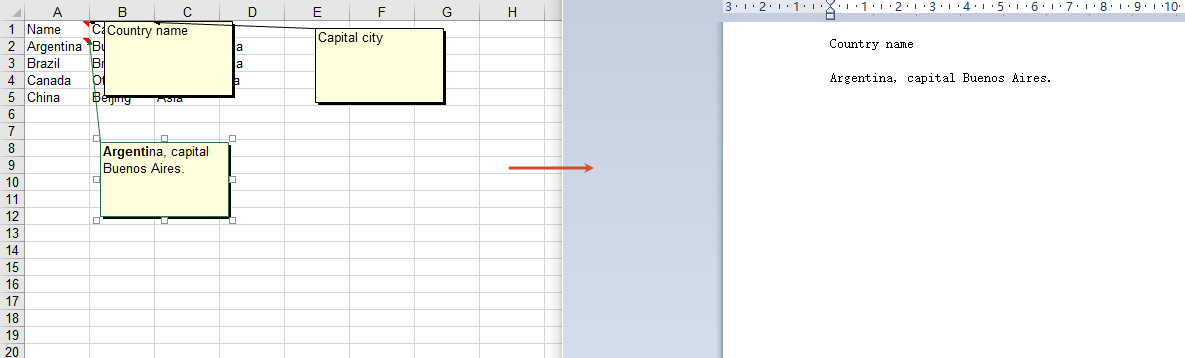
Edit Comment Content
Get a comment by index through Comments.get(0), and then modify its text content.
function App() {
  const editComment = async () => {
    // Get the Spire.XLS WASM module
    const xlsModule = window.wasmModule?.spirexls;

    // Check if the module is ready
    if (!xlsModule) {
      alert('Spire.Xls is not ready yet');
      return;
    }

    // Load the font and the Excel file into VFS
    await window.spire.FetchFileToVFS('ARIAL.TTF', '/Library/Fonts/', `${process.env.PUBLIC_URL}/font/`);
    const inputFileName = 'CommentsSample.xlsx';
    await window.spire.FetchFileToVFS(inputFileName, '', `${process.env.PUBLIC_URL}data/`);

    // Load the workbook
    const workbook = new xlsModule.Workbook();
    workbook.LoadFromFile({ fileName: inputFileName });

    // Get the first worksheet
    const sheet = workbook.Worksheets.get(0);

    // Get the first comment
    const comment = sheet.Comments.get(0);

    // Edit the comment content
    comment.Text = 'This comment has been edited by Spire.XLS.';

    // Save the workbook
    const outputFileName = 'EditExcelComment_output.xlsx';
    workbook.SaveToFile({ fileName: outputFileName, version: xlsModule.ExcelVersion.Version2010 });

    // Release resources
    workbook.Dispose();

    // Read the generated file from VFS and trigger the download
    const fileArray = window.dotnetRuntime.Module.FS.readFile(outputFileName);
    const blob = new Blob([fileArray], { type: 'application/vnd.openxmlformats-officedocument.spreadsheetml.sheet' });
    const url = URL.createObjectURL(blob);
    const a = document.createElement('a');
    a.href = url;
    a.download = outputFileName;
    a.click();
    URL.revokeObjectURL(url);
  };

  return (
    <div style={{ textAlign: 'center', height: '300px' }}>
      <h1>Edit Excel Comment</h1>
      <button onClick={editComment}>Start</button>
    </div>
  );
}

export default App;
The edited comment content 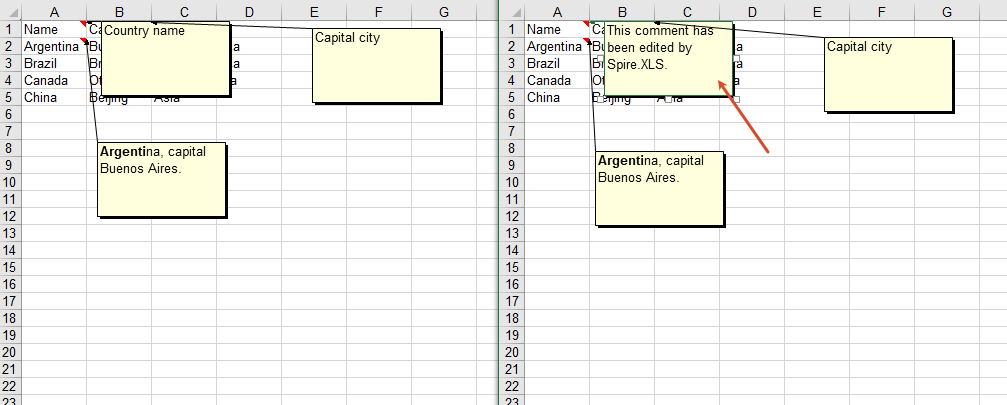
Delete Comments
You can delete all comments in a worksheet through the Comments.Clear method.
function App() {
  const removeComment = async () => {
    // Get the Spire.XLS WASM module
    const xlsModule = window.wasmModule?.spirexls;

    // Check if the module is ready
    if (!xlsModule) {
      alert('Spire.Xls is not ready yet');
      return;
    }

    // Load the font and the Excel file into VFS
    await window.spire.FetchFileToVFS('ARIAL.TTF', '/Library/Fonts/', `${process.env.PUBLIC_URL}/font/`);
    const inputFileName = 'CommentsSample.xlsx';
    await window.spire.FetchFileToVFS(inputFileName, '', `${process.env.PUBLIC_URL}data/`);

    // Load the workbook
    const workbook = new xlsModule.Workbook();
    workbook.LoadFromFile({ fileName: inputFileName });

    // Get all comments of the first worksheet
    const comments = workbook.Worksheets.get(0).Comments;

    // Clear all comments; alternatively, use comments.RemoveAt(0) to delete a comment by index
    comments.Clear();

    // Save the workbook
    const outputFileName = 'RemoveComment_output.xlsx';
    workbook.SaveToFile({ fileName: outputFileName, version: xlsModule.ExcelVersion.Version2010 });

    // Release resources
    workbook.Dispose();

    // Read the generated file from VFS and trigger the download
    const fileArray = window.dotnetRuntime.Module.FS.readFile(outputFileName);
    const blob = new Blob([fileArray], { type: 'application/vnd.openxmlformats-officedocument.spreadsheetml.sheet' });
    const url = URL.createObjectURL(blob);
    const a = document.createElement('a');
    a.href = url;
    a.download = outputFileName;
    a.click();
    URL.revokeObjectURL(url);
  };

  return (
    <div style={{ textAlign: 'center', height: '300px' }}>
      <h1>Remove Comment</h1>
      <button onClick={removeComment}>Start</button>
    </div>
  );
}

export default App;
After deleting comments 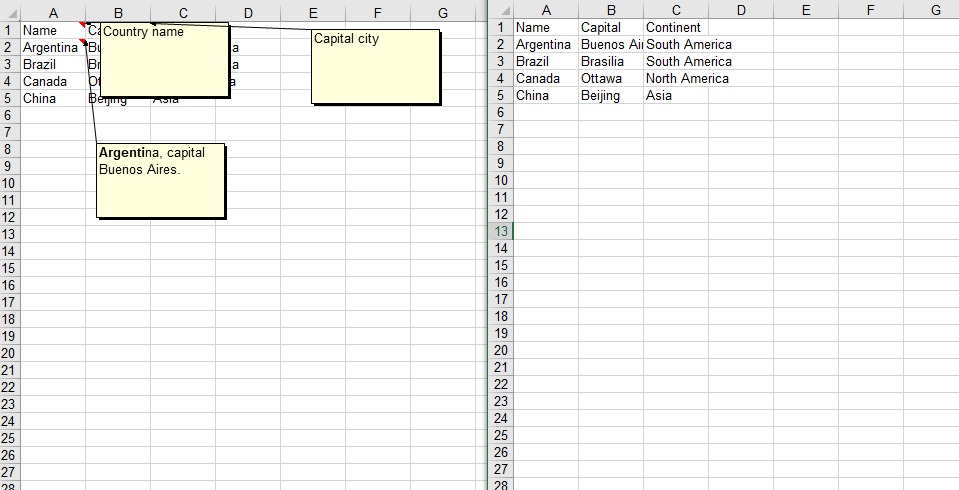
FAQ
Comment is not visible after being added
Cause: The IsVisible property was not set to true after adding the comment, so the comment remains hidden by default.
Solution: Set comment.IsVisible = true after adding the comment to make it visible in the worksheet.
Empty content is returned when reading a comment
Cause: There is no comment on the target cell, or an incorrect cell reference was used.
Solution: Confirm that the target cell has a comment, and access the comment content through methods such as sheet.Range.get('A1').Comment.
Get a Free License
If you want to remove the evaluation messages in the resulting documents, or get rid of functional limitations, please contact sales to obtain a temporary license valid for 30 days.
Set Excel Background Color and Background Image with JavaScript in React
2026-09-02 09:38:17 Written by jie zouWhen creating reports, setting background colors for cells highlights headers and key data, and setting a background image for the worksheet makes the whole report more recognizable. Spire.XLS for JavaScript performs both kinds of settings directly in the browser based on WebAssembly, and manages input/output files through a virtual file system (VFS), with no backend service required.
This article covers two core features:
For installation and project configuration, refer to Integrating Spire.XLS for JavaScript in a React Project. The examples below assume Spire.XLS is installed and the WebAssembly module is initialized.
Set Cell Background Color
Setting a background color for cells highlights headers, important data, or specific regions. Spire.XLS for JavaScript sets a background color for a cell or a cell range through the CellRange.Style.Color property, with rich built-in colors supported. The main steps are as follows:
- Create a
Workbookobject and use theLoadFromFile()method to load the Excel document. - Use the
Workbook.Worksheets.get()method to get a specific worksheet. - Use the
CellRange.Style.Colorproperty to set a background color for a specific cell range. - Use the
Workbook.SaveToFile()method to save the document to a specified path.
Here is a complete code example showing how to set background colors for cell ranges in React:
function App() {
  const setBackgroundColor = async () => {
    // Get the Spire.XLS WASM module
    const xlsModule = window.wasmModule?.spirexls;

    // Check whether the module is ready
    if (!xlsModule) {
      alert('Spire.Xls is not ready yet');
      return;
    }

    // Load the font and Excel file into the VFS
    await window.spire.FetchFileToVFS('ARIAL.TTF', '/Library/Fonts/', `${process.env.PUBLIC_URL}/font/`);
    const inputFileName = 'SetBackgroundColor.xlsx';
    await window.spire.FetchFileToVFS(inputFileName, '', `${process.env.PUBLIC_URL}data/`);

    // Load the workbook
    const workbook = new xlsModule.Workbook();
    workbook.LoadFromFile({ fileName: inputFileName });

    // Get the first worksheet
    const sheet = workbook.Worksheets.get(0);

    // Set the header row to a yellow background
    sheet.Range.get("A1:E1").Style.Color = xlsModule.Color.get_Yellow();

    // Set the first two data rows to a light sky blue background
    sheet.Range.get("A2:E2").Style.Color = xlsModule.Color.get_LightSkyBlue();
    sheet.Range.get("A3:E3").Style.Color = xlsModule.Color.get_LightSkyBlue();

    // Save the document
    const outputFileName = 'SetBackgroundColor_output.xlsx';
    workbook.SaveToFile({ fileName: outputFileName, version: xlsModule.ExcelVersion.Version2010 });

    // Release resources
    workbook.Dispose();

    // Read the converted file from the VFS and trigger a download
    const fileArray = window.dotnetRuntime.Module.FS.readFile(outputFileName);
    const blob = new Blob([fileArray], { type: 'application/vnd.openxmlformats-officedocument.spreadsheetml.sheet' });
    const url = URL.createObjectURL(blob);
    const a = document.createElement('a');
    a.href = url;
    a.download = outputFileName;
    a.click();
    URL.revokeObjectURL(url);
  };

  return (
    <div style={{ textAlign: 'center', height: '300px' }}>
      <h1>Set Cell Background Color</h1>
      <button onClick={setBackgroundColor}>
        Start
      </button>
    </div>
  );
}

export default App;
After setting the background colors, the header row is displayed with a yellow background and the first two data rows with a light sky blue background, making it easy to distinguish cells in different regions.
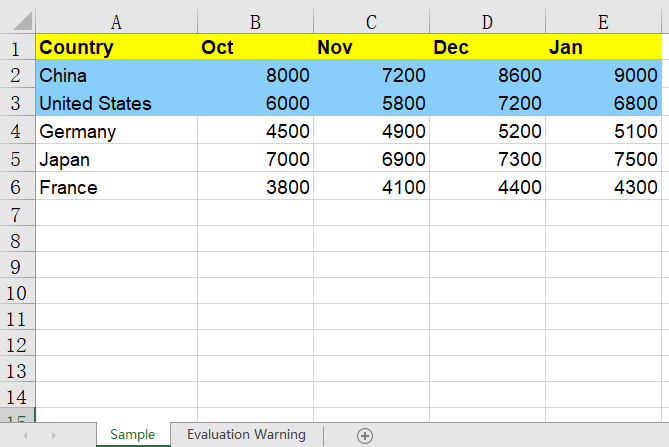
Set Worksheet Background Image
In addition to setting background colors for cells, you can also set a background image for the whole worksheet to make the report more recognizable. Spire.XLS for JavaScript sets an image as the worksheet background through the Worksheet.PageSetup.BackgroundImage property. The main steps are as follows:
- Create a
Workbookobject and use theLoadFromFile()method to load the Excel document. - Use the
Workbook.Worksheets.get()method to get a specific worksheet. - Use a
Streamobject to read the image file to be used as the background. - Use the
Worksheet.PageSetup.BackgroundImageproperty to set the image as the worksheet background. - Use the
Workbook.SaveToFile()method to save the document to a specified path.
Here is a complete code example showing how to set a background image for a worksheet in React:
function App() {
  const setBackgroundImage = async () => {
    // Get the Spire.XLS WASM module
    const xlsModule = window.wasmModule?.spirexls;

    // Check whether the module is ready
    if (!xlsModule) {
      alert('Spire.Xls is not ready yet');
      return;
    }

    // Load the font, image, and Excel file into the VFS
    await window.spire.FetchFileToVFS('ARIAL.TTF', '/Library/Fonts/', `${process.env.PUBLIC_URL}/font/`);
    const backgroundImageName = 'Background.png';
    await window.spire.FetchFileToVFS(backgroundImageName, '', `${process.env.PUBLIC_URL}data/`);
    const inputFileName = 'SetBackgroundColor.xlsx';
    await window.spire.FetchFileToVFS(inputFileName, '', `${process.env.PUBLIC_URL}data/`);

    // Load the workbook
    const workbook = new xlsModule.Workbook();
    workbook.LoadFromFile({ fileName: inputFileName });

    // Get the first worksheet
    const sheet = workbook.Worksheets.get(0);

    // Open the image as a stream
    const bm = new xlsModule.Stream(backgroundImageName);

    // Set the image as the worksheet background
    sheet.PageSetup.BackgroundImage = bm;

    // Save the document
    const outputFileName = 'SetBackgroundImage_output.xlsx';
    workbook.SaveToFile({ fileName: outputFileName, version: xlsModule.ExcelVersion.Version2010 });

    // Release resources
    workbook.Dispose();

    // Read the converted file from the VFS and trigger a download
    const fileArray = window.dotnetRuntime.Module.FS.readFile(outputFileName);
    const blob = new Blob([fileArray], { type: 'application/vnd.openxmlformats-officedocument.spreadsheetml.sheet' });
    const url = URL.createObjectURL(blob);
    const a = document.createElement('a');
    a.href = url;
    a.download = outputFileName;
    a.click();
    URL.revokeObjectURL(url);
  };

  return (
    <div style={{ textAlign: 'center', height: '300px' }}>
      <h1>Set Worksheet Background Image</h1>
      <button onClick={setBackgroundImage}>
        Start
      </button>
    </div>
  );
}

export default App;
After setting the background image, the image fills the back of the worksheet as its background, while the cell contents and data remain clearly displayed on top of the image.
FAQ
The background color is lost after saving and reopening
Cause: The Style.Color property sets the background (fill) color of a cell, not the font color. If the color is overridden by other styles, or the fill pattern is not set correctly, the color may not display properly.
Solution: Set the color directly for the cell range, for example sheet.Range.get("A1:E1").Style.Color = xlsModule.Color.get_Yellow();. If you want to use a patterned fill, combine Style.Interior.FillPattern and Style.Interior.Gradient.
The background image does not appear above the data
Cause: A worksheet background image is always displayed behind the cell contents and only serves as background decoration. It neither covers the data nor is covered by it.
Solution: This is the normal display layering. If you need the image to appear on top of the data, use the Worksheet.Pictures.Add() method to insert a floating image in the worksheet instead of setting a worksheet background.
Obtain a Free License
Spire.XLS for JavaScript offers a 30-day full-featured free trial license with no functional limitations. Apply here to evaluate before purchasing.
