
Spire.PDF 10.10.5 supports logging output when converting HTML to PDF using Chrome plugin
We're pleased to announce the release of Spire.PDF 10.10.5. This version supports logging output when converting HTML to PDF using Chrome plugin, as well as creating PdfAttachmentAnnotation and adding an author. Moreover, some know issues that occurred when converting, processing PDF files have also been successfully fixed. More details are listed below.
Here is a list of changes made in this release
| Category | ID | Description |
| New feature | SPIREPDF-7014 | Adds the Logger class that supports logging output when converting HTML to PDF using Chrome plugin.
ChromeHtmlConverter converter = new ChromeHtmlConverter(TestUtil.ChromiumPath); converter.Logger = new Logger(logFilePath); //Enable IsEnabled to output logs to the console //Logger.IsEnabled = true; ConvertOptions options = new ConvertOptions(); |
| New feature | SPIREPDF-7104 | Supports creating PdfAttachmentAnnotation and adding an author.
annotation.Title = "test"; |
| Bug | SPIREPDF-5473 | Fixes the issue that the bold fonts were not correctly applied when converting PDF document to PdfX1A2001 document. |
| Bug | SPIREPDF-7044 | Fixes the issue that the Bounds for vertical text were not obtained correctly. |
| Bug | SPIREPDF-7066 | Fixes the issue that the application threw "NullReferenceException" when converting PDF document to LinearizedPdf document. |
| Bug | SPIREPDF-7079 | Fixes the issue that the application threw "An item with the same key has already been added" exception during multi-threaded extraction of text from PDF pages. |
| Bug | SPIREPDF-7110 | Fixes the issue that the application threw a "DivideByZeroException" when calling the SetPdfToHtmlOptions method in multi-threaded scenarios. |
| Bug | SPIREPDF-7111 | Fixes the issue that the output result was incorrect when converting OFD document to PDF document and then saving them as XPS. |
| Bug | SPIREPDF-7119 | Fixes the issue that the program would hang while reading fonts from PDF document. |
Spire.Presentation for Java 9.10.2 supports the FindFirstTextAsRange method
We are happy to announce the release of Spire.Presentation for Java 9.10.2. The latest version supports the FindFirstTextAsRange method for finding the first occurrence of text. Moreover, some known bugs are fixed successfully in the update, such as the issue that the program threw the NullPointerException exception when loading PPTX documents. More details are listed below.
Here is a list of changes made in this release
| Category | ID | Description |
| New feature | SPIREPPT-2573 | Supports the FindFirstTextAsRange method for finding the first occurrence of text.
Presentation ppt = new Presentation();
ppt.loadFromFile(inputFile);
String text = "create, read";
PortionEx textRange=ppt.getSlides().get(0).FindFirstTextAsRange(text);
textRange.getFill().setFillType(FillFormatType.SOLID);
textRange.getFill().getSolidColor().setColor(Color.red);
textRange.setFontHeight(28);
textRange.setLatinFont(new TextFont("Arial"));
textRange.isBold(TriState.TRUE);
textRange.isItalic(TriState.TRUE);
textRange.setTextUnderlineType(TextUnderlineType.DOUBLE);
textRange.setTextStrikethroughType(TextStrikethroughType.SINGLE);
ppt.saveToFile(outputFile, FileFormat.PPTX_2016);
ppt.dispose();
|
| Bug | SPIREPPT-2614 | Fixes the issue that the program threw the NullPointerException exception when loading PPTX documents. |
| Bug | SPIREPPT-2616 SPIREPPT-2617 |
Fixes the issue that incorrect content occurred when converting PPTX documents to images. |
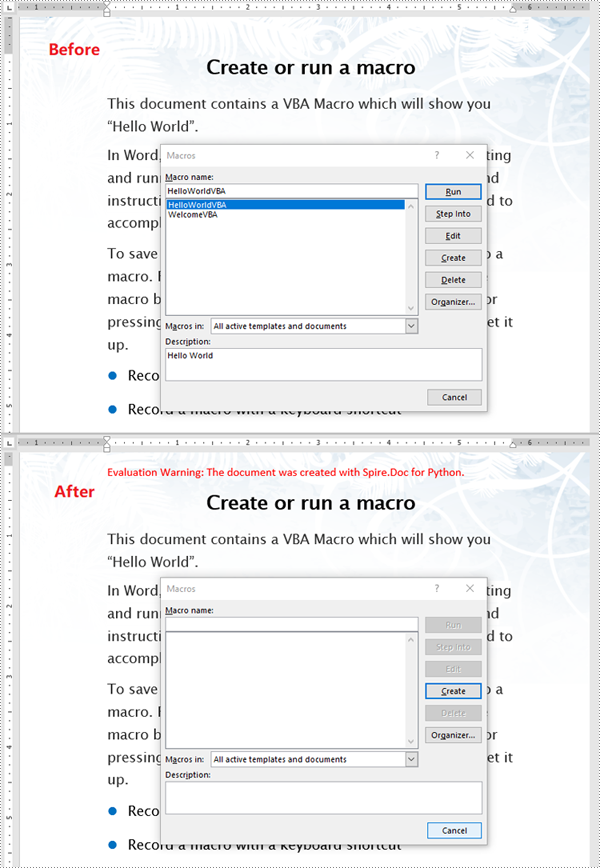
Python: Detect and Remove VBA Macros in Word Documents
Macros in Word documents are small programs created using the Visual Basic for Applications (VBA) language. They are designed to automate repetitive tasks or add advanced functionality. While these macros can be powerful tools for improving productivity, they also pose security risks if used maliciously. Therefore, it is essential to detect and remove potentially harmful macros from Word documents, especially when handling files from untrusted sources. In this article, we will explain how to detect and remove VBA macros in Word documents in Python using Spire.Doc for Python.
- Detect Whether a Word Document Contains VBA Macros in Python
- Remove VBA Macros from a Word Document in Python
Install Spire.Doc for Python
This scenario requires Spire.Doc for Python and plum-dispatch v1.7.4. They can be easily installed in your Windows through the following pip command.
pip install Spire.Doc
If you are unsure how to install, please refer to this tutorial: How to Install Spire.Doc for Python on Windows
Detect Whether a Word Document Contains VBA Macros in Python
Spire.Doc for Python provides the Document.IsContainMacro property, enabling developers to check whether a Word document contains VBA macros easily. This property returns a boolean value: True indicates that the document includes one or more VBA macros, while False indicates that no macros are present in the document.
The following steps explain how to detect whether a Word document contains VBA macros using Spire.Doc for Python:
- Initialize an instance of the Document class.
- Load a Word document using the Document.LoadFromFile() method.
- Detect whether the document includes VBA macros using the Document.IsContainMacro property.
- Python
from spire.doc import *
from spire.doc.common import *

# Initialize an instance of the Document class
document = Document()
# Load a Word document
document.LoadFromFile("Test.docm")

# Detect if the document contains VBA macros
if document.IsContainMacro:
    print("The document contains VBA macros.")
else:
    print("The document does not contain any VBA macros.")

document.Close()

Remove VBA Macros from a Word Document in Python
Developers can remove all macros from a Word document at once by using the Document.ClearMacros() method. The detailed steps are as follows.
- Initialize an instance of the Document class.
- Load a Word document using the Document.LoadFromFile() method.
- Remove all macros from the document using the Document.ClearMacros() method.
- Save the result document using the Document.SaveToFile() method.
- Python
from spire.doc import *
from spire.doc.common import *

# Initialize an instance of the Document class
document = Document()
# Load a Word document
document.LoadFromFile("Test.docm")

# Remove all VBA macros from the document
document.ClearMacros()

# Save the modified document to a docm file
document.SaveToFile("RemoveMacros.docm", FileFormat.Docm2016)
document.Close()
Apply for a Temporary License
If you'd like to remove the evaluation message from the generated documents, or to get rid of the function limitations, please request a 30-day trial license for yourself.
Python: Extract or Update Textboxes in a Word Document
Textboxes in a Word document serve as versatile containers for text, enabling users to enhance layout and design. They allow for the separation of content from the main body, making documents more visually appealing and organized. Extracting or updating textboxes can be essential for improving document efficiency, ensuring information is current, and facilitating data analysis.
In this article, you will learn how to extract or update textboxes in a Word document using Python and Spire.Doc for Python.
Install Spire.Doc for Python
This scenario requires Spire.Doc for Python and plum-dispatch v1.7.4. They can be easily installed in your Windows through the following pip command.
pip install Spire.Doc
If you are unsure how to install, please refer to this tutorial: How to Install Spire.Doc for Python on Windows
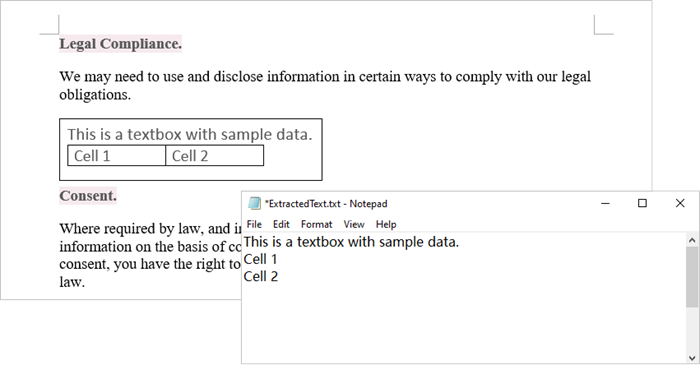
Extract Text from a Textbox in Word
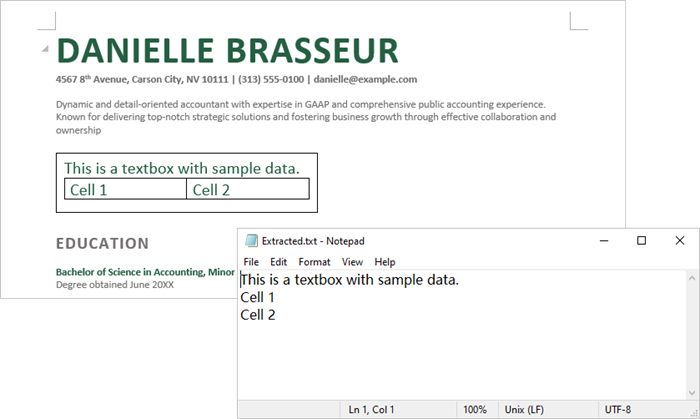
Using Spire.Doc for Python, you can access a specific text box in a document by utilizing the Document.TextBoxes[index] property. After retrieving the text box, you can iterate through its child objects to identify whether each one is a paragraph or a table. If the object is a paragraph, you can retrieve its text using the Paragraph.Text property. In cases where the object is a table, you will need to loop through each cell to extract text from every individual cell within that table.
The steps to extract text from a text box in a Word document are as follows:
- Create a Document object.
- load a Word file by using Document.LoadFromFile() method.
- Access a specific text box using Document.TextBoxes[index] property.
- Iterate through the child objects within the text box.
- Determine if a child object is a paragraph. If it is, retrieve the text from the paragraph using Paragraph.Text property.
- Check if a child object is a table. If so, iterate through the cells in the table to extract text from each cell.
- Python
from spire.doc import *
from spire.doc.common import *

# Create a Document object
document = Document()

# Load a Word file
document.LoadFromFile("C:\\Users\\Administrator\\Desktop\\input.docx")

# Get a specific textbox
textBox = document.TextBoxes[0]

with open('ExtractedText.txt','w') as sw:

    # Iterate through the child objects in the textbox
    for i in range(textBox.ChildObjects.Count):

        # Get a specific child object
        object = textBox.ChildObjects.get_Item(i)

        # Determine if the child object is paragraph
        if object.DocumentObjectType == DocumentObjectType.Paragraph:

            # Write paragraph text to txt file
            sw.write((object if isinstance(object, Paragraph) else None).Text + "\n")

        # Determine if the child object is table
        if object.DocumentObjectType == DocumentObjectType.Table:
            table = object if isinstance(object, Table) else None
            for i in range(table.Rows.Count):
                row = table.Rows[i]
                for j in range(row.Cells.Count):
                    cell = row.Cells[j]
                    for k in range(cell.Paragraphs.Count):
                        paragraph = cell.Paragraphs.get_Item(k)

                        # Write paragrah text of a specific cell to txt file
                        sw.write(paragraph.Text + "\n")

# Dispose resources
document.Dispose()
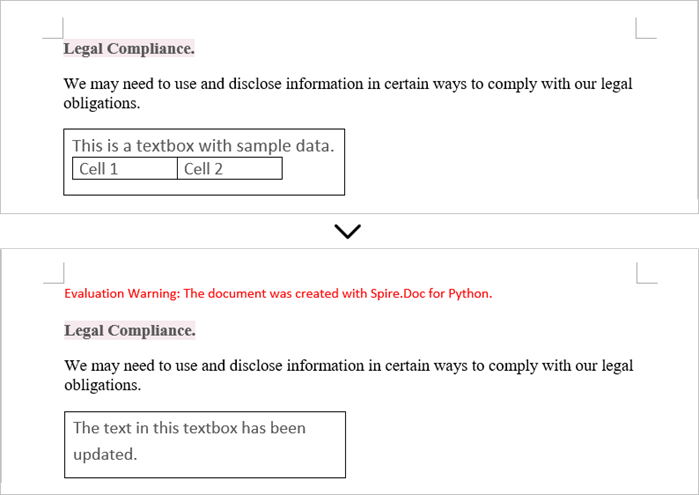
Update Text in a Textbox in Word
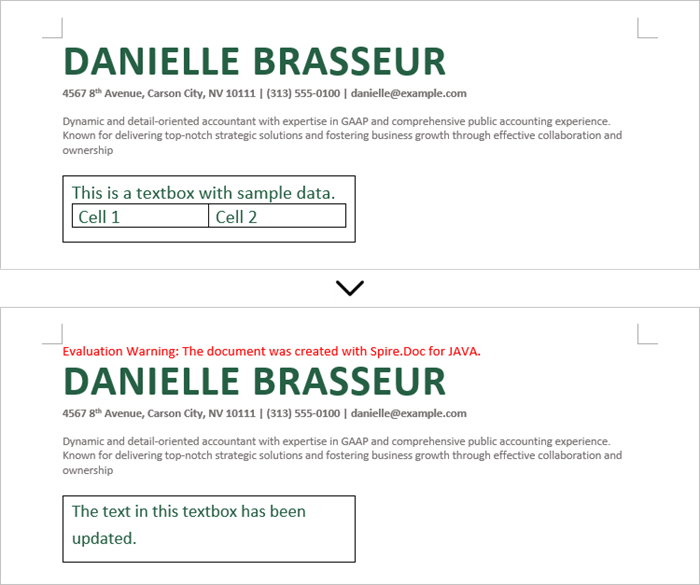
To update a textbox in a Word document, start by clearing its existing content with the TextBox.ChildObjects.Clear() method. This action removes all child objects, including any paragraphs or tables currently contained within the textbox. After clearing the content, you can add a new paragraph to the text box. Once the paragraph is created, set its text to the desired value.
The steps to update a textbox in a Word document are as follows:
- Create a Document object.
- Load a Word file using Document.LoadFromFile() method.
- Get a specific textbox using Document.TextBoxes[index] property
- Remove existing content of the textbox using TextBox.ChildObjects.Clear() method.
- Add a paragraph to the textbox using TextBox.Body.AddParagraph() method.
- Add text to the paragraph using Paragraph.AppendText() method.
- Save the document to a different Word file.
- Python
from spire.doc import *
from spire.doc.common import *

# Create a Document object
document = Document()

# Load a Word file
document.LoadFromFile("C:\\Users\\Administrator\\Desktop\\Input.docx")

# Get a specific textbox
textBox = document.TextBoxes[0]

# Remove child objects of the textbox
textBox.ChildObjects.Clear()

# Add a new paragraph to the textbox
paragraph = textBox.Body.AddParagraph()

# Set line spacing
paragraph.Format.LineSpacing = 15.0

# Add text to the paragraph
textRange = paragraph.AppendText("The text in this textbox has been updated.")

# Set font size
textRange.CharacterFormat.FontSize = 15.0

# Save the document to a different Word file
document.SaveToFile("UpdateTextbox.docx", FileFormat.Docx2019);

# Dispose resources
document.Dispose()
Apply for a Temporary License
If you'd like to remove the evaluation message from the generated documents, or to get rid of the function limitations, please request a 30-day trial license for yourself.
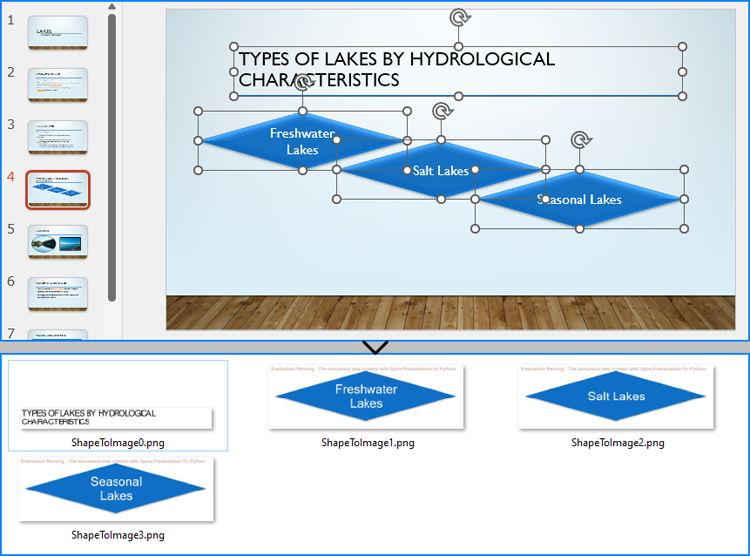
Python: Save Shapes as Image Files in PowerPoint Presentations
Extracting and repurposing elements from PowerPoint presentations is a valuable skill for cross-platform content sharing. By converting shapes from slides into standalone image files, users can seamlessly integrate them into documents, web pages, or design projects without losing their original formatting and visual effects. With Python, this process becomes straightforward. In this article, we'll explore how to use Spire.Presentation for Python to save shapes from presentation slides as image files with simple Python code.
- Save Shapes from Slides as Image Files with Python
- Save Images from Slides with Formatting as Images Files
Install Spire.Presentation for Python
This scenario requires Spire.Presentation for Python and plum-dispatch v1.7.4. They can be easily installed in your Windows through the following pip command.
pip install Spire.Presentation
If you are unsure how to install, please refer to: How to Install Spire.Presentation for Python on Windows
Save Shapes from Slides as Image Files with Python
Spire.Presentation for Python provides the Slide.Shapes.SaveAsImage(shapIndex: int, dpiX: int, dpiY: int) method to save shapes in presentation slides as images with the specified DPI(optional). With this method, developers can save either a specific shape or all shapes in a PowerPoint presentation. The detailed steps are as follows:
- Create an instance of Presentation class.
- Load a PowerPoint presentation using Presentation.LoadFromFile() method.
- Get a slide using Presentation.Slides.get_Item() method.
- Iterate through the shapes in the slide:
- Save each shape as an image stream using Slide.Shapes.SaveAsImage() method.
- Save the image stream as an image file using Stream.Save() method.
- Python
from spire.presentation import *

# Create an instance of Presentation
presentation = Presentation()

# Load a PowerPoint file
presentation.LoadFromFile("Sample.pptx")

# Get the first slide
slide = presentation.Slides.get_Item(3)

# Save the shape as an image stream
for i in range(slide.Shapes.Count):
  imageStream = slide.Shapes.SaveAsImage(i, 256, 256)
  # Save the image
  imageStream.Save(f"output/Shapes/ShapeToImage{i}.png")

# Release resources
presentation.Dispose()
Save Images from Slides with Formatting as Images Files
By using the methods provided by Spire.Presentation for Python, developers can also save images from slides as image files while preserving the edits and formatting applied to them. This requires first checking if the shape is an object of SlidePicture class, and if so, the shape can be saved as an image file. The detailed steps are as follows:
- Create an instance of Presentation class.
- Load a PowerPoint presentation using Presentation.LoadFromFile() method.
- Get a slide using Presentation.Slides.get_Item() method.
- Iterate through the shapes in the slide:
- Check if each shape is an object of SlidePicture class.
- If it is, save the shape as an image stream using Slide.Shapes.SaveAsImage() method.
- Save the image stream to a file using Stream.Save() method.
- Python
from spire.presentation import *

# Create an instance of Presentation
presentation = Presentation()

# Load a PowerPoint file
presentation.LoadFromFile("Sample.pptx")

# Get a slide
slide = presentation.Slides.get_Item(4)

# Iterate through all shapes in the slide
i = 0
for shape in slide.Shapes:
  # Check if the shape is an object of SlidePicture
  if isinstance(shape, SlidePicture):
    # Save the shape as an image
    shape = shape if isinstance(shape, SlidePicture) else None
    image = slide.Shapes.SaveAsImage(slide.Shapes.IndexOf(shape), 256, 256)
    image.Save(f"output/Images/ImageShape{i}.png")
    i += 1

# Release resources
presentation.Dispose()

Apply for a Temporary License
If you'd like to remove the evaluation message from the generated documents, or to get rid of the function limitations, please request a 30-day trial license for yourself.
Spire.Doc for Java 12.10.3 enhances the conversion from Markdown to Word
We are delighted to announce the release of Spire.Doc for Java 12.10.3. This version enhances the conversion from Markdown to Word. Besides, it also fixes the issue that the TOC field was updated incorrectly. More details are listed below.
Here is a list of changes made in this release
| Category | ID | Description |
| Bug | SPIREDOC-10795 | Fixes issue that the TOC field was updated incorrectly. |
| Bug | SPIREDOC-10800 | Fixes the issue that the Chinese characters were garbled after converting Markdown to Word. |
| Bug | SPIREDOC-10801 | Fixes the issue that the list numbers were lost after converting Markdown to Word. |
Python: Retrieve and Modify Text Formatting in PDF
Using Python to manipulate text formatting in PDFs provides a powerful way to automate and customize documents. With the Spire.PDF for Python library, developers can efficiently find text with advanced search options to retrieve and modify text properties like font, size, color, and style, enabling users to find and update text formatting across large document sets, saving time and reducing manual work. This article will demonstrate how to use Spire.PDF for Python to retrieve and modify text formatting in PDF documents with Python code.
- Find Text and Retrieve the Font Information in PDFs
- Find and Modify Text Formatting in PDF Documents
Install Spire.PDF for Python
This scenario requires Spire.PDF for Python and plum-dispatch v1.7.4. They can be easily installed in your Windows through the following pip command.
pip install Spire.PDF
If you are unsure how to install, please refer to: How to Install Spire.PDF for Python on Windows
Find Text and Retrieve Formatting Information in PDFs
Developers can use the PdfTextFinder and PdfTextFindOptions classes provided by Spire.PDF for Python to precisely search for specific text in a PDF document and obtain a collection of PdfTextFragment objects representing the search results. Then, developers can access the format information of the specified search result text through properties such as FontName, FontSize, and FontFamily, under PdfTextFragment.TextStates[] property.
The detailed steps for finding text in PDF and retrieving its font information are as follows:
- Create an instance of PdfDocument class and load a PDF document using PdfDocument.LoadFromFile() method.
- Get a page using PdfDocument.Pages.get_Item() method.
- Create a PdfTextFinder object using the page.
- Create a PdfTextFindOptions object, set the search options, and apply the search options through PdfTextFinder.Options property.
- Find specific text on the page using PdfTextFinder.Find() method and get a collection of PdfTextFragment objects.
- Get the formatting of the first finding result through PdfTextFragment.TextStates property.
- Get the font name, font size, and font family of the result through PdfTextStates[0].FontName, PdfTextStates[0].FontSize, and PdfTextStates[0].FontFamily properties.
- Print the result.
- Python
from spire.pdf import *
# Create a PdfDocument instance
pdf = PdfDocument()
# Load a PDF file
pdf.LoadFromFile("Sample.pdf")
# Get the first page
page = pdf.Pages.get_Item(0)
# Create a PdfTextFinder instance
finder = PdfTextFinder(page)
# Create a PdfTextFindOptions instance and set the search options
options = PdfTextFindOptions()
options.CaseSensitive = True
options.WholeWords = True
# Apply the options
finder.Options = options
# Find the specified text
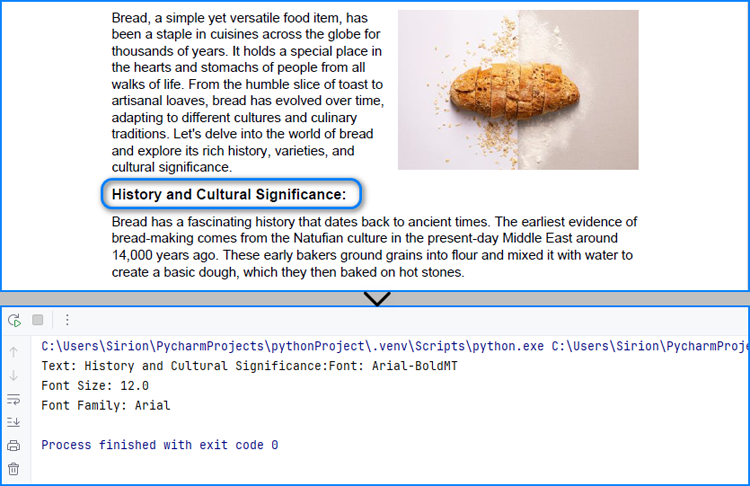
fragments = finder.Find("History and Cultural Significance:")
# Get the formatting of the first fragment
formatting = fragments[0].TextStates
# Get the formatting information
fontInfo = ""
fontInfo += "Text: " + fragments[0].Text
fontInfo += "Font: " + formatting[0].FontName
fontInfo += "\nFont Size: " + str(formatting[0].FontSize)
fontInfo += "\nFont Family: " + formatting[0].FontFamily
# Output font information
print(fontInfo)
# Release resources
pdf.Dispose()
Find and Modify Text Formatting in PDF Documents
After finding specific text, developers can overlay it with a rectangle in the same color as the background and then redraw the text in a new format at the same position, thus achieving text format modification of simple PDF text fragments on solid color pages. The detailed steps are as follows:
- Create an instance of PdfDocument class and load a PDF document using PdfDocument.LoadFromFile() method.
- Get a page using PdfDocument.Pages.get_Item() method.
- Create a PdfTextFinder object using the page.
- Create a PdfTextFindOptions object, set the search options, and apply the search options through PdfTextFinder.Options property.
- Find specific text on the page using PdfTextFinder.Find() method and get the first result.
- Get the color of the page background through PdfPageBase.BackgroundColor property and change the color to white if the background is empty.
- Draw rectangles with the obtained color in the position of the found text using PdfPageBase.Canvas.DrawRectangle() method.
- Create a new font, brush, and string format and calculate the text frame.
- Draw the text in the new format in the same position using PdfPageBase.Canvas.DrawString() method.
- Save the document using PdfDocument.SaveToFile() method.
- Python
from spire.pdf import *
# Create a PdfDocument instance
pdf = PdfDocument()
# Load a PDF file
pdf.LoadFromFile("Sample.pdf")
# Get the first page
page = pdf.Pages.get_Item(0)
# Create a PdfTextFinder instance
finder = PdfTextFinder(page)
# Create a PdfTextFindOptions instance and set the search options
options = PdfTextFindOptions()
options.CaseSensitive = True
options.WholeWords = True
finder.Options = options
# Find the specified text
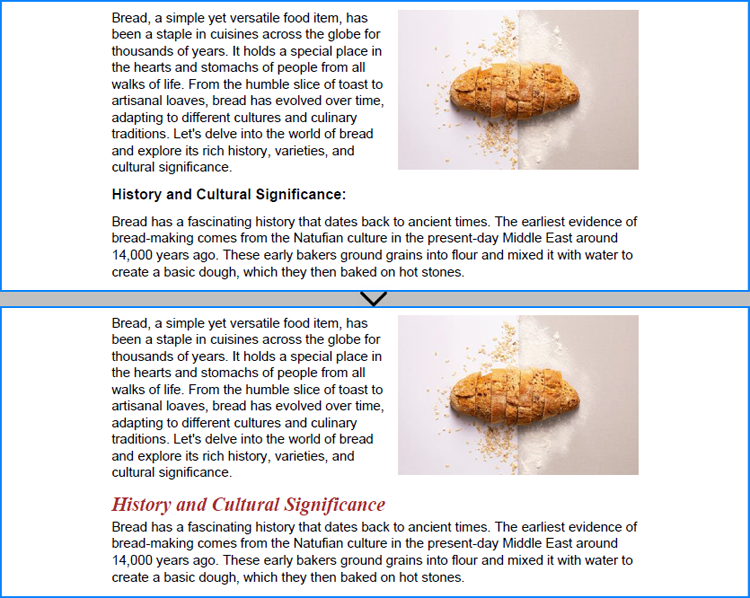
fragments = finder.Find("History and Cultural Significance:")
# Get the first result
fragment = fragments[0]
# Get the background color and change it to white if its empty
backColor = page.BackgroundColor
if backColor.ToArgb() == 0:
backColor = Color.get_White()
# Draw a rectangle with the background color to cover the text
for i in range(len(fragment.Bounds)):
page.Canvas.DrawRectangle(PdfSolidBrush(PdfRGBColor(backColor)), fragment.Bounds[i])
# Create a new font and a new brush
font = PdfTrueTypeFont("Times New Roman", 16.0, 3, True)
brush = PdfBrushes.get_Brown()
# Create a PdfStringFormat instance
stringFormat = PdfStringFormat()
stringFormat.Alignment = PdfTextAlignment.Left
# Calculate the rectangle that contains the text
point = fragment.Bounds[0].Location
size = SizeF(fragment.Bounds[-1].Right, fragment.Bounds[-1].Bottom)
rect = RectangleF(point, size)
# Draw the text with the specified format in the same rectangle
page.Canvas.DrawString("History and Cultural Significance", font, brush, rect, stringFormat)
# Save the document
pdf.SaveToFile("output/FindModifyTextFormat.pdf")
# Release resources
pdf.Close()
Apply for a Temporary License
If you'd like to remove the evaluation message from the generated documents, or to get rid of the function limitations, please request a 30-day trial license for yourself.
Java: Extract or Update Textboxes in Word
Text boxes in Microsoft Word are flexible elements that improve the layout and design of documents. They enable users to place text separately from the main text flow, facilitating the creation of visually attractive documents. At times, you might need to extract text from these text boxes for reuse, or update the content within them to maintain clarity and relevance. This article demonstrates how to extract or update textboxes in a Word document using Java with Spire.Doc for Java.
Install Spire.Doc for Java
First of all, you're required to add the Spire.Doc.jar file as a dependency in your Java program. The JAR file can be downloaded from this link. If you use Maven, you can easily import the JAR file in your application by adding the following code to your project's pom.xml file.
<repositories>
    <repository>
        <id>com.e-iceblue</id>
        <name>e-iceblue</name>
        <url>https://repo.e-iceblue.com/nexus/content/groups/public/</url>
    </repository>
</repositories>
<dependencies>
    <dependency>
        <groupId>e-iceblue</groupId>
        <artifactId>spire.doc</artifactId>
        <version>13.6.2</version>
    </dependency>
</dependencies>
Extract Text from a Textbox in Word in Java
With Spire.Doc for Java, you can access a specific text box in a document using the Document.getTextBoxes().get() method. You can then iterate through the child objects of the text box to check if each one is a paragraph or a table. For paragraphs, retrieve the text using the Paragraph.getText() method. For tables, loop through the cells to extract text from each cell.
Here are the steps to extract text from a text box in a Word document:
- Create a Document object.
- Load a Word file using Document.loadFromFile() method.
- Access a specific text box using Document.getTextBoxes().get() method.
- Iterate through the child objects of the text box.
- Check if a child object is a paragraph. If so, use Paragraph.getText() method to get the text.
- Check if a child object is a table. If so, use extractTextFromTable() method to retrieve the text from the table.
- Java
import com.spire.doc.*;
import com.spire.doc.documents.DocumentObjectType;
import com.spire.doc.documents.Paragraph;
import com.spire.doc.fields.TextBox;

import java.io.FileWriter;
import java.io.IOException;

public class ExtractTextFromTextbox {

    public static void main(String[] args) throws IOException {

        // Create a Document object
        Document document = new Document();

        // Load a Word file
        document.loadFromFile("C:\\Users\\Administrator\\Desktop\\Input.docx");

        // Get a specific textbox
        TextBox textBox = document.getTextBoxes().get(0);

        // Create a FileWriter to write extracted text to a txt file
        FileWriter fileWriter = new FileWriter("Extracted.txt");

        // Iterate though child objects of the textbox
        for (Object object: textBox.getChildObjects()) {

            // Determine if the child object is a paragraph
            if (((DocumentObject) object).getDocumentObjectType() == DocumentObjectType.Paragraph) {

                // Write paragraph text to the txt file
                fileWriter.write(((Paragraph)object).getText() + "\n");
            }

            // Determine if the child object is a table
            if (((DocumentObject) object).getDocumentObjectType() == DocumentObjectType.Table) {

                // Extract text from table to the txt file
                extractTextFromTable((Table)object, fileWriter);
            }
        }

        // Close the stream
        fileWriter.close();
    }

    // Extract text from a table
    static void extractTextFromTable(Table table, FileWriter fileWriter) throws IOException {
        for (int i = 0; i < table.getRows().getCount(); i++) {
            TableRow row = table.getRows().get(i);
            for (int j = 0; j < row.getCells().getCount(); j++) {
                TableCell cell = row.getCells().get(j);
                for (Object paragraph: cell.getParagraphs()) {
                    fileWriter.write(((Paragraph) paragraph).getText() + "\n");
                }
            }
        }
    }
}
Update a Textbox in Word in Java
To modify a text box, first remove its existing content using TextBox.getChildObjects.clear() method. Then, create a new paragraph and assign the desired text to it.
Here are the steps to update a text box in a Word document:
- Create a Document object.
- Load a Word file using Document.loadFromFile() method.
- Get a specific textbox using Document.getTextBoxes().get() method.
- Remove existing content of the textbox using TextBox.getChildObjects().clear() method.
- Add a paragraph to the textbox using TextBox.getBody().addParagraph() method.
- Add text to the paragraph using Paragraph.appendText() method.
- Save the document to a different Word file.
- Java
import com.spire.doc.Document;
import com.spire.doc.FileFormat;
import com.spire.doc.documents.Paragraph;
import com.spire.doc.fields.TextBox;
import com.spire.doc.fields.TextRange;

public class UpdateTextbox {

    public static void main(String[] args) {

        // Create a Document object
        Document document = new Document();

        // Load a Word file
        document.loadFromFile("C:\\Users\\Administrator\\Desktop\\Input.docx");

        // Get a specific textbox
        TextBox textBox = document.getTextBoxes().get(0);

        // Remove child objects of the textbox
        textBox.getChildObjects().clear();

        // Add a new paragraph to the textbox
        Paragraph paragraph = textBox.getBody().addParagraph();

        // Set line spacing
        paragraph.getFormat().setLineSpacing(15f);

        // Add text to the paragraph
        TextRange textRange = paragraph.appendText("The text in this textbox has been updated.");

        // Set font size
        textRange.getCharacterFormat().setFontSize(15f);

        // Save the document to a different Word file
        document.saveToFile("UpdateTextbox.docx", FileFormat.Docx_2019);

        // Dispose resources
        document.dispose();
    }
}
Apply for a Temporary License
If you'd like to remove the evaluation message from the generated documents, or to get rid of the function limitations, please request a 30-day trial license for yourself.
C#: Add Filters to Pivot Tables in Excel
Filters in pivot tables enable users to narrow down the displayed data based on specific criteria. By adding filters, users can focus on subsets of data that are most relevant to their analysis, allowing for a more targeted and efficient data exploration. In this article, we will demonstrate how to add filters to pivot tables in Excel in C# using Spire.XLS for .NET.
- Add Report Filter to Pivot Table in Excel in C#
- Add Filter to a Row Field of Pivot Table in Excel in C#
- Add Filter to a Column Field of Pivot Table in Excel in C#
Install Spire.XLS for .NET
To begin with, you need to add the DLL files included in the Spire.XLS for.NET package as references in your .NET project. The DLL files can be either downloaded from this link or installed via NuGet.
PM> Install-Package Spire.XLS
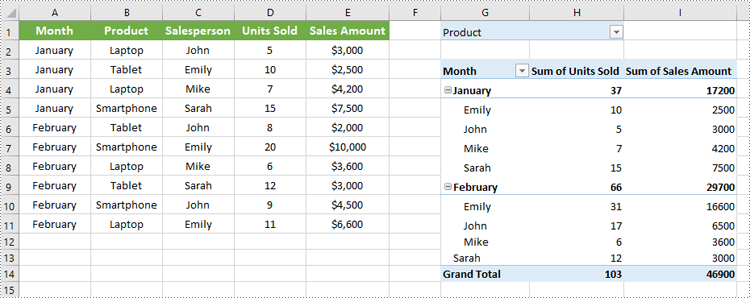
Add Report Filter to Pivot Table in Excel in C#
Spire.XLS for .NET offers the XlsPivotTable.ReportFilters.Add() method to add report filters to a pivot table. The detailed steps are as follows.
- Create an object of the Workbook class.
- Load an Excel file using Workbook.LoadFromFile() method.
- Get a specific worksheet in the file using Workbook.Worksheets[index] property.
- Get a specific pivot table in the worksheet using Worksheet.PivotTables[index] property.
- Create a report filter using PovotReportFilter class.
- Add the report filter to the pivot table using XlsPivotTable.ReportFilters.Add() method.
- Save the resulting file using Workbook.SaveToFile() method.
- C#
using Spire.Xls;
using Spire.Xls.Core.Spreadsheet.PivotTables;

namespace AddReportFilter
{
    internal class Program
    {
        static void Main(string[] args)
        {
            // Create an object of the Workbook class
            Workbook workbook = new Workbook();
            // Load an Excel file
            workbook.LoadFromFile("Sample.xlsx");

            // Get the first worksheet
            Worksheet sheet = workbook.Worksheets[0];

            // Get the first pivot table
            XlsPivotTable pt = sheet.PivotTables[0] as XlsPivotTable;

            // Create a report filter
            PivotReportFilter reportFilter = new PivotReportFilter("Product", true);

            // Add the report filter to the pivot table
            pt.ReportFilters.Add(reportFilter);

            // Save the resulting file
            workbook.SaveToFile("AddReportFilter.xlsx", FileFormat.Version2016);
            workbook.Dispose();
        }
    }
}
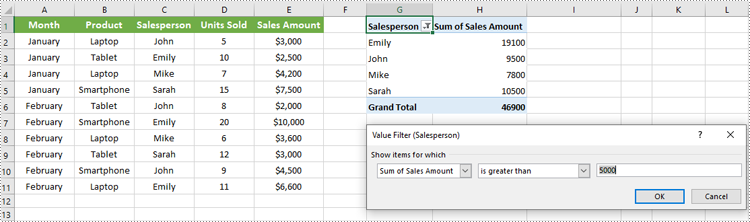
Add Filter to a Row Field of Pivot Table in Excel in C#
You can add a value filter or label filter to a specific row field in a pivot table using the XlsPivotTable.RowFields[index].AddValueFilter() or XlsPivotTable.RowFields[index].AddLabelFilter() method. The detailed steps are as follows.
- Create an object of the Workbook class.
- Load an Excel file using Workbook.LoadFromFile() method.
- Get a specific worksheet in the file using Workbook.Worksheets[index] property.
- Get a specific pivot table in the worksheet using Worksheet.PivotTables[index] property.
- Add a value filter or label filter to a specific row field in the pivot table using XlsPivotTable.RowFields[index].AddValueFilter() or XlsPivotTable.RowFields[index].AddLabelFilter() method.
- Calculate the data in the pivot table using XlsPivotTable.CalculateData() method.
- Save the resulting file using Workbook.SaveToFile() method.
- C#
using Spire.Xls;
using Spire.Xls.Core.Spreadsheet.PivotTables;

namespace AddRowFilter
{
    internal class Program
    {
        static void Main(string[] args)
        {
            // Create an object of the Workbook class
            Workbook workbook = new Workbook();
            // Load an Excel file
            workbook.LoadFromFile("Sample.xlsx");

            // Get the first worksheet
            Worksheet sheet = workbook.Worksheets[0];

            // Get the first pivot table
            XlsPivotTable pt = sheet.PivotTables[0] as XlsPivotTable;


            // Add a value filter to the first row field in the pivot table
            pt.RowFields[0].AddValueFilter(PivotValueFilterType.GreaterThan, pt.DataFields[0], 5000, null);
            // Or add a label filter to the first row field in the pivot table
            //pt.RowFields[0].AddLabelFilter(PivotLabelFilterType.Equal, "Mike", null);

            // Calculate the pivot table data
            pt.CalculateData();

            // Save the resulting file
            workbook.SaveToFile("AddRowFilter.xlsx", FileFormat.Version2016);
            workbook.Dispose();
        }
    }
}
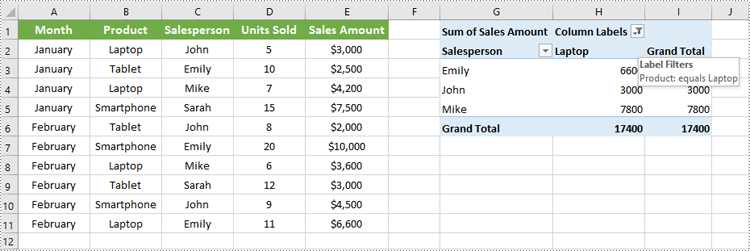
Add Filter to a Column Field of Pivot Table in Excel in C#
To add a value filter or label filter to a specific column field in a pivot table, you can use the XlsPivotTable.ColumnFields[index].AddValueFilter() or XlsPivotTable.ColumnFields[index].AddLabelFilter() method. The detailed steps are as follows.
- Create an object of the Workbook class.
- Load an Excel file using Workbook.LoadFromFile() method.
- Get a specific worksheet in the file using Workbook.Worksheets[index] property.
- Get a specific pivot table in the worksheet using Worksheet.PivotTables[index] property.
- Add a value filter or label filter to a specific column field in the pivot table using XlsPivotTable.ColumnFields[index].AddValueFilter() or XlsPivotTable.ColumnFields[index].AddLabelFilter() method.
- Calculate the data in the pivot table using XlsPivotTable.CalculateData() method.
- Save the resulting file using Workbook.SaveToFile() method.
- C#
using Spire.Xls;
using Spire.Xls.Core.Spreadsheet.PivotTables;

namespace AddColumnFilter
{
    internal class Program
    {
        static void Main(string[] args)
        {
            // Create an object of the Workbook class
            Workbook workbook = new Workbook();
            // Load an Excel file
            workbook.LoadFromFile("Sample.xlsx");

            // Get the first worksheet
            Worksheet sheet = workbook.Worksheets[0];

            // Get the first pivot table
            XlsPivotTable pt = sheet.PivotTables[0] as XlsPivotTable;

            // Add a label filter to the first column field in the pivot table
            pt.ColumnFields[0].AddLabelFilter(PivotLabelFilterType.Equal, "Laptop", null);
            // Or add a value filter to the first column field in the pivot table
            // pt.ColumnFields[0].AddValueFilter(PivotValueFilterType.Between, pt.DataFields[0], 5000, 10000);


            // Calculate the pivot table data
            pt.CalculateData();

            // Save the resulting file
            workbook.SaveToFile("AddColumnFilter.xlsx", FileFormat.Version2016);
            workbook.Dispose();
        }
    }
}
Apply for a Temporary License
If you'd like to remove the evaluation message from the generated documents, or to get rid of the function limitations, please request a 30-day trial license for yourself.
Python: Detect and Remove Digital Signatures in Excel Files
Digital signatures serve as a critical layer of security, ensuring that an Excel file has not been altered since it was signed and verifying the identity of its originator. However, there are scenarios where the detection and removal of these digital signatures become necessary, such as when consolidating multiple documents, updating content, or preparing files for systems that do not support digitally signed documents. This article shows how to detect and remove digital signatures in Excel files with Python code using Spire.XLS for Python, providing a simple way to batch process Excel file digital signatures.
- Detecting the Presence of Digital Signatures in Excel Files
- Removing Digital Signatures from Excel Files
Install Spire.XLS for Python
This scenario requires Spire.XLS for Python and plum-dispatch v1.7.4. They can be easily installed in your Windows through the following pip commands.
pip install Spire.XLS
If you are unsure how to install, please refer to: How to Install Spire.XLS for Python on Windows
Detecting the Presence of Digital Signatures in Excel Files
Spire.XLS for Python provides the Workbook class to deal with Excel files and the Workbook.IsDigitallySigned property to check if an Excel file has digital signatures. Developers can use the Boolean value returned by this property to determine whether the Excel file contains a digital signature.
The detailed steps for detecting if an Excel file has digital signatures are as follows:
- Create an instance of Workbook class.
- Load an Excel file using Workbook.LoadFromFile() method.
- Check whether the workbook is digitally signed by the value of the Workbook.IsDigitallySigned property.
- Python
from spire.xls import *

# Create an instance of Workbook
workbook = Workbook()

# Load an Excel file
workbook.LoadFromFile("Sample.xlsx")

# Check whether the workbook is digitally signed
if workbook.IsDigitallySigned is False:
    print("The workbook is not digitally signed.")
else:
    print("The workbook is digitally signed.")

Removing Digital Signatures from Excel Files
Developers can use the Workbook.RemoveAllDigitalSignatures() method to effortlessly delete all digital signatures in an Excel workbook. The detailed steps are as follows:
- Create an instance of Workbook class.
- Load an Excel file using Workbook.LoadFromFile() method.
- Remove all digital signatures from the workbook using Workbook.RemoveAllDigitalSignatures() method.
- Save the workbook using Workbook.SaveToFile() method.
- Python
from spire.xls import *

# Create an instance of Workbook
workbook = Workbook()

# Load an Excel file
workbook.LoadFromFile("Sample.xlsx")

# Remove digital signatures
workbook.RemoveAllDigitalSignatures()

# Save the document
workbook.SaveToFile("output/RemoveExcelDigitalSignature.xlsx", FileFormat.Version2016)
workbook.Dispose()
Apply for a Temporary License
If you'd like to remove the evaluation message from the generated documents, or to get rid of the function limitations, please request a 30-day trial license for yourself.