Python: Add, Remove or Replace Comments in PowerPoint
Comments in Microsoft PowerPoint allow users to add additional information to specific slides or elements of a slide to improve collaboration and communication when sharing presentations. These comments can be related content, suggestions for changes, and so on. This feature is very useful when several people are working on a presentation together. In this article, you will learn how to use Spire.Presentation for Python to add, remove or replace comments on slides in Python programs.
- Add Comments to a Presentation Slide in Python
- Remove Comments from a Presentation Slide in Python
- Replace Comments on a Presentation Slide in Python
Install Spire.Presentation for Python
This scenario requires Spire.Presentation for Python and plum-dispatch v1.7.4. They can be easily installed in your VS Code through the following pip commands.
pip install Spire.Presentation
If you are unsure how to install, please refer to this tutorial: How to Install Spire.Presentation for Python on Windows
Add Comments to a Presentation Slide in Python
Spire.Presentation for Python provides the Presentation.CommentAuthors.AddAuthor() and Presentation.Slides[].AddComment(author:ICommentAuthor,text:str,position:PointF,dateTime:DateTime) methods to support adding comments to a slide. The detailed steps are as follows.
- Create a new PowerPoint presentation.
- Load a PowerPoint presentation using Presentation.LoadFromFile() method.
- Add the author of the comment by using Presentation.CommentAuthors.AddAuthor() method.
- Then add a comment to the first slide using Presentation.Slides[].AddComment(author:ICommentAuthor,text:str,position:PointF,dateTime:DateTime) method.
- Add another comment using the same method.
- Save the result file using Presentation.SaveToFile() method.
- Python
from spire.presentation.common import *
from spire.presentation import *
inputFile = "C:/Users/Administrator/Desktop/Sample.pptx"
outputFile = "C:/Users/Administrator/Desktop/AddComment.pptx"
# Create a Presentation instance
presentation = Presentation()
# Load a presentation from disk
presentation.LoadFromFile(inputFile)
# Add the author of the comment
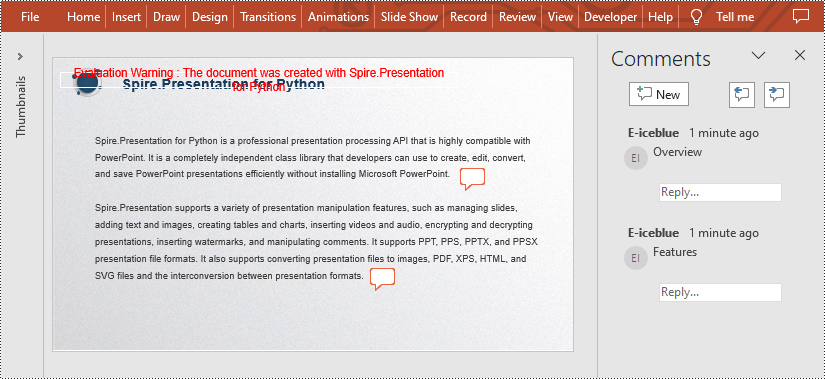
author = presentation.CommentAuthors.AddAuthor("E-iceblue", "comment:")
# Add a comment to the first slide
point = PointF(45.0,12.0)
presentation.Slides[0].AddComment(author, "Overview", point, DateTime.get_Now())
# Add another comment to this slide
author = presentation.CommentAuthors.AddAuthor("E-iceblue", "comment:")
point = PointF(35.0,23.0)
presentation.Slides[0].AddComment(author, "Features", point, DateTime.get_Now())
# Save the result file
presentation.SaveToFile(outputFile, FileFormat.Pptx2010)
presentation.Dispose()
Remove Comments from a Presentation Slide in Python
You can also remove the specific comment from the slides by using Presentation.Slides[].DeleteComment(Comment) method. The detailed steps are as follows.
- Create a Presentation instance.
- Load a PowerPoint presentation using Presentation.LoadFromFile() method.
- Remove the first comment from the specified slide using Presentation.Slides[].DeleteComment(Comment) method.
- Save the result file using Presentation.SaveToFile() method.
- Python
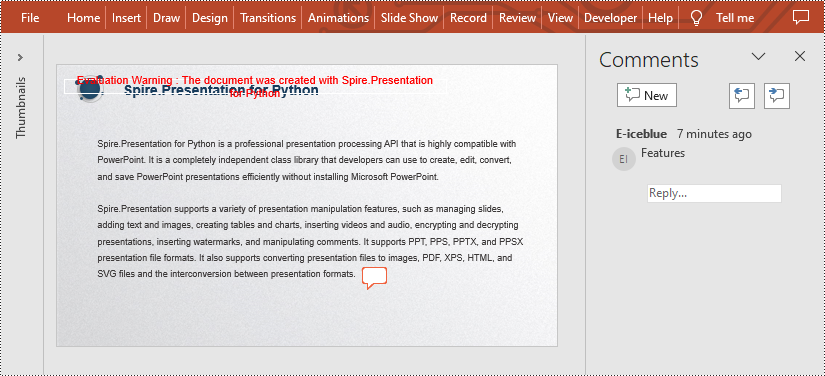
from spire.presentation.common import *
from spire.presentation import *

inputFile = "C:/Users/Administrator/Desktop/AddComment.pptx"
outputFile = "C:/Users/Administrator/Desktop/DeleteComment.pptx"

# Create a Presentation instance
presentation = Presentation()

# Load a presentation from disk
presentation.LoadFromFile(inputFile)

# Delete the first comment from the first slide
presentation.Slides[0].DeleteComment(presentation.Slides[0].Comments[0])

# Save the result file
presentation.SaveToFile(outputFile, FileFormat.Pptx2010)
presentation.Dispose()
Replace Comments on a Presentation Slide in Python
If you want to replace the comment content with new text, please use the Presentation.Slides[].Comments[].Text property. The detailed steps are as follows.
- Create a Presentation instance.
- Load a PowerPoint presentation using Presentation.LoadFromFile() method.
- Replace the content of the second comment with new text by Presentation.Slides[].Comments[].Text property.
- Save the result file using Presentation.SaveToFile() method.
- Python
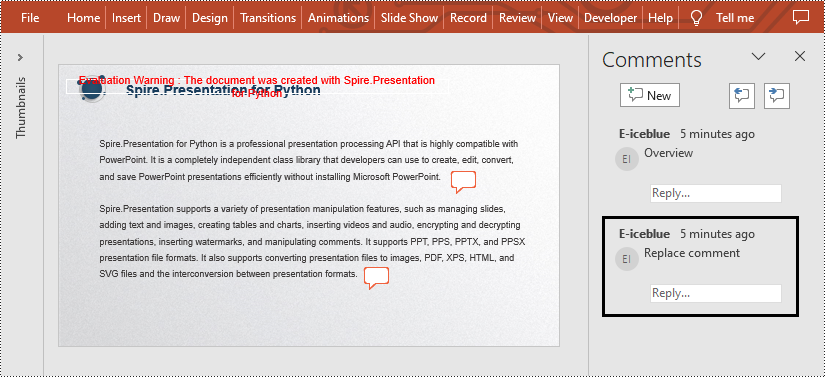
from spire.presentation.common import *
from spire.presentation import *

inputFile = "C:/Users/Administrator/Desktop/AddComment.pptx"
outputFile = "C:/Users/Administrator/Desktop/ReplaceComment.pptx"

# Create a Presentation instance
presentation = Presentation()

# Load a presentation from disk
presentation.LoadFromFile(inputFile)

# Replace the content of the second comment with new text
presentation.Slides[0].Comments[1].Text = "Replace comment"

# Save the result file
presentation.SaveToFile(outputFile, FileFormat.Pptx2010)
presentation.Dispose()
Apply for a Temporary License
If you'd like to remove the evaluation message from the generated documents, or to get rid of the function limitations, please request a 30-day trial license for yourself.
Python: Modify or Remove Hyperlinks in PDF
Hyperlinks in PDF documents are commonly used tools for navigating to internal or external related information. However, these links need to be accurate and up-to-date in order to be effective. Document editors are supposed to have the power to change or delete hyperlinks to update outdated references, rectify errors, comply with evolving web standards, or enhance accessibility. This article will demonstrate how to use Spire.PDF for Python to modify or remove hyperlinks in PDF documents to ensure accurate information dissemination, seamless navigation, and inclusive user experience.
- Update the Target Address of Hyperlinks in PDF Using Python
- Remove Hyperlinks in PDF Documents Using Python
Install Spire.PDF for Python
This scenario requires Spire.PDF for Python and plum-dispatch v1.7.4. They can be easily installed in your VS Code through the following pip command.
pip install Spire.PDF
If you are unsure how to install, please refer to this tutorial: How to Install Spire.PDF for Python on Windows
Update the Target Address of Hyperlinks in PDF Using Python
In PDF documents, hyperlinks are annotations displayed on the linked content on a page. Therefore, to modify hyperlinks in PDF documents, it is needed to retrieve all annotations on a page through PdfPageBase.AnnotationsWidget property. Then, a specific hyperlink annotation can be obtained from the annotation list and the target address can be updated through PdfTextWebLinkAnnotationWidget.Url property. The detailed steps are as follows:
- Create an object of PdfDocument class and load a PDF document using PdfDocument.LoadFromFile() method.
- Get a page of the document using PdfDocument.Pages.get_Item() method.
- Get all annotations on the page through PdfPageBase.AnnotationsWidget property.
- Get a hyperlink annotation and cast it to a PdfTextWebLinkAnnotationWidget object.
- Set a new target address for the hyperlink annotation through PdfTextWebLinkAnnotationWidget.Url property.
- Save the document using PdfDocument.SaveToFile() method.
- Python
from spire.pdf.common import *
from spire.pdf import *
# Create an object of PdfDocument class and load a PDF document
pdf = PdfDocument()
pdf.LoadFromFile("Sample.pdf")
# Get the first page of the document
page = pdf.Pages.get_Item(0)
# Get all annotations on the page
widgetCollection = page.AnnotationsWidget
# Get the second hyperlink annotation
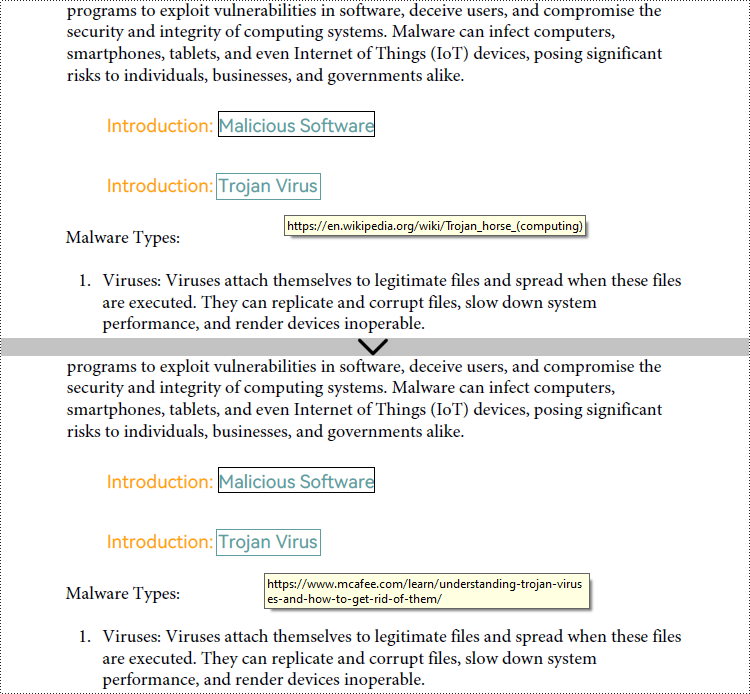
annotation = widgetCollection.get_Item(1)
# Cast the hyperlink annotation to a PdfTextWebLinkAnnotationWidget object
link = PdfTextWebLinkAnnotationWidget(annotation)
# Set a new target address for the second hyperlink
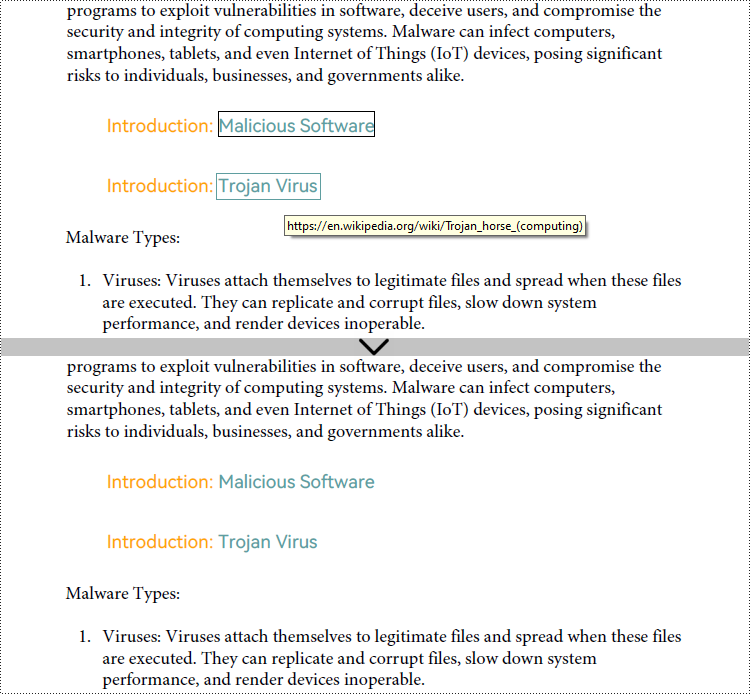
link.Url = "https://www.mcafee.com/learn/understanding-trojan-viruses-and-how-to-get-rid-of-them/"
#Save the document
pdf.SaveToFile("output/ModifyPDFHyperlink.pdf")
pdf.Close()
Remove Hyperlinks in PDF Documents Using Python
Spire.PDF for Python enables developers to effortlessly remove specific hyperlinks on a page using the PdfPageBase.AnnotationsWidget.RemoveAt() method. Additionally, developers can also iterate through each page and its annotations to identify and eliminate all hyperlink annotations in the entire PDF document with the help of Spire.PDF for Python. The detailed steps are as follows:
- Create an object of PdfDocument class and load a PDF document using PdfDocument.LoadFromFile() method.
- To remove a specific hyperlink, get a page in the document using PdfDocument.Pages.get_Item() method and remove the hyperlink annotation using PdfPageBase.AnnotationsWidget.RemoveAt() method.
- To remove all hyperlinks in the document, loop through the pages in the document to get the annotations on each page through PdfPageBase.AnnotationsWidget property.
- Loop through the annotations to check if each annotation is an instance of PdfTextWebLinkAnnotationWidget class. If it is, remove it using PdfAnnotationCollection.Remove() method.
- Save the document using PdfDocument.SaveToFile() method.
- Python
from spire.pdf import *
from spire.pdf.common import *

# # Create an object of PdfDocument class and load a PDF document
pdf = PdfDocument()
pdf.LoadFromFile("Sample.pdf")

# Remove the first hyperlink on the first page
#page = pdf.Pages.get_Item(0)
#page.AnnotationsWidget.RemoveAt(0)

# Remove all hyperlinks
# Loop through the pages in the document
for j in range(pdf.Pages.Count):
    # Get each page
    page = pdf.Pages.get_Item(j)
    # Get the annotations on each page
    annotations = page.AnnotationsWidget
    # Check if there is any annotations on a page
    if annotations.Count > 0:
        # Loop through the annotations
        i = annotations.Count - 1
        while i >=0:
            # Get an annotation
            annotation = annotations.get_Item(i)
            # Check if each annotation is a hyperlink
            if isinstance(annotation, PdfTextWebLinkAnnotationWidget):
                # Remove hyperlink annotations
                annotations.Remove(annotation)
            i -= 1

# Save the document
pdf.SaveToFile("output/RemovePDFHyperlink.pdf")
pdf.Close()
Apply for a Temporary License
If you'd like to remove the evaluation message from the generated documents, or to get rid of the function limitations, please request a 30-day trial license for yourself.
Python: Create and Identify PDF Portfolios
A PDF portfolio is a collection of files assembled into a single PDF document. It serves as a comprehensive and interactive showcase of various types of content, such as documents, images, presentations, videos, and more. Unlike a traditional PDF document, a PDF portfolio allows you to present multiple files in a cohesive and organized manner, providing a seamless browsing experience for the viewer. In this article, we will demonstrate how to create a PDF portfolio and how to identify if a PDF is a portfolio in Python using Spire.PDF for Python.
Install Spire.PDF for Python
This scenario requires Spire.PDF for Python and plum-dispatch v1.7.4. They can be easily installed in your VS Code through the following pip command.
pip install Spire.PDF
If you are unsure how to install, please refer to this tutorial: How to Install Spire.PDF for Python on Windows
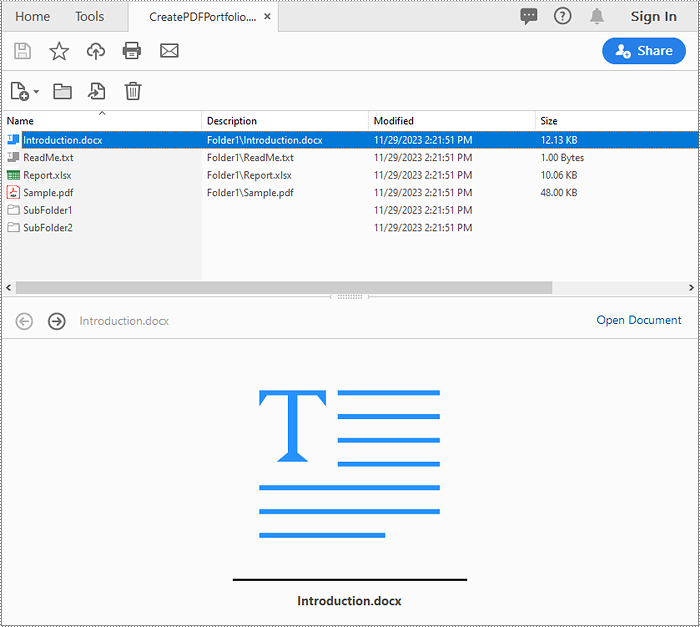
Create a PDF Portfolio with Python
Spire.PDF for Python allows you to generate a PDF portfolio by adding files to a PDF using the PdfDocument.Collection.AddFile() method. Furthermore, you can organize the files within the PDF portfolio by adding folders using the PdfDocument.Collection.Folders.CreateSubfolder() method. The detailed steps are as follows.
- Specify the output file path and the folders where the files to be included in the PDF portfolio are located.
- Create a PdfDocument object.
- Iterate through the files in the first folder and add them to the PDF portfolio using the PdfDocument.Collection.AddFile() method.
- Iterate through the files in the second folder. For each file, create a separate folder within the PDF portfolio using the PdfDocument.Collection.Folders.CreateSubfolder() method, and then add the file to the corresponding folder using the PdfFolder.AddFile() method.
- Save the resulting PDF portfolio using the PdfDocument.SaveToFile() method.
- Python
from spire.pdf.common import *
from spire.pdf import *
import glob

# Specify the folders where the files to be included in the PDF portfolio are located
input_folder1 = "Folder1/*"
input_folder2 = "Folder2/*"
# Specify the output file path
output_file = "CreatePDFPortfolio.pdf"

# Create a PdfDocument object
doc = PdfDocument()

# Get the list of file paths in the first folder
files1 = glob.glob(input_folder1)
# Loop through the files in the list
for i, file in enumerate(files1):
    # Add each file to the PDF portfolio
    doc.Collection.AddFile(file)

# Get the list of file paths in the second folder
files2 = glob.glob(input_folder2)
# Loop through the files in the list
for j, file in enumerate(files2):
    # Create a separate folder for each file
    folder = doc.Collection.Folders.CreateSubfolder(f"SubFolder{j + 1}")
    # Add the file to the folder
    folder.AddFile(file)

# Save the resulting PDF portfolio to the specified file path
doc.SaveToFile(output_file)

# Close the PdfDocument object
doc.Close()
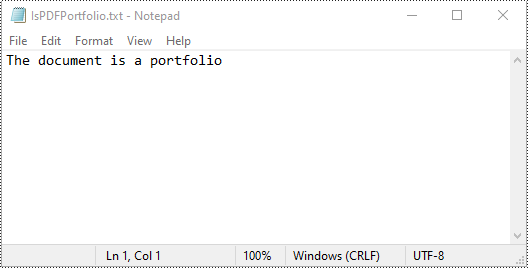
Identify if a PDF is a Portfolio with Python
You can use the PdfDocument.IsPortfolio property to easily identify whether a PDF document is a portfolio or not. The detailed steps are as follows.
- Specify the input and output file paths.
- Create a PdfDocument object.
- Load a PDF document using the PdfDocument.LoadFromFile() method.
- Identify whether the document is a portfolio or not using the PdfDocument.IsPortfolio property.
- Save the result to a text file.
- Python
from spire.pdf.common import *
from spire.pdf import *

# Specify the input and output file paths
input_file = "CreatePDFPortfolio.pdf"
output_file = "IsPDFPortfolio.txt"

# Create a PdfDocument object
doc = PdfDocument()
# Load a PDF document
doc.LoadFromFile(input_file)

# Identify whether the document is a portfolio or not
if doc.IsPortfolio:
    st = "The document is a portfolio"
else:
    st = "The document is not a portfolio"

# Save the result to a text file
with open(output_file, "w") as text_file:
    text_file.write(st)

# Close the PdfDocument object
doc.Close()
Apply for a Temporary License
If you'd like to remove the evaluation message from the generated documents, or to get rid of the function limitations, please request a 30-day trial license for yourself.
Spire.Office 8.11.2 is released
We are happy to announce the release of Spire.Office 8.11.2. In this version, Spire.Doc publicizes the enumeration of Spire.Doc.Publics.Drawing.FontStyle; Spire.PDF adds the new PdfImageHelper interface for image extraction, deletion, replacement and compression; Spire.Presentation releases several new features, such as obtaining the height and width of the text area within a shape and retrieving text from different lines within a shape. Besides, a lot of known issues are fixed successfully in this version. More details are listed below.
In this version, the most recent versions of Spire.Doc, Spire.PDF, Spire.XLS, Spire.Presentation, Spire.Email, Spire.DocViewer, Spire.PDFViewer, Spire.Spreadsheet, Spire.OfficeViewer, Spire.DataExport, Spire.Barcode are included.
DLL Versions:
- Spire.Doc.dll v11.11.8
- Spire.Pdf.dll v9.11.9
- Spire.XLS.dll v13.11.4
- Spire.Presentation.dll v8.11.1
- Spire.Email.dll v6.5.8
- Spire.Barcode.dll v7.2.3
- Spire.DocViewer.Forms.dll v8.7.4
- Spire.Spreadsheet.dll v7.4.3
- Spire.PdfViewer.Forms.dll v7.12.1
- Spire.PdfViewer.Asp v7.12.1
- Spire.OfficeViewer.Forms.dll v8.11.2
- Spire.DataExport.dll v4.9.0
- Spire.DataExport.ResourceMgr.dll v2.1.0.
Here is a list of changes made in this release
Spire.Doc
| Category | ID | Description |
| New feature | - | Publicizes the enumeration Spire.Doc.Publics.Drawing.FontStyle. |
| New feature | - | Changes the namespace of the "FontStyle" in the "PrivateFontPath" structure to "Spire.Doc.Publics.Drawing".
Instructions:
Changes the method "public PrivateFontPath(string fontName, System.Drawing.FontStyle fontStyle, string fontPath)" to "public PrivateFontPath(string fontName, Spire.Doc.Publics.Drawing.FontStyle fontStyle, string fontPath)". Changes the method "public PrivateFontPath(string fontName, System.Drawing.FontStyle fontStyle, string fontPath, bool useArabicConcatenationRules)" to "public PrivateFontPath(string fontName, Spire.Doc.Publics.Drawing.FontStyle fontStyle, string fontPath, bool useArabicConcatenationRules)". |
| Bug | SPIREDOC-9369 | Fixes the issue that the content formatting was incorrect after converting Word to PDF. |
| Bug | SPIREDOC-9456 | Fixes the issue that the pagination was incorrect after converting Word to PDF. |
| Bug | SPIREDOC-9594 | Fixes the issue that the content was not correct after converting HTML to PDF. |
| Bug | SPIREDOC-9716 | Fixes the issue that the program threw System.ArgumentException when converting ODT to PDF. |
| Bug | SPIREDOC-9764 | Fixes the issue that the page numbers of the table of contents were incorrectly positioned after merging Word documents and converting them to PDF. |
| Bug | SPIREDOC-9765 | Fixes the issue that the formatting of the table of contents was incorrect after merging Word documents and converting them to PDF. |
| Bug | SPIREDOC-9869 | Fixes the issue that images were not displayed after converting HTML to PDF. |
| Bug | SPIREDOC-9906 | Fixes the issue that the content of OLE objects cloned from RTF documents to Docx documents was not displayed completely. |
| Bug | SPIREDOC-9909 | Fixes the issue that the program threw System.InvalidOperationException when converting Word to image/PDF. |
| Bug | SPIREDOC-9923 | Fixes the issue that the newly added rows were not aligned after adding new rows to a Word table and converting it to PDF. |
| Bug | SPIREDOC-9924 | Fixes the issue that the program threw System.IndexOutOfRangeException when modifying the content of a Word table and converting the document to PDF. |
| Bug | SPIREDOC-9934 | Fixes the issue that editing restrictions were lost after saving a Doc format document as a new document. |
Spire.PDF
| Category | ID | Description |
| New feature | - | Adds the new PdfImageHelper interface for image extraction, deletion, replacement and compression. Key code snippets are as follows: // Delete image:
imageHelper.DeleteImage(imageInfos[0]);
// Extract images:
int index = 0;
foreach (PdfImageInfo info in imageInfos)
{
info.Image.Save(outputFile_I + string.Format("Image-{0}.png", index));
index++;
}
// Replace image:
PdfImage image = PdfImage.FromFile(TestUtil.DataPath + "ImgFiles/E-iceblue logo.png");
imageHelper.ReplaceImage(imageInfos[0], image);
// Compress images:
foreach (PdfPageBase page in doc.Pages)
{
foreach (PdfImageInfo info in imageHelper.GetImagesInfo(page))
{
bool success = info.TryCompressImage();
}
}
|
| Bug | SPIREPDF-5781 | Fixes the issue that two columns of the extracted PDF table were merged into one. |
| Bug | SPIREPDF-6225 | Fixes the issue that the result document of XPS to PDF conversion was blank. |
| Bug | SPIREPDF-6232 | Fixes the issue that it popped up page error when opening PDF converted from XPS with Adobe tools. |
| Bug | SPIREPDF-6355 | Fixes the issue that extra characters appeared in the content after converting PDF to XPS. |
| Bug | SPIREPDF-6361 | Fixes the issue that the program threw an exception System.NullReferenceException when loading PDF documents. |
| Bug | SPIREPDF-6320 | Improves the speed of converting PDF to images. |
| Bug | SPIREPDF-4552 | Fixes the issue that the extracted content from PDF was incorrect. |
| Bug | SPIREPDF-5949 | Fixes the issue that the resulting file became larger after splitting and merging PDFs. |
| Bug | SPIREPDF-6017 | Fixes the issue that the program crashed when converting PDF to SVG on Linux. |
| Bug | SPIREPDF-6273 | Fixes the issue that the table content extracted from PDF was incorrect. |
| Bug | SPIREPDF-6301 | Fixes the issue that the order of extracted table content was incorrect. |
| Bug | SPIREPDF-6305 | Fixes the issue that the text style changed after converting PDF to images. |
| Bug | SPIREPDF-6308 | Fixes the issue that documents could still be decrypted without entering a password. |
| Bug | SPIREPDF-6309 | Fixes the issue that the program threw an exception "System.NullReferenceException" when comparing and saving PDF |
| Bug | SPIREPDF-6312 | Fixes the issue that some content was unclear when printing PDF. |
| Bug | SPIREPDF-6314 | Fixes the issue that the program threw an exception "System.ArgumentOutOfRangeException" when converting PDF to SVG. |
| Bug | SPIREPDF-6333 | Fixes the issue that the program threw an exception "System.StackOverflowException" when converting PDF to images. |
| Bug | SPIREPDF-6346 | Fixes the issue that the program threw an exception "System.NullReferenceException" when extracting text. |
| Bug | SPIREPDF-6348 | Fixed an issue that tables were not recognized. |
Spire.XLS
| Category | ID | Description |
| Bug | SPIREXLS-4876 | Fixed the issue that some cells were missing when convert Excel to HTML. |
| Bug | SPIREXLS-4880 | Fixed the issue that the font directory did not take effective when converting Excel to PDF. |
| Bug | SPIREXLS-4904 | Fixed the issue that the function SHEET(A3) did not auto calculate. |
| Bug | SPIREXLS-4922 | Fixed the problem that the encryption information obtained from a worksheet was incorrect. |
| Bug | SPIREXLS-4925 | Fixed the issue that the watermark was incorrect after copying a worksheet. |
| Bug | SPIREXLS-4931 | Fixed the issue that the pagination was incorrect when converting Excel to PDF. |
| Bug | SPIREXLS-4933 | Fixed the issue that the System.FormatException exception was thrown when loading an Excel document. |
| Bug | SPIREXLS-4942 | Fixed the issue that the parentheses were not recognized when converting Excel to images |
| Bug | SPIREXLS-4963 | Fixed the issue that some content got lost when copying a custom shape created by Excel 365 to another worksheet. |
Spire.Presentation
| Category | ID | Description |
| New feature | SPIREPPT-2378 | Supports preserving position information of shapes relative to slides when converting shapes to SVG.
byte[] svgByte = shape.SaveAsSvgInSlide();
FileStream fs = new FileStream("shapePath_" + num + ".svg", FileMode.Create);
fs.Write(svgByte, 0, svgByte.Length);
fs.Close();
|
| New feature | SPIREPPT-2379 | Supports obtaining the height and width of a text area within a shape.
IAutoShape autoShape = shape as IAutoShape; SizeF size = autoShape.TextFrame.GetTextSize(); |
| New feature | SPIREPPT-2384 | Supports retrieving text from different lines within a shape.
Presentation ppt = new Presentation();
ppt.LoadFromFile(inputFile);
ISlide slide = ppt.Slides[0];
for (int i = 0; i < slide.Shapes.Count; i++)
{
    IAutoShape shape = (IAutoShape)slide.Shapes[i];
    File.AppendAllText(outputFile, "shape" + i + ":" + "\r\n");
    IList<LineText> lines = shape.TextFrame.GetLayoutLines();
    for (int j = 0; j < lines.Count; j++)
    {
        File.AppendAllText(outputFile,"line[" + j + "]:" + lines[j].Text + "\r\n");
    }
}
|
| New feature | SPIREPPT-2390 | Supports retrieving the ShapeID property of an OleObject object.
Presentation ppt = new Presentation();
ppt.LoadFromFile(inputFile);
OleObjectCollection oles = ppt.Slides[0].OleObjects;
OleObject oleObject = oles[0];
StringBuilder sb = new StringBuilder();
sb.AppendLine("ShapeID=" + oleObject.ShapeID);
foreach (DictionaryEntry entry in oleObject.Properties)
{
    sb.AppendLine(entry.Key + ":" + entry.Value);
}
File.AppendAllText(outputFile, sb.ToString());
|
| Bug | SPIREPPT-2391 | Fixes the issue that the program threw System.InvalidCastException when executing shape.TextFrame.GetTextLocation() method. |
Spire.Presentation 8.11.1 supports obtaining the height and width of the text area within a shape
We are excited to announce the release of Spire.Presentation 8.11.1. This version releases several new features, such as obtaining the height and width of the text area within a shape and retrieving text from different lines within a shape. Besides, it also fixes the issue that the program threw System.InvalidCastException exception when executing the shape.TextFrame.GetTextLocation() method. More details are listed below.
Here is a list of changes made in this release
| Category | ID | Description |
| New feature | SPIREPPT-2378 | Supports preserving position information of shapes relative to slides when converting shapes to SVG.
byte[] svgByte = shape.SaveAsSvgInSlide();
FileStream fs = new FileStream("shapePath_" + num + ".svg", FileMode.Create);
fs.Write(svgByte, 0, svgByte.Length);
fs.Close();
|
| New feature | SPIREPPT-2379 | Supports obtaining the height and width of a text area within a shape.
IAutoShape autoShape = shape as IAutoShape; SizeF size = autoShape.TextFrame.GetTextSize(); |
| New feature | SPIREPPT-2384 | Supports retrieving text from different lines within a shape.
Presentation ppt = new Presentation();
ppt.LoadFromFile(inputFile);
ISlide slide = ppt.Slides[0];
for (int i = 0; i < slide.Shapes.Count; i++)
{
    IAutoShape shape = (IAutoShape)slide.Shapes[i];
    File.AppendAllText(outputFile, "shape" + i + ":" + "\r\n");
    IList<LineText> lines = shape.TextFrame.GetLayoutLines();
    for (int j = 0; j < lines.Count; j++)
    {
        File.AppendAllText(outputFile,"line[" + j + "]:" + lines[j].Text + "\r\n");
    }
}
|
| New feature | SPIREPPT-2390 | Supports retrieving the ShapeID property of an OleObject object.
Presentation ppt = new Presentation();
ppt.LoadFromFile(inputFile);
OleObjectCollection oles = ppt.Slides[0].OleObjects;
OleObject oleObject = oles[0];
StringBuilder sb = new StringBuilder();
sb.AppendLine("ShapeID=" + oleObject.ShapeID);
foreach (DictionaryEntry entry in oleObject.Properties)
{
    sb.AppendLine(entry.Key + ":" + entry.Value);
}
File.AppendAllText(outputFile, sb.ToString());
|
| Bug | SPIREPPT-2391 | Fixes the issue that the program threw System.InvalidCastException when executing shape.TextFrame.GetTextLocation() method. |
Python: Set or Change Fonts in PowerPoint
In a PowerPoint document, the choice of fonts plays a significant role in enhancing the overall visual appeal and effectiveness of the presentation. Different fonts can be used to establish a visual hierarchy, allowing you to emphasize key points, headings, or subheadings in your presentation and guide the audience's attention. This article introduces how to set or change fonts in a PowerPoint document in Python using Spire.Presentation for Python.
- Set Fonts when Creating a New PowerPoint Document in Python
- Change Fonts in an Existing PowerPoint Document in Python
Install Spire.Presentation for Python
This scenario requires Spire.Presentation for Python and plum-dispatch v1.7.4. They can be easily installed in your VS Code through the following pip commands.
pip install Spire.Presentation
If you are unsure how to install, please refer to this tutorial: How to Install Spire.Presentation for Python on Windows
Set Fonts when Creating a New PowerPoint Document in Python
Spire.Presentation for Python offers the TextRange class to represent a range of text. A paragraph can consist of one or more text ranges. To apply font formatting to the characters in a text range, you can use the properties like LatinFont, IsBold, IsItalic, and FontHeight of the TextRange class. The following are the steps to set fonts when creating a new PowerPoint document in Python.
- Create a Presentation object.
- Get the first slide through Presentation.Slides[0] property.
- Add a shape to the slide using ISlide.Shapes.AppendShape() method.
- Add text to the shape using IAutoShape.AppendTextFrame() method.
- Get TextRange object through IAutoShape.TextFrame.TextRange property.
- Set the font information such as font name, font size, bold, italic, underline, and text color through the properties under the TextRange object.
- Save the presentation to a PPTX file using Presentation.SaveToFile() method.
- Python
from spire.presentation.common import *
import math
from spire.presentation import *
# Create a Presentation object
presentation = Presentation()
# Set slide size type
presentation.SlideSize.Type = SlideSizeType.Screen16x9
# Add a shape to the first slide
rec = RectangleF.FromLTRB (30, 100, 900, 250)
shape = presentation.Slides[0].Shapes.AppendShape(ShapeType.Rectangle, rec)
# Set line color and fill type of the shape
shape.ShapeStyle.LineColor.Color = Color.get_Transparent()
shape.Fill.FillType = FillFormatType.none
# Add text to the shape
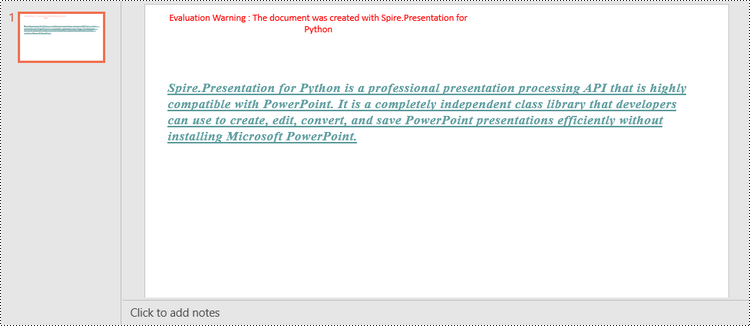
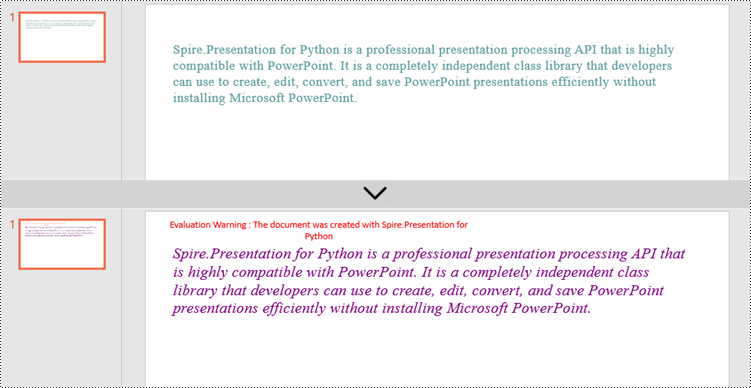
shape.AppendTextFrame("Spire.Presentation for Python is a professional presentation processing API that \
is highly compatible with PowerPoint. It is a completely independent class library that developers can \
use to create, edit, convert, and save PowerPoint presentations efficiently without installing Microsoft PowerPoint.")
# Get text of the shape as a text range
textRange = shape.TextFrame.TextRange
# Set font name
textRange.LatinFont = TextFont("Times New Roman")
# Set font style (bold & italic)
textRange.IsBold = TriState.TTrue
textRange.IsItalic = TriState.TTrue
# Set underline type
textRange.TextUnderlineType = TextUnderlineType.Single
# Set font size
textRange.FontHeight = 22
# Set text color
textRange.Fill.FillType = FillFormatType.Solid
textRange.Fill.SolidColor.Color = Color.get_CadetBlue()
# Set alignment
textRange.Paragraph.Alignment = TextAlignmentType.Left
# Set line spacing
textRange.LineSpacing = 0.5
# Save to file
presentation.SaveToFile("output/SetFont.pptx", FileFormat.Pptx2019)
presentation.Dispose()
Change Fonts in an Existing PowerPoint Document in Python
To change the font for a specific paragraph, we need to get the paragraph from the document. Then, iterate through the text ranges in the paragraph and reset the font information for each text range. Below are the steps to change the font of a paragraph in an existing PowerPoint document using Spire.Presentation for Python.
- Create a Presentation object.
- Get a specific slide through Presentation.Slides[index] property.
- Get a specific shape through ISlide.Shapes[index] property.
- Get a specific paragraph of the shape through IAutoShape.TextFrame.Paragraphs[index] property.
- Iterate through the text ranges in the paragraph.
- Set the font information such as font name, font size, bold, italic, underline, and text color of a specific text range through the properties under the TextRange object.
- Save the presentation to a PPTX file using Presentation.SaveToFile() method.
- Python
from spire.presentation.common import *
from spire.presentation import *

# Create a Presentation object
presentation = Presentation()

# Load a PowerPoint file
presentation.LoadFromFile("C:\\Users\\Administrator\\Desktop\\input.pptx")

# Get the first slide
slide = presentation.Slides[0]

# Get the first shape on the slide
shape = slide.Shapes[0]

# Get the first paragraph of the shape
paragraph = shape.TextFrame.Paragraphs[0]

# Create a font
newFont = TextFont("Times New Roman")

# Loop through the text ranges in the paragraph
for textRange in paragraph.TextRanges:

    # Apply font to a specific text range
    textRange.LatinFont = newFont

    # Set font to Italic
    textRange.Format.IsItalic = TriState.TTrue

    # Set font size
    textRange.FontHeight = 25

    # Set font color
    textRange.Fill.FillType = FillFormatType.Solid
    textRange.Fill.SolidColor.Color = Color.get_Purple()

# Save to file
presentation.SaveToFile("output/ChangeFont.pptx", FileFormat.Pptx2019)
presentation.Dispose()
Apply for a Temporary License
If you'd like to remove the evaluation message from the generated documents, or to get rid of the function limitations, please request a 30-day trial license for yourself.
Python: Set Background Colors for Word Paragraphs or Text
Setting the background colors for paragraphs and text in Word documents can significantly enhance the presentation and readability of content. Customizing background color is an effective approach to emphasize key information, categorize content, and add a personalized touch, thereby making it easy to create polished and professional documents. By carefully selecting and applying background colors, documents can be transformed into visually appealing works that effectively convey information and engage the reader. This article shows how to use Spire.Doc for Python to set background colors for paragraphs and text in Word documents, unlocking new possibilities for document styling and customization.
- Set Background Colors for Paragraphs Using Python
- Set Background Colors for Selected Text Using Python
Install Spire.Doc for Python
This scenario requires Spire.Doc for Python and plum-dispatch v1.7.4. They can be easily installed in your VS Code through the following pip command.
pip install Spire.Doc
If you are unsure how to install, please refer to this tutorial: How to Install Spire.Doc for Python on Windows
Set Background Color for Paragraphs Using Python
By using Spire.Doc for Python, developers can get any paragraph in any section. After getting a paragraph, developers can apply a background color to it by assigning a Color object to Paragraph.Format.BackColor property. Below are the detailed steps:
- Create an instance of Document class and load a Word document using Document.LoadFromFile() method.
- Get a section using Document.Sections.get_Item() method.
- Get a paragraph in the section using Section.Paragraphs.get_Item() method.
- Set the background color of the paragraph through Paragraph.Format.BackColor property.
- Save the document using Document.SaveToFile() method.
- Python
from spire.doc import *
from spire.doc.common import *
# Create an instance of Document class and load a Word document
doc = Document()
doc.LoadFromFile("Sample.docx")
# Get the first section
section = doc.Sections.get_Item(0)
# Get the fifth paragraph
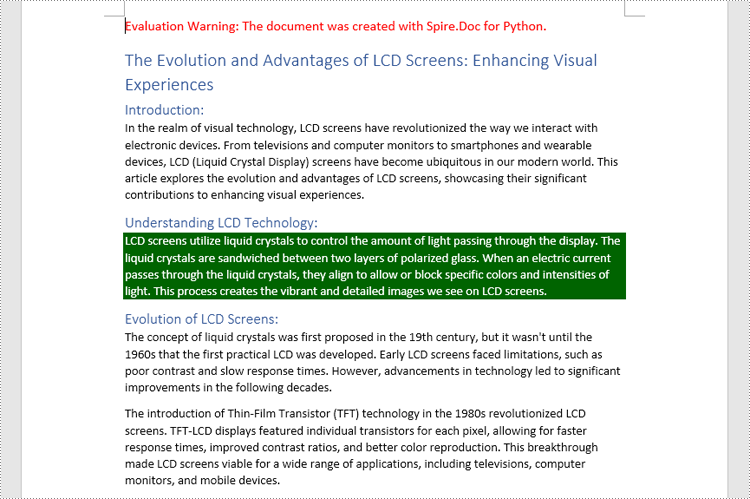
paragraph = section.Paragraphs.get_Item(4)
# Set background color for the paragraph
paragraph.Format.BackColor = Color.get_DarkGreen()
# Save the document
doc.SaveToFile("output/ParagraphBackground.docx")
doc.Close()
Set Background Colors for Selected Text Using Python
Spire.Doc for Python enables developers to find all the occurrences of specific text in a Word document with Document.FindAllString() method. After getting the finding results, developers can set the background for them through TextRange.CharacterFormat.TextBackgroundColor property. The detailed steps are as follows:
- Create an instance of Document class and load a Word document using Document.LoadFromFile() method.
- Find all the occurrences of specific text using Document.FindAllString() method.
- Loop through the occurrences, get each occurrence as a text range using TextSelection.GetAsOneRange(True) method, and set the background color of each occurrence through TextRange.CharacterFormat.TextBackgroundColor property. It is also possible to get only one occurrence from the result list and set the background color for the occurrence.
- Save the document using Document.SaveToFile() method.
- Python
from spire.doc import *
from spire.doc.common import *
# Create an instance of Document class and load a Word document
doc = Document()
doc.LoadFromFile("Sample.docx")
# Find text in the Word document
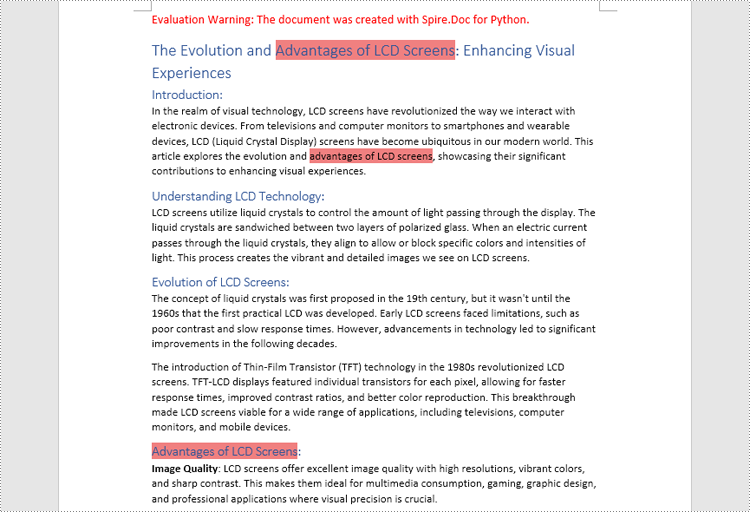
findResults = doc.FindAllString("advantages of LCD screens", False, False)
# Loop through the finding results to set background color for all occurrences
for text in findResults:
# Get an occurrence as a text range
textRange = text.GetAsOneRange(True)
# Set the background color of the text range
textRange.CharacterFormat.TextBackgroundColor = Color.get_LightCoral()
# Set the background color of a sepecified occurrence
# Get an occurrence as one text range
# textRange = findResults[1].GetAsOneRange()
# Set the background color of the text range
# textRange.CharacterFormat.BackgroundColor = Color.get_DarkCyan()
# Save the document
doc.SaveToFile("output/TextBackground.docx")
doc.Close()
Apply for a Temporary License
If you'd like to remove the evaluation message from the generated documents, or to get rid of the function limitations, please request a 30-day trial license for yourself.
Spire.Office for C++ 8.11.0 is released
We are delighted to announce the release of Spire.Office for C++ 8.11.0. This version adds support for the Linux platform. Spire.PDF for C++ supports the PdfMarker type. In addition, some known issues are fixed in this version. More details are listed below.
Here is a list of changes made in this release
Spire.PDF for C++
| Category | ID | Description |
| New feature | SPIREPDF-5945 | Supports the PdfMarker type.
intrusive_ptr<PdfDocument> doc = new PdfDocument(); intrusive_ptr<PdfNewPage> page = Object::Dynamic_cast<PdfNewPage>(doc->GetPages()->Add()); intrusive_ptr<PdfMarker> marker = new PdfMarker(PdfUnorderedMarkerStyle::CustomImage); marker->SetImage(PdfImage::FromFile(inputFile_Img.c_str())); std::wstring listContent = L"Data Structure\n"; listContent += L"Algorithm\n"; listContent += L"Computer Newworks\n"; listContent += L"Operating System\n"; listContent += L"C Programming\n"; listContent += L"Computer Organization and Architecture"; intrusive_ptr<PdfList> list = new PdfList(listContent.c_str()); list->SetIndent(2); list->SetTextIndent(4); list->SetMarker(marker); ((intrusive_ptr<PdfLayoutWidget>)list)->Draw(page, 100, 100); doc->SaveToFile(outputFile.c_str(), FileFormat::PDF); doc->Close(); |
| Bug | SPIREPDF-6052 | Fixes the issue that the first-level bookmark navigation function failed when performing linearized conversion of PDF documents. |
| Bug | SPIREPDF-6173 | Fixes the issue that the validation of signatures was incorrect. |
| Bug | SPIREPDF-6191 | Removes doc->GetXmpMetaData() method. |
| Bug | SPIREPDF-6242 | Fixes the issue that reading properties of PDF documents failed. |
| Bug | SPIREPDF-6257 | Fixes the issue that the program threw an exception System.InvalidCastException when converting PDF documents to XPS documents multiple times. |
| Bug | SPIREPDF-6270 | Fixes the issue that compressing PDF documents failed. |
| Bug | SPIREPDF-6344 | Fixes the issue that the program threw an exception System.TypeInitializationException when converting a PDF document to a PowerPoint document. |
Spire.PDF for C++ 9.11.0 supports the PdfMarker type
We are excited to announce the release of Spire.PDF for C++ 9.11.0. This version supports the PdfMarker type. It also enhances the conversion from PDF to XPS and PowerPoint files. Moreover, some known issues are fixed successfully in this version, such as the issue that compressing PDF documents failed. More details are listed below.
Here is a list of changes made in this release
| Category | ID | Description |
| New feature | SPIREPDF-5945 | Supports the PdfMarker type.
intrusive_ptr<PdfDocument> doc = new PdfDocument(); intrusive_ptr<PdfNewPage> page = Object::Dynamic_cast<PdfNewPage>(doc->GetPages()->Add()); intrusive_ptr<PdfMarker> marker = new PdfMarker(PdfUnorderedMarkerStyle::CustomImage); marker->SetImage(PdfImage::FromFile(inputFile_Img.c_str())); std::wstring listContent = L"Data Structure\n"; listContent += L"Algorithm\n"; listContent += L"Computer Newworks\n"; listContent += L"Operating System\n"; listContent += L"C Programming\n"; listContent += L"Computer Organization and Architecture"; intrusive_ptr<PdfList> list = new PdfList(listContent.c_str()); list->SetIndent(2); list->SetTextIndent(4); list->SetMarker(marker); ((intrusive_ptr<PdfLayoutWidget>)list)->Draw(page, 100, 100); doc->SaveToFile(outputFile.c_str(), FileFormat::PDF); doc->Close(); |
| Bug | SPIREPDF-6052 | Fixes the issue that the first-level bookmark navigation function failed when performing linearized conversion of PDF documents. |
| Bug | SPIREPDF-6173 | Fixes the issue that the validation of signatures was incorrect. |
| Bug | SPIREPDF-6191 | Removes doc->GetXmpMetaData() method. |
| Bug | SPIREPDF-6242 | Fixes the issue that reading properties of PDF documents failed. |
| Bug | SPIREPDF-6257 | Fixes the issue that the program threw an exception System.InvalidCastException when converting PDF documents to XPS documents multiple times. |
| Bug | SPIREPDF-6270 | Fixes the issue that compressing PDF documents failed. |
| Bug | SPIREPDF-6344 | Fixes the issue that the program threw an exception System.TypeInitializationException when converting a PDF document to a PowerPoint document. |
Python: Count the Number of Pages in a PDF File
To get the number of pages in a PDF file, you can open the file in a PDF viewer such as Adobe, which has a built-in page count feature. However, when there is a batch of PDF files, opening each file to check how many pages it contains is a time-consuming task. In this article, you will learn how to quicky count the number of pages in a PDF file through programming using Spire.PDF for Python.
Install Spire.PDF for Python
This scenario requires Spire.PDF for Python and plum-dispatch v1.7.4. They can be easily installed in your VS Code through the following pip command.
pip install Spire.PDF
If you are unsure how to install, please refer to this tutorial: How to Install Spire.PDF for Python on Windows
Count the Number of Pages in a PDF File in Python
Spire.PDF for Python offers the PdfDocument.Pages.Count property to quickly count the number of pages in a PDF file without opening it. The following are the detailed steps.
- Create a PdfDocument object.
- Load a sample PDF document using PdfDocument.LoadFromFile() method.
- Count the number of pages in the PDF document using PdfDocument.Pages.Count property.
- Write the result to a TXT file or print it out directly.
- Python
from spire.pdf.common import *
from spire.pdf import *
def AppendText(fname: str, text: str):
fp = open(fname, "w")
fp.write(text + "\n")
fp.close()
# Specify the input and output files
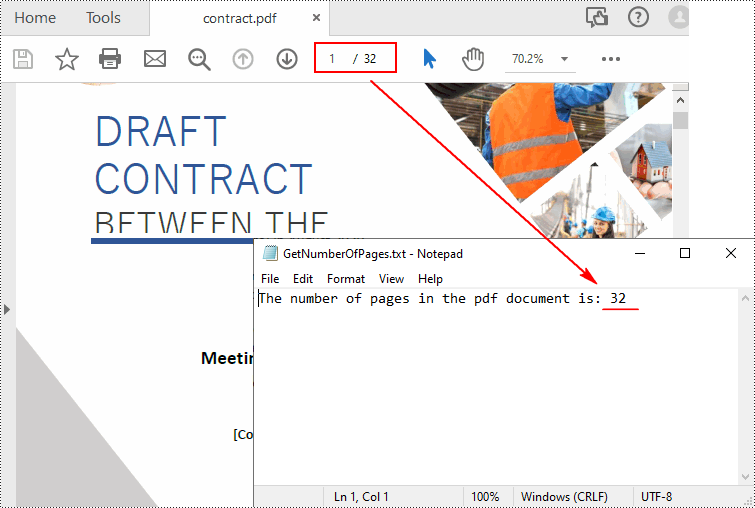
inputFile = "contract.pdf"
outputFile = "GetNumberOfPages.txt"
# Create a PdfDocument object
pdf = PdfDocument()
# Load a PDF document from disk
pdf.LoadFromFile(inputFile)
# Count the number of pages in the document
count = pdf.Pages.Count
# Print the result
print("Total Pages:", count)
# Write the result to a TXT file
AppendText(
outputFile, "The number of pages in the pdf document is: " + str(count))
pdf.Close()
Apply for a Temporary License
If you'd like to remove the evaluation message from the generated documents, or to get rid of the function limitations, please request a 30-day trial license for yourself.