Как добавить номера страниц в Word: пропустить первую страницу, начать позже и многое другое
Содержание
- Краткий обзор параметров нумерации страниц
- Вставка номеров страниц в Word
- Скрытие номеров страниц на первой странице
- Начало нумерации с определенной страницы
- Использование разных форматов номеров страниц в одном документе
- Добавление «Страница X из Y» в Word
- Изменение и настройка номеров страниц в Word
- Добавление номеров страниц в Word Online
- Пакетное добавление номеров страниц в документы Word с помощью Python
- Устранение распространенных проблем с нумерацией страниц в Word
- Заключение
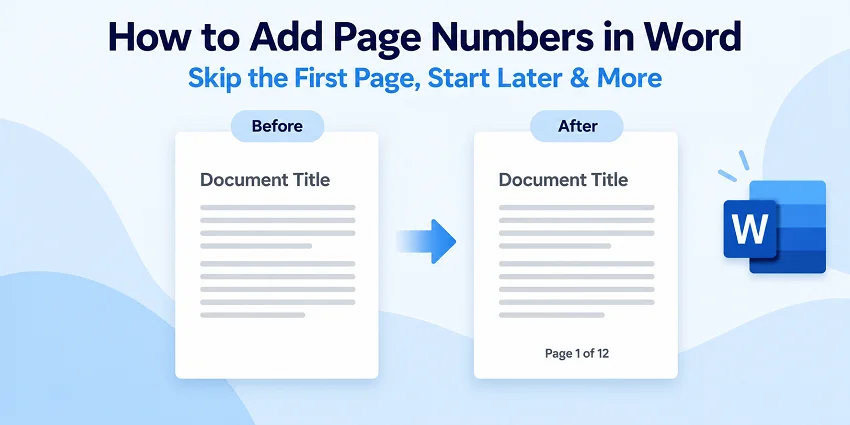
Добавление номеров страниц в Microsoft Word — простая задача, но для разных документов часто требуются разные схемы нумерации. Возможно, нужно оставить титульную страницу без номера, начать нумерацию с определенной страницы, использовать римские цифры для вводных страниц или отображать общее количество страниц.
В этом руководстве описаны наиболее полезные параметры нумерации страниц в настольной версии Word, показано, как вставлять номера страниц в Word Online, и продемонстрировано, как автоматизировать эту задачу для нескольких документов с помощью Python.
Краткий обзор параметров нумерации страниц
Правильный подход зависит от того, как вы хотите, чтобы номера страниц отображались в документе. Используйте таблицу ниже, чтобы найти подходящий метод и перейти к его инструкциям.
| Что вы хотите сделать | Рекомендуемый подход |
|---|---|
| Нумеровать каждую страницу | Вставка → Номер страницы |
| Скрыть номер на первой странице | Включить «Особый колонтитул для первой страницы» |
| Начать нумерацию с 1 на странице 3 или позже | Вставить разрыв раздела, отменить связь соответствующего колонтитула и задать начальный номер |
| Использовать римские цифры для вводной части | Настроить форматы номеров страниц для каждого раздела |
| Отображать «Страница X из Y» | Выбрать стиль нумерации «Страница X из Y» |
| Изменить положение или стиль номера | Использовать параметры форматирования номеров страниц |
| Добавить номера страниц в Word Online | Использовать Word в Интернете |
| Пакетно добавлять номера страниц в документы Word | Использовать автоматизацию на Python |
Приведенные ниже инструкции для настольной версии относятся к Microsoft Word для Windows. На Mac названия меню могут немного отличаться.
Вставка номеров страниц в Word
Для документов, которым нужна простая последовательная нумерация, встроенная функция нумерации страниц Word позволяет размещать номера в верхних, нижних колонтитулах или на полях страницы. Номера автоматически обновляются при добавлении или удалении страниц.
Пошаговое руководство
Откройте документ Word.
Перейдите на вкладку «Вставка».
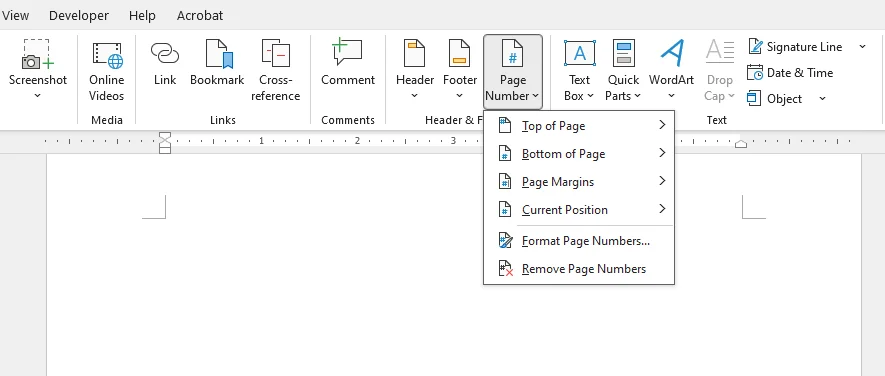
Нажмите «Вставка > Номер страницы» в группе «Колонтитулы».Выберите положение номера страницы.
Выберите один из доступных вариантов:- Вверху страницы: размещает номера страниц в верхнем колонтитуле.
- Внизу страницы: размещает номера страниц в нижнем колонтитуле.
- Поля страницы: размещает номера страниц вдоль полей страницы.
- Текущее положение: вставляет номер страницы в текущую позицию курсора, например в существующий верхний или нижний колонтитул.
Выберите стиль нумерации.
Выберите макет в галерее, например номер с выравниванием по левому краю, по центру или по правому краю.Закройте верхний или нижний колонтитул.
Если Word открывает область редактирования колонтитула, нажмите «Закрыть окно колонтитулов» или клавишу Esc, чтобы вернуться к документу.
По умолчанию Word вставляет последовательные номера страниц, начиная с 1. Например, при выборе «Внизу страницы > Простой номер 2» по центру внизу каждой страницы размещаются номера страниц.
Скрытие номеров страниц на первой странице
В документах с обложкой или титульной страницей часто нужны номера страниц на последующих страницах, но не на первой. Word решает это с помощью параметра «Особый колонтитул для первой страницы», который задает для первой страницы отдельный верхний или нижний колонтитул без необходимости разрыва раздела.
Действия для скрытия номера страницы на первой странице
Сначала вставьте номера страниц с помощью описанных выше действий.
Дважды щелкните область верхнего или нижнего колонтитула на первой странице.
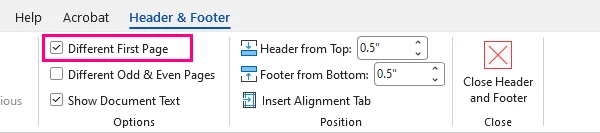
На вкладке «Колонтитулы» установите флажок «Особый колонтитул для первой страницы».
Если на первой странице все еще остается номер страницы, выделите его в верхнем или нижнем колонтитуле первой страницы и нажмите Delete.
Нажмите «Закрыть окно колонтитулов».
На первой странице больше не отображается номер, а остальные страницы продолжают нумероваться.
Примечание. «Особый колонтитул для первой страницы» также создает отдельные верхний и нижний колонтитулы для первой страницы. Если исходный колонтитул содержит другие сведения, возможно, их потребуется снова добавить в колонтитул первой страницы.
Как сделать так, чтобы вторая страница начиналась с 1, а не с 2
По умолчанию скрытие номера первой страницы не меняет последовательность нумерации. На второй странице по-прежнему отображается 2. Чтобы показать 1 на второй странице:
Дважды щелкните верхний или нижний колонтитул с номерами страниц.
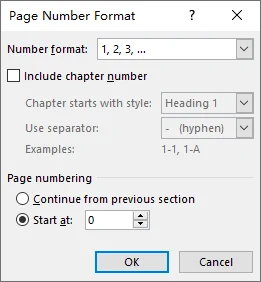
Перейдите на вкладку «Вставка», выберите «Номер страницы > Формат номеров страниц».
В разделе «Нумерация страниц» выберите «Начать с».
Введите 0 и нажмите ОК.
Номер страницы на первой странице остается скрытым, а на второй странице отображается 1.
Начало нумерации с определенной страницы
Иногда нумерация должна начинаться со страницы 3, 4 или другой более поздней страницы. Например, в исследовательской работе может быть титульная страница и оглавление, а на третьей странице — начале основного текста — должен отображаться номер 1.
Word поддерживает это, позволяя настраивать нумерацию страниц в отдельных разделах. Разрыв раздела позволяет вводным страницам и основному содержимому использовать независимые параметры нумерации.
Шаг 1. Вставка разрыва раздела
Поместите курсор в конец содержимого непосредственно перед страницей, с которой должна начаться нумерация.
Перейдите в «Макет > Разрывы».
В разделе «Разрывы разделов» выберите «Со следующей страницы».
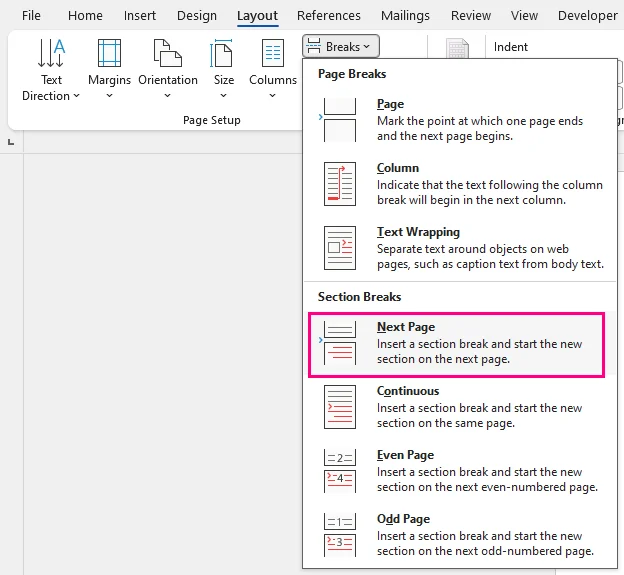
Word создает новый раздел, начинающийся со следующей страницы.
Примечание. Обычный разрыв страницы только начинает новую страницу, а разрыв раздела позволяет независимо управлять нумерацией страниц. Если две части уже разделены ручным разрывом страницы, замените его разрывом раздела «Со следующей страницы», чтобы не создавать лишнюю пустую страницу.
Шаг 2. Отмена связи колонтитула в новом разделе
Дважды щелкните верхний или нижний колонтитул на первой странице нового раздела в зависимости от того, где должны отображаться номера страниц.
На вкладке «Колонтитулы» нажмите «Как в предыдущем разделе», чтобы отключить связь.
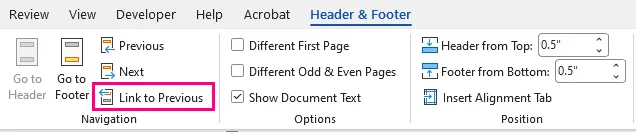
Если новый раздел уже содержит номер страницы, удалите его перед вставкой нового, сохранив остальное содержимое колонтитула, которое нужно оставить.
Word управляет связями верхнего и нижнего колонтитулов отдельно, поэтому обязательно отмените связь для той области, где будут отображаться номера страниц.
Шаг 3. Вставка номеров страниц и установка начального номера
Установив курсор в новом разделе, перейдите в «Вставка > Номер страницы».
Выберите положение и стиль номеров страниц в новом разделе.
Выберите «Номер страницы > Формат номеров страниц».
В разделе «Нумерация страниц» выберите «Начать с» и введите 1.
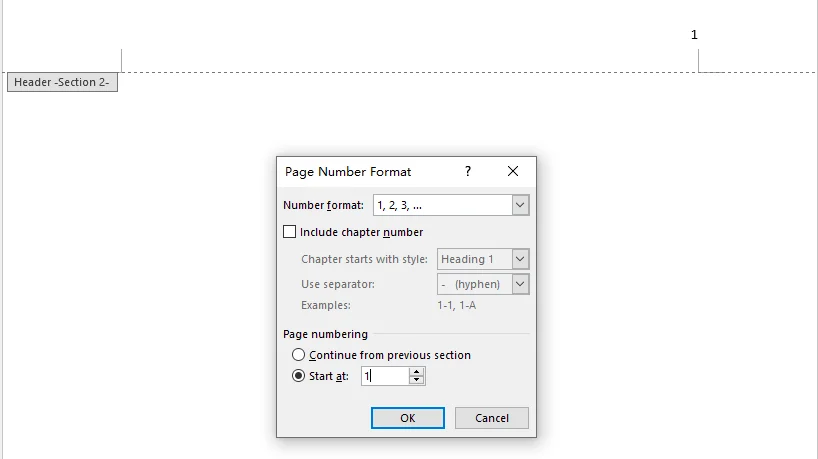
Нажмите ОК, затем закройте верхний или нижний колонтитул.
Новый раздел теперь начинается с номера страницы 1. Если в предыдущем разделе уже есть номера страниц, их можно сохранить или удалить в соответствии с макетом документа.
Совет. Если номер не отображается на первой странице нового раздела, проверьте, включен ли параметр «Особый колонтитул для первой страницы». Этот параметр может задавать отдельный верхний или нижний колонтитул для первой страницы каждого раздела.
Использование разных форматов номеров страниц в одном документе
В длинных документах иногда используются римские цифры (i, ii, iii) для предварительных страниц и арабские цифры (1, 2, 3) для основного текста. Например, в диссертации реферат и оглавление могут быть пронумерованы римскими цифрами, а затем нумерация может начинаться заново с 1 для главы 1.
Для этого назначьте разные форматы номеров отдельным разделам.
Действия для использования римских и арабских цифр
Вставьте разрыв раздела.
Поместите курсор в конец вводного содержимого, затем выберите «Макет > Разрывы > Со следующей страницы».Отмените связь основного раздела.
На первой странице основного раздела дважды щелкните верхний или нижний колонтитул, где должны отображаться номера страниц. Затем отключите «Как в предыдущем разделе» на вкладке «Колонтитулы».Вставьте номера страниц во вводном разделе.
Вернитесь во вводный раздел и выберите «Вставка > Номер страницы», затем выберите положение и стиль.Измените формат нумерации вводного раздела.
Выберите «Номер страницы > Формат номеров страниц». В разделе «Формат номера» выберите «i, ii, iii, ...». Установите для параметра «Начать с» значение «i», затем нажмите ОК.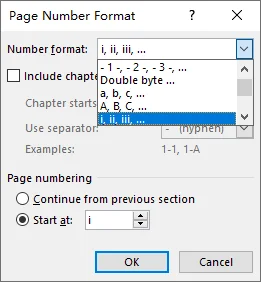
Вставьте номера страниц в основном разделе.
Перейдите в основной раздел и вставьте номера страниц, если они еще не добавлены.Задайте основной формат нумерации.
Снова откройте «Формат номеров страниц». Выберите «1, 2, 3, ...» и установите для параметра «Начать с» значение 1, чтобы основной текст начинался с номера страницы 1.Примените параметры.
Нажмите ОК и закройте верхний или нижний колонтитул.
Теперь в документе можно использовать римские цифры для вводных страниц и арабские цифры для основного содержимого. Например:
| Часть документа | Номер страницы |
|---|---|
| Реферат | i |
| Оглавление | ii |
| Список иллюстраций | iii |
| Глава 1, первая страница | 1 |
| Глава 1, вторая страница | 2 |
Если документ также включает титульную страницу без номера, в зависимости от макета может потребоваться дополнительный раздел или отдельный колонтитул первой страницы.
Добавление «Страница X из Y» в Word
Иногда читателям нужно знать не только текущий номер страницы, но и общее количество страниц. Формат нумерации Word «Страница X из Y» позволяет отображать значения, например «Страница 1 из 12» и «Страница 2 из 12».
Действия для вставки «Страница X из Y»
Откройте документ Word. Если в нем уже есть верхний или нижний колонтитул, дважды щелкните эту область и поместите курсор туда, где должны отображаться номера страниц.
Перейдите в «Вставка > Номер страницы».
Выберите «Текущее положение», если работаете в существующем колонтитуле. В противном случае выберите «Вверху страницы» или «Внизу страницы».
Просмотрите доступные стили и выберите формат «Страница X из Y».
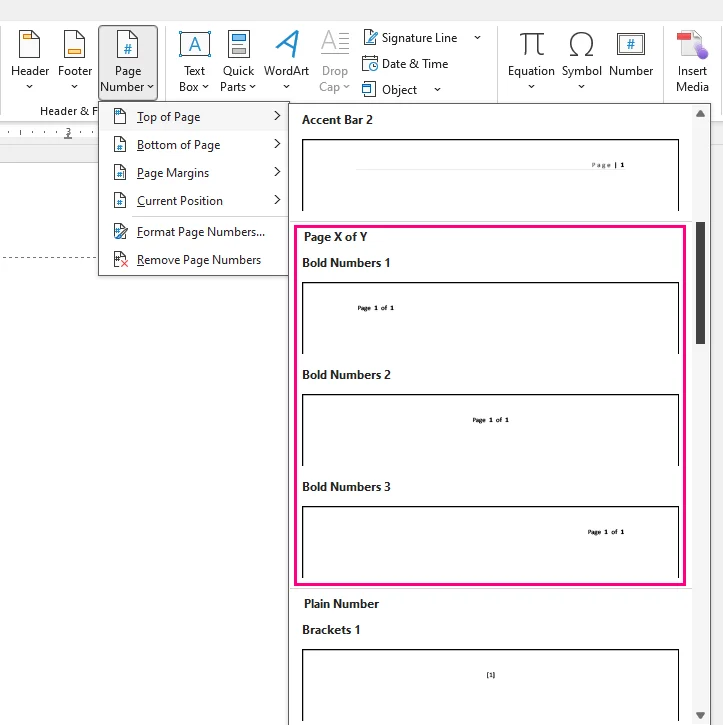
Нажмите «Закрыть окно колонтитулов».
Word автоматически отображает текущий номер страницы и общее количество страниц.
Как работает «Страница X из Y»
Word использует динамические поля для отображения сведений о страницах:
- PAGE: отображает текущий номер страницы.
- NUMPAGES: отображает общее количество страниц в документе.
Эти поля могут обновляться при изменении разбиения документа на страницы.
Примечание. Поле NUMPAGES учитывает все страницы документа, включая титульные страницы без видимых номеров. Например, если в документе из 12 страниц есть непронумерованная обложка, а нумерация начинается с 1 на второй странице, на этой странице может отображаться «Страница 1 из 12».
Чтобы исключить обложку из общего числа, поместите ее в отдельный раздел и используйте поле SECTIONPAGES вместо NUMPAGES в основном разделе. Это работает, когда все остальные страницы принадлежат одному разделу, так как SECTIONPAGES учитывает только страницы текущего раздела.
Изменение и настройка номеров страниц в Word
После вставки номеров страниц может потребоваться настроить их положение, внешний вид или стиль нумерации в соответствии с макетом документа.
Изменение положения или выравнивания номеров страниц
- Дважды щелкните верхний или нижний колонтитул с номером страницы.
- Выделите абзац, содержащий номер страницы.
- Используйте элементы выравнивания в разделе «Главная > Абзац», чтобы выровнять номер по левому краю, по центру или по правому краю.
- Закройте верхний или нижний колонтитул.
Также можно выбрать другой макет в галерее «Вставка > Номер страницы». Однако применение другого макета может повлиять на существующее содержимое колонтитула. Если колонтитул содержит другие сведения, попробуйте настроить позиции табуляции, чтобы переместить номер страницы, не затрагивая окружающий текст.
Изменение шрифта и внешнего вида
- Дважды щелкните верхний или нижний колонтитул.
- Выделите номер страницы.
- Используйте элементы управления «Главная > Шрифт», чтобы изменить шрифт, размер, цвет или другое форматирование.
- Закройте верхний или нижний колонтитул.
Изменение формата нумерации
Чтобы переключаться между арабскими цифрами, римскими цифрами или буквами:
- Откройте верхний или нижний колонтитул в разделе, формат нумерации которого нужно изменить.
- Выберите «Номер страницы > Формат номеров страниц».
- Выберите другой «Формат номера».
- Нажмите ОК.
Удаление номеров страниц
Чтобы удалить номера страниц, перейдите в «Вставка > Номер страницы > Удалить номера страниц». Если верхний или нижний колонтитул содержит другое содержимое, которое нужно сохранить, дважды щелкните эту область, выделите только номер страницы и нажмите Delete.
Для документов с несколькими разделами или разными колонтитулами первой страницы/четных и нечетных страниц проверьте каждую соответствующую область и удалите оставшиеся номера страниц.
Если вы хотите полностью удалить верхний колонтитул, см. наше руководство о том, как удалить верхние колонтитулы в Word.
Добавление номеров страниц в Word Online
Вы можете добавлять номера страниц прямо в браузере с помощью Word в Интернете, также известного как Word Online, не устанавливая настольное приложение. Он поддерживает стандартную нумерацию страниц, а также макет «Страница X из Y» с отображением общего количества страниц.
Пошаговое руководство
- Откройте документ в Word в Интернете и при необходимости переключитесь в режим «Редактирование».
- Перейдите в «Вставка > Номера страниц».
- Чтобы показать общее количество страниц, выберите «Включить число страниц». Затем выберите предпочтительное положение и макет в галерее.
- Проверьте номера страниц в документе.
Чтобы удалить номера страниц, перейдите в «Вставка > Номера страниц» и выберите «Удалить номера страниц» внизу галереи.
Чтобы скрыть номер страницы на первой странице, перейдите в «Вставка > Верхний и нижний колонтитулы» и включите «Особый колонтитул для первой страницы». Если нужны разные форматы или последовательности нумерации в разных разделах, откройте документ в настольной версии Word.
Подробнее см. инструкции Microsoft по работе с номерами страниц в Word в Интернете.
Пакетное добавление номеров страниц в документы Word с помощью Python
Добавлять номера страниц вручную удобно для отдельных файлов Word. Однако если вы регулярно работаете с десятками или сотнями отчетов, договоров и других документов, открытие и редактирование каждого файла может занимать много времени.
Python позволяет автоматизировать эту задачу для папки с файлами DOCX. В приведенном ниже примере используется Spire.Doc for Python для вставки формата «Страница X из Y» в несколько документов без необходимости установки Microsoft Word.
Установка Spire.Doc for Python
Установите библиотеку с помощью pip:
pip install Spire.Doc
Пакетное добавление номеров страниц в несколько файлов Word
Создайте папку с именем input_docs и поместите в нее файлы DOCX:
input_docs/
    annual_report.docx
    project_proposal.docx
    user_manual.docx
Скрипт добавляет «Страница X из Y» в стандартные нижние колонтитулы одно- и многораздельных документов Word. Предполагается, что исходные файлы еще не содержат номеров страниц; документы с разными макетами колонтитулов первой страницы или четных/нечетных страниц могут потребовать дополнительной обработки.
from pathlib import Path
from spire.doc import *
from spire.doc.common import *

# Define input and output folders
input_dir = Path("input_docs")
output_dir = Path("numbered_docs")

if not input_dir.is_dir():
    raise FileNotFoundError(f"Input folder not found: {input_dir}")

output_dir.mkdir(parents=True, exist_ok=True)

# Process all DOCX files
for file_path in sorted(input_dir.glob("*.docx")):
    # Skip temporary Word files
    if file_path.name.startswith("~$"):
        continue

    output_file = output_dir / file_path.name
    if output_file.exists():
        print(f"Skipped (already exists): {file_path.name}")
        continue

    doc = Document()
    try:
        doc.LoadFromFile(str(file_path))

        # Add Page X of Y to each independent footer
        for i in range(doc.Sections.Count):
            section = doc.Sections.get_Item(i)
            footer = section.HeadersFooters.Footer

            # Linked footers inherit the previous section's content
            if i > 0 and footer.LinkToPrevious:
                continue

            paragraph = footer.AddParagraph()
            paragraph.Format.HorizontalAlignment = HorizontalAlignment.Center
            paragraph.AppendText("Page ")
            paragraph.AppendField("PageNumber", FieldType.FieldPage)
            paragraph.AppendText(" of ")
            paragraph.AppendField("TotalPages", FieldType.FieldNumPages)

        # Save the numbered document
        doc.SaveToFile(str(output_file), FileFormat.Docx)
        print(f"Processed: {file_path.name}")

    except Exception as e:
        print(f"Failed: {file_path.name} - {e}")
    finally:
        doc.Dispose()
Как работает код
Скрипт выполняет четыре основные операции:
- Поиск документов Word:
Path.glob("*.docx")находит файлы DOCX вinput_docs, не выполняя поиск во вложенных папках. Скрипт пропускает временные файлы Word и файлы, для которых уже существует выходная копия. - Обработка разделов документа: он перебирает каждый раздел и добавляет номера страниц только в нижние колонтитулы, не связанные с предыдущим разделом. Связанные нижние колонтитулы наследуют поля номеров страниц без необходимости повторной вставки.
- Вставка динамических номеров страниц:
FieldType.FieldPageотображает текущий номер страницы, аFieldType.FieldNumPages— общее количество страниц в документе. - Сохранение результатов: каждый успешно обработанный файл сохраняется в
numbered_docsпод исходным именем. Если обработка файла завершается ошибкой, скрипт сообщает об ошибке и продолжает работу с остальными файлами.
Например, выходная папка может содержать:
numbered_docs/
    annual_report.docx
    project_proposal.docx
    user_manual.docx
При стандартной нумерации, начинающейся с 1, отчет из 12 страниц может отображать «Страница 1 из 12», а предложение из пяти страниц — «Страница 1 из 5». Поля являются динамическими, поэтому их отображаемые значения могут обновляться при открытии документа в Word или обновлении полей.
Важно. Скрипт добавляет новый абзац нижнего колонтитула, а не заменяет существующее содержимое. Перед пакетной обработкой проверьте документы с существующим текстом нижнего колонтитула. Он сохраняет исходные параметры нумерации страниц каждого раздела, включая любые перезапуски нумерации.
Для документов с разными макетами колонтитулов первой страницы или четных/нечетных страниц см. руководство о том, как вставлять и настраивать верхние и нижние колонтитулы Word с помощью Python, и адаптируйте скрипт для обработки соответствующих типов колонтитулов.
Примечание о лицензировании. Оценочная версия библиотеки может добавлять уведомления об оценке или накладывать функциональные ограничения. Вы можете запросить бесплатную временную лицензию, чтобы снять эти ограничения на время тестирования.
Устранение распространенных проблем с нумерацией страниц в Word
Проблемы с нумерацией страниц в Word часто связаны с разрывами разделов, настройками колонтитулов или форматами нумерации.
1. Номера страниц отображаются не на каждой странице
Возможная причина. В документе используется «Особый колонтитул для первой страницы» или «Разные колонтитулы для четных и нечетных страниц», либо в его разделах независимо настроены верхние и нижние колонтитулы.
Как исправить. Дважды щелкните верхний или нижний колонтитул и проверьте, включен ли параметр «Особый колонтитул для первой страницы» или «Разные колонтитулы для четных и нечетных страниц». Если да, добавьте номера страниц в соответствующие области колонтитулов. Для документов с несколькими разделами проверьте каждый раздел по необходимости.
2. Номера страниц неожиданно начинаются заново с 1
Возможная причина. В разделе настроен перезапуск нумерации вместо продолжения с предыдущего раздела.
Как исправить. Щелкните в затронутом разделе, откройте его верхний или нижний колонтитул и выберите «Номер страницы > Формат номеров страниц». В разделе «Нумерация страниц» выберите «Продолжить с предыдущего раздела», затем нажмите ОК.
3. Изменения номеров страниц в одном разделе влияют на другой
Возможная причина. Верхние или нижние колонтитулы разделов по-прежнему связаны.
Как исправить. Если вы хотите редактировать номер страницы в одном разделе независимо, откройте его верхний или нижний колонтитул и отключите «Как в предыдущем разделе» перед внесением изменений. Связь верхних и нижних колонтитулов нужно отменять отдельно.
4. На каждой странице отображается один и тот же номер
Возможная причина. Номер был введен вручную в верхний или нижний колонтитул, а не вставлен как динамическое поле.
Как исправить. Удалите введенный вручную номер и используйте «Вставка > Номер страницы», чтобы вставить поле номера страницы.
5. «Страница X из Y» показывает неожиданное общее число
Возможная причина. В общее число включены страницы без видимых номеров, например обложка или вводные страницы.
Как исправить. Проверьте, нужно ли количество страниц для всего документа или для конкретного раздела. Используйте NUMPAGES для всего документа или SECTIONPAGES для количества страниц в разделе.
Заключение
Microsoft Word предоставляет несколько способов добавления номеров страниц в зависимости от макета документа. Стандартная нумерация подходит для большинства файлов, а «Особый колонтитул для первой страницы», разрывы разделов и настраиваемые форматы номеров позволяют решать более специфические задачи.
Для больших коллекций документов Word Python предлагает автоматизированную альтернативу, которая сокращает повторяющееся редактирование и помогает применять единообразную нумерацию страниц к нескольким файлам.
Связанные руководства по Word
How to Add Page Numbers in Word: Skip the First Page, Start Later & More
Table of Contents
- Page Numbering Options at a Glance
- Insert Page Numbers in Word
- Hide Page Numbers on the First Page
- Start Page Numbering from a Specific Page
- Use Different Page Number Formats in One Document
- Add Page X of Y in Word
- Change or Customize Page Numbers in Word
- Add Page Numbers in Word Online
- Batch Add Page Numbers to Word Documents with Python
- Troubleshooting Common Word Page Numbering Issues
- Conclusion
Adding page numbers in Microsoft Word is simple, but different documents often require different numbering setups. You might need to leave the cover page unnumbered, start numbering from a specific page, use Roman numerals for introductory pages, or display the total page count.
This guide explains the most useful page numbering options in desktop Word, shows how to insert page numbers in Word online, and demonstrates how to automate the task across multiple documents with Python.
Page Numbering Options at a Glance
The right approach depends on how you want page numbers to appear in your document. Use the table below to find the appropriate method and jump to its instructions.
| What You Want to Do | Recommended Approach |
|---|---|
| Number every page | Insert → Page Number |
| Hide the number on the first page | Enable Different First Page |
| Start numbering at 1 on page 3 or later | Insert a section break, unlink the relevant header or footer, and set the starting number |
| Use Roman numerals for the front matter | Configure page number formats by section |
| Display Page X of Y | Choose a Page X of Y numbering style |
| Change the number position or style | Use page number formatting options |
| Add page numbers in Word Online | Use Word for the web |
| Batch add page numbers to Word documents | Use Python automation |
The desktop instructions below use Microsoft Word for Windows. Menu names may differ slightly on Mac.
Insert Page Numbers in Word
For documents that need simple, consecutive numbering, Word's built-in page numbering feature lets you place numbers in headers, footers, or page margins. The numbers update automatically as pages are added or removed.
Step-by-Step Guide
Open your Word document.
Go to the Insert tab.
Click Insert > Page Number in the Header & Footer group.Choose a page number position.
Select one of the available options:- Top of Page: Places page numbers in the header.
- Bottom of Page: Places page numbers in the footer.
- Page Margins: Positions page numbers along the page margins.
- Current Position: Inserts a page number at the current cursor position, such as within an existing header or footer.
Select a numbering style.
Choose a layout from the gallery, such as a left-aligned, centered, or right-aligned number.Close the header or footer.
If Word opens the header or footer editing area, click Close Header and Footer or press Esc to return to your document.
By default, Word inserts consecutive page numbers starting from 1. For example, selecting Bottom of Page > Plain Number 2 places centered page numbers at the bottom of each page.
Hide Page Numbers on the First Page
Documents with a cover or title page often need page numbers on subsequent pages but not on the first page. Word handles this using Different First Page, which gives the first page a separate header or footer without requiring a section break.
Steps to Hide the Page Number on the First Page
First, insert page numbers using the steps above.
Double-click the header or footer area on the first page.
On the Header & Footer tab, select Different First Page.
If a page number remains on the first page, select it in the first-page header or footer and press Delete.
Click Close Header and Footer.
The first page no longer displays a page number, while the remaining pages continue to be numbered.
Note: Different First Page also creates a separate header and footer for the first page. If the original header or footer contains other information, you may need to add it back to the first-page header or footer.
Make the Second Page Start at 1 Instead of 2
By default, hiding the first page number does not change the numbering sequence. The second page still displays 2. To show 1 on the second page:
Double-click the header or footer containing the page numbers.
Go to the Insert tab, select Page Number > Format Page Numbers.
Under Page numbering, choose Start at.
Enter 0 and click OK.
The page number on the first page remains hidden, and the second page displays 1.
Start Page Numbering from a Specific Page
Sometimes numbering should begin on page 3, page 4, or another later page. For example, a research paper might have a title page and table of contents, while the third page—the beginning of the main text—should display page number 1.
Word supports this by allowing you to configure page numbering in separate sections. A section break allows the introductory pages and main content to use independent numbering settings.
Step 1: Insert a Section Break
Place your cursor at the end of the content immediately before the page where numbering should begin.
Go to Layout > Breaks.
Under Section Breaks, select Next Page.
Word creates a new section starting on the next page.
Note: A regular page break only starts a new page, while a section break lets you control page numbering independently. If a manual page break already separates the two parts, replace it with a Next Page section break to avoid creating an extra blank page.
Step 2: Unlink the Header or Footer in the New Section
Double-click the header or footer on the first page of the new section, depending on where you want the page numbers to appear.
On the Header & Footer tab, click Link to Previous to turn it off.
If the new section already contains a page number, remove it before inserting a new one, keeping any other header or footer content you want to preserve.
Word manages header and footer links separately, so make sure you unlink the area where the page numbers will appear.
Step 3: Insert Page Numbers and Set the Starting Number
With the cursor in the new section, go to Insert > Page Number.
Choose the position and style for the page numbers in the new section.
Select Page Number > Format Page Numbers.
Under Page numbering, select Start at and enter 1.
Click OK, then close the header or footer.
The new section now begins with page number 1. If the earlier section already contains page numbers, you can choose to keep or remove them according to your document layout.
Tip: If the number does not appear on the first page of the new section, check whether Different First Page is enabled. This setting can give the first page of each section a separate header or footer.
Use Different Page Number Formats in One Document
Long documents sometimes use Roman numerals (i, ii, iii) for preliminary pages and Arabic numbers (1, 2, 3) for the main text. For example, a thesis may number its abstract and table of contents with Roman numerals, then restart at 1 for Chapter 1.
To do this, assign different number formats to separate sections.
Steps to Use Roman Numerals and Arabic Numbers
Insert a section break.
Place your cursor at the end of the introductory content, then select Layout > Breaks > Next Page.Unlink the main section.
On the first page of the main section, double-click the header or footer where you want the page numbers to appear. Then turn off Link to Previous on the Header & Footer tab.Insert page numbers in the introductory section.
Return to the introductory section and choose Insert > Page Number, then select a position and style.Change the introductory numbering format.
Select Page Number > Format Page Numbers. Under Number format, choose i, ii, iii, .... Set Start at to i, then click OK.Insert page numbers in the main section.
Go to the main section and insert page numbers if they are not already present.Set the main numbering format.
Open Format Page Numbers again. Select 1, 2, 3, ... and set Start at to 1 so that the main content begins with page number 1.Apply the settings.
Click OK and close the header or footer.
Your document can now use Roman numerals for its introductory pages and Arabic numbers for the main content. For example:
| Document Part | Page Number |
|---|---|
| Abstract | i |
| Table of Contents | ii |
| List of Figures | iii |
| Chapter 1, first page | 1 |
| Chapter 1, second page | 2 |
If the document also includes an unnumbered cover page, you may need an additional section or a different first-page footer, depending on the layout.
Add Page X of Y in Word
Sometimes readers need to know not only the current page number but also the total number of pages. Word's Page X of Y numbering format can display values such as Page 1 of 12 and Page 2 of 12.
Steps to Insert Page X of Y
Open your Word document. If it already has a header or footer, double-click that area and place the cursor where you want the page numbers to appear.
Go to Insert > Page Number.
Choose Current Position if you're working in an existing header or footer. Otherwise, select Top of Page or Bottom of Page.
Scroll through the available styles and select a Page X of Y format.
Click Close Header and Footer.
Word displays the current page number and total page count automatically.
How Page X of Y Works
Word uses dynamic fields to display page information:
- PAGE: Displays the current page number.
- NUMPAGES: Displays the total number of pages in the document.
These fields can update when the document's pagination changes.
Note: NUMPAGES counts all pages in the document, including cover pages without visible page numbers. For example, if a 12-page document has an unnumbered cover and numbering starts at 1 on the second page, that page may display Page 1 of 12.
To exclude the cover page from the total, place it in a separate section and use the SECTIONPAGES field instead of NUMPAGES in the main section. This works when all remaining pages belong to a single section, as SECTIONPAGES counts only the pages in the current section.
Change or Customize Page Numbers in Word
After inserting page numbers, you may need to adjust their position, appearance, or numbering style to match the document layout.
Change the Page Number Position or Alignment
- Double-click the header or footer containing the page number.
- Select the paragraph containing the page number.
- Use the alignment controls under Home > Paragraph to align it to the left, center, or right.
- Close the header or footer.
You can also choose a different layout from the Insert > Page Number gallery. However, applying a different layout may affect existing header or footer content. If your header or footer contains other information, consider adjusting its tab stops to reposition the page number without affecting the surrounding text.
Change the Font and Appearance
- Double-click the header or footer.
- Select the page number.
- Use the Home > Font controls to change the font, size, color, or other formatting.
- Close the header or footer.
Change the Numbering Format
To switch between Arabic numbers, Roman numerals, or letters:
- Open the header or footer in the section whose numbering format you want to change.
- Select Page Number > Format Page Numbers.
- Choose a different Number format.
- Click OK.
Remove Page Numbers
To remove page numbers, go to Insert > Page Number > Remove Page Numbers. If your header or footer contains other content you want to keep, double-click that area, select only the page number, and press Delete instead.
For documents with multiple sections or different first-page or odd/even headers and footers, check each relevant area and remove any remaining page numbers.
If you want to remove the header entirely, see our guide on how to remove headers in Word.
Add Page Numbers in Word Online
You can add page numbers directly in your browser using Word for the web, also known as Word Online, without installing the desktop application. It supports standard page numbering as well as a Page X of Y layout showing the total page count.
Step-by-Step Guide
- Open your document in Word for the web and switch to Editing view if necessary.
- Go to Insert > Page Numbers.
- To show the total number of pages, select Include Page Count. Then choose your preferred position and layout from the gallery.
- Review the page numbers in your document.
To remove page numbers, go to Insert > Page Numbers and select Remove Page Numbers at the bottom of the gallery.
To hide the page number on the first page, go to Insert > Header & Footer and enable Different First Page. If you need different numbering formats or sequences across sections, open the document in desktop Word.
For details, see Microsoft's instructions for page numbers in Word for the web.
Batch Add Page Numbers to Word Documents with Python
Adding page numbers manually works well for individual Word files. However, if you regularly handle dozens or hundreds of reports, contracts, or other documents, opening and editing each file can become time-consuming.
Python can automate this task across a folder of DOCX files. The example below uses Spire.Doc for Python to insert the Page X of Y format into multiple documents without requiring Microsoft Word to be installed.
Install Spire.Doc for Python
Install the library using pip:
pip install Spire.Doc
Batch Add Page Numbers to Multiple Word Files
Create a folder named input_docs and place your DOCX files inside it:
input_docs/
    annual_report.docx
    project_proposal.docx
    user_manual.docx
The script adds Page X of Y to the default footers of single- and multi-section Word documents. It assumes the source files do not already contain page numbers; documents with different first-page or odd/even footer layouts may require additional handling.
from pathlib import Path
from spire.doc import *
from spire.doc.common import *

# Define input and output folders
input_dir = Path("input_docs")
output_dir = Path("numbered_docs")

if not input_dir.is_dir():
    raise FileNotFoundError(f"Input folder not found: {input_dir}")

output_dir.mkdir(parents=True, exist_ok=True)

# Process all DOCX files
for file_path in sorted(input_dir.glob("*.docx")):
    # Skip temporary Word files
    if file_path.name.startswith("~$"):
        continue

    output_file = output_dir / file_path.name
    if output_file.exists():
        print(f"Skipped (already exists): {file_path.name}")
        continue

    doc = Document()
    try:
        doc.LoadFromFile(str(file_path))

        # Add Page X of Y to each independent footer
        for i in range(doc.Sections.Count):
            section = doc.Sections.get_Item(i)
            footer = section.HeadersFooters.Footer

            # Linked footers inherit the previous section's content
            if i > 0 and footer.LinkToPrevious:
                continue

            paragraph = footer.AddParagraph()
            paragraph.Format.HorizontalAlignment = HorizontalAlignment.Center
            paragraph.AppendText("Page ")
            paragraph.AppendField("PageNumber", FieldType.FieldPage)
            paragraph.AppendText(" of ")
            paragraph.AppendField("TotalPages", FieldType.FieldNumPages)

        # Save the numbered document
        doc.SaveToFile(str(output_file), FileFormat.Docx)
        print(f"Processed: {file_path.name}")

    except Exception as e:
        print(f"Failed: {file_path.name} - {e}")
    finally:
        doc.Dispose()
How the Code Works
The script performs four main operations:
- Find Word documents:
Path.glob("*.docx")finds DOCX files ininput_docswithout searching subfolders. The script skips temporary Word files and files with an existing output copy. - Process document sections: It loops through each section and adds page numbers only to footers that are not linked to the previous section. Linked footers inherit the page-number fields without requiring another insertion.
- Insert dynamic page numbers:
FieldType.FieldPagedisplays the current page number, whileFieldType.FieldNumPagesdisplays the total number of pages in the document. - Save the results: Each successfully processed file is saved to
numbered_docsunder its original filename. If processing a file fails, the script reports the error and continues with the remaining files.
For example, the output folder may contain:
numbered_docs/
    annual_report.docx
    project_proposal.docx
    user_manual.docx
With standard numbering starting at 1, a 12-page report can display Page 1 of 12, while a five-page proposal can display Page 1 of 5. The fields are dynamic, so their displayed values may update when the document is opened in Word or its fields are refreshed.
Important: The script adds a new footer paragraph rather than replacing existing content. Check documents with existing footer text before processing them in bulk. It preserves each section's original page-numbering settings, including any numbering restarts.
For documents with different first-page or odd/even footer layouts, see how to insert and customize Word headers and footers with Python and adapt the script to handle the appropriate footer types.
Licensing note: The evaluation version of the library may add evaluation notices or impose functional limitations. You can request a free temporary license to remove these restrictions during testing.
Troubleshooting Common Word Page Numbering Issues
Page numbering problems in Word are often related to section breaks, header and footer settings, or numbering formats.
1. Page Numbers Are Not Showing on Every Page
Possible cause: The document uses Different First Page or Different Odd & Even Pages, or its sections have independently configured headers and footers.
How to fix: Double-click the header or footer and check whether Different First Page or Different Odd & Even Pages is enabled. If so, add page numbers to the appropriate header or footer areas. For documents with multiple sections, check each section as needed.
2. Page Numbers Restart at 1 Unexpectedly
Possible cause: A section is configured to restart numbering instead of continuing from the previous section.
How to fix: Click in the affected section, open its header or footer, and select Page Number > Format Page Numbers. Under Page numbering, choose Continue from previous section, then click OK.
3. Changes to Page Numbers in One Section Affect Another
Possible cause: The headers or footers of the sections are still linked.
How to fix: If you want to edit the page number in one section independently, open its header or footer and turn off Link to Previous before making changes. Headers and footers must be unlinked separately.
4. Page Numbers Display the Same Number on Every Page
Possible cause: A number was typed manually into the header or footer rather than inserted as a dynamic field.
How to fix: Remove the manually entered number and use Insert > Page Number to insert a page number field.
5. Page X of Y Shows an Unexpected Total
Possible cause: The total includes pages without visible numbers, such as cover or preliminary pages.
How to fix: Check whether you need the page count for the entire document or a particular section. Use NUMPAGES for the whole document or SECTIONPAGES for a section-specific count.
Conclusion
Microsoft Word provides several ways to add page numbers depending on the document layout. Standard numbering works for most files, while Different First Page, section breaks, and custom number formats handle more specific requirements.
For large collections of Word documents, Python provides an automated alternative that reduces repetitive editing and helps apply consistent page numbering across multiple files.
Related Word Tutorials
Como Inserir um Hiperlink no Word: Páginas da Web, Arquivos, E-mail e Mais
Índice
- Inserir um hiperlink para um site no Microsoft Word
- Vincular a um título ou marcador no mesmo documento do Word
- Criar hiperlinks para arquivos ou endereços de e-mail
- Adicionar um hiperlink no Word para a Web
- Inserir hiperlinks em documentos do Word com Python
- Editar, remover ou corrigir hiperlinks no Word
- Dicas finais
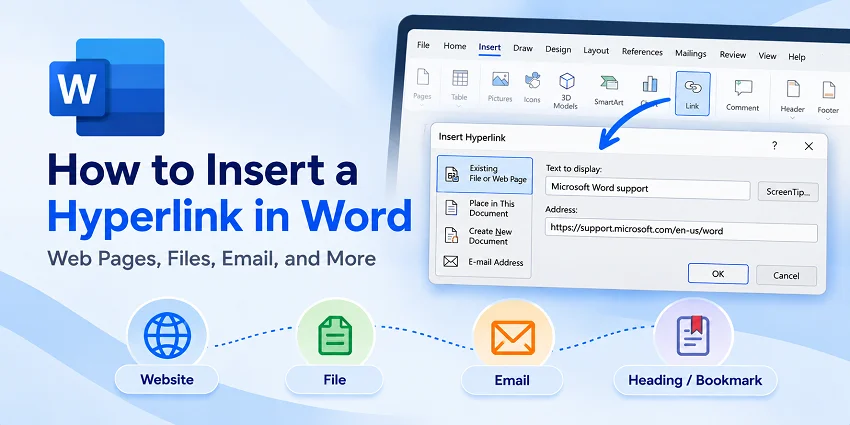
Um hiperlink em um documento do Word pode levar os leitores a um site, abrir um arquivo relacionado, iniciar um e-mail ou ir para uma seção do mesmo documento. Isso é especialmente útil em relatórios, manuais, propostas e outros documentos que fazem referência a informações de apoio.
Para inserir um hiperlink no Word rapidamente, selecione o texto que deseja tornar clicável, pressione Ctrl + K (Windows) ou Command + K (Mac), insira o endereço de destino e clique em OK. As etapas abaixo explicam como criar diferentes tipos de hiperlinks, editar ou remover links existentes e inserir hiperlinks programaticamente com Python.
Inserir um hiperlink para um site no Microsoft Word
O tipo mais comum de hiperlink no Word aponta para um site. Em vez de exibir uma URL longa, você pode transformar uma frase descritiva, como Suporte do Microsoft Word, em um link clicável.
Guia passo a passo
As etapas a seguir usam o Microsoft Word para Windows. A interface pode ser ligeiramente diferente no Mac, mas o processo é semelhante.
Selecione o texto ou a imagem.
Destaque as palavras que deseja tornar clicáveis ou selecione uma imagem no documento.Abra a caixa de diálogo de hiperlink.
Vá para a guia Inserir e clique em Link (ou Hiperlink em algumas versões). Como alternativa, clique com o botão direito no texto ou na imagem selecionada e escolha Link, ou pressione Ctrl + K.Digite o endereço do site.
Na caixa de diálogo Inserir Hiperlink, selecione Arquivo Existente ou Página da Web e cole a URL completa no campo Endereço, comohttps://support.microsoft.com/en-us/word.Verifique o texto de exibição (para links de texto).
Se você selecionou texto, o campo Texto a ser exibido mostra as palavras que os leitores verão. Você pode alterar esse texto sem alterar a URL de destino. Esse campo não fica disponível ao vincular uma imagem.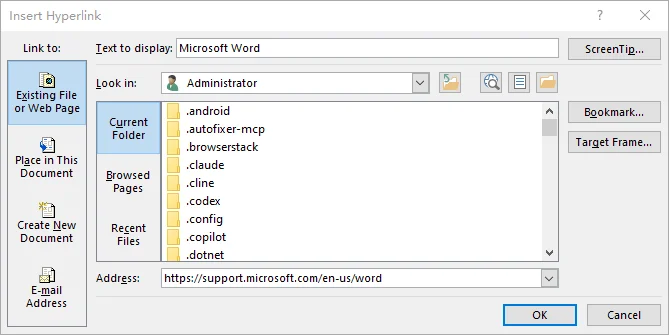
Insira o hiperlink.
Clique em OK para aplicar o link e depois teste-o para garantir que ele abre a página correta.
Se você estiver no Mac, pressione Command + K ou vá para Inserir > Link. Na caixa de diálogo Inserir Hiperlink, selecione Página da Web ou Arquivo e insira o endereço do site.
Dicas:
Para personalizar o texto que aparece quando você passa o mouse sobre um hiperlink, clique em Dica de Tela na caixa de diálogo Inserir Hiperlink e insira o texto desejado. Se você não especificar uma Dica de Tela, o Word normalmente exibe o endereço ou o caminho do arquivo do link.
O Word pode converter automaticamente endereços de sites em hiperlinks. Digite uma URL e pressione Espaço ou Enter. Isso é conveniente para edições rápidas, mas um texto de link descritivo geralmente é mais fácil de ler e entender.
Se você também trabalha com PDFs, pode adicionar hiperlinks a um PDF para vincular a sites, arquivos ou outras páginas dentro do documento.
Vincular a um título ou marcador no mesmo documento do Word
Os hiperlinks internos ajudam os leitores a navegar por documentos longos do Word sem rolar por várias páginas. Por exemplo, você pode vincular a frase Consulte a seção de recomendações diretamente a essa seção de um relatório.
O Word oferece suporte a dois destinos comuns para hiperlinks internos: títulos e marcadores.
Vincular a um título existente
Se o documento usa estilos de título internos, você pode vincular diretamente a esses títulos sem criar marcadores separados.
- Selecione o título de destino e aplique um estilo interno, como Título 1 ou Título 2, em Página Inicial > Estilos, caso ele ainda não tenha um.
- Selecione o texto que deseja transformar em hiperlink, como Ir para Recomendações.
- Pressione Ctrl + K e escolha Colocar neste documento em Vincular a.
- Selecione o título de destino na lista.
- Clique em OK e teste o hiperlink.
Vincular a um marcador
Um marcador é útil quando você deseja vincular a um parágrafo, tabela ou local específico que não tem um título adequado.
- Selecione o texto de destino ou posicione o cursor onde deseja que o link leve.
- Vá para Inserir > Marcador.
- Insira um nome de marcador, como
PricingDetails, e clique em Adicionar. Os nomes de marcadores devem começar com uma letra e não podem conter espaços. Você pode usar sublinhados para separar palavras. - Selecione o texto que servirá como hiperlink e pressione Ctrl + K.
- Escolha Colocar neste documento, selecione o marcador de destino e clique em OK.
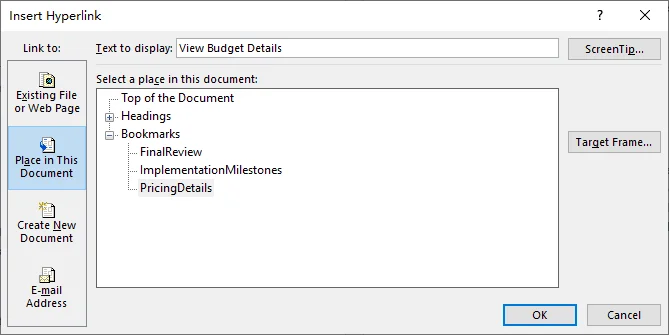
Os hiperlinks do Word podem apontar para títulos ou marcadores em vez de números de página fixos. Isso é útil porque o destino permanece associado ao conteúdo mesmo quando as edições alteram a paginação do documento, desde que o título ou marcador seja preservado.
Criar hiperlinks para arquivos ou endereços de e-mail
Os hiperlinks no Word não se limitam a sites. Você também pode vincular a outro documento ou criar um link que abra uma nova mensagem de e-mail.
Vincular a um arquivo existente
Você pode criar hiperlinks para documentos do Word, planilhas do Excel, PDFs e outros arquivos armazenados no computador ou em um local compartilhado acessível.
- Selecione o texto em que os leitores devem clicar, como Abrir a planilha de orçamento.
- Vá para Inserir > Link.
- Em Vincular a, selecione Arquivo Existente ou Página da Web.
- Navegue até o arquivo que deseja vincular e selecione-o.
- Clique em OK.
Importante: Um hiperlink apenas aponta para um arquivo; ele não inclui o próprio arquivo no documento do Word. Se você quiser que o arquivo acompanhe o documento, pode anexar ou incorporar o arquivo no Word. Se você mover um arquivo vinculado ou compartilhar o documento com alguém que não possa acessar seu local, o hiperlink poderá parar de funcionar.
Para documentos compartilhados com colegas, considere vincular a um arquivo em uma unidade de rede compartilhada acessível ou usar um link compartilhável de um serviço de armazenamento em nuvem. Certifique-se de que os destinatários tenham permissão para acessar o arquivo.
Criar um hiperlink de e-mail
Um hiperlink de e-mail permite que os leitores iniciem uma mensagem para um destinatário especificado diretamente de um documento do Word.
- Selecione um texto como Contatar a equipe do projeto.
- Abra Inserir > Link.
- Em Vincular a, escolha Endereço de E-mail.
- Insira o endereço do destinatário no campo Endereço de e-mail.
- Opcionalmente, insira um Assunto para preencher previamente a linha de assunto do e-mail.
- Clique em OK.
Quando um leitor ativa o hiperlink, o Word tenta abrir o aplicativo de e-mail padrão com uma nova mensagem endereçada ao destinatário especificado.
Esse comportamento depende do aplicativo de e-mail e das configurações do dispositivo do leitor. Alguns clientes de e-mail podem não reconhecer uma linha de assunto predefinida.
Adicionar um hiperlink no Word para a Web
Se você usa o Word no navegador, também pode inserir hiperlinks no Word para a Web sem instalar o aplicativo para desktop.
Para vincular a um site no Word para a Web:
Selecione o texto que deseja transformar em hiperlink.
Vá para Inserir > Link.
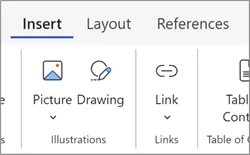
Insira ou cole a URL de destino na caixa Inserir Link em Endereço.
Verifique o texto de exibição e insira o hiperlink.
Para vincular a um título ou marcador no mesmo documento, selecione o texto e vá para Inserir > Link > Inserir Link. Escolha Títulos e Marcadores no lado direito da caixa de diálogo aberta e selecione o destino.
Você também pode criar links de e-mail inserindo um endereço que comece com mailto:, como mailto:[email protected], na caixa Inserir Link.
A interface do navegador difere da caixa de diálogo Inserir Hiperlink do desktop, portanto, alguns controles podem ter nomes ou locais diferentes. Para vincular a arquivos locais ou trabalhar com opções de hiperlink mais avançadas, o Word para desktop geralmente é mais prático.
Inserir hiperlinks em documentos do Word com Python
Os métodos acima funcionam bem para adicionar hiperlinks manualmente no Word. No entanto, se você gera relatórios com frequência ou atualiza documentos com novos links de referência, o Python pode ajudar a automatizar o processo.
O exemplo abaixo usa o Spire.Doc for Python, que oferece suporte à adição de links para sites, arquivos, endereços de e-mail e marcadores sem exigir a instalação do Microsoft Word.
Instalar o Spire.Doc for Python
Antes de executar o script, instale a biblioteca usando pip:
pip install Spire.Doc
Adicionar hiperlinks a um documento existente do Word
O exemplo a seguir abre um documento existente do Word chamado report.docx, adiciona um parágrafo de recursos no final e insere dois hiperlinks: um para um site e outro para um endereço de e-mail.
from spire.doc import Document, FileFormat, HyperlinkType

# Open the existing Word document
doc = Document()
doc.LoadFromFile("report.docx")

try:
    # Add a paragraph to the last section
    section = doc.Sections.get_Item(doc.Sections.Count - 1)
    paragraph = section.AddParagraph()
    paragraph.AppendText("Useful resources: ")

    # Insert a website hyperlink
    paragraph.AppendHyperlink(
        "https://support.microsoft.com/en-us/word",
        "Microsoft Word help",
        HyperlinkType.WebLink
    )

    paragraph.AppendText(" | ")

    # Insert an email hyperlink
    paragraph.AppendHyperlink(
        "mailto:[email protected]",
        "Email the project team",
        HyperlinkType.EMailLink
    )

    # Save the modified document
    doc.SaveToFile("report_with_links.docx", FileFormat.Docx)

finally:
    doc.Close()
Ao adicionar um hiperlink de texto, o método AppendHyperlink() aceita três argumentos:
- Destino: A URL, o caminho do arquivo, o endereço de e-mail ou o nome do marcador.
- Texto de exibição: O texto clicável mostrado no documento do Word.
- Tipo de hiperlink: Um valor como
HyperlinkType.WebLinkouHyperlinkType.EMailLink.
Observação: Este exemplo acrescenta novos hiperlinks ao documento. Ele não pesquisa texto existente nem converte esse texto em um hiperlink.
Adicionar links de arquivo ou links de marcador com Python
O mesmo método pode ser usado para outros destinos de hiperlink.
Por exemplo, para vincular a uma pasta de trabalho do Excel armazenada no computador:
# Link to an existing Excel file
paragraph.AppendHyperlink(
    r"C:\Reports\budget.xlsx",
    "Open the budget workbook",
    HyperlinkType.FileLink
)
Para criar um hiperlink para um marcador já definido no documento do Word:
# Link to an existing bookmark
paragraph.AppendHyperlink(
    "PricingDetails",
    "Jump to pricing details",
    HyperlinkType.Bookmark
)
Você pode usar esses trechos no bloco try do exemplo principal, antes de doc.SaveToFile(), para substituir ou complementar as chamadas de hiperlink existentes. Para links de marcador, o marcador de destino já deve existir no documento do Word. Os hiperlinks de arquivo também dependem de o arquivo referenciado permanecer acessível ao leitor.
A biblioteca também oferece suporte a hiperlinks em imagens. Você pode adicionar uma imagem a um parágrafo usando AppendPicture() e, em seguida, passar o objeto de imagem resultante para AppendHyperlink() em vez do texto de exibição. Para ver um exemplo completo, consulte como adicionar hiperlinks a texto e imagens no Word com Python.
Observação sobre avaliação: A versão de avaliação do Spire.Doc for Python pode adicionar avisos de avaliação ou impor limitações funcionais. Você pode solicitar uma licença temporária para avaliar a geração de documentos sem essas restrições.
Editar, remover ou corrigir hiperlinks no Word
Depois de inserir hiperlinks, você pode precisar atualizar seus destinos, alterar sua aparência ou corrigir links que não funcionam mais.
- Editar um hiperlink: Clique com o botão direito no texto vinculado e selecione Editar Hiperlink. Altere a URL em Endereço ou atualize o Texto a ser exibido e clique em OK.
- Remover um hiperlink: Clique com o botão direito no texto vinculado e selecione Remover Hiperlink. O Word remove o link mantendo o texto visível. Para remover todos os hiperlinks de uma vez ou limpar vários documentos, consulte nosso guia sobre como remover hiperlinks no Word.
- Alterar a formatação do hiperlink: Modifique a formatação do texto ou o estilo Hiperlink do Word para alterar a aparência dos links. Conforme explicado nas diretrizes de acessibilidade do Word da Microsoft, os links devem permanecer distinguíveis do texto ao redor sem depender apenas da cor.
- Seguir um hiperlink: No Word para desktop no Windows, o comportamento padrão geralmente exige Ctrl + Clique durante a edição. Se clicar em um link apenas posicionar o cursor no texto, o hiperlink ainda pode estar funcionando corretamente.
- Corrigir um hiperlink quebrado: Verifique se há erros na URL, confirme se o título ou marcador vinculado ainda existe e verifique se algum arquivo referenciado não foi movido ou excluído. Para links de e-mail, certifique-se de que um aplicativo de e-mail compatível esteja configurado.
Impedir que o Word crie hiperlinks automaticamente
Se o Word converter endereços da web automaticamente em links clicáveis e você quiser desativar esse comportamento:
- Vá para Arquivo > Opções > Revisão de Texto.
- Clique em Opções de AutoCorreção.
- Abra a guia AutoFormatação ao Digitar.
- Desmarque Caminhos da Internet e da rede por hiperlink.
- Clique em OK para salvar a alteração.
Essas etapas se aplicam ao Word para desktop no Windows. O local da configuração pode ser diferente no Mac ou em outras versões do Word.
Dicas finais
Esteja você vinculando a um site, outro arquivo, um endereço de e-mail ou um local dentro do documento, certifique-se de que o texto do link seja claro e o destino funcione conforme esperado. Para documentos compartilhados, verifique se os destinatários podem acessar todos os arquivos vinculados.
As ferramentas internas do Word são suficientes para a edição diária, enquanto o Python é útil quando hiperlinks precisam ser adicionados automaticamente durante a geração de documentos.
Word에서 하이퍼링크 삽입하는 방법: 웹 페이지, 파일, 이메일 등
Word 문서의 하이퍼링크는 독자를 웹사이트로 보내거나, 관련 파일을 열거나, 이메일 작성을 시작하거나, 같은 문서의 특정 섹션으로 이동하게 할 수 있습니다. 이는 보고서, 매뉴얼, 제안서 및 지원 정보를 참조하는 기타 문서에서 특히 유용합니다.
Word에서 하이퍼링크를 빠르게 삽입하려면 클릭 가능하게 만들 텍스트를 선택하고 Ctrl + K(Windows) 또는 Command + K(Mac)를 누른 다음 대상 주소를 입력하고 확인을 클릭합니다. 아래 단계에서는 다양한 유형의 하이퍼링크를 만드는 방법, 기존 링크를 편집하거나 제거하는 방법, Python으로 프로그래밍 방식으로 하이퍼링크를 삽입하는 방법을 설명합니다.
Microsoft Word에서 웹사이트로 연결되는 하이퍼링크 삽입
Word에서 가장 일반적인 유형의 하이퍼링크는 웹사이트를 가리킵니다. 긴 URL을 표시하는 대신 Microsoft Word 지원과 같은 설명적인 문구를 클릭 가능한 링크로 바꿀 수 있습니다.
단계별 안내
다음 단계는 Windows용 Microsoft Word를 기준으로 합니다. Mac에서는 인터페이스가 약간 다를 수 있지만 과정은 비슷합니다.
텍스트 또는 이미지를 선택합니다.
클릭 가능하게 만들 단어를 강조 표시하거나 문서에서 이미지를 선택합니다.하이퍼링크 대화 상자를 엽니다.
삽입 탭으로 이동하여 링크(일부 버전에서는 하이퍼링크)를 클릭합니다. 또는 선택한 텍스트나 이미지를 마우스 오른쪽 버튼으로 클릭하고 링크를 선택하거나 Ctrl + K를 누릅니다.웹사이트 주소를 입력합니다.
하이퍼링크 삽입 대화 상자에서 기존 파일 또는 웹 페이지를 선택한 다음 주소 필드에https://support.microsoft.com/en-us/word와 같은 전체 URL을 붙여넣습니다.표시 텍스트를 확인합니다(텍스트 링크의 경우).
텍스트를 선택한 경우 표시할 텍스트 필드에 독자가 보게 될 단어가 표시됩니다. 대상 URL을 변경하지 않고 이 문구를 변경할 수 있습니다. 이미지를 연결할 때는 이 필드를 사용할 수 없습니다.하이퍼링크를 삽입합니다.
확인을 클릭하여 링크를 적용한 다음 올바른 페이지가 열리는지 테스트합니다.
Mac을 사용하는 경우 Command + K를 누르거나 삽입 > 링크로 이동합니다. 하이퍼링크 삽입 대화 상자에서 웹 페이지 또는 파일을 선택하고 웹사이트 주소를 입력합니다.
팁:
하이퍼링크 위로 마우스를 가져갈 때 표시되는 텍스트를 사용자 지정하려면 하이퍼링크 삽입 대화 상자에서 화면 설명을 클릭하고 원하는 텍스트를 입력합니다. 화면 설명을 지정하지 않으면 Word는 일반적으로 링크의 주소 또는 파일 경로를 표시합니다.
Word는 웹사이트 주소를 자동으로 하이퍼링크로 바꿀 수 있습니다. URL을 입력하고 스페이스 또는 Enter를 누릅니다. 빠른 편집에는 편리하지만, 설명적인 링크 텍스트가 보통 읽고 이해하기 더 쉽습니다.
PDF도 작업하는 경우 PDF에 하이퍼링크 추가하여 웹사이트, 파일 또는 문서 내 다른 페이지로 연결할 수 있습니다.
같은 Word 문서 내의 제목 또는 책갈피로 연결
내부 하이퍼링크는 독자가 여러 페이지를 스크롤하지 않고도 긴 Word 문서를 탐색하는 데 도움이 됩니다. 예를 들어 권장 사항 섹션 보기라는 문구를 보고서의 해당 섹션에 직접 연결할 수 있습니다.
Word는 내부 하이퍼링크에 대해 제목과 책갈피의 두 가지 일반적인 대상을 지원합니다.
기존 제목에 연결
문서에서 기본 제공 제목 스타일을 사용하는 경우 별도의 책갈피를 만들지 않고도 해당 제목에 직접 연결할 수 있습니다.
- 대상 제목을 선택하고 아직 스타일이 없는 경우 홈 > 스타일에서 제목 1 또는 제목 2와 같은 기본 제공 스타일을 적용합니다.
- 권장 사항으로 이동과 같이 하이퍼링크로 바꿀 텍스트를 선택합니다.
- Ctrl + K를 누르고 연결 대상에서 이 문서에 배치를 선택합니다.
- 목록에서 대상 제목을 선택합니다.
- 확인을 클릭하고 하이퍼링크를 테스트합니다.
책갈피에 연결
책갈피는 적합한 제목이 없는 특정 단락, 표 또는 위치에 연결하려는 경우 유용합니다.
- 대상 텍스트를 선택하거나 링크를 연결할 위치에 커서를 놓습니다.
- 삽입 > 책갈피로 이동합니다.
PricingDetails와 같은 책갈피 이름을 입력하고 추가를 클릭합니다. 책갈피 이름은 문자로 시작해야 하며 공백을 포함할 수 없습니다. 밑줄을 사용하여 단어를 구분할 수 있습니다.- 하이퍼링크로 사용할 텍스트를 선택하고 Ctrl + K를 누릅니다.
- 이 문서에 배치를 선택하고 대상 책갈피를 선택한 다음 확인을 클릭합니다.
Word 하이퍼링크는 고정 페이지 번호가 아닌 제목이나 책갈피를 가리킬 수 있습니다. 제목이나 책갈피가 유지되는 한 편집으로 문서의 페이지 매김이 변경되어도 대상이 콘텐츠와 연결된 상태로 유지되므로 유용합니다.
파일 또는 이메일 주소로 연결되는 하이퍼링크 만들기
Word의 하이퍼링크는 웹사이트로 제한되지 않습니다. 다른 문서에 연결하거나 새 이메일 메시지를 여는 링크를 만들 수도 있습니다.
기존 파일에 연결
컴퓨터 또는 액세스 가능한 공유 위치에 저장된 Word 문서, Excel 스프레드시트, PDF 및 기타 파일에 대한 하이퍼링크를 만들 수 있습니다.
- 예산 스프레드시트 열기와 같이 독자가 클릭할 텍스트를 선택합니다.
- 삽입 > 링크로 이동합니다.
- 연결 대상에서 기존 파일 또는 웹 페이지를 선택합니다.
- 연결할 파일을 찾아 선택합니다.
- 확인을 클릭합니다.
중요: 하이퍼링크는 파일만 가리키며 파일 자체를 Word 문서에 포함하지 않습니다. 파일이 문서와 함께 이동하도록 하려면 Word에 파일을 첨부하거나 포함할 수 있습니다. 연결된 파일을 이동하거나 해당 위치에 액세스할 수 없는 사람과 문서를 공유하면 하이퍼링크가 작동하지 않을 수 있습니다.
동료와 공유하는 문서의 경우 액세스 가능한 공유 네트워크 드라이브의 파일에 연결하거나 클라우드 저장소 서비스의 공유 가능한 링크를 사용하는 것이 좋습니다. 수신자에게 파일에 액세스할 권한이 있는지 확인하세요.
이메일 하이퍼링크 만들기
이메일 하이퍼링크를 사용하면 독자가 Word 문서에서 바로 지정된 수신자에게 보낼 메시지를 시작할 수 있습니다.
- 프로젝트 팀에 문의와 같은 텍스트를 선택합니다.
- 삽입 > 링크를 엽니다.
- 연결 대상에서 전자 메일 주소를 선택합니다.
- 전자 메일 주소 필드에 수신자의 주소를 입력합니다.
- 선택적으로 제목을 입력하여 이메일 제목 줄을 미리 채웁니다.
- 확인을 클릭합니다.
독자가 하이퍼링크를 활성화하면 Word는 지정된 수신자에게 보내는 새 메시지와 함께 기본 이메일 응용 프로그램을 열려고 시도합니다.
이 동작은 독자의 이메일 응용 프로그램 및 장치 설정에 따라 달라집니다. 일부 이메일 클라이언트는 미리 정의된 제목 줄을 인식하지 못할 수 있습니다.
Word for the web에서 하이퍼링크 추가
브라우저에서 Word를 사용하는 경우 데스크톱 응용 프로그램을 설치하지 않고도 Word for the web에서 하이퍼링크를 삽입할 수 있습니다.
Word for the web에서 웹사이트에 연결하려면:
하이퍼링크로 바꿀 텍스트를 선택합니다.
삽입 > 링크로 이동합니다.
주소 아래의 링크 입력 상자에 대상 URL을 입력하거나 붙여넣습니다.
표시 텍스트를 확인하고 하이퍼링크를 삽입합니다.
같은 문서의 제목이나 책갈피에 연결하려면 텍스트를 선택하고 삽입 > 링크 > 링크 삽입으로 이동합니다. 열린 대화 상자의 오른쪽에서 제목 및 책갈피를 선택한 다음 대상을 선택합니다.
링크 입력 상자에 mailto:[email protected]과 같이 mailto:로 시작하는 주소를 입력하여 이메일 링크를 만들 수도 있습니다.
브라우저 인터페이스는 데스크톱의 하이퍼링크 삽입 대화 상자와 다르므로 일부 컨트롤의 이름이나 위치가 다를 수 있습니다. 로컬 파일에 연결하거나 고급 하이퍼링크 옵션을 사용하려면 일반적으로 데스크톱 Word가 더 실용적입니다.
Python으로 Word 문서에 하이퍼링크 삽입
위의 방법은 Word에서 수동으로 하이퍼링크를 추가하는 데 적합합니다. 그러나 보고서를 자주 생성하거나 새 참조 링크로 문서를 업데이트하는 경우 Python이 이 과정을 자동화하는 데 도움이 될 수 있습니다.
아래 예제는 Microsoft Word를 설치하지 않고도 웹사이트, 파일, 이메일 주소 및 책갈피에 링크를 추가할 수 있는 Spire.Doc for Python을 사용합니다.
Spire.Doc for Python 설치
스크립트를 실행하기 전에 pip를 사용하여 라이브러리를 설치합니다:
pip install Spire.Doc
기존 Word 문서에 하이퍼링크 추가
다음 예제는 report.docx라는 기존 Word 문서를 열고 끝에 리소스 단락을 추가하며 웹사이트로 연결되는 하이퍼링크와 이메일 주소로 연결되는 하이퍼링크 두 개를 삽입합니다.
from spire.doc import Document, FileFormat, HyperlinkType

# Open the existing Word document
doc = Document()
doc.LoadFromFile("report.docx")

try:
    # Add a paragraph to the last section
    section = doc.Sections.get_Item(doc.Sections.Count - 1)
    paragraph = section.AddParagraph()
    paragraph.AppendText("Useful resources: ")

    # Insert a website hyperlink
    paragraph.AppendHyperlink(
        "https://support.microsoft.com/en-us/word",
        "Microsoft Word help",
        HyperlinkType.WebLink
    )

    paragraph.AppendText(" | ")

    # Insert an email hyperlink
    paragraph.AppendHyperlink(
        "mailto:[email protected]",
        "Email the project team",
        HyperlinkType.EMailLink
    )

    # Save the modified document
    doc.SaveToFile("report_with_links.docx", FileFormat.Docx)

finally:
    doc.Close()
텍스트 하이퍼링크를 추가할 때 AppendHyperlink() 메서드는 세 개의 인수를 받습니다:
- 대상: URL, 파일 경로, 이메일 주소 또는 책갈피 이름입니다.
- 표시 텍스트: Word 문서에 표시되는 클릭 가능한 텍스트입니다.
- 하이퍼링크 유형:
HyperlinkType.WebLink또는HyperlinkType.EMailLink와 같은 값입니다.
참고: 이 예제는 문서에 새 하이퍼링크를 추가합니다. 기존 텍스트를 검색하여 해당 텍스트를 하이퍼링크로 변환하지는 않습니다.
Python으로 파일 링크 또는 책갈피 링크 추가
다른 하이퍼링크 대상에도 같은 메서드를 사용할 수 있습니다.
예를 들어 컴퓨터에 저장된 Excel 통합 문서에 연결하려면:
# Link to an existing Excel file
paragraph.AppendHyperlink(
    r"C:\Reports\budget.xlsx",
    "Open the budget workbook",
    HyperlinkType.FileLink
)
Word 문서에 이미 정의된 책갈피에 하이퍼링크를 만들려면:
# Link to an existing bookmark
paragraph.AppendHyperlink(
    "PricingDetails",
    "Jump to pricing details",
    HyperlinkType.Bookmark
)
이 코드 조각을 기본 예제의 try 블록에서 doc.SaveToFile() 앞에 사용하여 기존 하이퍼링크 호출을 바꾸거나 보완할 수 있습니다. 책갈피 링크의 경우 대상 책갈피가 Word 문서에 이미 있어야 합니다. 파일 하이퍼링크도 참조된 파일이 독자가 액세스할 수 있는 상태로 유지되는지에 따라 달라집니다.
이 라이브러리는 이미지의 하이퍼링크도 지원합니다. AppendPicture()를 사용하여 단락에 이미지를 추가한 다음 표시 텍스트 대신 결과 이미지 개체를 AppendHyperlink()에 전달할 수 있습니다. 전체 예제는 Python으로 Word의 텍스트 및 이미지에 하이퍼링크를 추가하는 방법을 참조하세요.
평가 참고 사항: Spire.Doc for Python의 평가판은 평가 알림을 추가하거나 기능 제한을 적용할 수 있습니다. 이러한 제한 없이 문서 생성을 평가하려면 임시 라이선스를 요청할 수 있습니다.
Word에서 하이퍼링크 편집, 제거 또는 수정
하이퍼링크를 삽입한 후 대상 업데이트, 모양 변경 또는 더 이상 작동하지 않는 링크 수정이 필요할 수 있습니다.
- 하이퍼링크 편집: 연결된 텍스트를 마우스 오른쪽 버튼으로 클릭하고 하이퍼링크 편집을 선택합니다. 주소의 URL을 변경하거나 표시할 텍스트를 업데이트한 다음 확인을 클릭합니다.
- 하이퍼링크 제거: 연결된 텍스트를 마우스 오른쪽 버튼으로 클릭하고 하이퍼링크 제거를 선택합니다. Word는 표시되는 텍스트를 유지하면서 링크를 제거합니다. 모든 하이퍼링크를 한 번에 제거하거나 여러 문서를 정리하려면 Word에서 하이퍼링크를 제거하는 방법 안내를 참조하세요.
- 하이퍼링크 서식 변경: 텍스트 서식 또는 Word의 하이퍼링크 스타일을 수정하여 링크 표시 방식을 변경합니다. Microsoft의 Word 접근성 지침에서 설명하듯이, 링크는 색상에만 의존하지 않고 주변 텍스트와 구분될 수 있어야 합니다.
- 하이퍼링크 따라가기: Windows용 데스크톱 Word에서 기본 동작은 일반적으로 편집 중에 Ctrl + 클릭을 요구합니다. 링크를 클릭했을 때 텍스트에 커서만 놓이는 경우에도 하이퍼링크는 올바르게 작동하고 있을 수 있습니다.
- 깨진 하이퍼링크 수정: URL에 오류가 있는지 확인하고, 연결된 제목 또는 책갈피가 여전히 존재하는지 확인하며, 참조된 파일이 이동되거나 삭제되지 않았는지 확인합니다. 이메일 링크의 경우 호환되는 이메일 응용 프로그램이 구성되어 있는지 확인하세요.
Word에서 자동으로 하이퍼링크를 만들지 않도록 설정
Word가 웹 주소를 자동으로 클릭 가능한 링크로 변환하며 이 동작을 사용하지 않으려면:
- 파일 > 옵션 > 언어 교정으로 이동합니다.
- 자동 고침 옵션을 클릭합니다.
- 입력할 때 자동 서식 탭을 엽니다.
- 인터넷 및 네트워크 경로를 하이퍼링크로를 선택 해제합니다.
- 확인을 클릭하여 변경 사항을 저장합니다.
이 단계는 Windows용 데스크톱 Word에 적용됩니다. Mac 또는 다른 Word 버전에서는 설정 위치가 다를 수 있습니다.
마지막 팁
웹사이트, 다른 파일, 이메일 주소 또는 문서 내 위치에 연결하든 링크 텍스트가 명확하고 대상이 예상대로 작동하는지 확인하세요. 공유 문서의 경우 수신자가 연결된 파일에 액세스할 수 있는지 확인하세요.
Word의 기본 제공 도구는 일상적인 편집에 충분하며, 문서 생성 중에 하이퍼링크를 자동으로 추가해야 할 때는 Python이 유용합니다.
Come inserire un collegamento ipertestuale in Word: pagine web, file, email e altro
Indice
- Inserire un collegamento ipertestuale a un sito Web in Microsoft Word
- Collegarsi a un titolo o a un segnalibro nello stesso documento di Word
- Creare collegamenti ipertestuali a file o indirizzi di posta elettronica
- Aggiungere un collegamento ipertestuale in Word per il Web
- Inserire collegamenti ipertestuali nei documenti di Word con Python
- Modificare, rimuovere o correggere i collegamenti ipertestuali in Word
- Suggerimenti finali
Un collegamento ipertestuale in un documento di Word può indirizzare i lettori a un sito Web, aprire un file correlato, avviare un messaggio di posta elettronica o passare a una sezione dello stesso documento. Questo è particolarmente utile in report, manuali, proposte e altri documenti che fanno riferimento a informazioni di supporto.
Per inserire rapidamente un collegamento ipertestuale in Word, seleziona il testo che vuoi rendere cliccabile, premi Ctrl + K (Windows) o Command + K (Mac), inserisci l'indirizzo di destinazione e fai clic su OK. I passaggi seguenti spiegano come creare diversi tipi di collegamenti ipertestuali, modificare o rimuovere collegamenti esistenti e inserire collegamenti ipertestuali a livello di codice con Python.
Inserire un collegamento ipertestuale a un sito Web in Microsoft Word
Il tipo più comune di collegamento ipertestuale in Word punta a un sito Web. Invece di visualizzare un URL lungo, puoi trasformare una frase descrittiva, ad esempio supporto di Microsoft Word, in un collegamento cliccabile.
Guida passo passo
I passaggi seguenti usano Microsoft Word per Windows. L'interfaccia può differire leggermente su Mac, ma la procedura è simile.
Seleziona il testo o l'immagine.
Evidenzia le parole che vuoi rendere cliccabili oppure seleziona un'immagine nel documento.Apri la finestra di dialogo del collegamento ipertestuale.
Vai alla scheda Inserisci e fai clic su Collegamento (o Collegamento ipertestuale in alcune versioni). In alternativa, fai clic con il pulsante destro del mouse sul testo o sull'immagine selezionati e scegli Collegamento, oppure premi Ctrl + K.Inserisci l'indirizzo del sito Web.
Nella finestra di dialogo Inserisci collegamento ipertestuale, seleziona File o pagina Web esistente, quindi incolla l'URL completo nel campo Indirizzo, ad esempiohttps://support.microsoft.com/en-us/word.Controlla il testo visualizzato (per i collegamenti di testo).
Se hai selezionato del testo, il campo Testo da visualizzare mostra le parole che i lettori vedranno. Puoi modificare questo testo senza cambiare l'URL di destinazione. Questo campo non è disponibile quando colleghi un'immagine.Inserisci il collegamento ipertestuale.
Fai clic su OK per applicare il collegamento, quindi provalo per assicurarti che apra la pagina corretta.
Se usi un Mac, premi Command + K oppure vai a Inserisci > Collegamento. Nella finestra di dialogo Inserisci collegamento ipertestuale, seleziona Pagina Web o file e inserisci l'indirizzo del sito Web.
Suggerimenti:
Per personalizzare il testo visualizzato quando si passa il mouse su un collegamento ipertestuale, fai clic su Suggerimento nella finestra di dialogo Inserisci collegamento ipertestuale e inserisci il testo preferito. Se non specifichi un suggerimento, Word in genere visualizza l'indirizzo o il percorso del file del collegamento.
Word può convertire automaticamente gli indirizzi dei siti Web in collegamenti ipertestuali. Digita un URL e premi Spazio o Invio. Questo è comodo per modifiche rapide, ma un testo del collegamento descrittivo è di solito più facile da leggere e capire.
Se lavori anche con PDF, puoi aggiungere collegamenti ipertestuali a un PDF per collegarti a siti Web, file o altre pagine all'interno del documento.
Collegarsi a un titolo o a un segnalibro nello stesso documento di Word
I collegamenti ipertestuali interni aiutano i lettori a spostarsi in documenti Word lunghi senza scorrere più pagine. Ad esempio, puoi collegare la frase Vedi la sezione delle raccomandazioni direttamente a quella sezione di un report.
Word supporta due destinazioni comuni per i collegamenti ipertestuali interni: titoli e segnalibri.
Collegamento a un titolo esistente
Se il documento usa stili di titolo predefiniti, puoi collegarti direttamente a quei titoli senza creare segnalibri separati.
- Seleziona il titolo di destinazione e applica uno stile predefinito, ad esempio Titolo 1 o Titolo 2, in Home > Stili, se non ne ha già uno.
- Seleziona il testo che vuoi trasformare in un collegamento ipertestuale, ad esempio Vai alle raccomandazioni.
- Premi Ctrl + K e scegli Posizione nel documento in Collega a.
- Seleziona il titolo di destinazione dall'elenco.
- Fai clic su OK e prova il collegamento ipertestuale.
Collegamento a un segnalibro
Un segnalibro è utile quando vuoi collegarti a un paragrafo, una tabella o una posizione specifici che non hanno un titolo adatto.
- Seleziona il testo di destinazione o posiziona il cursore dove vuoi che porti il collegamento.
- Vai a Inserisci > Segnalibro.
- Inserisci un nome per il segnalibro, ad esempio
PricingDetails, e fai clic su Aggiungi. I nomi dei segnalibri devono iniziare con una lettera e non possono contenere spazi. Puoi usare i caratteri di sottolineatura per separare le parole. - Seleziona il testo che farà da collegamento ipertestuale e premi Ctrl + K.
- Scegli Posizione nel documento, seleziona il segnalibro di destinazione e fai clic su OK.
I collegamenti ipertestuali di Word possono puntare a titoli o segnalibri anziché a numeri di pagina fissi. Questo è utile perché la destinazione rimane associata al contenuto anche quando le modifiche cambiano l'impaginazione del documento, a condizione che il titolo o il segnalibro venga conservato.
Creare collegamenti ipertestuali a file o indirizzi di posta elettronica
I collegamenti ipertestuali in Word non si limitano ai siti Web. Puoi anche collegarti a un altro documento o creare un collegamento che apra un nuovo messaggio di posta elettronica.
Collegamento a un file esistente
Puoi creare collegamenti ipertestuali a documenti di Word, fogli di calcolo di Excel, PDF e altri file salvati sul computer o in un percorso condiviso accessibile.
- Seleziona il testo su cui vuoi che i lettori facciano clic, ad esempio Apri il foglio di calcolo del budget.
- Vai a Inserisci > Collegamento.
- In Collega a, seleziona File o pagina Web esistente.
- Individua il file a cui vuoi collegarti e selezionalo.
- Fai clic su OK.
Importante: un collegamento ipertestuale punta solo a un file; non include il file stesso nel documento di Word. Se vuoi che il file viaggi con il documento, puoi allegare o incorporare il file in Word. Se sposti un file collegato o condividi il documento con qualcuno che non può accedere alla sua posizione, il collegamento ipertestuale potrebbe smettere di funzionare.
Per i documenti condivisi con i colleghi, valuta la possibilità di collegarti a un file su un'unità di rete condivisa accessibile o di usare un collegamento condivisibile da un servizio di archiviazione cloud. Assicurati che i destinatari abbiano l'autorizzazione per accedere al file.
Creare un collegamento ipertestuale di posta elettronica
Un collegamento ipertestuale di posta elettronica consente ai lettori di avviare un messaggio a un destinatario specificato direttamente da un documento di Word.
- Seleziona un testo come Contatta il team del progetto.
- Apri Inserisci > Collegamento.
- In Collega a, scegli Indirizzo di posta elettronica.
- Inserisci l'indirizzo del destinatario nel campo Indirizzo di posta elettronica.
- Facoltativamente, inserisci un Oggetto per precompilare la riga dell'oggetto del messaggio.
- Fai clic su OK.
Quando un lettore attiva il collegamento ipertestuale, Word tenta di aprire l'applicazione di posta elettronica predefinita con un nuovo messaggio indirizzato al destinatario specificato.
Questo comportamento dipende dall'applicazione di posta elettronica e dalle impostazioni del dispositivo del lettore. Alcuni client di posta elettronica potrebbero non riconoscere una riga dell'oggetto predefinita.
Aggiungere un collegamento ipertestuale in Word per il Web
Se usi Word in un browser, puoi anche inserire collegamenti ipertestuali in Word per il Web senza installare l'applicazione desktop.
Per collegarti a un sito Web in Word per il Web:
Seleziona il testo che vuoi trasformare in un collegamento ipertestuale.
Vai a Inserisci > Collegamento.
Inserisci o incolla l'URL di destinazione nella casella Immetti collegamento in Indirizzo.
Controlla il testo visualizzato e inserisci il collegamento ipertestuale.
Per collegarti a un titolo o a un segnalibro nello stesso documento, seleziona il testo e vai a Inserisci > Collegamento > Inserisci collegamento. Scegli Titoli e segnalibri sul lato destro della finestra di dialogo aperta, quindi seleziona la destinazione.
Puoi anche creare collegamenti di posta elettronica inserendo un indirizzo che inizia con mailto:, ad esempio mailto:[email protected], nella casella Immetti collegamento.
L'interfaccia del browser è diversa dalla finestra di dialogo Inserisci collegamento ipertestuale del desktop, quindi alcuni controlli potrebbero avere nomi o posizioni diversi. Per collegarsi a file locali o lavorare con opzioni più avanzate dei collegamenti ipertestuali, Word desktop è generalmente più pratico.
Inserire collegamenti ipertestuali nei documenti di Word con Python
I metodi sopra descritti funzionano bene per aggiungere collegamenti ipertestuali manualmente in Word. Tuttavia, se generi spesso report o aggiorni documenti con nuovi collegamenti di riferimento, Python può aiutarti ad automatizzare il processo.
L'esempio seguente usa Spire.Doc for Python, che supporta l'aggiunta di collegamenti a siti Web, file, indirizzi di posta elettronica e segnalibri senza richiedere l'installazione di Microsoft Word.
Installare Spire.Doc for Python
Prima di eseguire lo script, installa la libreria usando pip:
pip install Spire.Doc
Aggiungere collegamenti ipertestuali a un documento di Word esistente
L'esempio seguente apre un documento di Word esistente denominato report.docx, aggiunge un paragrafo delle risorse alla fine e inserisce due collegamenti ipertestuali: uno a un sito Web e uno a un indirizzo di posta elettronica.
from spire.doc import Document, FileFormat, HyperlinkType

# Open the existing Word document
doc = Document()
doc.LoadFromFile("report.docx")

try:
    # Add a paragraph to the last section
    section = doc.Sections.get_Item(doc.Sections.Count - 1)
    paragraph = section.AddParagraph()
    paragraph.AppendText("Useful resources: ")

    # Insert a website hyperlink
    paragraph.AppendHyperlink(
        "https://support.microsoft.com/en-us/word",
        "Microsoft Word help",
        HyperlinkType.WebLink
    )

    paragraph.AppendText(" | ")

    # Insert an email hyperlink
    paragraph.AppendHyperlink(
        "mailto:[email protected]",
        "Email the project team",
        HyperlinkType.EMailLink
    )

    # Save the modified document
    doc.SaveToFile("report_with_links.docx", FileFormat.Docx)

finally:
    doc.Close()
Quando si aggiunge un collegamento ipertestuale di testo, il metodo AppendHyperlink() accetta tre argomenti:
- Destinazione: l'URL, il percorso del file, l'indirizzo di posta elettronica o il nome del segnalibro.
- Testo visualizzato: il testo cliccabile mostrato nel documento di Word.
- Tipo di collegamento ipertestuale: un valore come
HyperlinkType.WebLinkoHyperlinkType.EMailLink.
Nota: questo esempio aggiunge nuovi collegamenti ipertestuali al documento. Non cerca il testo esistente per convertirlo in un collegamento ipertestuale.
Aggiungere collegamenti a file o segnalibri con Python
Lo stesso metodo può essere usato per altre destinazioni dei collegamenti ipertestuali.
Ad esempio, per collegarsi a una cartella di lavoro di Excel salvata sul computer:
# Link to an existing Excel file
paragraph.AppendHyperlink(
    r"C:\Reports\budget.xlsx",
    "Open the budget workbook",
    HyperlinkType.FileLink
)
Per creare un collegamento ipertestuale a un segnalibro già definito nel documento di Word:
# Link to an existing bookmark
paragraph.AppendHyperlink(
    "PricingDetails",
    "Jump to pricing details",
    HyperlinkType.Bookmark
)
Puoi usare questi frammenti nel blocco try dell'esempio principale, prima di doc.SaveToFile(), per sostituire o integrare le chiamate esistenti ai collegamenti ipertestuali. Per i collegamenti ai segnalibri, il segnalibro di destinazione deve già esistere nel documento di Word. I collegamenti ipertestuali ai file dipendono anche dal fatto che il file di riferimento rimanga accessibile al lettore.
La libreria supporta anche i collegamenti ipertestuali sulle immagini. Puoi aggiungere un'immagine a un paragrafo usando AppendPicture(), quindi passare l'oggetto immagine risultante a AppendHyperlink() invece del testo visualizzato. Per un esempio completo, vedi come aggiungere collegamenti ipertestuali a testo e immagini in Word con Python.
Nota di valutazione: la versione di prova di Spire.Doc for Python può aggiungere avvisi di valutazione o imporre limitazioni funzionali. Puoi richiedere una licenza temporanea per valutare la generazione di documenti senza queste restrizioni.
Modificare, rimuovere o correggere i collegamenti ipertestuali in Word
Dopo aver inserito i collegamenti ipertestuali, potrebbe essere necessario aggiornarne le destinazioni, modificarne l'aspetto o correggere i collegamenti che non funzionano più.
- Modificare un collegamento ipertestuale: fai clic con il pulsante destro del mouse sul testo collegato e seleziona Modifica collegamento ipertestuale. Modifica l'URL in Indirizzo o aggiorna Testo da visualizzare, quindi fai clic su OK.
- Rimuovere un collegamento ipertestuale: fai clic con il pulsante destro del mouse sul testo collegato e seleziona Rimuovi collegamento ipertestuale. Word rimuove il collegamento mantenendo il testo visibile. Per rimuovere tutti i collegamenti ipertestuali in una volta o riordinare più documenti, consulta la nostra guida su come rimuovere i collegamenti ipertestuali in Word.
- Modificare la formattazione dei collegamenti ipertestuali: modifica la formattazione del testo o lo stile Collegamento ipertestuale di Word per cambiare l'aspetto dei collegamenti. Come spiegato nelle linee guida Microsoft per l'accessibilità di Word, i collegamenti devono rimanere distinguibili dal testo circostante senza affidarsi solo al colore.
- Seguire un collegamento ipertestuale: in Word desktop per Windows, il comportamento predefinito di solito richiede Ctrl + clic durante la modifica. Se facendo clic su un collegamento si posiziona solo il cursore nel testo, è possibile che il collegamento ipertestuale funzioni comunque correttamente.
- Correggere un collegamento ipertestuale non funzionante: controlla l'URL per errori, verifica che il titolo o il segnalibro collegato esista ancora e assicurati che il file di riferimento non sia stato spostato o eliminato. Per i collegamenti di posta elettronica, verifica che sia configurata un'applicazione di posta elettronica compatibile.
Impedire a Word di creare automaticamente collegamenti ipertestuali
Se Word converte automaticamente gli indirizzi Web in collegamenti cliccabili e vuoi disattivare questo comportamento:
- Vai a File > Opzioni > Strumenti di correzione.
- Fai clic su Opzioni correzione automatica.
- Apri la scheda Formattazione automatica mentre si digita.
- Deseleziona Percorsi Internet e di rete con collegamenti ipertestuali.
- Fai clic su OK per salvare la modifica.
Questi passaggi si applicano a Word desktop per Windows. La posizione dell'impostazione può variare su Mac o in altre versioni di Word.
Suggerimenti finali
Che tu stia collegando un sito Web, un altro file, un indirizzo di posta elettronica o una posizione all'interno del documento, assicurati che il testo del collegamento sia chiaro e che la destinazione funzioni come previsto. Per i documenti condivisi, verifica che i destinatari possano accedere a tutti i file collegati.
Gli strumenti integrati di Word sono sufficienti per la modifica quotidiana, mentre Python è utile quando i collegamenti ipertestuali devono essere aggiunti automaticamente durante la generazione dei documenti.
Comment insérer un lien hypertexte dans Word : pages web, fichiers, e-mail, etc.
Table des matières
- Insérer un lien hypertexte vers un site web dans Microsoft Word
- Créer un lien vers un titre ou un signet dans le même document Word
- Créer des liens hypertextes vers des fichiers ou des adresses e-mail
- Ajouter un lien hypertexte dans Word pour le web
- Insérer des liens hypertextes dans des documents Word avec Python
- Modifier, supprimer ou corriger des liens hypertextes dans Word
- Conseils finaux
Un lien hypertexte dans un document Word peut diriger les lecteurs vers un site web, ouvrir un fichier associé, démarrer un e-mail ou accéder à une section du même document. Cela est particulièrement utile dans les rapports, les manuels, les propositions et d'autres documents qui font référence à des informations complémentaires.
Pour insérer rapidement un lien hypertexte dans Word, sélectionnez le texte que vous souhaitez rendre cliquable, appuyez sur Ctrl + K (Windows) ou Command + K (Mac), saisissez l'adresse de destination, puis cliquez sur OK. Les étapes ci-dessous expliquent comment créer différents types de liens hypertextes, modifier ou supprimer des liens existants et insérer des liens hypertextes par programmation avec Python.
Insérer un lien hypertexte vers un site web dans Microsoft Word
Le type de lien hypertexte le plus courant dans Word pointe vers un site web. Au lieu d'afficher une longue URL, vous pouvez transformer une expression descriptive, telle que Support Microsoft Word, en un lien cliquable.
Guide étape par étape
Les étapes suivantes utilisent Microsoft Word pour Windows. L'interface peut légèrement différer sur Mac, mais le processus est similaire.
Sélectionnez le texte ou l'image.
Mettez en surbrillance les mots que vous souhaitez rendre cliquables ou sélectionnez une image dans votre document.Ouvrez la boîte de dialogue de lien hypertexte.
Accédez à l'onglet Insertion et cliquez sur Lien (ou Lien hypertexte dans certaines versions). Vous pouvez également faire un clic droit sur le texte ou l'image sélectionné et choisir Lien, ou appuyer sur Ctrl + K.Saisissez l'adresse du site web.
Dans la boîte de dialogue Insérer un lien hypertexte, sélectionnez Fichier ou page web existant, puis collez l'URL complète dans le champ Adresse, par exemplehttps://support.microsoft.com/en-us/word.Vérifiez le texte affiché (pour les liens textuels).
Si vous avez sélectionné du texte, le champ Texte à afficher indique les mots que les lecteurs verront. Vous pouvez modifier ce libellé sans changer l'URL de destination. Ce champ n'est pas disponible lorsque vous créez un lien sur une image.Insérez le lien hypertexte.
Cliquez sur OK pour appliquer le lien, puis testez-le pour vous assurer qu'il ouvre la bonne page.
Si vous utilisez un Mac, appuyez sur Command + K ou accédez à Insertion > Lien. Dans la boîte de dialogue Insérer un lien hypertexte, sélectionnez Page web ou fichier et saisissez l'adresse du site web.
Conseils :
Pour personnaliser le texte qui apparaît lorsque vous survolez un lien hypertexte, cliquez sur Info-bulle dans la boîte de dialogue Insérer un lien hypertexte et saisissez le texte souhaité. Si vous ne spécifiez pas d'info-bulle, Word affiche généralement l'adresse du lien ou le chemin du fichier.
Word peut automatiquement transformer les adresses de sites web en liens hypertextes. Saisissez une URL et appuyez sur Espace ou Entrée. Cela est pratique pour une modification rapide, mais un texte de lien descriptif est généralement plus facile à lire et à comprendre.
Si vous travaillez également avec des PDF, vous pouvez ajouter des liens hypertextes à un PDF pour créer des liens vers des sites web, des fichiers ou d'autres pages du document.
Créer un lien vers un titre ou un signet dans le même document Word
Les liens hypertextes internes aident les lecteurs à naviguer dans de longs documents Word sans faire défiler plusieurs pages. Par exemple, vous pouvez lier l'expression Voir la section des recommandations directement à cette section d'un rapport.
Word prend en charge deux destinations courantes pour les liens hypertextes internes : les titres et les signets.
Créer un lien vers un titre existant
Si votre document utilise des styles de titre intégrés, vous pouvez créer un lien directement vers ces titres sans créer de signets distincts.
- Sélectionnez le titre de destination et appliquez un style intégré tel que Titre 1 ou Titre 2 sous Accueil > Styles, s'il n'en possède pas déjà un.
- Sélectionnez le texte que vous souhaitez transformer en lien hypertexte, par exemple Aller aux recommandations.
- Appuyez sur Ctrl + K et choisissez Placer dans ce document sous Lien vers.
- Sélectionnez le titre de destination dans la liste.
- Cliquez sur OK et testez le lien hypertexte.
Créer un lien vers un signet
Un signet est utile lorsque vous souhaitez créer un lien vers un paragraphe, un tableau ou un emplacement spécifique qui ne dispose pas d'un titre approprié.
- Sélectionnez le texte de destination ou placez le curseur à l'endroit où vous souhaitez que le lien mène.
- Accédez à Insertion > Signet.
- Saisissez un nom de signet, par exemple
PricingDetails, et cliquez sur Ajouter. Les noms de signets doivent commencer par une lettre et ne peuvent pas contenir d'espaces. Vous pouvez utiliser des traits de soulignement pour séparer les mots. - Sélectionnez le texte qui servira de lien hypertexte et appuyez sur Ctrl + K.
- Choisissez Placer dans ce document, sélectionnez votre signet de destination et cliquez sur OK.
Les liens hypertextes Word peuvent pointer vers des titres ou des signets plutôt que vers des numéros de page fixes. Cela est utile car la destination reste associée au contenu même lorsque les modifications changent la pagination du document, à condition que le titre ou le signet soit conservé.
Créer des liens hypertextes vers des fichiers ou des adresses e-mail
Les liens hypertextes dans Word ne se limitent pas aux sites web. Vous pouvez également créer un lien vers un autre document ou créer un lien qui ouvre un nouveau message électronique.
Créer un lien vers un fichier existant
Vous pouvez créer des liens hypertextes vers des documents Word, des feuilles de calcul Excel, des PDF et d'autres fichiers stockés sur votre ordinateur ou dans un emplacement partagé accessible.
- Sélectionnez le texte sur lequel les lecteurs doivent cliquer, par exemple Ouvrir la feuille de calcul budgétaire.
- Accédez à Insertion > Lien.
- Sous Lien vers, sélectionnez Fichier ou page web existant.
- Parcourez jusqu'au fichier vers lequel vous souhaitez créer un lien et sélectionnez-le.
- Cliquez sur OK.
Important : un lien hypertexte pointe uniquement vers un fichier ; il n'inclut pas le fichier lui-même dans votre document Word. Si vous souhaitez que le fichier accompagne le document, vous pouvez joindre ou intégrer le fichier dans Word. Si vous déplacez un fichier lié ou partagez le document avec une personne qui ne peut pas accéder à son emplacement, le lien hypertexte peut cesser de fonctionner.
Pour les documents partagés avec des collègues, envisagez de créer un lien vers un fichier sur un lecteur réseau partagé accessible ou d'utiliser un lien partageable à partir d'un service de stockage cloud. Assurez-vous que les destinataires disposent de l'autorisation d'accéder au fichier.
Créer un lien hypertexte e-mail
Un lien hypertexte e-mail permet aux lecteurs de rédiger un message à un destinataire spécifié directement depuis un document Word.
- Sélectionnez un texte tel que Contacter l'équipe du projet.
- Ouvrez Insertion > Lien.
- Sous Lien vers, choisissez Adresse e-mail.
- Saisissez l'adresse du destinataire dans le champ Adresse e-mail.
- Facultativement, saisissez un Objet pour préremplir la ligne d'objet de l'e-mail.
- Cliquez sur OK.
Lorsqu'un lecteur active le lien hypertexte, Word tente d'ouvrir l'application de messagerie par défaut avec un nouveau message adressé au destinataire spécifié.
Ce comportement dépend de l'application de messagerie et des paramètres de l'appareil du lecteur. Certains clients de messagerie peuvent ne pas reconnaître une ligne d'objet prédéfinie.
Ajouter un lien hypertexte dans Word pour le web
Si vous utilisez Word dans un navigateur, vous pouvez également insérer des liens hypertextes dans Word pour le web sans installer l'application de bureau.
Pour créer un lien vers un site web dans Word pour le web :
Sélectionnez le texte que vous souhaitez transformer en lien hypertexte.
Accédez à Insertion > Lien.
Saisissez ou collez l'URL de destination dans la zone Entrer le lien sous Adresse.
Vérifiez le texte affiché et insérez le lien hypertexte.
Pour créer un lien vers un titre ou un signet dans le même document, sélectionnez le texte et accédez à Insertion > Lien > Insérer un lien. Choisissez Titres et signets sur le côté droit de la boîte de dialogue ouverte, puis sélectionnez la destination.
Vous pouvez également créer des liens e-mail en saisissant une adresse commençant par mailto:, par exemple mailto:[email protected], dans la zone Entrer le lien.
L'interface du navigateur diffère de la boîte de dialogue Insérer un lien hypertexte de bureau, de sorte que certains contrôles peuvent avoir des noms ou des emplacements différents. Pour créer des liens vers des fichiers locaux ou travailler avec des options de lien hypertexte plus avancées, Word de bureau est généralement plus pratique.
Insérer des liens hypertextes dans des documents Word avec Python
Les méthodes ci-dessus fonctionnent bien pour ajouter manuellement des liens hypertextes dans Word. Cependant, si vous générez fréquemment des rapports ou mettez à jour des documents avec de nouveaux liens de référence, Python peut vous aider à automatiser le processus.
L'exemple ci-dessous utilise Spire.Doc for Python, qui prend en charge l'ajout de liens vers des sites web, des fichiers, des adresses e-mail et des signets sans nécessiter l'installation de Microsoft Word.
Installer Spire.Doc for Python
Avant d'exécuter le script, installez la bibliothèque à l'aide de pip :
pip install Spire.Doc
Ajouter des liens hypertextes à un document Word existant
L'exemple suivant ouvre un document Word existant nommé report.docx, ajoute un paragraphe de ressources à la fin et insère deux liens hypertextes : un vers un site web et un autre vers une adresse e-mail.
from spire.doc import Document, FileFormat, HyperlinkType

# Open the existing Word document
doc = Document()
doc.LoadFromFile("report.docx")

try:
    # Add a paragraph to the last section
    section = doc.Sections.get_Item(doc.Sections.Count - 1)
    paragraph = section.AddParagraph()
    paragraph.AppendText("Useful resources: ")

    # Insert a website hyperlink
    paragraph.AppendHyperlink(
        "https://support.microsoft.com/en-us/word",
        "Microsoft Word help",
        HyperlinkType.WebLink
    )

    paragraph.AppendText(" | ")

    # Insert an email hyperlink
    paragraph.AppendHyperlink(
        "mailto:[email protected]",
        "Email the project team",
        HyperlinkType.EMailLink
    )

    # Save the modified document
    doc.SaveToFile("report_with_links.docx", FileFormat.Docx)

finally:
    doc.Close()
Lors de l'ajout d'un lien hypertexte textuel, la méthode AppendHyperlink() accepte trois arguments :
- Destination : l'URL, le chemin d'accès au fichier, l'adresse e-mail ou le nom du signet.
- Texte affiché : le texte cliquable affiché dans le document Word.
- Type de lien hypertexte : une valeur telle que
HyperlinkType.WebLinkouHyperlinkType.EMailLink.
Remarque : cet exemple ajoute de nouveaux liens hypertextes au document. Il ne recherche pas de texte existant et ne convertit pas ce texte en lien hypertexte.
Ajouter des liens vers des fichiers ou des signets avec Python
La même méthode peut être utilisée pour d'autres destinations de liens hypertextes.
Par exemple, pour créer un lien vers un classeur Excel stocké sur votre ordinateur :
# Link to an existing Excel file
paragraph.AppendHyperlink(
    r"C:\Reports\budget.xlsx",
    "Open the budget workbook",
    HyperlinkType.FileLink
)
Pour créer un lien hypertexte vers un signet déjà défini dans le document Word :
# Link to an existing bookmark
paragraph.AppendHyperlink(
    "PricingDetails",
    "Jump to pricing details",
    HyperlinkType.Bookmark
)
Vous pouvez utiliser ces extraits dans le bloc try de l'exemple principal, avant doc.SaveToFile(), pour remplacer ou compléter les appels de lien hypertexte existants. Pour les liens vers des signets, le signet de destination doit déjà exister dans le document Word. Les liens hypertextes vers des fichiers dépendent également du fait que le fichier référencé reste accessible au lecteur.
La bibliothèque prend également en charge les liens hypertextes sur les images. Vous pouvez ajouter une image à un paragraphe à l'aide de AppendPicture(), puis transmettre l'objet image résultant à AppendHyperlink() au lieu du texte affiché. Pour un exemple complet, consultez comment ajouter des liens hypertextes au texte et aux images dans Word avec Python.
Remarque sur l'évaluation : la version d'essai de Spire.Doc for Python peut ajouter des mentions d'évaluation ou imposer des limitations fonctionnelles. Vous pouvez demander une licence temporaire pour évaluer la génération de documents sans ces restrictions.
Modifier, supprimer ou corriger des liens hypertextes dans Word
Après avoir inséré des liens hypertextes, vous pouvez avoir besoin de mettre à jour leurs destinations, de modifier leur apparence ou de corriger les liens qui ne fonctionnent plus.
- Modifier un lien hypertexte : faites un clic droit sur le texte lié et sélectionnez Modifier le lien hypertexte. Modifiez l'URL dans Adresse ou mettez à jour le Texte à afficher, puis cliquez sur OK.
- Supprimer un lien hypertexte : faites un clic droit sur le texte lié et sélectionnez Supprimer le lien hypertexte. Word supprime le lien tout en conservant le texte visible. Pour supprimer tous les liens hypertextes en une seule fois ou nettoyer plusieurs documents, consultez notre guide sur comment supprimer les liens hypertextes dans Word.
- Modifier la mise en forme des liens hypertextes : modifiez la mise en forme du texte ou le style Lien hypertexte de Word pour changer l'apparence des liens. Comme expliqué dans les directives d'accessibilité de Word de Microsoft, les liens doivent rester distinguables du texte environnant sans dépendre uniquement de la couleur.
- Suivre un lien hypertexte : dans Word de bureau pour Windows, le comportement par défaut nécessite généralement Ctrl + Clic pendant l'édition. Si un clic sur un lien ne fait que placer le curseur dans le texte, le lien hypertexte peut toujours fonctionner correctement.
- Corriger un lien hypertexte rompu : vérifiez l'URL pour détecter les erreurs, confirmez que le titre ou le signet lié existe toujours et assurez-vous que tout fichier référencé n'a pas été déplacé ou supprimé. Pour les liens e-mail, assurez-vous qu'une application de messagerie compatible est configurée.
Empêcher Word de créer automatiquement des liens hypertextes
Si Word convertit automatiquement les adresses web en liens cliquables et que vous souhaitez désactiver ce comportement :
- Accédez à Fichier > Options > Vérification.
- Cliquez sur Options de correction automatique.
- Ouvrez l'onglet Mise en forme automatique au cours de la frappe.
- Décochez Chemins Internet et réseau par des liens hypertextes.
- Cliquez sur OK pour enregistrer la modification.
Ces étapes s'appliquent à Word de bureau pour Windows. L'emplacement du paramètre peut différer sur Mac ou dans d'autres versions de Word.
Conseils finaux
Que vous créiez un lien vers un site web, un autre fichier, une adresse e-mail ou un emplacement dans le document, assurez-vous que le texte du lien est clair et que la destination fonctionne comme prévu. Pour les documents partagés, vérifiez que les destinataires peuvent accéder à tous les fichiers liés.
Les outils intégrés de Word suffisent pour l'édition quotidienne, tandis que Python est utile lorsque des liens hypertextes doivent être ajoutés automatiquement lors de la génération de documents.
Cómo insertar un hipervínculo en Word: páginas web, archivos, correo electrónico y más
Tabla de contenido
- Insertar un hipervínculo a un sitio web en Microsoft Word
- Vincular a un encabezado o marcador en el mismo documento de Word
- Crear hipervínculos a archivos o direcciones de correo electrónico
- Agregar un hipervínculo en Word para la web
- Insertar hipervínculos en documentos de Word con Python
- Editar, eliminar o corregir hipervínculos en Word
- Consejos finales
Un hipervínculo en un documento de Word puede enviar a los lectores a un sitio web, abrir un archivo relacionado, iniciar un correo electrónico o saltar a una sección del mismo documento. Esto es especialmente útil en informes, manuales, propuestas y otros documentos que hacen referencia a información de apoyo.
Para insertar un hipervínculo en Word rápidamente, seleccione el texto que desea convertir en clicable, presione Ctrl + K (Windows) o Command + K (Mac), escriba la dirección de destino y haga clic en Aceptar. Los pasos a continuación explican cómo crear diferentes tipos de hipervínculos, editar o eliminar enlaces existentes e insertar hipervínculos mediante programación con Python.
Insertar un hipervínculo a un sitio web en Microsoft Word
El tipo de hipervínculo más común en Word apunta a un sitio web. En lugar de mostrar una URL larga, puede convertir una frase descriptiva, como Compatibilidad de Microsoft Word, en un enlace clicable.
Guía paso a paso
Los siguientes pasos utilizan Microsoft Word para Windows. La interfaz puede variar ligeramente en Mac, pero el proceso es similar.
Seleccione el texto o la imagen.
Resalte las palabras que desea convertir en clicables o seleccione una imagen en su documento.Abra el cuadro de diálogo de hipervínculo.
Vaya a la pestaña Insertar y haga clic en Vínculo (o Hipervínculo en algunas versiones). También puede hacer clic con el botón derecho en el texto o la imagen seleccionados y elegir Vínculo, o presionar Ctrl + K.Escriba la dirección del sitio web.
En el cuadro de diálogo Insertar hipervínculo, seleccione Archivo existente o página web y pegue la URL completa en el campo Dirección, por ejemplo,https://support.microsoft.com/en-us/word.Compruebe el texto para mostrar (para enlaces de texto).
Si seleccionó texto, el campo Texto para mostrar muestra las palabras que verán los lectores. Puede cambiar esta redacción sin cambiar la URL de destino. Este campo no está disponible cuando se vincula una imagen.Inserte el hipervínculo.
Haga clic en Aceptar para aplicar el vínculo y, luego, pruébelo para asegurarse de que abre la página correcta.
Si usa una Mac, presione Command + K o vaya a Insertar > Vínculo. En el cuadro de diálogo Insertar hipervínculo, seleccione Página web o archivo y escriba la dirección del sitio web.
Consejos:
Para personalizar el texto que aparece al pasar el cursor sobre un hipervínculo, haga clic en Sugerencia en el cuadro de diálogo Insertar hipervínculo y escriba el texto que prefiera. Si no especifica una Sugerencia, Word normalmente muestra la dirección o la ruta del archivo del vínculo.
Word puede convertir automáticamente las direcciones de sitios web en hipervínculos. Escriba una URL y presione Espacio o Entrar. Esto resulta cómodo para ediciones rápidas, pero el texto de vínculo descriptivo suele ser más fácil de leer y comprender.
Si también trabaja con PDF, puede agregar hipervínculos a un PDF para vincular a sitios web, archivos u otras páginas dentro del documento.
Vincular a un encabezado o marcador en el mismo documento de Word
Los hipervínculos internos ayudan a los lectores a navegar por documentos de Word largos sin tener que desplazarse por varias páginas. Por ejemplo, puede vincular la frase Ver la sección de recomendaciones directamente a esa sección de un informe.
Word admite dos destinos comunes para los hipervínculos internos: encabezados y marcadores.
Vincular a un encabezado existente
Si su documento utiliza estilos de encabezado integrados, puede vincular directamente a esos encabezados sin crear marcadores independientes.
- Seleccione el encabezado de destino y aplique un estilo integrado, como Encabezado 1 o Encabezado 2, en Inicio > Estilos, si aún no tiene uno.
- Seleccione el texto que desea convertir en hipervínculo, como Ir a Recomendaciones.
- Presione Ctrl + K y elija Lugar de este documento en Vincular a.
- Seleccione el encabezado de destino en la lista.
- Haga clic en Aceptar y pruebe el hipervínculo.
Vincular a un marcador
Un marcador es útil cuando desea vincular a un párrafo, una tabla o una ubicación específicos que no tienen un encabezado adecuado.
- Seleccione el texto de destino o coloque el cursor donde desea que lleve el vínculo.
- Vaya a Insertar > Marcador.
- Escriba un nombre de marcador, como
PricingDetails, y haga clic en Agregar. Los nombres de marcador deben comenzar con una letra y no pueden contener espacios. Puede usar guiones bajos para separar palabras. - Seleccione el texto que servirá como hipervínculo y presione Ctrl + K.
- Elija Lugar de este documento, seleccione el marcador de destino y haga clic en Aceptar.
Los hipervínculos de Word pueden apuntar a encabezados o marcadores en lugar de números de página fijos. Esto es útil porque el destino permanece asociado con el contenido incluso cuando las ediciones cambian la paginación del documento, siempre que se conserve el encabezado o el marcador.
Crear hipervínculos a archivos o direcciones de correo electrónico
Los hipervínculos en Word no se limitan a sitios web. También puede vincular a otro documento o crear un vínculo que abra un nuevo mensaje de correo electrónico.
Vincular a un archivo existente
Puede crear hipervínculos a documentos de Word, hojas de cálculo de Excel, PDF y otros archivos almacenados en su equipo o en una ubicación compartida accesible.
- Seleccione el texto en el que desea que los lectores hagan clic, como Abrir la hoja de cálculo del presupuesto.
- Vaya a Insertar > Vínculo.
- En Vincular a, seleccione Archivo existente o página web.
- Busque el archivo al que desea vincular y selecciónelo.
- Haga clic en Aceptar.
Importante: Un hipervínculo solo apunta a un archivo; no incluye el archivo en su documento de Word. Si desea que el archivo viaje con el documento, puede adjuntar o incrustar el archivo en Word. Si mueve un archivo vinculado o comparte el documento con alguien que no puede acceder a su ubicación, es posible que el hipervínculo deje de funcionar.
Para documentos compartidos con colegas, considere vincular a un archivo en una unidad de red compartida accesible o usar un vínculo compartible de un servicio de almacenamiento en la nube. Asegúrese de que los destinatarios tengan permiso para acceder al archivo.
Crear un hipervínculo de correo electrónico
Un hipervínculo de correo electrónico permite a los lectores iniciar un mensaje a un destinatario especificado directamente desde un documento de Word.
- Seleccione texto como Contactar con el equipo del proyecto.
- Abra Insertar > Vínculo.
- En Vincular a, elija Dirección de correo electrónico.
- Escriba la dirección del destinatario en el campo Dirección de correo electrónico.
- Opcionalmente, escriba un Asunto para rellenar previamente la línea de asunto del correo electrónico.
- Haga clic en Aceptar.
Cuando un lector activa el hipervínculo, Word intenta abrir la aplicación de correo electrónico predeterminada con un nuevo mensaje dirigido al destinatario especificado.
Este comportamiento depende de la aplicación de correo electrónico y la configuración del dispositivo del lector. Es posible que algunos clientes de correo electrónico no reconozcan una línea de asunto predefinida.
Agregar un hipervínculo en Word para la web
Si usa Word en un navegador, también puede insertar hipervínculos en Word para la web sin instalar la aplicación de escritorio.
Para vincular a un sitio web en Word para la web:
Seleccione el texto que desea convertir en hipervínculo.
Vaya a Insertar > Vínculo.
Escriba o pegue la URL de destino en el cuadro Escribir vínculo en Dirección.
Compruebe el texto para mostrar e inserte el hipervínculo.
Para vincular a un encabezado o marcador en el mismo documento, seleccione el texto y vaya a Insertar > Vínculo > Insertar vínculo. Elija Encabezados y marcadores en el lado derecho del cuadro de diálogo abierto y, luego, seleccione el destino.
También puede crear vínculos de correo electrónico escribiendo una dirección que comience por mailto:, como mailto:[email protected], en el cuadro Escribir vínculo.
La interfaz del navegador difiere del cuadro de diálogo Insertar hipervínculo de escritorio, por lo que algunos controles pueden tener nombres o ubicaciones diferentes. Para vincular a archivos locales o trabajar con opciones de hipervínculo más avanzadas, Word de escritorio suele ser más práctico.
Insertar hipervínculos en documentos de Word con Python
Los métodos anteriores funcionan bien para agregar hipervínculos manualmente en Word. Sin embargo, si genera informes con frecuencia o actualiza documentos con nuevos vínculos de referencia, Python puede ayudar a automatizar el proceso.
El ejemplo siguiente usa Spire.Doc for Python, que permite agregar vínculos a sitios web, archivos, direcciones de correo electrónico y marcadores sin necesidad de tener Microsoft Word instalado.
Instalar Spire.Doc for Python
Antes de ejecutar el script, instale la biblioteca con pip:
pip install Spire.Doc
Agregar hipervínculos a un documento de Word existente
El siguiente ejemplo abre un documento de Word existente llamado report.docx, agrega un párrafo de recursos al final e inserta dos hipervínculos: uno a un sitio web y otro a una dirección de correo electrónico.
from spire.doc import Document, FileFormat, HyperlinkType

# Open the existing Word document
doc = Document()
doc.LoadFromFile("report.docx")

try:
    # Add a paragraph to the last section
    section = doc.Sections.get_Item(doc.Sections.Count - 1)
    paragraph = section.AddParagraph()
    paragraph.AppendText("Useful resources: ")

    # Insert a website hyperlink
    paragraph.AppendHyperlink(
        "https://support.microsoft.com/en-us/word",
        "Microsoft Word help",
        HyperlinkType.WebLink
    )

    paragraph.AppendText(" | ")

    # Insert an email hyperlink
    paragraph.AppendHyperlink(
        "mailto:[email protected]",
        "Email the project team",
        HyperlinkType.EMailLink
    )

    # Save the modified document
    doc.SaveToFile("report_with_links.docx", FileFormat.Docx)

finally:
    doc.Close()
Al agregar un hipervínculo de texto, el método AppendHyperlink() acepta tres argumentos:
- Destino: la URL, la ruta del archivo, la dirección de correo electrónico o el nombre del marcador.
- Texto para mostrar: el texto clicable que se muestra en el documento de Word.
- Tipo de hipervínculo: un valor como
HyperlinkType.WebLinkoHyperlinkType.EMailLink.
Nota: este ejemplo agrega nuevos hipervínculos al documento. No busca texto existente ni convierte ese texto en un hipervínculo.
Agregar vínculos a archivos o marcadores con Python
El mismo método se puede usar para otros destinos de hipervínculo.
Por ejemplo, para vincular a un libro de Excel almacenado en su equipo:
# Link to an existing Excel file
paragraph.AppendHyperlink(
    r"C:\Reports\budget.xlsx",
    "Open the budget workbook",
    HyperlinkType.FileLink
)
Para crear un hipervínculo a un marcador ya definido en el documento de Word:
# Link to an existing bookmark
paragraph.AppendHyperlink(
    "PricingDetails",
    "Jump to pricing details",
    HyperlinkType.Bookmark
)
Puede usar estos fragmentos en el bloque try del ejemplo principal, antes de doc.SaveToFile(), para reemplazar o complementar las llamadas de hipervínculo existentes. Para los vínculos a marcadores, el marcador de destino ya debe existir en el documento de Word. Los hipervínculos a archivos también dependen de que el archivo referenciado siga siendo accesible para el lector.
La biblioteca también admite hipervínculos en imágenes. Puede agregar una imagen a un párrafo con AppendPicture() y, luego, pasar el objeto de imagen resultante a AppendHyperlink() en lugar del texto para mostrar. Para ver un ejemplo completo, consulte cómo agregar hipervínculos a texto e imágenes en Word con Python.
Nota de evaluación: la versión de prueba de Spire.Doc for Python puede agregar avisos de evaluación o imponer limitaciones funcionales. Puede solicitar una licencia temporal para evaluar la generación de documentos sin estas restricciones.
Editar, eliminar o corregir hipervínculos en Word
Después de insertar hipervínculos, es posible que necesite actualizar sus destinos, cambiar su apariencia o corregir vínculos que ya no funcionan.
- Editar un hipervínculo: haga clic con el botón derecho en el texto vinculado y seleccione Editar hipervínculo. Cambie la URL en Dirección o actualice Texto para mostrar y, luego, haga clic en Aceptar.
- Eliminar un hipervínculo: haga clic con el botón derecho en el texto vinculado y seleccione Quitar hipervínculo. Word elimina el vínculo pero mantiene el texto visible. Para eliminar todos los hipervínculos a la vez o limpiar varios documentos, consulte nuestra guía sobre cómo eliminar hipervínculos en Word.
- Cambiar el formato de los hipervínculos: modifique el formato del texto o el estilo Hipervínculo de Word para cambiar la apariencia de los vínculos. Como se explica en las directrices de accesibilidad de Word de Microsoft, los vínculos deben seguir siendo distinguibles del texto circundante sin depender únicamente del color.
- Seguir un hipervínculo: en Word de escritorio para Windows, el comportamiento predeterminado normalmente requiere Ctrl + clic durante la edición. Si al hacer clic en un vínculo solo se coloca el cursor en el texto, es posible que el hipervínculo siga funcionando correctamente.
- Corregir un hipervínculo roto: compruebe si hay errores en la URL, confirme que el encabezado o marcador vinculado todavía existe y verifique que el archivo referenciado no se haya movido ni eliminado. Para los vínculos de correo electrónico, asegúrese de que haya una aplicación de correo electrónico compatible configurada.
Evitar que Word cree hipervínculos automáticamente
Si Word convierte automáticamente las direcciones web en vínculos clicables y desea desactivar este comportamiento:
- Vaya a Archivo > Opciones > Revisión.
- Haga clic en Opciones de Autocorrección.
- Abra la pestaña Autoformato mientras escribe.
- Desactive Internet y rutas de red con hipervínculos.
- Haga clic en Aceptar para guardar el cambio.
Estos pasos se aplican a Word de escritorio para Windows. La ubicación de la configuración puede variar en Mac o en otras versiones de Word.
Consejos finales
Ya sea que vincule a un sitio web, a otro archivo, a una dirección de correo electrónico o a una ubicación dentro del documento, asegúrese de que el texto del vínculo sea claro y de que el destino funcione como se espera. Para documentos compartidos, compruebe que los destinatarios puedan acceder a los archivos vinculados.
Las herramientas integradas de Word son suficientes para la edición diaria, mientras que Python resulta útil cuando los hipervínculos deben agregarse automáticamente durante la generación de documentos.
So fügen Sie einen Hyperlink in Word ein: Webseiten, Dateien, E-Mails und mehr
Inhaltsverzeichnis
- Einen Hyperlink zu einer Website in Microsoft Word einfügen
- Auf eine Überschrift oder ein Lesezeichen im selben Word-Dokument verlinken
- Hyperlinks zu Dateien oder E-Mail-Adressen erstellen
- Einen Hyperlink in Word für das Web hinzufügen
- Hyperlinks mit Python in Word-Dokumente einfügen
- Hyperlinks in Word bearbeiten, entfernen oder reparieren
- Abschließende Tipps
Ein Hyperlink in einem Word-Dokument kann Leser zu einer Website führen, eine zugehörige Datei öffnen, eine neue E-Mail erstellen lassen oder zu einem Abschnitt desselben Dokuments springen. Dies ist besonders nützlich in Berichten, Handbüchern, Angeboten und anderen Dokumenten, die auf ergänzende Informationen verweisen.
Um schnell einen Hyperlink in Word einzufügen, markieren Sie den Text, der anklickbar werden soll, drücken Sie Strg + K (Windows) oder Befehl + K (Mac), geben Sie die Zieladresse ein und klicken Sie auf OK. Die folgenden Schritte erläutern, wie Sie verschiedene Arten von Hyperlinks erstellen, vorhandene Links bearbeiten oder entfernen und Hyperlinks programmgesteuert mit Python einfügen.
Einen Hyperlink zu einer Website in Microsoft Word einfügen
Der häufigste Hyperlinktyp in Word verweist auf eine Website. Anstatt eine lange URL anzuzeigen, können Sie einen beschreibenden Ausdruck wie Microsoft Word-Support in einen anklickbaren Link umwandeln.
Schritt-für-Schritt-Anleitung
Die folgenden Schritte beziehen sich auf Microsoft Word für Windows. Die Benutzeroberfläche kann auf dem Mac geringfügig abweichen, der Ablauf ist jedoch ähnlich.
Wählen Sie den Text oder das Bild aus.
Markieren Sie die Wörter, die anklickbar werden sollen, oder wählen Sie ein Bild in Ihrem Dokument aus.Öffnen Sie den Hyperlink-Dialog.
Wechseln Sie zur Registerkarte Einfügen und klicken Sie auf Link (in einigen Versionen Hyperlink). Alternativ können Sie mit der rechten Maustaste auf den ausgewählten Text oder das Bild klicken und Link auswählen oder Strg + K drücken.Geben Sie die Website-Adresse ein.
Wählen Sie im Dialog Hyperlink einfügen die Option Vorhandene Datei oder Webseite aus, und fügen Sie dann die vollständige URL in das Feld Adresse ein, z. B.https://support.microsoft.com/en-us/word.Prüfen Sie den Anzeigetext (bei Textlinks).
Wenn Sie Text ausgewählt haben, zeigt das Feld Anzuzeigender Text die Wörter an, die Leser sehen werden. Sie können diesen Wortlaut ändern, ohne die Ziel-URL zu ändern. Dieses Feld ist beim Verlinken eines Bildes nicht verfügbar.Fügen Sie den Hyperlink ein.
Klicken Sie auf OK, um den Link anzuwenden, und testen Sie ihn anschließend, um sicherzustellen, dass er die richtige Seite öffnet.
Wenn Sie einen Mac verwenden, drücken Sie Befehl + K oder gehen Sie zu Einfügen > Link. Wählen Sie im Dialog Hyperlink einfügen die Option Webseite oder Datei aus, und geben Sie die Website-Adresse ein.
Tipps:
Um den Text anzupassen, der beim Überfahren eines Hyperlinks angezeigt wird, klicken Sie im Dialog Hyperlink einfügen auf QuickInfo und geben Sie den gewünschten Text ein. Wenn Sie keine QuickInfo angeben, zeigt Word normalerweise die Adresse oder den Dateipfad des Links an.
Word kann Website-Adressen automatisch in Hyperlinks umwandeln. Geben Sie eine URL ein und drücken Sie die Leertaste oder die Eingabetaste. Das ist praktisch für die schnelle Bearbeitung, aber beschreibender Linktext ist in der Regel leichter zu lesen und zu verstehen.
Wenn Sie auch mit PDFs arbeiten, können Sie Hyperlinks zu einem PDF hinzufügen, um auf Websites, Dateien oder andere Seiten innerhalb des Dokuments zu verlinken.
Auf eine Überschrift oder ein Lesezeichen im selben Word-Dokument verlinken
Interne Hyperlinks helfen Lesern, in langen Word-Dokumenten zu navigieren, ohne durch mehrere Seiten scrollen zu müssen. Sie können beispielsweise den Ausdruck Siehe Abschnitt Empfehlungen direkt mit diesem Abschnitt eines Berichts verlinken.
Word unterstützt zwei gängige Ziele für interne Hyperlinks: Überschriften und Lesezeichen.
Auf eine vorhandene Überschrift verlinken
Wenn Ihr Dokument integrierte Überschriftenformatvorlagen verwendet, können Sie direkt auf diese Überschriften verlinken, ohne separate Lesezeichen zu erstellen.
- Wählen Sie die Zielüberschrift aus, und wenden Sie eine integrierte Formatvorlage wie Überschrift 1 oder Überschrift 2 unter Start > Formatvorlagen an, falls sie noch keine hat.
- Wählen Sie den Text aus, den Sie in einen Hyperlink umwandeln möchten, z. B. Zu den Empfehlungen springen.
- Drücken Sie Strg + K, und wählen Sie unter Link zu die Option In diesem Dokument aus.
- Wählen Sie die Zielüberschrift aus der Liste aus.
- Klicken Sie auf OK, und testen Sie den Hyperlink.
Auf ein Lesezeichen verlinken
Ein Lesezeichen ist nützlich, wenn Sie auf einen bestimmten Absatz, eine Tabelle oder eine Stelle verlinken möchten, die keine geeignete Überschrift hat.
- Wählen Sie den Zieltext aus, oder platzieren Sie den Cursor an die Stelle, zu der der Link führen soll.
- Gehen Sie zu Einfügen > Lesezeichen.
- Geben Sie einen Lesezeichennamen ein, z. B.
PricingDetails, und klicken Sie auf Hinzufügen. Lesezeichennamen müssen mit einem Buchstaben beginnen und dürfen keine Leerzeichen enthalten. Sie können Unterstriche verwenden, um Wörter zu trennen. - Wählen Sie den Text aus, der als Hyperlink dienen soll, und drücken Sie Strg + K.
- Wählen Sie In diesem Dokument aus, wählen Sie Ihr Ziel-Lesezeichen und klicken Sie auf OK.
Word-Hyperlinks können auf Überschriften oder Lesezeichen statt auf feste Seitenzahlen verweisen. Das ist nützlich, weil das Ziel mit dem Inhalt verknüpft bleibt, auch wenn Bearbeitungen die Seitennummerierung des Dokuments ändern – vorausgesetzt, die Überschrift oder das Lesezeichen bleibt erhalten.
Hyperlinks zu Dateien oder E-Mail-Adressen erstellen
Hyperlinks in Word sind nicht auf Websites beschränkt. Sie können auch auf ein anderes Dokument verlinken oder einen Link erstellen, der eine neue E-Mail-Nachricht öffnet.
Auf eine vorhandene Datei verlinken
Sie können Hyperlinks zu Word-Dokumenten, Excel-Tabellen, PDFs und anderen Dateien erstellen, die auf Ihrem Computer oder an einem zugänglichen freigegebenen Speicherort gespeichert sind.
- Wählen Sie den Text aus, auf den Leser klicken sollen, z. B. Budgettabelle öffnen.
- Gehen Sie zu Einfügen > Link.
- Wählen Sie unter Link zu die Option Vorhandene Datei oder Webseite aus.
- Navigieren Sie zu der Datei, auf die Sie verlinken möchten, und wählen Sie sie aus.
- Klicken Sie auf OK.
Wichtig: Ein Hyperlink verweist nur auf eine Datei; er schließt die Datei selbst nicht in Ihr Word-Dokument ein. Wenn die Datei zusammen mit dem Dokument weitergegeben werden soll, können Sie die Datei in Word anhängen oder einbetten. Wenn Sie eine verknüpfte Datei verschieben oder das Dokument mit jemandem teilen, der nicht auf ihren Speicherort zugreifen kann, funktioniert der Hyperlink möglicherweise nicht mehr.
Bei Dokumenten, die mit Kollegen geteilt werden, sollten Sie erwägen, auf eine Datei auf einem zugänglichen freigegebenen Netzwerklaufwerk zu verlinken oder einen freigebbaren Link eines Cloud-Speicherdienstes zu verwenden. Stellen Sie sicher, dass Empfänger die Berechtigung haben, auf die Datei zuzugreifen.
Einen E-Mail-Hyperlink erstellen
Ein E-Mail-Hyperlink ermöglicht es Lesern, direkt aus einem Word-Dokument eine Nachricht an einen bestimmten Empfänger zu verfassen.
- Wählen Sie Text wie Projektteam kontaktieren aus.
- Öffnen Sie Einfügen > Link.
- Wählen Sie unter Link zu die Option E-Mail-Adresse aus.
- Geben Sie die Adresse des Empfängers in das Feld E-Mail-Adresse ein.
- Optional können Sie einen Betreff eingeben, um die Betreffzeile der E-Mail vorauszufüllen.
- Klicken Sie auf OK.
Wenn ein Leser den Hyperlink aktiviert, versucht Word, die Standard-E-Mail-Anwendung mit einer neuen Nachricht an den angegebenen Empfänger zu öffnen.
Dieses Verhalten hängt von der E-Mail-Anwendung und den Geräteeinstellungen des Lesers ab. Einige E-Mail-Clients erkennen möglicherweise keine vordefinierte Betreffzeile.
Einen Hyperlink in Word für das Web hinzufügen
Wenn Sie Word in einem Browser verwenden, können Sie auch Hyperlinks in Word für das Web einfügen, ohne die Desktopanwendung zu installieren.
So verlinken Sie in Word für das Web auf eine Website:
Wählen Sie den Text aus, den Sie in einen Hyperlink umwandeln möchten.
Gehen Sie zu Einfügen > Link.
Geben Sie die Ziel-URL in das Feld Link eingeben unter Adresse ein, oder fügen Sie sie dort ein.
Prüfen Sie den Anzeigetext, und fügen Sie den Hyperlink ein.
Um auf eine Überschrift oder ein Lesezeichen im selben Dokument zu verlinken, wählen Sie den Text aus, und gehen Sie zu Einfügen > Link > Link einfügen. Wählen Sie auf der rechten Seite des geöffneten Dialogs Überschriften und Lesezeichen aus, und wählen Sie dann das Ziel aus.
Sie können auch E-Mail-Links erstellen, indem Sie im Feld Link eingeben eine Adresse eingeben, die mit mailto: beginnt, z. B. mailto:[email protected].
Die Browseroberfläche unterscheidet sich vom Dialog Hyperlink einfügen der Desktopversion, daher können einige Steuerelemente andere Namen oder Positionen haben. Für das Verlinken auf lokale Dateien oder die Arbeit mit erweiterten Hyperlinkoptionen ist die Desktopversion von Word in der Regel praktischer.
Hyperlinks mit Python in Word-Dokumente einfügen
Die oben beschriebenen Methoden eignen sich gut, um Hyperlinks manuell in Word hinzuzufügen. Wenn Sie jedoch häufig Berichte erstellen oder Dokumente mit neuen Referenzlinks aktualisieren, kann Python helfen, den Prozess zu automatisieren.
Das folgende Beispiel verwendet Spire.Doc for Python, das das Hinzufügen von Links zu Websites, Dateien, E-Mail-Adressen und Lesezeichen unterstützt, ohne dass Microsoft Word installiert sein muss.
Spire.Doc for Python installieren
Bevor Sie das Skript ausführen, installieren Sie die Bibliothek mit pip:
pip install Spire.Doc
Hyperlinks zu einem vorhandenen Word-Dokument hinzufügen
Das folgende Beispiel öffnet ein vorhandenes Word-Dokument namens report.docx, fügt am Ende einen Absatz mit Ressourcen hinzu und fügt zwei Hyperlinks ein: einen zu einer Website und einen zu einer E-Mail-Adresse.
from spire.doc import Document, FileFormat, HyperlinkType

# Open the existing Word document
doc = Document()
doc.LoadFromFile("report.docx")

try:
    # Add a paragraph to the last section
    section = doc.Sections.get_Item(doc.Sections.Count - 1)
    paragraph = section.AddParagraph()
    paragraph.AppendText("Useful resources: ")

    # Insert a website hyperlink
    paragraph.AppendHyperlink(
        "https://support.microsoft.com/en-us/word",
        "Microsoft Word help",
        HyperlinkType.WebLink
    )

    paragraph.AppendText(" | ")

    # Insert an email hyperlink
    paragraph.AppendHyperlink(
        "mailto:[email protected]",
        "Email the project team",
        HyperlinkType.EMailLink
    )

    # Save the modified document
    doc.SaveToFile("report_with_links.docx", FileFormat.Docx)

finally:
    doc.Close()
Beim Hinzufügen eines Text-Hyperlinks akzeptiert die Methode AppendHyperlink() drei Argumente:
- Ziel: Die URL, der Dateipfad, die E-Mail-Adresse oder der Lesezeichenname.
- Anzeigetext: Der anklickbare Text, der im Word-Dokument angezeigt wird.
- Hyperlinktyp: Ein Wert wie
HyperlinkType.WebLinkoderHyperlinkType.EMailLink.
Hinweis: Dieses Beispiel fügt dem Dokument neue Hyperlinks hinzu. Es sucht nicht nach vorhandenem Text und wandelt diesen Text nicht in einen Hyperlink um.
Dateilinks oder Lesezeichenlinks mit Python hinzufügen
Dieselbe Methode kann für andere Hyperlinkziele verwendet werden.
So können Sie beispielsweise auf eine auf Ihrem Computer gespeicherte Excel-Arbeitsmappe verlinken:
# Link to an existing Excel file
paragraph.AppendHyperlink(
    r"C:\Reports\budget.xlsx",
    "Open the budget workbook",
    HyperlinkType.FileLink
)
So erstellen Sie einen Hyperlink zu einem bereits im Word-Dokument definierten Lesezeichen:
# Link to an existing bookmark
paragraph.AppendHyperlink(
    "PricingDetails",
    "Jump to pricing details",
    HyperlinkType.Bookmark
)
Sie können diese Ausschnitte im try-Block des Hauptbeispiels vor doc.SaveToFile() verwenden, um die vorhandenen Hyperlinkaufrufe zu ersetzen oder zu ergänzen. Bei Lesezeichenlinks muss das Ziel-Lesezeichen bereits im Word-Dokument vorhanden sein. Dateihyperlinks hängen außerdem davon ab, dass die referenzierte Datei für den Leser weiterhin zugänglich bleibt.
Die Bibliothek unterstützt außerdem Hyperlinks auf Bildern. Sie können einem Absatz mit AppendPicture() ein Bild hinzufügen und dann das resultierende Bildobjekt anstelle von Anzeigetext an AppendHyperlink() übergeben. Ein vollständiges Beispiel finden Sie unter So fügen Sie mit Python Hyperlinks zu Text und Bildern in Word hinzu.
Hinweis zur Evaluierung: Die Testversion von Spire.Doc for Python fügt möglicherweise Evaluierungshinweise hinzu oder schränkt den Funktionsumfang ein. Sie können eine temporäre Lizenz anfordern, um die Dokumentgenerierung ohne diese Einschränkungen zu testen.
Hyperlinks in Word bearbeiten, entfernen oder reparieren
Nach dem Einfügen von Hyperlinks müssen Sie möglicherweise deren Ziele aktualisieren, ihr Erscheinungsbild ändern oder Links reparieren, die nicht mehr funktionieren.
- Einen Hyperlink bearbeiten: Klicken Sie mit der rechten Maustaste auf den verlinkten Text, und wählen Sie Hyperlink bearbeiten aus. Ändern Sie die URL in Adresse, oder aktualisieren Sie Anzuzeigender Text, und klicken Sie dann auf OK.
- Einen Hyperlink entfernen: Klicken Sie mit der rechten Maustaste auf den verlinkten Text, und wählen Sie Hyperlink entfernen aus. Word entfernt den Link, behält aber den sichtbaren Text bei. Informationen zum gleichzeitigen Entfernen aller Hyperlinks oder zum Bereinigen mehrerer Dokumente finden Sie in unserer Anleitung zum Entfernen von Hyperlinks in Word.
- Hyperlinkformatierung ändern: Ändern Sie die Textformatierung oder die Formatvorlage Hyperlink von Word, um das Erscheinungsbild von Links zu ändern. Wie in Microsofts Richtlinien für die Barrierefreiheit von Word erläutert, sollten Links auch ohne alleinige Abhängigkeit von der Farbe vom umgebenden Text unterscheidbar bleiben.
- Einem Hyperlink folgen: In der Desktopversion von Word für Windows ist beim Bearbeiten standardmäßig normalerweise Strg + Klicken erforderlich. Wenn durch Klicken auf einen Link nur der Cursor in den Text gesetzt wird, funktioniert der Hyperlink möglicherweise trotzdem ordnungsgemäß.
- Einen defekten Hyperlink reparieren: Prüfen Sie die URL auf Fehler, stellen Sie sicher, dass die verlinkte Überschrift oder das Lesezeichen noch vorhanden ist, und vergewissern Sie sich, dass eine referenzierte Datei nicht verschoben oder gelöscht wurde. Stellen Sie bei E-Mail-Links sicher, dass eine kompatible E-Mail-Anwendung konfiguriert ist.
Verhindern, dass Word automatisch Hyperlinks erstellt
Wenn Word Webadressen automatisch in anklickbare Links umwandelt und Sie dieses Verhalten deaktivieren möchten:
- Gehen Sie zu Datei > Optionen > Dokumentprüfung.
- Klicken Sie auf AutoKorrektur-Optionen.
- Öffnen Sie die Registerkarte AutoFormat beim Eingeben.
- Deaktivieren Sie Internet- und Netzwerkpfade durch Hyperlinks.
- Klicken Sie auf OK, um die Änderung zu speichern.
Diese Schritte gelten für die Desktopversion von Word für Windows. Der Speicherort der Einstellung kann sich auf dem Mac oder in anderen Word-Versionen unterscheiden.
Abschließende Tipps
Unabhängig davon, ob Sie auf eine Website, eine andere Datei, eine E-Mail-Adresse oder eine Stelle im Dokument verlinken, stellen Sie sicher, dass der Linktext klar ist und das Ziel wie erwartet funktioniert. Prüfen Sie bei freigegebenen Dokumenten, ob Empfänger auf alle verlinkten Dateien zugreifen können.
Die integrierten Tools von Word reichen für die alltägliche Bearbeitung aus, während Python nützlich ist, wenn Hyperlinks bei der Dokumenterstellung automatisch hinzugefügt werden müssen.
Как вставить гиперссылку в Word: веб-страницы, файлы, электронная почта и другое
Содержание
- Вставка гиперссылки на веб-сайт в Microsoft Word
- Ссылка на заголовок или закладку в том же документе Word
- Создание гиперссылок на файлы или адреса электронной почты
- Добавление гиперссылки в Word в Интернете
- Вставка гиперссылок в документы Word с помощью Python
- Редактирование, удаление и исправление гиперссылок в Word
- Заключительные советы
Гиперссылка в документе Word может отправить читателей на веб-сайт, открыть связанный файл, начать создание электронного письма или перейти к разделу того же документа. Это особенно полезно в отчетах, руководствах, предложениях и других документах, которые ссылаются на вспомогательную информацию.
Чтобы быстро вставить гиперссылку в Word, выделите текст, который нужно сделать кликабельным, нажмите Ctrl + K (Windows) или Command + K (Mac), введите адрес назначения и нажмите ОК. В приведенных ниже шагах объясняется, как создавать различные типы гиперссылок, редактировать или удалять существующие ссылки, а также вставлять гиперссылки программным способом с помощью Python.
Вставка гиперссылки на веб-сайт в Microsoft Word
Наиболее распространенный тип гиперссылки в Word указывает на веб-сайт. Вместо отображения длинного URL-адреса можно превратить описательную фразу, например поддержка Microsoft Word, в кликабельную ссылку.
Пошаговое руководство
В следующих шагах используется Microsoft Word для Windows. На Mac интерфейс может немного отличаться, но процесс аналогичен.
Выделите текст или изображение.
Выделите слова, которые должны стать кликабельными, или выберите изображение в документе.Откройте диалоговое окно гиперссылки.
Перейдите на вкладку Вставка и нажмите Ссылка (или Гиперссылка в некоторых версиях). Также можно щелкнуть выделенный текст или изображение правой кнопкой мыши и выбрать Ссылка либо нажать Ctrl + K.Введите адрес веб-сайта.
В диалоговом окне Вставка гиперссылки выберите Существующий файл или веб-страница, затем вставьте полный URL-адрес в поле Адрес, напримерhttps://support.microsoft.com/en-us/word.Проверьте отображаемый текст (для текстовых ссылок).
Если вы выделили текст, поле Отображаемый текст показывает слова, которые увидят читатели. Можно изменить эту формулировку, не меняя URL-адрес назначения. Это поле недоступно при создании ссылки на изображение.Вставьте гиперссылку.
Нажмите ОК, чтобы применить ссылку, затем проверьте ее, чтобы убедиться, что она открывает правильную страницу.
Если вы используете Mac, нажмите Command + K или перейдите в Вставка > Ссылка. В диалоговом окне Вставка гиперссылки выберите Веб-страница или файл и введите адрес веб-сайта.
Советы:
Чтобы настроить текст, который отображается при наведении указателя на гиперссылку, нажмите Подсказка в диалоговом окне Вставка гиперссылки и введите нужный текст. Если подсказка не указана, Word обычно отображает адрес ссылки или путь к файлу.
Word может автоматически превращать адреса веб-сайтов в гиперссылки. Введите URL-адрес и нажмите Пробел или Enter. Это удобно для быстрого редактирования, но описательный текст ссылки обычно легче читать и понимать.
Если вы также работаете с PDF-файлами, вы можете добавлять гиперссылки в PDF, чтобы ссылаться на веб-сайты, файлы или другие страницы внутри документа.
Ссылка на заголовок или закладку в том же документе Word
Внутренние гиперссылки помогают читателям перемещаться по длинным документам Word без прокрутки множества страниц. Например, можно связать фразу См. раздел рекомендаций непосредственно с этим разделом отчета.
Word поддерживает два распространенных назначения для внутренних гиперссылок: заголовки и закладки.
Ссылка на существующий заголовок
Если в документе используются встроенные стили заголовков, можно ссылаться непосредственно на эти заголовки, не создавая отдельные закладки.
- Выделите целевой заголовок и примените встроенный стиль, например Заголовок 1 или Заголовок 2, в разделе Главная > Стили, если он еще не применен.
- Выделите текст, который нужно превратить в гиперссылку, например Перейти к рекомендациям.
- Нажмите Ctrl + K и выберите Поместить в этот документ в разделе Ссылка на.
- Выберите целевой заголовок из списка.
- Нажмите ОК и проверьте гиперссылку.
Ссылка на закладку
Закладка полезна, когда нужно создать ссылку на конкретный абзац, таблицу или место, не имеющее подходящего заголовка.
- Выделите целевой текст или поместите курсор туда, куда должна вести ссылка.
- Перейдите в Вставка > Закладка.
- Введите имя закладки, например
PricingDetails, и нажмите Добавить. Имена закладок должны начинаться с буквы и не могут содержать пробелы. Для разделения слов можно использовать символы подчеркивания. - Выделите текст, который будет служить гиперссылкой, и нажмите Ctrl + K.
- Выберите Поместить в этот документ, выберите целевую закладку и нажмите ОК.
Гиперссылки Word могут указывать на заголовки или закладки, а не на фиксированные номера страниц. Это удобно, поскольку назначение остается связанным с содержимым, даже когда редактирование изменяет разбиение документа на страницы, при условии сохранения заголовка или закладки.
Создание гиперссылок на файлы или адреса электронной почты
Гиперссылки в Word не ограничиваются веб-сайтами. Вы также можете ссылаться на другой документ или создавать ссылку, которая открывает новое сообщение электронной почты.
Ссылка на существующий файл
Можно создавать гиперссылки на документы Word, электронные таблицы Excel, PDF-файлы и другие файлы, хранящиеся на компьютере или в доступном общем расположении.
- Выделите текст, по которому должны щелкнуть читатели, например Открыть таблицу бюджета.
- Перейдите в Вставка > Ссылка.
- В разделе Ссылка на выберите Существующий файл или веб-страница.
- Найдите файл, на который нужно создать ссылку, и выберите его.
- Нажмите ОК.
Важно: Гиперссылка только указывает на файл; она не включает сам файл в документ Word. Если нужно, чтобы файл перемещался вместе с документом, можно вложить или внедрить файл в Word. Если переместить связанный файл или поделиться документом с кем-то, у кого нет доступа к его расположению, гиперссылка может перестать работать.
Для документов, которыми вы делитесь с коллегами, рассмотрите возможность создания ссылки на файл на доступном общем сетевом диске или использования общей ссылки из службы облачного хранения. Убедитесь, что у получателей есть разрешение на доступ к файлу.
Создание гиперссылки на электронную почту
Гиперссылка на электронную почту позволяет читателям начать создание сообщения указанному получателю непосредственно из документа Word.
- Выделите текст, например Связаться с проектной группой.
- Откройте Вставка > Ссылка.
- В разделе Ссылка на выберите Адрес электронной почты.
- Введите адрес получателя в поле Адрес электронной почты.
- При необходимости введите Тему, чтобы заранее заполнить строку темы письма.
- Нажмите ОК.
Когда читатель активирует гиперссылку, Word пытается открыть приложение электронной почты по умолчанию с новым сообщением, адресованным указанному получателю.
Это поведение зависит от приложения электронной почты и настроек устройства читателя. Некоторые почтовые клиенты могут не распознавать заранее заданную строку темы.
Добавление гиперссылки в Word в Интернете
Если вы используете Word в браузере, вы также можете вставлять гиперссылки в Word в Интернете без установки настольного приложения.
Чтобы создать ссылку на веб-сайт в Word в Интернете:
Выделите текст, который нужно превратить в гиперссылку.
Перейдите в Вставка > Ссылка.
Введите или вставьте целевой URL-адрес в поле Введите ссылку в разделе Адрес.
Проверьте отображаемый текст и вставьте гиперссылку.
Чтобы создать ссылку на заголовок или закладку в том же документе, выделите текст и перейдите в Вставка > Ссылка > Вставить ссылку. Выберите Заголовки и закладки в правой части открывшегося диалогового окна, затем выберите назначение.
Вы также можете создавать ссылки на электронную почту, вводя адрес, начинающийся с mailto:, например mailto:[email protected], в поле Введите ссылку.
Интерфейс браузера отличается от настольного диалогового окна «Вставка гиперссылки», поэтому некоторые элементы управления могут иметь другие названия или расположение. Для ссылок на локальные файлы или работы с более сложными параметрами гиперссылок настольная версия Word обычно более практична.
Вставка гиперссылок в документы Word с помощью Python
Описанные выше методы хорошо подходят для добавления гиперссылок в Word вручную. Однако если вы часто создаете отчеты или обновляете документы новыми справочными ссылками, Python может помочь автоматизировать этот процесс.
В приведенном ниже примере используется Spire.Doc for Python, который поддерживает добавление ссылок на веб-сайты, файлы, адреса электронной почты и закладки без необходимости установки Microsoft Word.
Установка Spire.Doc for Python
Перед запуском скрипта установите библиотеку с помощью pip:
pip install Spire.Doc
Добавление гиперссылок в существующий документ Word
В следующем примере открывается существующий документ Word с именем report.docx, в конце добавляется абзац с ресурсами и вставляются две гиперссылки: одна на веб-сайт, другая на адрес электронной почты.
from spire.doc import Document, FileFormat, HyperlinkType

# Open the existing Word document
doc = Document()
doc.LoadFromFile("report.docx")

try:
    # Add a paragraph to the last section
    section = doc.Sections.get_Item(doc.Sections.Count - 1)
    paragraph = section.AddParagraph()
    paragraph.AppendText("Useful resources: ")

    # Insert a website hyperlink
    paragraph.AppendHyperlink(
        "https://support.microsoft.com/en-us/word",
        "Microsoft Word help",
        HyperlinkType.WebLink
    )

    paragraph.AppendText(" | ")

    # Insert an email hyperlink
    paragraph.AppendHyperlink(
        "mailto:[email protected]",
        "Email the project team",
        HyperlinkType.EMailLink
    )

    # Save the modified document
    doc.SaveToFile("report_with_links.docx", FileFormat.Docx)

finally:
    doc.Close()
При добавлении текстовой гиперссылки метод AppendHyperlink() принимает три аргумента:
- Назначение: URL-адрес, путь к файлу, адрес электронной почты или имя закладки.
- Отображаемый текст: кликабельный текст, отображаемый в документе Word.
- Тип гиперссылки: значение, например
HyperlinkType.WebLinkилиHyperlinkType.EMailLink.
Примечание. В этом примере новые гиперссылки добавляются в документ. Он не ищет существующий текст и не преобразует этот текст в гиперссылку.
Добавление ссылок на файлы или закладки с помощью Python
Тот же метод можно использовать для других назначений гиперссылок.
Например, чтобы создать ссылку на книгу Excel, сохраненную на компьютере:
# Link to an existing Excel file
paragraph.AppendHyperlink(
    r"C:\Reports\budget.xlsx",
    "Open the budget workbook",
    HyperlinkType.FileLink
)
Чтобы создать гиперссылку на закладку, уже определенную в документе Word:
# Link to an existing bookmark
paragraph.AppendHyperlink(
    "PricingDetails",
    "Jump to pricing details",
    HyperlinkType.Bookmark
)
Эти фрагменты можно использовать в блоке try основного примера перед doc.SaveToFile(), чтобы заменить или дополнить существующие вызовы гиперссылок. Для ссылок на закладки целевая закладка уже должна существовать в документе Word. Гиперссылки на файлы также зависят от того, остается ли указанный файл доступным для читателя.
Библиотека также поддерживает гиперссылки на изображения. Можно добавить изображение в абзац с помощью AppendPicture(), а затем передать полученный объект изображения в AppendHyperlink() вместо отображаемого текста. Полный пример см. в разделе как добавлять гиперссылки к тексту и изображениям в Word с помощью Python.
Примечание об ознакомительной версии. Пробная версия Spire.Doc for Python может добавлять уведомления об ознакомительной версии или накладывать функциональные ограничения. Вы можете запросить временную лицензию, чтобы оценить создание документов без этих ограничений.
Редактирование, удаление и исправление гиперссылок в Word
После вставки гиперссылок может потребоваться обновить их назначение, изменить их внешний вид или исправить ссылки, которые больше не работают.
- Редактирование гиперссылки. Щелкните текст ссылки правой кнопкой мыши и выберите Изменить гиперссылку. Измените URL-адрес в поле Адрес или обновите Отображаемый текст, затем нажмите ОК.
- Удаление гиперссылки. Щелкните текст ссылки правой кнопкой мыши и выберите Удалить гиперссылку. Word удаляет ссылку, сохраняя видимый текст. Чтобы удалить все гиперссылки сразу или очистить несколько документов, см. наше руководство о том, как удалить гиперссылки в Word.
- Изменение форматирования гиперссылки. Измените форматирование текста или стиль Гиперссылка в Word, чтобы изменить внешний вид ссылок. Как объясняется в рекомендациях Microsoft по обеспечению доступности Word, ссылки должны оставаться отличимыми от окружающего текста, не полагаясь только на цвет.
- Переход по гиперссылке. В настольной версии Word для Windows по умолчанию обычно требуется Ctrl + щелчок во время редактирования. Если щелчок по ссылке только помещает курсор в текст, гиперссылка может по-прежнему работать правильно.
- Исправление неработающей гиперссылки. Проверьте URL-адрес на наличие ошибок, убедитесь, что связанный заголовок или закладка все еще существует, и проверьте, что указанный файл не был перемещен или удален. Для ссылок на электронную почту убедитесь, что настроено совместимое приложение электронной почты.
Отключение автоматического создания гиперссылок в Word
Если Word автоматически преобразует веб-адреса в кликабельные ссылки и вы хотите отключить это поведение:
- Перейдите в Файл > Параметры > Правописание.
- Нажмите Параметры автозамены.
- Откройте вкладку Автоформат при вводе.
- Снимите флажок Интернет-адреса и сетевые пути с гиперссылками.
- Нажмите ОК, чтобы сохранить изменение.
Эти шаги относятся к настольной версии Word для Windows. Расположение параметра может отличаться на Mac или в других версиях Word.
Заключительные советы
Создаете ли вы ссылку на веб-сайт, другой файл, адрес электронной почты или место внутри документа, убедитесь, что текст ссылки понятен, а назначение работает должным образом. Для общих документов проверьте, что получатели могут получить доступ к любым связанным файлам.
Встроенных инструментов Word достаточно для повседневного редактирования, а Python полезен, когда гиперссылки нужно добавлять автоматически во время создания документа.
How to Insert a Hyperlink in Word: Web Pages, Files, Email, and More
Table of Contents
A hyperlink in a Word document can send readers to a website, open a related file, start an email, or jump to a section of the same document. This is especially useful in reports, manuals, proposals, and other documents that refer to supporting information.
To insert a hyperlink in Word quickly, select the text you want to make clickable, press Ctrl + K (Windows) or Command + K (Mac), enter the destination address, and click OK. The steps below explain how to create different types of hyperlinks, edit or remove existing links, and insert hyperlinks programmatically with Python.
Insert a Hyperlink to a Website in Microsoft Word
The most common type of hyperlink in Word points to a website. Instead of displaying a long URL, you can turn a descriptive phrase, such as Microsoft Word support, into a clickable link.
Step-by-Step Guide
The following steps use Microsoft Word for Windows. The interface may differ slightly on Mac, but the process is similar.
Select the text or image.
Highlight the words you want to make clickable, or select an image in your document.Open the hyperlink dialog.
Go to the Insert tab and click Link (or Hyperlink in some versions). Alternatively, right-click the selected text or image and choose Link, or press Ctrl + K.Enter the website address.
In the Insert Hyperlink dialog, select Existing File or Web Page, then paste the full URL into the Address field, such ashttps://support.microsoft.com/en-us/word.Check the display text (for text links).
If you selected text, the Text to display field shows the words readers will see. You can change this wording without changing the destination URL. This field is unavailable when linking an image.Insert the hyperlink.
Click OK to apply the link, then test it to make sure it opens the correct page.
If you're on a Mac, press Command + K or go to Insert > Link. In the Insert Hyperlink dialog, select Web Page or File and enter the website address.
Tips:
To customize the text that appears when you hover over a hyperlink, click ScreenTip in the Insert Hyperlink dialog and enter your preferred text. If you don't specify a ScreenTip, Word typically displays the link's address or file path.
Word can automatically turn website addresses into hyperlinks. Type a URL and press Space or Enter. This is convenient for quick editing, but descriptive link text is usually easier to read and understand.
If you also work with PDFs, you can add hyperlinks to a PDF to link to websites, files, or other pages within the document.
Link to a Heading or Bookmark in the Same Word Document
Internal hyperlinks help readers navigate long Word documents without scrolling through multiple pages. For example, you can link the phrase See the recommendations section directly to that section of a report.
Word supports two common destinations for internal hyperlinks: headings and bookmarks.
Link to an Existing Heading
If your document uses built-in heading styles, you can link directly to those headings without creating separate bookmarks.
- Select the destination heading and apply a built-in style such as Heading 1 or Heading 2 under Home > Styles, if it does not already have one.
- Select the text you want to turn into a hyperlink, such as Jump to Recommendations.
- Press Ctrl + K and choose Place in This Document under Link to.
- Select the destination heading from the list.
- Click OK and test the hyperlink.
Link to a Bookmark
A bookmark is useful when you want to link to a specific paragraph, table, or location that does not have a suitable heading.
- Select the destination text or place the cursor where you want the link to lead.
- Go to Insert > Bookmark.
- Enter a bookmark name, such as
PricingDetails, and click Add. Bookmark names must begin with a letter and cannot contain spaces. You can use underscores to separate words. - Select the text that will serve as the hyperlink and press Ctrl + K.
- Choose Place in This Document, select your destination bookmark, and click OK.
Word hyperlinks can point to headings or bookmarks rather than fixed page numbers. This is useful because the destination remains associated with the content even when editing changes the document's pagination, provided the heading or bookmark is preserved.
Create Hyperlinks to Files or Email Addresses
Hyperlinks in Word are not limited to websites. You can also link to another document or create a link that opens a new email message.
Link to an Existing File
You can create hyperlinks to Word documents, Excel spreadsheets, PDFs, and other files stored on your computer or in an accessible shared location.
- Select the text you want readers to click, such as Open the budget spreadsheet.
- Go to Insert > Link.
- Under Link to, select Existing File or Web Page.
- Browse to the file you want to link to and select it.
- Click OK.
Important: A hyperlink only points to a file; it does not include the file itself in your Word document. If you want the file to travel with the document, you can attach or embed the file in Word. If you move a linked file or share the document with someone who cannot access its location, the hyperlink may stop working.
For documents shared with colleagues, consider linking to a file on an accessible shared network drive or using a shareable link from a cloud storage service. Make sure recipients have permission to access the file.
Create an Email Hyperlink
An email hyperlink allows readers to start a message to a specified recipient directly from a Word document.
- Select text such as Contact the project team.
- Open Insert > Link.
- Under Link to, choose E-mail Address.
- Enter the recipient's address in the E-mail address field.
- Optionally, enter a Subject to prefill the email subject line.
- Click OK.
When a reader activates the hyperlink, Word attempts to open the default email application with a new message addressed to the specified recipient.
This behavior depends on the reader's email application and device settings. Some email clients may not recognize a predefined subject line.
Add a Hyperlink in Word for the Web
If you use Word in a browser, you can also insert hyperlinks in Word for the web without installing the desktop application.
To link to a website in Word for the web:
Select the text you want to turn into a hyperlink.
Go to Insert > Link.
Enter or paste the destination URL in the Enter Link box under Address.
Check the display text and insert the hyperlink.
To link to a heading or bookmark in the same document, select the text and go to Insert > Link > Insert Link. Choose Headings and Bookmarks on the right side of the opened dialog, then select the destination.
You can also create email links by entering an address beginning with mailto:, such as mailto:[email protected], in the Enter Link box.
The browser interface differs from the desktop Insert Hyperlink dialog, so some controls may have different names or locations. For linking to local files or working with more advanced hyperlink options, desktop Word is generally more practical.
Insert Hyperlinks into Word Documents with Python
The methods above work well for adding hyperlinks manually in Word. However, if you frequently generate reports or update documents with new reference links, Python can help automate the process.
The example below uses Spire.Doc for Python, which supports adding links to websites, files, email addresses, and bookmarks without requiring Microsoft Word to be installed.
Install Spire.Doc for Python
Before running the script, install the library using pip:
pip install Spire.Doc
Add Hyperlinks to an Existing Word Document
The following example opens an existing Word document named report.docx, adds a resources paragraph at the end, and inserts two hyperlinks: one to a website and another to an email address.
from spire.doc import Document, FileFormat, HyperlinkType

# Open the existing Word document
doc = Document()
doc.LoadFromFile("report.docx")

try:
    # Add a paragraph to the last section
    section = doc.Sections.get_Item(doc.Sections.Count - 1)
    paragraph = section.AddParagraph()
    paragraph.AppendText("Useful resources: ")

    # Insert a website hyperlink
    paragraph.AppendHyperlink(
        "https://support.microsoft.com/en-us/word",
        "Microsoft Word help",
        HyperlinkType.WebLink
    )

    paragraph.AppendText(" | ")

    # Insert an email hyperlink
    paragraph.AppendHyperlink(
        "mailto:[email protected]",
        "Email the project team",
        HyperlinkType.EMailLink
    )

    # Save the modified document
    doc.SaveToFile("report_with_links.docx", FileFormat.Docx)

finally:
    doc.Close()
When adding a text hyperlink, the AppendHyperlink() method accepts three arguments:
- Destination: The URL, file path, email address, or bookmark name.
- Display text: The clickable text shown in the Word document.
- Hyperlink type: A value such as
HyperlinkType.WebLinkorHyperlinkType.EMailLink.
Note: This example appends new hyperlinks to the document. It does not search for existing text and convert that text into a hyperlink.
Add File Links or Bookmark Links with Python
The same method can be used for other hyperlink destinations.
For example, to link to an Excel workbook stored on your computer:
# Link to an existing Excel file
paragraph.AppendHyperlink(
    r"C:\Reports\budget.xlsx",
    "Open the budget workbook",
    HyperlinkType.FileLink
)
To create a hyperlink to a bookmark already defined in the Word document:
# Link to an existing bookmark
paragraph.AppendHyperlink(
    "PricingDetails",
    "Jump to pricing details",
    HyperlinkType.Bookmark
)
You can use these snippets in the main example's try block, before doc.SaveToFile(), to replace or supplement the existing hyperlink calls. For bookmark links, the destination bookmark must already exist in the Word document. File hyperlinks also depend on the referenced file remaining accessible to the reader.
The library also supports hyperlinks on images. You can add an image to a paragraph using AppendPicture(), then pass the resulting image object to AppendHyperlink() instead of display text. For a complete example, see how to add hyperlinks to text and images in Word with Python.
Evaluation note: The trial version of Spire.Doc for Python may add evaluation notices or impose functional limitations. You can request a temporary license to evaluate document generation without these restrictions.
Edit, Remove, or Fix Hyperlinks in Word
After inserting hyperlinks, you may need to update their destinations, change their appearance, or fix links that no longer work.
- Edit a hyperlink: Right-click the linked text and select Edit Hyperlink. Change the URL in Address or update Text to display, then click OK.
- Remove a hyperlink: Right-click the linked text and select Remove Hyperlink. Word removes the link while keeping the visible text. To remove all hyperlinks at once or clean up multiple documents, see our guide on how to remove hyperlinks in Word.
- Change hyperlink formatting: Modify the text formatting or Word's Hyperlink style to change how links appear. As explained in Microsoft's Word accessibility guidelines, links should remain distinguishable from surrounding text without relying on color alone.
- Follow a hyperlink: In desktop Word for Windows, the default behavior usually requires Ctrl + Click while editing. If clicking a link only places the cursor in the text, the hyperlink may still be working correctly.
- Fix a broken hyperlink: Check the URL for errors, confirm that the linked heading or bookmark still exists, and verify that any referenced file has not been moved or deleted. For email links, make sure a compatible email application is configured.
Stop Word from Automatically Creating Hyperlinks
If Word automatically converts web addresses into clickable links and you want to disable this behavior:
- Go to File > Options > Proofing.
- Click AutoCorrect Options.
- Open the AutoFormat As You Type tab.
- Clear Internet and network paths with hyperlinks.
- Click OK to save the change.
These steps apply to desktop Word for Windows. The setting's location may differ on Mac or in other versions of Word.
Final Tips
Whether you're linking to a website, another file, an email address, or a location within the document, make sure the link text is clear and the destination works as expected. For shared documents, check that recipients can access any linked files.
Word's built-in tools are sufficient for everyday editing, while Python is useful when hyperlinks need to be added automatically during document generation.