Convert RTF to Word: 3 Easy Methods (Online, Word, Python)
Table of Contents

Converting RTF to Word is essential for improving compatibility with modern word processors and unlocking Word's advanced formatting options. While RTF files are commonly used for basic text formatting, Word documents offer additional features such as templates, better formatting tools, and professional document design. In this guide, we'll show you three easy methods to convert RTF to Word: using Microsoft Word, free online tools, and Python automation-suitable for both beginners and advanced users.
What You Will Learn
- Why Convert RTF to Word?
- How to Convert RTF to Word?
- Best Practices and Tips to Avoid Formatting Issues When Converting RTF to Word
Why Convert RTF to Word?
Converting RTF to Word can improve your workflow by making the document easier to manage and edit. Below are some key reasons why you might want to convert an RTF file to a Word document:
- Enhanced Formatting and Styling: Word offers more sophisticated formatting tools, including advanced text styles, headers, footers, page numbers, and table of contents, which are not fully supported in RTF.
- Collaboration: Word documents are more commonly used in collaborative environments where multiple people are editing the document at the same time.
- Security and Compatibility: Word files are compatible with a variety of applications and platforms, and they offer more robust options for document protection and encryption.
- Advanced Features: Word files allow you to add features like comments, track changes, and more, which makes document management easier.
How to Convert RTF to Word?
Now that we know the reasons to convert RTF to Word, let's look at how to do it. We will explore three methods: using Microsoft Word, free online tools, and Python automation.
Convert RTF to Word Using Microsoft Word
Microsoft Word is one of the most widely used tools for working with Word documents. It also provides an easy and reliable way to open and save RTF files as Word documents.
Steps to Convert RTF to Word Using Microsoft Word:
-
Open Microsoft Word: Launch Microsoft Word on your computer.
-
Open the RTF File: Go to File > Open, then select the RTF file you want to convert. Word will automatically open the RTF file.
-
Save as Word Document: Once the RTF file is open, go to File > Save As. From the Save as type dropdown menu, select either Word Document (*.docx) or Word 97-2003 Document (*.doc).

-
Choose a Save Location: Select the location where you want to save the Word document and click Save. Your RTF file is now converted to a Word document.
Pros:
- Quick and Simple: The process is fast and easy.
- Full Control over Formatting: You can manually adjust the document's appearance as needed.
- No Third-Party Tools Needed: Utilizes Microsoft Word, which is a widely used tool.
Cons:
- Not Ideal for Batch Conversions: Manual conversion is not efficient for multiple files.
- Requires Microsoft Word: You must have Microsoft Word installed on your system.
Convert RTF to Word Using Free Online Tools
If you don't have Microsoft Word or prefer a quick, software-free solution, online tools like Zamzar and convertio are a great choice. Simply upload your RTF file, select the Word format, and download your converted document. This approach is fast, free, and accessible from any device with an internet connection.
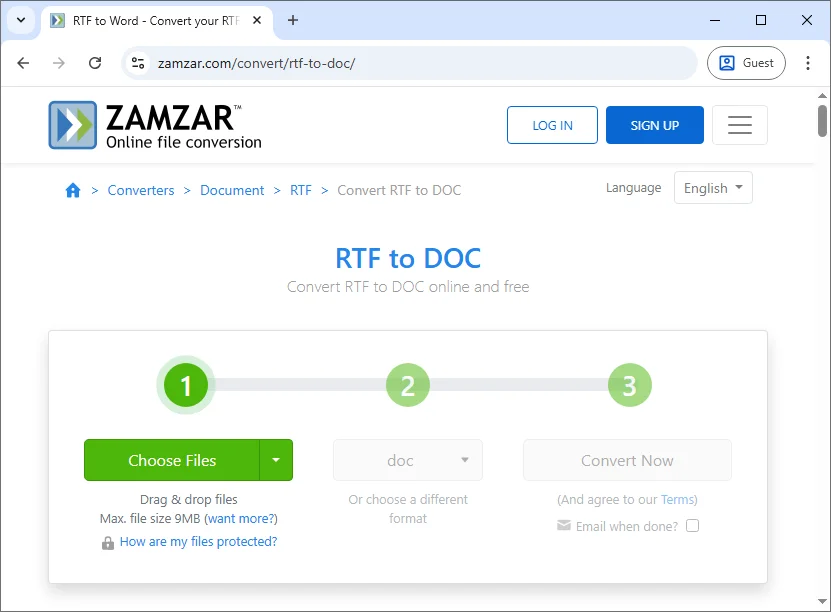
Steps to Convert RTF to Word Online for Free (using Zamzar as an example):
- Go to Zamzar: Visit Zamzar's free online RTF to Word converter.
- Upload Your RTF File: Click the Choose Files button to upload your RTF file from your computer, or drag & drop the file to the designated area.
- Select Output Format: Choose doc or docx as the output format.
- Convert the File: Click the Convert Now button. The tool will process the file and generate the converted Word document.
- Download the Word File: Once the conversion is complete, download the converted Word document.
Pros:
- No Installation Required: Accessible from any device with internet access.
- Free and Easy to Use: Ideal for quick, one-time conversions.
- Supports Multiple Formats: Many online tools support various file types beyond RTF to Word.
Cons:
- Privacy Concerns: Uploading files to third-party websites may expose sensitive data.
- File Size Limitations: Some tools impose limits on file size for free conversions.
- Dependent on Internet Connection: Requires a stable internet connection to access and use the tool.
Batch Convert RTF to Word Using Python Automation
For users who need to batch convert RTF to Word frequently or prefer automation for multiple files, Python provides an efficient and scalable solution. Using libraries like Spire.Doc for Python, you can easily convert RTF files to Word documents without the need for Microsoft Word to be installed.
Key Features
- Create and Edit Documents: Effortlessly create, edit, and manage Word documents directly from Python.
- Convert Between Formats: Seamlessly convert between various document formats, including RTF to DOCX, DOC to PDF, and more.
- Preserve Document Structure: Maintain the integrity of document formatting, including text styles, tables, paragraphs, and headers.
- Advanced Formatting Options: Apply custom formatting to text, tables, and paragraphs, such as adjusting margins, font styles, and alignment.
- Batch Conversion: Automate the conversion of multiple RTF files to Word in a single operation for efficient bulk processing.
By using Spire.Doc for Python, you can automate RTF to Word conversions, ensuring consistent results across large sets of files while eliminating manual intervention.

Steps to Convert RTF to Word Using Python:
-
Install the Required Python Library:
Install the Spire.Doc library from PyPI using pip:
pip install spire-doc -
Add the Python Script to Convert RTF to Word:
Once the library is installed, add the following code to convert an RTF file to a Word document in Python:
from spire.doc import * # Create a Document object document = Document() # Load the RTF file document.LoadFromFile("Test.rtf") # Option 1: Save as .docx (Word 2016 format) document.SaveToFile("Test_output.docx", FileFormat.Docx2016) # Option 2: Save as .doc (Word 97-2003 format) # document.SaveToFile("Test_output.doc", FileFormat.Doc) # Close the document document.Close() -
Run the Script:
The script will load the RTF file into a Spire.Doc Document object and save it to a Word DOCX or DOC document.
If you want to batch convert multiple RTF files in a folder to Word documents, you can modify the code as follows:
from spire.doc import *
import os

# Path to the folder containing the RTF files
input_folder = "path_to_rtf_folder"
output_folder = "path_to_output_folder"

# Loop through all files in the folder
for filename in os.listdir(input_folder):
    if filename.endswith(".rtf"):
        # Create a Document object
        document = Document()

        # Load the RTF file
        rtf_path = os.path.join(input_folder, filename)
        document.LoadFromFile(rtf_path)

        # Define the output file path (same name, but with .docx extension)
        output_path = os.path.join(output_folder, f"{os.path.splitext(filename)[0]}.docx")

        # Save as .docx (Word 2016 format)
        document.SaveToFile(output_path, FileFormat.Docx2016)

        # Optionally, save as .doc (Word 97-2003 format)
        # document.SaveToFile(output_path.replace(".docx", ".doc"), FileFormat.Doc)

        # Close the document
        document.Close()

print("Conversion completed for all RTF files.")
Pros:
- Ideal for Batch Processing: Easily convert multiple RTF files at once.
- No Need for Microsoft Word: The conversion is handled entirely by Python, without requiring Microsoft Word.
- Customizable: Add features like error handling, logging, or document manipulation before saving.
Cons:
- Requires Python Knowledge: Not suitable for users without programming experience.
- Setup Required: You need to install Python, the necessary library, and manage the environment.
For more details, check the official full guide: Python: Convert Word to RTF and Vice Versa.
Best Practices and Tips to Avoid Formatting Issues When Converting RTF to Word
When converting RTF files to Word, following some best practices can help you ensure the quality and accuracy of your conversion:
- Check Formatting: Always review the converted Word document for formatting errors. RTF files sometimes lose their original formatting during conversion.
- Batch Conversion: If you need to convert many RTF files, consider using Python automation or batch processing tools to save time.
- Save Backups: Keep backups of your original RTF files, especially if you're using an online tool or an automated script, to prevent data loss.
- Validate Compatibility: Ensure that the converted Word file is compatible with the version of Microsoft Word you're using.
Tips to Prevent Formatting Problems
-
Check Images and Tables: These elements are prone to breaking during conversion.
-
Use Common Fonts: Stick to web-safe fonts like Arial or Times New Roman.
-
Use Microsoft Word for Complex Files: The native Word converter handles complex formatting better than online tools.
Conclusion
Converting RTF to Word is a straightforward yet essential step for enhancing document formatting and compatibility. Whether you prefer the reliability of Microsoft Word, the convenience of online tools for quick conversions, or the efficiency of Python automation for bulk tasks, there's a solution to fit every need.
Select the method that best suits your requirements and start transforming your RTF files into professional Word documents today!
FAQs: RTF to Word Conversion
Q1: Can I convert RTF to Word without Microsoft Word?
A1: Yes, online tools and Python libraries allow you to convert RTF to Word without needing Microsoft Word installed.
Q2: Does converting RTF to Word affect the document's formatting?
A2: Sometimes, converting RTF to Word can cause minor formatting issues. Always check the converted document and adjust formatting as needed.
Q3: Can I automate RTF to Word conversion for multiple files?
A3: Yes, Python and the Spire.Doc for Python library allows you to automate the process and convert many RTF files to Word at once, making it efficient for bulk conversion tasks.
See Also
How to Remove Duplicate Rows from Excel - 6 Easy Ways
Removing duplicate rows from Excel can be a challenging task, especially when dealing with large datasets. Whether you're cleaning a contact list, analyzing sales data, or organizing research results, removing duplicates is crucial for improving data quality and ensuring accurate analysis.
In this guide, we'll show you 6 simple methods to remove duplicate rows from Excel. From using Excel's built-in Remove Duplicates tool for quick fixes to leveraging advanced techniques like Power Query and C# automation, you'll learn how to streamline your workflow and keep your data clean and organized.
What You Will Learn
- Why Remove Duplicate Rows from Excel?
- How to Remove Duplicate Rows from Excel?
- Remove Duplicate Rows Using the Remove Duplicates Tool
- Remove Duplicate Rows Using the Advanced Filter
- Find and Remove Duplicates in Excel Using a Conditional Formatting Helper Column
- Remove Duplicate Data in Excel Using Power Query
- Eliminate Duplicates with the UNIQUE Function in Excel 365
- Automate Duplicate Row Removal in Excel Using C#
- Which Method Should You Choose to Remove Duplicate Rows in Excel
- Best Practices for Removing Duplicates in Excel
Why Remove Duplicate Rows from Excel?
Before we dive into the methods, let's first discuss why removing duplicate rows from Excel is essential:
- Data Accuracy: Ensure calculations, such as sums and averages, are accurate and reliable.
- Clean Reporting: Generate precise pivot tables, charts, and dashboards without the risk of double-counting.
- Professionalism: Deliver clean, error-free data to your team or clients, boosting your credibility.
- Efficiency: Reduce file size and improve spreadsheet performance for faster loading and processing.
How to Remove Duplicate Rows from Excel?
When it comes to removing duplicate rows in Excel, there are several methods you can use depending on your specific needs. In this section, we'll explore 6 ways to clean up duplicate data in Excel, each tailored for different situations:
- Using the Remove Duplicates tool
- Using the Advanced Filter
- Using a Conditional Formatting helper column
- Using Power Query
- Using the UNIQUE function in Excel 365
- Automating the process with C#
Let's walk through each method so you can easily choose the best option to remove duplicates from Excel quickly and efficiently.
Remove Duplicate Rows Using the Remove Duplicates Tool
Excel's Remove Duplicates feature is the fastest and simplest way to clean up your data. This tool allows you to remove duplicates based on entire rows or specific columns.
Best for: Quick, one-time cleanup of an entire dataset.
Step-by-Step Instructions:
Step 1: Select Your Data
Click on any cell within your dataset. Excel will automatically detect and select the entire contiguous data range. If you wish to remove duplicates from a specific range, manually select that range before proceeding.
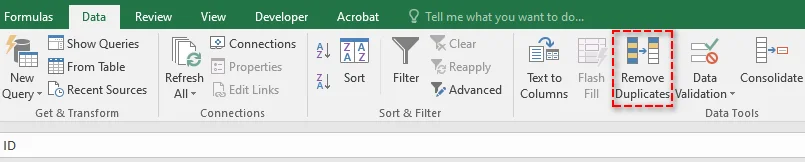
Step 2: Navigate to the Remove Duplicates Tool
Go to the Data tab on the ribbon and click on the Remove Duplicates button, which is located in the Data Tools group.
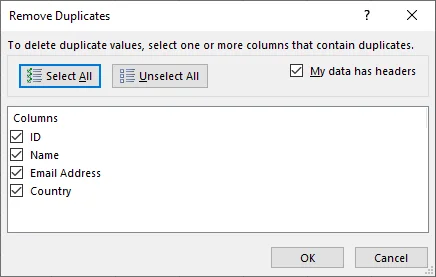
Step 3: Choose Your Columns
After clicking the Remove Duplicates button, a dialog box will appear:
- If your data has headers, ensure the My data has headers checkbox is selected. This allows Excel to treat the first row as headers, not data.
- By default, Excel selects all columns for duplicate checking. If you only want to find duplicates in specific columns (e.g., "Email Address"), uncheck the columns you don't need.
Step 4: Execute and Confirm
Click OK. Excel will process the data and display a message showing how many duplicate values were found and removed, and how many unique values remain.

You may also like: Remove Data Validation in Excel: Keep Data, Clear Restrictions
Remove Duplicate Rows Using the Advanced Filter
The Advanced Filter method provides more control over your data. Unlike the Remove Duplicates tool, it doesn't automatically delete duplicates but instead extracts a list of unique records to a new location. This approach is ideal if you want to review the unique list before making any changes to the original data.
Best for: When you want to keep the original data intact and review the results before making any deletions.
Step-by-Step Instructions:
Step 1: Select Your Data
Click on any cell within your data range.
Step 2: Open the Advanced Filter
Go to the Data tab, and click on the Advanced button, which is located in the Sort & Filter group.

Step 3: Configure the Filter
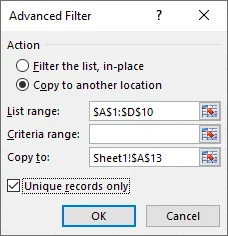
In the pop-up window:
- Select the Copy to another location button.
- The List range should already be populated with your data range.
- Leave the Criteria range blank.
- Click in the Copy to box, then select a cell where you want the unique list to be copied (e.g., $A$13).
- Crucially, check the box for "Unique records only".
Step 4: Execute and Confirm
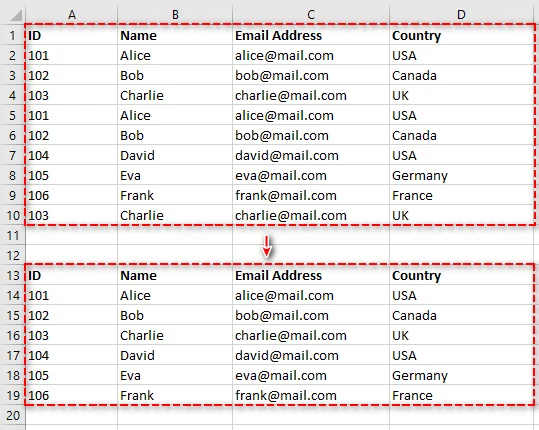
Click OK. Excel will copy all unique rows from your original data range to the new location you specified. You can now compare this unique list with your original data.
Find and Remove Duplicates in Excel Using a Conditional Formatting Helper Column
If you prefer not to delete anything immediately but instead want to identify and highlight duplicates for manual review, this method is perfect. It allows you to mark duplicates with a formula, then filter and delete them as needed.
Best for: Carefully reviewing and manually removing duplicates without permanent deletion right away.
Step-by-Step Instructions:
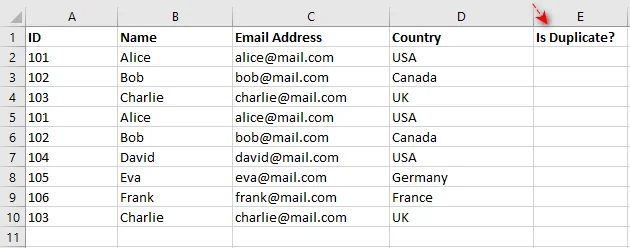
Step 1: Add a Helper Column
Insert a new column to the right of your data and give it a descriptive header like "Is Duplicate?". This column will be used to mark duplicate entries for easy identification.
Step 2: Enter the Formula
In the first cell of the new column, enter the following formula. Make sure to adjust the ranges to fit your data:
=COUNTIFS($A$2:$A2, A2, $B$2:$B2, B2, $C$2:$C2, C2, $D$2:$D2, D2) > 1
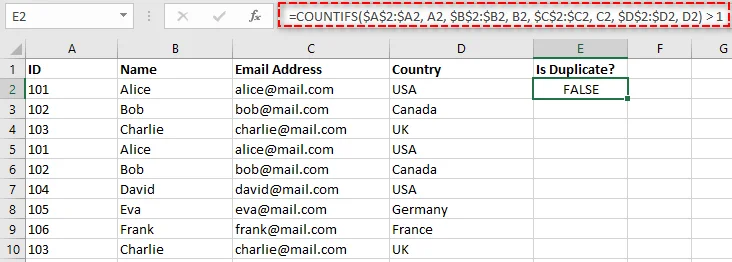
This is a "running count" formula that checks how many times the current row's combination of values (from columns A, B, C and D) has appeared so far. If the count is greater than 1, it will return TRUE, indicating a duplicate.
Note: A more modern alternative is the UNIQUE function in Excel 365, but this COUNTIFS method works in all versions of Excel.
Step 3: Copy the Formula Down
To apply the formula to the rest of the rows, double-click the fill handle (the small square at the bottom-right of the cell). This will copy the formula down the entire column, marking all duplicates.

Step 4: Filter and Delete
-
Apply a filter to your data by selecting your header row and clicking Data > Filter.
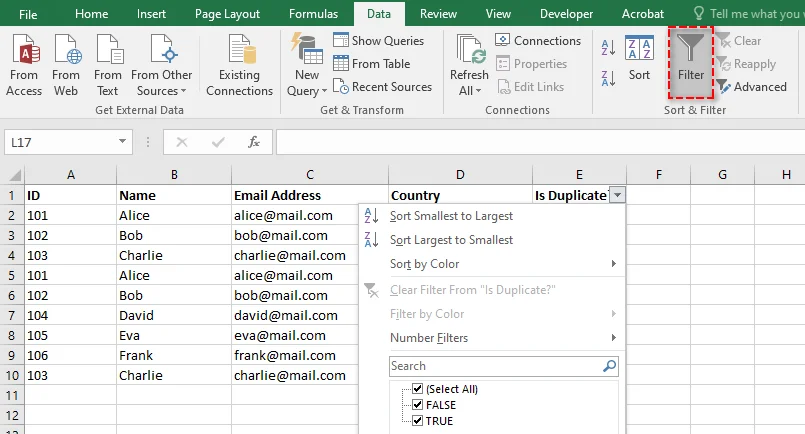
-
Filter the "Is Duplicate?" column to show only TRUE values. This will display all duplicate rows (keeping the first instance).
-
Select all visible rows, right-click, and choose Delete Row to remove the duplicates.
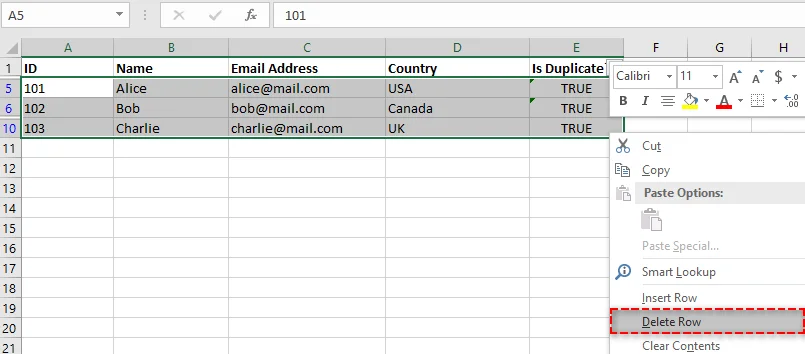
-
Clear the filter to view your clean, unique list of data.
Remove Duplicate Data in Excel Using Power Query
For those who work with data regularly, Power Query (also known as Get & Transform) is a game-changer. It's a non-destructive and fully reversible process, allowing you to clean data without permanently altering the original. Plus, Power Query can be refreshed with a single click if your source data changes, making it ideal for ongoing data management.
Best for: Cleaning regularly updated data and creating a repeatable data-cleaning process.
Step-by-Step Instructions:
Step 1: Load Your Data into Power Query
-
Select your data range.
-
Go to the Data tab, and click on From Table in the Get & Transform group.

-
In the dialog box, ensure the My table has headers box is checked, then click OK. This will open the Power Query Editor window, where you can clean and transform your data.
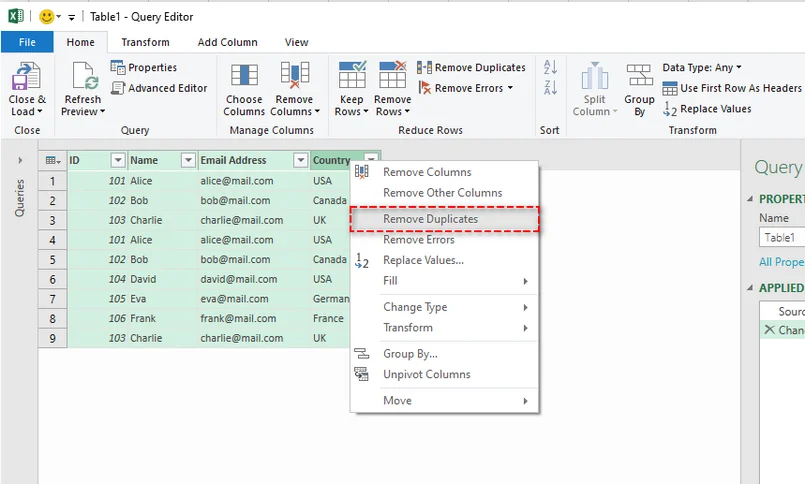
Step 2: Remove Duplicates
In the Power Query Editor, you can remove duplicates based on selected columns:
-
Select the columns you want to base the duplicate check on. Hold Ctrl to select multiple columns.
-
Right-click on one of the selected column headers and choose Remove Duplicates from the context menu.
- Tip: To remove duplicates based on the entire row, select all the columns before clicking Remove Duplicates.
Step 3: Close and Load
Once your duplicates are removed, click Close & Load from the Home tab. Power Query will create a new worksheet with your cleaned, duplicate-free data.
Eliminate Duplicates with the UNIQUE Function in Excel 365
If you have Microsoft 365, you have access to the revolutionary dynamic array functions. The UNIQUE function is the simplest way to extract a list of unique values in Excel without altering the original data.
Best for: Instantly extracting a unique list that updates dynamically.
Step-by-Step Instructions:
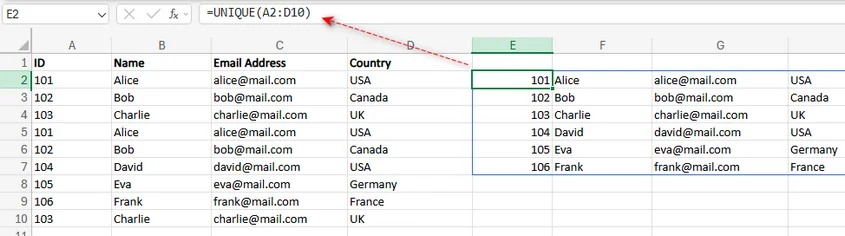
Step 1: Select a Single Cell
Click on an empty cell where you want the unique list to appear. This will be the starting point where the unique values will "spill" into.
Step 2: Enter the UNIQUE Formula
In the selected cell, enter the following formula:
=UNIQUE(A2:D10)
This assumes your data is in the range A2:D10. Modify the range according to your dataset.
Step 3: Press Enter
Once you've entered the formula, simply press Enter. Excel will automatically spill the entire list of unique rows into the cells below. This new list is dynamic. If you change data in your original range, the unique list will update automatically.
For more details on the UNIQUE Function, see the official Microsoft documentation: UNIQUE function.
Automate Duplicate Row Removal in Excel Using C#
If you're working with large Excel files and need to automate the removal of duplicate rows in Excel, using C# with a library like Spire.XLS for .NET can simplify the process. This tool allows you to create, read, and manipulate Excel files programmatically, without needing Excel installed on your system.
With Spire.XLS, you can easily remove duplicate rows from Excel files using just a few lines of C# code, saving you time and improving your data management workflow.
Best for: Developers or anyone looking to automate data cleaning, especially for large datasets.
Step-by-Step Instructions:
Step 1: Install Spire.XLS via NuGet
To get started, you need to download the library, or install it from NuGet by running the following command in the NuGet Package Manager Console:
PM> Install-Package Spire.XLS
This will add the Spire.XLS library to your project, enabling you to programmatically manipulate Excel files.
Step 2: Use the RemoveDuplicates Method
In your C# application, use the RemoveDuplicates method provided by Spire.XLS to automate duplicate row removal. Here's a simple code snippet to remove duplicate rows from Excel in C#:
using Spire.Xls;

namespace RemoveDuplicateRows
{
    internal class Program
    {
        static void Main(string[] args)
        {
            // Open the Excel file
            Workbook workbook = new Workbook();
            workbook.LoadFromFile("input.xlsx");

            // Get the desired worksheet
            Worksheet sheet = workbook.Worksheets[0];

            // Remove duplicates from the specified cell range (if you want to remove all duplicates in the worksheet, do not set the parameters)
            sheet.RemoveDuplicates(2, 1, 10, 4);

            // Save the modified file
            workbook.SaveToFile("RemoveDuplicates.xlsx", ExcelVersion.Version2016);
            workbook.Dispose();
        }
    }
}
This code will remove duplicate rows in the specified cell range and save the cleaned workbook to a new file.

Which Method Should You Choose to Remove Duplicate Rows in Excel?
Now that you're familiar with various techniques for removing duplicate rows from Excel, it's important to understand which method best suits your specific needs. The following table compares each method in terms of its ideal use case, advantages, and potential drawbacks, helping you make an informed decision based on your requirements.
| Method | Best For | Pros | Cons |
|---|---|---|---|
| Remove Duplicates | Quick, one-off cleaning. | Fast, built-in, simple. | Destructive (no undo). |
| Advanced Filter | Reviewing unique lists before deleting. | Non-destructive, gives control. | Slightly more steps. |
| Helper Column | Manual review and complex criteria. | Highly flexible, visual. | Requires formula knowledge. |
| Power Query | Repeating the process on updated data. | Reusable, powerful, non-destructive. | Steeper learning curve. |
| UNIQUE Function | Dynamic extraction (Excel 365). | Instant, dynamic, simple formula. | Doesn't delete source data. |
| C# Automation | Automating repetitive tasks. | Fully automated, highly customizable, integrates with other processes. | Requires programming knowledge, setup complexity. |
Best Practices for Removing Duplicates in Excel
While choosing the right method to remove duplicates is crucial, following best practices can further enhance the accuracy and efficiency of your data cleaning process. Here are some essential tips to keep in mind when removing duplicate data from your Excel files.
-
Backup Your Data
Always create a backup of your data before removing duplicates to avoid accidental loss of important information.
-
Be Aware of Hidden Duplicates
Sometimes duplicates aren't immediately visible due to extra spaces or case sensitivity. Use the TRIM function to remove unwanted spaces, and normalize case with LOWER or UPPER functions.
-
Remove Duplicates from Specific Columns
If duplicates are relevant only to certain columns (like email addresses), select only those columns when removing duplicates rather than checking the entire row.
-
Review Data Before Deleting
If you're using non-destructive methods (like Advanced Filter or Power Query), review the results before deleting to ensure no valuable data is lost.
-
Test Methods on a Small Dataset
Always test your chosen method on a small dataset to ensure it works as expected before applying it to the entire dataset.
Conclusion
No matter the size of your dataset, removing duplicate rows from Excel is a crucial step in maintaining clean and accurate data. Whether you're using Excel's built-in tools, leveraging Power Query for advanced data transformation, applying the dynamic UNIQUE function in Excel 365, or automating the process with C# using Spire.XLS, these methods can help you efficiently remove duplicate rows from Excel and optimize your data management.
Start cleaning your data today with these powerful techniques, and take your Excel productivity to the next level!
FAQs: Remove Duplicate Rows from Excel
Q1. What is the easiest way to remove duplicate rows from Excel?
A1: The easiest way to remove duplicate rows from Excel is by using the built-in Remove Duplicates tool. Simply select your data range, and Excel will remove duplicates in a few clicks.
Q2. How can I remove duplicates without changing the original data?
A2: Use Power Query or the Advanced Filter to extract unique records to a new location, keeping the original data intact.
Q3. How does the UNIQUE function in Excel 365 help remove duplicates?
A3: The UNIQUE function in Excel 365 dynamically removes duplicates by extracting unique values, and it updates automatically when data changes.
Q4. Can I automate removing duplicates in Excel using C#?
A4: Yes, you can automate the process using Spire.XLS for .NET. Just a few lines of C# code can help you remove duplicates programmatically, saving time on large datasets.
Q5. Should I back up my data before removing duplicates?
A5: Yes, always back up your data before removing duplicates, especially when using the Remove Duplicates tool to avoid accidental loss.
See Also
How to Remove Macros from Excel - 4 Easy Ways

Excel macros are powerful tools that help automate repetitive tasks, making your workflow much more efficient. However, there are times when you might need to remove macros from Excel, whether it's for security, compatibility, or simply cleaning up an old workbook. In this article, we will show you four simple ways to remove macros from Excel, so you can keep your files secure, clean, and easy to use.
What You Will Learn
- Why Remove Macros from Excel?
- How to Remove Macros from Excel?
- Best Practices for Removing Macros in Excel
Why Remove Macros from Excel?
While macros are incredibly useful, they can also pose significant risks if not properly managed. Below are some key reasons why it's important to remove macros from Excel:
- Security Risks: Macros can contain harmful code, putting your data at risk.
- Compatibility: Macros may not work across different Excel versions or platforms.
- Simplify Files: Old macros can clutter your workbook and increase file size.
- Performance: Complex macros can slow down Excel.
- Compliance: Some industries require macro-free files.
- Prevent Accidental Execution: Disabling macros avoids unintended actions.
How to Remove Macros from Excel?
Now that we understand why it's important to remove macros, let's look at how to do it. We'll explore four methods: manual removal, disabling macros, saving the file in a macro-free format, and automating the process using Python.
Remove Macros Manually Using the Excel Developer Tab
If you're dealing with a small number of macros, the Developer Tab in Excel is the most straightforward way to remove them. Here's how you can do it:
Steps to Remove Macros:
-
Open Excel: Launch Excel and open the workbook containing the macros you wish to remove.
-
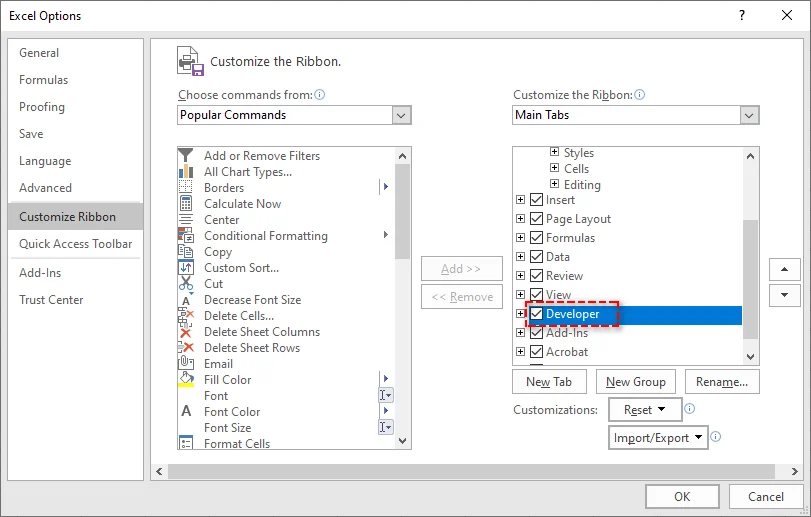
Enable the Developer Tab: If the Developer tab is not visible, go to File > Options > Customize Ribbon and check Developer under the list of main tabs.
-
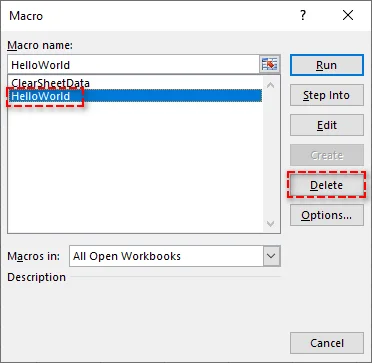
Open the Macro Dialog: In the Developer tab, click Macros to open the Macro dialog box. A list of all macros in the workbook will be displayed.

-
Select and Delete Macros: Select the macro you want to remove and click Delete. Repeat this process for any other macros you wish to remove.
-
Save the Workbook: After removing the macros, click File > Save As to save the workbook with the macros removed.
Pros:
- Quick and straightforward for removing individual macros.
- No need for extra tools or advanced techniques.
Cons:
- Time-consuming if dealing with many macros or large workbooks.
For more details, refer to the Use the Developer tab to create or delete a macro in Excel guide from Microsoft.
Disable Macros via Excel Trust Center
If you don't want to permanently delete macros but want to prevent them from running, you can disable them via Excel's Trust Center. This method is perfect for security purposes when sharing workbooks with others.
Steps to Disable Macros:
-
Open Excel: Launch Excel and open the workbook.
-
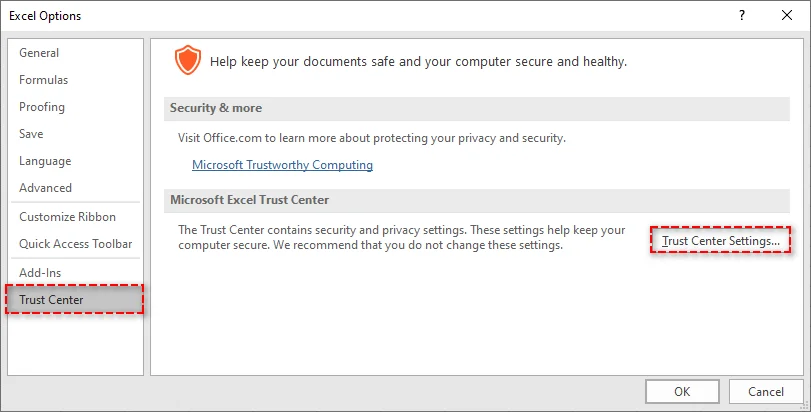
Access Trust Center: Go to File > Options, and choose Trust Center from the list on the left. Then, click Trust Center Settings.
-
Configure Macro Settings: In the Trust Center Settings window, select Macro Settings from the left sidebar.
-
Select Disable Macros: Choose Disable all macros without notification to prevent any macros from running. Alternatively, you can choose Disable all macros with notification to be prompted when a macro tries to run.

-
Save Your Settings: Click OK to apply the changes, and macros will be disabled the next time you open the workbook.
Pros:
- Quick and simple.
- Does not delete macros, allowing you to keep them for later use.
Cons:
- Macros still exist in the workbook, but they are not executed.
- Not ideal for sharing files if the recipient does not trust macros.
Remove Macros by Saving the File in a Macro-Free Format
If you want to completely remove all macros from an Excel workbook without manually deleting each one, saving the workbook as a macro-free format (.xlsx) will strip out all the macros. This method is the simplest for ensuring a macro-free file.
Steps to Save as a Macro-Free File:
-
Open the Workbook: Open the Excel file that contains macros.
-
Save As: Go to File > Save As and choose a location to save the new file.
-
Select Excel Workbook Format: In the Save as type dropdown, select Excel Workbook (*.xlsx). The .xlsx format does not support macros, so saving the file in this format removes them automatically.

-
Save the File: Click Save, and your file will be saved without any macros.
Pros:
- Simple and effective for removing all macros.
- Ensures compatibility with systems that don't support macros.
Cons:
- Irreversible-once saved in .xlsx format, the macros are gone forever.
- Not suitable if you want to keep macros for future use.
Automate Macro Removal from Excel Using Python
For those who need to remove macros from multiple Excel files or prefer automating the process, Python offers an efficient solution. Spire.XLS for Python is a powerful library that allows developers to easily manipulate Excel files. It provides features such as:
- Create, edit, and read Excel files: Generate new workbooks, update existing ones, or extract data.
- Convert Excel to PDF and other formats: Convert Excel files into PDF, CSV, and HTML for better compatibility and sharing.
- Remove macros: Effortlessly clear macros from Excel files to improve file security and performance.
- No dependency on Microsoft Excel: Unlike traditional methods, this solution doesn't require Excel to be installed, making it ideal for server-side applications and environments that lack Excel.
By using Spire.XLS for Python, you can automate the macro removal process, ensuring consistent results across large sets of files. This method is particularly effective for batch processing, eliminating the need for manual intervention and speeding up the workflow.

Steps to Remove Macros from Excel Files Using Python:
-
Install Spire.XLS for Python:
Install the Spire.XLS library from PyPI via pip:pip install spire-xls -
Use the Python Code Snippet to Remove Macros:
After installation, use the following code to remove macros from an Excel file in Python:from spire.xls import * # Load the workbook workbook = Workbook() workbook.LoadFromFile("example.xlsm") # Remove all macros workbook.HasMacros = False # Save the workbook without macros workbook.SaveToFile("remove_macros.xlsm") workbook.Dispose()
This code will remove all macros from the workbook and save it as a new file. It works for both .xls and .xlsm formats.
Pros:
- Efficient for large-scale macro removal.
- Automates the process, ensuring consistency across multiple files.
- No need for Excel.
Cons:
- Requires Python knowledge.
- Requires installation of the Spire.XLS library.
Best Practices for Removing Macros from Excel
When working with macros in Excel, follow these best practices to ensure security and efficiency:
- Backup Your Files: Always create a backup before you remove macros from Excel to avoid losing essential data.
- Use Digital Signatures: If you need to keep macros, sign them digitally to ensure they're trustworthy.
- Only Enable Macros from Trusted Sources: To prevent harmful code, avoid running macros from untrusted files.
- Clean Up Regularly: If macros are no longer needed, remove them to keep your files manageable.
- Use Macro-Free Templates: Start new projects with templates free of macros to avoid unnecessary risks.
- Keep Excel Updated: Regularly update Excel and your security software to protect against macro-related vulnerabilities.
Conclusion
Removing macros from Excel is crucial for improving security, enhancing compatibility, and keeping your workbooks streamlined. Depending on your needs, you can choose to delete individual macros, disable them temporarily, save the file in a Macro-free format, or even automate the macro removal process for multiple Excel files using Python. By following the methods outlined above, you can enhance the security of your Excel workbooks and avoid any risks associated with potentially harmful macros.
Frequently Asked Questions
Q1: Can I recover macros after removing them from Excel?
A1: No, once macros are removed or saved in a macro-free format (.xlsx), they cannot be recovered. Always save a backup of the original file if needed.
Q2: How can I remove specific macros from Excel?
A2: You can remove individual macros using the Developer Tab in Excel by selecting and deleting them manually.
Q3: Is it possible to disable macros instead of removing them?
A3: Yes, you can disable macros in Excel via Excel's Trust Center Settings, preventing them from running while keeping them in the workbook.
Q4: How can I automate macro removal from Excel?
A4: You can automate the process of removing macros from Excel by using Python with the Spire.XLS for Python library. This method is especially useful for batch processing multiple files. The library allows you to load Excel files, remove macros, and save them in a macro-free format automatically.
Also Read
How to Convert Images to PPT - 3 Easy Methods
Table of Contents

Converting images to PPT is a quick and efficient way to present visual content in a dynamic format. Whether it's photos, charts, or infographics, transforming them into PowerPoint slides can make your presentations more engaging and impactful.
In this guide, we will show you three simple methods to convert images to PPT, including manual techniques, online tools, and Python automation. These methods are suitable for all skill levels, from beginners to advanced users, providing easy solutions to help you create professional and visually appealing presentations from your images.
Contents Overview
- Why Convert Images to PPT
- Method 1. Convert Images to PPT Manually Using Microsoft PowerPoint
- Method 2. Convert Images to PPT using Free Online Tools
- Method 3. Automate Image to PPT Conversion Using Python
- Best Practices for Converting Images to PPT
- Conclusion
- FAQs: Converting Images to PowerPoint
Why Convert Images to PPT?
Before we explore the methods, let's first look at the benefits of converting images to PPT slides:
- Showcasing Visual Content: Images often speak louder than words. Whether it's a photo, infographic, or chart, inserting images into PowerPoint slides allows you to highlight and discuss them more effectively during presentations.
- Ease of Editing: Images in PowerPoint are easier to manage, resize, and reposition compared to raw images inserted into documents or emails.
- Professional Presentations: PowerPoint allows you to create professional slides with added animations, text overlays, and transitions that enhance the presentation experience.
- Integration with Other Content: PowerPoint slides are often used in conjunction with other forms of media. Converting images to PPT allows seamless integration of visual elements with text and graphs.
Now, let's explore the different ways to convert images to PowerPoint slides.
Method 1. Convert Images to PPT Manually Using Microsoft PowerPoint
Microsoft PowerPoint offers two methods for inserting images into a PowerPoint presentation. Here's a step-by-step guide for both methods.
Option 1: Using the Insert Tab in PowerPoint
If you're working with a small number of images, the Insert Tab is ideal for adding individual images to your slides. It allows you to completely control how the images are positioned and formatted.
Steps to Manually Insert Images:
- Open PowerPoint: First, launch PowerPoint and choose the "Blank Presentation" option to start a new presentation.
- Add a Blank Slide: Next, go to the Home tab and click the "New Slide" button. From the dropdown menu, select "Blank" to add a slide without preformatted placeholders.
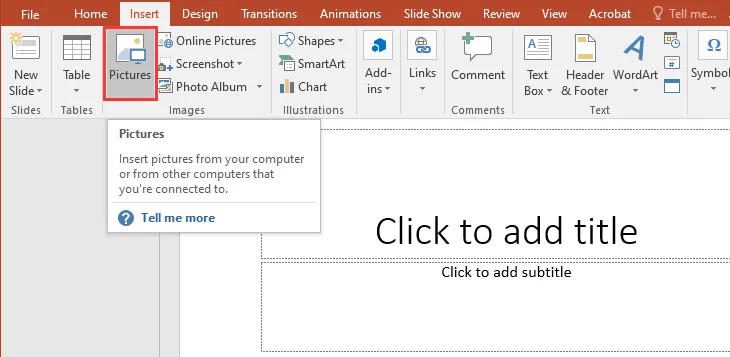
- Insert an Image: Then, go to the Insert tab on the ribbon. Click Pictures (or Online Pictures if you want to use images from the web). Navigate to the image you want to insert, select it, and click Insert.
- Adjust Image Position and Size: After inserting the image, resize it by dragging the corners and move it around the slide to your preferred position.
- Repeat for Additional Images: To add more images, repeat steps 2-4.
- Save Your Presentation: Once all images are added and arranged, click File > Save As to save your PowerPoint file to the desired file location.
Pros:
- Simple and easy to use.
- Provides full control over image positioning and formatting.
- No additional tools or software required.
Cons:
- Can be time-consuming if you have many images to insert.
Option 2: Using the Photo Album Feature in PowerPoint
If you have multiple images or photos and need to convert them to separate slides quickly, the Photo Album feature in PowerPoint is a more efficient solution.
Steps to Convert Multiple Images:
- Open PowerPoint: First, launch PowerPoint and select the "Blank Presentation" option to start a new presentation.
- Navigate to the Photo Album Feature: Next, go to the Insert tab on the ribbon, click Photo Album, and select New Photo Album from the drop-down menu.
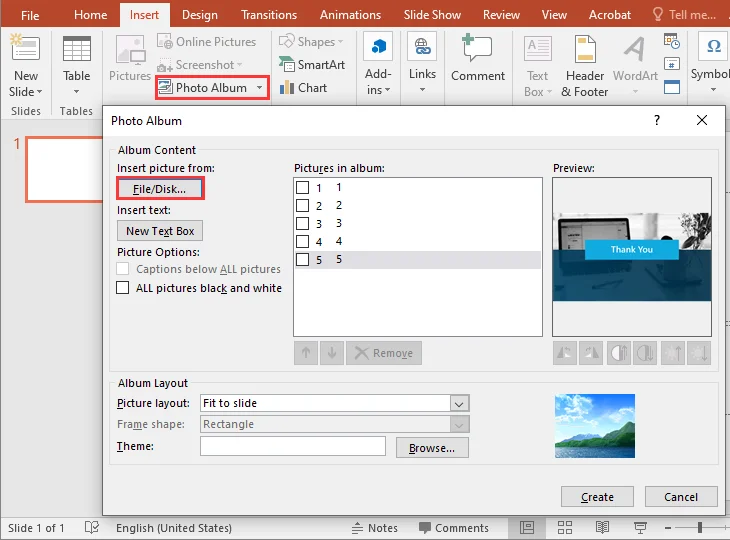
- Select Your Images: In the Photo Album dialog box, click File/Disk to browse and select the images you want to add. Choose all the images you want to convert, and click Insert.
- Customize the Layout (Optional): Choose how the images should appear on the slides, such as one image per slide or multiple images on each slide. You can also add captions and select a theme for the slides if desired.
- Create the Album: After making your selections, click Create. PowerPoint will automatically generate a new slide for each image.
- Save Your Presentation: Once the album is created, click File > Save As to save your PowerPoint file to the desired location.
Pros:
- Quick and efficient for bulk image conversion.
- Customizable slide layouts.
- Saves time when adding multiple images at once.
Cons:
- Limited control over individual image formatting.
- Not ideal for complex layouts or detailed image editing.
Pro Tip: For a more polished and efficient design, you can download professionally crafted PowerPoint Photo Album templates from Microsoft. These ready-made templates can streamline the process, giving your presentation a sleek, visually appealing look in no time.
Method 2. Convert Images to PPT using Free Online Tools
If you don't have Microsoft PowerPoint installed, some online tools offer a free, easy way to convert images to PowerPoint. One such tool is Online2PDF.
Steps to Convert Images using the Online Tool:
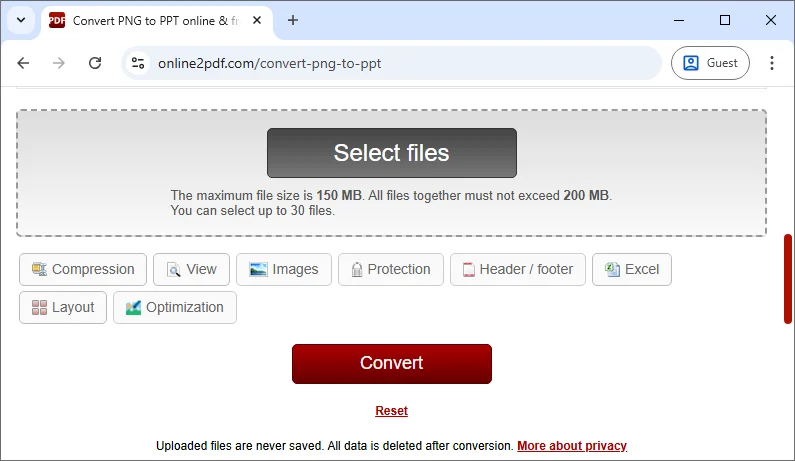
- Go to Online2PDF: Visit the online Image to PPT Converter.
- Upload Your Images: Click Select files and upload the images from your computer. You can also drag and drop your images directly into the conversion area.
- Select the Output Format: Choose .ppt or .pptx as the output format.
- Convert the Files: Click Convert to start the conversion process.
- Download the PPT: After the conversion is complete, download your PPT file.
Pros:
- No software installation needed.
- Fast and simple conversion process.
- Works across devices, web-based.
Cons:
- Privacy concerns when uploading files to third-party websites.
- Some converters may have size or format limitations on free accounts.
- Limited customization options for image layout and formatting.
Method 3. Convert Images to PPT Automatically using Python
For those looking to automate the conversion of multiple images into PowerPoint presentations, Python offers a powerful solution. By leveraging the Spire.Presentation for Python library, users can automate the process of inserting images, adjusting layouts, and saving presentations-all with minimal code.
Key Features:
- Create and Manage Slides: Effortlessly add or remove slides within a PowerPoint presentation.
- Insert Images and Shapes: Insert images, text, shapes, charts, and other objects into slides.
- Customizable Layouts: Adjust image size, position, and format to match the desired layout.
- Apply Animations and Transitions: Enhance presentations with customizable transitions and animations.
- Export in Various Formats: Save presentations in formats such as PPTX, PDF, and images.
- No Dependency on Microsoft Office: Operates independently, offering all the functionality needed to create and modify presentations without requiring Microsoft Office.
Steps to Convert Images to a PowerPoint Presentation using Python:
-
Install the Spire.Presentation for Python library from PyPI:
pip install spire-presentation -
Add the following code to convert images to a PowerPoint presentation:
  import os
  from spire.presentation import *

  # Create a new Presentation object
  presentation = Presentation()

  # Remove the default first slide
  presentation.Slides.RemoveAt(0)

  # Define the image directory
  baseDir = r"C:\Users\Administrator\Downloads\Images"

  # Get all file paths in the specified directory
  picFiles = [f for f in os.listdir(baseDir) if os.path.isfile(os.path.join(baseDir, f))]

  # Loop through the images
  for picFile in picFiles:
      # Add a new slide
      slide = presentation.Slides.Append()

      # Create the full image path
      imagePath = os.path.join(baseDir, picFile)

      # Load the image using Stream and get image data
      stream = Stream(imagePath)
      imageData = presentation.Images.AppendStream(stream)
      stream.Close()

      # Get the image width and height from the imageData
      imageWidth = float(imageData.Width)
      imageHeight = float(imageData.Height)

      # Set the slide size to match the image size
      presentation.SlideSize.Type = SlideSizeType.Custom
      presentation.SlideSize.Size = SizeF(imageWidth, imageHeight)

      # Define the position for the image (position at top-left corner)
      rect = RectangleF(0.0, 0.0, imageWidth, imageHeight)  # Use full image size

      # Insert the image into the slide (make it fit the entire slide)
      pptImage = slide.Shapes.AppendEmbedImageByImageData(ShapeType.Rectangle, imageData, rect)

      # Remove the border around the shape (optional)
      pptImage.Line.FillType = FillFormatType.none

  # Save the presentation to a file
  presentation.SaveToFile("ImagesToPPT.pptx", FileFormat.Pptx2013)
  # Clean up resources
  presentation.Dispose()

Pros:
- Fully automated for batch processing.
- Customizable for different image sizes, layouts, and formatting.
- Ideal for large-scale or recurring tasks.
Cons:
- Requires Python knowledge and setup.
- Needs Python and the necessary libraries installed.
For more details, refer to the full official guide: Python: Add Images to PowerPoint Presentations.
Best Practices for Converting Images to PPT
Regardless of the method you choose to create PowerPoint slides from images, adhering to some best practices can help ensure your slides are professional, efficient, and visually appealing. Here are a few tips to keep in mind:
- Optimize Image Size: Large images can increase the file size of your PowerPoint presentation, making it slow to load. Resize the images if needed before adding them.
- Use Consistent Layouts: When inserting multiple images, use consistent formatting for a polished, professional look.
- Consider Aspect Ratio: Ensure that the images fit well within the slide dimensions without distortion.
- Add Captions or Descriptions: Use text boxes to describe the images or provide additional context.
Conclusion
Converting images to PPT slides can significantly improve your presentation quality. Whether you prefer the manual method for small projects, need an online tool for quick conversions, or want to automate the process with Python, each method has its own advantages.
- Manual methods are great for simple, small-scale tasks.
- Online converters are perfect for quick, one-time conversions.
- Python automation is ideal for bulk tasks or when automation is required.
Choose the method that best suits your needs and start converting your images to PowerPoint today!
FAQs: Converting Images to PowerPoint
Q1: What's the easiest method to convert images to PPT?
A1: For beginners, using Microsoft PowerPoint's Insert Tab or Photo Album Feature is the easiest and quickest way to add images to slides manually.
Q2: Can I convert images to PPT without PowerPoint?
A2: Yes, free online tools like online2pdf allow you to convert images to PPT without the need to install any software.
Q3: How can I automate image conversion to PPT?
A3: You can automate the process using Python and Spire.Presentation, which allows for batch processing and customization for large numbers of images.
See Also
Remove a Table in Excel (Convert to Range, Clear Formatting, VBA & Python)
Table of Contents
- Understanding What Happens When You Remove a Table in Excel
- How to Remove a Table in Excel by Converting It to a Range
- How to Remove Table Formatting in Excel
- How to Remove a Table in Excel Completely
- How to Remove Tables in Excel at Once Using VBA
- How to Remove Tables in Excel using Python Automation
- Pro Tips for Removing a Table in Excel
- Conclusion
- FAQs: Remove Table in Excel

Removing a table in Excel is a simple yet essential task for simplifying your data. While tables are useful for organizing and managing information, there are times when you might want to remove them - whether to streamline formatting, export raw data, or stop using structured features.
In this guide, we'll explore various methods to remove a table in Excel, including converting it to a range, clearing its formatting, and deleting it completely. Additionally, we'll demonstrate how to automate the process using VBA and Python, helping you save time when working with multiple tables.
Contents Overview
- Understanding What Happens When You Remove a Table in Excel
- How to Remove a Table in Excel by Converting It to a Range
- How to Remove Table Formatting in Excel
- How to Remove a Table in Excel Completely
- How to Remove Tables in Excel at Once Using VBA
- How to Remove Tables in Excel using Python Automation
- Pro Tips for Removing a Table in Excel
- Conclusion
- FAQs: Remove Table in Excel
Understanding What Happens When You Remove a Table in Excel
Removing a table in Excel can have different outcomes depending on the method you choose:
- Convert to Range: Keeps all your data and any table-applied formatting as static cell formatting, but removes table features like filters and structured references.
- Clear Table Formatting: Keeps data but removes all table colors, borders, and styles.
- Delete Entire Table: Permanently removes both the table and its data.
Let's explore these options in detail and see how they affect your Excel data.
How to Remove a Table in Excel by Converting It to a Range?
The simplest and most reliable method for removing a table in Excel is to convert it to a regular range, which keeps your data and formatting intact. You can choose from two main options for this conversion: using the Excel ribbon or the Right-Click menu.
Option 1. Using the Excel Ribbon
Follow the steps below to convert a table to a range through the Excel ribbon:
-
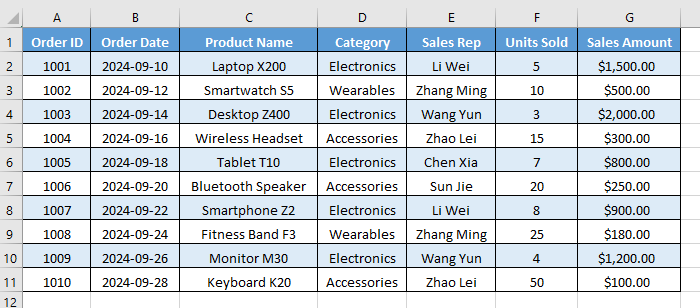
Select Any Cell Inside Your Table: Click on any cell (such as "A1") within the table you wish to remove. You don't need to select the entire table.
-
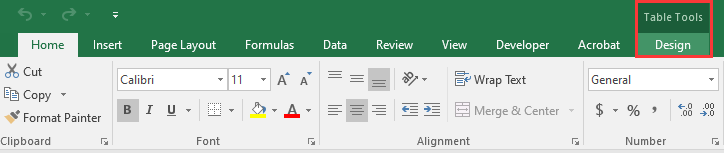
Navigate to the Design Tab: As soon as you select a table cell, the contextual Design tab will appear on the Excel ribbon, under Table Tools. Click on it.
-
Click "Convert to Range": In the Tools group on the far left, you will find the "Convert to Range" button. Click it.

-
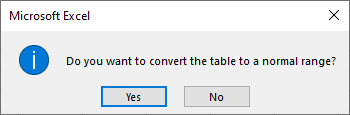
Confirm the Action: Excel will pop up a dialog box asking, "Do you want to convert the table to a normal range?" Click Yes.
After conversion, the table structure is removed, and filters are no longer available. However, any table formatting (like banded rows and header styles) remains, but the range becomes static instead of dynamic.
Option 2. Using the Right-Click Menu
For those who prefer context menus, using the Right-Click menu is just as effective and a bit faster:
-
Select Any Cell Inside the Table: Just like in the first method, click anywhere inside your table's data.
-
Right-Click to Open the Context Menu: Right-click on the selected cell.
-
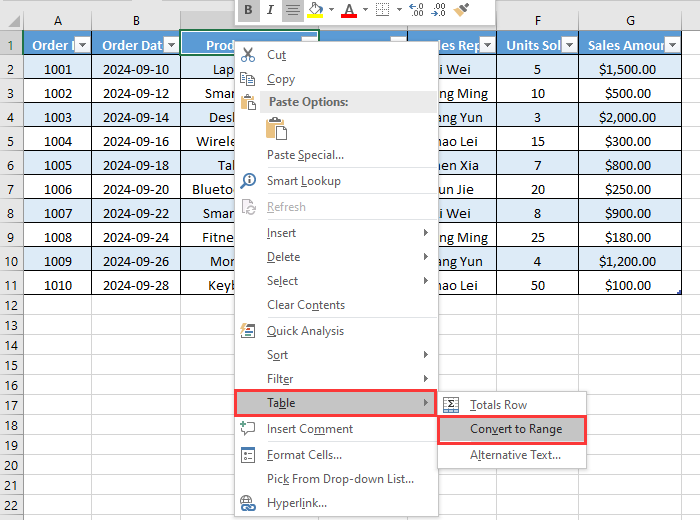
Navigate the Menu: In the right-click menu, hover over (or click) Table.
-
Select "Convert to Range": From the sub-menu that appears, select Convert to Range.
-
Confirm the Action: Click Yes in the confirmation dialog box.
This method produces the same result as using the ribbon but offers a quicker, mouse-driven approach.
How to Remove Table Formatting in Excel?
In some cases, you might want to remove the table formatting in Excel, including elements like filters, colors, and borders. Follow the steps below to clear the formatting and return your data to a simpler layout:
-
Convert the Table to a Range: First, convert the table to a normal range using either the Excel ribbon or the right-click menu described above.
-
Clear the Table Formatting
Now, the data is a simple range, you can remove the leftover formatting.-
Select the Entire Data Range: Click and drag to select all the cells that were part of the original table, including the header.
-
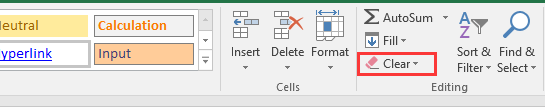
Go to the Home Tab: On the Excel ribbon, navigate to the Home tab.

-
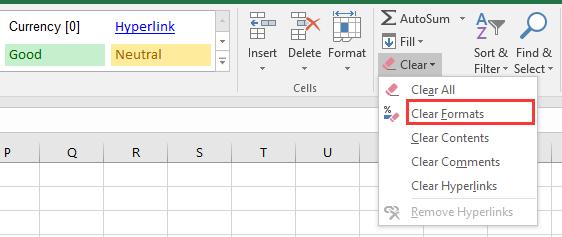
Clear the Formats:
-
In the Editing group, click on the Clear button (it looks like a pink eraser).
-
From the dropdown menu, select Clear Formats.
-
-
Now, all table-specific formatting is removed, but your data remains intact. The cells revert to Excel's default font, color, and borders, giving you a clean, unformatted block of data ready for new formatting or analysis.
How to Remove a Table in Excel Completely
If you need to remove both the table and all the data it contains, this method will help. Make sure you're certain you no longer need the information before proceeding. To completely delete a table, follow these steps:
-
Select the Entire Table: Click anywhere inside the table and press Ctrl + A (Windows) or Cmd + A (Mac) to select the entire table, including the header and total rows.
-
Clear All Data and Formatting: Go to the Home tab and find the Editing group. Click Clear, then select Clear All from the dropdown menu.
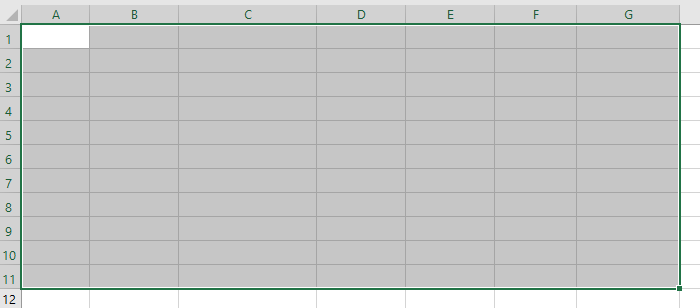
This action permanently removes all data, formatting, and the table structure. The cells will be cleared, leaving no trace of the original table.
How to Remove Tables in Excel at Once Using VBA
If your Excel file contains multiple tables, removing each one manually can be time-consuming. You can use VBA (Visual Basic for Applications) to automate the process.

Here's how to remove all tables in an Excel file while keeping the data using VBA Script:
-
Press Alt + F11 to open the VBA Editor.
-
Click Insert → Module.
-
Copy and paste the following VBA code:
Sub ConvertAllTablesToRanges() Dim ws As Worksheet Dim tbl As ListObject For Each ws In ActiveWorkbook.Worksheets For Each tbl In ws.ListObjects tbl.Unlist ' Convert table to range Next tbl Next ws End Sub -
Press F5 to run the macro.
This macro loops through every worksheet in the Excel file, finds all ListObjects (tables), and converts them into normal ranges - preserving the data but removing table functionality.
For more details on the Unlist method used in this VBA script, see the official Microsoft documentation: Excel ListObject.Unlist Method.
How to Remove Tables in Excel using Python Automation?
If you're working with Python for data processing, automated reporting, or backend applications, you can remove tables in Excel using a library like Spire.XLS for Python.
Spire.XLS for Python is a popular Excel library that enables developers to create, read, and manipulate Excel files directly through code without requiring Microsoft Excel. In addition to removing tables, it allows you to read and write cell values and formulas, apply or clear formatting, manage worksheets, insert charts or images, and even convert Excel files to PDF or other formats.
Here is how you can remove tables in Excel using Python with Spire.XLS for Python:
-
Install Spire.XLS for Python: Run the following command in your terminal to install it directly via PyPI:
pip install Spire.XLS -
Remove Tables with Python Code: Once the library is installed, add the following code to remove tables in your Excel file using Python:
from spire.xls import *

# Load the workbook
workbook = Workbook()
workbook.LoadFromFile("CreateTable.xlsx")

# Loop through all worksheets by index
for ws_index in range(len(workbook.Worksheets)):
  sheet = workbook.Worksheets[ws_index]
  # Loop from last table to first to safely remove by index
  for tbl_index in range(len(sheet.ListObjects) - 1, -1, -1):
      sheet.ListObjects.RemoveAt(tbl_index)

# Save the workbook
workbook.SaveToFile("DeleteAllTables.xlsx", ExcelVersion.Version2016)
workbook.Dispose()
This code removes all tables in the Excel file, keeping your data intact and ready for further processing.
Read the full official guide: Add or Remove Tables in Excel in Python.
Pro Tips for Removing a Table in Excel
When removing a table in Excel, the following tips can help you avoid common issues and maintain data integrity:
- Always back up your workbook before running VBA or automation scripts.
- Double-check formulas for broken references after conversion.
- Reapply filters manually if needed after converting to a range.
- Keep a consistent format by applying custom cell styles after removing table formatting.
- Use named ranges instead of tables if you only need fixed references without structured behavior.
Conclusion
Removing a table in Excel doesn't have to be complicated. By following this guide on how to remove a table in Excel, you can safely keep your data and formatting intact. Whether you prefer manual steps, VBA automation, or Python scripting with Spire.XLS, these methods make table removal quick, reliable, and stress-free. Try them today to clean up your spreadsheets and streamline your workflow!
FAQs: Remove Table in Excel
Q1: How to convert a table to a normal range in Excel but keep the data?
A1: Select any cell in the table → Right-click Table → Convert to Range or go to Design → Convert to Range → Click Yes. Your data remains, but table features are removed.
Q2: How do I remove only the table formatting in Excel?
A2: First, convert the table to a normal range. Then select all the cells → go to Home → click Clear → Clear Formats.
Q3: Can I remove multiple tables in Excel at once?
A3: Yes. Use a VBA macro to convert all tables to ranges.
Q4: Can I remove a table in Excel using Python?
A4: Yes. You can utilize libraries like Spire.XLS for Python to remove tables in Excel with Python.
Also Read
Remove Hyperlinks in Excel - 4 Easy Methods
Table of Contents

Do you want to remove hyperlinks in Excel files quickly and easily? Whether they appeared automatically when typing URLs or were copied from other sources, unwanted hyperlinks can clutter your spreadsheet, make formatting difficult, and slow down your workflow.
In this guide, you will learn 4 easy ways to remove hyperlinks in Excel - manually through the right-click menu or the Home tab, and automatically using VBA macros or C# - so you can clean your sheets efficiently, keep your data organized, and maintain a professional-looking workbook.
Table of Contents
- How to Remove Hyperlinks Manually in Excel
- How to Remove All Hyperlinks in Excel Automatically
- Best Practices for Deleting Hyperlinks in Excel
- Conclusion
- FAQs
How to Remove Hyperlinks Manually in Excel?
If you only have a few hyperlinks to delete, manual removal is usually the quickest solution. Excel provides built-in tools for this task, and they're easy to access. Below are three different manual methods you can use, depending on your preference and situation.
Remove Hyperlinks using the Right-Click Menu
This is the most direct and beginner-friendly way to remove hyperlinks from an Excel sheet, especially when dealing with a small dataset.
Steps to Remove Hyperlinks in Excel using the Right-Click Menu:
- Open your Excel file in MS Excel, and then select the cell or range that contains the hyperlinks you want to remove.
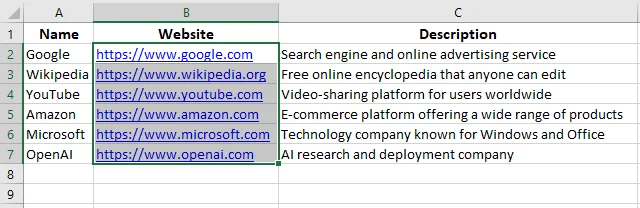
- Right-click on the selected cell or range.
- From the context menu, choose Remove Hyperlinks.
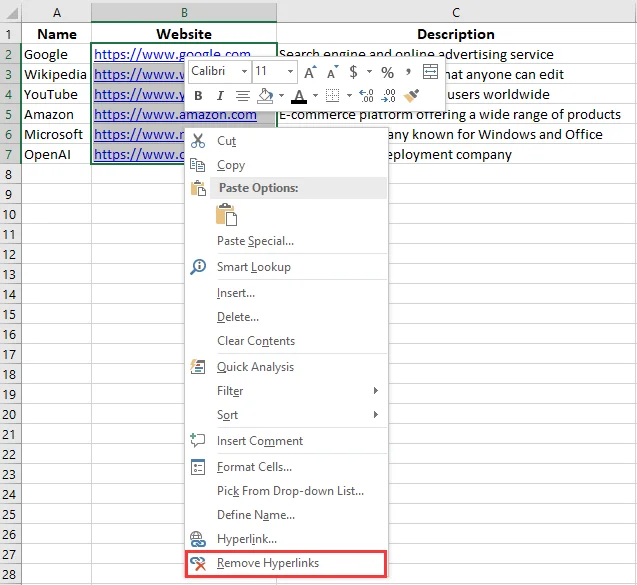
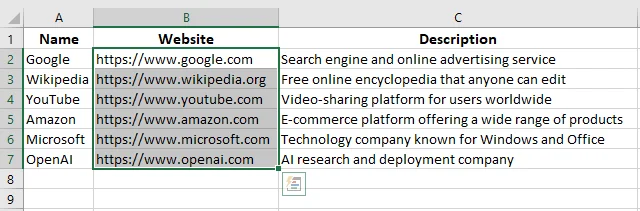
Excel instantly removes the hyperlink but keeps the display text intact. The text remains visible in the cell, only without the clickable link.
Tip: If you select a single cell, the menu will show Remove Hyperlink. If you select multiple cells, Excel changes it to Remove Hyperlinks, allowing you to delete all hyperlinks in one go.
Remove Hyperlinks using the Home Tab
Another quick way to remove hyperlinks in Excel is through the Home tab on the ribbon. This method works similarly to the right-click option but is better for those who prefer working with Excel's toolbar rather than context menus.
Steps to Remove Hyperlinks from Excel using the Home Tab:
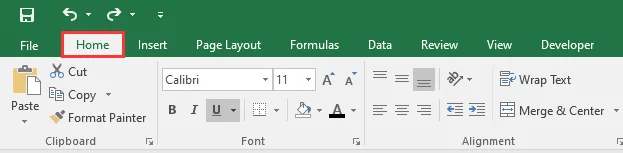
- Select the cell or range that contains the hyperlinks you want to delete.

- Go to the Home tab on the top toolbar, next to Insert.
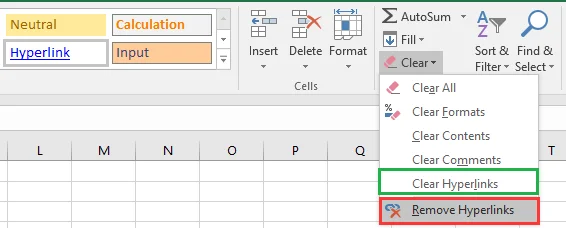
- In the Editing group on the right, click the Clear button (the one with the pink eraser icon). A drop-down list will appear.
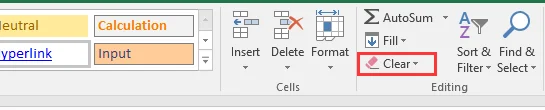
-
From the list, choose Clear Hyperlinks or Remove Hyperlinks based on your needs:
-
Clear Hyperlinks - Removes only the hyperlink, while keeping the original text formatting intact.
-
Remove Hyperlinks - Deletes both the hyperlink and any formatting (such as font color or underline) applied to it.
-
Your selected cells will now be free of clickable hyperlinks, with formatting either preserved or removed depending on the option you chose.
How to Remove All Hyperlinks in Excel Automatically?
When your workbook contains hundreds or thousands of hyperlinks, manual removal becomes impractical. In such cases, automation can save significant time. You can remove all hyperlinks at once using VBA (Visual Basic for Applications) or C# with the Spire.XLS library. These methods allow you to clean your sheets efficiently without losing text.
Remove Hyperlinks using VBA
Excel's built-in VBA scripting feature allows you to execute small code snippets that perform tasks automatically. Removing hyperlinks through VBA is one of the fastest ways to clean up your entire workbook.
Steps to Remove All Hyperlinks from Excel using VBA Macros:
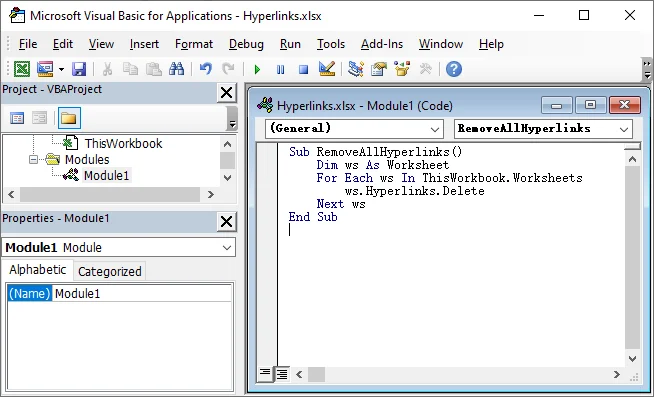
- Press Alt + F11 to open the VBA Editor.
- In the editor window, go to Insert → Module.
- Copy and paste the following VBA code:
Sub RemoveHyperlinks()
    Dim ws As Worksheet
    For Each ws In ThisWorkbook.Worksheets
        ws.Hyperlinks.Delete
    Next ws
End Sub
- Press F5 to execute the VBA code.
This will remove all hyperlinks from the Excel workbook while keeping the cell text intact.

Tip: You can assign this macro to a button on your Ribbon for one-click hyperlink removal in future workflows.
Remove Hyperlinks Programmatically with C#
If you need to remove hyperlinks in Excel using C#, especially when VBA is not suitable or Excel is not installed, the Spire.XLS for .NET library offers an efficient and flexible solution. It lets developers remove hyperlinks from one or more worksheets entirely through code, while keeping the cell text and data intact.
In addition to hyperlink removal, Spire.XLS supports a wide range of Excel operations, such as reading and writing files, formatting cells, creating tables, and more. This makes it a comprehensive solution for developers who want to streamline data processing and hyperlink management in Excel.
Steps to Remove All Hyperlinks from Excel using C# with Spire.XLS:
- Install Spire.XLS NuGet Package via NuGet Package Manager:
PM> Install-Package Spire.XLS
- Add the following code to delete all hyperlinks from an Excel file at once using C#.
using Spire.Xls;

namespace RemoveHyperlinks
{
    internal class Program
    {
        static void Main(string[] args)
        {
            // Load the Excel file
            Workbook workbook = new Workbook();
            workbook.LoadFromFile("Hyperlinks.xlsx");

            // Loop through all worksheets
            for (int s = 0; s < workbook.Worksheets.Count; s++)
            {
                Worksheet sheet = workbook.Worksheets[s];

                // Remove all hyperlinks from the worksheet
                for (int i = sheet.HyperLinks.Count - 1; i >= 0; i--)
                {
                    sheet.HyperLinks.RemoveAt(i);
                }
            }

            // Save the modified workbook
            workbook.SaveToFile("NoHyperlinks.xlsx", ExcelVersion.Version2016);
            workbook.Dispose();
        }
    }
}
- Press F5 to run the C# code.
After running the code, all hyperlinks in the workbook are removed, while all cell text remain unchanged.

Tip: You can customize the code to remove hyperlinks from a specific worksheet, target a particular hyperlink, or process multiple Excel files in bulk.
Best Practices for Deleting Hyperlinks in Excel
While removing hyperlinks in Excel is simple, a few extra steps can help you avoid common problems and keep your worksheet clean and consistent. Here are some best practices to follow:
- Check for Reappearing Hyperlinks
Sometimes, hyperlinks reappear when you re-enter or paste data into a cell. To prevent this, go to
File > Options > Proofing > AutoCorrect Options > AutoFormat As You Type and uncheck Internet and network paths with hyperlinks. This stops Excel from automatically creating new hyperlinks. - Use VBA or C# for Large Datasets
When dealing with large spreadsheets, manually deleting hyperlinks can be inefficient. Instead, use a VBA macro or C# automation to remove all hyperlinks at once. This saves time and ensures consistent results across multiple sheets. - Always Backup Before Running Code
Before running any script or automation, save a backup of your file. Even simple macros can sometimes remove more than intended, especially if hyperlinks are embedded in formulas or comments.
Conclusion
In summary, manual removal is perfect for quick, one-off edits, while VBA or C# automation is ideal for large datasets and repetitive tasks. If you only need to remove a few hyperlinks, Excel's built-in options-right-click menu or the Home tab-are fast and straightforward. For developers or power users managing multiple workbooks, automating the cleanup with VBA or C# saves time and ensures consistency. Choose the method that best fits your workflow, and feel free to experiment with different approaches to see what works best for your Excel files.
FAQs
Q1: How do I remove all hyperlinks in Excel at once?
A1: You can remove all hyperlinks at once using VBA or C# automation. In VBA, use ActiveSheet.Hyperlinks.Delete for a single worksheet or loop through all worksheets to clean the entire workbook. C# libraries like Spire.XLS allow programmatic removal of hyperlinks while keeping the cell text intact.
Q2: Can I remove hyperlinks without losing the cell text in Excel?
A2: Yes. Excel's built-in options-Right-Click menu or Home tab-delete the hyperlinks but retain the cell's display text. VBA and C# solutions achieve the same result.
Q3: How to remove hyperlinks in Excel but keep formatting?
A3: To remove hyperlinks but keep formatting, first select the cell or range containing the hyperlinks. Then, go to the Home tab, click Clear in the Editing group, and choose Clear Hyperlinks from the drop-down list.
Q4: How can I remove hyperlinks from multiple worksheets efficiently?
A4: For multiple worksheets, automation with VBA or C# is recommended. Loop through each sheet and delete hyperlinks programmatically to save time, especially for large workbooks.