Python: Add, Extract and Remove Custom Document Properties in Word Documents
Custom document properties are user-defined fields within a Word document that store specific metadata. Unlike standard properties, such as title, author, or subject, which are predefined by Microsoft Word, these custom properties provide users with the flexibility to define and manage additional metadata fields according to their specific requirements. In this article, we will demonstrate how to add, extract, and remove custom document properties in Word documents in Python using Spire.Doc for Python.
- Add Custom Document Properties to Word in Python
- Extract Custom Document Properties in Word in Python
- Remove Custom Document Properties from Word in Python
Install Spire.Doc for Python
This scenario requires Spire.Doc for Python and plum-dispatch v1.7.4. They can be easily installed in your Windows through the following pip command.
pip install Spire.Doc
If you are unsure how to install, please refer to this tutorial: How to Install Spire.Doc for Python on Windows
Add Custom Document Properties to Word in Python
Spire.Doc for Python provides the CustomDocumentProperties.Add() method, which enables developers to assign different types of values, such as text, time, numeric, or yes or no, to the custom properties of a Word document. The steps below demonstrate how to add custom document properties with different types of values to a Word document using Spire.Doc for Python.
- Initialize an instance of the Document class.
- Load a Word document using the Document.LoadFromFile() method.
- Get the custom document properties of the document through the Document.CustomDocumentProperties property.
- Add custom document properties with different data types to the document using the CustomDocumentProperties.Add(name, value) method.
- Save the result document using the Document.SaveToFile() method.
- Python
from spire.doc import *
from spire.doc.common import *

# Create a Document object
document = Document()
# Load a Word document
document.LoadFromFile("Example.docx")

# Add custom document properties with different types of values to the document
customProperties = document.CustomDocumentProperties
customProperties.Add("DocumentCategory", String("Technical Report"))
customProperties.Add("RevisionNumber", Int32(5))
customProperties.Add("LastReviewedDate", DateTime(2024, 12, 1, 0, 0, 0, 0))
customProperties.Add("RequiresFollowUp", Boolean(False))

# Save the result document
document.SaveToFile("AddCustomDocumentProperties.docx", FileFormat.Docx2016)
document.Close()

Extract Custom Document Properties in Word in Python
Extracting custom document properties allows developers to access metadata for further analysis, reporting, or integration into other applications. Spire.Doc for Python makes it simple to retrieve the details of these properties using the CustomDocumentProperty.Name and CustomDocumentProperty.Value properties. The detailed steps are as follows.
- Initialize an instance of the Document class.
- Load a Word document using the Document.LoadFromFile() method.
- Get the custom document properties of the document through the Document.CustomDocumentProperties property.
- Iterate through the custom document properties.
- Extract the name and value of each custom document property.
- Save the extracted data to a text file.
- Python
from spire.doc import *
from spire.doc.common import *
# Create a Document object
document = Document()
# Load a Word document
document.LoadFromFile("AddCustomDocumentProperties.docx")
# Open a text file to save the extracted custom properties
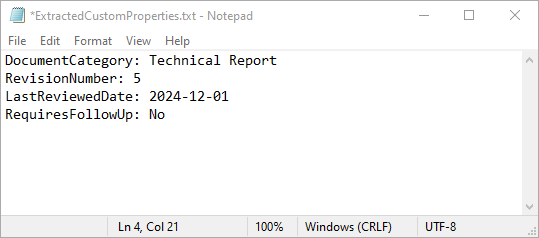
with open("ExtractedCustomProperties.txt", "w") as output_file:
# Iterate through all custom document properties
for i in range(document.CustomDocumentProperties.Count):
# Extract the name and value of each custom property
property_name = document.CustomDocumentProperties.get_Item(i).Name
property_value = document.CustomDocumentProperties.get_Item(i).Value
# Write the property details to the text file
output_file.write(f"{property_name}: {property_value}\n")
document.Close()
Remove Custom Document Properties from Word in Python
Cleaning up custom document properties is crucial for maintaining confidentiality, reducing file size, and ensuring metadata does not contain outdated or irrelevant information. Spire.Doc for Python allows developers to remove custom properties from a Word document using the DocumentProperties.Remove() method. The detailed steps are as follows.
- Initialize an instance of the Document class.
- Load a Word document using the Document.LoadFromFile() method.
- Get the custom document properties of the document through the Document.CustomDocumentProperties property.
- Iterate through the custom document properties.
- Remove each custom document property through its name using the DocumentProperties.Remove() method.
- Save the result document using the Document.SaveToFile() method.
- Python
from spire.doc import *
from spire.doc.common import *

# Create a Document object
document = Document()
# Load a Word document
document.LoadFromFile("AddCustomDocumentProperties.docx")

# Iterate through all custom document properties
customProperties = document.CustomDocumentProperties
for i in range(customProperties.Count - 1, -1, -1):
    # Remove each custom document property by its name
    customProperties.Remove(customProperties[i].Name)

# Save the result document
document.SaveToFile("RemoveCustomDocumentProperties.docx", FileFormat.Docx2016)
document.Close()
Apply for a Temporary License
If you'd like to remove the evaluation message from the generated documents, or to get rid of the function limitations, please request a 30-day trial license for yourself.
How to Integrate Spire.XLS for JavaScript in a React Project
In today's data-driven landscape, efficiently handling Excel files is crucial for web applications. React, a widely-used JavaScript library for user interfaces, can significantly enhance its capabilities by integrating Spire.XLS for JavaScript. This integration allows developers to perform complex operations like reading, writing, and formatting Excel files directly within their React projects.
This article will walk you through the integration of Spire.XLS for JavaScript into your React projects, covering everything from the initial setup to a straightforward usage example.
- Benefits of Using Spire.XLS for JavaScript in React Projects
- Set Up Your Environment
- Integrate Spire.XLS for JavaScript in Your Project
- Create and Save Excel Files Using JavaScript
Benefits of Using Spire.XLS for JavaScript in React Projects
React, a popular JavaScript library for building user interfaces, has revolutionized web development by enabling developers to create interactive and dynamic user experiences. On the other hand, Spire.XLS for JavaScript is a powerful library that allows developers to manipulate Excel files directly in the browser.
By integrating Spire.XLS for JavaScript into your React project, you can add advanced Excel capabilities to your application. Here are some of the key advantages:
- Enhanced Functionality: Spire.XLS for JavaScript enables creating, modifying, and formatting Excel files directly in the browser, enhancing your React app's capabilities and user experience.
- Improved Data Management: Easily import, export, and manipulate Excel files with Spire.XLS, streamlining data management and reducing errors.
- Cross-Browser Compatibility: Designed to work seamlessly across major web browsers, Spire.XLS ensures consistent handling of Excel files in your React application.
- Seamless Integration: Compatible with various JavaScript frameworks, including React, Spire.XLS integrates easily into existing projects without disrupting your workflow.
Set Up Your Environment
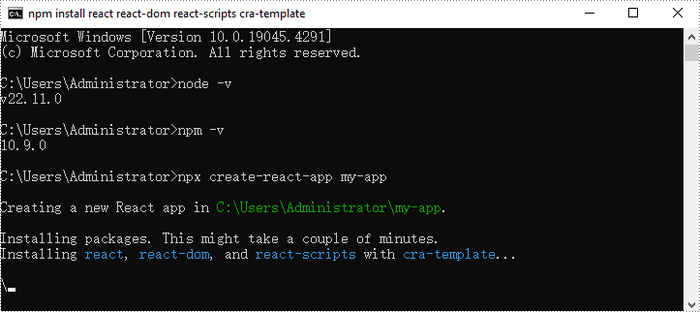
Step 1. Install Node.js and npm
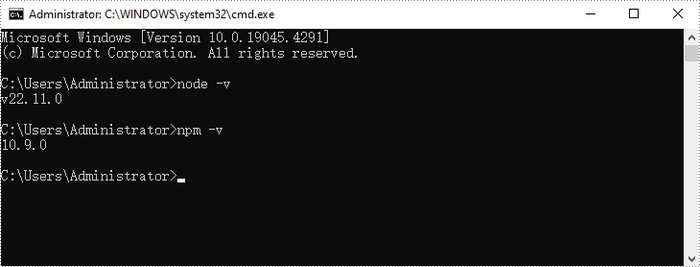
Download and install Node.js from the official website. Make sure to choose the version that matches your operating system.
After the installation is complete, you can verify that Node.js and npm are working correctly by running the following commands in your terminal:
node -v
npm -v

Step 2. Create a New React Project
Create a new React project named my-app using Create React App from terminal:
npx create-react-app my-app
Once the project is created, you can navigate to the project directory and start the development server using the following commands:
cd my-app
npm start

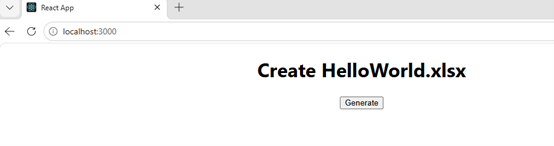
If your React project is compiled successfully, the app will be served at http://localhost:3000, allowing you to view and test your application in a browser.

To visually browse and manage the files in your project, you can open the project using VS Code.

Integrate Spire.XLS for JavaScript in Your Project
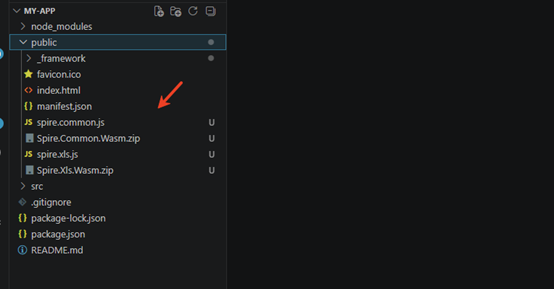
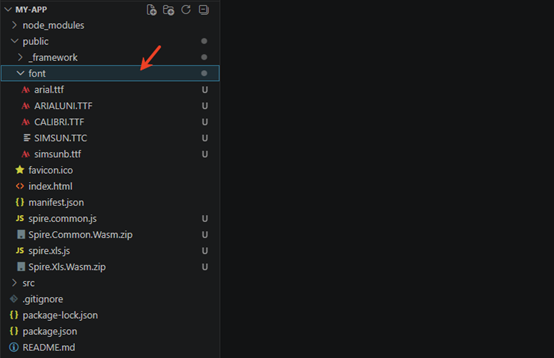
Download Spire.XLS for JavaScript from our website and unzip it to a location on your disk. The downloaded product package has been integrated Spire.Doc for JavaScript,Spire.XLS for JavaScript,Spire.PDF for JavaScript,Spire.Presentation for JavaScript. To use the functionality of Spire.XLS for JavaScript, you need to copy the corresponding files (spire.xls.js, Spire.Xls.Wasm.zip, spire.common.js, Spire.Common.Wasm.zip, and _framework) to the project's “public” folder.
You can also install Spire.XLS for JavaScript using npm. In the terminal within VS Code, run the following command:
npm i spire.office
After downloading this command, find the corresponding file in the node_comodules/spire.office path of the project and copy it to “public” folder.
At the same time, in order to ensure text rendering, the related font files can be added with custom paths. In the following example, the font addition path is: public\font.
Create Excel files using JavaScript
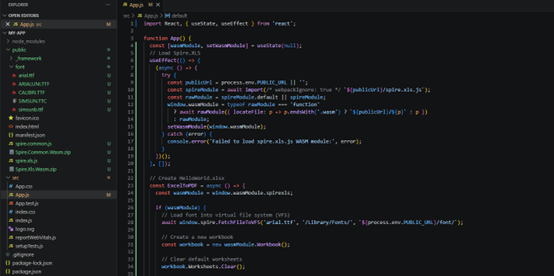
Modify the code in the "App.js" file to generate an Excel file using the WebAssembly (WASM) module. Specifically, utilize the Spire.XLS for JavaScript library for Excel file manipulation.
- JavaScript
import React, { useState, useEffect } from 'react';

function App() {
  const [wasmModule, setWasmModule] = useState(null);
  // Load Spire.XLS
  useEffect(() => {
    (async () => {
      try {
        const publicUrl = process.env.PUBLIC_URL || '';
        const spireModule = await import(/* webpackIgnore: true */ `${publicUrl}/spire.xls.js`);
        const rawModule = spireModule.default || spireModule;
        window.wasmModule = typeof rawModule === 'function'
          ? await rawModule({ locateFile: p => p.endsWith('.wasm') ? `${publicUrl}/${p}` : p })
          : rawModule;
        setWasmModule(window.wasmModule);
      } catch (error) {
        console.error('Failed to load spire.xls.js WASM module:', error);
      }
    })();
  }, []);

  // Create HelloWorld.xlsx
  const ExcelToPDF = async () => {
    const wasmModule = window.wasmModule.spirexls;

    if (wasmModule) {
      // Load font into virtual file system (VFS)
      await window.spire.FetchFileToVFS('arial.ttf', '/Library/Fonts/', `${process.env.PUBLIC_URL}/font/`);

      // Create a new workbook
      const workbook = new wasmModule.Workbook();

      // Clear default worksheets
      workbook.Worksheets.Clear();

      // Add a new worksheet named "MySheet"
      const sheet = workbook.Worksheets.Add("MySheet");

      // Set the text of cell "A1"
      sheet.Range.get("A1").Text = "Hello World";

      // Set column width to auto-fit
      sheet.Range.get("A1").AutoFitColumns();

      // Define output file name
      const outputFileName = 'HelloWorld.xlsx';

      // Save the workbook to the specified path
      workbook.SaveToFile({ fileName: outputFileName, version: wasmModule.ExcelVersion.Version2010 });

      // Read the saved file and convert to Blob object
      const modifiedFileArray = window.dotnetRuntime.Module.FS.readFile(outputFileName);
      const modifiedFile = new Blob([modifiedFileArray], { type: 'application/vnd.openxmlformats-officedocument.spreadsheetml.sheet' });

      // Create a URL for the Blob and start download
      const url = URL.createObjectURL(modifiedFile);
      const a = document.createElement('a');
      a.href = url;
      a.download = outputFileName;
      document.body.appendChild(a);
      a.click();
      document.body.removeChild(a);
      URL.revokeObjectURL(url);

      // Clean up resources used by the workbook
      workbook.Dispose();
    }
  };

  return (
    <div style={{ textAlign: 'center', height: '300px' }}>
      <h1>Create HelloWorld.xlsx</h1>
      <button onClick={ExcelToPDF} disabled={!wasmModule}>
        Generate
      </button>
    </div>
  );
}

export default App;
Using "npm start" to run the program, and click "Generate" to download the generated Excel file.
Apply for a Temporary License
If you'd like to remove the evaluation message from the generated documents, or to get rid of the function limitations, please request a 30-day trial license for yourself.
How to Integrate Spire.XLS for JavaScript in a Node.js Project
Excel manipulation is a crucial aspect of many modern web applications, from data analysis to report generation. Node.js, with its non-blocking I/O model and rich ecosystem, is an excellent choice for backend development. When combined with Spire.XLS for JavaScript, you can unlock a world of possibilities for handling Excel files efficiently.
This guide will walk you through the process of integrating Spire.XLS for JavaScript into your Node.js projects, covering everything from initial setup to generating a simple Excel document.
- Benefits of Using Spire.XLS for JavaScript in Node.js Projects
- Set Up Your Environment
- Integrate Spire.XLS for JavaScript in Your Project
- Create and Save Excel Files Using JavaScript
Benefits of Using Spire.XLS for JavaScript in Node.js Projects
Node.js is a great option for developing scalable network applications. When paired with Spire.XLS for JavaScript, you get a robust solution for handling Excel files. Here are some key features and benefits of using Spire.XLS for JavaScript in Node.js projects:
- Comprehensive Excel Support: Spire.XLS for JavaScript supports a wide range of Excel features, including formulas, charts, pivot tables, and more.
- High Performance: The library is optimized for speed, ensuring that your application remains responsive even when handling large datasets.
- Cross-Platform Compatibility: With Node.js, you can run your application on any platform that supports JavaScript, including Windows, macOS, and Linux.
- Secure and Reliable: The library is designed to be secure, with features like data validation and encryption to protect your data.
By leveraging the strengths of both Node.js and Spire.XLS for JavaScript, you can build powerful applications that handle Excel files with ease.
Set Up Your Environment
Step 1
Download and install Node.js from the official website. Make sure to choose the version that matches your operating system.
After the installation is complete, you can verify that Node.js and npm are installed correctly, along with the version numbers, by entering the following commands in CMD:
node -v
npm -v
Step 2
Initialize a Node.js project:
npm init -y
Installation dependencies:
npm install adm-zip@^0.5.16
Configure packaging.json:
{
	"name": "nodejstest",
    "version": "1.0.0",
    "description": "Simple test project to generate HelloWorld.xlsx using spire.xls.js",
    "main": "index.js",
    "type": "module",
    "scripts": {
      "start": "node --experimental-modules --experimental-wasm-modules --experimental-vm-modules index.js"
    },
    "dependencies": {
      "adm-zip": "^0.5.16"
    }
  }
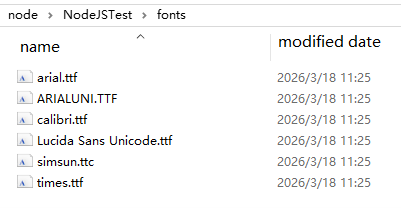
Customize folder in the root directory to put some font files, you can customize and add fonts based on the font used in your documents.
Integrate Spire.XLS for JavaScript in Your Project
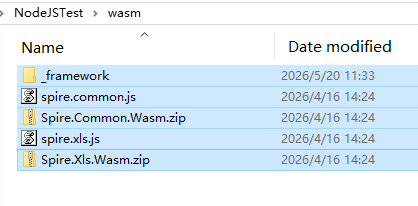
Download Spire.XLS for JavaScript and unzip it to a location on your disk. The downloaded product package integrates Spire.Doc for JavaScript, Spire.XLS for JavaScript, Spire.PDF for JavaScript, and Spire.Presentation for JavaScript. To use the features of Spire.XLS for JavaScript, customize the folder in the root directory, this tutorial defined the 'wasm' folder, and copy the corresponding files (spire.xls.js, Spire.Xls.Wasm.zip, spire.common.js, Spire.Common.Wasm.zip, and the _framework folder) to the “wasm” folder.
Add the 'index.js' file to the root directory of the project and set the following content to create a simple Excel file
- JavaScript
//NodeJSTest----create "HelloWorld.xlsx"
import fs from 'fs/promises';
import path from 'path';
import { fileURLToPath } from 'url';
import AdmZip from 'adm-zip';
const __filename = fileURLToPath(import.meta.url);
const __dirname = path.dirname(__filename);
async function extractWasmFiles() {
const wasmDir = path.join(__dirname, 'wasm');
const frameworkDir = path.join(wasmDir, '_framework');
await fs.mkdir(frameworkDir, { recursive: true });
for (const zipName of ['Spire.Common.Wasm.zip', 'Spire.Xls.Wasm.zip']) {
const zipPath = path.join(wasmDir, zipName);
try {
await fs.access(zipPath);
new AdmZip(zipPath).extractAllTo(wasmDir, true);
} catch { }
}
}
async function main() {
try {
await extractWasmFiles();
const { spirexls } = await import('./wasm/spire.xls.js');
const spire = globalThis.spire;
if (!spire) throw new Error('WASM module not loaded correctly');
const outputDir = path.join(__dirname, 'output');
await fs.mkdir(outputDir, { recursive: true });
const fontsPath = path.join(__dirname, 'fonts');
try {
await fs.access(fontsPath);
spire.copyLocalPathToVFS(fontsPath, '/Library/Fonts/');
} catch { }
// Create a new workbook
const workbook = new spirexls.Workbook();
// Clear default worksheets
workbook.Worksheets.Clear();
// Add a new worksheet named "MySheet"
const sheet = workbook.Worksheets.Add("MySheet");
// Set text for the "A1" range
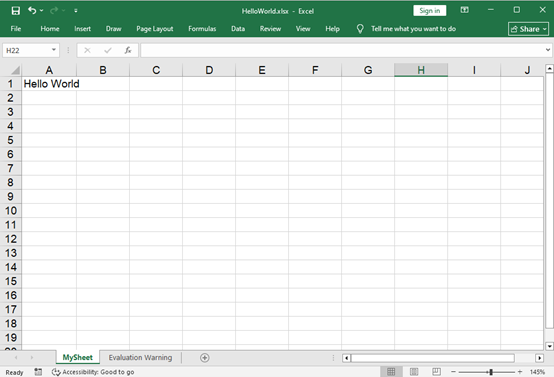
sheet.Range.get("A1").Text = "Hello World";
// Set the column width to auto fit
sheet.Range.get("A1").AutoFitColumns();
// Define the output file name
const outputFileName = 'HelloWorld.xlsx';
// Save the workbook to the specified path
workbook.SaveToFile({ fileName: outputFileName, version: spirexls.ExcelVersion.Version2010 });
const outputFile = path.join(outputDir, outputFileName);
spire.copyFileFromFSToLocalStorage(outputFileName, outputFile);
workbook.Dispose();
console.log(`Document saved to ${outputFile}`);
} catch (error) {
console.error(error);
process.exit(1);
}
}
main();
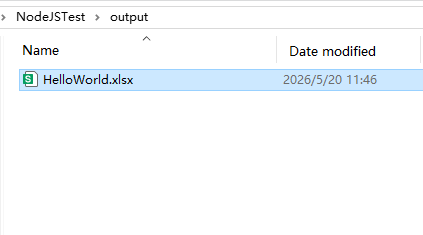
Using “npm start” run the program, you will find the generated Word file in the designated file path.
Apply for a Temporary License
If you'd like to remove the evaluation message from the generated documents, or to get rid of the function limitations, please request a 30-day trial license for yourself.
Python: Insert, Retrieve, Reorder, and Remove Slides in PowerPoint Sections
PowerPoint presentations are a powerful tool for presenting information in an organized and engaging manner. To further enhance the organization of slides, PowerPoint allows users to group slides into sections. This feature makes navigating and managing large presentations much easier. In this article, we'll show you how to manage slides within PowerPoint sections in Python using Spire.Presentation for Python. Specifically, we'll cover how to add, retrieve, reorder, and remove slides in these sections.
- Insert Slides into a PowerPoint Section in Python
- Retrieve Slides from a PowerPoint Section in Python
- Reorder Slides in a PowerPoint Section in Python
- Remove Slides from a PowerPoint Section in Python
Install Spire.Presentation for Python
This scenario requires Spire.Presentation for Python and plum-dispatch v1.7.4. They can be easily installed in your Windows through the following pip command.
pip install Spire.Presentation
If you are unsure how to install, please refer to this tutorial: How to Install Spire.Presentation for Python on Windows
Insert Slides into a PowerPoint Section in Python
Inserting slides is essential when you want to introduce new content to a section. Using Spire.Presentation for Python, you can quickly insert a slide into a section with the Section.Insert() method. The detailed steps are as follows.
- Create an instance of the Presentation class.
- Load a PowerPoint presentation using the Presentation.LoadFromFile() method.
- Get a specific section through its index (0-based) using the Presentation.SectionList(index) property.
- Add a new slide to the presentation, then insert it into the section using the Section.Insert() method.
- Remove the added slide from the presentation.
- Save the resulting presentation using the Presentation.SaveToFile() method.
- Python
from spire.presentation import *

# Create an instance of the Presentation class
presentation = Presentation()
# Load a PowerPoint presentation
presentation.LoadFromFile("Example.pptx")

# Access the first section
first_section = presentation.SectionList.get_Item(0)

# Add a new slide to the presentation and insert it at the start of the section
slide = presentation.Slides.Append()
first_section.Insert(0, slide)

# Remove the added slide from the presentation
presentation.Slides.Remove(slide)

# Save the modified presentation
presentation.SaveToFile("InsertSlidesInSection.pptx", FileFormat.Pptx2016)
# Close the Presentation object
presentation.Dispose()
Retrieve Slides from a PowerPoint Section in Python
Retrieving slides from a specific section allows you to focus on a smaller group of slides for tasks such as reordering or applying custom formatting. Using the Section.GetSlides() method in Spire.Presentation for Python, you can easily access all the slides in a particular section. The detailed steps are as follows.
- Create an instance of the Presentation class.
- Load a PowerPoint presentation using the Presentation.LoadFromFile() method.
- Get a specific section through its index (0-based) using the Presentation.SectionList(index) property.
- Retrieve the slides within the section using the Section.GetSlides() method.
- Iterate through the retrieved slides and get the slide number (1-based) of each slide.
- Python
from spire.presentation import *

# Create an instance of the Presentation class
presentation = Presentation()
# Load a PowerPoint presentation
presentation.LoadFromFile("Example.pptx")

# Retrieve the slides in the 3rd section
section = presentation.SectionList.get_Item(2)
slides = section.GetSlides()

output_content = "The slide numbers in this section are:\n"

# Get the slide number of each slide in the section
for slide in slides:
    output_content += str(slide.SlideNumber) + " "

# Save the slide number to a text file
with open("slide_numbers.txt", "w") as file:
    file.write(output_content)

Reorder Slides in a PowerPoint Section in Python
Reordering slides is important to ensure related content is in the right order. Spire.Presentation for Python offers the Section.Move() method, which allows you to move a slide to a new position within a section. The detailed steps are as follows.
- Create an instance of the Presentation class.
- Load a PowerPoint presentation using the Presentation.LoadFromFile() method.
- Get a specific section through its index (0-based) using the Presentation.SectionList(index) property.
- Move a specific slide in the section to another position using the Section.Move() method.
- Save the resulting presentation using the Presentation.SaveToFile() method.
- Python
from spire.presentation import *

# Create an instance of the Presentation class
presentation = Presentation()
# Load a PowerPoint presentation
presentation.LoadFromFile("Example.pptx")

# Access the 3rd section
section = presentation.SectionList.get_Item(2)

# Retrieve the slides in the section
slides = section.GetSlides()

# Move the 1st slide in the section to the specified position
section.Move(2, slides[0])

# Save the modified presentation
presentation.SaveToFile("ReorderSlidesInSection.pptx", FileFormat.Pptx2016)
# Close the Presentation object
presentation.Dispose()
Remove Slides from a PowerPoint Section in Python
Removing slides from a section streamlines your presentation, particularly when some slides become outdated or unnecessary. With Spire.Presentation for Python, you can easily remove a single slide or multiple slides from a section using the Section.RemoveAt() or Section.RemoveRange() method. The detailed steps are as follows.
- Create an instance of the Presentation class.
- Load a PowerPoint presentation using the Presentation.LoadFromFile() method.
- Get a specific section through its index (0-based) using the Presentation.SectionList(index) property.
- Remove a specific slide or a range of slides from the presentation using the Section.RemoveAt() or Section.RemoveRange() method.
- Save the resulting presentation using the Presentation.SaveToFile() method.
- Python
from spire.presentation import *

# Create an instance of the Presentation class
presentation = Presentation()
# Load a PowerPoint presentation
presentation.LoadFromFile("Example.pptx")

# Access the 3rd section
section = presentation.SectionList.get_Item(2)

# Remove the first slide from the section
section.RemoveAt(0)

# Or remove a range of slides from the section
# section.RemoveRange(0, 2)

# Save the modified presentation
presentation.SaveToFile("RemoveSlidesInSection.pptx", FileFormat.Pptx2016)
# Close the Presentation object
presentation.Dispose()
Apply for a Temporary License
If you'd like to remove the evaluation message from the generated documents, or to get rid of the function limitations, please request a 30-day trial license for yourself.
Python: Extract Annotations from PDF
Annotations in PDF documents play a crucial role in enhancing collaboration, emphasizing key points, or providing additional context. Extracting annotations is essential for efficiently analyzing PDF content, but manual extraction can be tedious. This guide demonstrates how to extract annotations from PDF with Python using Spire.PDF for Python, providing a faster and more flexible solution to access important information.
- Extract Specified Annotations from PDF Documents
- Extract All Annotations from a PDF Page
- Extract All Annotations from PDF Files
Install Spire.PDF for Python
This scenario requires Spire.PDF for Python and plum-dispatch v1.7.4. They can be easily installed in your Windows through the following pip command.
pip install Spire.PDF
If you are unsure how to install it, please refer to this tutorial: How to Install Spire.PDF for Python on Windows.
Extract Specified Annotations from PDF Documents
Although Adobe Acrobat offers a built-in one-click annotation extraction feature, it lacks flexibility when handling specific annotations. If you only need to extract one or a few annotations, you must manually locate and copy them, which can be inefficient, especially when working with PDFs containing multiple annotations. Spire.PDF (short for Spire.PDF for Python), however, provides the PdfAnnotationCollection.get_item() method, enabling targeted extraction of specific annotations, making PDF annotation management more flexible and efficient.
Steps to extract specified annotations from PDF:
- Create an object of PdfDocument class.
- Load a PDF document from the local storage with PdfDocument.LoadFromFile() method.
- Get a page using PdfDocument.Pages[] property, and access the annotations collection with PdfPageBase.AnnotationsWidget property.
- Create a list to store annotation information.
- Access the specified annotation using PdfAnnotationCollection.get_Item() method.
- Append annotation details to the list.
- Save the list as a Text file.
Here is the code example of exporting the first annotation on the third page:
- Python
from spire.pdf.common import *
from spire.pdf import *

# Create a new PDF document
pdf = PdfDocument()

# Load the file from disk
pdf.LoadFromFile( "Sample.pdf")

# Get the third page
page = doc.Pages.get_Item(2)

# Access the annotations on the page
annotations = page.AnnotationsWidget

# Create a list to save information of annotations
sb = []

# Access the first annotation on the page
annotation = annotations.get_Item(0)

# Append the annotation details to the list
sb.append("Annotation information: ")
sb.append("Text: " + annotation.Text)
modifiedDate = annotation.ModifiedDate.ToString()
sb.append("ModifiedDate: " + modifiedDate)

# Save the list as a Text file
with open("GetSpecificAnnotation.txt", "w", encoding="utf-8") as file:
    file.write("\n".join(sb))

# Close the PDF file
pdf.Close()

Extract All Annotations from a PDF Page
To export all annotations from a specified PDF page, you can still use the PdfPageBase.AnnotationsWidget property along with the PdfAnnotationCollection.get_item() method. However, you will need to iterate through all the annotations on the page to ensure none are missed. Below are the steps and code examples to guide you through the process.
Steps to extract annotations from PDF pages:
- Create a PdfDocument instance.
- Read a PDF document from the local storage with PdfDocument.LoadFromFile() method.
- Access the annotation collection on the specified page using PdfDocument.Pages.AnnotationsWidget property.
- Create a list to store annotation information.
- Loop through annotations on a certain page.
- Retrieve each annotation using PdfAnnotationCollection.get_Item() method.
- Add annotation details to the list.
- Save the list as a Text file.
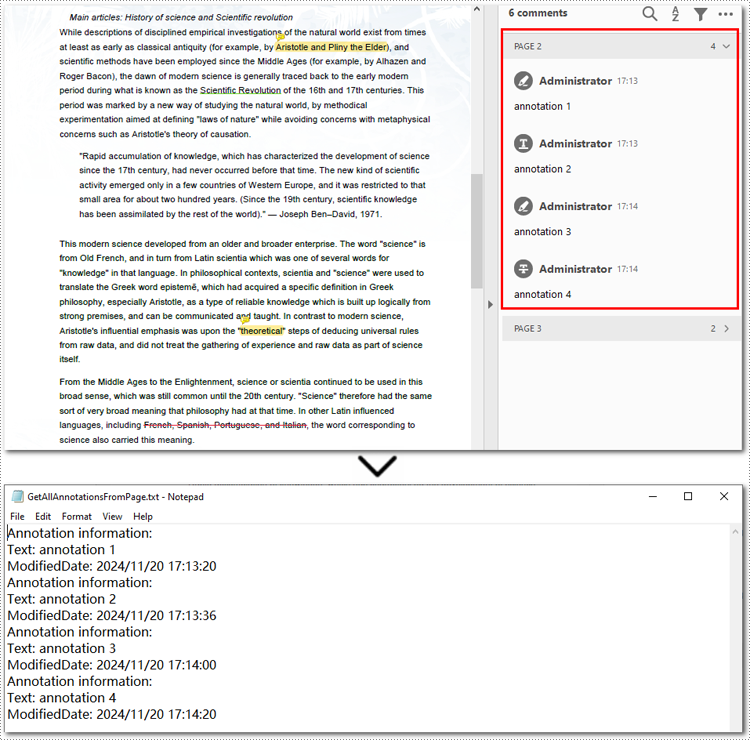
Below is the code example of extracting all annotations on the second page:
- Python
from spire.pdf.common import *
from spire.pdf import *

# Create a new PDF document
pdf = PdfDocument()

# Load the file from disk
pdf.LoadFromFile("Sample.pdf")

# Get all annotations from the second page
annotations = pdf.Pages.get_Item(1).AnnotationsWidget

# Create a list to maintain annotation details
sb = []

# Loop through annotations on the page
if annotations.Count > 0:
    for i in range(annotations.Count):
        # Get the current annotation
        annotation = annotations.get_Item(i)

        # Get the annotation details
        if isinstance(annotation, PdfPopupAnnotationWidget):
            continue
        sb.append("Annotation information: ")
        sb.append("Text: " + annotation.Text)
        modifiedDate = annotation.ModifiedDate.ToString()
        sb.append("ModifiedDate: " + modifiedDate)

# Save annotations as a Text file
with open("GetAllAnnotationsFromPage.txt", "w", encoding="utf-8") as file:
    file.write("\n".join(sb))

# Release resources
pdf.Close()
Extract All Annotations from PDF Files
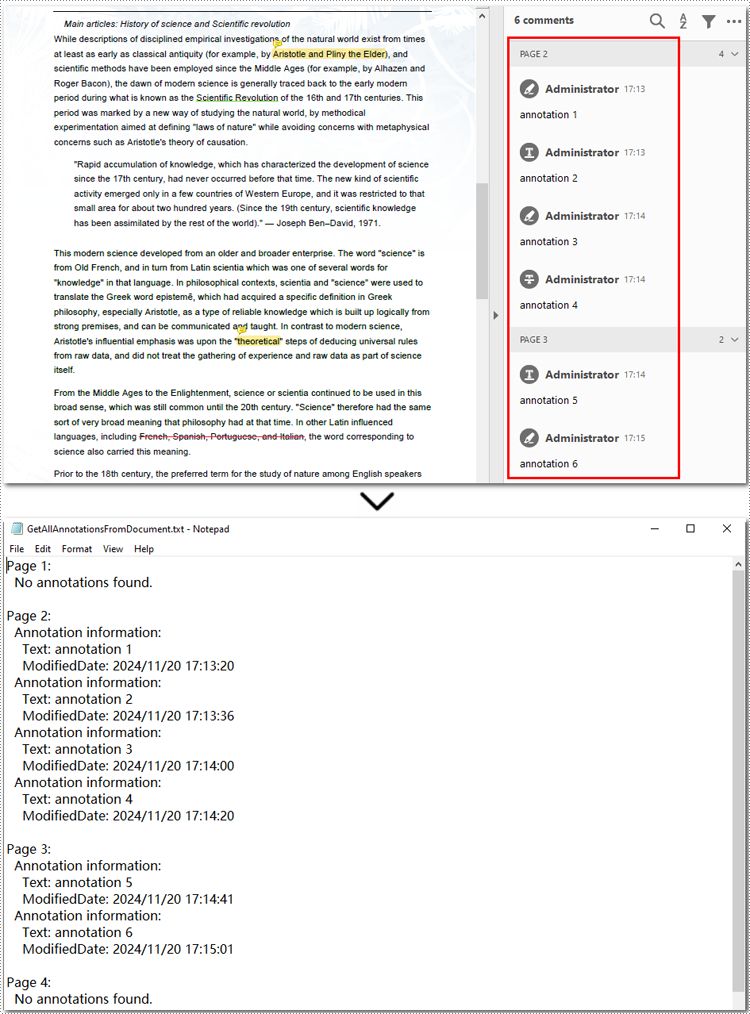
The final section of this guide illustrates how to extract all annotations from a PDF document using Python. The process is similar to exporting annotations from a single page but involves iterating through each page, traversing all annotations, and accessing their details. Finally, the extracted annotation details are saved to a text file for further use. Let’s take a closer look at the detailed steps.
Steps to extract all annotations from a PDF document:
- Create an instance of PdfDocument class.
- Read a PDF document from the disk with PdfDocument.LoadFromFile() method.
- Initialize a list to store annotation information.
- Loop through all pages and access the annotation collection with PdfDocument.Pages.AnnotationsWidget property.
- Iterate each annotation in the collection and get annotations using PdfAnnotationCollection.get_item() method.
- Append annotation details to the list.
- Output the list as a Text file.
Here is an example of exporting all annotations from a PDF file:
- Python
from spire.pdf.common import *
from spire.pdf import *

# Create a new PDF document
pdf = PdfDocument()

# Load the file from disk
pdf.LoadFromFile("Sample.pdf")

# Create a list to save annotation details
sb = []

# Iterate through all pages in the PDF document
for pageIndex in range(pdf.Pages.Count):
    sb.append(f"Page {pageIndex + 1}:")

    # Access the annotation collection of the current page
    annotations = pdf.Pages.get_Item(pageIndex).AnnotationsWidget

    # Loop through annotations in the collection
    if annotations.Count > 0:
        for i in range(annotations.Count):
            # Get the annotations of the current page
            annotation = annotations.get_Item(i)

            # Skip invalid annotations (empty text and default date)
            if not annotation.Text.strip() and annotation.ModifiedDate.ToString() == "0001/1/1 0:00:00":
                continue

            # Extract annotation information
            sb.append("Annotation information: ")
            sb.append("Text: " + (annotation.Text.strip() or "N/A"))
            modifiedDate = annotation.ModifiedDate.ToString()
            sb.append("ModifiedDate: " + modifiedDate)
    else:
        sb.append("No annotations found.")

    # Add a blank line after each page
    sb.append("")

# Save all annotations to a file
with open("GetAllAnnotationsFromDocument.txt", "w", encoding="utf-8") as file:
    file.write("\n".join(sb))

# Close the PDF document
pdf.Close()
Apply for a Temporary License
If you'd like to remove the evaluation message from the generated documents, or to get rid of the function limitations, please request a 30-day trial license for yourself.
Python: Split PowerPoint Presentations
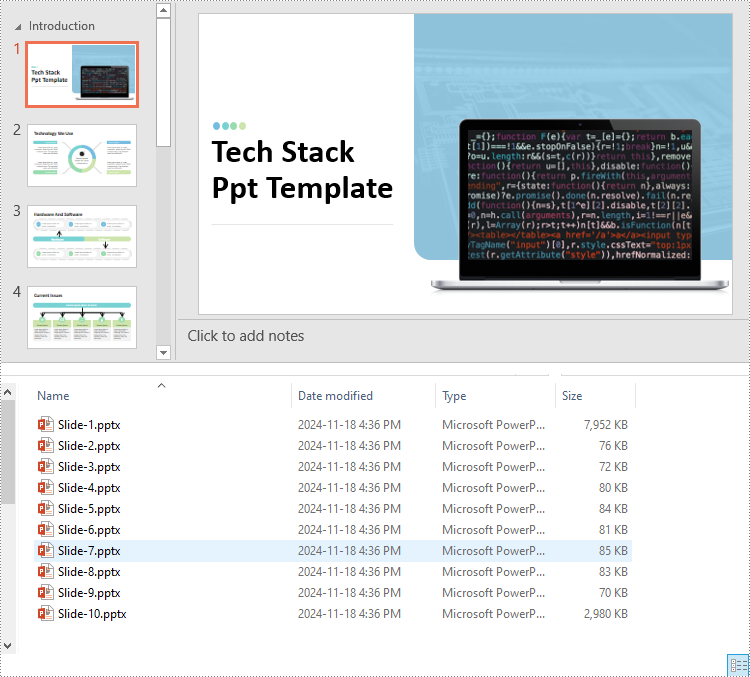
Splitting a PowerPoint presentation into smaller files or individual sections can be useful in various situations. For instance, when collaborating with a team, each member may only need a specific section of the presentation to work on. Additionally, breaking a large presentation into smaller parts can simplify sharing over email or uploading to platforms with file size restrictions. In this article, we'll show you how to split PowerPoint presentations by slides, slide ranges, and sections in Python using Spire.Presentation for Python.
- Split PowerPoint Presentations by Slides in Python
- Split PowerPoint Presentations by Slide Ranges in Python
- Split PowerPoint Presentations by Sections in Python
Install Spire.Presentation for Python
This scenario requires Spire.Presentation for Python and plum-dispatch v1.7.4. They can be easily installed in your Windows through the following pip command.
pip install Spire.Presentation
If you are unsure how to install, please refer to this tutorial: How to Install Spire.Presentation for Python on Windows
Split PowerPoint Presentations by Slides in Python
Developers can use Spire.Presentation for Python to split a PowerPoint presentation into individual slides by iterating through the slides in the presentation and adding each slide to a new presentation. The detailed steps are as follows.
- Create an instance of the Presentation class.
- Load a PowerPoint presentation using the Presentation.LoadFromFile() method.
- Iterate through all slides in the presentation:
- Access the current slide through the Presentation.Slides[index] property.
- Create a new PowerPoint presentation using the Presentation class and remove its default slide using the Presentation.Slides.RemoveAt(0) method.
- Append the current slide to the new presentation using the Presentation.Slides.AppendBySlide() method.
- Save the new presentation as a file using the ISlide.SaveToFile() method.
- Python
from spire.presentation.common import *
from spire.presentation import *

# Create an instance of the Presentation class
presentation = Presentation()
# Load a PowerPoint presentation
presentation.LoadFromFile("Sample.pptx")

# Iterate through all slides in the presentation
for i in range(presentation.Slides.Count):
    # Get the current slide
    slide = presentation.Slides[i]

    # Create a new PowerPoint presentation and remove its default slide
    newPresentation = Presentation()
    newPresentation.Slides.RemoveAt(0)

    # Append the current slide to the new presentation
    newPresentation.Slides.AppendBySlide(slide)

    # Save the new presentation as a file
    newPresentation.SaveToFile(f"output/Presentations/Slide-{i + 1}.pptx", FileFormat.Pptx2013)
    newPresentation.Dispose()

presentation.Dispose()
Split PowerPoint Presentations by Slide Ranges in Python
Apart from splitting a PowerPoint presentation into individual slides, developers can also divide it into specific ranges of slides by adding the desired slides to new presentations. The detailed steps are as follows.
- Create an instance of the Presentation class.
- Load a PowerPoint presentation using the Presentation.LoadFromFile() method.
- Create new PowerPoint presentations using the Presentation class and remove the default slides within them using the Presentation.Slides.RemoveAt(0) method.
- Append specified ranges of slides to the new presentations using the Presentation.Slides.AppendBySlide() method.
- Save the new presentations as files using the Presentation.SaveToFile() method.
- Python
from spire.presentation.common import *
from spire.presentation import *

# Create an instance of the Presentation class
presentation = Presentation()
# Load a PowerPoint presentation
presentation.LoadFromFile("Sample.pptx")

# Create two new PowerPoint presentations and remove their default slides
presentation1 = Presentation()
presentation2 = Presentation()
presentation1.Slides.RemoveAt(0)
presentation2.Slides.RemoveAt(0)

# Append slides 1-3 to the first new presentation
for i in range(3):
    presentation1.Slides.AppendBySlide(presentation.Slides[i])
# Append the remaining slides to the second new presentation
for i in range(3, presentation.Slides.Count):
    presentation2.Slides.AppendBySlide(presentation.Slides[i])

# Save the new presentations as files
presentation1.SaveToFile("output/Presentations/SlideRange1.pptx", FileFormat.Pptx2013)
presentation2.SaveToFile("output/Presentations/SlideRange2.pptx", FileFormat.Pptx2013)

presentation1.Dispose()
presentation2.Dispose()
presentation.Dispose()
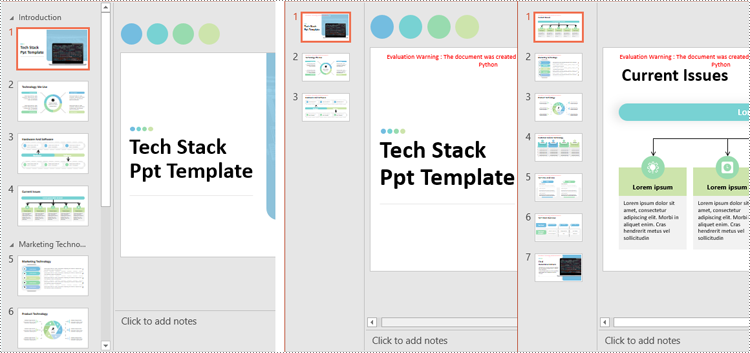
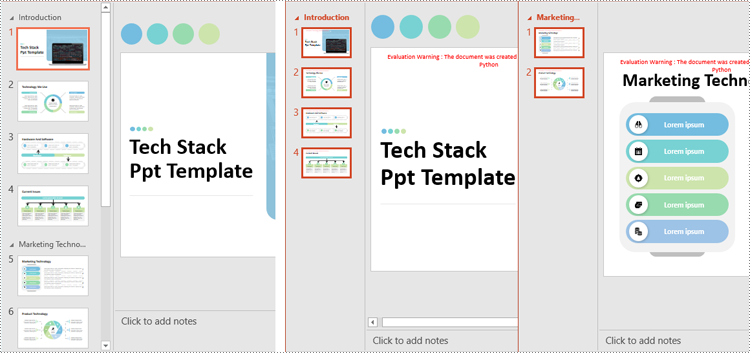
Split PowerPoint Presentations by Sections in Python
Sections in PowerPoint are often used to organize slides into manageable groups. With Spire.Presentation for Python, developers can split a PowerPoint presentation into sections by iterating through the sections in the presentation and adding the slides within each section to a new presentation. The detailed steps are as follows.
- Create an instance of the Presentation class.
- Load a PowerPoint presentation using the Presentation.LoadFromFile() method.
- Iterate through all sections in the presentation:
- Access the current section through the Presentation.SectionList[] property.
- Create a new PowerPoint presentation using the Presentation class and remove its default slide using the Presentation.Slides.RemoveAt(0) method.
- Add a section to the new presentation with the same name using the Presentation.SectionList.Append() method.
- Retrieve the slides of the current section using the Section.GetSlides() method.
- Iterate through the retrieved slides and add them to the section of the new presentation using the Section.Insert() method.
- Save the new presentation as a file using the Presentation.SaveToFile() method.
- Python
from spire.presentation.common import *
from spire.presentation import *

# Create an instance of the Presentation class
presentation = Presentation()
# Load a PowerPoint presentation
presentation.LoadFromFile("Sample.pptx")

# Iterate through all sections
for i in range(presentation.SectionList.Count):
    # Get the current section
    section = presentation.SectionList.get_Item(0)

    # Create a new PowerPoint presentation and remove its default slide
    newPresentation = Presentation()
    newPresentation.Slides.RemoveAt(0)
    # Add a section to the new presentation
    newSection = newPresentation.SectionList.Append(section.Name)

    # Retrieve the slides of the current section
    slides = section.GetSlides()

    # Insert each retrieved slide into the section of the new presentation
    for slide_index, slide in enumerate(slides):
        newSection.Insert(slide_index, slide)

    # Save the new presentation as a file
    newPresentation.SaveToFile(f"output/Presentations/Section-{i + 1}.pptx", FileFormat.Pptx2019)
    newPresentation.Dispose()

presentation.Dispose()
Apply for a Temporary License
If you'd like to remove the evaluation message from the generated documents, or to get rid of the function limitations, please request a 30-day trial license for yourself.
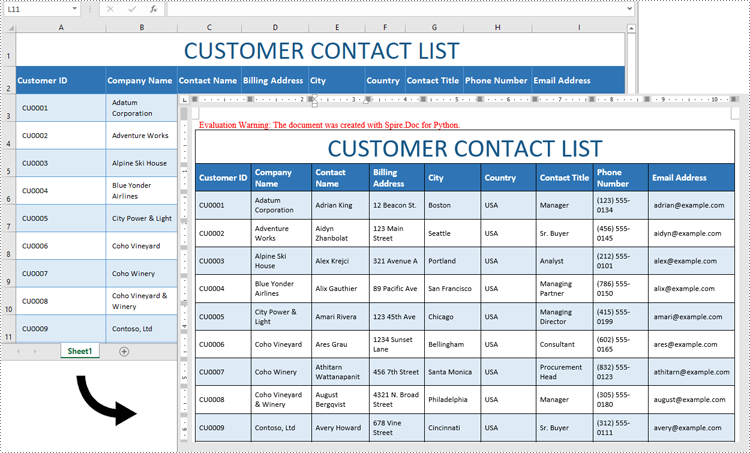
Python: Convert Excel Data to Word Table with Formatting
Excel is ideal for data calculations, analysis, and organization, while Word shines at creating polished, well-formatted documents and reports. Transferring data from Excel to Word is often necessary for professionals preparing reports or presentations, as it allows for advanced formatting options that enhance readability and create a more professional look. In this guide, you will learn how to convert data in an Excel sheet to a Word table with formatting in Python using Spire.Office for Python.
Install Spire.Office for Python
This scenario requires Spire.Office for Python and plum-dispatch v1.7.4. They can be easily installed in your Windows through the following pip command.
pip install Spire.Office
Convert Excel Data to Word Table with Formatting in Python
This process uses two libraries in the Spire.Office for Python package. They’re Spire.XLS for Python and Spire.Doc for Python. The former is used to read data and formatting from an Excel worksheet, and the latter is used to create a Word document and write data, including formatting, into a table. To make this code example easy to understand, we have defined the following two custom methods that handle specific tasks:
- MergeCells() - Merge the corresponding cells in the Word table based on the merged cells in the Excel sheet.
- CopyStyle() - Copy various cell styles from the Excel worksheet to the Word table, including font style, background color, and text alignment.
The following steps demonstrate how to convert data from an Excel sheet to a Word table with formatting using Spire.Office for Python.
- Create an object of the Workbook class and load a sample Excel file using the Workbook.LoadFromFile() method.
- Get a specific worksheet through the Workbook.Worksheets[index] property.
- Create a new Word document using the Document class, and add a section to it.
- Add a table to the Word document using the Section.AddTable() method.
- Detect the merged cells in the worksheet and merge the corresponding cells in the Word tale using the custom method MergeCells().
- Iterate through the cells in the worksheet, read the data of the cells through the CellRange.Value property and add the data to Word table cells using the TableCell.AddParagraph().AppendText() method.
- Copy the cell styles from the Excel worksheet to the Word table using the custom method CopyStyle().
- Save the Word document to a file using the Document.SaveToFile() method.
- Python
from spire.xls import *
from spire.doc import *

def MergeCells(sheet, table):
    """Merge cells in the Word table based on merged cells in the Excel sheet."""
    if sheet.HasMergedCells:
        ranges = sheet.MergedCells
        for i in range(len(ranges)):
            startRow = ranges[i].Row
            startColumn = ranges[i].Column
            rowCount = ranges[i].RowCount
            columnCount = ranges[i].ColumnCount

            if rowCount > 1 and columnCount > 1:
                for j in range(startRow, startRow + rowCount):
                    table.ApplyHorizontalMerge(j - 1, startColumn - 1, startColumn - 1 + columnCount - 1)
                table.ApplyVerticalMerge(startColumn - 1, startRow - 1, startRow - 1 + rowCount - 1)

            if rowCount > 1 and columnCount == 1:
                table.ApplyVerticalMerge(startColumn - 1, startRow - 1, startRow - 1 + rowCount - 1)

            if columnCount > 1 and rowCount == 1:
                table.ApplyHorizontalMerge(startRow - 1, startColumn - 1, startColumn - 1 + columnCount - 1)

def CopyStyle(wTextRange, xCell, wCell):
    """Copy cell styling from Excel to Word."""
    # Copy font style
    wTextRange.CharacterFormat.TextColor = Color.FromRgb(xCell.Style.Font.Color.R, xCell.Style.Font.Color.G, xCell.Style.Font.Color.B)
    wTextRange.CharacterFormat.FontSize = float(xCell.Style.Font.Size)
    wTextRange.CharacterFormat.FontName = xCell.Style.Font.FontName
    wTextRange.CharacterFormat.Bold = xCell.Style.Font.IsBold
    wTextRange.CharacterFormat.Italic = xCell.Style.Font.IsItalic

    # Copy background color
    if xCell.Style.FillPattern is not ExcelPatternType.none:
        wCell.CellFormat.Shading.BackgroundPatternColor=Color.FromRgb(xCell.Style.Color.R, xCell.Style.Color.G, xCell.Style.Color.B)


        # Copy horizontal alignment
    if xCell.HorizontalAlignment == HorizontalAlignType.Left:
        wTextRange.OwnerParagraph.Format.HorizontalAlignment = HorizontalAlignment.Left
    elif xCell.HorizontalAlignment == HorizontalAlignType.Center:
        wTextRange.OwnerParagraph.Format.HorizontalAlignment = HorizontalAlignment.Center
    elif xCell.HorizontalAlignment == HorizontalAlignType.Right:
        wTextRange.OwnerParagraph.Format.HorizontalAlignment = HorizontalAlignment.Right

    # Copy vertical alignment
    if xCell.VerticalAlignment == VerticalAlignType.Bottom:
        wCell.CellFormat.VerticalAlignment = VerticalAlignment.Bottom
    elif xCell.VerticalAlignment == VerticalAlignType.Center:
        wCell.CellFormat.VerticalAlignment = VerticalAlignment.Middle
    elif xCell.VerticalAlignment == VerticalAlignType.Top:
        wCell.CellFormat.VerticalAlignment = VerticalAlignment.Top

# Load an Excel file
workbook = Workbook()
workbook.LoadFromFile("Contact list.xlsx")

# Get the first worksheet
sheet = workbook.Worksheets[0]

# Create a Word document
doc = Document()
section = doc.AddSection()
section.PageSetup.Orientation = PageOrientation.Landscape

# Add a table
table = section.AddTable(True)
table.ResetCells(sheet.LastRow, sheet.LastColumn)

# Merge cells
MergeCells(sheet, table)

# Export data and styles from Excel to Word table
for r in range(1, sheet.LastRow + 1):
    table.Rows[r - 1].Height = float(sheet.Rows[r - 1].RowHeight)

    for c in range(1, sheet.LastColumn + 1):
        xCell = sheet.Range[r, c]
        wCell = table.Rows[r - 1].Cells[c - 1]

        # Add text from Excel to Word table cell
        textRange = wCell.AddParagraph().AppendText(xCell.NumberText)

        # Copy font and cell style
        CopyStyle(textRange, xCell, wCell)

# Save the document to a Word file
doc.SaveToFile("ConvertExcelDataToWordTable.docx", FileFormat.Docx)
Apply for a Temporary License
If you'd like to remove the evaluation message from the generated documents, or to get rid of the function limitations, please request a 30-day trial license for yourself.
Python: Find and Highlight Data in Excel Worksheets
Efficiently emphasizing critical data within Excel workbooks is essential for swift analysis. This process not only draws immediate attention to the most relevant information but also aids in identifying trends, anomalies, and key metrics. By using Python to handle Excel workbooks, users can automate the search and highlight functions, enhancing productivity and ensuring precision. This article explores how to leverage Python for finding and highlighting data in Excel worksheets using Spire.XLS for Python library.
Install Spire.XLS for Python
This scenario requires Spire.XLS for Python and plum-dispatch v1.7.4. They can be easily installed in your Windows through the following pip commands.
pip install Spire.XLS
If you are unsure how to install, please refer to: How to Install Spire.XLS for Python on Windows
Find and Highlight Data in Excel Worksheets
Using Spire.XLS for Python, we can find all cells containing a specific string and return them as a list by using the Worksheet.FindAllString(stringValue: str, formula: bool, formulaValue: bool) method. After that, we can iterate through the found cells and apply a highlight color by setting it via the CellRange.Style.Color property.
The detailed steps for finding and highlighting data in an Excel worksheet are as follows:
- Create an instance of Workbook class and load an Excel workbook using Workbook.LoadFromFile() method.
- Get a worksheet using Workbook.Worksheets.get_Item() method.
- Find all the cells containing the string to be highlighted using Worksheet.FindAllString() method.
- Iterate through the results to highlight the cells by setting a fill color through CellRange.Style.Color property.
- Save the workbook using Workbook.SaveToFile() method.
- Python
from spire.xls import *

# Create an instance of Workbook
workbook = Workbook()

# Load an Excel file
workbook.LoadFromFile("Sample.xlsx")

# Get the first worksheet
sheet = workbook.Worksheets.get_Item(0)

# Find the data to be highlighted
cellRanges = sheet.FindAllString("Urgent", False, True)

# Iterate through the found ranges
for cellRange in cellRanges:
    # Highlight the data
    cellRange.Style.Color = Color.get_LightYellow()

# Save the workbook
workbook.SaveToFile("output/FindHighlightDataExcel.xlsx")
workbook.Dispose()
Find and Highlight Data in a Specific Cell Range
In addition to searching for data across the entire worksheet, we can use the CellRange.FindAllString(stringValue: str, formula: bool, formulaValue: bool) method to find and highlight data within a specified cell range. The detailed steps are as follows:
- Workbook.LoadFromFile() method.
- Get a worksheet using Workbook.Worksheets.get_Item() method.
- Get a cell range through Worksheet.Range[] property.
- Find all the cells containing the string to be highlighted using CellRange.FindAllString() method.
- Iterate through the results to highlight the cells by setting a fill color through CellRange.Style.Color property.
- Save the workbook using Workbook.SaveToFile() method.
- Python
from spire.xls import *

# Create an instance of Workbook
workbook = Workbook()

# Load an Excel file
workbook.LoadFromFile("Sample.xlsx")

# Get the first worksheet
sheet = workbook.Worksheets.get_Item(0)

# Get the cell range
findRange = sheet.Range["C1:C11"]

# Find the data to be highlighted
cellRanges = findRange.FindAllString("Urgent", False, True)

# Iterate the found ranges
for cellRange in cellRanges:
    # Highlight the data
    cellRange.Style.Color = Color.get_LightYellow()

# Save the workbook
workbook.SaveToFile("output/FindHighlightRange.xlsx")
workbook.Dispose()
Apply for a Temporary License
If you'd like to remove the evaluation message from the generated documents, or to get rid of the function limitations, please request a 30-day trial license for yourself.
Python: Extract or Update Textboxes in a Word Document
Textboxes in a Word document serve as versatile containers for text, enabling users to enhance layout and design. They allow for the separation of content from the main body, making documents more visually appealing and organized. Extracting or updating textboxes can be essential for improving document efficiency, ensuring information is current, and facilitating data analysis.
In this article, you will learn how to extract or update textboxes in a Word document using Python and Spire.Doc for Python.
Install Spire.Doc for Python
This scenario requires Spire.Doc for Python and plum-dispatch v1.7.4. They can be easily installed in your Windows through the following pip command.
pip install Spire.Doc
If you are unsure how to install, please refer to this tutorial: How to Install Spire.Doc for Python on Windows
Extract Text from a Textbox in Word
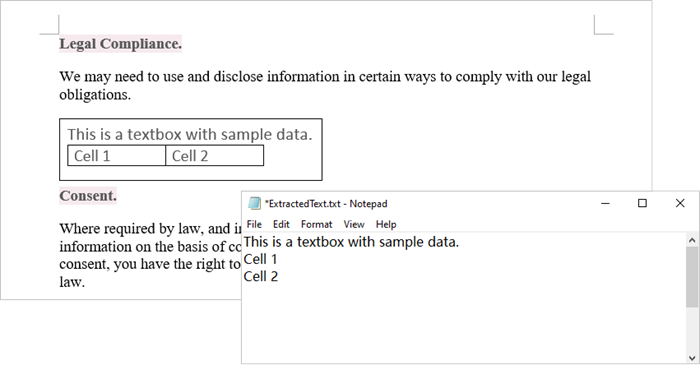
Using Spire.Doc for Python, you can access a specific text box in a document by utilizing the Document.TextBoxes[index] property. After retrieving the text box, you can iterate through its child objects to identify whether each one is a paragraph or a table. If the object is a paragraph, you can retrieve its text using the Paragraph.Text property. In cases where the object is a table, you will need to loop through each cell to extract text from every individual cell within that table.
The steps to extract text from a text box in a Word document are as follows:
- Create a Document object.
- load a Word file by using Document.LoadFromFile() method.
- Access a specific text box using Document.TextBoxes[index] property.
- Iterate through the child objects within the text box.
- Determine if a child object is a paragraph. If it is, retrieve the text from the paragraph using Paragraph.Text property.
- Check if a child object is a table. If so, iterate through the cells in the table to extract text from each cell.
- Python
from spire.doc import *
from spire.doc.common import *

# Create a Document object
document = Document()

# Load a Word file
document.LoadFromFile("C:\\Users\\Administrator\\Desktop\\input.docx")

# Get a specific textbox
textBox = document.TextBoxes.get_Item(0)

with open('ExtractedText.txt','w') as sw:

    # Iterate through the child objects in the textbox
    for i in range(textBox.ChildObjects.Count):

        # Get a specific child object
        object = textBox.ChildObjects.get_Item(i)

        # Determine if the child object is paragraph
        if object.DocumentObjectType == DocumentObjectType.Paragraph:

            # Write paragraph text to txt file
            sw.write((object if isinstance(object, Paragraph) else None).Text + "\n")

        # Determine if the child object is table
        if object.DocumentObjectType == DocumentObjectType.Table:
            table = object if isinstance(object, Table) else None
            for i in range(table.Rows.Count):
                row = table.Rows[i]
                for j in range(row.Cells.Count):
                    cell = row.Cells[j]
                    for k in range(cell.Paragraphs.Count):
                        paragraph = cell.Paragraphs.get_Item(k)

                        # Write paragrah text of a specific cell to txt file
                        sw.write(paragraph.Text + "\n")

# Dispose resources
document.Dispose()
Update Text in a Textbox in Word
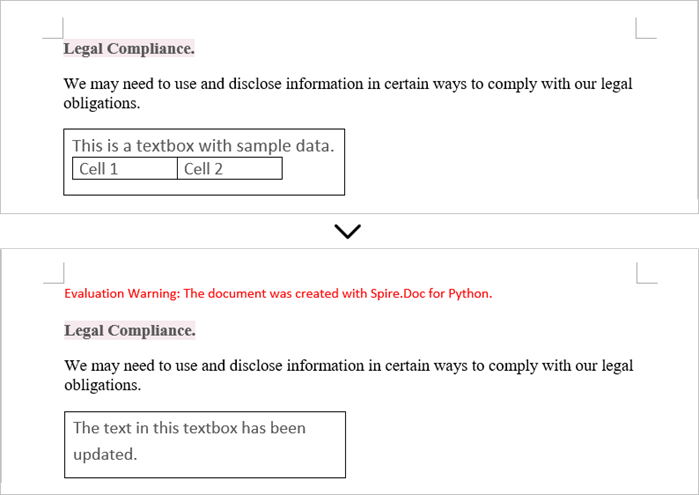
To update a textbox in a Word document, start by clearing its existing content with the TextBox.ChildObjects.Clear() method. This action removes all child objects, including any paragraphs or tables currently contained within the textbox. After clearing the content, you can add a new paragraph to the text box. Once the paragraph is created, set its text to the desired value.
The steps to update a textbox in a Word document are as follows:
- Create a Document object.
- Load a Word file using Document.LoadFromFile() method.
- Get a specific textbox using Document.TextBoxes[index] property
- Remove existing content of the textbox using TextBox.ChildObjects.Clear() method.
- Add a paragraph to the textbox using TextBox.Body.AddParagraph() method.
- Add text to the paragraph using Paragraph.AppendText() method.
- Save the document to a different Word file.
- Python
from spire.doc import *
from spire.doc.common import *

# Create a Document object
document = Document()

# Load a Word file
document.LoadFromFile("C:\\Users\\Administrator\\Desktop\\Input.docx")

# Get a specific textbox
textBox = document.TextBoxes.get_Item(0)

# Remove child objects of the textbox
textBox.ChildObjects.Clear()

# Add a new paragraph to the textbox
paragraph = textBox.Body.AddParagraph()

# Set line spacing
paragraph.Format.LineSpacing = 15.0

# Add text to the paragraph
textRange = paragraph.AppendText("The text in this textbox has been updated.")

# Set font size
textRange.CharacterFormat.FontSize = 15.0

# Save the document to a different Word file
document.SaveToFile("UpdateTextbox.docx", FileFormat.Docx2019);

# Dispose resources
document.Dispose()
Apply for a Temporary License
If you'd like to remove the evaluation message from the generated documents, or to get rid of the function limitations, please request a 30-day trial license for yourself.
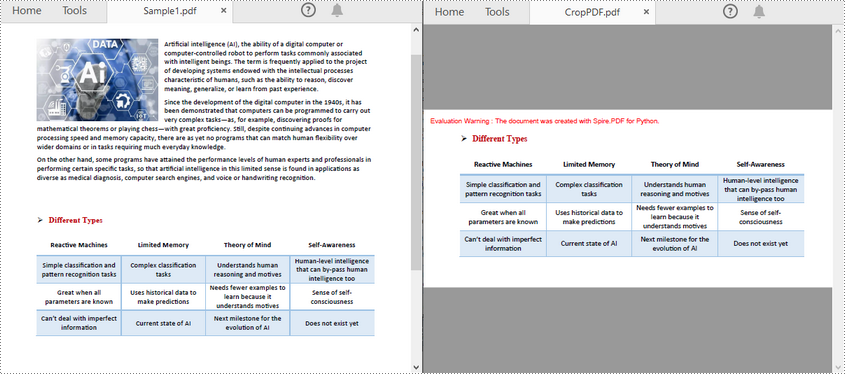
Python: Crop Pages in PDF
When dealing with PDF files, you might sometimes need to crop pages in the PDF to remove unnecessary margins, borders, or unwanted content. By doing so, you can make the document conform to specific design requirements or page sizes, ensuring a more aesthetically pleasing or functionally optimized output. This article will introduce how to crop pages in PDF in Python using Spire.PDF for Python.
Install Spire.PDF for Python
This scenario requires Spire.PDF for Python. It can be easily installed in your Windows through the following pip command.
pip install Spire.PDF
If you are unsure how to install, please refer to this tutorial: How to Install Spire.PDF for Python on Windows
Crop a PDF Page in Python
Spire.PDF for Python allows you specify a rectangular area, and then use the PdfPageBase.CropBox property to crop page to the specified area. The following are the detailed steps.
- Create a PdfDocument instance.
- Load a PDF file using PdfDocument.LoadFromFile() method.
- Get a specified page using PdfDocument.Pages[] property.
- Crop the page to the specified area using PdfPageBase.CropBox property.
- Save the result file using PdfDocument.SaveToFile() method.
- Python
from spire.pdf.common import *
from spire.pdf import *

# Create a PdfDocument object
pdf = PdfDocument()

# Load a PDF file from disk
pdf.LoadFromFile("Sample1.pdf")

# Get the first page
page = pdf.Pages.get_Item(0)

# Crop the page by the specified area
page.CropBox = RectangleF(0.0, 300.0, 600.0, 260.0)

# Save the result file
pdf.SaveToFile("CropPDF.pdf")
pdf.Close()
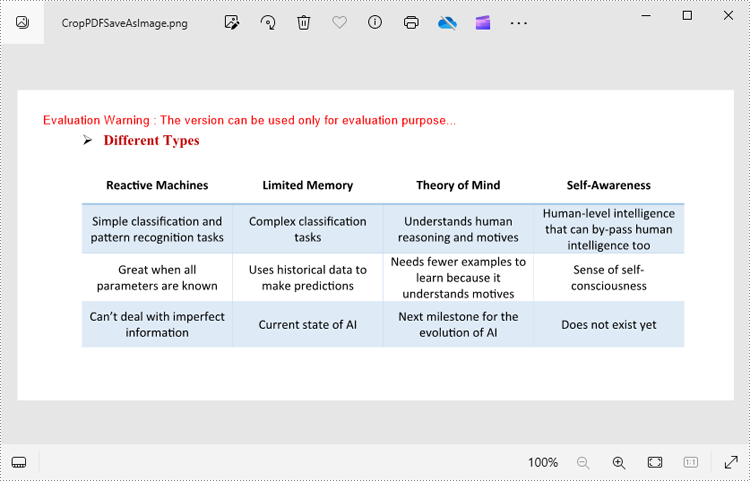
Crop a PDF Page and Export as an Image in Python
To accomplish this task, you can use the PdfDocument.SaveAsImage(pageIndex: int) method to convert a cropped PDF page to an image stream. The following are the detailed steps.
- Create a PdfDocument instance.
- Load a PDF file using PdfDocument.LoadFromFile() method.
- Get a specified page using PdfDocument.Pages[] property.
- Crop the page to the specified area using PdfPageBase.CropBox property.
- Convert the cropped page to an image stream using PdfDocument.SaveAsImage() method.
- Save the image as a PNG, JPG or BMP file using Stream.Save() method.
- Python
from spire.pdf.common import *
from spire.pdf import *

# Create a PdfDocument object
pdf = PdfDocument()

# Load a PDF file from disk
pdf.LoadFromFile("Sample1.pdf")

# Get the first page
page = pdf.Pages.get_Item(0)

# Crop the page by the specified area
page.CropBox = RectangleF(0.0, 300.0, 600.0, 260.0)

# Convert the page to an image
with pdf.SaveAsImage(0) as imageS:

    # Save the image as a PNG file
    imageS.Save("CropPDFSaveAsImage.png")
pdf.Close()
Apply for a Temporary License
If you'd like to remove the evaluation message from the generated documents, or to get rid of the function limitations, please request a 30-day trial license for yourself.