Python: Insert or Remove Section Breaks in Word
Section breaks in Word allow users to divide a document into sections, each with unique formatting options. This is especially useful when working with long documents where you want to apply different layouts, headers, footers, margins or page orientations within the same document. In this article, you will learn how to insert or remove section breaks in Word in Python using Spire.Doc for Python.
Install Spire.Doc for Python
This scenario requires Spire.Doc for Python and plum-dispatch v1.7.4. They can be easily installed in your Windows through the following pip commands.
pip install Spire.Doc
If you are unsure how to install, please refer to this tutorial: How to Install Spire.Doc for Python on Windows
Insert Section Breaks in Word in Python
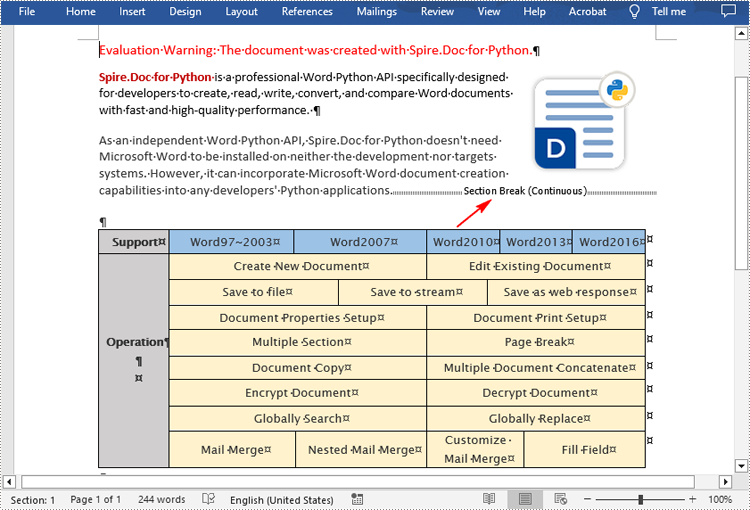
Spire.Doc for Python provides the Paragraph.InsertSectionBreak(breakType: SectionBreakType) method to insert a specified type of section break to a paragraph. The following table provides an overview of the supported section break types, along with their corresponding Enums and descriptions:
| Section Break | Enum | Description |
| New page | SectionBreakType.New_Page | Start the new section on a new page. |
| Continuous | SectionBreakType.No_Break | Start the new section on the same page, allowing for continuous content flow. |
| Odd page | SectionBreakType.Odd_Page | Start the new section on the next odd-numbered page. |
| Even page | SectionBreakType.Even_Page | Start the new section on the next even-numbered page. |
| New column | SectionBreakType.New_Column | Start the new section in the next column if columns are enabled. |
The following are the detailed steps to insert a continuous section break:
- Create a Document instance.
- Load a Word document using Document.LoadFromFile() method.
- Get a specified section using Document.Sections[] property.
- Get a specified paragraph of the section using Section.Paragraphs[] property.
- Add a section break to the end of the paragraph using Paragraph.InsertSectionBreak() method.
- Save the result document using Document.SaveToFile() method.
- Python
from spire.doc import *
from spire.doc.common import *

inputFile = "sample.docx"
outputFile = "InsertSectionBreak.docx"

# Create a Document instance
document = Document()

# Load a Word document
document.LoadFromFile(inputFile)

# Get a specific section
section = document.Sections.get_Item(0)

# Get a specific paragraph
paragraph = section.Paragraphs.get_Item(0)

# Insert a continuous section break
paragraph.InsertSectionBreak(SectionBreakType.NoBreak)

# Save the result document
document.SaveToFile(outputFile, FileFormat.Docx2016)
document.Close()
Remove Section Breaks in Word in Python
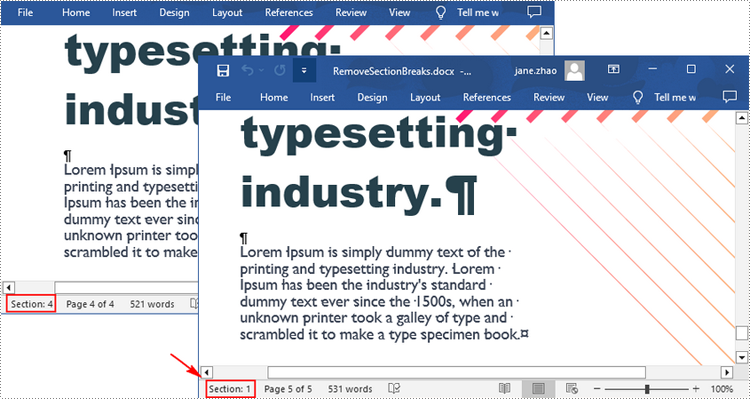
To delete all sections breaks in a Word document, we need to access the first section in the document, then copy the contents of the other sections to the first section and delete them. The following are the detailed steps:
- Create a Document instance.
- Load a Word document using Document.LoadFromFile() method.
- Get the first section using Document.Sections[] property.
- Iterate through other sections in the document.
- Get the second section, and then iterate through to get its child objects.
- Clone the child objects of the second section and add them to the first section using Section.Body.ChildObjects.Add() method.
- Delete the second section using Document.Sections.Remove() method.
- Repeat the process to copy and delete the remaining sections.
- Save the result document using Document.SaveToFile() method.
- Python
from spire.doc import *
from spire.doc.common import *

inputFile = "Report.docx"
outputFile = "RemoveSectionBreaks.docx"

# Create a Document instance
document = Document()

# Load a Word document
document.LoadFromFile(inputFile)

# Get a specific section
section = document.Sections.get_Item(0)

# Iterate through other sections in the document
for i in range(document.Sections.Count - 1):
    # Get the second section in the document
    section = document.Sections[1]

    # Iterate through all child objects of the second section
    for j in range(section.Body.ChildObjects.Count):
        # Get the child objects
        obj = section.Body.ChildObjects.get_Item(j)
        # Clone the child objects to the first section
        sec.Body.ChildObjects.Add(obj.Clone())
        # Remove the second section
        document.Sections.Remove(section)

# Save the result document
document.SaveToFile(outputFile, FileFormat.Docx2016)
document.Close()
Apply for a Temporary License
If you'd like to remove the evaluation message from the generated documents, or to get rid of the function limitations, please request a 30-day trial license for yourself.
Python: Extract Comments from Word
Comments in Word documents are often used for collaborative review and feedback purposes. They may contain text and images that provide valuable information to guide document improvements. Extracting the text and images from comments allows you to analyze and evaluate the feedback provided by reviewers, helping you gain a comprehensive understanding of the strengths, weaknesses, and suggestions related to the document. In this article, we will demonstrate how to extract text and images from Word comments in Python using Spire.Doc for Python.
Install Spire.Doc for Python
This scenario requires Spire.Doc for Python and plum-dispatch v1.7.4. They can be easily installed in your Windows through the following pip command.
pip install Spire.Doc
If you are unsure how to install, please refer to this tutorial: How to Install Spire.Doc for Python on Windows
Extract Text from Word Comments in Python
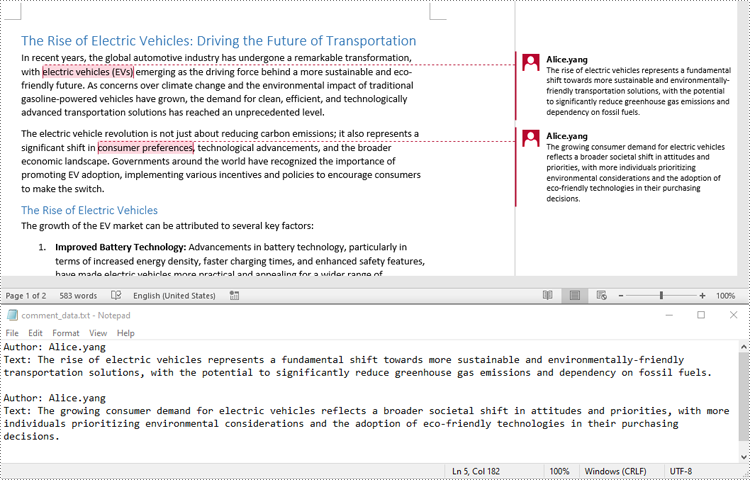
You can easily retrieve the author and text of a Word comment using the Comment.Format.Author and Comment.Body.Paragraphs[index].Text properties provided by Spire.Doc for Python. The detailed steps are as follows.
- Create an object of the Document class.
- Load a Word document using the Document.LoadFromFile() method.
- Create a list to store the extracted comment data.
- Iterate through the comments in the document.
- For each comment, iterate through the paragraphs of the comment body.
- For each paragraph, get the text using the Comment.Body.Paragraphs[index].Text property.
- Get the author of the comment using the Comment.Format.Author property.
- Add the text and author of the comment to the list.
- Save the content of the list to a text file.
- Python
from spire.doc import *
from spire.doc.common import *

# Create an object of the Document class
document = Document()
# Load a Word document containing comments
document.LoadFromFile("Comments.docx")

# Create a list to store the extracted comment data
comments = []

# Iterate through the comments in the document
for i in range(document.Comments.Count):
    comment = document.Comments[i]
    comment_text = ""

    # Iterate through the paragraphs in the comment body
    for j in range(comment.Body.Paragraphs.Count):
        paragraph = comment.Body.Paragraphs[j]
        comment_text += paragraph.Text + "\n"

    # Get the comment author
    comment_author = comment.Format.Author

    # Append the comment data to the list
    comments.append({
        "author": comment_author,
        "text": comment_text
    })

# Write the comment data to a file
with open("comment_data.txt", "w", encoding="utf-8") as file:
    for comment in comments:
        file.write(f"Author: {comment['author']}\nText: {comment['text']}\n\n")
Extract Images from Word Comments in Python
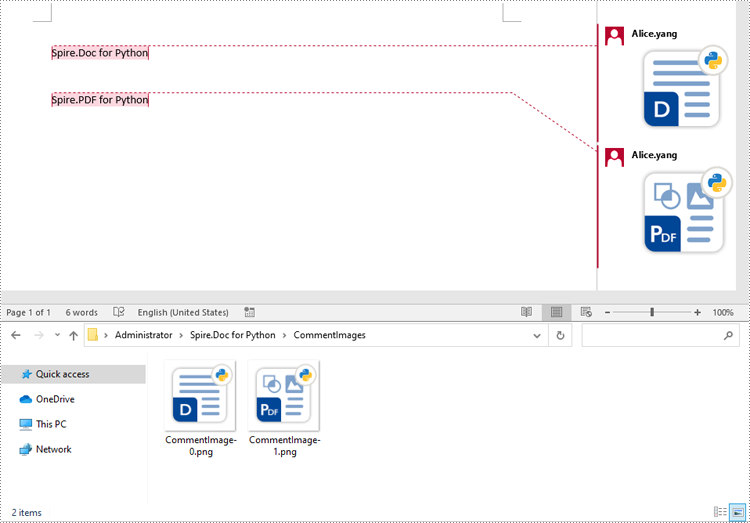
To extract images from Word comments, you need to iterate through the child objects in the paragraphs of the comments to find the DocPicture objects, then get the image data using DocPicture.ImageBytes property, finally save the image data to image files.
- Create an object of the Document class.
- Load a Word document using the Document.LoadFromFile() method.
- Create a list to store the extracted image data.
- Iterate through the comments in the document.
- For each comment, iterate through the paragraphs of the comment body.
- For each paragraph, iterate through the child objects of the paragraph.
- Check if the object is a DocPicture object.
- If the object is a DocPicture, get the image data using the DocPicture.ImageBytes property and add it to the list.
- Save the image data in the list to individual image files.
- Python
from spire.doc import *
from spire.doc.common import *

# Create an object of the Document class
document = Document()
# Load a Word document containing comments
document.LoadFromFile("Comments.docx")

# Create a list to store the extracted image data
images = []

# Iterate through the comments in the document
for i in range(document.Comments.Count):
    comment = document.Comments.get_Item(i)
    # Iterate through the paragraphs in the comment body
    for j in range(comment.Body.Paragraphs.Count):
        paragraph = comment.Body.Paragraphs.get_Item(j)
        # Iterate through the child objects in the paragraph
        for o in range(paragraph.ChildObjects.Count):
            obj = paragraph.ChildObjects.get_Item(o)
            # Find the images
            if isinstance(obj, DocPicture):
                picture = obj
                # Get the image data and add it to the list
                data_bytes = picture.ImageBytes
                images.append(data_bytes)

# Save the image data to image files
for i, image_data in enumerate(images):
    file_name = f"CommentImage-{i}.png"
    with open(os.path.join("CommentImages/", file_name), 'wb') as image_file:
        image_file.write(image_data)
Apply for a Temporary License
If you'd like to remove the evaluation message from the generated documents, or to get rid of the function limitations, please request a 30-day trial license for yourself.
Python: Get Coordinates of the Specified Text or Image in PDF
Retrieving the coordinates of text or images within a PDF document can quickly locate specific elements, which is valuable for extracting content from PDFs. This capability also enables adding annotations, marks, or stamps to the desired locations in a PDF, allowing for more advanced document processing and manipulation.
In this article, you will learn how to get coordinates of the specified text or image in a PDF document using Spire.PDF for Python.
- Get Coordinates of the Specified Text in PDF in Python
- Get Coordinates of the Specified Image in PDF in Python
Install Spire.PDF for Python
This scenario requires Spire.PDF for Python and plum-dispatch v1.7.4. They can be easily installed in your Windows through the following pip command.
pip install Spire.PDF
If you are unsure how to install, please refer to this tutorial: How to Install Spire.PDF for Python on Windows
Coordinate System in Spire.PDF
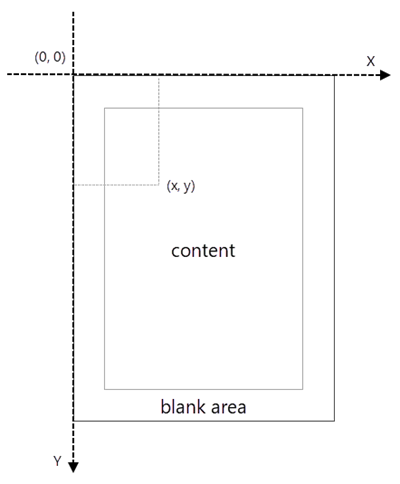
When using Spire.PDF to process an existing PDF document, the origin of the coordinate system is located at the top left corner of the page. The X-axis extends horizontally from the origin to the right, and the Y-axis extends vertically downward from the origin (shown as below).
Get Coordinates of the Specified Text in PDF in Python
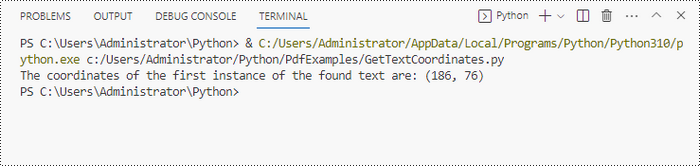
To find the coordinates of a specific piece of text within a PDF document, you must first use the PdfTextFinder.Find() method to locate all instances of the target text on a particular page. Once you have found these instances, you can then access the PdfTextFragment.Positions property to retrieve the precise (X, Y) coordinates for each instance of the text.
The steps to get coordinates of the specified text in PDF are as follows.
- Create a PdfDocument object.
- Load a PDF document from a specified path.
- Get a specific page from the document.
- Create a PdfTextFinder object.
- Specify find options through PdfTextFinder.Options property.
- Search for a string within the page using PdfTextFinder.Find() method.
- Get a specific instance of the search results.
- Get X and Y coordinates of the text through PdfTextFragment.Positions[0].X and PdfTextFragment.Positions[0].Y properties.
- Python
from spire.pdf.common import *
from spire.pdf import *

# Create a PdfDocument object
doc = PdfDocument()

# Load a PDF document
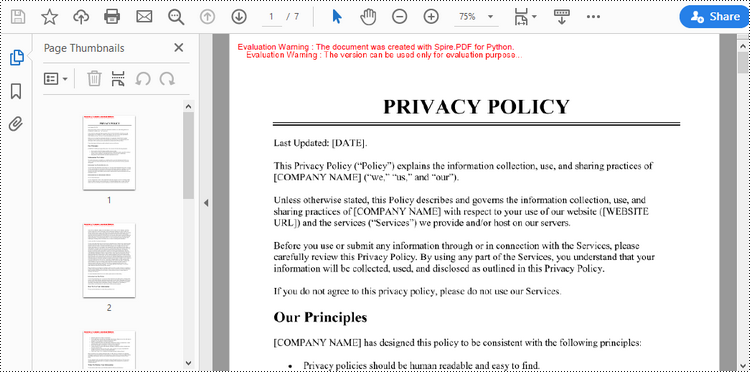
doc.LoadFromFile("C:\\Users\\Administrator\\Desktop\\Privacy Policy.pdf")

# Get a specific page
page = doc.Pages.get_Item(0)

# Create a PdfTextFinder object
textFinder = PdfTextFinder(page)

# Specify find options
findOptions = PdfTextFindOptions()
findOptions.Parameter = TextFindParameter.IgnoreCase
findOptions.Parameter = TextFindParameter.WholeWord
textFinder.Options = findOptions

# Search for the string "PRIVACY POLICY" within the page
findResults = textFinder.Find("PRIVACY POLICY")

# Get the first instance of the results
result = findResults[0]

# Get X/Y coordinates of the found text
x = int(result.Positions[0].X)
y = int(result.Positions[0].Y)
print("The coordinates of the first instance of the found text are:", (x, y))

# Dispose resources
doc.Dispose()
Get Coordinates of the Specified Image in PDF in Python
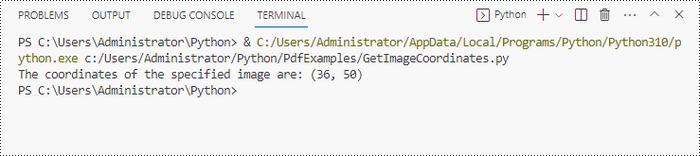
Spire.PDF for Python provides the PdfImageHelper class, which allows users to extract image details from a specific page within a PDF file. By doing so, you can leverage the PdfImageInfo.Bounds property to retrieve the (X, Y) coordinates of an individual image.
The steps to get coordinates of the specified image in PDF are as follows.
- Create a PdfDocument object.
- Load a PDF document from a specified path.
- Get a specific page from the document.
- Create a PdfImageHelper object.
- Get the image information from the page using PdfImageHelper.GetImagesInfo() method.
- Get X and Y coordinates of a specific image through PdfImageInfo.Bounds property.
- Python
from spire.pdf.common import *
from spire.pdf import *

# Create a PdfDocument object
doc = PdfDocument()

# Load a PDF document
doc.LoadFromFile("C:\\Users\\Administrator\\Desktop\\Privacy Policy.pdf")

# Get a specific page
page = doc.Pages.get_Item(0)

# Create a PdfImageHelper object
imageHelper = PdfImageHelper()

# Get image information from the page
imageInformation = imageHelper.GetImagesInfo(page)

# Get X/Y coordinates of a specific image
x = int(imageInformation[0].Bounds.X)
y = int(imageInformation[0].Bounds.Y)
print("The coordinates of the specified image are:", (x, y))

# Dispose resources
doc.Dispose()
Apply for a Temporary License
If you'd like to remove the evaluation message from the generated documents, or to get rid of the function limitations, please request a 30-day trial license for yourself.
Python: Convert PDF to TIFF and TIFF to PDF
TIFF is a popular image format used in scanning and archiving due to its high quality and support for a wide range of color spaces. On the other hand, PDFs are widely used for document exchange because they preserve the layout and formatting of a document while compressing the file size. Conversion between these formats can be useful for various purposes such as archival, editing, or sharing documents.
In this article, you will learn how to convert PDF to TIFF and TIFF to PDF using the Spire.PDF for Python and Pillow libraries.
Install Spire.PDF for Python
This situation relies on the combination of Spire.PDF for Python and Pillow (PIL). Spire.PDF is used to read, create and convert PDF documents, while the PIL library is used for handling TIFF files and accessing their frames.
The libraries can be easily installed on your device through the following pip command.
pip install Spire.PDF
pip install pillow
Convert PDF to TIFF in Python
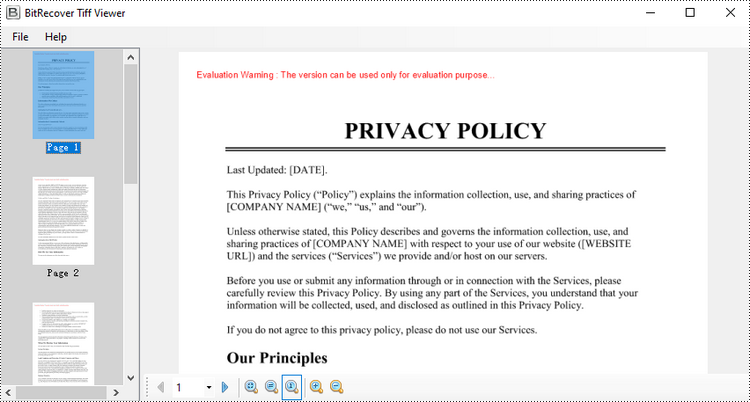
To complete the PDF to TIFF conversion, you first need to load the PDF document and convert the individual pages into image streams using Spire.PDF. Subsequently, these image streams are then merged together using the functionality of the PIL library, resulting in a consolidated TIFF image.
The following are the steps to convert PDF to TIFF using Python.
- Create a PdfDocument object.
- Load a PDF document from a specified file path.
- Iterate through the pages in the document.
- Convert each page into an image stream using PdfDocument.SaveAsImage() method.
- Convert the image stream into a PIL image.
- Combine these PIL images into a single TIFF image.
- Python
from spire.pdf.common import *
from spire.pdf import *

from PIL import Image
from io import BytesIO

# Create a PdfDocument object
doc = PdfDocument()

# Load a PDF document
doc.LoadFromFile("C:\\Users\\Administrator\\Desktop\\Input.pdf")

# Create an empty list to store PIL Images
images = []

# Iterate through all pages in the document
for i in range(doc.Pages.Count):

    # Convert a specific page to an image stream
    with doc.SaveAsImage(i) as imageData:

        # Open the image stream as a PIL image
        img = Image.open(BytesIO(imageData.ToArray()))

        # Append the PIL image to list
        images.append(img)

# Save the PIL Images as a multi-page TIFF file
images[0].save("Output/ToTIFF.tiff", save_all=True, append_images=images[1:])

# Dispose resources
doc.Dispose()
Convert TIFF to PDF in Python
With the assistance of the PIL library, you can load a TIFF file and transform each frame into distinct PNG files. Afterwards, you can utilize Spire.PDF to draw these PNG files onto pages within a PDF document.
To convert a TIFF image to a PDF document using Python, follow these steps.
- Create a PdfDocument object.
- Load a TIFF image.
- Iterate though the frames in the TIFF image.
- Get a specific frame, and save it as a PNG file.
- Add a page to the PDF document.
- Draw the image on the page at the specified location using PdfPageBase.Canvas.DrawImage() method.
- Save the document to a PDF file.
- Python
from spire.pdf.common import *
from spire.pdf import *

from PIL import Image
import io

# Create a PdfDocument object
doc = PdfDocument()

# Set the page margins to 0
doc.PageSettings.SetMargins(0.0)

# Load a TIFF image
tiff_image = Image.open("C:\\Users\\Administrator\\Desktop\\TIFF.tiff")

    # Go to the current frame
    tiff_image.seek(i)

    # Extract the image of the current frame
    frame_image = tiff_image.copy()

    # Save the image to a PNG file
    frame_image.save(f"temp/output_frame_{i}.png")

    # Load the image file to PdfImage
    image = PdfImage.FromFile(f"temp/output_frame_{i}.png")

    # Get image width and height
    width = image.PhysicalDimension.Width
    height = image.PhysicalDimension.Height

    # Add a page to the document
    page = doc.Pages.Add(SizeF(width, height))

    # Draw image at (0, 0) of the page
    page.Canvas.DrawImage(image, 0.0, 0.0, width, height)

# Save the document to a PDF file
doc.SaveToFile("Output/TiffToPdf.pdf",FileFormat.PDF)

# Dispose resources
doc.Dispose()
Apply for a Temporary License
If you'd like to remove the evaluation message from the generated documents, or to get rid of the function limitations, please request a 30-day trial license for yourself.
Python: Add or Remove Shapes in Word
In the modern office environment, Microsoft Word has become an indispensable part of our daily work and study. Whether it's writing reports, creating resumes, or designing promotional materials, Word provides us with a rich set of features and tools. Among them, the function of adding shapes is particularly popular among users because it allows us to easily enhance the visual appeal and expressiveness of documents. Manipulating shape elements is one of the highlights of Spire.Doc functionality, and this article will introduce you to how to add or delete shapes in Word using Spire.Doc for Python.
Install Spire.Doc for Python
This scenario requires Spire.Doc for Python and plum-dispatch v1.7.4. They can be easily installed in your Windows through the following pip command.
pip install Spire.Doc
If you are unsure how to install, please refer to this tutorial: How to Install Spire.Doc for Python on Windows
Add Shapes in Word Document in Python
Spire.Doc for Python supports adding various shapes such as rectangles, trapezoids, triangles, arrows, lines, emoticons, and many other predefined shape types. By calling the Paragraph.AppendShape(width: float, height: float, shapeType: 'ShapeType') method, you can not only easily insert these shapes at any position in the document but also customize various properties of the shapes, such as fill color, border style, rotation angle, transparency, etc., to meet different typesetting needs and visual effects. Below are the detailed steps:
- Create a new Document object.
- Call Document.AddSection() and Section.AddParagraph() methods to add a section and a paragraph within the section, respectively.
- Call the Paragraph.AppendShape(width: float, height: float, shapeType: 'ShapeType') method to add a shape on the paragraph, where width and height represent the dimensions of the shape, and shapeType enum is used to specify the type of shape.
- Define the style of the shape, such as fill color, border color, border style, and width.
- Set the horizontal and vertical position of the shape relative to the page.
- Add multiple other types of shapes using the same method.
- Save the document using the Document.SaveToFile() method.
- Python
from spire.doc import *
from spire.doc.common import *

# Create a new Document object
doc = Document()

# Add a new section in the document
sec = doc.AddSection()

# Add a paragraph in the new section
para = sec.AddParagraph()

# Add a rectangle shape in the paragraph with width and height both 60
shape1 = para.AppendShape(60, 60, ShapeType.Rectangle)

# Define the fill color of the shape
shape1.FillColor = Color.get_YellowGreen()

# Define the border color
shape1.StrokeColor = Color.get_Gray()

# Define the border style and width
shape1.LineStyle = ShapeLineStyle.Single
shape1.StrokeWeight = 1

# Set the horizontal and vertical position of the shape relative to the page
shape1.HorizontalOrigin = HorizontalOrigin.Page
shape1.HorizontalPosition = 100
shape1.VerticalOrigin = VerticalOrigin.Page
shape1.VerticalPosition = 200

# Similarly, add a triangle shape in the same paragraph and set its properties
shape2 = para.AppendShape(60, 60, ShapeType.Triangle)
shape2.FillColor = Color.get_Green()
shape2.StrokeColor = Color.get_Gray()
shape2.LineStyle = ShapeLineStyle.Single
shape2.StrokeWeight = 1
shape2.HorizontalOrigin = HorizontalOrigin.Page
shape2.HorizontalPosition = 200
shape2.VerticalOrigin = VerticalOrigin.Page
shape2.VerticalPosition = 200

# Add an arrow shape and set its properties
shape3 = para.AppendShape(60, 60, ShapeType.Arrow)
shape3.FillColor = Color.get_SeaGreen()
shape3.StrokeColor = Color.get_Gray()
shape3.LineStyle = ShapeLineStyle.Single
shape3.StrokeWeight = 1
shape3.HorizontalOrigin = HorizontalOrigin.Page
shape3.HorizontalPosition = 300
shape3.VerticalOrigin = VerticalOrigin.Page
shape3.VerticalPosition = 200

# Add a smiley face shape and set its properties
shape4 = para.AppendShape(60, 60, ShapeType.SmileyFace)
shape4.FillColor = Color.get_LightGreen()
shape4.StrokeColor = Color.get_Gray()
shape4.LineStyle = ShapeLineStyle.Single
shape4.StrokeWeight = 1
shape4.HorizontalOrigin = HorizontalOrigin.Page
shape4.HorizontalPosition = 400
shape4.VerticalOrigin = VerticalOrigin.Page
shape4.VerticalPosition = 200

# Save the document
outputFile = "AddShapes.docx"
doc.SaveToFile(outputFile, FileFormat.Docx2016)

# Release the document
doc.Close()

Add Shape Group in Word Document
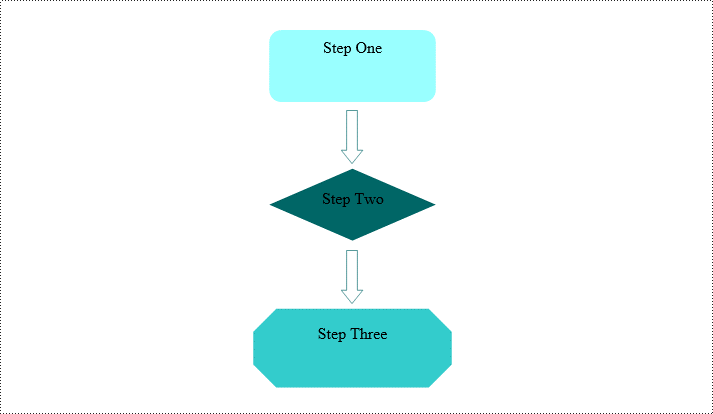
Spire.Doc for Python not only provides the functionality to add individual shapes (such as rectangles, circles, lines, etc.) but also supports creating and managing grouped shapes. A grouped shape is a special collection of shapes that organizes multiple independent shapes together to form a whole, sharing the same transformation properties (such as position, rotation angle, etc.). Here are the specific steps to achieve this:
- Create an object of the Document class.
- Call the Document.AddSection() method to add a blank section.
- Call the Section.AddParagraph() method to add a blank paragraph in the section.
- Call Paragraph.AppendShapeGroup() to add a shape group and specify its dimensions.
- Create a Textbox and specify its shape type, dimensions, position, fill color, and other properties.
- Add paragraphs within the Textbox and insert text, setting the paragraph's horizontal alignment to center.
- Add the Textbox to the list of child objects of the shape group.
- Similar to the above steps, create shapes for symbols like arrows, diamond-shaped text boxes, octagonal text boxes, and set their properties, adding them to the list of child objects of the shape group.
- Save the document using the Document.SaveToFile() method.
- Python
from spire.doc import *
from spire.doc.common import *

# Create a Document object
doc = Document()

# Add a section to the document
sec = doc.AddSection()

# Add a paragraph to the section
para = sec.AddParagraph()

# Add a shape group to the paragraph and specify its horizontal position
shapegroup = para.AppendShapeGroup(375, 350)
shapegroup.HorizontalPosition = 180

# Calculate the relative unit scale X and Y for the shape group for subsequent element size positioning
X = float((shapegroup.Width / 1000.0))
Y = float((shapegroup.Height / 1000.0))

# Create a rounded rectangle text box
txtBox = TextBox(doc)

# Set the shape type of the text box
txtBox.SetShapeType(ShapeType.RoundRectangle)

# Set the width and height of the text box
txtBox.Width = 125 / X
txtBox.Height = 54 / Y

# Add a paragraph inside the text box and set its horizontal alignment to center
paragraph = txtBox.Body.AddParagraph()
paragraph.Format.HorizontalAlignment = HorizontalAlignment.Center

# Add the text "Step One" to the paragraph
paragraph.AppendText("Step One")

# Set the horizontal and vertical position of the text box
txtBox.HorizontalPosition = 19 / X
txtBox.VerticalPosition = 27 / Y

# Set the fill color of the text box and remove the border line
txtBox.Format.FillColor = Color.FromRgb(153, 255, 255)
txtBox.Format.NoLine = True

# Add the text box to the list of child objects of the shape group
shapegroup.ChildObjects.Add(txtBox)

# Create a downward arrow shape and specify its shape type
arrowLineShape = ShapeObject(doc, ShapeType.DownArrow)

# Set the width and height of the arrow shape
arrowLineShape.Width = 16 / X
arrowLineShape.Height = 40 / Y

# Set the horizontal and vertical position of the arrow shape
arrowLineShape.HorizontalPosition = 73 / X
arrowLineShape.VerticalPosition = 87 / Y

# Set the stroke color of the arrow shape
arrowLineShape.StrokeColor = Color.get_CadetBlue()

# Add the arrow shape to the list of child objects of the shape group
shapegroup.ChildObjects.Add(arrowLineShape)

# (Similar subsequent code, creating diamond-shaped text boxes, downward arrow shapes, and octagonal text boxes, with corresponding property settings and positioning)

txtBox = TextBox(doc)
txtBox.SetShapeType(ShapeType.Diamond)
txtBox.Width = 125 / X
txtBox.Height = 54 / Y
paragraph = txtBox.Body.AddParagraph()
paragraph.Format.HorizontalAlignment = HorizontalAlignment.Center
paragraph.AppendText("Step Two")
txtBox.HorizontalPosition = 19 / X
txtBox.VerticalPosition = 131 / Y
txtBox.Format.FillColor = Color.FromRgb(0, 102, 102)
txtBox.Format.NoLine = True
shapegroup.ChildObjects.Add(txtBox)

arrowLineShape = ShapeObject(doc, ShapeType.DownArrow)
arrowLineShape.Width = 16 / X
arrowLineShape.Height = 40 / Y
arrowLineShape.HorizontalPosition = 73 / X
arrowLineShape.VerticalPosition = 192 / Y
arrowLineShape.StrokeColor = Color.get_CadetBlue()
shapegroup.ChildObjects.Add(arrowLineShape)

txtBox = TextBox(doc)
txtBox.SetShapeType(ShapeType.Octagon)
txtBox.Width = 149 / X
txtBox.Height = 59 / Y
paragraph = txtBox.Body.AddParagraph()
paragraph.Format.HorizontalAlignment = HorizontalAlignment.Center
paragraph.AppendText("Step Three")
txtBox.HorizontalPosition = 7 / X
txtBox.VerticalPosition = 236 / Y
txtBox.Format.FillColor = Color.FromRgb(51, 204, 204)
txtBox.Format.NoLine = True
shapegroup.ChildObjects.Add(txtBox)

# Define the output file name
outputFile = "ShapeGroup.docx"

# Save the document
doc.SaveToFile(outputFile, FileFormat.Docx2016)

# Close the document object
doc.Close()
Remove Shapes from Word Document
Spire.Doc for Python supports efficiently removing individual shapes and shape groups from a Word document. Below are the detailed steps:
- Create an object of the Document class.
- Call the Document.LoadFromFile() method to load a document containing shapes.
- Traverse through all the sections of the document and the body elements within the sections to get paragraphs.
- Check if the child elements under the paragraph are shape objects or shape group objects.
- Call the Paragraph.ChildObjects.Remove() method to remove the shape object.
- Save the document using the Document.SaveToFile() method.
- Python
from spire.doc import *
from spire.doc.common import *

# Create an object of the Document class
doc = Document()

# Load a Word document
doc.LoadFromFile("ShapeGroup.docx")

# Iterate through all sections of the document
for s in range(doc.Sections.Count):
    # Get the current section
    section = doc.Sections.get_Item(i)

    # Iterate through all child objects within the section
    for i in range(section.Body.ChildObjects.Count):
        # Get the current child object
        document_object = section.Body.ChildObjects.get_Item(i)

        # If the current child object is a paragraph
        if isinstance(document_object, Paragraph):
            # Convert the child object to a paragraph object
            paragraph = document_object

            # Initialize the inner loop index
            j = 0

            # Iterate through all child objects within the paragraph
            while j < paragraph.ChildObjects.Count:
                # Get the current child object within the paragraph
                c_obj = paragraph.ChildObjects.get_Item(i)

                # If the current child object is a shape group or shape object
                if isinstance(c_obj, ShapeGroup) or isinstance(c_obj, ShapeObject):
                    # Remove the shape object from the paragraph
                    paragraph.ChildObjects.Remove(c_obj)

                    # Update the inner loop index
                    j -= 1

                # Increment the inner loop index
                j += 1

# Save the document
doc.SaveToFile("RemovedShapes.docx", FileFormat.Docx2016)

# Close the document object
doc.Close()
Apply for a Temporary License
If you'd like to remove the evaluation message from the generated documents, or to get rid of the function limitations, please request a 30-day trial license for yourself.
Python: Set Paragraph Indentations in Word
Paragraph indentations determine the horizontal space between the page margins and the text of paragraphs. They are an important formatting tool used in various types of written documents, such as essays, reports, and articles, to improve readability and create a visual distinction between paragraphs. In this article, we will demonstrate how to set paragraph indentations in Word documents in Python using Spire.Doc for Python.
Install Spire.Doc for Python
This scenario requires Spire.Doc for Python and plum-dispatch v1.7.4. They can be easily installed in your Windows through the following pip command.
pip install Spire.Doc
If you are unsure how to install, please refer to this tutorial: How to Install Spire.Doc for Python on Windows
Set Paragraph Indentations in Word in Python
Microsoft Word provides four types of paragraph indent options that enable you to format your document efficiently. These options are as follows:
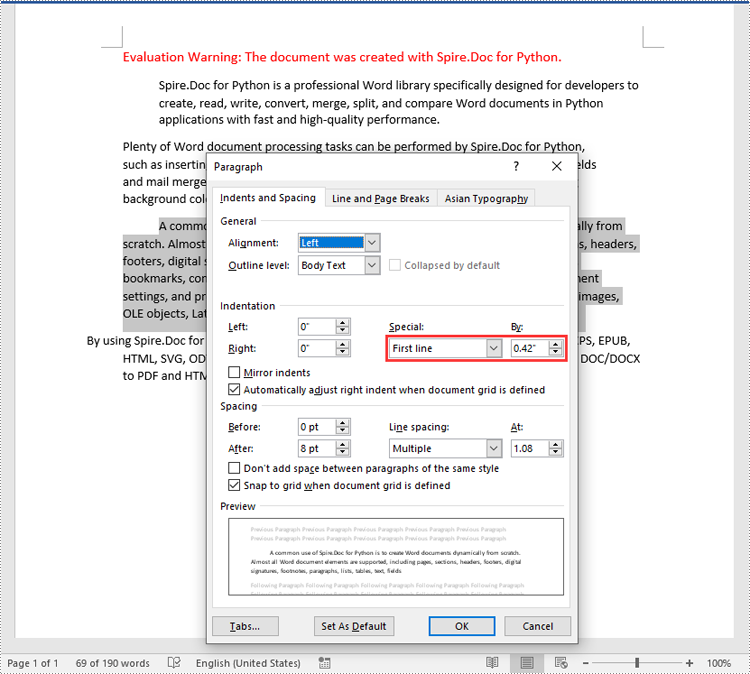
- First Line Indent: The first line indent refers to the horizontal space between the left margin and the beginning of the first line of a paragraph. It indents only the first line while keeping the subsequent lines aligned with the left margin.
- Left Indent: The left indent, also known as the paragraph indent or the left margin indent, determines the horizontal distance between the left margin and the entire paragraph. It uniformly indents the entire paragraph from the left margin.
- Right Indent: The right indent sets the horizontal distance between the right margin and the entire paragraph. It indents the paragraph from the right side, shifting the text towards the left.
- Hanging Indent: The hanging indent is a unique indentation style where the first line remains aligned with the left margin, while all subsequent lines of the paragraph are indented inward. This creates a "hanging" effect, commonly used for bibliographies, references, or citations.
Spire.Doc for Python supports all these types of indents. The table below lists some of the core classes and methods that are used to set different paragraph indents in Word with Spire.Doc for Python:
| Name | Description |
| ParagraphFormat Class | Represents the format of a paragraph. |
| ParagraphFormat.SetLeftIndent() Method | Sets the left indent value for paragraph. |
| ParagraphFormat.SetRightIndent() Method | Sets the right indent value for paragraph. |
| ParagraphFormat.SetFirstLineIndent() Method | Sets the first line or hanging indent value. Positive value represents first-line indent, and negative value represents hanging indent. |
The steps below explain how to set paragraph indents in a Word document using Spire.Doc for Python:
- Create a Document instance.
- Load a sample Word document using Document.LoadFromFile() method.
- Get a specific section using Document.Sections[] property.
- Get a specific paragraph using Section.Paragraphs[] property.
- Get the paragraph format using Paragraph.Format property, and then set the paragraph indent using the above listed methods of ParagraphFormat class.
- Save the document to another file using Document.SaveToFile() method.
- Python
from spire.doc import *
from spire.doc.common import *

# Create a Document instance
doc = Document()
# Load a sample Word document
doc.LoadFromFile(""Sample6.docx"")

# Get the first section
section = doc.Sections.get_Item(0)

# Get the first paragraph and set the left indent
para1 = section.Paragraphs.get_Item(0)
para1.Format.SetLeftIndent(30)

# Get the second paragraph and set the right indent
para2 = section.Paragraphs.get_Item(1)
para2.Format.SetRightIndent(30)

# Get the third paragraph and set the first line indent
para3 = section.Paragraphs.get_Item(2)
para3.Format.SetFirstLineIndent(30)

# Get the fourth paragraph and set the hanging indent
para4 = section.Paragraphs.get_Item(3)
para4.Format.SetFirstLineIndent(-30)

# Save the document to file
doc.SaveToFile(""SetIndents.docx"", FileFormat.Docx2013)
doc.Close()
Apply for a Temporary License
If you'd like to remove the evaluation message from the generated documents, or to get rid of the function limitations, please request a 30-day trial license for yourself.
Python: Create a Pie Chart or a Doughnut Chart in PowerPoint
Pie charts and doughnut charts are two popular types of data visualization tools that are widely used to show the proportional distribution of categories within the whole. Both charts can serve as powerful communication aids, allowing viewers to quickly grasp the significance of each component and how it relates to the overall picture.
While pie charts and doughnut charts share many similarities, they also have unique characteristics that make them suitable for different analytical scenarios. In this article, you will learn how to create a pie chart or a doughnut chart in PowerPoint with Python using Spire.Presentation for Python.
Install Spire.Presentation for Python
This scenario requires Spire.Presentation for Python and plum-dispatch v1.7.4. They can be easily installed in your Windows through the following pip command.
pip install Spire.Presentation
If you are unsure how to install, please refer to this tutorial: How to Install Spire.Presentation for Python on Windows
Create a Pie Chart in PowerPoint with Python
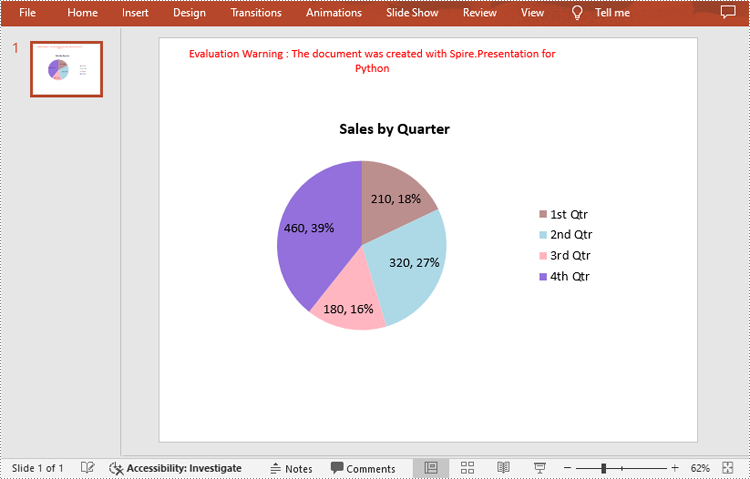
Pie charts are designed to resemble a circle, which is divided into sections or "slices", with each slice representing a portion of the whole.
With Spire.Prensetion for Python, you can add a pie chart to a presentation slide using the ISlide.Shapes.AppendChartInit(type: ChartType, rectangle: RectangleF, init: bool) method and specify the chart type as Pie. The following are the detailed steps.
- Create a Presentation instance.
- Get the first slide using Prenstion.Slides[] property.
- Add a pie chart at a specified location on the side using ISlide.Shapes.AppendChartInit(type: ChartType, rectangle RectangleF, init bool).
- Set and format the chart title.
- Define some data and append the data to the chart sheet as chart data using IChart.ChartData property.
- Set series labels, category labels, series values and other attributes using the properties of the IChart class.
- Set to show label value and percentage value.
- Save the result file using Presentation.SaveToFile() method.
- Python
from spire.presentation.common import *
from spire.presentation import *

# Create a Presentation instance
presentation = Presentation()

# Add a pie chart at a specified location on the first slide
rect = RectangleF.FromLTRB (40, 100, 590, 420)
chart = presentation.Slides[0].Shapes.AppendChartInit (ChartType.Pie, rect, False)

# Set and format chart title
chart.ChartTitle.TextProperties.Text = "Sales by Quarter"
chart.ChartTitle.TextProperties.IsCentered = True
chart.ChartTitle.Height = 30
chart.HasTitle = True

# Define some data
quarters = ["1st Qtr", "2nd Qtr", "3rd Qtr", "4th Qtr"]
sales = [210, 320, 180, 460]

# Append data to ChartData, which represents a data table where the chart data is stored
chart.ChartData[0,0].Text = "Quarters"
chart.ChartData[0,1].Text = "Sales"
i = 0
while i < len(quarters):
    chart.ChartData[i + 1,0].Text = quarters[i]
    chart.ChartData[i + 1,1].NumberValue = sales[i]
    i += 1

# Set series labels and category labels
chart.Series.SeriesLabel = chart.ChartData["B1","B1"]
chart.Categories.CategoryLabels = chart.ChartData["A2","A5"]

# Set values for series
chart.Series[0].Values = chart.ChartData["B2","B5"]

# Add data points to series
for i, unusedItem in enumerate(chart.Series[0].Values):
    cdp = ChartDataPoint(chart.Series[0])
    cdp.Index = i
    chart.Series[0].DataPoints.Add(cdp)

# Fill each data point with a different color
chart.Series[0].DataPoints.get_Item(0).Fill.FillType = FillFormatType.Solid
chart.Series[0].DataPoints.get_Item(0).Fill.SolidColor.Color = Color.get_RosyBrown()
chart.Series[0].DataPoints.get_Item(1).Fill.FillType = FillFormatType.Solid
chart.Series[0].DataPoints.get_Item(1).Fill.SolidColor.Color = Color.get_LightBlue()
chart.Series[0].DataPoints.get_Item(2).Fill.FillType = FillFormatType.Solid
chart.Series[0].DataPoints.get_Item(2).Fill.SolidColor.Color = Color.get_LightPink()
chart.Series[0].DataPoints.get_Item(3).Fill.FillType = FillFormatType.Solid
chart.Series[0].DataPoints.get_Item(3).Fill.SolidColor.Color = Color.get_MediumPurple()

# Set the data labels to display label value and percentage value
chart.Series[0].DataLabels.LabelValueVisible = True
chart.Series[0].DataLabels.PercentValueVisible = True

# Save the result file
presentation.SaveToFile("CreatePieChart.pptx", FileFormat.Pptx2016)
presentation.Dispose()
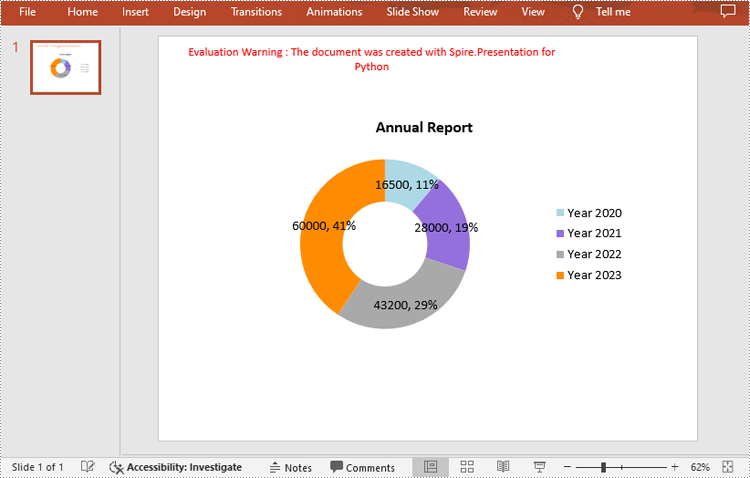
Create a Doughnut Chart in PowerPoint with Python
Doughnut charts are very similar to pie charts, with the primary difference being the presence of a "hole" in the center. This hole can be used to display additional information or to maintain a cleaner look.
To add a donut chart to a presentation slide, you can specify the ChartType parameter of ISlide.Shapes.AppendChartInit() method as Doughnut. The following are the detailed steps.
- Create a Presentation instance.
- Get the first slide using Prenstion.Slides[] property.
- Add a doughnut chart at a specified location on the side using ISlide.Shapes.AppendChartInit(type: ChartType, rectangle: RectangleF, init: bool).
- Define some data and append the data to the chart sheet as chart data using IChart.ChartData property.
- Set series labels, category labels, series values and other attributes using the properties of the IChart class.
- Set to show label value and percentage value.
- Save the result file using Presentation.SaveToFile() method.
- Python
from spire.presentation.common import *
from spire.presentation import *

# Create a Presentation instance
presentation = Presentation()

# Add a doughnut chart at a specified location on the first slide
rect = RectangleF.FromLTRB (80, 100, 630, 420)
chart = presentation.Slides[0].Shapes.AppendChartInit(ChartType.Doughnut, rect, False)

# Set and format chart title
chart.ChartTitle.TextProperties.Text = "Annual Report"
chart.ChartTitle.TextProperties.IsCentered = True
chart.ChartTitle.Height = 30

# Define some data
years = ["Year 2020", "Year 2021", "Year 2022", "Year 2023"]
sales = [16500, 28000, 43200, 60000]

# Append data to ChartData, which represents a data table where the chart data is stored
chart.ChartData[0,0].Text = "Quarters"
chart.ChartData[0,1].Text = "Sales"
i = 0
while i < len(years):
    chart.ChartData[i + 1,0].Text = years[i]
    chart.ChartData[i + 1,1].NumberValue = sales[i]
    i += 1

# Set series labels and category labels
chart.Series.SeriesLabel = chart.ChartData["B1","B1"]
chart.Categories.CategoryLabels = chart.ChartData["A2","A5"]

# Set values for series
chart.Series[0].Values = chart.ChartData["B2","B5"]

# Add data points to series
for i, item in enumerate(chart.Series[0].Values):
    cdp = ChartDataPoint(chart.Series[0])
    cdp.Index = i
    chart.Series[0].DataPoints.Add(cdp)

# Fill each data point with a different color
chart.Series[0].DataPoints.get_Item(0).Fill.FillType = FillFormatType.Solid
chart.Series[0].DataPoints.get_Item(0).Fill.SolidColor.Color = Color.get_LightBlue()
chart.Series[0].DataPoints.get_Item(1).Fill.FillType = FillFormatType.Solid
chart.Series[0].DataPoints.get_Item(1).Fill.SolidColor.Color = Color.get_MediumPurple()
chart.Series[0].DataPoints.get_Item(2).Fill.FillType = FillFormatType.Solid
chart.Series[0].DataPoints.get_Item(2).Fill.SolidColor.Color =  Color.get_DarkGray()
chart.Series[0].DataPoints.get_Item(3).Fill.FillType = FillFormatType.Solid
chart.Series[0].DataPoints.get_Item(3).Fill.SolidColor.Color = Color.get_DarkOrange()

# Set the data labels to display label value and percentage value
chart.Series[0].DataLabels.LabelValueVisible = True
chart.Series[0].DataLabels.PercentValueVisible = True

# Set the hole size of the doughnut chart
chart.Series[0].DoughnutHoleSize = 50

# Save the result file
presentation.SaveToFile("DoughnutChart.pptx", FileFormat.Pptx2016)
presentation.Dispose()
Apply for a Temporary License
If you'd like to remove the evaluation message from the generated documents, or to get rid of the function limitations, please request a 30-day trial license for yourself.
Python: Set or Remove Table Borders in PowerPoint
Table borders in PowerPoint refer to the visible lines or outlines that surround the cells within a table. These borders provide a visual separation between cells and help define the boundaries of the table. By setting or modifying table borders, you can customize the appearance of tables in your PowerPoint presentations. In this article, we will guide you on how to set and remove table borders in PowerPoint in Python using Spire.Presentation for Python.
Install Spire.Presentation for Python
This scenario requires Spire.Presentation for Python and plum-dispatch v1.7.4. They can be easily installed in your Windows through the following pip command.
pip install Spire.Presentation
If you are unsure how to install, please refer to this tutorial: How to Install Spire.Presentation for Python on Windows
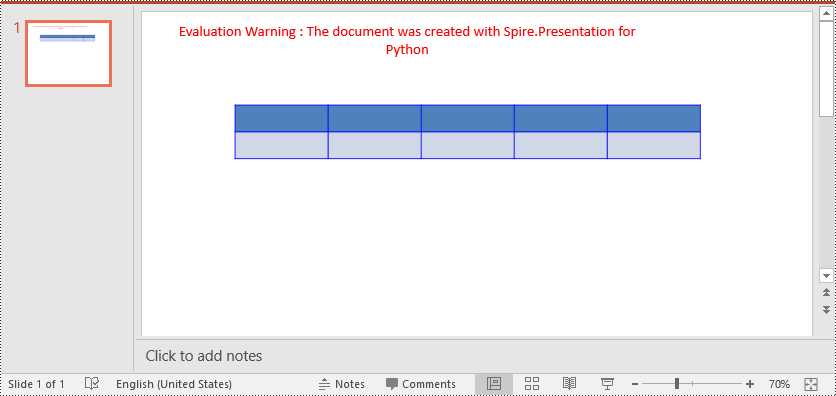
Set Table Borders in PowerPoint in Python
Spire.Presentation for Python provides the ITable.SetTableBorder() method, which allows you to set borders for a table in PowerPoint. The detailed steps are as follows.
- Create an object of the Presentation class.
- Get the first slide of the presentation using Presentation.Slides[] property.
- Add a table to the slide using ISlide.Shapes.AppendTable() method.
- Add borders to the table and set the border type, width, and color using ITable.SetTableBorder() method.
- Save the result presentation using Presentation.SaveToFile() method.
- Python
from spire.presentation.common import *
from spire.presentation import *

# Create a Presentation object
presentation = Presentation()
# Get  the first slide of the presentation
slide = presentation.Slides[0]

# Specify the number and size of rows and columns in table
widths = [100, 100, 100, 100, 100]
heights = [20, 20]

# Add a table to the first slide
table = slide.Shapes.AppendTable(100, 100, widths, heights)

# Add borders to the table and set the border type, width, and color
table.SetTableBorder(TableBorderType.All, 1, Color.get_Blue())

# Save the result presentation
presentation.SaveToFile("SetBorders.pptx", FileFormat.Pptx2013)
presentation.Dispose()
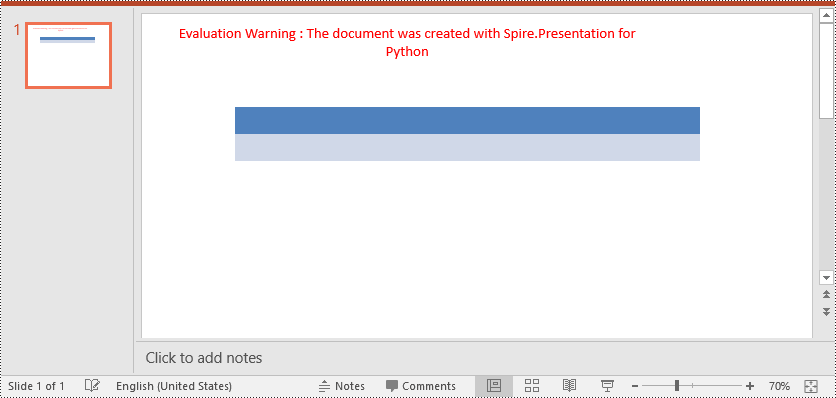
Remove Table Borders in PowerPoint in Python
To remove borders from a table, you need to iterate through the cells in the table and then remove the borders from each cell. The detailed steps are as follows.
- Create an object of the Presentation class.
- Load a PowerPoint presentation using Presentation.LoadFromFile() method.
- Get a specific slide of the presentation using Presentation.Slides[] property.
- Get the table on the slide.
- Iterate through the rows in the table and the cells in each row.
- Remove the borders from each cell by setting the fill type of the top, bottom, left and right borders of the cell as none.
- Save the result presentation using Presentation.SaveToFile() method.
- Python
from spire.presentation.common import *
from spire.presentation import *

# Create a PowerPoint presentation
presentation = Presentation()
# Load a PowerPoint presentation
presentation.LoadFromFile("SetBorders.pptx")

# Get the first slide
slide = presentation.Slides[0]
# Get the table on the slide
table = slide.Shapes[0] if isinstance(slide.Shapes[0], ITable) else None
table = (ITable)(table)

# Iterate through the rows and cells in the table
for row in table.TableRows:
    for cell in row:
        # Remove borders from each cell by setting the fill type of the top, bottom, left and right borders of the cell as none
        cell.BorderTop.FillType = FillFormatType.none
        cell.BorderBottom.FillType = FillFormatType.none
        cell.BorderLeft.FillType = FillFormatType.none
        cell.BorderRight.FillType = FillFormatType.none

# Save the result presentation
presentation.SaveToFile("RemoveBorders.pptx", FileFormat.Pptx2013)
presentation.Dispose()
Apply for a Temporary License
If you'd like to remove the evaluation message from the generated documents, or to get rid of the function limitations, please request a 30-day trial license for yourself.
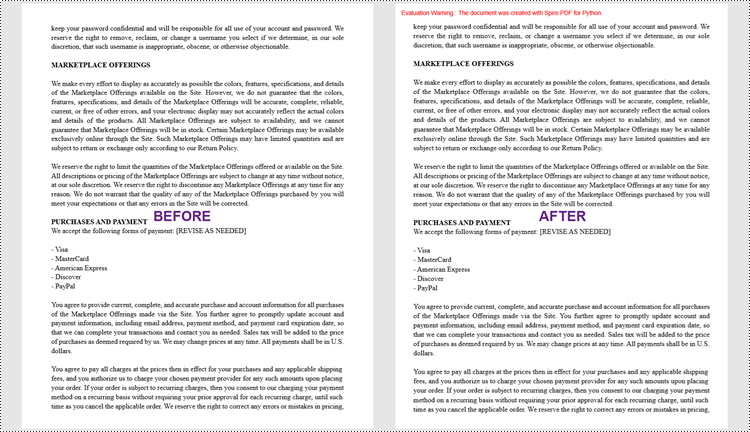
Python: Change the Margins of a PDF Document
Margins in a PDF document refer to the blank spaces surrounding the content on each page. They act as a buffer zone between the text or images and the edges of the page. Changing the margins of a PDF document can be a useful task when you want to adjust the layout, accommodate annotations or comments, or prepare the document for printing or presentation.
This article introduces how to modify the margins of a PDF document using the Spire.PDF for Python library. You will discover techniques to both increase and reduce the margins of your PDFs, enabling you to customize the layout according to your specific requirements.
Install Spire.PDF for Python
This scenario requires Spire.PDF for Python and plum-dispatch v1.7.4. They can be easily installed in your Windows through the following pip command.
pip install Spire.PDF
If you are unsure how to install, please refer to this tutorial: How to Install Spire.PDF for Python on Windows
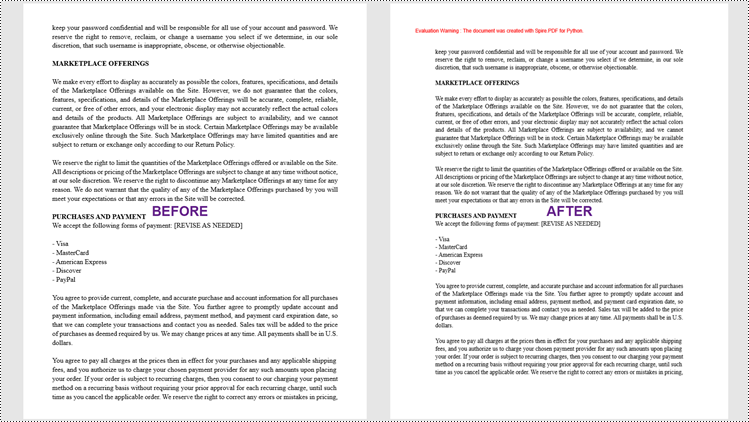
Increase the Margins of a PDF Document in Python
In Spire.PDF for Python, there isn't a direct method to modify the margins of an existing PDF document. However, you can increase the margins by creating a new PDF document with a page size equal to the original document's page size plus the increased margin values. Then, copy and paste (draw) each page of the original document into the appropriate place on the new document page.
The following are the steps to increase the margins of a PDF document using Python.
- Create a PdfDocument object called "originalPdf" and load the original PDF document.
- Create another PdfDocument object called "newPdf" for creating a new PDF document.
- Specify the desired increase values for the top, bottom, left, and right margins.
- Calculate the new page size by adding the margin increase values to the original page dimensions.
- Create a template based on the original PDF page using PdfPageBase.CreateTemplate() method.
- Add a new page to the "newPdf" document with the calculated page size using PdfDocument.Pages.Add() method.
- Draw the template onto the new page at the appropriate location to using PdfTemplate.Draw() method.
- Repeat steps 5-7 for each page in the original PDF document.
- Save the "newPdf" object to a PDF file.
- Python
from spire.pdf.common import *
from spire.pdf import *

# Create a PdfDocument object
originalPdf = PdfDocument()

# Load a PDF file
originalPdf.LoadFromFile("C:\\Users\\Administrator\\Desktop\\Input.pdf")

# Get the first page
"firstPage = originalPdf.Pages.get_Item(0)

# Create another PdfDocument object for creating new document
newPdf = PdfDocument()

# Set the increase values of the margins
marginsToAdd = newPdf.PageSettings.Margins
marginsToAdd.Top = 40
marginsToAdd.Bottom = 40
marginsToAdd.Left = 40
marginsToAdd.Right = 40

# Calculate the new page size
sizeF = SizeF(firstPage.Size.Width + marginsToAdd.Left + marginsToAdd.Right, firstPage.Size.Height + marginsToAdd.Top + marginsToAdd.Bottom)

# Iterate through the pages in the original document
for i in range(originalPdf.Pages.Count):

    # Create a template based on a specific page
    pdfTemplate = originalPdf.Pages.get_Item(i).CreateTemplate()"

    # Add a page to the new PDF
    page = newPdf.Pages.Add(sizeF)

    # Draw template on the page
    pdfTemplate.Draw(page, 0.0, 0.0)

# Save the new document
newPdf.SaveToFile("Output/IncreaseMargins.pdf", FileFormat.PDF)

# Dispose resources
originalPdf.Dispose()
newPdf.Dispose()
Reduce the Margins of a PDF Document in Python
Similarly, you can reduce the margins by creating a new PDF document with a page size equal to the page size of the original document minus the margin value to be reduced. Then, copy and paste (draw) each page of the original document into the appropriate place on the new document page.
To reduce the margins of a PDF document using Python, follow these steps:
- Create a PdfDocument object called "originalPdf" and load the original PDF document.
- Create another PdfDocument object called "newPdf" for creating a new PDF document.
- Specify the desired reduction values for the top, bottom, left, and right margins.
- Calculate the new page size by subtracting the margin value to be reduced from the original page size.
- Create a template based on the original PDF page using PdfPageBase.CreateTemplate() method.
- Add a new page to the "newPdf" document with the calculated page size using PdfDocument.Pages.Add() method.
- Draw the template onto the new page at the appropriate location using PdfTemplate.Draw() method.
- Repeat steps 5-7 for each page in the original PDF document.
- Save the "newPdf" object to a PDF file.
- Python
from spire.pdf.common import *
from spire.pdf import *

# Create a PdfDocument object
originalPdf = PdfDocument()

# Load a PDF file
originalPdf.LoadFromFile(""C:\\Users\\Administrator\\Desktop\\Input.pdf"")

# Get the first page
firstPage = originalPdf.Pages.get_Item(0)

# Create another PdfDocument object
newPdf = PdfDocument()

# Set the reduction value of the margins
topToReduce = 20.0
bottomToReduce = 20.0
leftToReduce = 20.0
rightToReduce = 20.0

# Calculate the new page size
sizeF = SizeF(firstPage.Size.Width - leftToReduce - rightToReduce, firstPage.Size.Height - topToReduce - bottomToReduce)

# Iterate through the pages in the original document
for i in range(originalPdf.Pages.Count):

    # Create a template based on a specific page
    pdfTemplate = originalPdf.Pages.get_Item(i).CreateTemplate()

    # Add a page to the new PDF
    page = newPdf.Pages.Add(sizeF, PdfMargins(0.0))

    # Draw template on the page
    pdfTemplate.Draw(page, -leftToReduce, -topToReduce)

# Save the new document
newPdf.SaveToFile(""Output/ReduceMargins.pdf"", FileFormat.PDF)

# Dispose resources
originalPdf.Dispose()
newPdf.Dispose()
Apply for a Temporary License
If you'd like to remove the evaluation message from the generated documents, or to get rid of the function limitations, please request a 30-day trial license for yourself.
Java: Read Content from a Word Document
Extracting content from Word documents plays a crucial role in both work and study. Extracting one page of content helps in quickly browsing and summarizing key points, while extracting content from one section aids in in-depth study of specific topics or sections. Extracting the entire document allows you to have a comprehensive understanding of the document content, facilitating deep analysis and comprehensive comprehension. This article will introduce how to use Spire.Doc for Java to read a page, a section, and the entire content of a Word document in a Java project.
- Read a Page from a Word Document in Java
- Read a Section from a Word Document in Java
- Read the Entire Content from a Word Document in Java
Install Spire.Doc for Java
First, you're required to add the Spire.Doc.jar file as a dependency in your Java program. The JAR file can be downloaded from this link. If you use Maven, you can easily import the JAR file in your application by adding the following code to your project's pom.xml file.
<repositories>
    <repository>
        <id>com.e-iceblue</id>
        <name>e-iceblue</name>
        <url>https://repo.e-iceblue.com/nexus/content/groups/public/</url>
    </repository>
</repositories>
<dependencies>
    <dependency>
        <groupId>e-iceblue</groupId>
        <artifactId>spire.doc</artifactId>
        <version>14.9.5</version>
    </dependency>
</dependencies>
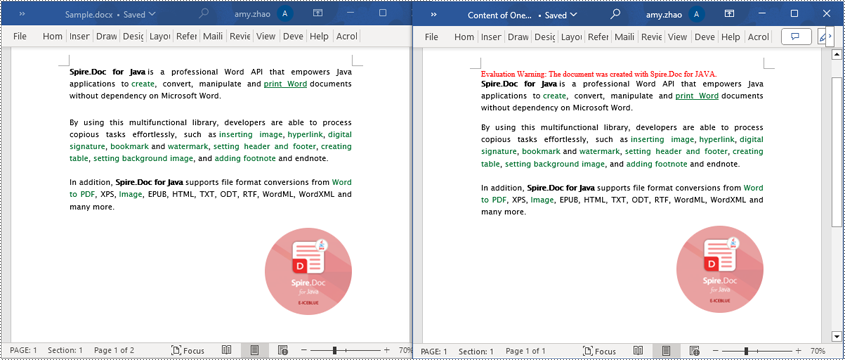
Read a Page from a Word Document in Java
Using the FixedLayoutDocument class and FixedLayoutPage class makes it easy to extract content from a specified page. To facilitate viewing the extracted content, the following example code saves the extracted content to a new Word document. The detailed steps are as follows:
- Create a Document object.
- Load a Word document using the Document.loadFromFile() method.
- Create a FixedLayoutDocument object.
- Obtain a FixedLayoutPage object for a page in the document.
- Use the FixedLayoutPage.getSection() method to get the section where the page is located.
- Get the index position of the first paragraph on the page within the section.
- Get the index position of the last paragraph on the page within the section.
- Create another Document object.
- Add a new section using Document.addSection().
- Clone the properties of the original section to the new section using Section.cloneSectionPropertiesTo(newSection) method.
- Copy the content of the page from the original document to the new document.
- Save the resulting document using the Document.saveToFile() method.
- Java
import com.spire.doc.*;
import com.spire.doc.pages.*;
import com.spire.doc.documents.*;

public class ReadOnePage {
    public static void main(String[] args) {
        // Create a new document object
        Document document = new Document();

        // Load document content from the specified file
        document.loadFromFile("Sample.docx");

        // Create a fixed layout document object
        FixedLayoutDocument layoutDoc = new FixedLayoutDocument(document);

        // Get the first page
        FixedLayoutPage page = layoutDoc.getPages().get(0);

        // Get the section where the page is located
        Section section = page.getSection();

        // Get the first paragraph of the page
        Paragraph paragraphStart = page.getColumns().get(0).getLines().getFirst().getParagraph();
        int startIndex = 0;
        if (paragraphStart != null) {
            // Get the index of the paragraph in the section
            startIndex = section.getBody().getChildObjects().indexOf(paragraphStart);
        }

        // Get the last paragraph of the page
        Paragraph paragraphEnd = page.getColumns().get(0).getLines().getLast().getParagraph();

        int endIndex = 0;
        if (paragraphEnd != null) {
            // Get the index of the paragraph in the section
            endIndex = section.getBody().getChildObjects().indexOf(paragraphEnd);
        }

        // Create a new document object
        Document newdoc = new Document();

        // Add a new section
        Section newSection = newdoc.addSection();

        // Clone the properties of the original section to the new section
        section.cloneSectionPropertiesTo(newSection);

        // Copy the content of the original document's page to the new document
        for (int i = startIndex; i <=endIndex; i++)
        {
            newSection.getBody().getChildObjects().add(section.getBody().getChildObjects().get(i).deepClone());
        }

        // Save the new document to the specified file
        newdoc.saveToFile("Content of One Page.docx", FileFormat.Docx);

        // Close and release the new document
        newdoc.close();
        newdoc.dispose();

        // Close and release the original document
        document.close();
        document.dispose();
    }
}
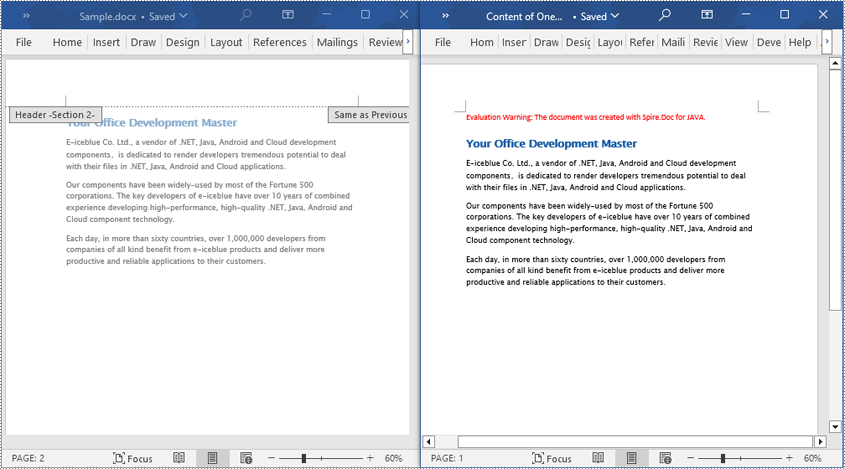
Read a Section from a Word Document in Java
Using Document.Sections[index], you can access specific Section objects that contain the header, footer, and body content of a document. The following example demonstrates a simple method to copy all content from one section to another document. The detailed steps are as follows:
- Create a Document object.
- Load a Word document using the Document.loadFromFile() method.
- Use Document.getSections().get(1) to retrieve the second section of the document.
- Create another new Document object.
- Clone the default style of the original document to the new document using Document.cloneDefaultStyleTo(newdoc) method.
- Use Document.getSections().add(section.deepClone()) to clone the content of the second section of the original document to the new document.
- Save the resulting document using the Document.saveToFile() method.
- Java
import com.spire.doc.*;

public class ReadOneSection {
    public static void main(String[] args) {
        // Create a new document object
        Document document = new Document();

        // Load a Word document from a file
        document.loadFromFile("Sample.docx");

        // Get the second section of the document
        Section section = document.getSections().get(1);

        // Create a new document object
        Document newdoc = new Document();

        // Clone the default style to the new document
        document.cloneDefaultStyleTo(newdoc);

        // Clone the second section to the new document
        newdoc.getSections().add(section.deepClone());

        // Save the new document to a file
        newdoc.saveToFile("Content of One Section.docx", FileFormat.Docx);

        // Close and release the new document object
        newdoc.close();
        newdoc.dispose();

        // Close and release the original document object
        document.close();
        document.dispose();
    }
}
Read the Entire Content from a Word Document in Java
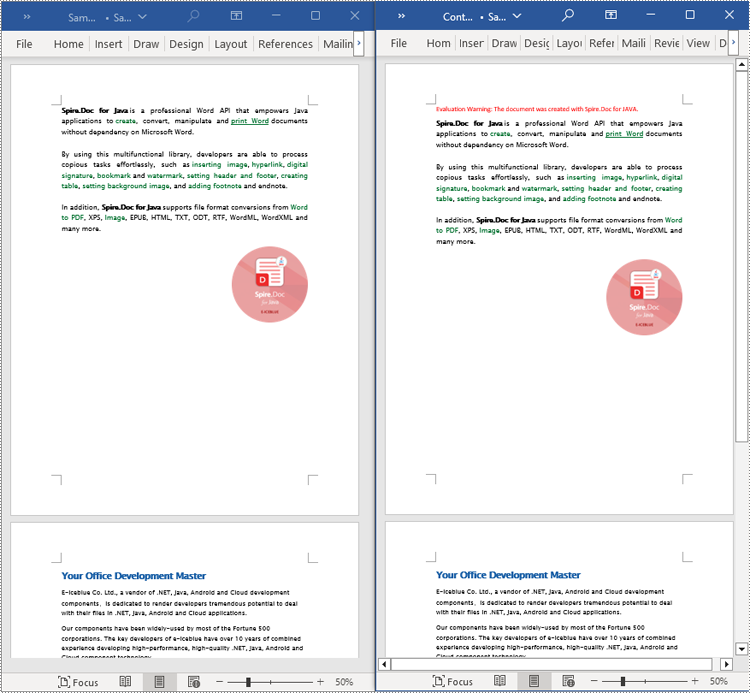
This example demonstrates how to iterate through each section of the original document to read the entire content of the document and clone each section into a new document. This method can help you quickly replicate both the structure and content of the entire document, preserving the format and layout of the original document in the new document. Such operations are very useful for maintaining the integrity and consistency of the document structure. The detailed steps are as follows:
- Create a Document object.
- Load a Word document using the Document.loadFromFile() method.
- Create another new Document object.
- Clone the default style of the original document to the new document using the Document.cloneDefaultStyleTo(newdoc) method.
- Iterate through each section of the original document using a for loop and clone it into the new document.
- Save the resulting document using the Document.saveToFile() method.
- Java
import com.spire.doc.*;

public class ReadOneDocument {
    public static void main(String[] args) {
        // Create a new document object
        Document document = new Document();

        // Load a Word document from a file
        document.loadFromFile("Sample.docx");

        // Create a new document object
        Document newdoc = new Document();

        // Clone the default style to the new document
        document.cloneDefaultStyleTo(newdoc);

        // Iterate through each section in the original document and clone it to the new document
        for (Section sourceSection : (Iterable<Section>) document.getSections()) {
            newdoc.getSections().add(sourceSection.deepClone());
        }
        // Save the new document to a file
        newdoc.saveToFile("Content of the entire document.docx", FileFormat.Docx);

        // Close and release the new document object
        newdoc.close();
        newdoc.dispose();

        // Close and release the original document object
        document.close();
        document.dispose();
    }
}
Apply for a Temporary License
If you'd like to remove the evaluation message from the generated documents, or to get rid of the function limitations, please request a 30-day trial license for yourself.