C#/VB.NET: Insert Images in Word
Images in Word documents are often closely related to the textual content. Compared with documents full of text, documents with images are more illustrative and attractive. In this article, you will learn how to programmatically insert images in a Word document using Spire.Doc for .NET. With this professional Word library, you can also set the image size, position as well as wrapping styles.
- Insert Images and Set their Wrapping Styles in a Word Document
- Insert an Image at a Specified Location in a Word document
Install Spire.Doc for .NET
To begin with, you need to add the DLL files included in the Spire.Doc for .NET package as references in your .NET project. The DLLs files can be either downloaded from this link or installed via NuGet.
PM> Install-Package Spire.Doc
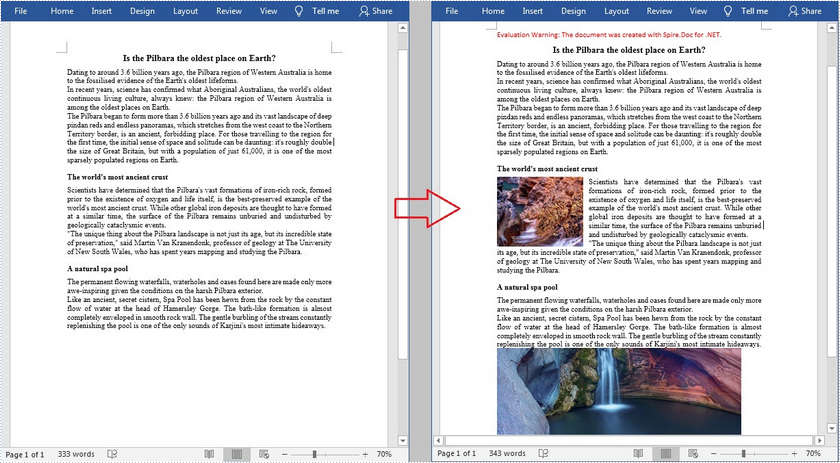
Insert Images and Set their Wrapping Styles in a Word Document
Spire.Doc for .NET supports common wrapping styles such as In Line with Text, Square, Tight, Through, Top and Bottom, Behind the Text as well as In Front of Text. Below are the detailed steps to insert images and then set their wrapping styles.
- Create a Document instance.
- Load a sample Word document using Document.LoadFromFile() method.
- Get the first section of the Word Document using Document.Sections[] property.
- Get a specified paragraph of the section using Section.Paragraphs[] property.
- Load an image and insert the image in the specified paragraph using Paragraph.AppendPicture() method.
- Set the wrapping style of the image using DocPicture.TextWrappingType property.
- Save the document to another file using Document.SaveToFile() method.
- C#
- VB.NET
using System.Drawing;
using Spire.Doc;
using Spire.Doc.Documents;
using Spire.Doc.Fields;

namespace WordImage
{
    class ImageinWord
    {
        static void Main(string[] args)
        {
            //Create a Document instance
            Document document = new Document();

            //Load a sample Word document
            document.LoadFromFile("input.docx");

            //Get the first section
            Section section = document.Sections[0];

            //Get two specified paragraphs
            Paragraph para1 = section.Paragraphs[5];
            Paragraph para2 = section.Paragraphs[9];

            //Insert images in the specified paragraphs
            DocPicture Pic1 = para1.AppendPicture(Image.FromFile(@"C:\Users\Administrator\Desktop\pic1.jpg"));
            DocPicture Pic2 = para2.AppendPicture(Image.FromFile(@"C:\Users\Administrator\Desktop\pic2.png"));

            //Set wrapping styles to Square and Inline respectively
            Pic1.TextWrappingStyle = TextWrappingStyle.Square;
            Pic2.TextWrappingStyle = TextWrappingStyle.Inline;

            //Save the document to file
            document.SaveToFile("InsertImage.docx", FileFormat.Docx);
        }
    }
}
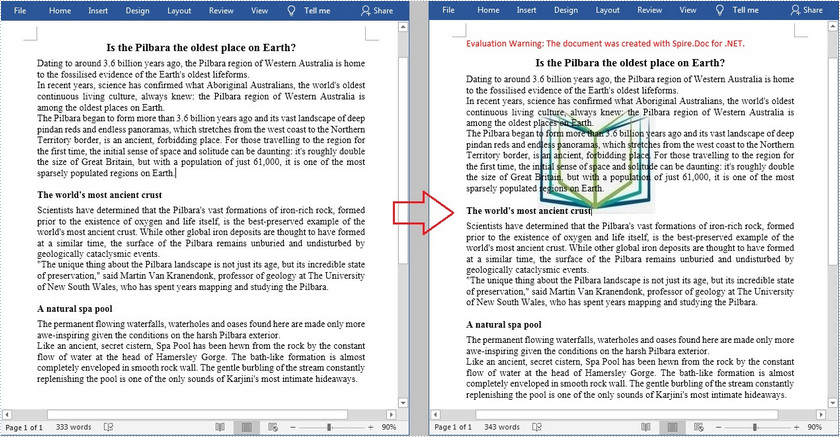
Insert an Image at a Specified Location in a Word document
The DocPicture.HorizontalPosition and DocPicture.VerticalPosition properties offered by Spire.Doc for .NET allows you to insert an image at a specified location. The detailed steps are as follows.
- Create a Document instance.
- Load a sample Word document using Document.LoadFromFile() method.
- Get the first section of the Word Document using Document.Sections[] property.
- Get a specified paragraph of the section using Section.Paragraphs[] property.
- Load an image and insert the image to the document using Paragraph.AppendPicture() method.
- Set the horizontal and vertical position of the image using DocPicture.HorizontalPosition and DocPicture.VerticalPosition properties.
- Set the height and width of the image using DocPicture.Width and DocPicture.Height properties.
- Set the wrapping style of the image using DocPicture.TextWrappingType property.
- Save the document to another file using Document.SaveToFile() method.
- C#
- VB.NET
using Spire.Doc;
using Spire.Doc.Documents;
using Spire.Doc.Fields;
using System.Drawing;

namespace InsertImage
{
    class Program
    {
        static void Main(string[] args)
        {
            //Create a Document instance
            Document document = new Document();

            //Load a sample Word document
            document.LoadFromFile("input.docx");

            //Get the first section
            Section section = document.Sections[0];

            //Load an image and insert it to the document
            DocPicture picture = section.Paragraphs[0].AppendPicture(Image.FromFile(@"C:\Users\Administrator\Desktop\pic.jpg"));

            //Set the position of the image
            picture.HorizontalPosition = 90.0F;
            picture.VerticalPosition = 50.0F;

            //Set the size of the image
            picture.Width = 150;
            picture.Height = 150;

            //Set the wrapping style to Behind
            picture.TextWrappingStyle = TextWrappingStyle.Behind;

            // Save the document to file
            document.SaveToFile("Insert.docx", FileFormat.Docx);
        }
    }
}
Apply for a Temporary License
If you'd like to remove the evaluation message from the generated documents, or to get rid of the function limitations, please request a 30-day trial license for yourself.
Edit Word Document in C#, VB.NET
In order to correct wrong spellings or add some new contents in a Word document, users need to edit an existing Word document. This guide demonstrates a solution to edit Word document in C# and VB.NET.
Spire.Doc for .NET, wonderful .NET Word component, offers a Paragraph class, which enables users to edit contents in paragraphs through set its properties. In this example, the title is updated and new text is added in paragraph two (Title is paragraph one). The editing result is shown as following screenshot.
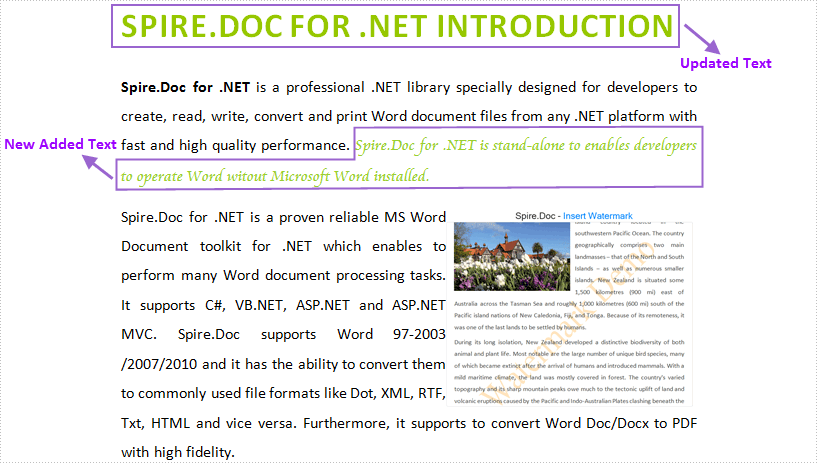
Firstly, declare a Paragraph instance and its value is set as paragraph one (title). Set its Text property to update the original contents. Secondly, declare another Paragraph instance and its value is set as Paragraph two. Invoke Paragraph.AppendText method to add new contents for this paragraph. The overload passed to this method is string text. For distinguishing new contents and existing contents, new contents are formatted in this example. Declare a TextRange instance and set its value as new added contents. Set CharacterFormat properties for this TextRange, including FontName, FontSize and TextColor. Download and install Spire.Doc for .NET and follow the code below to edit Word document.
using System.Drawing;
using Spire.Doc;
using Spire.Doc.Documents;
using Spire.Doc.Fields;

namespace EidtWord
{
    class Program
    {
        static void Main(string[] args)
        {
            //Load Document
            Document document = new Document();
            document.LoadFromFile(@"E:\Work\Documents\WordDocuments\Spire.Doc for .NET.docx");

            //Update Text of Title
            Section section = document.Sections[0];
            Paragraph para1 = section.Paragraphs[0];
            para1.Text = "Spire.Doc for .NET Introduction";

            //Add New Text
            Paragraph para2 = section.Paragraphs[1];
            TextRange tr=para2.AppendText("Spire.Doc for .NET is stand-alone"
            +"to enables developers to operate Word witout Microsoft Word installed.");
            tr.CharacterFormat.FontName = "Cataneo BT";
            tr.CharacterFormat.FontSize=12;
            tr.CharacterFormat.TextColor = Color.YellowGreen;

            //Save and Launch
            document.SaveToFile("Edit Word.docx", FileFormat.Docx);
            System.Diagnostics.Process.Start("Edit Word.docx");
        }
    }
}
Imports System.Drawing
Imports Spire.Doc
Imports Spire.Doc.Documents
Imports Spire.Doc.Fields

Namespace EidtWord
    Friend Class Program
        Shared Sub Main(ByVal args() As String)
            'Load Document
            Dim document As New Document()
            document.LoadFromFile("E:\Work\Documents\WordDocuments\Spire.Doc for .NET.docx")

            'Update Text of Title
            Dim section As Section = document.Sections(0)
            Dim para1 As Paragraph = section.Paragraphs(0)
            para1.Text = "Spire.Doc for .NET Introduction"

            'Add New Text
            Dim para2 As Paragraph = section.Paragraphs(1)
            Dim tr As TextRange = para2.AppendText("Spire.Doc for .NET is stand-alone" &
                                                   "to enables developers to operate Word witout Microsoft Word installed.")
            tr.CharacterFormat.FontName = "Cataneo BT"
            tr.CharacterFormat.FontSize = 12
            tr.CharacterFormat.TextColor = Color.YellowGreen

            'Save and Launch
            document.SaveToFile("Edit Word.docx", FileFormat.Docx)
            System.Diagnostics.Process.Start("Edit Word.docx")
        End Sub
    End Class
End Namespace
Spire.Doc, an easy-to-use component to operate Word document, allows developers to fast generate, write, edit and save Word (Word 97-2003, Word 2007, Word 2010) in C# and VB.NET for .NET, Silverlight and WPF.
C#/VB.NET: Create a Word Document
There's no doubt that Word document is one of the most popular document file types today. Because Word document is an ideal file format for generating letters, memos, reports, term papers, novels and magazines, etc. In this article, you will learn how to create a simple Word document from scratch in C# and VB.NET by using Spire.Doc for .NET.
Spire.Doc for .NET provides the Document class to represent a Word document model, allowing users to read and edit existing documents or create new ones. A Word document must contain at least one section (represented by Section class) and each section is a container for basic Word elements like paragraphs, tables, headers, footers and so on. The table below lists the important classes and methods involved in this tutorial.
| Member | Description |
| Document class | Represents a Word document model. |
| Section class | Represents a section in a Word document. |
| Paragraph class | Represents a paragraph in a section. |
| ParagraphStyle class | Defines the font formatting information that can be applied to a paragraph. |
| Section.AddParagraph() method | Adds a paragraph to a section. |
| Paragraph.AppendText() method | Appends text to a paragraph at the end. |
| Paragraph.ApplyStyle() method | Applies a style to a paragraph. |
| Document.SaveToFile() method | Saves the document to a Word file with an extension of .doc or .docx. This method also supports saving the document to PDF, XPS, HTML, PLC, etc. |
Install Spire.Doc for .NET
To begin with, you need to add the DLL files included in the Spire.Doc for .NET package as references in your .NET project. The DLL files can be either downloaded from this link or installed via NuGet.
PM> Install-Package Spire.Doc
Create a Simple Word Document
The following are the steps to create a simple Word document that contains several paragraphs by using Spire.Doc for .NET.
- Create a Document object.
- Add a section using Document.AddSection() method.
- Set the page margins through Section.PageSetUp.Margins property.
- Add several paragraphs to the section using Section.AddParagraph() method.
- Add text to the paragraphs using Paragraph.AppendText() method.
- Create a ParagraphStyle object, and apply it to a specific paragraph using Paragraph.ApplyStyle() method.
- Save the document to a Word file using Document.SaveToFile() method.
- C#
- VB.NET
using Spire.Doc;
using Spire.Doc.Documents;
using System.Drawing;

namespace CreateWordDocument
{
    class Program
    {
        static void Main(string[] args)
        {
            //Create a Document object
            Document doc = new Document();

            //Add a section
            Section section = doc.AddSection();

            //Set the page margins
            section.PageSetup.Margins.All = 40f;

            //Add a paragraph as title
            Paragraph titleParagraph = section.AddParagraph();
            titleParagraph.AppendText("Introduction of Spire.Doc for .NET");

            //Add two paragraphs as body
            Paragraph bodyParagraph_1 = section.AddParagraph();
            bodyParagraph_1.AppendText("Spire.Doc for .NET is a professional Word.NET library specifically designed " +
                "for developers to create, read, write, convert, compare and print Word documents on any.NET platform " +
                "(.NET Framework, .NET Core, .NET Standard, Xamarin & Mono Android) with fast and high-quality performance.");


            Paragraph bodyParagraph_2 = section.AddParagraph();
            bodyParagraph_2.AppendText("As an independent Word .NET API, Spire.Doc for .NET doesn't need Microsoft Word to " +
                         "be installed on neither the development nor target systems. However, it can incorporate Microsoft Word " +
                         "document creation capabilities into any developers' .NET applications.");

            //Create a style for title paragraph
            ParagraphStyle style1 = new ParagraphStyle(doc);
            style1.Name = "titleStyle";
            style1.CharacterFormat.Bold = true;
            style1.CharacterFormat.TextColor = Color.Purple;
            style1.CharacterFormat.FontName = "Times New Roman";
            style1.CharacterFormat.FontSize = 12;
            doc.Styles.Add(style1);
            titleParagraph.ApplyStyle("titleStyle");

            //Create a style for body paragraphs
            ParagraphStyle style2 = new ParagraphStyle(doc);
            style2.Name = "paraStyle";
            style2.CharacterFormat.FontName = "Times New Roman";
            style2.CharacterFormat.FontSize = 12;
            doc.Styles.Add(style2);
            bodyParagraph_1.ApplyStyle("paraStyle");
            bodyParagraph_2.ApplyStyle("paraStyle");

            //Set the horizontal alignment of paragraphs
            titleParagraph.Format.HorizontalAlignment = HorizontalAlignment.Center;
            bodyParagraph_1.Format.HorizontalAlignment = HorizontalAlignment.Justify;
            bodyParagraph_2.Format.HorizontalAlignment = HorizontalAlignment.Justify;

            //Set the first line indent
            bodyParagraph_1.Format.FirstLineIndent = 30;
            bodyParagraph_2.Format.FirstLineIndent = 30;

            //Set the after spacing
            titleParagraph.Format.AfterSpacing = 10;
            bodyParagraph_1.Format.AfterSpacing = 10;

            //Save to file
            doc.SaveToFile("WordDocument.docx", FileFormat.Docx2013);
        }
    }
}
Apply for a Temporary License
If you'd like to remove the evaluation message from the generated documents, or to get rid of the function limitations, please request a 30-day trial license for yourself.
Spire.Doc for .NET Program Guide Content
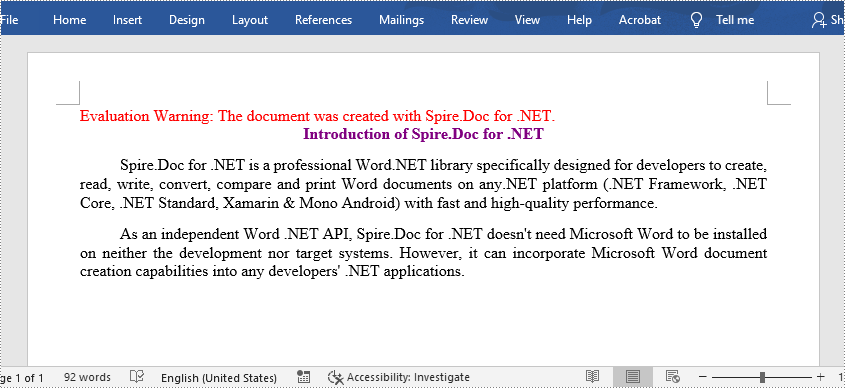
Spire.Doc for .NET is a professional Word .NET library specifically designed for developers to create, read, write, convert, compare and print Word documents on any .NET platform ( Target .NET Framework, .NET Core, .NET Standard, .NET 5.0, .NET 6.0, Xamarin & Mono Android ) with fast and high quality performance.
As an independent Word .NET API, Spire.Doc for .NET doesn't need Microsoft Word to be installed on neither the development nor target systems. However, it can incorporate Microsoft Word document creation capabilities into any developers' .NET applications.
Solutions to Open Word in C#, VB.NET
No matter what users want to do on Word document, they should open it. This guide demonstrates several solutions to open Word in C# and VB.NET via Spire.Doc for .NET.
Open Existing Word
Spire.Doc for .NET provides a Document(String) constructor to enable users to initialize a new instance of Document class from the specified existing document.
Document document = new Document(@"E:\Work\Documents\Spire.Doc for .NET.docx");
Dim document As New Document("E:\Work\Documents\Spire.Doc for .NET.docx")
Spire.Doc for .NET also provides Document.LoadFromFile(String) method of Document class to open a Word document. The Word document can be .doc(Word 97-2003), .docx(Word 2007 and 2010) and .docm(Word with macro).
  Document document = new Document();
            document.LoadFromFile(@"E:\Work\Documents\Spire.Doc for .NET.docx");
 Dim document As New Document()
            document.LoadFromFile("E:\Work\Documents\Spire.Doc for .NET.docx")
Open Word in Read Mode
Spire.Doc for .NET provides Document.LoadFromFileInReadMode(String, FileFormat) method of Document class to load Word in Read-Only mode.
            Document document = new Document();
            document.LoadFromFileInReadMode(@"E:\Work\Documents\Spire.Doc for .NET.docx",FileFormat.Docx);
            Dim document As New Document()
            document.LoadFromFileInReadMode("E:\Work\Documents\Spire.Doc for .NET.docx", FileFormat.Docx)
Load Word from Stream
Spire.Doc for .NET provides the constructor Document(Stream) to initialize a new instance of Document class from specified data stream and the method Document.LoadFromStream(Stream, FileFormat) to open document from Stream in XML or Microsoft Word document.
            Stream stream = File.OpenRead(@"E:\Work\Documents\Spire.Doc for .NET.docx");
            Document document = new Document(stream);
            Stream stream = File.OpenRead(@"E:\Work\Documents\Spire.Doc for .NET.docx");
            Document document = new Document();
            document.LoadFromStream(stream, FileFormat.Docx);
            Dim stream As Stream = File.OpenRead("E:\Work\Documents\Spire.Doc for .NET.docx")
            Dim document As New Document(stream)
            Dim stream As Stream = File.OpenRead("E:\Work\Documents\Spire.Doc for .NET.docx")
            Dim document As New Document()
            document.LoadFromStream(stream, FileFormat.Docx)
Spire.Doc, an easy-to-use component to operate Word document, allows developers to fast generate, write, edit and save Word (Word 97-2003, Word 2007, Word 2010) in C# and VB.NET for .NET, Silverlight and WPF.
Licensing
Each product of e-iceblue provides a trial version, every registered user can download them from our site for free. The trial version product will add an extra sheet (in Spire.XLS) or paragraph (in Spire.Doc) with the Evaluation Warning to the result file. From Spire.Doc v3.6.0/Spire.XLS v5.8.0/Spire.Office 1.4.0, We deprecated the old username-key registeration method and use a new license file to instead. When you purchase a license, you will get a license file from us. After you apply it, the Evaluation Warning will disappear.
This section will show you what is the license file and how to apply the license file. It includes following topics:
- License File Introduction (.NET)
- How to Apply the License File (.NET)
- How to Include the License File as an Embedded Resource (.NET)
- How to Apply the License File in a Web Site (.NET)
- How to Apply the License by license key (.NET/Java/C++/Python)

- How to Apply two licenses or more (.NET & Java)
License File Introduction
The license file is an XML format file that contains details such as the username&email&organization of the purchaser, licensing date, product name, product version, the number of licensed developer, the number of licensed site and so on. The license file is digitally signed, so do not modify it anyway.
You need to apply it before performing any operations with our products, but it's only required once to apply the license file in an application or process.
How to Apply the License File
Performing any operation with our products will lead the license module to check whether the license has been loaded. If not, the license module will try to load it. The license can be loaded implicitly or explicitly from a file, stream or an embedded resource, implicit is default.
Note: Whether implicity or explicity, you must apply the license file before you call any of our products.
Implicit Loading
In this mode, the license module will try to search the license file in the following locations:
- The folder that contains the entry assembly (your assembly named .exe) in runtime.
- An embedded resource in the assembly that calls our product.
- The folder that contains the assembly of our product (for example: Spire.Doc.dll, Spire.XLS.dll) referenced by your assembly in runtime.
- The folder that contains the assembly that calls our product in runtime.
When you get the license file from us, the default name of it is license.elic.xml. You can put it in any location aforementioned. The license module will load it automatically in your application. You can also change the license file name. If you do that, it's required to tell the license module the new file name before you perform any operation with our products, for example:
- C#
- VB.NET
//Tell the license module that you changed the license file name.
Spire.License.LicenseProvider.SetLicenseFileName("your-license-file-name");
You can also get the license file name by which the license module search the license, for example:
- C#
- VB.NET
//To get the default license file name.
String fileName = Spire.License.LicenseProvider.GetLicenseFileName();
Explicit Loading
In this mode, the license module will try to load the license from a specified file or stream you provide.
Explicitly specify the license file by a full file name.
- C#
- VB.NET
//Specify the license file by a full file name.
Spire.License.LicenseProvider.SetLicenseFileFullPath(@"D:\myApp\license.lic.xml");
Explicitly specify the license file by a FileInfo object.
- C#
- VB.NET
//Specify the license file by a FileInfo object.
FileInfo licenseFile = new FileInfo(@"D:\myApp\license.lic.xml");
Spire.License.LicenseProvider.SetLicenseFile(licenseFile);
Provide a license data stream.
- C#
- VB.NET
//Specify the license by a license data stream.
Stream stream = File.OpenRead(@"D:\myApp\license.lic.xml");
Spire.License.LicenseProvider.SetLicenseFileStream(stream);
See also: How to Apply the License by license key
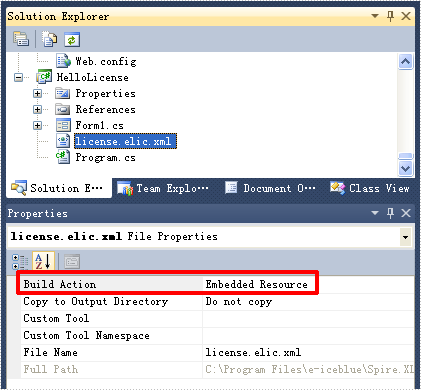
How to Include the License File as an Embedded Resource
Including the license file as an embedded resource into one of the assemblies that calls our products is a good idea. It will make your release and deployment become easier. You don't need to worry about the loss of it any longer. To include the license file as an embedded resource in Visual Studio, perform the following steps:
- In the Solution Explorer, right-click your project and click Add | Add Existing Item... menu.
- Find your license file in the opend file browser dialog, then click the Add button to add it into your project.
- Select the file in the Solution Explorer and set Build Action to Embedded Resource in the Properties window.
- If your license file name is not the default file name license.elic.xml, invoke Spire.License.LicenseProvider.SetLicenseFileName to tell the real name to the license module in your code.
See also: How to Apply the License by license key
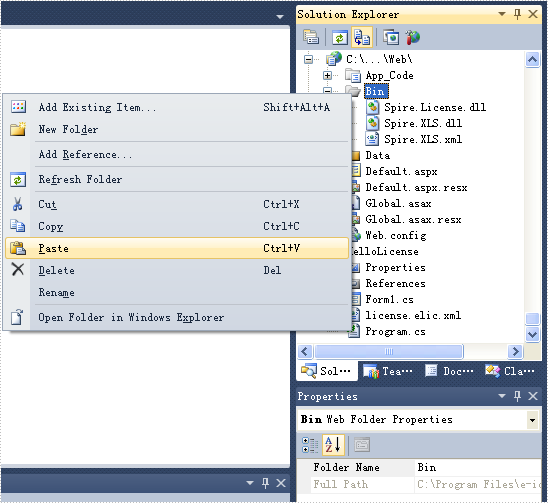
How to Apply the License File in a Web Site
If you want to apply the license file in a web site, just copy it into the folder Bin which contains the referenced assemblies of your web site.
See also: How to Apply the License by license key
How to Apply the License by license key
Sometimes, your application could not read the license file because of lack of permission or other reason. In this case, you can invoke the method Spire.License.LicenseProvider.SetLicenseKey(String key) to apply your license. The parameter key is the value of the Key attribute of the element License of your license xml file. To make sure that apply the license before any operation with our products, we recommend invoking this method in the top of your entry method.
- C#
- VB.NET
//Register the license key
Spire.License.LicenseProvider.SetLicenseKey("your license key");
//Spire.Doc version 11.5.6 or above
Spire.Doc.License.LicenseProvider.SetLicenseKey("your license key");
//Spire.XLS  version 13.6.0 or above
Spire.Xls.License.LicenseProvider.SetLicenseKey("your license key");
//Spire.PDF version 9.6.0 or above
Spire.Pdf.License.LicenseProvider.SetLicenseKey("your license key");
//Spire.Presentation version 8.6.0 or above
Spire.Presentation.License.LicenseProvider.SetLicenseKey("your license key");
- Java
//Register the license key
com.spire.license.LicenseProvider.setLicenseKey("your license key");
//Spire.Doc version 12.1.10 or above
com.spire.doc.license.LicenseProvider.setLicenseKey("Key");
//Spire.XLS version 14.1.3 or above
com.spire.xls.license.LicenseProvider.setLicenseKey("Key");
//Spire.Presentation version 9.1.2 or above
com.spire.presentation.license.LicenseProvider.setLicenseKey("Key");
//Spire.PDF version 10.1.9 or above
com.spire.pdf.license.LicenseProvider.setLicenseKey("Key");
//Spire.Ocr version 1.9.3 or above
com.spire.ocr.license.LicenseProvider.setLicenseKey("Key");
//Spire.Barcode version 5.1.3 or above
com.spire.barcode.license.LicenseProvider.setLicenseKey("Key");
- C++
//Spire.Doc
Spire::Doc::License::SetLicenseKey("your license key")
//Spire.XLS
Spire::Xls::License::SetLicenseKey("your license key")
//Spire.Presentation
Spire::Presentation::License::SetLicenseKey("your license key")
//Spire.PDF
Spire::Pdf::License::SetLicenseKey("your license key")
- Python
from spire.xls.common import *
//Spire.XLS
License.SetLicenseKey("your license key")
- If your application is WinForm Application or Console Application, this code above should be added into the Main method.
- If your application is ASP.NET Application, you need to add Global.asax into your project and add this method code above into the Application_Start method.
- If your application is ASP.NET Core Application, this code above should be added into the Startup method of Startup.cs.
How to Apply two licenses or more
When you need to use two products in the same project,such as Spire.Doc and Spire.XLS, Spire.Presentation and Spire.XLS, you need to download Spire.Office to use them together and there is no need for you to purchase Spire.Office. Please refer to how to apply two license to use Spire.Office normally by applying the license files you purchased.
If you apply your 2 licenses or more by license key, you can invoke the following method in the top of your entry method.
- C#
- Java
Spire.Doc.License.LicenseProvider.SetLicenseKey("your license key");
Spire.Doc.License.LicenseProvider.LoadLicense();
Spire.Xls.License.LicenseProvider.SetLicenseKey("your license key");
Spire.XLs.License.LicenseProvider.LoadLicense();
Spire.Pdf.License.LicenseProvider.SetLicenseKey("your license key");
Spire.Pdf.License.LicenseProvider.LoadLicense();
Spire.Presentation.License.LicenseProvider.SetLicenseKey("your license key");
Spire.Presentation.License.LicenseProvider.LoadLicense();
If you apply them by license file, you can invoke the following method:
- C#
Spire.License.LicenseProvider.SetLicenseFileName("license1.elic.xml");
Spire.License.LicenseProvider.LoadLicense();
Spire.License.LicenseProvider.SetLicenseFileName("license2.elic.xml");
Spire.License.LicenseProvider.LoadLicense();
Word Page Setup in C#, VB.NET
The sample demonstrates how to work with Word page setup.
Word document setup in C#, VB.NET
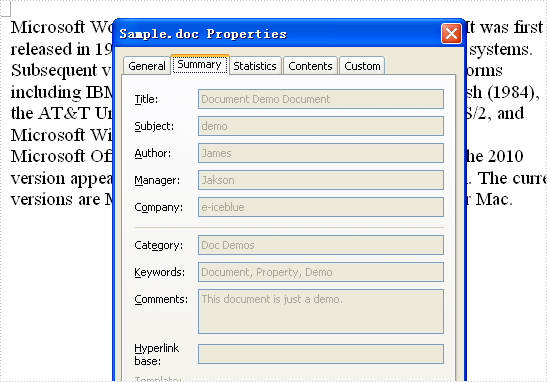
The sample demonstrates how to set document properties.
Word merge event handler in C#, VB.NET
The sample demonstrates how to handle merge event.

Word to pdf in C#, VB.NET
The sample demonstrates how to export doc document to PDF file.