How to Convert PDF to SVG (3 Easy Methods)
Table of Contents

In today's digital landscape, scalable vector graphics (SVG) have become the gold standard for web graphics, digital illustrations, and responsive design. Unlike PDFs, which can contain both vector and raster elements, SVG files are pure vector format—meaning they scale infinitely without losing quality. Knowing how to convert PDF to SVG unlocks new possibilities for web integration, animation, and precise editing in design software.
Whether you're a web developer needing scalable logos, a designer repurposing print materials for digital platforms, or a content creator looking to enhance your website's visuals, this guide will walk you through the most effective methods to convert PDF to SVG, covering free tools, professional software, and automation scripts, along with pro tips to ensure flawless results.
Contents:
- Understanding the Basics: PDF vs. SVG
- Method 1: Using Online Free PDF to SVG Converters
- Method 2: Using Free Desktop Software Inkscape
- Method 3: Using Python to Automate PDF to SVG Conversion
- Best Practices for PDF to SVG Conversion
- Common PDF to SVG Questions
Understanding the Basics: PDF vs. SVG
Before diving into conversion methods, let’s clarify the core differences between these two formats to help you make informed decisions:
- PDF (Portable Document Format) can contain text, images, vector graphics, and complex layouts. It is primarily designed for consistent printing and document sharing.
- SVG (Scalable Vector Graphics) is an XML-based vector image format for logos, icons, diagrams, and illustrations. It is natively supported by all modern browsers and is SEO-friendly (text is indexable).
When to Change PDF to SVG:
- Extracting logos or icons from PDF documents
- Converting diagrams for web presentation
- Preparing illustrations for animation
- Creating responsive graphics that scale across devices
Method 1: Using Online Free PDF to SVG Converters
If you need a quick conversion for non-sensitive files, online tools are your best bet. They’re free, require no software setup, and work on any OS (Windows, Mac, Linux, or mobile). Here are the two most reliable options:
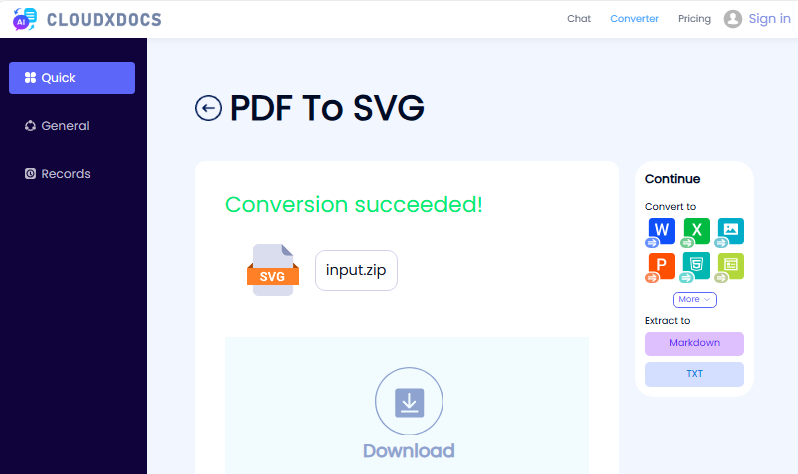
Option A: CLOUDXDOCS (Free, No Registration)
CLOUDXDOCS is a trusted, ad-free converter that supports converting PDF to SVG online. It’s ideal for small to medium files and requires zero sign-up.
- Go to CLOUDXDOCS PDF to SVG converter.
- Upload your PDF file or drag-and-drop the file into the upload area.
- Wait for the conversion process to complete.
- Download the converted SVG file.
Option B: Convertio (Batch Conversion)
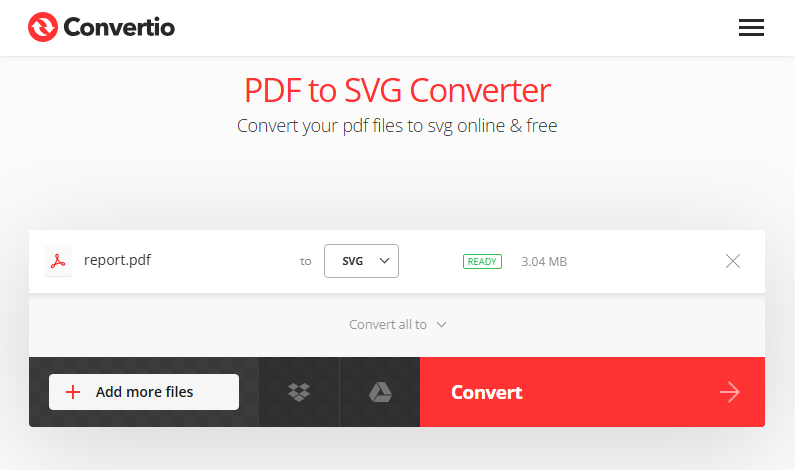
Convertio online converter is great for batch processing and works on mobile devices. It preserves vector elements effectively.
- Visit Convertio PDF to SVG Converter.
- Click “Choose Files” to upload your PDF files.
- Click “Convert” – no extra settings needed for basic use.
- Download individual SVGs or a zip folder of all files.
Pro Tip: To optimize the final SVG file size, you can crop PDF pages before conversion to remove irrelevant content and focus on the core elements you need.
Method 2: Using Free Desktop Software Inkscape
For more control (and offline use), Inkscape is the best free tool. It’s open-source, supports advanced vector editing, and ensures high-quality conversions, perfect for designers or power users.
- Download and install Inkscape from inkscape.org.
- Open Inkscape, then go to “File > Import” and select your PDF file.
- In the import dialog, choose your preferred options to handle PDF pages and images, then click “OK”.
- Optional: Edit the file (e.g., ungroup elements, remove unwanted parts, or adjust paths).
- Save as SVG: Go to “File > Save As”, select “Plain SVG (*.svg)” or "Inkscape SVG (*.svg)” from the dropdown, and click “Save”.
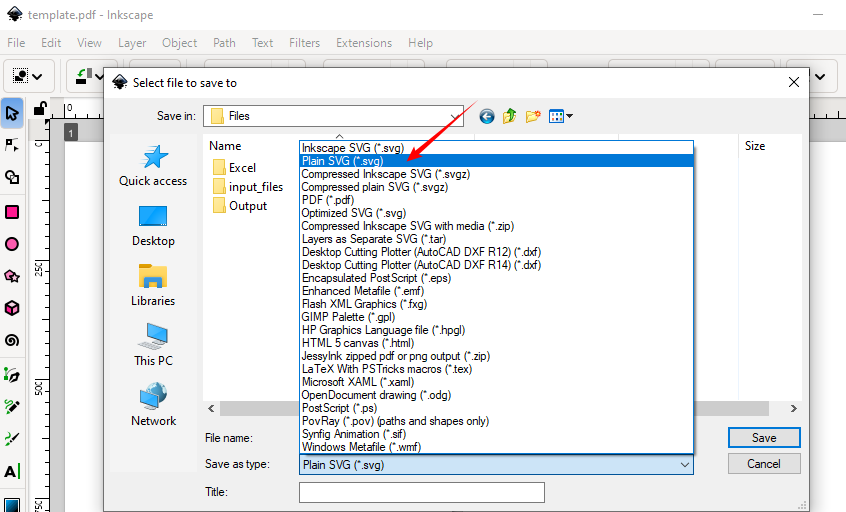
Advantage: Inkscape often preserves vector paths more accurately than some online tools.
You may also like: Convert Images to PDF on Windows, Mac, and Linux
Method 3: Using Python to Automate PDF to SVG Conversion
Developers can integrate PDF to SVG conversion into apps, scripts, or pipelines using Spire.PDF for Python —a powerful library that supports multi-page PDFs, batch processing, and custom settings.
Step-by-Step Guide:
1. Install the Python PDF processing library:
pip install Spire.PDF
2. Use this code to convert a PDF to SVG (supports multi-page PDFs):
from spire.pdf import *

# Create an object of the PdfDocument class
doc = PdfDocument()
# Load a PDF file
doc.LoadFromFile("Sample.pdf")

# Save each page of the file to a separate SVG file
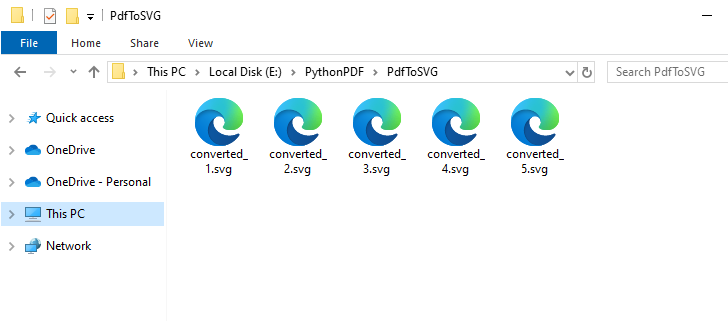
doc.SaveToFile("PdfToSVG/converted.svg", FileFormat.SVG)

# Close the PdfDocument object
doc.Close()
The SaveToFile() method converts each page of a PDF file to a separate SVG file. Here’s the result of converting a 5-page PDF file:
In addition to vector graphics, Spire.PDF for Python also supports converting PDF to common bitmap images such as PNG, JPG, and BMP.
Best Practices for PDF to SVG Conversion
Before Conversion:
- Verify PDF type: Vector-based PDFs yield the best results
- Extract specific pages if needed
- Check resolution: Minimum 300 DPI for embedded images
- Simplify complex documents when possible
After Conversion:
- Compress SVG size with SVGOMG
- Validate SVG structure using W3C Validator
- Test across browsers (Chrome, Firefox, Safari)
- Add accessibility tags (title, desc, ARIA labels)
Conclusion
Converting PDF to SVG unlocks powerful capabilities for web and digital design. For quick conversions, use online tools like CLOUDXDOCS. For professional work, Inkscape provides free, powerful editing. Developers can automate with Python for scalable workflows.
By following this comprehensive guide, you'll achieve perfect SVG conversions every time, ready for any web or design application.
Common PDF to SVG Questions
Q: Is it possible to convert a PDF to SVG for free?
A: Yes. Use online tools like CLOUDXDOCS, or desktop software like Inkscape (free and open-source). For Python solution, try the Free Spire.PDF for Python library (with limitations).
Q: Does the conversion preserve layers?
A: This depends on the converter. Inkscape preserves layers if “Import as Pages” is selected, while many online tools flatten the document.
Q: Is there a loss of quality?
A: Pure vector elements should convert without quality loss. However, raster images embedded in PDFs will remain raster in the SVG unless manually traced.
Q: Can I batch convert multiple PDFs to SVG?
A: Yes. Use the online batch converter or Python scripts to automate bulk conversion.
See Also
Top 5 Ways to Convert Excel to Word
Table of Contents
- Method 1: Manual Copy-Paste (Quickest for Simple Data)
- Method 2: Insert Excel as an Object (For Linked, Editable Data)
- Method 3: Online Excel to Word Converter (For Quick, One-Time Use)
- Method 4: Automate with VBA Macros (For Advanced Users)
- Method 5: Batch Convert Excel to Word via Python (For Multiple Files)
- Best Practices for a Flawless Conversion
- Which Excel to Word Method Should You Choose?
- Frequently Asked Questions (FAQs)
In today’s data-driven professional landscape, the ability to seamlessly transfer information between Microsoft Office applications is an essential skill. Whether you're compiling a quarterly business report, integrating financial data into a client proposal, or preparing a research document, manual data re-entry is a tedious and error-prone process. Converting Excel to Word effectively can save hours of work, preserve critical formatting, and streamline your entire document workflow.
This comprehensive guide will walk you through 5 proven methods to convert Excel sheets to Word. We’ve organized these methods from the simplest to the most advanced, ensuring there’s a perfect solution for every user—from the occasional Office user to the IT professional automating batch reports.
- Method 1: Manual Copy-Paste (Quickest for Simple Data)
- Method 2: Insert Excel as an Object (For Linked, Editable Data)
- Method 3: Online Excel to Word Converter (For Quick, One-Time Use)
- Method 4: Automate with VBA Macros (For Advanced Users)
- Method 5: Batch Convert Excel to Word via Python (For Multiple Files)
- Best Practices for a Flawless Conversion
- Which Excel to Word Method Should You Choose?
- Frequently Asked Questions (FAQs)
Method 1: Manual Copy-Paste (Quickest for Simple Data)
If you only need to convert a small table or range of data, the copy-paste method is fast and straightforward. It works for both Windows and Mac and requires no extra tools.
How to convert Excel to Word:
- Open your Excel file and select the data you want to convert.
- Copy the data: Right-click and select “Copy”, or use the shortcut "Ctrl+C" (Windows) / "Cmd+C" (Mac).
- Open a new or existing Word document and place your cursor where you want the data to appear.
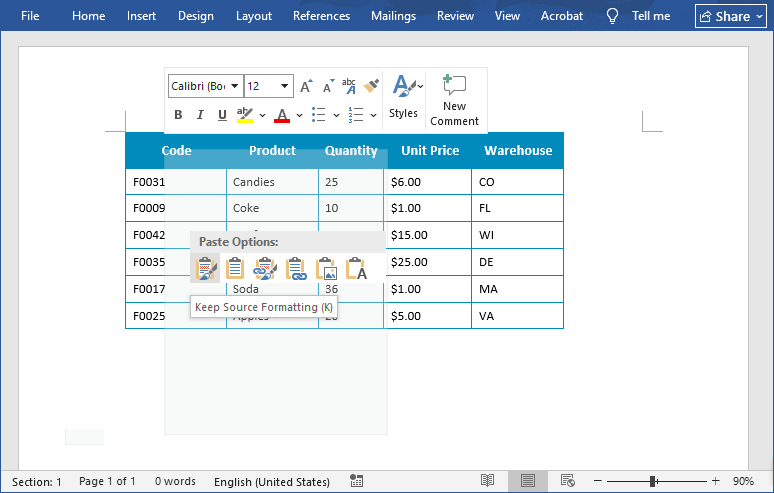
- Paste with formatting control (right-click to choose):
- Keep Source Formatting: Preserves Excel’s fonts, colors, and cell borders.
- Use Destination Styles: Adapts Excel data to your Word document’s style.
- Link & Keep Source Formatting: Creates a dynamic link to the Excel file.
- Picture: Pastes the selection as a static, non-editable image.
- Keep Text Only: Pastes data as plain text, often tab-separated.
Pro Tip: For wide tables, use Word’s AutoFit to Window option to prevent columns from being cut off.
Method 2: Insert Excel as an Object (For Linked, Editable Data)
This method goes beyond a simple table; it embeds a miniature, functional version of the entire Excel worksheet inside your Word document. It's the best choice when the data needs to remain fully editable and calculable within the Word file itself.
Steps to embed Excel in Word:
- Open your Word document and go to the “Insert” tab.
- Click “Object” in the “Text” group.
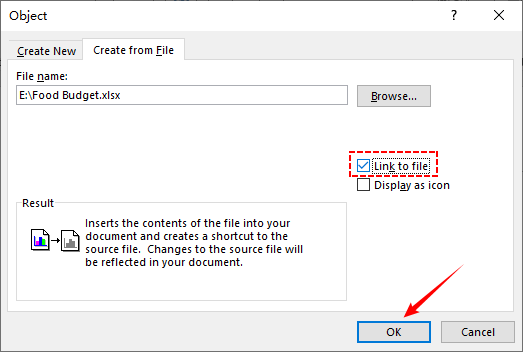
- In the Object dialog box, go to the “Create from File” tab.
- Click “Browse” to select your Excel file, then check the box for “Link to file” (optional: links the Word document to the original Excel file, so updates in Excel auto-sync to Word).
- Click “OK” and your Excel data will appear in Word as an editable object.
Best For: Reports that need frequent data updates (e.g., project trackers, monthly sales dashboards).
You may also be interested in: Convert PDF Table to Word – Accurate & Reliable Methods
Method 3: Online Excel to Word Converter (For Quick, One-Time Use)
When you need a quick conversion on a computer where you can't install software, free online converters are a viable option.
Top 3 Free Online Tools:
- Zamzar: Supports 1200+ formats, including Excel to Word. No sign-up required for small files.
- OnlineConvertFree: Simple interface with drag-and-drop support. Converts files in 30 seconds or less.
- Converter365: Supports batch conversion and works on all browsers. Preserves charts and formulas.
General Steps to convert Excel to Word online:
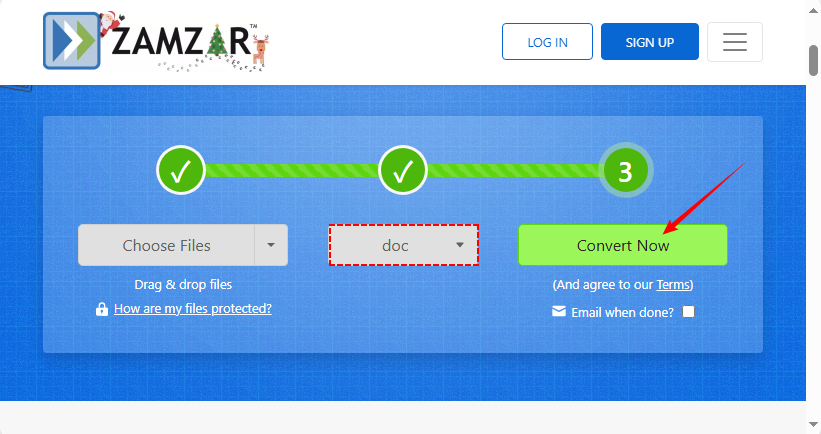
- Go to your chosen converter (e.g., Zamzar.com).
- Select “Choose Files” to upload your Excel file.
- Pick “Doc” or “Docx” as the output format.
- Click the “Convert” button and download your Word file.
Important Security Note: Never use online converters for sensitive or confidential data, as you upload files to a third-party server.
Method 4: Automate with VBA Macros (For Advanced Users)
If you frequently convert Excel tables to Word (e.g., daily reports), use a VBA macro to automate the process.
Step-by-Step:
- Open your Excel file and press Alt+F11 to open the VBA Editor.
- Click “Insert” → “Module” to create a new module.
- Paste the following macro code (customize the range and save path as needed):
Sub ExcelToWord_Basic()
    Dim wdApp As Object
    Dim wdDoc As Object
    Dim ws As Worksheet
    Dim rng As Range

    ' Set your worksheet and range
    Set ws = ThisWorkbook.Worksheets("Sheet1")
    Set rng = ws.Range("A1:E7")

    ' Create a new instance of Word
    Set wdApp = CreateObject("Word.Application")
    wdApp.Visible = True ' Set to False for invisible processing

    ' Create a new document
    Set wdDoc = wdApp.Documents.Add

    ' Copy the range from Excel
    rng.Copy

    ' Paste into Word
    wdApp.Selection.Paste

    ' Save the document
    wdDoc.SaveAs2 "F:\Report.docx"

    ' Clean up
    Set wdDoc = Nothing
    Set wdApp = Nothing
    MsgBox "Conversion complete!"
End Sub
- Run the macro (press F5) to convert an Excel file to Word.
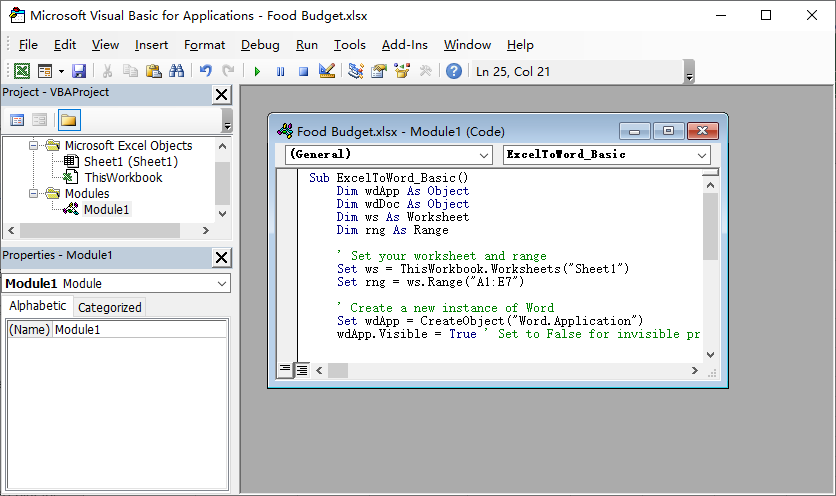
Cleaning Excel data is the foundation of a smooth conversion. To avoid blank rows/columns from creating unnecessary gaps in Word tables, follow the guide to remove them efficiently: How to Delete Blank Rows in Excel: 5 Easy Methods
Method 5: Batch Convert Excel to Word via Python (For Multiple Files)
For processing dozens or hundreds of files, or for integrating Excel to Word Doc or Docx conversion into a larger automated data pipeline, Python is the industry-standard solution. Below are the steps to perform the conversion using Free Spire.Office for Python library:
- Loads the Excel workbook via LoadFromFile().
- Reads data and formatting (fonts, colors, alignments, merged cells) from specified worksheets.
- Creates a new Word document and builds a table within it via AddTable().
- Maps the Excel data cell-by-cell into the Word table via AppendText().
- Applies the captured formatting styles to the Word table cells via custom method MergeCells() and CopyStyle().
- Saves the final Word document and clean up resources.
Python code to convert Excel data to Word Table
from spire.xls import *
from spire.doc import *

def MergeCells(sheet, table):
    """Merge cells in the Word table based on merged cells in the Excel sheet."""
    if sheet.HasMergedCells:
        ranges = sheet.MergedCells
        for i in range(len(ranges)):
            startRow = ranges[i].Row
            startColumn = ranges[i].Column
            rowCount = ranges[i].RowCount
            columnCount = ranges[i].ColumnCount

            if rowCount > 1 and columnCount > 1:
                for j in range(startRow, startRow + rowCount):
                    table.ApplyHorizontalMerge(j - 1, startColumn - 1, startColumn - 1 + columnCount - 1)
                table.ApplyVerticalMerge(startColumn - 1, startRow - 1, startRow - 1 + rowCount - 1)

            if rowCount > 1 and columnCount == 1:
                table.ApplyVerticalMerge(startColumn - 1, startRow - 1, startRow - 1 + rowCount - 1)

            if columnCount > 1 and rowCount == 1:
                table.ApplyHorizontalMerge(startRow - 1, startColumn - 1, startColumn - 1 + columnCount - 1)

def CopyStyle(wTextRange, xCell, wCell):
    """Copy cell styling from Excel to Word."""
    # Copy font style
    wTextRange.CharacterFormat.TextColor = Color.FromRgb(xCell.Style.Font.Color.R, xCell.Style.Font.Color.G, xCell.Style.Font.Color.B)
    wTextRange.CharacterFormat.FontSize = float(xCell.Style.Font.Size)
    wTextRange.CharacterFormat.FontName = xCell.Style.Font.FontName
    wTextRange.CharacterFormat.Bold = xCell.Style.Font.IsBold
    wTextRange.CharacterFormat.Italic = xCell.Style.Font.IsItalic

    # Copy background color
    if xCell.Style.FillPattern is not ExcelPatternType.none:
        wCell.CellFormat.BackColor = Color.FromRgb(xCell.Style.Color.R, xCell.Style.Color.G, xCell.Style.Color.B)

    # Copy horizontal alignment
    if xCell.HorizontalAlignment == HorizontalAlignType.Left:
        wTextRange.OwnerParagraph.Format.HorizontalAlignment = HorizontalAlignment.Left
    elif xCell.HorizontalAlignment == HorizontalAlignType.Center:
        wTextRange.OwnerParagraph.Format.HorizontalAlignment = HorizontalAlignment.Center
    elif xCell.HorizontalAlignment == HorizontalAlignType.Right:
        wTextRange.OwnerParagraph.Format.HorizontalAlignment = HorizontalAlignment.Right

    # Copy vertical alignment
    if xCell.VerticalAlignment == VerticalAlignType.Bottom:
        wCell.CellFormat.VerticalAlignment = VerticalAlignment.Bottom
    elif xCell.VerticalAlignment == VerticalAlignType.Center:
        wCell.CellFormat.VerticalAlignment = VerticalAlignment.Middle
    elif xCell.VerticalAlignment == VerticalAlignType.Top:
        wCell.CellFormat.VerticalAlignment = VerticalAlignment.Top

# Load an Excel file
workbook = Workbook()
workbook.LoadFromFile("sample.xlsx")

# Get the first worksheet
sheet = workbook.Worksheets[0]

# Create a Word document
doc = Document()
section = doc.AddSection()
section.PageSetup.Orientation = PageOrientation.Landscape

# Add a table
table = section.AddTable(True)
table.ResetCells(sheet.LastRow, sheet.LastColumn)

# Merge cells
MergeCells(sheet, table)

# Export data and styles from Excel to Word table
for r in range(1, sheet.LastRow + 1):
    table.Rows[r - 1].Height = float(sheet.Rows[r - 1].RowHeight)

    for c in range(1, sheet.LastColumn + 1):
        xCell = sheet.Range[r, c]
        wCell = table.Rows[r - 1].Cells[c - 1]

        # Add text from Excel to Word table cell
        textRange = wCell.AddParagraph().AppendText(xCell.NumberText)

        # Copy font and cell style
        CopyStyle(textRange, xCell, wCell)

# Save the document to a Word file
doc.SaveToFile("ExcelToWordTable.docx", FileFormat.Docx)
doc.Dispose()
Conversion result:
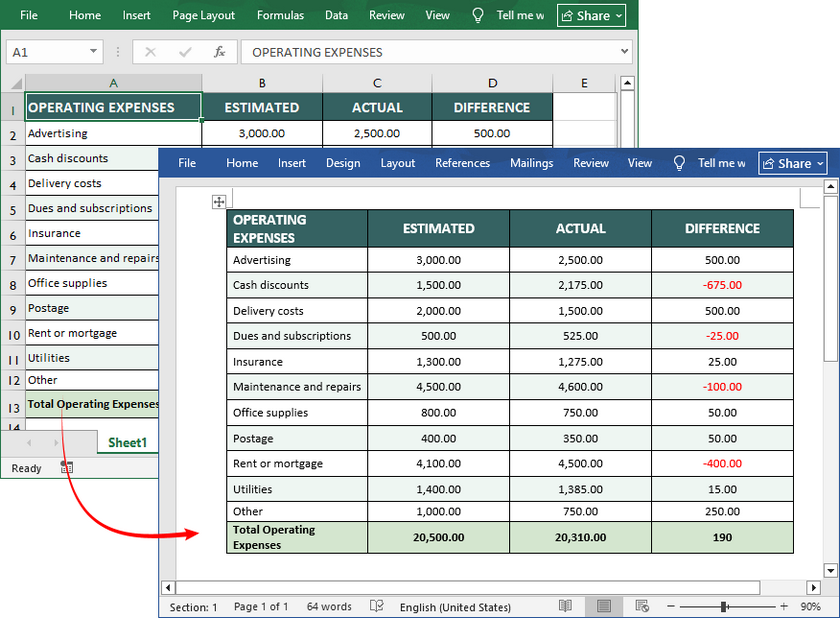
If you need to export Word table data into an Excel sheet, check this: Convert Word to Excel in Python.
Best Practices for a Flawless Conversion
- Clean Your Data First: Remove blank rows/columns, ensure consistent formatting, and check for errors in Excel before converting.
- Mind the Formatting: Excel tables are often wider than Word's page margins. Use Word's AutoFit options to resize.
- Maintain Links Carefully: If you use linking (method 2), sending the Word file to others will break the link unless you also send the Excel file and maintain the folder path. Consider breaking the link before finalizing.
- Check Page Layout: Always review the converted document in Word's Print Layout view to ensure tables and charts display correctly on the page.
Which Excel to Word Method Should You Choose?
Here’s a quick cheat sheet to pick the right method:
| Scenario | Best Method | Pros | Cons |
|---|---|---|---|
| Small table, quick conversion | Copy-Paste (Method 1) | Fast, no tools | Limited formatting control for large data |
| Editable data, auto-updates | Insert Object (Method 2) | Syncs with Excel, editable | Requires Excel installed |
| No-install, one-time use | Online Tools (Method 3) | Convenient, free | Risks data exposure; poor for complex data |
| Frequent automated conversion | VBA Macro (Method 4) | Saves time, customizable | Requires VBA knowledge |
| Complex formatting/batch files | Python Script (Method 5) | Customizable, integrates into workflows | Requires coding skills |
Conclusion
Mastering the transfer of data from Excel to Word is a fundamental competency in the modern office. With the 5 tailored methods outlined here, there’s a solution for every user, skill level, and scenario. Whether you’re a beginner needing a quick copy-paste for a small table, a professional requiring editable, auto-updating data, or a tech-savvy user automating batch conversions with VBA or Python, these approaches eliminate tedious manual effort and preserve the integrity of your data.
Frequently Asked Questions (FAQs)
Q1: Can I convert an Excel file to Word without losing formatting?
A: Yes, using "Keep Source Formatting" during paste or embedding the worksheet as an object preserves most formatting.
Q2: How do I convert Excel to Word for free?
A: All native Microsoft Office methods (copy/paste, insert object) are free. Several reputable online converters also offer free tiers. For high-quality batch conversion, the Python scripting method is powerful if you have the technical skill.
Q3: Can I convert Excel to Word and keep the formulas?
A: Formulas don't translate directly. When pasted as a table, only the results appear. The exception is Method 2 (Insert Object). If you double-click the embedded Excel object within Word, you can see and edit the live formulas in the embedded Excel interface, and they will calculate there.
Q4: How do I convert multiple Excel sheets to one Word document?
A: Copy and paste each sheet individually, or use the "Insert Object" method for each. For automation, a VBA macro or Python script can be programmed to loop through all sheets in a workbook and compile them sequentially into one Word file.
See Also
Convert PDF to PowerPoint for Free – 3 Easy Methods
Table of Contents

In today’s fast-paced digital world, repurposing content efficiently is a critical skill for students, educators, business professionals, and content creators alike. PDFs excel at preserving document formatting for sharing, but they lack the editability and slide-based structure needed for dynamic presentations. Many users search for free solutions to transform static PDF documents into dynamic presentations without expensive software. In this comprehensive guide, we'll explore several reliable tools to convert PDF to PowerPoint for free, provide step-by-step instructions, and offer expert tips to ensure seamless conversions tailored to different needs.
- What to Look for in a Free PDF to PPT Converter
- Free Online PDF to PPT Converter
- Free Offline Tool to Convert PDF to PPT
- Convert PDF to PowerPoint with Python
- Tips for Successful PDF to PowerPoint Conversion
- Frequently Asked Questions (FAQs)
What to Look for in a Free PDF to PPT Converter
PDFs are great for sharing and preserving documents, but they’re not designed for editing or presenting. Converting a PDF to PowerPoint lets you tweak text, images, layouts, and add animations—critical for creating engaging slideshows. When choosing a free PDF to PPT converter tool, keep these factors in mind:
- Formatting Preservation: The tool should retain fonts, images, tables, and spacing.
- No Watermarks: Avoid converters that add logos or watermarks to your slides.
- File Security: For sensitive documents, choose tools that process files offline or delete them after conversion.
- Editability: Output should be fully editable in PowerPoint, not just image-based slides.
Now, let’s explore the best free ways to turn PDF into PowerPoint.
Free Online PDF to PPT Converter
Online converters are ideal if you don’t want to install software and need a fast conversion. Here are 3 top free online tools that deliver high-quality results:
- CLOUDXDOCS: A user-friendly online tool to convert PDF to PPTX. NO ads, no watermark.
- Smallpdf: A trusted platform with reliable PDF-to-PPT conversion and high formatting accuracy.
- ILovePDF: Another robust option with a clean interface. Supports batch conversion and handles text and layout recognition effectively.
How to export PDF to PowerPoint online:
- Navigate to the tool’s website (e.g., CLOUDXDOCS PDF to PowerPoint page).
- Choose or drag-and-drop your PDF file.
- Wait for the upload and conversion process to complete.
- Download your new PowerPoint (.PPTX) file.
Note: Online tools are convenient, but avoid using them for confidential documents.
Free Offline Tool to Convert PDF to PPT
For sensitive files (e.g., company reports, personal records), offline tools eliminate the risk of data exposure. LibreOffice — a free, open-source office suite that includes Impress (its PowerPoint alternative) and can transform PDF to PPT files effectively. It works on Windows, Mac, and Linux.
How to convert PDF to slides offline:
- Download and install LibreOffice (it’s 100% free, no hidden costs).
- Open LibreOffice Impress (the presentation app) and then go to “File > Open”.
- At the bottom of the file selection dialog box, open the “File Type” drop-down menu and manually select "PDF - Portable Document Format (Impress) (*.pdf)".
- LibreOffice will convert the PDF to a presentation. You can edit the slides as needed.
- Go to “File > Save As” and select “PowerPoint 2007–365 (*.pptx)” format to save PDF as a PowerPoint file.
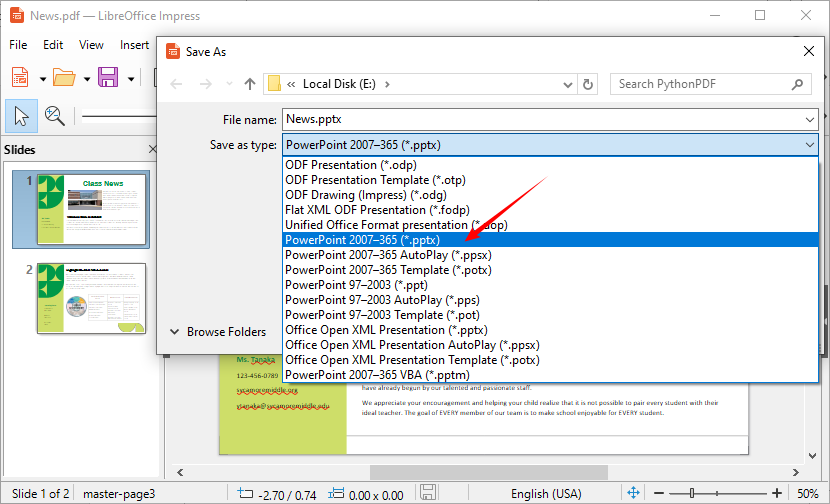
Pro tip: LibreOffice works best with PDFs that have selectable text. For scanned PDFs, you can refer to this guide: How to Convert Images to Text: Best OCR Tools for Beginners
Convert PDF to PowerPoint with Python
If you’re familiar with Python or want to automate PDF-to-PPT conversions (e.g., batch processing), Free Spire.PDF for Python is an excellent choice. It’s a lightweight, free library that supports converting PDF files to editable PowerPoint (PPT/PPTX) formats without losing formatting.
Installation
First, you need to install the library via pip. Open your command prompt (Windows) or terminal (Mac/Linux) and run the following command:
pip install Spire.Pdf.Free
Write the Conversion Code
Create a new Python file and paste the following code. This code loads a PDF file, converts it to a PPTX file, and saves it to your desired folder:
from spire.pdf.common import *
from spire.pdf import *

# Create an object of the PdfDocument class
pdf = PdfDocument()
# Load a sample PDF document
pdf.LoadFromFile("News.pdf")

# Save the PDF document as a PowerPoint PPTX file
pdf.SaveToFile("PdfToPowerPoint.pptx", FileFormat.PPTX)
pdf.Close()
Benefits of This Method:
- Automation: Convert multiple PDFs in batch
- Integration: Embed conversion in larger workflows
- Consistency: Uniform results across conversions
The conversion result:
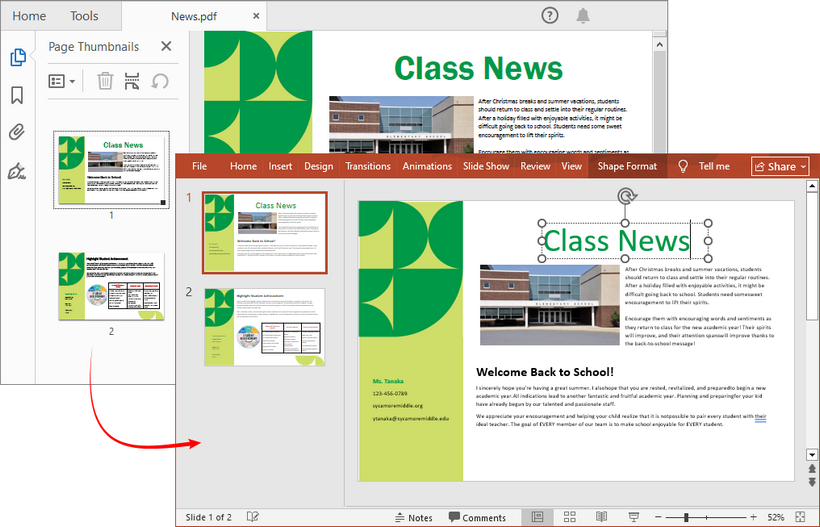
Pro Tip: For batch conversion (converting multiple PDFs at once), add a loop to iterate over all PDF files in a folder. To make the generated presentation files more professional, you can use Free Spire.PDF for Python to adjust page margins or reorder PDF pages before conversion.
Tips for Successful PDF to PowerPoint Conversion
- Start with a High-Quality PDF: The cleaner the source (text-based, not scanned), the better the output.
- Check formatting: After conversion, review the PPT file—adjust fonts, image sizes, and spacing to fix any issues.
- Avoid large files: Online tools may struggle with PDFs over 100MB. Compress your PDF first if needed.
- Use offline tools for sensitive data: Never upload confidential files to online converters—use offline tools like LibreOffice instead.
- Test with a sample page: If you’re converting a long PDF, test with one page first to ensure the tool preserves formatting.
Conclusion
Converting PDF to PowerPoint for free is not only possible but also offers multiple approaches suitable for different needs. For occasional conversions, online tools provide convenience. For regular users concerned about privacy, free desktop software offers a good balance. For developers and professionals needing automation and batch processing, Python with Free Spire.PDF presents the most powerful and flexible solution.
While each method has its strengths, the key is choosing the approach that best matches your specific requirements for frequency, volume, privacy, and automation needs. Always remember to review the final presentation to ensure it meets your standards for clarity and design.
Frequently Asked Questions (FAQs)
Q1: Can I convert a scanned PDF to PowerPoint?
Yes, but you’ll need an OCR (Optical Character Recognition) tool first to make the text selectable.
Q2: Are free converters safe to use with sensitive documents?
For confidential files, use offline tools like LibreOffice or programmatic methods to avoid uploading data to the cloud.
Q3: Why does my converted PowerPoint look different from the PDF?
Complex layouts, custom fonts, or embedded images may not always transfer perfectly. Some manual adjustment in PowerPoint may be needed.
Q4: Can I convert multiple PDFs at once for free?
Yes, using Python with Free Spire.PDF or offline tools that offer a batch conversion feature.
Q5: Is the Python method suitable for beginners?
Yes, basic conversion requires only 5–10 lines of code. No advanced Python knowledge is needed, and the library is well-documented.
See Also
How to Compress a PDF: Best Tools to Make PDFs Smaller
Table of Contents
In today’s digital world, PDFs are the universal standard for sharing documents. However, large PDF files can be a major hassle—they clog email inboxes, exceed upload limits, and are slow to transfer. Learning how to compress a PDF is an essential digital skill, whether you’re a student, professional, or casual user.
This comprehensive guide will walk you through the easiest and most effective methods to compress PDF files, including using free online tools, desktop software, and C# programming, plus pro tips to keep quality high while reducing PDF file size.
- Why Should You Compress a PDF File?
- Quick Solution: Compress PDF Files Online
- Offline Tools: Compress PDF with Desktop Software
- Batch Automation: Compress PDF Programmatically with C#
- Pro Tips to Compress PDF Without Losing Quality
- FAQs About Reducing PDF Size
Why Should You Compress a PDF File?
Reducing PDF size offers several key benefits:
- Easy Email Attachments: Stay within the common 25MB email limits.
- Faster Uploads & Downloads: Ideal for portals, job applications, or cloud storage.
- Save Storage Space: Free up space on your hard drive and mobile devices.
- Professional Sharing: Send files quickly and efficiently to clients or colleagues.
- Website Optimization: Smaller files load faster on web pages, improving user experience and SEO.
Quick Solution: Compress PDF Files Online
Many online PDF compressors allow you to reduce PDF size for free. They require no software installation and work on any device with a browser.
Recommended Tools:
- Smallpdf: A user-friendly all-in-one suite for PDF tasks.
- iLovePDF: A reliable alternative with batch processing options.
- PDF2Go: Offers precise control over compression level.
Steps to Decrease PDF Size:
- Go to your chosen compressor website (e.g. SmallPDF’s Free PDF Compression Tool).
- Click “CHOOSE FILES” or drag-and-drop your file into the browser window.
- Choose your compression level (e.g., “Basic” for medium file size, standard resolution).
- Click the “Compress” or “Shrink PDF” button.
- Download your new, smaller PDF file to your device.
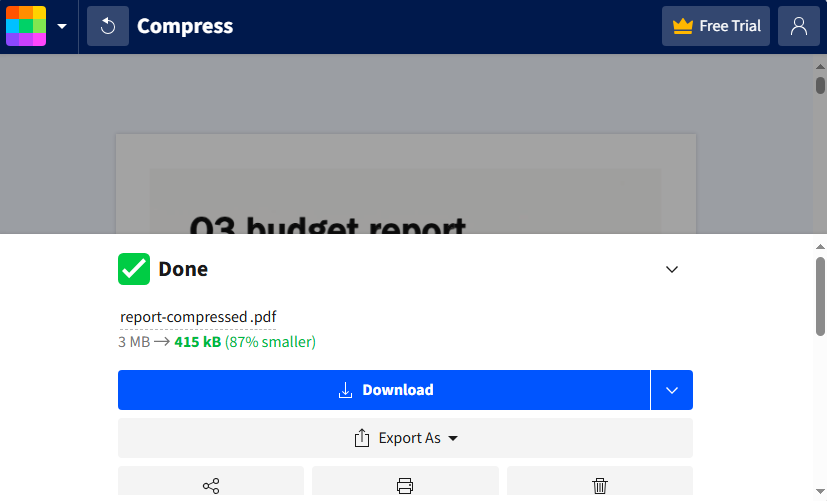
The compression result:
Pro Tip: For sensitive documents, check the tool’s privacy policy. Most reputable sites delete your files from their servers after a short period.
Offline Tools: Compress PDF with Desktop Software
If you need to compress PDFs offline (no internet) or handle large batches regularly, desktop software is better. Here are the best PDF compressors to shrink PDF file size:
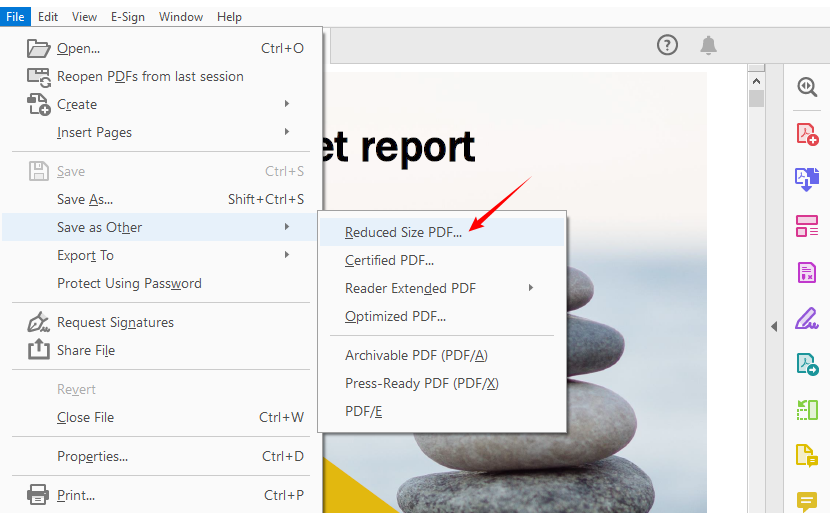
Adobe Acrobat Pro DC (Industry standard)
Adobe’s native tool offers the most advanced optimization settings to make a PDF smaller.
- Open your PDF in Acrobat Pro DC.
- Go to “File” > “Save As Other” and choose "Reduce File Size”.
- Select a compatibility level and save the compressed PDF file.
PDF24 Creator Desktop Tool (Free alternative)
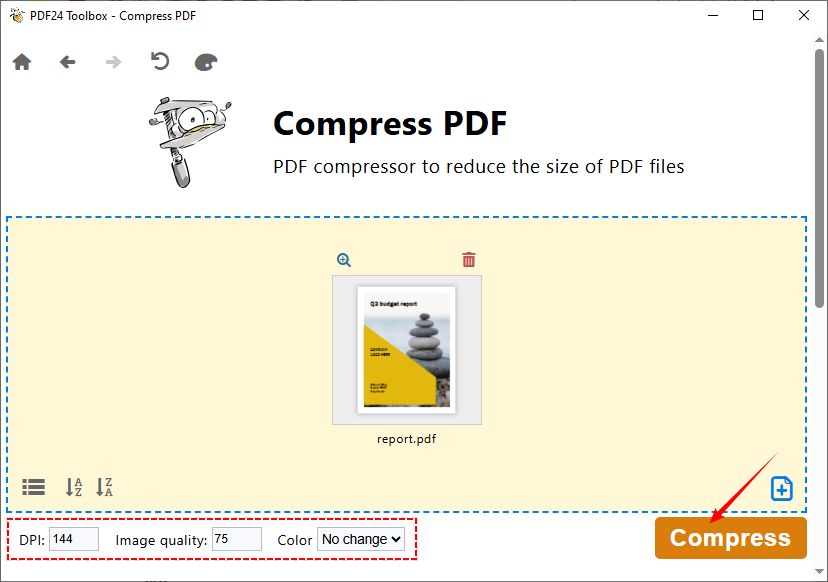
A top-rate free desktop tool works entirely offline. It offers over 40 built-in PDF tools and supports batch compression.
- Open the PDF24 Toolbox, and select the Compress PDF tool.
- Click “Choose files” or drop your PDF file into the window.
- Set “DPI”, “Image quality”, and “Color” options.
- Click the “Compress” button and save the file.
ALSO READ: How to Delete Pages from PDF without Acrobat (Free Methods)
Batch Automation: Compress PDF Programmatically with C#
For developers building automation tools, batch processing systems, or custom PDF workflows, a library like Spire.PDF for .NET is an excellent choice. Spire.PDF offers several compression methods, and we’ll cover the most common use cases to reduce PDF size.
C# Code to Compress Images in PDF
Images are the primary cause of large PDF sizes. This example reduces image size and quality while maintaining readability.
using Spire.Pdf.Conversion.Compression;

namespace CompressImages
{
    class Program
    {
        static void Main(string[] args)
        {
            // Create a PdfCompressor object and load the PDF file
            PdfCompressor compressor = new PdfCompressor("Example.pdf");

            // Get the image compression options
            ImageCompressionOptions imageCompression = compressor.Options.ImageCompressionOptions;

            // Enable Image resizing
            imageCompression.ResizeImages = true;

            // Enable image compression
            imageCompression.CompressImage = true;

            // Set the image quality (available options: Low, Medium, High)
            imageCompression.ImageQuality = ImageQuality.Medium;


            // Compress the PDF file according to the compression options and save it to a new file
            compressor.CompressToFile("Compressed.pdf");
        }
    }
}
In this code, the ImageCompressionOptions class acts as a "settings panel" for how embedded images in a PDF are optimized. Its core properties are listed below:
- CompressImage: The master switch for image compression. If set to false, all other image compression settings are completely ignored.
- ResizeImages: Sets whether to shrink image dimensions automatically.
- ImageQuality: Sets the quality level of compressed images (three options):
- Low: Minimum quality, smallest file size (significant loss of image clarity).
- Medium: Balanced quality and file size (recommended for most scenarios).
- High: Highest quality, minimal compression (only slight reduction in file size).
C# Code to Optimize Fonts in PDF
Font management can significantly impact file size, particularly in text-heavy documents. This example compresses or unembeds fonts in the PDF to reduce file size without quality loss:
using Spire.Pdf.Conversion.Compression;

namespace OptimizeFonts
{
    internal class Program
    {
        static void Main(string[] args)
        {
            // Create a PdfCompressor object and load the PDF file
            PdfCompressor compressor = new PdfCompressor("Example.pdf");

            // Get the text compression options
            TextCompressionOptions textCompression = compressor.Options.TextCompressionOptions;

            // Compress the fonts
            textCompression.CompressFonts = true;

            // Unembed the fonts
            // textCompression.UnembedFonts = true;

            // Compress the PDF file according to the compression options and save it to a new file
            compressor.CompressToFile("CompressFonts.pdf");
        }
    }
}
The TextCompressionOptions class controls optimization for text/fonts in a PDF (it does NOT affect images). Core properties:
- CompressFonts: Master switch for font compression. 100% safe to shrink font data (text looks identical, file size smaller).
- UnembedFonts: Sets whether to remove embedded fonts (Risky: text may look garbled/unreadable if the device opening the PDF lacks the font).
Pro Tip: For the redundant or unused data in a PDF, use Spire.PDF to remove them before compression (e.g., cleaning up metadata, removing embedded attachments).
Pro Tips to Compress PDF Without Losing Quality
Compressing a PDF doesn’t mean sacrificing quality.Follow these tips to get the smallest file size possible while keeping your document usable:
- Remove unnecessary elements: Delete redundant pages, images, or comments before compressing.
- Optimize images: PDFs with large images are often the biggest culprits. Resize images to 72–150 DPI (sufficient for digital use) before adding them to the PDF.
- Avoid embedding fonts: Embedded fonts increase file size. Use standard fonts (Arial, Times New Roman) that most devices already have.
- Choose the right compression level: For text-only PDFs (e.g., resumes, reports), use “High Compression” (little to no quality loss). For image-heavy PDFs (e.g., brochures, photos), use “Balanced” to avoid blurriness.
- Test before sharing: Always open the compressed PDF to check for readability (e.g., text clarity, image sharpness) before sending or uploading.
Conclusion
Knowing how to compress a PDF is a crucial skill that streamlines your digital workflow. Whether you need a quick online fix, the advanced control of desktop software, or the power of automation with C# and Spire.PDF, there’s a perfect tool for every scenario.
For most users, online compressors offer simplicity, while developers can build robust, integrated solutions with programmable libraries. Evaluate your specific needs for security, volume, and quality to choose the best method, and never let bulky files slow you down again.
FAQs About Reducing PDF Size
Q1. Does compressing a PDF reduce quality?
Yes, if not done carefully—especially for image-heavy PDFs. Use lossless compression settings or moderate image quality reduction to balance size and clarity.
Q2. Is it safe to use online PDF compressors?
Most reputable sites encrypt transfers and delete files after processing. Avoid uploading sensitive documents to unknown websites.
Q3. How much can I reduce a PDF file size?
It depends on the content. Text-based PDFs can shrink by 50–90%, while image-heavy files may reduce by 20–50%.
Q4. Can I batch compress multiple PDFs at once?
Yes, many tools support batch processing. Desktop applications like Adobe Acrobat Pro offer robust batch capabilities. For automated batch compressing, use the Spire.PDF for .NET library.
See Also
Convert JSON to CSV: Free Online Tools, Excel & Python Scripts
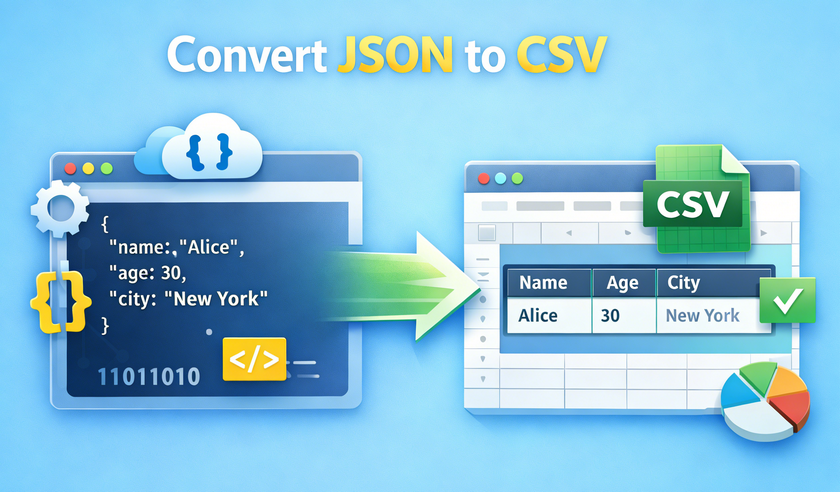
In the world of data handling, JSON and CSV are two of the most widely used formats. JSON is ideal for storing and transmitting structured data, while CSV excels at simplicity, making it perfect for spreadsheets, data analysis tools like Excel or Google Sheets, and quick data sharing. Converting JSON to CSV is a common task for marketers, data analysts, developers, and anyone working with structured data.
In this comprehensive guide, we’ll walk you through the most reliable JSON to CSV conversion methods, from beginner-friendly online tools to code-based solutions for advanced users. Whether you’re dealing with small JSON files or large datasets, you’ll find a suitable approach here.
Contents:
- What Are JSON and CSV? A Quick Overview
- Method 1: Using JSON to CSV Online Converters (Quick & Easy)
- Method 2: Convert JSON to CSV in Python (Flexible & Scalable)
- Method 3: Transform JSON to CSV Using MS Excel (GUI-Friendly)
- Comparison of JSON-to-CSV Methods
- Best Practices for JSON to CSV Conversion
- Frequently Asked Questions
What Are JSON and CSV? A Quick Overview
Before diving into conversion, let’s briefly recap what JSON and CSV are, so you understand why conversion is often necessary:
- JSON (JavaScript Object Notation): A lightweight, human-readable format that uses key-value pairs to store data. It’s widely used in APIs, web applications, and NoSQL databases because it handles nested data well.
- CSV (Comma-Separated Values): A plain-text, table-like format where values are separated by commas. It’s simple, compatible with almost all spreadsheet tools, and easy to import into data analysis software.
The JSON to CSV conversion process essentially "flattens" JSON's hierarchical structure into rows and columns, thereby leveraging CSV’s compatibility with spreadsheet tools and data analysis platforms.
Method 1: Using JSON to CSV Online Converters (Quick & Easy)
Online converters provide the fastest path to conversion, perfect for one-time tasks, small datasets, or users without programming experience. These web-based tools handle the transformation entirely in your browser.
Step 1: Find a Reliable Online Converter
Search for "free JSON to CSV converter" and choose a reputable, ad-light tool like JSON-CSV.com or OnlineJSONTools.com. For sensitive data, consider privacy-focused options that process files locally in your browser without uploading to servers.
Step 2: Prepare Your JSON Data
Ensure your JSON is properly formatted and valid. Most converters will fail silently or produce unexpected results with malformed JSON. A simple array of objects converts most seamlessly:
[
  {"employee_id": 101, "name": "John Chen", "department": "Engineering", "salary": 85000},
  {"employee_id": 102, "name": "Maria Garcia", "department": "Marketing", "salary": 72000},
  {"employee_id": 103, "name": "David Kim", "department": "Sales", "salary": 68000}
]
Pro tip: Use a JSON validator like JSONLint if you're unsure about your file's structure.
Step 3: Upload, Paste, or Link Your JSON Data
Quality converters offer multiple input methods:
- File Upload: Click “Import” or similar button to select your .json file
- Direct Input: Paste raw JSON into a text box
- URL Fetch: Enter a public URL containing JSON data (useful for API endpoints)
For this example, try pasting the employee data above into the converter's input field.
Step 4: Configure Conversion Settings (Advanced Options)
Many converters offer customization:
- Delimiter: Choose comma (standard), semicolon, tab, or pipe
- Text Qualifier: Specify how text fields are enclosed, typically double quotes
- Encoding: UTF-8 is standard and handles international characters
- Header Row: Include or exclude column headers
- Nested Handling: Choose to flatten nested objects
Step 5: Convert and Download
Click the convert button, and you should see a preview within seconds. Click "Download CSV" to save the file to your computer. Open it in Excel or any spreadsheet software to verify the conversion.
An example of converting JSON to CSV using JSON-CSV.com:

Limitations to Note: Online tools typically have file size limits (often 1-10MB), may not handle deeply nested JSON optimally, and raise security concerns with sensitive data.
Method 2: Convert JSON to CSV in Python (Flexible & Scalable)
For recurring conversions, large datasets, complex JSON structures, or automated workflows, using Python is the most efficient option. Among its rich ecosystem of data libraries, Free Spire.XLS for Python is a powerful library that simplifies JSON to CSV (or CSV to JSON) conversion.
Step 1: Install Free Python Library
Ensure you have Python installed, and then open your terminal or command prompt and run the following pip to install the Free Spire.XLS library:
pip install Spire.Xls.Free
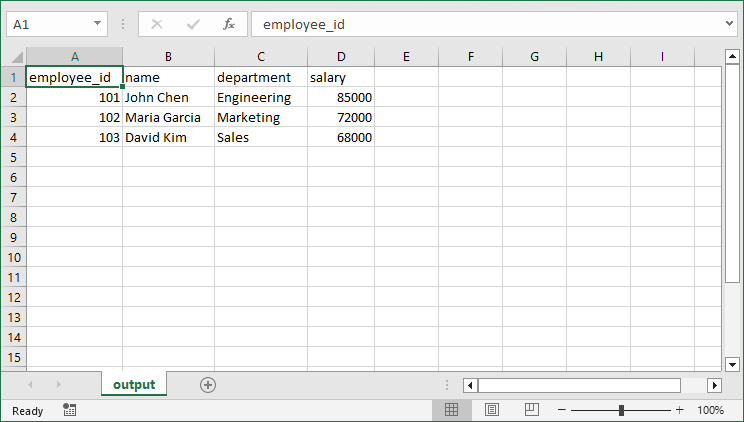
Step 2: Write the Python Script to convert a JSON file to CSV
This script works for flat JSON files (no nested data).
import json
from spire.xls import *

# Load JSON data
with open('employee.json') as f:
    data = json.load(f)

# Create workbook and worksheet
workbook = Workbook()
sheet = workbook.Worksheets[0]
# Extract headers from JSON keys
headers = list(data[0].keys())

# Write headers to the first row
for col, header in enumerate(headers, start=1):
    sheet.Range[1, col].Value = header

# Populate values from each JSON object to the subsequent rows
for row_index, item in enumerate(data, start=2):
    for col_index, key in enumerate(headers, start=1):
        value = item.get(key, "")
        sheet.Range[row_index, col_index].Value = str(value) if value is not None else ""

# Save the worksheet as a CSV file
sheet.SaveToFile("output.csv", ",", Encoding.get_UTF8())
workbook.Dispose()
Core Methods in This Code:
json.load(): Parse JSON content into a Python list/dictionary.Workbook(): Spire.XLS’ core object to create an Excel workbook.data[].keys(): Extract column headers from the keys of the JSON list.Worksheet.Range[].Value: Write text/values to a specific cell (1-based row/column indexing for Spire.XLS).get(key, ""): Safely retrieves the value for each key (returns empty string if the key is missing, avoiding KeyError).SaveToFile(filename, delimiter, encoding): Export the worksheet to a CSV file with specified parameters and encoding.
The conversion result:
Real-world JSON often contains nested structures. To handle nested JSON with dictionaries and arrays, refer to the detailed guide: JSON to CSV in Python – Complete Guide for Flat & Nested JSON
Method 3: Transform JSON to CSV Using MS Excel (GUI-Friendly)
For those who prefer graphical interfaces or need to manually review data during conversion, MS Excel offers a built-in capability to import JSON and save as CSV format. Here’s how:
- Open Excel and create a new workbook.
- Go to the “Data” tab > “Get Data” > “From File” > “From JSON”.
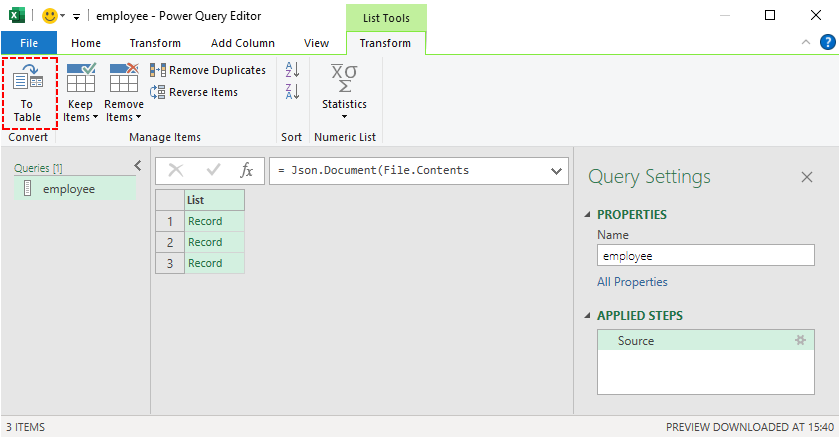
- Select your JSON file and click “Import”, and then Excel will open a “Power Query Editor” window.
- Click “To Table” in the ribbon to convert the JSON structure.
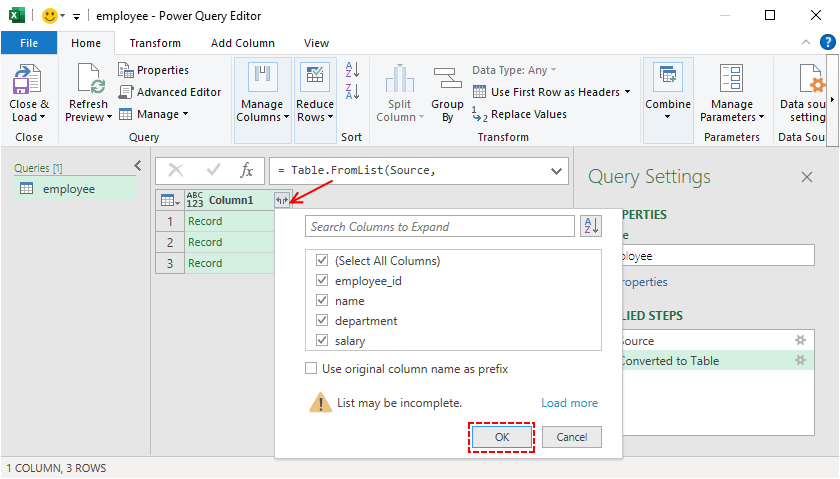
- Expand columns by clicking the double-arrow icon next to column headers.
- Transform data as needed using Power Query's intuitive interface.
- Once the data is formatted correctly, click “Close & Load” to import the data into your Excel worksheet.
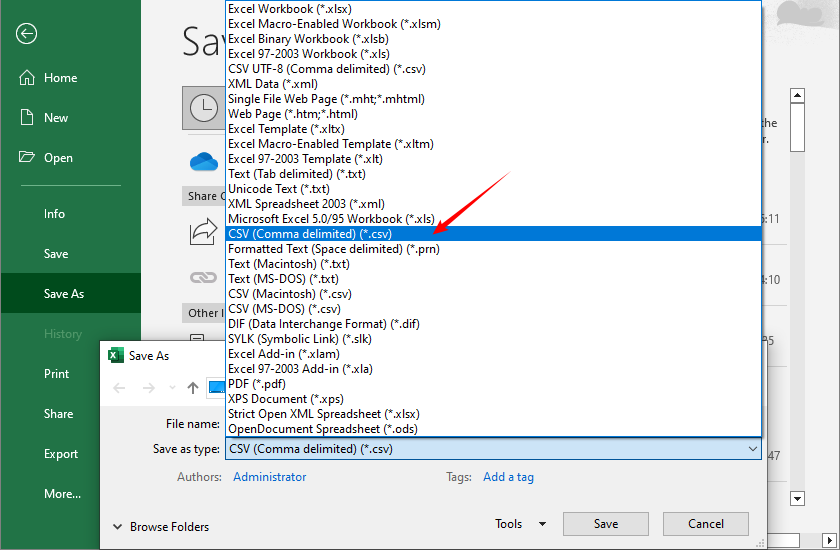
- To convert JSON to CSV in Excel: Go to “File” > “Save As”, select “CSV (Comma delimited) (*.csv)” as the file format, and click “Save”.
Pro Tip: Excel's Power Query creates a reproducible "query" that can be refreshed if your JSON source updates, perfect for recurring reports.
You may also like: Convert CSV to TXT: 4 Easy Methods for All Users
Comparison of JSON-to-CSV Methods
Choose the method that fits your dataset size, technical skill, and security needs:
| Method | Best For | Difficulty | Customization | Security Level |
|---|---|---|---|---|
| Online Tools | Quick, one-time conversions | Beginner | Low | Low (data uploaded to third-party servers) |
| Python | Large datasets, automation | Intermediate | High | High (local execution, no data leaving your machine) |
| MS Excel | Manual review/editing | Beginner | Medium | Medium (local execution, but Excel files may be shared inadvertently) |
Best Practices for JSON to CSV Conversion
- Validate JSON First: Use JSONLint or similar validators.
- Preserve Data Types: Note that CSV may convert numbers to strings.
- Handle Null Values: Decide how to represent null/empty values.
- Maintain Character Encoding: Use UTF-8 to preserve special characters.
- Test with Sample Data: Always test with a small subset first.
- Document the Process: Keep notes on transformations applied.
Conclusion
Converting JSON to CSV is a fundamental skill in data processing. Whether you’re a beginner needing a quick online tool, a developer automating workflows with Python, or an analyst using Excel for manual review, this guide has you covered.
With these tools and best practices, you’ll turn hierarchical JSON data into usable CSV files in minutes, unlocking seamless integration with spreadsheets, data analysis tools, and reports.
Frequently Asked Questions
Q1: Is it possible to convert JSON to CSV for free?
Yes. There are many free tools, including online converters, and Python with the Free Spire.XLS library (with certain page limitations).
Q2: Can I convert nested JSON to CSV?
Yes, but you need to flatten the nested JSON data first. Use tools like Excel’s Power Query, online tools with flattening features, or Python’s built-in json module.
Q3: How do I convert JSON to CSV on a Mac?
Mac users can use the same methods as Windows users: online tools, Excel for Mac, or Python (which works on Mac, Windows, and Linux).
Q4: Can I automate JSON to CSV conversion?
Yes. Use Python scripts to automate conversion for multiple files or scheduled tasks.
See Also
- 4 Proven Ways to Convert CSV to Excel (Free & Automated)
- Convert Excel to XML: Free Tools + Python Automation
- Convert XLS/XLSX to HTML Easily — Keep Excel Formatting Intact
- Convert JSON to/from Excel in Python – Full Guide with Examples
- Convert Excel to JSON and JSON to Excel in C# .NET – Step-by-Step Guide
Convert TXT to Word: 4 Easy & Free Methods
Table of Contents
TXT files are widely used for their simplicity and compatibility across all devices, but they lack formatting options like fonts, tables, or images that make documents professional. Whether you need to prepare a report, draft an essay, or create a business document, converting TXT to Word is a common task that can save you time and enhance your work quality.
In this article, we’ll share the most effective, user-friendly TXT to Word conversion methods, including offline tools, online converters, and automated programming workflows. By the end, you’ll be able to choose the best approach for your needs and complete the conversion in minutes.
- Method 1: Using Microsoft Word (Offline)
- Method 2: Using Online TXT to Word Converter
- Method 3: Using Google Docs (Free & Cloud-Based)
- Method 4: C# Programming (Batch/Automated Conversion)
- Tips for Successful TXT to Word Conversion
- Troubleshooting Common Issues
- Frequently Asked Questions
Method 1: Using Microsoft Word (Offline)
Microsoft Word is the most popular word processor, and it has a built-in feature to open and convert TXT files directly. This method is ideal if you already have Word installed on your computer, as it ensures 100% formatting accuracy (for plain text) and doesn’t require any third-party tools.
Step-by-step guide to convert text file to Word:
- Open Microsoft Word, and then click on “File” > “Open”.
- In the file explorer window, navigate to the folder where your TXT file is stored.
- In the “File type” dropdown, select “Plain Text (*.txt)” to filter TXT files.
- Select your TXT file and click “Open”, then choose the appropriate encoding.
- Once the TXT content is displayed in Word, click “File” again and select “Save As”.
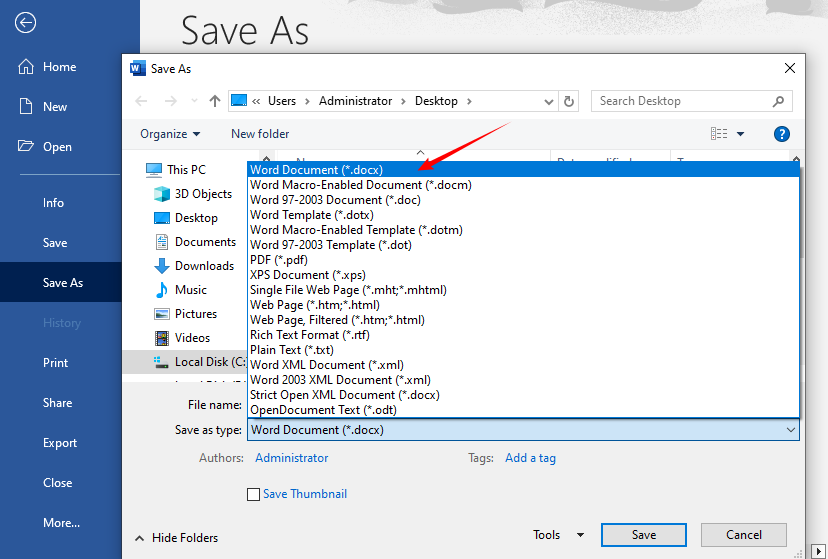
- Choose a save location, select “Word Document (*.docx)” or “Word 97-2003 Document (*.doc)” as the file format, and click “Save”.
Tip: If your TXT file has special characters (e.g., accents, symbols), ensure the “Encoding” option in the Text Import Wizard is set to “UTF-8” to preserve them during conversion.
Method 2: Using Online TXT to Word Converter
If you don’t have Microsoft Word installed, online converters are a great alternative. They work on any device with an internet connection (Windows, Mac, phone, tablet) and require no downloads.
Recommended Converters:
- CLOUDXDOCS: Convert TXT to Word files without any ads, watermarks
- FreeConvert: User-friendly online converter with a clean interface
- Convertio: Supports batch conversion and converts TXT to doc/ docx
Steps to convert TXT to Word online:
- Visit your chosen converter website
- Upload your TXT file (drag-and-drop or browse)
- Select "DOC" or "DOCX" as output format
- Click "Convert" or "Start" button
- Download the converted Word document
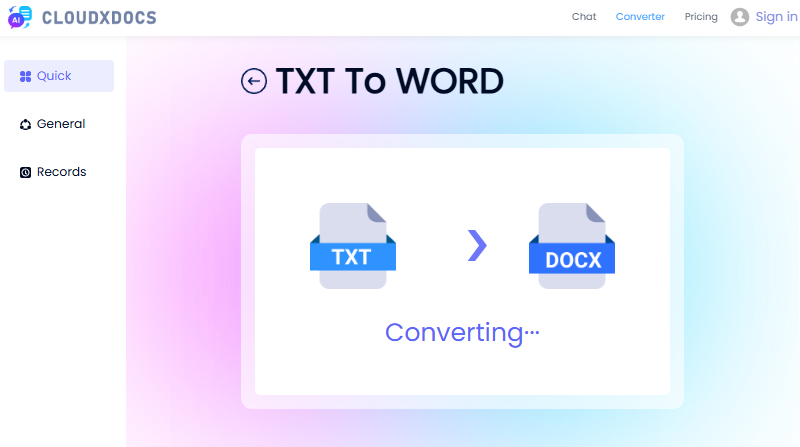
Example of using CLOUDXDOCS:
Security Note: For sensitive documents, consider offline methods as online tools temporarily store files on their servers.
You may also like: Convert Text to PDF Easily: 4 Quick and Professional Methods
Method 3: Using Google Docs (Free & Cloud-Based)
Google Docs is a free cloud-based word processor that lets you open, edit, and convert text files to Word files without installing software. It’s perfect for users who prefer cloud storage and collaboration.
Step-by-step guide to convert TXT to Word for free:
- Open your browser and go to Google Docs. Click on the “Blank” document to create a new file.
- Click “File” > “Open” from the top menu. In the “Open a file” window, click the “Upload” tab.
- Drag and drop your TXT file into the upload area, or click “Browse” to choose it manually.
- Once the TXT file is uploaded, it will open in Google Docs.
- Click “File” > “Download” > “Microsoft Word (.docx)” from the dropdown menu.
- The converted Word file will automatically download to your device.
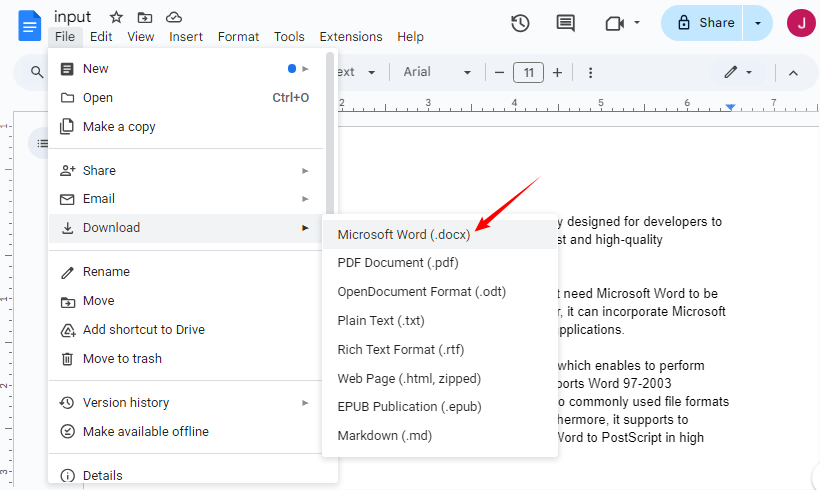
✔ Best for: Collaborative editing or users who work across multiple devices.
Method 4: C# Programming (Batch/Automated Conversion)
For developers or teams needing to convert hundreds of TXT files (or integrate conversion into a .NET app), the C# approach with Free Spire.Doc for .NET is efficient and scalable.
What is Free Spire.Doc for .NET?
Free Spire.Doc is a free .NET library that lets you create, edit, and convert Word documents (DOC/DOCX) in C#/VB.NET without installing Microsoft Office. It supports cross-platform development and is ideal for automated workflows (e.g., converting user-uploaded TXT files in a web app).
Steps to convert TXT to Word in C#
- Install via NuGet:
Install-Package FreeSpire.Doc
- Full C# Code:
using Spire.Doc;

namespace ConvertTextToWord
{
    internal class Program
    {
        static void Main(string[] args)
        {
            // Create a Document object
            Document doc = new Document();
            // Load a text file
            doc.LoadText("Sample.txt");

            // Save the text file in Word format
            doc.SaveToFile("TextToWord.docx", FileFormat.Docx2016);
            doc.Close();
        }
    }
}
This code loads a TXT file and saves it as DOCX format via the SaveToFile() method. In addition, Free Spire.Doc also supports converting Word files back to TXT files via C#.
Tips for Successful TXT to Word Conversion
To avoid common issues (e.g., missing text, formatting errors), follow these tips:
- Backup your original TXT file before conversion: In case of errors, you can revert to the original version.
- Check for line breaks: TXT files often have manual line breaks. After conversion, use Word’s “Replace” feature (Ctrl+H) to remove extra line breaks if needed.
- Avoid large TXT files with online converters: Most free online tools have file size limits (50MB-100MB). For large files, use Microsoft Word or Google Docs.
- Verify special characters: If your TXT file contains non-English characters or symbols, check the converted Word file to ensure they’re preserved.
Troubleshooting Common Issues
| Problem | Solution |
|---|---|
| Lost formatting | TXT files contain no formatting; reapply styles in Word after conversion. |
| Special characters display incorrectly | Ensure UTF-8 encoding is selected during import. |
| File won’t convert | Verify the file is not corrupted or password-protected. |
| Converted file is too large | Save as DOCX, delete unused blank lines, or compress images (if added post-conversion). |
Conclusion
Converting TXT to Word format is simple with the right approach. For most users, directly opening the TXT file in Microsoft Word provides the best results. For those without Word access, free online tools or Google Docs offer reliable alternatives. If you are a developer needing scalability, the C# method with Free Spire.Doc lets you automate batch conversions and customize formatting
Whether you’re polishing a single document or building an automated workflow, these methods cover every use case for TXT-to-Word conversion. Remember that while conversion is straightforward, formatting will need to be applied afterward since plain text files contain only raw content.
Frequently Asked Questions
Q: Is the TXT to Word conversion free?
A: Yes, multiple free methods exist, including online tools, Google Docs, and using the free .NET library.
Q: Does converting TXT to Word preserve formatting?
A: TXT files contain no formatting data, so you'll need to apply formatting in Word after conversion.
Q: How can I convert multiple TXT files to Word at once?
A: You can:
- Use an online batch converter like Convertio.
- Write a C# script using Free Spire.Doc to loop through all TXT files in a folder with
Directory.GetFiles(@"C:\Documents\", "*.txt")and repeat the conversion logic for each file.
Q: What’s the difference between DOC and DOCX formats?
A: DOC is the older binary format used in Word 97–2003. DOCX is the newer, XML-based format (used since Word 2007) with better file compression, security, and recovery features. DOCX is recommended unless you need compatibility with very old software.
See Also
3 Ways to Reorder PDF Pages: Online, Desktop & Python
Table of Contents
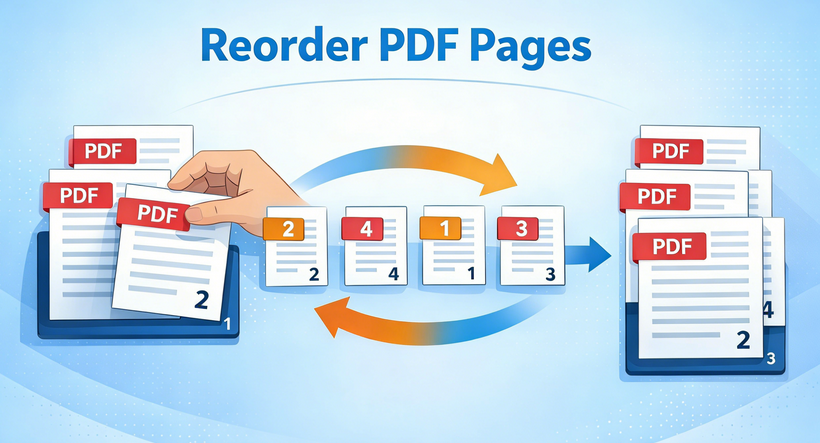
Have you ever downloaded a PDF only to find the pages are completely out of order? Perhaps you scanned documents without realizing the sequence was wrong, or you need to extract specific pages from multiple PDFs into a new document. Rearranging PDF pages is a common but often frustrating task that professionals, students, and everyday users encounter regularly.
In this comprehensive guide, we'll explore multiple methods to reorder PDF pages—from simple online tools to powerful Python automation. Whether you need a quick fix or want to implement programmatic solutions, you'll find the right approach here.
- Why You Might Need to Rearrange PDF Pages
- Reorder PDF Pages Free Online Tools
- Desktop PDF Page Order Editor Tools
- Python Automation Method for Bulk PDF Reordering
- Best Practices for Reordering PDF Pages
- FAQs About Organizing PDF Pages
Why You Might Need to Rearrange PDF Pages
PDFs have become the universal standard for sharing documents while preserving formatting, but they lack the flexibility of editable formats. The ability to reorder pages of PDF files is essential for:
- Reports and presentations needing logical flow adjustments
- Scanned documents where pages were accidentally shuffled
- Academic papers requiring reorganization of chapters or appendices
- Business documents needing executive summaries moved to the front
- Creating custom PDFs by combining pages from multiple sources
Reorder PDF Pages Free Online Tools
Online tools are perfect if you don’t want to download software and only need to change order of pages in PDF occasionally. Most are free, user-friendly, and work on any device with a browser—no technical skills required.
Top Pick: iLovePDF (Organize PDF)
ILovePDF is one of the most popular free online PDF tools, with a dedicated “Organize PDF” feature designed specifically for reordering, deleting, or rotating pages. It supports batch processing (a rare free feature) and cloud storage integration.
Steps to reorder PDF pages online with iLovePDF:
- Visit the iLovePDF Organize PDF tool.
- Upload your PDF(s) from your device, Google Drive, Dropbox, or URL.
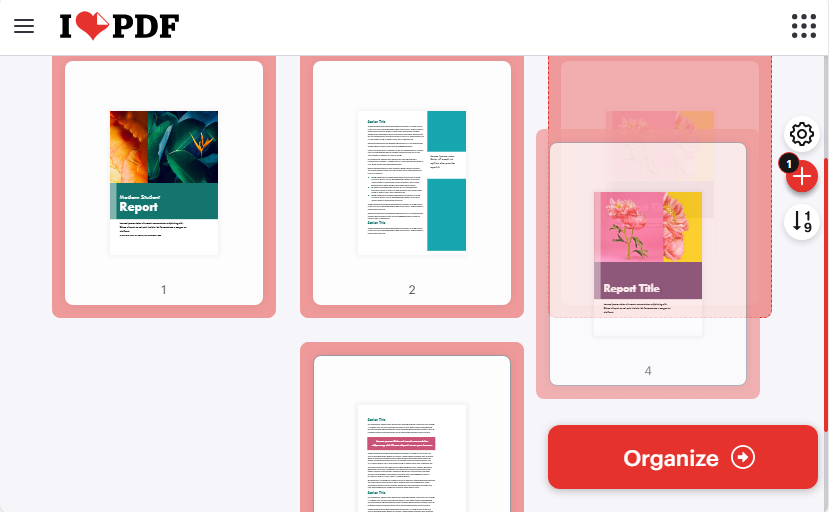
- Use the drag-and-drop interface to rearrange pages. (You can also rotate pages or delete unwanted ones if needed.)
- After reordering, click "Organize" and download the reordered PDF file.
Alternative Online Tools:
- PDF Candy: User-friendly interface; lets you save output to cloud storage directly.
- Sejda: A privacy-focused alternative; great pick for sensitive documents or large PDFs.
Related Article: How to Extract Pages from a PDF for Free — No Adobe Needed
Desktop PDF Page Order Editor Tools
For frequent PDF editing, sensitive documents (e.g., legal contracts, medical records), or offline use, desktop tools are superior - all processing happens locally on your device to ensure maximum data security.
Top Pick: PDF24 Creator (Free, Offline & Portable)
PDF24 Creator is a 100% free, ad-free desktop tool that excels at reordering PDF pages and offers a full suite of PDF editing features (merging, splitting, rotating, etc.). It works offline and is compatible with Windows (7/8/10/11).
Steps to rearrange PDF pages with PDF24 Creator:
- Download PDF24 Creator and launch it.
- Open the PDF24 Toolbox and click “Organize PDFs”.
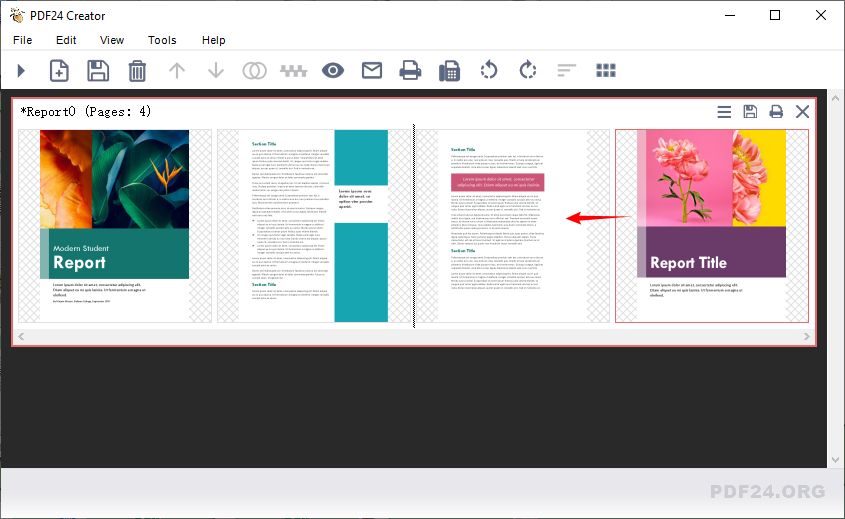
- Import your PDF file by clicking "File > Open" or dragging and dropping it into the interface.
- To reorder pages, simply click and drag any page to your desired position.
- Once you’re satisfied with the new order, click "Save" to export your organized PDF file.
Other Desktop Options:
- Preview (Mac): Built-in, no install needed. Use thumbnail view to drag pages.
- Adobe Acrobat Pro (Paid): A premium subscription-based tool for power users and businesses needing advanced PDF workflow automation.
Pro Tip: After reordering, you can add page numbers to make the PDF document more navigable for readers.
Python Automation Method for Bulk PDF Reordering
If you need to automate batch PDF reordering (e.g., reorder 100+ PDFs at once) or integrate page reordering into a Python workflow, Free Spire.PDF for Python is a powerful, free library. It’s ideal for developers, data analysts, or anyone working with large volumes of PDFs.
Python Code to Reorder PDF Pages
This code loads a PDF, changes the order of PDF pages, and saves to a new file.
from spire.pdf.common import *
from spire.pdf import *

# Create a PdfDocument instance
pdf = PdfDocument()

# Load a PDF file
pdf.LoadFromFile("Report.pdf")

# Reorder pages in the PDF file
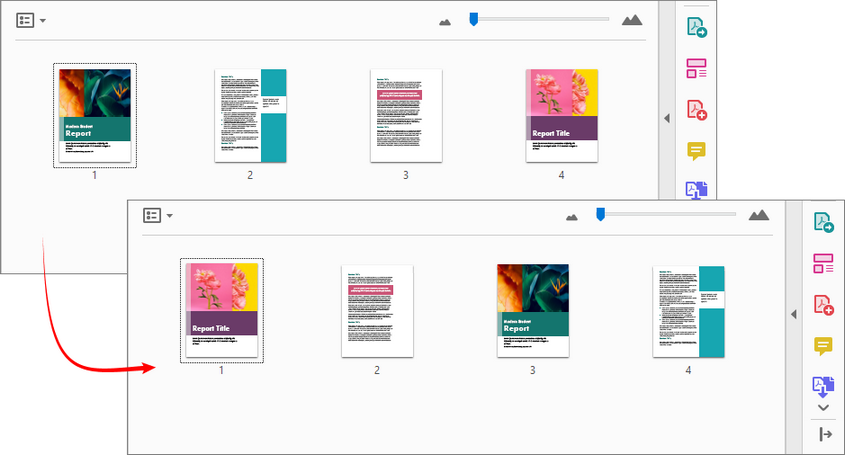
pdf.Pages.ReArrange([3, 2, 0, 1])

# Save the result file
pdf.SaveToFile("RearrangePDFPageOrder.pdf", FileFormat.PDF)
pdf.Close()
Customization Tips:
- File Paths: Replace input and output files with absolute paths (e.g., "C:/Documents/Report.pdf") or valid relative paths (e.g., "./data/Report.pdf") to avoid file-not-found errors.
- Page Order: Modify the [3, 2, 0, 1] list (0-based indices) to adjust page sequence. Ensure the list length matches the PDF’s total.
- Batch Processing: Wrap the function in a loop to reorder all PDFs in a folder (use os.listdir() to iterate over files).
Result:
With Free Spire.PDF for Python, you can also merge pages from multiple PDFs and arrange them in a custom order
Best Practices for Reordering PDF Pages
To avoid mistakes and ensure a smooth workflow, follow these tips:
Before you start:
- Make a backup copy of your original document
- Check if the PDF is secured/encrypted (may need password removal first)
- Ensure page numbers or references that might need updating
During the process:
- Use the multi-page view to understand the overall structure
- Consider logical groupings when moving multiple pages
- Verify that cross-references within the document still make sense
After reordering:
- Scroll through the entire document to check the flow
- Update bookmarks or links if your software supports it
- Consider optimizing file size if you've added or manipulated pages
Conclusion
Reordering PDF pages is straightforward with the right tool. For most users, online platforms like iLovePDF deliver a fast, no-download solution. If you handle confidential files or work offline, desktop software such as PDF24 Creator keeps your data secure and in your control. For automation or batch processing, Python with Free Spire.PDF provides a flexible, scriptable approach.
Choose the method that aligns with your workflow, and turn messy, out-of-order PDFs into organized, easy-to-use files in minutes.
FAQs About Organizing PDF Pages
Q: Are these PDF reorder tools really free?
A: Yes, all tools listed offer free tiers. Some have file size or page limits.
Q: Do these methods work on scanned/image-based PDFs?
A: Yes, you can reorder scanned PDFs, but they will remain as images. If you need to edit text within a scanned PDF, you will first need to perform OCR (Optical Character Recognition).
Q: Is there a way to reverse the entire page order (last page to first)?
A: Yes, in tools like iLovePDF and PDF24 Creator, they offer a reverse page order button. With Python, you can generate a reversed index list (e.g., [9, 8, 7, ..., 0] for a 10-page document).
Q: Can I schedule automated PDF reordering tasks?
A: With Python scripts, yes—you can use task schedulers (like cron on Linux or Task Scheduler on Windows) to run reordering scripts automatically at set times.
See Also
Extract PDF Images: Top Free Tools & Best Practices
Table of Contents
PDFs are ubiquitous for sharing static, formatted content—but extracting embedded images often feels like a puzzle. Whether you’re repurposing visuals for marketing materials, archiving high-resolution graphics from technical manuals, recovering images from legal documents, or automating workflows for a business, knowing how to efficiently extract PDF images is an essential digital skill.
This guide will break down the most practical PDF image extraction solutions, covering free tools, a code-based method, and expert best practices to preserve quality, stay compliant, and organize your extracted images.
Contents:
- Why You Might Need to Extract Pictures from PDFs
- Method 1: Using Online PDF Image Extractors (Quick & No-Install)
- Method 2: PDF24 Desktop App (Free, All-in-One Solution)
- Method 3: Programmatic Extraction with Free Spire.PDF
- Best Practices for Extracting PDF Images
- Frequently Asked Questions (FAQs)
Why You Might Need to Extract Pictures from PDFs
Common real-world scenarios include:
- Design and Branding: Recovering high-resolution logos or marketing materials from old PDF documents.
- Academic Research: Extracting charts, graphs, and illustrations from research papers.
- Content Creation: Harvesting images for presentations, websites, or social media posts.
- Archival Purposes: Preserving photographs embedded in digital documents.
- Legal & compliance: Isolating visual evidence or signed illustrations from legal documents.
Method 1: Using Online PDF Image Extractors (Quick & No-Install)
For occasional use, e.g., extracting all images from a PDF, online tools offer convenience. They require no software downloads, work on any device, and are free for basic tasks. Here are the top tools, with detailed steps and unique features:
Top Online Tools:
- FreeConvert: User-friendly with a clean interface.
- iLovePDF: Batch processing capabilities for multiple files.
- PDFCandy: Preview images before download.
Example: Use iLovePDF to Extract Images from PDF Online
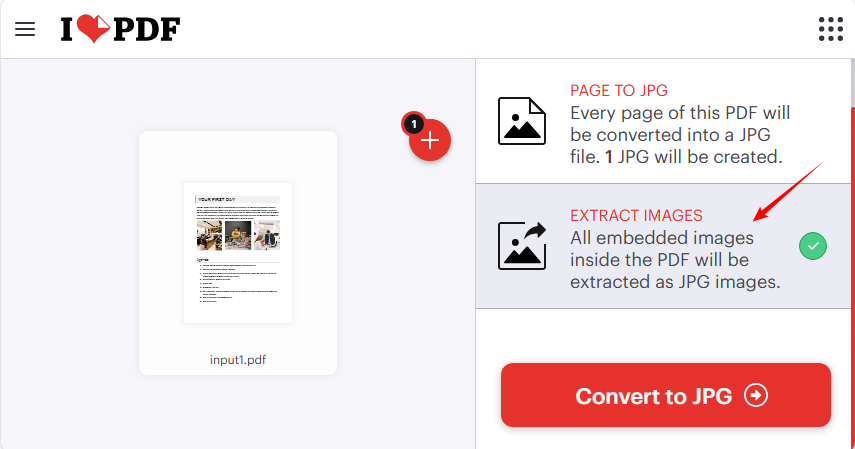
iLovePDF stands out for its simplicity and reliability—perfect for beginners. It supports batch uploads and extracts JPG from PDF by default.
- Go to iLovePDF’s Extract Images Tool (no registration required).
- Upload a PDF or drag and drop the document.
- Select “EXTRACT IMAGES” → click “Convert to JPG”.
- Download the ZIP file containing all extracted images.
Critical Security Note:
Never upload sensitive, confidential, or proprietary documents to untrusted online tools. Many platforms may store your files temporarily (or permanently) for processing. For sensitive data, use offline methods (desktop software or programming) instead.
You may also like: How to Extract Pages from a PDF for Free — No Adobe Needed
Method 2: PDF24 Desktop App (Free, All-in-One Solution)
The PDF24 Creator software stands out for its unlimited free usage, offline functionality, and robust image extraction tools. No ads, file size caps, or task limits. It’s ideal for Windows users who need to batch extract images from PDFs.
Step-by-Step:
- Download from pdf24.org (no registration required).
- Open the PDF24 Desktop App → select the "Extract PDF Images" tool from the dashboard.
- Click “Choose files” (or drag-and-drop your PDF into the app window).
- Click “Extract images” and then choose a folder to save extracted images.

Key Benefits of Desktop Tools:
- ✔ Security: No data leaves your device—ideal for confidential documents.
- ✔ Unlimited Use: No file size or task limits (unlike online tools).
- ✔ Batch Processing: Extract from 10+ PDFs at once, saving hours of manual work.
Method 3: Programmatic Extraction with Free Spire.PDF
For developers building applications that require automated or batch PDF image extraction, programming solutions offer the most power and flexibility. Free Spire.PDF for .NET is a robust, free library perfect for exporting images from PDF without watermarks.
Step-by-Step: Extract Images from PDF Using C#
- Install Free Spire.PDF via NuGet Package Manager:
Install-Package FreeSpire.PDF
- Code to Extract Images from All Pages
using Spire.Pdf;
using Spire.Pdf.Utilities;
using System.Drawing;

namespace ExtractAllImages
{
    class Program
    {
        static void Main(string[] args)
        {
            // Create a PdfDocument object
            PdfDocument pdf = new PdfDocument();

            // Load a PDF document
            pdf.LoadFromFile("Input.pdf");

            // Create a PdfImageHelper object
            PdfImageHelper imageHelper = new PdfImageHelper();

            // Declare an int variable
            int m = 0;

            // Iterate through the pages
            for (int i = 0; i < pdf.Pages.Count; i++)
            {
                // Get a specific page
                PdfPageBase page = pdf.Pages[i];

                // Get all image information from the page
                PdfImageInfo[] imageInfos = imageHelper.GetImagesInfo(page);

                // Iterate through the image information
                for (int j = 0; j < imageInfos.Length; j++)
                {
                    // Get a specific image information
                    PdfImageInfo imageInfo = imageInfos[j];

                    // Get the image
                    Image image = imageInfo.Image;

                    // Save the image to a PNG file
                    image.Save("Extracted/Image-" + m + ".png");
                    m++;
                }

            }

            // Dispose resources
            pdf.Dispose();
        }
    }
}
Key Classes & Methods:
- PdfDocument: Represents a PDF document.
- PdfImageHelper: Utility for getting image info from PDF pages.
- PdfImageHelper.GetImagesInfo(): Returns all image info from a specified PDF page.
- PdfImageInfo: Stores image metadata (e.g., Image property for the actual image).
- Image.Save(): Saves the Image object to a file (supports JPG, PNG).
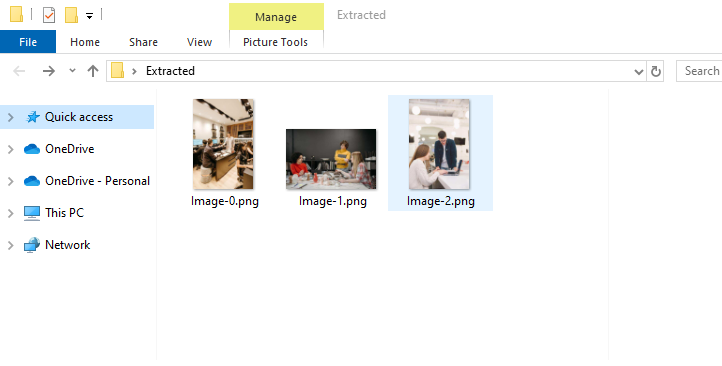
The extracted images:
To extract text content, refer to: Effortlessly Automate PDF Text Extraction Using C# .NET: A Complete Guide
Use Cases:
- ✔ Automated workflows
- ✔ Server-side processing
- ✔ Integration into .NET applications
- ✔ High-volume batch extraction
Best Practices for Extracting PDF Images
To ensure you can extract images from PDFs with high-quality while avoid legal or technical issues, follow these expert tips:
1. Preserve Image Quality
- Extract at the highest available resolution
- Choose lossless formats (PNG, TIFF) for diagrams and text-heavy images
- Use JPEG for photographs when file size matters
2. Maintain Organization
- Use consistent naming conventions
- Preserve page number references in filenames
- Create logical folder structures for extracted assets
3. Check Copyright and Usage Rights
- Always verify you have permission to extract and reuse images
- Respect intellectual property rights
- Attribute sources when required
Conclusion
Extracting PDF images is a valuable skill with applications across numerous professions and personal projects. Whether you choose a simple online tool for occasional use, robust desktop software for regular work, or programming solutions for automation, the right approach depends on your specific needs, technical comfort, and security requirements.
By following the methods and best practices outlined in this guide, you can efficiently recover valuable visual assets from PDF documents while maintaining quality.
Frequently Asked Questions (FAQs)
Q1: What's the best free tool to extract images from PDF?
A: For most users, iLovePDF offers an excellent free online option. For desktop use, PDF24 App provides robust free extraction capabilities.
Q2: Can I extract images from scanned PDFs?
A: Yes, but they'll be extracted as they appear in the scan (page images). You cannot extract individual elements from within a scanned page image without OCR and advanced processing.
Q3: Why are my extracted images blurry?
A: Blurriness usually stems from:
- The original PDF contains low-resolution preview images.
- The tool downscaled the image during extraction.
- You used a lossy format (JPG) for graphics—switch to PNG/TIFF.
Q4: Is it legal to extract images from PDFs?
A: It depends on the document's copyright, your usage rights, and intended use. Always verify you have appropriate permissions before extracting and reusing images.
See Also
Convert CSV to TXT: 4 Easy Methods for All Users
Table of Contents
CSV (Comma-Separated Values) files are widely used in spreadsheets, databases, and data analytics, but they often fail to display properly in basic text editors or simple software. Converting CSV to TXT solves this compatibility issue, making data easier to read and share on any device.
Whether you’re a non-technical user needing a quick conversion, a developer automating workflows, or a professional handling sensitive data, this guide details reliable CSV to Text conversion methods tailored to different skill levels and requirements.
- 1. Using Text Editors: Quick Manual Conversion
- 2. Online CSV to TXT Converter: One-Click Conversion
- 3. Programming: Batch Conversion for Developers
- 4. Office Software: Excel/Google Sheets for Daily Users
- Formatting Considerations When Converting CSV to Text
- FAQs About CSV to TXT Conversion
1. Using Text Editors: Quick Manual Conversion
The simplest method involves opening your CSV file in any text editor like Notepad, TextEdit, or VS Code and saving it with a .txt extension. This maintains the comma-separated structure but stores it as plain text.
Steps:
- Open CSV file in your preferred text editor.
- Review the content for proper formatting.
- Go to File → Save As.
- Change the file extension from .csv to .txt.
- Save to your desired location.
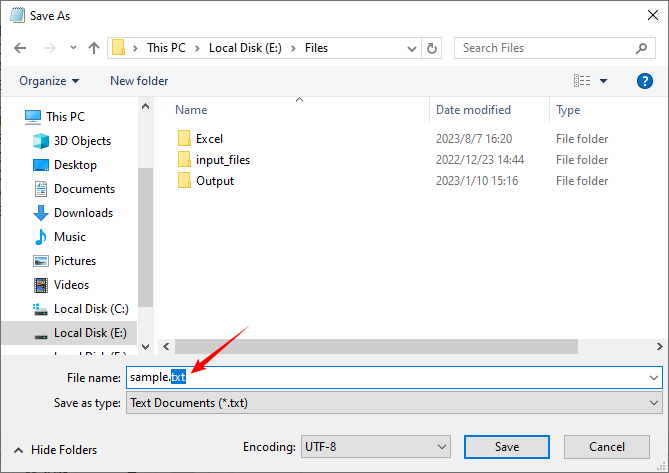
Note: This method does not alter the data; it merely changes the file extension. Some systems may still treat the file as CSV-based on its content.
You may also be interested in: 4 Proven Ways to Convert CSV to Excel (Free & Automated)
2. Online CSV to TXT Converter: One-Click Conversion
For users who prefer a graphical interface without downloading software, online tools offer a convenient one-click solution. They are especially useful for quick conversions on any device (computer, tablet, phone).
Example Tool: Convertio
Step-by-Step:
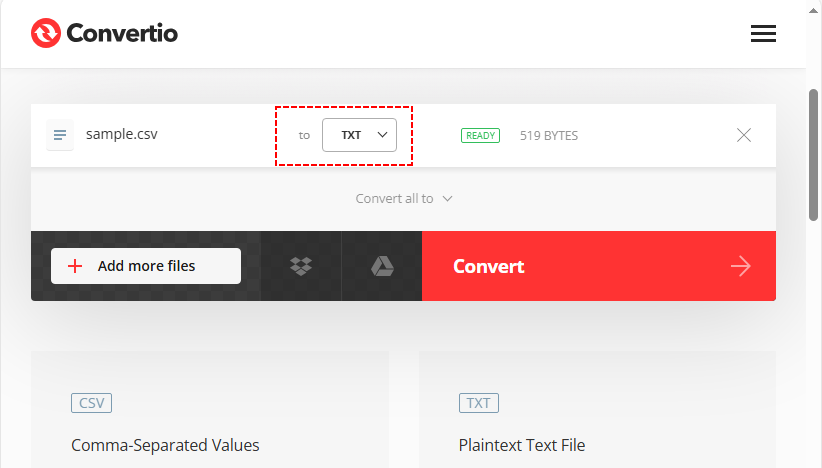
- Visit Convertio’s CSV to TXT Converter page. The clear interface ensures you won’t get lost.
- Click “Choose Files” to upload your CSV file. It supports local files and cloud storage (Google Drive, Dropbox).
- Confirm the output format is “TXT” (usually selected by default).
- Hit “Convert” and wait 1–3 seconds. Click “Download” to save the TXT file.
✔ Advantages: Fast, free for small files, cross-platform and mobile-friendly.
Security Note: Avoid uploading sensitive or confidential data to public online tools. Use offline methods for financial, personal, or proprietary information.
3. Programming: Batch Conversion for Developers
If you need to convert hundreds of CSV files or integrate conversion into workflows, programming is the most efficient solution. With the Free Spire.XLS library, you can convert CSV to TXT in Python with minimal code, while retaining full control over delimiters, encoding, and structure.
Step-by-Step Code for Bulk Conversion:
The code below converts entire folders of CSV files into text files automatically:
from spire.xls import *
from spire.xls.common import *
import os

def batch_csv_to_txt(input_dir: str, output_dir: str, delimiter: str = "\t"):
    # Create output directory if it doesn't exist
    if not os.path.exists(output_dir):
        os.makedirs(output_dir)

    # Get all files in input directory
    for filename in os.listdir(input_dir):
        # Only process CSV files (case-insensitive: .csv or .CSV)
        if filename.lower().endswith(".csv"):
            # Construct full input file path
            input_csv_path = os.path.join(input_dir, filename)
            # Generate output TXT filename (replace .csv with .txt)
            txt_filename = os.path.splitext(filename)[0] + ".txt"
            output_txt_path = os.path.join(output_dir, txt_filename)

            try:
                # Create workbook instance for each CSV (critical to avoid resource leaks)
                workbook = Workbook()

                # Load CSV file (matches your original load logic: delimiter ",", start at row 1, column 1)
                workbook.LoadFromFile(input_csv_path, ",", 1, 1)

                # Get the first worksheet (CSV is loaded as a single worksheet)
                sheet = workbook.Worksheets[0]

                # Save as tab-delimited TXT (use specified delimiter)
                sheet.SaveToFile(output_txt_path, delimiter, Encoding.get_UTF8())

                print(f"Success: {filename} → {txt_filename}")

            except Exception as e:
                print(f"Failed to process {filename}: {str(e)}")

            finally:
                # Dispose workbook to release memory (mandatory for batch processing)
                workbook.Dispose()

# --------------------------
# Usage Example
# --------------------------
if __name__ == "__main__":
    # Configure your input/output directories here
    INPUT_DIRECTORY = "./input_csvs"
    OUTPUT_DIRECTORY = "./output_txts"

    # Run batch conversion (delimiter = "\t" for tab, or use "," for comma-separated TXT)
    batch_csv_to_txt(INPUT_DIRECTORY, OUTPUT_DIRECTORY, delimiter="\t")
Key Features:
- Customizable delimiter (tab, comma, pipe, etc.)
- UTF-8 encoding ensured
- Error handling for robust batch processing
Result of batch converting CSV files to text files:
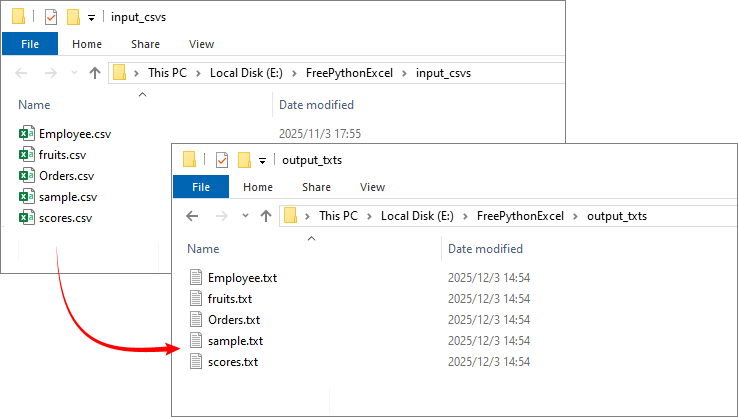
Pro Tip: The free Python library is also capable of converting the TXT file back to CSV file.
4. Office Software: Excel/Google Sheets for Daily Users
For users already familiar with spreadsheet software, this method integrates conversion into an existing workflow without new tools.
Take Excel as an Example:
- Open your CSV file with Excel. The data will be automatically arranged in columns.
- Click “File → Save As”. In the “Save as type” dropdown, select “Text (Tab delimited) (*.txt)”.
- Choose a save location, name the file, and click “Save” to change CSV to TXT.
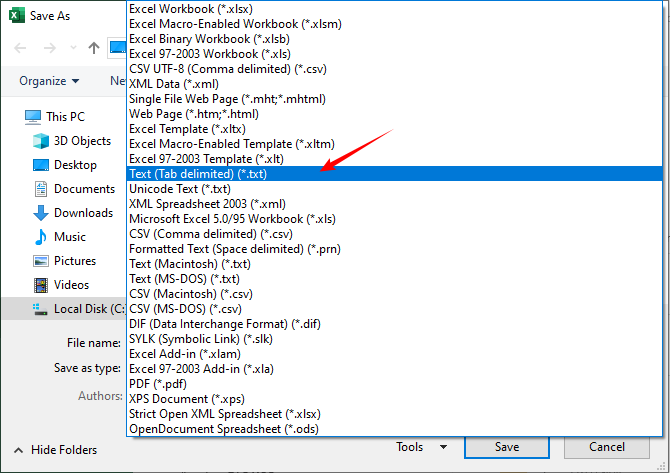
Google Sheets Operation: Open the CSV file, go to “File → Download → Plain Text (.txt)”.
Notes: Excel may add extra formatting—preview the TXT file to ensure data integrity.
Formatting Considerations When Converting CSV to Text
Delimiter Selection
When converting CSV to text, you might change delimiters for better readability:
- Tab-separated values: Ideal for alignment in text editors
- Pipe-separated values (|): Useful when data contains commas
- Custom delimiters: Can be specified based on your needs
Preserving Data Structure
Maintain data integrity by:
- Handling special characters and line breaks within fields
- Maintaining consistent encoding (UTF-8 recommended for multilingual text)
- Test conversions with a sample file before batch processing.
Conclusion
Converting CSV to TXT is a versatile skill that bridges the gap between structured data and universal accessibility. From manual text-editor methods to automated Python scripts, the right approach depends on your volume, technical comfort, and need for customization.
By understanding the various approaches outlined in this guide, you can select the most efficient method for your situation, ensuring your data remains intact while becoming more accessible across different platforms and applications.
FAQs About CSV to TXT Conversion
Q: Will converting CSV to TXT change my data?
A: The data itself remains unchanged, but the formatting may differ. For example:
- Commas may be replaced with tabs or another delimiter.
- All values become plain text.
- Special characters and line breaks within fields should be preserved if the conversion is done correctly.
Q: Can I convert multiple CSV files to TXT at once?
A: Yes. Using a programming script (like the Python example provided) or batch conversion tools allows you to process entire folders of CSV files automatically. Spreadsheet software and most online converters typically handle only one file at a time.
Q: Why does my TXT file still look like a CSV after conversion?
A: If you only changed the file extension (e.g., from .csv to .txt) without altering the content, the data will still be comma-separated. To visually separate columns, use a converter that changes the delimiter to tabs or spaces.
Q: What should I do if my CSV has multiple sheets?
A: CSV files do not support multiple sheets. If your source is an Excel file with multiple sheets, save each sheet as a separate CSV first, then convert each to TXT. The Free Spire.XLS for Python library can handle multi-sheet Excel files directly if needed.
See Also
4 Proven Ways to Convert CSV to Excel (Free & Automated)
Table of Contents
If you've ever downloaded data from a bank statement, an online tool, or a database, you've likely encountered a CSV file. While incredibly useful for storing raw data, CSVs lack the powerful features needed for analysis, formatting, and visualization. Converting your CSV to Excel unlocks a world of possibilities, transforming static data into a dynamic and insightful workbook.
This comprehensive guide will walk you through the easiest and most effective methods to convert CSV files to Excel, from simple manual methods to automated Python scripts.
- Understanding CSV and Excel Formats
- Method 1: Convert CSV to Excel Using Microsoft Excel
- Method 2: Convert CSV to Excel Using Google Sheets
- Method 3: Use Free Online CSV to Excel Converters
- Method 4: Automate CSV to Excel Conversion with Python
- Method Comparison: Choose the Right Tool
Understanding CSV and Excel Formats
What's the real difference between a CSV and an Excel file? Specifically:
-
CSV (Comma-Separated Values): This is a plain text file. It's like a digital notepad where data is separated by commas (or sometimes other delimiters like semicolons). Its simplicity is its strength—it's universally compatible. However, it cannot store formulas, charts, formatting (like colors or fonts), or multiple sheets.
-
Excel (XLS/XLSX): This is a proprietary, binary file format. Think of it as a full-featured digital ledger. It can store data, plus formulas, pivot tables, charts, multiple sheets, cell formatting, and much more.
You should convert CSV to Excel when you need to:
- Use formulas (SUM, VLOOKUP, etc.) on your data.
- Create charts or graphs for visualization.
- Apply filtering, sorting, or conditional formatting.
- Organize data across multiple tabs.
- Make your report look professional with colors and fonts.
Method 1: Convert CSV to Excel Using Microsoft Excel
If you already have Microsoft Excel (2016, 2019, 365, or 2021) installed, this is the simplest and most reliable method.
The Simple "Open With" Method (Best for Most Users)
This is the fastest and most straightforward way to convert a single CSV file. It's essentially using Excel to "save as" a new format.
- Locate your CSV file in Windows File Explorer or Mac Finder.
- Right-click on the file.
- Hover over "Open with" and select Microsoft Excel.
- Once opened in Excel, go to File > Save As.
- Choose the location where you want to save the new file.
- In the "Save as type" dropdown menu, select Excel Workbook (*.xlsx) or Excel 97-2003 Workbook (*.xls).
- Click Save.
The converted Excel file:
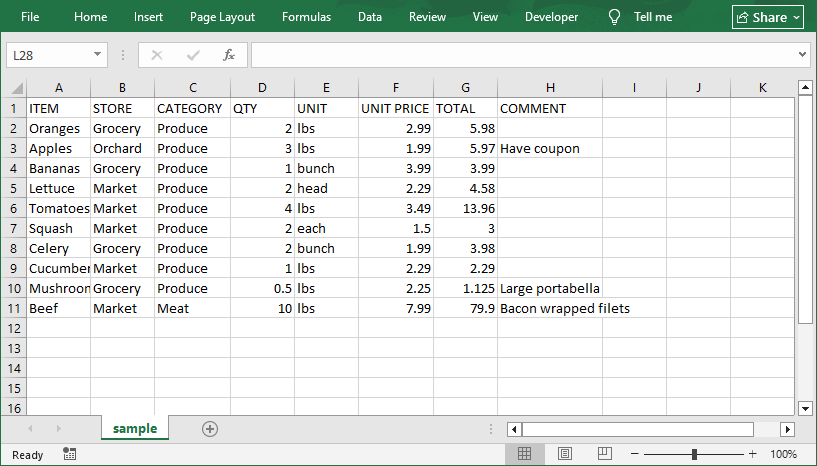
Importing Data via Excel's Data Tab (More Control)
This method gives you precision, allowing you to define data types during import to prevent formatting errors.
Step 1: Open CSV File in Excel
- Launch Excel and go to the Data tab.
- Click New Query > From File > From CSV.
- Browse to your CSV file, select it, and click Open.
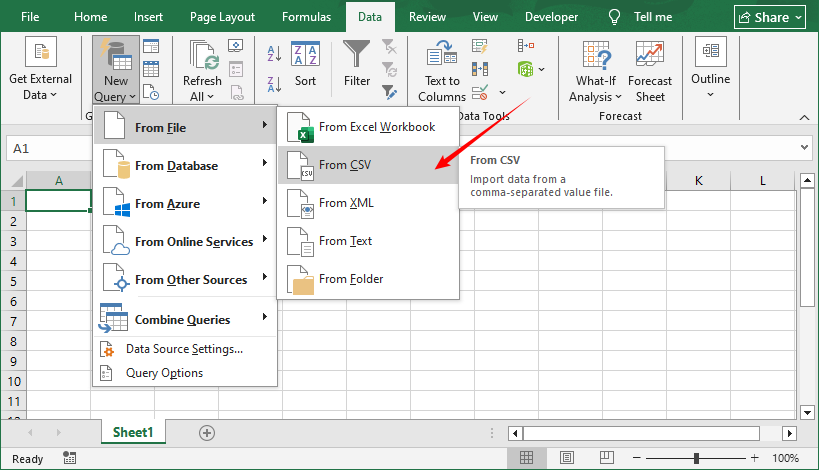
Step 2: Customize the Import Settings
Excel will open a preview window where you can adjust settings to ensure data accuracy:
- Delimiter: Confirm “Comma” is selected. If your file uses tabs or semicolons, choose the correct option.
- Data Type Detection: Choose "Based on entire dataset" for auto-detection, or "Text" for sensitive fields (e.g., ZIP codes with leading zeros).
- Encoding: If your CSV has special characters, choose UTF-8 from the dropdown to avoid garbled text.
Click Load when you’re ready.
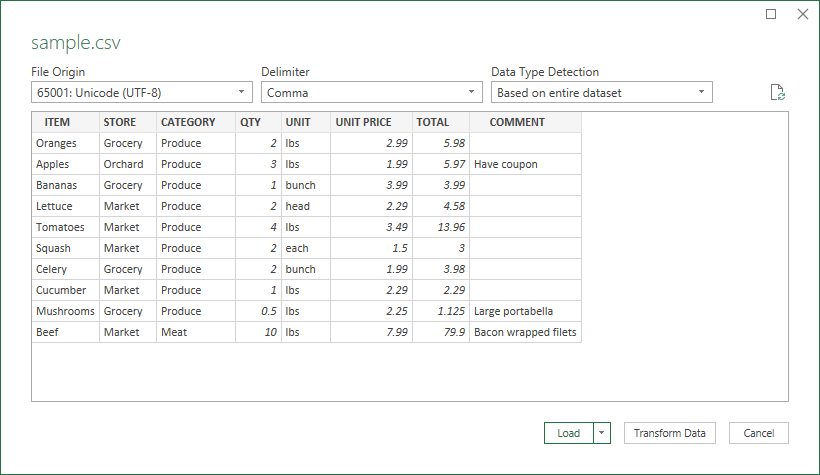
Step 3: Save as an Excel File
The CSV data will now open in Excel. To save it as a native Excel file:
- Go to File > Save As.
- Choose a location to save the file.
- Select Excel Workbook (*.xlsx) or Excel 97-2003 Workbook (*.xls) from the “Save as type” dropdown.
- Click Save. Your CSV file is now an Excel spreadsheet with all the functionality of Excel.
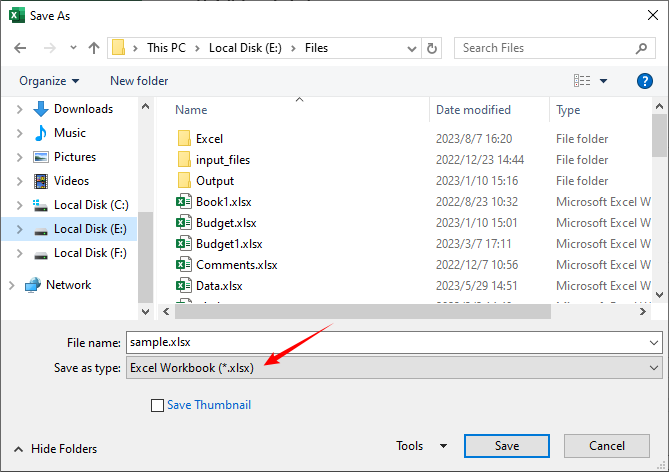
Method 2: Convert CSV to Excel Using Google Sheets
If you don’t have Excel, Google Sheets (Google’s free spreadsheet tool) is a fantastic alternative. It works in any browser, syncs to your Google Drive, and supports seamless CSV-to-Excel conversion. Here’s how:
Step 1: Import the CSV File to Google Sheets
- Go to Google Sheets and create a new blank spreadsheet.
- Click File > Import > Upload.
- Click Browse to select your CSV file or drag and drop it.
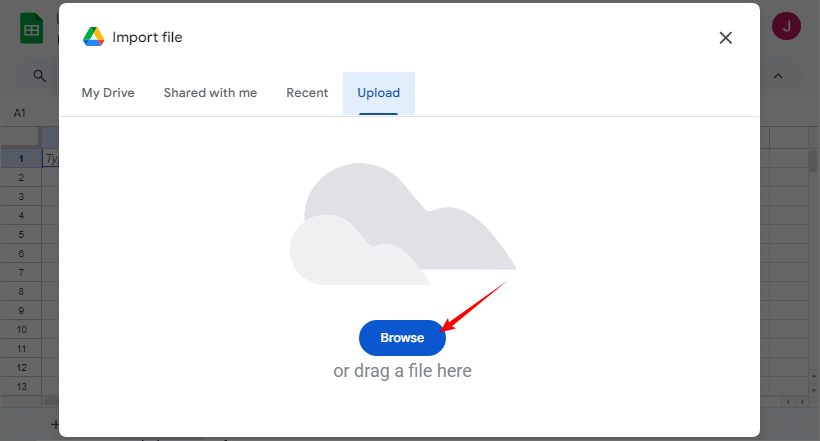
Step 2: Configure Import Options
In the import window:
- Select your preferred Import location and Separator type.
- Click Import data.
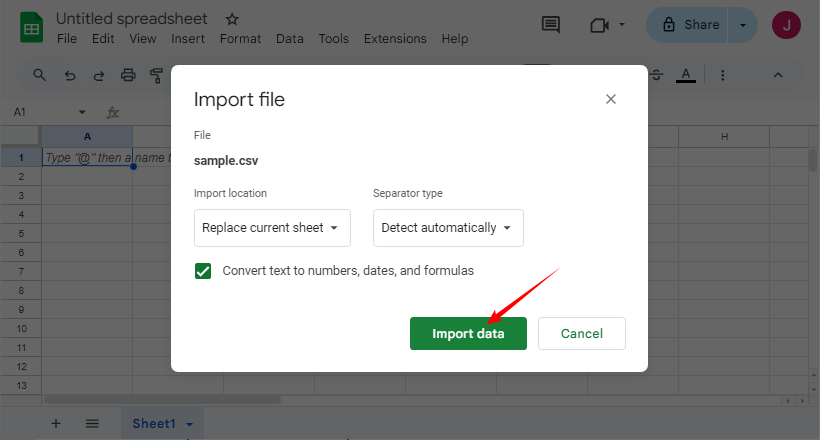
Step 3: Export as an Excel File
Once your data is in Google Sheets, go to File > Download > Microsoft Excel (.xlsx). The Excel file will download to your device automatically. Open it in Excel or another spreadsheet tool to verify the data.
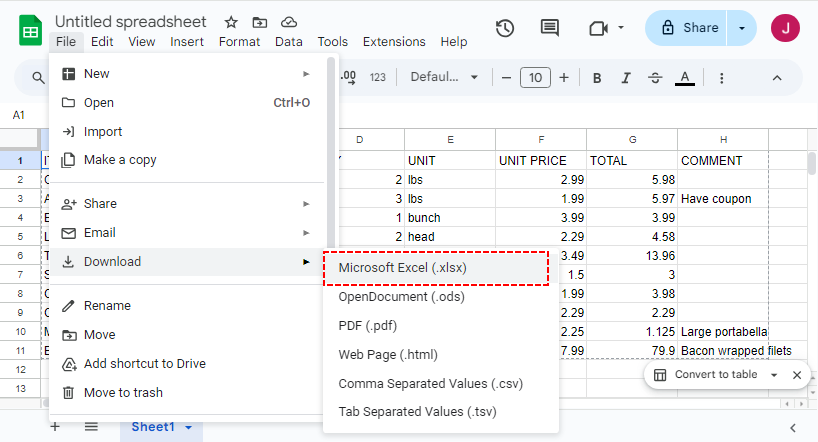
ALSO READ: Convert CSV to PDF: 4 Efficient Methods
Method 3: Use Free Online CSV to Excel Converters
For one-off conversions, free online tools are a quick solution. Look for tools that prioritize data privacy and support large files. Our top picks:
CSV to XLSX Converter by CLOUDXDOCS
CLOUDXDOCS is a trusted file conversion tool that supports CSV to XLSX conversions. Here’s how to use it:
- Go to CLOUDXDOCS CSV to Excel page.
- Upload your CSV file or drag and drop it.
- Wait for the conversion to complete and then download the Excel file.
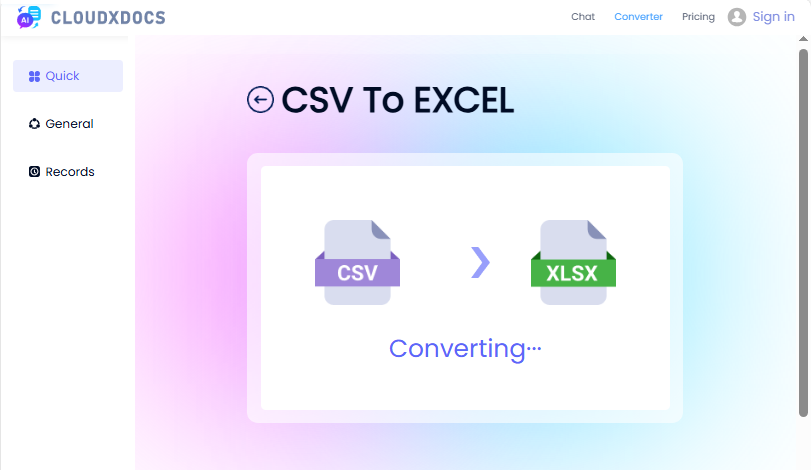
Convertio (Supports Batch Conversions)
Convertio is ideal if you need to convert multiple CSV files at once. Steps:
- Visit Convertio’s CSV to XLSX converter.
- Drag and drop multiple CSV files or upload them from Google Drive/Dropbox.
- Ensure the output format is set to XLSX.
- Click Convert and download the zip file with your Excel files.
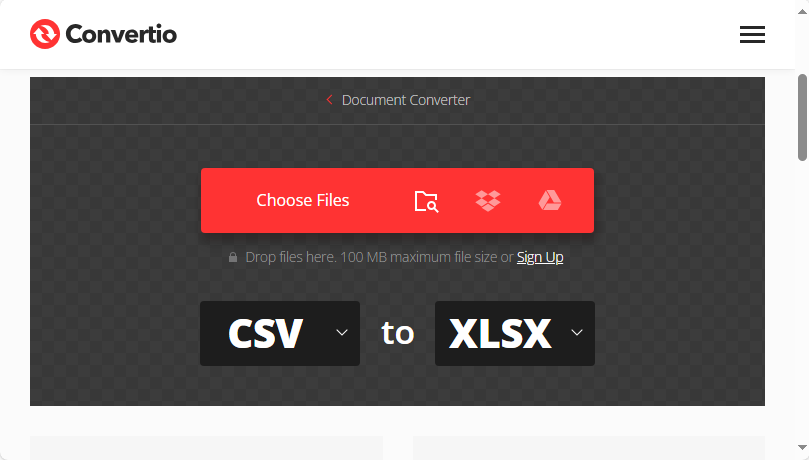
Method 4: Automate CSV to Excel Conversion with Python
For developers who need to convert bulk CSV files or integrate CSV-to-Excel into Python workflows, Spire.XLS for Python is the perfect tool. It is a powerful spreadsheet library that handles Excel/CSV operations programmatically.
Step 1: Install the Python Library
Open your terminal/command prompt and run the following pip command:
pip install spire-xls
Step 2: Python Code to Convert CSV to Excel (Single File)
This code converts a single CSV to XLS or XLSX format.
from spire.xls import *
from spire.xls.common import *

# Create a workbook
workbook = Workbook()

# Load a CSV file
workbook.LoadFromFile("sample csv.csv", ",", 1, 1)

# Save to xls format
workbook.SaveToFile("CSVToXLS.xls", ExcelVersion.Version97to2003)

# Save to xlsx format
workbook.SaveToFile("CSVToXLSX.xlsx", ExcelVersion.Version2016)
Step 3: Python Code to Batch Convert CSV Files (Multiple Files)
If you have a folder full of CSV files, use this code to batch convert CSV to Excel in one go:
import os
from spire.xls import *

input_folder = r"F:\CSVs"
output_folder = r"F:\Output"

# Loop through each CSV file
for csv_file in os.listdir(input_folder):
    if csv_file.endswith(".csv"):
        input_path = os.path.join(input_folder, csv_file)
        output_name = os.path.splitext(csv_file)[0] + ".xlsx"
        output_path = os.path.join(output_folder, output_name)

        # Create a Workbook instance and load CSV files
        workbook = Workbook()
        workbook.LoadFromFile(input_path, ",", 1, 1)

        # Save each CSV file as an Excel file
        workbook.SaveToFile(output_path, ExcelVersion.Version2016)
Code Explanation
- Workbook: The core class of Spire.XLS for Python—handles all Excel/CSV operations.
- LoadFromFile: Imports CSV data into the workbook. You can customize the delimiter (e.g., ";" for European CSVs).
- SaveToFile: Exports the workbook to an Excel file (supports Excel 2003-2019 formats).
- Bulk Conversion: Uses os.listdir to loop through CSV files.
Pro Tip: Spire.XLS for Python also supports converting CSV to XML and CSV to JSON.
Method Comparison: Choose the Right Tool
| Method | Automation | Security | Best For |
|---|---|---|---|
| Manual Excel | None | High | Single files, non-technical users |
| Google Sheets | None | Medium | Quick conversions, collaborative projects, users without Excel. |
| Online Tools | None | Low | One-time use, small non-confidential files, utmost convenience. |
| Python + Spire.XLS | Full | High | Batch processing, automation, integration into workflows. |
Final Thoughts
Converting a CSV file to Excel is a simple but powerful skill that unlocks the full analytical and presentation potential of your data. For quick, simple needs, use Excel’s “Open With” or Google Sheets. For messy/complex CSVs, Excel’s Data Tab ensures precision. Online tools work for one-off small files, while Python + Spire.XLS handles batch/automated tasks for power users.
Choose the method that fits your file size and skills, then leverage Excel’s calculations, visuals, and organization to turn raw data into meaningful, actionable results.