How to Convert Images to Text: Best OCR Tools for Beginners
Table of Contents
Have you ever needed to edit the text from a screenshot, a scanned PDF, or a photo of a document? Manually retyping everything is a tedious and error-prone process. Thankfully, you can convert images to text using powerful technology known as Optical Character Recognition (OCR).
In this comprehensive guide, we’ll explore the best free tools and methods to extract text from images instantly, catering to both casual users and developers.
- Why Convert an Image to TXT? Top Use Cases
- How Image to Text Converter Works: The Basics of OCR
- Top Free Tools to Convert Images to Text Online
- Picture to Text Free Desktop Converter: Microsoft OneNote
- Python OCR Library: Extract Text from Image using Spire.OCR
- Frequently Asked Questions (FAQs)
Why Convert an Image to TXT? Top Use Cases
The ability to convert images such as PNG or JPG to TXT files is more useful than you might think. Here are some common scenarios:
- Edit Scanned Documents: Turn old paper documents, contracts, or letters into editable Word or Google Docs files.
- Capture Text from Screenshots: Quickly grab text from a software tutorial, a social media post, or an error message without retyping.
- Translate Text in Images: Use an OCR tool to extract text, then paste it into a translator like Google Translate.
- Improve Accessibility: Make text within images readable by screen readers for visually impaired users.
How Image to Text Converter Works: The Basics of OCR
Most free tools use cloud-based OCR (no software download needed) or lightweight desktop apps. The process is simple:

Modern OCR tools support multiple languages (English, Spanish, Chinese, etc.), handwritten text (with varying accuracy), and can even handle low-quality images—though clearer images yield better results.
Pro Tip: For best OCR results, use high-resolution images with good lighting, minimal glare, and straight text (avoid tilted photos).
Top Free Tools to Convert Images to Text Online
You don't need expensive software. Here are the best free online OCR tools that work directly in your browser.
1. Google Drive (Google Docs)
This is one of the most powerful and often overlooked free OCR solutions.
How to use it:
- Go to drive.google.com.
- Upload your image (JPG, PNG) or scanned PDF to your Drive.
- Right-click the file and select “Open with > Google Docs”.
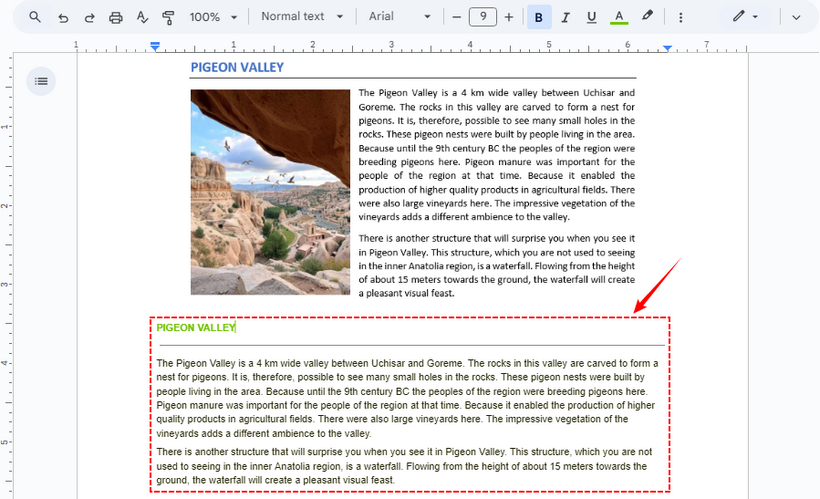
- Google Docs will instantly create a new document. The extracted text will be at the bottom of the embedded image.
✔ Pros: Highly accurate, integrates seamlessly with your Google ecosystem, and handles multiple pages.
✘ Cons: Formatting can sometimes be imperfect.
2. Online OCR Tool
Online OCR is a dedicated web tool for free image-to-text conversion. It supports JPG, PNG, TIFF, and PDF (up to 15MB per file for free).
How to use it:
- Go to Online OCR (no sign-up required).
- Upload your image or drag-and-drop it into the tool.
- Select the source language (e.g., English, French) and output format (Word, TXT, Excel).
- Click “Convert” and download the editable file with extracted text.

✔ Pros: No registration required for basic use; supports a wide range of languages and output formats.
✘ Cons: Free version has file size limits; ads on the site.
Need to export text as PDF? Refer to: Convert Text to PDF Easily: 4 Quick and Professional Methods
Picture to Text Free Desktop Converter: Microsoft OneNote
If you use Windows or Microsoft Office, OneNote’s built-in OCR tool is seamless and free. It works with images, scanned PDFs, and even screenshots you paste into notes.
How to use it:
- Open Microsoft OneNote and create a new page.
- Paste an image into the page or insert one via “Insert > Pictures”.
- Right-click the image and select “Copy Text from Picture”.
- Paste the extracted text anywhere (Word, Excel, etc.).
Note: If you need to recognize other languages, remember to right-click the image, select “Make text in image searchable”, and choose the exact language of your text.

✔ Pros: Integrates perfectly with Office; supports handwritten text; works offline.
✘ Cons: Requires the desktop app to be installed; less intuitive for Mac users.
Python OCR Library: Extract Text from Image using Spire.OCR
For users with basic Python skills, the Spire.OCR for Python library enables automated image-to-text conversion. It supports batch processing, multiple languages, and image formats (JPG, PNG, BMP, etc.)—perfect for streamlining repetitive OCR tasks (e.g., extracting text from 100 product images at once).
1. Install Spire.OCR Library: Open your command prompt or terminal and run the following pip command:
pip install spire.ocr
2. Download the OCR Model: Download the pre-trained model for your operating system from the links below and extract the files to a known directory (e.g., F:\OCR\win-x64).
3. Write the Python Script
Create a new Python file (e.g., image_to_text.py) and paste the following code. This script loads an image, performs OCR, and saves the extracted text to a file.
from spire.ocr import *

# Create OCR scanner instance
scanner = OcrScanner()

# Configure OCR model path and language
configureOptions = ConfigureOptions()
configureOptions.ModelPath = "F:\\OCR Model\\win-x64"
configureOptions.Language = "English"
scanner.ConfigureDependencies(configureOptions)

# Perform OCR on the image
scanner.Scan("Sample.png")

# Save extracted text to file
text = scanner.Text.ToString()
with open("ImageText.txt", "a", encoding="utf-8") as file:
    file.write(text)
Key Steps:
- Create an OCR Scanner: Initializes a core OcrScanner object, which is responsible for all OCR-related operations (configuration, image scanning, text extraction).
- Configure Model Path & Language:
- ConfigureOptions: A class to set OCR parameters.
- ModelPath: Path to the extracted OCR model files (critical for accurate text recognition).
- Language: Specifies the text recognition language (supports English, Chinese, French, etc).
- Perform OCR on Image: Uses the Scan() method to process the target image, triggering the OCR engine to extract text from the image.
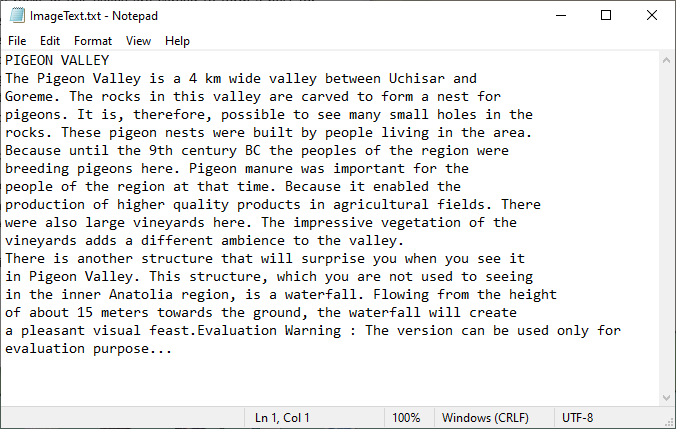
The Extracted Text:
✔ Pros: Perfect for automation and batch processing; highly customizable through code.
✘ Cons: Requires basic Python knowledge and initial setup.
For scanned PDF, check this: Perform PDF OCR with Python (Extract Text from Scanned PDF)
Final Thoughts
Converting an image to text for free is no longer a complex task reserved for professionals. With powerful and accessible tools like Google Drive, OnlineOCR, and Microsoft OneNote, you can extract text from any image in seconds. For developers and power users looking to automate repetitive tasks, Python OCR libraries provide a robust and scalable solution.
Frequently Asked Questions (FAQs)
Q: Can these tools extract text from handwritten notes?
A: Yes, but with varying accuracy. Printed text is recognized with high precision, while handwriting success depends on its clarity and the tool's capabilities.
Q: Are free online OCR tools safe to use?
A: Reputable tools like Google Drive and OnlineOCR are generally safe for non-sensitive documents. However, for confidential files, using a desktop tool like OneNote or a local Python script is more secure as it doesn't upload your data to a server.
Q: Can I convert images to text offline?
A: Yes. You can use Microsoft OneNote or the Spire.OCR for Python library without an internet connection.
Q: Can Spire.OCR extract text coordinates in the image?
A: Yes. Spire.OCR captures text coordinates by returning the bounding box information of each recognized text region.
# Extract block-level text with position
block_text = ""
for block in text.Blocks:
    rectangle = block.Box
    block_info = f'{block.Text} -> x: {rectangle.X}, y: {rectangle.Y}, w: {rectangle.Width}, h: {rectangle.Height}'
    block_text += block_info + '\n'
See Also
Convert HTML to Text: Easy Solutions for Beginners & Devs
In today's digital world, HTML (HyperText Markup Language) is the backbone of web content. However, there are countless scenarios where you need clean, unformatted plain text instead. Whether you're extracting data for analysis, simplifying content for an email, or preparing text for SEO analysis, knowing how to convert HTML to text is an essential skill.
This comprehensive guide will walk you through the most effective methods to convert HTML to plain text, from simple online tools for beginners to powerful code libraries for developers.
- Key Benefits of HTML to Text Conversion
- Two Easy Methods to Convert HTML to Plain Text
- Advanced: Convert HTML to Text with Code (For Developers)
- Frequently Asked Questions (FAQs)
Key Benefits of HTML to Text Conversion
Stripping away the HTML markup to get clean, readable text serves several crucial purposes:
- Data Processing and Analysis: For data scientists and analysts, plain text is the starting point for Natural Language Processing (NLP), sentiment analysis, and keyword extraction. HTML tags are just noise for these algorithms.
- Search Engine Optimization (SEO): When search engines crawl your site, they primarily index the plain text content. Ensuring that your core message is easily extractable from HTML helps with on-page SEO and ranking.
- Content Repurposing: Plain text is lightweight and versatile, perfect for email newsletters, app notifications, social media previews, or document snippets.
- Web Scraping Efficiency: Web scrapers are designed to extract specific data. Converting the raw HTML response to text is often the first step in filtering out the essential information from the presentation layer.
Two Easy Methods to Convert HTML to Plain Text
For non-technical users, these user-friendly tools deliver fast results without manual tag removal.
1. Online HTML to Text Converters
For quick, one-off conversions, online tools automate markup stripping with minimal effort.
Top Tools:
CLOUDXDOCS, Convertio, CodeBeautify (all free, no sign-up).
General Steps:
- Upload your HTML file.
- Select “Convert” or “Extract Text.”
- Download the plain-text output (usually as a .txt file).
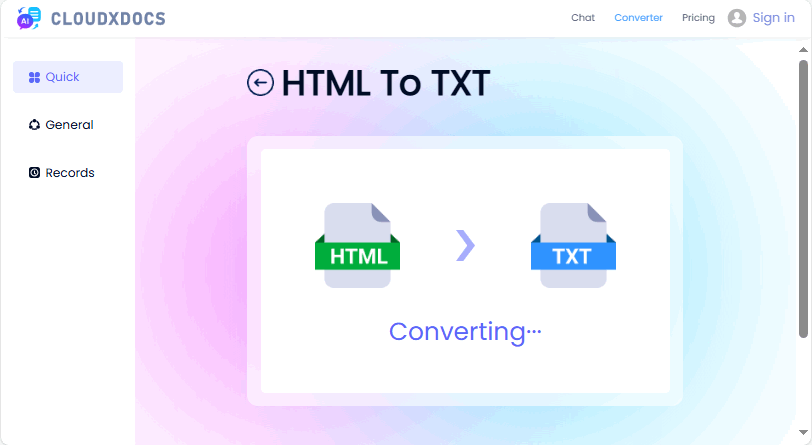
Example of using CLOUDXDOCS:
Pros: Fast, require no technical skills, and often preserve basic formatting like line breaks.
Cons: Not suitable for batch processing; privacy concerns with sensitive data.
You may also like: 5 Best Free HTML to Word Converters (Tested & Recommended)
2. Word Processors (Microsoft Word, Google Docs)
Leverage familiar office tools to change HTML to text effectively—no extra software required.
Microsoft Word:
- Open Word and go to “File > Open”
- Select your HTML file (choose “All Files” from the dropdown to see it).
- Word will convert the HTML to an editable document.
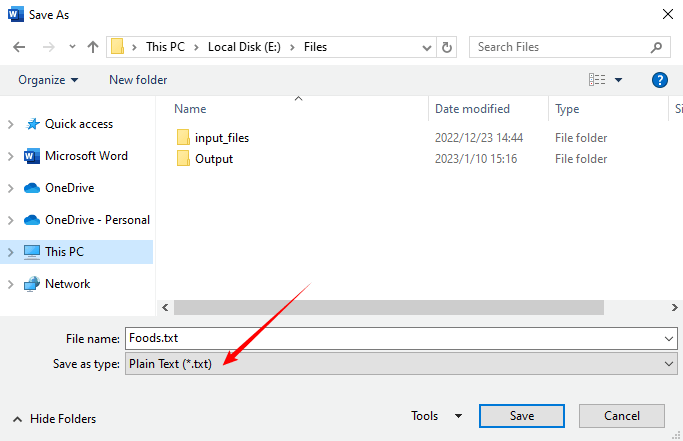
- Go to “File > Save As” and select “Plain Text (*.txt)” as the format.
Google Docs:
- Upload the HTML file to Google Drive.
- Right-click the file and select “Open with > Google Docs”
- Google Docs will render the HTML as text.
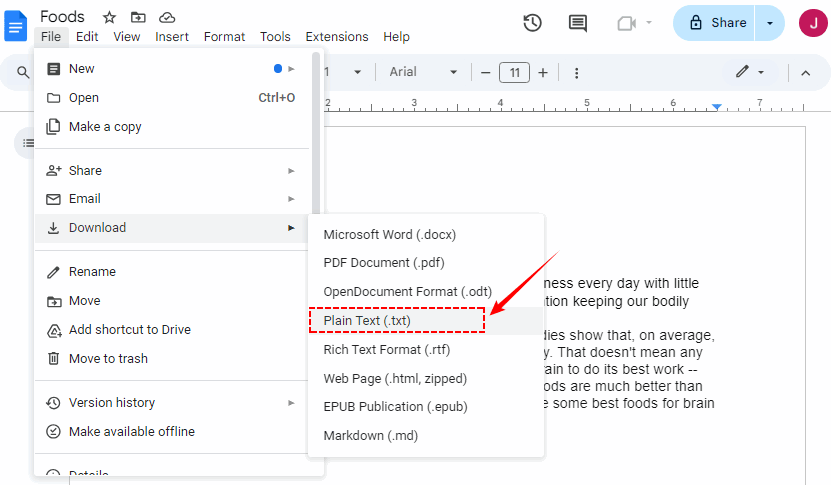
- Download as “Plain text (.txt)” via “File > Download”
Best For: Users who are already comfortable with these applications and need to perform this task infrequently.
Advanced: Convert HTML to Text with Code (For Developers)
If you need to automate conversions (e.g., bulk processing, web scraping), using programming languages like Python or C# is the most powerful approach.
1. Convert HTML to Text in Python
The Spire.Doc for Python library provides the SaveToFile method for saving HTML files as TXT files directly.
- Install via Pypi:
pip install Spire.Doc
- Write the Python script:
from spire.doc import *
from spire.doc.common import *

# Load an HTML file
document = Document()
document.LoadFromFile("sample.html", FileFormat.Html, XHTMLValidationType.none)
# Save as a plain text file
document.SaveToFile("HtmlToText.txt", FileFormat.Txt)
document.Close()
If you need to process HTML strings, check this: How to Convert an HTML String to Text in Python
2. Convert HTML to Plain Text in C#
For .NET applications, Spire.Doc for .NET is a robust solution to extract text from HTML.
- Install via Nuget:
Install-Package Spire.Doc
- Sample C# code:
using Spire.Doc;
using Spire.Doc.Documents;

namespace HtmlToText
{
    class Program
    {
        static void Main()
        {
            // Create a Document object
            Document doc = new Document();

            // Load an HTML file
            doc.LoadFromFile("sample.html", FileFormat.Html, XHTMLValidationType.None);

            // Convert HTML to plain text
            doc.SaveToFile("HTMLtoText.txt", FileFormat.Txt);
            doc.Dispose();
        }
    }
}
The converted TXT file:

Best For: Developers, data scientists, and anyone needing automated, scalable, or customized text extraction.
Conclusion
Knowing how to convert HTML to text is a fundamental skill that bridges the gap between web content and usable data. Beginners can use online tools or word processors for quick tasks, while developers can automate with code for bulk or custom workflows. No matter your skill level, the goal is to get clean, usable text that fits your use case.
By following these methods, you’ll save time, avoid formatting headaches, and unlock the full potential of plain text in your digital workflow.
Frequently Asked Questions (FAQs)
Q: Why can't I just copy and paste text from a website?
A: Copying and pasting directly from a webpage often pulls hidden formatting, extra spaces, or partial HTML tags. This leads to messy text that requires manual cleaning. HTML-to-text tools/ methods strip only the markup while preserving the core content, saving you time.
Q: Can I convert HTML to rich text (RTF) instead of plain text?
A: Yes, most online tools (e.g., Convertio) and word processors support RTF output. For coding, use Spire.Doc to save HTML as RTF while preserving formatting like bold, italics, and headings.
Q: What is the best method for converting multiple HTML files at once?
A: For bulk conversion, using a script is the most efficient method. You can write a simple Python or C# script to loop through all files in a directory and convert them one by one.
Q: Are online HTML-to-text converters safe to use?
A: You should avoid pasting sensitive, confidential, or proprietary HTML code into online tools. While most reputable sites are safe, there's a risk that your data could be intercepted or stored. For sensitive information, always use a local method like a script on your own computer.
See Also
Convert Excel to XML: Free Tools + Python Automation
If you’re working with data that needs to be shared across software, APIs, or websites, converting Excel to XML is a critical skill. XML (Extensible Markup Language) is a universal, machine-readable format ideal for data interchange, while Excel excels at organizing spreadsheets. Bridging the gap between them allows your data to flow seamlessly across platforms.
Whether you're a beginner looking for a quick solution, an analyst ensuring data integrity, or a developer building an automated pipeline, this guide will walk you through three effective and error-free Excel to XML conversion methods.
- Method 1: Manual Excel to XML Conversion (Built-in Developer Tab)
- Method 2: Free Excel to XML Online Converters
- Method 3: Automate Excel to XML Conversion in Python
Why Convert Excel to XML?
The core value of converting Excel to XML lies in:
- Cross-Platform Compatibility: XML works with APIs, CMS platforms (WordPress, Shopify), enterprise tools (SAP, Salesforce), and programming languages (Python, Java).
- Structured Data: XML preserves Excel’s rows/columns as tagged elements (e.g.,
<product><name>Laptop</name><price>999</price></product>), making it easy for software to parse. - Data Integrity: XML avoids formatting issues that plague Excel files (e.g., broken formulas, merged cells) when shared across systems.
- Use Cases: E-commerce product feeds, API data exports, CMS content imports, and enterprise data integration.
Structuring Excel Data for Successful Conversion
The first and most critical step happens in Excel. A well-structured source sheet guarantees a smooth conversion.
- Use unique, short column headers (no spaces/special characters—e.g., "ProductName" instead of "Product Name").
- Remove empty rows/columns (they cause XML validation errors).
- Ensure consistent data types (e.g., all prices as numbers, dates in a uniform format).
- Avoid merged cells or complex formulas; use raw data instead.
Method 1: Manual Excel to XML Conversion (Built-in Developer Tab)
Excel’s built-in Developer Tab provides native support for XML tasks, making it accessible to Excel users without programming knowledge.
Step-by-Step Guide:
Step 1: Prepare Your Excel Data
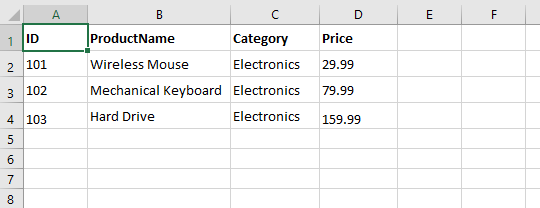
Structure your data in a clear, tabular format. The first row should contain your column headers, which will become your XML tags. For this example, let's use a simple product list:
Step 2: Create an XML Schema
An XML schema (.xsd file) defines the structure of your XML output. It specifies which tags to use and how they relate to each other.
Example Schema (save this as “products.xsd” on your computer):
<?xml version="1.0" encoding="UTF-8"?>
<xs:schema xmlns:xs="http://www.w3.org/2001/XMLSchema">
  <xs:element name="Catalog">
    <xs:complexType>
      <xs:sequence>
        <xs:element name="Product" maxOccurs="unbounded">
          <xs:complexType>
            <xs:sequence>
              <xs:element name="ID" type="xs:integer"/>
              <xs:element name="ProductName" type="xs:string"/>
              <xs:element name="Category" type="xs:string"/>
              <xs:element name="Price" type="xs:decimal"/>
            </xs:sequence>
          </xs:complexType>
        </xs:element>
      </xs:sequence>
    </xs:complexType>
  </xs:element>
</xs:schema>
- Adjust the name attributes to match your Excel column headers (case-sensitive).
- Use appropriate types (e.g., xsd:integer for numbers, xsd:string for text).
Step 3: Add the Schema to Excel
- Open your Excel file.
- Go to the Developer tab. (If you don’t see it, go to File > Options > Customize Ribbon, check "Developer," and click "OK.")
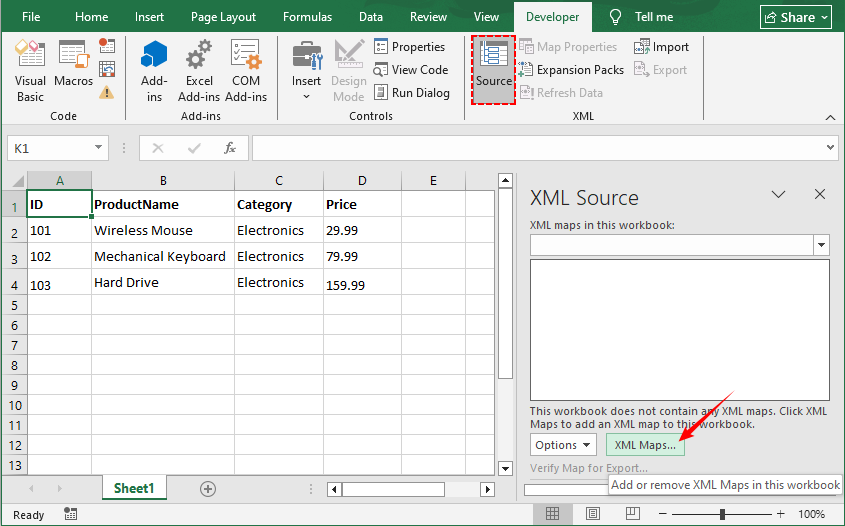
- In the Developer tab, click Source to open the XML Source pane.
- Click XML Maps... and then Add....
- Attach the .xsd schema file you created using the XML Maps dialog
Step 4: Map XML Elements to Your Cells
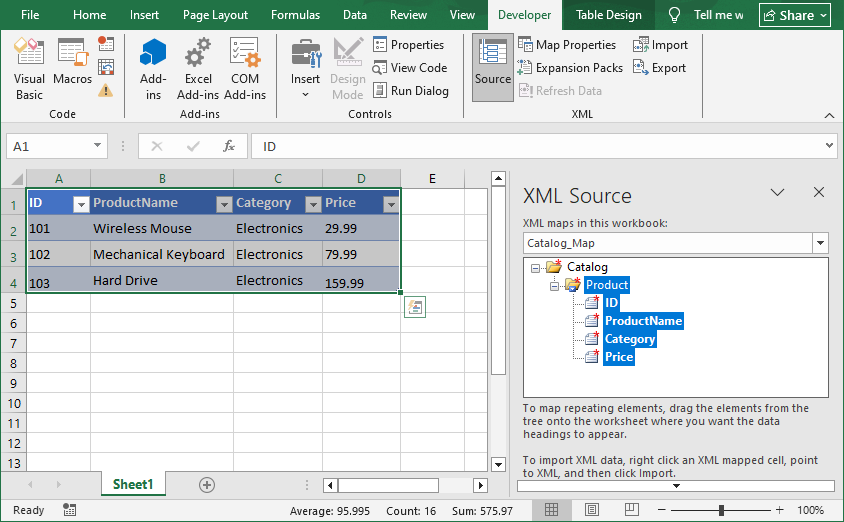
- In the XML Source pane, you will see your elements (“Catalog”, “Product”, “ID”, etc.).
- Drag the “Product” element and drop it onto cell A1. Excel will create a nicely formatted table.
- The elements will now be mapped. Your data is now ready for export.
Step 5: Export to XML
- With your mapped data selected, go back to the Developer tab.
- Click Export.
- Choose a location and name for your new XML file and click OK.
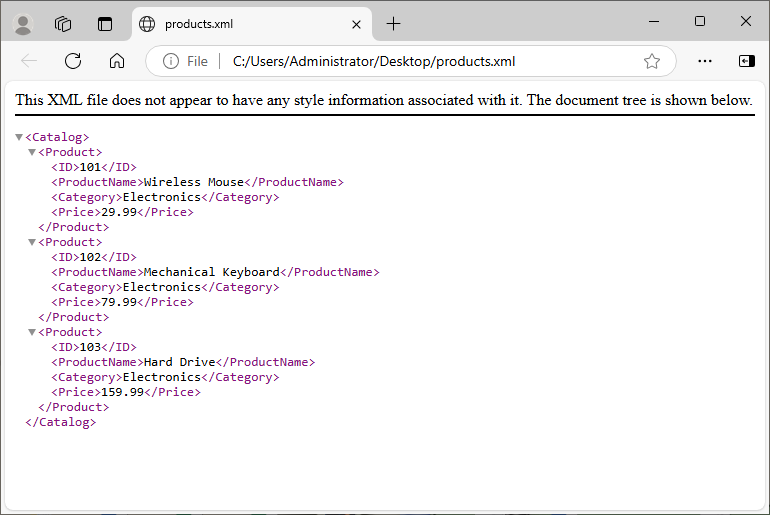
The exported XML file will match your schema, like this:
You may also like: Convert XLS/XLSX to HTML Easily — Keep Excel Formatting Intact
Method 2: Free Excel to XML Online Converters
If you need a quick, one-time conversion without the technical setup, online tools are your best friend.
Top tools to convert Excel into XML online (100% free, no sign-up):
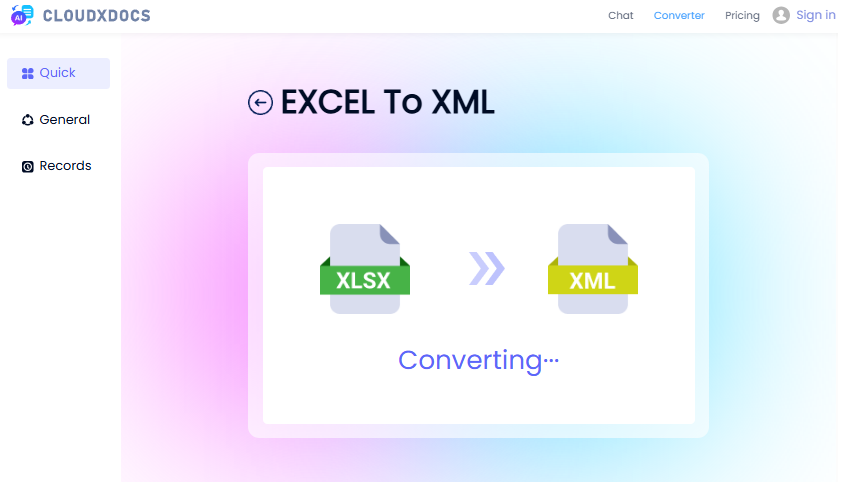
1. CloudxDocs (Most User-Friendly)
- Go to CloudxDocs EXCEL TO XML converter.
- Upload your Excel file (supports XLS, XLSX, XLSB).
- Wait for the conversion to complete and download your XML file.
This converter defaults to producing an XML Spreadsheet file that preserves Excel’s formatting.
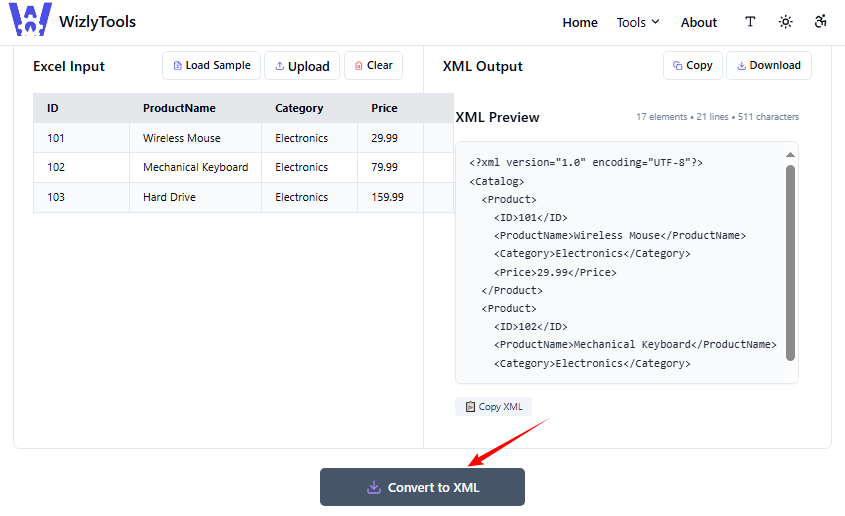
2. WizlyTools (Supports Custom XML)
- Go to WizlyTools Excel to XML converter.
- Upload an Excel file (.xlsx, .xls).
- Enter the root element name and row element name.
- Select an indentation size for your XML output.
- Click "Convert to XML" and then copy or download the resulting XML
This converter gives you more control over the XML structure, such as defining a specific root element, row element, and allows you to preview XML before downloading
Note: Avoid uploading sensitive data (e.g., financial records) to online tools. Use manual methods for confidential files.
Method 3: Automate Excel to XML Conversion in Python
For developers and IT professionals working in Python, Spire.XLS for Python provides a robust, code-driven solution for converting Excel spreadsheets to XML without requiring Microsoft Excel to be installed. This is ideal for server-side automation and application integration.
Step 1: Installation
First, you need to install the Spire.XLS for Python library. It's available via PyPI.
pip install Spire.XLS
Step 2: Write the Python Script
This script uses Spire.XLS to read Excel data, then generates XML with Python’s built-in xml.etree.ElementTree (for structure) and minidom (for pretty formatting).
from spire.xls import *
import xml.etree.ElementTree as ET
from xml.dom import minidom

# Load the Excel file
workbook = Workbook()
workbook.LoadFromFile("Orders.xlsx")

# Get the first worksheet
worksheet = workbook.Worksheets[0]

# Get row and column counts (Spire.XLS uses 1-based indexing)
max_row = worksheet.LastRow
max_col = worksheet.LastColumn

# Check if data exists (headers in row 1, data in row 2+)
if max_row < 2:
    raise ValueError("No data found! Ensure headers are in row 1 and data starts in row 2.")

# Create XML root element
root = ET.Element("Info")

# Loop through data rows (skip row 1: headers)
for row in range(2, max_row + 1):
    # Create a row element (e.g., <Order>)
    row_element = ET.SubElement(root, "Order")

    # Loop through columns to get headers and values
    for col in range(1, max_col + 1):
        # Get header (XML tag)
        header = worksheet.Range[1, col].Value

        # Get cell value (data for the XML tag)
        cell_value = worksheet.Range[row, col].Value

        # Create sub-element and add value
        ET.SubElement(row_element, header).text = str(cell_value)

# Pretty-print XML (add indentation for readability)
rough_string = ET.tostring(root, 'utf-8')
reparsed = minidom.parseString(rough_string)
pretty_xml = reparsed.toprettyxml(indent="  ")

# Save to XML file
with open("Orders.xml", 'w', encoding='utf-8') as f:
    f.write(pretty_xml)

# Close the workbook
workbook.Dispose()
Code Explanation:
- Load Excel File: Uses Spire.XLS to open an Excel file and access its first worksheet.
- Define Data Range: Finds the last row and column with data (1-based indexing in Spire.XLS) to know the bounds of the data.
- Build XML Structure:
- Creates a root XML element
<Info>. - Loops through each data row (starting from row 2), making a
<Order>element for each. - For each column in the row: Use the header from row 1 as the XML tag, and the cell value as the tag’s content.
- Creates a root XML element
- Save XML: Formats the XML with indentation (for readability) and saves it to an XML file.
Example Output XML
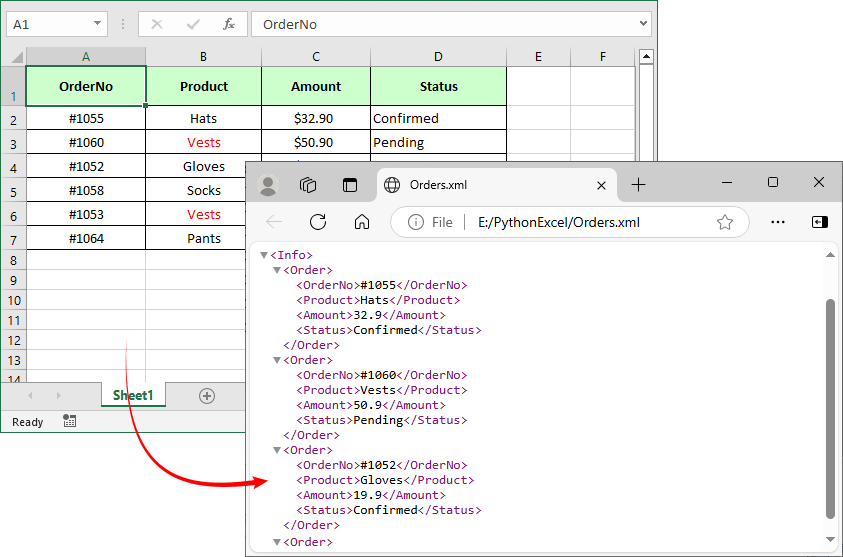
Spire.XLS for Python also provides a direct SaveAsXml() method to convert Excel to Open XML format.
Final Thoughts
Converting Excel to XML is a fundamental skill that unlocks the true potential of your data, allowing it to flow seamlessly into web applications, configuration files, and other business systems. By understanding the methods available, from the controlled power of Excel's XML Maps to the rapid-fire ease of online tools and the industrial strength of Python scripting, you can choose the right tool for every job.
FAQs About Excel to XML Conversion
Q1: How do I batch-convert multiple Excel files to XML at once?
Batch conversion saves time for 10+ files—use these methods based on your skill level:
- Online tools: Zamzar supports up to 50 files per batch (upload all Excel files, select “XML” as output, and get a zip of XMLs).
- Spire.XLS for Python: Extend the provided script to loop through a folder
import os
from spire.xls import *
import xml.etree.ElementTree as ET
from xml.dom import minidom

input_folder = "C:/Excel_Batch"
output_folder = "C:/XML_Batch"
os.makedirs(output_folder, exist_ok=True)

for filename in os.listdir(input_folder):
    if filename.endswith((".xlsx", ".xls")):
        workbook = Workbook()
        workbook.LoadFromFile(os.path.join(input_folder, filename))
        # Add conversion logic (same as single file) here
        workbook.Dispose()
Q2: Can I customize the XML structure (e.g., change root/row tags)?
Yes, all methods support customization:
- Manual: Edit the XML schema (.xsd file) to change root (e.g.,
<Catalog>) or row (e.g.,<Product>) tags. - Online: Tools like WizlyTools let you set root/row element names in settings.
- Python: Modify the script’s ET.Element("RootName") and ET.SubElement(root, "RowName") lines to match your needs.
Q3: My data has formulas. Will the XML output contain the formula or the calculated value?
In almost all cases, the XML export will contain the calculated value (the result of the formula), not the formula itself. XML is primarily a format for representing data, not the logic or calculations behind it. The conversion process reads the visible cell values.
Q4: My XML file looks messy when I open it. How can I format it properly?
The XML generated by these methods is often in a compressed format without line breaks or indentation. This is still valid XML. To view it in a readable format:
- Open the file in a modern web browser (Chrome, Firefox, Edge), which will automatically format and display it neatly.
- Use a code editor like VS Code, Notepad++, or Sublime Text, which have built-in XML formatting or plugins to re-indent the code.
See Also
How to Change PDF Page Size: Online, Adobe & With Code
Table of Contents
Have you ever downloaded a PDF only to find it’s an awkward, non-standard size that doesn’t fit your needs? Perhaps it's a poster-sized document you need to print on A4, or a legal document that must be converted to Letter size for a submission. Changing PDF page size can resolve issues like misaligned content, wasted paper, or poor readability.
In this guide, we’ll introduce how to resize PDF pages, including step-by-step methods for everyday users (no tech skills required) and a developer-friendly C# solution to automate bulk tasks.
- Standard Paper Sizes You Should Know
- Method 1: Using Free Online PDF Tools
- Method 2: Using Adobe Acrobat (Standard/Pro)
- Method 3: Using Windows Built-In Printer Feature
- Method 4: Using C# to Change PDF Page Size
- FAQ: Common PDF Resizing Questions
- Final Thoughts
Standard Paper Sizes You Should Know
When changing your PDF size, you'll likely use one of these common standards:
- A4 (210 x 297 mm / 8.27" x 11.69"): The international standard, used everywhere except North America.
- Letter (8.5" x 11" / 216 x 279 mm): The standard in the United States and Canada.
- Legal (8.5" x 14" / 216 x 356 mm): Often used for contracts and official documents.
- A3 (297 x 420 mm / 11.69" x 16.54"): Twice the size of A4, common for diagrams and small posters.
- Tabloid/Ledger (11" x 17" / 279 x 432 mm): Often used for newspapers or large presentations.
Method 1: Using Free Online PDF Tools
For quick, one-off jobs without installing software, free online tools are excellent. They work on any browser and support basic to moderate resizing needs.
Popular Tools: Smallpdf, PDF2Go, and Soda PDF.
General process to change PDF page size online:
- Go to the tool’s “Resize PDF” page (e.g., PDF2Go Resize PDF tool).
- Upload your PDF file by dragging and dropping or selecting it from your computer.
- Select a preset page size (A4, A3, Letter, etc.) from the dropdown menu, or enter custom dimensions.
- Click the "Start" button and then download the resized PDF.
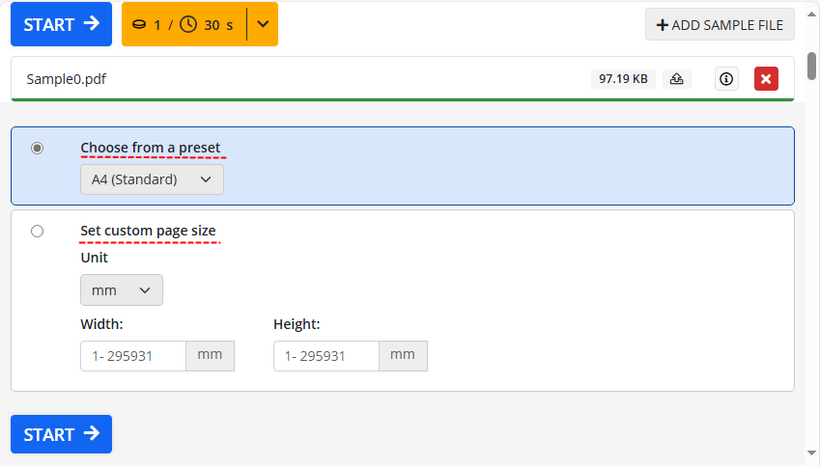
Note: While convenient, online PDF resizing tools may pose privacy risks for sensitive documents, and free plans usually limit file size and number of tasks.
Also Read: How to Crop PDFs for Free (3 Easy Methods)
Method 2: Using Adobe Acrobat (Standard/Pro)
For precise control, especially with professional or complex documents, Adobe Acrobat (Pro or Standard) is the industry standard.
How to resize PDF pages with Adobe Acrobat:
- Open your PDF in Acrobat and go to “File > Print” (or press “Ctrl+P”).
- Choose "Microsoft Print to PDF" as your printer.
- Go to "Page Setup" and select your desired paper size (e.g., Letter, A4).
- In the “Page Size & Handling” section, choose “Fit” to scale the content to the new page size.
- Click "Print" to apply the changes.

Best for: Users who need high precision, batch processing, or are working with sensitive or professional documents.
Method 3: Using Windows Built-In Printer Feature
This is a clever workaround available to all Windows 10 and 11 users. It uses the printer settings to effectively create a new PDF with a different size.
Steps to resize PDF pages in Windows:
- Open your file in any PDF viewer (like the built-in Microsoft Edge).
- Press “Ctrl + P” or click the printer icon.
- Choose “Microsoft Print to PDF” as your printer, and click "More settings."
- Look for a "Paper Size" dropdown and select your desired size (e.g., A4, Letter).
- Check "Fit to printable area” to scale the content appropriately to the new size.
- Click “Print” to save the new, resized PDF under a different name or location.
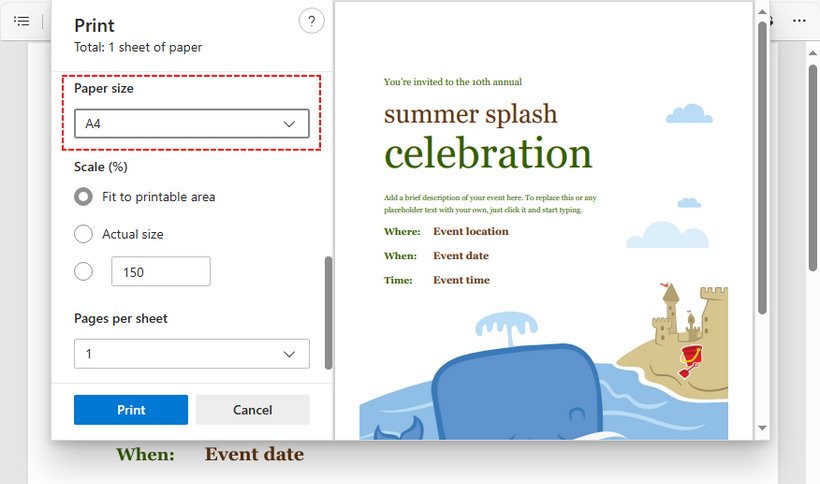
When to Use This Method: You’re a Windows 10/11 user and want a free, no-installation solution to resize simple PDF documents.
Method 4: Using C# to Change PDF Page Size
For developers, automating PDF resizing (e.g., in apps, batch jobs, or workflows) saves time and reduces errors. Spire.PDF for .NET is a robust library that allows you to adjust the PDF page sizes via C#.
How to set PDF page size in C#:
The code below creates a new PDF with A3-sized pages, then scales and copies content from the original PDF to fit the new dimensions.
using Spire.Pdf;
using Spire.Pdf.Graphics;
using System.Drawing;

namespace ChangePDFSize
{
    class Program
    {
        static void Main(string[] args)
        {
            // Create a PdfDocument instance
            PdfDocument originPdf = new PdfDocument();
            // Load the original PDF document
            originPdf.LoadFromFile("Sample.pdf");

            // Create a new PDF document
            PdfDocument newPdf = new PdfDocument();

            // Loop through the pages in the original PDF
            foreach(PdfPageBase page in originPdf.Pages)
            {
                // Add an A3-sized page to the new PDF
                PdfPageBase newPage = newPdf.Pages.Add(PdfPageSize.A3, new PdfMargins(0));
                // Create a PdfTextLayout instance
                PdfTextLayout layout = new PdfTextLayout();
                // Set text layout as one page to ensure the content will scale to fit page size
                layout.Layout = PdfLayoutType.OnePage;
                // Create a template from the original page
                PdfTemplate template = page.CreateTemplate();
                // Draw the templates onto the pages in the new PDF
                template.Draw(newPage, new PointF(0, 0), layout);
            }

            // Save the resized document
            newPdf.SaveToFile("ChangePageSizeToA3.pdf");
        }
    }
}
Core Methods:
- PdfDocument.Pages.Add(PdfPageSize size, PdfMargins margins): Adds a new page to a PdfDocument with a specified size and margins.
- PdfPageBase.CreateTemplate(): Captures content (text, images, shapes, etc.) from the original page.
- PdfTemplate.Draw(PdfPageBase targetPage, PointF location, PdfTextLayout layout): Draws the content of a PdfTemplate onto the new PDF page, with positioning and layout rules.
Here’s the result PDF file with a page size of A3 (11.69 x 16.54 inch):
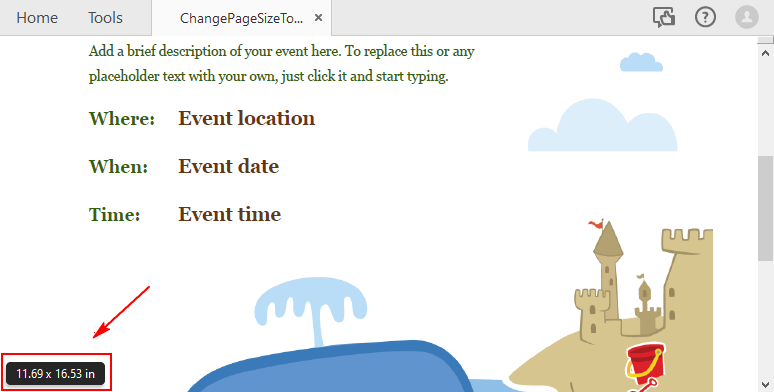
If you need to customize the PDF page size, refer to: Change PDF Page Size to a Custom Paper Size in C#
FAQ: Common PDF Resizing Questions
Q1: Will resizing a PDF page distort my text or images?
A: When done correctly, the content should scale proportionally. However, drastic size changes (e.g., A4 to A6) can make text very small or images pixelated. Always check the output file. Using the "Fit to page" or similar scaling option is crucial to maintain proportions.
Q2: Is there a free Mac alternative to Microsoft Print to PDF?
A: Yes, use Mac’s default Preview app:
- Open the PDF in Preview.
- Go to “File > Print”.
- Click the “Paper Size” dropdown and select your desired paper size from the list.
- Click “PDF” (bottom-left) and choose "Save as PDF" to export.
Q3: Which method is best for batch resizing PDF pages?
A: Free online tools often have limitations on batch processing. Adobe Acrobat Pro has built-in batch actions for this purpose. For large-scale, automated batch processing, the programmatic C# method using Spire.PDF is the most efficient and powerful solution.
Q4: As a developer, is Spire.PDF free to use?
A: Spire.PDF for .NET offers a free community edition with limitations, which is good for evaluation and small projects. If you want to test the full functionality, you can apply for a 30-day trial license here.
Final Thoughts
Adjusting PDF page size is straightforward with online tools or Adobe Acrobat for general users. If you’re on Windows and want a reliable, offline option for simple documents, the built-in “Microsoft Print to PDF” feature is perfect. For automation or app integration, Spire.PDF for .NET offers a powerful C# solution. No matter which tool you choose, always check the final PDF to ensure content and formatting stay correct. With this guide, you are now equipped to handle any PDF page size challenge efficiently.
See Also
Marker Designer: Generate Excel Reports from Templates in .NET
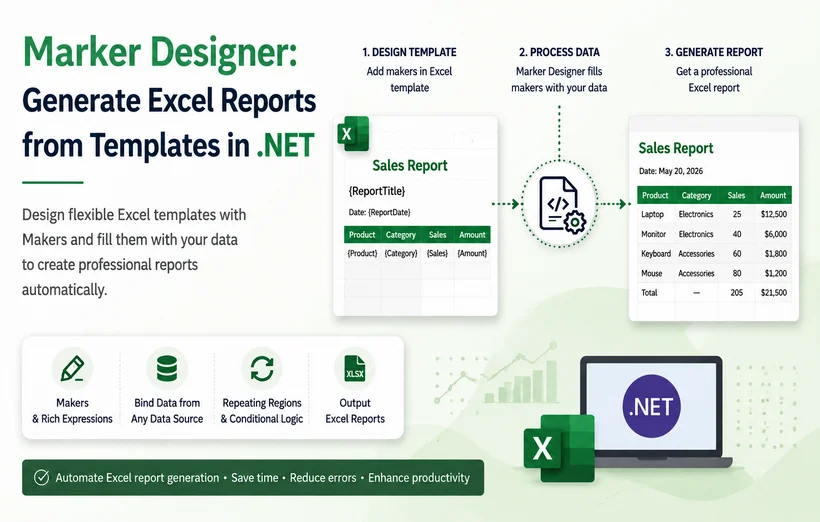
Generating dynamic Excel reports is a core requirement for most enterprise .NET applications. Yet, traditional automation approaches often create more problems than they solve. When code is tightly coupled to specific layouts, even a minor design change—moving a logo or adding a column—can trigger costly rewrites and endless debugging cycles.
The Marker Designer feature in Spire.XLS for .NET reimagines this workflow. It establishes a clean separation between presentation and logic: designers build visually polished templates in native Excel, while developers write simple, decoupled C# code that focuses solely on data retrieval. The engine acts as an intelligent bridge—parsing placeholders, injecting data, expanding rows, and adjusting formulas automatically, all while preserving every detail of the original formatting.
In this article, we will explore how to use the Marker Designer feature to import data into Excel. We’ll cover its core concepts, syntax, supported data sources, and practical code examples—from simple variable replacement to complex data‑driven reports with automatic formula recalculation.
- Understanding Marker Designer Architecture
- Install Spire.XLS for .NET
- Example 1: Basic Text Variable Replacement
- Example 2: Populate Templates from a DataTable
- Example 3: Import Arrays to Excel Rows and Columns
- Example 4: Dynamic Auto-Adjusting Formulas
- Practical: Auto Populate Excel Template from an External Data File
- Frequently Asked Questions
Understanding Marker Designer Architecture
Core Components
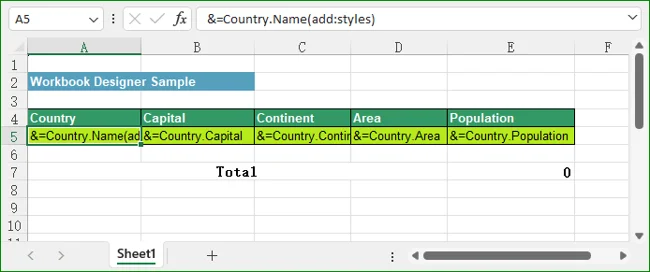
Marker: A special text string placed in an Excel cell that tells Spire.XLS where to insert data and which data field to use. Every marker starts with the prefix &=, followed by a data source identifier and a field name.
- Example:
&=Party.FullName - This marker tells the engine to replace the cell content with the “FullName” field from the “Party” data source.
Designer Spreadsheet: A standard Excel file (.xls or .xlsx) that serves as a reusable template. It typically contains:
- Visual formatting (colors, fonts, borders)
- Predefined Excel formulas
- Marker designers in cells where data should be inserted
Marker Syntax Reference
All markers begin with the prefix &= and are placed directly in cells of your Excel template. The standard syntax formats:
- &=DataSource.FieldName: References a field from a structured data source such as a DataTable column.
- &=[Data Source].[Field Name]: Used when data source or field names contain spaces.
- &=VariableName: References a single-value parameter or variable.
Supported Data Sources
Marker Designer supports a wide range of .NET data types. Data sources are registered in code via dedicated methods on the MarkerDesigner object:
| Data Source Type | Method |
|---|---|
| DataTable | AddDataTable(string paraName, DataTable dataTable) |
| DataTable with row limit | AddDataTable(string paraName, DataTable dataTable, int rowCount) |
| DataView | AddDataView(string paraName, DataView dataView) |
| DataColumn | AddDataColumn(string paraName, DataColumn paramValue) |
| Array | AddArray(string paraName, Object[] paramValues) |
| Parameter (single value) | AddParameter(string paraName, Object paramValue) |
Advanced Marker Parameters
Parameters are appended in parentheses after the field name and provide granular control over the rendering behavior.
add:styles: Inherits all cell formatting (font, fill color, borders, number format) from the marker cell and applies it to all expanded data rows.
- Example:
&=Country.Name(add:styles) - Pro Tip: Apply add:styles only to the first marker cell in a template row. The engine automatically propagates formatting to all other expanded cells.
Horizontal: Fills data horizontally (across columns) instead of the default vertical (down rows) direction.
- Example:
&=Products.Name(horizontal) - Use Case: This is particularly useful for creating cross-tabular reports, comparative charts, or filling out header columns for specific date ranges.
Install Spire.XLS for .NET
Option 1: Install via NuGet (Recommended)
Package Manager Console:
Install-Package Spire.XLS
Or search for “Spire.XLS” within NuGet Package Manager UI in Visual Studio.
Option 2: Manual DLL Reference
- Download the Spire.XLS package and extract the files.
- In Visual Studio, right-click References > Add Reference > Browse, then select the appropriate Spire.Xls.dll based on your target framework.
Example 1: Basic Text Variable Replacement
This example demonstrates how to bind a single text value to a marker, ideal for report titles, dates, or summary labels.
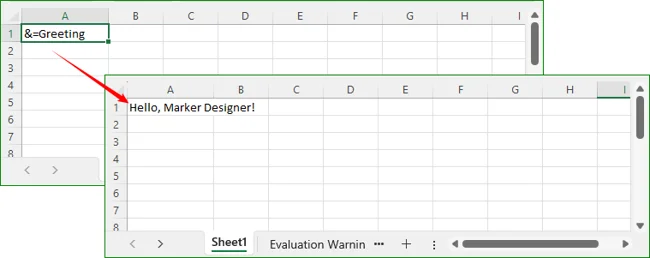
Template Preparation: In cell A1 of Template1.xlsx, place the marker: &=Greeting.
C# Code:
using Spire.Xls;

class Program
{
    static void Main()
    {
        // Load template workbook
        Workbook workbook = new Workbook();
        workbook.LoadFromFile("Template1.xlsx");

        // Add a simple parameter
        workbook.MarkerDesigner.AddParameter("Greeting", "Hello, Marker Designer!");

        // Apply all markers
        workbook.MarkerDesigner.Apply();

        // Save the result
        workbook.SaveToFile("Output.xlsx", ExcelVersion.Version2016);
        workbook.Dispose();
    }
}
Result: Cell A1 will display: Hello, Marker Designer!
Example 2: Populate Templates from a DataTable
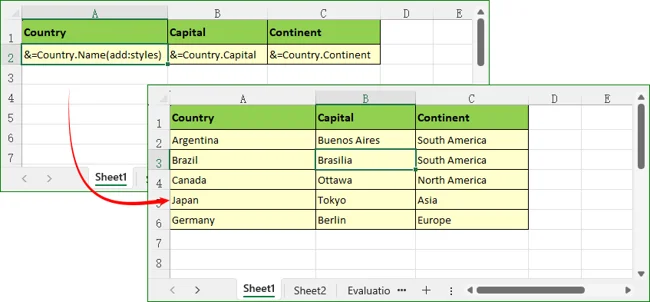
This is the most widely used scenario for generating tabular business reports. Data from a DataTable is populated vertically into a formatted template.
C# code to import DataTable:
using System.Data;
using Spire.Xls;

class Program
{
    static void Main()
    {
        // Create sample DataTable
        DataTable dt = new DataTable("Country");
        dt.Columns.Add("Name", typeof(string));
        dt.Columns.Add("Capital", typeof(string));
        dt.Columns.Add("Continent", typeof(string));

        dt.Rows.Add("Argentina", "Buenos Aires", "South America");
        dt.Rows.Add("Brazil", "Brasilia", "South America");
        dt.Rows.Add("Canada", "Ottawa", "North America");
        dt.Rows.Add("Japan", "Tokyo", "Asia");
        dt.Rows.Add("Germany", "Berlin", "Europe");

        // Load template
        Workbook workbook = new Workbook();
        workbook.LoadFromFile("CountryTemplate.xlsx");
        Worksheet sheet = workbook.Worksheets[0];

        // Register DataTable with Marker Designer
        // The name "Country" must match the prefix in &=Country.Name
        workbook.MarkerDesigner.AddDataTable("Country", dt);

        // Apply markers – data expands downward automatically
        workbook.MarkerDesigner.Apply();

        // Optional: Auto-fit columns
        //sheet.AllocatedRange.AutoFitColumns();
        //sheet.AllocatedRange.AutoFitRows();

        // Save output
        workbook.SaveToFile("CountryReport.xlsx", ExcelVersion.Version2016);
        workbook.Dispose();
    }
}
Result: The template row (row 2) expands to 5 rows of data, with header formatting preserved and styles inherited.
In real-world projects, source data is typically stored in a separate Excel file rather than being constructed inline in code. You can combine Spire.XLS's data export capability with Marker Designer to read raw data from one workbook and populate it into a pre-formatted template workbook.
Example 3: Import Arrays to Excel Rows and Columns
This example demonstrates how to bind a simple one‑dimensional array to fill a column or row with sequential values.
using Spire.Xls;

class Program
{
    static void Main()
    {
        // Load template workbook
        Workbook workbook = new Workbook();
        workbook.LoadFromFile("ArrayTemplate.xlsx");

        // Add array data source
        string[] products = { "Apple", "Banana", "Cherry", "Durian" };
        workbook.MarkerDesigner.AddArray("ProductList", products);

        // Apply markers
        workbook.MarkerDesigner.Apply();

        workbook.SaveToFile("ArrayOutput.xlsx", ExcelVersion.Version2016);
        workbook.Dispose();
    }
}
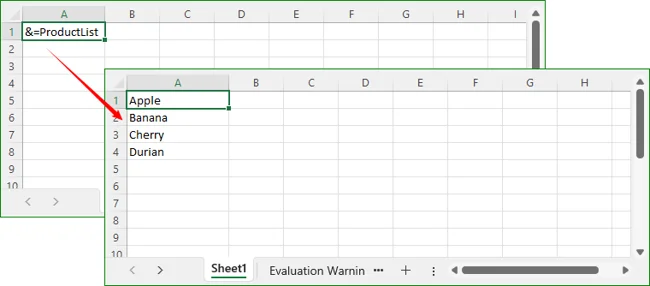
Result: The array values fill vertically from A1 to A4.
Horizontal Fill
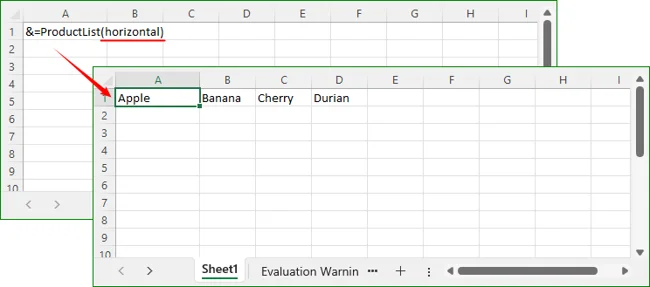
To fill horizontally, you could modify the marker to &=ProductList(horizontal), and the array would span A1 to D1.
Example 4: Dynamic Auto-Adjusting Formulas
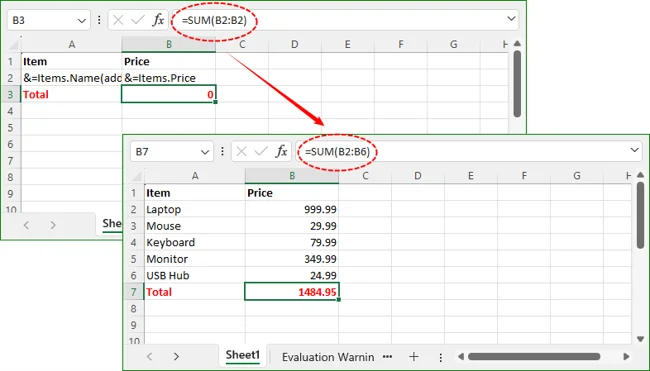
When data expands vertically, formulas referencing marker rows automatically adjust their range. Place summary formulas in the row immediately after the marker row, and they will shift down correctly.
using System.Data;
using Spire.Xls;
class Program
{
    static void Main()
    {
        // Prepare sample data
        DataTable items = new DataTable("Items");
        items.Columns.Add("Name", typeof(string));
        items.Columns.Add("Price", typeof(decimal));
        items.Rows.Add("Laptop", 999.99);
        items.Rows.Add("Mouse", 29.99);
        items.Rows.Add("Keyboard", 79.99);
        items.Rows.Add("Monitor", 349.99);
        items.Rows.Add("USB Hub", 24.99);

        // Create workbook and build template inline
        Workbook workbook = new Workbook();
        workbook.LoadFromFile("FormulaTemplate.xlsx");

        // Bind data source
        workbook.MarkerDesigner.AddDataTable("Items", items);

        // Apply markers – formula range expands automatically
        workbook.MarkerDesigner.Apply();

        // Recalculate all formulas to get actual values
        workbook.CalculateAllValue();

        // Save result
        workbook.SaveToFile("FormulaReport.xlsx", ExcelVersion.Version2016);
        workbook.Dispose();
    }
}
Result: Original template formula “=SUM(B2:B2)” auto‑updates to “=SUM(B2:B6)” after row expansion to cover all generated data rows.
Practical: Auto Populate Excel Template from an External Data File
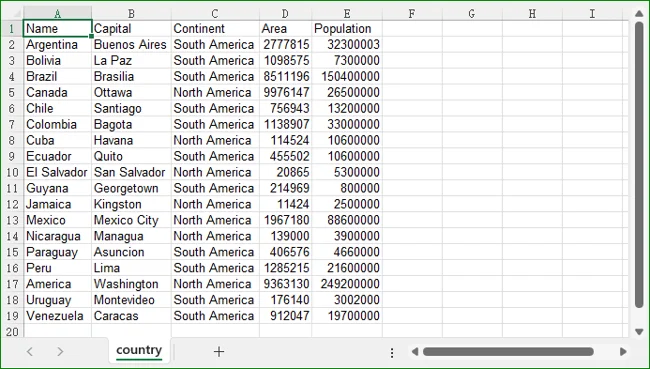
Very often, your application receives raw data files (e.g., an export from a legacy system, a CSV converted to Excel, or a weekly operational report) that contain only numbers and text but lack any visual styling. Separately, your design team maintains a beautifully formatted “Template.xlsx” file containing headers, logos, color schemes, and the markers.
This example bridges the gap by reading the raw data from a source file, converting it into a DataTable, and injecting it into the styled template—all programmatically.
The template file containing formatted headers with markers:
The data source file containing unformatted data:
C# Code:
using Spire.Xls;
using System.Data;

class Program
{
    static void Main(string[] args)
    {
        // 1. Create a new workbook instance and load the DESIGN template.
        Workbook workbook = new Workbook();
        workbook.LoadFromFile("C:\\Users\\Administrator\\Desktop\\MarkerDesigner.xls");

        // 2. Fetch the raw data from a SEPARATE source file.
        DataTable dt = ExportTable();

        // 3. (Optional) Retrieve row count for logging or validation purposes.
        int rowCount = dt.Rows.Count;

        // 4. Get the first worksheet (where your markers are located).
        Worksheet sheet = workbook.Worksheets[0];

        // 5. Bind the extracted DataTable to the MarkerDesigner engine.
        // The name "Country" must match the marker in the template (e.g., &=Country.Name).
        workbook.MarkerDesigner.AddDataTable("Country", dt);
        workbook.MarkerDesigner.Apply();

        // 6. AutoFit rows and columns to ensure all content is fully visible.
        sheet.AllocatedRange.AutoFitRows();
        sheet.AllocatedRange.AutoFitColumns();

        // 7. Recalculate all formulas in the workbook.
        workbook.CalculateAllValue();

        // 8. Save the modified workbook.
        workbook.SaveToFile("Output_MarkerDesigner.xlsx", ExcelVersion.Version2016);

        // 9. Dispose of the workbook object to release memory and file locks.
        workbook.Dispose();
    }

    // Helper method to load data from a specific data-source Excel file.
    static DataTable ExportTable()
    {
        // Instantiate a new workbook to act purely as a data reader.
        Workbook workbook = new Workbook();

        // Load the raw data file (this could be an export from a CRM, ERP, etc.).
        workbook.LoadFromFile("C:\\Users\\Administrator\\Desktop\\MarkerDesigner-DataSample.xls");

        // Initialize the first worksheet where the data resides.
        Worksheet sheet = workbook.Worksheets[0];

        // Export the entire range of the worksheet into a DataTable.
        return sheet.ExportDataTable();
    }
}
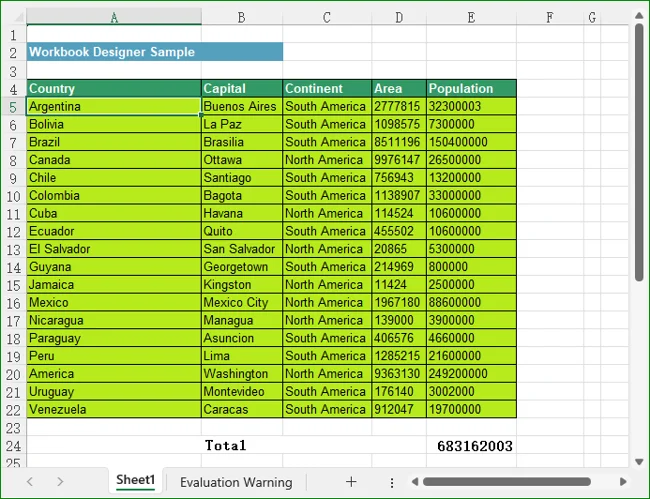
Result: The output file contains formatted headers and styles from the template, with rows dynamically populated from the data file.
Conclusion
Marker Designer streamlines Excel report generation by decoupling visual design from data logic, reducing development effort and improving maintainability. With support for multiple data sources, configurable single‑value marker parameters, and automatic formula adaptation, it provides a flexible solution for building dynamic Excel documents in .NET applications.
Whether you are generating simple parameterized reports, complex tabular datasets, or summary reports with calculated fields, Marker Designer in Spire.XLS for .NET delivers a declarative, low‑code approach to Excel automation that saves hundreds of hours of development effort.
Frequently Asked Questions
Can I use multiple data sources in a single template?
A: Yes. You can register multiple data sources (DataTables, arrays, parameters) in the same workbook. Each marker references its corresponding data source by name, and all markers are processed in a single Apply() call.
Does the add:styles parameter work on multiple columns?
A: You only need to apply add:styles to the very first marker cell in a template row. The engine captures the style from that cell and propagates it horizontally across all the newly created cells in that row. If you apply it to a middle column, the style propagation may not extend correctly to preceding columns.
How do I control the number of rows populated from a DataTable?
A: Use the AddDataTable overload with the rowCount parameter to limit the maximum number of rows populated from the data source. This is useful for preview scenarios or paginated reports.
Can I use MarkerDesigner with existing Excel files that already contain data?
A: Yes. You can load any Excel file, register data sources, and apply markers. The engine will update only the cells containing markers, leaving other content untouched.