
.NET (1329)
Children categories
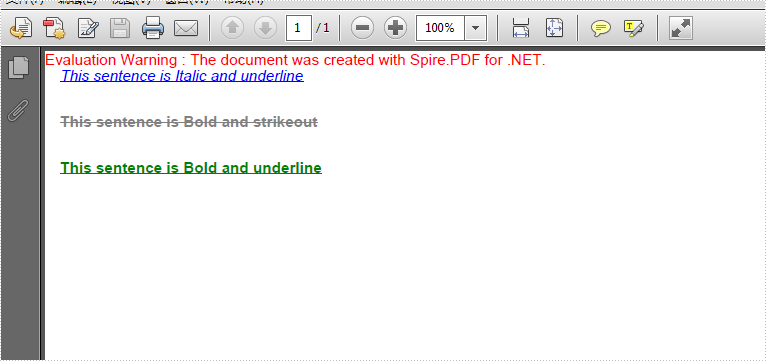
With the help of Spire.PDF, we have already demonstrated how to add text with different styles to a PDF file. By using the method canvas.drawstring offered by Spire.PDF, we can set the position, font, brush and style for the adding texts. With the PdfFontStyle, we can set the style to underline, bold, italic, regular and strikeout. Sometimes we may need to set multiple font style for the same texts within one paragraph, such as bold and italic together.
Here comes to the code snippet of how to apply two kinds of font styles together for the text on PDF in C#.
Step 1: Create a new PDF document.
PdfDocument pdf = new PdfDocument();
Step 2: Add a new page to the PDF file.
PdfPageBase page = pdf.Pages.Add(PdfPageSize.A4, new PdfMargins());
Step 3: Create the PdfFont as Helvetica with size 10f, apply two font styles for it.
PdfFont font = new PdfFont(PdfFontFamily.Helvetica,10f,PdfFontStyle.Italic | PdfFontStyle.Underline);
PdfFont font2 = new PdfFont(PdfFontFamily.Helvetica, 10f, PdfFontStyle.Bold | PdfFontStyle.Strikeout);
PdfFont font3 = new PdfFont(PdfFontFamily.Helvetica, 10f, PdfFontStyle.Bold | PdfFontStyle.Underline);
Step 4: Create a brush and set its color.
PdfSolidBrush brush = new PdfSolidBrush(Color.Blue);
PdfSolidBrush brush2 = new PdfSolidBrush(Color.Gray);
PdfSolidBrush brush3 = new PdfSolidBrush(Color.Green);
Step 5: Draw the text string at the specified location with the specified Brush and Font objects.
page.Canvas.DrawString("This sentence is Italic and underline", font, brush, new PointF(10, 10));
page.Canvas.DrawString("This sentence is Bold and strikeout", font2,brush2, new PointF(10, 40));
page.Canvas.DrawString("This sentence is Bold and underline",font3,brush3,new PointF(10, 70));
Step 6: Save the document to file.
pdf.SaveToFile("reslut.pdf");
Please check the effective screenshot as below:
Full codes:
using Spire.Pdf;
using Spire.Pdf.Graphics;
using System.Drawing;


namespace MultipleFontStyles
{
    class Program
    {
        static void Main(string[] args)
        {
            PdfDocument pdf = new PdfDocument();
            PdfPageBase page = pdf.Pages.Add(PdfPageSize.A4, new PdfMargins());

            PdfFont font = new PdfFont(PdfFontFamily.Helvetica, 10f, PdfFontStyle.Italic | PdfFontStyle.Underline);
            PdfFont font2 = new PdfFont(PdfFontFamily.Helvetica, 10f, PdfFontStyle.Bold | PdfFontStyle.Strikeout);
            PdfFont font3 = new PdfFont(PdfFontFamily.Helvetica, 10f, PdfFontStyle.Bold | PdfFontStyle.Underline);

            PdfSolidBrush brush = new PdfSolidBrush(Color.Blue);
            PdfSolidBrush brush2 = new PdfSolidBrush(Color.Gray);
            PdfSolidBrush brush3 = new PdfSolidBrush(Color.Green);

            page.Canvas.DrawString("This sentence is Italic and underline", font, brush, new PointF(10, 10));
            page.Canvas.DrawString("This sentence is Bold and strikeout", font2, brush2, new PointF(10, 40));
            page.Canvas.DrawString("This sentence is Bold and underline", font3, brush3, new PointF(10, 70));

            pdf.SaveToFile("reslut.pdf");
        }
    }
}
Textbox in Excel is a special kind of graphic object, which allows users to add some text in it. Moreover, textbox can be filled with solid color, gradient, pattern or a picture so that it looks more attractive. This article presents how to add a picture fill to Excel textbox and adjust the position of the picture as well.
Code Snippets:
Step 1: Create a new instance of Workbook class and get the first worksheet.
Workbook workbook = new Workbook();
Worksheet sheet = workbook.Worksheets[0];
Step 2: Add a textbox shape into the worksheet.
ITextBoxShape shape = sheet.TextBoxes.AddTextBox(2, 2, 200, 300);
Step 3: Fill the textbox with a 160x160 pixels picture.
shape.Fill.CustomPicture(@"C:\Users\Administrator\Desktop\logo.png");
shape.Fill.FillType = ShapeFillType.Picture;
Step 4: Save the file.
workbook.SaveToFile("PicFill.xlsx", ExcelVersion.Version2013);
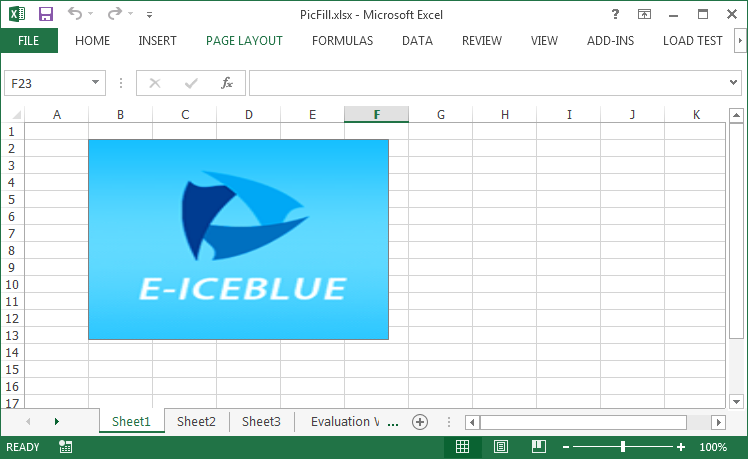
When we add a picture fill to a textbox using above code, the picture will stretch to fill the shape, like below screenshot.
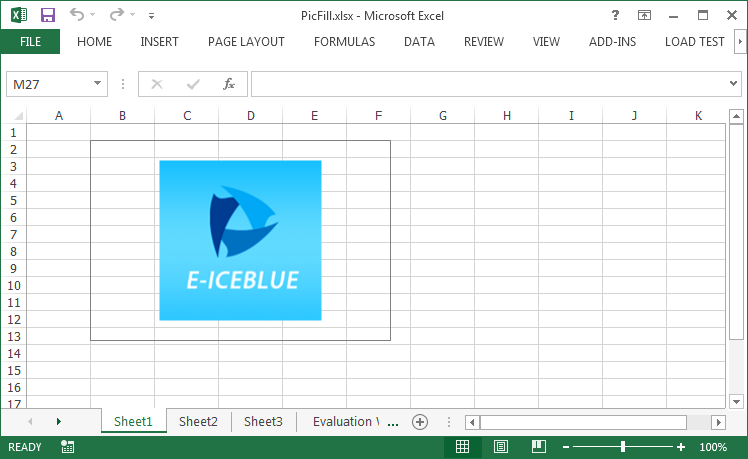
If you want to prevent the image from stretching, you can adjust the size of the textbox or change the position of the picture, for example, place the image at the central position of the textbox. Following code snippet demonstrates how to center align the picture fill.
//If the height of textbox is larger than the height of original picture, set the picture into vertical center
if (textbox.Height > textbox.Fill.Picture.Height)
{
    int difH = textbox.Height - textbox.Fill.Picture.Height;
    (textbox.Fill as XlsShapeFill).PicStretch.Top = difH * 100 / (textbox.Height * 2);
    (textbox.Fill as XlsShapeFill).PicStretch.Bottom = difH * 100 / (textbox.Height * 2);
}
//If the width of textbox is larger than the width of original picture, set the picture into horizontal center
if (textbox.Width > textbox.Fill.Picture.Width)
{
    int difW = textbox.Width - textbox.Fill.Picture.Width;
    (textbox.Fill as XlsShapeFill).PicStretch.Left = difW * 100 / (textbox.Width * 2);
    (textbox.Fill as XlsShapeFill).PicStretch.Right = difW * 100 / (textbox.Width * 2);
}
Full Code:
using Spire.Xls;
using Spire.Xls.Core;
using Spire.Xls.Core.Spreadsheet.Shapes;
namespace AddingPicture
{
    class Program
    {

        static void Main(string[] args)
        {
            //load Excel file
            Workbook workbook = new Workbook();
            Worksheet sheet = workbook.Worksheets[0];
            ITextBoxShape textbox = sheet.TextBoxes.AddTextBox(2, 2, 200, 300);

            textbox.Fill.CustomPicture(@"C:\Users\Administrator\Desktop\logo.png");
            textbox.Fill.FillType = ShapeFillType.Picture;

            //If the height of textbox is larger than the height of original picture, set the picture into vertical center
            if (textbox.Height > textbox.Fill.Picture.Height)
            {
                int difH = textbox.Height - textbox.Fill.Picture.Height;
                (textbox.Fill as XlsShapeFill).PicStretch.Top = difH * 100 / (textbox.Height * 2);
                (textbox.Fill as XlsShapeFill).PicStretch.Bottom = difH * 100 / (textbox.Height * 2);
            }
            //If the width of textbox is larger than the width of original picture, set the picture into horizontal center
            if (textbox.Width > textbox.Fill.Picture.Width)
            {
                int difW = textbox.Width - textbox.Fill.Picture.Width;
                (textbox.Fill as XlsShapeFill).PicStretch.Left = difW * 100 / (textbox.Width * 2);
                (textbox.Fill as XlsShapeFill).PicStretch.Right = difW * 100 / (textbox.Width * 2);
            }

            workbook.SaveToFile("PicFill.xlsx", ExcelVersion.Version2013);
        }
    }
}
Imports Spire.Xls
Imports Spire.Xls.Core
Imports Spire.Xls.Core.Spreadsheet.Shapes
Namespace AddingPicture
	Class Program

		Private Shared Sub Main(args As String())
			'load Excel file
			Dim workbook As New Workbook()
			Dim sheet As Worksheet = workbook.Worksheets(0)
			Dim textbox As ITextBoxShape = sheet.TextBoxes.AddTextBox(2, 2, 200, 300)

			textbox.Fill.CustomPicture("C:\Users\Administrator\Desktop\logo.png")
			textbox.Fill.FillType = ShapeFillType.Picture

			'If the height of textbox is larger than the height of original picture, set the picture into vertical center
			If textbox.Height > textbox.Fill.Picture.Height Then
				Dim difH As Integer = textbox.Height - textbox.Fill.Picture.Height
				TryCast(textbox.Fill, XlsShapeFill).PicStretch.Top = difH * 100 / (textbox.Height * 2)
				TryCast(textbox.Fill, XlsShapeFill).PicStretch.Bottom = difH * 100 / (textbox.Height * 2)
			End If
			'If the width of textbox is larger than the width of original picture, set the picture into horizontal center
			If textbox.Width > textbox.Fill.Picture.Width Then
				Dim difW As Integer = textbox.Width - textbox.Fill.Picture.Width
				TryCast(textbox.Fill, XlsShapeFill).PicStretch.Left = difW * 100 / (textbox.Width * 2)
				TryCast(textbox.Fill, XlsShapeFill).PicStretch.Right = difW * 100 / (textbox.Width * 2)
			End If

			workbook.SaveToFile("PicFill.xlsx", ExcelVersion.Version2013)
		End Sub
	End Class
End Namespace
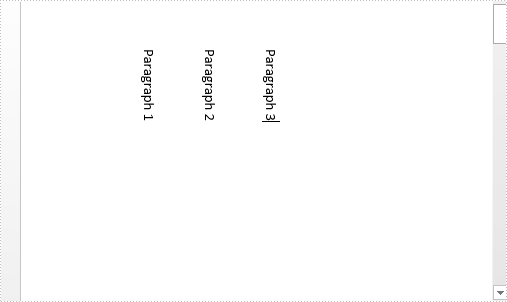
We can use the TextDirection enumeration in Spire.Doc.Documents namespace to set the direction of text in a word document. This enumeration contains six members: LeftToRight, TopToBottom, LeftToRightRotated, TopToBottomRotated, RightToLeft and RightToLeftRotated. The following example shows how to set text direction for all text and a part of text in a section.
Detail steps:
Step 1: Initialize a new instance of Document class and load the word document.
Document document = new Document();
document.LoadFromFile("Word.docx");
Step 2: Set text direction for all text in a section.
//Get the first section and set its text direction
Section section = document.Sections[0];
section.TextDirection = TextDirection.RightToLeftRotated;
To set text direction for a part of text, we can put the text in a table and then set text direction, as shown in the following step:
Step 3: Add a new section to the document and a table to the section, get the target table cell and set text direction for it, afterwards append text to the cell.
//Add a new section to the document
Section sec = document.AddSection();
//Add a table to the new section
Table table = sec.AddTable();
//Add one row and one column to the table
table.ResetCells(1, 1);
//Get the table cell
TableCell cell = table.Rows[0].Cells[0];
table.Rows[0].Height = 150;
table.Rows[0].Cells[0].Width = 10;
//Set text direction for the cell and append some text
cell.CellFormat.TextDirection = TextDirection.RightToLeftRotated;
cell.AddParagraph().AppendText("Hello,world: vertical style");
Add a new paragraph to check if above settings will affect the text direction of other text in this section:
sec.AddParagraph().AppendText("New Paragraph");
Step 4: Save the document.
document.SaveToFile("result.docx", FileFormat.Docx);
Result:
Set text direction for all text in a section:
Set text direction for a part of text:

Full codes:
using Spire.Doc;
using Spire.Doc.Documents;

namespace Set_text_direction_in_Word
{
    class Program
    {
        static void Main(string[] args)
        {
            Document document = new Document();
            document.LoadFromFile("Word.docx");
            //Set text direction for all text in a section
            Section section = document.Sections[0];
            section.TextDirection = TextDirection.RightToLeftRotated;

            // Set text direction for a part of text
            Section sec = document.AddSection();
            Table table = sec.AddTable();
            table.ResetCells(1, 1);
            TableCell cell = table.Rows[0].Cells[0];
            table.Rows[0].Height = 150;
            table.Rows[0].Cells[0].Width = 10;
            cell.CellFormat.TextDirection = TextDirection.RightToLeftRotated;
            cell.AddParagraph().AppendText("Hello,world: vertical style");

            sec.AddParagraph().AppendText("New Paragraph");

            //Save the document
            document.SaveToFile("result.docx", FileFormat.Docx);
        }
    }
}
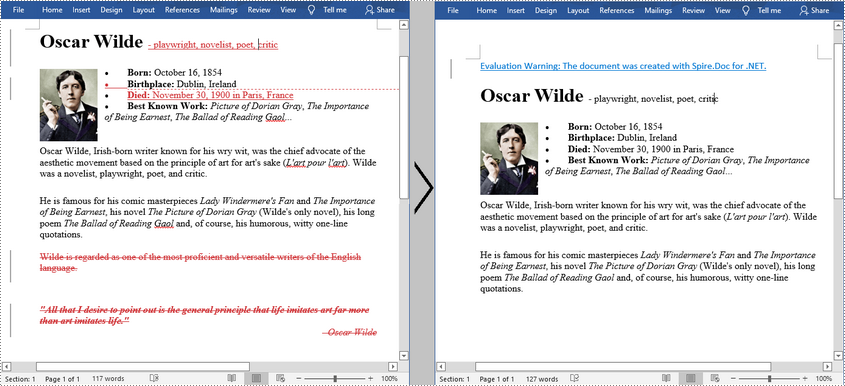
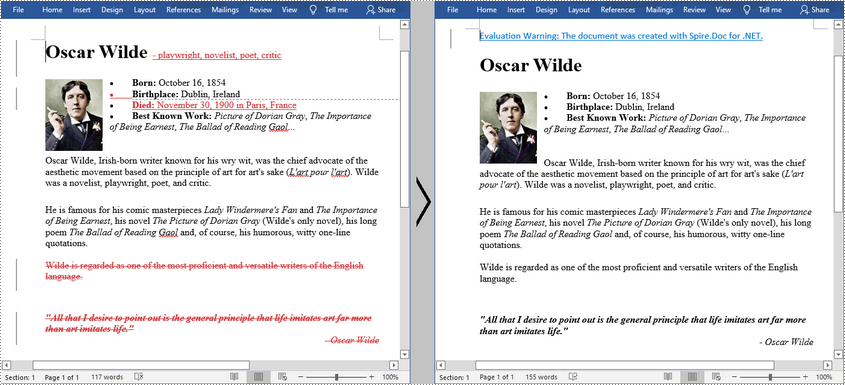
Track Changes in MS Word can track the revisions, corrections, changes, edits, and even suggestions and comments people make to documents. When you receive a revised document with Track Changes turned on, you can decide whether to reject the changes to keep the original content or directly accept them. This article will demonstrate how to programmatically accept or reject all tracked changes in a Word document using Spire.Doc for .NET.
Install Spire.Doc for .NET
To begin with, you need to add the DLL files included in the Spire.Doc for .NET package as references in your .NET project. The DLL files can be either downloaded from this link or installed via NuGet.
PM> Install-Package Spire.Doc
Accept All Tracked Changes in a Word Document
The detailed steps are as follows:
- Create a Document instance.
- Load a sample Word document using Document.LoadFromFile() method.
- Accept all changes in the document using Document.AcceptChanges() method.
- Save the document to another file using Document.SaveToFile() method.
- C#
- VB.NET
using Spire.Doc;

namespace AcceptTrackedChanges
{
    class Program
    {
        static void Main(string[] args)
        {
            //Create a Document instance
            Document doc = new Document();

            //Load a sample Word document
            doc.LoadFromFile("test.docx");

            //Accept all changes in the document
            doc.AcceptChanges();

            //Save the result document
            doc.SaveToFile("AcceptTrackedChanges.docx", FileFormat.Docx);

        }
    }
}
Reject All Tracked Changes in a Word document
The detailed steps are as follows.
- Create a Document instance.
- Load a sample Word document using Document.LoadFromFile() method.
- Reject all changes in the document using Document.RejectChanges() method.
- Save the document to another file using Document.SaveToFile() method.
- C#
- VB.NET
using Spire.Doc;

namespace RejectTrackedChanges
{
    class Program
    {
        static void Main(string[] args)
        {
            //Create a Document instance
            Document doc = new Document();

            //Load a sample Word document
            doc.LoadFromFile("test.docx");

            //Reject all changes in the document
            doc.RejectChanges();

            //Save the result document
            doc.SaveToFile("RejectAllChanges.docx", FileFormat.Docx);

        }
    }
}
Apply for a Temporary License
If you'd like to remove the evaluation message from the generated documents, or to get rid of the function limitations, please request a 30-day trial license for yourself.
A looping slideshow displays each slide automatically for a certain amount of time. Once the slideshow reaches the end, it repeats from the beginning. This article will introduce how to programmatically set a PowerPoint document to keep looping when presenting.
Code Snippet:
Step 1: Initialize an instance of Presentation class. Load a sample PowerPoint document to it.
Presentation ppt = new Presentation();
ppt.LoadFromFile(@"C:\Users\Administrator\Desktop\sample.pptx");
Step 2: Set the Boolean value of ShowLoop as true, which makes the slideshow repeat with continuous looping.
ppt.ShowLoop = true;
Step 3: Set the PowerPoint document to show animation and narration. Use slide transition timings to advance slide.
ppt.ShowAnimation = true;
ppt.ShowNarration = true;
ppt.UseTimings = true;
Step 4: Save the file.
ppt.SaveToFile("LoopEnding.pptx", FileFormat.Pptx2010);
Full Code:
using Spire.Presentation;
namespace LoopPPT
{
    class Program
    {
        static void Main(string[] args)
        {
            Presentation ppt = new Presentation();
            ppt.LoadFromFile(@"C:\Users\Administrator\Desktop\sample.pptx");

            ppt.ShowLoop = true;
            ppt.ShowAnimation = true;
            ppt.ShowNarration = true;
            ppt.UseTimings = true;

            ppt.SaveToFile("LoopEnding.pptx", FileFormat.Pptx2010);
            }
        }
    }
Imports Spire.Presentation
Namespace LoopPPT
	Class Program
		Private Shared Sub Main(args As String())
			Dim ppt As New Presentation()
			ppt.LoadFromFile("C:\Users\Administrator\Desktop\sample.pptx")

			ppt.ShowLoop = True
			ppt.ShowAnimation = True
			ppt.ShowNarration = True
			ppt.UseTimings = True

			ppt.SaveToFile("LoopEnding.pptx", FileFormat.Pptx2010)
		End Sub
	End Class
End Namespace
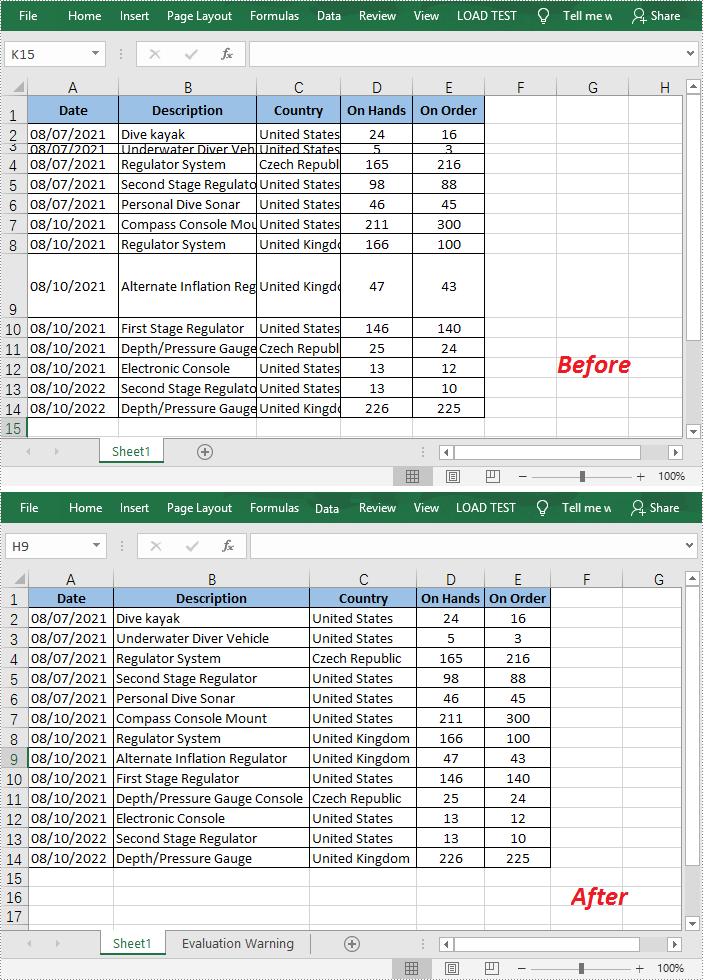
When the text entered in a cell is too long to be fully displayed in the current cell, the “AutoFit” feature in Excel allows you to quickly adjust the column width or row height to fit all the content and make the entire worksheet more readable. In this article, you will learn how to programmatically AutoFit the column width and row height in an Excel worksheet using Spire.XLS for .NET.
Install Spire.XLS for .NET
To begin with, you need to add the DLL files included in the Spire.XLS for .NET package as references in your .NET project. The DLL files can be either downloaded from this link or installed via NuGet.
PM> Install-Package Spire.XLS
AutoFit Column Width and Row Height in Excel
The detailed steps are as follows.
- Create a Workbook object.
- Load a sample Excel document using Workbook.LoadFromFile() method.
- Get a specified worksheet using Workbook.Worksheets[] property.
- Get the used range on the specified worksheet using Worksheet.AllocatedRange property.
- AutoFit column width and row height in the range using CellRange.AutoFitColumns() and CellRange.AutoFitRows() methods.
- Save the result file using Workbook.SaveToFile() method.
- C#
- VB.NET
using Spire.Xls;

namespace AutofitColumn
{
    class Program
    {
        static void Main(string[] args)
        {
            //Create a Workbook object
            Workbook workbook = new Workbook();

            //Load a sample Excel document
            workbook.LoadFromFile(@"E:\Files\Test.xlsx");

            //Get the first worksheet
            Worksheet worksheet = workbook.Worksheets[0];

            //AutoFit column width and row height
            worksheet.AllocatedRange.AutoFitColumns();
            worksheet.AllocatedRange.AutoFitRows();

            //Save the result file
            workbook.SaveToFile("AutoFit.xlsx", FileFormat.Version2010);
        }
    }
}
Apply for a Temporary License
If you'd like to remove the evaluation message from the generated documents, or to get rid of the function limitations, please request a 30-day trial license for yourself.
Trendline
A trendline is a line superimposed on a chart revealing the overall direction of the data. There are six different types of trendlines:
- linear
- logarithmic
- polynomial
- power
- exponential
- moving average
Add trendline for chart series
Spire.Presentation enables developers to add all types of the trendlines mentioned above by using Charts.ChartSeriesDataFormat.AddTrendLine() method and set the trendline type by using Charts.TrendlinesType enum.
Here comes to the detailed steps:
Step 1: Initialize a new instance of Presentation class and load the ppt file.
Presentation ppt = new Presentation();
ppt.LoadFromFile("Sample.pptx");
Step 2: Get the target chart, add trendline for the first data series of the chart and specify the trendline type.
IChart chart = ppt.Slides[0].Shapes[0] as IChart;
ITrendlines it = chart.Series[0].AddTrendLine(TrendlinesType.Linear);
//Set the trendline properties to determine what should be displayed.
it.displayEquation = false;
it.displayRSquaredValue = false;
Step 3: Save the file.
ppt.SaveToFile("output.pptx",FileFormat.Pptx2010);
Output:

Full codes:
using Spire.Presentation;
using Spire.Presentation.Charts;

namespace Add_trendline_for_chart_series
{
    class Program
    {
        static void Main(string[] args)
        {
            Presentation ppt = new Presentation();
            ppt.LoadFromFile("Sample.pptx");

            IChart chart = ppt.Slides[0].Shapes[0] as IChart;
            ITrendlines it = chart.Series[0].AddTrendLine(TrendlinesType.Linear);
            it.displayEquation = false;
            it.displayRSquaredValue = false;

            ppt.SaveToFile("output.pptx",FileFormat.Pptx2010);
        }
    }
}
A text box can be formatted to display number, currency, date, time, zip code, phone number, social security number, etc. Adobe Acrobat provides various built-in JavaScripts, such as AFNumber_Keystroke(2, 0, 0, 0, "$", true) and AFNumber_Format(2, 0, 0, 0, "$", true), to format and validate the input of text field. The script with Format suffix is used to format the input, the script with Keystroke suffix is used to validate the input.
However, Spire.PDF has offered corresponding methods to perform formatting and validation on text field. Here is the list of frequently used formats and corresponding methods in Spire.PDF.
| Description | Example | JavaScript | Method |
| Date | 01/31/2008 | AFDate_FormatEx("mm/dd/yyyy"); AFDate_KeystrokeEx("mm/dd/yyyy"); |
GetDateFormatString("mm/dd/yyyy"); GetDateKeystrokeString("mm/dd/yyyy"); |
| Date | 1/31/2008 | AFDate_FormatEx("m/d/yyyy"); AFDate_KeystrokeEx("m/d/yyyy"); |
GetDateFormatString("m/d/yyyy"); GetDateKeystrokeString("m/d/yyyy"); |
| Zip code | 12345 | AFSpecial_Format(0); AFSpecial_Keystroke(0); |
GetSpecialFormatString(0); GetSpecialKeystrokeString(0); |
| Zip+4 | 12345-1234 | AFSpecial_Format(1); AFSpecial_Keystroke(1); |
GetSpecialFormatString(1); GetSpecialKeystrokeString(1); |
| Phone number | (123) 456-7890 | AFSpecial_Format(2); AFSpecial_Keystroke(2); |
GetSpecialFormatString(2); GetSpecialKeystrokeString(2); |
| Money (minus sign if negative) | $12,345.00 -$12,345.00 |
AFNumber_Format(2, 0, 0, 0, "$", true); AFNumber_Keystroke(2, 0, 0, 0, "$", true); |
GetNumberFormatString(2, 0, 0, 0, "$", true); GetNumberKeystrokeString(2, 0, 0, 0, "$", true); |
| Validate | 1.5≤input value≤5.5 | AFRange_Validate(true,1.5,true,5.5) | GetRangeValidateString(true, 1.5, true, 5.5); |
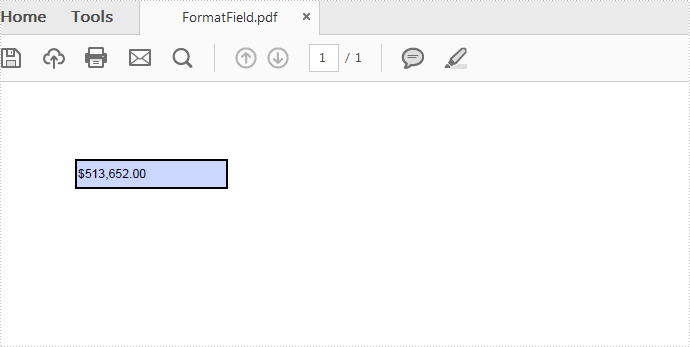
This tutorial demonstrates how to create a text box and display its contents in currency format in C# and VB.NET.
Code Snippets:
Step 1: Create an object of PdfDocument and add a page to it.
PdfDocument pdf = new PdfDocument();
PdfPageBase page = pdf.Pages.Add();
Step 2: Initialize an instance of PdfTextBoxField class and set its position, border width and border style.
PdfTextBoxField textbox = new PdfTextBoxField(page, "Number-TextBox");
textbox.Bounds = new RectangleF(10, 10, 100, 20);
textbox.BorderWidth = 0.75f;
textbox.BorderStyle = PdfBorderStyle.Solid;
Step 3: Set a JavaScript action to be performed when uses type a keystroke into a text field. This action can check the keystroke for validity and reject or modify it.
string js = PdfJavaScript.GetNumberKeystrokeString(2, 0, 0, 0, "$", true);
PdfJavaScriptAction jsAction = new PdfJavaScriptAction(js);
textbox.Actions.KeyPressed = jsAction;
Step 4: Set a JavaScript action to format the value of text field before showing it.
js = PdfJavaScript.GetNumberFormatString(2, 0, 0, 0, "$", true);
jsAction = new PdfJavaScriptAction(js);
textbox.Actions.Format = jsAction;
Step 5: Add the text box to PDF field and save the file.
pdf.Form.Fields.Add(textbox);
pdf.SaveToFile("FormatField.pdf",FileFormat.PDF);
Output:
Full Code:
using Spire.Pdf;
using Spire.Pdf.Actions;
using Spire.Pdf.Fields;
using System.Drawing;

namespace FormatTextboxField
{
    class Program
    {
        static void Main(string []args)
        {
            PdfDocument pdf = new PdfDocument();
            PdfPageBase page = pdf.Pages.Add();
            PdfTextBoxField textbox = new PdfTextBoxField(page, "Number-TextBox");
            textbox.Bounds = new RectangleF(10, 10, 100, 20);
            textbox.BorderWidth = 0.75f;
            textbox.BorderStyle = PdfBorderStyle.Solid;

            string js = PdfJavaScript.GetNumberKeystrokeString(2, 0, 0, 0, "$", true);
            PdfJavaScriptAction jsAction = new PdfJavaScriptAction(js);
            textbox.Actions.KeyPressed = jsAction;

            js = PdfJavaScript.GetNumberFormatString(2, 0, 0, 0, "$", true);
            jsAction = new PdfJavaScriptAction(js);
            textbox.Actions.Format = jsAction;

            pdf.Form.Fields.Add(textbox);
            pdf.SaveToFile("FormatField.pdf", FileFormat.PDF);
        }
    }
}
Imports Spire.Pdf
Imports Spire.Pdf.Actions
Imports Spire.Pdf.Fields
Imports System.Drawing

Namespace FormatTextboxField
	Class Program
		Private Shared Sub Main(args As String())
			Dim pdf As New PdfDocument()
			Dim page As PdfPageBase = pdf.Pages.Add()
			Dim textbox As New PdfTextBoxField(page, "Number-TextBox")
			textbox.Bounds = New RectangleF(10, 10, 100, 20)
			textbox.BorderWidth = 0.75F
			textbox.BorderStyle = PdfBorderStyle.Solid

			Dim js As String = PdfJavaScript.GetNumberKeystrokeString(2, 0, 0, 0, "$", True)
			Dim jsAction As New PdfJavaScriptAction(js)
			textbox.Actions.KeyPressed = jsAction

			js = PdfJavaScript.GetNumberFormatString(2, 0, 0, 0, "$", True)
			jsAction = New PdfJavaScriptAction(js)
			textbox.Actions.Format = jsAction

			pdf.Form.Fields.Add(textbox)
			pdf.SaveToFile("FormatField.pdf", FileFormat.PDF)
		End Sub
	End Class
End Namespace
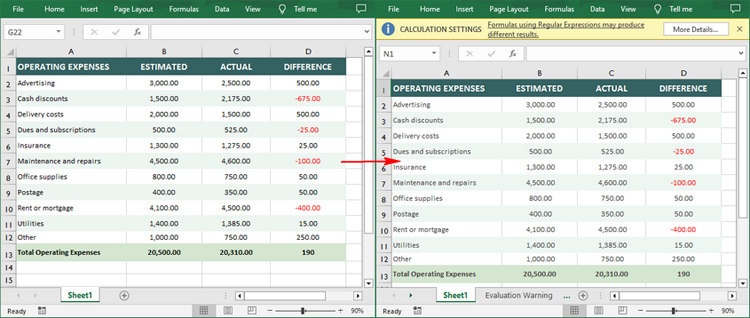
Excel, developed by Microsoft, is a widely used spreadsheet application that offers a range of features for data analysis, visualization, and management. ODS (OpenDocument Spreadsheet), on the other hand, is an open standard format for spreadsheets, which means it can be read and edited by various software applications, including LibreOffice and Apache OpenOffice.
Converting between these two formats can be necessary for compatibility, sharing, or specific feature requirements. In this article, you will learn how to convert Excel to ODS or OSD to Excel in C# using Spire.XLS for .NET.
Install Spire.XLS for .NET
To begin with, you need to add the DLL files included in the Spire.XLS for .NET package as references in your .NET project. The DLL files can be either downloaded from this link or installed via NuGet.
PM> Install-Package Spire.XLS
Convert Excel to ODS (OpenDocument Spreadsheet) in C#
You can load an Excel (.xls or .xlsx) file and then save it as an ODS file through the Workbook.SaveToFile(string fileName, FileFormat.ODS) method. The following are the detailed steps:
- Create a Workbook instance.
- Load an Excel file using Workbook.LoadFromFile() method.
- Save the Excel file to ODS format using Workbook.SaveToFile(string fileName, FileFormat.ODS) method.
- C#
using Spire.Xls;

namespace ConvertExcelToODS
{
    class Program
    {
        static void Main(string[] args)
        {
            // Create Workbook instance
            Workbook workbook = new Workbook();

            // Load an Excel file
            workbook.LoadFromFile("Sample.xlsx");

            // Save the Excel to ODS file
            workbook.SaveToFile("ToODS.ods", FileFormat.ODS);
        }
    }
}
Convert ODS to Excel (XLS/XLSX) in C#
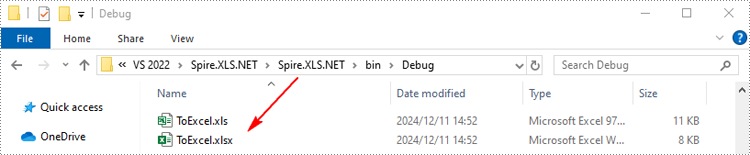
Spire.XLS for .NET also supports converting an ODS file back to Excel XLS or XLS format. The following are the detailed steps:
- Create a Workbook instance.
- Load an ODS file using Workbook.LoadFromFile() method.
- Save the ODS file in XLS or XLSX format using Workbook.SaveToFile(string fileName, FileFormat fileFormat) method.
- C#
using Spire.Xls;

namespace ODSToExcel
{
    class Program
    {
        static void Main(string[] args)
        {
            // Create Workbook instance
            Workbook workbook = new Workbook();

            // Load an ODS file
            workbook.LoadFromFile("ToODS.ods");

            // Save the ODS file in XLSX format
            workbook.SaveToFile("ToExcel.xlsx", FileFormat.Version2016);

            // Save the ODS file in XLS format
            workbook.SaveToFile("ToExcel.xls", FileFormat.Version97to2003);
        }
    }
}
Apply for a Temporary License
If you'd like to remove the evaluation message from the generated documents, or to get rid of the function limitations, please request a 30-day trial license for yourself.
In MS Word, you can split a document by manually cutting the content from the original document and pasting it into a new document. Although the task is simple, it can also be quite tedious and time-consuming especially when dealing with a long document. This article will demonstrate how to programmatically split a Word document into multiple files using Spire.Doc for .NET .
Install Spire.Doc for .NET
To begin with, you need to add the DLL files included in the Spire.Doc for.NET package as references in your .NET project. The DLL files can be either downloaded from this link or installed via NuGet.
PM> Install-Package Spire.Doc
Split a Word Document by Page Break
A Word document can contain multiple pages separated by page breaks. To split a Word document by page break, you can refer to the below steps and code.
- Create a Document instance.
- Load a sample Word document using Document.LoadFromFile() method.
- Create a new Word document and add a section to it.
- Traverse through all body child objects of each section in the original document and determine whether the child object is a paragraph or a table.
- If the child object of the section is a table, directly add it to the section of new document using Section.Body.ChildObjects.Add() method.
- If the child object of the section is a paragraph, first add the paragraph object to the section of the new document. Then traverse through all child objects of the paragraph and determine whether the child object is a page break.
- If the child object of the paragraph is a page break, get its index and then remove the page break from its paragraph by index.
- Save the new Word document and then repeat the above processes.
- C#
- VB.NET
using System;
using Spire.Doc;
using Spire.Doc.Documents;

namespace SplitByPageBreak
{
    class Program
    {
        static void Main(string[] args)
        {
            //Create a Document instance
            Document original = new Document();

            //Load a sample Word document
            original.LoadFromFile(@"E:\Files\SplitByPageBreak.docx");

            //Create a new Word document and add a section to it
            Document newWord = new Document();
            Section section = newWord.AddSection();
            int index = 0;

            //Traverse through all sections of the original document
            foreach (Section sec in original.Sections)
            {
                //Traverse through all body child objects of each section
                foreach (DocumentObject obj in sec.Body.ChildObjects)
                {
                    if (obj is Paragraph)
                    {
                        Paragraph para = obj as Paragraph;
                        sec.CloneSectionPropertiesTo(section);

                        //Add paragraph object in the section of original document into section of new document
                        section.Body.ChildObjects.Add(para.Clone());

                        //Traverse through all child objects of each paragraph and determine whether the object is a page break
                        foreach (DocumentObject parobj in para.ChildObjects)
                        {
                            if (parobj is Break && (parobj as Break).BreakType == BreakType.PageBreak)
                            {
                                //Get the index of page break in paragraph
                                int i = para.ChildObjects.IndexOf(parobj);

                                //Remove the page break from its paragraph
                                section.Body.LastParagraph.ChildObjects.RemoveAt(i);

                                //Save the new Word document
                                newWord.SaveToFile(String.Format("result\out-{0}.docx", index), FileFormat.Docx);
                                index++;

                                //Create a new document and add a section
                                newWord = new Document();
                                section = newWord.AddSection();

                                //Add paragraph object in original section into section of new document
                                section.Body.ChildObjects.Add(para.Clone());
                                if (section.Paragraphs[0].ChildObjects.Count == 0)
                                {
                                    //Remove the first blank paragraph
                                    section.Body.ChildObjects.RemoveAt(0);
                                }
                                else
                                {
                                    //Remove the child objects before the page break
                                    while (i >= 0)
                                    {
                                        section.Paragraphs[0].ChildObjects.RemoveAt(i);
                                        i--;
                                    }
                                }
                            }
                        }
                    }
                    if (obj is Table)
                    {
                        //Add table object in original section into section of new document
                        section.Body.ChildObjects.Add(obj.Clone());
                    }
                }
            }

            //Save to file
            newWord.SaveToFile(String.Format("result/out-{0}.docx", index), FileFormat.Docx);

        }
    }
}

Split a Word Document by Section Break
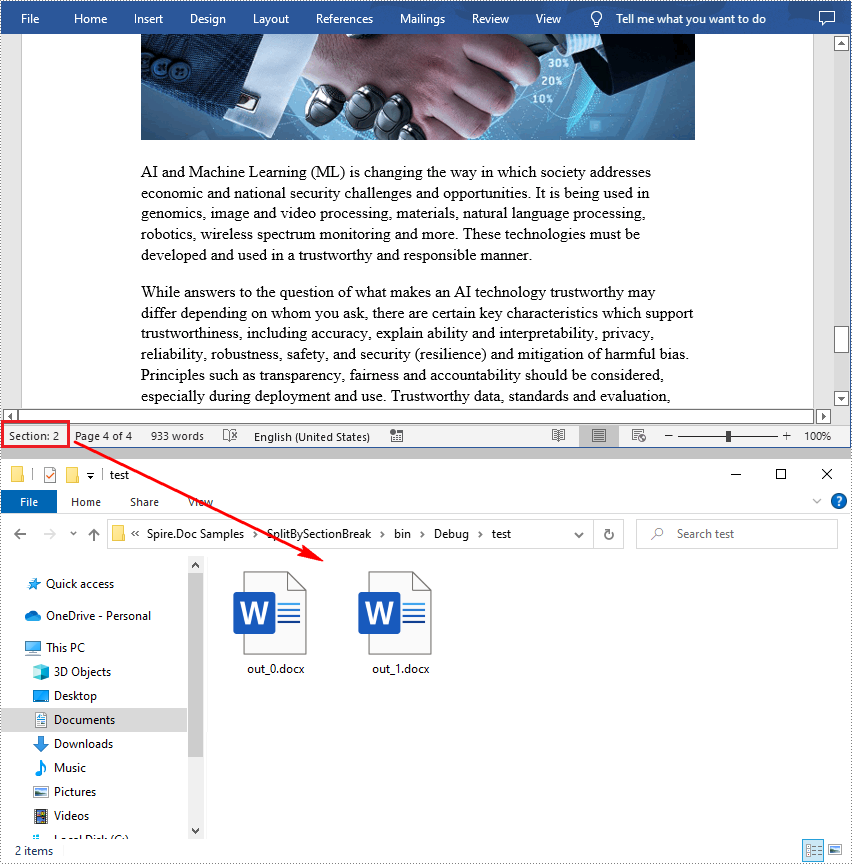
In Word, a section is a part of a document that contains its own page formatting. For documents that contain multiple sections, Spire.Doc for .NET also supports splitting documents by section breaks. The detailed steps are as follows.
- Create a Document instance.
- Load a sample Word document using Document.LoadFromFile() method.
- Define a new Word document object.
- Traverse through all sections of the original Word document.
- Clone each section of the original document using Document.Sections.Clone() method.
- Add the cloned section to the new document as a new section using Document.Sections.Add() method.
- Save the result document using Document.SaveToFile() method.
- C#
- VB.NET
using System;
using Spire.Doc;

namespace SplitBySectionBreak
{
    class Program
    {
        static void Main(string[] args)
        {
            //Create a Document instance
            Document document = new Document();

            //Load a sample Word document
            document.LoadFromFile(@"E:\Files\SplitBySectionBreak.docx");

            //Define a new Word document object
            Document newWord;

            //Traverse through all sections of the original Word document
            for (int i = 0; i < document.Sections.Count; i++)
            {
                newWord = new Document();

                //Clone each section of the original document and add it to the new document as new section
                newWord.Sections.Add(document.Sections[i].Clone());

                //Save the result document
                newWord.SaveToFile(String.Format(@"test\out_{0}.docx", i));
            }
        }
    }
}
Apply for a Temporary License
If you'd like to remove the evaluation message from the generated documents, or to get rid of the function limitations, please request a 30-day trial license for yourself.
