
.NET (1329)
Children categories
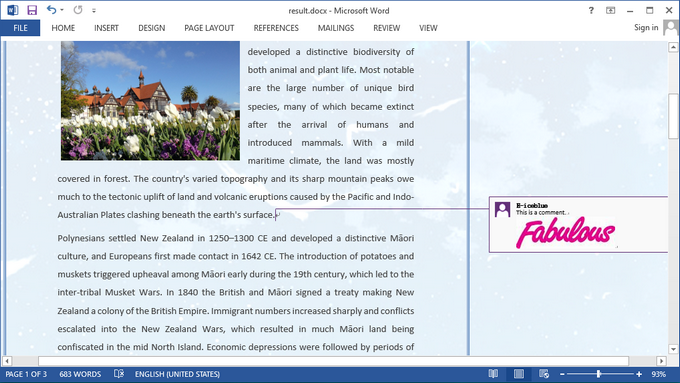
A comment in Word can contain rich elements such as text, image, OLE object, and etc. This article presents how we can insert a picture to a comment in Word using Spire.Doc.
Step 1: Initialize an instance of Document class and load a sample document.
Document doc = new Document();
doc.LoadFromFile(@"C:\Users\Administrator\Desktop\sample.docx");
Step 2: Get the third paragraph from section one.
Paragraph paragraph = doc.Sections[0].Paragraphs[2];
Step 3: Append a comment to the paragraph.
Comment comment = paragraph.AppendComment("This is a comment.");
comment.Format.Author = "E-iceblue";
Step 4: Insert an image to comment body.
DocPicture docPicture = new DocPicture(doc);
Image img = Image.FromFile(@"C:\Users\Administrator\Desktop\logo.png");
docPicture.LoadImage(img);
comment.Body.AddParagraph().ChildObjects.Add(docPicture);
Step 5: Save the file.
doc.SaveToFile("result.docx",FileFormat.Docx2013);
Output:
Full Code:
using Spire.Doc;
using Spire.Doc.Documents;
using Spire.Doc.Fields;
using System.Drawing;
namespace InsertPicture
{
    class Program
    {

        static void Main(string[] args)
        {

            Document doc = new Document();
            doc.LoadFromFile(@"C:\Users\Administrator\Desktop\sample.docx");
            Paragraph paragraph = doc.Sections[0].Paragraphs[2];

            Comment comment = paragraph.AppendComment("This is a comment.");
            comment.Format.Author = "E-iceblue";
            DocPicture docPicture = new DocPicture(doc);
            Image img = Image.FromFile(@"C:\Users\Administrator\Desktop\logo.png");
            docPicture.LoadImage(img);
            comment.Body.AddParagraph().ChildObjects.Add(docPicture);

            doc.SaveToFile("result.docx", FileFormat.Docx2013);
        }
    }
}
Imports Spire.Doc
Imports Spire.Doc.Documents
Imports Spire.Doc.Fields
Imports System.Drawing
Namespace InsertPicture
	Class Program

		Private Shared Sub Main(args As String())

			Dim doc As New Document()
			doc.LoadFromFile("C:\Users\Administrator\Desktop\sample.docx")
			Dim paragraph As Paragraph = doc.Sections(0).Paragraphs(2)

			Dim comment As Comment = paragraph.AppendComment("This is a comment.")
			comment.Format.Author = "E-iceblue"
			Dim docPicture As New DocPicture(doc)
			Dim img As Image = Image.FromFile("C:\Users\Administrator\Desktop\logo.png")
			docPicture.LoadImage(img)
			comment.Body.AddParagraph().ChildObjects.Add(docPicture)

			doc.SaveToFile("result.docx", FileFormat.Docx2013)
		End Sub
	End Class
End Namespace
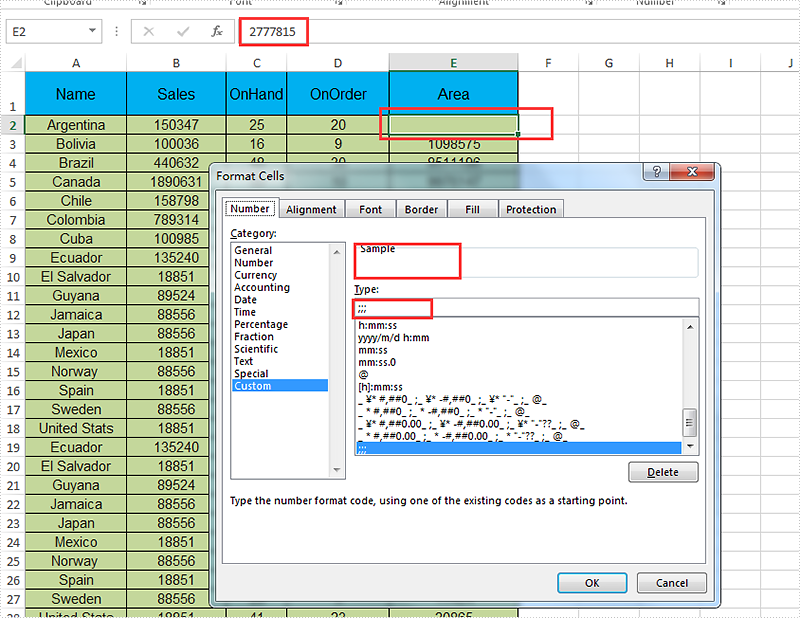
We have already demonstrated how to using Spire.XLS hide excel columns and rows in C#. Sometimes we don't want to show the data on a certain cell to others but not hide the whole row or column. Then we can only hide the data on this cell by setting the number format for it. This article will focus on showing how to hide the content on a certain cell by setting the number format as ";;;" to hide the content to others.
Step 1: Initialize an instance of Workbook and load the document from file.
Workbook workbook = new Workbook();
workbook.LoadFromFile("Sample.xlsx");
Step 2: Get the first worksheet from the workbook.
Worksheet worksheet = workbook.Worksheets[0];
Step 3: Hide the area by setting the number format as ";;;".
worksheet.Range["E2"].NumberFormat = ";;;";
Step 4: Save the document to file.
workbook.SaveToFile("Result.xlsx", FileFormat.Version2010);
Effective screenshot of hide the content on Excel cell by setting the number format:
Full codes:
using Spire.Xls;
namespace HideContent
{
    class Program
    {

        static void Main(string[] args)
        {
            Workbook workbook = new Workbook();
            workbook.LoadFromFile("Sample.xlsx");

            Worksheet worksheet = workbook.Worksheets[0];
            worksheet.Range["E2"].NumberFormat = ";;;";

            workbook.SaveToFile("Result.xlsx", FileFormat.Version2010);
        }
    }
}
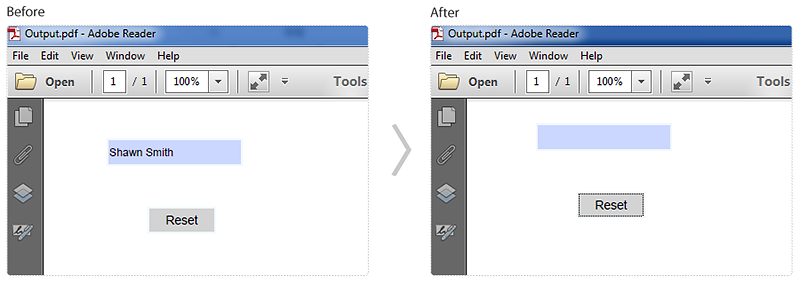
Spire.PDF allows us to reset the values of PDF form fields using the PdfResetFormAction. The following code example demonstrates how we can use Spire.PDF to implement this function.
Code snippet:
Step 1: Create a PDF document and add a new page to it.
PdfDocument document = new PdfDocument();
PdfPageBase page = document.Pages.Add();
Step 2: Create a text box field, set properties for the text box field and add it to the document.
PdfTextBoxField textBoxField = new PdfTextBoxField(page, "Name");
textBoxField.BorderColor = new PdfRGBColor(Color.AliceBlue);
textBoxField.BorderStyle = PdfBorderStyle.Solid;
textBoxField.Bounds = new RectangleF(50, 50, 100, 20);
textBoxField.Text = "Shawn Smith";
document.Form.Fields.Add(textBoxField);
Step 3: Create a button field, set properties for the button field and add it to the document.
PdfButtonField button = new PdfButtonField(page, "Reset");
button.Bounds = new RectangleF(80, 100, 50, 20);
button.BorderColor = new PdfRGBColor(Color.AliceBlue);
button.BorderStyle = PdfBorderStyle.Solid;
button.ToolTip = "Reset";
button.Font = new PdfFont(PdfFontFamily.Helvetica, 9f);
document.Form.Fields.Add(button);
Step 4: Create a reset action for the button field using PdfResetFormAction class.
PdfResetFormAction resetAction = new PdfResetFormAction();
button.Actions.OnReceiveFocus = resetAction;
Step 5: Save and close the PDF document.
document.SaveToFile("Output.pdf");
document.Close();
Screenshot before and after resetting value:
Full code:
using System.Drawing;
using Spire.Pdf;
using Spire.Pdf.Actions;
using Spire.Pdf.Fields;
using Spire.Pdf.Graphics;

namespace Reset_form_fields_in_PDF
{
    class Program
    {
        static void Main(string[] args)
        {
            //Create a PDF document
            PdfDocument document = new PdfDocument();

            //Add a new page
            PdfPageBase page = document.Pages.Add();

            //Create a text box field.
            PdfTextBoxField textBoxField = new PdfTextBoxField(page, "Name");

            //Set properties for the text box field.
            textBoxField.BorderColor = new PdfRGBColor(Color.AliceBlue);
            textBoxField.BorderStyle = PdfBorderStyle.Solid;
            textBoxField.Bounds = new RectangleF(50, 50, 100, 20);
            textBoxField.Text = "Shawn Smith";

            //Add the text box field to the document
            document.Form.Fields.Add(textBoxField);

            //Create a button field.
            PdfButtonField button = new PdfButtonField(page, "Reset");

            //Set properties for the button field
            button.Bounds = new RectangleF(80, 100, 50, 20);
            button.BorderColor = new PdfRGBColor(Color.AliceBlue);
            button.BorderStyle = PdfBorderStyle.Solid;
            button.ToolTip = "Reset";
            button.Font = new PdfFont(PdfFontFamily.Helvetica, 9f);

            //Add the button field to the document
            document.Form.Fields.Add(button);

            //Create a reset action for the button field
            PdfResetFormAction resetAction = new PdfResetFormAction();
            button.Actions.OnReceiveFocus = resetAction;

            //Save and close the PDF document
            document.SaveToFile("Output.pdf");
            document.Close();
        }
    }
}
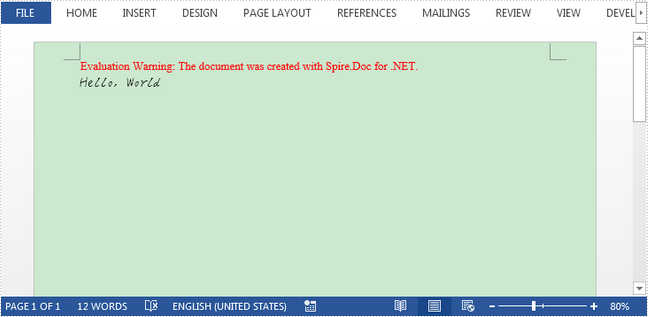
RTF is a document language used for encoding formatted text and graphics for easy transfer between applications. This article presents how to insert a piece of RTF encoded string to Word document using Spire.Doc.
Step 1: Initialize an instance of Document class, add a section to it.
Document doc = new Document();
Section section = doc.
Step 2: Add a paragraph to the section.
Paragraph para = section.AddParagraph();
Step 3: Declare a String variable to store the RTF string.
String rtfString = @"{\rtf1\ansi\deff0 {\fonttbl {\f0 hakuyoxingshu7000;}}\f0\fs28 Hello, World}";
Step 4: Append RTF string to paragraph.
para.AppendRTF(rtfString);
Step 5: Save the file.
doc.SaveToFile("Output.docx");
Output:
Full Code:
using Spire.Doc;
using Spire.Doc.Documents;
using System;
namespace InsertRTF
{
 class Program
    {

     static void Main(string[] args)
     {
         Document doc = new Document();
         Section section = doc.AddSection();
         Paragraph para = section.AddParagraph();

         String rtfString = @"{\rtf1\ansi\deff0 {\fonttbl {\f0 hakuyoxingshu7000;}}\f0\fs28 Hello, World}";
         para.AppendRTF(rtfString);

         doc.SaveToFile("Output.docx");

     }

    }
}
Imports Spire.Doc
Imports Spire.Doc.Documents
Namespace InsertRTF
	Class Program

		Private Shared Sub Main(args As String())
			Dim doc As New Document()
			Dim section As Section = doc.AddSection()
			Dim para As Paragraph = section.AddParagraph()

			Dim rtfString As [String] = "{\rtf1\ansi\deff0 {\fonttbl {\f0 hakuyoxingshu7000;}}\f0\fs28 Hello, World}"
			para.AppendRTF(rtfString)

			doc.SaveToFile("Output.docx")

		End Sub

	End Class
End Namespace
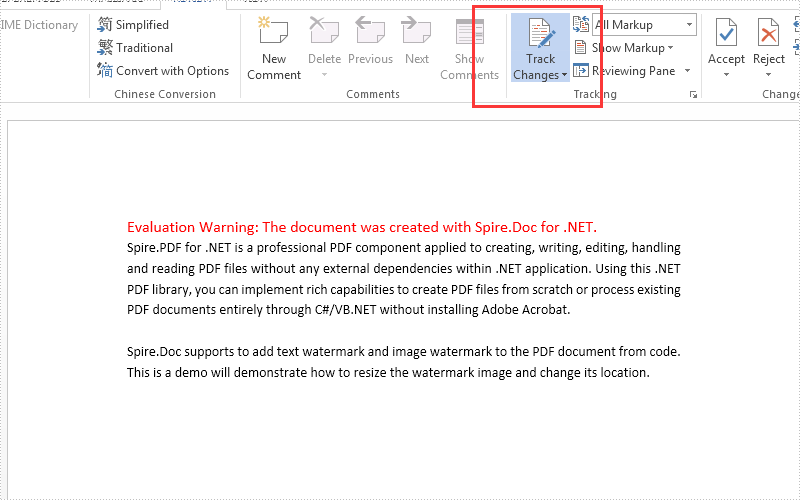
The track changes has been used to keep track of the every changes that made to the Word document. It helps to record every edit, insertion, deletion, or modification in a word document. We have demonstrated how to accept/reject the tracked changes on word document in C#. This article will show you how to enable track changes of the document.
Step 1: Create a new word document and load the document from file.
Document document = new Document();
document.LoadFromFile("Sample.docx", FileFormat.Docx2010);
Step 2: Enable the track changes.
document.TrackChanges = true;
Step 3: Save the document to file.
document.SaveToFile("Enable Trackchanges.docx", FileFormat.Docx2010);
Effective screenshot:
Full codes:
using Spire.Doc;
namespace EnableTrack
{
    class Program
    {
        static void Main(string[] args)
        {
            Document document = new Document();
            document.LoadFromFile("Sample.docx", FileFormat.Docx2010);
            document.TrackChanges = true;
         document.SaveToFile("Enable Trackchanges.docx", FileFormat.Docx2010);

        }
    }
}
Lock Specified Sections of Word Documents in C#, VB.NET
2017-03-15 08:04:50 Written by AdministratorSection protection allows users to be able to edit only the forms (if any) rather than any other content within it. When we protect a document, we can specify that the specific sections of the document be protected. This is useful in case we want to protect parts of a Word document.
Following code snippets demonstrate the same.
Step 1: Initialize an instance of Document class.
Document doc = new Document();
Step 2: Add two sections to the document.
Section s1 = doc.AddSection();
Section s2 = doc.AddSection();
Step 3: Append some text to section 1 and section 2.
s1.AddParagraph().AppendText("section 1");
s2.AddParagraph().AppendText("section 2");
Step 4: Protect the document with AllowOnlyFormFields protection type.
doc.Protect(ProtectionType.AllowOnlyFormFields, "123");
Step 5: Unprotect section 2.
s2.ProtectForm = false;
Step 6: Save the document.
doc.SaveToFile("Protect_Section.docx");
Result:
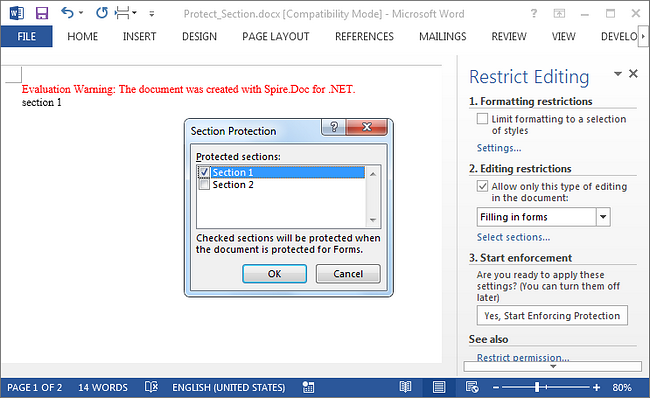
Run the program, we should get the file in which section 1 is protected to allow only editing in form fields while section 2 can be edited freely.
Full Code:
using Spire.Doc;
namespace LockSection
{
    class Program
    {
        static void Main(string[] args)
        {
            Document doc = new Document();
            Section s1 = doc.AddSection();
            Section s2 = doc.AddSection();

            s1.AddParagraph().AppendText("section 1");
            s2.AddParagraph().AppendText("section 2");

            //protect all sections
            doc.Protect(ProtectionType.AllowOnlyFormFields, "123");
            //unprotect section 2
            s2.ProtectForm = false;

            doc.SaveToFile("Protect_Section.docx");
        }
    }
}
Imports Spire.Doc
Namespace LockSection
	Class Program
		Private Shared Sub Main(args As String())
			Dim doc As New Document()
			Dim s1 As Section = doc.AddSection()
			Dim s2 As Section = doc.AddSection()

			s1.AddParagraph().AppendText("section 1")
			s2.AddParagraph().AppendText("section 2")

			'protect all sections
			doc.Protect(ProtectionType.AllowOnlyFormFields, "123")
			'unprotect section 2
			s2.ProtectForm = False

			doc.SaveToFile("Protect_Section.docx")
		End Sub
	End Class
End Namespace
A Sound action is used to embed and play a sound file in PDF document. In Spire.PDF, we can create a sound action by using the PdfSoundAction class. Attributes like sound, volume and repeat can be specified for the sound action.
Refer below code example:
Step 1: Create a new PDF document and add a page to it.
PdfDocument document = new PdfDocument();
PdfPageBase page = document.Pages.Add();
Step 2: Create a sound action and set its attributes.
PdfSoundAction soundAction = new PdfSoundAction(@"C:\Users\Administrator\Desktop\because of you.wav");
soundAction.Sound.Bits = 15;
soundAction.Sound.Channels = PdfSoundChannels.Stereo;
soundAction.Sound.Encoding = PdfSoundEncoding.Signed;
soundAction.Volume = 0.8f;
soundAction.Repeat = true;
Step 3: Set the sound action to be executed when the PDF document is opened.
document.AfterOpenAction = soundAction;
Step 4: Save and close the PDF document.
document.SaveToFile("Output.pdf");
document.Close();
Full code:
using Spire.Pdf;
using Spire.Pdf.Actions;
using Spire.Pdf.General;

namespace PDF_Sound_Action
{
    class Program
    {
        static void Main(string[] args)
        {
            //Create a new PDF document
            PdfDocument document = new PdfDocument();
            //Add a page
            PdfPageBase page = document.Pages.Add();

            //Create a sound action
            PdfSoundAction soundAction = new PdfSoundAction(@"C:\Users\Administrator\Desktop\because of you.wav");
            soundAction.Sound.Bits = 15;
            soundAction.Sound.Channels = PdfSoundChannels.Stereo;
            soundAction.Sound.Encoding = PdfSoundEncoding.Signed;
            soundAction.Volume = 0.8f;
            soundAction.Repeat = true;

            // Set the sound action to be executed when the PDF document is opened
            document.AfterOpenAction = soundAction;

            //Save and close the PDF document
            document.SaveToFile("Output.pdf");
            document.Close();
        }
    }
}
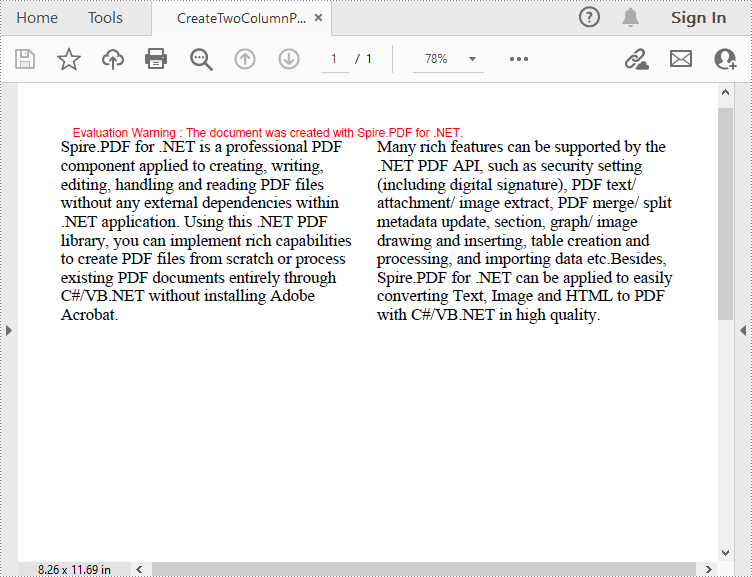
When designing magazines or newspapers, you may need to display content in multiple columns on a single page to improve readability. In this article, you will learn how to programmatically create a two-column PDF from scratch using Spire.PDF for .NET.
Install Spire.PDF for .NET
To begin with, you need to add the DLL files included in the Spire.PDF for .NET package as references in your .NET project. The DLLs files can be either downloaded from this link or installed via NuGet.
PM> Install-Package Spire.PDF
Create a Two-Column PDF from Scratch in C# and VB.NET
Spire.PDF for .NET allows you to create a two-column PDF by drawing text at two separate rectangle areas in a PDF page. Below are the detailed steps to achieve the task.
- Create a PdfDocument instance.
- Add a new page in the PDF using PdfDocument.Pages.Add() method.
- Define paragraph text, then set the text font and text alignment.
- Draw text at two separate rectangle areas in the PDF using PdfPageBase.Canvas.DrawString (String, PdfFontBase, PdfBrush, RectangleF, PdfStringFormat) method.
- Save the result file using PdfDocument.SaveToFile() method.
- C#
- VB.NET
using Spire.Pdf;
using Spire.Pdf.Graphics;
using System.Drawing;

namespace CreateTwoColumnPDF
{
    class Program
    {
        static void Main(string[] args)
        {
            //Create a PdfDocument instance
            PdfDocument doc = new PdfDocument();

            //Add a new page
            PdfPageBase page = doc.Pages.Add();

            //Define paragraph text
            string s1 = "Spire.PDF for .NET is a professional PDF component applied to creating, writing, "
                        + "editing, handling and reading PDF files without any external dependencies within "
                        + ".NET application. Using this .NET PDF library, you can implement rich capabilities "
                        + "to create PDF files from scratch or process existing PDF documents entirely through "
                        + "C#/VB.NET without installing Adobe Acrobat.";

            string s2 = "Many rich features can be supported by the .NET PDF API, such as security setting "
                        + "(including digital signature), PDF text/ attachment/ image extract, PDF merge/ split "
                        + ", metadata update, section, graph/ image drawing and inserting, table creation and "
                        + "processing, and importing data etc.Besides, Spire.PDF for .NET can be applied to easily "
                        + "converting Text, Image and HTML to PDF with C#/VB.NET in high quality.";

            //Get width and height of page
            float pageWidth = page.GetClientSize().Width;
            float pageHeight = page.GetClientSize().Height;

            //Create a PdfSolidBrush instance
            PdfSolidBrush brush = new PdfSolidBrush(new PdfRGBColor(Color.Black));

            //Create a PdfFont instance
            PdfFont font = new PdfFont(PdfFontFamily.TimesRoman, 14f);

            //Set the text alignment via PdfStringFormat class
            PdfStringFormat format = new PdfStringFormat(PdfTextAlignment.Left);

            //Draw text
            page.Canvas.DrawString(s1, font, brush, new RectangleF(0, 20, pageWidth / 2 - 8f, pageHeight),format);
            page.Canvas.DrawString(s2, font, brush, new RectangleF(pageWidth / 2 + 8f, 20, pageWidth / 2, pageHeight), format);

            //Save the result document
            doc.SaveToFile("CreateTwoColumnPDF.pdf.pdf");
        }
    }
}
Apply for a Temporary License
If you'd like to remove the evaluation message from the generated documents, or to get rid of the function limitations, please request a 30-day trial license for yourself.
Whether to display the additional information for presentation slides on header and footer area
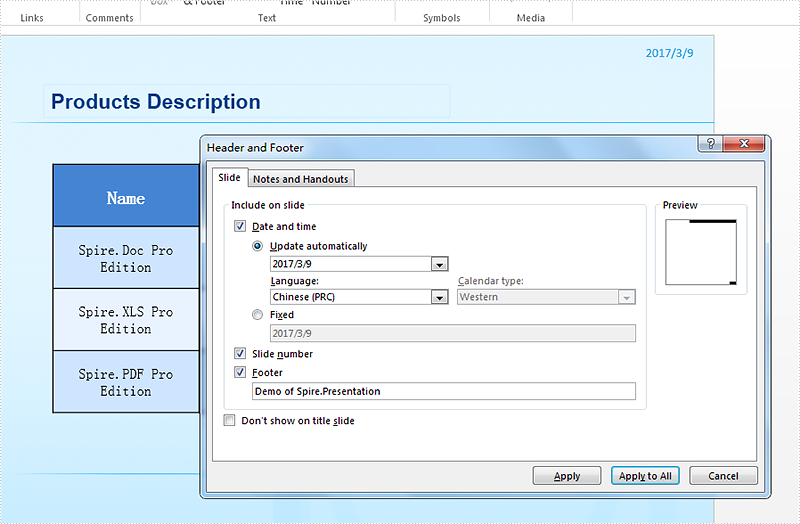
2017-03-09 07:15:10 Written by KoohjiWhen we operate the Microsoft PowerPoint documents, we can set whether to show some additional information of slides to readers, such as “Date and Time”, “Slide number” and footer. This article will demonstrate how to set whether to show these information to readers in C# with the help of Spire.Presentation.
Firstly, view the screenshot of the property of slide appearance on the header and footer area.
Step 1: Create a presentation instance and load the document from file.
Presentation ppt = new Presentation();
ppt.LoadFromFile("Sample.pptx", FileFormat.Pptx2010);
Step 2: Set the appearance property for slide number, footer and date time.
ppt.SlideNumberVisible = true;

ppt.FooterVisible = false;

ppt.DateTimeVisible = false;
Step 3: Save the document to file.
ppt.SaveToFile("Result.pptx", FileFormat.Pptx2010);
Effective screenshot of the slide appearance on header and footer area.
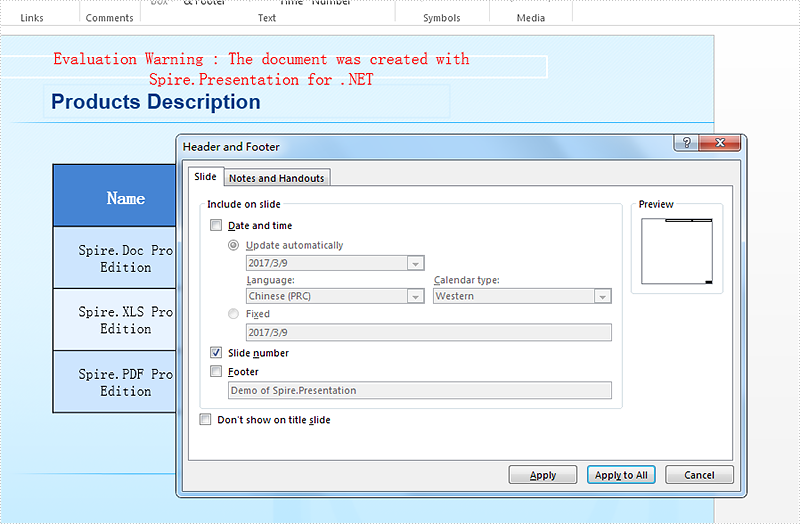
Full codes of how to set the additional information of presentation slides’ header and footer area:
using Spire.Presentation;
using Spire.Xls;
namespace AdditionalInfo
{

    class Program
    {

        static void Main(string[] args)
        {
            Presentation ppt = new Presentation();
            ppt.LoadFromFile("Sample.pptx", FileFormat.Pptx2010);

            ppt.SlideNumberVisible = true;

            ppt.FooterVisible = false;

            ppt.DateTimeVisible = false;

            ppt.SaveToFile("Result.pptx", FileFormat.Pptx2010);

        }
    }
}
Link to files with relative paths using PdfLaunchAction
2017-03-07 09:37:07 Written by AdministratorPDF actions can refer to external files by using either absolute or relative file paths. While using the relative path in action, the file can be moved into a different location. In Spire.PDF, we can use the PdfLaunchAction to link to files with relative paths.
Code snippet:
Step 1: Create a new PDF document and add a page to it.
PdfDocument document = new PdfDocument();
PdfPageBase page = document.Pages.Add();
Step 2: Create a PDF launch action that refers to an external file with relative path.
PdfLaunchAction launchAction = new PdfLaunchAction(@"..\..\test.txt", PdfFilePathType.Relative);
Step 3: Create a PDF action annotation with the launch action. Add the annotation to the page.
string text = "Click here to open file with relative path";
PdfTrueTypeFont font = new PdfTrueTypeFont(new Font("Arial", 13f));
RectangleF rect = new RectangleF(50, 50, 230, 15);
page.Canvas.DrawString(text, font, PdfBrushes.ForestGreen, rect);
PdfLinkAnnotation annotation = new PdfLinkAnnotation(page, rect, launchAction);
PdfAnnotationCollection.Create(page).Add(annotation);
Step 4: Save the document.
document.SaveToFile("RelativeFilePath.pdf");
Screenshot:
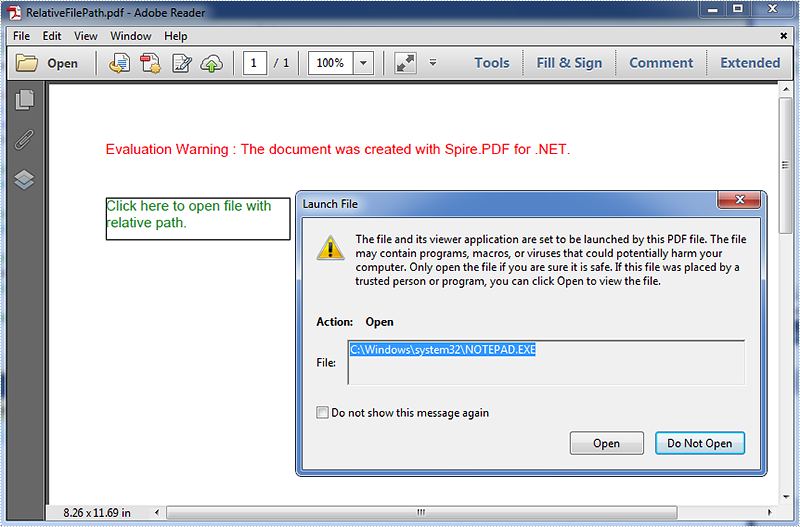
Full code:
using System.Drawing;
using Spire.Pdf;
using Spire.Pdf.Actions;
using Spire.Pdf.Interactive.Annotations;
using Spire.Pdf.Graphics;

namespace Link_to_files_with_relative_paths
{
    class Program
    {
        static void Main(string[] args)
        {
            //Create a new PDF document and add a page to it
            PdfDocument document = new PdfDocument();
            PdfPageBase page = document.Pages.Add();

            //Create a PDF Launch Action
            PdfLaunchAction launchAction = new PdfLaunchAction(@"..\..\test.txt", PdfFilePathType.Relative);

            //Create a PDF Link Annotation with the PDF Launch Action
            string text = "Click here to open file with relative path";
            PdfTrueTypeFont font = new PdfTrueTypeFont(new Font("Arial", 13f));
            RectangleF rect = new RectangleF(50, 50, 230, 15);
            page.Canvas.DrawString(text, font, PdfBrushes.ForestGreen, rect);
            PdfLinkAnnotation annotation = new PdfLinkAnnotation(page, rect, launchAction);
            //Add the PDF Link Annotation to page
            PdfAnnotationCollection.Create(page).Add(annotation);

            //Save and close the document
            document.SaveToFile("RelativeFilePath.pdf");
            document.Close();
        }
    }
}
