
.NET (1329)
Children categories
Add simplified and traditional Chinese characters to PDF in C#/VB.NET
2016-07-21 08:02:26 Written by KoohjiSpire.PDF for .NET provides several font classes such as PdfFont, PdfTrueTypeFont and PdfCjkStandardFont which enable developers to add various fonts to PDF files. In this article we will learn how to generate fonts that support Chinese characters and use the fonts to add simplified and traditional Chinese characters to a PDF file in C# and VB.NET.
Before start, please ensure you have installed the corresponding font on system. If not, you can download it from the following link:
http://www.adobe.com/support/downloads/thankyou.jsp?ftpID=5508&fileID=5521
Detail steps and code snippets:
Step 1: Create a new PDF document and add a new page to it.
PdfDocument pdf = new PdfDocument();
PdfPageBase page = pdf.Pages.Add();
Step 2: Use PdfTrueTypeFont class and PdfCjkStandardFont class to generate fonts that support simplified and traditional Chinese characters.
PdfTrueTypeFont font = new PdfTrueTypeFont(new Font("Arial Unicode MS", 11f), true);
PdfCjkStandardFont font1 = new PdfCjkStandardFont(PdfCjkFontFamily.MonotypeSungLight, 11f);
Step 3: Use PdfCanvas.DrawString(string s, PdfFontBase font, PdfBrush brush, float x, float y) method and the generated fonts to draw Chinese characters to specified location of the PDF file.
page.Canvas.DrawString("中国", font, PdfBrushes.Red, 50, 50);
page.Canvas.DrawString("中國", font1, PdfBrushes.Red, 50, 70);
Step 4: Save the PDF file to disk.
pdf.SaveToFile("result.pdf");
Run the project and we'll get the following result PDF file:

Full codes:
using Spire.Pdf;
using Spire.Pdf.Graphics;
using System.Drawing;

namespace Add_Chinese_Characters_to_PDF
{
    class Program
    {
        static void Main(string[] args)
        {
            PdfDocument pdf = new PdfDocument();
            PdfPageBase page = pdf.Pages.Add();

            PdfTrueTypeFont font = new PdfTrueTypeFont(new Font("Arial Unicode MS", 11f), true);
            PdfCjkStandardFont font1 = new PdfCjkStandardFont(PdfCjkFontFamily.MonotypeSungLight, 11f);
            page.Canvas.DrawString("中国", font, PdfBrushes.Red, 50, 50);
            page.Canvas.DrawString("中國", font1, PdfBrushes.Red, 50, 70);
            pdf.SaveToFile("result.pdf");
            System.Diagnostics.Process.Start("result.pdf");
        }
    }
}
Imports Spire.Pdf
Imports Spire.Pdf.Graphics
Imports System.Drawing

Namespace Add_Chinese_Characters_to_PDF
	Class Program
		Private Shared Sub Main(args As String())
			Dim pdf As New PdfDocument()
			Dim page As PdfPageBase = pdf.Pages.Add()
			Dim font As New PdfTrueTypeFont(New Font("Arial Unicode MS", 11F), True)
			Dim font1 As New PdfCjkStandardFont(PdfCjkFontFamily.MonotypeSungLight, 11F)
			page.Canvas.DrawString("中国", font, PdfBrushes.Red, 50, 50)
			page.Canvas.DrawString("中國", font1, PdfBrushes.Red, 50, 70)
			pdf.SaveToFile("result.pdf")
			System.Diagnostics.Process.Start("result.pdf")
		End Sub
	End Class
End Namespace
Generally, when we open a PDF document from a PDF viewer, it displays the first page instead of others. For some reasons, we may want to skip the first few pages and start on another page. This article will introduce how to specify a particular page when viewing a PDF document in C# and VB.NET.
Code Snippet:
Step 1: Initialize an instance of PdfDocument class and a load a sample PDF file.
PdfDocument doc = new PdfDocument();
doc.LoadFromFile(@"C:\Users\Administrator\Desktop\sample.pdf");
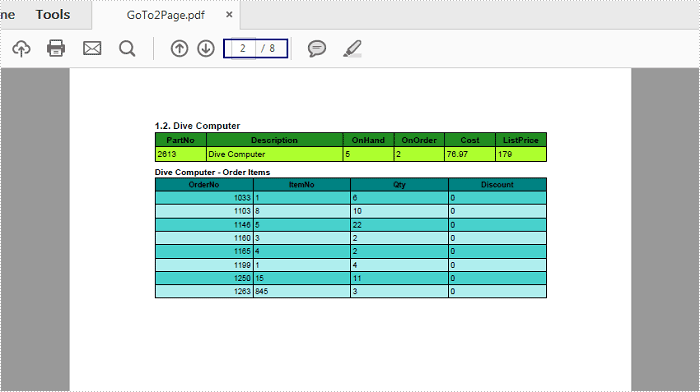
Step 2: Create a PdfGoToAction which will redirect to a destination (page 2 in this case) in the current document.
PdfXYZExplicitDestination destination = new PdfXYZExplicitDestination(doc.Pages[1], 0f, 0f, 0.8f);
PdfGoToAction action = new PdfGoToAction(destination);
Step 3: Sets the action to execute after the document is opened.
doc.AfterOpenAction = action;
Step 4: Save the file.
doc.SaveToFile("GoTo2Page.pdf",FileFormat.PDF);
Output:
The document opens at the second page.
Full Code:
using Spire.Pdf;
using Spire.Pdf.Actions;
using Spire.Pdf.General;
using Spire.Pdf.Destinations;

namespace OpenPDF
{
    class Program
    {
        static void Main(string[] args)
        {
            PdfDocument doc = new PdfDocument();
            doc.LoadFromFile(@"C:\Users\Administrator\Desktop\sample.pdf");

            PdfXYZExplicitDestination destination = new PdfXYZExplicitDestination(doc.Pages[1], 0f, 0f, 0.8f);
            PdfGoToAction action = new PdfGoToAction(destination);
            doc.AfterOpenAction = action;

            doc.SaveToFile("GoTo2Page.pdf", FileFormat.PDF);
        }
    }
}
Imports Spire.Pdf
Imports Spire.Pdf.Actions
Imports Spire.Pdf.General
Imports Spire.Pdf.Destinations

Namespace OpenPDF
	Class Program
		Private Shared Sub Main(args As String())
			Dim doc As New PdfDocument()
			doc.LoadFromFile("C:\Users\Administrator\Desktop\sample.pdf")

			Dim destination As New PdfXYZExplicitDestination(doc.Pages(1), 0F, 0F, 0.8F)
			Dim action As New PdfGoToAction(destination)
			doc.AfterOpenAction = action

			doc.SaveToFile("GoTo2Page.pdf", FileFormat.PDF)
		End Sub
	End Class
End Namespace
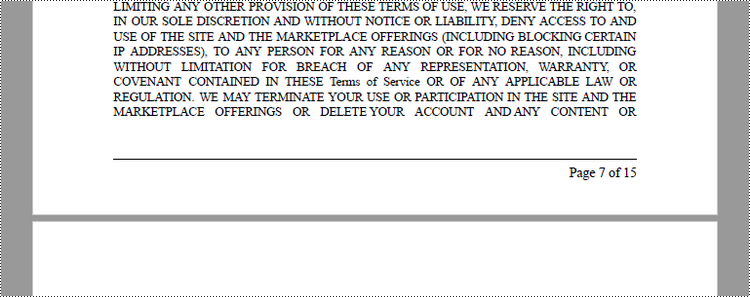
Adding page numbers to a PDF document is not only practical but also aesthetically pleasing, as it provides a polished look akin to professionally published materials. Whether you're dealing with a digital copy of a novel, a report, or any other type of lengthy document, having page numbers can significantly improve its readability and utility. In this article, you will learn how to add page numbers to a PDF document in C# using Spire.PDF for .NET.
- Add Left-Aligned Page Numbers in the Footer in C#
- Add Center-Aligned Page Numbers in the Footer in C#
- Add Right-Aligned Page Numbers in the Footer in C#
Install Spire.PDF for .NET
To begin with, you need to add the DLL files included in the Spire.PDF for.NET package as references in your .NET project. The DLL files can be either downloaded from this link or installed via NuGet.
PM> Install-Package Spire.PDF
PDF Coordinate System
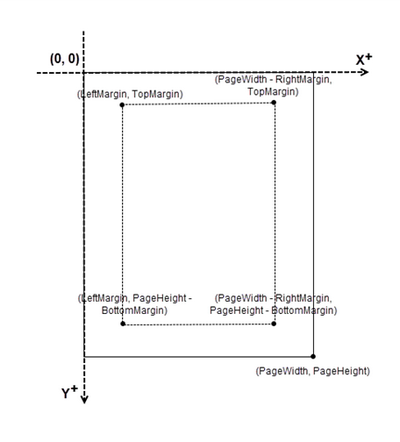
When utilizing Spire.PDF for .NET to manipulate an existing PDF document, it's important to note that the coordinate system's origin is located at the top left corner of the page. The x-axis extends to the right, while the y-axis extends downward.
Typically, page numbers are positioned within the header or footer section of a document. Therefore, it is crucial to take into account the page size and margins when determining the appropriate placement for the page numbers.
Add Left-Aligned Page Numbers in the Footer in C#
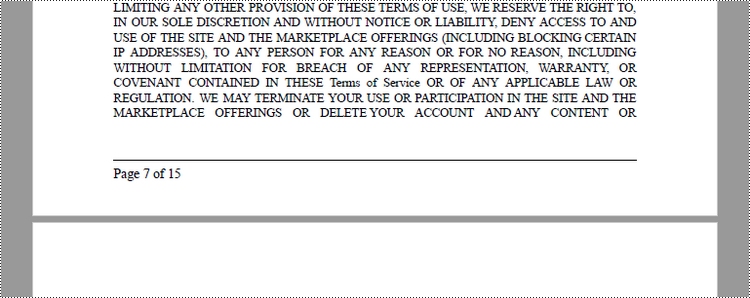
In the Spire.PDF for .NET library, there are two classes available: PdfPageNumberField and PdfPageCountField. These classes allow you to retrieve and display the current page number and the total page count when they are added to a page of a PDF document. If you wish to insert text such as "Page X" or "Page X of Y", you can utilize the PdfCompositeField class, which enables you to combine the desired text with one or more fields into a single field.
The following are the steps to add left-aligned page numbers in the PDF footer using C#.
- Create a Document object.
- Load a PDF file from a specified page.
- Create a PdfPageNumberField object and a PdfPageCountField object.
- Create a PdfCompositeField object to create a "Page X of Y" format.
- Specify the location of the PdfCompositeField object using PdfCompositeField.Location property.
- Iterate though the pages in the document, and add "Page X of Y" to the left corner of the footer section using PdfCompositeField.Draw() method.
- Save the document to a different PDF file.
- C#
using Spire.Pdf.AutomaticFields;
using Spire.Pdf.Graphics;
using Spire.Pdf;
using System.Drawing;
using Spire.Pdf.License;

namespace AddPageNumbersToLeftCorner
{
    class Program
    {
        static void Main(string[] args)
        {
            // Apply your license key
            LicenseProvider.SetLicenseKey("License Key");

            // Create a PdfDocument object
            PdfDocument doc = new PdfDocument();

            // Load a PDF file
            doc.LoadFromFile("C:\\Users\\Administrator\\Desktop\\Terms of service.pdf");

            // Create font, brush and pen, which determine the appearance of the page numbers to be added
            PdfTrueTypeFont font = new PdfTrueTypeFont(new Font("Times New Roman", 12, FontStyle.Regular), true);
            PdfBrush brush = PdfBrushes.Black;
            PdfPen pen = new PdfPen(brush, 1.0f);

            // Create a PdfPageNumberField object and a PdfPageCountField object
            PdfPageNumberField pageNumberField = new PdfPageNumberField();
            PdfPageCountField pageCountField = new PdfPageCountField();

            // Create a PdfCompositeField object to combine page count field and page number field in a single field
            PdfCompositeField compositeField = new PdfCompositeField(font, brush, "Page {0} of {1}", pageNumberField, pageCountField);

            // Get the page size
            SizeF pageSize = doc.Pages[0].Size;

            // Set the location of the composite field
            compositeField.Location = new PointF(72, pageSize.Height - 45);

            // Iterate through the pages in the document
            for (int i = 0; i < doc.Pages.Count; i++)
            {

                // Get a specific page
                PdfPageBase page = doc.Pages[i];

                // Draw a line at the specified position
                page.Canvas.DrawLine(pen, 72, pageSize.Height - 50, pageSize.Width - 72, pageSize.Height - 50);

                // Draw the composite field on the page
                compositeField.Draw(page.Canvas);
            }

            // Save to a different PDF file
            doc.SaveToFile("AddPageNumbersToLeftCorner.pdf");

            // Dispose resources
            doc.Dispose();
        }
    }
}
Add Center-Aligned Page Numbers in the Footer in C#
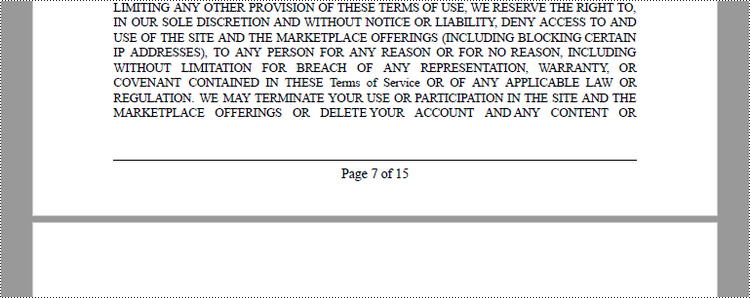
In order to align the page number in the footer section to the center, it is crucial to dynamically calculate the width of the text "Page X of Y." This calculation is essential as it determines the X coordinate of the page number (PdfCompositeField). To achieve center alignment, the X coordinate is calculated by subtracting the width of the page number from the page width and dividing the result by 2, as follows: (PageWidth - PageNumberWidth)/2.
The following are the steps to add center-aligned page numbers in the PDF footer using C#.
- Create a Document object.
- Load a PDF file from a specified page.
- Create a PdfPageNumberField object and a PdfPageCountField object.
- Create a PdfCompositeField object to create a "Page X of Y" format.
- Specify the location of the PdfCompositeField object using PdfCompositeField.Location property.
- Iterate though the pages in the document, and add "Page X of Y" to the center of the footer section using PdfCompositeField.Draw() method.
- Save the document to a different PDF file.
- C#
using Spire.Pdf.AutomaticFields;
using Spire.Pdf.Graphics;
using Spire.Pdf;
using System.Drawing;
using Spire.Pdf.License;

namespace AddPageNumbersToCenter
{
    class Program
    {
        static void Main(string[] args)
        {
            // Apply your license key
            LicenseProvider.SetLicenseKey("License Key");

            // Create a PdfDocument object
            PdfDocument doc = new PdfDocument();

            // Load a PDF file
            doc.LoadFromFile("C:\\Users\\Administrator\\Desktop\\Terms of service.pdf");

            // Create font, brush and pen, which determine the appearance of the page numbers to be added
            PdfTrueTypeFont font = new PdfTrueTypeFont(new Font("Times New Roman", 12, FontStyle.Regular), true);
            PdfBrush brush = PdfBrushes.Black;
            PdfPen pen = new PdfPen(brush, 1.0f);

            // Create a PdfPageNumberField object and a PdfPageCountField object
            PdfPageNumberField pageNumberField = new PdfPageNumberField();
            PdfPageCountField pageCountField = new PdfPageCountField();

            // Create a PdfCompositeField object to combine page count field and page number field in a single field
            PdfCompositeField compositeField = new PdfCompositeField(font, brush, "Page {0} of {1}", pageNumberField, pageCountField);


            // Iterate through the pages in the document
            for (int i = 0; i < doc.Pages.Count; i++)
            {

                // Get a specific page
                PdfPageBase page = doc.Pages[i];

                // Get the page size
                SizeF pageSize = doc.Pages[i].Size;

                // Draw a line at the specified position
                page.Canvas.DrawLine(pen, 72, pageSize.Height - 50, pageSize.Width - 72, pageSize.Height - 50);

                // Measure the size the "Page X of Y"
                SizeF pageNumberSize = font.MeasureString(string.Format("Page {0} of {1}", i + 1, doc.Pages.Count));

                // Set the location of the composite field
                compositeField.Location = new PointF((pageSize.Width - pageNumberSize.Width) / 2, pageSize.Height - 45);

                // Draw the composite field on the page
                compositeField.Draw(page.Canvas);

            }

            // Save to a different PDF file
            doc.SaveToFile("AddPageNumbersToCenter.pdf");

            // Dispose resources
            doc.Dispose();
        }
    }
}
Add Right-Aligned Page Numbers in the Footer in C#
To position the page number in the footer section's right corner, it is essential to dynamically calculate the width of the text "Page X of Y" as well. Because the X coordinate of the page number (PdfCompositeField) is determined by subtracting the combined width of the page number and the right page margin from the page width, as follows: PageWidth - (PageNumberWidth + RightPageMargin).
Below are the steps to add right-aligned page numbers in the PDF footer in C#.
- Create a Document object.
- Load a PDF file from a specified page.
- Create a PdfPageNumberField object and a PdfPageCountField object.
- Create a PdfCompositeField object to create a "Page X of Y" format.
- Specify the location of the PdfCompositeField object using PdfCompositeField.Location property.
- Iterate though the pages in the document, and add "Page X of Y" to the right corner of the footer section using PdfCompositeField.Draw() method.
- Save the document to a different PDF file.
- C#
using Spire.Pdf.AutomaticFields;
using Spire.Pdf.Graphics;
using Spire.Pdf;
using System.Drawing;
using Spire.Pdf.License;

namespace AddPageNumbersToRigthCorner
{
    class Program
    {
        static void Main(string[] args)
        {
            // Apply your license key
            LicenseProvider.SetLicenseKey("License Key");

            // Create a PdfDocument object
            PdfDocument doc = new PdfDocument();

            // Load a PDF file
            doc.LoadFromFile("C:\\Users\\Administrator\\Desktop\\Terms of service.pdf");

            // Create font, brush and pen, which determine the appearance of the page numbers to be added
            PdfTrueTypeFont font = new PdfTrueTypeFont(new Font("Times New Roman", 12, FontStyle.Regular), true);
            PdfBrush brush = PdfBrushes.Black;
            PdfPen pen = new PdfPen(brush, 1.0f);

            // Create a PdfPageNumberField object and a PdfPageCountField object
            PdfPageNumberField pageNumberField = new PdfPageNumberField();
            PdfPageCountField pageCountField = new PdfPageCountField();

            // Create a PdfCompositeField object to combine page count field and page number field in a single field
            PdfCompositeField compositeField = new PdfCompositeField(font, brush, "Page {0} of {1}", pageNumberField, pageCountField);


            // Iterate through the pages in the document
            for (int i = 0; i < doc.Pages.Count; i++)
            {

                // Get a specific page
                PdfPageBase page = doc.Pages[i];

                // Get the page size
                SizeF pageSize = doc.Pages[i].Size;

                // Draw a line at the specified position
                page.Canvas.DrawLine(pen, 72, pageSize.Height - 50, pageSize.Width - 72, pageSize.Height - 50);

                // Measure the size the "Page X of Y"
                SizeF pageNumberSize = font.MeasureString(string.Format("Page {0} of {1}", i + 1, doc.Pages.Count));

                // Set the location of the composite field
                compositeField.Location = new PointF(pageSize.Width - pageNumberSize.Width - 72, pageSize.Height - 45);

                // Draw the composite field on the page
                compositeField.Draw(page.Canvas);

            }

            // Save to a different PDF file
            doc.SaveToFile("AddPageNumbersToRigthCorner.pdf");

            // Dispose resources
            doc.Dispose();
        }
    }
}
Apply for a Temporary License
If you'd like to remove the evaluation message from the generated documents, or to get rid of the function limitations, please request a 30-day trial license for yourself.
How to remove a specific node by position from SmartArt in PowerPoint
2016-07-14 08:41:05 Written by KoohjiSpire.Presentation for .NET provides two flexible methods: RemoveNode() and RemoveNodeByPosition() for developers to remove nodes from SmartArt. In this article, we will learn how to remove a specific node by position from SmartArt in PowerPoint using the RemoveNodeByPosition() method.
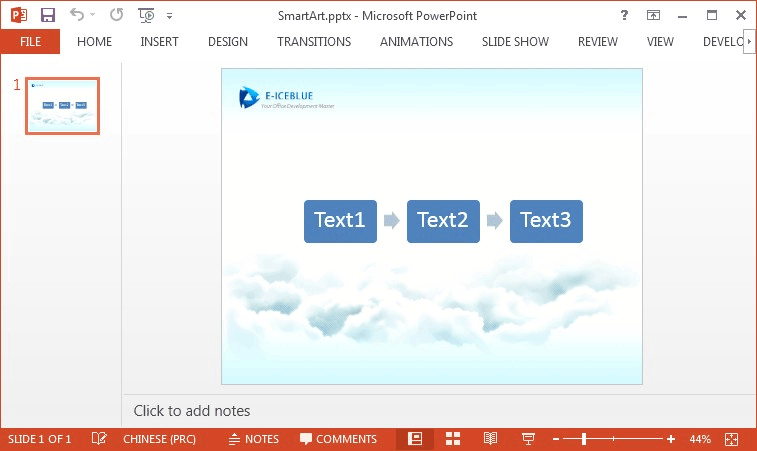
Below is the screenshot of the original SmartArt:
Detail steps:
Step 1: Create a new instance of Presentation class and load the PPT file.
Presentation presentation = new Presentation();
presentation.LoadFromFile("SmartArt.pptx");
Step 2: Get the SmartArt and collect nodes.
ISmartArt smartart = presentation.Slides[0].Shapes[0] as ISmartArt;
ISmartArtNodeCollection nodes = smartart.Nodes;
Step 3: Call nodes.RemoveNodeByPosition(int position) method to remove the specific node by position.
nodes.RemoveNodeByPosition(0);
Step 4: Save the file to disk.
presentation.SaveToFile("RemoveNodes.pptx", FileFormat.Pptx2010);
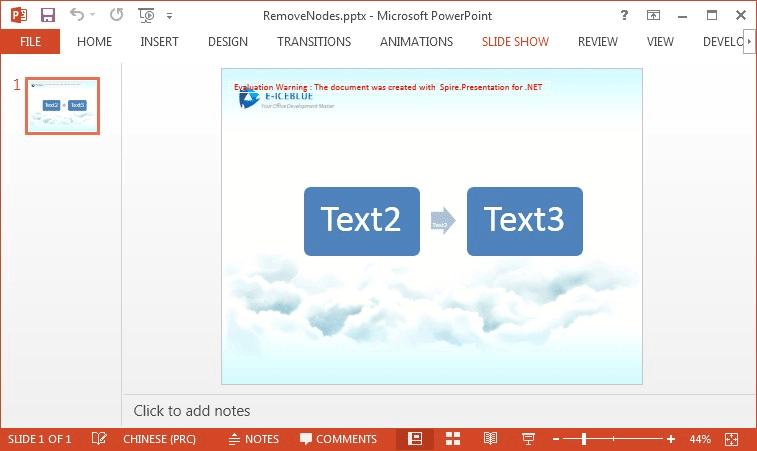
Running the project, we'll get the following result SmartArt:
Full codes:
using Spire.Presentation;
using Spire.Presentation.Diagrams;

namespace Remove_Node_from_SmartArt_in_PowerPoint
{
    class Program
    {
        static void Main(string[] args)
        {
            Presentation presentation = new Presentation();
            presentation.LoadFromFile("SmartArt.pptx");

            ISmartArt smartart = presentation.Slides[0].Shapes[0] as ISmartArt;
            ISmartArtNodeCollection nodes = smartart.Nodes;

            nodes.RemoveNodeByPosition(0);

            presentation.SaveToFile("RemoveNodes.pptx", FileFormat.Pptx2010);
        }
    }
}
Imports Spire.Presentation
Imports Spire.Presentation.Diagrams

Namespace Remove_Node_from_SmartArt_in_PowerPoint
	Class Program
		Private Shared Sub Main(args As String())
			Dim presentation As New Presentation()
			presentation.LoadFromFile("SmartArt.pptx")

			Dim smartart As ISmartArt = TryCast(presentation.Slides(0).Shapes(0), ISmartArt)
			Dim nodes As ISmartArtNodeCollection = smartart.Nodes

			nodes.RemoveNodeByPosition(0)

			presentation.SaveToFile("RemoveNodes.pptx", FileFormat.Pptx2010)
		End Sub
	End Class
End Namespace
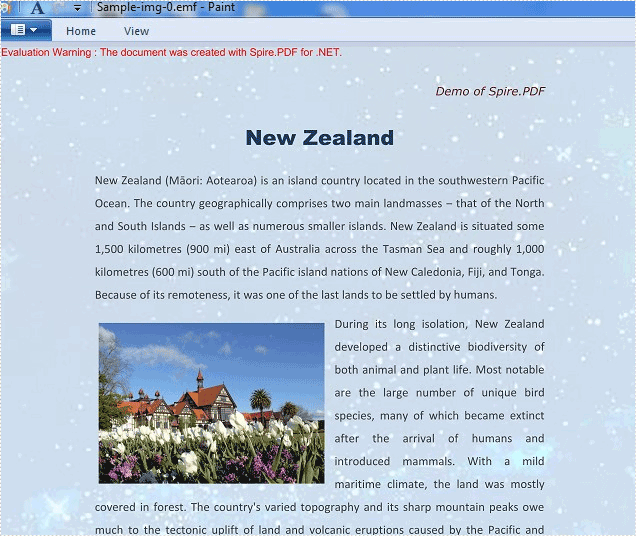
Spire.PDF supports to save the PDF files into different image file formats, such as BMP, JPG, PNG, GIF and TIFF. It also supports to save the PDF files as the Enhanced Metafile (EMF) image file format. This article will demonstrate how to save the PDF file as the EMF image file format in C#. With the help of Spire.PDF, we only need three lines of codes to finish the conversion function.
Note: Before Start, please download the latest version of Spire.PDF and add Spire.Pdf.dll in the bin folder as the reference of Visual Studio.
Here comes to the steps of how to export the PDF file to EMF in C#:
Step 1: Create a new PDF document and load from file.
PdfDocument doc = new PdfDocument();
doc.LoadFromFile("sample.pdf");
Step 2: Call to use the SaveAsImage method to save all the PDF pages as System.Drawing.Imaging.ImageFormat.Emf file format.
for (int i = 0; i < doc.Pages.Count; i++)
{
    String fileName = String.Format("Sample-img-{0}.emf", i);
    using (Image image = doc.SaveAsImage(i, Spire.Pdf.Graphics.PdfImageType.Bitmap, 300, 300))
     {
       image.Save(fileName, System.Drawing.Imaging.ImageFormat.Emf);
     }

}
Effective screenshot:
Full codes:
using Spire.Pdf;
using System;
using System.Drawing;

namespace ConvertPDFtoEMF
{
    class Program
    {
        static void Main(string[] args)
        {
            PdfDocument doc = new PdfDocument();
            doc.LoadFromFile("sample.pdf");

            for (int i = 0; i < doc.Pages.Count; i++)
            {
              using (Image image = doc.SaveAsImage(i, Spire.Pdf.Graphics.PdfImageType.Bitmap, 300, 300))
               {
                 image.Save(fileName, System.Drawing.Imaging.ImageFormat.Emf);
               }

            }
        }
    }
}
Open a PDF file at a specific zoom factor/percentage in C#/VB.NET
2016-07-08 02:46:34 Written by KoohjiSometimes, we may need to change the zoom factor when displaying a PDF file to fulfil our requirements. In this article, we will demonstrate how to open a PDF file at a specific zoom factor/percentage (such as default, 100 percent or any other zoom factors as required) by using Spire.PDF for .NET.
Now, please check the original zoom factor of the PDF file as below picture:
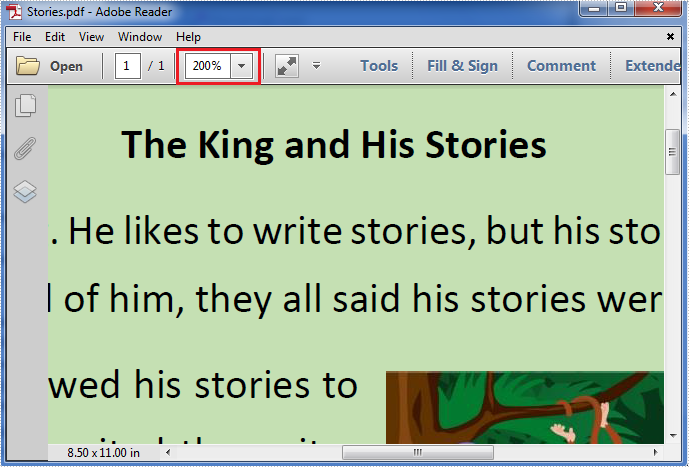
Then refer to the following detail steps:
Step 1: Create a new instance of PdfDocument class, load the original PDF file and get its first page.
PdfDocument pdf = new PdfDocument("Stories.pdf");
PdfPageBase page = pdf.Pages[0];
Step 2: Create a new PdfXYZExplicitDestination object using the PdfXYZExplicitDestination(PdfPageBase page, float left, float top, float zoom) constructor, which takes the page, the page display location and the zoom factor/percentage in one call.
// Specify the page, the display location and the zoom factor in one call (1f = 100%; use 0f for the default/inherit zoom).
PdfXYZExplicitDestination dest = new PdfXYZExplicitDestination(page, -40f, -40f, 1f);
Step 3: Create a new instance of PdfGoToAction class and enable the zoom factor resetting action to be executed when the PDF file is opened.
PdfGoToAction gotoaction = new PdfGoToAction(dest);
pdf.AfterOpenAction = gotoaction;
Step 4: Save the PDF file.
pdf.SaveToFile("result.pdf");
The result zoom factor of the PDF file:
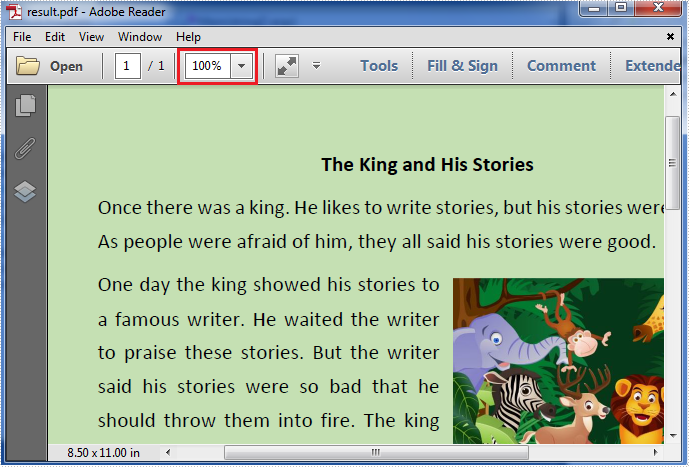
Full codes:
using Spire.Pdf;
using Spire.Pdf.Actions;
using Spire.Pdf.Destinations;
using Spire.Pdf.General;
using System.Drawing;

namespace Set_the_zoom_factor
{
    class Program
    {
        static void Main(string[] args)
        {
            PdfDocument pdf = new PdfDocument("Stories.pdf");
            PdfPageBase page = pdf.Pages[0];
            PdfXYZExplicitDestination dest = new PdfXYZExplicitDestination(page, -40f, -40f, 1f);
            PdfGoToAction gotoaction = new PdfGoToAction(dest);
            pdf.AfterOpenAction = gotoaction;
            pdf.SaveToFile("result.pdf");
        }
    }
}
Imports Spire.Pdf
Imports Spire.Pdf.Actions
Imports Spire.Pdf.Destinations
Imports Spire.Pdf.General
Imports System.Drawing

Namespace Set_the_zoom_factor
	Class Program
		Private Shared Sub Main(args As String())
			Dim pdf As New PdfDocument("Stories.pdf")
			Dim page As PdfPageBase = pdf.Pages(0)
			Dim dest As New PdfXYZExplicitDestination(page, -40F, -40F, 1F)
			Dim gotoaction As New PdfGoToAction(dest)
			pdf.AfterOpenAction = gotoaction
			pdf.SaveToFile("result.pdf")
		End Sub
	End Class
End Namespace
By default, when we insert an image to a cell, the image automatically be placed at top left corner. If there are some text in the same cell, then the text will be covered by the image. To avoid the problem, we need to vertically or horizontally align the picture. This article focuses on how to align a picture within a cell using Spire.XLS with C#, VB.NET.
Code Snippet:
Step 1: Create an object of Workbook and get the first worksheet.
Workbook wb = new Workbook();
Worksheet sheet = wb.Worksheets[0];
Step 2: Insert an image to the specific cell using Pictures.Add(int topRow, int leftColumn, string filename) method.
string picPath = @"C:\Users\Administrator\Desktop\scenery.jpg";
ExcelPicture picture = sheet.Pictures.Add(1, 1, picPath);
Step 3: Adjust the column width and row height so that the cell can contain the picture.
sheet.Columns[0].ColumnWidth = 50;
sheet.Rows[0].RowHeight = 150;
Step 4: Vertically and horizontally align the image by setting values for LeftColumnOffset and TopRowOffset properties.
picture.LeftColumnOffset = 100;
picture.TopRowOffset = 25;
Step 5: Save the file.
wb.SaveToFile("AlignPicture.xlsx", ExcelVersion.Version2013);
Output:
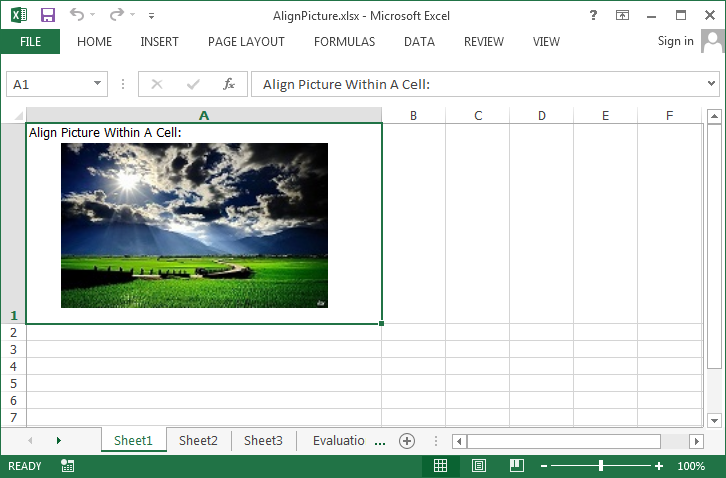
Full Code:
using Spire.Xls;
namespace AlignPicture
{
    class Program
    {
        static void Main(string[] args)
        {
            Workbook wb = new Workbook();
            Worksheet sheet = wb.Worksheets[0];

            sheet.Range["A1"].Text = "Align Picture Within A Cell:";
            sheet.Range["A1"].Style.VerticalAlignment = VerticalAlignType.Top;

            string picPath = @"C:\Users\Administrator\Desktop\scenery.jpg";
            ExcelPicture picture = sheet.Pictures.Add(1, 1, picPath);

            sheet.Columns[0].ColumnWidth = 50;
            sheet.Rows[0].RowHeight = 150;

            picture.LeftColumnOffset = 100;
            picture.TopRowOffset = 25;

            wb.SaveToFile("AlignPicture.xlsx", ExcelVersion.Version2013);
        }
    }
}
Imports Spire.Xls
Namespace AlignPicture
	Class Program
		Private Shared Sub Main(args As String())
			Dim wb As New Workbook()
			Dim sheet As Worksheet = wb.Worksheets(0)

			sheet.Range("A1").Text = "Align Picture Within A Cell:"
			sheet.Range("A1").Style.VerticalAlignment = VerticalAlignType.Top

			Dim picPath As String = "C:\Users\Administrator\Desktop\scenery.jpg"
			Dim picture As ExcelPicture = sheet.Pictures.Add(1, 1, picPath)

			sheet.Columns(0).ColumnWidth = 50
			sheet.Rows(0).RowHeight = 150

			picture.LeftColumnOffset = 100
			picture.TopRowOffset = 25

			wb.SaveToFile("AlignPicture.xlsx", ExcelVersion.Version2013)
		End Sub
	End Class
End Namespace
The table of contents plays a critical role in enhancing the readability and navigability of a document. It provides readers with a clear overview of the document's structure and enables them to quickly locate and access specific sections or information they are interested in. This can be especially valuable for longer documents, such as reports, books, or academic papers, where readers may need to refer back to specific sections or chapters multiple times. In this article, we'll explore how to create a table of contents in a PDF document in C# and VB.NET using Spire.PDF for .NET.
Install Spire.PDF for .NET
To begin with, you need to add the DLL files included in the Spire.PDF for.NET package as references in your .NET project. The DLL files can be either downloaded from this link or installed via NuGet.
PM> Install-Package Spire.PDF
Create a Table of Contents in PDF in C# and VB.NET
A table of contents mainly includes the TOC title (e.g. Table of Contents), TOC content, page numbers, and actions that will take you to the target pages when clicked on. To create a table of contents in PDF using Spire.PDF for .NET, you can follow these steps:
- Initialize an instance of the PdfDocument class.
- Load a PDF document using PdfDocument.LoadFromFile() method.
- Get the page count of the document using PdfDocument.Pages.Count property.
- Insert a new page into the PDF document as the first page using PdfDocument.Pages.Insert(0) method.
- Draw the TOC title, TOC content, and page numbers on the page using PdfPageBase.Canvas.DrawString() method.
- Create actions using PdfLinkAnnotation class and add the actions to the page using PdfAnnotationCollection.Create(page) method and its Add() method.
- Save the result document using PdfDocument.SaveToFile() method.
- C#
- VB.NET
using Spire.Pdf;
using Spire.Pdf.Actions;
using Spire.Pdf.Interactive.Annotations;
using Spire.Pdf.Destinations;
using Spire.Pdf.Graphics;
using System;
using System.Drawing;

namespace TableOfContents
{
    internal class Program
    {
        static void Main(string[] args)
        {
            //Initialize an instance of the PdfDocument class
            PdfDocument doc = new PdfDocument();
            //Load a PDF document
            doc.LoadFromFile("Sample.PDF");

            //Get the page count of the document
            int pageCount = doc.Pages.Count;

            //Insert a new page into the pdf document as the first page
            PdfPageBase tocPage = doc.Pages.Insert(0);

            //Draw TOC title on the new page
            string title = "Table of Contents";
            PdfTrueTypeFont titleFont = new PdfTrueTypeFont(new Font("Arial", 20, FontStyle.Bold));
            PdfStringFormat centerAlignment = new PdfStringFormat(PdfTextAlignment.Center, PdfVerticalAlignment.Middle);
            PointF location = new PointF(tocPage.Canvas.ClientSize.Width / 2, titleFont.MeasureString(title).Height + 10);
            tocPage.Canvas.DrawString(title, titleFont, PdfBrushes.CornflowerBlue, location, centerAlignment);

            //Draw TOC content on the new page
            PdfTrueTypeFont titlesFont = new PdfTrueTypeFont(new Font("Arial", 14));
            String[] titles = new String[pageCount];
            for (int i = 0; i < titles.Length; i++)
            {
                titles[i] = string.Format("This is page {0}", i + 1);
            }
            float y = titleFont.MeasureString(title).Height + 10;
            float x = 0;

            //Draw page numbers of the target pages on the new page
            for (int i = 1; i <= pageCount; i++)
            {
                string text = titles[i - 1];
                SizeF titleSize = titlesFont.MeasureString(text);

                PdfPageBase navigatedPage = doc.Pages[i];

                string pageNumText = (i + 1).ToString();
                SizeF pageNumTextSize = titlesFont.MeasureString(pageNumText);
                tocPage.Canvas.DrawString(text, titlesFont, PdfBrushes.CadetBlue, 0, y);
                float dotLocation = titleSize.Width + 2 + x;
                float pageNumlocation = tocPage.Canvas.ClientSize.Width - pageNumTextSize.Width;
                for (float j = dotLocation; j < pageNumlocation; j++)
                {
                    if (dotLocation >= pageNumlocation)
                    {
                        break;
                    }
                    tocPage.Canvas.DrawString(".", titlesFont, PdfBrushes.Gray, dotLocation, y);
                    dotLocation += 3;
                }
                tocPage.Canvas.DrawString(pageNumText, titlesFont, PdfBrushes.CadetBlue, pageNumlocation, y);

                //Add actions that will take you to the target pages when clicked on to the new page
                location = new PointF(0, y);
                RectangleF titleBounds = new RectangleF(location, new SizeF(tocPage.Canvas.ClientSize.Width, titleSize.Height));
                PdfXYZExplicitDestination Dest = new PdfXYZExplicitDestination(navigatedPage, -doc.PageSettings.Margins.Top, -doc.PageSettings.Margins.Left);
                PdfLinkAnnotation action = new PdfLinkAnnotation(tocPage, titleBounds, new PdfGoToAction(Dest));
                action.Border.Width = 0;
                PdfAnnotationCollection.Create(tocPage).Add(action);
                y += titleSize.Height + 10;
            }

            //Save the result pdf document
            doc.SaveToFile("AddTableOfContents.pdf");
            doc.Close();
        }
    }
}
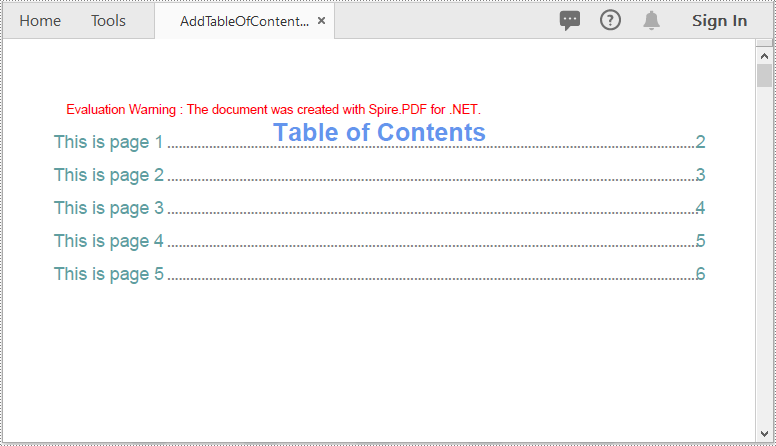
Apply for a Temporary License
If you'd like to remove the evaluation message from the generated documents, or to get rid of the function limitations, please request a 30-day trial license for yourself.
Modify Password of Encrypted PowerPoint Document in C#, VB.NET
2016-07-01 03:10:31 Written by KoohjiSometimes we may need to re-encrypt the document whose password has been or is at the risk of being leaked out. This article will show you how to load an encrypted PowerPoint document and modify its password using Spire.Presentation.
Code Snippet:
Step 1: Create an object of Presentation class.
Presentation presentation = new Presentation();
Step 2: Load an encrypted PowerPoint document into the Presentation object.
presentation.LoadFromFile("Encrypted.pptx",FileFormat.Pptx2010, "oldPassword");
Step 3: Remove the encryption.
presentation.RemoveEncryption();
Step 4: Protect the document by setting a new password.
presentation.Protect("newPassword");
Step 5: Save the file.
presentation.SaveToFile("result.pptx", FileFormat.Pptx2010);
Full Code:
using Spire.Presentation;
namespace ModifyPassword
{

    class Program
    {

        static void Main(string[] args)
        {
            Presentation presentation = new Presentation();
            presentation.LoadFromFile("Encrypted.pptx", FileFormat.Pptx2010, "oldPassword");

            presentation.RemoveEncryption();
            presentation.Protect("newPassword");

            presentation.SaveToFile("result.pptx", FileFormat.Pptx2010);

        }
    }
}
Imports Spire.Presentation
Namespace ModifyPassword

	Class Program

		Private Shared Sub Main(args As String())
			Dim presentation As New Presentation()
			presentation.LoadFromFile("Encrypted.pptx", FileFormat.Pptx2010, "oldPassword")

			presentation.RemoveEncryption()
			presentation.Protect("newPassword")

			presentation.SaveToFile("result.pptx", FileFormat.Pptx2010)

		End Sub
	End Class
End Namespace
Spire.Presentation as a powerful PowerPoint library, enables developers to create SmartArt, add text to SmartArt and format SmartArt in a flexible way (Reference: How to Create and Format SmartArt in PowerPoint in C#, VB.NET). In this article, we will further introduce how to extract text from SmartArt in PowerPoint in C# and VB.NET by using Spire.Presentation for .NET.
Please look at the appearance of the sample PPT file first:
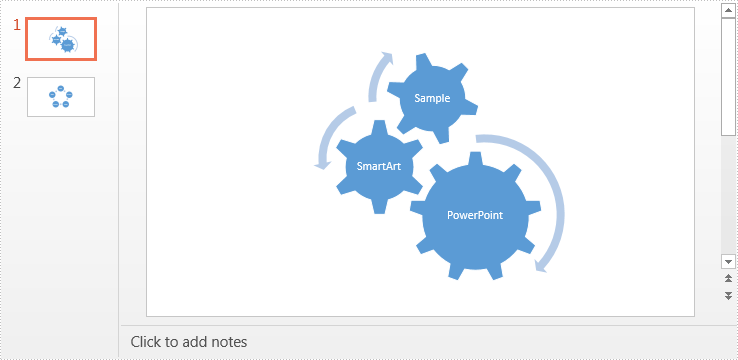
Detail steps and code snippets are as below:
Step 1: Create a new instance of Presentation class and load the sample PPT file.
Presentation ppt = new Presentation();
ppt.LoadFromFile("Sample.pptx");
Step 2: Create a new instance of StringBulider class, traverse through all the slides of the PPT file, find the SmartArt shapes, and then extract text from SmartArt shape Nodes and append to the StringBuilder object.
StringBuilder st = new StringBuilder();
for (int i = 0; i < ppt.Slides.Count; i++)
{
    for (int j = 0; j < ppt.Slides[i].Shapes.Count; j++)
    {
        if (ppt.Slides[i].Shapes[j] is ISmartArt)
        {
            ISmartArt smartArt = ppt.Slides[i].Shapes[j] as ISmartArt;
            for (int k = 0; k < smartArt.Nodes.Count; k++)
            {
                st.Append(smartArt.Nodes[k].TextFrame.Text);
            }
        }
    }
}
Step 3: Create a new text file and write the extracted text to the text file.
File.WriteAllText("Result.txt", st.ToString());
The result text file:
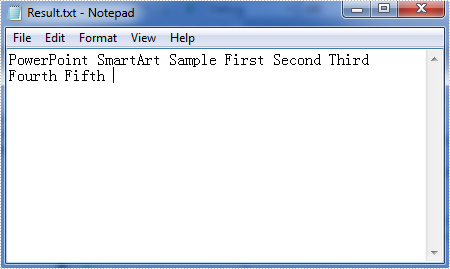
Full codes:
using System.IO;
using System.Text;
using Spire.Presentation;
using Spire.Presentation.Diagrams;

namespace Extract_text_from_SmartArt_in_PPT
{
    class Program
    {
        static void Main(string[] args)
        {
            Presentation ppt = new Presentation();
            ppt.LoadFromFile("Sample.pptx");

            StringBuilder st = new StringBuilder();
            for (int i = 0; i < ppt.Slides.Count; i++)
            {
                for (int j = 0; j < ppt.Slides[i].Shapes.Count; j++)
                {
                    if (ppt.Slides[i].Shapes[j] is ISmartArt)
                    {
                        ISmartArt smartArt = ppt.Slides[i].Shapes[j] as ISmartArt;
                        for (int k = 0; k < smartArt.Nodes.Count; k++)
                        {
                            st.Append(smartArt.Nodes[k].TextFrame.Text);
                        }
                    }
                }
            }
            File.WriteAllText("Result.txt", st.ToString());
       }
    }
}
Imports System.IO
Imports System.Text
Imports Spire.Presentation
Imports Spire.Presentation.Diagrams

Namespace Extract_text_from_SmartArt_in_PPT
	Class Program
		Private Shared Sub Main(args As String())
			Dim ppt As New Presentation()
			ppt.LoadFromFile("Sample.pptx")

			Dim st As New StringBuilder()
			For i As Integer = 0 To ppt.Slides.Count - 1
				For j As Integer = 0 To ppt.Slides(i).Shapes.Count - 1
					If TypeOf ppt.Slides(i).Shapes(j) Is ISmartArt Then
						Dim smartArt As ISmartArt = TryCast(ppt.Slides(i).Shapes(j), ISmartArt)
						For k As Integer = 0 To smartArt.Nodes.Count - 1							st.Append(smartArt.Nodes(k).TextFrame.Text)
						Next
					End If
				Next
			Next
			File.WriteAllText("Result.txt", st.ToString())
		End Sub
	End Class
End Namespace
