
React (98)
Children categories
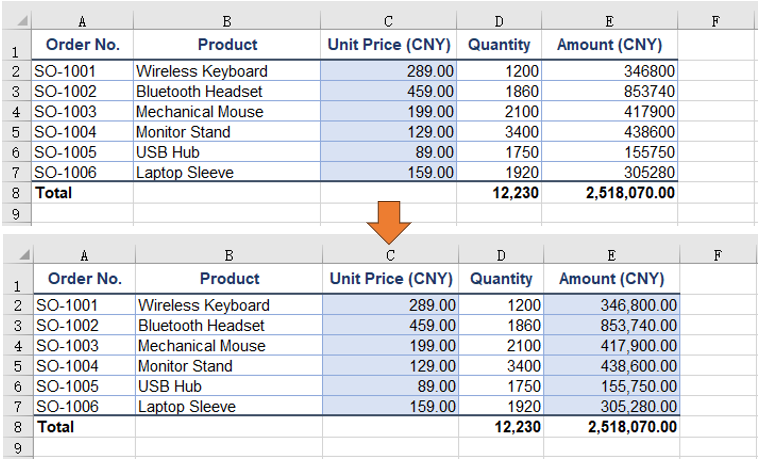
A cell whose formatting is already right often has to be reused elsewhere: the unit price column carries a money format, a light blue fill and thin borders, while the amount column on the same row is still plain. Copying a cell format hands the look the source cell has already settled on to the target cell -- number format, font, fill, border and alignment in one go -- and leaves the data in the target cell untouched. Spire.XLS for JavaScript performs these operations in the browser through WebAssembly; the input and output files are managed by a virtual file system (VFS), with no backend service required.
This article covers two feature points:
For installation and project setup, see Integrating Spire.XLS for JavaScript in a React Project. The examples below assume Spire.XLS is installed and the WebAssembly module has been initialized.
Copy the whole cell format
Every part of a cell's look is kept in a style object of its own. Handing the source cell's style object straight to the target cell carries the number format, font, fill, border and alignment across in one go, while the data in the target cell stays where it is. The sample workbook's unit price column already carries a money format and a light blue fill, and the amount column is still plain, so copying the former onto the latter row by row shows the difference.
Assigning the source cell's whole Style to the target cell's Style completes the copy:
| Syntax | Result |
|---|---|
sheet.Range.get('C2').Style |
Takes the whole style object of the source cell (the unit price column) |
sheet.Range.get('E2').Style = sheet.Range.get('C2').Style |
Hands that whole style to the target cell (the amount column): number format, font, fill, border and alignment follow |
sheet.Range.get({ row, column: 5 }).Text |
The value already in the target cell stays where it is, unaffected by the style assignment |
The steps are:
- Load the font file and the test data file into the VFS with
window.spire.FetchFileToVFS. - Create a workbook with
new Workbook(), load the input file withworkbook.LoadFromFile, and take the first worksheet withworkbook.Worksheets.get(0). - Take the source column's cell and the target column's cell row by row with
sheet.Range.get. - Assign the source cell's
Styleto the target cell'sStyle; the whole cell format follows, and the target cell's value is left untouched. - Save the workbook with
workbook.SaveToFileand dispose of it withworkbook.Disposeto free resources.
The full code example below shows how to copy the whole cell format in React:
function App() {
  const copyCellStyle = async () => {
    // get the Spire.XLS WASM module
    const xlsModule = window.wasmModule?.spirexls;

    // check that the module is ready
    if (!xlsModule) {
      alert('Spire.Xls is not ready yet');
      return;
    }

    // load the font and the test data file into the VFS
    await window.spire.FetchFileToVFS('ARIAL.TTF', '/Library/Fonts/', `${process.env.PUBLIC_URL}/font/`);
    const inputFileName = 'CopyCellStyle.xlsx';
    await window.spire.FetchFileToVFS(inputFileName, '', `${process.env.PUBLIC_URL}data/`);

    // load the workbook and take the first worksheet
    const workbook = new xlsModule.Workbook();
    workbook.LoadFromFile({ fileName: inputFileName });
    const sheet = workbook.Worksheets.get(0);

    // row by row, put the unit price column's format onto the amount column; the amounts stay put
    for (let row = 2; row <= 7; row++) {
      sheet.Range.get(`E${row}`).Style = sheet.Range.get(`C${row}`).Style;
    }

    // save the workbook
    const outputFileName = 'CopyCellStyle-output.xlsx';
    workbook.SaveToFile({ fileName: outputFileName, version: xlsModule.ExcelVersion.Version2016 });

    // dispose of the workbook to free resources
    workbook.Dispose();

    // read the result file from the VFS and start the download
    const fileArray = window.dotnetRuntime.Module.FS.readFile(outputFileName);
    const blob = new Blob([fileArray], { type: 'application/vnd.openxmlformats-officedocument.spreadsheetml.sheet' });
    const url = URL.createObjectURL(blob);
    const a = document.createElement('a');
    a.href = url;
    a.download = outputFileName;
    a.click();
    URL.revokeObjectURL(url);
  };

  return (
    <div style={{ textAlign: 'center', height: '300px' }}>
      <h1>Copy Cell Format</h1>
      <button id="copy-cell-style" onClick={copyCellStyle}>Copy the Whole Cell Format</button>
    </div>
  );
}

export default App;
The worksheet after copying the whole cell format:
Clone and reuse a named style
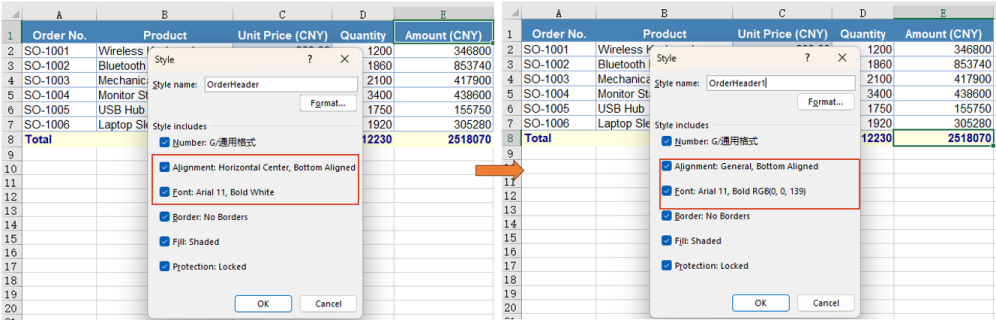
When one set of formatting is needed in several places, registering it as a named style lets it be applied to any range by name, and a colour change has to be made in one place only. A named style lives on the workbook: create it with workbook.Styles.Add, set its properties, then apply it by name through Range.CellStyleName. The example builds a style of white text on a steel blue fill for the header row, then clones it and changes only the colours for the total line -- the change lands on the clone alone, and the original style is unaffected.
A named style is registered on the workbook and applied to a range by name:
| Syntax | Result |
|---|---|
workbook.Styles.Add('OrderHeader') |
Registers a named style called OrderHeader on the workbook |
headerStyle.Font.Color, headerStyle.Color, headerStyle.FillPattern |
Sets the text colour, the fill colour and the fill pattern one by one |
headerStyle.clone() |
Copies out a style of its own, with a number appended to the name |
sheet.Range.get('A1:E1').CellStyleName = headerStyle.Name |
Applies the named style to that range by name |
The steps are:
- Load the font file and the test data file into the VFS with
window.spire.FetchFileToVFS. - Create a workbook with
new Workbook(), load the input file withworkbook.LoadFromFile, and take the first worksheet withworkbook.Worksheets.get(0). - Create a named style with
workbook.Styles.Addand set its font name, size, bold, text colour, fill colour, fill pattern and horizontal alignment. - Apply the style to the header range by name with
sheet.Range.get('A1:E1').CellStyleName. - Clone it with the style's
clone(), change only the text colour and the fill colour, and get the variant the total line needs. - Apply the variant to the total line with
sheet.Range.get('A8:E8').CellStyleName. - Save the workbook with
workbook.SaveToFileand dispose of it withworkbook.Disposeto free resources.
The full code example below shows how to clone a named style and reuse it for different ranges in React:
function App() {
  const cloneNamedStyle = async () => {
    // get the Spire.XLS WASM module
    const xlsModule = window.wasmModule?.spirexls;

    // check that the module is ready
    if (!xlsModule) {
      alert('Spire.Xls is not ready yet');
      return;
    }

    // load the font and the test data file into the VFS
    await window.spire.FetchFileToVFS('ARIAL.TTF', '/Library/Fonts/', `${process.env.PUBLIC_URL}/font/`);
    const inputFileName = 'CopyCellStyle.xlsx';
    await window.spire.FetchFileToVFS(inputFileName, '', `${process.env.PUBLIC_URL}data/`);

    // load the workbook and take the first worksheet
    const workbook = new xlsModule.Workbook();
    workbook.LoadFromFile({ fileName: inputFileName });
    const sheet = workbook.Worksheets.get(0);

    // create a named style: white text on a steel blue fill, centred
    const headerStyle = workbook.Styles.Add('OrderHeader');
    headerStyle.Font.FontName = 'Arial';
    headerStyle.Font.Size = 11;
    headerStyle.Font.IsBold = true;
    headerStyle.Font.Color = xlsModule.Color.get_White();
    headerStyle.Color = xlsModule.Color.get_SteelBlue();
    headerStyle.FillPattern = xlsModule.ExcelPatternType.Solid;
    headerStyle.HorizontalAlignment = xlsModule.HorizontalAlignType.Center;

    // apply the named style to the header row
    sheet.Range.get('A1:E1').CellStyleName = headerStyle.Name;

    // clone it and change only the colours, giving the variant the total line needs
    const totalStyle = headerStyle.clone();
    totalStyle.Font.Color = xlsModule.Color.get_DarkBlue();
    totalStyle.Color = xlsModule.Color.get_LightYellow();

    // apply the cloned style to the total line
    sheet.Range.get('A8:E8').CellStyleName = totalStyle.Name;

    // save the workbook
    const outputFileName = 'CloneNamedStyle.xlsx';
    workbook.SaveToFile({ fileName: outputFileName, version: xlsModule.ExcelVersion.Version2016 });

    // dispose of the workbook to free resources
    workbook.Dispose();

    // read the result file from the VFS and start the download
    const fileArray = window.dotnetRuntime.Module.FS.readFile(outputFileName);
    const blob = new Blob([fileArray], { type: 'application/vnd.openxmlformats-officedocument.spreadsheetml.sheet' });
    const url = URL.createObjectURL(blob);
    const a = document.createElement('a');
    a.href = url;
    a.download = outputFileName;
    a.click();
    URL.revokeObjectURL(url);
  };

  return (
    <div style={{ textAlign: 'center', height: '300px' }}>
      <h1>Clone and Reuse a Named Style</h1>
      <button id="clone-named-style" onClick={cloneNamedStyle}>Clone and Reuse a Named Style</button>
    </div>
  );
}

export default App;
The worksheet after cloning a named style and reusing it:
FAQ
Copying the number format alone, without the fill or the border
Reason: A whole-cell copy takes the fill, font and border along with the number format, which is more than a change of display calls for.
Solution: Take NumberFormat from the source cell's style and assign that single property to the target cell's style, leaving the rest untouched:
// take the number format of the total line's quantity cell as the format to apply
const sourceStyle = sheet.Range.get('D8').Style;

// put only the number format onto the quantity column; the bold and the top border stay untouched
for (let row = 2; row <= 7; row++) {
  sheet.Range.get(`D${row}`).Style.NumberFormat = sourceStyle.NumberFormat;
}
Why a whole font object cannot be assigned to the target cell
Reason: Style.Font is a read-only property; it returns the font object the cell currently carries, so it cannot be replaced wholesale -- only the members hanging off it can be changed.
Solution: Set FontName, Size, Color, IsBold and the like one at a time. To bring the fill and the border across as well, assign the whole Style; to reuse a group of settings, register them as a named style and apply that style by name.
Does re-colouring a clone change the original style as well
Cause: clone() produces a copy that stands on its own, and once saved it takes a separate entry among the workbook's named styles; the name has a number appended to keep the two apart, so OrderHeader clones to OrderHeader1. Changing the text colour and the fill colour on the copy leaves the original where it was, still carrying the colours it had before the clone.
Solution: When several colour variants are needed, clone them all from the same base style and adjust each one separately; the definition of the base style never moves.
A named style or a plain Style assignment -- which one to use
Cause: Assigning a Style copies the source cell's current look onto the target cell in one go, which suits a one-off move; Range.CellStyleName applies a named style registered on the workbook, so a format used over and over is referred to by a single name in the code.
Solution: For a one-off move of the look, assign the whole Style; for a format reused in several places, build a named style with workbook.Styles.Add and apply it by name.
Get a Free License
Spire.XLS for JavaScript offers a 30-day full-featured free trial license with no functional limitations. Apply here to evaluate before purchasing.
When a workbook has to be handed to a front-end program, JSON is the shape that fits APIs, caches and components alike: one array per worksheet, one object per row, and the column headers as the keys. Once the workbook is converted, the table data joins the data flow of the page without a backend parsing it first. Spire.XLS for JavaScript performs the conversion in the browser on WebAssembly, handling input and output files through a virtual file system (VFS) with no backend service.
This article covers four core feature points:
- Convert the Entire Workbook to JSON
- Convert a Specific Worksheet to JSON
- Convert a Specific Cell Range to JSON
- Customize the JSON Output Format
For installation and project setup, see Integrating Spire.XLS for JavaScript in a React Project. The examples below assume Spire.XLS is installed and the WebAssembly module has been initialised.
Convert the Entire Workbook to JSON
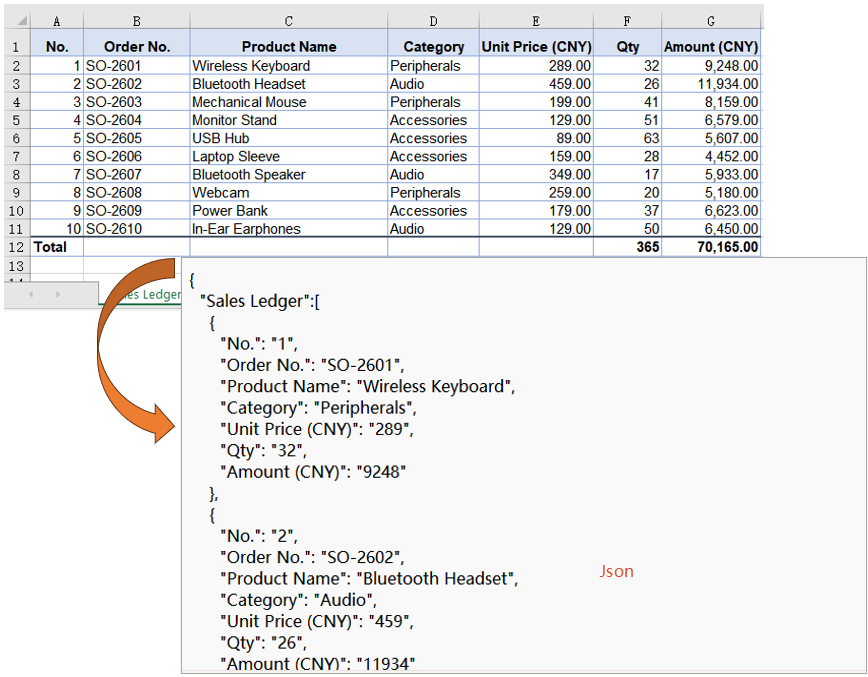
Every worksheet is a set of records that share a shape: the first row names the fields, and each row below it is one record. Handing over the whole workbook writes all of them at once, with the worksheet name as the key and the records as an array under it, so there is no need to call the conversion once per worksheet or to pick a range in advance. The sample workbook's three worksheets, the sales ledger, the customers and the notes, are written together, one top-level key each.
The whole-workbook conversion only has to name the target format when saving:
| Syntax | Result |
|---|---|
fileFormat: xlsModule.FileFormat.Json |
Writes the workbook as JSON, one top-level key per worksheet |
The steps are:
- Load the font and the test data file into the VFS with
window.spire.FetchFileToVFS. - Create a workbook with
new Workbook(), then load the input file withworkbook.LoadFromFile. - Save the workbook with
workbook.SaveToFile, namingxlsModule.FileFormat.JsoninfileFormat. - Dispose of the workbook with
workbook.Disposeto free resources.
The code below is the complete example of converting the entire workbook to JSON:
function App() {
  const workbookToJson = async () => {
    // get the Spire.XLS WASM module
    const xlsModule = window.wasmModule?.spirexls;

    // check that the module is ready
    if (!xlsModule) {
      alert('Spire.Xls is not ready yet');
      return;
    }

    // load the font and the test data file into the VFS
    await window.spire.FetchFileToVFS('ARIAL.TTF', '/Library/Fonts/', `${process.env.PUBLIC_URL}/font/`);
    const inputFileName = 'Sample.xlsx';
    await window.spire.FetchFileToVFS(inputFileName, '', `${process.env.PUBLIC_URL}data/`);

    // load the workbook
    const workbook = new xlsModule.Workbook();
    workbook.LoadFromFile({ fileName: inputFileName });

    // save the whole workbook as JSON
    const outputFileName = 'WorkbookToJson.json';
    workbook.SaveToFile({ fileName: outputFileName, fileFormat: xlsModule.FileFormat.Json });

    // dispose of the workbook to release its resources
    workbook.Dispose();

    // read the result back out of the VFS and trigger the download
    const fileArray = window.dotnetRuntime.Module.FS.readFile(outputFileName);
    const blob = new Blob([fileArray], { type: 'application/json' });
    const url = URL.createObjectURL(blob);
    const a = document.createElement('a');
    a.href = url;
    a.download = outputFileName;
    a.click();
    URL.revokeObjectURL(url);
  };

  return (
    <div style={{ textAlign: 'center', height: '300px' }}>
      <h1>Convert Excel to JSON</h1>
      <button id="workbook-to-json" onClick={workbookToJson}>Convert the Entire Workbook to JSON</button>
    </div>
  );
}

export default App;
The JSON file after converting the entire workbook:
Convert a Specific Worksheet to JSON
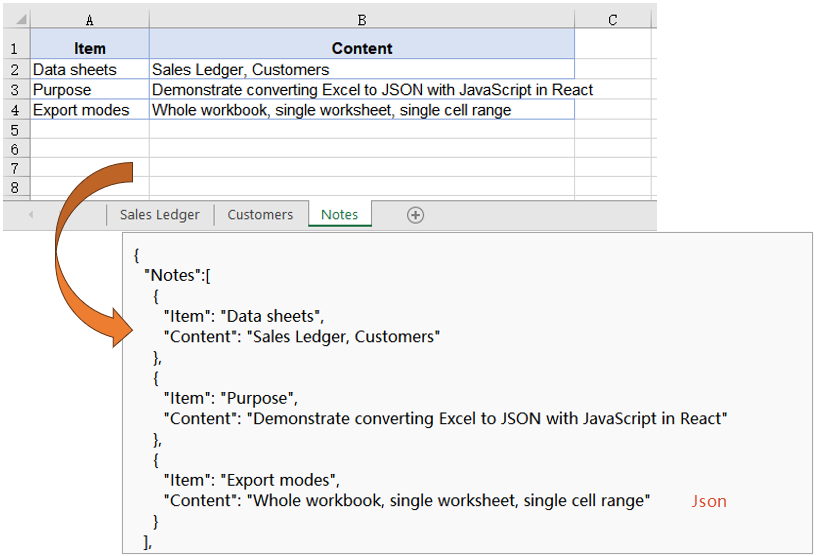
Most of the time only one worksheet is meant for the front end, while the rest are internal ledgers or instructions. Writing them all out lengthens the response and leaves the caller to pick the right one. The way around it is to copy the worksheet into a new workbook that holds nothing else and save that, so the result carries this one worksheet only. In the example the third worksheet, the notes, is exported, and the sales ledger and customers worksheets stay out of the result.
Isolating one worksheet comes down to three operations on the Worksheets collection:
| Syntax | Result |
|---|---|
workbook.Worksheets.get(2) |
Takes the third worksheet by index, counting from 0 |
workbook.Worksheets.Clear() |
Clears the worksheets the workbook already holds |
workbook.Worksheets.AddCopy({ sheet }) |
Copies the whole source worksheet into the cleared workbook |
The steps are:
- Load the font and the test data file into the VFS with
window.spire.FetchFileToVFS. - Create the source workbook with
new Workbook()and load the input file withworkbook.LoadFromFile, then take the worksheet to export withWorksheets.get(2). - Create a second workbook with
new Workbook()and clear the three blank worksheets it starts with usingWorksheets.Clear(). - Copy the target worksheet in with
Worksheets.AddCopy({ sheet }), so that it is the only one left. - Save the new workbook with
SaveToFile, namingxlsModule.FileFormat.JsoninfileFormat. - Dispose of both workbook objects with
Dispose.
The code below is the complete example of converting a specific worksheet to JSON:
function App() {
  const worksheetToJson = async () => {
    // get the Spire.XLS WASM module
    const xlsModule = window.wasmModule?.spirexls;

    // check that the module is ready
    if (!xlsModule) {
      alert('Spire.Xls is not ready yet');
      return;
    }

    // load the font and the test data file into the VFS
    await window.spire.FetchFileToVFS('ARIAL.TTF', '/Library/Fonts/', `${process.env.PUBLIC_URL}/font/`);
    const inputFileName = 'Sample.xlsx';
    await window.spire.FetchFileToVFS(inputFileName, '', `${process.env.PUBLIC_URL}data/`);

    // load the source workbook and take the third worksheet
    const sourceWorkbook = new xlsModule.Workbook();
    sourceWorkbook.LoadFromFile({ fileName: inputFileName });
    const targetSheet = sourceWorkbook.Worksheets.get(2);

    // create a new workbook and clear the three worksheets it starts with
    const targetWorkbook = new xlsModule.Workbook();
    targetWorkbook.Worksheets.Clear();

    // copy the target worksheet in, so that it is the only one left
    targetWorkbook.Worksheets.AddCopy({ sheet: targetSheet });

    // save that worksheet alone
    const outputFileName = 'WorksheetToJson.json';
    targetWorkbook.SaveToFile({ fileName: outputFileName, fileFormat: xlsModule.FileFormat.Json });

    // dispose of the workbook to release its resources
    sourceWorkbook.Dispose();
    targetWorkbook.Dispose();

    // read the result back out of the VFS and trigger the download
    const fileArray = window.dotnetRuntime.Module.FS.readFile(outputFileName);
    const blob = new Blob([fileArray], { type: 'application/json' });
    const url = URL.createObjectURL(blob);
    const a = document.createElement('a');
    a.href = url;
    a.download = outputFileName;
    a.click();
    URL.revokeObjectURL(url);
  };

  return (
    <div style={{ textAlign: 'center', height: '300px' }}>
      <h1>Convert Excel to JSON</h1>
      <button id="worksheet-to-json" onClick={worksheetToJson}>Convert a Specific Worksheet to JSON</button>
    </div>
  );
}

export default App;
The JSON file after converting a specific worksheet:
Convert a Specific Cell Range to JSON
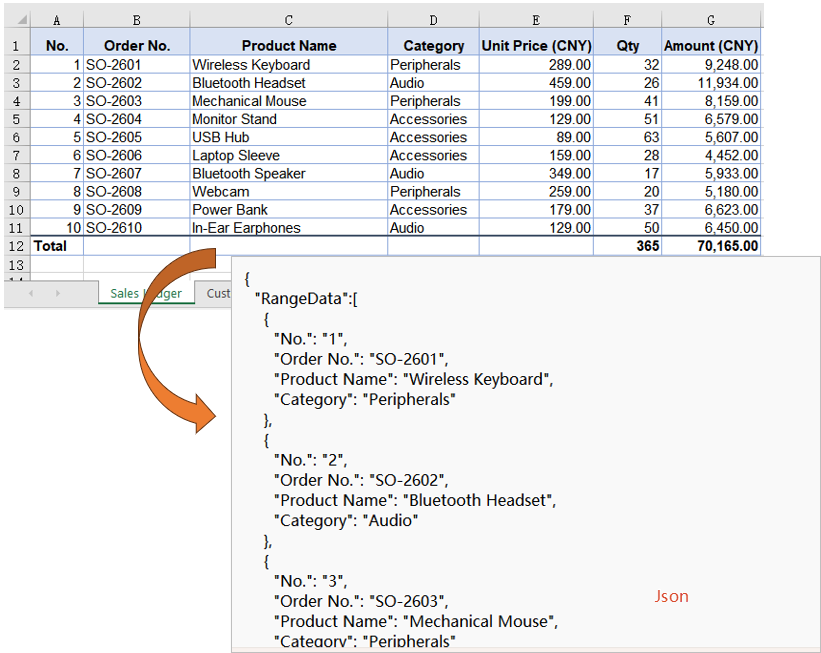
A worksheet usually carries more than the records themselves: title rows, totals formulas, helper columns pasted in from somewhere else. Exporting the whole sheet takes all of that along, when the caller only wants the tidy block in the middle. Naming the range first keeps everything outside it out of the result. The example takes A1:D6 of the sales ledger, six rows by four columns, leaving the price, quantity and amount columns behind in the workbook.
A range export follows the same path as a worksheet export, with a block of cells standing in for the whole sheet:
| Syntax | Result |
|---|---|
sourceSheet.Range.get('A1:D6') |
Takes the source cell range by address |
workbook.Worksheets.Add('RangeData') |
Adds a worksheet called RangeData to the cleared workbook |
targetSheet.Range.get('A1:D6') |
Takes a destination range of the same size as the source |
sourceSheet.Copy({ sourceRange, destRange, copyStyle: true }) |
Copies the values and styles into the destination range; copyStyle set to true brings the styles along |
The steps are:
- Load the font and the test data file into the VFS with
window.spire.FetchFileToVFS. - Create the source workbook with
new Workbook()and load the input file withworkbook.LoadFromFile, then take the source worksheet withWorksheets.get(0). - Mark out the cell range to export with
sourceSheet.Range.get('A1:D6'). - Create a target workbook and clear its default worksheets with
Worksheets.Clear(), then add a worksheet to receive the range withWorksheets.Add('RangeData'). - Take a destination range of the same size with
targetSheet.Range.get('A1:D6')and copy the values and styles across withsourceSheet.Copy({ sourceRange, destRange, copyStyle: true }). - Save the new workbook with
SaveToFile, namingxlsModule.FileFormat.JsoninfileFormat, and dispose of both workbook objects.
The code below is the complete example of converting a specific cell range to JSON:
function App() {
  const rangeToJson = async () => {
    // get the Spire.XLS WASM module
    const xlsModule = window.wasmModule?.spirexls;

    // check that the module is ready
    if (!xlsModule) {
      alert('Spire.Xls is not ready yet');
      return;
    }

    // load the font and the test data file into the VFS
    await window.spire.FetchFileToVFS('ARIAL.TTF', '/Library/Fonts/', `${process.env.PUBLIC_URL}/font/`);
    const inputFileName = 'Sample.xlsx';
    await window.spire.FetchFileToVFS(inputFileName, '', `${process.env.PUBLIC_URL}data/`);

    // load the source workbook and take the first worksheet
    const sourceWorkbook = new xlsModule.Workbook();
    sourceWorkbook.LoadFromFile({ fileName: inputFileName });
    const sourceSheet = sourceWorkbook.Worksheets.get(0);

    // name the cell range to export
    const sourceRange = sourceSheet.Range.get('A1:D6');

    // create a new workbook, clear its default worksheets and add one to receive the range
    const targetWorkbook = new xlsModule.Workbook();
    targetWorkbook.Worksheets.Clear();
    const targetSheet = targetWorkbook.Worksheets.Add('RangeData');

    // copy the values and styles across; the destination range must match the source size
    const destRange = targetSheet.Range.get('A1:D6');
    sourceSheet.Copy({ sourceRange, destRange, copyStyle: true });

    // save the new workbook
    const outputFileName = 'RangeToJson.json';
    targetWorkbook.SaveToFile({ fileName: outputFileName, fileFormat: xlsModule.FileFormat.Json });

    // dispose of the workbook to release its resources
    sourceWorkbook.Dispose();
    targetWorkbook.Dispose();

    // read the result back out of the VFS and trigger the download
    const fileArray = window.dotnetRuntime.Module.FS.readFile(outputFileName);
    const blob = new Blob([fileArray], { type: 'application/json' });
    const url = URL.createObjectURL(blob);
    const a = document.createElement('a');
    a.href = url;
    a.download = outputFileName;
    a.click();
    URL.revokeObjectURL(url);
  };

  return (
    <div style={{ textAlign: 'center', height: '300px' }}>
      <h1>Convert Excel to JSON</h1>
      <button id="range-to-json" onClick={rangeToJson}>Convert a Specific Cell Range to JSON</button>
    </div>
  );
}

export default App;
The JSON file after converting a specific cell range:
Customize the JSON Output Format
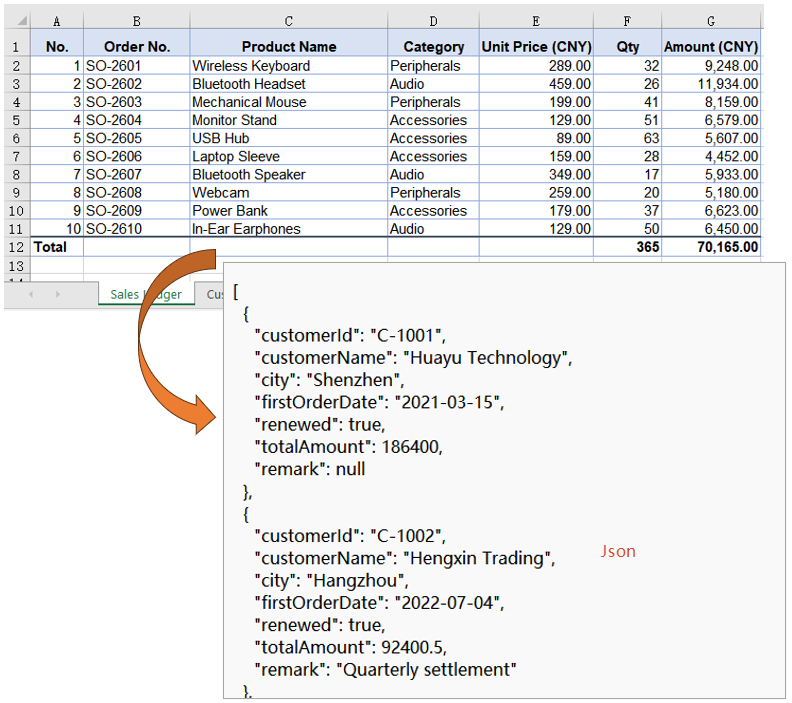
The three conversions above all produce a fixed shape: the field names are taken from the header row as they stand, every value is written as a string, an amount comes out as "186400", a boolean as "TRUE", a date in the runtime's own format rather than as yyyy-MM-dd, and a blank cell leaves its field out altogether. A result like that still has to be cleaned up before an API or a component binding can use it. Reading the cells one by one instead lets you decide the field names, the type of every value, and how a blank is represented.
Reading the cells yourself calls for the getters that return real types:
| Syntax | Result |
|---|---|
sheet.get(row, column) |
Takes a cell by row and column number, both counting from 1 |
sheet.LastRow / sheet.LastColumn |
The last row and column of the used range |
cell.Text |
The text in the cell; a blank cell returns an empty string |
cell.NumberValue |
The number in a numeric column, as a number; a blank cell returns null |
cell.BooleanValue |
The true or false of a boolean column, as a boolean |
cell.DateTimeValue |
The Date object of a date column, ready to be formatted |
JSON.stringify(records, null, 2) |
Serialises the records into JSON text indented by two spaces |
The steps are:
- Load the font and the test data file into the VFS with
window.spire.FetchFileToVFS, load the workbook withnew Workbook()andworkbook.LoadFromFile, and take the customers worksheet withWorksheets.get(1). - List the fields to keep in an array, each entry naming its column header, its output field name and how its value is read.
- Read the header row with
sheet.get(1, column)and, usingsheet.LastColumn, map each column header to its column number. - Walk the rows from row 2 to
sheet.LastRow, reading each value withcell.Text,cell.NumberValue,cell.BooleanValueorcell.DateTimeValueaccording to its field, and recording a blank cell asnull. - Build a
yyyy-MM-dddate from the year, month and day of theDateobject. - Serialise the records with
JSON.stringifyand a two-space indent, then write the text into the VFS withFS.writeFile. - Dispose of the workbook with
workbook.Disposeto free resources.
The code below is the complete example of customizing the JSON output format:
function App() {
  const customJsonFormat = async () => {
    // get the Spire.XLS WASM module
    const xlsModule = window.wasmModule?.spirexls;

    // check that the module is ready
    if (!xlsModule) {
      alert('Spire.Xls is not ready yet');
      return;
    }

    // load the font and the test data file into the VFS
    await window.spire.FetchFileToVFS('ARIAL.TTF', '/Library/Fonts/', `${process.env.PUBLIC_URL}/font/`);
    const inputFileName = 'Sample.xlsx';
    await window.spire.FetchFileToVFS(inputFileName, '', `${process.env.PUBLIC_URL}data/`);

    // load the workbook and take the customers worksheet
    const workbook = new xlsModule.Workbook();
    workbook.LoadFromFile({ fileName: inputFileName });
    const sheet = workbook.Worksheets.get(1);

    // the fields to keep: column header, output field name, how to read the value
    const fields = [
      { header: 'Customer ID', key: 'customerId', type: 'text' },
      { header: 'Customer Name', key: 'customerName', type: 'text' },
      { header: 'City', key: 'city', type: 'text' },
      { header: 'First Order Date', key: 'firstOrderDate', type: 'date' },
      { header: 'Renewed', key: 'renewed', type: 'boolean' },
      { header: 'Total Amount (CNY)', key: 'totalAmount', type: 'number' },
      { header: 'Remark', key: 'remark', type: 'text' },
    ];

    // read the header row and map each column header to its column number
    const columnOf = {};
    for (let column = 1; column <= sheet.LastColumn; column++) {
      columnOf[sheet.get(1, column).Text] = column;
    }

    // dates all go out as yyyy-MM-dd
    const pad = (value) => String(value).padStart(2, '0');
    const formatDate = (date) =>
      `${date.getFullYear()}-${pad(date.getMonth() + 1)}-${pad(date.getDate())}`;

    // walk the rows; a blank cell becomes null
    const records = [];
    for (let row = 2; row <= sheet.LastRow; row++) {
      const record = {};
      for (const field of fields) {
        const cell = sheet.get(row, columnOf[field.header]);
        if (field.type === 'number') {
          record[field.key] = cell.NumberValue;
        } else if (field.type === 'boolean') {
          record[field.key] = cell.BooleanValue;
        } else if (field.type === 'date') {
          record[field.key] = formatDate(cell.DateTimeValue);
        } else {
          const text = cell.Text;
          record[field.key] = text === '' ? null : text;
        }
      }
      records.push(record);
    }

    // write with a two-space indent so the result stays readable
    const json = JSON.stringify(records, null, 2);

    // write the JSON string into the VFS
    const outputFileName = 'CustomJsonFormat.json';
    window.dotnetRuntime.Module.FS.writeFile(outputFileName, new TextEncoder().encode(json));

    // dispose of the workbook to release its resources
    workbook.Dispose();

    // read the result back out of the VFS and trigger the download
    const fileArray = window.dotnetRuntime.Module.FS.readFile(outputFileName);
    const blob = new Blob([fileArray], { type: 'application/json' });
    const url = URL.createObjectURL(blob);
    const a = document.createElement('a');
    a.href = url;
    a.download = outputFileName;
    a.click();
    URL.revokeObjectURL(url);
  };

  return (
    <div style={{ textAlign: 'center', height: '300px' }}>
      <h1>Convert Excel to JSON</h1>
      <button id="custom-json-format" onClick={customJsonFormat}>Customize the JSON Output Format</button>
    </div>
  );
}

export default App;
The JSON file after applying the custom output format:
FAQ
Why are numbers, booleans and dates all strings in the exported JSON
Cause: SaveToFile writes the stored value of each cell. It neither applies the cell's number format nor infers a type, so an amount is written as "186400", a boolean as "TRUE", and a date in the runtime's own format instead of yyyy-MM-dd.
Solution: To get real types, read the cells yourself and take the value with cell.NumberValue, cell.BooleanValue or cell.DateTimeValue, then let JSON.stringify serialise the result.
Why do blank cells not appear in the JSON
Cause: Both the workbook and the worksheet conversion use the header row as the field names, and a blank cell produces no field at all, so that object ends up with fewer keys than the others.
Solution: If the caller needs every object to carry the same keys, read the cells yourself and write null whenever cell.Text comes back as an empty string.
Why is there an extra Evaluation Warning key at the top level of the JSON
Cause: The trial build adds an evaluation warning worksheet to the workbook, and in a whole-workbook conversion it becomes one more top-level key alongside the real worksheets.
Solution: Convert a specific worksheet or a specific cell range instead, and only the data you asked for is written; if the whole workbook has to be exported as it stands, contact sales for a temporary license that removes the evaluation message.
How do I export only a few columns
Cause: The workbook and worksheet conversions both write every column in the worksheet, while a range export can only take a consecutive block, so columns such as A, C and E cannot be expressed as a range.
Solution: Read the cells yourself the way the custom output format does and keep the fields you need; when the columns happen to be consecutive, a range export narrows the result just as well.
Get a Free License
Spire.XLS for JavaScript offers a 30-day full-featured free trial license with no functional limitations. Apply here to evaluate before purchasing.
A single column often packs several pieces of information into one cell: a contact's name, phone number and city written on one line, an order code joining the country code, the date and a serial number into one string. Such data can neither be sorted nor filtered by any one of those parts. Splitting text into columns takes a column of text apart by a given rule and drops the pieces into the columns to its right, leaving the original data where it is. Spire.XLS for JavaScript performs these operations in the browser through WebAssembly; the input and output files are managed by a virtual file system (VFS), with no backend service required.
This article covers two feature points:
For installation and project setup, see Integrating Spire.XLS for JavaScript in a React Project. The examples below assume Spire.XLS is installed and the WebAssembly module has been initialized.
Split on a separator
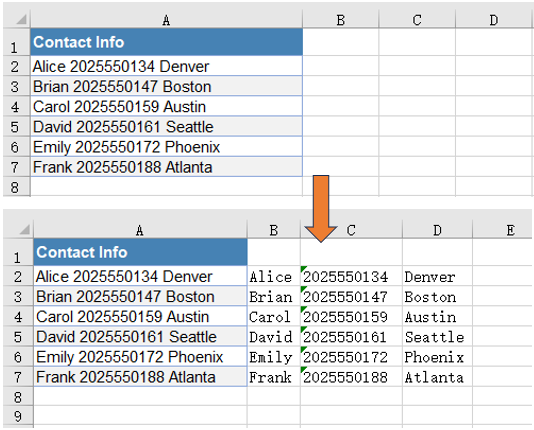
When every entry on a line is separated from the next by the same character, splitting on that character moves them into the columns to the right. Each kind of information then has a column of its own, ready for sorting, checking or grouping, while the original data stays where it is.
The split reads the text out of the first column, cuts it apart, and writes the pieces back into the columns on the right:
| Syntax | Result |
|---|---|
sheet.Range.get({ row, column: 1 }).Text |
Reads the raw text of the first column on that row |
.split(' ') |
Cuts the text apart on the space |
sheet.Range.get({ row, column: index + 2 }).Text = piece |
Writes the piece at index into the index + 1 column to its right |
sheet.AllocatedRange.AutoFitColumns() |
Sizes every column to its content |
The steps are:
- Load the font file and the test data file into the VFS with
window.spire.FetchFileToVFS. - Create a workbook with
new Workbook(), load the input file withworkbook.LoadFromFile, and take the target worksheet withworkbook.Worksheets.get(0). - Take the last data row with
sheet.LastRowand work row by row from row 2, skipping the header. - Read the raw text of the first column with
sheet.Range.get({ row, column: 1 }).Textand split it on the separator withsplit(' '). - Walk the pieces and write them back from the second column on with
sheet.Range.get({ row, column: index + 2 }).Text. - Size every column to its content with
sheet.AllocatedRange.AutoFitColumns(). - Save the workbook with
workbook.SaveToFileand dispose of it withworkbook.Disposeto free resources.
The full code example below shows how to split an Excel column on a separator in React:
function App() {
  const splitByDelimiter = async () => {
    // get the Spire.XLS WASM module
    const xlsModule = window.wasmModule?.spirexls;

    // check that the module is ready
    if (!xlsModule) {
      alert('Spire.Xls is not ready yet');
      return;
    }

    // load the font and the test data file into the VFS
    await window.spire.FetchFileToVFS('ARIAL.TTF', '/Library/Fonts/', `${process.env.PUBLIC_URL}/font/`);
    const inputFileName = 'SplitTextIntoColumns.xlsx';
    await window.spire.FetchFileToVFS(inputFileName, '', `${process.env.PUBLIC_URL}data/`);

    // load the workbook and take the first worksheet
    const workbook = new xlsModule.Workbook();
    workbook.LoadFromFile({ fileName: inputFileName });
    const sheet = workbook.Worksheets.get(0);

    // row by row, take the text in column A, split it on the space and write the pieces into the columns on the right
    const lastRow = sheet.LastRow;
    for (let row = 2; row <= lastRow; row++) {
      const pieces = sheet.Range.get({ row, column: 1 }).Text.split(' ');
      pieces.forEach((piece, index) => {
        sheet.Range.get({ row, column: index + 2 }).Text = piece;
      });
    }

    // size every column to its content
    sheet.AllocatedRange.AutoFitColumns();

    // save the workbook
    const outputFileName = 'SplitByDelimiter.xlsx';
    workbook.SaveToFile({ fileName: outputFileName, version: xlsModule.ExcelVersion.Version2016 });

    // dispose of the workbook to free resources
    workbook.Dispose();

    // read the result file from the VFS and start the download
    const fileArray = window.dotnetRuntime.Module.FS.readFile(outputFileName);
    const blob = new Blob([fileArray], { type: 'application/vnd.openxmlformats-officedocument.spreadsheetml.sheet' });
    const url = URL.createObjectURL(blob);
    const a = document.createElement('a');
    a.href = url;
    a.download = outputFileName;
    a.click();
    URL.revokeObjectURL(url);
  };

  return (
    <div style={{ textAlign: 'center', height: '300px' }}>
      <h1>Split Excel Data into Columns</h1>
      <button id="split-by-delimiter" onClick={splitByDelimiter}>Split by a Separator</button>
    </div>
  );
}

export default App;
The worksheet after splitting on a separator:
Split by fixed width
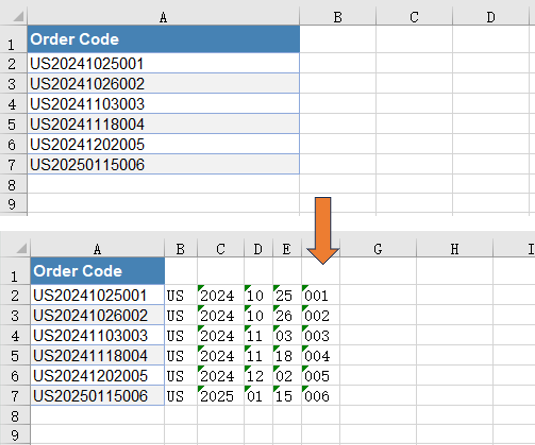
Other text is not divided by any character at all: every entry has a fixed length and they run end to end, as a code assembled from fields of known width. Such text is cut by the number of characters in each entry, carrying on from where the previous one ended.
The cut advances through the source text by the length of each entry and writes the pieces back into the columns on the right:
| Syntax | Result |
|---|---|
sheet.Range.get({ row, column: 1 }).Text |
Reads the raw code of the first column on that row |
code.substring(start, start + width) |
Cuts out width characters starting at start |
start += width |
Moves the cutting position past that entry, ready for the next |
sheet.Range.get({ row, column: index + 2 }).Text = piece |
Writes the piece at index into the index + 1 column to its right |
sheet.AllocatedRange.AutoFitColumns() |
Sizes every column to its content |
The steps are:
- Load the font file and the test data file into the VFS with
window.spire.FetchFileToVFS. - Create a workbook with
new Workbook(), load the input file withworkbook.LoadFromFile, and take the worksheet holding the text withworkbook.Worksheets.get(2). - Note down the number of characters in each entry in an array; the lengths should add up to that of the source text.
- Take the last data row with
sheet.LastRowand work row by row from row 2, skipping the header. - Cut one entry out with
code.substring(start, start + width), move the starting position on by that length, and write it back from the second column on withsheet.Range.get({ row, column: index + 2 }).Text. - Size every column to its content with
sheet.AllocatedRange.AutoFitColumns(). - Save the workbook with
workbook.SaveToFileand dispose of it withworkbook.Disposeto free resources.
The full code example below shows how to split an Excel column by fixed width in React:
function App() {
  const splitByFixedWidth = async () => {
    // get the Spire.XLS WASM module
    const xlsModule = window.wasmModule?.spirexls;

    // check that the module is ready
    if (!xlsModule) {
      alert('Spire.Xls is not ready yet');
      return;
    }

    // load the font and the test data file into the VFS
    await window.spire.FetchFileToVFS('ARIAL.TTF', '/Library/Fonts/', `${process.env.PUBLIC_URL}/font/`);
    const inputFileName = 'SplitTextIntoColumns.xlsx';
    await window.spire.FetchFileToVFS(inputFileName, '', `${process.env.PUBLIC_URL}data/`);

    // load the workbook and take the third worksheet
    const workbook = new xlsModule.Workbook();
    workbook.LoadFromFile({ fileName: inputFileName });
    const sheet = workbook.Worksheets.get(2);

    // row by row, take the code in column A and cut it at the fixed lengths into the columns on the right
    const widths = [2, 4, 2, 2, 3];
    const lastRow = sheet.LastRow;
    for (let row = 2; row <= lastRow; row++) {
      const code = sheet.Range.get({ row, column: 1 }).Text;
      let start = 0;
      widths.forEach((width, index) => {
        sheet.Range.get({ row, column: index + 2 }).Text = code.substring(start, start + width);
        start += width;
      });
    }

    // size every column to its content
    sheet.AllocatedRange.AutoFitColumns();

    // save the workbook
    const outputFileName = 'SplitByFixedWidth.xlsx';
    workbook.SaveToFile({ fileName: outputFileName, version: xlsModule.ExcelVersion.Version2016 });

    // dispose of the workbook to free resources
    workbook.Dispose();

    // read the result file from the VFS and start the download
    const fileArray = window.dotnetRuntime.Module.FS.readFile(outputFileName);
    const blob = new Blob([fileArray], { type: 'application/vnd.openxmlformats-officedocument.spreadsheetml.sheet' });
    const url = URL.createObjectURL(blob);
    const a = document.createElement('a');
    a.href = url;
    a.download = outputFileName;
    a.click();
    URL.revokeObjectURL(url);
  };

  return (
    <div style={{ textAlign: 'center', height: '300px' }}>
      <h1>Split Excel Data into Columns</h1>
      <button id="split-by-fixed-width" onClick={splitByFixedWidth}>Split by Fixed Width</button>
    </div>
  );
}

export default App;
The worksheet after splitting by fixed width:
FAQ
The column uses more than one kind of separator, how can it be split in one pass
Reason: split(' ') cuts on a single character at a time; when a text mixes commas, slashes and the like, each separator has to be handled on its own, so the code keeps piling up and one of them is easily left out.
Solution: Put the separators you expect into a character class, and a single split covers them all -- the characters inside the brackets are alternatives, so any one of them counts as a split point. The sample workbook's address sheet separates the levels of an address with a comma or a slash, and this form splits it into three columns at once:
// a comma and a slash both count as split points, taken apart in one pass
const pieces = sheet.Range.get({ row, column: 1 }).Text.split(/[,/]/);
An empty column turns up in the middle of the split result
Reason: split(' ') cuts strictly on a single space, so two adjacent spaces in the raw text cut out an empty string between them, and that empty string lands on the sheet as a blank column.
Solution: Strip the leading and trailing spaces with trim() first, then split on /\s+/ -- a run of consecutive spaces counts as one split point, and no empty string is cut out in between:
// strip the surrounding spaces, then split on a run of whitespace so no empty piece is cut out
const pieces = sheet.Range.get({ row, column: 1 }).Text.trim().split(/\s+/);
Does splitting into columns overwrite what the columns on the right already hold
Cause: The pieces are written cell by cell with sheet.Range.get({ row, column: index + 2 }).Text = piece, so whatever the target column held on that row is replaced by the entry written into it. The text in the first column is untouched; on the right, the columns the pieces land in are overwritten, and any column beyond them keeps its old data.
Solution: To keep what is already on the right, write the result further out into empty columns, or into a separate worksheet instead; sheet.LastColumn tells you whether the right-hand side already holds anything before you write.
What happens when the entry lengths do not add up to the length of the source text
Cause: substring(start, start + width) only takes what the source text actually holds. When the lengths add up to less than the source text, the characters left at the end of it go into no column at all; when they add up to more, the overrun is cut to an empty string and leaves a blank column.
Solution: Check that the lengths add up to the length of the source text before cutting, and every entry lands in a column of its own.
Get a Free License
Spire.XLS for JavaScript offers a 30-day full-featured free trial license with no functional limitations. Apply here to evaluate before purchasing.
A workbook is made for editing, which does not always make it the right thing to hand over for archiving or printing. XPS, OFD and PostScript are all fixed-layout documents: the page size, the position of every piece of text and the fonts are pinned when the file is written, so the document looks the same on any machine that opens it. Spire.XLS for JavaScript performs all three conversions in the browser on WebAssembly, handling input and output files through a virtual file system (VFS) with no backend service.
This article covers three core feature points:
For installation and project setup, see Integrating Spire.XLS for JavaScript in a React Project. The examples below assume Spire.XLS is installed and the WebAssembly module has been initialised.
Convert Excel to XPS
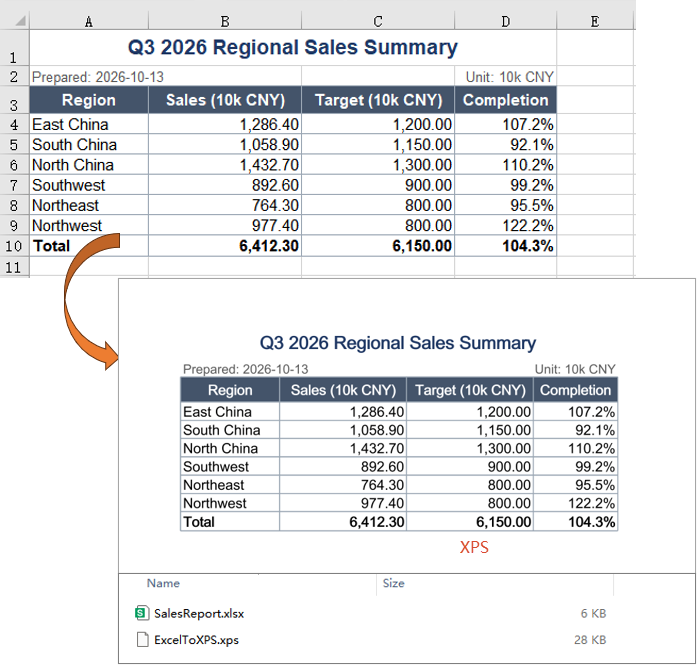
XPS is a fixed-layout document format that ships with Windows, and saving a workbook as XPS gives it an archived copy that no longer rearranges itself to suit the program that opens it, which is what makes it fit for a report that has to be read on a machine without Excel installed. The conversion changes only the format the file is saved in: the page setup, the cell formatting and the fonts of the worksheet are all written out with it, and a fileFormat argument names the target.
The fileFormat argument of workbook.SaveToFile decides which of the formats is written:
| Syntax | Result |
|---|---|
workbook.LoadFromFile({ fileName: inputFileName }) |
Loads the workbook to convert from the VFS |
workbook.SaveToFile({ fileName: 'ExcelToXPS.xps', fileFormat: xlsModule.FileFormat.XPS }) |
Writes the workbook as XPS, pinning the page size, the text position and the fonts |
workbook.Dispose() |
Releases the resources held by the workbook object |
The steps are:
- Load the font and the test data file into the VFS with
window.spire.FetchFileToVFS. - Create a workbook with
new Workbook(), then load the Excel file withworkbook.LoadFromFile. - Save the workbook with
workbook.SaveToFile, namingxlsModule.FileFormat.XPSinfileFormat. - Dispose of the workbook with
workbook.Disposeto free resources.
The code below is the complete example of converting a workbook to XPS in React:
function App() {
  const excelToXps = async () => {
    // get the Spire.XLS WASM module
    const xlsModule = window.wasmModule?.spirexls;

    // check that the module is ready
    if (!xlsModule) {
      alert('Spire.Xls is not ready yet');
      return;
    }

    // load the font and the test data file into the VFS
    await window.spire.FetchFileToVFS('ARIAL.TTF', '/Library/Fonts/', `${process.env.PUBLIC_URL}/font/`);
    const inputFileName = 'SalesReport.xlsx';
    await window.spire.FetchFileToVFS(inputFileName, '', `${process.env.PUBLIC_URL}data/`);

    // load the workbook
    const workbook = new xlsModule.Workbook();
    workbook.LoadFromFile({ fileName: inputFileName });

    // save as XPS, naming the format with fileFormat
    const outputFileName = 'ExcelToXPS.xps';
    workbook.SaveToFile({ fileName: outputFileName, fileFormat: xlsModule.FileFormat.XPS });

    // dispose of the workbook to free resources
    workbook.Dispose();

    // read the result file from the VFS and start the download
    const fileArray = window.dotnetRuntime.Module.FS.readFile(outputFileName);
    const blob = new Blob([fileArray], { type: 'application/vnd.ms-xpsdocument' });
    const url = URL.createObjectURL(blob);
    const a = document.createElement('a');
    a.href = url;
    a.download = outputFileName;
    a.click();
    URL.revokeObjectURL(url);
  };

  return (
    <div style={{ textAlign: 'center', height: '300px' }}>
      <h1>Convert Excel to XPS, OFD or PostScript</h1>
      <button id="excel-to-xps" onClick={excelToXps}>Convert Excel to XPS</button>
    </div>
  );
}

export default App;
The document after converting Excel to XPS:
Convert Excel to OFD
OFD is the fixed-layout document format used by Chinese electronic official documents and e-invoices, describing a page in a national standard so that it can be kept for the long term. Saving a sales report as OFD hands other systems a page whose layout is already fixed, and it no longer matters whether that system has the fonts or applies the same row heights. The conversion runs exactly like the previous feature point, with OFD named as the format.
| Syntax | Result |
|---|---|
workbook.LoadFromFile({ fileName: inputFileName }) |
Loads the workbook to convert from the VFS |
workbook.SaveToFile({ fileName: 'ExcelToOFD.ofd', fileFormat: xlsModule.FileFormat.OFD }) |
Writes the workbook as OFD, describing the page in the national standard |
workbook.Dispose() |
Releases the resources held by the workbook object |
The steps are:
- Load the font and the test data file into the VFS with
window.spire.FetchFileToVFS. - Create a workbook with
new Workbook(), then load the Excel file withworkbook.LoadFromFile. - Save the workbook with
workbook.SaveToFile, namingxlsModule.FileFormat.OFDinfileFormat. - Dispose of the workbook with
workbook.Disposeto free resources.
The code below is the complete example of converting a workbook to OFD in React:
function App() {
  const excelToOfd = async () => {
    // get the Spire.XLS WASM module
    const xlsModule = window.wasmModule?.spirexls;

    // check that the module is ready
    if (!xlsModule) {
      alert('Spire.Xls is not ready yet');
      return;
    }

    // load the font and the test data file into the VFS
    await window.spire.FetchFileToVFS('ARIAL.TTF', '/Library/Fonts/', `${process.env.PUBLIC_URL}/font/`);
    const inputFileName = 'SalesReport.xlsx';
    await window.spire.FetchFileToVFS(inputFileName, '', `${process.env.PUBLIC_URL}data/`);

    // load the workbook
    const workbook = new xlsModule.Workbook();
    workbook.LoadFromFile({ fileName: inputFileName });

    // save as OFD, naming the format with fileFormat
    const outputFileName = 'ExcelToOFD.ofd';
    workbook.SaveToFile({ fileName: outputFileName, fileFormat: xlsModule.FileFormat.OFD });

    // dispose of the workbook to free resources
    workbook.Dispose();

    // read the result file from the VFS and start the download
    const fileArray = window.dotnetRuntime.Module.FS.readFile(outputFileName);
    const blob = new Blob([fileArray], { type: 'application/ofd' });
    const url = URL.createObjectURL(blob);
    const a = document.createElement('a');
    a.href = url;
    a.download = outputFileName;
    a.click();
    URL.revokeObjectURL(url);
  };

  return (
    <div style={{ textAlign: 'center', height: '300px' }}>
      <h1>Convert Excel to XPS, OFD or PostScript</h1>
      <button id="excel-to-ofd" onClick={excelToOfd}>Convert Excel to OFD</button>
    </div>
  );
}

export default App;
The document after converting Excel to OFD:

Convert Excel to PostScript
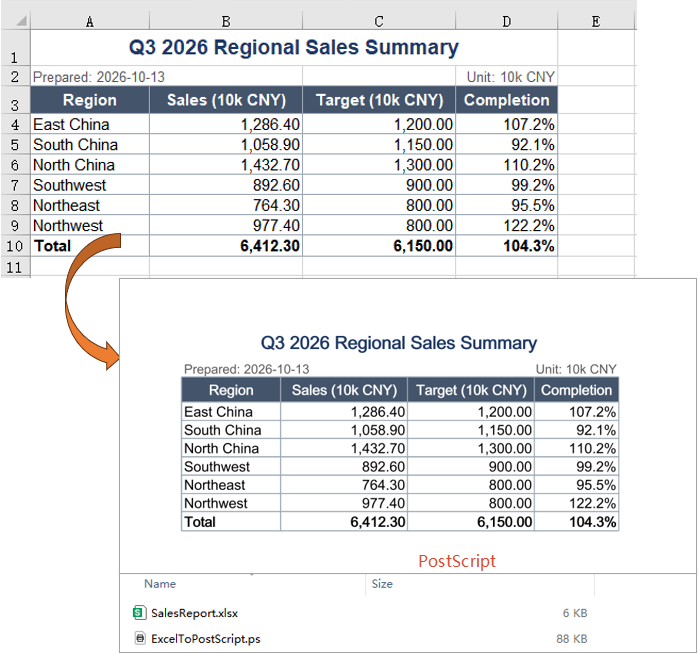
PostScript is the page description language used by printing devices and print workflows. The file is readable text that carries both the page description and the fonts embedded in it, so it can go straight to a PostScript printer or to typesetting software. When a report is headed for a print run, handing over PostScript is safer than handing over the original workbook. The usage matches the first two feature points, with PostScript named as the format.
| Syntax | Result |
|---|---|
workbook.LoadFromFile({ fileName: inputFileName }) |
Loads the workbook to convert from the VFS |
workbook.SaveToFile({ fileName: 'ExcelToPostScript.ps', fileFormat: xlsModule.FileFormat.PostScript }) |
Writes the workbook as PostScript, a readable page description |
workbook.Dispose() |
Releases the resources held by the workbook object |
The steps are:
- Load the font and the test data file into the VFS with
window.spire.FetchFileToVFS. - Create a workbook with
new Workbook(), then load the Excel file withworkbook.LoadFromFile. - Save the workbook with
workbook.SaveToFile, namingxlsModule.FileFormat.PostScriptinfileFormat. - Dispose of the workbook with
workbook.Disposeto free resources.
The code below is the complete example of converting a workbook to PostScript in React:
function App() {
  const excelToPostScript = async () => {
    // get the Spire.XLS WASM module
    const xlsModule = window.wasmModule?.spirexls;

    // check that the module is ready
    if (!xlsModule) {
      alert('Spire.Xls is not ready yet');
      return;
    }

    // load the font and the test data file into the VFS
    await window.spire.FetchFileToVFS('ARIAL.TTF', '/Library/Fonts/', `${process.env.PUBLIC_URL}/font/`);
    const inputFileName = 'SalesReport.xlsx';
    await window.spire.FetchFileToVFS(inputFileName, '', `${process.env.PUBLIC_URL}data/`);

    // load the workbook
    const workbook = new xlsModule.Workbook();
    workbook.LoadFromFile({ fileName: inputFileName });

    // save as PostScript, naming the format with fileFormat
    const outputFileName = 'ExcelToPostScript.ps';
    workbook.SaveToFile({ fileName: outputFileName, fileFormat: xlsModule.FileFormat.PostScript });

    // dispose of the workbook to free resources
    workbook.Dispose();

    // read the result file from the VFS and start the download
    const fileArray = window.dotnetRuntime.Module.FS.readFile(outputFileName);
    const blob = new Blob([fileArray], { type: 'application/postscript' });
    const url = URL.createObjectURL(blob);
    const a = document.createElement('a');
    a.href = url;
    a.download = outputFileName;
    a.click();
    URL.revokeObjectURL(url);
  };

  return (
    <div style={{ textAlign: 'center', height: '300px' }}>
      <h1>Convert Excel to XPS, OFD or PostScript</h1>
      <button id="excel-to-ps" onClick={excelToPostScript}>Convert Excel to PostScript</button>
    </div>
  );
}

export default App;
The document after converting Excel to PostScript:
FAQ
Why does the conversion fail with Cannot found font?
Cause: Writing XPS, OFD and PostScript means embedding every font the document uses, so a workbook whose text is not in the default Latin range needs the font file for it. If the font was never loaded into the VFS before the conversion, the module cannot find it and SaveToFile stops with a Cannot found font(...) installed on the system. error instead of writing a document.
Solution: Put the font file in public/font and load it into the VFS before loading the workbook, using the same file name the code refers to:
await window.spire.FetchFileToVFS('ARIAL.TTF', '/Library/Fonts/', `${process.env.PUBLIC_URL}/font/`);
Does the worksheet's page setup affect the converted document?
Cause: XPS, OFD and PostScript are all written page by page, and the size and the orientation of that page come from the worksheet's own page setup rather than from a decision the conversion makes on its own.
Solution: They carry over as they are. Taking the report in this example, the XPS page box is 794 x 1122 (portrait) while the report keeps its default orientation; set the first worksheet's sheet.PageSetup.Orientation to xlsModule.PageOrientationType.Landscape before converting, and the page box becomes 1122 x 794 (landscape). Paper size, margins and print area take effect on the way out in the same manner.
Why is the converted file much larger than the original workbook
Cause: Writing XPS, OFD and PostScript embeds every font the workbook uses, so the result comes out several times the size of a workbook that only holds cell data. That embedding is what lets a fixed-layout document be opened away from the machine it was made on.
Solution: This is normal and nothing needs fixing. To bring the size down, use a smaller font file, or check first that the report does not rely on several font files at once.
Get a Free License
Spire.XLS for JavaScript offers a 30-day full-featured free trial license with no functional limitations. Apply here to evaluate before purchasing.
Apply Cell Styles to an Excel Cell Range with JavaScript in React
2026-10-14 08:52:48 Written by liu taliaFormatting a cell range cell by cell means repeating the same group of properties down every column, and with enough columns one of them is easily missed; these formats also tend to be spread across fonts, borders and alignment, so each has to be set and then checked again on its own. Spire.XLS stores that group of formats as a named style, uses a flag object to state which of those formats should land this time, and then applies it to the target range: properties that were not ticked are not applied, and every other format on the range is left unchanged. Spire.XLS for JavaScript performs these operations in the browser through WebAssembly; the output file is managed by a virtual file system (VFS), with no backend service required.
This article covers two feature points:
For installation and project setup, see Integrating Spire.XLS for JavaScript in a React Project. The examples below assume Spire.XLS is installed and the WebAssembly module has been initialized.
Apply a named style to a cell range
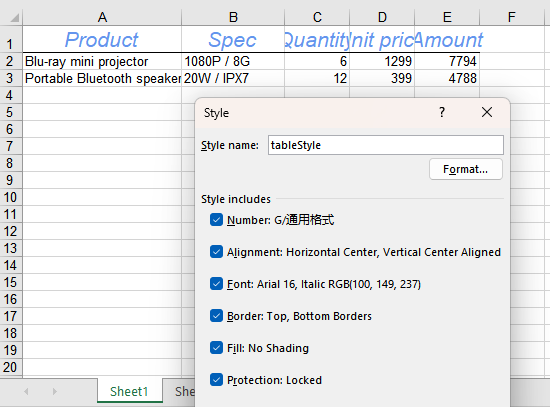
Setting formats cell by cell means repeating the same block of code in every column, and with enough columns a cell is easily missed; fonts, borders and centring set separately would also mean working over the same block three times over. A named style stores a group of formats as an object that can be taken up repeatedly, and the flag object states which of those formats should land this time; together they apply the wanted parts to the whole range in a single call, leaving the range's other formatting unchanged. The steps are:
- Load the font file into the VFS, create a workbook, take the first worksheet and write the header and two data rows.
- Create a named style with
workbook.Styles.Addand give it the font colour, size and italic the header will use. - Set the top and bottom borders on that same style.
- Set horizontal and vertical centring on that same style.
- Create the flag object with
new xlsModule.CellStyleFlag()and tick the properties to land this time; the items left unticked are not written into the target cells. - Apply the style to the header range with
sheet.Range.get('A1:E1').ApplyStyle(tableStyle, flag); set the column widths so the header text displays in full, then save the workbook and dispose of it to free resources.
The full code example below shows how to apply cell styles to an Excel cell range in React:
function App() {
  const applyStyleToRange = async () => {
    // get the Spire.XLS WASM module
    const xlsModule = window.wasmModule?.spirexls;

    // check that the module is ready
    if (!xlsModule) {
      alert('Spire.Xls is not ready yet');
      return;
    }

    // load the font file into the VFS
    await window.spire.FetchFileToVFS('ARIAL.TTF', '/Library/Fonts/', `${process.env.PUBLIC_URL}/font/`);

    // create a new workbook and take the first worksheet
    const workbook = new xlsModule.Workbook();
    const sheet = workbook.Worksheets.get(0);

    // write the header and two data rows
    const columns = ['A', 'B', 'C', 'D', 'E'];
    const headers = ['Product', 'Spec', 'Quantity', 'Unit price', 'Amount'];
    headers.forEach((text, index) => {
      sheet.Range.get(`${columns[index]}1`).Value = text;
    });

    const rows = [
      ['Blu-ray mini projector', '1080P / 8G', '6', '1299', '7794'],
      ['Portable Bluetooth speaker', '20W / IPX7', '12', '399', '4788'],
    ];
    rows.forEach((row, rowIndex) => {
      columns.forEach((column, columnIndex) => {
        sheet.Range.get(`${column}${rowIndex + 2}`).Value = row[columnIndex];
      });
    });

    // create a named style
    const tableStyle = workbook.Styles.Add('tableStyle');

    // give the header its font colour, size and italic
    tableStyle.Font.Color = xlsModule.Color.get_CornflowerBlue();
    tableStyle.Font.Size = 16;
    tableStyle.Font.IsItalic = true;

    // set the top and bottom borders on the same style
    tableStyle.Borders.get(xlsModule.BordersLineType.EdgeTop).LineStyle = xlsModule.LineStyleType.Thin;
    tableStyle.Borders.get(xlsModule.BordersLineType.EdgeBottom).LineStyle = xlsModule.LineStyleType.Thin;

    // and set horizontal and vertical centring on the same style
    tableStyle.HorizontalAlignment = xlsModule.HorizontalAlignType.Center;
    tableStyle.VerticalAlignment = xlsModule.VerticalAlignType.Center;

    // create the flag object and tick the properties to land this time; unticked ones are not written to the target cells
    const flag = new xlsModule.CellStyleFlag();
    flag.FontColor = true;
    flag.FontSize = true;
    flag.FontItalic = true;
    flag.Borders = true;
    flag.HorizontalAlignment = true;
    flag.VerticalAlignment = true;

    // apply the style to the header range
    sheet.Range.get('A1:E1').ApplyStyle(tableStyle, flag);

    // set the column widths
    sheet.Columns.get(0).ColumnWidth = 22;
    sheet.Columns.get(1).ColumnWidth = 14;

    // save the workbook as an Excel file
    const outputFileName = 'ApplyStyleToRange.xlsx';
    workbook.SaveToFile({ fileName: outputFileName, version: xlsModule.ExcelVersion.Version2016 });

    // dispose of the workbook to free resources
    workbook.Dispose();

    // read the result file from the VFS and start the download
    const fileArray = window.dotnetRuntime.Module.FS.readFile(outputFileName);
    const blob = new Blob([fileArray], { type: 'application/vnd.openxmlformats-officedocument.spreadsheetml.sheet' });
    const url = URL.createObjectURL(blob);
    const a = document.createElement('a');
    a.href = url;
    a.download = outputFileName;
    a.click();
    URL.revokeObjectURL(url);
  };

  return (
    <div style={{ textAlign: 'center', height: '300px' }}>
      <h1>Apply cell styles to a cell range</h1>
      <button id="apply-style-to-range" onClick={applyStyleToRange}>Apply cell styles to the cell range</button>
    </div>
  );
}

export default App;
After running, the effect of applying the named style to the cell range:
Read and adjust the named style
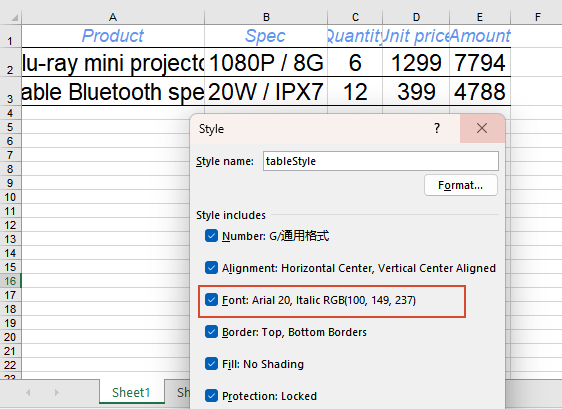
Once a style has been saved, later changes concern the values inside it rather than the whole set of formats, and no workbook has to be rebuilt: load the result file produced by feature point 1, read the named style by name, take the size already set in it, increase it, and apply the style to another range. The flag decides the scope here too: this time only the size, borders and centring are ticked, so the style's colour and italic are not written into the data range. Note that applying a style writes its properties into the cells as they stand at that moment, and the cells keep no reference to the style, so the range has to be applied again for the change to take effect. The steps are:
- Run the code of feature point 1 first, so that its result file
ApplyStyleToRange.xlsxstays in the VFS as this run's input file. - Load that input file with
workbook.LoadFromFileand take the first worksheet. - Read the named style feature point 1 created with
workbook.Styles.get('tableStyle')and take itsFont.Sizeas the baseline. - Raise the baseline size and write it back to the style, as the size the data range will use.
- Create the flag object and tick only the size, borders and centring; apply the adjusted style to the data range with
sheet.Range.get('A2:E3').ApplyStyle(readBack, flag), set the column widths so the larger font size still fits, then save the workbook and dispose of it to free resources.
The full code example below shows how to load a result file, read the named style and apply it after adjusting the size in React:
function App() {
  const readAndAdjustFontStyle = async () => {
    // get the Spire.XLS WASM module
    const xlsModule = window.wasmModule?.spirexls;

    // check that the module is ready
    if (!xlsModule) {
      alert('Spire.Xls is not ready yet');
      return;
    }

    // load the font file into the VFS
    await window.spire.FetchFileToVFS('ARIAL.TTF', '/Library/Fonts/', `${process.env.PUBLIC_URL}/font/`);

    // load the result file produced by feature point 1 as this run's input
    const workbook = new xlsModule.Workbook();
    workbook.LoadFromFile({ fileName: 'ApplyStyleToRange.xlsx' });
    const sheet = workbook.Worksheets.get(0);

    // read the named style feature point 1 created and take its current font size as the baseline
    const readBack = workbook.Styles.get('tableStyle');
    const baseSize = readBack.Font.Size;

    // raise the baseline size to get the size the data range will use
    readBack.Font.Size = baseSize + 4;

    // create the flag object: this time tick only the font size, borders and centring, so the style's colour and italic stay off the data range
    const flag = new xlsModule.CellStyleFlag();
    flag.FontSize = true;
    flag.Borders = true;
    flag.HorizontalAlignment = true;
    flag.VerticalAlignment = true;

    // apply the adjusted style to the data range
    sheet.Range.get('A2:E3').ApplyStyle(readBack, flag);

    // set the column widths so the larger font size still fits
    sheet.Columns.get(0).ColumnWidth = 30;
    sheet.Columns.get(1).ColumnWidth = 20;

    // save the workbook as an Excel file
    const outputFileName = 'ReadAndAdjustFontStyle.xlsx';
    workbook.SaveToFile({ fileName: outputFileName, version: xlsModule.ExcelVersion.Version2016 });

    // dispose of the workbook to free resources
    workbook.Dispose();

    // read the result file from the VFS and start the download
    const fileArray = window.dotnetRuntime.Module.FS.readFile(outputFileName);
    const blob = new Blob([fileArray], { type: 'application/vnd.openxmlformats-officedocument.spreadsheetml.sheet' });
    const url = URL.createObjectURL(blob);
    const a = document.createElement('a');
    a.href = url;
    a.download = outputFileName;
    a.click();
    URL.revokeObjectURL(url);
  };

  return (
    <div style={{ textAlign: 'center', height: '300px' }}>
      <h1>Read the style and adjust its size</h1>
      <button id="read-and-adjust-font-style" onClick={readAndAdjustFontStyle}>Read the named style, adjust it, then apply it</button>
    </div>
  );
}

export default App;
After running, the effect of reading the named style and adjusting its font size:
FAQ
Do the number formats already on the range change when I apply a style
Reason: No. Only the items ticked in the flag object are written into the target cells when the style is applied; the items left unticked take no part, so the number formats, borders and alignment already on the cells remain as they were.
Solution: Conversely, to apply number formats along with it, set the number format on the style as well and tick the matching item in the flag:
// give the style the number format first
tableStyle.NumberFormat = '0.00';

// tick the matching item in the flag
flag.NumberFormat = true;
sheet.Range.get('A1:E1').ApplyStyle(tableStyle, flag);
How do I apply a style to the whole worksheet
Reason: The examples above apply the style to one range at a time; a whole worksheet treated the same way would mean listing every range to cover. The worksheet object carries a method of the same name that covers the whole sheet in a single call.
Solution: Call ApplyStyle on the worksheet object to apply the whole style to the whole sheet:
sheet.ApplyStyle(tableStyle);
Get a Free License
Spire.XLS for JavaScript offers a 30-day full-featured free trial license with no functional limitations. Apply here to evaluate before purchasing.
A table has only a few seconds to be understood, and the work is done not only by the numbers but by the fonts: a title big enough to stand out, a figure that matters found at a glance, a cancelled line spotted immediately. In Excel every one of those differences is carried by a font object belonging to a single cell -- font name, size, colour, bold, italic, underline, strikethrough; changing a cell touches only that cell. One cell can also hold several fonts at once, and switching a single word to another colour or size lifts it out of the sentence around it. Spire.XLS for JavaScript performs these operations in the browser through WebAssembly; the output file is managed by a virtual file system (VFS), with no backend service required.
This article covers two feature points:
For installation and project setup, see Integrating Spire.XLS for JavaScript in a React Project. The examples below assume Spire.XLS is installed and the WebAssembly module has been initialized.
Set the font formatting of a cell
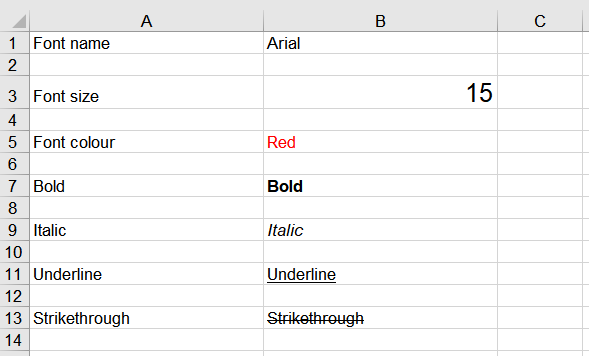
Every cell carries a font object of its own, and all seven properties -- font name, size, colour, bold, italic, underline and strikethrough -- hang off that object. To see what each one does, start a worksheet of its own, write the property's name and a sample of text row by row, and set the matching property on the cell that holds the sample: a change lands on that cell alone, and the description in column A keeps its own look. The steps are:
- Load the font file into the VFS with
window.spire.FetchFileToVFS. - Create a workbook with
new Workbook()and take the first worksheet withworkbook.Worksheets.get(0). - Write the properties out one per row with
sheet.Range.get: the name into column A and the sample text into column B, rows starting at 1 and going up by 2. - Set the matching format on each row's sample through
FontName,Size,Color,IsBold,IsItalic,UnderlineandIsStrikethroughonRange.Style.Font, taking the font colour fromxlsModule.Color.get_Red()and the underline fromxlsModule.FontUnderlineType.Single. - Set both columns to a width of 25 with
sheet.Columns.get(0).ColumnWidthandsheet.Columns.get(1).ColumnWidth. - Save the workbook with
workbook.SaveToFileand dispose of it withworkbook.Disposeto free resources.
The full code example below shows how to set font formatting for cells in React:
function App() {
  const setCellFont = async () => {
    // get the Spire.XLS WASM module
    const xlsModule = window.wasmModule?.spirexls;

    // check that the module is ready
    if (!xlsModule) {
      alert('Spire.Xls is not ready yet');
      return;
    }

    // load the font file into the VFS
    await window.spire.FetchFileToVFS('ARIAL.TTF', '/Library/Fonts/', `${process.env.PUBLIC_URL}/font/`);

    // create a new workbook and take the first worksheet
    const workbook = new xlsModule.Workbook();
    const sheet = workbook.Worksheets.get(0);

    // set the font name
    let row = 1;
    sheet.Range.get(`A${row}`).Value = 'Font name';
    sheet.Range.get(`B${row}`).Value = 'Arial';
    sheet.Range.get(`B${row}`).Style.Font.FontName = 'Arial';

    // set the font size
    row += 2;
    sheet.Range.get(`A${row}`).Value = 'Font size';
    sheet.Range.get(`B${row}`).Value = '15';
    sheet.Range.get(`B${row}`).Style.Font.Size = 15;

    // set the font colour
    row += 2;
    sheet.Range.get(`A${row}`).Value = 'Font colour';
    sheet.Range.get(`B${row}`).Value = 'Red';
    sheet.Range.get(`B${row}`).Style.Font.Color = xlsModule.Color.get_Red();

    // bold the text
    row += 2;
    sheet.Range.get(`A${row}`).Value = 'Bold';
    sheet.Range.get(`B${row}`).Value = 'Bold';
    sheet.Range.get(`B${row}`).Style.Font.IsBold = true;

    // italicise the text
    row += 2;
    sheet.Range.get(`A${row}`).Value = 'Italic';
    sheet.Range.get(`B${row}`).Value = 'Italic';
    sheet.Range.get(`B${row}`).Style.Font.IsItalic = true;

    // underline the text
    row += 2;
    sheet.Range.get(`A${row}`).Value = 'Underline';
    sheet.Range.get(`B${row}`).Value = 'Underline';
    sheet.Range.get(`B${row}`).Style.Font.Underline = xlsModule.FontUnderlineType.Single;

    // strike through the text
    row += 2;
    sheet.Range.get(`A${row}`).Value = 'Strikethrough';
    sheet.Range.get(`B${row}`).Value = 'Strikethrough';
    sheet.Range.get(`B${row}`).Style.Font.IsStrikethrough = true;

    // set the column widths
    sheet.Columns.get(0).ColumnWidth = 25;
    sheet.Columns.get(1).ColumnWidth = 25;

    // save the workbook as an Excel file
    const outputFileName = 'CellFont.xlsx';
    workbook.SaveToFile({ fileName: outputFileName, version: xlsModule.ExcelVersion.Version2016 });

    // dispose of the workbook to free resources
    workbook.Dispose();

    // read the result file from the VFS and start the download
    const fileArray = window.dotnetRuntime.Module.FS.readFile(outputFileName);
    const blob = new Blob([fileArray], { type: 'application/vnd.openxmlformats-officedocument.spreadsheetml.sheet' });
    const url = URL.createObjectURL(blob);
    const a = document.createElement('a');
    a.href = url;
    a.download = outputFileName;
    a.click();
    URL.revokeObjectURL(url);
  };

  return (
    <div style={{ textAlign: 'center', height: '300px' }}>
      <h1>Set Cell Font Formatting</h1>
      <button id="cell-font" onClick={setCellFont}>Set the font formatting of a cell</button>
    </div>
  );
}

export default App;
After running, the effect of setting font formatting for individual cells:
Mix several fonts inside one cell
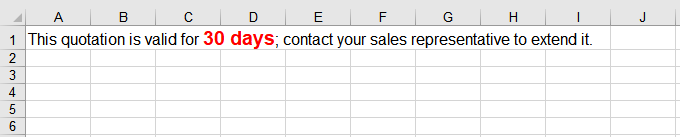
A cell's rich text object lets one run of text be cut at character positions and each piece given a different font, while the sentence still reads as a whole. The way to do it is to create the font objects first and then assign them range by range with SetFont -- each call overwrites one range, so every part of the sentence has to be covered. Ranges count from 0 and include both ends. The steps are:
- Load the font file into the VFS with
window.spire.FetchFileToVFS. - Create a workbook with
new Workbook()and take the first worksheet withworkbook.Worksheets.get(0). - Create two fonts with
workbook.CreateFont(): one for the whole sentence, and one that emphasises the key phrase throughIsBoldandKnownColor. - Take the cell that holds the sentence with
sheet.Range.get('A1'), and write the whole sentence into its rich text object throughRichText.Text. - Work out the start and end of the text that needs the new font within the sentence with
note.indexOf(key)andkey.length, then assign the fonts to the three parts -- before the key phrase, the key phrase itself and after it -- withRichText.SetFont. - Save the workbook with
workbook.SaveToFileand dispose of it withworkbook.Disposeto free resources.
The full code example below shows how to give part of the text in one cell a different font in React:
function App() {
  const setRichTextFonts = async () => {
    // get the Spire.XLS WASM module
    const xlsModule = window.wasmModule?.spirexls;

    // check that the module is ready
    if (!xlsModule) {
      alert('Spire.Xls is not ready yet');
      return;
    }

    // load the font file into the VFS
    await window.spire.FetchFileToVFS('ARIAL.TTF', '/Library/Fonts/', `${process.env.PUBLIC_URL}/font/`);

    // create a new workbook and take the first worksheet
    const workbook = new xlsModule.Workbook();
    const sheet = workbook.Worksheets.get(0);

    // create the first font, for the whole sentence
    const font1 = workbook.CreateFont();
    font1.FontName = 'Arial';
    font1.Size = 12;

    // create the second font, for the key phrase
    const font2 = workbook.CreateFont();
    font2.FontName = 'Arial';
    font2.Size = 14;
    font2.IsBold = true;
    font2.KnownColor = xlsModule.ExcelColors.Red;

    // take the cell's rich text object and write the whole sentence
    const note = 'This quotation is valid for 30 days; contact your sales representative to extend it.';
    const key = '30 days';
    const richText = sheet.Range.get('A1').RichText;
    richText.Text = note;

    // locate the character range the key phrase occupies
    const start = note.indexOf(key);
    const end = start + key.length - 1;

    // set the part before the key phrase to the first font
    richText.SetFont(0, start - 1, font1);

    // set the key phrase itself to the second font
    richText.SetFont(start, end, font2);

    // keep the part after the key phrase in the first font
    richText.SetFont(end + 1, note.length - 1, font1);

    // save the workbook as an Excel file
    const outputFileName = 'RichTextFont.xlsx';
    workbook.SaveToFile({ fileName: outputFileName, version: xlsModule.ExcelVersion.Version2016 });

    // dispose of the workbook to free resources
    workbook.Dispose();

    // read the result file from the VFS and start the download
    const fileArray = window.dotnetRuntime.Module.FS.readFile(outputFileName);
    const blob = new Blob([fileArray], { type: 'application/vnd.openxmlformats-officedocument.spreadsheetml.sheet' });
    const url = URL.createObjectURL(blob);
    const a = document.createElement('a');
    a.href = url;
    a.download = outputFileName;
    a.click();
    URL.revokeObjectURL(url);
  };

  return (
    <div style={{ textAlign: 'center', height: '300px' }}>
      <h1>Mix Several Fonts Inside One Cell</h1>
      <button id="rich-text-fonts" onClick={setRichTextFonts}>Give part of the text a different font</button>
    </div>
  );
}

export default App;
After running, the effect of mixing several fonts inside one cell:
FAQ
What value should SetFont's end position take
Reason: Both position arguments of SetFont count from 0 and include the end position itself, so passing a string's length directly lands one character past the end.
Solution: Pass "length minus one" as the end position. To cover a whole run of text, use the sentence's length minus one:
richText.SetFont(0, note.length - 1, font1);
Get a Free License
Spire.XLS for JavaScript offers a 30-day full-featured free trial license with no functional limitations. Apply here to evaluate before purchasing.
An Excel comment usually carries a paragraph of text, explaining a number or adding a note. When the thing to be explained is itself a picture -- a supplier mark, a product photo, a sketch of a part -- text alone will not do. Spire.XLS for JavaScript can fill a comment's background with a picture, so the image appears beside the cell without a separate floating picture object being placed on the sheet. A comment's background is controlled by its fill object, and switching to a solid colour likewise changes only that one object. Spire.XLS for JavaScript performs these operations in the browser through WebAssembly; input and output files are managed by a virtual file system (VFS), with no backend service required.
This article covers two feature points:
For installation and project setup, see Integrating Spire.XLS for JavaScript in a React Project. The examples below assume Spire.XLS is installed and the WebAssembly module has been initialized.
Insert a picture comment into a cell
A comment is attached to a cell; giving one a picture means first obtaining the comment object on the target cell and then filling it. The picture becomes the comment box's background, replacing the default pale-yellow shading, and it is this picture that appears when the mouse moves over the cell or the file is opened. The picture is scaled to the size of the comment box, and the default box is a flat rectangle, so a square picture is stretched out of shape; after filling, the width and height must therefore be set so that the box matches the picture's proportions. Where the box sits on the sheet is decided by a separate pair of position properties, so it does not have to follow the cell border. The steps are:
- Load the font, the picture and the test data file into the VFS.
- Load the workbook with
workbook.LoadFromFile. - Take the cell the comment will be attached to with
sheet.Range.get('A4'). - Create a comment object on the cell with
range.AddComment(). - Fill the comment background with the picture using
comment.Fill.CustomPicture, passing the picture as a stream built bynew xlsModule.Stream('logo.png')and'None'for thenameargument. - Set
comment.Widthandcomment.Heightso the comment box is square, matching the square picture, which keeps the picture from being stretched. - Place the comment box relative to the top-left corner of the worksheet with
comment.Topandcomment.Left, so that it covers the content below without obscuring its own row. - Set
comment.Visibleto show the comment as soon as the file is opened. - Save the workbook with
workbook.SaveToFile. - Dispose of the workbook with
workbook.Disposeto free resources.
The complete code example below shows how to insert a picture comment into an Excel cell in React:
function App() {
  const addPictureComment = async () => {
    // get the Spire.XLS WASM module
    const xlsModule = window.wasmModule?.spirexls;

    // check that the module is ready
    if (!xlsModule) {
      alert('Spire.Xls is not ready yet');
      return;
    }

    // load the font, the picture and the test data file into the VFS
    await window.spire.FetchFileToVFS('ARIAL.TTF', '/Library/Fonts/', `${process.env.PUBLIC_URL}/font/`);
    await window.spire.FetchFileToVFS('logo.png', '', `${process.env.PUBLIC_URL}data/`);
    const inputFileName = 'ProductList.xlsx';
    await window.spire.FetchFileToVFS(inputFileName, '', `${process.env.PUBLIC_URL}data/`);

    // load the workbook
    const workbook = new xlsModule.Workbook();
    workbook.LoadFromFile({ fileName: inputFileName });

    // take the first worksheet and add a comment to cell A4, filled with the picture
    const sheet = workbook.Worksheets.get(0);
    const range = sheet.Range.get('A4');
    const comment = range.AddComment();
    comment.Fill.CustomPicture({ im: new xlsModule.Stream('logo.png'), name: 'None' });

    // set the width and height of the comment box
    comment.Width = 150;
    comment.Height = 150;

    // place the comment box relative to the top-left corner of the worksheet
    comment.Top = 100;
    comment.Left = 400;

    // make the comment show as soon as the file is opened
    comment.Visible = true;

    // save the workbook
    const outputFileName = 'PictureComment.xlsx';
    workbook.SaveToFile({ fileName: outputFileName, version: xlsModule.ExcelVersion.Version2010 });

    // dispose of the workbook to free resources
    workbook.Dispose();

    // read the result file from the VFS and start the download
    const fileArray = window.dotnetRuntime.Module.FS.readFile(outputFileName);
    const blob = new Blob([fileArray], { type: 'application/vnd.openxmlformats-officedocument.spreadsheetml.sheet' });
    const url = URL.createObjectURL(blob);
    const a = document.createElement('a');
    a.href = url;
    a.download = outputFileName;
    a.click();
    URL.revokeObjectURL(url);
  };

  return (
    <div style={{ textAlign: 'center', height: '300px' }}>
      <h1>Insert Comments with Pictures</h1>
      <button id="picture-comment" onClick={addPictureComment}>Insert a picture comment into a cell</button>
    </div>
  );
}

export default App;
After running, the effect of inserting a picture comment into a cell:
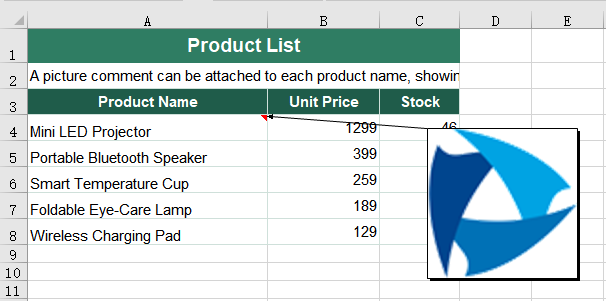
Fill a comment with a solid colour
A comment background need not be a picture. When all that is needed is for one comment to stand out from the pale-yellow shading around it, specifying a solid colour is more straightforward than preparing an image. Filling with a picture and filling with a solid colour use the same comment.Fill object; only the fill type changes from picture to solid. The steps are:
- Load the font and the test data file into the VFS.
- Load the workbook with
workbook.LoadFromFile. - Take the cell the comment will be attached to with
sheet.Range.get('A4')and create the comment withrange.AddComment(). - Write the comment text with
comment.Text. - Create a font with
workbook.CreateFont()and set the whole text to it withcomment.RichText.SetFont. - Set
comment.Fill.FillTypeto the solid fill type,xlsModule.ShapeFillType.SolidColor. - Pick the colour with
comment.Fill.ForeColor. - Set
comment.Visibleto show the comment as soon as the file is opened. - Save the workbook with
workbook.SaveToFile. - Dispose of the workbook with
workbook.Disposeto free resources.
The complete code example below shows how to fill an Excel comment with a solid colour in React:
function App() {
  const fillCommentColor = async () => {
    // get the Spire.XLS WASM module
    const xlsModule = window.wasmModule?.spirexls;

    // check that the module is ready
    if (!xlsModule) {
      alert('Spire.Xls is not ready yet');
      return;
    }

    // load the font and the test data file into the VFS
    await window.spire.FetchFileToVFS('ARIAL.TTF', '/Library/Fonts/', `${process.env.PUBLIC_URL}/font/`);
    const inputFileName = 'ProductList.xlsx';
    await window.spire.FetchFileToVFS(inputFileName, '', `${process.env.PUBLIC_URL}data/`);

    // load the workbook
    const workbook = new xlsModule.Workbook();
    workbook.LoadFromFile({ fileName: inputFileName });

    // take the first worksheet and add a comment to cell A4
    const sheet = workbook.Worksheets.get(0);
    const range = sheet.Range.get('A4');

    // create the font the comment text will use
    const font = workbook.CreateFont();
    font.FontName = 'Arial';
    font.Size = 11;
    font.KnownColor = xlsModule.ExcelColors.Orange;

    // write the comment text and set the whole text to that font
    const commentText = 'This product leads the season';
    range.Comment.Text = commentText;
    range.Comment.RichText.SetFont(0, commentText.length - 1, font);

    // set the comment fill to a solid colour and pick the colour
    range.Comment.Fill.FillType = xlsModule.ShapeFillType.SolidColor;
    range.Comment.Fill.ForeColor = xlsModule.Color.get_SkyBlue();
    range.Comment.Visible = true;

    // save the workbook
    const outputFileName = 'CommentFillColor.xlsx';
    workbook.SaveToFile({ fileName: outputFileName, version: xlsModule.ExcelVersion.Version2010 });

    // dispose of the workbook to free resources
    workbook.Dispose();

    // read the result file from the VFS and start the download
    const fileArray = window.dotnetRuntime.Module.FS.readFile(outputFileName);
    const blob = new Blob([fileArray], { type: 'application/vnd.openxmlformats-officedocument.spreadsheetml.sheet' });
    const url = URL.createObjectURL(blob);
    const a = document.createElement('a');
    a.href = url;
    a.download = outputFileName;
    a.click();
    URL.revokeObjectURL(url);
  };

  return (
    <div style={{ textAlign: 'center', height: '300px' }}>
      <h1>Insert Comments with Pictures</h1>
      <button id="comment-fill-color" onClick={fillCommentColor}>Fill a comment with a solid colour</button>
    </div>
  );
}

export default App;
After running, the effect of filling a comment with a solid colour:
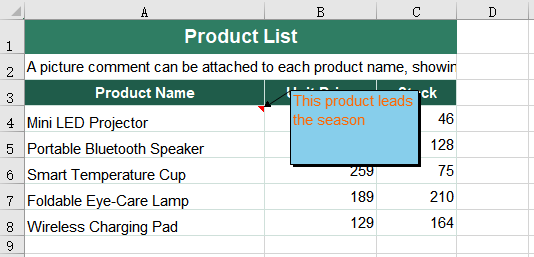
FAQ
Why does the picture comment not appear when the result file is opened
Reason: Comments are hidden by default and appear only when the mouse moves over the cell. If the comment was not set to visible before saving, reopening the file shows an ordinary worksheet, and the picture comment does not appear on its own.
Solution: Set comment.Visible to true, and the comment appears as soon as the file is opened:
comment.Visible = true;
Get a Free License
Spire.XLS for JavaScript offers a 30-day full-featured free trial license with no functional limitations. Apply here to evaluate before purchasing.
A shape in Excel is usually there to point at something: the arrow on a diagram, the triangle that flags a number, the cloud that circles an area. Give it a hyperlink and the drawing becomes an entry point a reader can click. A shape, like a picture, is not a cell, and its hyperlink lives on the shape object itself, so both setting and reading one go through the worksheet's shape collection rather than its cell hyperlink collection. Spire.XLS for JavaScript does this in the browser on WebAssembly, handling input and output files through a virtual file system (VFS) with no backend service.
This article covers two core feature points:
For installation and project setup, see Integrating Spire.XLS for JavaScript in a React Project. The examples below assume Spire.XLS is installed and the WebAssembly module has been initialised.
Set a hyperlink on a shape
Setting a hyperlink on a shape is what turns a drawing into a clickable entry point: a reader who clicks the shape on the worksheet opens the address it points at. The link belongs to the shape itself rather than to a cell, so the shape has to be taken from the worksheet's shape collection first, and the address handed to its own link object. The steps are:
- Load the font and the test data file into the VFS.
- Load the workbook with
workbook.LoadFromFile. - Add the shapes into the space left for them with
sheet.PrstGeomShapes.AddPrstGeomShape. - Take the shape count from
sheet.PrstGeomShapes.Countand walk every shape on the worksheet with it. - Take each shape's link object from its
HyLinkproperty and write the address into itsAddress. - Save the workbook with
workbook.SaveToFile. - Dispose of the workbook with
workbook.Disposeto free resources.
The complete code example below shows how to set a hyperlink on a shape in Excel in React:
function App() {
  const shapeHyperlink = async () => {
    // get the Spire.XLS WASM module
    const xlsModule = window.wasmModule?.spirexls;

    // check that the module is ready
    if (!xlsModule) {
      alert('Spire.Xls is not ready yet');
      return;
    }

    // load the font and the test data file into the VFS
    await window.spire.FetchFileToVFS('ARIAL.TTF', '/Library/Fonts/', `${process.env.PUBLIC_URL}/font/`);
    const inputFileName = 'ShapeLink.xlsx';
    await window.spire.FetchFileToVFS(inputFileName, '', `${process.env.PUBLIC_URL}data/`);

    // load the workbook
    const workbook = new xlsModule.Workbook();
    workbook.LoadFromFile({ fileName: inputFileName });

    // take the first worksheet and add the three shapes into the space left for them
    const sheet = workbook.Worksheets.get(0);
    const shapes = sheet.PrstGeomShapes;
    shapes.AddPrstGeomShape(10, 1, 90, 60, xlsModule.PrstGeomShapeType.Triangle);
    shapes.AddPrstGeomShape(10, 3, 90, 60, xlsModule.PrstGeomShapeType.CurvedRightArrow);
    shapes.AddPrstGeomShape(10, 5, 90, 60, xlsModule.PrstGeomShapeType.Cloud);

    // set a hyperlink on each shape in turn
    const addresses = [
      'https://www.e-iceblue.com/Introduce/xls-for-javascript.html',
      'https://www.e-iceblue.com/Buy/Spire.XLS-JavaScript.html',
      'https://www.e-iceblue.com/Download/Spire-Office-JavaScript.html',
    ];
    for (let i = 0; i < shapes.Count; i++) {
      shapes.get(i).HyLink.Address = addresses[i];
    }

    // save the workbook
    const outputFileName = 'ShapeHyperlink.xlsx';
    workbook.SaveToFile({ fileName: outputFileName, fileFormat: xlsModule.FileFormat.Version2010 });

    // dispose of the workbook to free resources
    workbook.Dispose();

    // read the result file from the VFS and start the download
    const fileArray = window.dotnetRuntime.Module.FS.readFile(outputFileName);
    const blob = new Blob([fileArray], { type: 'application/vnd.openxmlformats-officedocument.spreadsheetml.sheet' });
    const url = URL.createObjectURL(blob);
    const a = document.createElement('a');
    a.href = url;
    a.download = outputFileName;
    a.click();
    URL.revokeObjectURL(url);
  };

  return (
    <div style={{ textAlign: 'center', height: '300px' }}>
      <h1>Add Hyperlinks to Shapes in Excel</h1>
      <button id="shape-hyperlink" onClick={shapeHyperlink}>Set a hyperlink on the shape</button>
    </div>
  );
}

export default App;
After running, the effect of setting a hyperlink on a shape:
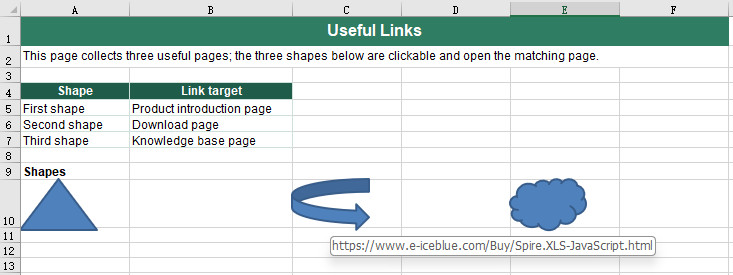
Read the hyperlink from a shape
Reading the hyperlink off a shape is how a finished sheet is checked over: whether every shape carries a link, and whether they point at the right addresses. The addresses that come back are written out as a text file, which makes them easy to line up against a list of links. Shape hyperlinks are not kept in the cell hyperlink collection, so the shapes have to be taken from the worksheet one by one, and each one asked for its own link object. The steps are:
- Load the font and the test data file into the VFS.
- Load the workbook with
workbook.LoadFromFile. - Take the shape count from
sheet.PrstGeomShapes.Countand walk every shape on the worksheet with it. - Take this shape's link object from its
HyLinkproperty. - Read the target address from the link object's
Address, collecting the addresses as you go. - Write the collected addresses into a text file with
FS.writeFile, one address per line. - Dispose of the workbook with
workbook.Disposeto free resources.
The complete code example below shows how to read the hyperlink from a shape in Excel in React:
function App() {
  const readShapeHyperlink = async () => {
    // get the Spire.XLS WASM module
    const xlsModule = window.wasmModule?.spirexls;

    // check that the module is ready
    if (!xlsModule) {
      alert('Spire.Xls is not ready yet');
      return;
    }

    // load the font and the test data file into the VFS
    await window.spire.FetchFileToVFS('ARIAL.TTF', '/Library/Fonts/', `${process.env.PUBLIC_URL}/font/`);
    const inputFileName = 'ShapeHyperlinks.xlsx';
    await window.spire.FetchFileToVFS(inputFileName, '', `${process.env.PUBLIC_URL}data/`);

    // load the workbook
    const workbook = new xlsModule.Workbook();
    workbook.LoadFromFile({ fileName: inputFileName });

    // walk the shapes of the worksheet and read the hyperlink off each one
    const sheet = workbook.Worksheets.get(0);
    const shapes = sheet.PrstGeomShapes;
    const addresses = [];
    for (let i = 0; i < shapes.Count; i++) {
      addresses.push(shapes.get(i).HyLink.Address);
    }

    // write the addresses that were read into a text file
    const outputFileName = 'ReadShapeHyperlink.txt';
    window.dotnetRuntime.Module.FS.writeFile(outputFileName, addresses.join('\n'));

    // dispose of the workbook to free resources
    workbook.Dispose();

    // read the result file from the VFS and start the download
    const fileArray = window.dotnetRuntime.Module.FS.readFile(outputFileName);
    const blob = new Blob([fileArray], { type: 'text/plain' });
    const url = URL.createObjectURL(blob);
    const a = document.createElement('a');
    a.href = url;
    a.download = outputFileName;
    a.click();
    URL.revokeObjectURL(url);
  };

  return (
    <div style={{ textAlign: 'center', height: '300px' }}>
      <h1>Add Hyperlinks to Shapes in Excel</h1>
      <button id="read-shape-hyperlink" onClick={readShapeHyperlink}>Read the hyperlink from the shape</button>
    </div>
  );
}

export default App;
After running, the effect of reading the hyperlink from a shape:
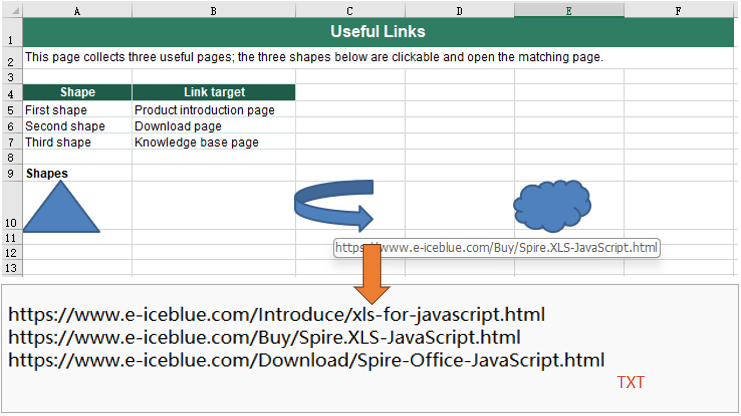
FAQ
Why does a shape's hyperlink not show up in sheet.HyperLinks?
Cause: sheet.HyperLinks collects cell hyperlinks only. A shape is not a cell; it belongs to the worksheet's shape collection, and the link hangs on the shape object's HyLink.
Solution: Go through the shape collection. In this example, after a hyperlink was set on the shapes, sheet.HyperLinks.Count was still 0, and it was still 0 after the file was saved and opened again. Read a shape's link with sheet.PrstGeomShapes.get(i).HyLink.Address.
Get a Free License
Spire.XLS for JavaScript offers a 30-day full-featured free trial license with no functional limitations. Apply here to evaluate before purchasing.
Add Cross-Sheet and External File Links with JavaScript in React
2026-10-13 01:09:11 Written by liu taliaExcel workbooks often need to tie scattered content together: one click on a summary page jumps to a detail worksheet, one click on a quote opens the source file kept beside it. That "jump elsewhere" ability belongs to cell hyperlinks, and the link type decides where the jump goes -- another worksheet inside the same workbook, or a file outside it. Spire.XLS for JavaScript does this in the browser through WebAssembly; input and output files are managed by a virtual file system (VFS), with no backend service required.
This article covers two feature points:
For installation and project setup, see Integrating Spire.XLS for JavaScript in a React Project. The examples below assume Spire.XLS is installed and the WebAssembly module has been initialized.
Add a link to another worksheet
A cross-sheet link solves the "jump from here to there" problem inside one workbook: it strings the content scattered across worksheets into a clickable path, so that the reader does not have to hunt for the right sheet. A link sits on a cell, so the first move is to create a hyperlink object on the target cell and then say, in turn, where it jumps and what text it shows. The steps are:
- Load the font and the test data file into the VFS.
- Load the workbook with
workbook.LoadFromFile. - Create a hyperlink object on the target cell with
sheet.HyperLinks.Add. - Mark the type as a workbook-internal link with the hyperlink's
Typeproperty, set toxlsModule.HyperLinkType.Workbook. - Set the text shown on the cell with the
TextToDisplayproperty. - Write the jump target into the
Addressproperty, in the form "sheet name!cell", for exampleData!B7. - Style the link text blue and underlined so that it reads differently from ordinary text.
- Save the workbook with
workbook.SaveToFile. - Dispose of the workbook with
workbook.Disposeto free resources.
The complete code example below shows how to add a cross-sheet hyperlink to an Excel cell in React:
function App() {
  const linkToOtherSheet = async () => {
    // get the Spire.XLS WASM module
    const xlsModule = window.wasmModule?.spirexls;

    // check that the module is ready
    if (!xlsModule) {
      alert('Spire.Xls is not ready yet');
      return;
    }

    // load the font and the test data file into the VFS
    await window.spire.FetchFileToVFS('ARIAL.TTF', '/Library/Fonts/', `${process.env.PUBLIC_URL}/font/`);
    const inputFileName = 'SheetLink.xlsx';
    await window.spire.FetchFileToVFS(inputFileName, '', `${process.env.PUBLIC_URL}data/`);

    // load the workbook
    const workbook = new xlsModule.Workbook();
    workbook.LoadFromFile({ fileName: inputFileName });

    // take the first worksheet and add a hyperlink object to cell B5
    const sheet = workbook.Worksheets.get(0);
    const cell = sheet.Range.get('B5');
    const hyperlink = sheet.HyperLinks.Add({ range: cell });

    // mark it as a workbook-internal link that points at cell B7 of the second worksheet
    hyperlink.Type = xlsModule.HyperLinkType.Workbook;
    hyperlink.TextToDisplay = 'View the full-year total in the data sheet';
    hyperlink.Address = 'Data!B7';

    // colour the link text blue and underline it so that it reads as a link
    cell.Style.Font.Color = xlsModule.Color.get_Blue();
    cell.Style.Font.Underline = xlsModule.FontUnderlineType.Single;

    // save the workbook
    const outputFileName = 'LinkToOtherSheetCell.xlsx';
    workbook.SaveToFile({ fileName: outputFileName, fileFormat: xlsModule.FileFormat.Version2010 });

    // dispose of the workbook to free resources
    workbook.Dispose();

    // read the result file from the VFS and start the download
    const fileArray = window.dotnetRuntime.Module.FS.readFile(outputFileName);
    const blob = new Blob([fileArray], { type: 'application/vnd.openxmlformats-officedocument.spreadsheetml.sheet' });
    const url = URL.createObjectURL(blob);
    const a = document.createElement('a');
    a.href = url;
    a.download = outputFileName;
    a.click();
    URL.revokeObjectURL(url);
  };

  return (
    <div style={{ textAlign: 'center', height: '300px' }}>
      <h1>Add Cross-Sheet and External File Links in Excel</h1>
      <button id="link-to-other-sheet" onClick={linkToOtherSheet}>Add a link to another worksheet</button>
      <button id="link-to-external-file" onClick={linkToExternalFile}>Add a link to an external file</button>
    </div>
  );
}

export default App;
After running, the effect of adding a cross-sheet link:
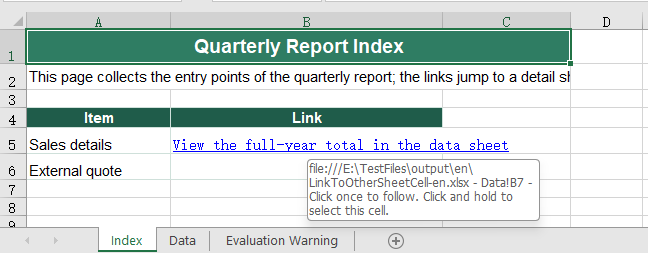
Add a link to an external file
A cross-sheet link can only jump within the same workbook, so once the target falls outside it, the link has to become a file link. It differs from a cross-sheet link in just two places: the type is marked as a file link, and the jump target becomes a file path -- either a full path or a path relative to the current workbook. The steps are:
- Load the font and the test data file into the VFS.
- Load the workbook with
workbook.LoadFromFile. - Create a hyperlink object on the target cell with
sheet.HyperLinks.Add. - Mark the type as a file link with the
Typeproperty, set toxlsModule.HyperLinkType.File. - Set the text shown on the cell with the
TextToDisplayproperty. - Write the path of the external file into the
Addressproperty, for example../files/Quote.xlsx. - Style the link text blue and underlined so that it reads differently from ordinary text.
- Save the workbook with
workbook.SaveToFile. - Dispose of the workbook with
workbook.Disposeto free resources.
The complete code example below shows how to add an external-file hyperlink to an Excel cell in React:
function App() {
  const linkToExternalFile = async () => {
    // get the Spire.XLS WASM module
    const xlsModule = window.wasmModule?.spirexls;

    // check that the module is ready
    if (!xlsModule) {
      alert('Spire.Xls is not ready yet');
      return;
    }

    // load the font and the test data file into the VFS
    await window.spire.FetchFileToVFS('ARIAL.TTF', '/Library/Fonts/', `${process.env.PUBLIC_URL}/font/`);
    const inputFileName = 'SheetLink.xlsx';
    await window.spire.FetchFileToVFS(inputFileName, '', `${process.env.PUBLIC_URL}data/`);

    // load the workbook
    const workbook = new xlsModule.Workbook();
    workbook.LoadFromFile({ fileName: inputFileName });

    // take the first worksheet and add a hyperlink object to cell B6
    const sheet = workbook.Worksheets.get(0);
    const cell = sheet.Range.get('B6');
    const hyperlink = sheet.HyperLinks.Add({ range: cell });

    // mark it as a file link that points at a file outside the workbook
    hyperlink.Type = xlsModule.HyperLinkType.File;
    hyperlink.TextToDisplay = 'Open the external quote';
    hyperlink.Address = '../files/Quote.xlsx';

    // colour the link text blue and underline it so that it reads as a link
    cell.Style.Font.Color = xlsModule.Color.get_Blue();
    cell.Style.Font.Underline = xlsModule.FontUnderlineType.Single;

    // save the workbook
    const outputFileName = 'LinkToExternalFile.xlsx';
    workbook.SaveToFile({ fileName: outputFileName, fileFormat: xlsModule.FileFormat.Version2010 });

    // dispose of the workbook to free resources
    workbook.Dispose();

    // read the result file from the VFS and start the download
    const fileArray = window.dotnetRuntime.Module.FS.readFile(outputFileName);
    const blob = new Blob([fileArray], { type: 'application/vnd.openxmlformats-officedocument.spreadsheetml.sheet' });
    const url = URL.createObjectURL(blob);
    const a = document.createElement('a');
    a.href = url;
    a.download = outputFileName;
    a.click();
    URL.revokeObjectURL(url);
  };

  return (
    <div style={{ textAlign: 'center', height: '300px' }}>
      <h1>Add Cross-Sheet and External File Links in Excel</h1>
      <button id="link-to-other-sheet" onClick={linkToOtherSheet}>Add a link to another worksheet</button>
      <button id="link-to-external-file" onClick={linkToExternalFile}>Add a link to an external file</button>
    </div>
  );
}

export default App;
After running, the effect of adding an external-file link:
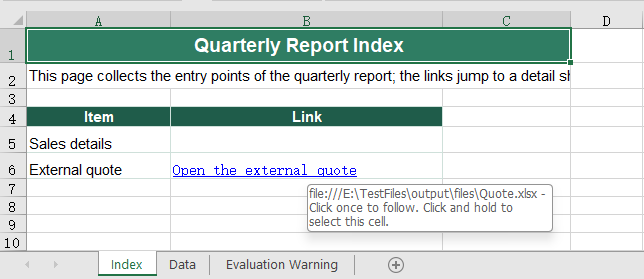
FAQ
Why does adding a link to a cell that already has text replace that text with the address
Reason: The text a cell shows is decided by TextToDisplay. Create a link without setting it and the address moves up to serve as the display text; the replacement happens the moment the link is added, so reading Range.Text afterwards returns the address rather than the original text.
Solution: Read the text before adding the link, then hand it back to TextToDisplay once the link is in place:
const cell = sheet.Range.get('B6');
const text = cell.Text;                  // keep the original text before adding the link
const hyperlink = sheet.HyperLinks.Add({ range: cell });
hyperlink.Type = xlsModule.HyperLinkType.File;
hyperlink.Address = '../files/Quote.xlsx';
hyperlink.TextToDisplay = text;          // hand the text back, so the cell still shows it
How do I remove a link but keep the text in the cell
Reason: The link and the text are two different things -- the link hangs on the cell, while the text is the cell's content. Range.ClearAll() clears the content, so using it to get rid of a link takes the text with it.
Solution: Remove the link by index with sheet.HyperLinks.RemoveAt, and the cell text stays as it was. For example, sheet.HyperLinks.RemoveAt(0) removes the first link; the text is still in the cell afterwards, it simply is no longer clickable.
Get a Free License
Spire.XLS for JavaScript offers a 30-day full-featured free trial license with no functional limitations. Apply here to evaluate before purchasing.
Add Hyperlinks to Pictures in Excel with JavaScript in React
2026-10-10 09:24:23 Written by liu taliaA picture in Excel is more than decoration. Put a logo or a product shot on a worksheet and give it a hyperlink, and the file stops being a plain description and becomes something a reader can click through. A picture is not a cell, though, and its hyperlink lives on the picture object, so both setting and reading one go through the worksheet's picture collection rather than its cell hyperlink collection. Spire.XLS for JavaScript does this in the browser on WebAssembly, handling input and output files through a virtual file system (VFS) with no backend service.
This article covers two core feature points:
For installation and project setup, see Integrating Spire.XLS for JavaScript in a React Project. The examples below assume Spire.XLS is installed and the WebAssembly module has been initialised.
Set a hyperlink on a picture
Setting a hyperlink on a picture is what turns it into a clickable entry point: a reader who clicks the picture on the worksheet opens the address it points at. The link belongs to the picture itself rather than to a cell, so the picture object has to be taken from the worksheet's picture collection first, and the address handed to that object. The steps are:
- Load the font, the picture and the test data file into the VFS.
- Load the workbook with
workbook.LoadFromFile. - Insert the picture into the space left for it with
sheet.Pictures.Add. - Set the hyperlink on the picture with
picture.SetHyperLink, passingtrueas the second argument. - Save the workbook with
workbook.SaveToFile. - Dispose of the workbook with
workbook.Disposeto free resources.
The complete code example below shows how to set a hyperlink on a picture in Excel in React:
function App() {
  const pictureHyperlink = async () => {
    // get the Spire.XLS WASM module
    const xlsModule = window.wasmModule?.spirexls;

    // check that the module is ready
    if (!xlsModule) {
      alert('Spire.Xls is not ready yet');
      return;
    }

    // load the font, the picture and the test data file into the VFS
    await window.spire.FetchFileToVFS('ARIAL.TTF', '/Library/Fonts/', `${process.env.PUBLIC_URL}/font/`);
    await window.spire.FetchFileToVFS('logo.png', '', `${process.env.PUBLIC_URL}data/`);
    const inputFileName = 'PictureLink.xlsx';
    await window.spire.FetchFileToVFS(inputFileName, '', `${process.env.PUBLIC_URL}data/`);

    // load the workbook
    const workbook = new xlsModule.Workbook();
    workbook.LoadFromFile({ fileName: inputFileName });

    // take the first worksheet and drop the picture into the space left for it
    const sheet = workbook.Worksheets.get(0);
    const picture = sheet.Pictures.Add({ topRow: 10, leftColumn: 1, fileName: 'logo.png' });

    // set the hyperlink on the picture; the second argument being true means it points outside the workbook
    picture.SetHyperLink('https://www.e-iceblue.com/Misc/about-us.html', true);

    // save the workbook
    const outputFileName = 'PictureHyperlink.xlsx';
    workbook.SaveToFile({ fileName: outputFileName, fileFormat: xlsModule.FileFormat.Version2010 });

    // dispose of the workbook to free resources
    workbook.Dispose();

    // read the result file from the VFS and start the download
    const fileArray = window.dotnetRuntime.Module.FS.readFile(outputFileName);
    const blob = new Blob([fileArray], { type: 'application/vnd.openxmlformats-officedocument.spreadsheetml.sheet' });
    const url = URL.createObjectURL(blob);
    const a = document.createElement('a');
    a.href = url;
    a.download = outputFileName;
    a.click();
    URL.revokeObjectURL(url);
  };

  return (
    <div style={{ textAlign: 'center', height: '300px' }}>
      <h1>Add Hyperlinks to Pictures in Excel</h1>
      <button id="picture-hyperlink" onClick={pictureHyperlink}>Set a hyperlink on the picture</button>
    </div>
  );
}

export default App;
After running, the effect of setting a hyperlink on a picture:
Read the hyperlink from a picture
Reading the hyperlink off a picture is how a finished workbook is checked over: whether the links are all there, and whether they point at the right addresses. The addresses that come back are written out as a text file, which makes them easy to line up against a list of links. Picture hyperlinks are not kept in the cell hyperlink collection, so the pictures have to be taken from the worksheet one by one, and each one asked for its own link object. The steps are:
- Load the font and the test data file into the VFS.
- Load the workbook with
workbook.LoadFromFile. - Take the picture count from
sheet.Pictures.Countand walk every picture on the worksheet with it. - Take this picture's hyperlink object with
picture.GetHyperLink. - Read the target address from the link object's
Address, collecting the addresses as you go. - Write the collected addresses into a text file with
FS.writeFile, one address per line. - Dispose of the workbook with
workbook.Disposeto free resources.
The complete code example below shows how to read the hyperlink from a picture in Excel in React:
function App() {
  const readPictureHyperlink = async () => {
    // get the Spire.XLS WASM module
    const xlsModule = window.wasmModule?.spirexls;

    // check that the module is ready
    if (!xlsModule) {
      alert('Spire.Xls is not ready yet');
      return;
    }

    // load the font and the test data file into the VFS
    await window.spire.FetchFileToVFS('ARIAL.TTF', '/Library/Fonts/', `${process.env.PUBLIC_URL}/font/`);
    const inputFileName = 'PictureHyperlinks.xlsx';
    await window.spire.FetchFileToVFS(inputFileName, '', `${process.env.PUBLIC_URL}data/`);

    // load the workbook
    const workbook = new xlsModule.Workbook();
    workbook.LoadFromFile({ fileName: inputFileName });

    // walk the pictures of the worksheet and read the hyperlink off each one
    const sheet = workbook.Worksheets.get(0);
    const pictures = sheet.Pictures;
    const addresses = [];
    for (let i = 0; i < pictures.Count; i++) {
      const link = pictures.get(i).GetHyperLink();
      addresses.push(link.Address);
    }

    // write the addresses that were read into a text file
    const outputFileName = 'ReadPictureHyperlink.txt';
    window.dotnetRuntime.Module.FS.writeFile(outputFileName, addresses.join('\n'));

    // dispose of the workbook to free resources
    workbook.Dispose();

    // read the result file from the VFS and start the download
    const fileArray = window.dotnetRuntime.Module.FS.readFile(outputFileName);
    const blob = new Blob([fileArray], { type: 'text/plain' });
    const url = URL.createObjectURL(blob);
    const a = document.createElement('a');
    a.href = url;
    a.download = outputFileName;
    a.click();
    URL.revokeObjectURL(url);
  };

  return (
    <div style={{ textAlign: 'center', height: '300px' }}>
      <h1>Add Hyperlinks to Pictures in Excel</h1>
      <button id="read-picture-hyperlink" onClick={readPictureHyperlink}>Read the hyperlink from the picture</button>
    </div>
  );
}

export default App;
After running, the effect of reading the hyperlink from a picture:
FAQ
Why does a picture's hyperlink not show up in sheet.HyperLinks?
Cause: sheet.HyperLinks collects cell hyperlinks only. A picture is not a cell; it belongs to the worksheet's picture collection, and the link hangs on the picture object itself.
Solution: Go through the picture collection. In this example, after a hyperlink was set on the picture, sheet.HyperLinks.Count was still 0, and it was still 0 after the file was saved and opened again. Read a picture's link with sheet.Pictures.get(i).GetHyperLink(), then read the Address off the link object.
When should the second argument of SetHyperLink be false?
Cause: The second argument of picture.SetHyperLink(address, isExternal) says whether the target lies outside the workbook.
Solution: Pass true for a web page or an external file, and the link type comes out as HyperLinkType.Url; pass false for a position inside the same workbook, write the address as a cell reference such as Sheet1!A1, and the type comes out as HyperLinkType.Workbook. In this example both forms were saved, and after the file was opened again the Address and Type read back matched what had been set.
Get a Free License
Spire.XLS for JavaScript offers a 30-day full-featured free trial license with no functional limitations. Apply here to evaluate before purchasing.
