Add, Preview, and Remove Excel Page Breaks with JavaScript in React
Page breaks are an important tool for controlling the print layout of Excel. They determine where data is divided across printed pages. Setting page breaks properly prevents data from being broken apart pointlessly when printing, resulting in clean, readable paper or PDF reports. Spire.XLS for JavaScript uses WebAssembly to add, preview, and remove page breaks directly in the browser, managing input and output files through a virtual file system (VFS) — no backend server required.
This article covers three core features:
For installation and project configuration, refer to Integrating Spire.XLS for JavaScript in a React Project. The examples below assume Spire.XLS is installed and the WebAssembly module is initialized.
Add Page Breaks
When printing reports, we often want to split data by a fixed number of rows and columns, for example printing a fixed number of data rows per page. Spire.XLS for JavaScript adds horizontal page breaks using the HPageBreaks.Add method and vertical page breaks using the VPageBreaks.Add method, enabling precise page break control.
function App() {
  const sheetToSVG = async () => {
    // Get the Spire.XLS WASM module
    const xlsModule = window.wasmModule?.spirexls;

    // Check if the module is ready
    if (!xlsModule) {
      alert('Spire.Xls is not ready yet');
      return;
    }

    // Load fonts and the Excel file into VFS
    await window.spire.FetchFileToVFS('ARIAL.TTF', '/Library/Fonts/', `${process.env.PUBLIC_URL}/font/`);
    const inputFileName = 'Template_Xls_4.xlsx';
    await window.spire.FetchFileToVFS(inputFileName, '', `${process.env.PUBLIC_URL}/static/data/`);

    // Load the workbook
    const workbook = new xlsModule.Workbook();
    workbook.LoadFromFile({ fileName: inputFileName });

    // Get the first worksheet
    const sheet = workbook.Worksheets.get(0);

    // Add a horizontal page break at row E4
    sheet.HPageBreaks.Add(sheet.Range.get("E4"));
    // Add a vertical page break at column C4
    sheet.VPageBreaks.Add(sheet.Range.get("C4"));

    const outputFileName = "AddPageBreakInXlsFile.xlsx";
    workbook.SaveToFile({ fileName: outputFileName });

    // Release the workbook object to free resources
    workbook.Dispose();

    // Read the converted file from VFS and trigger download
    const fileArray = window.dotnetRuntime.Module.FS.readFile(outputFileName);
    const blob = new Blob([fileArray], { type: "application/vnd.openxmlformats-officedocument.spreadsheetml.sheet" });
    const url = URL.createObjectURL(blob);
    const a = document.createElement('a');
    a.href = url;
    a.download = outputFileName;
    a.click();
    URL.revokeObjectURL(url);
  };

  return (
    <div style={{ textAlign: 'center', height: '300px' }}>
      <h1>Add Page Break</h1>
      <button onClick={sheetToSVG}>
        Start
      </button>
    </div>
  );
}

export default App;
Original document 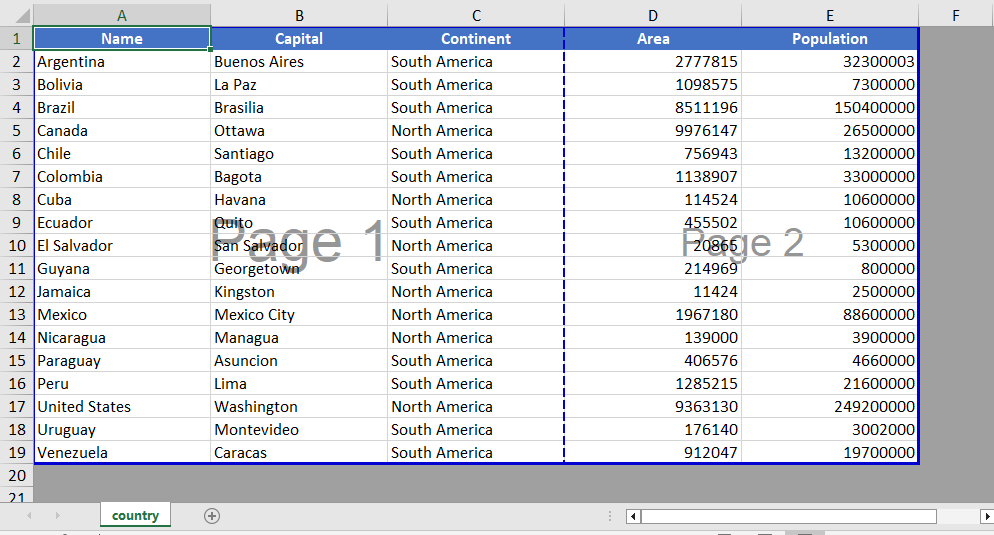 Add page break
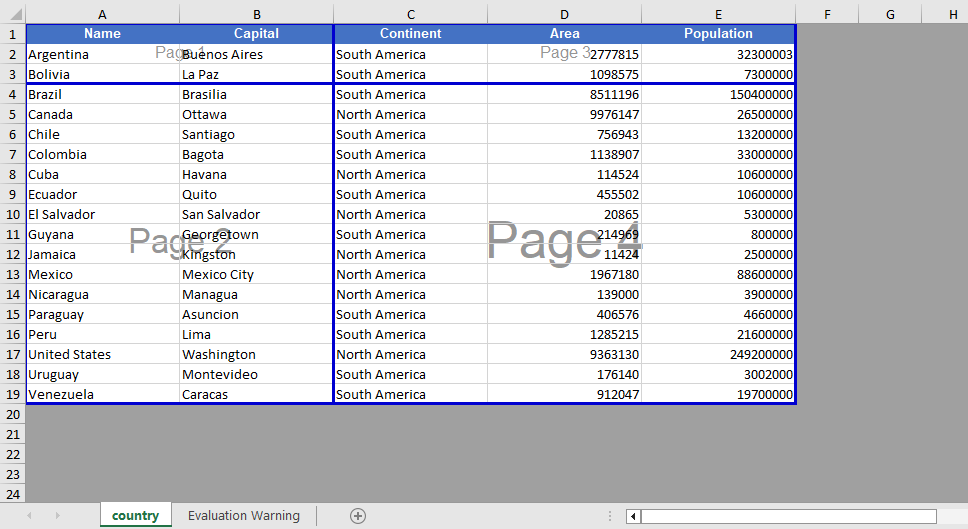
Page Break View Zoom Scale Setting
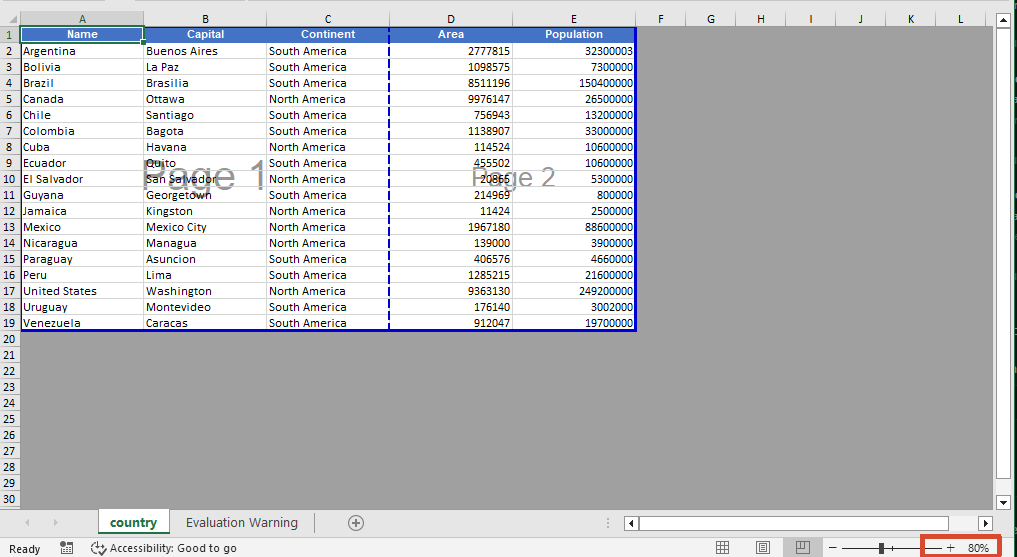
When viewing page break positions in the view mode, Spire.XLS for JavaScript supports setting the zoom scale of the page break preview view through the ZoomScalePageBreakView property.
function App() {
  const sheetToSVG = async () => {
    // Get the Spire.XLS WASM module
    const xlsModule = window.wasmModule?.spirexls;

    // Check if the module is ready
    if (!xlsModule) {
      alert('Spire.Xls is not ready yet');
      return;
    }

    // Load fonts and the Excel file into VFS
    await window.spire.FetchFileToVFS('ARIAL.TTF', '/Library/Fonts/', `${process.env.PUBLIC_URL}/font/`);
    const inputFileName = 'Template_Xls_4.xlsx';
    await window.spire.FetchFileToVFS(inputFileName, '', `${process.env.PUBLIC_URL}/static/data/`);

    // Load the workbook
    const workbook = new xlsModule.Workbook();
    workbook.LoadFromFile({ fileName: inputFileName });

    // Get the first worksheet
    const sheet = workbook.Worksheets.get(0);

    // Set the zoom scale of the page break preview view
    sheet.ZoomScalePageBreakView = 80;

    const outputFileName = "PageBreakPreview.xlsx";
    workbook.SaveToFile({ fileName: outputFileName });

    // Release the workbook object to free resources
    workbook.Dispose();

    // Read the converted file from VFS and trigger download
    const fileArray = window.dotnetRuntime.Module.FS.readFile(outputFileName);
    const blob = new Blob([fileArray], { type: "application/vnd.openxmlformats-officedocument.spreadsheetml.sheet" });
    const url = URL.createObjectURL(blob);
    const a = document.createElement('a');
    a.href = url;
    a.download = outputFileName;
    a.click();
    URL.revokeObjectURL(url);
  };

  return (
    <div style={{ textAlign: 'center', height: '300px' }}>
      <h1>Page Break Preview</h1>
      <button onClick={sheetToSVG}>
        Start
      </button>
    </div>
  );
}

export default App;
Before setting the zoom scale 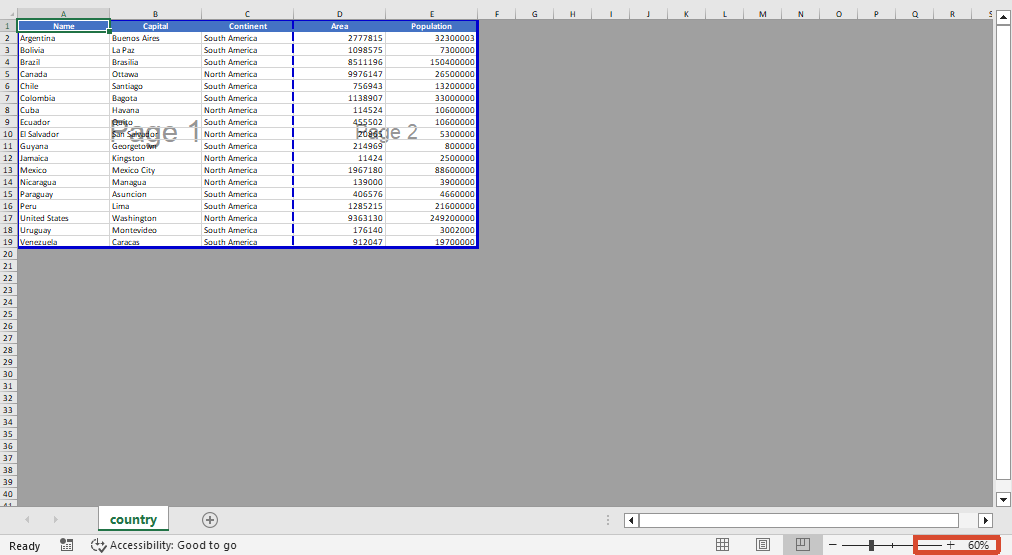 After setting the zoom scale
Remove Page Breaks
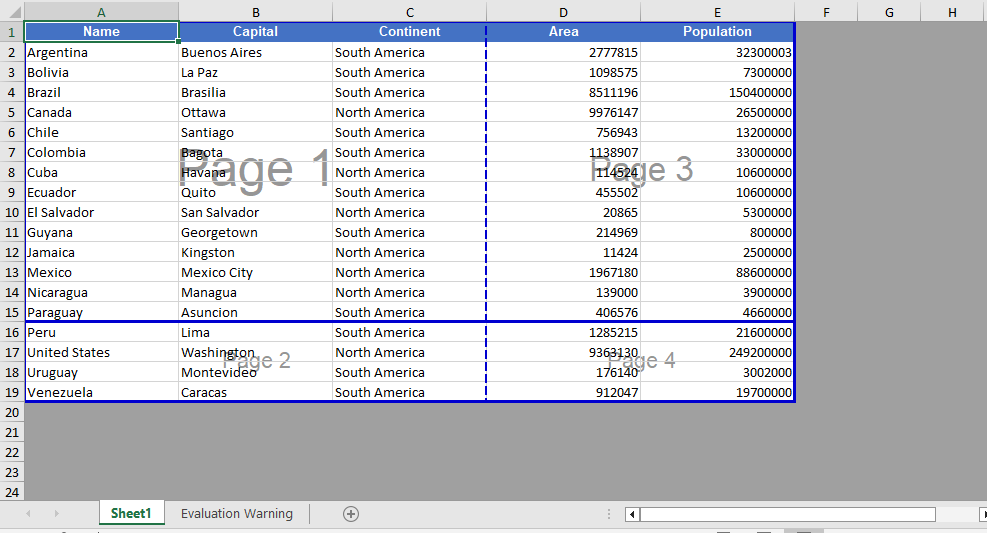
When page breaks are no longer needed, you can clear all page breaks in a specific direction using the Clear method, or delete the page break at a specific position by index using the RemoveAt method. After removal, you can also switch the worksheet to the page break preview view via the ViewMode property to visually confirm the page break effect.
function App() {
  const sheetToSVG = async () => {
    // Get the Spire.XLS WASM module
    const xlsModule = window.wasmModule?.spirexls;

    // Check if the module is ready
    if (!xlsModule) {
      alert('Spire.Xls is not ready yet');
      return;
    }

    // Load fonts and the Excel file into VFS
    await window.spire.FetchFileToVFS('ARIAL.TTF', '/Library/Fonts/', `${process.env.PUBLIC_URL}/font/`);
    const inputFileName = 'PageBreak.xlsx';
    await window.spire.FetchFileToVFS(inputFileName, '', `${process.env.PUBLIC_URL}/static/data/`);

    // Load the workbook
    const workbook = new xlsModule.Workbook();
    workbook.LoadFromFile({ fileName: inputFileName });

    // Get the first worksheet
    const sheet = workbook.Worksheets.get(0);

    // Clear all vertical page breaks
    sheet.VPageBreaks.Clear();

    // Remove the first horizontal page break
    sheet.HPageBreaks.RemoveAt(0);

    // Set the view mode to page break preview to check the page break effect
    sheet.ViewMode = xlsModule.ViewMode.Preview;

    const outputFileName = "RemovePageBreak_output.xlsx";
    workbook.SaveToFile({ fileName: outputFileName });

    // Release the workbook object to free resources
    workbook.Dispose();

    // Read the converted file from VFS and trigger download
    const fileArray = window.dotnetRuntime.Module.FS.readFile(outputFileName);
    const blob = new Blob([fileArray], { type: "application/vnd.openxmlformats-officedocument.spreadsheetml.sheet" });
    const url = URL.createObjectURL(blob);
    const a = document.createElement('a');
    a.href = url;
    a.download = outputFileName;
    a.click();
    URL.revokeObjectURL(url);
  };

  return (
    <div style={{ textAlign: 'center', height: '300px' }}>
      <h1>Remove Page Break</h1>
      <button onClick={sheetToSVG}>
        Start
      </button>
    </div>
  );
}

export default App;
Before removing the page break 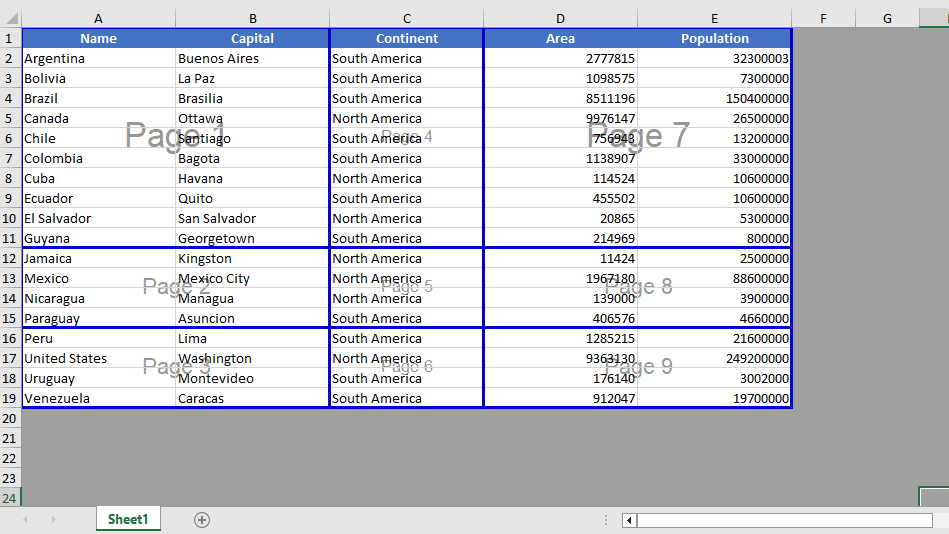 After removing the page break
FAQ
Page breaks do not take effect when printing after being added
Cause: The page break was added to a blank area, or the worksheet has a fixed print zoom scale set, causing the actual page break positions during printing to differ from what was expected.
Solution: Confirm that the page break is added on the row or column of a cell containing data, and check the worksheet's print zoom settings. If necessary, adjust the zoom scale through properties such as ZoomScalePageBreakView so the page breaks take effect as expected.
Page break lines still display after removal
Cause: The worksheet is still in page break preview view mode, or there are automatic page breaks that are generated automatically based on the amount of data.
Solution: Automatic page breaks cannot be removed directly by programming; automatic page breaks are determined by the number of data rows, columns, and the page size. They can be eliminated by adjusting row heights, column widths, or the print zoom scale.
Get a Free License
If you want to remove the evaluation messages in the resulting documents, or get rid of functional limitations, please contact sales to obtain a temporary license valid for 30 days.
Generate PPT from Multi-Format Documents with Spire.Agent.Office
Efficiently transferring technical knowledge is a core challenge for every enterprise in day-to-day business. A large number of technical specification documents — such as operation manuals, safety and maintenance guides, and supply chain standard documents — are often dozens or even hundreds of pages long. How to quickly turn the core knowledge in these dense technical specifications into easy-to-understand PPT material is a key pain point in enterprise knowledge management.
This article demonstrates how to use the Spire.Agent.Office Presentation AI capability to analyze and summarize data sources in various formats, extract the core points, and generate professional PPT presentations.
- Generate PPT from a Word Document
- Generate PPT from a PDF Document
- Generate PPT from a Markdown Document
- Generate PPT from an Excel Document
Comparing with Traditional SDK/API Processing
| Traditional Spire.Office for .NET API | Spire.Agent.Office | |
|---|---|---|
| Driving approach | Requires calling the APIs of four products — Word, Excel, PDF, PowerPoint — extracting content from each document type via code, then calling the PowerPoint API to create slides page by page, add elements, and manually calculate layouts | Directly describe the requirement in natural language, and the AI understands and generates the PPT automatically |
| Development complexity | You need to be familiar with 4 different API sets, write separate parsing code for each format (.docx/.xlsx/.pdf), and then piece together the PowerPoint generation logic — large amount of code with high coupling | One natural-language instruction completes the entire workflow |
| Document parsing | You must manually specify which data to extract from each type of document; the parsing logic is hard-coded, and any document structure change requires synchronized code modification | AI automatically analyzes the document structure in depth and accurately extracts the key information |
| Versatility & maintainability | Each document format requires its own parsing logic; format changes or new document types require extensive code changes, with poor reusability | The same set of natural-language instructions adapts to different documents |
| Processing cycle | Several days (large documents require senior engineers to spend full time writing/debugging code) | Minutes (upload document + template + one instruction) |
Regarding product installation and SpireToken configuration, please refer to Integrating Spire.Agent.Office in a .NET Project. The examples below assume that Spire.Agent.Office is installed and SpireToken is configured.
Generate PPT from a Word Document
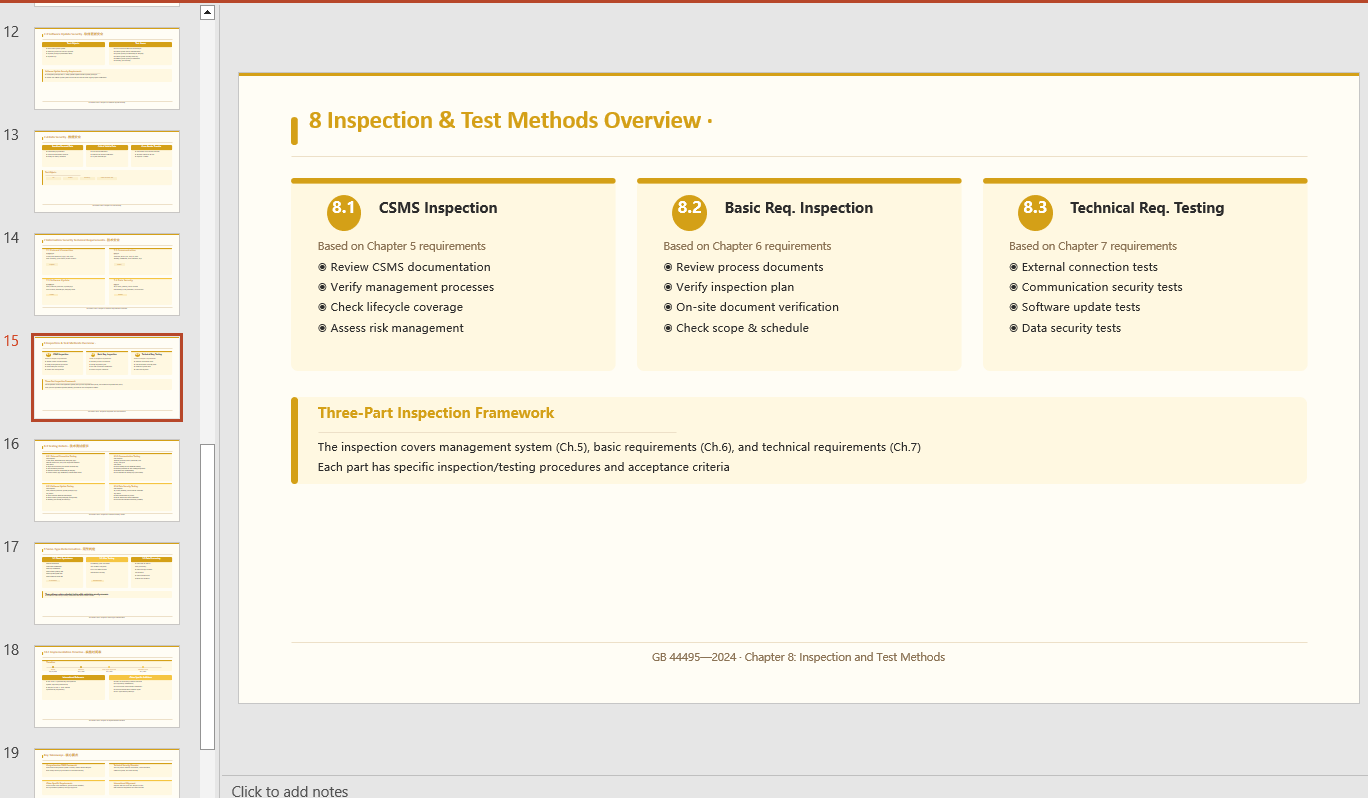
Generate a minimalist-style PPT presentation based on the content of a Word document according to a natural-language instruction.
using Spire.Agent.Office.AI;
using Spire.Agent.Office.Extensions;
using Spire.Presentation;

// Source data document
string inputPath = @"technical_requirements.docx";
// Result document path
string savePath = @"SafetyTechnicalRequirements.pptx";
// SpireToken Key
string key = "sk-TF***************************r";
// Natural language instruction
string instruction = "Extract the core points from 'technical_requirements.docx' to generate a PPT. 1. Ensure proper layout and formatting 2. Use a minimalist style with a light yellow theme 3. Generate 20 slides";
// AI generation
PPTGenerationResult result = GeneratePPT(inputPath, instruction, savePath, key);

// AI-assisted PPT generation
static PPTGenerationResult GeneratePPT(string input, string instruction, string savePath, string key)
{
    AIOptions options = new AIOptions();
    options.SpireToken = key;
    options.TimeoutMs = 1000000;
    using (Presentation ppt = new Presentation())
    {
        AIDocumentProcessor processor = ppt.AI(options);
        return processor.GeneratePresentation(input, instruction, savePath);
    }
}
Generate PPT from a PDF Document
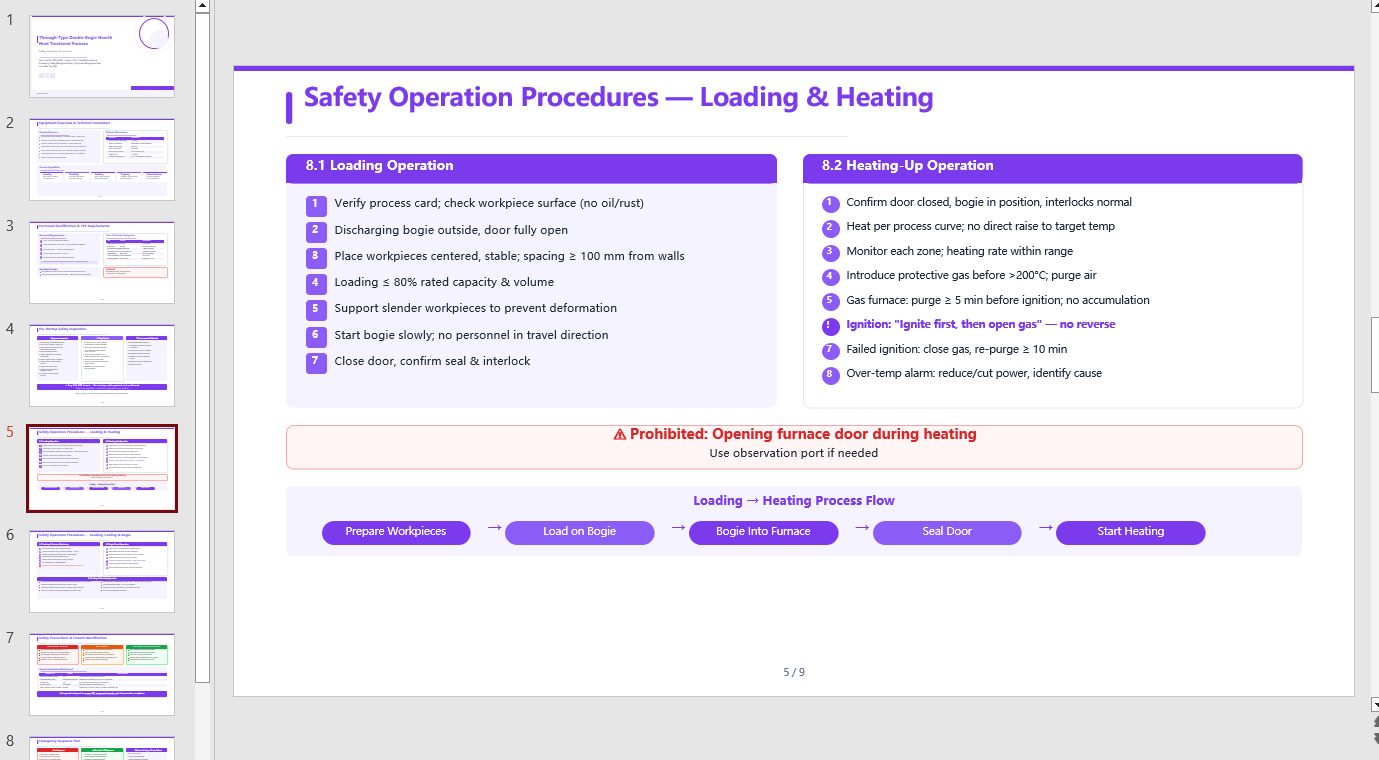
Automatically analyze the internal hierarchy of a PDF document, accurately extract the key information, and generate a retro-green themed PPT presentation according to the instruction.
using Spire.Agent.Office.AI;
using Spire.Agent.Office.Extensions;
using Spire.Presentation;

// Source data document
string inputPath = @"procedures.pdf";
// Result document path
string savePath = @"SafetyOperationProcedures.pptx";
// SpireToken Key
string key = "sk-TF***************************r";
// Natural language instruction
string instruction = "Extract the key points from 'procedures.pdf' and generate a PPT. " +
                     "1. Ensure a well-structured layout and visual appeal; " +
                     "2. Include relevant diagrams and charts; " +
                     "3. Use a simple purple style as the theme; "+
                     "4. 9 pages";
// AI generation
PPTGenerationResult result = GeneratePPT(inputPath, instruction, savePath, key);


// AI-assisted PPT generation
static PPTGenerationResult GeneratePPT(string input, string instruction, string savePath, string key)
{
    AIOptions options = new AIOptions();
    options.SpireToken = key;
    options.TimeoutMs = 1000000;
    using (Presentation ppt = new Presentation())
    {
        AIDocumentProcessor processor = ppt.AI(options);
        return processor.GeneratePresentation(input, instruction, savePath);
    }
}
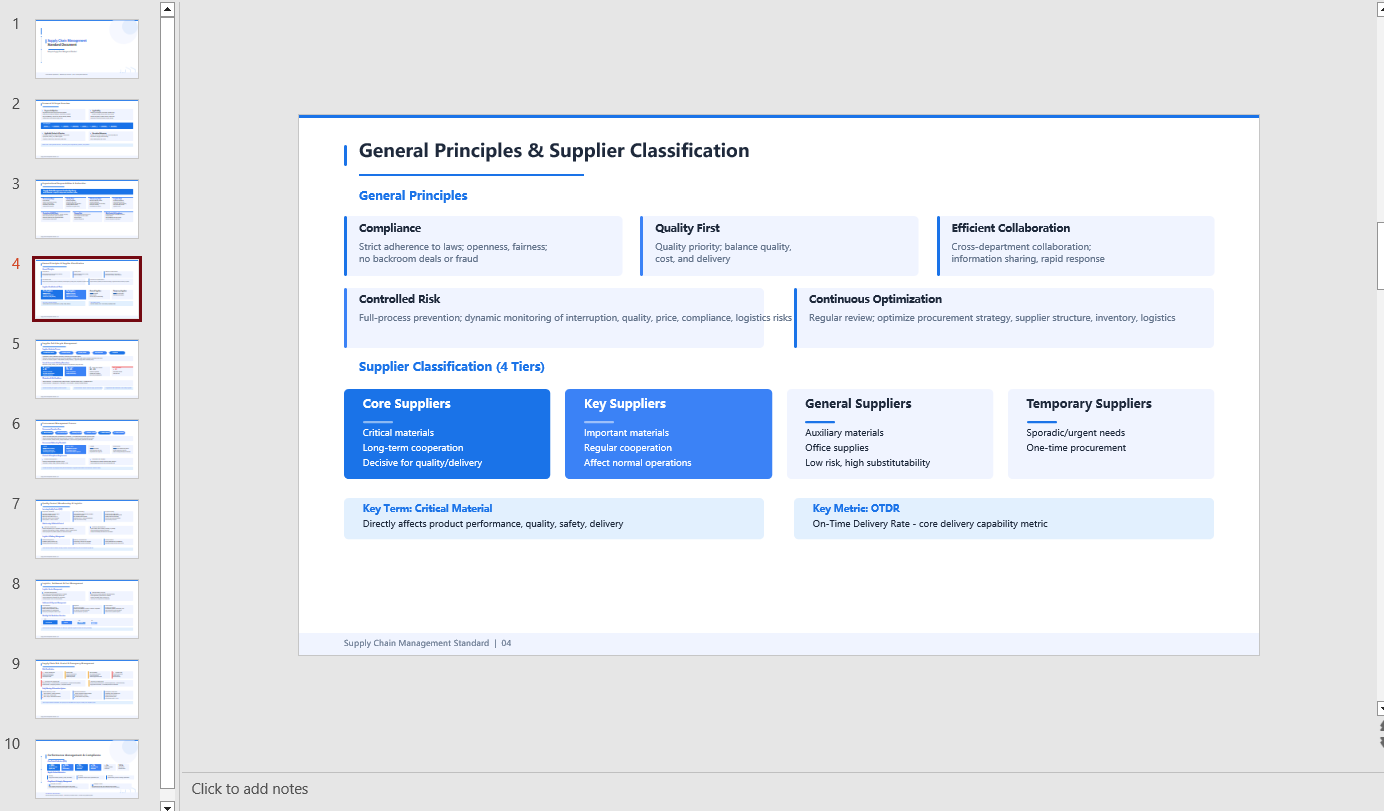
Generate PPT from a Markdown Document
Automatically summarize the content of a Markdown-format data source and generate a tech-style PPT.
using Spire.Agent.Office.AI;
using Spire.Agent.Office.Extensions;
using Spire.Presentation;

// Source data document
string inputPath = @"Management.md";
// Result document path
string savePath = @"SupplyChainManagement.pptx";
// SpireToken Key
string key = "sk-TF***************************r";
// Natural language instruction
string instruction = "Generate a PPT based on 'Management.md'. Requirements: 1. Adopt a tech/style; 2. Use light blue as the primary color scheme; 3. Ensure the core content is complete, with clear hierarchy and neat layout. Key data should be presented visually through charts and graphs.";
// AI generation
PPTGenerationResult result = GeneratePPT(inputPath, instruction, savePath, key);


// AI-assisted PPT generation
static PPTGenerationResult GeneratePPT(string input, string instruction, string savePath, string key)
{
    AIOptions options = new AIOptions();
    options.SpireToken = key;
    options.TimeoutMs = 1000000;
    using (Presentation ppt = new Presentation())
    {
        AIDocumentProcessor processor = ppt.AI(options);
        return processor.GeneratePresentation(input, instruction, savePath);
    }
}
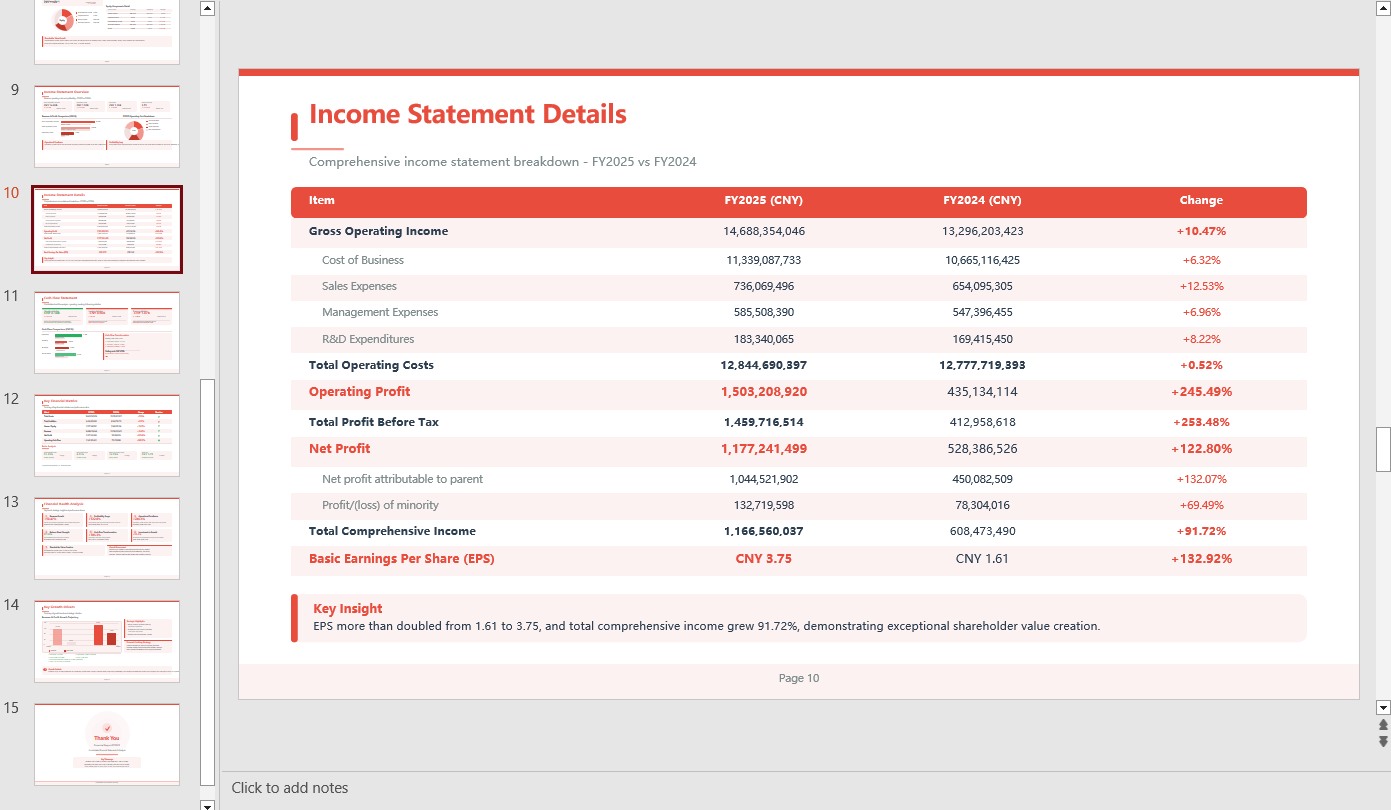
Generate PPT from an Excel Document
Automatically summarize the content of an Excel-format data source and generate a tech-style PPT.
using Spire.Agent.Office.AI;
using Spire.Agent.Office.Extensions;
using Spire.Presentation;

// Source data document
string inputPath = @"data.xlsx";
// Result document path
string savePath = @"out.pptx";
// SpireToken Key
string key = "sk-TF***************************r";
// Natural language instruction
string instruction = "Generate a PPT based on data
.xlsx, 1. Ensure proper layout and formatting 2. Use a minimalist style with a light red theme 3. Ensure chart visual effects 4.Generate 15 pages";
// AI generation
PPTGenerationResult result = GeneratePPT(inputPath, instruction, savePath, key);


// AI-assisted PPT generation
static PPTGenerationResult GeneratePPT(string input, string instruction, string savePath, string key)
{
    AIOptions options = new AIOptions();
    options.SpireToken = key;
    options.TimeoutMs = 1000000;
    using (Presentation ppt = new Presentation())
    {
        AIDocumentProcessor processor = ppt.AI(options);
        return processor.GeneratePresentation(input, instruction, savePath);
    }
}
FAQ
The number of generated PPT pages does not match the expectation
Cause: If the data source contains a large amount of content, the AI analysis will take more time. The default timeout of AIOptions.TimeoutMs is 5 minutes; if the analysis exceeds it, the AI analysis is interrupted.
Solution: Set AIOptions.TimeoutMs to a sufficiently large value, and also specify a page range in the instruction, e.g. "Keep the final PPT to 8-12 pages".
The key content extracted by AI is not accurate enough
Cause: The source document has a complex structure, and the AI may not have fully understood the hierarchy.
Solution: Explicitly specify the type of content to extract in the instruction, e.g. "Focus on extracting the data from the table in Chapter 2".
Get Your SpireToken Key
- Contact [email protected] or visit https://www.e-iceblue.com/TemLicense.html to obtain a trial/commercial API key
Configure it in code:
AIProcessorOptions options = new AIProcessorOptions();
options.SpireToken = key;
Generate Various Word Templates with Spire.Agent.Office
Word templates are the foundation of enterprise business workflows. HR needs standard employment contracts and offer letters, sales teams need professional quotation and report templates, and administration needs unified meeting notices and certification documents. With the Word AI capabilities of Spire.Agent.Office, you simply describe the desired template style and content structure in natural language — for example, "Create a contract template with mail merge fields for 'Name, Position, Department, Salary, Start Date, End Date, Contract Type, Probation Period (months), Location'" and AI delivers the template directly.
Comparison with Traditional SDK API Approach
| Traditional Spire.Office for .NET API | Spire.Agent.Office | |
|---|---|---|
| Development Approach | Call APIs to build document structure line by line, paragraph by paragraph | Describe template style and structure in natural language; AI automatically composes and generates the complete template document |
| Code Volume | Hundreds of lines of document-building code per template | Just 1 natural language instruction |
| Style Adjustment | Font, color, border, and other styles require complex code-based formatting | Simply describe in natural language |
| Template Flexibility | Template structure changes require rewriting underlying document-building logic — high maintenance cost | Adjust the instruction description, AI regenerates — flexibly responds to changing requirements |
Several typical business scenario Word template examples:
- Word Employment Contract Template
- Word Quotation Template
- Word Certificate Template
- Budget Report Template
For product installation and SpireToken configuration, please refer to Integrating Spire.Agent.Office in a .NET Project. The examples below assume Spire.Agent.Office is already installed and SpireToken is configured.
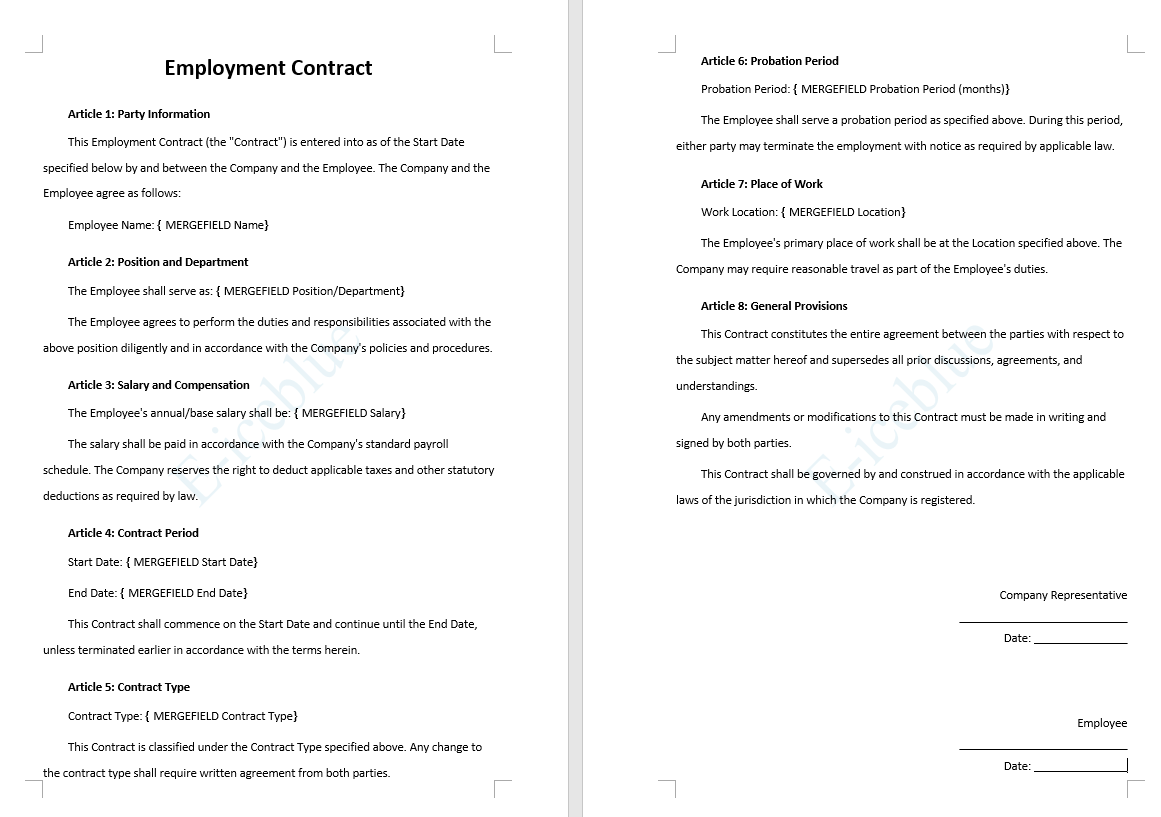
Word Employment Contract Template
The most commonly used employment contracts in HR departments all share a relatively fixed structure: title, party information, main body clauses, signature section, etc.
using Spire.Agent.Office.AI;
using Spire.Agent.Office.Extensions;
using Spire.Doc;

string inputPath = @"";
// Result document path
string savePath = @"employmentContract.docx"; ;
// SpireToken Key
string key = "s******************************r";
// Natural language instruction
string instruction =
    "Generate a Word employment contract template. " +
    "The main title is 'Employment Contract', in No. 2 font size, bold, and centered. " +
    "The body text uses Arial font throughout, in Small No. 4 font size (12pt), with a first-line indent of 2 characters per paragraph. " +
    "Add a light blue watermark with the text 'E-iceblue' throughout the entire document. " +
    "Include the following fields as mail merge fields: Name, Position/Department, Salary, Start Date, End Date, Contract Type, Probation Period (months), and Location. " +
    "The overall style should be formal and professional, suitable for legal document scenarios.";
// AI generation
AIResult result = ExecuteAIWord(instruction, inputPath, savePath, key);

// Word AI processing
static AIResult ExecuteAIWord(string instruction, string inputPath, string savePath, string key)
{
    // Create AI processor options instance
    AIOptions options = new AIOptions();
    options.SpireToken = key;
    // Create Word document object
    using (Document doc = new Document())
    {
        if (!string.IsNullOrEmpty(inputPath) && File.Exists(inputPath))
        {
            doc.LoadFromFile(inputPath);
        }
        // Create AI document processor instance
         AIDocumentProcessor processor = doc.AI(options);

        // Process the document according to the instruction and save the result to the specified path
        return processor.ExecuteInstruction(doc, instruction, savePath);
    }
}
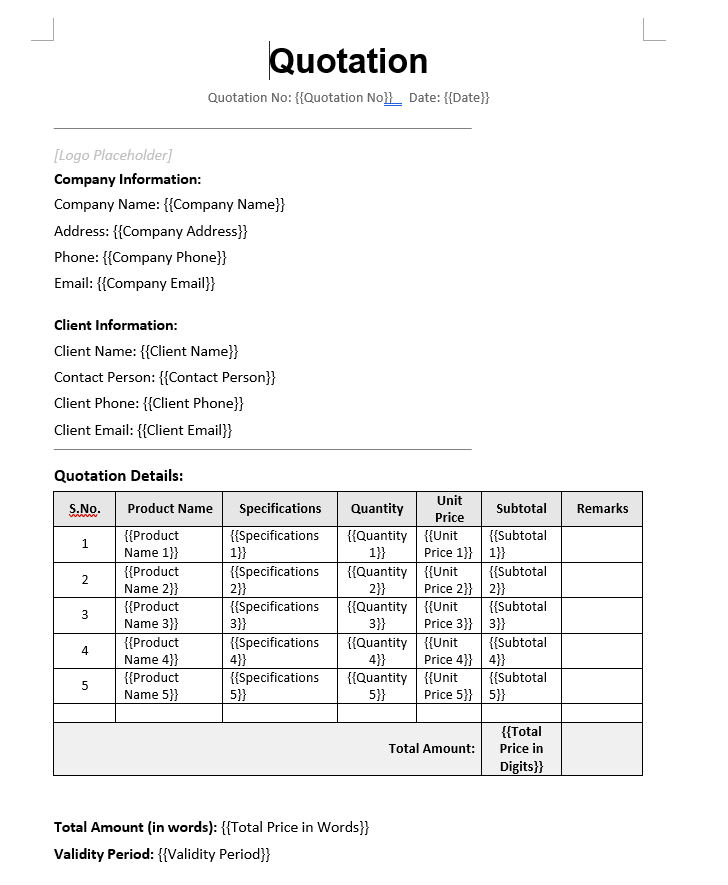
Word Quotation Template
The most commonly used quotation templates in sales and business departments all share a relatively fixed structure: title, company information, client information, product quotation table, amount summary, quotation terms, signature section, etc.
using Spire.Agent.Office.AI;
using Spire.Agent.Office.Extensions;
using Spire.Doc;

string inputPath = @"";
// Result document path
string savePath = @"QuotationTemplate.docx"; ;
// SpireToken Key
string key = "s******************************r";
// Natural language instruction
string instruction =
    "Generate a professional quotation template with the following styling requirements: " +
    "Main title: 'Quotation' , font size equivalent to  26pt, bold, centered, using 'Arial' font. " +
    "Body text: Calibri font, size 12pt , with 1.5× line spacing. " +
    "Template structure must include: Company logo placeholder area, company information (address, phone number, email), client information (client name, contact person), product quotation table (including Serial Number, Product Name, Specifications, Quantity, Unit Price, Subtotal, Remarks), total price (in words + in digits), quotation validity period, company stamp/seal area. \n" +
    "Use {{ }} as placeholder markers throughout the template, for example: {{Company Name}}, {{Client Name}}, {{Product Name}}, {{Unit Price}}, {{Quantity}}, {{Subtotal}}, {{Total Price in Words}}, {{Total Price in Digits}}.";

// AI generation
AIResult result = ExecuteAIWord(instruction, inputPath, savePath, key);

// Word AI processing
static AIResult ExecuteAIWord(string instruction, string inputPath, string savePath, string key)
{
    // Create AI processor options instance
    AIOptions options = new AIOptions();
    options.SpireToken = key;
    // Create Word document object
    using (Document doc = new Document())
    {
        if (!string.IsNullOrEmpty(inputPath) && File.Exists(inputPath))
        {
            doc.LoadFromFile(inputPath);
        }
        // Create AI document processor instance
         AIDocumentProcessor processor = doc.AI(options);

        // Process the document according to the instruction and save the result to the specified path
        return processor.ExecuteInstruction(doc, instruction, savePath);
    }
}
Word Certificate Template
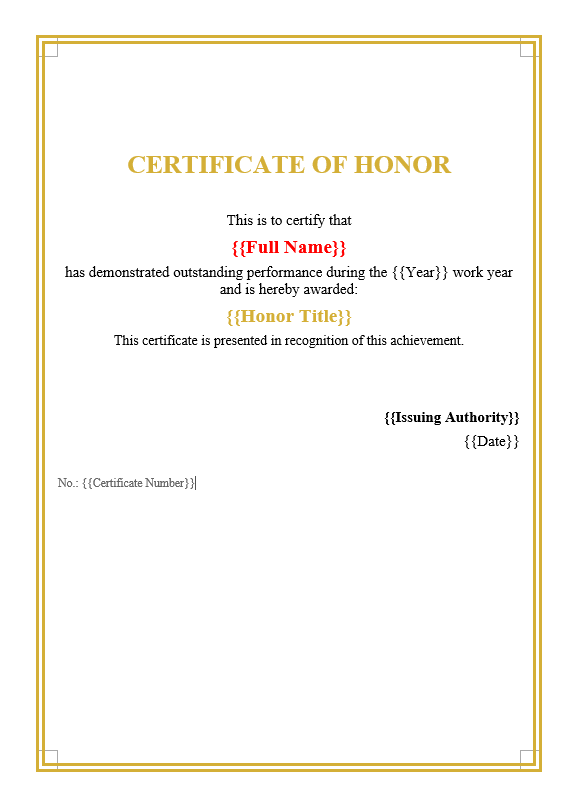
Certificate templates are widely used in scenarios such as training certification, commendation and awards, event participation, etc. Their core structure typically includes: certificate title (e.g., "Certificate of Honor", "Certificate of Completion"), certificate number, etc.
using Spire.Agent.Office.AI;
using Spire.Agent.Office.Extensions;
using Spire.Doc;

string inputPath = @"";
// Result document path
string savePath = @"WordCertificateTemplate.docx"; ;
// SpireToken Key
string key = "s******************************r";
// Natural language instruction
string instruction =
"Generate a one-page honor certificate template with the following style requirements: " +
"Overall classical and solemn style, with a gold double-line border, using Times New Roman font." +
"Centered at the top: certificate title 'CERTIFICATE OF HONOR' — 24pt, bold, gold color." +
"Center-aligned body layout with the following structure:" +
"  Line 1: 'This is to certify that';" +
"  Line 2: '{{Full Name}}' — bold, red color;" +
"  Line 3: 'has demonstrated outstanding performance during the {{Year}} work year and is hereby awarded:';" +
"  Line 4: '{{Honor Title}}' — bold, gold color;" +
"  Line 5: 'This certificate is presented in recognition of this achievement.'." +
"Signatory area: bottom right, two lines right-aligned: '{{Issuing Authority}}' and '{{Date}}'." +
"Bottom left: certificate number displayed as 'No.: {{Certificate Number}}'." +
"Overall style: formal, solemn, and dignified, suitable for government or corporate honorary certificate presentations.";

// AI generation
AIResult result = ExecuteAIWord(instruction, inputPath, savePath, key);

// Word AI processing
static AIResult ExecuteAIWord(string instruction, string inputPath, string savePath, string key)
{
    // Create AI processor options instance
    AIOptions options = new AIOptions();
    options.SpireToken = key;
    // Create Word document object
    using (Document doc = new Document())
    {
        if (!string.IsNullOrEmpty(inputPath) && File.Exists(inputPath))
        {
            doc.LoadFromFile(inputPath);
        }
        // Create AI document processor instance
         AIDocumentProcessor processor = doc.AI(options);

        // Process the document according to the instruction and save the result to the specified path
        return processor.ExecuteInstruction(doc, instruction, savePath);
    }
}
Budget Report Template
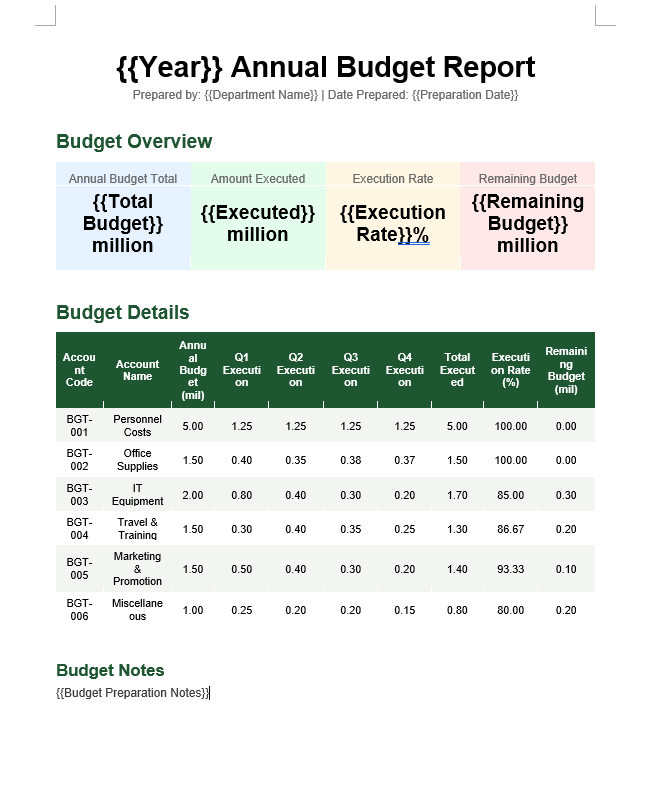
Budget report templates are commonly used document tools in enterprises or organizations for financial planning, project proposals, and annual planning. Their core structure typically includes: report title (e.g., "XX Annual Budget Report", "XX Project Budget Plan"), preparing unit and date, budget preparation notes, etc.
using Spire.Agent.Office.AI;
using Spire.Agent.Office.Extensions;
using Spire.Doc;

string inputPath = @"";
// Result document path
string savePath = @"BudgetReportTemplate.docx"; ;
// SpireToken Key
string key = "s******************************r";
// Natural language instruction
string instruction =
"Generate a professional budget report template with the following style requirements:" +
"Main title: '{{Year}} Annual Budget Report' — font size No.1 (approx. 26pt), bold, centered, using Arial." +
"Add a subtitle below the title: 'Prepared by: {{Department Name}} | Date: {{Preparation Date}}', font size No.4 small (approx. 12pt), centered." +
"The body is divided into four sections:\n" +
"  Section 1 (Budget Overview): At the top, display four key metrics in a card-style horizontal layout with light background shading — 'Annual Budget Total: {{Total Budget}} ten-thousand yuan', 'Amount Executed: {{Executed Amount}} ten-thousand yuan', 'Execution Rate: {{Execution Rate}}%', 'Remaining Budget: {{Remaining Budget}} ten-thousand yuan'. The four data cards are placed side by side with numeric values bolded and enlarged.\n" +
"  Section 2 (Detailed Budget Table): A detailed budget table with columns — Account Code, Account Name, Annual Budget (ten-thousand yuan), Q1 Execution, Q2 Execution, Q3 Execution, Q4 Execution, Total Executed, Execution Rate (%), Remaining Budget (ten-thousand yuan). Table header: dark green background (#1E5631), white bold font; all numeric columns: retain two decimal places; data rows: alternating row colors.\n" +
"  Section 4 (Budget Notes): At the bottom of the page, add a 'Budget Notes' section — '{{Budget Preparation Notes}}'." +
"Overall style: formal, professional, and elegant — suitable for a formal budget report presented to management.";

// AI generation
AIResult result = ExecuteAIWord(instruction, inputPath, savePath, key);

// Word AI processing
static AIResult ExecuteAIWord(string instruction, string inputPath, string savePath, string key)
{
    // Create AI processor options instance
    AIOptions options = new AIOptions();
    options.SpireToken = key;
    // Create Word document object
    using (Document doc = new Document())
    {
        if (!string.IsNullOrEmpty(inputPath) && File.Exists(inputPath))
        {
            doc.LoadFromFile(inputPath);
        }
        // Create AI document processor instance
         AIDocumentProcessor processor = doc.AI(options);

        // Process the document according to the instruction and save the result to the specified path
        return processor.ExecuteInstruction(doc, instruction, savePath);
    }
}
Frequently Asked Questions
Generated template style does not fully match expectations
Cause: The style description in the instruction is not specific enough.
Solution: Specify details such as font name explicitly in the instruction.
Already generated template needs modification
Cause: Business requirements have changed, requiring template adjustments.
Solution: Directly describe the modifications in the instruction and regenerate, or use the current document as input for AI secondary processing.
Generated template shows garbled Chinese characters or incorrect fonts
Cause: The font specified in the instruction is not installed on the system.
Solution: Ensure the font mentioned in the instruction is installed on the system, or use common system fonts in the instruction.
Getting a SpireToken Key
- Contact [email protected] or visit https://www.e-iceblue.com/TemLicense.html to obtain a trial/commercial API key
Configure in code:
AIOptions options = new AIOptions();
options.SpireToken = key;
Batch Contract Generation with Spire.Agent.Office
In enterprise HR scenarios, batch contract generation is one of the most common document processing needs — monthly new employee onboarding, contract renewals, labor agreement changes often involve processing dozens or even hundreds of contracts at once. Each contract needs personalized information such as employee name, position, salary, and contract term.
Comparison with Traditional SDK API Processing
| Traditional Spire.Office for .NET API | Spire.Agent.Office | |
|---|---|---|
| Approach | Write code for traditional API processing: load template → get fields → read data → fill row by row → save, every step requires code control | Describe the goal in natural language, AI automatically orchestrates and completes all processing steps |
| Code Volume | Requires dozens of lines of code for data reading, field mapping, loop writing, and format control | Only configuration code + 1 natural language instruction |
| Field Mapping | Hard-code the mapping between merge fields and Excel columns; data source changes require code updates | AI automatically understands semantic correspondence between column names and template fields; data source changes require no code changes |
| Flexibility | Template field changes require code changes → compilation → redeployment | Just adjust the template or data source; existing instructions are reusable |
| Maintainability | Relies on development team to maintain code | Templates and data sources can be maintained directly by business users |
This article introduces how to use Spire.Agent.Office Word AI capabilities to automatically write Excel employee data into Word templates and generate contracts in PDF format in batches, using both mail merge and placeholder replacement approaches. You are also free to save as DOCX, DOC, HTML, OFD, Markdown, XPS, and other formats to meet different archiving needs.
For product installation and SpireToken configuration, please refer to Integrating Spire.Agent.Office in a .NET Project. The following examples assume Spire.Agent.Office is already installed and SpireToken is configured.
Mail Merge Approach
Mail merge is the standard solution for batch Word document generation and the most commonly used pattern in HR scenarios. The core idea is: a contract template Word document with merge fields and a data source, letting AI complete the data-to-template merge.
using Spire.Agent.Office.AI;
using Spire.Agent.Office.Extensions;
using Spire.Doc;

// Multiple document paths (data source files)
string[] attachmentPaths = new string[] { @"E:\data.xlsx" };

// Word template file path
string inputPath = @"E:\template-mailmerge.docx";
// Result document path (null here — will use the output folder path set below)
string savePath = null;
// Output directory
string OutDir = @"E:\output";
// SpireToken Key
string key = "**************************";
// Natural language instruction
string instruction =
      "Execute mail merge: populate employee data from the attachment 'data.xlsx' into the merge fields of the contract template row by row; " +
      "preserve the original document layout and styling after merging; " +
      "generate one independent contract document per employee and save the output in PDF format";

// Call the Word document processing function
AIResult result = ExecuteDemoWord(instruction, inputPath, savePath, key, OutDir, attachmentPaths);

// Record processing log
WriteLog(result, "word", @"E:\log\");


// Execute Word document AI processing
static AIResult ExecuteDemoWord(string instruction, string inputPath, string savePath, string key, string output, string[] attachmentPaths)
{
    // Create AIOptions configuration object
    AIOptions options = new AIOptions();
    // Set working directory to output directory
    options.WorkDir = output;
    // Set SpireToken Key
    options.SpireToken = key;

    // Use Document object to process Word document
    using (Document doc = new Document())
    {
        // Load Word template from file
        if (!string.IsNullOrEmpty(inputPath) && File.Exists(inputPath))
        {
            doc.LoadFromFile(inputPath);
        }
        // Create AI document processor
        AIDocumentProcessor processor = doc.AI(options);

        // Execute AI instruction
        return processor.ExecuteInstruction(doc, instruction, savePath, attachmentPaths);
    }
}
Original Word template (with mail merge fields) and Excel data 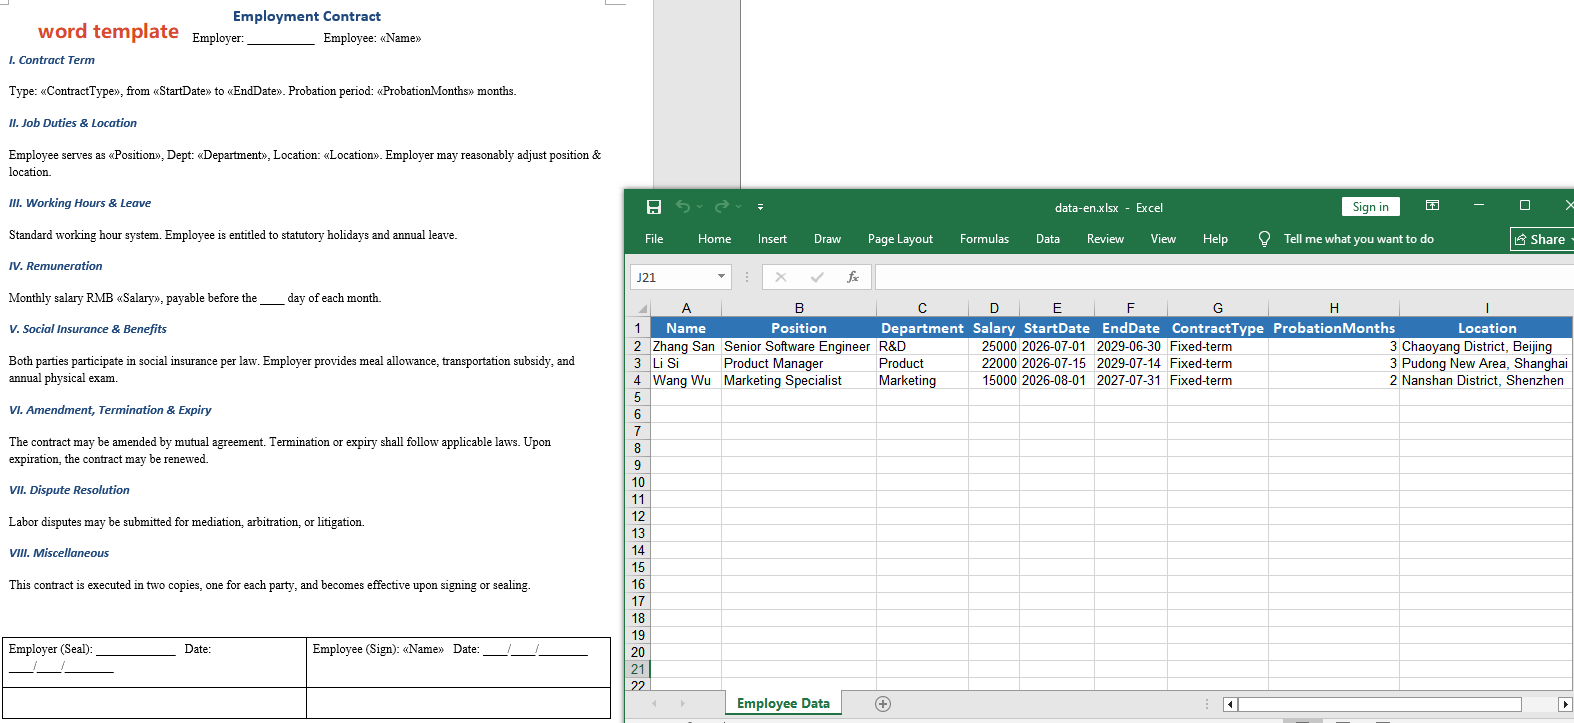 Output generated via mail merge
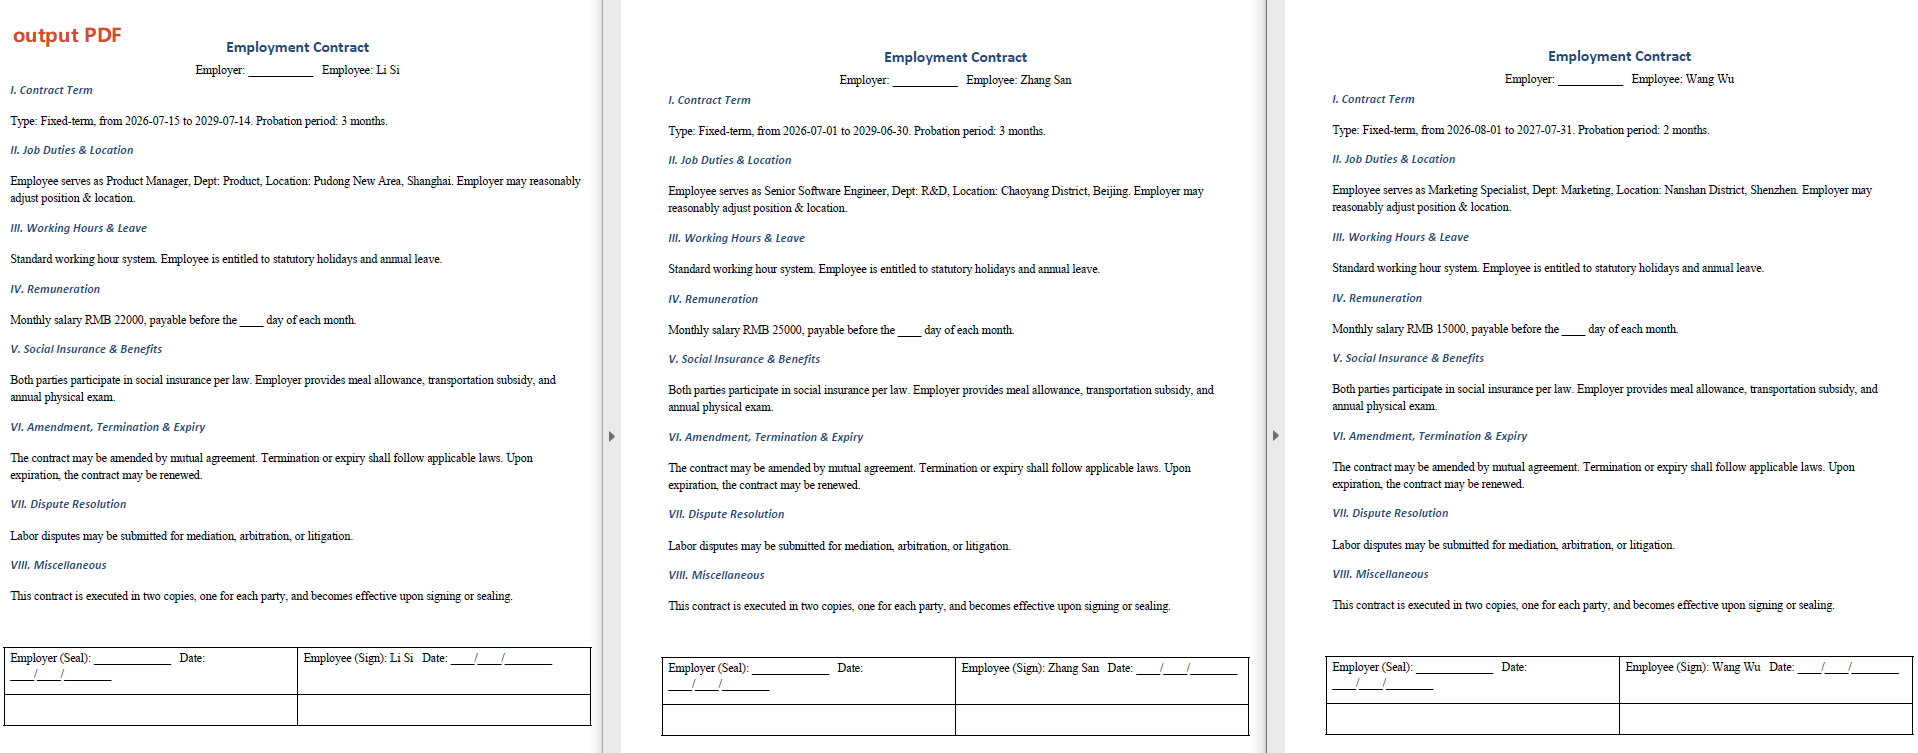
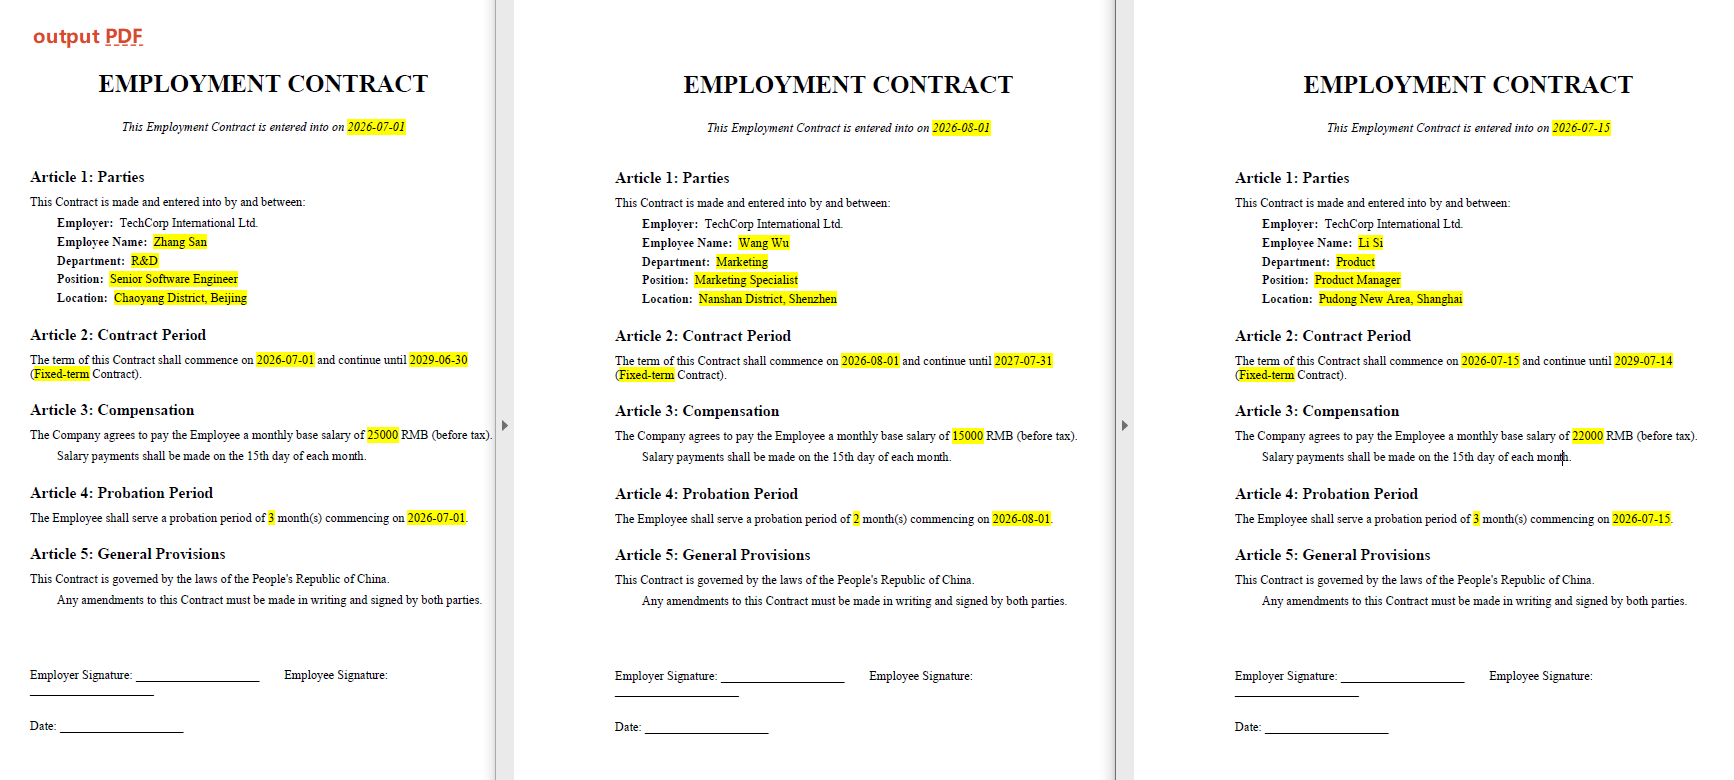
Each generated contract fully preserves the template's formatting, table styles, and font settings, with all merge fields replaced by the corresponding employee data. If 50 new employees are being onboarded, just one template + one Excel file + one instruction is all it takes to generate all contracts.
Placeholder Replacement Approach
The placeholder replacement approach does not require predefining mail merge fields in the template. Instead, it uses custom placeholder markers (such as {{Name}}, {{Salary}}) directly in the document, which the AI agent identifies and replaces.
// Multiple document paths (data source files)
string[] attachmentPaths = new string[] { @"E:\data.xlsx" };

// Contract template file path
string inputPath = @"E:\template.docx";
// Save path (null here — will use the output folder path set below)
string savePath = null;
// Output directory
string OutDir = @"E:\output";
// SpireToken Key
string key = "**************************";

// Natural language instruction
string instruction =
    "Read employee data from 'data.xlsx' and replace the corresponding placeholders in the contract template row by row" +
    "Highlight the replaced field content, preserve the original document layout, styling, and fonts after replacement," +
    "Generate one independent contract document per employee and save the output in PDF format";

// Call the AI Word document processing method
AIResult result = ExecuteDemoWord1(instruction, inputPath, savePath, key, OutDir, attachmentPaths);

// Record processing log
WriteLog(result, "word", @"E:\log\");


// Execute Word document AI processing
static AIResult ExecuteDemoWord(string instruction, string inputPath, string savePath, string key, string output, string[] attachmentPaths)
{
    // Create AIOptions configuration object
    AIOptions options = new AIOptions();
    // Set working directory to output directory
    options.WorkDir = output;
    // Set SpireToken Key
    options.SpireToken = key;

    // Use Document object to process Word document
    using (Document doc = new Document())
    {
        // Load Word template from file
        if (!string.IsNullOrEmpty(inputPath) && File.Exists(inputPath))
        {
            doc.LoadFromFile(inputPath);
        }
        // Create AI document processor
        AIDocumentProcessor processor = doc.AI(options);

        // Execute AI instruction
        return processor.ExecuteInstruction(doc, instruction, savePath, attachmentPaths);
    }
}
Original Word template (with {{}} placeholders) and Excel data 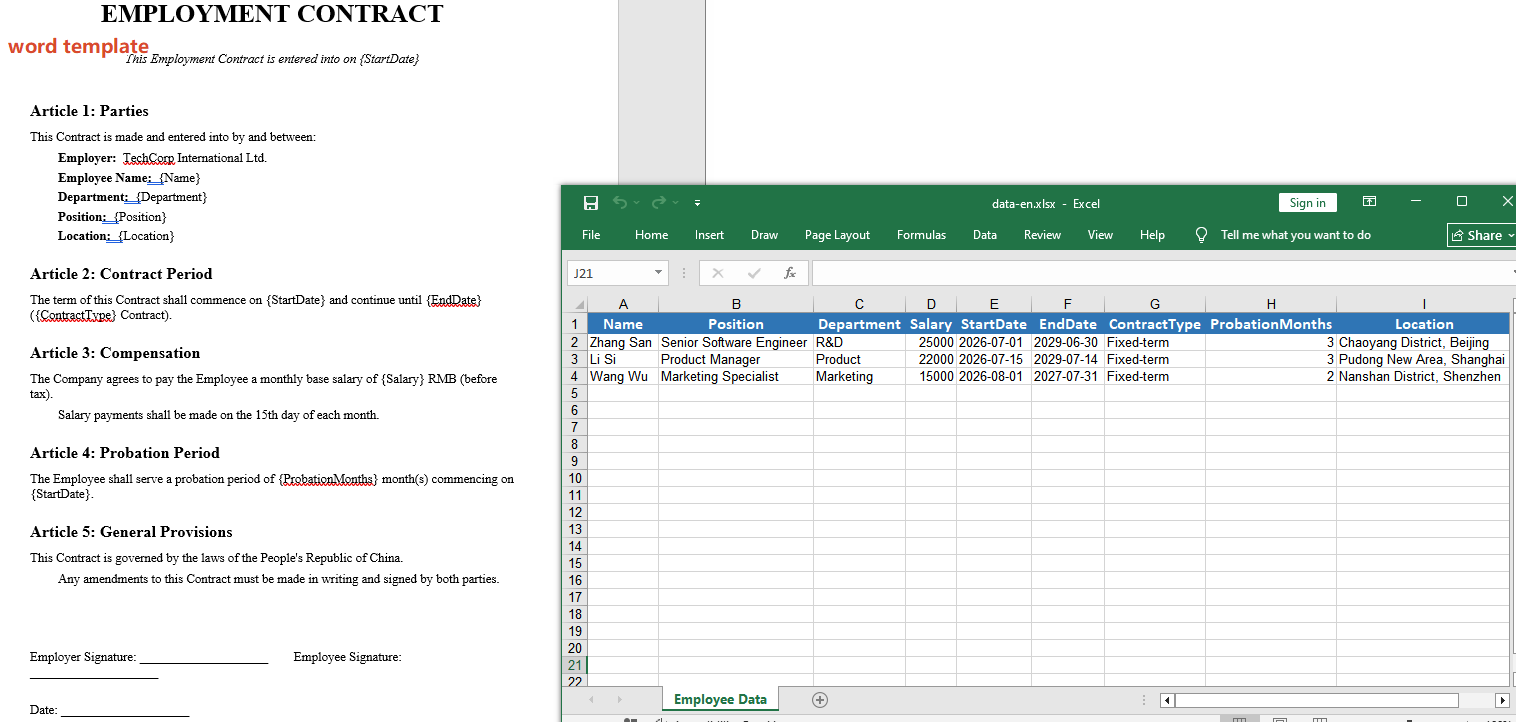 Output generated via placeholder replacement
Two Approaches Compared
| Mail Merge Approach | Placeholder Replacement Approach | |
|---|---|---|
| Template Creation | Requires inserting mail merge fields | Directly type {{}} placeholders |
| Learning Curve | Requires knowledge of Word mail merge functionality | Nearly zero learning cost |
| Flexibility | Fixed one-to-one field mapping | Supports dynamic calculation and formatting during replacement |
| Data Source | Requires structured data | Supports structured data, can also be defined in the instruction |
For creating Word templates with Spire.Agent.Office, please refer to the article "Creating Various Word Templates with Spire.Agent.Office".
Frequently Asked Questions
Generated document style changed
Cause: The AI model may modify or add content during processing.
Solution: Add a description like "preserve the original document layout, styling, and fonts" to the instruction.
Number of generated documents does not match the number of data rows after mail merge
Cause: Empty rows or merged cells in the data source Excel file, causing inaccurate row counting.
Solution: Ensure the first row of the data source contains column headers, with each subsequent row corresponding to one employee record and no empty rows in between. If the issue persists, add a sequence number column to the data source for validation.
Obtaining a SpireToken Key
- Contact [email protected] or visit https://www.e-iceblue.com/TemLicense.html to obtain a trial or commercial API key.
Configure it in code:
AIOptions options = new AIOptions();
options.SpireToken = key;
Integrate Spire.Agent.Office in .NET Project
Traditional Spire.Office for .NET workflows often require developers to have in-depth API knowledge and write extensive boilerplate code for tasks like formatting, extraction, and conversion. Spire.Agent.Office introduces an AI layer that abstracts this complexity, enabling you to accomplish these tasks using plain natural language instructions.
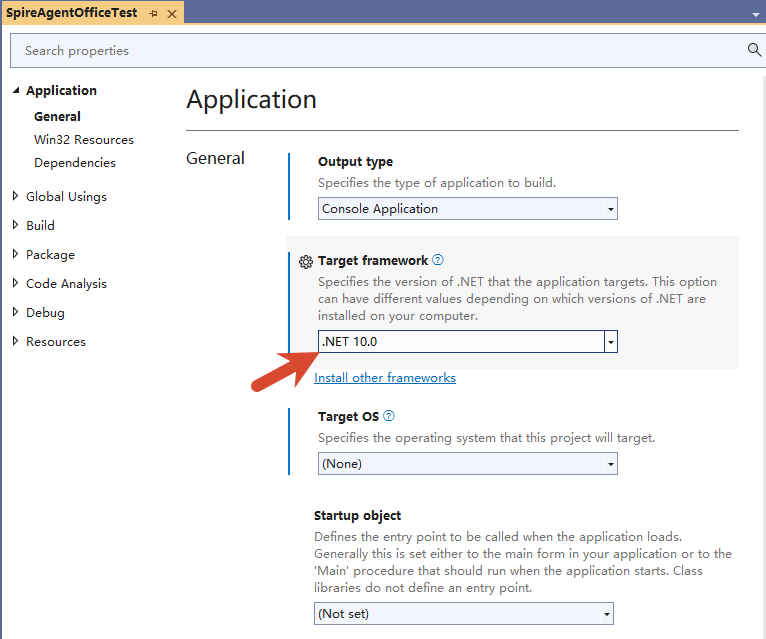
This tutorial walks you through integrating Spire.Agent.Office into a .NET 10 project(The product is based on NET Standard 2.1, compatible .NET 5/6/7/8 and other platforms, not limited to NET 10), enabling natural-language-powered document processing with minimal code.
- Why Choose Spire.Agent.Office
- Project Setup and Library Reference
- AI-Powered Document Processing
- Frequently Asked Questions
- Apply for SpireToken Key
Why Choose Spire.Agent.Office
Spire.Agent.Office is an AI agent built on top of the traditional Spire.Office for .NET document engine. The core differences are:
| Traditional Spire.Office for .NET | Spire.Agent.Office | |
|---|---|---|
| Operation | Manual coding (calling APIs, iterating document data, processing, saving results) | Natural language instructions (e.g., "Review this contract") |
| Low Learning Curve | Requires detailed API knowledge and object structure | Simply describe the requirements, AI executes automatically |
| Flexibility | API code may not suit all documents | Universal AI instructions handle all documents |
How It Works
Natural Language Instruction → Spire.Agent.Office AI Layer → Spire.Office Document Engine → Output File
Spire.Agent.Office parses your natural language instructions, converts them into internal calls to the Spire.Office document engine for processing, and ultimately generates the desired document. It supports processing and conversion of Word, Excel, PowerPoint, PDF, and other document formats.
Core Advantages
| Advantage | Description |
|---|---|
| AI-Native Experience | Replace complex API call chains with natural language for direct document processing |
| Stability and Reliability | Built on the mature Spire.Office document engine, ensuring reliable document processing |
| Seamless Integration | Cross-platform support, easy integration, flexible adaptation to business logic |
| Flexible AI Model Support | Compatible with mainstream AI infrastructure, ensuring accurate AI code generation |
| Accelerated Delivery | Reduces development time for document processing tasks |
Typical Use Cases
- Automated internal report generation and formatting
- Batch contract processing and data extraction
- Intelligent multi-format document conversion and distribution
- Automated meeting slide layout and export
Project Setup and Library Reference
Creating a .NET 10 Project
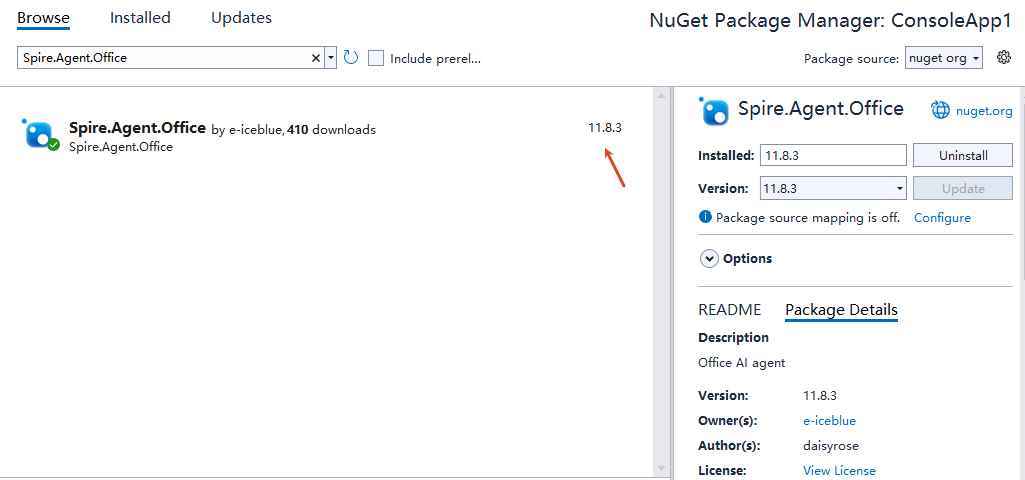
Installing Spire.Agent.Office via NuGet
After installing Spire.Agent.Office via NuGet, dependencies are installed automatically.
Importing Spire.Agent.Office Assemblies Locally
Download Spire.Agent.Office from the website, extract it to a local directory, and import it into the project.
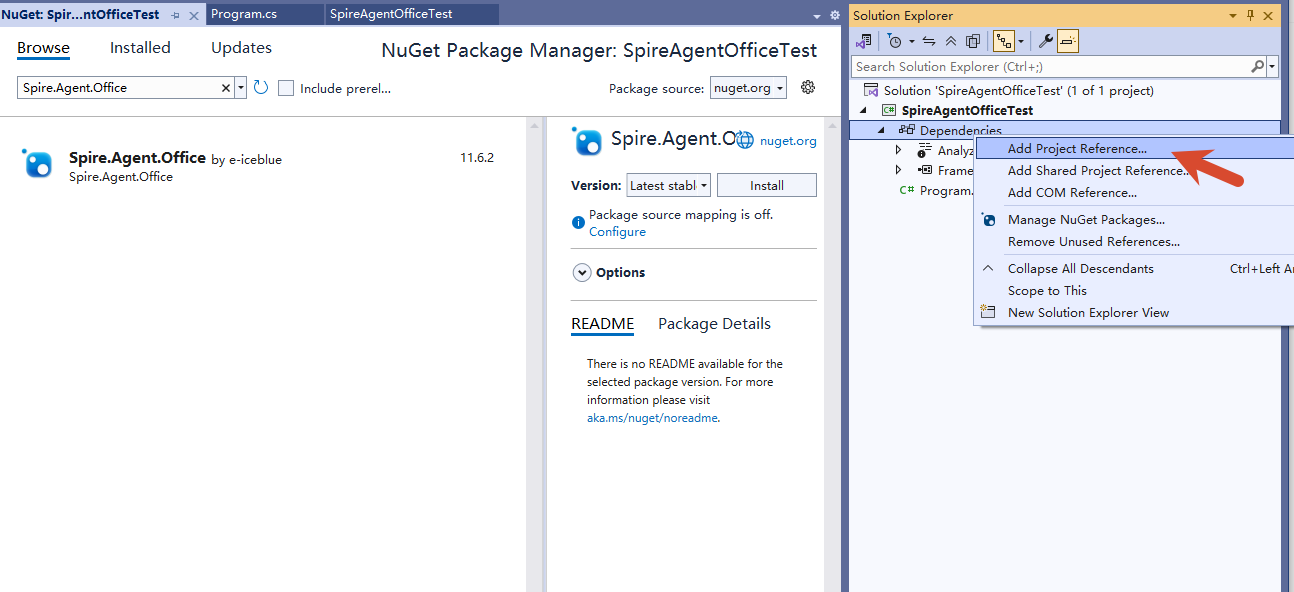
When adding via local DLLs, the following dependencies are also required for optimal performance:
| Dependency Package | Minimum Version |
|---|---|
| coverlet.collector | >= 6.0.4 |
| Microsoft.CodeAnalysis | >= 4.5.0 |
| Microsoft.Data.Sqlite | >= 8.0.0 |
| Microsoft.Extensions.Caching.Memory | >= 8.0.0 |
| Microsoft.Extensions.Configuration | >= 8.0.0 |
| Microsoft.Extensions.Configuration.Abstractions | >= 8.0.0 |
| Microsoft.Extensions.Configuration.EnvironmentVariables | >= 8.0.0 |
| Microsoft.Extensions.Configuration.Json | >= 8.0.0 |
| Microsoft.Extensions.DependencyInjection | >= 8.0.0 |
| Microsoft.Extensions.Hosting.Abstractions | >= 8.0.0 |
| Microsoft.Extensions.Http | >= 8.0.0 |
| Microsoft.Extensions.Http.Polly | >= 8.0.0 |
| Microsoft.Extensions.Logging | >= 8.0.0 |
| Microsoft.Extensions.Logging.Abstractions | >= 8.0.0 |
| Microsoft.Extensions.Logging.Console | >= 8.0.0 |
| Microsoft.Extensions.Options | >= 8.0.0 |
| Microsoft.ML.OnnxRuntime | >= 1.16.1 |
| Microsoft.NET.Test.Sdk | >= 17.12.0 |
| Polly | >= 8.0.0 |
| Polly.Extensions.Http | >= 3.0.0 |
| PolySharp | >= 1.4.0 |
| Serilog | >= 4.3.0 |
| Serilog.Extensions.Logging | >= 7.0.0 |
| Serilog.Sinks.File | >= 6.0.0 |
| SkiaSharp | >= 3.116.1 |
| Spire.Docfor.NETStandard | >= 14.8.0 |
| Spire.PDFfor.NETStandard | >= 12.8.3 |
| Spire.Presentationfor.NETStandard | >= 11.8.2 |
| Spire.XLSfor.NETStandard | >= 16.8.2 |
| System.Text.Json | >= 10.0.10 |
| xunit | >= 2.9.2 |
| xunit.runner.visualstudio | >= 2.8.2 |
AI-Powered Document Processing
Core Workflow
Document AI processing follows this pattern:
- Create a document object (Workbook / Document / PdfDocument / Presentation)
- Load a preset document (optional; can start with an empty document)
- Configure AIOptions (set SpireToken)
- Call
.AI(options)to obtain an AIDocumentProcessor - Execute AI instructions and monitor execution status:
- Processing existing documents: Call
AIDocumentProcessor.ExecuteInstruction(), returnsAIResult - Generating PPT documents: Call
AIDocumentProcessor.GeneratePresentation(), returnsGenerationResult
- Processing existing documents: Call
Core Code
using Spire.Agent.Office.AI;
using Spire.Agent.Office.Extensions;
using Spire.Pdf;
using Spire.Doc;
using Spire.Presentation;
using Spire.Xls;

// Excel Processing
static AIResult ExecuteDemoXls(string instruction, string inputPath, string savePath, string key, string[] attachmentPaths)
{
    AIOptions options = new AIOptions();
    options.SpireToken = key;

    using (Workbook workbook = new Workbook())
    {
        // Load the document if the input path exists and the file is accessible
        if (!string.IsNullOrEmpty(inputPath) && File.Exists(inputPath))
        {
            workbook.LoadFromFile(inputPath);
        }
        // Otherwise, use an empty Workbook
        AIDocumentProcessor processor = workbook.AI(options);
        return processor.ExecuteInstruction(workbook, instruction, savePath, attachmentPaths);
    }
}

// Word Processing
static AIResult ExecuteDemoWord(string instruction, string inputPath, string savePath, string key, string[] attachmentPaths)
{
    AIOptions options = new AIOptions();
    options.SpireToken = key;

    using (Document doc = new Document())
    {
        // Load the document if the input path exists and the file is accessible
        if (!string.IsNullOrEmpty(inputPath) && File.Exists(inputPath))
        {
            doc.LoadFromFile(inputPath);
        }
        // Otherwise, use an empty Document
        AIDocumentProcessor processor = doc.AI(options);
        return processor.ExecuteInstruction(doc, instruction, savePath, attachmentPaths);
    }
}

// PDF Processing
static AIResult ExecuteDemoPDF(string instruction, string inputPath, string savePath, string key, string[] attachmentPaths)
{
    AIOptions options = new AIOptions();
    options.SpireToken = key;

    using (PdfDocument pdf = new PdfDocument())
    {
        // Load the document if the input path exists and the file is accessible
        if (!string.IsNullOrEmpty(inputPath) && File.Exists(inputPath))
        {
            pdf.LoadFromFile(inputPath);
        }
        // Otherwise, use an empty PdfDocument
        AIDocumentProcessor processor = pdf.AI(options);
        return processor.ExecuteInstruction(pdf, instruction, savePath, attachmentPaths);
    }
}

// PPT Generation
static PPTGenerationResult GeneratPPT(string input, string instruction, string savePath, string key)
{
    AIOptions options = new AIOptions();
    options.SpireToken = key;

    using (Presentation ppt = new Presentation())
    {
        AIDocumentProcessor processor = ppt.AI(options);
        return processor.GeneratePresentation(input, instruction, savePath);
    }
}

// Based on existing PPT processing
static AIResult ExecuteDemoPPT(string inputPath, string instruction, string savePath, string key, string[] attachmentPaths)
{
    AIOptions options = new AIOptions();
    options.SpireToken = key;

    using (Presentation ppt = new Presentation())
    {
        // Load the document if the input path exists and the file is accessible
        if (!string.IsNullOrEmpty(inputPath) && File.Exists(inputPath))
        {
            ppt.LoadFromFile(inputPath);
        }
        // Otherwise, use an empty Presentation
        AIDocumentProcessor processor = ppt.AI(options);
        return processor.ExecuteInstruction(ppt, instruction, savePath, attachmentPaths);
    }
}

// Write execution log
static void WriteLog(dynamic? aiResult, string taskName, string basePath)
{
    string logFilePath = Path.Combine(basePath, $"{taskName}.txt");
    string? logDir = Path.GetDirectoryName(logFilePath);
    if (!string.IsNullOrEmpty(logDir) && !Directory.Exists(logDir))
        Directory.CreateDirectory(logDir);

    var logBuilder = new System.Text.StringBuilder();

    // Determine execution status: Success/Failure/Skipped
    string status = aiResult == null ? "SKIPPED" :
        aiResult.Success ? "SUCCESS" : $"FAILED: {aiResult.ErrorMessage}";

    logBuilder.AppendLine($"[{DateTime.Now:yyyy-MM-dd HH:mm:ss}] [{taskName}] {status}");

    if (aiResult != null)
    {
        // Log execution duration
        logBuilder.AppendLine($" | Duration: {aiResult.Duration.TotalSeconds:F2}s");

        // Log token usage statistics
        var tu = aiResult.TokenUsage;
        if (tu != null)
        {
            logBuilder.Append($" | In: {tu.InputTokens:N0}");           // Input tokens
            logBuilder.Append($" | Out: {tu.OutputTokens:N0}");         // Output tokens
            logBuilder.Append($" | CacheR: {tu.CacheReadTokens:N0}");   // Cache read tokens
            logBuilder.Append($" | CacheW: {tu.CacheWriteTokens:N0}");  // Cache write tokens
            logBuilder.Append($" | CacheT: {tu.TotalCacheTokens:N0}");  // Total cache tokens
            logBuilder.Append($" | Total: {tu.TotalTokens:N0}");        // Total tokens
        }
    }

    logBuilder.AppendLine();
    File.AppendAllText(logFilePath, logBuilder.ToString());
}
Calling AI Processing
The following examples demonstrate using natural language interaction to leverage the system's powerful document processing capabilities for various complex document tasks.
// Multiple document paths
string[] attachmentPaths = new string[] { };

// Word Processing
string inputPath = @"in.docx";
string savePath = @"out.pdf";
string key = "SpireToken key";
string instruction = "Find '****' and highlight it, save result to PDF";
AIResult result = ExecuteDemoWord(instruction, inputPath, savePath, key, attachmentPaths);
WriteLog(result, "word", @"log\");

// PPT Processing
string inputPath = @"in.pptx";
string savePath = @"out.pptx";
string key = "SpireToken key";
string instruction = "Add notes description to each slide";
AIResult result = ExecuteDemoPPT(instruction, inputPath, savePath, key, attachmentPaths);
WriteLog(result, "ppt", @"log\");

// PPT Generation
string inputPath = @"AI.md";
string savePath = @"out.pptx";
string key = "SpireToken key";
string instruction = "Generate a PPT based on AI.md";
PPTGenerationResult result = GeneratPPT(inputPath, instruction, savePath, key);
WriteLog(result, "ppt", @"log\");

// PDF Processing
string inputPath = @"in.pdf";
string savePath = @"out.md";
string key = "SpireToken key";
string instruction = "Extract table data and save as standard markdown format";
AIResult result = ExecuteDemoPDF(instruction, inputPath, savePath, key, attachmentPaths);
WriteLog(result, "pdf", @"log\");

// Excel Processing
string inputPath = @"in.xlsx";
string savePath = @"out.pdf";
string key = "SpireToken key";
string instruction = "Delete empty rows in the document";
AIResult result = ExecuteDemoXls(instruction, inputPath, savePath, key, attachmentPaths);
WriteLog(result, "xls", @"log\");
Frequently Asked Questions
SpireToken Key Not Configured Properly
If the SpireToken Key is not configured, is incorrect, or has expired, Spire.Agent.Office will throw an exception and the program will abort. Ensure the SpireToken Key is valid before proceeding.
AI Instruction Execution Failed
The AIResult returned by ExecuteInstruction may contain failure information. Check the Success property.
AIResult result = processor.ExecuteInstruction(doc, instruction, outputPath);

if (result == null || !result.Success)
{
    throw new InvalidOperationException(
        $"AI instruction failed: {result?.ErrorMessage ?? "Unknown error"}");
}
Incorrect Document Path
If processing an existing document, an incorrect file path will cause document loading to fail:
- Ensure the document path is correct
- For multi-document operations (e.g., document merging), additional documents can be defined in
attachmentPaths
Apply for SpireToken Key
Spire.Agent.Office requires a valid SpireToken Key to experience full functionality:
- Contact [email protected] or visit https://www.e-iceblue.com/TemLicense.html to obtain a trial or commercial API key
Configure it in your code:
AIOptions options = new AIOptions();
options.SpireToken = key;
Copy Excel Worksheets with JavaScript in React
Copying worksheets is one of the most common and efficient operations in everyday Excel document processing — whether you are quickly creating similar reports from a template or consolidating data across multiple documents. Spire.XLS for JavaScript handles this entirely in the browser via WebAssembly, using a virtual file system (VFS) to manage input and output files — no backend server required.
This article covers three core features:
- Copy a worksheet within the same workbook
- Copy a worksheet across workbooks
- Copy a selected cell range
For installation and project setup, refer to Integrating Spire.XLS for JavaScript in a React Project. The examples below assume Spire.XLS is installed and the WebAssembly module is initialized.
Copy a Worksheet Within the Same Workbook
Duplicating a worksheet within the same workbook is a frequent development task — for example, quickly creating next month's report copy from a monthly template. Spire.XLS for JavaScript provides the CopyFrom method to duplicate a worksheet. The copied sheet retains all content from the source worksheet, including data, styles, fonts, colors, borders, column widths, and row heights.
function App() {
  const sheetToSVG = async () => {
    // Get the Spire.XLS WASM module
    const xlsModule = window.wasmModule?.spirexls;

    // Check if the module is ready
    if (!xlsModule) {
      alert('Spire.Xls is not ready yet');
      return;
    }

    // Load fonts and the Excel file into VFS
    await window.spire.FetchFileToVFS('ARIAL.TTF', '/Library/Fonts/', `${process.env.PUBLIC_URL}/font/`);
    const inputFileName = 'Sample.xlsx';
    await window.spire.FetchFileToVFS(inputFileName, '', `${process.env.PUBLIC_URL}data/`);

    // Load the workbook
    const workbook = new xlsModule.Workbook();
    workbook.LoadFromFile({ fileName: inputFileName });

    // Get the first worksheet
    let sheet = workbook.Worksheets.get(0);

    // Add a new worksheet
    let sheet1 = workbook.Worksheets.Add("MySheet");

    // Copy the first worksheet into the newly added sheet
    sheet1.CopyFrom(sheet);

    const outputFileName = "CopySheetWithinWorkbook_output.xlsx";
    workbook.SaveToFile({ fileName: outputFileName });

    // Release the workbook object to free resources
    workbook.Dispose();

    // Read the converted file from VFS and trigger download
    const fileArray = window.dotnetRuntime.Module.FS.readFile(outputFileName);
    const blob = new Blob([fileArray], { type: "application/vnd.openxmlformats-officedocument.spreadsheetml.sheet" });
    const url = URL.createObjectURL(blob);
    const a = document.createElement('a');
    a.href = url;
    a.download = outputFileName;
    a.click();
    URL.revokeObjectURL(url);
  };

  return (
    <div style={{ textAlign: 'center', height: '300px' }}>
      <h1>Copy Worksheet Within Workbook</h1>
      <button onClick={sheetToSVG}>
        Start
      </button>
    </div>
  );
}

export default App;
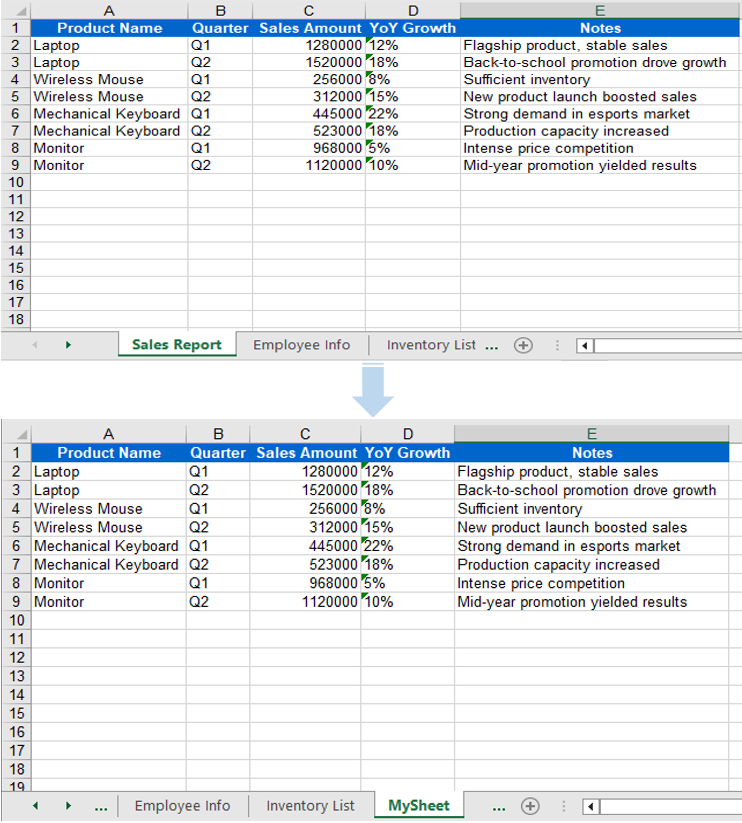
When using CopyFrom, data, styles, fonts, colors, borders, and column widths from the source worksheet are fully preserved in the new sheet.
Copy a Worksheet Across Workbooks
In real-world scenarios, data from multiple Excel files often needs to be consolidated into a single workbook — for example, extracting specific sheets from departmental reports and merging them into a master sheet. The AddCopy method lets you copy a worksheet from the source workbook into the target workbook with all its content intact.
function App() {
  const sheetToSVG = async () => {
    // Get the Spire.XLS WASM module
    const xlsModule = window.wasmModule?.spirexls;

    // Check if the module is ready
    if (!xlsModule) {
      alert('Spire.Xls is not ready yet');
      return;
    }

    // Load fonts and the Excel files into VFS
    await window.spire.FetchFileToVFS('arial.ttf', '/Library/Fonts/', `${process.env.PUBLIC_URL}/font/`);
    const sourceFileName = 'ReadImages.xlsx';
    const targetFileName = 'Sample.xlsx';
    await window.spire.FetchFileToVFS(sourceFileName, '', `${process.env.PUBLIC_URL}data/`);
    await window.spire.FetchFileToVFS(targetFileName, '', `${process.env.PUBLIC_URL}data/`);

    // Load the source workbook
    const sourceWorkbook = new xlsModule.Workbook();
    sourceWorkbook.LoadFromFile({ fileName: sourceFileName });

    // Get the first worksheet of the source workbook
    const srcWorksheet = sourceWorkbook.Worksheets.get(0);

    // Load the target workbook
    const targetWorkbook = new xlsModule.Workbook();
    targetWorkbook.LoadFromFile({ fileName: targetFileName });

    // Add a new worksheet in the target workbook and copy the source sheet into it
    targetWorkbook.Worksheets.AddCopy({ sheet: srcWorksheet });

    // Save the target workbook
    const outputFileName = "CopyAcrossWorkbooks_output.xlsx";
    targetWorkbook.SaveToFile({ fileName: outputFileName });

    // Release resources
    sourceWorkbook.Dispose();
    targetWorkbook.Dispose();

    // Read the converted file from VFS and trigger download
    const fileArray = window.dotnetRuntime.Module.FS.readFile(outputFileName);
    const blob = new Blob([fileArray], { type: "application/vnd.openxmlformats-officedocument.spreadsheetml.sheet"});
    const url = URL.createObjectURL(blob);
    const a = document.createElement('a');
    a.href = url;
    a.download = outputFileName;
    a.click();
    URL.revokeObjectURL(url);
  };

  return (
    <div style={{ textAlign: 'center', height: '300px' }}>
      <h1>Copy Worksheet Across Workbooks</h1>
      <button onClick={sheetToSVG}>
        Start
      </button>
    </div>
  );
}

export default App;
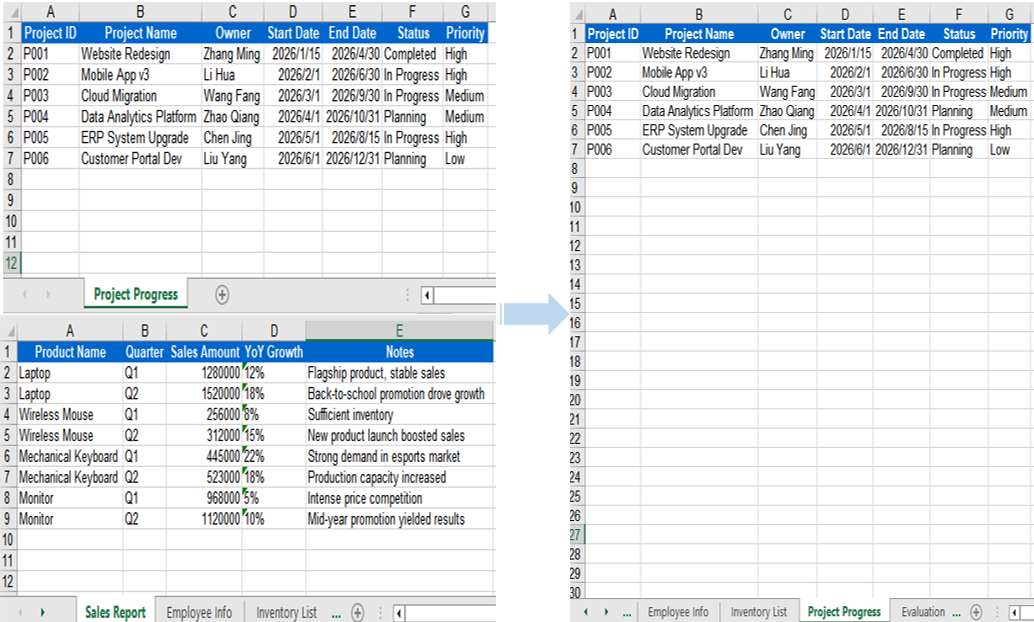
When copying across workbooks, all data and styles from the source worksheet are preserved — AddCopy copies the complete worksheet content into the target workbook.
Copy a Selected Cell Range
Sometimes you do not need to copy an entire worksheet — you only need to copy a specific cell range (such as a particular data table or summary result) to a target location. Spire.XLS for JavaScript provides the Copy method, which copies data, styles, and formatting from the source range to the starting position of the target range.
function App() {
  const sheetToSVG = async () => {
    // Get the Spire.XLS WASM module
    const xlsModule = window.wasmModule?.spirexls;

    // Check if the module is ready
    if (!xlsModule) {
      alert('Spire.Xls is not ready yet');
      return;
    }

    // Load the source Excel file into VFS
    await window.spire.FetchFileToVFS('ARIAL.TTF', '/Library/Fonts/', `${process.env.PUBLIC_URL}/font/`);
    const inputFileName = 'Sample.xlsx';
    await window.spire.FetchFileToVFS(inputFileName, '', `${process.env.PUBLIC_URL}data/`);

    // Load the workbook
    const workbook = new xlsModule.Workbook();
    workbook.LoadFromFile({ fileName: inputFileName });

    // Get the first row of the first worksheet as the source range
    const sheet = workbook.Worksheets.get(0);
    const sourceRange = sheet.Range.get("A1:E1");

    // Add a new worksheet
    let sheet1 = workbook.Worksheets.Add("AddSheet");

    // Copy the source range to the starting position of the target worksheet
    sheet.Copy(sourceRange, sheet1, sheet.FirstRow, sheet.FirstColumn, true);

    // Save the workbook
    const outputFileName = "CopyRange_output22.xlsx";
    workbook.SaveToFile({ fileName: outputFileName });

    // Release resources
    workbook.Dispose();

    // Read the converted file from VFS and trigger download
    const fileArray = window.dotnetRuntime.Module.FS.readFile(outputFileName);
    const blob = new Blob([fileArray], { type: "application/vnd.openxmlformats-officedocument.spreadsheetml.sheet" });
    const url = URL.createObjectURL(blob);
    const a = document.createElement('a');
    a.href = url;
    a.download = outputFileName;
    a.click();
    URL.revokeObjectURL(url);
  };

  return (
    <div style={{ textAlign: 'center', height: '300px' }}>
      <h1>Copy Range</h1>
      <button onClick={sheetToSVG}>
        Start
      </button>
    </div>
  );
}

export default App;
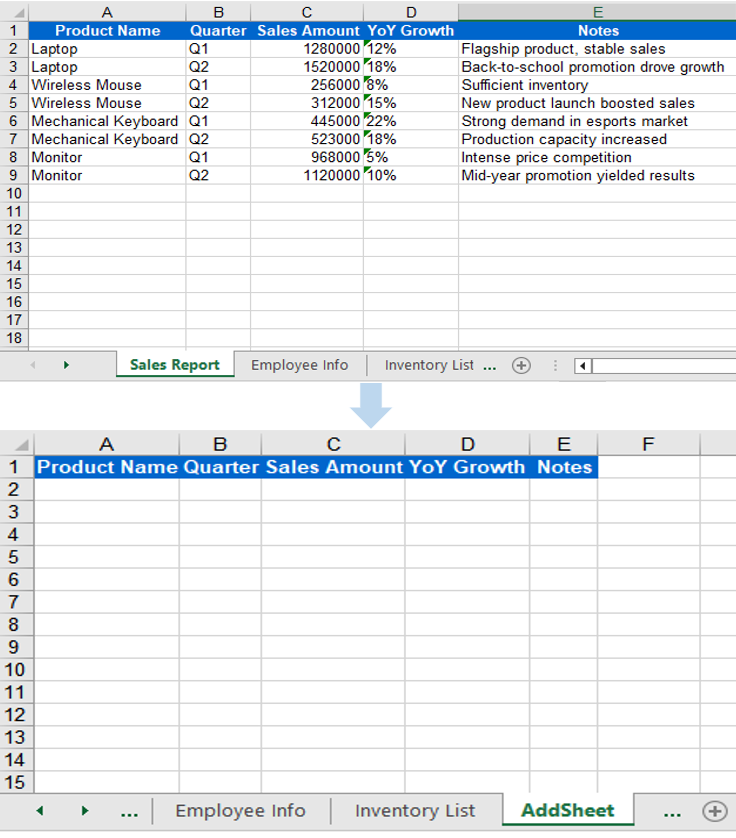
The Copy method transfers data, styles, and formatting from the source range to the target range — ideal for lightweight scenarios where only partial data extraction is needed.
FAQ
Column width differs after copying
Cause: Font mismatch between the source and target workbooks.
Solution: Ensure all required font files are loaded into the VFS environment of the target workbook before copying across workbooks:
await window.spire.FetchFileToVFS(
  'arial.ttf', '/Library/Fonts/', '/'
);
Range content is pasted at the wrong position
Cause: Incorrect destRow and destColumn parameters in the Copy method, causing data to be pasted at an unexpected location.
Solution: Confirm that the destination row and column indices start from 1 (not 0), and verify the row and column range of the target worksheet before copying.
Get a Free License
Spire.XLS for JavaScript offers a 30-day full-featured free trial license with no functional limitations. Apply here to evaluate before purchasing.
Add, Remove, and Move Excel Worksheets with JavaScript in React
Managing worksheets — adding, removing, and reordering them — is one of the most fundamental and frequently used operations in Excel document processing. Spire.XLS for JavaScript handles these operations entirely in the browser via WebAssembly, using a virtual file system (VFS) to manage input and output files — no backend server required.
This article covers three core features:
For installation and project setup, refer to Integrating Spire.XLS for JavaScript in a React Project. The examples below assume Spire.XLS is installed and the WebAssembly module is initialized.
Add Worksheet
Adding new worksheets to a workbook is a common requirement in daily development. Spire.XLS for JavaScript provides the Add method to create a new worksheet and give it a name. After adding, you can write data to the new sheet's cells and save the workbook.
function App() {
  const startProcessing = async () => {
    // Get the Spire.XLS WASM module
    const xlsModule = window.wasmModule?.spirexls;
    if (!xlsModule) {
      alert('Spire.Xls is not ready yet');
      return;
    }

    // Load fonts and the Excel file into VFS
    await window.spire.FetchFileToVFS('ARIAL.TTF', '/Library/Fonts/', `${process.env.PUBLIC_URL}/font/`);
    const inputFileName = 'AddWorksheet.xlsx';
    await window.spire.FetchFileToVFS(inputFileName, '', `${process.env.PUBLIC_URL}/data/`);

    // Create a workbook instance and load the file
    const workbook = new xlsModule.Workbook();
    workbook.LoadFromFile({ fileName: inputFileName });

    // Add a new worksheet named "NewSheet"
    const sheet = workbook.Worksheets.Add("NewSheet");
    sheet.Range.get("C5").Text = "This is an inserted sheet.";

    // Auto-fit columns
    sheet.AllocatedRange.AutoFitColumns();

    // Save the workbook
    const outputFileName = "AddWorksheet_output.xlsx";
    workbook.SaveToFile({ fileName: outputFileName });

    // Release resources
    workbook.Dispose();

    // Read the output file from VFS, wrap it as a Blob, and trigger download
    const modifiedFileArray = window.dotnetRuntime.Module.FS.readFile(outputFileName);
    const blob = new Blob([modifiedFileArray], { type: "application/vnd.openxmlformats-officedocument.spreadsheetml.sheet" });
    const url = URL.createObjectURL(blob);
    const a = document.createElement('a');
    a.href = url;
    a.download = outputFileName;
    a.click();
    URL.revokeObjectURL(url);
  };

  return (
    <div style={{ textAlign: 'center', height: '300px' }}>
      <h1>Add Worksheet</h1>
      <button onClick={startProcessing}>
        Start
      </button>
    </div>
  );
}

export default App;
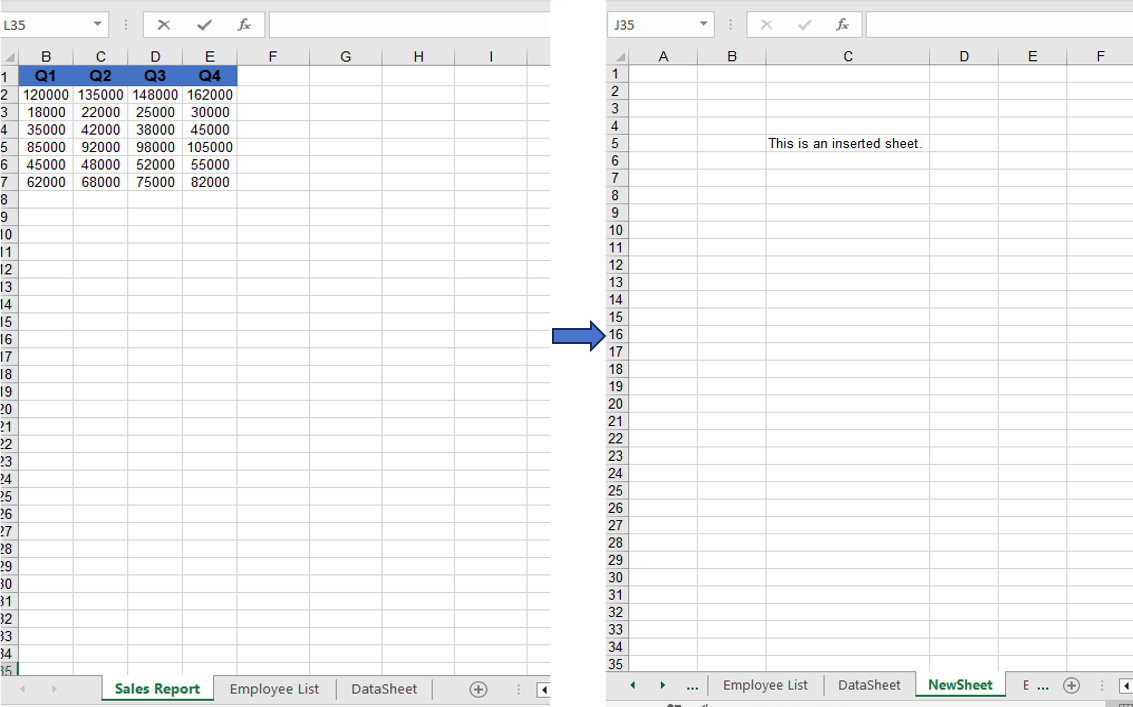
Adding a new worksheet after the existing ones via the Add method.
Remove Worksheet
When you need to clean up unwanted worksheets from a workbook, you can remove them directly by name. Spire.XLS for JavaScript's Remove method precisely locates and removes the target worksheet.
function App() {
  const startProcessing = async () => {
    // Get the Spire.XLS WASM module
    const xlsModule = window.wasmModule?.spirexls;
    if (!xlsModule) {
      alert('Spire.Xls is not ready yet');
      return;
    }

    // Load fonts and the Excel file into VFS
    await window.spire.FetchFileToVFS('ARIAL.TTF', '/Library/Fonts/', `${process.env.PUBLIC_URL}/font/`);
    const inputFileName = 'RemoveWorksheet.xlsx';
    await window.spire.FetchFileToVFS(inputFileName, '', `${process.env.PUBLIC_URL}/data/`);

    // Create a workbook instance and load the file
    const workbook = new xlsModule.Workbook();
    workbook.LoadFromFile({ fileName: inputFileName });

    // Remove a worksheet by name
    const sheet = workbook.Worksheets.get("Sheet2");
    workbook.Worksheets.Remove(sheet);
    // Remove by index
    //workbook.Worksheets.RemoveAt(1);

    // Save the workbook
    const outputFileName = "RemoveWorksheet_output.xlsx";
    workbook.SaveToFile({ fileName: outputFileName });

    // Release resources
    workbook.Dispose();

    // Read the output file from VFS, wrap it as a Blob, and trigger download
    const modifiedFileArray = window.dotnetRuntime.Module.FS.readFile(outputFileName);
    const blob = new Blob([modifiedFileArray], { type: "application/vnd.openxmlformats-officedocument.spreadsheetml.sheet" });
    const url = URL.createObjectURL(blob);
    const a = document.createElement('a');
    a.href = url;
    a.download = outputFileName;
    a.click();
    URL.revokeObjectURL(url);
  };

  return (
    <div style={{ textAlign: 'center', height: '300px' }}>
      <h1>Remove Worksheet</h1>
      <button onClick={startProcessing}>
        Start
      </button>
    </div>
  );
}

export default App;
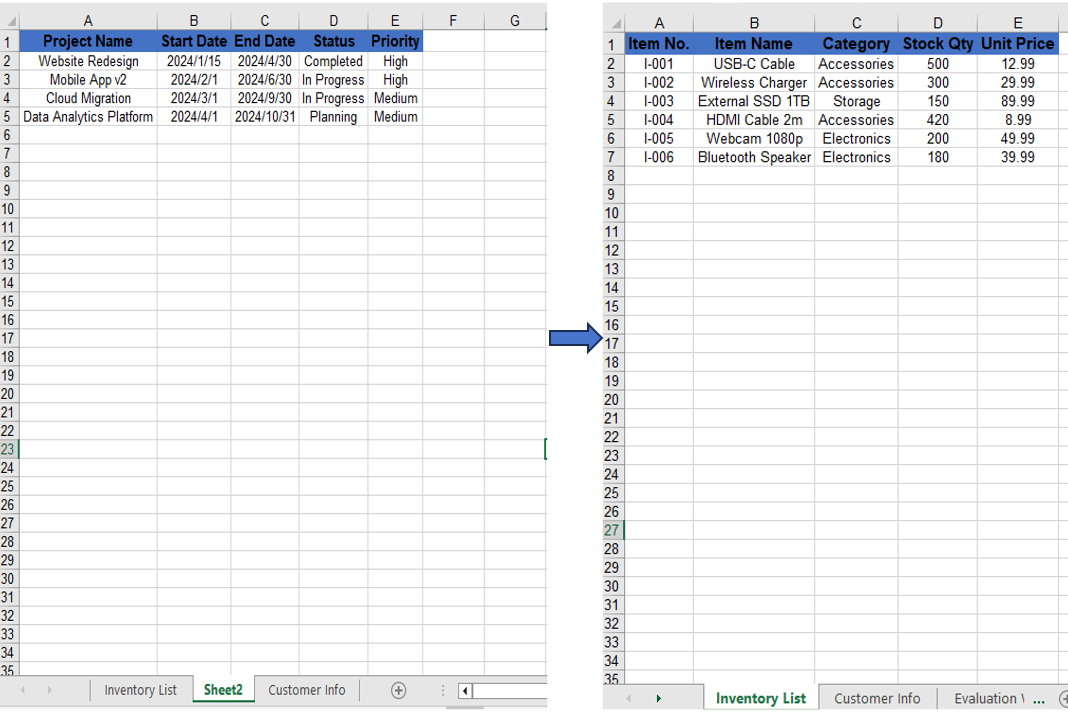
Using Remove to delete a worksheet by name.
Move and Reorder Worksheets
Reordering worksheets is a common task when organizing an Excel document. With Spire.XLS for JavaScript's MoveWorksheet method, you can move a worksheet to a target index position, effectively reordering the sheets within the workbook.
function App() {
  const startProcessing = async () => {
    // Get the Spire.XLS WASM module
    const xlsModule = window.wasmModule?.spirexls;
    if (!xlsModule) {
      alert('Spire.Xls is not ready yet');
      return;
    }

    // Load fonts and the Excel file into VFS
    await window.spire.FetchFileToVFS('ARIAL.TTF', '/Library/Fonts/', `${process.env.PUBLIC_URL}/font/`);
    const inputFileName = 'Sample.xlsx';
    await window.spire.FetchFileToVFS(inputFileName, '', `${process.env.PUBLIC_URL}/data/`);

    // Create a workbook instance and load the file
    const workbook = new xlsModule.Workbook();
    workbook.LoadFromFile({ fileName: inputFileName });

    // Get the first worksheet and move it to index 1
    const sheet = workbook.Worksheets.get(0);
    sheet.MoveWorksheet(1);

    // Save the workbook
    const outputFileName = "MoveWorksheet_output.xlsx";
    workbook.SaveToFile({ fileName: outputFileName });

    // Release resources
    workbook.Dispose();

    // Read the output file from VFS, wrap it as a Blob, and trigger download
    const modifiedFileArray = window.dotnetRuntime.Module.FS.readFile(outputFileName);
    const blob = new Blob([modifiedFileArray], { type: "application/vnd.openxmlformats-officedocument.spreadsheetml.sheet" });
    const url = URL.createObjectURL(blob);
    const a = document.createElement('a');
    a.href = url;
    a.download = outputFileName;
    a.click();
    URL.revokeObjectURL(url);
  };

  return (
    <div style={{ textAlign: 'center', height: '300px' }}>
      <h1>Move Worksheet</h1>
      <button onClick={startProcessing}>
        Start
      </button>
    </div>
  );
}

export default App;
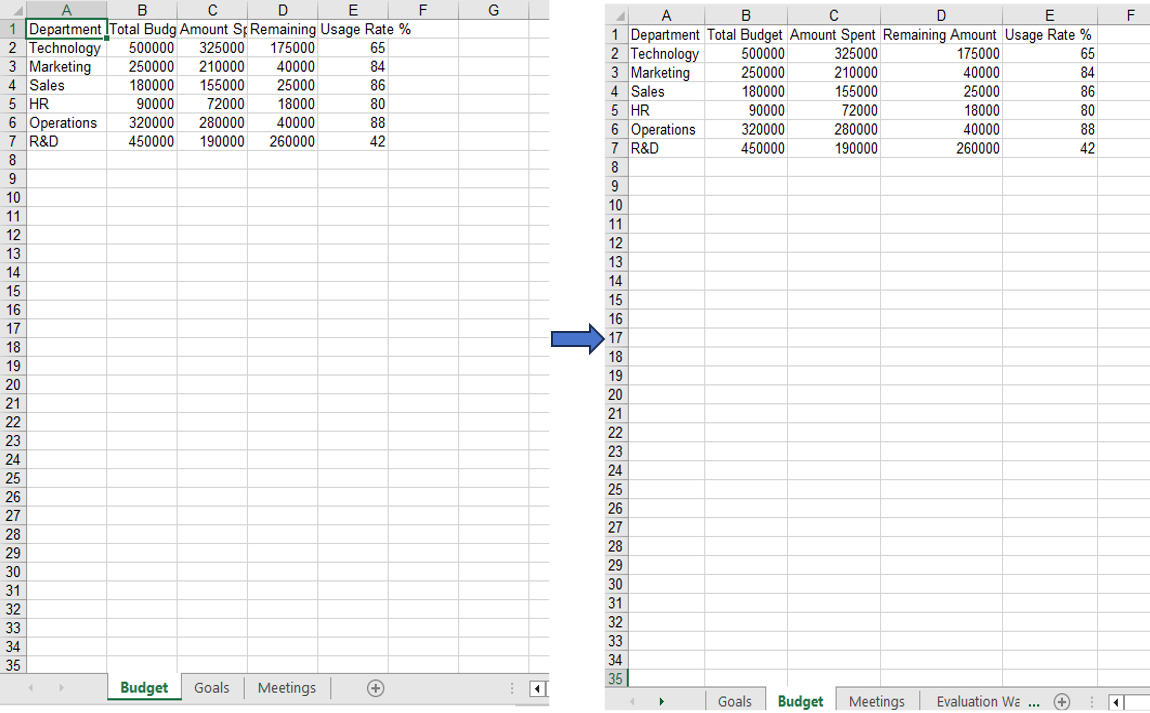
Moving the first worksheet to the second sheet position via the MoveWorksheet method.
FAQ
Index out of range when operating on worksheets
Cause: The index parameter is outside the range of the current worksheet collection in the workbook.
Solution: Verify the total number of worksheets before performing the operation, ensuring the index is within 0 to worksheets.Count-1. Use workbook.Worksheets.Count to get the current total:
const count = workbook.Worksheets.Count;
Worksheet not found when removing by name
Cause: The specified worksheet name does not exactly match the actual name in the workbook.
Solution: Iterate through the worksheet names to confirm before removal:
for (let i = 0; i < workbook.Worksheets.Count; i++) {
  let name = workbook.Worksheets.get(i).Name;
  console.log(name);
}
Get a Free License
Spire.XLS for JavaScript offers a 30-day full-featured free trial license with no functional limitations. Apply here to evaluate before purchasing.
How to Convert Word to OFD in C++: A Practical Guide
Converting Word documents to OFD (Open Fixed-layout Document) is a common requirement in many C++ applications, especially for projects serving the Chinese market, where OFD is a national standard for fixed-layout electronic documents in China (GB/T 33190). Whether you're building backend services, report generators, or document processing systems, implementing reliable C++ conversion Word to OFD functionality helps ensure documents can be shared, archived, or submitted to government systems while preserving their original formatting. However, implementing this feature isn't always easy. Traditional solutions often depend on Microsoft Office automation, which can introduce deployment issues and isn't ideal for server-side environments.
In this article, we'll demonstrate how to use Spire.Doc for C++ to convert Word to OFD programmatically. We'll cover basic document conversion as well as more advanced scenarios such as exporting specific pages to OFD format.
- Why Convert Word to OFD?
- Why Choose Spire.Doc for C++
- Setting Up Spire.Doc for C++
- Basic Word to OFD Conversion in C++
- Advanced Word to OFD Conversion Settings
- Frequently Asked Questions
Why Convert Word to OFD?
Although Word documents are convenient for editing, OFD is often preferred for official document archiving and distribution in China. Converting Word to OFD offers several advantages:
- National standard compliance: OFD is China's national standard for fixed-layout electronic documents, making it essential for government submissions and official archives.
- Consistent layout: OFD preserves the original formatting, ensuring the document looks the same across devices and operating systems.
- Document standardization: OFD files are designed to ensure consistent rendering across different platforms and viewers.
- Long-term archiving: OFD is well-suited for archiving and official record-keeping, making it ideal for legal and financial records.
- Improved document integrity: OFD files support digital signatures and document integrity protection, making them more resistant to tampering.
- Automation support: Applications can convert Word to OFD programmatically in document workflows.
Why Choose Spire.Doc for C++
There are a few ways to approach converting Word to OFD in C++ - COM automation, shelling out to external tools, or parsing the .docx format manually. Each comes with trade-offs: platform lock-in, environment dependencies, or significant implementation overhead.
Spire.Doc for C++ sidesteps most of these issues:
- No Office installation required - the library handles conversion internally, which makes it viable for server-side deployment
- Cross-platform - works on both Windows and Linux, which matters if your service runs in a containerized or Linux-based environment
- Faithful formatting - tables, images, headers, footers, and font styles are preserved reliably in the output OFD
- Straightforward API - the core conversion logic is concise, without needing to understand the full document object model upfront
- Support several Word document formats - including DOC, DOCX, DOCM, DOTX / DOTM.
It's not a perfect tool for every edge case, but for most production conversion needs, it covers the ground well.
Setting Up Spire.Doc for C++
Before starting the conversion, make sure your development environment and project are properly configured.
Install via NuGet Package Manager
- Open your project in Visual Studio.
- Go to Tools -> NuGet Package Manager -> Manage NuGet Packages for Solution...
- Search for "Spire.Doc.Cpp".
- Click "Install".
Manual Installation
- Download the latest version of Spire.Doc for C++ from the official website.
- Unzip the package.
- Configure your Visual Studio project to include the Include directory path and link the lib directory. Ensure the DLL files are placed in the same directory as your executable or in a system path.
For detailed installation instructions, see: Integrate Spire.Doc for C++ in a C++ Application
Basic C++ Project Setup
Once installed, make sure the following are in place before writing any code:
Include the header:
#include <iostream>
#include "Spire/Doc/pch.h"
#ifdef DocumentProperties
#undef DocumentProperties
#endif
#define DocumentProperties DocumentPropertiesA
#include "Spire/Doc/Document.h"
#include "Spire/Doc/FileFormat.h"
Add the required using namespace:
using namespace Spire::Doc;
Basic Word to OFD Conversion in C++
Once the project is ready, converting a Word document to OFD only requires a few lines of code.
Here is a complete C++ example:
#include <iostream>
#include "Spire/Doc/pch.h"
#ifdef DocumentProperties
#undef DocumentProperties
#endif
#define DocumentProperties DocumentPropertiesA
#include "Spire/Doc/Document.h"
#include "Spire/Doc/FileFormat.h"
using namespace std;
using namespace Spire::Doc;

int main()
{
    Document* document = new Document();

    try {
        document->LoadFromFile("BusinessReport.docx");

        document->SaveToFile("Output/BusinessReport.ofd", FileFormat::OFD);

        document->Close();

        std::cout << "success!" << std::endl;

    }
    catch (const std::exception& ex) {
        std::cerr << "error: " << ex.what() << std::endl;
        delete document;
        return -1;
    }

    delete document;
    return 0;
}
Key Code Explanations:
- Create a Document object.
- LoadFromFile() loads the Word document.
- SaveToFile() converts and saves the document as an OFD file using FileFormat::OFD.
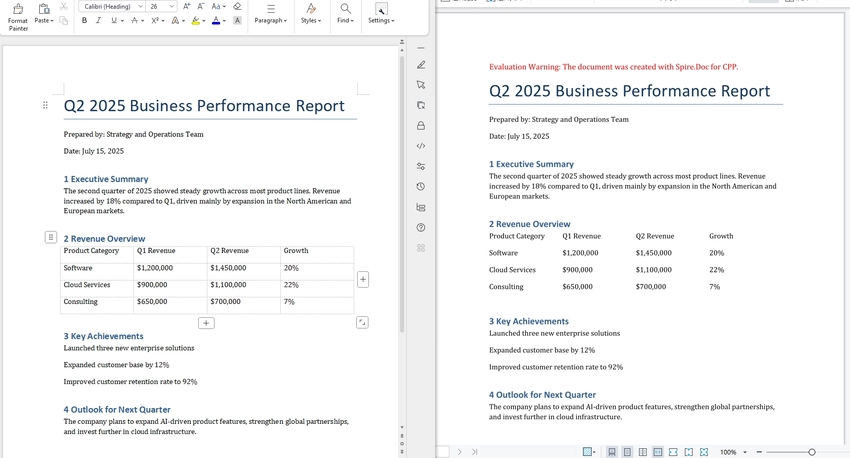
Word to OFD conversion result:
Advanced Word to OFD Conversion Settings
Beyond basic Word-to-OFD conversion, Spire.Doc for C++ also provides options for more specific needs. For example, you can export specific pages to OFD or customize the conversion process by adjusting image compression and embedding fonts.
Convert Specific Pages to OFD
In some workflows, you may only need to convert specific pages of a Word document to OFD format. The following example demonstrates how to extract specific pages and save them as a separate OFD file.
Code example:
#include <iostream>
#include "Spire/Doc/pch.h"
#ifdef DocumentProperties
#undef DocumentProperties
#endif
#define DocumentProperties DocumentPropertiesA
#include "Spire/Doc/Document.h"
#include "Spire/Doc/FileFormat.h"
using namespace std;
using namespace Spire::Doc;

int main()
{
    intrusive_ptr<Document> document = new Document();

    try {
        document->LoadFromFile("Agreement.docx");

        // Extract pages 1-3 (page index starts from 0)
        intrusive_ptr<Document> newDoc = document->ExtractPages(0, 3);

        newDoc->SaveToFile("Output/Agreement_Partial.ofd", FileFormat::OFD);

        document->Close();
        newDoc->Close();

        std::cout << "Partial OFD Success!" << std::endl;

    }
    catch (const std::exception& ex) {
        std::cerr << "error: " << ex.what() << std::endl;
        return -1;
    }

    return 0;
}
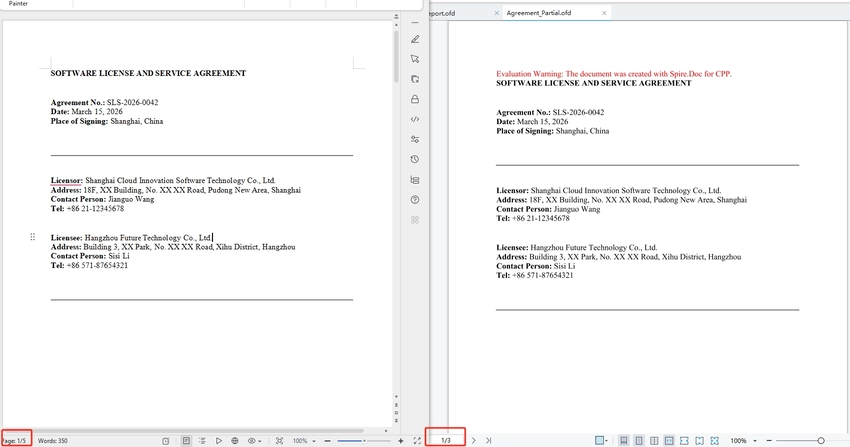
Code Explanation:
- intrusive_ptr is a smart pointer that automatically manages the memory of the Document object, ensuring it is properly destroyed when no longer needed, which helps prevent memory leaks and simplifies code.
- ExtractPages(0, 3) — Extracts pages 1-3 (0-based index) into a new Document.
- Saving the new document with FileFormat::OFD generates an OFD file containing only the selected pages.
Customize OFD Conversion Settings
In some situations, you may want to adjust conversion settings-for example, to reduce the size of the generated OFD or ensure fonts display correctly across different systems. Spire.Doc for C++ provides options for customizing the export process.
The code below shows how to enable image compression and font embedding during conversion.
#include <iostream>
#include "Spire/Doc/pch.h"
#ifdef DocumentProperties
#undef DocumentProperties
#endif
#define DocumentProperties DocumentPropertiesA
#include "Spire/Doc/Document.h"
#include "Spire/Doc/FileFormat.h"
#include "Spire/Doc/ToPdfParameterList.h"
using namespace std;
using namespace Spire::Doc;

int main()
{
    intrusive_ptr<Document> document = new Document();

        try {
            document->LoadFromFile("MarketingProposal.docx");

            document->SetJPEGQuality(75);

            intrusive_ptr<ToPdfParameterList> parameters = new ToPdfParameterList();
            parameters->SetIsEmbeddedAllFonts(true);

            document->SaveToFile("Output/MarketingProposal.ofd", FileFormat::OFD);
            document->Close();

            std::cout << "success" << std::endl;
        }
        catch (const std::exception& ex) {
            std::cerr << "error: " << ex.what() << std::endl;
            return -1;
        }
        return 0;
}
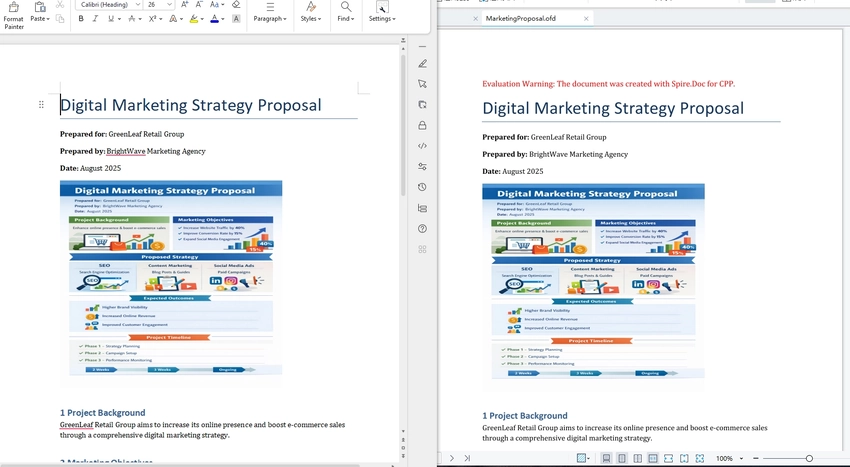
- SetJPEGQuality(75) sets the compression quality of JPEG images in the document to 75%. (value range 0-100).
- SetIsEmbeddedAllFonts(true) embeds all fonts used in the document, ensuring the OFD displays correctly even if the viewer's system does not have those fonts installed.
Frequently Asked Questions
Q1. Do I need Microsoft Word installed to perform the conversion?
A: No. Spire.Doc for C++ works independently of Microsoft Office and does not require Word to be installed on the system.
Q2. How can I convert only specific pages of a Word document to OFD?
A: As mentioned previously, you can extract the required pages from the document using intrusive_ptr<Document> newDoc = document->ExtractPages();, and then save the extracted content as an OFD file. Alternatively, you can copy the desired sections into a new document and then perform the conversion.
Q3. Why do some fonts appear different in the converted OFD?
A: This usually happens when the required fonts are not installed on the system. You can enable this by calling SetIsEmbeddedAllFonts(true) before saving the document.
Q4. How can I reduce the size of the generated OFD?
A: You can enable image compression or lower the JPEG quality (SetJPEGQuality(75))during the conversion process to reduce the file size.
Q5. What is the difference between OFD and PDF?
A: OFD (Open Fixed-layout Document) is China's national standard for electronic documents, while PDF is an international standard. OFD is widely adopted in China for e-government and official document workflows. Both formats preserve document layout and formatting.
Conclusion
Implementing a C++ conversion of Word documents to OFD is essential for applications that require reliable document sharing, archiving, or compliance with Chinese national standards. With Spire.Doc for C++, developers can perform Word-to-OFD conversion programmatically without relying on Microsoft Office automation. As demonstrated in this guide, the library supports not only full document conversion but also advanced scenarios such as exporting specific pages and customizing conversion settings, making it a practical solution for C++ document processing tasks.
C#: Extract Text from Images using the New Model of Spire.OCR for .NET
Spire.OCR for .NET offers developers a new model to extract text from images. In this article, we will demonstrate how to extract text from images in C# using the new model of Spire.OCR for .NET.
The detailed steps are as follows.
Step 1: Create a Console App (.NET Framework) in Visual Studio.
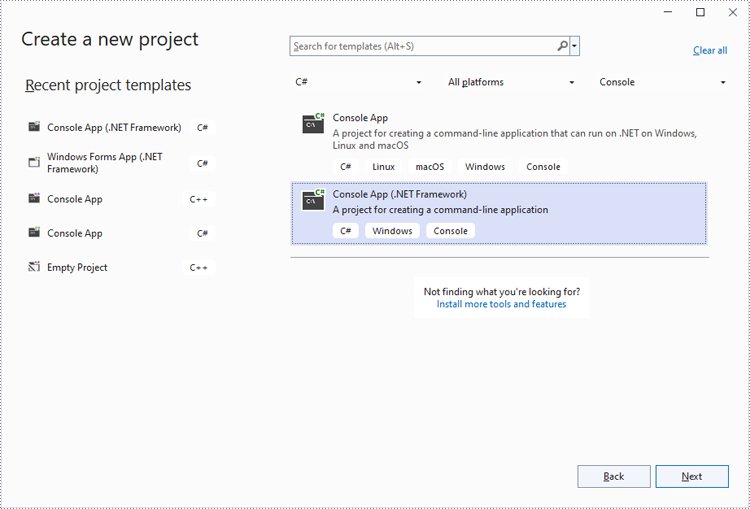
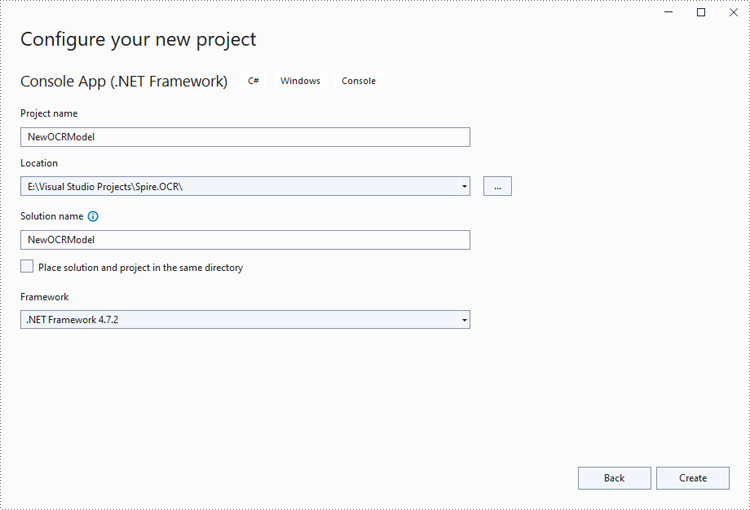
Step 2: Change the platform target of the application to x64.
In the application's Solution Explorer, right-click on the project's name and then select "Properties".
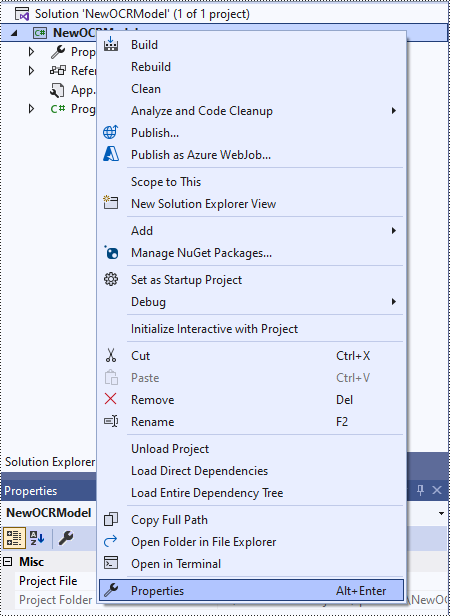
Change the platform target of the application to x64. This step must be performed since Spire.OCR only supports 64-bit platforms.
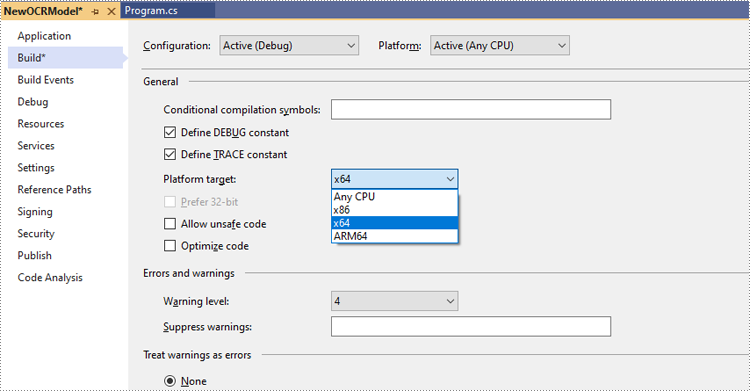
Step 3: Install Spire.OCR for .NET in your application.
Install Spire.OCR for .NET through NuGet by executing the following command in the NuGet Package Manager Console:
Install-Package Spire.OCR
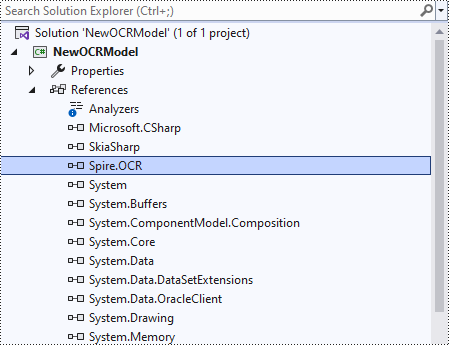
Step 4: Download the new model of Spire.OCR for .NET.
Download the model that fits in with your operating system from one of the following links.
Since Spire.OCR for .NET version 2.3.1, the netstandard2.0 platform DLL has been newly adapted to support the Paddle 6.0.0 models. These models no longer depend on spire_ocrsystem.dll and support three specifications: tiny, small, and medium. At the same time, they provide cross-platform support and are OS-independent. You can click "pp-ocrv6-onnx" to download them, or download them from HuggingFace.
Then extract the package and save it to a specific directory on your computer. In this example, we saved the package to "D:\".
Step 5: Use the new model of Spire.OCR for .NET to extract text from images in C#.
The following code example shows how to extract text from an image using C# and the new model of Spire.OCR for .NET:
- C#
using Spire.OCR;
using System.IO;

namespace NewOCRModel
{
    internal class Program
    {
        static void Main(string[] args)
        {
            // Set license key
            // Spire.OCR.License.LicenseProvider.SetLicenseKey("your-license-key");

            // Create an instance of the OcrScanner class
            OcrScanner scanner = new OcrScanner();

            // Create an instance of the ConfigureOptions class to set up the scanner configuration
            ConfigureOptions configureOptions = new ConfigureOptions();

            // Set the path to the new model
            configureOptions.ModelPath = "D:\\win-x64";

            // Set the language for text recognition. The default is English.
            // Supported languages include English, Chinese, Chinesetraditional, French, German, Japanese, and Korean.
            configureOptions.Language = "English";

            // Apply the configuration options to the scanner
            scanner.ConfigureDependencies(configureOptions);

            // Extract text from an image
            scanner.Scan("test.png");

            //Save the extracted text to a text file
            string text = scanner.Text.ToString();
            File.WriteAllText("Output.txt", text);
        }
    }
}
Apply for a Temporary License
If you'd like to remove the evaluation message from the generated documents, or to get rid of the function limitations, please request a 30-day trial license for yourself.
C++: Change Page Margins in Word
Page margins are the blank spaces at the top, bottom, left, and right edges of a document page. In Word, it may sometimes be quite necessary to adjust the margins to meet the layout requirements of specific documents, such as academic papers, business reports, or creative projects. This article will demonstrate how to programmatically change the page margins of an existing Word document using Spire.Doc for C++.
Install Spire.Doc for C++
There are two ways to integrate Spire.Doc for C++ into your application. One way is to install it through NuGet, and the other way is to download the package from our website and copy the libraries into your program. Installation via NuGet is simpler and more recommended. You can find more details by visiting the following link.
Integrate Spire.Doc for C++ in a C++ Application
Set Page Margins in Word in C++
The MarginsF class provided by Spire.Doc for C++ represents the page margins in Word. To set or change the margins of a Word document, you can use the methods of MarginsF class. The following are the detailed steps.
- Create a Document object.
- Load a Word document using Document->LoadFromFile() method.
- Get a specified section using Document->GetSections()->GetItemInSectionCollection() method.
- Get the page margins of the section using Section->GetPageSetup()->GetMargins() method.
- Set the top, bottom, left and right margins for the pages in the section using MarginsF->SetTop(), MarginsF->SetBottom(), MarginsF->SetLeft(), MarginsF->SetRight() methods.
- Save the result document using Document.SaveToFile() method.
- C++
#include <iostream>
#include <string>
#include "Spire/Doc/pch.h"
#ifdef DocumentProperties
#undef DocumentProperties
#endif
#define DocumentProperties DocumentPropertiesA
#include "Spire/Doc/Collections/SectionCollection.h"
#include "Spire/Doc/Document.h"
#include "Spire/Doc/Documents/MarginsF.h"
#include "Spire/Doc/FileFormat.h"
#include "Spire/Doc/PageSetup.h"
#include "Spire/Doc/Section.h"
using namespace std;
using namespace Spire::Doc;
using namespace Spire::Doc::Collections;
using namespace Spire::Doc::Documents;

int main() {
	//Specify the input and output file paths
	string inputFile = "Foods.docx";
	string outputFile = "SetMargins.docx";

	//Create a Document instance
	intrusive_ptr<Document> document = new Document();

	//Load a Word document
	document->LoadFromFile(inputFile.c_str());

	//Get the first section
	intrusive_ptr<Section> section = document->GetSections()->GetItem(0);

	//Set top, bottom, left and right page margins for the section
	section->GetPageSetup()->GetMargins()->SetTop(38.0f);
	section->GetPageSetup()->GetMargins()->SetBottom(38.0f);
	section->GetPageSetup()->GetMargins()->SetLeft(29.5f);
	section->GetPageSetup()->GetMargins()->SetRight(29.5f);

	//Save the result document
	document->SaveToFile(outputFile.c_str(), FileFormat::Docx2016);
	document->Close();
}
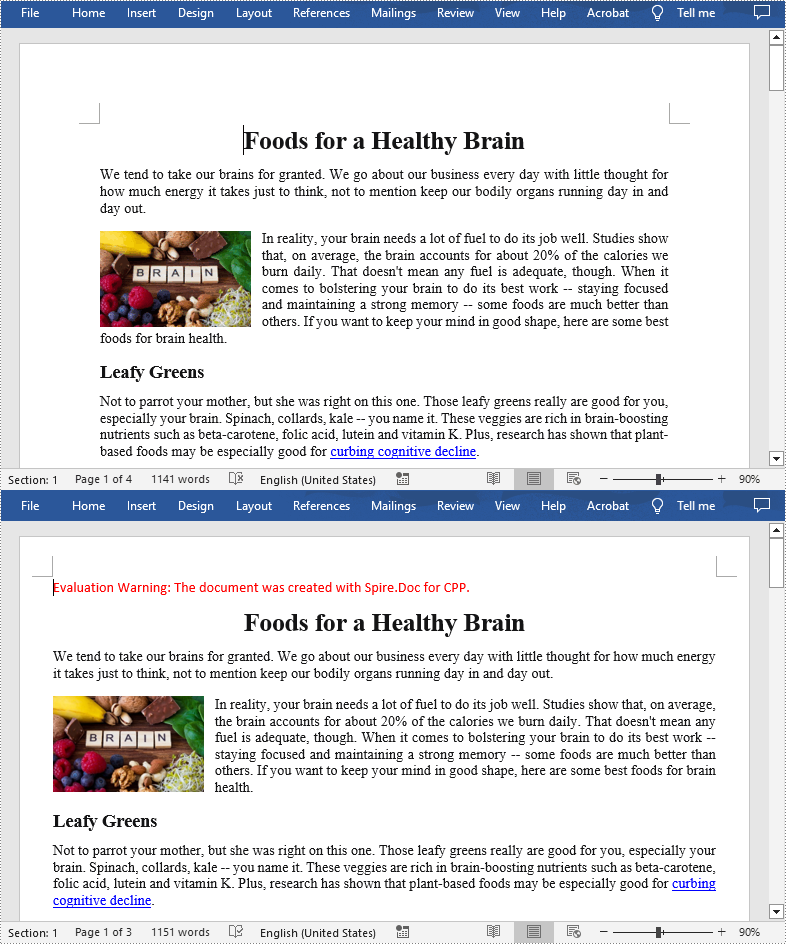
Apply for a Temporary License
If you'd like to remove the evaluation message from the generated documents, or to get rid of the function limitations, please request a 30-day trial license for yourself.