Leer valores de campos de formulario PDF por tipo con JavaScript
Tabla de contenidos
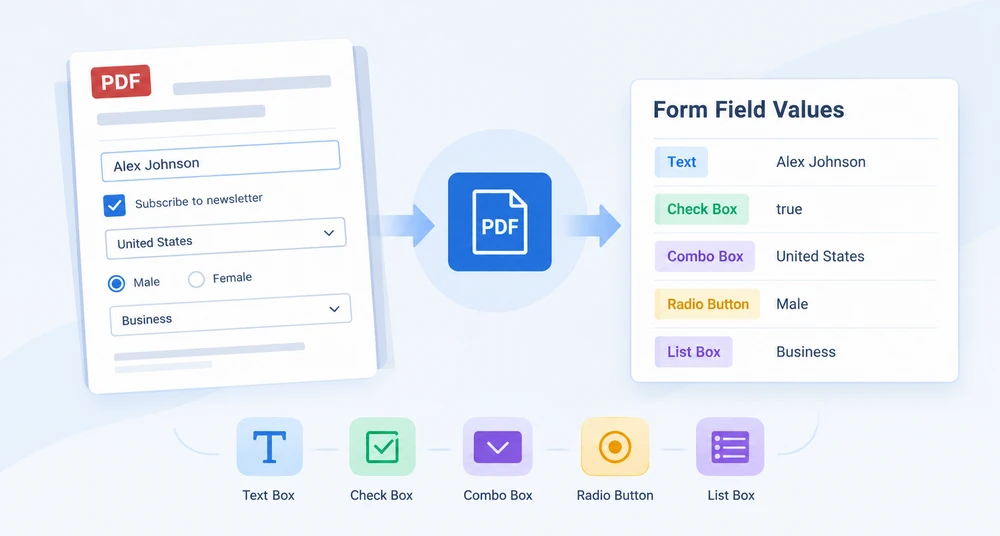
Cuando alguien rellena un formulario PDF y lo guarda, los valores introducidos residen dentro de las estructuras de campos del documento, no como texto plano que se pueda buscar o copiar de forma masiva. En un formulario con treinta o cuarenta campos, la transcripción manual se convierte en un cuello de botella. El problema de fondo es que cada tipo de campo almacena su valor de forma distinta: un cuadro de texto expone una cadena, una casilla de verificación informa un valor booleano, un cuadro combinado separa las opciones de la selección y un botón de opción almacena el elemento elegido. No existe una única llamada uniforme del tipo "dame el valor".
Este artículo explica cómo extraer los valores de los campos de formulario de un PDF con Spire.PDF for JavaScript. La biblioteca se ejecuta sobre WebAssembly en el navegador, por lo que el documento se analiza localmente a través de un sistema de archivos virtual, sin ida y vuelta al servidor. Verá cómo recorrer la colección de campos, despachar según el tipo de cada campo y leer la propiedad correcta para cuadros de texto, cuadros de lista, cuadros combinados, botones de opción y casillas de verificación.
Para la configuración del proyecto, consulte Integrar Spire.PDF for JavaScript en un proyecto de React. El código siguiente supone que Spire.PDF está instalado y que el módulo WASM está inicializado.
Tipos de campos de un vistazo
Antes de sumergirse en la implementación, conviene trazar cómo expone su valor cada tipo de campo. Spire.PDF for JavaScript representa los campos de formulario como clases de widget, y la propiedad que contiene el valor actual difiere de un tipo a otro:
| Tipo de campo | Clase de widget | Propiedad a leer | Notas |
|---|---|---|---|
| Cuadro de texto | PdfTextBoxFieldWidget |
Text |
Devuelve directamente la cadena introducida. |
| Cuadro de lista | PdfListBoxWidgetFieldWidget |
SelectedValue |
Values es la lista completa de opciones, no la elección del usuario. |
| Cuadro combinado | PdfComboBoxWidgetFieldWidget |
SelectedValue |
El mismo modelo de doble propiedad que el cuadro de lista. |
| Botón de opción | PdfRadioButtonListFieldWidget |
Value |
Proporciona la cadena del elemento seleccionado en un solo paso. |
| Casilla de verificación | PdfCheckBoxWidgetFieldWidget |
Checked |
Estado booleano. Value es undefined; no la use. |
El patrón es claro: no existe una única propiedad universal. La lógica de extracción debe comprobar el tipo de cada campo y leer la propiedad correspondiente, que es exactamente lo que implementa la sección siguiente.
Recorrer los campos y leer según el tipo
El flujo de trabajo principal tiene tres pasos: cargar el PDF, obtener su formulario como un PdfFormWidget y luego recorrer la colección FieldsWidget y ramificar según la clase de cada campo con instanceof. En cada rama, lea la propiedad específica del tipo y añada el resultado a una cadena de informe. Como el despacho cubre todos los tipos admitidos, no necesita saber de antemano qué campos contiene el documento: los campos no reconocidos simplemente caen en una etiqueta predeterminada.
function App() {
  const getAllFieldValues = async () => {
    // Get the Spire.PDF WASM module
    const pdfModule = window.wasmModule?.spirepdf;

    // Check that the module is ready
    if (!pdfModule) {
      alert('Spire.PDF is not ready yet');
      return;
    }

    // Load the PDF file to be read into the VFS
    const inputFileName = 'ApplicationForm.pdf';
    await window.spire.FetchFileToVFS(inputFileName, "", `${process.env.PUBLIC_URL}/data/`);

    // Create a PdfDocument object and load the PDF document
    const doc = new pdfModule.PdfDocument();
    doc.LoadFromFile(inputFileName);

    // Build a PdfFormWidget from the document's form handle; FieldsWidget is its field collection
    const formWidget = new pdfModule.PdfFormWidget(doc.Form.H);
    const fields = formWidget.FieldsWidget;

    let report = '';

    // Walk the field collection, check each type, and read the matching value
    for (let i = 0; i < fields.Count; i++) {
      const field = fields.get_Item({ index: i });

      // Both the type name and the value are filled in by the type dispatch
      let type = 'Unknown';
      let value = '(Unrecognized field type)';

      if (field instanceof pdfModule.PdfTextBoxFieldWidget) {
        // Text box field: read Text directly
        type = 'TextBox';
        value = field.Text;
      } else if (field instanceof pdfModule.PdfListBoxWidgetFieldWidget) {
        // List box field: Values holds every option, SelectedValue is the current one
        const options = [];
        for (let j = 0; j < field.Values.Count; j++) {
          options.push(field.Values.get_Item(j).Value);
        }
        type = 'ListBox';
        value = `Selected ${field.SelectedValue}, options ${options.join(', ')}`;
      } else if (field instanceof pdfModule.PdfComboBoxWidgetFieldWidget) {
        // Combo box field: like a list box, it has an option collection and a selected value
        const options = [];
        for (let j = 0; j < field.Values.Count; j++) {
          options.push(field.Values.get_Item(j).Value);
        }
        type = 'ComboBox';
        value = `Selected ${field.SelectedValue}, options ${options.join(', ')}`;
      } else if (field instanceof pdfModule.PdfRadioButtonListFieldWidget) {
        // Radio button field: Value is the selected item
        type = 'RadioButton';
        value = `Selected ${field.Value}`;
      } else if (field instanceof pdfModule.PdfCheckBoxWidgetFieldWidget) {
        // Check box field: Checked gives the state, not Value
        type = 'CheckBox';
        value = field.Checked ? 'Checked' : 'Not checked';
      }

      report += `Field "${field.Name}" (${type}): ${value}\n`;
    }

    const outputFileName = 'AllFieldValues.txt';
    window.dotnetRuntime.Module.FS.writeFile(outputFileName, report);
    doc.Close();

    // Read the generated file from the VFS and trigger the download
    const fileArray = window.dotnetRuntime.Module.FS.readFile(outputFileName);
    const blob = new Blob([fileArray], { type: 'text/plain' });
    const url = URL.createObjectURL(blob);
    const a = document.createElement('a');
    a.href = url;
    a.download = outputFileName;
    a.click();
    URL.revokeObjectURL(url);
  };

  return (
    <div style={{ textAlign: 'center', height: '300px' }}>
      <h1>Extract Form Field Values</h1>
      <button onClick={getAllFieldValues}>
        Extract values
      </button>
    </div>
  );
}

export default App;
Cuando el bucle termina, la cadena de informe contiene una línea por campo con su nombre, tipo y valor actual. El archivo se escribe en el sistema de archivos virtual y luego se descarga como un archivo de texto:

La cadena de instanceof es el corazón del enfoque. Cada rama sabe exactamente qué propiedad debe leer, por lo que la salida es correcta sin importar cuántos tipos de campo mezcle el documento. Las tres secciones siguientes abordan los escollos que surgen cuando la propiedad de valor de un campo no es la que podría esperarse.
Casillas de verificación: Checked frente a Value
Un error común al leer campos de casilla de verificación es recurrir a una propiedad Value. El widget de casilla de verificación —PdfCheckBoxWidgetFieldWidget— no expone Value en absoluto; intentar leerla devuelve undefined. Internamente, una casilla de verificación registra su estado mediante valores de exportación: Off cuando no está marcada, y Yes o una cadena de exportación personalizada cuando está marcada. Una cadena sin procesar no puede indicar de forma fiable si la casilla está seleccionada, por lo que la superficie de la API omite deliberadamente Value y ofrece Checked en su lugar.
La solución es sencilla: use siempre la propiedad booleana Checked:
// Check the state with Checked, not Value
const checked = field.Checked;
Esta devuelve true cuando la casilla está marcada y false en caso contrario, lo que le proporciona un booleano limpio para la lógica posterior sin necesidad de analizar cadenas.
Cuadros de lista y cuadros combinados: SelectedValue frente a Values
Los cuadros de lista y los cuadros combinados comparten un modelo de datos de dos partes que desconcierta a muchos desarrolladores. Tanto PdfListBoxWidgetFieldWidget como PdfComboBoxWidgetFieldWidget exponen una colección Values y una cadena SelectedValue, y es fácil suponer que Values contiene la entrada del usuario. No es así.
Values es el conjunto completo de opciones disponibles. Cada elemento de la colección es un objeto PdfListWidgetItem, por lo que debe desenvolverlo con .Value para obtener el texto de la opción. Recorrer Values le indica lo que el usuario podría haber elegido, no lo que eligió realmente. La selección real del usuario está en SelectedValue como una cadena simple.
Use SelectedValue para el valor actual, y recorra Values solo cuando necesite enumerar las opciones disponibles:
// The text of the currently selected item
const selected = field.SelectedValue;

// Every available option
const options = [];
for (let j = 0; j < field.Values.Count; j++) {
  options.push(field.Values.get_Item(j).Value);
}
Es esencial no confundir estas dos propiedades: tratar Values como la respuesta le da la lista de opciones en lugar del resultado rellenado, y ambas raramente tienen la misma longitud.
Manejo de PDF cifrados
La extracción de formularios comienza con la apertura del documento. Si el PDF está protegido con contraseña, llamar a LoadFromFile solo con el nombre del archivo genera un error —"Can not open an encrypted document. The password is invalid."— y no se devuelve ningún objeto de documento. Nunca se llega a los campos del formulario.
La solución es pasar la contraseña de apertura como segundo argumento:
doc.LoadFromFile(inputFileName, 'spire123');
Una vez que el documento se abre correctamente, el resto del flujo de extracción —crear el PdfFormWidget, recorrer los campos y despachar según el tipo— funciona exactamente igual que con un archivo sin cifrar. La contraseña solo controla la carga inicial; no cambia la forma en que se leen los valores de los campos.
Véase también
- Integrar Spire.PDF for JavaScript en un proyecto de React: configuración, instalación e inicialización de WASM
- Rellenar campos de formulario PDF con Spire.PDF for JavaScript: escribir valores en los campos del formulario mediante programación
- Importar y exportar datos de formularios PDF con Spire.PDF for JavaScript: serializar los datos del formulario en archivos FDF/XFDF
Si desea eliminar el mensaje de evaluación del documento resultante, o deshacerse de las limitaciones de funciones, contacte con ventas para obtener una licencia temporal válida durante 30 días.
PDF-Formularfeldwerte mit JavaScript nach Typ auslesen
Inhaltsverzeichnis
Wenn jemand ein PDF-Formular ausfüllt und speichert, liegen die eingegebenen Werte in den Feldstrukturen des Dokuments – nicht als einfacher Text, den man durchsuchen oder in großen Mengen kopieren könnte. Bei einem Formular mit dreißig oder vierzig Feldern wird das manuelle Übertragen zum Engpass. Das eigentliche Problem ist, dass jeder Feldtyp seinen Wert anders speichert: Ein Textfeld liefert eine Zeichenkette, ein Kontrollkästchen meldet einen booleschen Wert, ein Kombinationsfeld trennt die Optionen von der Auswahl, und ein Optionsfeld speichert das gewählte Element. Einen einheitlichen Aufruf nach dem Motto "Gib mir den Wert" gibt es nicht.
Dieser Artikel zeigt Schritt für Schritt, wie man Formularfeldwerte aus einem PDF mit Spire.PDF for JavaScript extrahiert. Die Bibliothek läuft im Browser auf WebAssembly, sodass das Dokument lokal über ein virtuelles Dateisystem geparst wird – ohne Roundtrip zum Server. Sie sehen, wie Sie die Feldsammlung durchlaufen, anhand des Typs jedes Felds verzweigen und die richtige Eigenschaft für Textfelder, Listenfelder, Kombinationsfelder, Optionsfelder und Kontrollkästchen auslesen.
Informationen zur Einrichtung und Projektkonfiguration finden Sie unter Integrate Spire.PDF for JavaScript in a React Project. Der folgende Code setzt voraus, dass Spire.PDF installiert und das WASM-Modul initialisiert ist.
Feldtypen auf einen Blick
Bevor wir in die Implementierung einsteigen, ist es hilfreich, sich klarzumachen, wie jeder Feldtyp seinen Wert bereitstellt. Spire.PDF for JavaScript bildet Formularfelder als Widget-Klassen ab, und die Eigenschaft, die den aktuellen Wert enthält, unterscheidet sich von Typ zu Typ:
| Feldtyp | Widget-Klasse | Auszulesende Eigenschaft | Hinweise |
|---|---|---|---|
| Textfeld | PdfTextBoxFieldWidget |
Text |
Gibt die eingegebene Zeichenkette direkt zurück. |
| Listenfeld | PdfListBoxWidgetFieldWidget |
SelectedValue |
Values ist die vollständige Optionsliste, nicht die Auswahl des Benutzers. |
| Kombinationsfeld | PdfComboBoxWidgetFieldWidget |
SelectedValue |
Dasselbe Zwei-Eigenschaften-Modell wie beim Listenfeld. |
| Optionsfeld | PdfRadioButtonListFieldWidget |
Value |
Liefert die Zeichenkette des ausgewählten Elements in einem Schritt. |
| Kontrollkästchen | PdfCheckBoxWidgetFieldWidget |
Checked |
Boolescher Zustand. Value ist undefined – nicht verwenden. |
Das Muster ist klar: Es gibt keine einzige universelle Eigenschaft. Die Extraktionslogik muss den Typ jedes Felds prüfen und die passende Eigenschaft auslesen – genau das implementiert der nächste Abschnitt.
Felder durchlaufen und nach Typ auslesen
Der Kernablauf besteht aus drei Schritten: das PDF laden, sein Formular als PdfFormWidget abrufen und dann die FieldsWidget-Sammlung durchlaufen und mit instanceof nach der Klasse jedes Felds verzweigen. In jedem Zweig wird die typspezifische Eigenschaft gelesen und das Ergebnis an eine Berichtszeichenkette angehängt. Da die Verzweigung jeden unterstützten Typ abdeckt, müssen Sie nicht im Voraus wissen, welche Felder das Dokument enthält – nicht erkannte Felder fallen einfach auf eine Standardbezeichnung zurück.
function App() {
  const getAllFieldValues = async () => {
    // Get the Spire.PDF WASM module
    const pdfModule = window.wasmModule?.spirepdf;

    // Check that the module is ready
    if (!pdfModule) {
      alert('Spire.PDF is not ready yet');
      return;
    }

    // Load the PDF file to be read into the VFS
    const inputFileName = 'ApplicationForm.pdf';
    await window.spire.FetchFileToVFS(inputFileName, "", `${process.env.PUBLIC_URL}/data/`);

    // Create a PdfDocument object and load the PDF document
    const doc = new pdfModule.PdfDocument();
    doc.LoadFromFile(inputFileName);

    // Build a PdfFormWidget from the document's form handle; FieldsWidget is its field collection
    const formWidget = new pdfModule.PdfFormWidget(doc.Form.H);
    const fields = formWidget.FieldsWidget;

    let report = '';

    // Walk the field collection, check each type, and read the matching value
    for (let i = 0; i < fields.Count; i++) {
      const field = fields.get_Item({ index: i });

      // Both the type name and the value are filled in by the type dispatch
      let type = 'Unknown';
      let value = '(Unrecognized field type)';

      if (field instanceof pdfModule.PdfTextBoxFieldWidget) {
        // Text box field: read Text directly
        type = 'TextBox';
        value = field.Text;
      } else if (field instanceof pdfModule.PdfListBoxWidgetFieldWidget) {
        // List box field: Values holds every option, SelectedValue is the current one
        const options = [];
        for (let j = 0; j < field.Values.Count; j++) {
          options.push(field.Values.get_Item(j).Value);
        }
        type = 'ListBox';
        value = `Selected ${field.SelectedValue}, options ${options.join(', ')}`;
      } else if (field instanceof pdfModule.PdfComboBoxWidgetFieldWidget) {
        // Combo box field: like a list box, it has an option collection and a selected value
        const options = [];
        for (let j = 0; j < field.Values.Count; j++) {
          options.push(field.Values.get_Item(j).Value);
        }
        type = 'ComboBox';
        value = `Selected ${field.SelectedValue}, options ${options.join(', ')}`;
      } else if (field instanceof pdfModule.PdfRadioButtonListFieldWidget) {
        // Radio button field: Value is the selected item
        type = 'RadioButton';
        value = `Selected ${field.Value}`;
      } else if (field instanceof pdfModule.PdfCheckBoxWidgetFieldWidget) {
        // Check box field: Checked gives the state, not Value
        type = 'CheckBox';
        value = field.Checked ? 'Checked' : 'Not checked';
      }

      report += `Field "${field.Name}" (${type}): ${value}\n`;
    }

    const outputFileName = 'AllFieldValues.txt';
    window.dotnetRuntime.Module.FS.writeFile(outputFileName, report);
    doc.Close();

    // Read the generated file from the VFS and trigger the download
    const fileArray = window.dotnetRuntime.Module.FS.readFile(outputFileName);
    const blob = new Blob([fileArray], { type: 'text/plain' });
    const url = URL.createObjectURL(blob);
    const a = document.createElement('a');
    a.href = url;
    a.download = outputFileName;
    a.click();
    URL.revokeObjectURL(url);
  };

  return (
    <div style={{ textAlign: 'center', height: '300px' }}>
      <h1>Extract Form Field Values</h1>
      <button onClick={getAllFieldValues}>
        Extract values
      </button>
    </div>
  );
}

export default App;
Nach dem Ende der Schleife enthält die Berichtszeichenkette eine Zeile pro Feld mit dessen Namen, Typ und aktuellem Wert. Die Datei wird in das virtuelle Dateisystem geschrieben und anschließend als Textdatei heruntergeladen:
Die instanceof-Kette ist das Herzstück des Ansatzes. Jeder Zweig weiß genau, welche Eigenschaft auszulesen ist, sodass die Ausgabe korrekt ist, egal wie viele Feldtypen das Dokument kombiniert. Die nächsten drei Abschnitte behandeln die Fallstricke, die auftreten, wenn die Werte-Eigenschaft eines Felds nicht die erwartete ist.
Kontrollkästchen: Checked vs. Value
Ein häufiger Fehler beim Auslesen von Kontrollkästchen ist der Griff zur Eigenschaft Value. Das Kontrollkästchen-Widget – PdfCheckBoxWidgetFieldWidget – stellt Value überhaupt nicht bereit; ein Leseversuch liefert undefined. Intern verfolgt ein Kontrollkästchen seinen Zustand über Exportwerte: Off, wenn es nicht angekreuzt ist, und Yes oder eine benutzerdefinierte Exportzeichenkette, wenn es angekreuzt ist. Eine reine Zeichenkette kann zuverlässig nicht sagen, ob das Kästchen ausgewählt ist, daher lässt die API Value bewusst weg und bietet stattdessen Checked.
Die Lösung ist unkompliziert – verwenden Sie immer die boolesche Eigenschaft Checked:
// Check the state with Checked, not Value
const checked = field.Checked;
Dies gibt true zurück, wenn das Kästchen angekreuzt ist, und andernfalls false – ein sauberer boolescher Wert für die weitere Logik, ganz ohne Parsen von Zeichenketten.
Listenfelder und Kombinationsfelder: SelectedValue vs. Values
Listenfelder und Kombinationsfelder teilen ein zweiteiliges Datenmodell, über das viele Entwickler stolpern. Sowohl PdfListBoxWidgetFieldWidget als auch PdfComboBoxWidgetFieldWidget stellen eine Values-Sammlung und eine SelectedValue-Zeichenkette bereit, und man nimmt leicht an, dass Values die Eingabe des Benutzers enthält. Das ist nicht der Fall.
Values ist die vollständige Menge der verfügbaren Optionen. Jedes Element der Sammlung ist ein PdfListWidgetItem-Objekt, daher müssen Sie es mit .Value entpacken, um den Optionstext zu erhalten. Das Durchlaufen von Values zeigt Ihnen, was der Benutzer hätte wählen können, nicht, was er tatsächlich ausgewählt hat. Die tatsächliche Auswahl des Benutzers steht als einfache Zeichenkette in SelectedValue.
Verwenden Sie SelectedValue für den aktuellen Wert und durchlaufen Sie Values nur, wenn Sie die verfügbaren Auswahlmöglichkeiten auflisten müssen:
// The text of the currently selected item
const selected = field.SelectedValue;

// Every available option
const options = [];
for (let j = 0; j < field.Values.Count; j++) {
  options.push(field.Values.get_Item(j).Value);
}
Es ist unerlässlich, diese beiden Eigenschaften auseinanderzuhalten: Behandelt man Values als die Antwort, erhält man die Optionsliste statt des ausgefüllten Ergebnisses, und beide sind selten gleich lang.
Umgang mit verschlüsselten PDFs
Die Formularextraktion beginnt mit dem Öffnen des Dokuments. Ist das PDF passwortgeschützt, löst der Aufruf von LoadFromFile nur mit dem Dateinamen einen Fehler aus – "Can not open an encrypted document. The password is invalid." – und es wird kein Dokumentobjekt zurückgegeben. Die Formularfelder werden nie erreicht.
Die Lösung besteht darin, das Öffnungspasswort als zweites Argument zu übergeben:
doc.LoadFromFile(inputFileName, 'spire123');
Sobald das Dokument erfolgreich geöffnet ist, funktioniert der restliche Extraktionsablauf – das Erstellen des PdfFormWidget, das Durchlaufen der Felder, das Verzweigen nach Typ – genauso wie bei einer unverschlüsselten Datei. Das Passwort betrifft nur das initiale Laden; es ändert nichts daran, wie Feldwerte ausgelesen werden.
Siehe auch
- Integrate Spire.PDF for JavaScript in a React Project — Einrichtung, Installation und WASM-Initialisierung
- Fill PDF Form Fields with Spire.PDF for JavaScript — Werte programmatisch in Formularfelder schreiben
- Import and Export PDF Form Data with Spire.PDF for JavaScript — Formulardaten in FDF/XFDF-Dateien serialisieren
Wenn Sie die Evaluierungswarnung aus dem Ergebnisdokument entfernen oder die Funktionseinschränkungen beseitigen möchten, wenden Sie sich an den Vertrieb, um eine temporäre Lizenz mit 30 Tagen Gültigkeit zu erhalten.
Чтение значений полей PDF-форм по типам с помощью JavaScript
Когда кто-то заполняет PDF-форму и сохраняет её, введённые значения хранятся внутри структур полей документа, а не в виде обычного текста, который можно искать или массово копировать. Для формы с тридцатью или сорока полями ручной перенос данных становится узким местом. Более глубокая проблема в том, что каждый тип поля хранит своё значение по-разному: текстовое поле предоставляет строку, флажок сообщает логическое значение, раскрывающийся список отделяет варианты от выбора, а переключатель хранит выбранный элемент. Единого универсального вызова "дай мне значение" не существует.
В этой статье рассматривается извлечение значений полей формы из PDF с помощью Spire.PDF for JavaScript. Библиотека работает на WebAssembly в браузере, поэтому документ обрабатывается локально через виртуальную файловую систему без обращения к серверу. Вы увидите, как перебрать коллекцию полей, выполнить ветвление по типу каждого поля и прочитать нужное свойство для текстовых полей, списков, раскрывающихся списков, переключателей и флажков.
По вопросам настройки и конфигурации проекта обращайтесь к разделу Интеграция Spire.PDF for JavaScript в проект React. Приведённый ниже код предполагает, что Spire.PDF установлен, а модуль WASM инициализирован.
Типы полей вкратце
Прежде чем перейти к реализации, полезно разобраться, как каждый тип поля предоставляет своё значение. Spire.PDF for JavaScript представляет поля формы в виде классов виджетов, и свойство, хранящее текущее значение, отличается от типа к типу:
| Тип поля | Класс виджета | Свойство для чтения | Примечания |
|---|---|---|---|
| Текстовое поле | PdfTextBoxFieldWidget |
Text |
Напрямую возвращает введённую строку. |
| Поле списка | PdfListBoxWidgetFieldWidget |
SelectedValue |
Values — это полный список вариантов, а не выбор пользователя. |
| Раскрывающийся список | PdfComboBoxWidgetFieldWidget |
SelectedValue |
Та же модель с двумя свойствами, что и у поля списка. |
| Переключатель | PdfRadioButtonListFieldWidget |
Value |
За один шаг возвращает строку выбранного элемента. |
| Флажок | PdfCheckBoxWidgetFieldWidget |
Checked |
Логическое состояние. Value не определено — не используйте его. |
Закономерность очевидна: единого универсального свойства нет. Логика извлечения должна проверять тип каждого поля и читать соответствующее свойство — именно это и реализуется в следующем разделе.
Перебор полей и чтение по типу
Основной процесс состоит из трёх шагов: загрузить PDF, получить его форму в виде PdfFormWidget, затем перебрать коллекцию FieldsWidget и выполнить ветвление по классу каждого поля с помощью instanceof. В каждой ветке читается свойство, специфичное для типа, а результат добавляется к строке отчёта. Поскольку ветвление охватывает все поддерживаемые типы, вам не нужно заранее знать, какие поля содержит документ: нераспознанные поля просто попадают в ветку с меткой по умолчанию.
function App() {
  const getAllFieldValues = async () => {
    // Get the Spire.PDF WASM module
    const pdfModule = window.wasmModule?.spirepdf;

    // Check that the module is ready
    if (!pdfModule) {
      alert('Spire.PDF is not ready yet');
      return;
    }

    // Load the PDF file to be read into the VFS
    const inputFileName = 'ApplicationForm.pdf';
    await window.spire.FetchFileToVFS(inputFileName, "", `${process.env.PUBLIC_URL}/data/`);

    // Create a PdfDocument object and load the PDF document
    const doc = new pdfModule.PdfDocument();
    doc.LoadFromFile(inputFileName);

    // Build a PdfFormWidget from the document's form handle; FieldsWidget is its field collection
    const formWidget = new pdfModule.PdfFormWidget(doc.Form.H);
    const fields = formWidget.FieldsWidget;

    let report = '';

    // Walk the field collection, check each type, and read the matching value
    for (let i = 0; i < fields.Count; i++) {
      const field = fields.get_Item({ index: i });

      // Both the type name and the value are filled in by the type dispatch
      let type = 'Unknown';
      let value = '(Unrecognized field type)';

      if (field instanceof pdfModule.PdfTextBoxFieldWidget) {
        // Text box field: read Text directly
        type = 'TextBox';
        value = field.Text;
      } else if (field instanceof pdfModule.PdfListBoxWidgetFieldWidget) {
        // List box field: Values holds every option, SelectedValue is the current one
        const options = [];
        for (let j = 0; j < field.Values.Count; j++) {
          options.push(field.Values.get_Item(j).Value);
        }
        type = 'ListBox';
        value = `Selected ${field.SelectedValue}, options ${options.join(', ')}`;
      } else if (field instanceof pdfModule.PdfComboBoxWidgetFieldWidget) {
        // Combo box field: like a list box, it has an option collection and a selected value
        const options = [];
        for (let j = 0; j < field.Values.Count; j++) {
          options.push(field.Values.get_Item(j).Value);
        }
        type = 'ComboBox';
        value = `Selected ${field.SelectedValue}, options ${options.join(', ')}`;
      } else if (field instanceof pdfModule.PdfRadioButtonListFieldWidget) {
        // Radio button field: Value is the selected item
        type = 'RadioButton';
        value = `Selected ${field.Value}`;
      } else if (field instanceof pdfModule.PdfCheckBoxWidgetFieldWidget) {
        // Check box field: Checked gives the state, not Value
        type = 'CheckBox';
        value = field.Checked ? 'Checked' : 'Not checked';
      }

      report += `Field "${field.Name}" (${type}): ${value}\n`;
    }

    const outputFileName = 'AllFieldValues.txt';
    window.dotnetRuntime.Module.FS.writeFile(outputFileName, report);
    doc.Close();

    // Read the generated file from the VFS and trigger the download
    const fileArray = window.dotnetRuntime.Module.FS.readFile(outputFileName);
    const blob = new Blob([fileArray], { type: 'text/plain' });
    const url = URL.createObjectURL(blob);
    const a = document.createElement('a');
    a.href = url;
    a.download = outputFileName;
    a.click();
    URL.revokeObjectURL(url);
  };

  return (
    <div style={{ textAlign: 'center', height: '300px' }}>
      <h1>Extract Form Field Values</h1>
      <button onClick={getAllFieldValues}>
        Extract values
      </button>
    </div>
  );
}

export default App;
После завершения цикла строка отчёта содержит по одной строке на каждое поле с его именем, типом и текущим значением. Файл записывается в виртуальную файловую систему, а затем скачивается как текстовый файл:
Цепочка instanceof — сердце этого подхода. Каждая ветка точно знает, какое свойство читать, поэтому результат будет правильным независимо от того, сколько типов полей смешано в документе. В следующих трёх разделах рассматриваются подводные камни, возникающие, когда свойство значения поля оказывается не тем, которое вы ожидали.
Флажки: Checked или Value
Частая ошибка при чтении полей-флажков — обращение к свойству Value. Виджет флажка — PdfCheckBoxWidgetFieldWidget — вообще не предоставляет Value; попытка его прочитать возвращает undefined. Внутри флажок отслеживает своё состояние через экспортные значения: Off, когда флажок не установлен, и Yes или пользовательскую экспортную строку, когда он установлен. Обычная строка не может надёжно сообщить, выбран ли флажок, поэтому в API намеренно опущено Value и вместо него предложено Checked.
Решение простое — всегда используйте логическое свойство Checked:
// Check the state with Checked, not Value
const checked = field.Checked;
Оно возвращает true, когда флажок установлен, и false в противном случае, предоставляя чистое логическое значение для дальнейшей логики без какого-либо разбора строк.
Списки и раскрывающиеся списки: SelectedValue или Values
Поля списков и раскрывающиеся списки используют модель данных из двух частей, которая сбивает с толку многих разработчиков. И PdfListBoxWidgetFieldWidget, и PdfComboBoxWidgetFieldWidget предоставляют коллекцию Values и строку SelectedValue, и легко предположить, что Values содержит введённое пользователем значение. Это не так.
Values — это полный набор доступных вариантов. Каждый элемент коллекции — объект PdfListWidgetItem, поэтому, чтобы получить текст варианта, его нужно развернуть с помощью .Value. Перебор Values показывает, что пользователь мог выбрать, а не то, что он выбрал на самом деле. Реальный выбор пользователя хранится в SelectedValue в виде обычной строки.
Используйте SelectedValue для текущего значения и перебирайте Values только тогда, когда нужно перечислить доступные варианты:
// The text of the currently selected item
const selected = field.SelectedValue;

// Every available option
const options = [];
for (let j = 0; j < field.Values.Count; j++) {
  options.push(field.Values.get_Item(j).Value);
}
Важно не путать эти два свойства: если считать Values ответом, вы получите список вариантов вместо заполненного результата, а их длины совпадают редко.
Работа с зашифрованными PDF-файлами
Извлечение данных формы начинается с открытия документа. Если PDF защищён паролем, вызов LoadFromFile только с именем файла вызывает ошибку — "Can not open an encrypted document. The password is invalid." — и объект документа не возвращается. До полей формы дело так и не доходит.
Решение — передать пароль для открытия вторым аргументом:
doc.LoadFromFile(inputFileName, 'spire123');
После успешного открытия документа остальной процесс извлечения — создание PdfFormWidget, перебор полей, ветвление по типу — работает точно так же, как и с незашифрованным файлом. Пароль только ограничивает начальную загрузку; он не влияет на то, как читаются значения полей.
См. также
- Интеграция Spire.PDF for JavaScript в проект React — настройка, установка и инициализация WASM
- Заполнение полей PDF-формы с помощью Spire.PDF for JavaScript — программная запись значений в поля формы
- Импорт и экспорт данных PDF-формы с помощью Spire.PDF for JavaScript — сериализация данных формы в файлы FDF/XFDF
Если вы хотите удалить оценочное сообщение из итогового документа или избавиться от ограничений функциональности, свяжитесь с отделом продаж, чтобы получить временную лицензию сроком на 30 дней.
Copy and Reuse PDF Pages Across Documents with JavaScript

Assembling a polished PDF from scattered source files is a routine yet fiddly task: a cover page needs to sit at the front of a project brief, pricing pages belong inside their contract, a quarterly summary stitches together charts from a dozen reports. Doing this by hand means juggling multiple PDF readers and hoping the page order comes out right, with mismatched page sizes compounding the problem.
Spire.PDF for JavaScript moves the entire operation into the browser. Powered by WebAssembly, it loads, manipulates, and saves PDF documents entirely client-side through a virtual file system (VFS), meaning no file is ever uploaded to a backend server. This article walks through four distinct techniques for copying PDF pages between documents — three that relocate whole pages and one that extracts page content as a reusable template — with complete React code examples for each.
For project setup and installation instructions, see Integrating Spire.PDF for JavaScript in a React Project. The examples below assume Spire.PDF is installed and the WebAssembly module has been initialized.
Four Ways to Copy PDF Pages at a Glance
Before examining each method individually, the table below provides a quick comparison. The first three techniques move intact pages and automatically carry over the source page's dimensions, rotation, and margins. The fourth decouples content from page geometry, handing you full control over the target page size and drawing position.
| Method | API Call | What Gets Copied | Page Size | Typical Use Case |
|---|---|---|---|---|
| Insert a single page | InsertPage |
One page at a position you choose | Inherits from source | Adding a cover or title page to the front |
| Insert a page range | InsertPageRange |
A consecutive block of pages | Inherits from source | Appending a specific section like pricing tables |
| Append a whole document | AppendPage |
Every page of the source document | Inherits from source | Concatenating full documents end-to-end |
| Draw page content as a template | CreateTemplate + DrawTemplate |
Page content only, drawn onto any page | You decide the target size | Reusing content on different page sizes or repeating it multiple times |
The first three methods are straightforward page moves — pick the source, pick the destination, and the library handles the rest. The template approach is more advanced and opens up possibilities that simple page copying cannot address, such as scaling content to fit a different page size or stamping the same content onto multiple pages. We will cover the three page-move methods first, then explore the template technique in depth.
Copy a Single Page to a Specific Position
The most precise of the four methods, PdfDocument.InsertPage, copies one page from a source document and places it at an exact index in the target. The resultPageIndex parameter controls where the copy lands: pass 0 to prepend it, pass the target's current page count to append it, or supply any index in between to insert at that position. Omit resultPageIndex entirely and the page defaults to the end.
function App() {
  const copyPageAtPosition = async () => {
    // Get the Spire.PDF WASM module
    const pdfModule = window.wasmModule?.spirepdf;

    // Check whether the module is ready
    if (!pdfModule) {
      alert('Spire.PDF is not ready yet');
      return;
    }

    // Load both the source and the target document into the VFS
    const sourceFileName = 'SourceDocument.pdf';
    const targetFileName = 'TargetDocument.pdf';
    await window.spire.FetchFileToVFS(sourceFileName, "", `${process.env.PUBLIC_URL}/data/`);
    await window.spire.FetchFileToVFS(targetFileName, "", `${process.env.PUBLIC_URL}/data/`);

    // Load the two documents
    const sourceDoc = new pdfModule.PdfDocument();
    sourceDoc.LoadFromFile(sourceFileName);
    const targetDoc = new pdfModule.PdfDocument();
    targetDoc.LoadFromFile(targetFileName);

    // Copy page 1 of the source document to the front of the target document
    // pageIndex comes from the source document, resultPageIndex is where the copy lands
    targetDoc.InsertPage({ ldDoc: sourceDoc, pageIndex: 0, resultPageIndex: 0 });

    // Save the result document
    const outputFileName = 'CopyPageAtPosition.pdf';
    targetDoc.SaveToFile(outputFileName);
    sourceDoc.Close();
    targetDoc.Close();

    // Read the generated file from the VFS and trigger the download
    const fileArray = window.dotnetRuntime.Module.FS.readFile(outputFileName);
    const blob = new Blob([fileArray], { type: 'application/pdf' });
    const url = URL.createObjectURL(blob);
    const a = document.createElement('a');
    a.href = url;
    a.download = outputFileName;
    a.click();
    URL.revokeObjectURL(url);
  };

  return (
    <div style={{ textAlign: 'center', height: '300px' }}>
      <h1>Copy Page at Position</h1>
      <button onClick={copyPageAtPosition}>
        Start
      </button>
    </div>
  );
}

export default App;
Among all four copy methods,
resultPageIndexis the only parameter that lets you choose the insertion point. Setting it to 0 places the page first, 1 places it second, and passing the target document's current page count produces the same effect as appending.
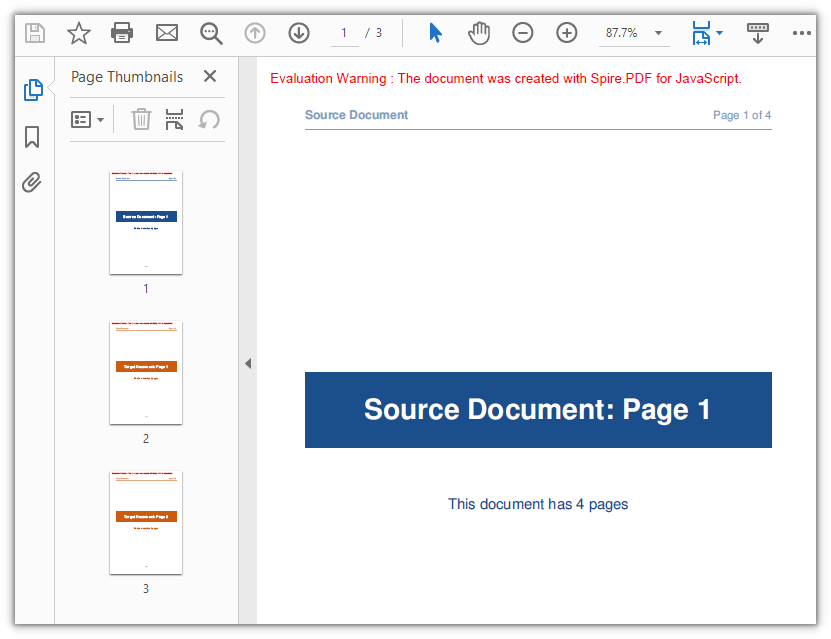
The target document grows from two pages to three, with the source document's first page now occupying the leading position:
Copy a Range of Pages to the End
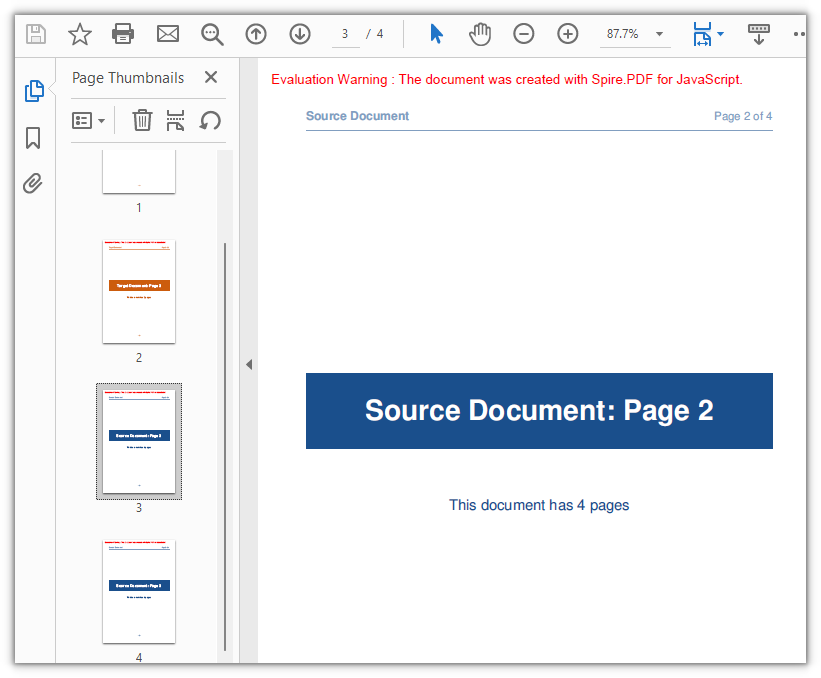
When you need more than one page but less than an entire document, PdfDocument.InsertPageRange copies a contiguous block of pages defined by a start and end index. Unlike InsertPage, this method accepts positional arguments rather than an options object, and it always appends the copied pages to the end of the target — there is no parameter for choosing the insertion position. The end index is inclusive, so passing (sourceDoc, 1, 2) copies pages 2 and 3 (zero-indexed).
function App() {
  const appendPageRange = async () => {
    // Get the Spire.PDF WASM module
    const pdfModule = window.wasmModule?.spirepdf;

    // Check whether the module is ready
    if (!pdfModule) {
      alert('Spire.PDF is not ready yet');
      return;
    }

    // Load both the source and the target document into the VFS
    const sourceFileName = 'SourceDocument.pdf';
    const targetFileName = 'TargetDocument.pdf';
    await window.spire.FetchFileToVFS(sourceFileName, "", `${process.env.PUBLIC_URL}/data/`);
    await window.spire.FetchFileToVFS(targetFileName, "", `${process.env.PUBLIC_URL}/data/`);

    // Load the two documents
    const sourceDoc = new pdfModule.PdfDocument();
    sourceDoc.LoadFromFile(sourceFileName);
    const targetDoc = new pdfModule.PdfDocument();
    targetDoc.LoadFromFile(targetFileName);

    // Append pages 2 to 3 of the source document to the end of the target document
    // Note: these are positional arguments, not an object; endIndex is inclusive
    targetDoc.InsertPageRange(sourceDoc, 1, 2);

    // Save the result document
    const outputFileName = 'CopyPageRange.pdf';
    targetDoc.SaveToFile(outputFileName);
    sourceDoc.Close();
    targetDoc.Close();

    // Read the generated file from the VFS and trigger the download
    const fileArray = window.dotnetRuntime.Module.FS.readFile(outputFileName);
    const blob = new Blob([fileArray], { type: 'application/pdf' });
    const url = URL.createObjectURL(blob);
    const a = document.createElement('a');
    a.href = url;
    a.download = outputFileName;
    a.click();
    URL.revokeObjectURL(url);
  };

  return (
    <div style={{ textAlign: 'center', height: '300px' }}>
      <h1>Copy Page Range</h1>
      <button onClick={appendPageRange}>
        Copy pages 2-3
      </button>
    </div>
  );
}

export default App;
The target document picks up two additional pages, bringing its total from two to four:
Append an Entire Document
For the simplest case — moving every page of one document into another — PdfDocument.AppendPage removes the need to calculate indices at all. Pass the source document object and all of its pages are appended to the target in their original sequence. To concatenate multiple documents together, call AppendPage repeatedly with each source document in turn.
function App() {
  const appendWholeDocument = async () => {
    // Get the Spire.PDF WASM module
    const pdfModule = window.wasmModule?.spirepdf;

    // Check whether the module is ready
    if (!pdfModule) {
      alert('Spire.PDF is not ready yet');
      return;
    }

    // Load both the source and the target document into the VFS
    const sourceFileName = 'SourceDocument.pdf';
    const targetFileName = 'TargetDocument.pdf';
    await window.spire.FetchFileToVFS(sourceFileName, "", `${process.env.PUBLIC_URL}/data/`);
    await window.spire.FetchFileToVFS(targetFileName, "", `${process.env.PUBLIC_URL}/data/`);

    // Load the two documents
    const sourceDoc = new pdfModule.PdfDocument();
    sourceDoc.LoadFromFile(sourceFileName);
    const targetDoc = new pdfModule.PdfDocument();
    targetDoc.LoadFromFile(targetFileName);

    // Use AppendPage when the whole document has to be copied; all pages are appended in order
    targetDoc.AppendPage({ doc: sourceDoc });

    // Save the result document
    const outputFileName = 'CopyAllPages.pdf';
    targetDoc.SaveToFile(outputFileName);
    sourceDoc.Close();
    targetDoc.Close();

    // Read the generated file from the VFS and trigger the download
    const fileArray = window.dotnetRuntime.Module.FS.readFile(outputFileName);
    const blob = new Blob([fileArray], { type: 'application/pdf' });
    const url = URL.createObjectURL(blob);
    const a = document.createElement('a');
    a.href = url;
    a.download = outputFileName;
    a.click();
    URL.revokeObjectURL(url);
  };

  return (
    <div style={{ textAlign: 'center', height: '300px' }}>
      <h1>Copy Whole Document</h1>
      <button onClick={appendWholeDocument}>
        Start
      </button>
    </div>
  );
}

export default App;
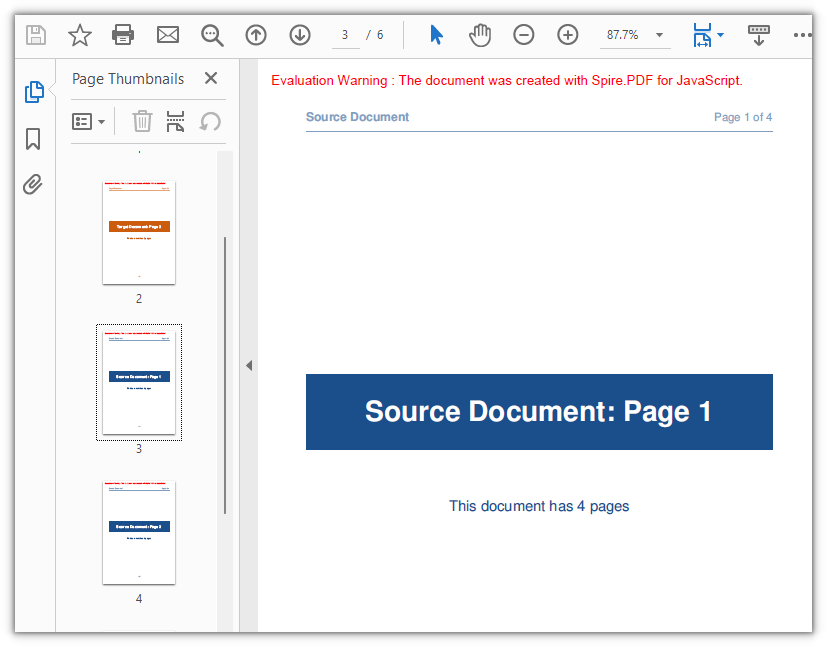
All four pages from the source document join the target, expanding it from two pages to six:
Copy Page Content with a Template
The three methods above treat a page as an indivisible unit: it moves with its size, rotation, and margins preserved. But real-world document assembly often demands finer control — placing a page's content onto a differently sized page, scaling it up or down, or stamping the same content onto multiple pages. This is where PdfPageBase.CreateTemplate enters the picture.
CreateTemplate extracts a page's visual content into a PdfTemplate object. You then draw that template onto any page using Canvas.DrawTemplate, specifying the position and size of the drawing area. The template is decoupled from the original page's geometry, so you can render it at any scale, at any position, on any page size — and you can draw the same template as many times as you need.
This makes templates especially useful for scenarios like:
- Placing an A5 cover's content centered on an A4 page without a white border
- Creating a watermark or background pattern from an existing page
- Duplicating a form layout across multiple new pages at different scales
function App() {
  const copyPageWithTemplate = async () => {
    // Get the Spire.PDF WASM module
    const pdfModule = window.wasmModule?.spirepdf;

    // Check whether the module is ready
    if (!pdfModule) {
      alert('Spire.PDF is not ready yet');
      return;
    }

    // Load the PDF file to work on into the VFS
    const inputFileName = 'SourceDocument.pdf';
    await window.spire.FetchFileToVFS(inputFileName, "", `${process.env.PUBLIC_URL}/data/`);

    // Load the document
    const doc = new pdfModule.PdfDocument();
    doc.LoadFromFile(inputFileName);

    // Take the page to be reused and turn it into a template: read the content once, draw it many times
    const sourcePage = doc.Pages.get_Item(0);
    const template = sourcePage.CreateTemplate();

    // First placement: insert an A4 page at position 2, a different size from the source,
    // and draw the content scaled to 297.6 x 421.6 at (80, 80)
    const page1 = doc.Pages.Insert(1, new pdfModule.SizeF(595.0, 842.0), new pdfModule.PdfMargins({ margin: 0.0 }));
    page1.Canvas.DrawTemplate(template, new pdfModule.PointF(80.0, 80.0), new pdfModule.SizeF(297.6, 421.6));

    // Second placement: insert another A4 page, drawing the same template smaller in the lower right
    const page2 = doc.Pages.Insert(2, new pdfModule.SizeF(595.0, 842.0), new pdfModule.PdfMargins({ margin: 0.0 }));
    page2.Canvas.DrawTemplate(template, new pdfModule.PointF(320.0, 460.0), new pdfModule.SizeF(200.0, 283.3));

    // Save the result document
    const outputFileName = 'CopyPageWithTemplate.pdf';
    doc.SaveToFile(outputFileName);
    doc.Close();

    // Read the generated file from the VFS and trigger the download
    const fileArray = window.dotnetRuntime.Module.FS.readFile(outputFileName);
    const blob = new Blob([fileArray], { type: 'application/pdf' });
    const url = URL.createObjectURL(blob);
    const a = document.createElement('a');
    a.href = url;
    a.download = outputFileName;
    a.click();
    URL.revokeObjectURL(url);
  };

  return (
    <div style={{ textAlign: 'center', height: '300px' }}>
      <h1>Copy Page with Template</h1>
      <button onClick={copyPageWithTemplate}>
        Start
      </button>
    </div>
  );
}

export default App;
A few details worth noting about DrawTemplate:
- Size argument: When the third argument (target size) is omitted, the template renders at its original dimensions without scaling. On a larger target page, the content occupies only a portion of the available space.
- Page creation: The target page's dimensions and margins come from
Pages.Insert, not from the template. In the example, zero margins on all sides make the drawing origin coincide with the page's top-left corner. - Multiple drawings: The same
templateobject is drawn twice onto two separate pages at different positions and scales, demonstrating the reuse capability.
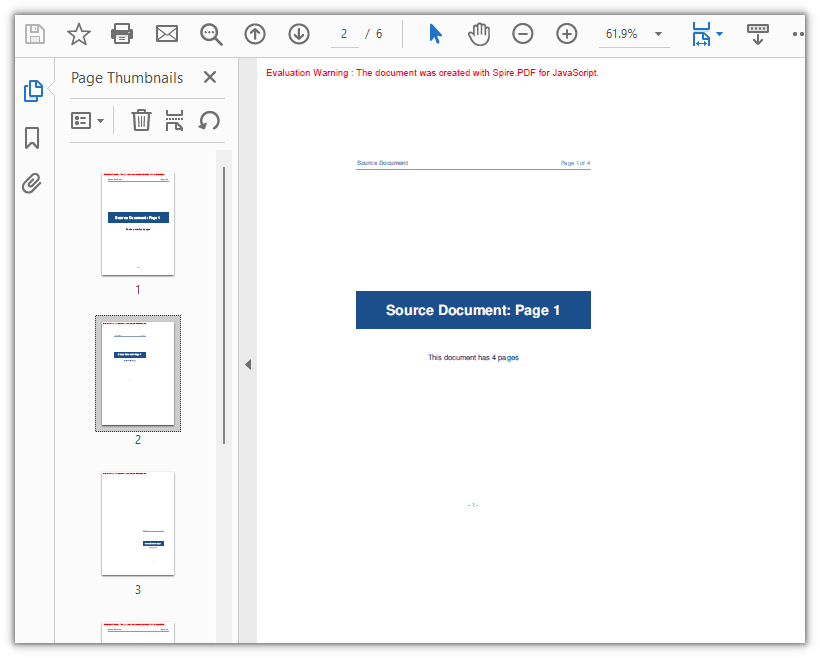
Page 1's content now appears on two newly inserted A4 pages at different scales and positions, growing the document from four pages to six:
FAQ
Creating a page with new PdfMargins(0.0) throws Arg_NullReferenceException
Cause: The PdfMargins constructor interprets a bare numeric argument as an internal handle rather than a margin value. Calling new pdfModule.PdfMargins(0.0) therefore produces an object that does not represent valid margins — accessing its Left or Top property triggers Arg_NullReferenceException, and passing it to page creation yields unexpected results.
Solution: Always pass margins as a configuration object. For uniform zero margins, use { margin: 0.0 }; for individual side values, specify each side explicitly:
// Zero margins on all four sides
const margins = new pdfModule.PdfMargins({ margin: 0.0 });

// Or set each side separately
const custom = new pdfModule.PdfMargins({ left: 20.0, top: 20.0, right: 20.0, bottom: 20.0 });
An out-of-range or reversed-range error is thrown when copying pages
Cause: Page indices are zero-based, and endIndex in InsertPageRange is inclusive. The valid range therefore runs from 0 to Pages.Count - 1. Supplying an index outside this range raises Index out of range, while setting startIndex higher than endIndex raises The start index is greater then the end index.
Solution: Guard the upper bound by clamping it against Pages.Count before calling the method:
// To copy pages 2 to 4: start = 1, end = 3, with the page count as the upper bound
const start = 1;
const end = Math.min(3, sourceDoc.Pages.Count - 1);
targetDoc.InsertPageRange(sourceDoc, start, end);
A rotated page comes out with the wrong orientation after copying
Cause: CreateTemplate() captures the page's drawn content but not its rotation angle (the /Rotate entry). When the source page carries a rotation, the template's coordinate system misaligns with the target page — drawing it directly places content outside the visible area, and the resulting copy has a Rotation of 0.
Solution: For rotated source pages, prefer a whole-page copy so the rotation angle travels with the content:
// Whole-page copy: the rotation angle comes with the page
targetDoc.InsertPage({ ldDoc: sourceDoc, pageIndex: 0, resultPageIndex: 1 });
If the template approach is unavoidable, temporarily clear the source page's rotation before extracting the template, then restore the original angle on both the source and the new page:
const rotation = sourcePage.Rotation.value;

// Zero it temporarily so the template exports at the page's real coordinates
sourcePage.Rotation = 0;
const newPage = doc.Pages.Insert(1, sourcePage.Size, new pdfModule.PdfMargins({ margin: 0.0 }));
newPage.Canvas.DrawTemplate(sourcePage.CreateTemplate(), new pdfModule.PointF(0.0, 0.0));

// Restore the source page and give the copy the same angle
sourcePage.Rotation = rotation;
newPage.Rotation = rotation;
To remove the evaluation watermark from output documents or unlock full feature access, contact sales for a temporary 30-day license.
See Also
Read PDF Form Field Values by Type with JavaScript
When someone fills out a PDF form and saves it, the entered values live inside the document's field structures — not as plain text you can search or copy in bulk. For a form with thirty or forty fields, hand-transcription becomes a bottleneck. The deeper problem is that each field type stores its value differently: a text box exposes a string, a check box reports a boolean, a combo box separates options from the selection, and a radio button stores its chosen item. A single uniform "give me the value" call does not exist.
This article walks through extracting form field values from a PDF using Spire.PDF for JavaScript. The library runs on WebAssembly in the browser, so the document is parsed locally through a virtual file system with no server round-trip. You will see how to walk the field collection, dispatch on each field's type, and read the correct property for text boxes, list boxes, combo boxes, radio buttons, and check boxes.
For setup and project configuration, refer to Integrate Spire.PDF for JavaScript in a React Project. The code below assumes Spire.PDF is installed and the WASM module is initialized.
Field Types at a Glance
Before diving into the implementation, it helps to map out how each field type exposes its value. Spire.PDF for JavaScript represents form fields as widget classes, and the property that holds the current value differs from one type to the next:
| Field Type | Widget Class | Read Property | Notes |
|---|---|---|---|
| Text Box | PdfTextBoxFieldWidget |
Text |
Returns the entered string directly. |
| List Box | PdfListBoxWidgetFieldWidget |
SelectedValue |
Values is the full option list, not the user's pick. |
| Combo Box | PdfComboBoxWidgetFieldWidget |
SelectedValue |
Same dual-property model as the list box. |
| Radio Button | PdfRadioButtonListFieldWidget |
Value |
Gives the selected item string in one step. |
| Check Box | PdfCheckBoxWidgetFieldWidget |
Checked |
Boolean state. Value is undefined — do not use it. |
The pattern is clear: there is no single universal property. The extraction logic must test each field's type and read the matching property, which is exactly what the next section implements.
Iterate Fields and Read by Type
The core workflow has three steps: load the PDF, obtain its form as a PdfFormWidget, then loop through the FieldsWidget collection and branch on each field's class with instanceof. At each branch, read the type-specific property and append the result to a report string. Because the dispatch covers every supported type, you do not need to know which fields the document contains ahead of time — unrecognized fields simply fall through to a default label.
function App() {
  const getAllFieldValues = async () => {
    // Get the Spire.PDF WASM module
    const pdfModule = window.wasmModule?.spirepdf;

    // Check that the module is ready
    if (!pdfModule) {
      alert('Spire.PDF is not ready yet');
      return;
    }

    // Load the PDF file to be read into the VFS
    const inputFileName = 'ApplicationForm.pdf';
    await window.spire.FetchFileToVFS(inputFileName, "", `${process.env.PUBLIC_URL}/data/`);

    // Create a PdfDocument object and load the PDF document
    const doc = new pdfModule.PdfDocument();
    doc.LoadFromFile(inputFileName);

    // Build a PdfFormWidget from the document's form handle; FieldsWidget is its field collection
    const formWidget = new pdfModule.PdfFormWidget(doc.Form.H);
    const fields = formWidget.FieldsWidget;

    let report = '';

    // Walk the field collection, check each type, and read the matching value
    for (let i = 0; i < fields.Count; i++) {
      const field = fields.get_Item({ index: i });

      // Both the type name and the value are filled in by the type dispatch
      let type = 'Unknown';
      let value = '(Unrecognized field type)';

      if (field instanceof pdfModule.PdfTextBoxFieldWidget) {
        // Text box field: read Text directly
        type = 'TextBox';
        value = field.Text;
      } else if (field instanceof pdfModule.PdfListBoxWidgetFieldWidget) {
        // List box field: Values holds every option, SelectedValue is the current one
        const options = [];
        for (let j = 0; j < field.Values.Count; j++) {
          options.push(field.Values.get_Item(j).Value);
        }
        type = 'ListBox';
        value = `Selected ${field.SelectedValue}, options ${options.join(', ')}`;
      } else if (field instanceof pdfModule.PdfComboBoxWidgetFieldWidget) {
        // Combo box field: like a list box, it has an option collection and a selected value
        const options = [];
        for (let j = 0; j < field.Values.Count; j++) {
          options.push(field.Values.get_Item(j).Value);
        }
        type = 'ComboBox';
        value = `Selected ${field.SelectedValue}, options ${options.join(', ')}`;
      } else if (field instanceof pdfModule.PdfRadioButtonListFieldWidget) {
        // Radio button field: Value is the selected item
        type = 'RadioButton';
        value = `Selected ${field.Value}`;
      } else if (field instanceof pdfModule.PdfCheckBoxWidgetFieldWidget) {
        // Check box field: Checked gives the state, not Value
        type = 'CheckBox';
        value = field.Checked ? 'Checked' : 'Not checked';
      }

      report += `Field "${field.Name}" (${type}): ${value}\n`;
    }

    const outputFileName = 'AllFieldValues.txt';
    window.dotnetRuntime.Module.FS.writeFile(outputFileName, report);
    doc.Close();

    // Read the generated file from the VFS and trigger the download
    const fileArray = window.dotnetRuntime.Module.FS.readFile(outputFileName);
    const blob = new Blob([fileArray], { type: 'text/plain' });
    const url = URL.createObjectURL(blob);
    const a = document.createElement('a');
    a.href = url;
    a.download = outputFileName;
    a.click();
    URL.revokeObjectURL(url);
  };

  return (
    <div style={{ textAlign: 'center', height: '300px' }}>
      <h1>Extract Form Field Values</h1>
      <button onClick={getAllFieldValues}>
        Extract values
      </button>
    </div>
  );
}

export default App;
After the loop finishes, the report string contains one line per field with its name, type, and current value. The file is written to the virtual file system and then downloaded as a text file:
The instanceof chain is the heart of the approach. Each branch knows exactly which property to read, so the output is correct regardless of how many field types the document mixes together. The next three sections address the pitfalls that arise when a field's value property is not the one you might expect.
Check Boxes: Checked vs Value
A common mistake when reading check box fields is reaching for a Value property. The check box widget — PdfCheckBoxWidgetFieldWidget — does not expose Value at all; attempting to read it returns undefined. Under the hood, a check box tracks its state through export values: Off when unticked, and Yes or a custom export string when ticked. A raw string cannot reliably tell you whether the box is selected, so the API surface deliberately omits Value and offers Checked instead.
The fix is straightforward — always use the boolean Checked property:
// Check the state with Checked, not Value
const checked = field.Checked;
This returns true when the box is ticked and false otherwise, giving you a clean boolean for downstream logic without any string parsing.
List Boxes and Combo Boxes: SelectedValue vs Values
List boxes and combo boxes share a two-part data model that trips up many developers. Both PdfListBoxWidgetFieldWidget and PdfComboBoxWidgetFieldWidget expose a Values collection and a SelectedValue string, and it is easy to assume Values holds the user's entry. It does not.
Values is the complete set of available options. Each element in the collection is a PdfListWidgetItem object, so you must unwrap it with .Value to get the option text. Walking Values tells you what the user could have chosen, not what they actually selected. The user's real selection lives on SelectedValue as a plain string.
Use SelectedValue for the current value, and walk Values only when you need to enumerate the available choices:
// The text of the currently selected item
const selected = field.SelectedValue;

// Every available option
const options = [];
for (let j = 0; j < field.Values.Count; j++) {
  options.push(field.Values.get_Item(j).Value);
}
Keeping these two properties straight is essential: treating Values as the answer gives you the option list instead of the filled-in result, and the two are rarely the same length.
Handling Encrypted PDFs
Form extraction begins with opening the document. If the PDF is password-protected, calling LoadFromFile with only the file name throws an error — "Can not open an encrypted document. The password is invalid." — and no document object is returned. The form fields are never reached.
The solution is to pass the open password as the second argument:
doc.LoadFromFile(inputFileName, 'spire123');
Once the document opens successfully, the rest of the extraction flow — building the PdfFormWidget, walking the fields, dispatching by type — works exactly the same way as with an unencrypted file. The password only gates the initial load; it does not change how field values are read.
See Also
- Integrate Spire.PDF for JavaScript in a React Project — setup, installation, and WASM initialization
- Fill PDF Form Fields with Spire.PDF for JavaScript — write values into form fields programmatically
- Import and Export PDF Form Data with Spire.PDF for JavaScript — serialize form data to FDF/XFDF files
If you want to remove the evaluation message from the result document, or to get rid of the feature limitations, contact sales for a temporary license valid for 30 days.
Round-Trip PDF Form Data: Export and Import with JavaScript
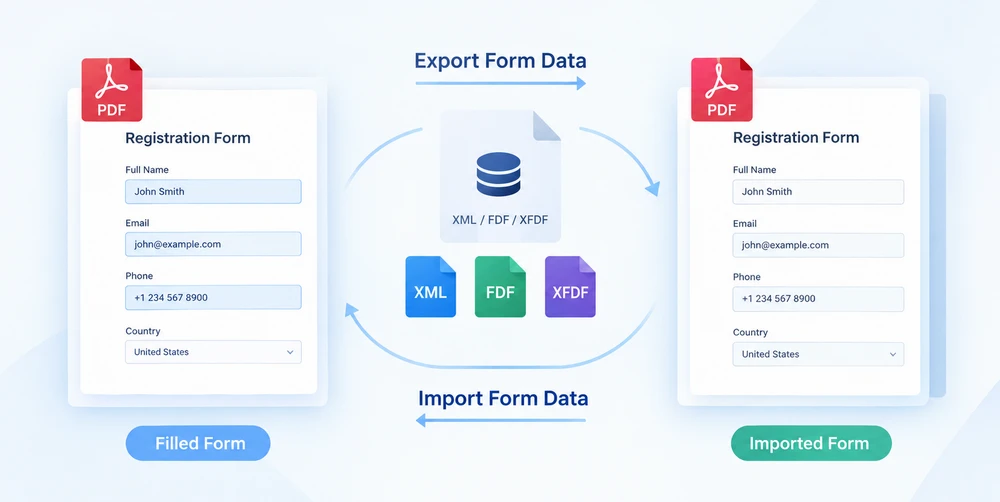
When a PDF form is filled out, the entered values fuse with the visual layout into a sealed artifact. Migrating those entries onto a different template means retyping every field by hand. The way out is to treat form data as a portable asset: extract field values into a standalone data file, then feed it back into a blank copy of the form to reproduce all entries in one automatic pass. This export-then-import cycle is what Spire.PDF for JavaScript delivers through PdfFormWidget.ExportData and PdfFormWidget.ImportData.
Both methods accept three file formats: XML, FDF, and XFDF. Switching between them is nothing more than changing a DataFormat enum value — the calling convention remains identical; only the on-disk structure of the output file changes. Because Spire.PDF for JavaScript runs entirely in the browser on top of WebAssembly, the whole round-trip executes locally through a virtual file system (VFS), with no backend server involved and no document ever leaving the client.
This article walks through the complete data flow:
- Export form data — pull field values out of a filled form
- Import form data — push those values back into a blank form
For installation and project setup, see Integrate Spire.PDF for JavaScript in a React Project. The examples below assume Spire.PDF is installed and the WebAssembly module is initialized.
Three Form Data Formats at a Glance
Before diving into code, it helps to understand the three formats that ExportData and ImportData work with. All three carry the same payload — a set of field-name/value pairs — but they package it in different ways. Picking the right one up front saves friction later when the data file needs to be shared, inspected, or fed into another tool.
| Format | Enum value | File structure | Human-readable | Best for |
|---|---|---|---|---|
| XML | DataFormat.Xml |
Adobe form-data XML; the field name becomes the element name, the value sits as element content | Yes | Quick inspection, debugging, simple tooling |
| FDF | DataFormat.Fdf |
Forms Data Format; a text structure starting with %FDF-, where /T holds the field name and /V the value |
No | Compact inter-program transfer |
| XFDF | DataFormat.XFdf |
XFDF, standard XML; one <field name="…"> per field, with the value inside <value> |
Yes | Version control, cross-system interchange |
All three are lossless with respect to field values — nothing is dropped or transformed during export or import. The choice between them is purely about workflow fit, which we return to in the format selection guide below.
Export PDF Form Data
The first half of the round-trip is extraction. PdfFormWidget.ExportData takes every field value in the form and writes it out to a single data file. The second argument — a DataFormat enum — controls which format is written. The third argument is the form name; for an unnamed AcroForm, pass an empty string.
The example below loads a filled-in customer information form, wraps its form handle in a PdfFormWidget, and exports the field values to an XML file. The FDF and XFDF variants are included as commented-out lines — uncomment any one to switch formats without touching anything else:
function App() {
  const exportFormData = async () => {
    // Get the Spire.PDF WASM module
    const pdfModule = window.wasmModule?.spirepdf;

    // Check that the module is ready
    if (!pdfModule) {
      alert('Spire.PDF is not ready yet');
      return;
    }

    // Load the PDF file to be exported into the VFS
    const inputFileName = 'CustomerInformationForm.pdf';
    await window.spire.FetchFileToVFS(inputFileName, "", `${process.env.PUBLIC_URL}/data/`);

    // Create a PdfDocument object and load the PDF document
    const doc = new pdfModule.PdfDocument();
    doc.LoadFromFile(inputFileName);

    // Build a PdfFormWidget from the document's form handle to reach the data export API
    const formWidget = new pdfModule.PdfFormWidget(doc.Form.H);

    // This demo exports XML
    const dataFiles = [
      { fileName: 'FormData.xml', format: pdfModule.DataFormat.Xml },
      // { fileName: 'FormData.fdf', format: pdfModule.DataFormat.Fdf },
      // { fileName: 'FormData.xfdf', format: pdfModule.DataFormat.XFdf },
    ];

    for (const item of dataFiles) {
      // The third parameter is the form name; pass an empty string for an unnamed form
      formWidget.ExportData(item.fileName, item.format, '');
    }
    doc.Close();

    // Read the generated file from the VFS and trigger the download
    for (const item of dataFiles) {
      const fileArray = window.dotnetRuntime.Module.FS.readFile(item.fileName);
      const blob = new Blob([fileArray], { type: 'application/octet-stream' });
      const url = URL.createObjectURL(blob);
      const a = document.createElement('a');
      a.href = url;
      a.download = item.fileName;
      a.click();
      URL.revokeObjectURL(url);
    }
  };

  return (
    <div style={{ textAlign: 'center', height: '300px' }}>
      <h1>Export Form Data</h1>
      <button onClick={exportFormData}>
        Export
      </button>
    </div>
  );
}

export default App;
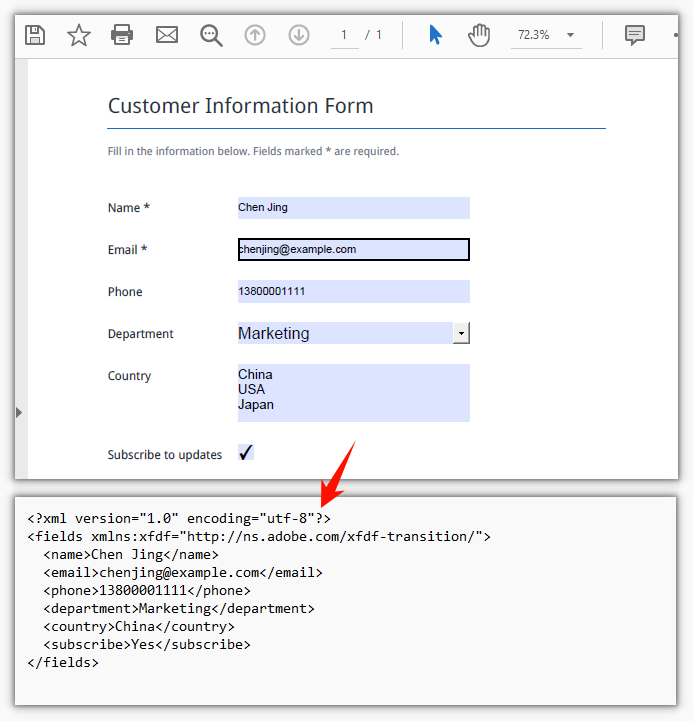
Once the export call finishes, the data file resides in the virtual file system. The code then reads it back from the VFS and triggers a browser download so the file can be saved, shared, or archived alongside other form data:
Import PDF Form Data
The second half of the round-trip is rehydration. PdfFormWidget.ImportData reads a data file and writes each value back into the matching form field by name. The DataFormat parameter tells the parser how to interpret the file contents — it has nothing to do with the file extension, so the declared format must match the actual format of the file.
The target here is a blank copy of the original form. The template goes out empty; when the data file comes back, every field is populated in a single pass — no manual re-entry, no field-by-field copying, no need to key everything in a second time:
function App() {
  const importFormData = async () => {
    // Get the Spire.PDF WASM module
    const pdfModule = window.wasmModule?.spirepdf;

    // Check that the module is ready
    if (!pdfModule) {
      alert('Spire.PDF is not ready yet');
      return;
    }

    // Load the blank form to be filled into the VFS
    const inputFileName = 'BlankCustomerInformationForm.pdf';
    await window.spire.FetchFileToVFS(inputFileName, "", `${process.env.PUBLIC_URL}/data/`);

    // This demo refills from the XML data file
    const dataFiles = [
      { fileName: 'FormData.xml', format: pdfModule.DataFormat.Xml, outputFileName: 'ImportedXMLData.pdf' },
      // { fileName: 'FormData.fdf', format: pdfModule.DataFormat.Fdf, outputFileName: 'ImportedFDFData.pdf' },
      // { fileName: 'FormData.xfdf', format: pdfModule.DataFormat.XFdf, outputFileName: 'ImportedXFDFData.pdf' },
    ];

    for (const item of dataFiles) {
      // The data file also has to be loaded into the VFS first
      await window.spire.FetchFileToVFS(item.fileName, "", `${process.env.PUBLIC_URL}/data/`);

      const doc = new pdfModule.PdfDocument();
      doc.LoadFromFile(inputFileName);

      // Read the data file and write the values back into the fields by name
      const formWidget = new pdfModule.PdfFormWidget(doc.Form.H);
      formWidget.ImportData(item.fileName, item.format);

      doc.SaveToFile(item.outputFileName);
      doc.Close();

      // Read the generated file from the VFS and trigger the download
      const fileArray = window.dotnetRuntime.Module.FS.readFile(item.outputFileName);
      const blob = new Blob([fileArray], { type: 'application/pdf' });
      const url = URL.createObjectURL(blob);
      const a = document.createElement('a');
      a.href = url;
      a.download = item.outputFileName;
      a.click();
      URL.revokeObjectURL(url);
    }
  };

  return (
    <div style={{ textAlign: 'center', height: '300px' }}>
      <h1>Import Form Data</h1>
      <button onClick={importFormData}>
        Import
      </button>
    </div>
  );
}

export default App;
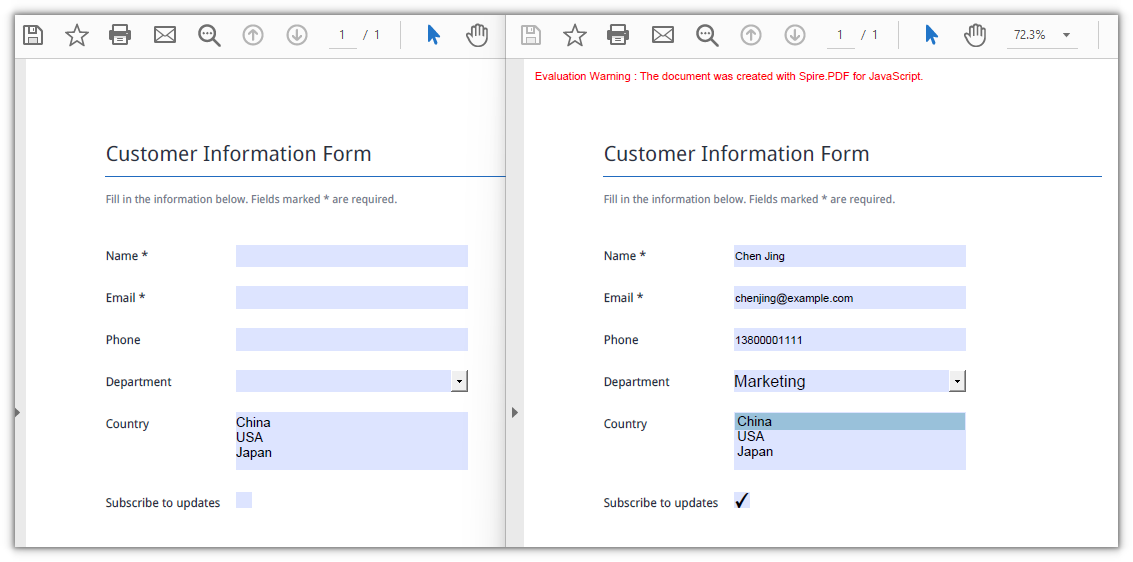
After the import call completes, the previously blank form is fully populated and ready to be saved or displayed. The result is a new PDF with every field filled in from the data file:
Choosing the Right Data Format
All three formats hold identical field values, so the decision comes down to structure and tool support rather than data fidelity. Here is how to think about each one in the context of a form data round-trip:
- FDF produces the smallest files. It starts with
%FDF-and uses a compact text notation where/Tcarries the field name and/Vthe value. This makes it efficient for passing data between form-handling programs, but the contents are not easily read by a person and do not play well with text tools or version-control systems. - XFDF is standard XML with one
<field>element per field. Because it is well-formed XML, it can be diffed, merged, and inspected with ordinary text tools, making it the safest choice when the data file enters version control, needs human review, or must interoperate with another system. - XML (Adobe form-data XML) puts the field name directly in the element name, giving the most straightforward structure of the three. It is ideal when you simply want a readable list of field names and values without any extra ceremony.
In short: use FDF for round trips that stay inside a single program; use XFDF when the file crosses tool or team boundaries; use XML when readability is the top priority.
FAQ
Some fields are still empty after import
Cause: ImportData matches by field name, so the names in the data file must match the field names in the form exactly — including case and whitespace. A field that does not match is silently skipped; there is no error and no return value indicating a mismatch. Only the fields whose names align receive a value.
Solution: Before importing, walk the form's field collection and print the actual names, then compare them against the data file:
const fields = formWidget.FieldsWidget;
for (let i = 0; i < fields.Count; i++) {
  console.log(fields.get_Item({ index: i }).Name);
}
Import throws Xml_MessageWithErrorPosition or "not a valid FDF file"
Cause: ImportData parses the file according to the format named by the second parameter and never inspects the file extension. When the content does not match the declared format, parsing fails immediately: XML files report Xml_MessageWithErrorPosition, Xml_InvalidRootData, and a non-FDF file reports The source is not a valid FDF file because it does not start with "%FDF-".
Solution: Pass the DataFormat that matches the file's actual content, and use the original exported data file rather than one that has been re-saved in a different format.
See Also
Count PDF Pages in JavaScript: More Than Just a Number

A single integer — the total number of pages in a PDF — sits behind a surprising number of real-world decisions: upload limits, paper estimation for printing, split operations, progress bars. Most PDF rendering libraries only draw pages and do not expose a simple count, and sending the file to a backend just to read a page count adds latency and privacy concerns.
Spire.PDF for JavaScript loads and parses PDF documents directly in the browser through WebAssembly, so the file never leaves the client. The page count is available as a single property — no loops, no server round-trips, no rendering workarounds. This article walks through retrieving that count and three practical concerns: telling physical page counts apart from display labels, handling password-protected files, and avoiding off-by-one errors when iterating over pages.
For installation and project setup, see Integrate Spire.PDF for JavaScript in a React Project. The examples below assume Spire.PDF is installed and the WebAssembly module has been initialized.
Get the Page Count of a PDF Document
Once a PdfDocument object has loaded a file, its Pages property exposes the page collection, and the Count property on that collection returns the total number of pages. There is no need to iterate through the pages individually — the count is available immediately after loading.
The following React component demonstrates the full workflow: fetch the PDF into the virtual file system, create a PdfDocument, load the file, read Pages.Count, and write the result to a downloadable text file.
function App() {
  const getPageCount = async () => {
    // Get the Spire.PDF WASM module
    const pdfModule = window.wasmModule?.spirepdf;

    // Check whether the module is ready
    if (!pdfModule) {
      alert('Spire.PDF is not ready yet');
      return;
    }

    // Load the PDF file to be counted into the VFS
    const inputFileName = 'Multipage_Document.pdf';
    await window.spire.FetchFileToVFS(inputFileName, '', `${process.env.PUBLIC_URL}/data/`);

    // Create a PdfDocument object and load the PDF document
    const doc = new pdfModule.PdfDocument();
    doc.LoadFromFile(inputFileName);

    // Pages is the document's page collection; Count is the total page count
    const pageCount = doc.Pages.Count;

    // Write the result to the VFS
    const outputFileName = 'PageCountResult.txt';
    const report = `Document: ${inputFileName}\r\nTotal pages: ${pageCount}`;
    window.dotnetRuntime.Module.FS.writeFile(outputFileName, report);
    doc.Close();

    // Read the generated file from the VFS and trigger the download
    const fileArray = window.dotnetRuntime.Module.FS.readFile(outputFileName);
    const blob = new Blob([fileArray], { type: 'text/plain' });
    const url = URL.createObjectURL(blob);
    const a = document.createElement('a');
    a.href = url;
    a.download = outputFileName;
    a.click();
    URL.revokeObjectURL(url);
  };

  return (
    <div style={{ textAlign: 'center', height: '300px' }}>
      <h1>Get PDF Page Count</h1>
      <button onClick={getPageCount}>
        Count Pages
      </button>
    </div>
  );
}

export default App;
The result is written to a text file that records the document's total page count:
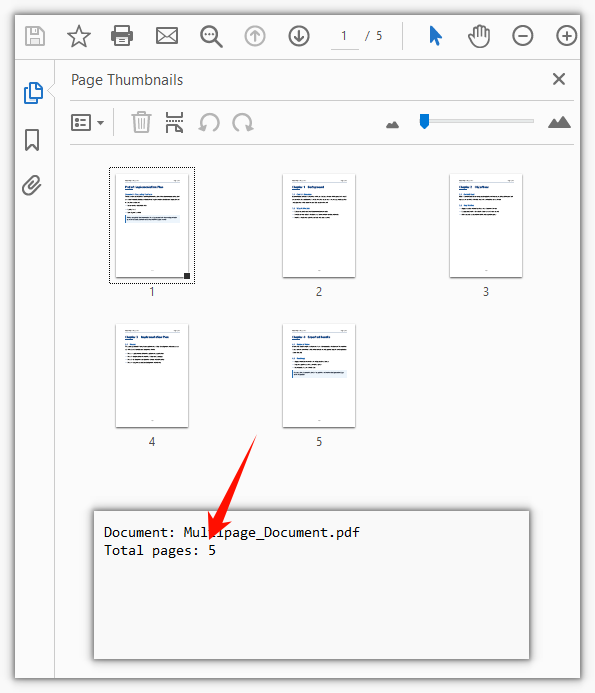
In a production application, you would typically use the pageCount value directly rather than writing it to a file — for example, to validate an upload, set a loop bound, or display metadata in the UI. The file-output approach shown here is useful for testing and demonstration.
Physical Page Count vs Page Labels
Here is a situation that catches developers off guard: you read Pages.Count and get 12, but the PDF reader on the user's screen shows the last page as "page 8." Which number is correct?
Both are — they measure different things. Pages.Count returns the number of physical pages in the document, plain and simple. The number displayed by a reader, however, comes from page labels (the /PageLabels entry in the PDF specification). Page labels are a presentation layer that publishers use to control how page numbers appear to the reader. A book publisher might exclude the cover from numbering, use roman numerals (i, ii, iii) for the front matter, and restart the body at 1. After all that, the fifth physical page could display as iii or 1 depending on how the labels are configured.
This distinction matters when your application needs to show users a page number that matches what they see in their reader. If you display Pages.Count as the "current page," it will not line up with the reader's numbering whenever page labels are in play.
When you need the displayed label rather than the physical index, read the PageLabel property on the individual page object:
// What label the 5th physical page displays in a reader
const page = doc.Pages.get_Item(4);
console.log(page.PageLabel);
Note the zero-based index: get_Item(4) retrieves the fifth physical page. When the document has no page labels configured, PageLabel returns an empty string. In that common case, the displayed number matches the physical page order, so Count is the value you want.
A practical way to handle both scenarios is to check PageLabel first and fall back to the physical index when it is empty. This gives your application a page number that always matches what the user sees, regardless of whether the document uses custom labels.
Counting Pages in an Encrypted PDF
Many PDFs in business environments are protected by an open password — a security measure that prevents the document from being read without the correct credential. If you try to load such a file with a plain LoadFromFile call, the WASM runtime throws an error before Pages.Count is ever reached:
Can not open an encrypted document. The password is invalid.
This happens at load time, not at the point where you read the page count. The document's content — including its page structure — is encrypted, so the library cannot parse it without the password. There is no way to count pages without first unlocking the document.
The fix is straightforward: pass the open password as the second argument to LoadFromFile. Once the document is unlocked, the page count is available just as with an unencrypted file:
// The second argument is the open password
doc.LoadFromFile(inputFileName, 'spire123');
const pageCount = doc.Pages.Count;
In a real application, you would typically collect the password from the user through a form field and pass it in dynamically rather than hardcoding it. If the user enters the wrong password, the same error is thrown — so wrapping the LoadFromFile call in a try/catch block and showing a friendly "incorrect password" message is a good practice.
One more thing worth noting: this password is the open password (also called the user password), which controls who can view the document. A PDF can also have a permissions password (owner password) that restricts editing, printing, or copying without blocking viewing. For the purpose of counting pages, only the open password is relevant — once the document is open, Pages.Count works regardless of permissions restrictions.
Using Page Count as a Loop Boundary
Once you have the page count, a natural next step is to loop over every page — to extract text, render thumbnails, split the document, or apply some transformation. This is where a subtle but common bug appears: using Count as an inclusive upper bound.
The Pages collection is zero-indexed, which means valid indices run from 0 to Count - 1. If the loop condition is written with <= instead of <, the final iteration tries to access the page at index Count, which does not exist. The WASM runtime wraps the underlying .NET ArgumentOutOfRangeException as a JavaScript Error with a message like:
ArgumentOutOfRange_IndexMustBeLess Arg_ParamName_Name, index
Because the error's name property is just the generic Error, you cannot distinguish it by name alone — you have to match on the message string if you want to handle it specifically.
The correct loop uses < so the last accessed index is Count - 1:
// The upper bound is Count - 1, so use < rather than <=
for (let i = 0; i < doc.Pages.Count; i++) {
  const page = doc.Pages.get_Item(i);
}
This off-by-one pattern is one of the most frequent sources of runtime errors when working with page collections. It is easy to miss in testing if your sample documents happen to have only one or two pages — the error only surfaces on the final iteration, so a single-page document will not trigger it at all. Always test loop logic with a document that has at least three pages to make sure the boundary condition is correct.
See Also
- Integrate Spire.PDF for JavaScript in a React Project — Setup guide for installing Spire.PDF and initializing the WebAssembly module in a React app.
- Spire.PDF for JavaScript Product Page — Overview of features, supported operations, and browser-based PDF processing capabilities.
- spire.pdf on npm — Package page for installing the library via npm.
Trim PDF Pages: Crop Margins and White Space with JavaScript

PDFs often carry more whitespace than they need — scanned documents with thick borders, engineering drawings with generous margins, or invoices where only the center table matters. Cropping the page is the natural fix, but doing it in a browser-based workflow is not straightforward. Desktop tools break the web experience, and sending the file to a backend server raises privacy and compliance concerns.
This is where Spire.PDF for JavaScript comes in. It runs on WebAssembly and operates entirely inside the browser, loading and saving PDFs through a virtual file system (VFS) with no server round-trip. You can set the visible area of each page programmatically and let the user download the trimmed result — all client-side. For installation and project setup, refer to Integrate Spire.PDF for JavaScript in a React project. The examples below assume Spire.PDF is installed and the WebAssembly module is initialized.
CropBox and MediaBox: Two Page Boxes Explained
Every PDF page is defined by two rectangles, and understanding the difference between them is essential before you start cropping.
MediaBox describes the physical dimensions of the page — the full sheet of paper, so to speak. It is the outermost boundary and defines the coordinate space in which all content is placed. A standard A4 page has a MediaBox of approximately 595 × 842 points.
CropBox defines what the viewer actually displays. It is a sub-region of the MediaBox, and any content falling outside the CropBox is hidden from view. By default, the CropBox matches the MediaBox, which is why you normally see the entire page. When you shrink the CropBox, you are effectively telling the PDF reader, "Only show this portion of the page."
The key insight for cropping is that the CropBox is derived from the MediaBox. You read the full page dimensions from page.MediaBox.Width and page.MediaBox.Height, then compute a smaller rectangle — inset by whatever margin you want on each side — and assign it to page.CropBox. The x and y coordinates of the CropBox are measured from the top-left corner of the page, and width and height determine how much of the page is retained.
Crop All Pages with a Uniform Margin
The most common scenario is applying the same margin reduction to every page in a document. You iterate over doc.Pages, read each page's MediaBox, and set a CropBox that is inset by a fixed number of points on all four sides.
The example below trims 60 points off every edge of every page — enough to remove a wide white border or an unwanted frame:
function App() {
  const cropPdfPage = async () => {
    // Get the Spire.PDF WASM module
    const pdfModule = window.wasmModule?.spirepdf;

    // Check whether the module is ready
    if (!pdfModule) {
      alert('Spire.PDF is not ready yet');
      return;
    }

    // Load the PDF file to be cropped into the VFS
    const inputFileName = 'ToCrop.pdf';
    await window.spire.FetchFileToVFS(inputFileName, "", `${process.env.PUBLIC_URL}/data/`);

    // Create a PdfDocument object and load the PDF document
    let doc = new pdfModule.PdfDocument();
    doc.LoadFromFile(inputFileName);

    // Trim 60 points off every side
    const margin = 60;

    for (let i = 0; i < doc.Pages.Count; i++) {
      const page = doc.Pages.get_Item(i);

      // MediaBox gives the full extent of the page, from which the crop box is derived
      // (x and y are measured from the top-left corner of the page)
      const width = page.MediaBox.Width;
      const height = page.MediaBox.Height;

      page.CropBox = new pdfModule.RectangleF({
        x: margin,
        y: margin,
        width: width - margin * 2,
        height: height - margin * 2,
      });
    }

    const outputFileName = 'CropByMargins.pdf';
    doc.SaveToFile(outputFileName);
    doc.Close();

    // Read the generated file from the VFS and trigger the download
    const fileArray = window.dotnetRuntime.Module.FS.readFile(outputFileName);
    const blob = new Blob([fileArray], { type: 'application/pdf' });
    const url = URL.createObjectURL(blob);
    const a = document.createElement('a');
    a.href = url;
    a.download = outputFileName;
    a.click();
    URL.revokeObjectURL(url);
  };

  return (
    <div style={{ textAlign: 'center', height: '300px' }}>
      <h1>Crop PDF Pages</h1>
      <button onClick={cropPdfPage}>
        Crop PDF
      </button>
    </div>
  );
}

export default App;
Both pages are cropped by a 60-point margin, so the white margin and the frame around the page are removed:
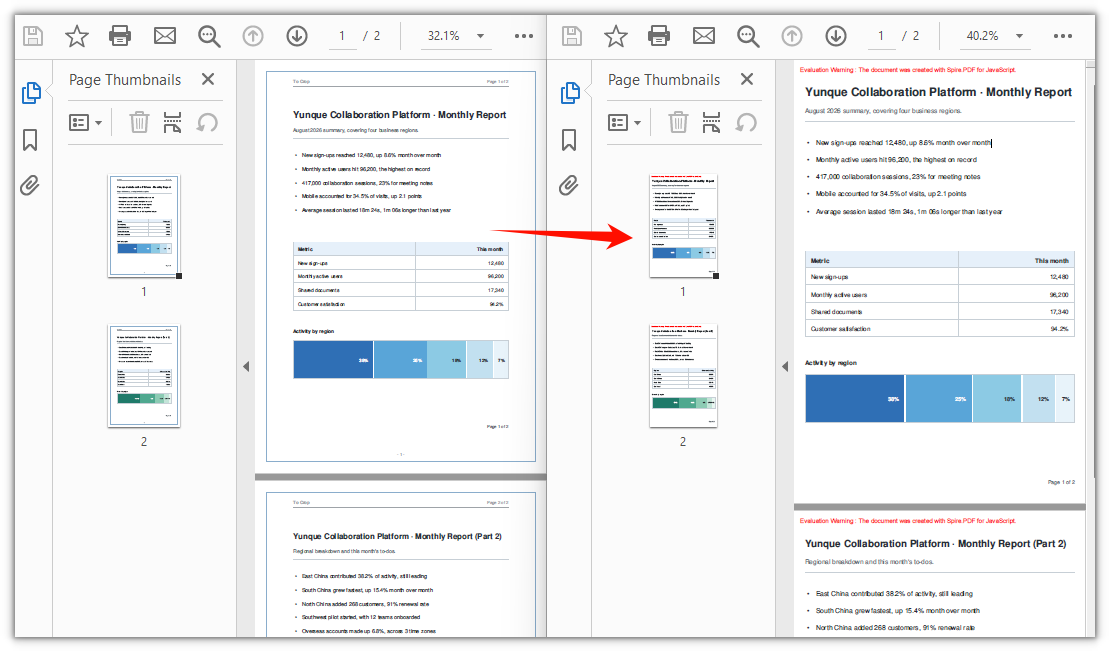
Adjust the margin value to control how aggressively the page is trimmed. A larger value removes more whitespace; a smaller value performs a subtler trim. Because the margin is applied uniformly to all four sides, this approach works best when the unwanted border is roughly equal on every edge — which is typically the case with scanned documents and exported drawings.
Single Page vs Whole Document Cropping
The loop in the previous section applies the same crop to every page. But CropBox is a page-level property — there is no document-wide cropping interface. The loop simply ensures that each page receives the same margin. This distinction matters when your pages have different needs.
When to crop the whole document: Use the loop approach when all pages share the same problem — for instance, a scanned batch where every page has the same scanner border, or a multi-page drawing set exported with identical margins. A single margin value keeps the code simple and the result consistent.
When to crop a single page: Drop the loop and assign the CropBox directly to the target page. This is useful when only one page needs trimming — for example, a cover page with an oversized logo, or an invoice where only the table region on page 2 should be visible. You can also apply different crop values to different pages by combining per-page logic inside the loop.
Here is how to crop just the first page, keeping a 400 × 500 point block starting at position (80, 80) from the top-left corner:
// Crop page 1 only: keep a 400 x 500 point block starting at (80, 80) from the top-left corner
const page = doc.Pages.get_Item(0);
page.CropBox = new pdfModule.RectangleF({ x: 80, y: 80, width: 400, height: 500 });
The x and y values specify where the visible region begins, measured from the top-left corner of the page. The width and height values define the size of that region. Everything outside this rectangle is hidden from the viewer.
Soft Cropping: What Happens to the Content
There is an important detail about CropBox that is easy to overlook: it performs a soft crop, not a hard one.
When you set the CropBox, you are changing the visible boundary of the page — the rectangle that PDF viewers display and that printers use as the page area. But the content that falls outside this boundary is not removed from the file. It is still there, just hidden. This has two practical consequences:
File size does not decrease. The cropped-away text, images, and vector graphics remain in the PDF data stream. If your goal is to reduce file size by trimming margins, setting the CropBox alone will not achieve that.
Cropped content is still searchable. Text outside the visible CropBox can still be found by search functions and copied by users who know how to select beyond the visible area. This is usually fine for margin trimming, but it means cropping is not a way to redact or securely remove sensitive information.
If you need to truly eliminate content — for redaction, file size reduction, or ensuring that hidden text cannot be recovered — you must rebuild the page. The approach is to create a new document, extract the visible content from the cropped page using page.CreateTemplate(), draw it onto a fresh page in the new document, and save the result. This produces a hard crop where the out-of-bounds content no longer exists in the file.
For most margin-trimming and whitespace-removal use cases, however, soft cropping with CropBox is exactly what you want: it is fast, simple, and produces a visually clean result without the overhead of rebuilding the document.
FAQ
Can I crop a single page instead of the whole document?
Yes. Since CropBox is a per-page property, there is no built-in "crop entire document" method — the loop in the main example is just a convenience for applying the same margin to every page. To crop only one page, skip the loop and assign the CropBox directly to that page:
// Crop page 1 only: keep a 400 x 500 point block starting at (80, 80) from the top-left corner
const page = doc.Pages.get_Item(0);
page.CropBox = new pdfModule.RectangleF({ x: 80, y: 80, width: 400, height: 500 });
How do I undo a crop?
Setting CropBox modifies the page box in place, and the document does not store the previous box. You might expect that assigning page.MediaBox back to page.CropBox would restore the original view, but this does not work as intended — the coordinates are applied relative to the origin of the current visible area, so only the dimensions change while the origin stays fixed. After a 60-point crop, reassigning the MediaBox dimensions still leaves the visible area starting at (60, 60).
The simplest solution is to reload the original file if you still have it. If only the cropped file is available, you can shift the origin back to the top-left corner using negative offsets and restore the full page dimensions:
// Undo when the crop offset was (offsetX, offsetY)
page.CropBox = new pdfModule.RectangleF({
  x: -offsetX,
  y: -offsetY,
  width: page.MediaBox.Width,
  height: page.MediaBox.Height,
});
The file did not get smaller and the cropped content is still searchable — why?
This is expected behavior. CropBox performs a soft crop: it changes only the visible boundary of the page, while content outside that boundary remains in the file and can still be found by text search or copy operations. If you need to physically remove the content from the PDF, setting the CropBox is not sufficient — you would need to rebuild the page by creating a new document, extracting the visible content with page.CreateTemplate(), drawing it onto a new page, and saving to a new file.
See Also
How to Generate a PDF in JavaScript (React)

JavaScript can generate PDF files programmatically by creating a document, adding pages, drawing text and other elements, and saving the document. In a React application, this workflow can run entirely in the browser with Spire.PDF for JavaScript and WebAssembly, without requiring a backend server.
At a high level, JavaScript PDF generation consists of five steps: create the document, add pages, add content, save the PDF, and download the generated file. This tutorial uses React as the example environment, but the PDF-generation workflow itself is JavaScript-based and applies to any frontend framework.
Here, “generating a PDF” means creating a PDF document programmatically from scratch, rather than printing an existing HTML page to PDF. JavaScript applications can generate PDFs through HTML-to-PDF conversion, canvas-based rendering, or programmatic PDF construction. This tutorial focuses on programmatic PDF generation with Spire.PDF for JavaScript.
What You Need
This tutorial assumes that Spire.PDF for JavaScript has already been installed and initialized in your React project. For setup details, see How to Integrate Spire.PDF for JavaScript in a React Project. You also need the WebAssembly resources configured so that the PDF module is available through window.spirepdf (Spire.Office for JavaScript 11.7.0 or later).
How to Generate a PDF in JavaScript
Create PdfDocument -> Add Page -> Draw Content -> Save -> Download
1. Create a PDF document
Start by creating a PdfDocument object. This is the in-memory representation of the PDF file you will build.
const pdf = window.spirepdf;
let doc = new pdf.PdfDocument();
2. Add a page
A PDF document needs at least one page. Call Pages.Add() to create a blank page with a default size.
let page = doc.Pages.Add();
3. Add text and other content
The page has a Canvas property that exposes drawing methods. Use DrawString to add text, DrawImage to add images, DrawLine to draw lines, and DrawRectangle to draw filled or outlined rectangles. Coordinates are measured in points (1 point = 1/72 inch) from the top-left corner.
let font = new pdf.PdfFont({ fontFamily: pdf.PdfFontFamily.Helvetica, size: 12 });
let brush = new pdf.PdfSolidBrush({ pdfRGBColor: new pdf.PdfRGBColor(0, 0, 0) });
page.Canvas.DrawString({ s: "Hello, World!", font: font, brush: brush, x: 50, y: 50 });
4. Save the generated PDF
Once all content is in place, call SaveToFile to write the PDF to the WebAssembly virtual file system (VFS). The VFS is an in-browser file system that Spire.PDF uses to manage input and output files without touching the real disk or a server.
doc.SaveToFile({ fileName: 'Output.pdf' });
doc.Close();
5. Download the PDF in the browser
After saving to the VFS, read the file back as a byte array, wrap it in a Blob, and trigger a download by creating a temporary anchor element. This pattern is used in every Spire.PDF for JavaScript example.
const fileArray = window.dotnetRuntime.Module.FS.readFile('Output.pdf');
const blob = new Blob([fileArray], { type: 'application/pdf' });
const url = URL.createObjectURL(blob);
const a = document.createElement('a');
a.href = url;
a.download = 'Output.pdf';
a.click();
URL.revokeObjectURL(url);
Programmatic PDF generation is useful when you need precise control over the document structure, page layout, text, graphics, or metadata. If you already have a web page or HTML template and simply need to convert that layout into a PDF, an JavaScript HTML-to-PDF workflow may be a better fit.
The next section puts these steps together in a complete example that generates a PDF from JavaScript data.
Generate an Invoice PDF from JavaScript Data
Real applications generate structured documents — invoices, reports, quotations — from application data, not hardcoded strings. In a React application, the invoice object could come from form input, component state, or an API response; the PDF generation code only needs the data needed for the document layout. This example defines an invoice as a JavaScript object and renders a print-ready PDF from it: a bleed header, a billed-to block, a line-item table, a totals cascade, and payment details. It combines DrawString, DrawRectangle, DrawLine, and PdfGrid into one complete runnable React component.
function App() {
  const generateInvoicePdf = async () => {
    // spire.office 11.7.0 hangs the engine off window.spirepdf.
    const pdf = window.spirepdf;
    if (!pdf) return alert('Spire.PDF is not ready yet');

    // ── The invoice, as data. Swap this object and the layout follows. ────
    const invoice = {
      number: 'INV-2026-0148', issued: '23 September 2026',
      due: '23 October 2026', po: 'PO-ACME-88231', terms: 'Net 30',
      seller: ['NIMBUS SOFTWARE LTD.', 'Cloud platforms for manufacturing teams',
        '12 Kingsway, London WC2B 6UN, United Kingdom'],
      buyer: ['Acme Manufacturing Co.', 'Attn: Sarah Chen, Procurement',
        '1400 Harbor Boulevard, Suite 320', 'Long Beach, CA 90802', 'United States'],
      // [description, quantity, unit price] — the amount is derived below
      items: [
        ['CloudDesk Pro — annual subscription (25 seats)', 25, 120],
        ['Implementation & onboarding (remote, 16 hours)', 16, 95],
        ['Priority support — Premium tier (12 months)', 1, 2400],
        ['Additional object storage (500 GB per year)', 1, 480],
      ],
      discountRate: 0.05, taxRate: 0.08,
      bank: ['Barclays Bank PLC · Sort code 20-00-00 · Account 5571 2043',
        'IBAN GB29 BARC 2000 0055 7120 43 · SWIFT BARCGB22'],
      remark: ['Quote the invoice number as the payment reference.',
        'Amounts unpaid after the due date accrue interest at 1.5% per month.'],
      legal:
        'Nimbus Software Ltd. · 12 Kingsway, London WC2B 6UN · VAT GB 412 8876 21 · Company No. 09882417',
      contact: '[email protected] · +44 20 7946 0812 · nimbussoftware.com',
    };

    const round = (n) => Math.round(n * 100) / 100;
    const subtotal = round(invoice.items.reduce((sum, [, qty, unit]) => sum + qty * unit, 0));
    const discount = -round(subtotal * invoice.discountRate);
    const tax = round((subtotal + discount) * invoice.taxRate);
    const total = round(subtotal + discount + tax);
    const money = (n) =>
      '$' + Math.abs(n).toLocaleString('en-US', { minimumFractionDigits: 2, maximumFractionDigits: 2 });
    const pct = (rate) => Math.round(rate * 100) + '%';

    // ── Document ──────────────────────────────────────────────────────────
    const doc = new pdf.PdfDocument();
    doc.PageSettings.Margins.All = 0; // before Pages.Add(), or the origin stays at the margin
    const page = doc.Pages.Add();

    // Text is dropped past the canvas client area, so lay out against it.
    const W = page.Canvas.ClientSize.Width;
    const H = page.Canvas.ClientSize.Height;
    const PAD = 28;
    const EDGE = W - PAD;

    // ── Drawing toolkit ───────────────────────────────────────────────────
    // Object notation selects the PdfFont / PdfSolidBrush / PdfPen overload —
    // the positional constructors all report "Ambiguous call" here.
    const rgb = (c) => new pdf.PdfRGBColor(c[0], c[1], c[2]);
    const paint = (c) => new pdf.PdfSolidBrush({ pdfRGBColor: rgb(c) });
    const font = (size, bold) =>
      new pdf.PdfFont({
        fontFamily: pdf.PdfFontFamily.Helvetica,
        size,
        ...(bold ? { style: pdf.PdfFontStyle.Bold } : {}),
      });
    // DrawString's first parameter is `s`, and it has no alignment option in
    // point mode — measure the string when it has to be right-aligned.
    const text = (s, f, colour, x, y, align) => {
      const dx = align === 'right' ? f.MeasureString({ text: s }).Width : 0;
      page.Canvas.DrawString({ s, font: f, brush: paint(colour), x: x - dx, y });
    };
    const box = (colour, x, y, w, h) =>
      page.Canvas.DrawRectangle({ brush: paint(colour), x, y, width: w, height: h });

    const INK = [26, 31, 43], NAVY = [23, 54, 93], ACCENT = [47, 111, 181];
    const MUTED = [107, 114, 128], RULE = [220, 225, 232], ZEBRA = [246, 248, 251];
    const SOFT = [238, 243, 249], WHITE = [255, 255, 255], ON_NAVY = [186, 200, 220];
    const fHero = font(26, true), fBrand = font(17, true), fTitle = font(11, true);
    const fBody = font(9.5), fBold = font(9.5, true), fSmall = font(8.5);
    const fLabel = font(7.5, true), fFoot = font(7.5), fCell = font(9), fHead = font(8, true);

    // ── Header band, bleeding to the sheet edges ──────────────────────────
    box(NAVY, 0, 0, W, 106);
    box(ACCENT, 0, 106, W, 3.5);
    text(invoice.seller[0], fBrand, WHITE, PAD, 30);
    text(invoice.seller[1], fSmall, ON_NAVY, PAD, 52);
    text(invoice.seller[2], fFoot, ON_NAVY, PAD, 68);
    text('INVOICE', fHero, WHITE, EDGE, 22, 'right');
    text(invoice.number, fBody, ON_NAVY, EDGE, 56, 'right');
    text(`Issued ${invoice.issued}`, fFoot, ON_NAVY, EDGE, 74, 'right');

    // ── Billed to / invoice details ───────────────────────────────────────
    const top = 158;
    text('BILL TO', fLabel, MUTED, PAD, top);
    text(invoice.buyer[0], fBold, INK, PAD, top + 17);
    invoice.buyer.slice(2).forEach((line, i) => text(line, fBody, MUTED, PAD, top + 35 + i * 14));
    text(invoice.buyer[1], fSmall, MUTED, PAD, top + 83);

    const details = [
      ['Invoice No.', invoice.number], ['Issue date', invoice.issued], ['Due date', invoice.due],
      ['PO number', invoice.po], ['Payment terms', invoice.terms],
    ];
    text('INVOICE DETAILS', fLabel, MUTED, EDGE, top, 'right');
    details.forEach(([key, value], i) => {
      text(key, fSmall, MUTED, EDGE - 128, top + 20 + i * 16);
      text(value, fBold, INK, EDGE, top + 20 + i * 16, 'right');
    });

    const tableY = top + 106;
    page.Canvas.DrawLine({
      pen: new pdf.PdfPen({ pdfRGBColor: rgb(RULE), width: 0.75 }),
      x1: PAD, y1: tableY, x2: EDGE, y2: tableY,
    });

    // ── Line items ────────────────────────────────────────────────────────
    const grid = new pdf.PdfGrid();
    grid.Columns.Add(4);
    [255, 44, 112, 128].forEach((w, i) => (grid.Columns.get_Item(i).Width = w));

    const alignRight = new pdf.PdfStringFormat({ alignment: pdf.PdfTextAlignment.Right });
    [1, 2, 3].forEach((i) => (grid.Columns.get_Item(i).Format = alignRight));

    // Cell padding is subtracted from row.Height — leave room for one line box
    // or every cell renders blank, with no error at all.
    const padding = new pdf.PdfPaddings();
    padding.Left = padding.Right = 8;
    padding.Top = padding.Bottom = 2;
    grid.Style.CellPadding = padding;
    grid.Style.Font = fCell;

    const hairline = new pdf.PdfBorders();
    hairline.All = new pdf.PdfPen({ pdfRGBColor: rgb(RULE), width: 0.5 });

    try { grid.Headers.Add(1); } catch {}
    const head = grid.Headers.get_Item(0);
    head.Height = 26;
    head.Style.BackgroundBrush = paint(NAVY);
    head.Style.TextBrush = paint(WHITE);
    head.Style.Font = fHead;
    ['DESCRIPTION', 'QTY', 'UNIT PRICE', 'AMOUNT'].forEach((label, i) => {
      const cell = head.Cells.get_Item(i);
      cell.Value = new pdf.String(label); // .Value is a .NET object — box the string
      if (i) cell.StringFormat = alignRight;
      cell.Style.Borders = hairline;
    });

    invoice.items.forEach(([description, qty, unit], r) => {
      const row = grid.Rows.Add();
      row.Height = 26;
      if (r % 2) row.Style.BackgroundBrush = paint(ZEBRA);
      [description, String(qty), money(unit), money(qty * unit)].forEach((value, i) => {
        const cell = row.Cells.get_Item(i);
        cell.Value = new pdf.String(value);
        cell.Style.Borders = hairline;
      });
    });

    const layout = new pdf.PdfGridLayoutFormat();
    layout.Layout = pdf.PdfLayoutType.Paginate;
    // The parameter is `format`, not `layout`.
    const tableBottom = grid.Draw({ page, x: PAD, y: tableY + 26, format: layout }).Bounds.Bottom;

    // ── Totals cascade ────────────────────────────────────────────────────
    let y = tableBottom + 22;
    const summary = [
      ['Subtotal', money(subtotal)],
      [`Discount · partner rate ${pct(invoice.discountRate)}`, '-' + money(discount)],
      [`Sales tax · ${pct(invoice.taxRate)}`, money(tax)],
    ];
    summary.forEach(([label, value], i) => {
      text(label, fBody, MUTED, EDGE - 220, y + i * 18);
      text(value, fBody, INK, EDGE, y + i * 18, 'right');
    });
    y += 58;

    box(NAVY, EDGE - 220, y, 220, 34);
    text('TOTAL DUE', fTitle, WHITE, EDGE - 204, y + 11);
    text(money(total), font(14, true), WHITE, EDGE - 14, y + 8, 'right');
    y += 34;

    // ── Payment details ───────────────────────────────────────────────────
    const cardTop = y + 34;
    box(SOFT, PAD, cardTop, W - 2 * PAD, 104);
    box(ACCENT, PAD, cardTop, 3, 104);
    text('PAYMENT DETAILS', fLabel, ACCENT, PAD + 18, cardTop + 16);
    text(invoice.bank[0], fBody, INK, PAD + 18, cardTop + 34);
    text(invoice.bank[1], fBody, INK, PAD + 18, cardTop + 50);
    invoice.remark.forEach((line, i) => text(line, fSmall, MUTED, PAD + 18, cardTop + 72 + i * 14));

    // ── Footer band, mirroring the header ─────────────────────────────────
    box(NAVY, 0, H - 58, W, 58);
    text(invoice.legal, fFoot, ON_NAVY, PAD, H - 41);
    text(invoice.contact, fFoot, ON_NAVY, PAD, H - 27);
    text('Page 1 of 1', fFoot, ON_NAVY, EDGE, H - 41, 'right');
    text(invoice.number, fFoot, ON_NAVY, EDGE, H - 27, 'right');

    // ── Save and download ─────────────────────────────────────────────────
    const fileName = 'Invoice.pdf';
    doc.SaveToFile({ fileName });
    doc.Close();

    const bytes = window.dotnetRuntime.Module.FS.readFile(fileName);
    const url = URL.createObjectURL(new Blob([bytes], { type: 'application/pdf' }));
    Object.assign(document.createElement('a'), { href: url, download: fileName }).click();
    URL.revokeObjectURL(url);
  };

  return (
    <div style={{ textAlign: 'center', height: '300px' }}>
      <h1>Generate Invoice PDF</h1>
      <button onClick={generateInvoicePdf}>Generate Invoice PDF</button>
    </div>
  );
}

export default App;
Invoice PDF generated from JavaScript data
What the code does:
- Defines an
invoiceobject with the seller, the customer, the invoice metadata, and anitemsarray — the shape a React app would receive from a form, an API response, or component state. - Derives
subtotal,discount,tax, andtotalfrom that data withreduce, so the figures printed on the PDF always match the figures in the app. - Sets
Margins.Allto0before callingPages.Add(). The canvas origin sits at the page's margin origin, so this is what makes(0, 0)the top-left corner of the sheet and lets the header and footer bands bleed to the edges. - Lays the page out against
Canvas.ClientSizeinstead ofSize, because text drawn past the client area is dropped rather than clipped. - Draws the header band, the billed-to and invoice-details blocks, the totals cascade, and the payment box with
DrawRectangle,DrawLine, andDrawString. Right-aligned strings are measured withMeasureStringfirst, sinceDrawStringhas no alignment option when you draw at a point. - Builds the line-item table with
PdfGrid: fixed column widths, a styled header row, zebra-striped body rows, and right-aligned numeric columns driven by aPdfStringFormat. - Saves the document to the VFS and downloads it with the blob-and-anchor pattern from step 5.
The same pattern works for any structured document — replace the invoice object with report data, quotation data, or receipt data, and the five-step workflow stays the same.
Add More Content to the PDF
After creating the basic document, you can extend the same workflow with other PDF elements depending on the document you need to generate.
| Element | Typical use | Tutorial |
|---|---|---|
| Text | Titles, labels, paragraphs | Covered in this tutorial |
| Images | Logos, signatures, charts | Add Images to a PDF |
| Tables | Invoices, reports, statements | Document Operation guide |
| Shapes | Borders, separators, diagrams | Draw Shapes in PDF |
| Headers & Footers | Page numbers, repeating headers | Page Setting guide |
| Form fields | Interactive forms, editable documents | Form Field guide |
The five-step workflow does not change — only the content you draw in step 3 differs.
Generate PDFs in the Browser with WebAssembly
Spire.PDF for JavaScript runs its PDF processing engine through WebAssembly. Once the WASM module loads, your application can create, edit, and save PDFs on the client side. Files move through an in-browser Virtual File System (VFS):
JavaScript -> Spire.PDF WebAssembly -> VFS -> Blob -> Download
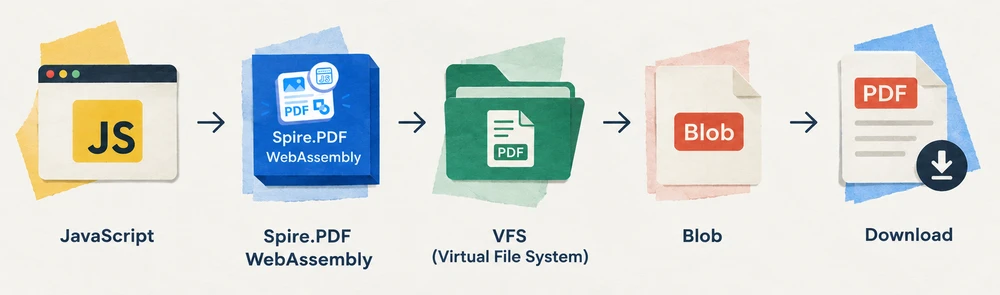
This means no PDF-generation backend is required. The browser handles document creation, rendering, and file output locally. The generated PDF is read from the VFS as a byte array and downloaded as a standard Blob.
The trade-off is the initial WASM download size, which is a one-time cost per session. For applications that generate documents frequently, subsequent generations are fast since the module is already loaded. For very large or complex PDFs, client-side performance depends on the user's device and available memory.
Common Use Cases
Common use cases include invoices, reports, quotations, certificates, receipts, and other structured business documents generated from application data. The specific layout changes, but the underlying workflow — create, add page, draw, save, download — remains the same.
Troubleshooting
WASM Module Not Initialized
If window.spirepdf is undefined, ensure the WebAssembly runtime is fully initialized before using the API:
const commonModule = await import('/node_modules/spire.office/spire.common.js');
await commonModule.initializeWasm();
await import('/node_modules/spire.office/spire.pdf.js');
Generated PDF Cannot Be Downloaded
If the download does not trigger or the file is empty, verify that SaveToFile was called before reading from the VFS. The file must exist in the VFS before FS.readFile can read it:
doc.SaveToFile({ fileName: 'Output.pdf' });
doc.Close();

// Only read after saving
const fileArray = window.dotnetRuntime.Module.FS.readFile('Output.pdf');
Conclusion
Spire.PDF for JavaScript provides a practical way to generate PDF files directly in the browser using JavaScript and WebAssembly. The five-step workflow — create, add page, draw, save, download — handles everything from simple text documents to structured invoices with tables and totals. You can apply for a 30-day free license to evaluate all features before purchasing.
Gráficos Excel mais claros em JavaScript: rótulos multinível e eixos duplos
Índice
- Quando um eixo não é suficiente
- Pré-requisitos
- Os dados por trás dos rótulos de vários níveis
- Criar um gráfico com rótulos de categoria de vários níveis
- Por que a série de crescimento desaparece
- Mover uma série para o eixo secundário
- Definir a escala do eixo secundário
- Problemas comuns
- Perguntas frequentes
- Veja também

Um gráfico de colunas com regiões e meses no mesmo eixo apresenta dois problemas, e eles não são o mesmo problema. O primeiro é que os rótulos de categoria se aglutinam em uma única linha — "Norte", "Jan", "Norte", "Fev" — e o leitor precisa reagrupar mentalmente qual mês pertence a qual região. O segundo é que, quando uma série de taxa de crescimento é adicionada ao lado de uma série de vendas que chega aos milhões, a taxa de crescimento se torna uma linha plana colada à linha de base, porque um único eixo de valores não consegue atender a duas ordens de grandeza ao mesmo tempo.
Os rótulos de categoria de vários níveis resolvem o primeiro problema. Um eixo secundário resolve o segundo. São recursos independentes que, por acaso, são úteis no mesmo gráfico, e o Spire.XLS for JavaScript lida com ambos por meio da API de eixos do gráfico — diretamente no navegador via WebAssembly, com os arquivos passando por um sistema de arquivos virtual (VFS) e sem envolvimento de backend.
Para a configuração do projeto, consulte Integrating Spire.XLS for JavaScript in a React Project. Os exemplos abaixo pressupõem que o pacote está instalado e que o módulo WebAssembly foi inicializado.
Quando um eixo não é suficiente
Os dois problemas aparecem no mesmo tipo de planilha — uma em que as categorias têm uma hierarquia e os valores têm uma dispersão — mas vêm de lugares diferentes:
| Problema | De onde vem | Como fica o gráfico | O que resolve |
|---|---|---|---|
| Os rótulos se acumulam em uma linha | As categorias são hierárquicas (região → mês, ano → trimestre), mas o eixo as trata como planas | Uma única linha de rótulos em que as categorias externas e internas se alternam sem agrupamento visual | Rótulos de categoria de vários níveis |
| Uma série se achata em uma linha | Duas séries diferem em ordens de grandeza (vendas em milhões, crescimento em porcentagem), mas compartilham um único eixo de valores | A série menor se comprime para perto de zero e sua variação fica invisível | Eixo secundário |
Nenhum dos dois é uma questão de estilo. Ambos se devem ao fato de o eixo não saber algo que precisa saber — que as categorias têm camadas, ou que os valores têm escalas incompatíveis. As duas seções abaixo abordam cada um deles por vez, e a segunda se baseia na primeira, de modo que o gráfico final carrega ambas as correções.
Pré-requisitos
Você precisa de um projeto React com o Spire.XLS for JavaScript instalado e o módulo WebAssembly inicializado, acessível em window.wasmModule.spirexls. O exemplo carrega uma fonte e um arquivo de dados pré-construído no VFS antes de criar o gráfico, e ambos são obtidos da pasta public do projeto.
Os dados por trás dos rótulos de vários níveis
Os rótulos de vários níveis não são criados apenas por uma propriedade — eles são lidos dos dados. O eixo de categorias desenha tantos níveis de rótulos quantas forem as colunas no intervalo para o qual CategoryLabels aponta. Portanto, a planilha precisa ser disposta com a hierarquia distribuída pelas colunas:
| Coluna A (externa) | Coluna B (interna) | Coluna C (valores) |
|---|---|---|
| Norte | Jan | 120.000 |
| Norte | Fev | 135.000 |
| Sul | Jan | 98.000 |
| Sul | Fev | 110.000 |
Os rótulos externos na coluna A estão mesclados ao longo das linhas que abrangem — "Norte" abrange as duas linhas de Jan e Fev. Essa mesclagem é o que faz o nível se aglutinar visualmente em um único rótulo por grupo quando o gráfico é renderizado. Sem ela, o eixo ainda mostra dois níveis, mas o nível externo repete o rótulo em cada linha em vez de agrupá-lo.
Isso é uma questão de layout de dados, não de API de gráfico. O código do gráfico só precisa apontar CategoryLabels para ambas as colunas; se as células externas estão mescladas é decidido na pasta de trabalho, não no objeto de gráfico.
Criar um gráfico com rótulos de categoria de vários níveis
Depois que os dados estão dispostos, o código do gráfico faz duas coisas: aponta CategoryLabels para um intervalo que abrange tanto a coluna externa quanto a interna, e ativa MultiLevelLable para que o eixo expanda essas colunas em linhas empilhadas. As etapas são:
- Carregar a fonte e o arquivo de dados de teste no VFS.
- Carregar a pasta de trabalho e obter a planilha.
- Adicionar um gráfico de colunas e adicionar uma série de vendas nomeada.
- Apontar os rótulos de categoria para a coluna de região e a de mês.
- Ativar os rótulos de vários níveis para o eixo de categorias e salvar a pasta de trabalho.
function App() {
  const createMultiLevelChart = async () => {
    // Get the Spire.XLS WASM module
    const xlsModule = window.wasmModule?.spirexls;

    // Check if the module is ready
    if (!xlsModule) {
      alert('Spire.Xls is not ready yet');
      return;
    }

    // Load the font and the test data file into the VFS
    await window.spire.FetchFileToVFS('ARIAL.TTF', '/Library/Fonts/', `${process.env.PUBLIC_URL}/font/`);
    const inputFileName = 'MultiLevelChartData.xlsx';
    await window.spire.FetchFileToVFS(inputFileName, '', `${process.env.PUBLIC_URL}data/`);

    // Load the workbook and get the first worksheet
    const workbook = new xlsModule.Workbook();
    workbook.LoadFromFile({ fileName: inputFileName });
    const sheet = workbook.Worksheets.get(0);

    // Add a column chart
    const chart = sheet.Charts.Add({ chartType: xlsModule.ExcelChartType.ColumnClustered });
    chart.ChartTitle = "Sales";
    chart.Legend.Delete();

    // Add the sales series and give it a name
    const serie = chart.Series.Add({ name: "Sales", serieType: xlsModule.ExcelChartType.ColumnClustered });
    serie.Values = sheet.Range.get("C2:C7");

    // Point the category labels at both the region and the month column
    serie.CategoryLabels = sheet.Range.get("A2:B7");

    // Turn on multi-level category labels so each level gets its own row
    chart.PrimaryCategoryAxis.MultiLevelLable = true;

    // Place the chart on the worksheet
    chart.LeftColumn = 5;
    chart.TopRow = 1;
    chart.RightColumn = 14;

    // Save the workbook
    const outputFileName = "MultiLevelLabels.xlsx";
    workbook.SaveToFile({ fileName: outputFileName });

    // Dispose of the workbook object to free resources
    workbook.Dispose();

    // Read the result file from the VFS and trigger the download
    const fileArray = window.dotnetRuntime.Module.FS.readFile(outputFileName);
    const blob = new Blob([fileArray], { type: 'application/vnd.openxmlformats-officedocument.spreadsheetml.sheet' });
    const url = URL.createObjectURL(blob);
    const a = document.createElement('a');
    a.href = url;
    a.download = outputFileName;
    a.click();
    URL.revokeObjectURL(url);
  };

  return (
    <div style={{ textAlign: 'center', height: '300px' }}>
      <h1>Multi-Level Labels</h1>
      <button onClick={createMultiLevelChart}>Start</button>
    </div>
  );
}

export default App;
Um gráfico com rótulos de categoria de vários níveis, cada nível em sua própria linha
O intervalo A2:B7 é o que faz o eixo mostrar dois níveis. Vincular um intervalo de uma única coluna, como B2:B7, ainda produziria um nível mesmo com MultiLevelLable definido como true — a propriedade controla se vários níveis são expandidos em linhas, não se existe um nível de dados a expandir.
Por que a série de crescimento desaparece
Adicione uma segunda série para o crescimento ano a ano — valores na casa dos dez, em porcentagens — e plote-a no mesmo eixo de valores das vendas. As colunas de vendas chegam a 120.000; a taxa de crescimento chega a 12. Em um eixo que varia de 0 a 140.000, o número 12 é indistinguível de zero. A série está lá, os dados estão corretos, e o gráfico mostra uma linha plana colada à linha de base.
Isso não é um bug nos dados nem no gráfico. É o eixo de valores fazendo seu trabalho — mapear um intervalo que cobre a maior série — ao custo da menor. A única maneira de ver as duas séries com clareza é dar a cada uma sua própria escala, e é isso que o eixo secundário faz.
Mover uma série para o eixo secundário
A série de crescimento é adicionada como linha em vez de coluna. Uma linha não ocupa largura de barra, então ela se destaca claramente em relação à série de colunas que compartilha as mesmas categorias. Movê-la para fora do eixo primário é uma única propriedade: UsePrimaryAxis = false. As etapas são:
- Carregar a fonte e o arquivo de dados de teste no VFS.
- Carregar a pasta de trabalho e obter a planilha.
- Adicionar um gráfico de colunas e adicionar uma série de vendas nomeada.
- Adicionar a série de crescimento como linha.
- Mover a série de crescimento para o eixo secundário e salvar a pasta de trabalho.
function App() {
  const addSecondaryAxis = async () => {
    // Get the Spire.XLS WASM module
    const xlsModule = window.wasmModule?.spirexls;

    // Check if the module is ready
    if (!xlsModule) {
      alert('Spire.Xls is not ready yet');
      return;
    }

    // Load the font and the test data file into the VFS
    await window.spire.FetchFileToVFS('ARIAL.TTF', '/Library/Fonts/', `${process.env.PUBLIC_URL}/font/`);
    const inputFileName = 'MultiLevelChartData.xlsx';
    await window.spire.FetchFileToVFS(inputFileName, '', `${process.env.PUBLIC_URL}data/`);

    // Load the workbook and get the first worksheet
    const workbook = new xlsModule.Workbook();
    workbook.LoadFromFile({ fileName: inputFileName });
    const sheet = workbook.Worksheets.get(0);

    // Add a column chart
    const chart = sheet.Charts.Add({ chartType: xlsModule.ExcelChartType.ColumnClustered });
    chart.ChartTitle = "Sales and YoY Growth";

    // Add the sales series, which stays on the primary axis
    const salesSerie = chart.Series.Add({ name: "Sales", serieType: xlsModule.ExcelChartType.ColumnClustered });
    salesSerie.Values = sheet.Range.get("C2:C7");

    // Point the category labels at both the region and the month column
    salesSerie.CategoryLabels = sheet.Range.get("A2:B7");

    // Add the growth series as a line
    const growthSerie = chart.Series.Add({ name: "YoY Growth", serieType: xlsModule.ExcelChartType.Line });
    growthSerie.Values = sheet.Range.get("D2:D7");

    // Move the growth series to the secondary axis so it plots on its own percentage scale
    growthSerie.UsePrimaryAxis = false;

    // Turn on multi-level category labels
    chart.PrimaryCategoryAxis.MultiLevelLable = true;

    // Place the chart on the worksheet
    chart.LeftColumn = 5;
    chart.TopRow = 1;
    chart.RightColumn = 14;

    // Save the workbook
    const outputFileName = "SecondaryAxis.xlsx";
    workbook.SaveToFile({ fileName: outputFileName });

    // Dispose of the workbook object to free resources
    workbook.Dispose();

    // Read the result file from the VFS and trigger the download
    const fileArray = window.dotnetRuntime.Module.FS.readFile(outputFileName);
    const blob = new Blob([fileArray], { type: 'application/vnd.openxmlformats-officedocument.spreadsheetml.sheet' });
    const url = URL.createObjectURL(blob);
    const a = document.createElement('a');
    a.href = url;
    a.download = outputFileName;
    a.click();
    URL.revokeObjectURL(url);
  };

  return (
    <div style={{ textAlign: 'center', height: '300px' }}>
      <h1>Secondary Axis</h1>
      <button onClick={addSecondaryAxis}>Start</button>
    </div>
  );
}

export default App;
Um gráfico de colunas com um eixo secundário para a série de linhas da taxa de crescimento
UsePrimaryAxis = false afeta apenas a série na qual é definido; todas as outras séries permanecem no eixo primário. O gráfico ganha um segundo par de eixos de valores e de categorias, dando-lhe dois intervalos de escala separados. Series.Add recebe o nome da série ao mesmo tempo, então a legenda mostra o nome passado em vez de um "Série 1" gerado automaticamente.
Definir a escala do eixo secundário
Quando uma série é movida para o eixo secundário, esse eixo calcula sua própria escala — e o faz de forma independente do primário. Os dois intervalos não têm conhecimento um do outro, o que significa que o eixo secundário pode escolher limites que não se alinham bem com os dados.
PrimaryValueAxis.MinValue, MaxValue e MajorUnit controlam apenas o eixo primário. Para definir a escala do eixo secundário, use SecondaryValueAxis:
// Give the secondary axis a 0-20 scale with a major unit of 5
chart.SecondaryValueAxis.MinValue = 0;
chart.SecondaryValueAxis.MaxValue = 20;
chart.SecondaryValueAxis.MajorUnit = 5;
Defina a escala depois que a série tiver sido movida para o eixo secundário. Enquanto nenhuma série usar o eixo secundário, a atribuição é aceita mas nunca gravada no arquivo — o eixo não existe na saída até que uma série seja plotada nele.
Problemas comuns
O eixo de categorias mostra apenas um nível de rótulos.
O CategoryLabels está apontando para um intervalo de uma única coluna. O número de níveis é decidido por quantas colunas o intervalo abrange, não pela propriedade MultiLevelLable. Aponte para um intervalo de várias colunas, como A2:B7, e certifique-se de que as células de rótulo externas estejam mescladas nos dados.
A escala do eixo secundário parece errada.
Os eixos de valores primário e secundário calculam suas escalas de forma independente. Definir MinValue ou MaxValue em PrimaryValueAxis não afeta o eixo secundário. Use chart.SecondaryValueAxis para definir sua escala diretamente, e faça isso depois de mover uma série para ele.
A série de crescimento ainda aparece plana depois de adicionar um eixo secundário.
Verifique se UsePrimaryAxis = false está definido na série de crescimento, não na série de vendas. A propriedade é por série — defini-la na série errada move a série errada para o eixo secundário.
A legenda mostra "Série 1" em vez do nome da série.
O nome não foi passado para Series.Add. Use chart.Series.Add({ name: "Sales", ... }) para que a legenda use o nome pretendido em vez de um rótulo gerado automaticamente.
Perguntas frequentes
Posso ter mais de dois níveis de rótulos de categoria?
Sim. O número de níveis é determinado pelo número de colunas que o intervalo CategoryLabels abrange. Um intervalo de três colunas produz três níveis — por exemplo, ano, trimestre e mês. As células de rótulo externas precisam estar mescladas nos dados para que cada nível seja agrupado corretamente.
O eixo secundário funciona com tipos de gráfico diferentes de colunas e linhas?
Sim. O eixo secundário não está vinculado a um tipo específico de gráfico. O padrão comum é colunas mais linha — a linha não ocupa largura de barra e se destaca claramente em relação às colunas — mas qualquer série pode ser movida para o eixo secundário definindo UsePrimaryAxis = false.
Preciso ter o Excel instalado para criar esses gráficos?
Não. O mecanismo de planilha vem com o pacote e é executado como WebAssembly no navegador. A pasta de trabalho é criada, recebe o gráfico e é salva inteiramente no lado do cliente.
Posso controlar o eixo de categorias secundário separadamente?
Quando uma série é movida para o eixo secundário, o gráfico ganha um eixo de categorias secundário além do eixo de valores secundário. Os dois eixos de categorias compartilham os mesmos rótulos de categoria por padrão, então os rótulos de vários níveis se aplicam a ambos.
O arquivo de saída é compatível com o Excel?
Sim. A pasta de trabalho é salva como .xlsx, e o gráfico — incluindo os rótulos de vários níveis e o eixo secundário — é gravado como XML de gráfico padrão que o Excel lê nativamente.